![]()
Download Article
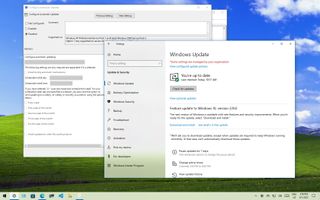
An in-depth guide to stop your Windows 10 computer or laptop from updating automatically
![]()
Download Article
- Disabling the Update Service
- Using a Metered Connection
- Using Group Policy Editor
- Disabling App Updates
- Video
- Q&A
- Tips
- Warnings
|
|
|
|
|
|
|
Do you want to turn off auto updates on your Windows 10 computer? While there is no way to permanently disable automatic updates, you can delay them indefinitely by using the Services program or by setting your Wi-Fi as a metered connection. You can also disable automatic updates for the apps and drivers on your computer. Be advised that stopping Windows updates will make your system more vulnerable to viruses and malware. This wikiHow will show you how to turn off automatic updates on your Windows 10 computer.
Things You Should Know
- Open «Start» and enter «Services». Click «Services» → «Windows Services» → «Manual» → select «Disabled» → «Apply» → «OK».
- Open «Settings» → «Network & Internet» → «Wi-Fi» → click your network → toggle on «Set as metered connection».
- Disabling Windows 10 updates will increase your risk for viruses and malware.
-

1
Press the Windows key on your keyboard. This opens the Start menu and activates the search bar.
-
Understand the limitations of this method. While disabling the automatic update service will temporarily halt any Windows 10 cumulative updates, the service will re-enable itself after a certain amount of time.[1]
-
Understand the limitations of this method. While disabling the automatic update service will temporarily halt any Windows 10 cumulative updates, the service will re-enable itself after a certain amount of time.[1]
-
2
Type services, and click Services in the search results. Doing so will open the Services window.
- You can also press the Windows key + R to open the Run window. Type services.msc and press Enter.
Advertisement
-
3
Scroll down and double-click Windows Update. Doing so opens the Windows Update Properties window.
-
4
Click the «Startup type» menu and select Disabled. It’s in the middle of the window. Selecting Disabled will prevent the Windows Update service from automatically starting itself for the time being.
- If you don’t see this option, first make sure that you’re on the right tab by clicking General at the top of the Properties window.
-
5
Click the Stop button. You’ll find this option near the bottom of the window. Clicking it prompts the Windows Update service to stop running.
-
6
Click Apply, then click OK. Both options are at the bottom of the window. Doing so will apply your settings and close the Properties window. The Windows Update service should now be disabled.
-
7
Check the update service periodically. Any time you restart your computer or go more than two days without shutting down, open Services and check the «Windows Update» status to ensure that it’s still disabled. While the Windows Update service shouldn’t turn itself back on often, it will occasionally do so.
- If you see «Disabled» to the right of the «Windows Update» heading, Windows Update is still disabled.
- If you see anything other than «Disabled» to the right of the «Windows Update» heading, disable the Windows Update again.


Advertisement
-
1
Open your Windows Settings
. You’ll find this gear icon in the Start menu, which is typically at the bottom-left corner of the screen. Click the gear in the lower-left side of the Start menu opens your Settings.
- This method won’t work for Ethernet connections. You can only disable automatic updates by using this method on a Wi-Fi connection.
-
2
Click
Network & Internet. It’s in the Settings window.
-
3
Click the Wi-Fi tab. You’ll find this option in the upper-left side of the window.
-
4
Click your current connection’s name. It’s near the top of the page. Doing so will open the Wi-Fi connection’s settings page.
-
5
Scroll down to «Set as metered connection» and turn the feature On
. This sets your connection to metered, which will prevent Windows from downloading updates over your currently connected network.
- If this switch is colored and has «On» next to it, your Wi-Fi is already set up as a metered connection.


Advertisement
-
1
Make sure that you’re using the right version of Windows. You’ll need a pre-Anniversary edition of Windows 10 Pro or an equivalent. You can’t use this method if you’re using Windows 10 Home edition.
- The Windows 10 Education and Enterprise editions also include the Group Policy Editor.
- You can check your version of Windows by typing system into Start, clicking System Information near the top of the menu, and looking for «Microsoft Windows 10 Professional» to the right of the «OS Name» heading.
- The Windows Anniversary update removed the option to turn off automatic updates from the Group Policy Editor, so this method will not work if you’ve been keeping Windows 10 up to date.
-
2
Press ⊞ Win+R. Pressing these two keys at the same time opens the Run dialog window. You can also get here by typing run into the Search bar.
-
3
Type gpedit.msc into the Run window and click OK. The Group Policy Editor window will open.
-
4
Navigate to the «Windows Update» folder. In the sidebar on the left side of the Group Policy Editor window, do the following:
-
5
Click Configure Automatic Updates. It’s an item in the main Group Policy Editor window. Doing so selects this item.
-
6
Open the «Configure Automatic Updates» properties window. Right-click the selected Configure Automatic Updates item, then click Edit in the resulting drop-down menu.
-
7
Check the «Enabled» box. It’s in the upper-left side of the window.
-
8
Click the «Configure automatic updating» drop-down menu. This option is on the left side of the window.
-
9
Click 2 — Notify for download and notify for install. It’s in the drop-down menu. This option ensures that you’ll be asked before updates are installed, allowing you to decline the updates.
-
10
Click Apply, then click OK. Doing so saves your changes.
-
11
Apply your changes. To do so:
- Open Start
- Open Settings
- Click Update & Security
- Click Windows Update
- Click Check for updates
- Wait for Windows to identify available updates (Windows will not install these updates).
- When finished, restart your computer. Once your computer finishes restarting, your update preferences will be saved.
- You’ll still be able to manually allow updates as they become available.


Advertisement
-
1
Open Start
. Click the Windows logo in the bottom-left corner of the screen. The Start menu will pop up.
-
2
Click
Microsoft Store. You should usually see this option on the right side of the Start menu.
- If you don’t see the Store icon in the Start menu, type store into the search bar at the bottom of the menu and then click Store when it appears at the top of the menu.
-
3
Click ⋯. It’s in the top-right corner of the window. This will prompt a drop-down menu.
- On older versions of Windows 10, you’ll click your profile picture in the upper-left corner of the Windows Store.
-
4
Click Settings. This is in the drop-down menu.
-
5
Click the colored «Update apps automatically» switch
. Doing so will turn off the switch
.
- If this switch is off, updates for Windows apps are already disabled.


Advertisement
Add New Question
-
Question
What do I do if the Windows Update Service keeps turning itself back on when I disable it?

When you are disabling the Microsoft Update Service, on tabs you’ll see «recovery» is set to «one» in «one minute» and «at restart.» change that to «9999,» «day» and no restart. This will prevent it from restarting the service automatically, unless you restart it manually.
-
Question
If updates are disabled, will my PC still boot?
Yes. Updates simply keep the system more up-to-date and secure.
-
Question
Why does Windows need updates?
There are different types of updates. Security updates help fix any vulnerabilities in Windows so that malware cannot infect your system. Feature updates add new features and interface changes, and are usually delivered a few times a year. Bug fixes fix any software errors and glitches that make it work improperly. These updates can either be delivered alone or bundled with each other in a Windows update.

See more answers
Ask a Question
200 characters left
Include your email address to get a message when this question is answered.
Submit
Advertisement
Video
-
Automatic updates often improve the use and security of Windows, though these updates can eventually slow down an older computer.
Thanks for submitting a tip for review!
Advertisement
-
Disabling Windows Updates makes your system vulnerable to malware. It is strongly recommended that you do not disable updates in Windows.
Advertisement
About This Article
Article SummaryX
1. Type «services» into the Windows search bar.
2. Click Services.
3. Double-click Windows Update.
4. Select Disabled from the «Startup type» menu.
5. Click Stop.
6. Click Ok.
7. Click Ok.
Did this summary help you?
Thanks to all authors for creating a page that has been read 312,386 times.
Is this article up to date?

Contents
- 1 How to Disable Automatic Updates Using Windows Settings
- 2 How to Disable Automatic Updates in Windows 11 / Windows 10 Permanently Using Group Policy
- 3 How to Disable Automatic Updates Using Windows Registry
- 4 How to Turn Off Automatic Updates in Windows 11 / Windows 10 Using a Metered Connection
- 5 Extra: How to Turn off Automatic Updates for Microsoft Store Apps
Automatic updates in Windows 11 / Windows 10 are a feature that allows your PC to download and install the latest security patches, bug fixes, and feature enhancements from Microsoft. Automatic updates help keep your PC running smoothly and securely.
However, sometimes they can cause problems such as blue screen errors, missing drivers, incompatible applications, or server configuration issues. These problems can affect your device’s performance, stability, or functionality. If you encounter any of these problems after updating Windows 11 / Windows 10, you can try some troubleshooting steps to fix them.
By Default, When Will Windows Install Software Updates?
By default, Windows 11 / Windows 10 will install software updates at 3:00 A.M. every morning. This is to ensure that the system is up-to-date and secure without interrupting the user’s work or leisure time. You can change this setting by adjusting the active hours.
Should I Turn off Automatic Windows Updates?
There are several ways to turn off automatic updates in Windows 10 and Windows 11, such as pausing them for up to 35 days, setting your Wi-Fi as a metered connection, or disabling the Windows Update service. However, be aware that stopping automatic updates can make your system more vulnerable to viruses and malware, so you should always check for updates manually and install them as soon as possible.
One thing to consider regarding Windows Updates when on the go might be the amount of data transferred for downloading the packages. The volume of this “data overhead” for Windows updates depends on several factors, such as the size and number of updates, the settings for delivery optimization, and the network conditions. A typical monthly update can be around 200 MB to 500 MB in size, while a major feature update can be up to 4 GB. However, these numbers may vary depending on how often Windows Update checks for updates and what kind of updates are available.
⚠️ Please note: The methods described below are the same in Windows 11 as in Windows 10. However, bear in mind that we’ll be using screenshots from Windows 11, so your UI may look a little different.
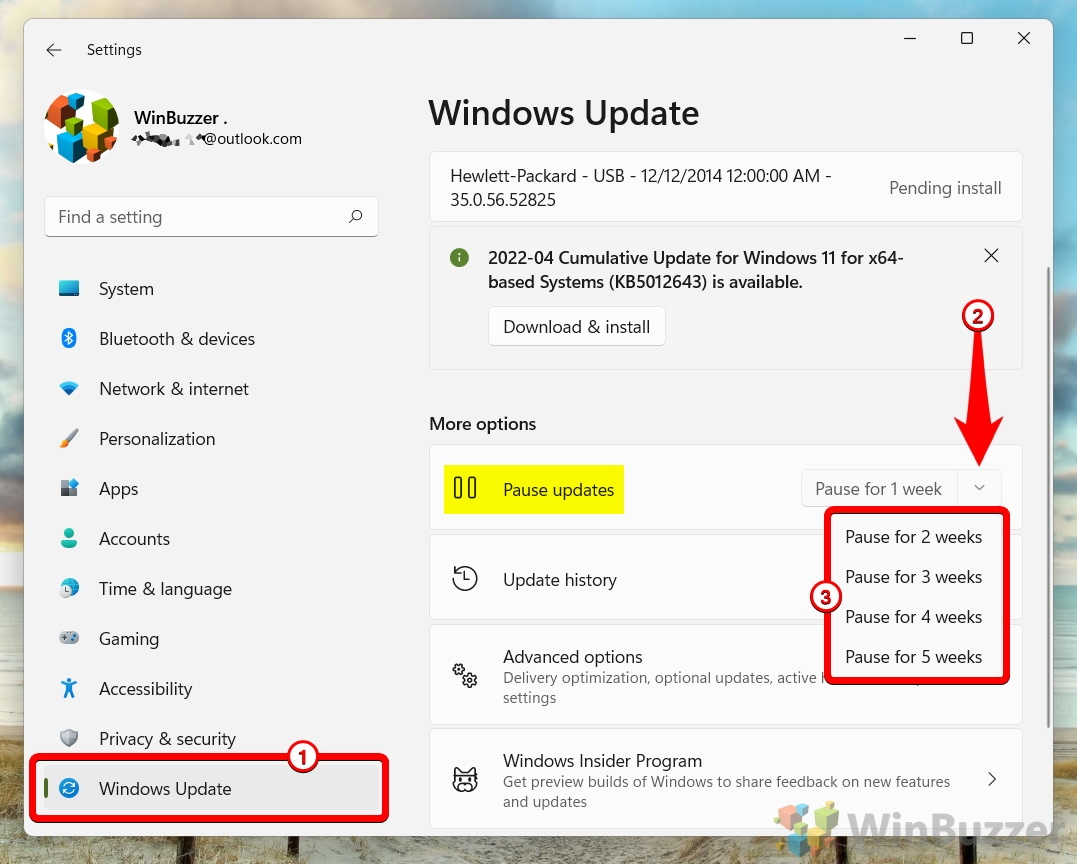
How to Disable Automatic Updates Using Windows Settings
Via Windows 11 / Windows 10 Settings you can pause automatic Windows updates for up to 35 days. Once this time has passed Windows updates will be reactivated and downloaded again automatically.
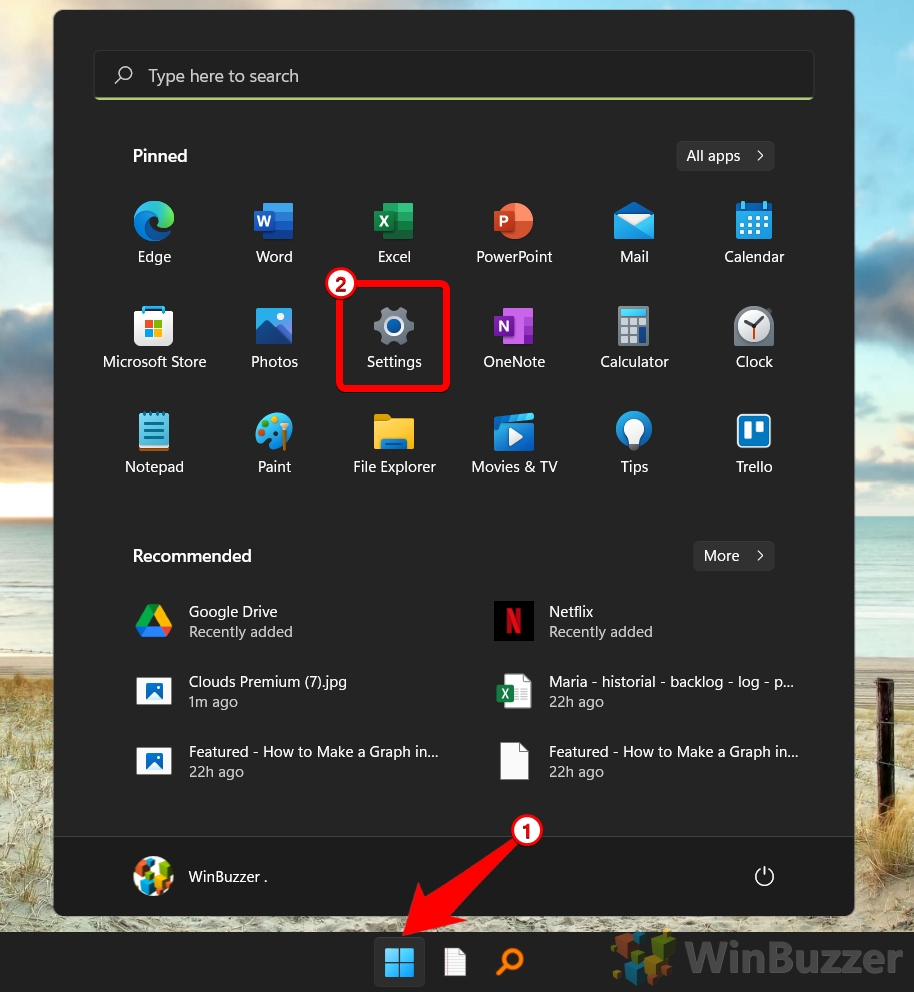
- Click the Windows button or hit the Windows key on your keyboard and open Settings

- Switch to “Windows Update” and pause automatic Windows updates as desiredYou can turn off automatic updates in Windows 11 / Windows 10 for 2, 3, 4, or 5 weeks. This is the easiest way to block Windows update downloads temporarily.

How to Disable Automatic Updates in Windows 11 / Windows 10 Permanently Using Group Policy
This option requires the Group Policy Editor which is missing in Windows 11 Home if you don´t install it manually.
If you disable automatic Windows updates using Group Policy, you will stop receiving any updates from Microsoft unless you manually check for them or use another method such as Windows Update Assistant. This means that your system may become vulnerable to security risks or compatibility issues over time. Therefore, it is recommended that you only disable automatic windows updates if you have a valid reason and a backup plan for keeping your system updated.
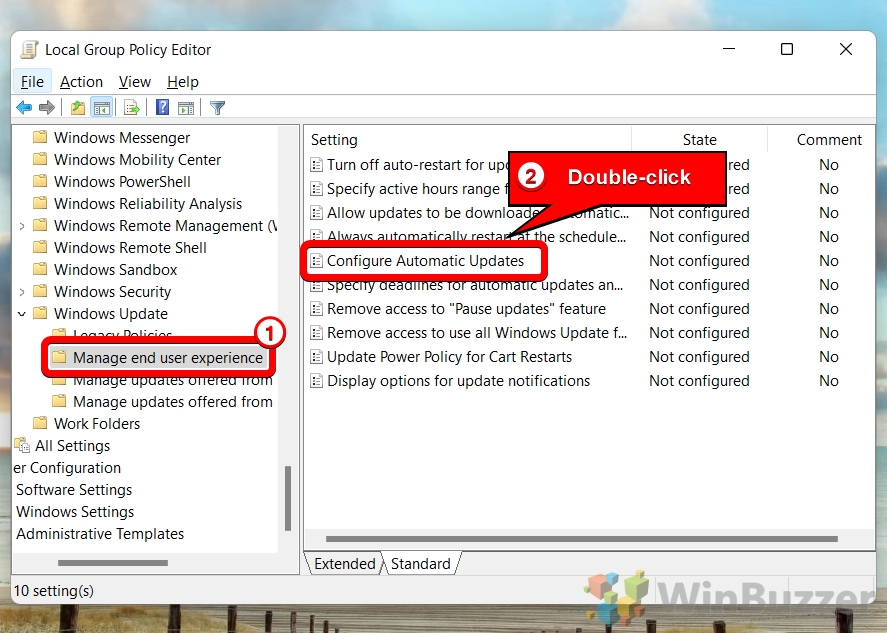
- Open the Group Policy Editor with a search for “gpedit”

- Open the “Configure Automatic Updates” group policy via double clickThe “Configure Automatic Updates” group policy is located in “Computer Configuration\Administrative Templates\Windows Components\Windows Update\Manage end user experience” of the Group Policy Management Console.

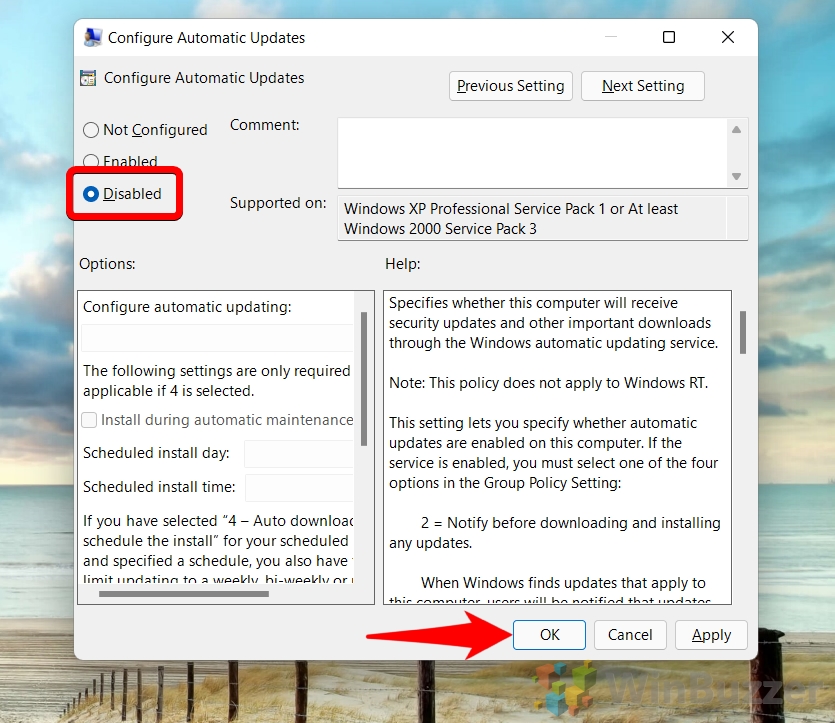
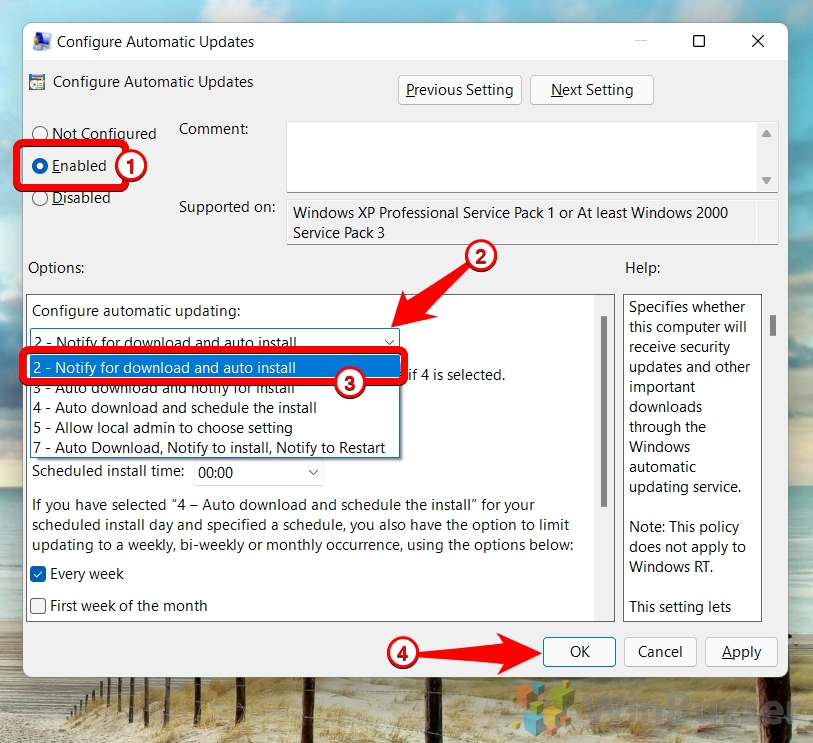
- Turn off the automatic Windows update checkerThe “Configure Automatic Updates” group policy has four options: Not Configured, Disabled, Enabled with scheduled installation, and Enabled with notify for download and notify for installation. Choose “Diabled” and “OK” to turn off auto updates in Windows 11 / Windows 10 completely.

- Revert to “Not Configured” to turn on automatic Windows updates againIf the “Configure Automatic Updates” group policy is set to “not configured”, it means that Windows Update will use the default settings for downloading and installing updates.

- Select “Enabled” to define the exact update beaviour
When you choose “Enabled” in the “Configure Automatic Updates” group policy, you can specify how and when Windows updates are installed on your computer. You have different options to choose one of the available Windows 11 update methods:
– Option 2 (Notify for download and auto install): This option notifies you before downloading updates and automatically installs them at a scheduled time.
– Option 3 (Auto download and notify for install): This option automatically downloads updates and notifies you when they are ready to be installed.
– Option 4 (Auto download and schedule the install): This option automatically downloads updates and installs them at a scheduled time that you specify.
– Option 5 (Allow local admin to choose setting): This option allows the local administrator to choose one of the above options on each computer.
– Option 7 (Auto download, Notify for install, Notify to Restar ): This option automatically downloads updates, notifies you when they are ready to be installed, and also notifies after installation for you to manually restart the PC


How to Disable Automatic Updates Using Windows Registry
One way to disable automatic updates on Windows 11 is to use the Registry Editor. As the Group Policy Editor is not available in the Home editions of Windows 11 / Windows 10 if you don´t install it manually, this method is the only one available there to turn off Windows automatic updates completely.
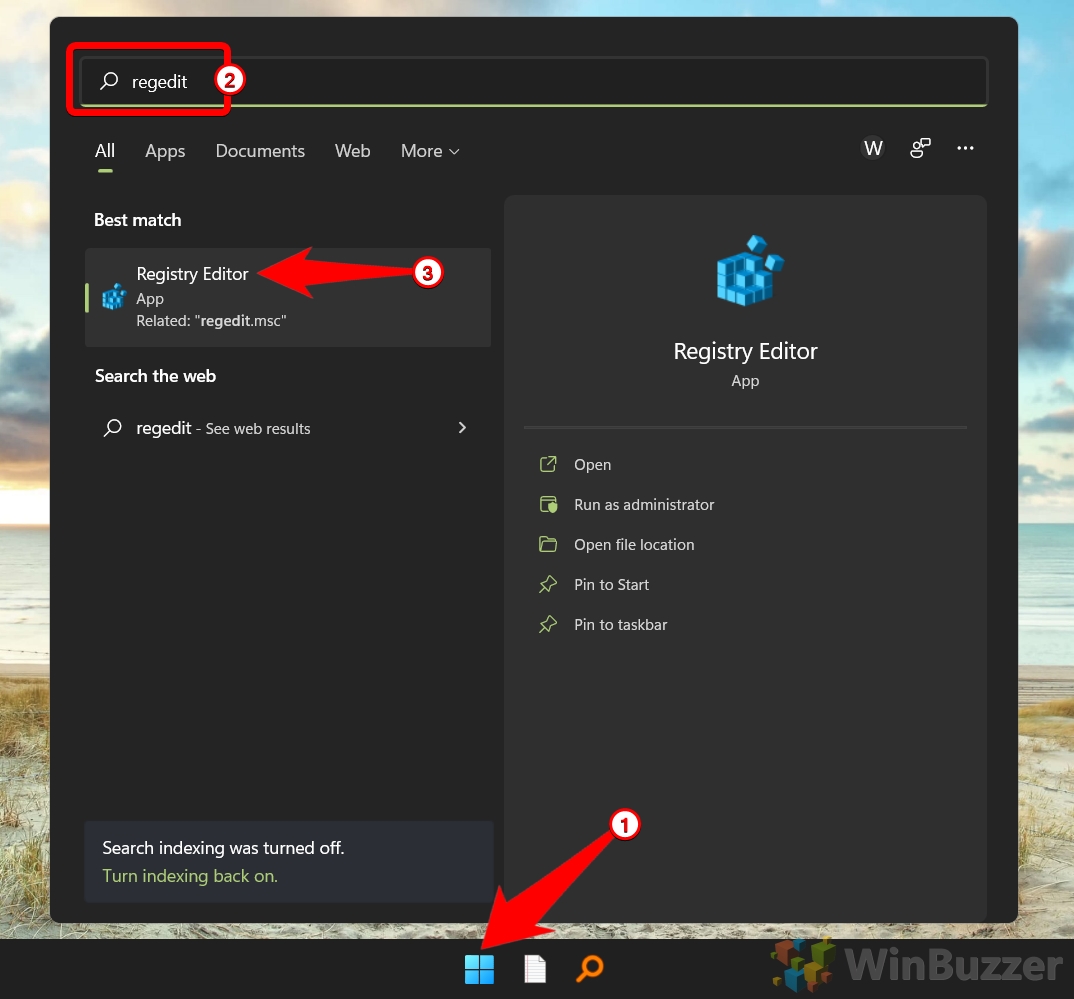
- Open Search by pressing the Windows key or hitting the start button, type “regedit” and start the “Registry Editor”

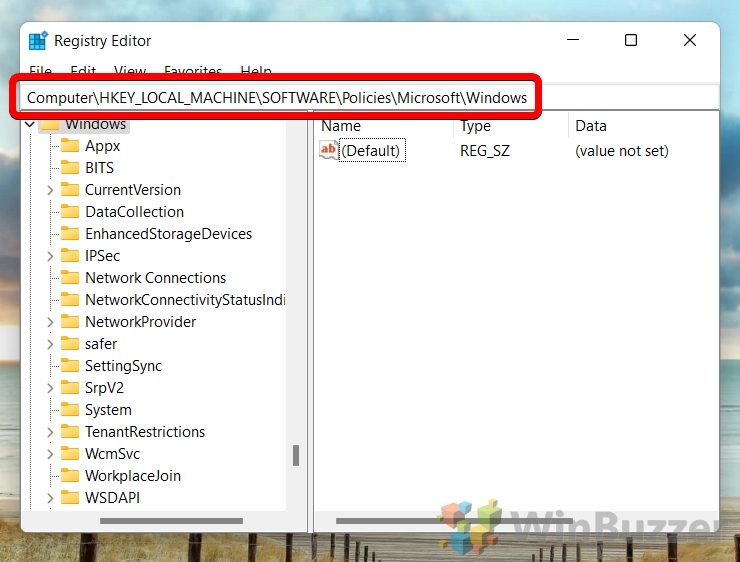
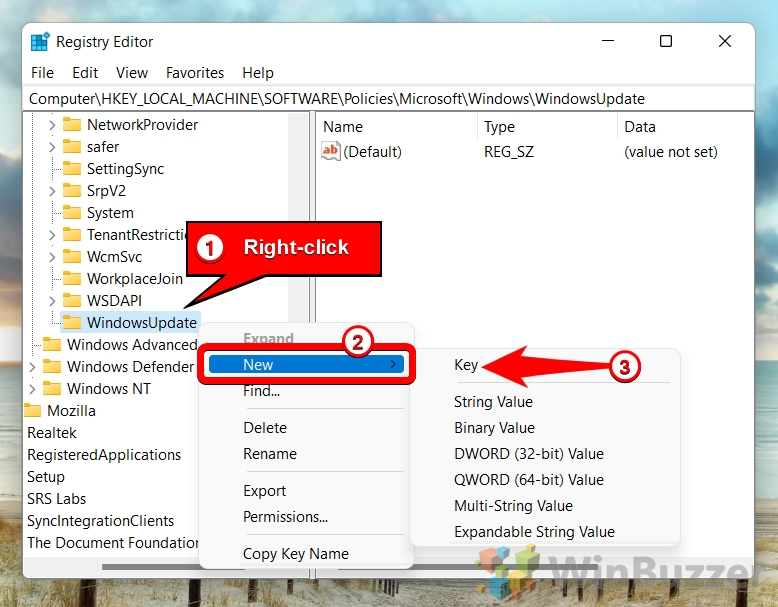
- Navigate to HKEY_LOCAL_MACHINE\SOFTWARE\Policies\Microsoft\Windows

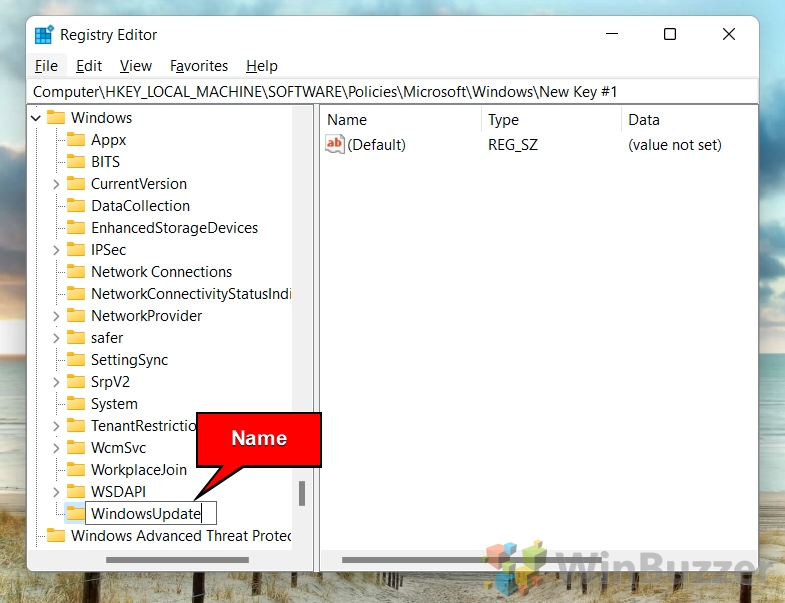
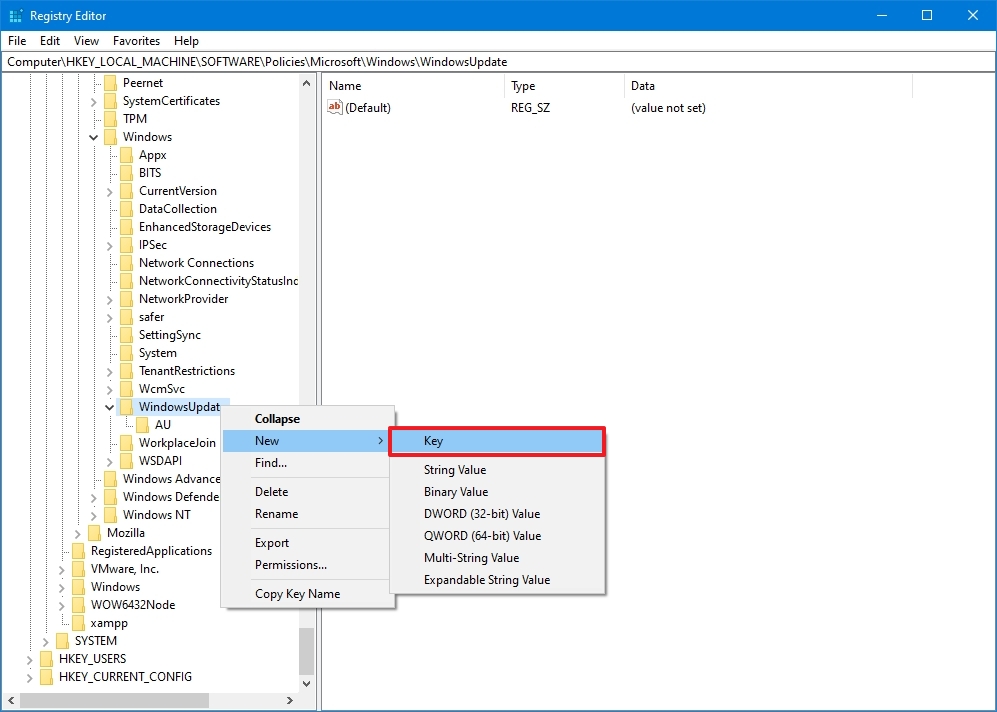
- Right-click on “Windows”, select “New” and then “Key”This step can be ignored if the registry key folder “WindowsUpdate” exists already.

- Name the new registry key “WindowsUpdate”

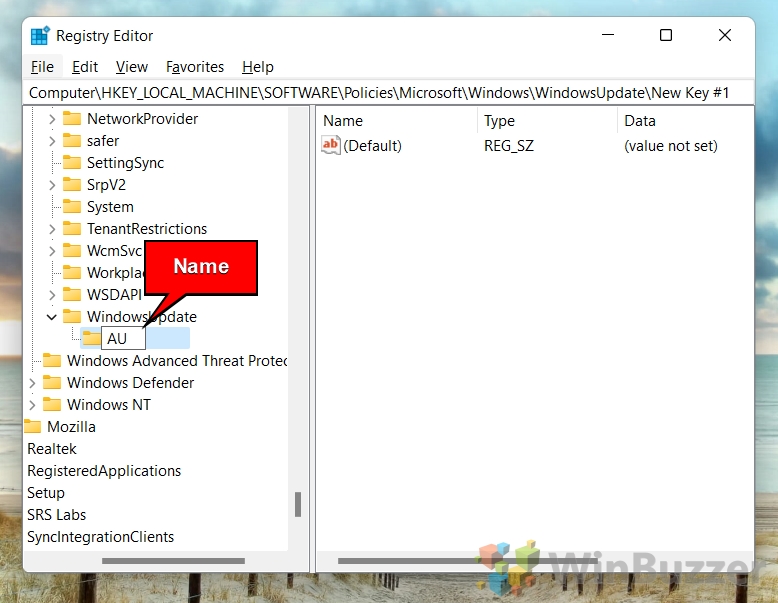
- Right-click “WindowsUpdate”, select “New” and click “Key”

- Name the registry key “AU”

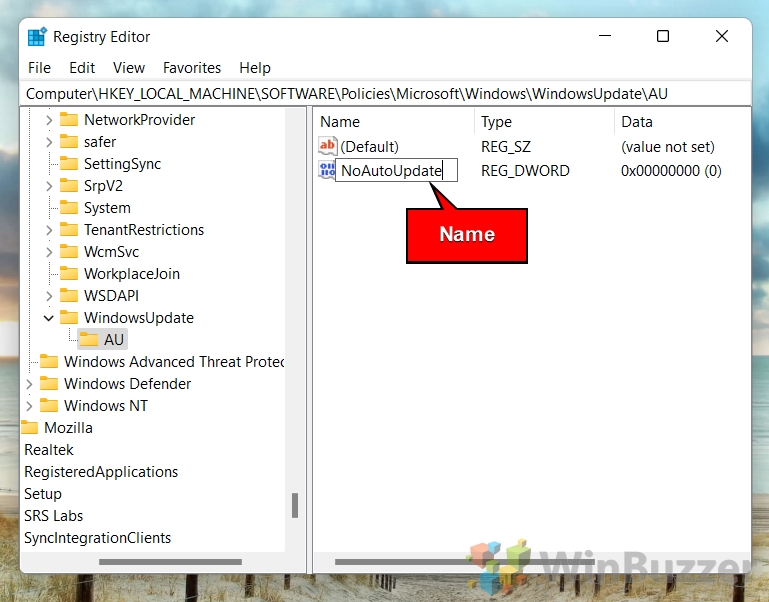
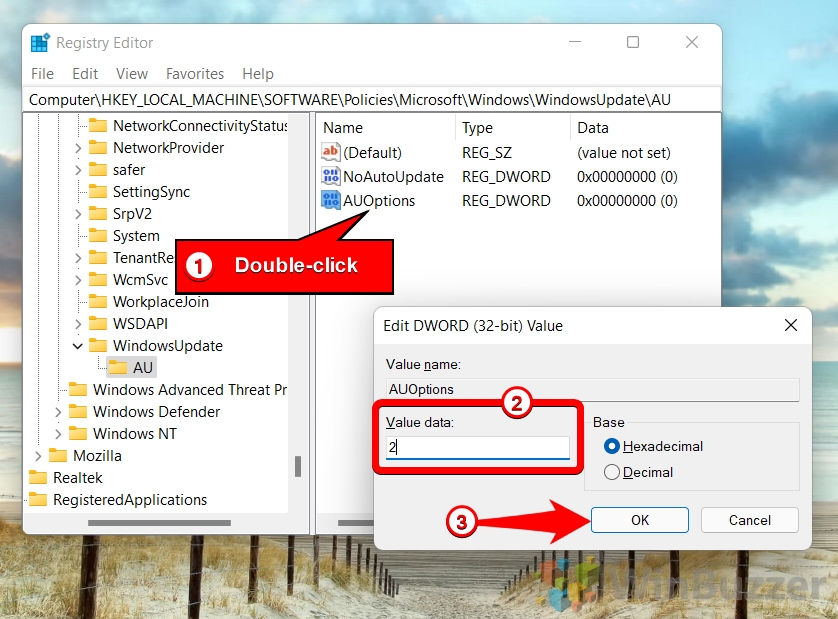
- Right-click in the right pane and choose “New” – “DWORD (32-bit) Value”

- Name the DWORD “NoAutoUpdate”

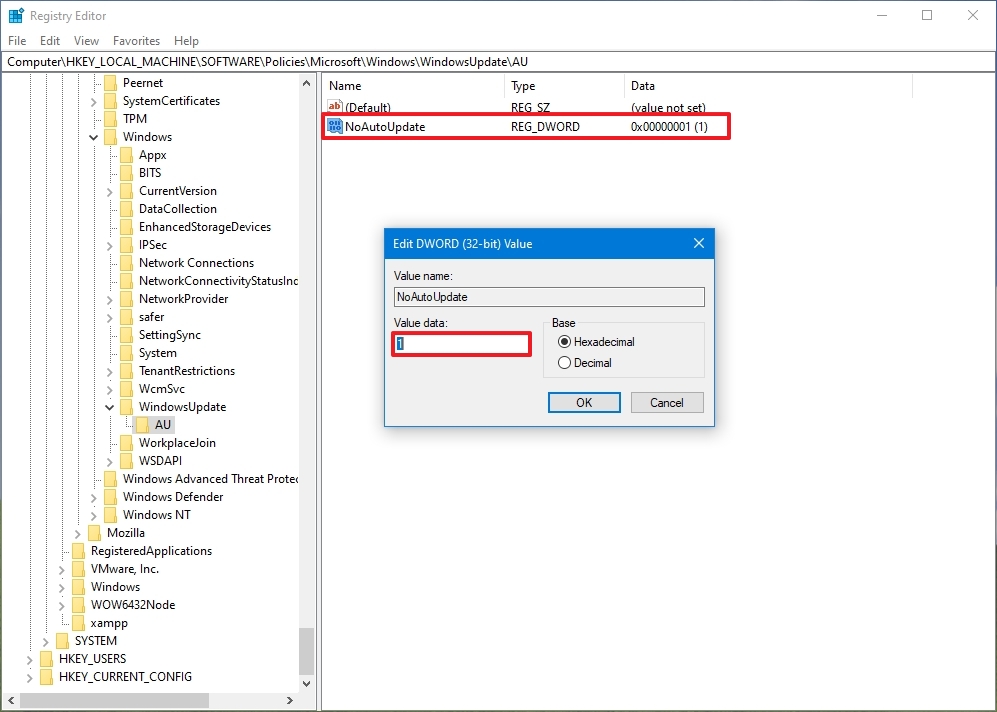
- Disable Windows 11 update downloads and installationDouble-click the DWORD “NoAutoUpdate”, write “1” in “Value data” and save via “OK”.

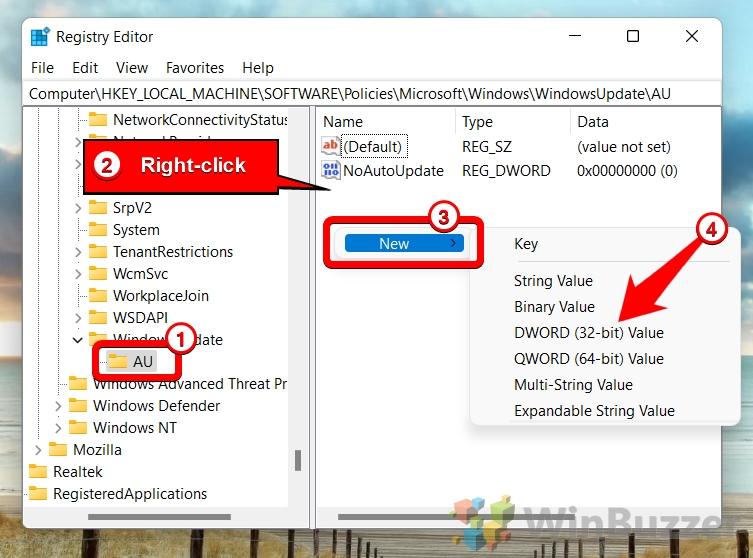
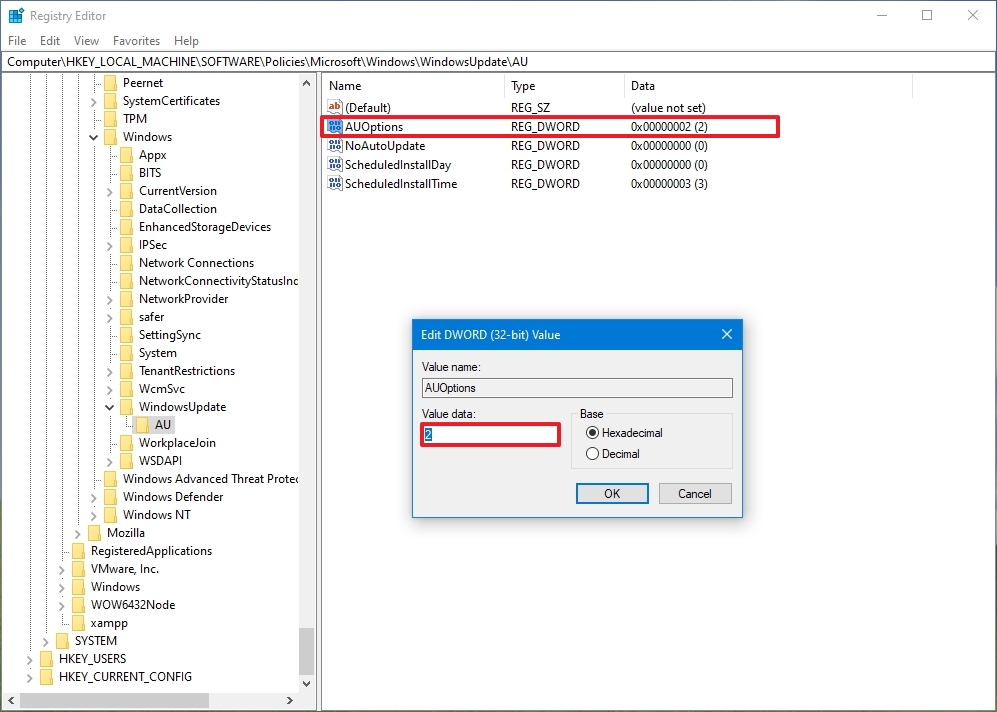
- Optional: Set automatic update behaviorInstead of completely turning off automatic updates in Windows 10 / Windows 11 you can use another registry edit to choose additional settings, just like in the Group Policy Editor. To do that, right-click again in the right pane and choose “New” – “DWORD (32-bit) Value”.

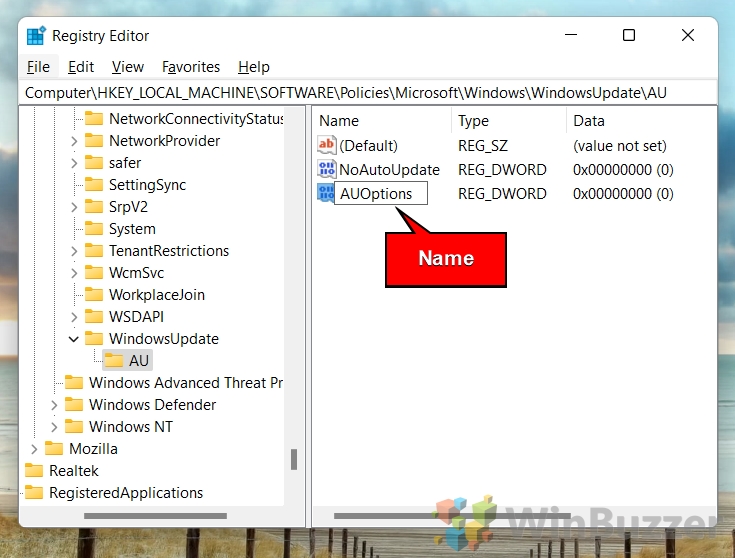
- Name the DWORD “AUOptions”

- Set the desired option for Windows updates
Double-click on “AUOptions”, set the desired option in “Value data” and save with “OK”. The value of this DWORD determines the various Windows 11 update methods. According to Microsoft, these are the possible values:
– 2: This option notifies you before downloading updates and automatically installs them at a scheduled time.
– 3: This option automatically downloads updates and notifies you when they are ready to be installed.
– 4: This option automatically downloads updates and installs them at a scheduled time that you specify.
– 5: This option allows the local administrator to choose one of the above options on each computer.
– 7: This option automatically downloads updates, notifies you when they are ready to be installed, and also notifies after installation for you to manually restart the PCBy default, Windows 11 uses value 4. To disable automatic updates, you can change it to value 2 or 3. However, this method is not recommended as it may cause security issues or compatibility problems.


How to Turn Off Automatic Updates in Windows 11 / Windows 10 Using a Metered Connection
You might want to consider to stop automatic updates in Windows 11 / Windows 10 using a metered connection for specific environments. A metered connection is an internet connection that has a data limit associated with it. Setting a metered connection in Windows can help reduce your data usage by preventing some apps and updates from using too much bandwidth. You can set a metered connection for Wi-Fi, Ethernet, or Cellular networks in Windows 10 by following some simple steps . This can be useful if you have a limited or expensive data plan, or if you want to save data for other purposes.
The Windows Store’s ability to update apps automatically can be a very useful tool, but it can also be a nuisance. Often, users will notice that the service host network service is taking up a lot of their bandwidth and slowing things down. Like automatic Windows updates, you might want to turn off automatic updates for apps, as shown in our other guide.
On Windows 10, cumulative updates download and install automatically as soon as they become available. Although this approach allows laptops and desktop computers to receive security updates to patch vulnerabilities, improve performance, and bring enhancements without user interaction, it is a very controversial feature.
Typically, it’s because updates contain bugs that can negatively affect the experience in many ways. For example, they could break existing features, introduce driver and application compatibility problems, or cause the Blue Screen of Death (BSoD), and they require a system restart to complete the installation, which can disrupt your workflow.
If you experience more problems than benefits during updates, or if you have a good reason to use a device without updates, depending on your edition of Windows 10, you can disable automatic updates using the Settings app or permanently with Group Policy and Registry.
This guide will walk you through the steps to prevent Windows Update from automatically downloading and installing updates on Windows 10.
How to disable automatic updates using Settings
You do not need to disable Windows Update permanently if you want to prevent the system from downloading a specific update immediately. Instead, you could pause updates for up to seven days.
To disable automatic updates temporarily, use these steps:
- Open Settings.
- Click on Update & Security.
- Click on Windows Update.
- Click the «Pause updates for 7 days» option.
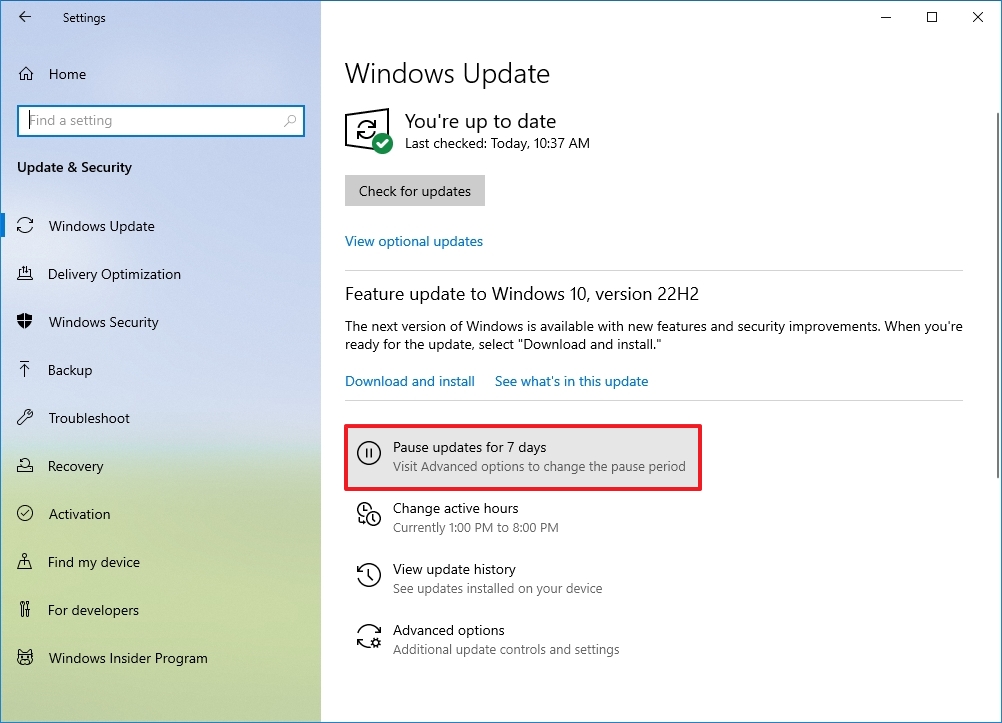
Once you complete the steps, Windows Update will no longer download for the time you specified. When the system reaches the pause limit, you will need to install the latest patch available to make the option available again.
You can always undo the changes with the instructions outlined above, but on step 4, choose the Select date option. Alternatively, you can accomplish the same effect by clicking the Resume updates button.
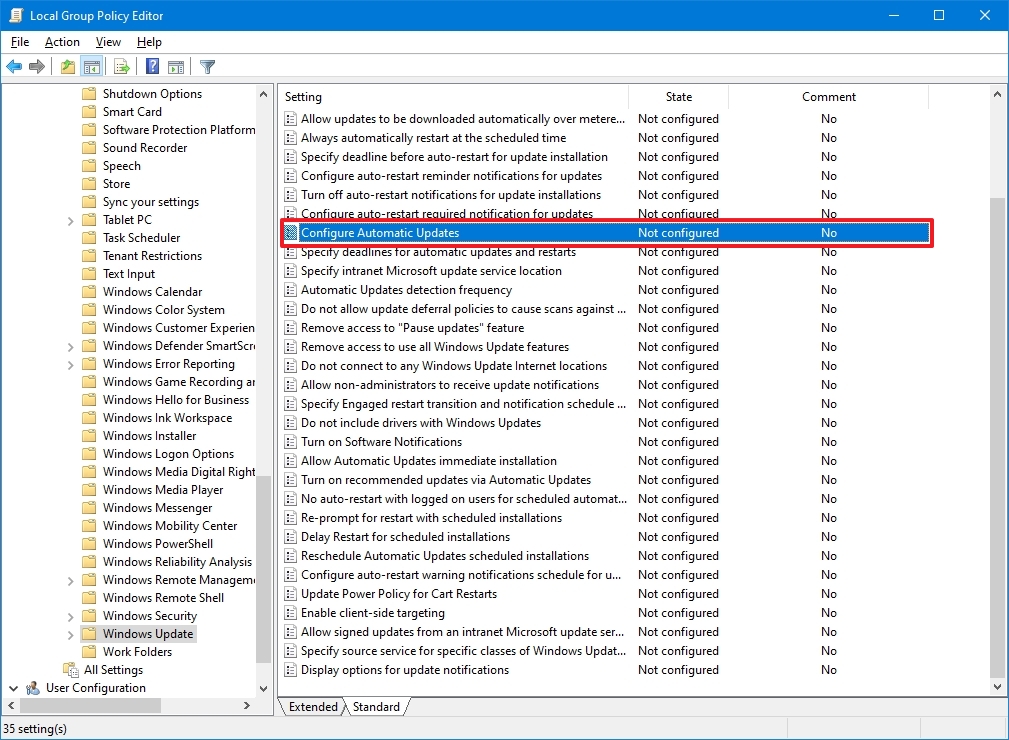
How to disable automatic updates using Group Policy
On Windows 10 Pro, the Local Group Policy Editor includes policies to permanently disable automatic updates or change the update settings to choose when patches should be installed on the device.
Disable Windows 10 updates
To disable automatic updates on Windows 10 permanently, use these steps:
- Open Start.
- Search for gpedit.msc and click the top result to launch the Local Group Policy Editor.
- Navigate to the following path: Computer Configuration > Administrative Templates > Windows Components > Windows Update
- Double-click the «Configure Automatic Updates» policy on the right side.
- Check the Disabled option to turn off automatic Windows 10 updates permanently.
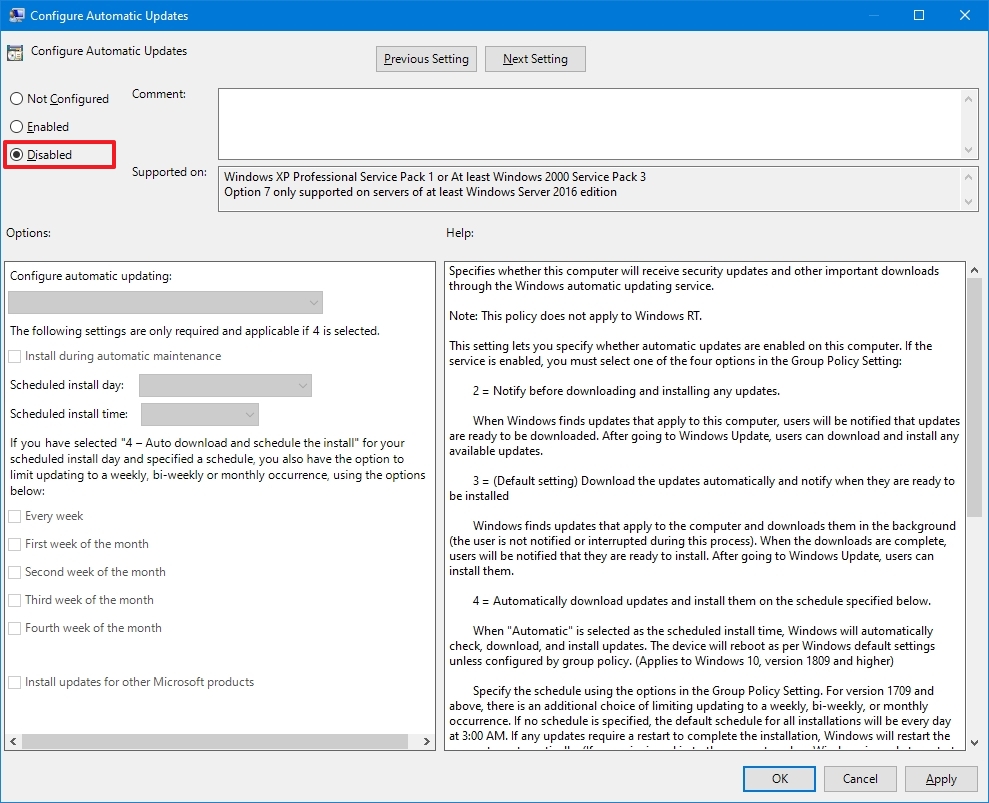
- Click the Apply button.
- Click the OK button.
After you complete the steps, Windows 10 will stop downloading updates automatically. However, the ability to check for updates manually will continue to be available on Settings > Update & Security > Windows Update, and clicking the Check for updates button to download the most recent patches as needed.
If you want to enable automatic updates on the computer again, you can use the same instructions outlined above, but in step 5, make sure to select the Not Configured option.
Limit Windows 10 updates
The Local Group Policy Editor also lets you choose how to disable automatic updates.
To manage Windows Update automatic downloads with Group Policy on Windows 10, use these steps:
- Open Start.
- Search for gpedit.msc and select the top result to launch the experience.
- Navigate to the following path: Computer Configuration > Administrative Templates > Windows Components > Windows Update
- Double-click the Configure Automatic Updates policy on the right side.
- Check the Enable option to turn on the policy.
- Under the «Options» section, select the option to prevent updates from downloading automatically on Windows 10:
- 2 — Notify for download and auto install.
- 3 — Auto download and notify for install.
- 4 — Auto download and schedule the install.
- 5 — Allow local admin to choose setting.
- 7 — Auto Download, Notify to install, Notify to Restart.
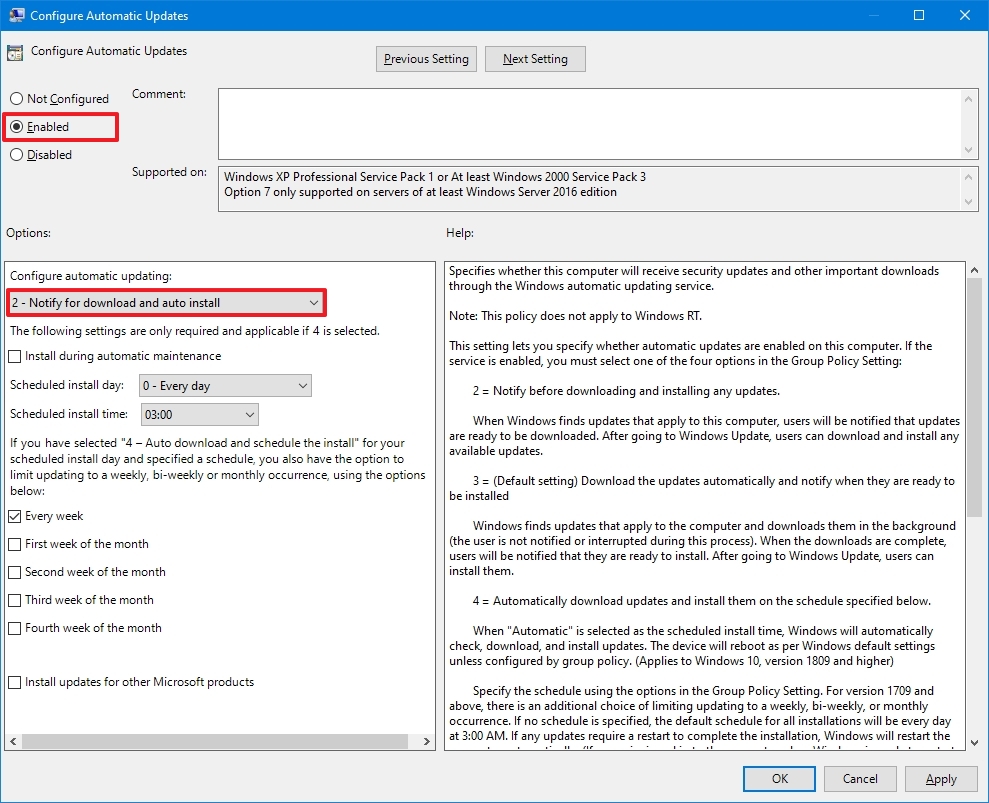
- Quick tip: The best option to disable automatic updates is the 2 — Notify for download and auto install option, but you can make a different selection. If you choose option 2, updates won’t download automatically. Instead, you will now see an «Install now» button to manually trigger an update on the Windows Update settings page.
- Click the Apply button.
- Click the OK button.
Once you complete the steps, automatic updates will be permanently disabled on Windows 10. However, when new updates become available, you can install them manually from the Windows Update settings page.
How to disable automatic updates with Registry
You can also use the Registry in two different ways to disable automatic updates on Windows 10.
Warning: This is a friendly reminder that editing the Registry is risky and can cause irreversible damage to your installation if you don’t do it correctly. Before proceeding, it’s recommended to make a backup of your PC.
Disable updates
To disable Windows 10 updates permanently by changing the Registry settings, use these steps:
- Open Start.
- Search for regedit and click the top result to launch the Registry Editor.
- Navigate to the following path: HKEY_LOCAL_MACHINE\SOFTWARE\Policies\Microsoft\Windows
- Right-click the Windows (folder) key, select the New submenu and choose the Key option.
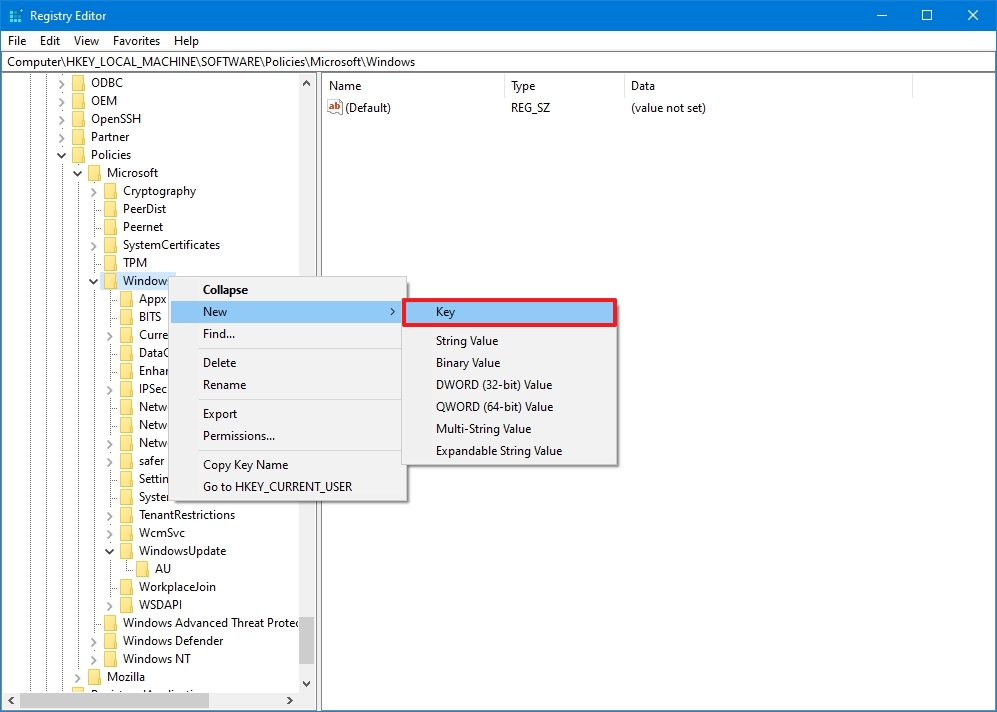
- Name the new key WindowsUpdate and press Enter.
- Right-click the newly created key, select the New submenu, and choose the Key option.
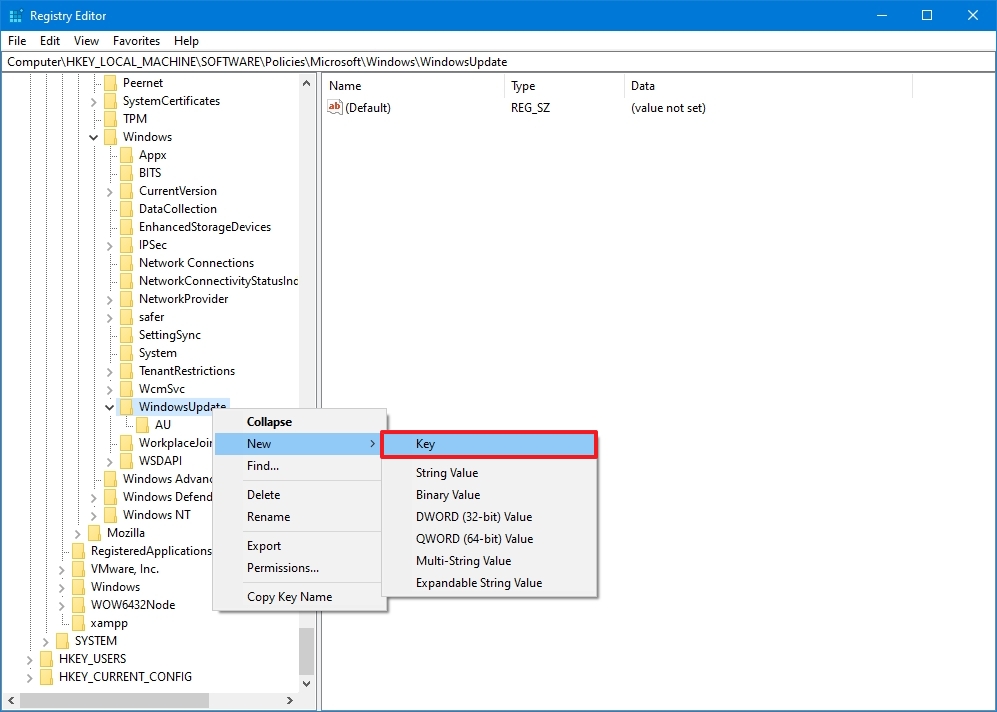
- Name the new key AU and press Enter.
- Right-click the AU key, select the New submenu, and choose the DWORD (32-bit) Value option.
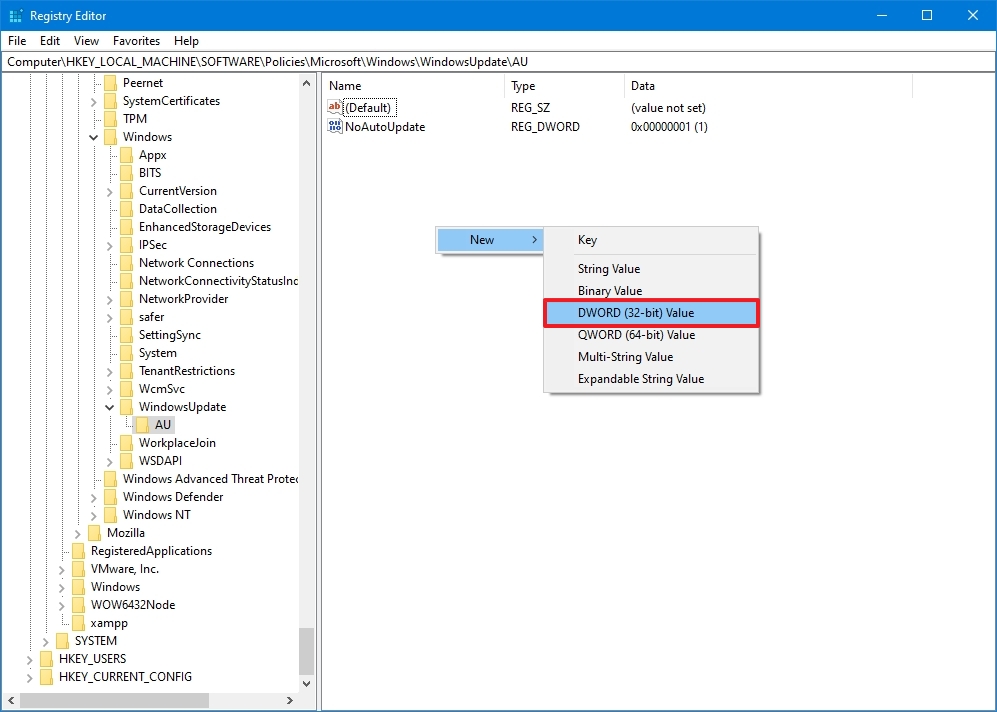
- Name the new key NoAutoUpdate and press Enter.
- Double-click the newly created key and change its value from 0 to 1.
- Click the OK button.
- Restart the computer.
After you complete the steps, automatic updates will be disabled permanently on the device. However, you will still be able to download updates by clicking the Check for updates button on the Windows Update settings page.
If you want to undo the changes, you can use the same instructions outlined above, but on step 4, right-click the WindowsUpdate key, select the Delete option, then reboot the computer to apply the settings.
Limit updates
Finally, you can use the Registry to configure the system settings to decide how to get updates on Windows 10.
To use the Registry to stop automatic updates (but choosing how to receive updates), use these steps:
- Open Start.
- Search for regedit and click the top result to open the Registry Editor.
- Navigate to the following path: HKEY_LOCAL_MACHINE\SOFTWARE\Policies\Microsoft\Windows
- Right-click the Windows (folder) key, select the New submenu and choose the Key option.
- Name the new key WindowsUpdate and press Enter.
- Right-click the newly created key, select the New submenu, and choose the Key option.
- Name the new key AU and press Enter.
- Right-click the AU key, select the New submenu, and select the DWORD (32-bit) Value option.
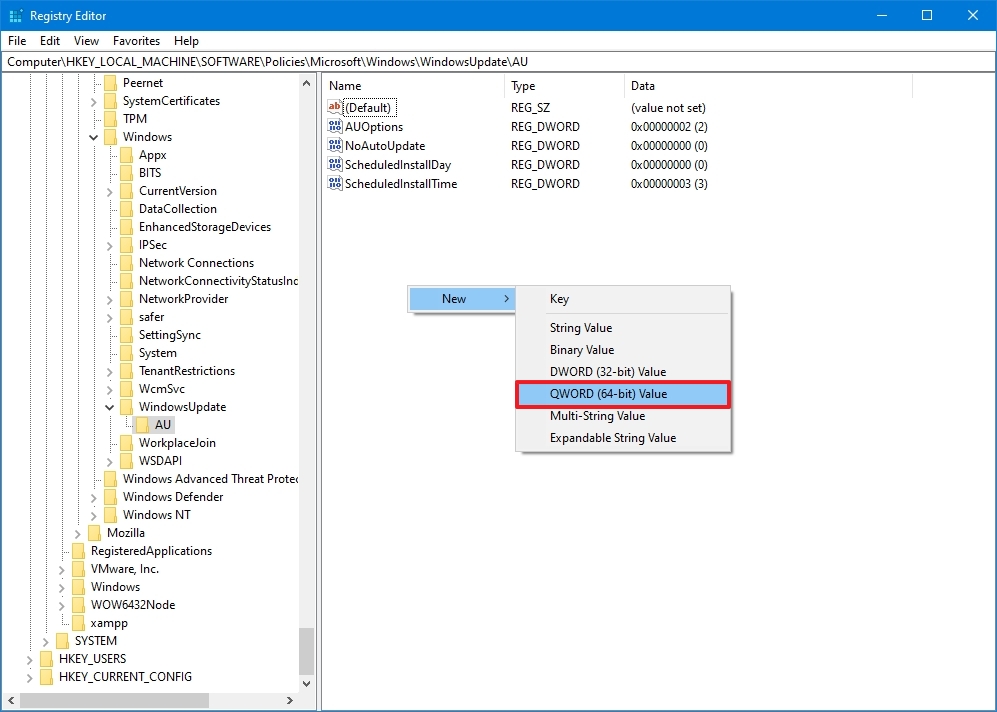
- Name the new key AUOptions and press Enter.
- Double-click the newly created key and change the value (number only) to:
- 2 — Notify for download and auto install.
- 3 — Auto download and notify for install.
- 4 — Auto download and schedule the install.
- 5 — Allow local admin to choose settings.
- 7 — Auto Download, Notify to install, Notify to Restart.
- Quick note: These options are the same as the Group Policy settings, and option 2 is the closest to disable Windows Update permanently.
- Click the OK button.
- Restart the computer.
Once you complete the steps, cumulative updates will no longer download and install automatically. However, when a new update becomes available, you will find the option to install it manually from the Windows Update settings.
You can use the same instructions outlined above to restore the original settings, but on step 4, right-click the WindowsUpdate key, select the Delete option, and reboot the computer.
Updates are essential to fix security vulnerabilities, resolve issues, and improve the overall experience, no matter the version of Windows you use. However, you may still need to disable this feature in some situations. For instance, when you want to have complete control over updates on Windows 10, when you want to avoid issues since bugs are common in most rollouts, or when you are using a critical app or equipment and you do not want to encounter any compatibility issues.
More resources
For more helpful articles, coverage, and answers to common questions about Windows 10 and Windows 11, visit the following resources:
- Windows 11 on Windows Central — All you need to know
- Windows 10 on Windows Central — All you need to know
All the latest news, reviews, and guides for Windows and Xbox diehards.
Mauro Huculak is technical writer for WindowsCentral.com. His primary focus is to write comprehensive how-tos to help users get the most out of Windows 10 and its many related technologies. He has an IT background with professional certifications from Microsoft, Cisco, and CompTIA, and he’s a recognized member of the Microsoft MVP community.
 В этой инструкции пошагово описаны способы отключить автоматические обновления Windows 10 (т.е. установку обновлений). В начале инструкции — проверенные и работающие в настоящее время методы отключения обновлений, далее — дополнительные варианты, которые к настоящему моменту могут не функционировать.
По умолчанию, Windows 10 автоматически проверяет наличие обновление, скачивает и устанавливает их, при этом отключить обновления стало сложнее, чем в предыдущих версиях операционной системы. Тем не менее, сделать это возможно: с помощью средств администрирования ОС или сторонних программ. В инструкции ниже — о том, как полностью отключить обновления системы, если же вам требуется отключить установку конкретного обновления KB и удалить его, необходимую информацию вы найдете в руководстве Как удалить обновления Windows 10. См. также: Как отключить автоматическое обновление драйверов в Windows 10.
Помимо полного отключения обновлений Windows 10 в инструкции показано, как отключить конкретное обновление, вызывающее проблемы, или, при необходимости — «большое обновление», такое как Windows 10 20H2, 2004 May 2020 Update, Windows 10 1909, не отключая при этом установку обновлений безопасности. Также учитывайте, что есть отдельные программы управления обновлениями Windows 10, позволяющие, в том числе, отключить автоматический их поиск, скачивание и установку, а при необходимости — загрузить необходимые вручную.
Полное отключение обновлений Windows 10 без отключения Центра обновлений (рекомендуемый способ, работа проверена осенью-зимой 2020)
Этот метод я тестировал в течение всего ноября 2020 на Windows 10 последней версии, и он показал себя полностью работоспособным. Суть заключается в настройке обновлений таким образом, чтобы системы использовала локальный сервер обновлений. При этом, по причине фактического отсутствия этого сервера, обновления загружаться не будут.
Одновременно, служба центра обновлений Windows продолжит работать (не нагружая систему), а какие-либо серверы Майкрософт заблокированы не будут: это может быть полезным для работоспособности и правильного функционирования остальных компонентов системы, установки некоторых компонентов разработки Майкрософт, обновления приложений из Windows Store и других задач.
Чтобы отключить обновления Windows 10 этим методом, создайте reg-файл со следующим содержимым:
Windows Registry Editor Version 5.00

[HKEY_LOCAL_MACHINE\SOFTWARE\Policies\Microsoft\Windows\WindowsUpdate]
"DoNotConnectToWindowsUpdateInternetLocations"=dword:00000001
"UpdateServiceUrlAlternate"="server.wsus"
"WUServer"="server.wsus"
"WUStatusServer"="server.wsus"

[HKEY_LOCAL_MACHINE\SOFTWARE\Policies\Microsoft\Windows\WindowsUpdate\AU]
"UseWUServer"=dword:00000001
После этого «запустите» созданный файл и согласитесь с добавлением параметров в реестр. Сразу после этого, без перезагрузки компьютера, обновления перестанут скачиваться и обновляться.
Видео с демонстрацией метода
Для отмены сделанных изменений:
- Из раздела реестра
HKEY_LOCAL_MACHINE\SOFTWARE\Policies\Microsoft\Windows\WindowsUpdate
удалите параметры DoNotConnectToWindowsUpdateInternetLocations, UpdateServiceUrlAlternate, WUServer, WUStatusServer
- Из раздела реестра
HKEY_LOCAL_MACHINE\SOFTWARE\Policies\Microsoft\Windows\WindowsUpdate\AU
удалите параметр UseWUServer
Этот же метод отключения обновлений реализован в бесплатной утилите Winaero Tweaker.
Как отключить автоматические обновления Windows 10, но разрешить ручную установку обновлений
С выходом новых версий Windows 10 многие способы отключения обновлений перестали работать: служба «Центр обновления Windows» включается сама по себе, блокировка в hosts не срабатывает, задания в планировщике заданий автоматически активируются со временем, параметры реестра работают не для всех редакций ОС.
Тем не менее, способ отключения обновлений (во всяком случае, их автоматического поиска, скачивания на компьютер и установки) существует. В заданиях Windows 10 присутствует задание Schedule Scan (в разделе UpdateOrchestrator), которое, используя системную программу C:\Windows\System32\UsoClient.exe регулярно выполняет проверку наличия обновлений, и мы можем сделать так, чтобы оно не работало. При этом обновления определений вредоносных программ для защитника Windows продолжат устанавливаться автоматически.
Отключение задания Schedule Scan и автоматических обновлений
Для того, чтобы задание Schedule Scan перестало работать, а соответственно перестали автоматически проверяться и скачиваться обновления Windows 10, можно установить запрет на чтение и выполнение программы UsoClient.exe, без чего задание работать не будет.
Порядок действий будет следующим (для выполнения действий вы должны быть администратором в системе)
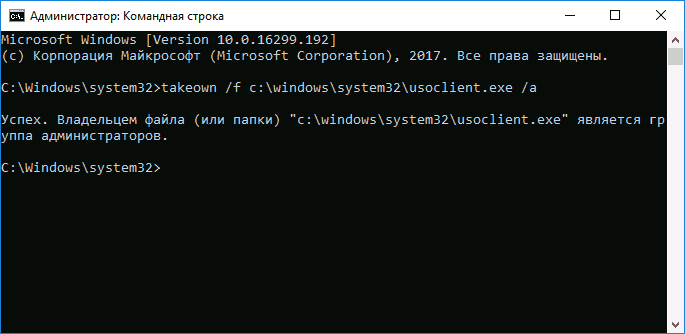
- Запустите командную строку от имени администратора. Для этого можно начать набирать «Командная строка» в поиске на панели задач, затем нажать правой кнопкой мыши по найденному результату и выбрать пункт «Запуск от имени администратора».
- В командной строке введите команду
takeown /f c:\windows\system32\usoclient.exe /a
и нажмите Enter.

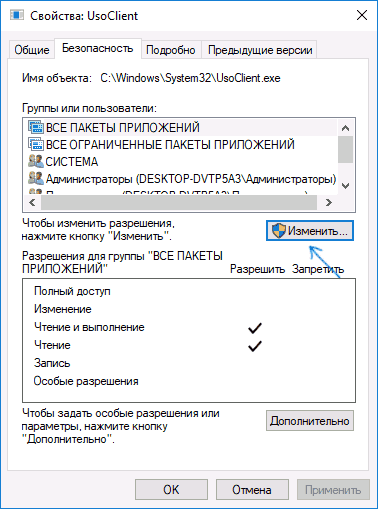
- Закройте командную строку, перейдите в папку C:\Windows\System32\ и найдите там файл usoclient.exe, нажмите по нему правой кнопкой мыши и выберите пункт «Свойства».
- На вкладке «Безопасность» нажмите кнопку «Изменить».

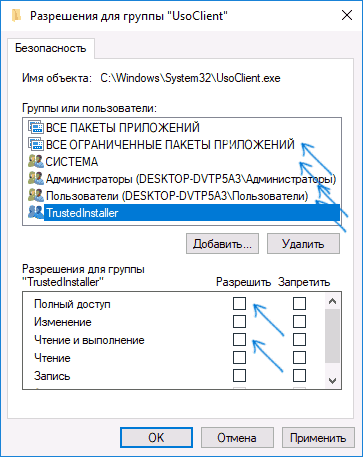
- Поочередно выберите каждый пункт в списке «Группы или пользователи» и снимите для них все отметки в столбце «Разрешить» ниже.

- Нажмите Ок и подтвердите изменение разрешений.
- Перезагрузите компьютер.
После этого обновления Windows 10 не будут устанавливаться (и обнаруживаться) автоматически. Однако, при желании вы можете проверить наличие обновлений и установить их вручную в «Параметры» — «Обновление и безопасность» — «Центр обновления Windows».
При желании, вы можете вернуть разрешения на использование файла usoclient.exe командной в командной строке, запущенной от имени администратора:
icacls c:\windows\system32\usoclient.exe /reset
(однако, разрешения для TrustedInstaller не будут возвращены, равно как и не будет изменен владелец файла).
Примечания: Иногда, когда Windows 10 попробует обратиться к файлу usoclient.exe вы можете получить сообщение об ошибке «Отказано в доступе». Описанные выше шаги 3-6 можно выполнить и в командной строке, используя icacls, но рекомендую визуальный путь, поскольку список групп и пользователей с разрешениями может меняться по ходу обновлений ОС (а в командной строке нужно их указывать вручную).
В комментариях предлагают ещё один способ, который может оказаться работоспособным, лично не проверил:
Есть ещё одна идея, которая автоматически отключает службу «Центр обновления Windows», в чём суть. Windows 10 включает сам «Центр обновления Windows», в Управление компьютером — Служебные программы — Просмотр событий — Журналы Windows — Система, отображается информация об этом, при этом указывается, что сам пользователь включил службу (ага, только выключил недавно). Гуд, событие есть, поехали дальше. Создаём батник, который останавливает службу и меняет тип запуска на «отключить»:
net stop wuauserv
sc config wuauserv start=disabled
Гуд, батник создан.
Теперь создаём задачу в Управление компьютером — Служебные программы — Планировщик заданий.
- Триггеры. Журнал: Система. Источник: Service Control Manager.
- Код события: 7040. Действия. Запуск нашего батника.
Остальные настройки по вашему усмотрению.
Также, если в последнее время у вас стал принудительно устанавливаться помощник по обновлению до следующей версии Windows 10 и вам требуется это прекратить, обратите внимание на новую информацию в разделе «Отключение обновления до Windows 10 версии 1903 и 1809» далее в этой инструкции. И еще одно примечание: если никак не удается достичь желаемого (а в 10-ке это становится сложнее и сложнее), посмотрите комментарии к инструкции — там также есть полезные сведения и дополнительные подходы.
Отключение Центра обновления Windows 10 (обновлено, так чтобы он не включался автоматически)
Как вы могли заметить, обычно центр обновления включается снова, параметры реестра и задания планировщика система также приводит в нужное ей состояние, таким образом, что обновления продолжают скачиваться. Однако, есть способы решить эту проблему, причем это тот редкий случай, когда я рекомендую использовать стороннее средство. Прежде всего, рекомендую попробовать программу, по которой у меня опубликована отдельная инструкция — Как отключить обновления Windows 10 в Windows Update Blocker.
UpdateDisabler — очень эффективный метод полностью отключить обновления
UpdateDisabler — простая утилита, которая позволяет очень просто и полностью отключить обновления Windows 10 и, возможно, на текущий момент времени — это одно из самых действенных решений.
При установке, UpdateDisabler создает и запускает службу, которая не дает Windows 10 снова начать загружать обновления, т.е. желаемый результат достигается не путем изменения параметров реестра или отключения службы «Центр обновления Windows 10», которые затем вновь изменяются самой системой, а постоянно следит за наличием заданий обновления и состоянием центра обновлений и, при необходимости, сразу отключает их.
Процесс отключения обновлений с помощью UpdateDisabler:
- Скачайте архив с сайта https://winaero.com/download.php?view.1932 и распакуйте на компьютер. Не рекомендую в качестве места хранения рабочий стол или папки документов, далее нам потребуется вводить путь к файлу программы.
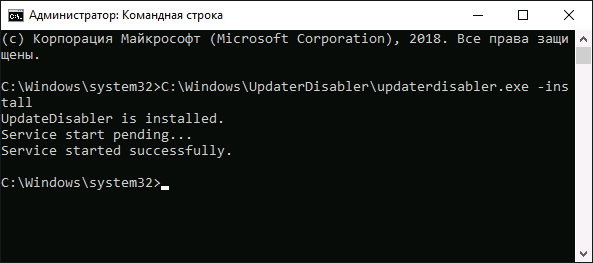
- Запустите командную строку от имени администратора (для этого можно начать набирать «Командная строка» в поиске на панели задач, затем нажать правой кнопкой мыши по найденному результату и выбрать пункт «Запуск от имени администратора») и введите команду, состоящую из пути к файлу UpdaterDisabler.exe и параметра -install, как на примере ниже:
C:\Windows\UpdaterDisabler\UpdaterDisabler.exe -install

- Служба отключения обновлений Windows 10 будет установлена и запущена, обновления скачиваться не будут (в том числе и вручную через параметры), также не будет выполняться и их поиск. Не удаляйте файл программы, оставьте его в том же расположении, откуда производилась установка.

- При необходимости снова включить обновления, используйте тот же метод, но в качестве параметра укажите -remove.
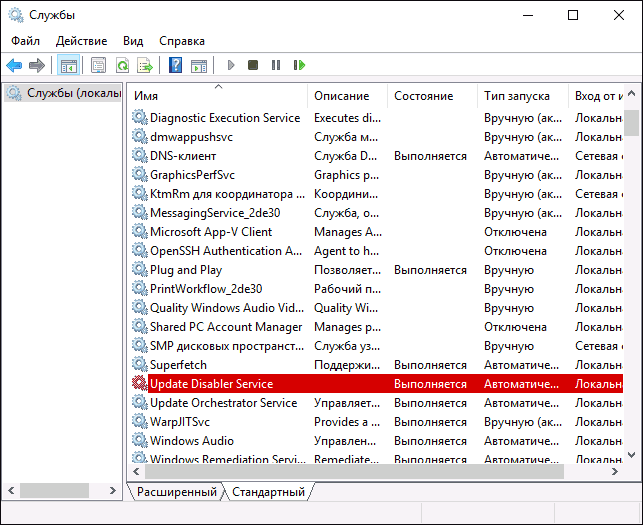
На данный момент времени утилита работает исправно, а операционная система не включает автоматические обновления снова.
Изменение параметров запуска службы Центр обновления Windows
Этот способ подходит не только для Windows 10 Профессиональная и Корпоративная, но и для домашней версии (если у вас Pro, рекомендую вариант с помощью редактора локальной групповой политики, который описан далее). Заключается он в отключении службы центра обновления. Однако, начиная с версии 1709 этот способ перестал работать в описываемом виде (служба включается со временем сама).
Перед использованием метода настоятельно рекомендую создать точку восстановления системы, по некоторым отзывам в комментариях, пользователям не удается откатить изменения (сам воспроизвести проблему не смог).
После отключения указанной службы, ОС не сможет автоматически загружать обновления и устанавливать их до тех пор, пока вы снова не включите ее. С недавних пор Центр обновления Windows 10 стал сам включаться, но это можно обойти и отключить его навсегда. Для отключения проделайте следующие шаги.
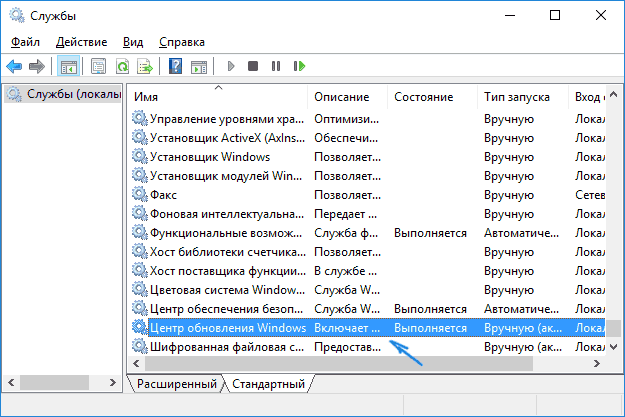
- Нажмите клавиши Win+R (Win — клавиша с эмблемой ОС), введите services.msc в окно «Выполнить» и нажмите Enter. Откроется окно «Службы».

- Найдите в списке службу «Центр обновления Windows» (Windows Update), дважды кликните по ней.
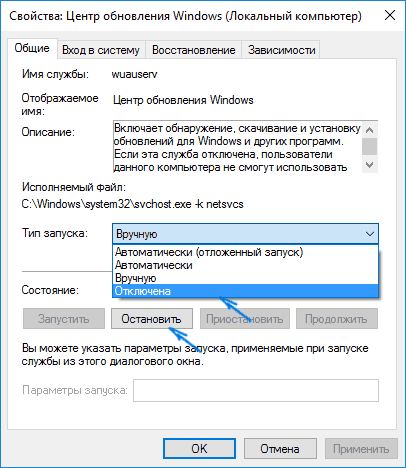
- Нажмите «Остановить». Также установите в поле «Тип запуска» значение «Отключена», примените настройки.

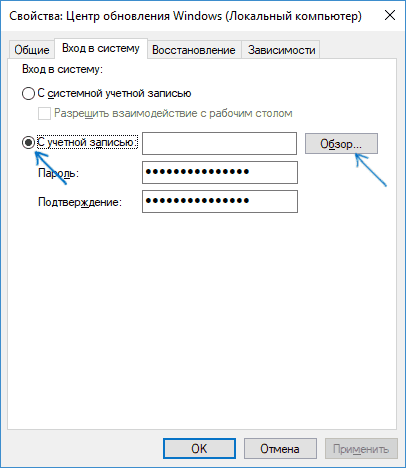
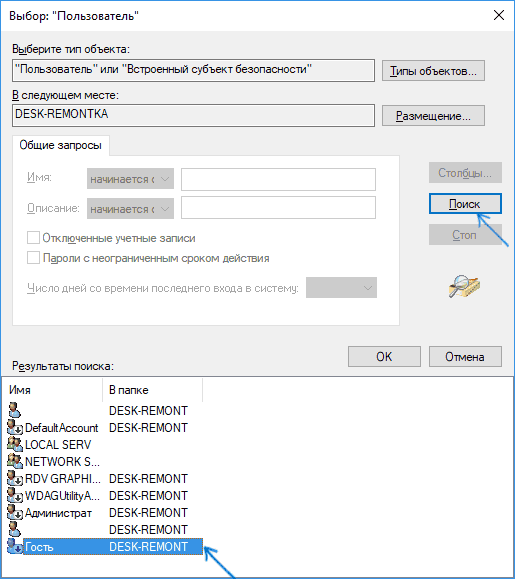
- Если так и оставить, то через некоторое время Центр обновления снова включится. Чтобы этого не произошло, в этом же окне, после применения параметров, перейдите на вкладку «Вход в систему», выберите пункт «С учетной записью» и нажмите «Обзор».
- В следующем окне нажмите «Дополнительно», затем — «Поиск» и в списке выберите пользователя без прав администратора, например, встроенного пользователя Гость.

- В окне уберите пароль и подтверждение пароля для пользователя (у него нет пароля) и примените настройки.
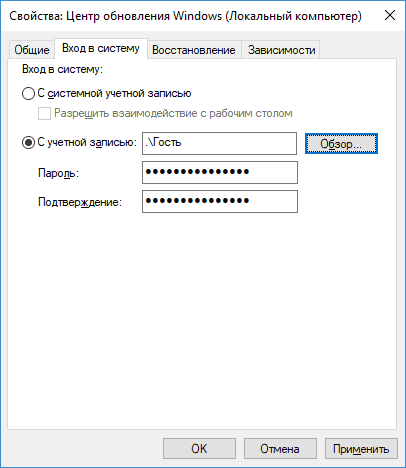
Теперь автоматическое обновление системы происходить не будет: при необходимости, вы можете аналогичным образом вновь запустить службу Центра обновления и сменить пользователя, от которого производится запуск на «С системной учетной записью».
Также на сайте доступна инструкция с дополнительными способами (хотя приведенного выше должно быть достаточно): Как отключить Центр обновления Windows 10.
Как отключить автоматические обновления Windows 10 в редакторе локальной групповой политики
Отключение обновлений с помощью редактора локальной групповой политики работает только для Windows 10 Pro и Enterprise, но при этом является самым надежным способом для выполнения указанной задачи. Действия по шагам:
- Запустите редактор локальной групповой политики (нажать Win+R, ввести gpedit.msc)
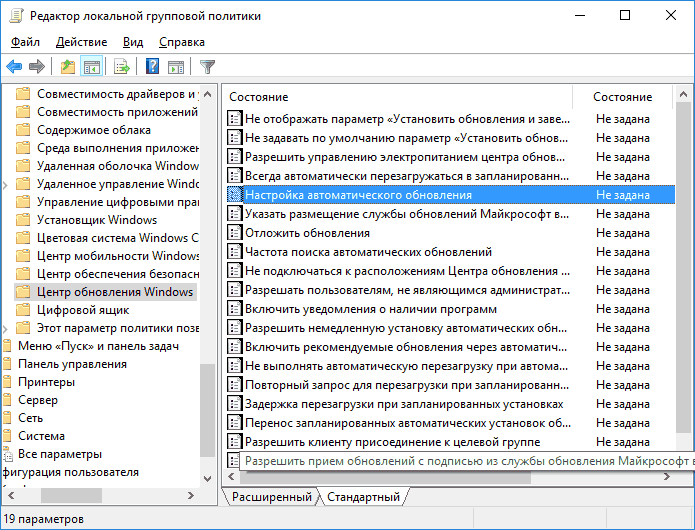
- Перейдите к разделу «Конфигурация компьютера» — «Административные шаблоны» — «Компоненты Windows» — «Центр обновления Windows». Найдите пункт «Настройка автоматического обновления» и дважды кликните по нему.

- В окне настройки установите «Отключено» для того, чтобы Windows 10 никогда не проверяла и не устанавливала обновления.

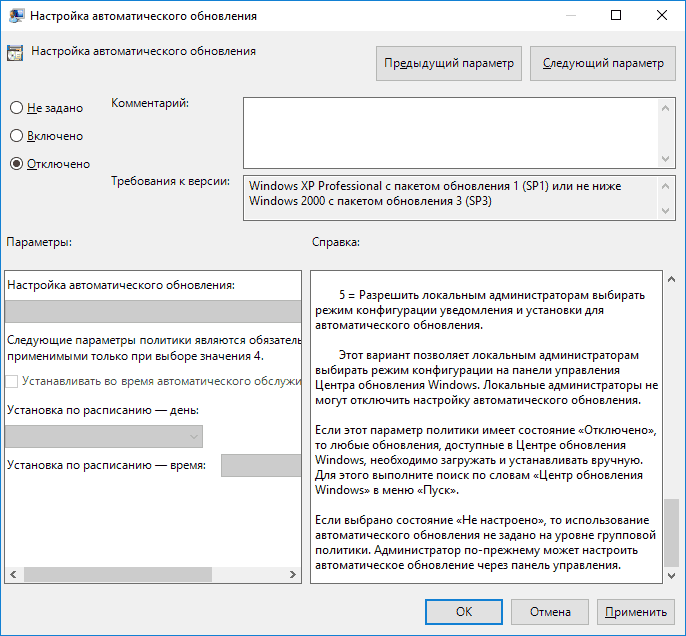
Закройте редактор, после чего зайдите в параметры системы и выполните проверку наличия обновлений (это нужно, чтобы изменения вступили в силу, сообщают, что иногда срабатывает не сразу. При этом при ручной проверке обновления найдутся, но в будущем автоматически поиск и установка выполняться не будут).
То же действие можно сделать и с помощью редактора реестра (в Домашней работать не будет), для этого в разделе HKEY_LOCAL_MACHINE\ SOFTWARE\ Policies\ Microsoft\ Windows\ WindowsUpdate\ AU создайте параметр DWORD с именем NoAutoUpdate и значением 1 (единица).
Использование лимитного подключения для предотвращения установки обновлений
Примечание: начиная с Windows 10 «Обновление для дизайнеров» в апреле 2017 года, задание лимитного подключения не будет блокировать все обновления, некоторые продолжат скачиваться и устанавливаться.
По умолчанию, Windows 10 не загружает обновления автоматически при использовании лимитного подключения. Таким образом, если вы для своей Wi-Fi укажите «Задать как лимитное подключение» (для локальной сети не получится), это отключить установку обновлений. Способ также работает для всех редакций Windows 10.
Чтобы сделать это, зайдите в Параметры — Сеть и Интернет — Wi-Fi, нажмите по имени нужной Wi-Fi сети, а затем в её параметрах включите пункт «Задать как лимитное подключение», чтобы ОС относилось к этому подключению как к Интернету с оплатой за трафик.
Отключение установки конкретного обновления
В некоторых случаях может потребоваться отключить установку конкретного обновления, которое приводит к неправильной работе системы. Для этого можно использовать официальную утилиту Microsoft Show or Hide Updates (Показывать или скрывать обновления):
- Загрузите утилиту со страницы официального сайта.
- Запустите утилиту, нажмите кнопку Далее, а затем — Hide Updates (скрыть обновления).

- Выберите обновления, установку которых необходимо отключить.
- Нажмите Далее и дождитесь завершения выполнения задачи.
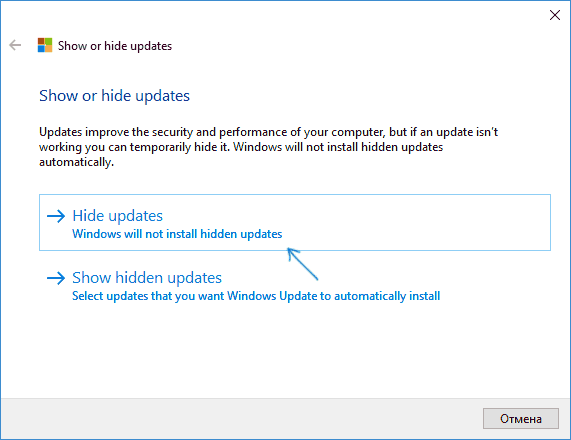
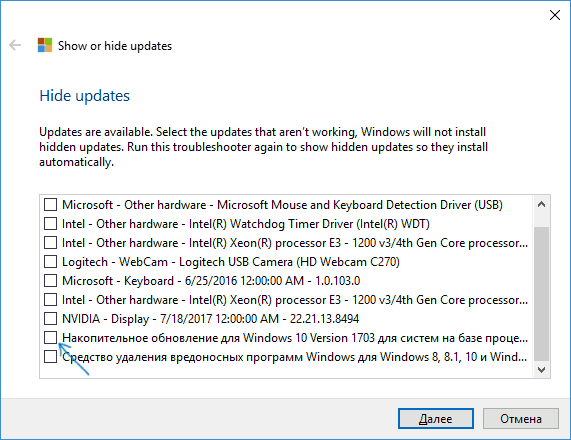
После этого выбранное обновление не будет устанавливаться. Если же вы решите установить его, снова запустите утилиту и выберите пункт Show hidden updates (показать скрытые обновления), после чего уберите обновление из числа скрытых.
Отключение обновления до Windows 10 новой версии
В последнее время обновления компонентов Windows 10 стали устанавливаться на компьютеры автоматически вне зависимости от настроек. Существует следующий способ отключить это:
- В панели управления — программы и компоненты — просмотр установленных обновлений найдите и удалите обновления KB4023814 и KB4023057 если они там присутствуют.
- Создайте следующий reg файл и внесите изменения в реестр Windows 10.
Windows Registry Editor Version 5.00

[HKEY_LOCAL_MACHINE\SOFTWARE\Policies\Microsoft\Windows\WindowsUpdate]
"DisableOSUpgrade"=dword:00000001

[HKEY_LOCAL_MACHINE\SOFTWARE\Policies\Microsoft\WindowsStore]
"DisableOSUpgrade"=dword:00000001

[HKEY_LOCAL_MACHINE\SOFTWARE\Microsoft\Windows\CurrentVersion\WindowsUpdate\OSUpgrade]
"AllowOSUpgrade"=dword:00000000
"ReservationsAllowed"=dword:00000000

[HKEY_LOCAL_MACHINE\SYSTEM\Setup\UpgradeNotification]
"UpgradeAvailable"=dword:00000000
Ещё один метод, который подойдет только для Windows 10 Pro описан в инструкции Как задать целевую (максимальную) версию Windows 10 в реестре.
В скором времени, весной 2020, на компьютеры пользователей начнет приходить очередное большое обновление — Windows 10 версии 2004. Если вы не хотите его устанавливать, сделать это можно следующим образом:
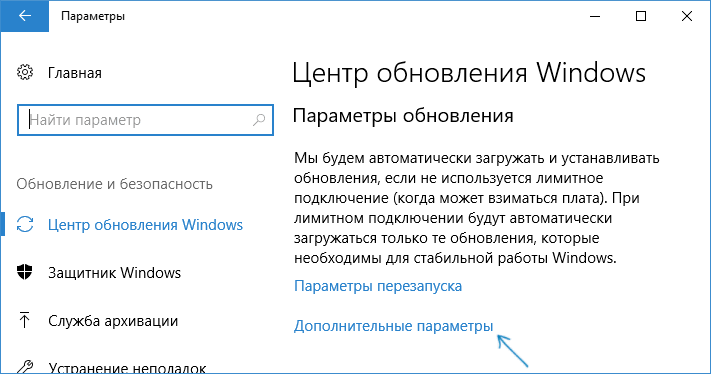
- Зайдите в Параметры — Обновление и безопасность и нажмите «Дополнительные параметры» в разделе «Центр обновления Windows».

- В дополнительных параметрах в разделе «Выберите, когда устанавливать обновления» установите «Semi Annual Channel» или «Current branch for business» (доступные для выбора пункты зависят от версии, опция отложит установку обновления на несколько месяцев по сравнению с датой выхода очередного обновления для простых пользователей).

- В разделе «Обновление компонентов включает в себя…» установите максимальное значение — 365, это отложит установку обновления еще на один год.

Несмотря на то, что это не полное отключение установки обновления, вероятнее всего, срока в год с лишним будет вполне достаточно.
Есть еще один способ отложить установку обновлений компонентов Windows 10 — с помощью редактора локальной групповой политики (только в Pro и Enterprise): запустите gpedit.msc, перейдите в раздел «Конфигурация компьютера» — «Административные шаблоны» — «Компоненты Windows» — «Центр обновления Windows» — «Отложить обновления Windows».
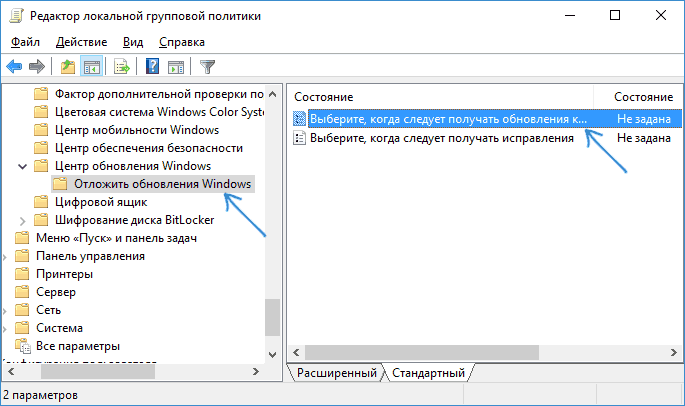
Дважды нажмите по параметру «Выберите, когда следует получать обновления компонентов Windows 10», задайте «Включено», «Semi Annual Channel» или «Current Branch for Business» и 365 дней.

Программы для отключения обновлений Windows 10
Сразу после выхода Windows 10 появилось множество программ, позволяющих выключить те или иные функции системы (см. например статью про Отключение шпионства Windows 10). Есть таковые и для отключения автоматических обновлений.
Рекомендуемой мной решение — O&O ShutUp10. Все, что потребуется, это включить два пункта в программе:

И, после применения настроек перезагрузить компьютер. Скачать утилиту можно с официального сайта https://www.oo-software.com/en/shutup10
Еще одна программа, работающая в настоящее время и не содержащая чего-либо нежелательного (проверял portable-версию, вам рекомендую тоже выполнять проверку на Virustotal) — бесплатная Win Updates Disabler, доступная для скачивания на сайте site2unblock.com.
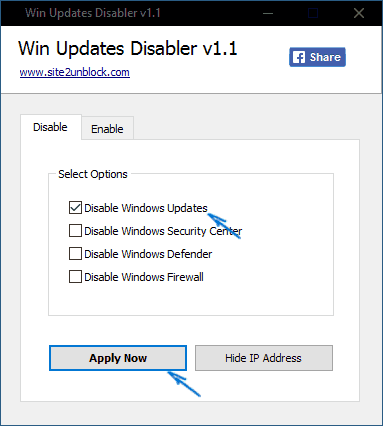
После загрузки программы все что требуется сделать — отметить пункт «Disable Windows Updates» и нажать кнопку «Apply Now» (применить сейчас). Для работы требуются права администратора и, помимо прочего, программа умеет отключать защитник Windows и брандмауэр. Второе ПО такого рода — Windows Update Blocker, правда этот вариант платный.
Приостановка обновлений в параметрах Windows 10
В Windows 10 последней версии в разделе параметров «Обновление и безопасность» — «Центр обновления Windows» — «Дополнительные параметры» появился новый пункт — «Приостановка обновлений».
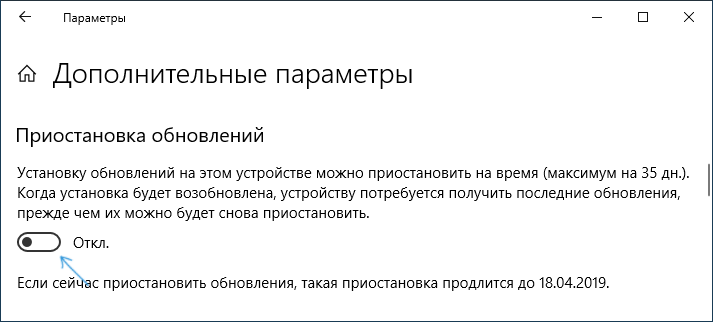
При использовании опции любые обновления перестанут устанавливаться на период 35 дней. Но есть одна особенность: после того, как вы отключите её, автоматически запустится загрузка и установка всех вышедших обновлений, а до этого момента повторная приостановка будет невозможна.
Как отключить автоматическую установку обновлений Windows 10 — видео инструкция
В завершение — видео, в котором наглядно показаны описанные выше способы предотвратить установку и загрузку обновлений.
Надеюсь, вы смогли найти способы, подходящие в вашей ситуации. Если нет — спрашивайте в комментариях. На всякий случай отмечу, что отключение обновлений системы, особенно если это лицензионная ОС Windows 10 — не самая лучшая практика, делайте это только при явной необходимости.
Довольно часто очередное обновление операционной системы Windows 10 ставит пользователя в тупик — иногда нужно быстро выключить компьютер и уйти по делам, либо же наоборот включить систему и выполнить какое-то действие. Вместо этого приходится смотреть на экран установки обновления, которое иногда может занять пять-десять минут. И, к сожалению, с каждой свежей версией ОС разработчики из Microsoft закрывают возможности эти апдейты отключить — пользоваться устаревшей версией системы буквально затруднительно. Но, конечно, есть сразу несколько вариантов решения данной проблемы.
Отключение обновлений через настройку прав пользователей
Первый способ позволяет полностью запретить операционной системе запускать обновление через перенастройку прав пользователей.
Для этого нужно выполнить несколько простых шагов:
- нажмите Win+R на клавиатуре, в открывшемся окне введите команду services.msc и нажмите Enter;
- в открывшемся списке найдите службу «Центр обновлений Windows» и два раза кликните по ней;
- во вкладке «Общие» откройте выпадающее меню «Тип запуска» и выберите пункт «Отключена»;
- нажмите на «Остановить»;
- в этом же окне перейдите во вкладку «Вход в систему»;
- выберите пункт «С учётной записью» и нажмите на кнопку «Обзор»;
- в открывшемся окне выберите пункт «Дополнительно», после чего откройте поиск и в открывшемся списке кликните по «Гость»;
- нажмите «ОК»;
- удалите пароль для пользователя «Гость», после чего примените изменения;
- перезагрузите компьютер.
После внесённых изменений служба «Центр обновлений Windows» будет полностью отключена, а её права настроены как «Гость», то есть без прав администратора — возможности вносить изменения в систему у данной службы нет. А поскольку устанавливать обновления можно только от имени администратора, Windows 10 больше не будет обновляться без разрешения самого пользователя.
Отключение обновлений через редактор групповой политики
Операционная система Windows 10 может похвастаться достаточно продвинутым набором различных утилит, которые могут настраивать даже самые важные функции ОС. Среди них — редактор групповой политики, благодаря которому тоже можно отключить обновления в Windows 10.
Для этого нужно выполнить несколько простых шагов:
- нажмите Win+R на клавиатуре;
- в открывшемся окне введите команду gpedit.msc;
- перейдите по адресу: Конфигурация компьютера\Административные шаблоны\Компоненты Windows;
- выберите категорию «Центр обновления Windows»;
- найдите пункт «Настройка автоматического обновления»;
- переведите параметр в режим «Отключено»;
- нажмите «ОК».
Отключение обновлений через планировщик задач
Благодаря утилите «Планировщик задач» определённые процессы в операционной системе запускаются автоматически — к ним относятся и обновления системы.
К счастью, функции данной утилиты тоже можно ограничить:
- нажмите Win+R на клавиатуре;
- в открывшемся окне введите команду taskschd.msc;
- проследуйте по адресу: Библиотека планировщика заданий\Microsoft\Windows\UpdateOrchestrator;
- отключите всё, что связано с обновлением Windows.
⚠️ Важно: разработчики из Microsoft периодически переименовывают службы, так что стоит искать всё, что связано со словом Update.
Всё и сразу
В большинстве ситуаций для отключения апдейтов хватает одного из вышеуказанных способов, но для наибольшей надёжности стоит воспользоваться сразу всеми. В этом случае Windows 10 будет гораздо труднее обойти запреты и запустить обновление автоматически, без ведома пользователя.
- Теперь не боюсь за Windows: точки восстановления создаются каждый день. Вот как это настроить
- Эта бесплатная утилита от Microsoft в разы ускоряет работу. Она существует ещё с Windows 95
- Эта утилита показывает, где используется выбранный файл в Windows и что мешает удалить его
- Мод Windows 10 для игр: тестирую Atlas OS, из которого вырезали лишнее ради производительности
- 10 приложений, которые нужно сразу установить на новый компьютер