by Ivan Jenic
Passionate about all elements related to Windows and combined with his innate curiosity, Ivan has delved deep into understanding this operating system, with a specialization in drivers and… read more
Updated on
- Many users reported not being able to play audio files in Windows 10 and getting a Device in use error message.
- There are various problems with your PC that may cause this error, but generally nothing major.
- Find below some tricks that will help you with this, such as updating or rolling back your drivers.
- We also show how to use the Windows Troubleshooter in order to tackle this specific problem.

It looks like audio-related issues are some of the biggest problems in Windows 10. And one of the most common problems is the “Device in use” error.
According to Microsoft, this error is quite common in new Insider builds, but you could also face it in the stable versions. There’s still no official workaround, however. So, while the development team is investigating the issue, we’re going to try and fix the issue on our own.
How to fix “Device in use” error in Windows 10
- Use the Audio Troubleshooter
- Restart the Audio service
- Update the USB drivers
- Roll back the USB driver
1. Use the Audio Troubleshooter
The first thing we’re going to try is also the simplest one. We’ll let Windows 10’s own troubleshooting tool try and solve the issue for us. As this tool can be used for dealing with all sorts of issues, it will probably be helpful with the “Device in use” error, as well.
Here’s how to run Windows 10’s built-in troubleshooting tool:
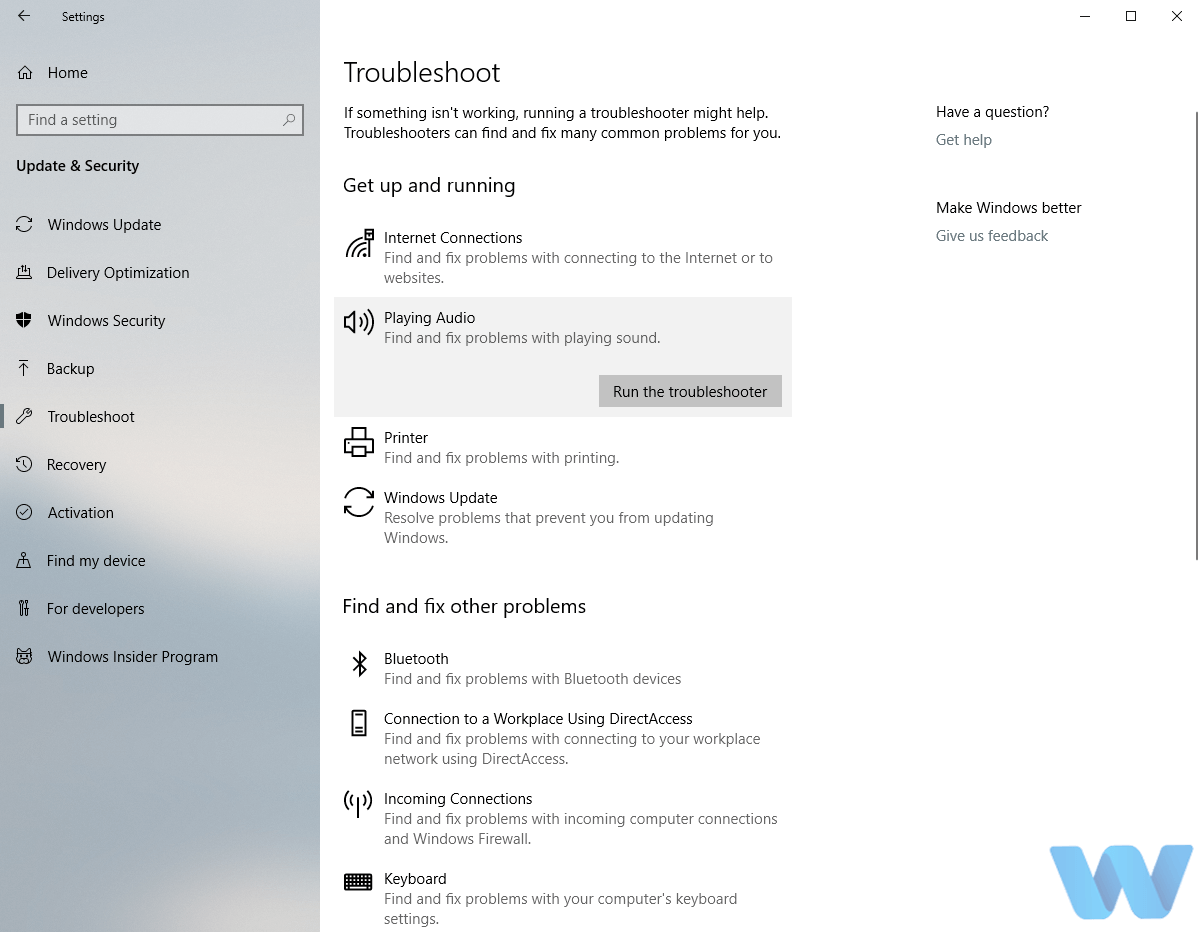
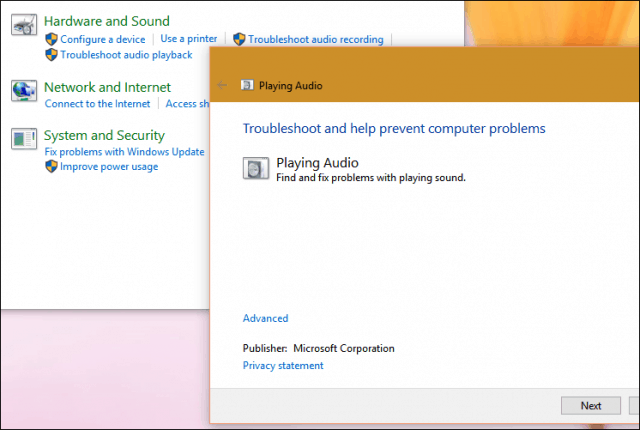
- Open the Settings app and go to Update & Security section.
- Select Troubleshoot from the menu on the left.
- Select Playing Audio from the right pane and click Run the troubleshooter.

- Follow the instructions on the screen to complete the troubleshooter.
2. Restart the Audio service
According to Microsoft, restarting the Audio service is probably the most effective solution to this problem. So, that’s exactly what we’re going to do now.
How we test, review and rate?
We have worked for the past 6 months on building a new review system on how we produce content. Using it, we have subsequently redone most of our articles to provide actual hands-on expertise on the guides we made.
For more details you can read how we test, review, and rate at WindowsReport.
To restart the Audio service in Windows 10, do the following:
- Go to Search, type services.msc, and open Services
- Find Windows Audio from the list of services
- Right-click it, and choose Restart

- Wait for the service to restart

3. Update the USB drivers
The “Device in use” error can also be caused by an inappropriate or outdated audio driver that’s installed on your computer. So, the next thing we’re going to try is updating your audio drivers. If you’re not sure how to do that, follow these instructions:
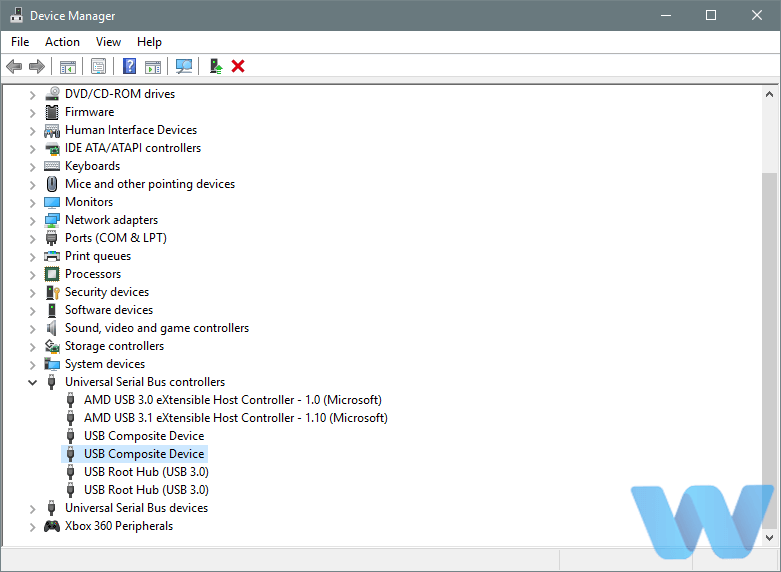
- Right-click the Start and select Device Manager.
- Navigate to Universal Serial Bus controllers and expand this section.
- Right-click your graphics device and open Properties.

- Select the Details tab.
- From the drop-down menu, open HardwareIds.
- Copy the first row and paste it into your browser’s address bar.
- The search results should show you the exact drivers you’ll need to install.
3.1 Update drivers automatically
Searching for drivers on your own can be time-consuming. So, we advise you to use a tool that will do this for you automatically.
Using an automatic driver updater will certainly save you from the hassle of searching for drivers manually, and it will always keep your system up to date with the latest drivers.
We recommend you give Outbyte Driver Updater a try because it is very easy to use, lightweight, and is proven to always find the corresponding driver version for your software.
On top of that, you can use it to have a fully automated driver management system. It uses up very few resources, so you can let it run in the background and regularly check on your drivers and update them when necessary.
⇒ Get Outbyte Driver Updater
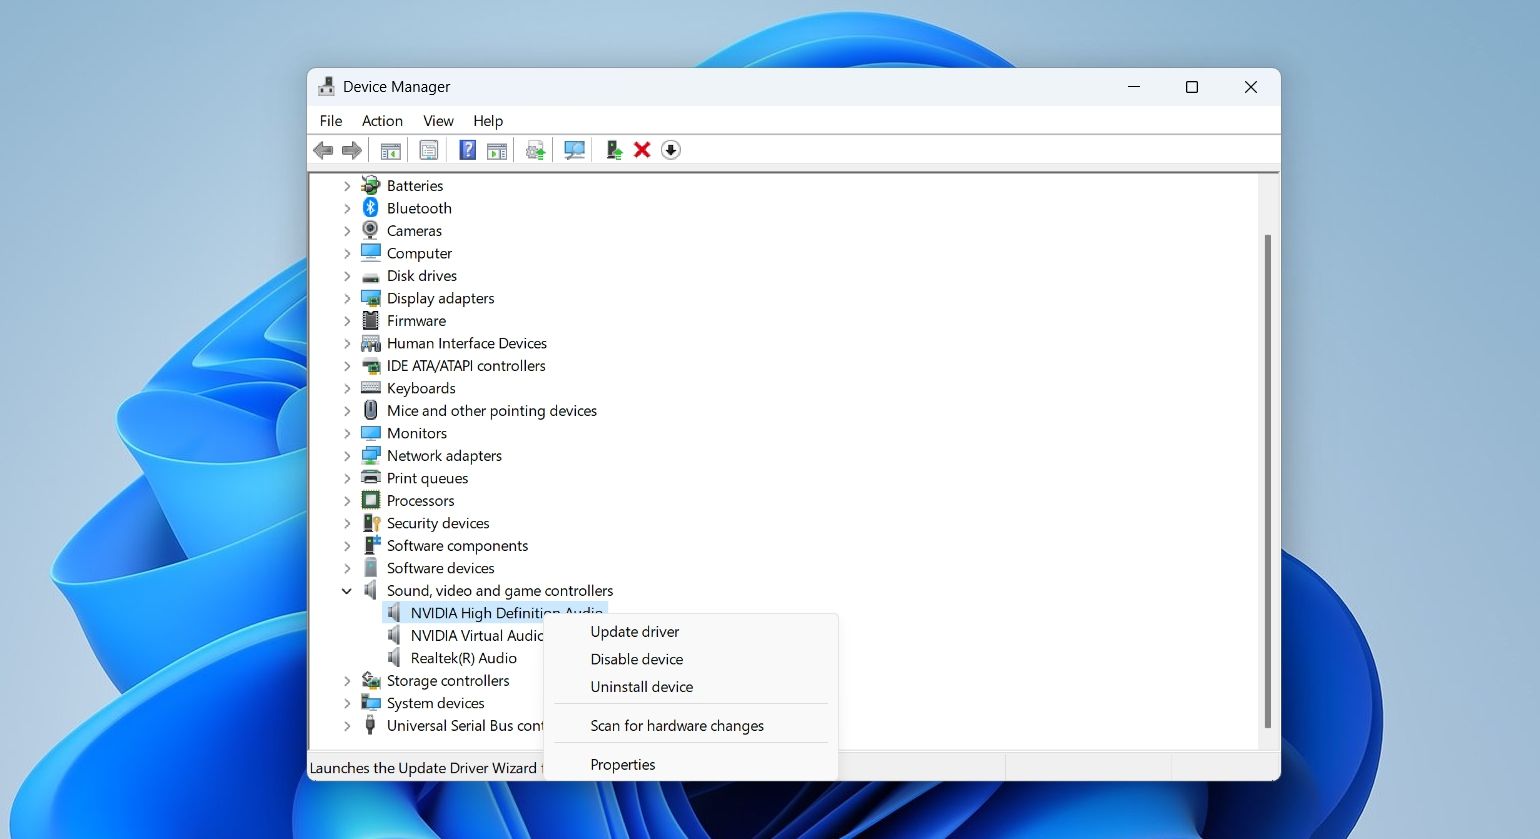
4. Roll back the USB driver
On the other hand, maybe you installed a faulty driver, and that’s what’s causing the “Device in use” error. If you suspect that might be the case, go on and roll back your current audio driver. And here’s how to do that:
- Right-click Start and open Device Manager.
- Navigate to Sound, video, and game controllers.
- Right-click your audio device and open Properties.
- Open Driver tab.
- Click Roll Back Driver.
- Wait until the procedure finishes and restart your PC.
Now, check if you can hear audio from your computer. If Microsoft’s advice were correct, your problem should be fixed now. However, if the problem still persists, you should our article about audio issues in Windows 10, for even more solutions.
If you’ve tried everything we told you in this article, let us know about your results in the comments. Also, if you know about some workaround that we didn’t list here, please don’t hesitate to write it down below.
![]()
Select Start (Windows logo Start button) > Settings (Gear-shaped Settings icon) > System > Sound. In Sound settings, go to Input > Choose your input device, and then select the microphone or recording device you want to use.
Contents
- 1 How do I manage my audio devices?
- 2 How do I find my audio device in Windows 10?
- 3 Where is audio device settings?
- 4 How do I change audio settings in Windows 10?
- 5 Where is Audio in Device Manager?
- 6 How do I enable audio devices in Windows 10?
- 7 How do I control the Sound on my laptop?
- 8 How do I change the audio output in Windows 10?
- 9 How do I get to advanced Sound settings on Windows 10?
- 10 How do I change my audio device?
- 11 How do I change my default audio device?
- 12 How do I fix audio device not installed Windows 10?
- 13 How do I fix my disabled audio device?
- 14 How do I enable line in audio?
- 15 How do I turn on Realtek audio?
- 16 How do I open the Sound Control Panel in Windows 10?
- 17 How do I control all sounds on my computer?
- 18 How do I open Realtek HD Audio Manager?
- 19 How do I change my audio device in Windows?
- 20 What is the shortcut to switch audio devices in Windows 10?
Windows: Click Start, and then click Control Panel. Click Hardware and Sound in Windows Vista or Sound in Windows 7. Under the Sound tab, click Manage Audio Devices.
How do I find my audio device in Windows 10?
3. Check audio devices
- Open Control Panel.
- Go to Hardware and Sound.
- Click Sound.
- Go to the Playback tab.
- Right-click an empty area and select Show Disabled Devices and Show Disconnected Devices.
- If you see your audio device, right-click it and select Enable Device.
Where is audio device settings?
Windows Playback and Recording Device Settings
- In the Start menu or search bar, type “Sound” and click on the “Sound Control panel” option.
- Click on device you would like to configure.
- From here you can rename, disable, or otherwise change and verify your sound device.
How do I change audio settings in Windows 10?
Change Audio Output in Windows 10
- Click on the Sound icon at the bottom right of your screen.
- Click the arrow next to the Speaker option.
- You will see the options available for audio output. Click the one that you need based on what you are connected to. (
- Sound should start playing out of the correct device.
Where is Audio in Device Manager?
Step 1: Right-click on the Start button in the taskbar area and then click Device Manager to open the same. Step 2: In the Device Manager, expand Sound, video and game controllers tree. Step 3: You should now see your audio driver’s name. Most likely you have Realtek High Definition Audio.
How do I enable audio devices in Windows 10?
Re-enable audio device
- Open Control panel.
- Click Hardware and Sound and then Click on Sounds.
- Under Playback tab, right click on the empty area and make sure “Show Disabled Devices” has a check mark on it. If headphones/Speakers are disabled, it will now show up in the list.
- Right click on the device and Enable it.
How do I control the Sound on my laptop?
From the Control Panel, click Hardware and Sound.
Make any of the following settings:
- Move the Device slider to adjust the system’s speaker volume up and down.
- For sounds played by Windows, such as a sound when you close an application (called system sounds), adjust the volume by moving the System Sounds slider.
How do I change the audio output in Windows 10?
Click the small speaker icon next to the clock on your Windows taskbar. Select the small up arrow to the right of your current audio output device. Select your output of choice from the list that appears.
How do I get to advanced Sound settings on Windows 10?
Right-click on the Volume system icon in the notification area at the bottom right corner area of the taskbar, click on Sounds from the list. Open the Settings app in Windows 10, go to Personalization and then select Themes in the left menu. Click the Advanced sound settings link on the right side of the window.
How do I change my audio device?
Tap the small button at the top right of the player notification tile. In the media player pop-up, you’ll see a list of connected audio devices. Tap the one you want to switch to.
How do I change my default audio device?
Click Start, and then click Control Panel. Click Hardware and Sound in Windows Vista or Sound in Windows 7. Under the Sound tab, click Manage Audio Devices. On the Playback tab, click your headset, and then click the Set Default button.
How do I fix audio device not installed Windows 10?
Expand the Sound, video and game controllers menu by clicking on the arrow next to it. Right-click on your audio device listed in the menu and choose the Uninstall device option. Restart your computer. Windows 10 should automatically re-download the latest version of your audio device driver.
How do I fix my disabled audio device?
Press Windows + R, type “devmgmt. msc” in the dialogue box and press Enter. Once in the device manager, right-click on the audio device which is disabled and select “Enable device”. You can instantly see which device is disabled by checking the black arrow beside it pointing downwards.
How do I enable line in audio?
Plug in your device into the line-in. Then right click the sound icon on the taskbar and go to Sounds -> Recording tab and enable line-in and set it as default device.
How do I turn on Realtek audio?
1. Enable Realtek HD Audio Manager on the Startup tab
- Right-click the taskbar and select Task Manager.
- Next, select the Startup tab.
- Then right-click Realtek HD Audio Manager and select Enable if it’s disabled.
- Close the Task Manager, and restart Windows.
How do I open the Sound Control Panel in Windows 10?
Hit the Windows key, type “Control Panel” in the taskbar’s search field, and select the Control Panel desktop app in the results. Next, select “Hardware and Sound” on the main Control Panel menu, followed by “Sound” on the next panel. The Sound pop-up window appears on the screen.
How do I control all sounds on my computer?
How to manage advanced Windows sound options using Settings
- Open Settings.
- Click on System.
- Click on Sound.
- Under “Other sound options,” click the App volume and device preferences option.
How do I open Realtek HD Audio Manager?
Usually, you can open Realtek HD Audio Manager with the following steps:
- Step 1: Press Win + E to open File Explorer.
- Step 2: Navigate to C: > Program Files > Realtek > Audio > HDA.
- Step 3: Locate and double-click the .exe file of Realtek HD Audio Manager.
- Step 1: Open Run window by pressing Win + R.
How do I change my audio device in Windows?
Easily switch audio devices on Windows
- To switch Playback devices, left-click the Audio Switch icon in the system tray and select it from the list.
- To switch Recording devices, hold Ctrl and left-click the Audio Switch icon.
- To hide specific audio devices from the list, right-click the icon > Settings > Devices.
What is the shortcut to switch audio devices in Windows 10?
Click the plus button at the bottom right of the Hotkeys tab. On the Add Hot Key window, open the Device dropdown and select the audio device you want to set the keyboard shortcut for.
Audio plays a critical role in our experiences when using Windows. Here’s a look at how to manage audio settings in Windows 10 which includes new settings.
Audio plays a critical role in our experiences when using Windows. Whether it is listening to music, movies, or communicating with family and friends over Skype, depending on the type of computer you own, your choice of audio output might be different. Laptops and some desktops will have onboard audio, while both can accommodate external speakers to enhance sound quality.
Update: If you are looking for a quality alternative sound app that adds extra features, check out the Ear Trumpet App.
Adjust Volume and Audio Settings in Windows 10
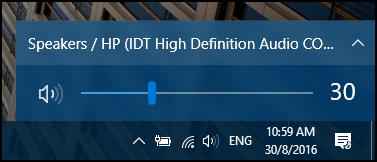
Basic audio settings can be accessed from the Speakers notification on the taskbar. You can use the slider to increase or lower the volume.
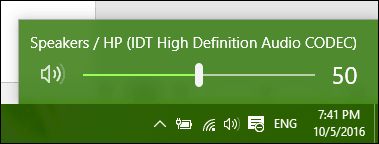
Audio can mute audio by clicking the speaker icon on the new volume menu.

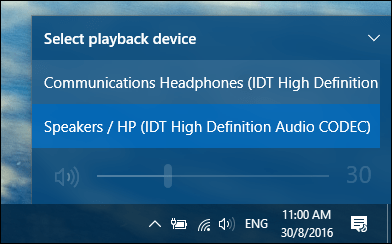
The Windows 10 Anniversary Update now makes it easier to switch between different audio devices. To do so, click the audio icon in the Notification Area.
Click the audio output device you would like to use. This is especially handy if you want to switch between built-in audio or your headphones.
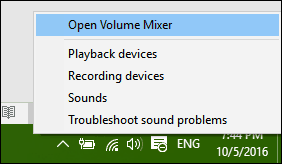
Additional audio options can be accessed from a right-click menu.
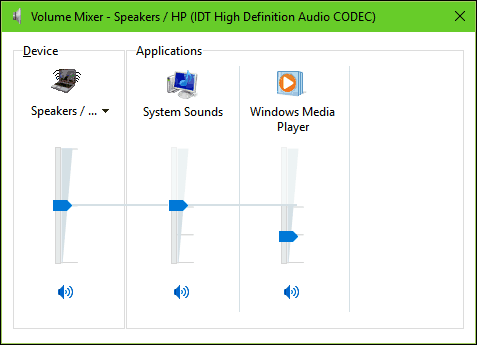
The Volume Mixer provides options for managing volume per desktop application. Not all applications support this feature, though. If they do, you’ll see them in the Mixer and can adjust the volume levels. For example, you might want to mute specific applications such as system sounds when watching a movie.
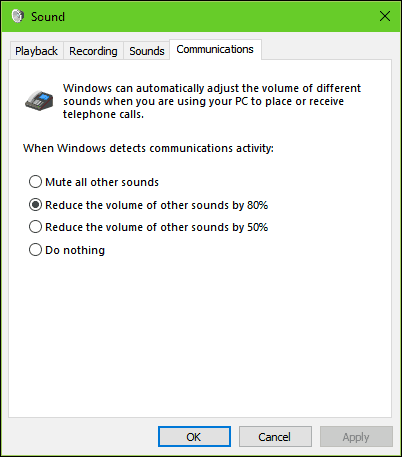
A handy function of the Windows sound settings is the ability to modify audio behavior when multi-tasking. If you use a smartphone, you might be aware of an option that lowers the audio of the active application when you receive a notification. If you use an application such as Skype to send and receive video calls, Windows can automatically adjust the volume when communication activity is detected.
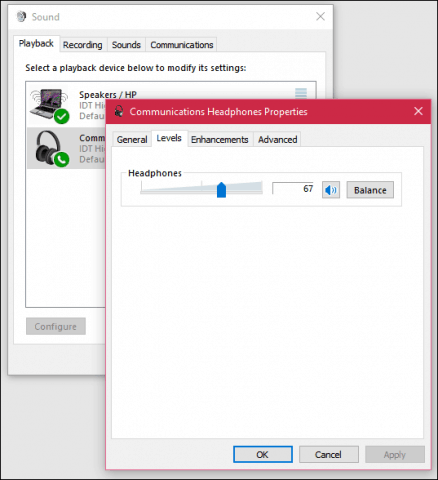
Connected external audio devices such as speakers or headphones can be modified from the Sound Settings playback options. Enhancements such as bass, loudness, and surround sound quality can be applied.
Troubleshooting Audio In Windows 10
If you’re unable to hear audio, there are some things you can try. First, check if the volume is turned down or muted.
If you have recently upgraded to Windows 10, your previous audio driver might not be compatible. Uninstalling and reinstalling your audio device might resolve the issue. Press Windows Key + X and click Device Manager. Then expand Sound > video and game controller. Select your audio device, right-click it and Uninstall. Please restart your computer and let Windows redetect it. You can also check Windows Update for the latest drivers for your sound card.
If the problem persists, try running the Troubleshooting audio playback to fix it.
Check out our other articles about managing audio:
- How to Turn Off or Change Windows 10 Notification Sounds
- Silence Smartphone Notifications from Interrupting Your Music
- Switch between Speakers and Headphones in 1 Click
- EarTrumpet for Windows 10 Makes Using Audio Controls a Snap
![]()
This strange error message can appear when putting Windows into hibernate or sleep mode, but don’t fret; it’s an easy fix.
Windows’ sleep and hibernation modes are great for taking breaks from work when you know you will resume in a short while. With these low-power state modes, you can pick up where you left off while saving the computer’s energy.
However, some Windows users have reported facing an error message that reads «an audio stream is currently in use» when putting their system to sleep or hibernation mode. In this guide, we will examine this problem more deeply and explore some fixes that have helped other users.
What Does the «An Audio Stream Is Currently in Use» Error Mean?
The error under discussion mainly appears when the computer fails to enter sleep or hibernation mode because one of the installed applications is playing audio in the background. But sometimes, you can face this error even if no application is playing streams. In such situations, the error can result due to the following reasons:
- If the audio drivers installed on your computer are corrupt or outdated, they’ll become incompatible with the PC and cause various issues.
- Your computer’s power setting might be configured incorrectly, stopping your PC from entering hibernation or sleep mode.
- The error can also appear if you are using Cortana on your computer.
Having identified the culprits for the problem, let’s dive into fixes that helped other users eliminate the issue.
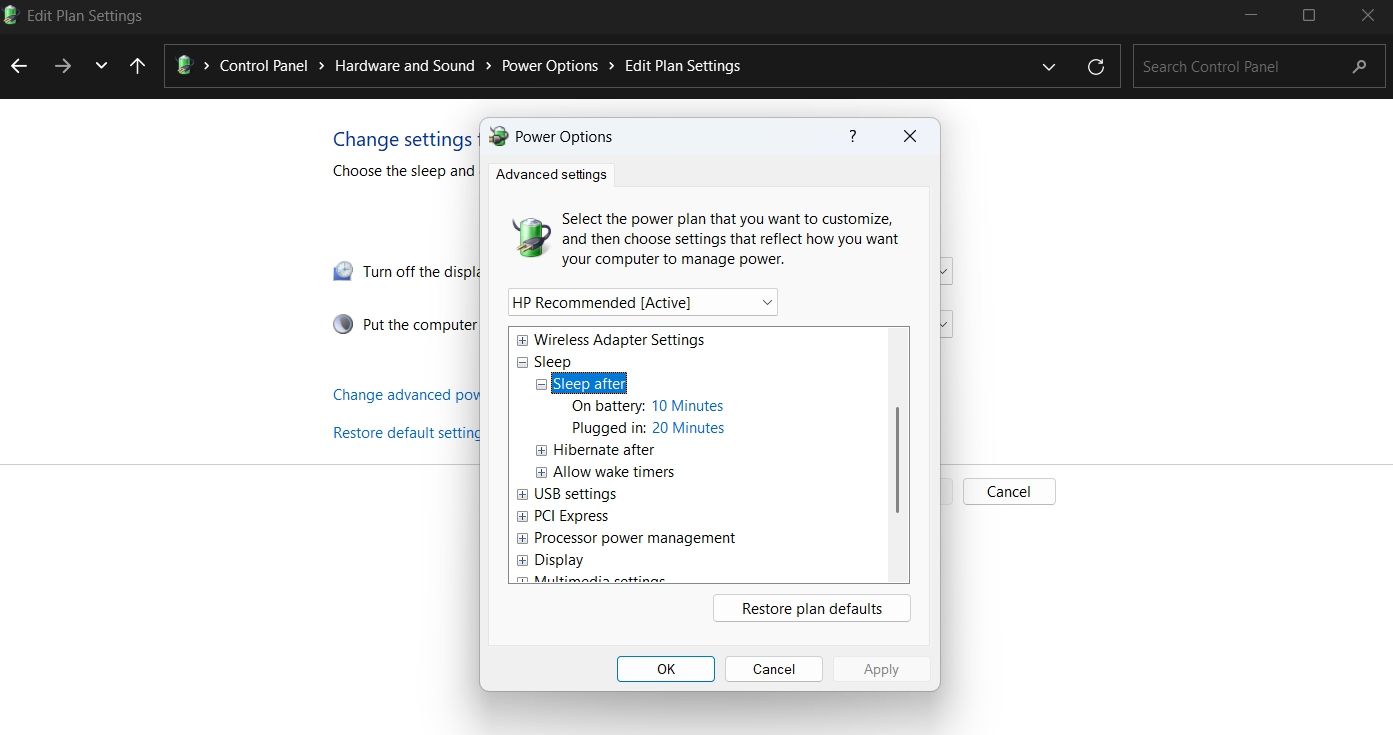
1. Change Advanced Power Settings
Apparently, your computer will never enter sleep mode if its timing is configured incorrectly in the Advanced Power Settings. To fix the issue, you will have to correctly configure the time after which your computer goes to sleep mode. Here’s how to do it:
- Open the Control Panel, and change View by to Category.
- Select Hardware and Sound.
- Click on the Change when the computer sleeps option.
- Click the Change Advanced power settings option in the following window.
- Change the Sleep after timing for On Battery from Never to 10 minutes (or any other large number).

- Click Apply > OK.
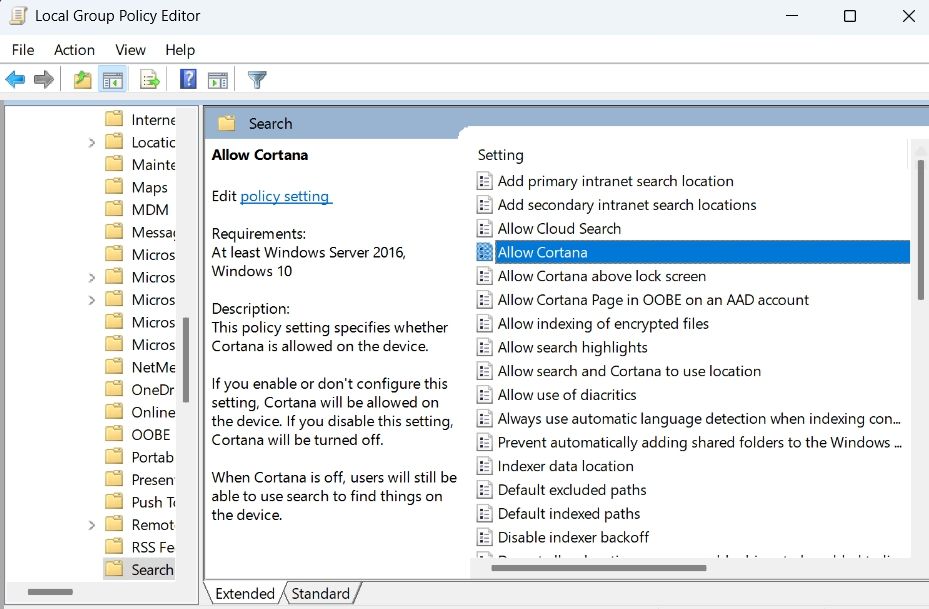
2. Turn Off Cortana
Cortana is Microsoft’s official virtual assistant that helps you quickly find information and stay on track. But when running in the background, it can use your computer’s audio components and cause the problem at hand.
The solution, in this case, is to use one of the quicker ways to disable Cortana on your Windows computer. Here’s how:
- Open the Run dialog box, type gpedit.msc in the search bar, and click OK. This is one of the many ways to open the Local Group Policy Editor.
- Head towards Computer Configuration > Administrative Templates > Windows Components > Search.
- In the Search folder, locate and right-click on the Allow Cortana policy file. Then, choose Edit.

- Choose the Disabled radio box in the new window that appears.
- Click Apply > OK to save the changes.
That’s it. Check if the problem is fixed or not.
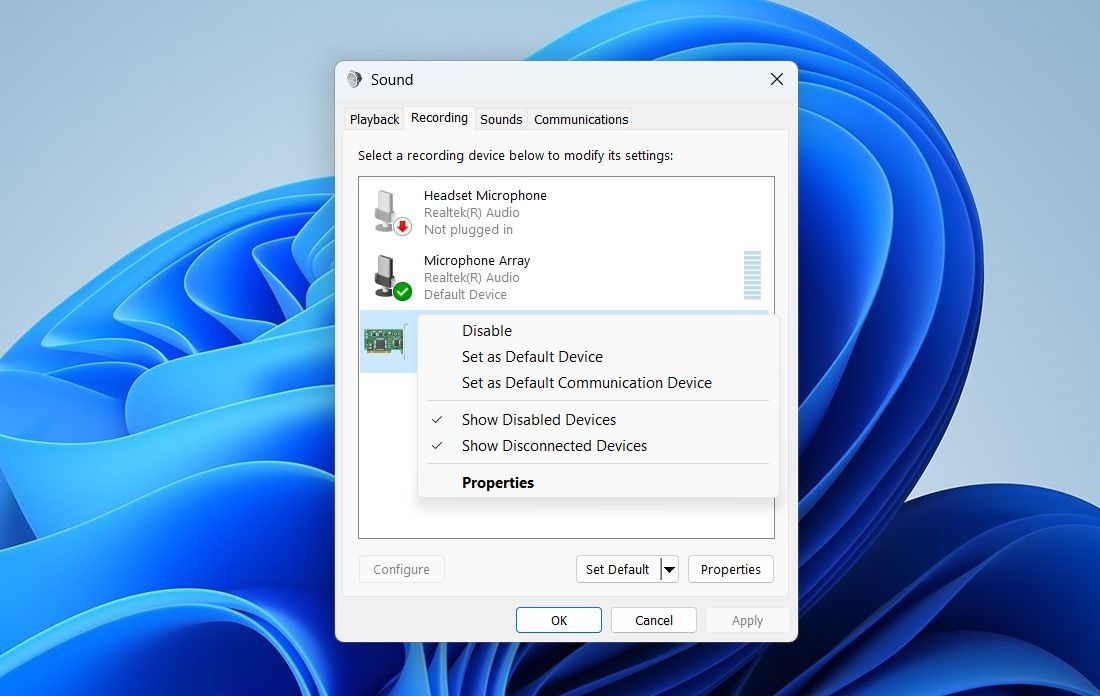
3. Modify the Sound Settings
Line-in is a jack available in computer sound cards that lets you connect external audio devices like CD players, audio mixers, and microphones. If Line-in is enabled under the sound settings, you’re likely to see the «an audio stream is currently in use» error.
You have to disable Line-in to fix the issue. Follow the below structures to do it:
- Open Settings and choose System from the left panel.
- Select the Sound option.
- Scroll down and click on More sound settings under the Advanced section.
- In the Sound settings window that pops up, switch to the Recording tab.
- Right-click on the Line-in device, and choose Disable from the context menu.

- Click Apply and then OK to save the settings.
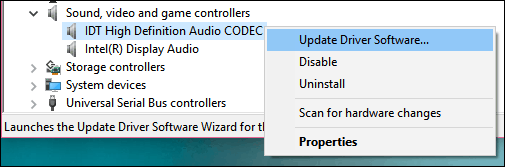
4. Update or Rollback Driver
Outdated or corrupt audio drivers are among the prime reasons behind the problem in the discussion. To fix this, you will have to download the latest audio driver update through the Device Manager. However, if this doesn’t work, you can also roll back the drivers on Windows to an older version and see if it helps.
To update the audio driver, follow the below instructions:
- Open the Start Menu by pressing the Win key.
- In the search bar, type Device Manager and press Enter.
- In the Device Manager, expand the Sound,video, and game controllers options.
- Right-click on the installed audio driver and choose Update driver from the context menu.

- Select Search automatically for drivers.
- Windows will now search and install the new drivers automatically.
Alternatively, you can also download the latest audio driver update via Windows Settings. Here’s how:
- Open the Settings menu, and choose Windows Update from the left panel.
- Choose Advanced options, and then select Optional updates under Additional options.
- Expand the Driver updates section.
- Check the box next to the available audio driver update and click on the Download and install button.
Once the update is installed, restart your computer and check for the problem.
5. Ignore the Problematic Device and Enter Sleep Mode
As aforementioned, the «an audio stream is currently in use» error appears when any program or device is preventing your computer from entering sleep mode. To find out the exact culprit, follow the below steps:
- Launch the Start Menu, type Command Prompt in the search bar, and choose Run as administrator in the right pane.
- In the elevated command prompt window, type powercfg -requests and press Enter.

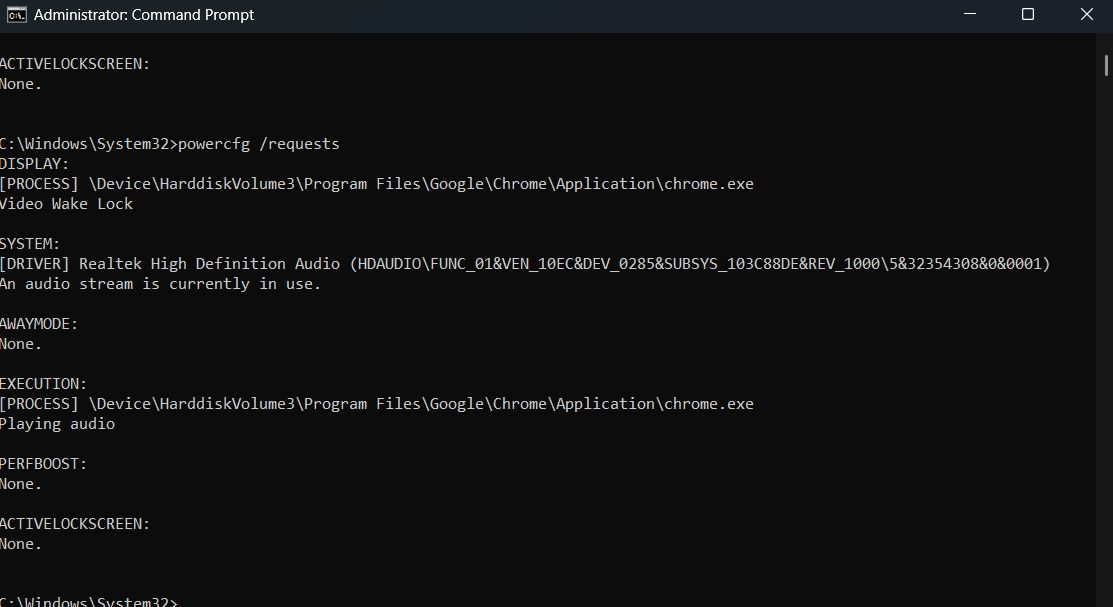
This command will tell you exactly which device or program is causing the problem. It can be an audio card, web browser, or any other application running in the background.
Now that you know which program is causing the issue, you will have to tell the power management system to ignore this program and go to sleep. Here’s how to do it:
- In the elevated command prompt window, type the following command.
powercfg -REQUESTSOVERRIDE DRIVER "Name of the driver that's causing the issue" SYSTEM
- Press Enter.
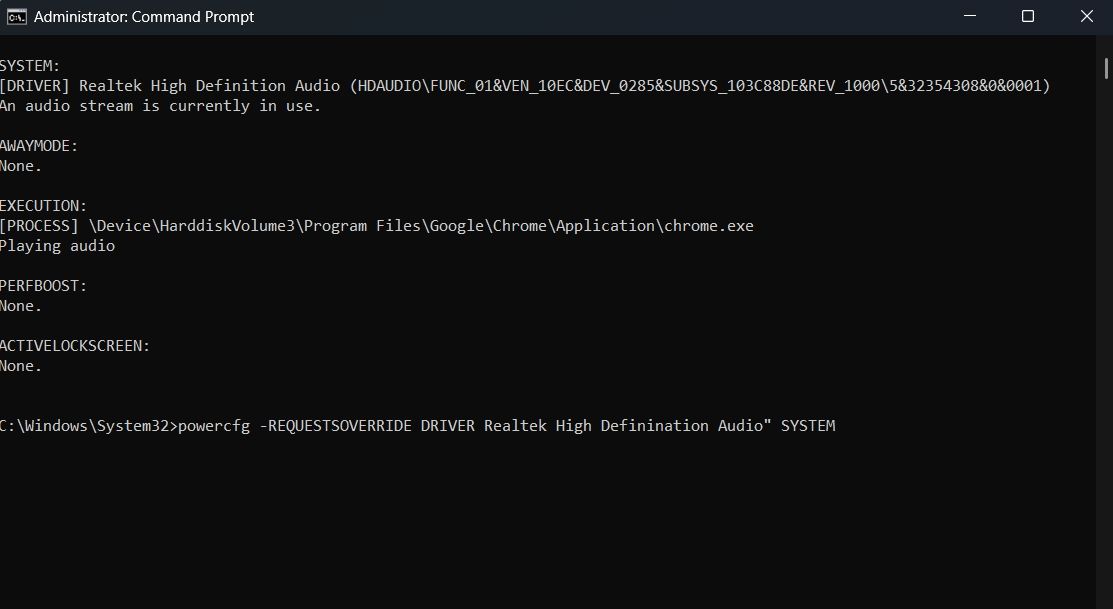
So, that’s it. Now you can easily enter sleep or hibernate mode on your computer.
Enter Sleep Mode Without Any More Issues
Sleep mode is a power-saving feature that you can use when you are away from your device. But if your computer fails to enter sleep mode and shows the «An audio stream is currently in use» error, you now know what’s causing the problem and how to fix it.
Sometimes, Windows can get stuck in hibernate or sleep mode. Fortunately, it’s very easy to tackle a system that won’t wake up after hibernating or sleeping.
Contents
- How to Fix “The Device Is Being Used by Another Application” Error on Windows 10?
- Fix One: Restart Audio Service
- Fix Two: Revert Your Audio Drivers to the Previous Version
- Fix Three: Updated Your Drivers
- Fix Four: Disable Exclusive Application Control
![[RESOLVED] The device is being used by another application](https://www.auslogics.com/en/articles/wp-content/uploads/2021/11/the-device-is-being-used-by-another-application.jpg)
“The device is being used by another application” error is a rather common video and audio issue occurring on Windows devices. It is often related to an HDMI connection (High-Definition Multimedia Interface) and can come up when you are using a digital camera projector, monitor, or TV. The error message doesn’t seem to be related to any particular software or device. Even so, it is quite common for all Windows users.
So, what causes the “device is being used by another application” error? There can be many reasons behind this issue. However, in a lot of cases, it is related to corrupted audio drivers and other files that have been incorrectly installed on your PC.
Now, what can you do to get rid of the problem? Multiple fixes can be applied here like rolling back some software updates or, on the contrary, installing the latest ones. You may also want to update your system drivers and disable excluding application control. Below, we will look into solving the error in more detail.
How to Fix “The Device Is Being Used by Another Application” Error on Windows 10?
Once you get “the device is being used by another application” error, you will see this message:
“The device is being used by another application. Please close any devices that are playing audio to this device and then try again.”
The error message will stop you from running the application normally and you won’t be able to use your audio devices like microphones, speakers, headphones, etc. Naturally, this can be a big problem — and you will certainly want to get rid of the error right away.
Unfortunately, the error message itself doesn’t provide any information on how this issue can be solved. Luckily, we have a few ideas. Here are several fixes we suggest you try to get rid of the problem:
- Restarting the audio device
- Reverting your audio drivers to the previous version
- Updating your drivers
- Disabling exclusive application control
Now, let’s go over each of these methods in a bit more detail. Try each solution by following the steps below. If the first solution you try doesn’t work, simply move on to the next one. Let’s get started.
Fix One: Restart Audio Service
Restarting your audio service can fix the problem in just a few simple steps:
- Use the Win+R key combo on your keyboard to launch Run.
- Type in “services.msc” (no quotes) to open the Windows Services window.
- Double-click Windows Audio.
- Under Service status, click the Stop button.
- When the service has stopped, click Start.
- When the service starts up again, click OK.
If this doesn’t help solve the error on your PC, try the next fix.
Fix Two: Revert Your Audio Drivers to the Previous Version
- Launch Run.
- Type in “devmgmt.msc” (no quotes) and press Enter to bring up the Device Manager.
- Find Sound, Video and Game Controllers and expand them.
- Right-click your primary audio device.
- Select Properties from the context menu.
- Go to the Driver tab.
- Select the Roll Back Driver option, then click OK.
Check if the error has been resolved. If not, move on to the next solution.
Fix Three: Updated Your Drivers
Outdated or corrupt drivers can be causing a lot of issues on your PC. So, if you are running into errors like “the device is being used by another application,” try updating your drivers to their latest available versions. Here’s how;
- On your keyboard, use the Windows key + X key combo to bring up the Power User menu.
- Select Device Manager from the list.
- Find the Sound, Video and Game Controllers items and expand them.
- Right-click your sound driver and then select Update Driver.
- Select the ‘Search automatically download and install drivers for you’ option.
- Next, restart Windows.
Note that if Windows can’t locate the needed drivers, you will need to do this manually. This means that you must head to the manufacturer’s website to find, download, and install the latest available driver versions. If you’ve never don’t this before, this process can be quite time-consuming and complicated. What’s more, if you install an incompatible driver, this can lead to even bigger issues for your system.
However, there is another way you can go about updating your drivers. You can do it automatically with the help of specialized software. This will make things much quicker and will also help you eliminate all associated risks. For this, you can use a program like Auslogics Driver Updater. Once installed, it will run a check of your system for outdated drivers. If any are located, Driver Updater will update them automatically to the latest available versions.
If you want to use Auslogics Driver Updater to update your drivers, you just need to do the following:
- First, go to Auslogics Driver Updater’s official page.
- Download the software.
- Follow the prompts of the installation wizard.
- Once the program has been successfully installed, go to Scan for Driver Issues.
- Driver Updater will then scan your system to locate any outdated or faulty drivers.
- If any such drivers are found, you will receive an update.
- Next, press the Update Drivers button.
- There you go — your drivers will be updated with no risk of anything going wrong.
Once you’ve made all the necessary updates, check if you are still running into the same problem. If you are, try the next fix.
Fix Four: Disable Exclusive Application Control
Disabling excluding application control can also be effective in getting rid of the error. Here’s how to proceed:
- On your taskbar, right-click the speaker icon.
- From the context menu, select Open Volume Mixer.
- In the Volume Mixer dialog box, you will see all your applications that are currently using audio devices.
- Note down these applications.
- Use the Ctrl + Shift + Esc key combo on your keyboard to launch Task Manager.
- In Task Manager, under the processes tab, locate the applications that you’ve noted down from the Volume Mixer dialog box.
- Terminate these applications.
- Next, right-click the speaker icon again to open the context menu.
- Here, select Sounds.
- Navigate to Playback.
- Choose your default audio device.
- Click Properties.
- In the Advanced tab, uncheck the box next to the “Allow applications to take exclusive control of this device” option.
- Click OK to confirm and restart your PC.
There you have it. We hope you now have several workable ideas for how to remove “the device is being used by another application” error message. At least one of the methods above should resolve the problem.
Which fix has worked the best for you? Please share in the comments below.
Do you like this post? 🙂
Please rate and share it and subscribe to our newsletter!
4 votes,
average: 4.00 out of
5
Loading…