Общая информация
Одним из новых инструментов администрирования серверов на базе операционной системы Windows является Windows Admin Center. Он реализует современный подход к управлению, когда с любого устройства через веб-браузер можно подключиться к панели управления инфраструктурой и получить информацию о состоянии сервера или произвести изменение его конфигурации.
При подключении пользователя к центру администрирования используются протоколы HTTP/HTTPS. Сам же центр администрирования использует WinRM/PowerShell для подключения к контролируемым серверам, получения от них информации и внесения изменений в конфигурацию. Соответственно, внедряя Windows Admin Center, нужно принимать во внимание каким образом будут производиться подключения компонентов друг к другу, и использовать защищенные версии протоколов (HTTPS и WinRM через HTTPS) когда соединения происходят через публичные сети (интернет).
Windows Admin Center устанавливается отдельно. Он не входит в состав операционной системы, поэтому дистрибутив необходимо скачать с сайта Майкрософт. Там же можно найти дополнительную информацию об этом продукте.
Загрузка и установка Windows Admin Center
Пройдем по всем шагам, необходимым для успешной установки консоли управления:
Открыв сайт Майкрософт в браузере, находим и нажимаем на ссылку для скачивания Windows Admin Center:

На открывшейся странице жмем Continue:

Заполняем форму, чтобы получить свою копию дистрибутива и нажимаем Continue, после чего начнется загрузка:

Дождавшись окончания загрузки запускаем установочный файл, принимаем лицензионное соглашение и жмем Next:

Выбираем использовать или нет службу обновлений Майкрософт (рекомендуется использовать), нажимаем Next:

На следующей странице содержится общая информация о способах использования устанавливаемого компонента, а также ссылка на статью с возможными сценариями установки. Нажимаем Next:

На странице конфигурирования шлюза содержатся два параметра — Allow Windows Admin Center to modify this machine`s trusted hosts settings — ставим галку, если серверы, которые будут подключаться к центру администрирования, не входят в домен Active Directory; Use WinRM over HTTPS only — ставим галку в том случае, если подключения от центра администрирования к другим серверам будут проходить через публичные сети (интернет). Если мы планируем управлять только локальным сервером, на котором установлен Windows Admin Center, можно оставить настройки по умолчанию и нажать Next:

Выбираем порт, по которому будут приниматься подключения к веб-консоли (для указанного порта будет создано разрешающее правило в брандмауэре операционной системы), а также указываем сгенерировать ли самоподписанный сертификат или же использовать другой сертификат, установленный на сервере. Чтобы не получать сообщений о недоверенных соединениях, можно использовать приобретенный и установленный заранее цифровой сертификат. Не забываем ставить галку Redirect HTTP port 80 traffic to HTTPS, чтобы использовались только зашифрованные соединения:

После нажатия кнопки Install ожидаем завершения процесса установки:

Процесс завершен, нажимаем Finish:

Подключение к Windows Admin Center
Для подключения к Windows Admin Center требуется использовать поддерживаемый браузер. Internet Explorer для этих целей не подходит. Можно использовать Microsoft Edge, но по умолчанию он может быть не установлен в серверной операционной системе. Самый оптимальный вариант — использовать Google Chrome. При подключении с локального сервера вводим в адресной строке браузера адрес https://localhost (если при установке был указан нестандартный порт для подключения, добавляем номер порта через двоеточие, например https://localhost:10443). Если подключаемся с удаленного компьютера, нужно указать либо внешний IP-адрес сервера, либо доменное имя, сопоставленное с внешним IP-адресом. При использовании нашего сервиса внешний IP-адрес сервера можно увидеть в панели управления сервером.
Если при конфигурировании мы выбрали использование недоверенного сертификата и получаем соответствующее предупреждение, чтобы продолжить подключение нажимаем кнопку Дополнительные:

В новой форме кликаем по ссылке Перейти на сайт … :

Вводим учетные данные для подключения и попадаем на главную страницу административной веб-консоли. Если понадобится сменить язык отображения консоли, кликаем по шестеренке в правом верхнем углу страницы:

В настройках переходим в раздел Язык/Регион и в выпадающих списках выбираем нужные значения. После чего жмем кнопку Сохранить и перезагрузить в самом низу страницы:

Для возврата на главную страницу нужно кликнуть левой кнопкой по надписи Windows Admin Center в левом верхнем углу. С главной страницы можно подключиться к имеющемуся серверу (клик по серверу в списке), либо добавить дополнительные серверы (клик по кнопке Добавить):

При добавлении сервера потребуется указать его имя или IP-адрес. Если сервер будет доступен, система запросит реквизиты для подключения. В случае успеха сервер появится в списке подключенных:

Кликнув по серверу в списке мы попадем в раздел администрирования. На главной странице будет отображена общая информация о сервере и статистика использования ресурсов (процессорные мощности, оперативная память, пропускная способность сети) в реальном времени в виде графиков:

С левой стороны расположена навигационная панель, с помощью которой можно переключаться между разными разделами административной консоли и получать доступ к управлению:
1. Настройками и правилами брандмауэра:

2. Процессами операционной системы:

3. Локальными каталогами и файлами:

4. Учетными записями пользователей и группами пользователей:

5. Интерактивной консолью PowerShell:

и многим, многим другим.
191028
Санкт-Петербург
Литейный пр., д. 26, Лит. А
+7 (812) 403-06-99
![]()
700
300
ООО «ИТГЛОБАЛКОМ ЛАБС»
191028
Санкт-Петербург
Литейный пр., д. 26, Лит. А
+7 (812) 403-06-99
![]()
700
300
ООО «ИТГЛОБАЛКОМ ЛАБС»
Search code, repositories, users, issues, pull requests…
Provide feedback
Saved searches
Use saved searches to filter your results more quickly
Sign up
Reading Time: 2 minutes
Windows Admin Center is becoming more and more popular day by day and the adoption rate rising hot! Server Management is something that Microsoft is investing serious time and effort and that’s why this product is only getting better. In this post, I will not go through the very basics since the product is being around now for approximately 1,5 years.
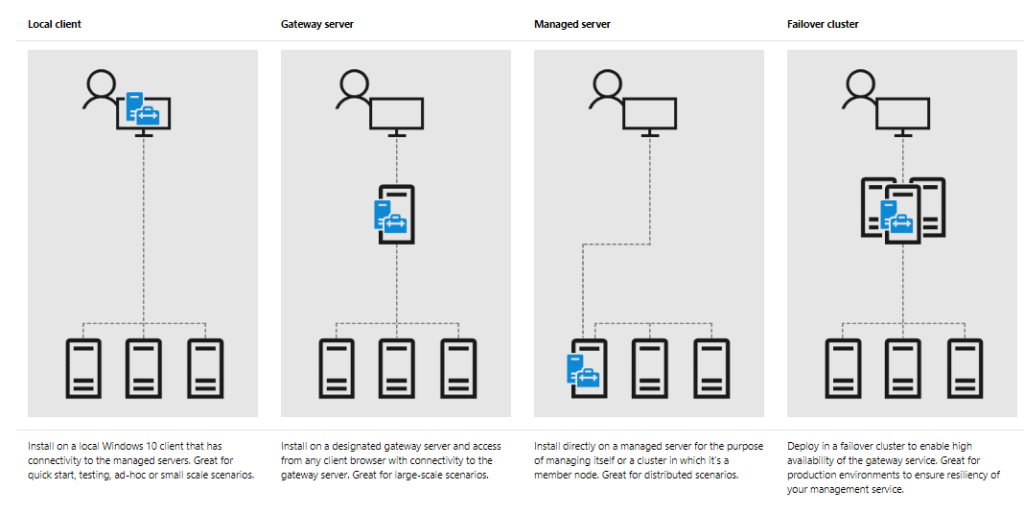
The only thing that needs to be mentioned again, is the supported deployment options. You have the ability to choose among 4 different deployment flavors as shown in the picture below.
During this how-to guide, we will go through the option of installing Windows Admin Center on a Server Core and use it as a Gateway server. Also, we will go through the configuration basics using the GUI and…PowerShell of course! The configuration basics will be covered in another post, part 2 of this how-to guide.
The process described below is as much minimalistic as Server Core. That is why we plan to use the bare minimum tools to achieve our goal! Again, PowerShell to the rescue!
Installing #WAC on Server Core
Establish a remote connection to the target server by using PowerShell Remoting. This will allow you to perform the installation straight from the remote PowerShell session.
Enter-PSSession -ComputerName RemoteServerCoreHost -Credential mydomain\myuser
Once you are connected, create a temporary directory where the Windows Admin Center binaries will be downloaded into.
New-Item -Path C:\Downloads -ItemType directory
Download Windows Admin Center binaries from Microsoft.
wget "http://aka.ms/WACDownload" -outfile "C:\Downloads\WindowsAdminCenterCurrent.msi"
Initiate the installation of Windows Admin Center using the following parameters (using a self-signed certificate and port 443).
cd C:\Downloads ; msiexec /i WindowsAdminCenterCurrent.msi /qn /L*v log.txt SME_PORT=443 SSL_CERTIFICATE_OPTION=generate
However, there is always the option to use a different port such as a certificate that you currently own. Make sure you specify the certificate thumbprint in the on-liner below.
cd C:\Downloads ; msiexec /i WindowsAdminCenterCurrent.msi /qn /L*v log.txt SME_PORT=443 SME_THUMBPRINT=(ssl certificate thumbprint) SSL_CERTIFICATE_OPTION=installed
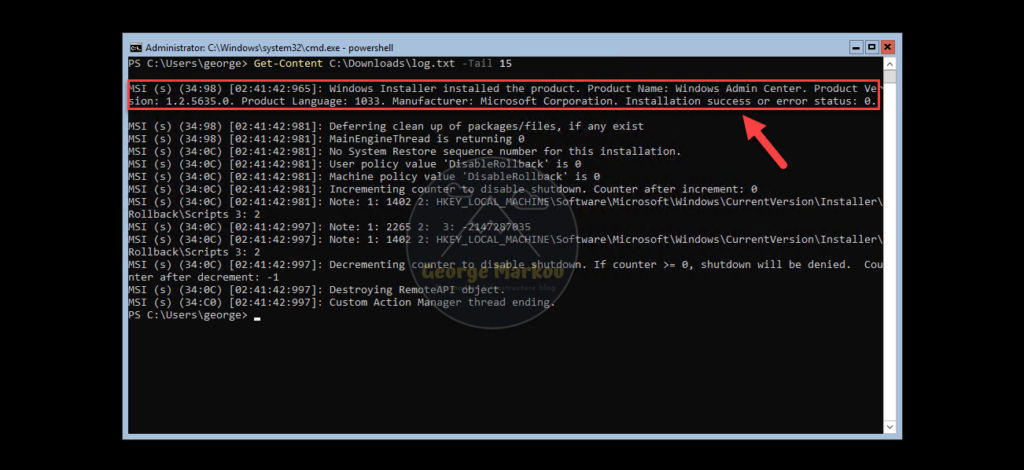
Examine the installation log and verify that the installation was successful. If yes, you will find the following message contained in the log as shown below.
Get-Content C:\Downloads\log.txt -Tail 20
Now that we verified the installation was successful, let’s try out launching a browser and access our freshly installed Windows Admin Center instance!
Stay tuned for part 2..
Until then, enjoy managing servers with #WAC!
Thanks for reading my blog!
Feel free to drop your comment or question below.
In this post, we will explore the installation process of Windows Admin Center on Windows Server 2022 with Desktop Experience and Server Core. Windows Admin Center is a powerful management tool that provides a modern and streamlined interface for managing Windows Server environments.
Windows Admin Center is a browser-based management tool that allows system administrators to centrally manage Windows Server environments. It provides a modern and intuitive interface, replacing the traditional management consoles such as Server Manager and MMC (Microsoft Management Console). With Windows Admin Center, you can manage local and remote servers from a single pane of glass, making it an indispensable tool for administrators.
On this page:
- Core Functionalities of Windows Admin Center
- Installation Types
- Supported Operating Systems
- Management target: Supported operating systems
- Installing Windows Admin Center (Gateway server) on Windows Server with desktop experience
- Installing Windows Admin Center (Gateway server) on Server Core
- Basic Configuration and Quick Walkthrough
- Adding connections to Windows Admin Center
- Bottom Line
Let’s begin.
Core Functionalities of Windows Admin Center
- Server Management: Windows Admin Center offers a comprehensive set of management tools to handle various server tasks, including managing roles and features, configuring network settings, monitoring performance, and managing storage and virtual machines.
- Hyper-Converged Infrastructure (HCI) Management: Windows Admin Center simplifies the management of hyper-converged infrastructure, allowing administrators to manage storage, networking, and virtual machines in an integrated manner.
- Azure Integration: Windows Admin Center provides seamless integration with Azure services, allowing administrators to manage Azure resources, configure hybrid scenarios, and monitor Azure virtual machines.
- PowerShell and Command-Line Integration: Windows Admin Center offers support for PowerShell and command-line management, enabling administrators to leverage their scripting and automation skills.
Installation Types
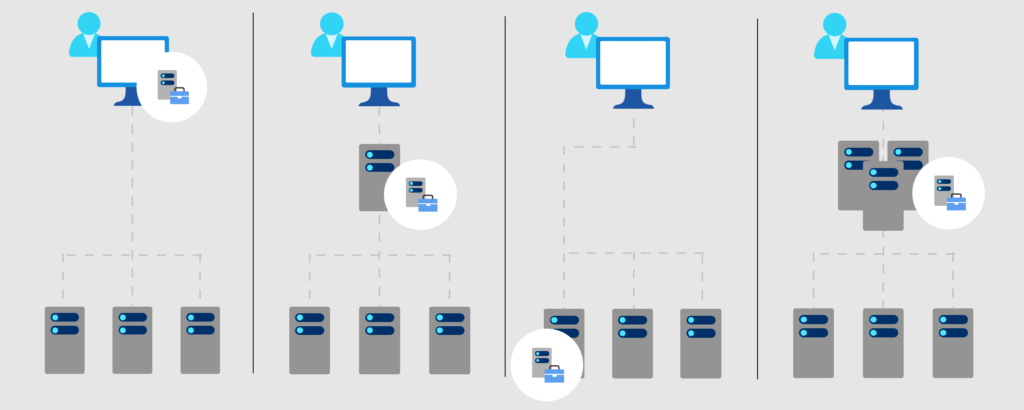
| Local client | Gateway server | Managed server | Failover cluster |
|---|---|---|---|
| Install on a local Windows 10 client that has connectivity to the managed servers. Great for quick start, testing, ad-hoc or small scale scenarios. | Install on a designated gateway server and access from any client browser with connectivity to the gateway server. Great for large-scale scenarios. | Install directly on a managed server for the purpose of remotely managing the server or a cluster in which it’s a member node. Great for distributed scenarios. | Deploy in a failover cluster to enable high availability of the gateway service. Great for production environments to ensure resiliency of your management service. |
Supported Operating Systems
You can install Windows Admin Center on the following Windows operating systems:
| Platform | Installation mode |
|---|---|
| Windows 11 | Local client |
| Windows 10 | Local client |
| Windows Server Semi-Annual Channel | Gateway sever, managed server, failover cluster |
| Windows Server 2016 | Gateway sever, managed server, failover cluster |
| Windows Server 2019 | Gateway sever, managed server, failover cluster |
| Windows Server 2022 | Gateway sever, managed server, failover cluster |
Management target: Supported operating systems
You can manage the following Windows operating systems using Windows Admin Center:
| Version | Manage node via Server Manager | Manage via Cluster Manager |
|---|---|---|
| Windows 11 | Yes (via Computer Management) | N/A |
| Windows 10 | Yes (via Computer Management) | N/A |
| Windows Server Semi-Annual Channel | Yes | Yes |
| Windows Server 2022 | Yes | Yes |
| Windows Server 2019 | Yes | Yes |
| Windows Server 2016 | Yes | Yes, with latest cumulative update |
| Microsoft Hyper-V Server 2016 | Yes | Yes |
| Windows Server 2012 R2 | Yes | Yes |
| Microsoft Hyper-V Server 2012 R2 | Yes | Yes |
| Windows Server 2012 | Yes | Yes |
| Azure Stack HCI 21H2 and higher | Yes | Yes |
Installing Windows Admin Center (Gateway server) on Windows Server with desktop experience
For the purpose of writing this post, we have installed Windows Admin Center (Gateway server) on Hyper-V hosted a virtual machine running Windows Server 2022 with desktop experience, you can follow our post Step-By-Step: How to Install, Set up, and Configure Windows Server 2022 to install similar system. If you do not have Hyper-V already installed in your environment, our other post Step-By-Step: Turning on Hyper-V on Windows 11 can guide you through that. You do not necessarily need a Hyper-V virtual machine to complete the Windows Admin Center installation, any either physical or virtual system running Windows Server might fit the requirements.
Installing Windows Admin Center (Gateway server) on Server Core
For the purpose of writing this post, we have installed Windows Admin Center (Gateway server) on Hyper-V hosted a virtual machine running Windows Server 2022 (Server Core), you can follow our post Step-By-Step: How to Install, Set up, and Configure Windows Server 2022 to install similar system. If you do not have Hyper-V already installed in your environment, our other post Step-By-Step: Turning on Hyper-V on Windows 11 can guide you through that. You do not necessarily need a Hyper-V virtual machine to complete the Windows Admin Center installation, any either physical or virtual system running Windows Server might fit the requirements.
Basic Configuration and Quick Walkthrough
Adding connections to Windows Admin Center
Bottom Line
Windows Admin Center is a powerful management tool that simplifies the administration of Windows Server environments. With its modern interface and comprehensive set of management functionalities, Windows Admin Center enhances productivity and streamlines day-to-day operations. By following the installation steps outlined in this post, you can set up Windows Admin Center on Windows Server 2022, whether with Desktop Experience or Server Core, and take advantage of its rich feature set to efficiently manage your servers.
Remember, Windows Admin Center is a continuously evolving tool, with new features and improvements being introduced regularly. Stay updated with the latest releases to leverage the full potential of Windows Admin Center for your server management needs.
Hello World,
In our previous post, we have quickly provided a quick overview of the Windows Admin Center (WAC) software solution provided by Microsoft. Windows Admin Center is a web based administration tool that allows sysadmins to perform their day to day jobs when working in a Windows based network. Microsoft sells this tool as the next iteration of Server Manager and MMC tools since the tool provides a new way of managing the infrastructure
In this post, we will provide a quick step by step guide on how to perform a simple installation of the Windows Admin Center…
Let’s do this !
Overview
More and more companies are moving into Core Editions because it’s more secure but because it has also a smaller footprint and can be patched more quickly as well. However, not everyone is comfortable with Core editions where administration is done through Command line. To overcome this situation, Windows Admin Center can help traditional windows sysadmins to move forward and accept to have more Windows core editions servers running on their network.
The move to core edition Server is driven by the current economical situation. Indeed, Shortage of chips, hardware price increase, availability of hardware components pushes companies to do more with less. To optimize resources, companies have started strong consolidation of their IT Infrastructure, chasing ghost and unused machines. Another approach also consists of replacing classical admin Remote Desktop Servers which has can be expansive (RDS CAL Licensing) and deploy Windows Admin Center Server which is free and also require a smaller foot print.
This post will assume that Windows Admin Center Software will be installed on a Core Edition Server and that Windows Admin Center will be installed in a Gateway configuration mode. This mode will allow a windows admin user to add more servers into the web interface and manage from this central web interface multiple servers available on the network.

click on picture for better resolution – Source : Microsoft – Check this page
Step by Step Installation
Step 0 – Install Windows 2022 Server Core Edition
In order to install Windows Admin Center on top of a Core Server, you will need to first install Windows on a server. This can be a physical machine or a virtual machine. We assume that the server will member of an Active Directory Forest/Domain. To perform a Windows 2022 Core Edition, you can follow the steps provided in our blog to install Windows 2019 Core Edition. The process is exactly identical.
Step 1 – Download the Windows Admin tools
You will need to obtain the Windows Admin Center software binaries. You can obtain them by visiting Microsoft web site (https://www.microsoft.com/en-us/windows-server/windows-admin-center) and download the package to your computer and then transfer it to the Windows Core Edition server that will be hosting the Windows Admin Center
You can also download the package directly from your Windows Core Edition server if it’s connected to the internet. You will need to go the the Windows PowerShell Console and issue the following command
Invoke-WebRequest -Uri https://go.microsoft.com/fwlink/p/?linkid=2194936 -UserBasicParsing -outfile windowsAdminCenter-xxx.msi
Step 2 – Start the Installation process
After downloading the windows admin center msi package, go to the directory where the file is located, and start the installation process. You will see the Welcome Page of the Installation Wizard. When ready, click on Next

click on picture for better resolution
In the License Agreement page, accept the Agreements and Press Next

click on picture for better resolution
In the Send Data Page, specify your choice and Press Next

click on picture for better resolution
In the Update Page, select the option that fits your organization and Press Next

click on picture for better resolution
In the Install Page, Review the information provided and Press Next

click on picture for better resolution
In the Install Page, Select the options that fits your needs and your security Policy. The options below are usually the standard one used for installing Windows Admin Center

click on picture for better resolution
Note : We have not checked the WinRM over HTTPS only because in our lab and in this scenario, we will be using a self signed certificates
In the Next Page, specify the port to be used (443 is a good option) and we would recommend you to select the option to redirect any HTTP to HTTPS

click on picture for better resolution
Wait for the installation to complete

click on picture for better resolution
In the Summary page, review your settings and Click Finish

click on picture for better resolution
Step 3 – Test your installation and access your WAC
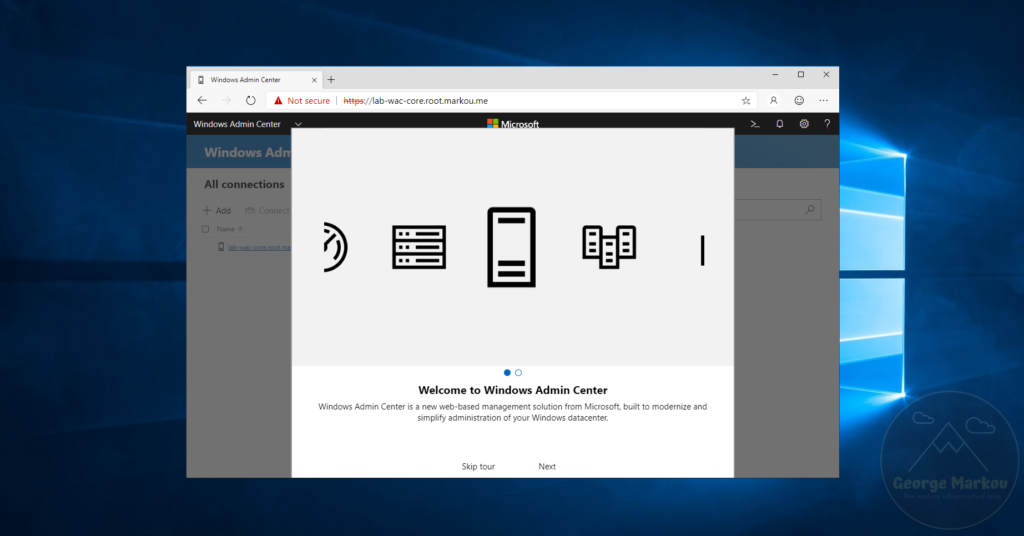
Finally, it’s time to try your newly installed Windows Admin Center. You will open your “favorite browser” even if Microsoft recommends you to use Edge. In Edge, provide the url address of the Windows Admin center and see what’s happening
You might get prompted for some credentials

click on picture for better resolution
If everything is ok, you will see the Windows Admin Center page loading

click on picture for better resolution
You will see in the main page, the server that is hosting the Windows Admin Center. Obviously, you will have now to add servers that needs to be managed into this console and you will be able to access them

click on picture for better resolution
Since we have just performed the installation, by clicking on the server hosting WAC, you will access a new page that will allow you to perform all necessary administration tasks on a server through a simple Web Browser

click on picture for better resolution
Final Notes
This is it for this post !
At this stage, you should have a working installation of Windows Admin Center in Gateway mode. It’s time for you to see all the options that are available through the web interface and see how you can add additional servers to be managed. The Tool is really user friendly, not to difficult to use and you can also have access to PowerShell or Remote Desktop, from the browser… WAC can help moving from a traditional way of managing servers (via RDP mainly) into a web interface or even through command line (CLI)
We might publish some posts about Windows Admin Center to get even more information and configuration tips… but not sure. We need to start working on other topics as well….
Till next time
See ya