Windows Admin Center — это развертываемое приложение на основе браузера для управления серверами, кластерами, гиперконвергентной инфраструктурой и компьютерами с Windows 10. Он поставляется на бесплатной основе и не входит в состав Windows. Готов к использованию в производстве. Узнайте больше о Windows Admin Center. Так как после установки управление сервером будет доступно через браузер с любого устройства. Вы с легкостью сможете изменять настройки сервера с любого устройства с доступом в интернет.
Преимущества
- Простой и современный опыт управления
- Гибридные возможности
- Интегрированный набор инструментов
- Создан для расширяемости
Поддерживаемые языки:
Chinese (Simplified), Chinese (Traditional), Czech, Dutch (Netherlands), English, French, German, Hungarian, Italian, Japanese, Korean, Polish, Portuguese (Brazil), Portuguese (Portugal), Русский, Spanish, Swedish (Sweden), Turkish
If you want to learn how to download Windows Admin Center, set it up including tweaking the Windows Admin Center port, you’ve come to the right place.
Not a reader? Watch this related video tutorial!
Not seeing the video? Make sure your ad blocker is disabled.
In this tutorial, you’re going to learn how to set up Windows Admin Center from scratch from download all the way to installing new extensions!
Prerequisites
To fully examine the capabilities of Windows Admin Center, you need to have more than just a desktop in place. To follow along, you will need the following:
- A test Windows domain with a domain controller. This guide is a good place to start if you do not have one in place.
- A fresh install of Windows Server 2016 or Windows Server 2019 (This article will be using Windows Server Core 2019). You can find the installation media on Microsoft’s Website.
Windows Admin Center works on Windows 10, but will not allow remote access. It will launch like an application instead of service and can only be used from the computer it launches from. Windows Server allows for Windows Admin Center to be used from any computer with a web browser.
Downloading Windows Admin Center (with Installation)
Windows Admin Center is freely available as an MSI on Microsoft’s Website. Windows Admin Center has no licensing costs and is available to install on Windows 10 (1709 or later), or Window Server 2016 and up.
Downloading and installing Windows Admin Center is typically a seamless process. You can find it via the Windows Server Evaluation Portal, or just using a direct download link.
To save you some time downloading Windows Admin Center below is a PowerShell snippet that will both download and install on your Windows Server.
Note the SME_PORT=6516 option below. By default, the Windows Admin Center port is 6516. If you’d like to change the port upon installation, you can do that here. The SSL_CERTIFICATE_OPTION option is creating a self-signed certificate for Windows Admin Center to use.
## Download the msi file
Invoke-WebRequest 'https://aka.ms/WACDownload' -OutFile "$pwd\WAC.msi"

## install windows admin center
$msiArgs = @("/i", "$pwd\WAC.msi", "/qn", "/L*v", "log.txt", "SME_PORT=6516", "SSL_CERTIFICATE_OPTION=generate")
Start-Process msiexec.exe -Wait -ArgumentList $msiArgs
Adding Firewall Rules
The MSI installer will automatically allow remote access to the Windows Admin Center port, however, that only applies to your network’s current state. but if your network profile changes (for example, from private to domain), that access will become invalid.
A network profile is a set of firewall rules that can change depending on the state of your server. You can think of it is as a security group for firewall settings. Typically there are four profiles: Public, Private, Work, and Domain.
If your server is currently in a workgroup (for this tutorial we’ll assume so), ensure you create inbound Windows firewall exceptions for the Windows Admin Center port of 6516 (or whatever port you set of the SME_PORT option above.
When the Winodws server is added to a domain, the network profile will change to Domain and, if not defined for the Domain network profile, you might not be able to access Windows Admin Center.
Below you will find a few PowerShell commands to run to open up the Windows Admin Center port.
> New-NetFirewallRule -DisplayName "Allow Windows Admin Center" -Direction Outbound -profile Domain -LocalPort 6516 -Protocol TCP -Action Allow

> New-NetFirewallRule -DisplayName "Allow Windows Admin Center" -Direction Inbound -profile Domain -LocalPort 6516 -Protocol TCP -Action Allow
Logging into Windows Admin Center
Now that you have initially installed Windows Admin Center, you can now start managing your server using a web browser, like Chrome or the new Microsoft Edge.
To access Windows Admin Center:
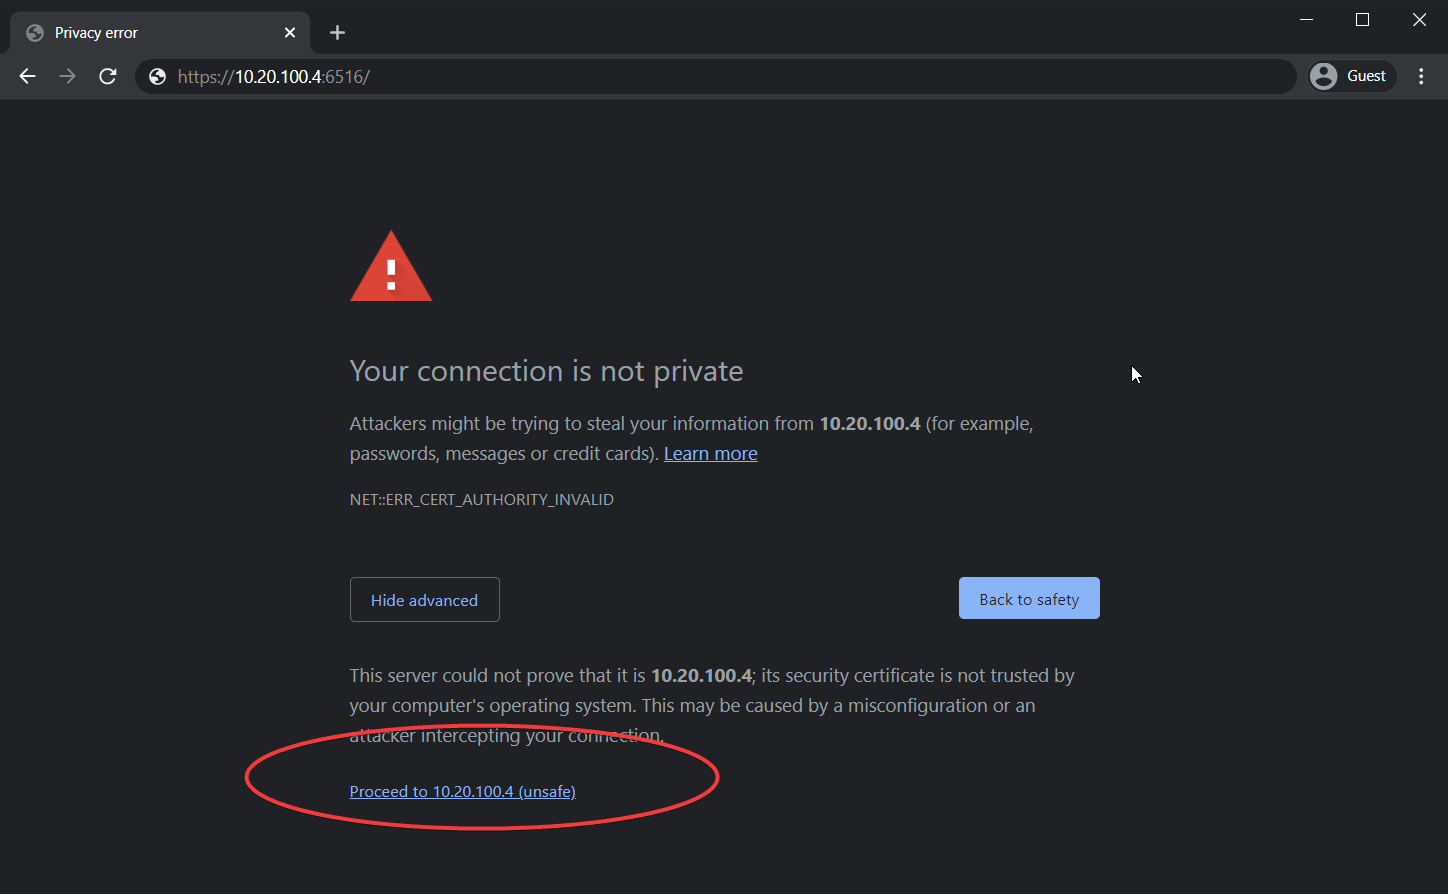
- Open up a web browser on any computer on the same LAN as the Windows server and go to https://<server ip>:6516. This guide is using https://10.20.100.4:6516.
If you do not know the IP of your server, you can retrieve it by running ipconfig in the PowerShell console on the server.
Related: The ipconfig Commands You Need to Know
2. You will likely be greeted with a big warning saying Your Connection is not private. Select “show advanced” and then “Proceed to <IP> (unsafe). Click on Proceed to <server IP> (unsafe).
You are seeing this warning because Windows Admin Center is using a self-signed certificate and your local browser does not trust it.
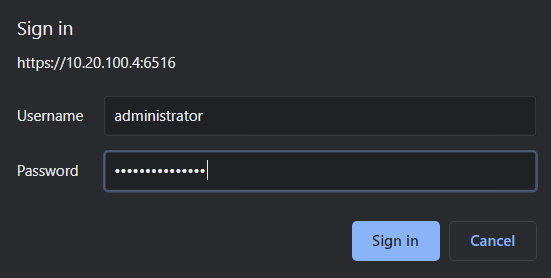
3. Provide the local administrator username and password at the Sign in prompt.
This tutorial is using the local administrator account for convenience. But you can get much more advanced in this area by checking out the User Access Options documentation.
Joining a Domain with Windows Admin Center
Windows Admin Center has a slew of features and ways to manage Windows Server. To provide a demonstration of what Windows Admin Center can do, let’s briefly cover how to add the Windows Server to a domain.
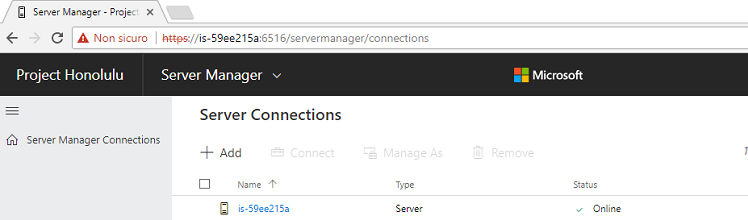
Whenever you first log in, you will be greeted by a list of computers, of which, there’s actually only a single computer: the one you installed Windows Admin Center on. You can see an example of what this screen looks like below.
- To select a server to work with, click on the (probably only) Windows server in the list.

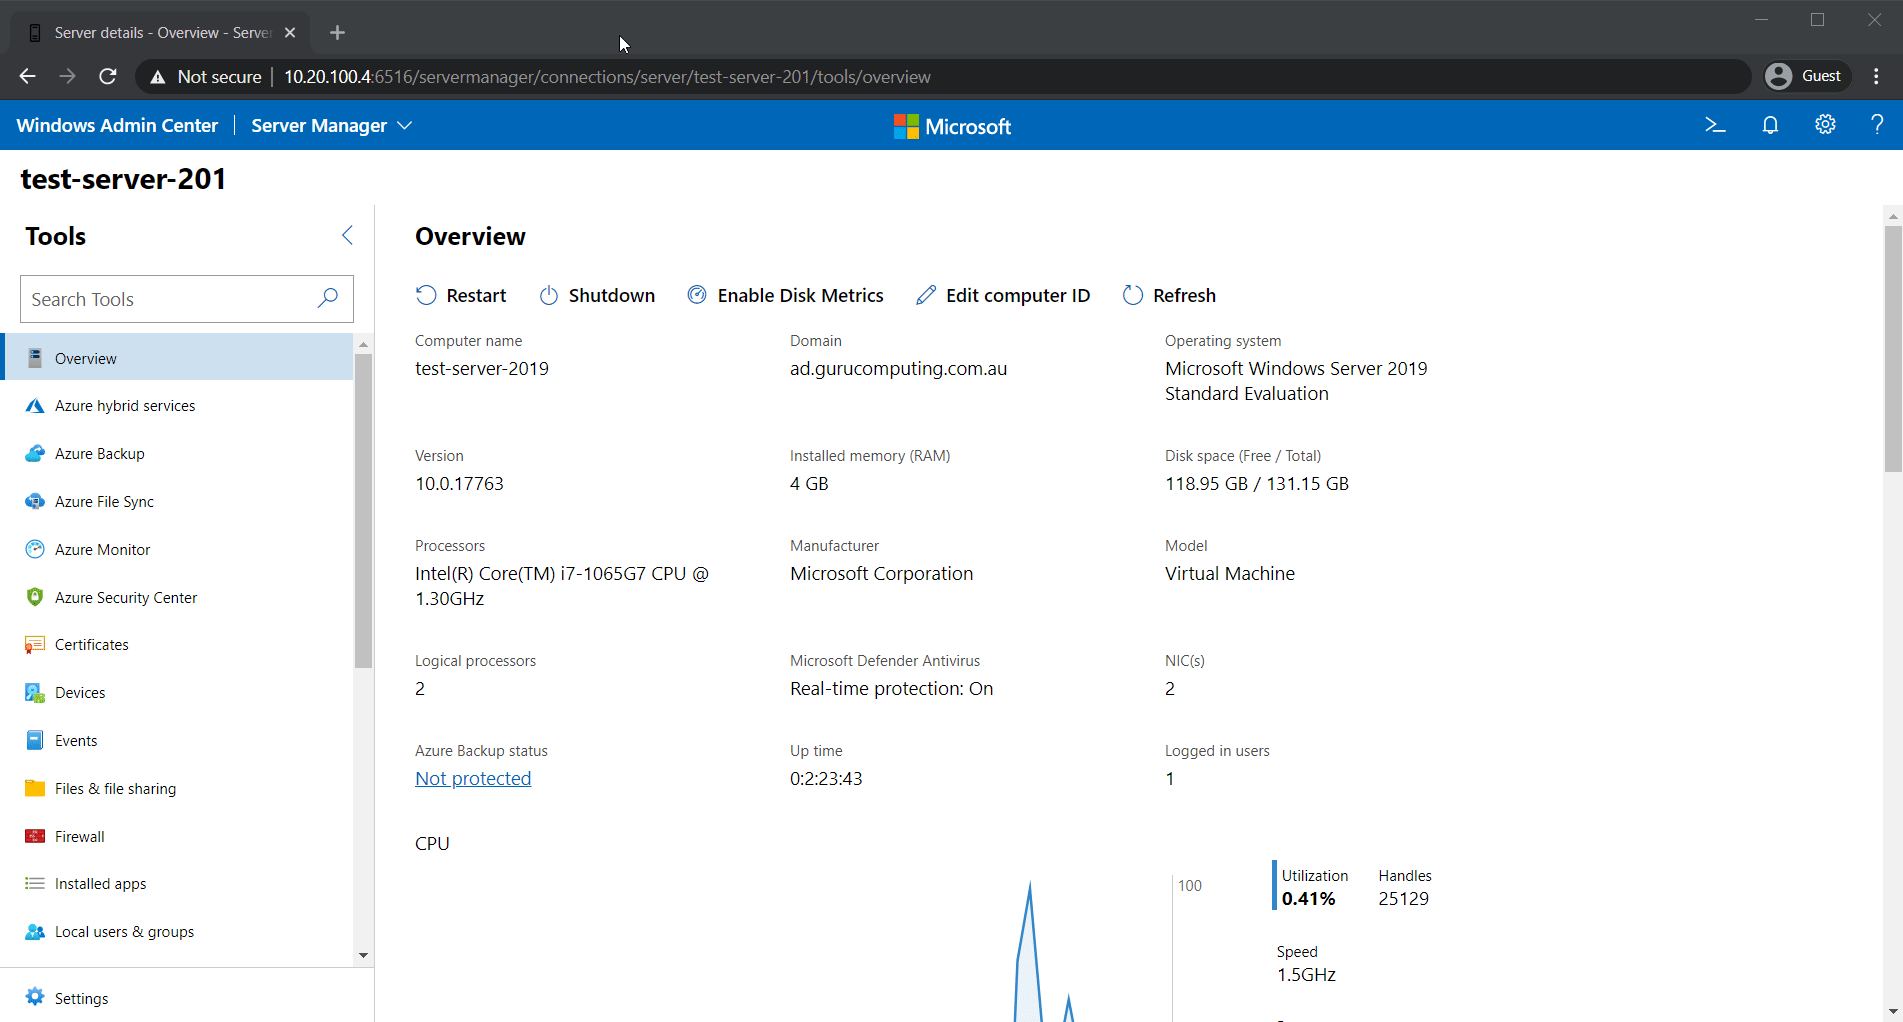
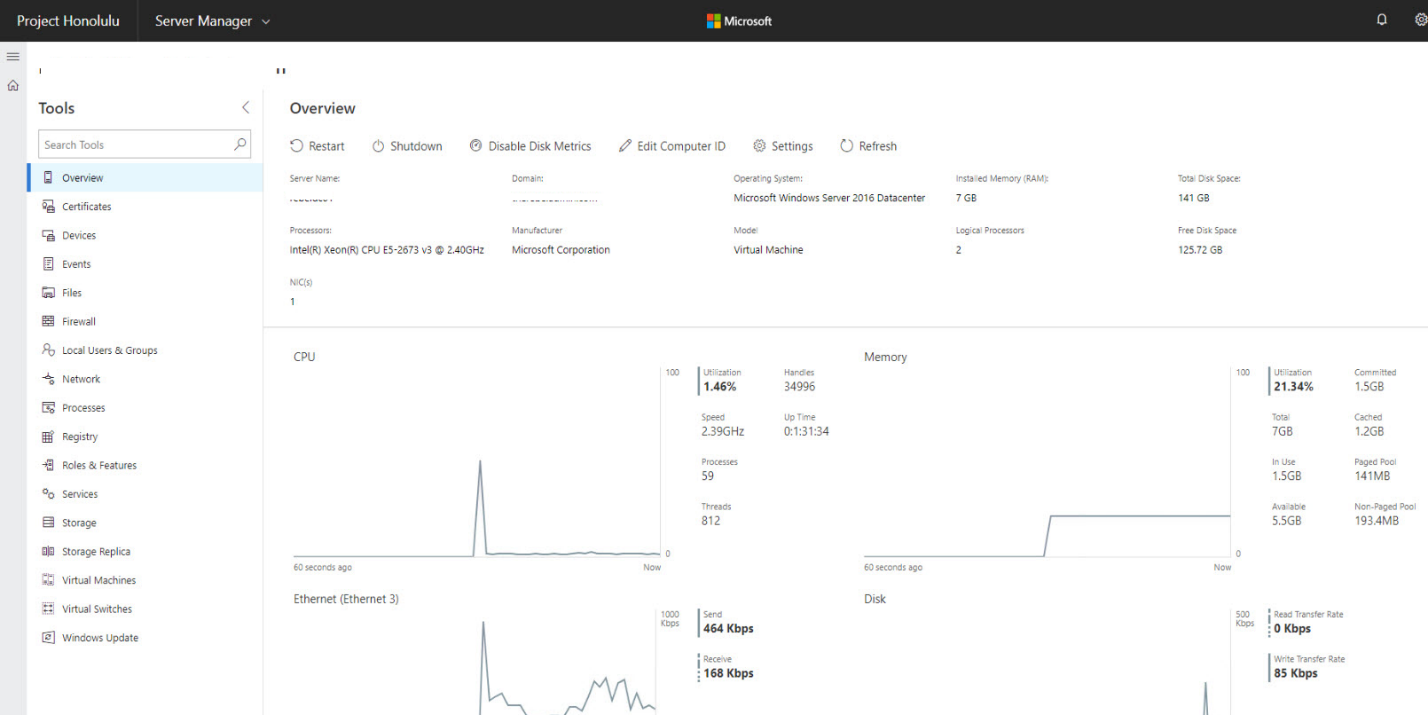
2. Once selected, Windows Admin Center will present you with a dashboard of your Windows Admin Center server (as seen below). You will also notice that the computer name (1) is randomly generated (if you used the Windows installer), and the Domain (2) doesn’t exist.
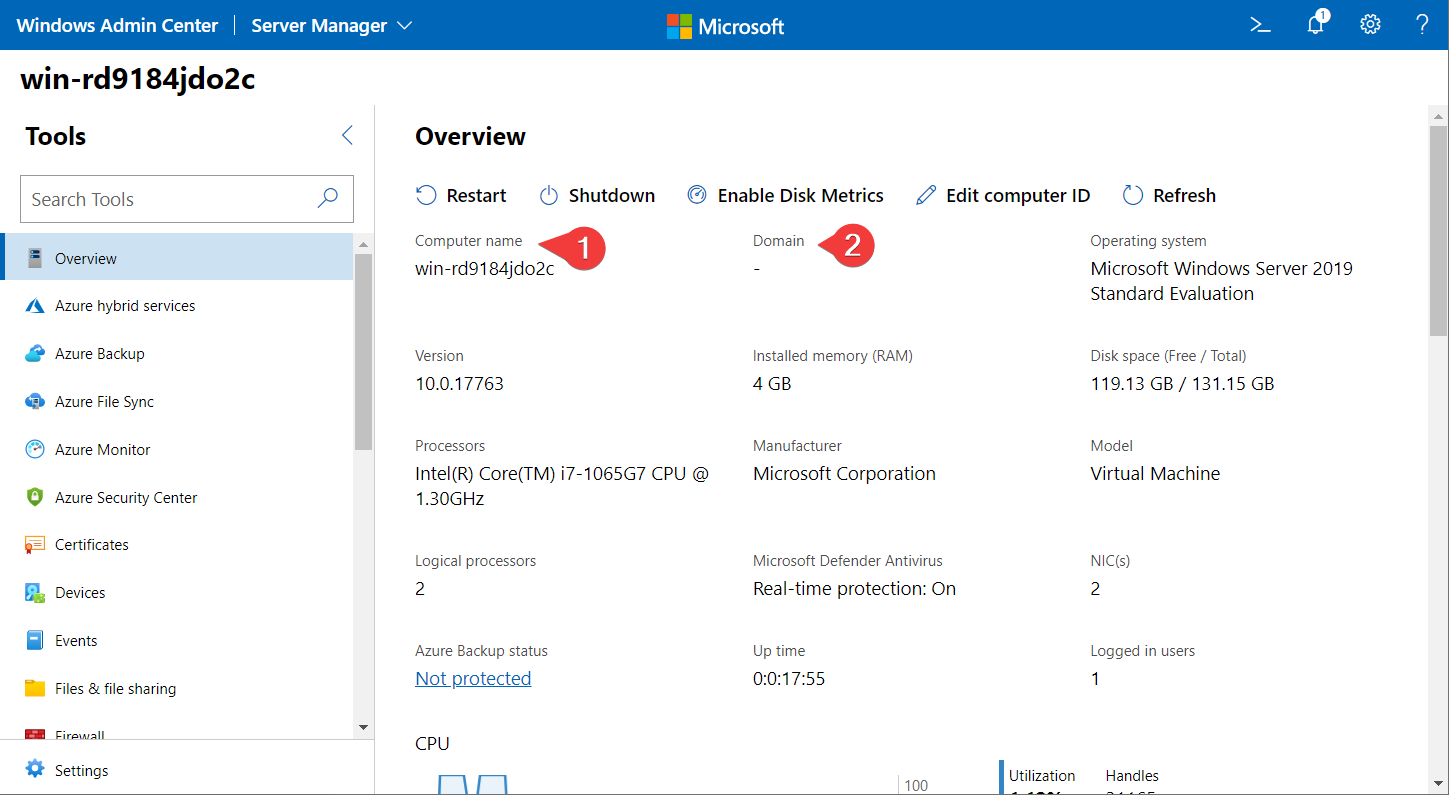
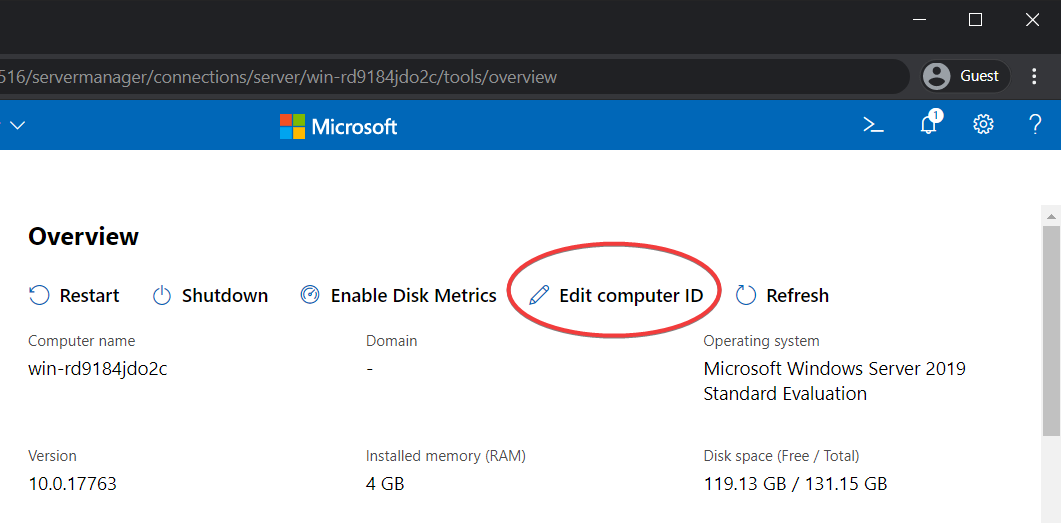
3. Select Edit Computer ID on the dashboard. The Computer ID is how Windows Admin Center defines common properties like hostname and domain membership.
4. Enter your desired computer name and domain. This tutorial is using a domain called ad.gurucomputing.com.au and Test-Server-2019 as the computer name.
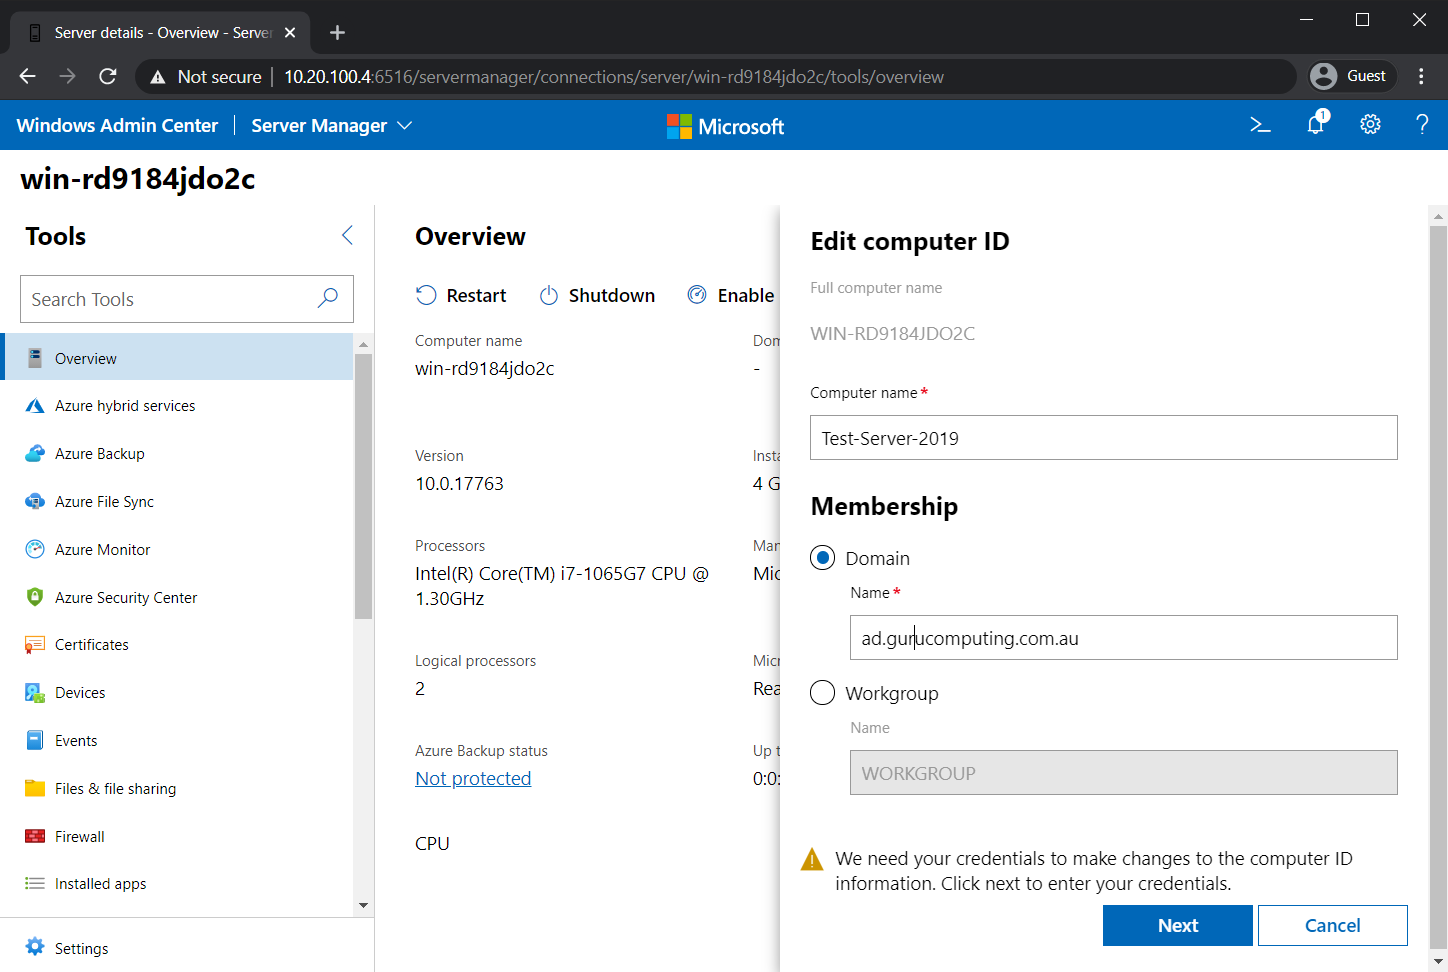
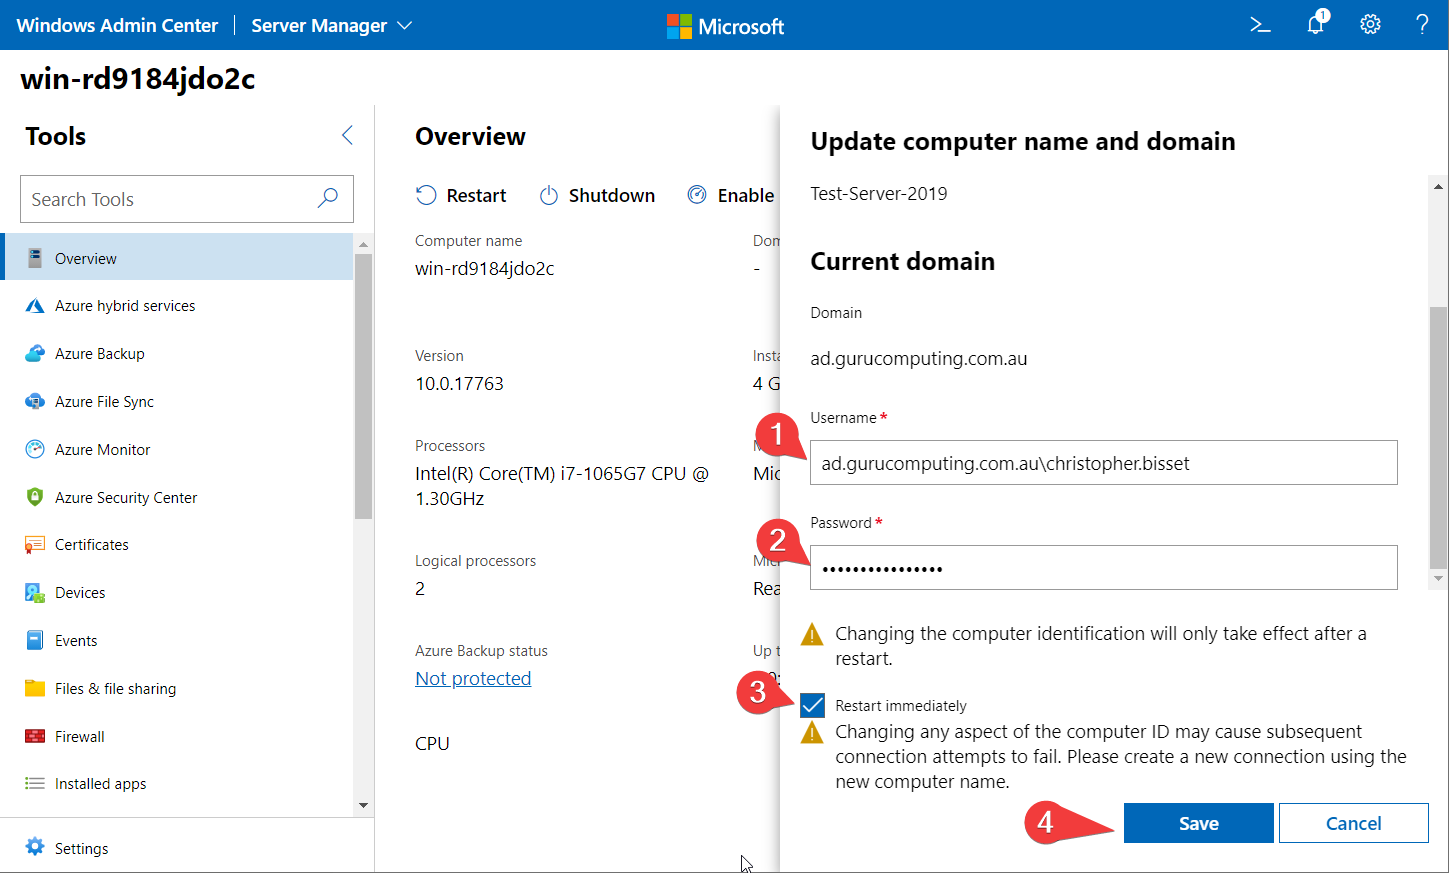
5. Supply the Domain User and Password with rights to join the domain (this article us using ad.gurucomputing.com.au/christopher.bisset), enable the Restart immediately checkbox, and click on Save. You will then be prompted to reboot and choose to do so.
6. Upon reboot, log back into Windows Admin Center (https://10.20.100.4:6516 in the example) with your domain admin credentials (not the local administrator user account) and click on the test Winodws server again.
You should now see a view of the updated dashboard. You will now notice in the below screenshot that the computer name is updated as well as the domain.
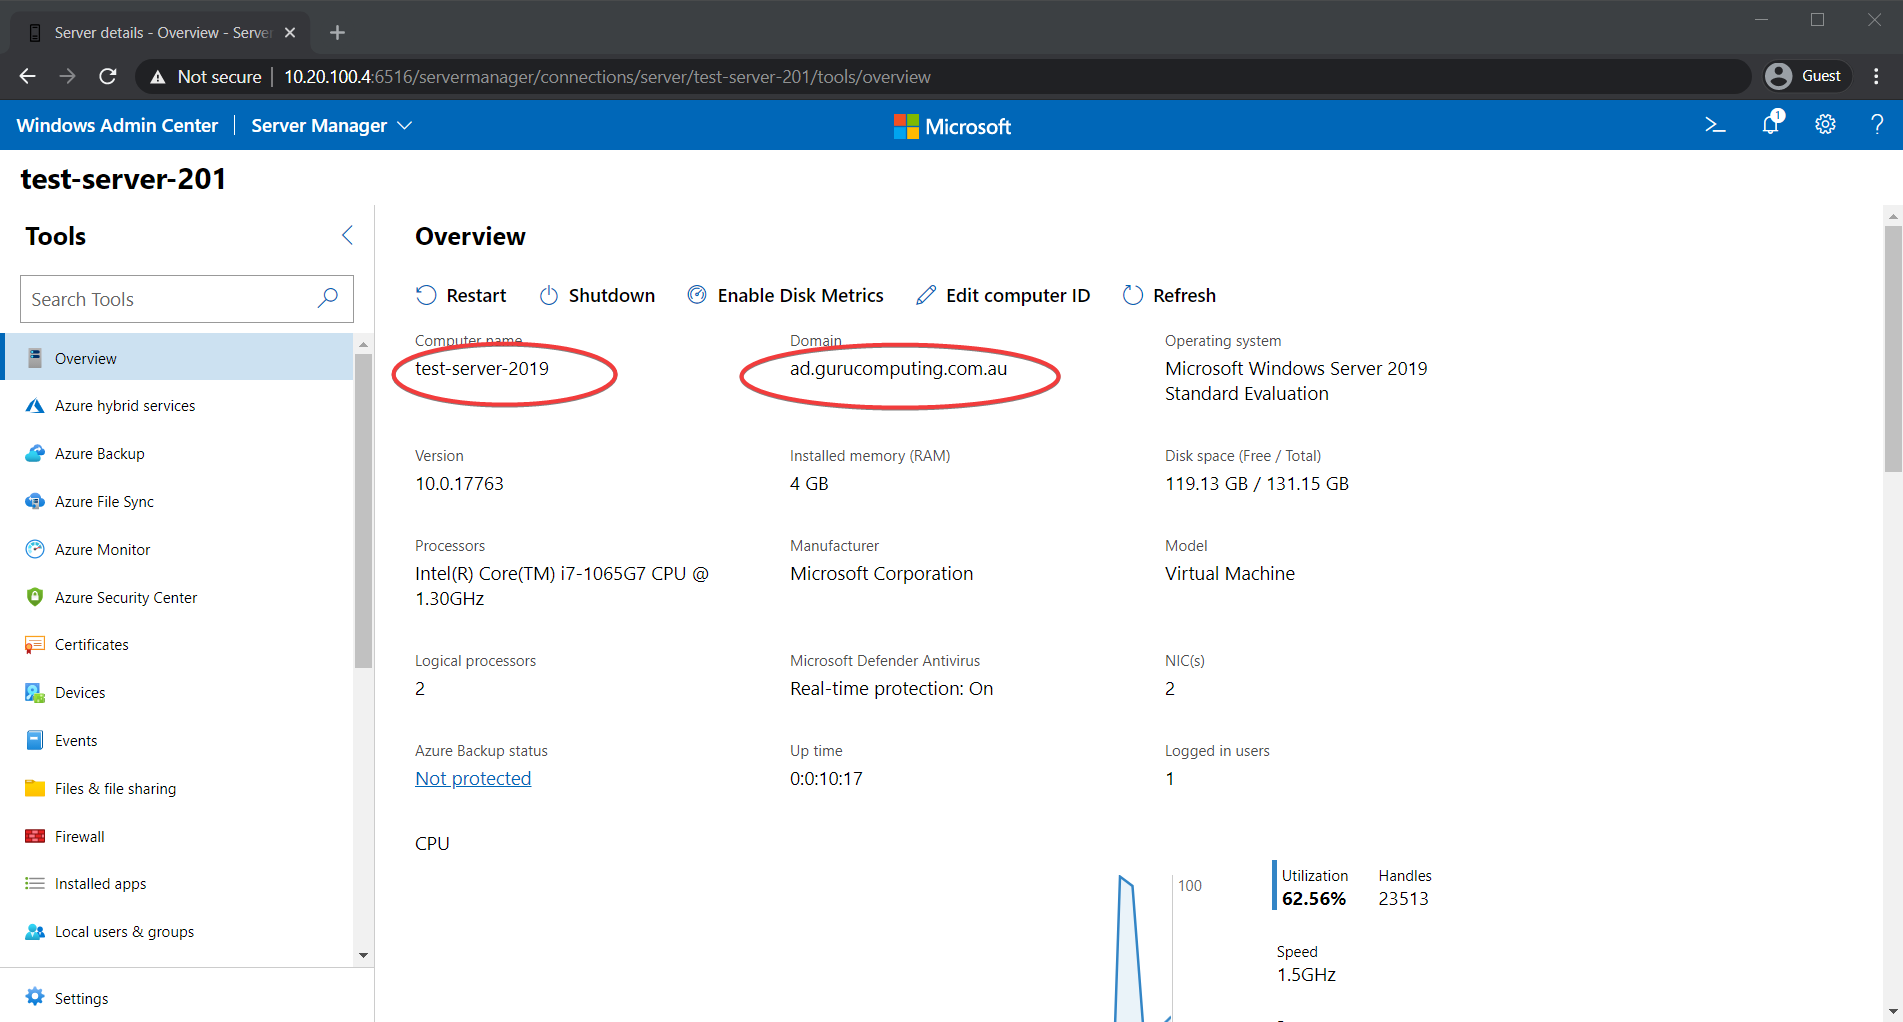
Note that the Name in the Top Left has been cut off, as older systems expect a max of 15 characters.
Now that you have successfully joined the domain, you can start exploring the options that Windows Admin Center provides. You will immediately notice that most of the sidebar categories (the left side menu in the screenshot below) look suspiciously like control panel categories, and in fact, most of them are.
Windows Admin Center is designed to be a web replacement for server management. Most of the categories (such as Firewall, Installed apps, etc.) are a direct replacement for the control panel.
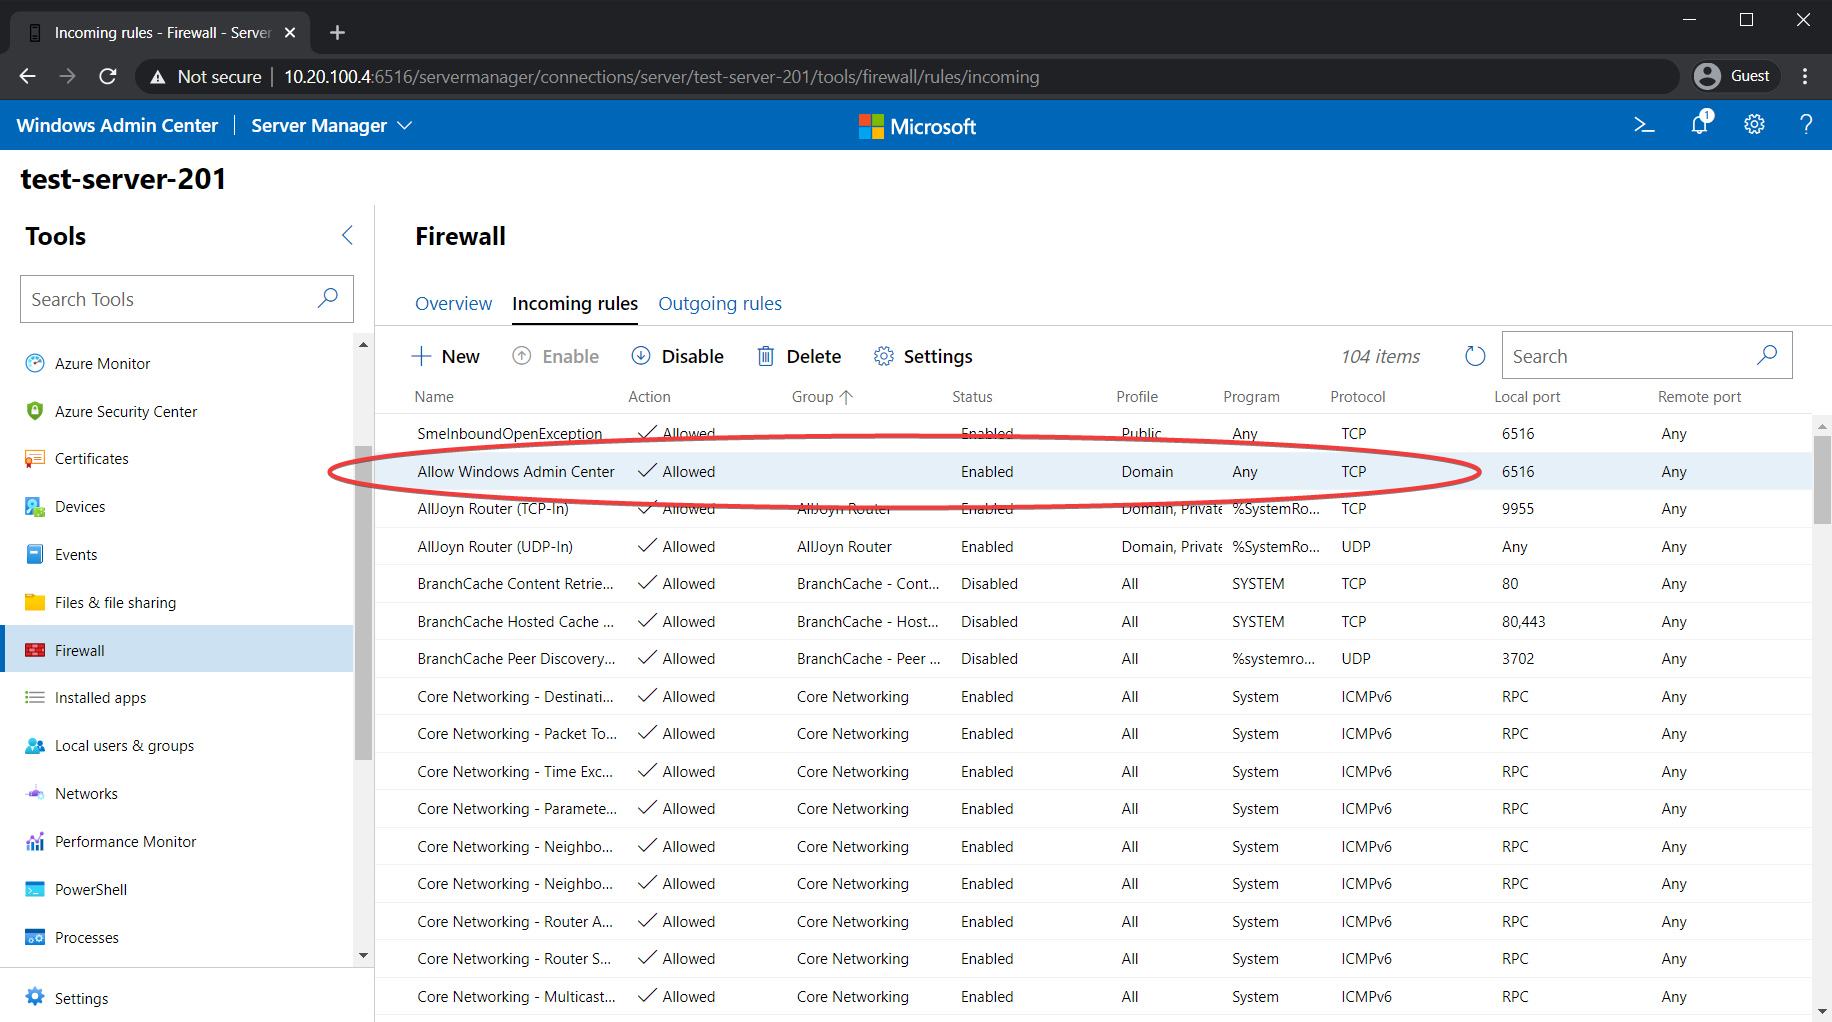
For example, when viewing a Windows server, select the Firewall category. You’ll see that firewall exception you made using PowerShell earlier.
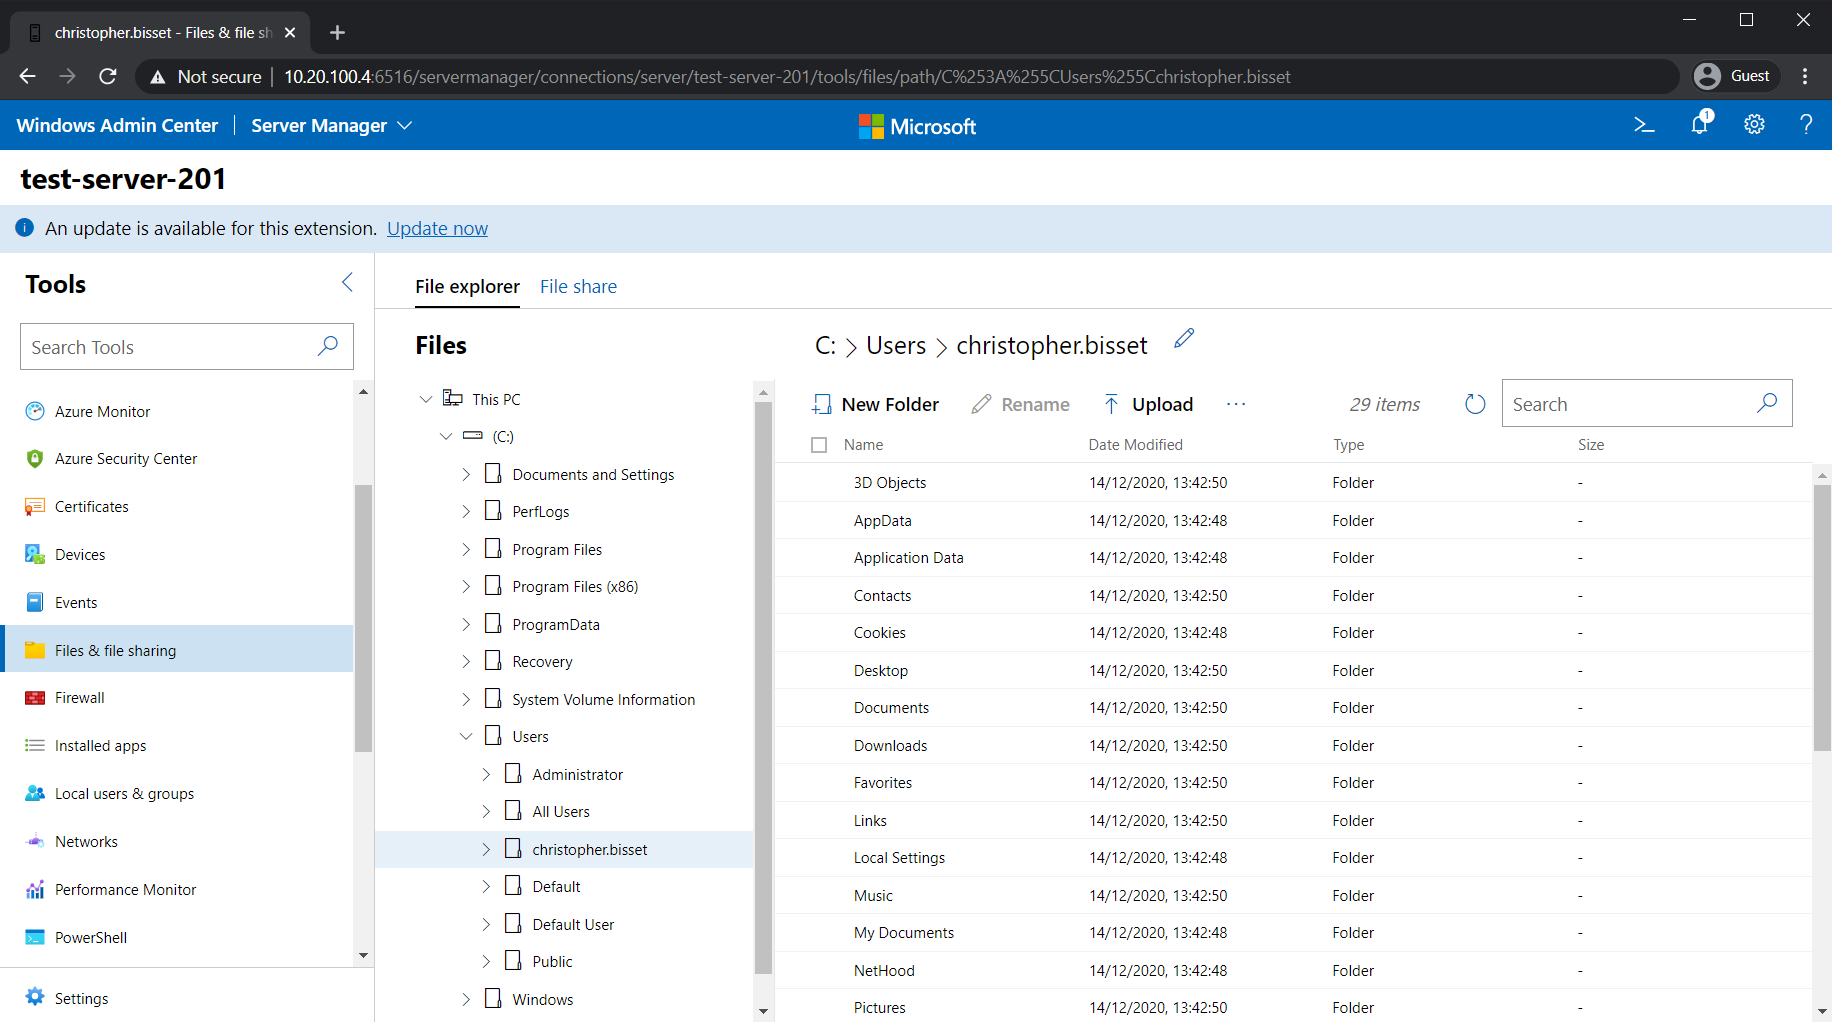
There are also several categories designed for remote management of the server. Files & File Sharing allows you to directly upload, download, or modify files on your server as shown in the following screenshot.
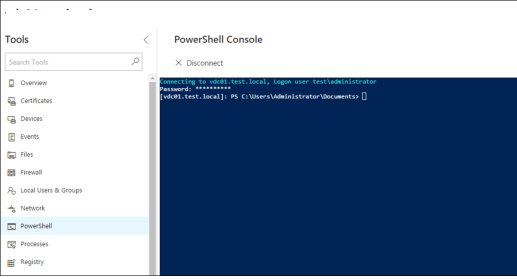
The PowerShell and Remote Desktop categories, in particular, are extremely interesting. PowerShell allows you to open a remote terminal directly on the machine as if you were using remote PowerShell natively!
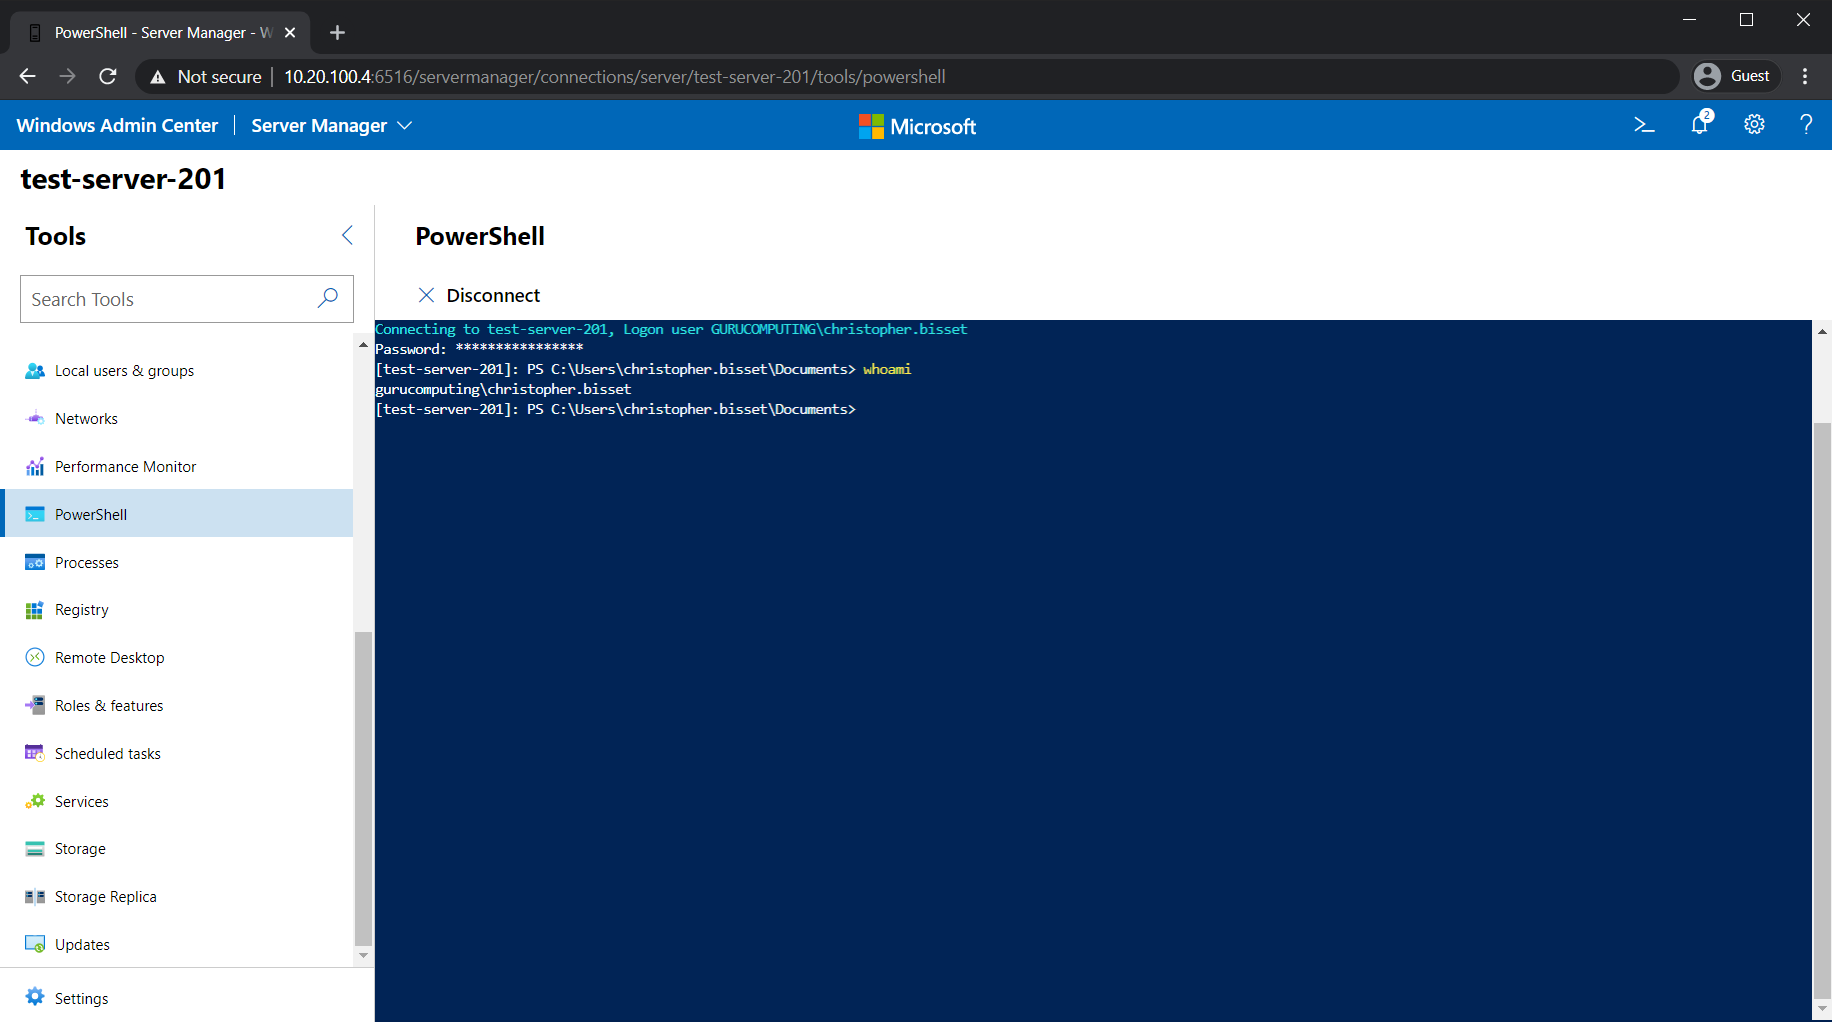
This remote PowerShell console is especially helpful for workgroup servers, remotely managing a workgroup server can be extremely tricky without a Domain.
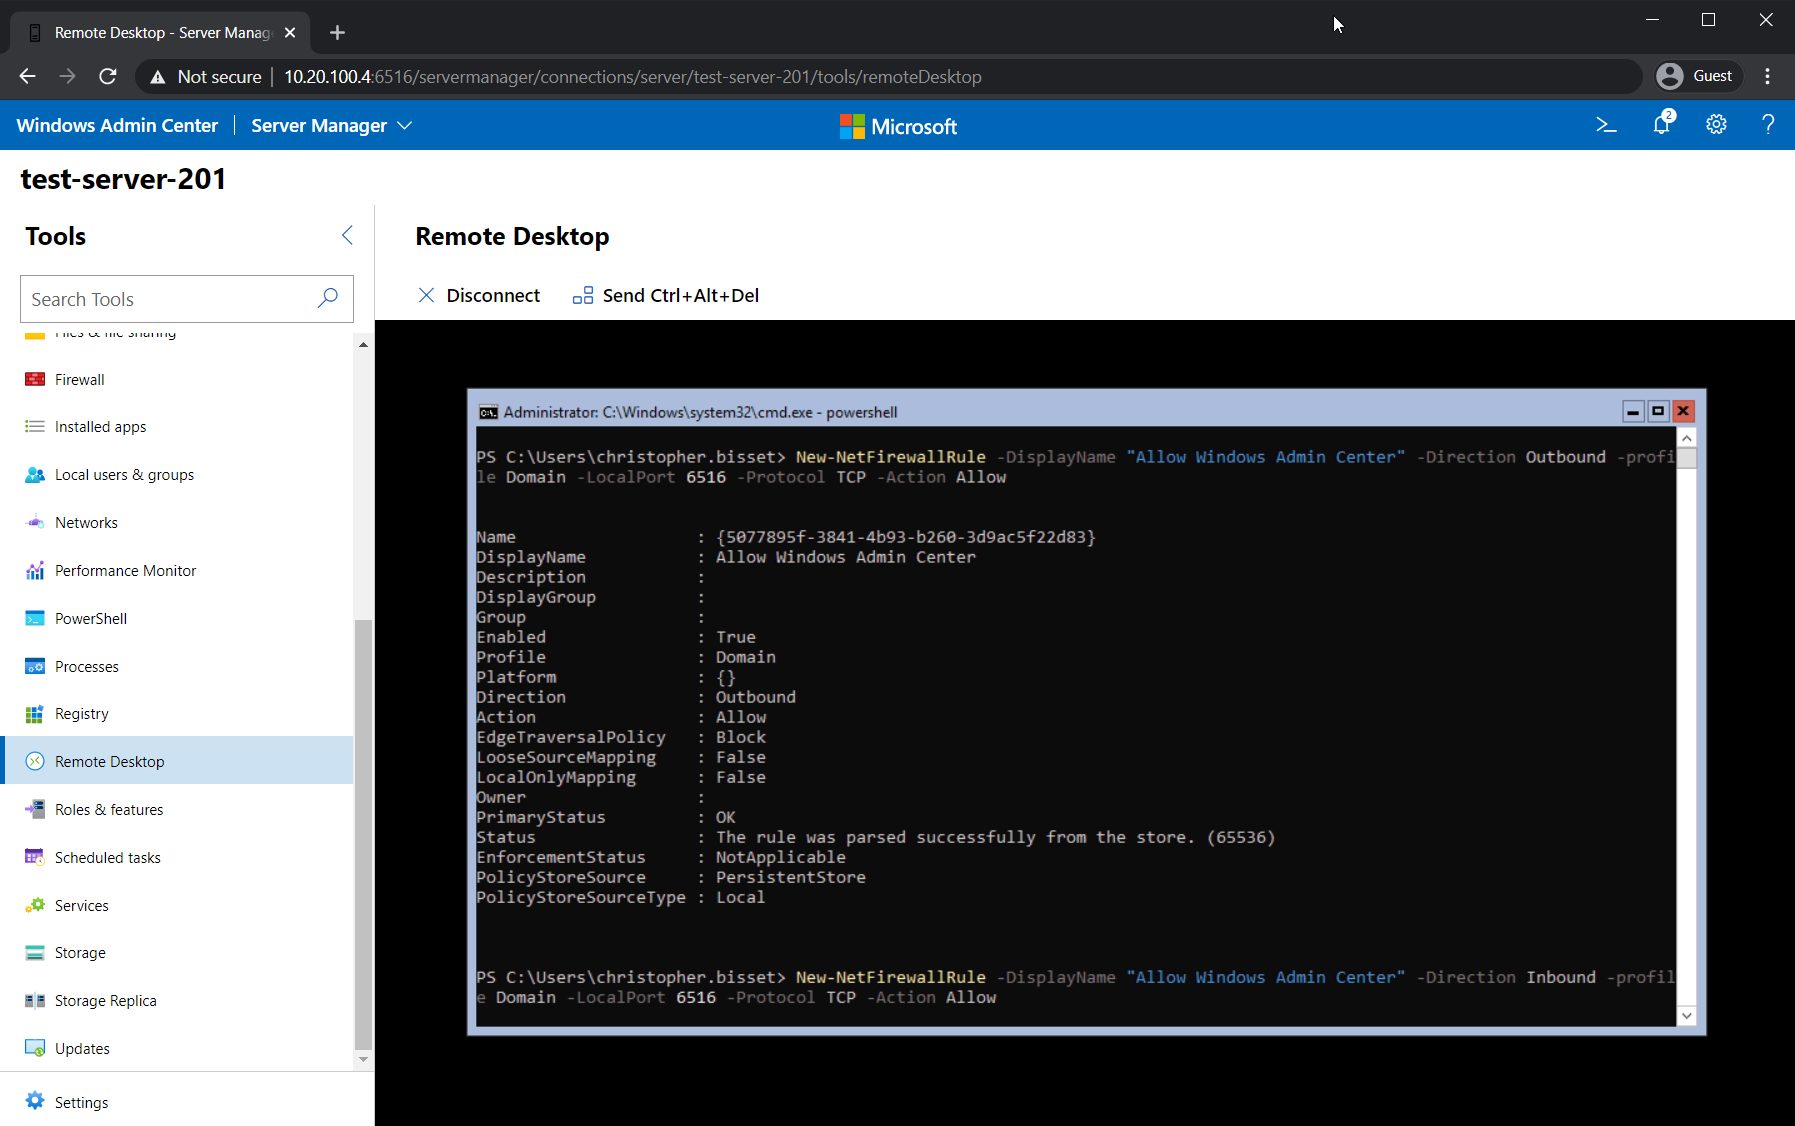
The Remote Desktop option allows you to open up RDP directly in your browser. RDP in a browser means you can have a full-blown remote desktop session inside Windows Admin Center!
There are over a dozen other categories, which this article will gloss over for the time being. Most of them are analogous to the control panel and are fairly self-explanatory. Instead, let’s explore managing Active Directory with a Windows Admin Center extension.
Managing Active Directory with Windows Admin Center Extensions
Windows Admin Center has an extensible system with support for adding on more functionality in the form of extensions. It supports a large swathe of extensions for various administrative tasks (in fact, some of the sidebar categories are Microsoft bundled extensions).
A Windows Admin Center Extension is an optional extra that adds additional functionality. This could include cluster management, virtual machine management, or active directory management (as seen below)
To demonstrate extensions, let’s install the Active Directory extension.
For a full demonstration of the Active Directory extension, this website did a great job.
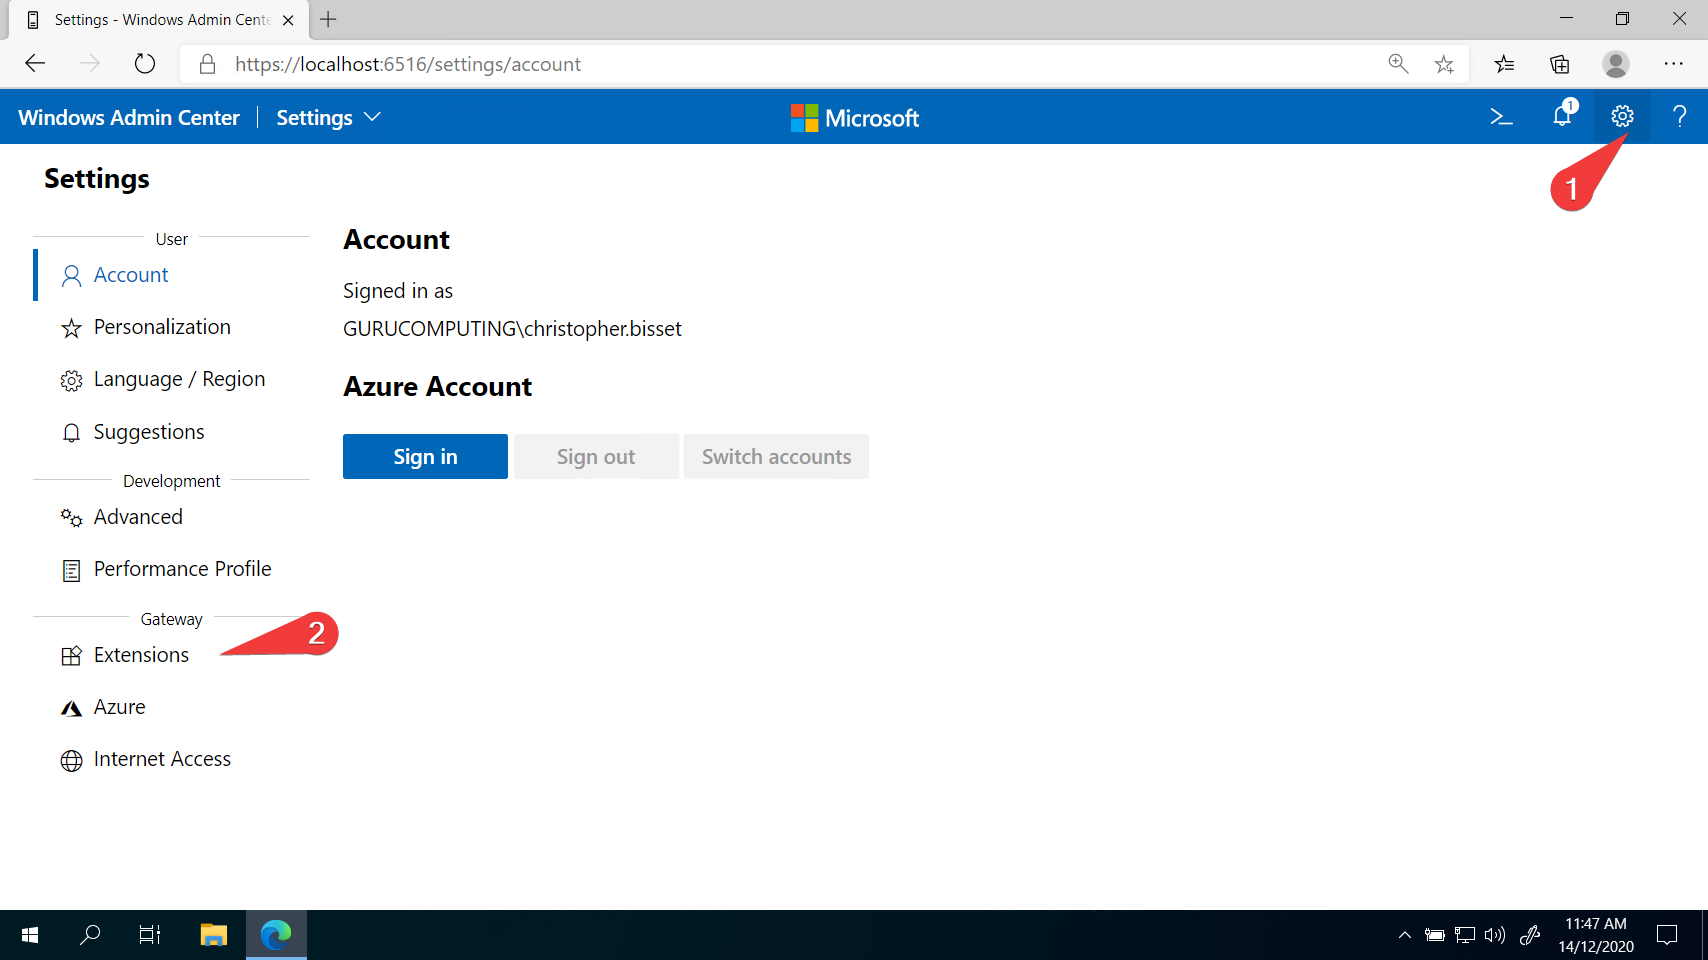
- While on the main Windows Admin Center page, select the Settings cog (1) in the top right
2. Click on Extensions (2) on the left-hand side as shown below. You should be presented with a list of installed and available extensions:
3. Click on the Active Directory extension and click on Install.
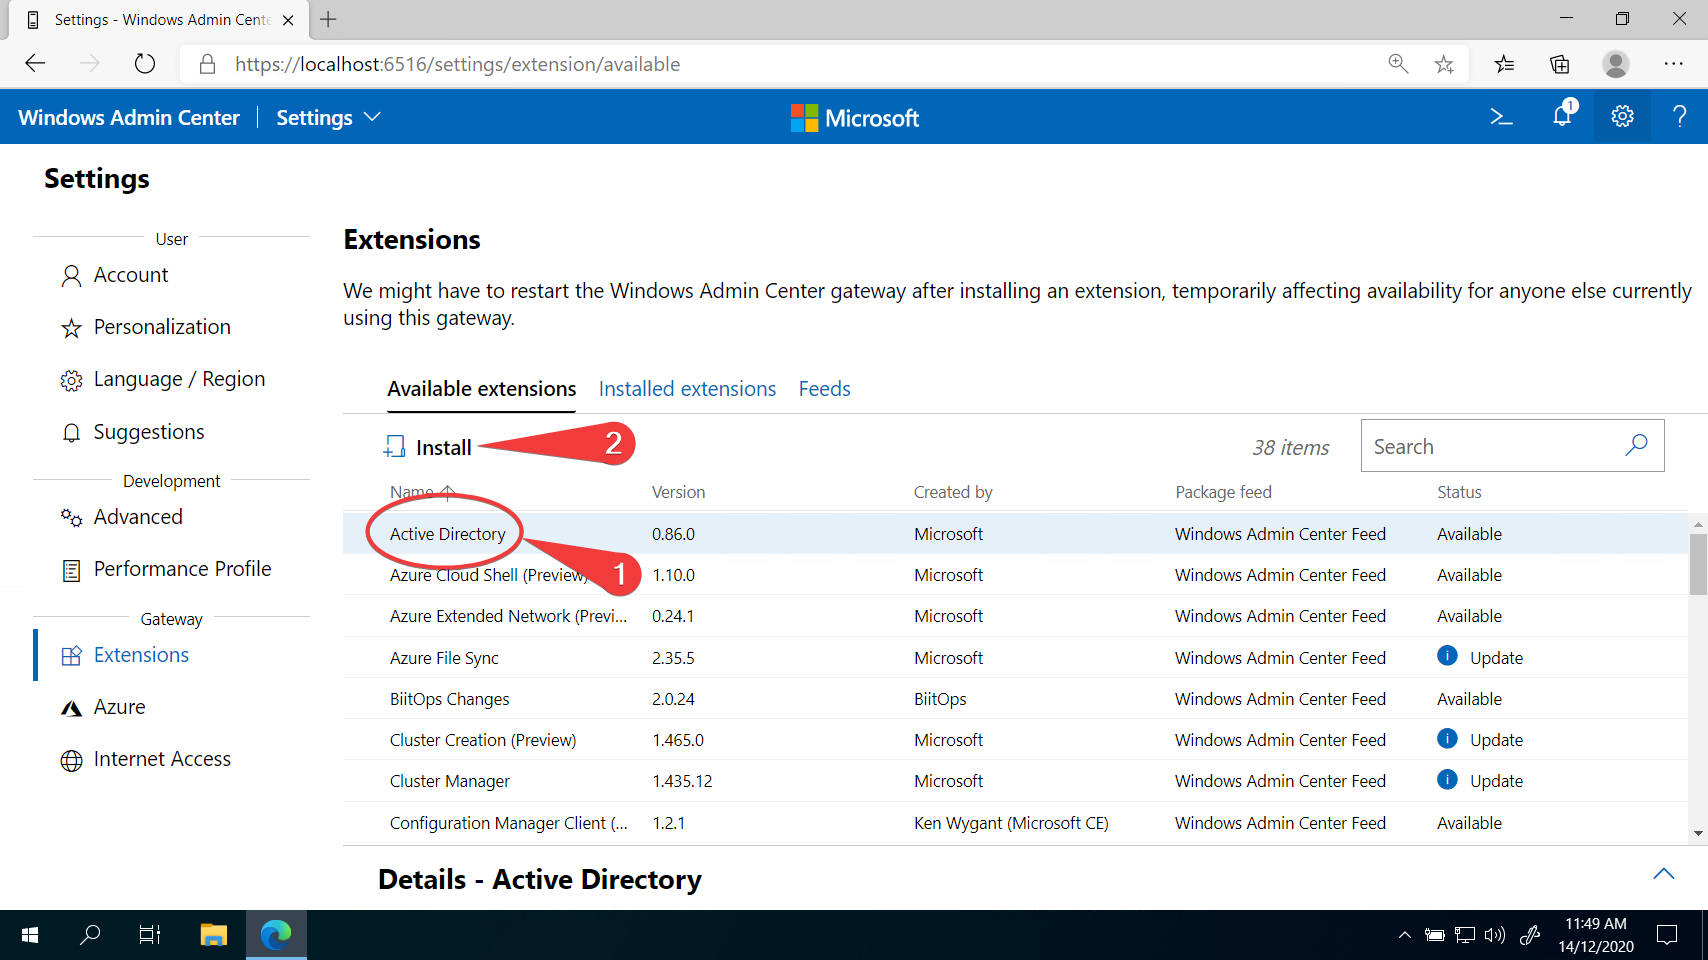
It is worth browsing through the list of extensions to see what is available. Many Microsoft related services have a Windows Admin Center extension available.
Once installed, the Active Directory option will move from Available Extensions to Installed Extensions.
4. If you are remotely managing your Domain Controller (addressed later in the article), you can see in the sidebar that you now have an Active Directory option. Click on it and begin managing Active Directory.
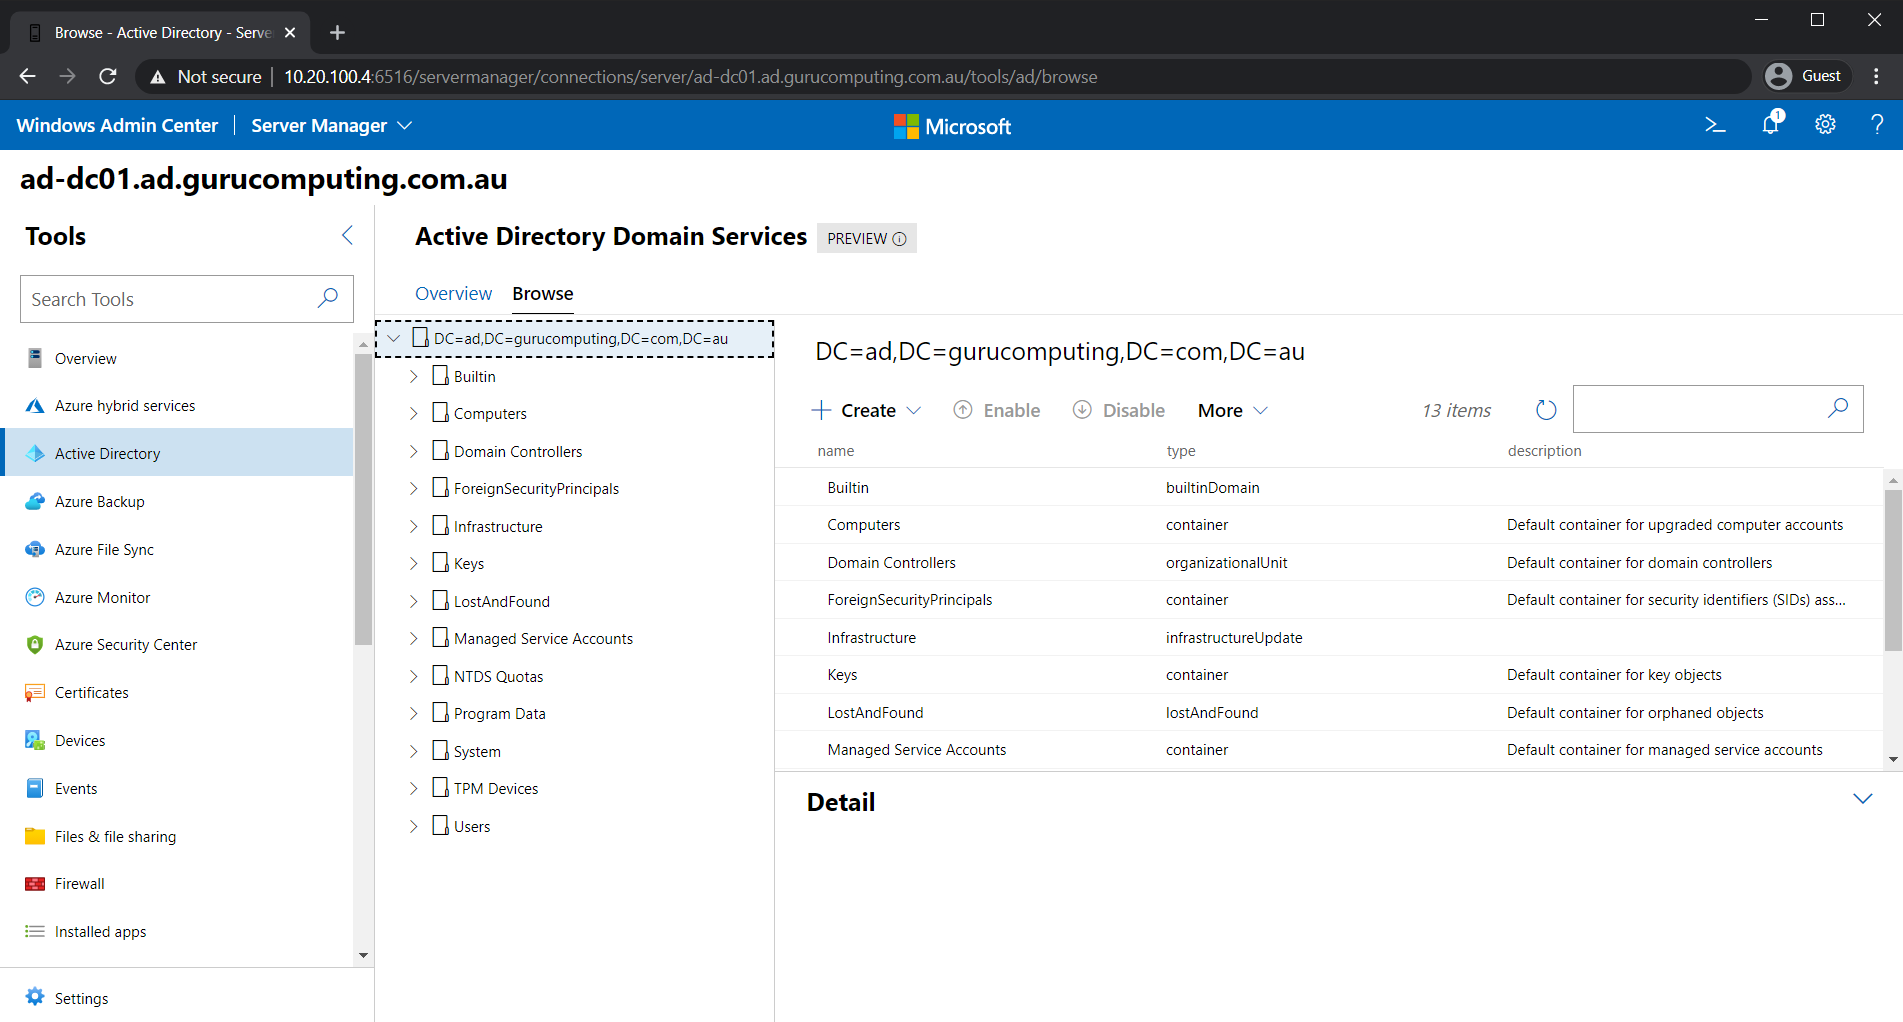
As you are most likely not using Windows Admin Center on a domain controller, the Active Directory section will not appear in the sidebar as in the above screenshot. This problem will be addressed shortly.
For those familiar with the Active Directory Administrative Tools (not to be confused with Windows Admin Center), this will be a very similar experience. The main difference is you are not using Microsoft’s Remote Server snap-ins: You’re using a web interface with no locally installed tools at all.
It’s all PowerShell Under the Hood
Something you might not be aware of is that PowerShell drives the entire backend of Windows Admin Center. Every time you change a setting or view a dashboard, a corresponding PowerShell script runs in the background to enact that change. In fact, you can peek behind the curtain in Windows Admin Center and directly extract the PowerShell it runs!
Inspecting Firewall PowerShell Functions
Navigate back to the Firewall Category again and click the View Powershell Scripts icon as seen below. Doing so brings up a new panel, showing a dropdown list of PowerShell functions. Choosing an option (as seen with the Disable-FirewallRule option below) displays the corresponding function that Windows Admin Center uses to perform its tasks.
This type of inspection can be done for every category in the sidebar.
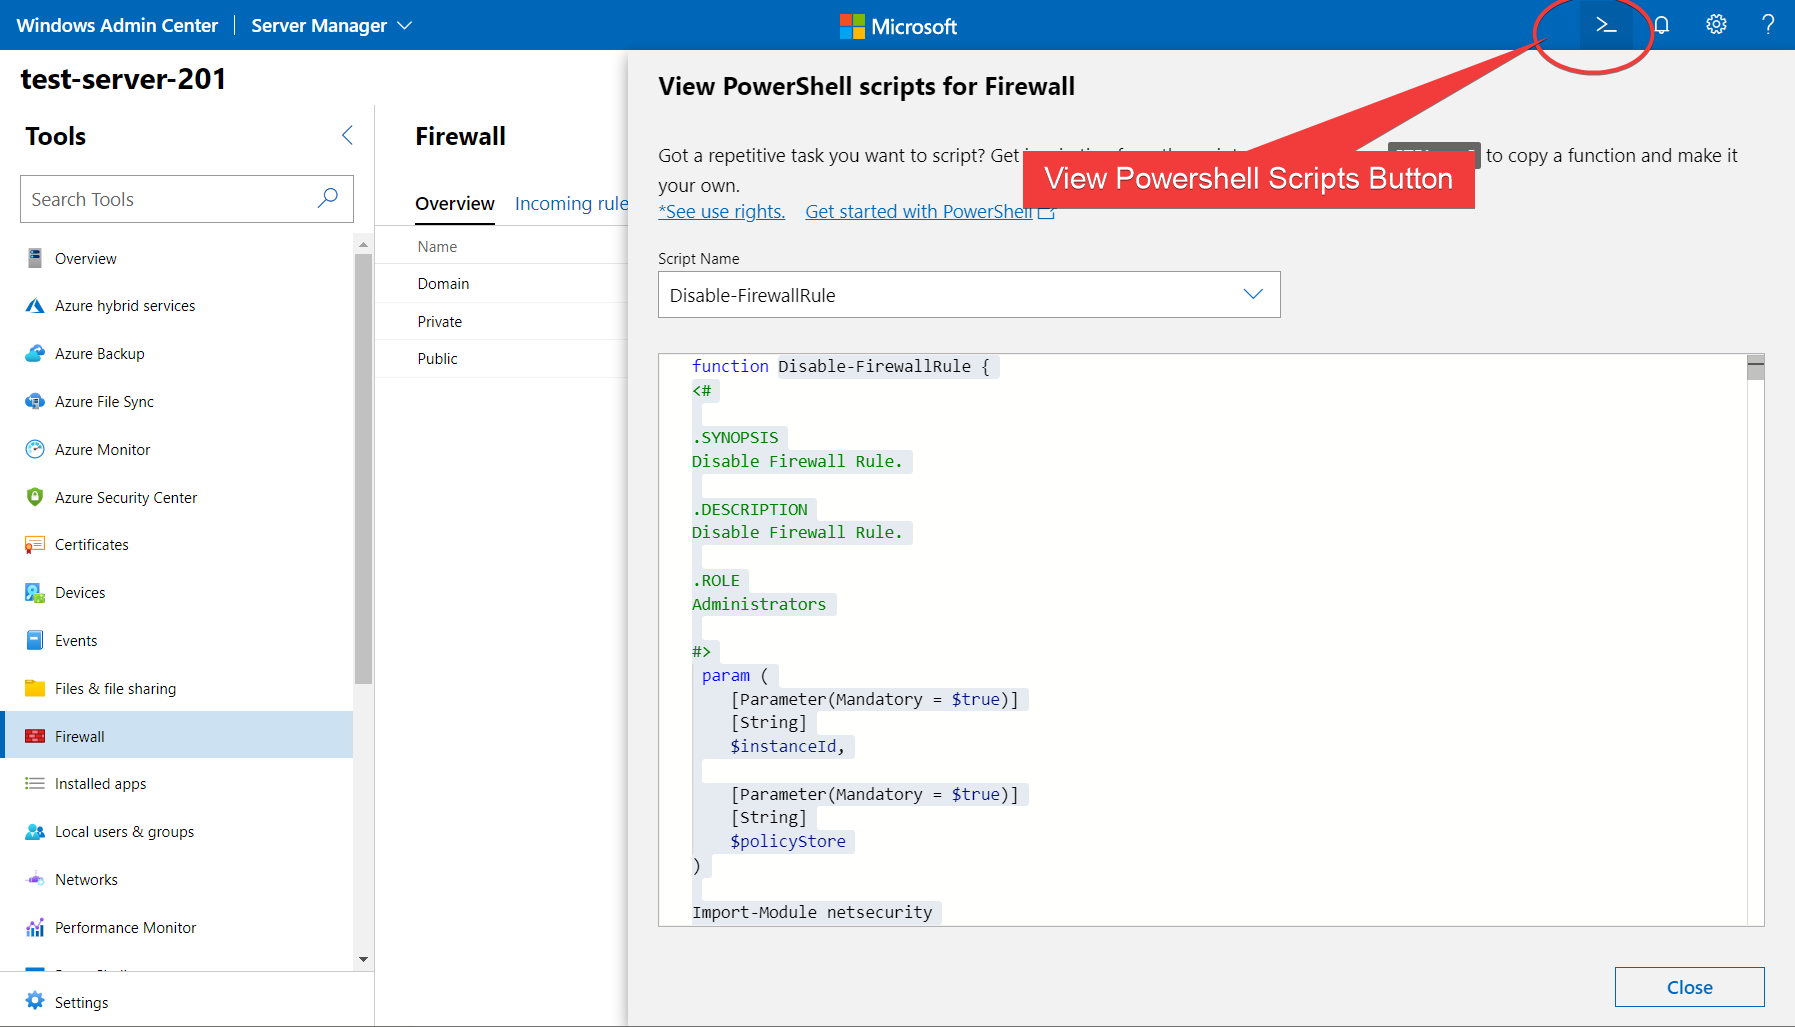
This is a handy tool because it lets you directly view exactly how Microsoft structures all of their PowerShell and gives you tons of best practice examples when writing your own PowerShell!
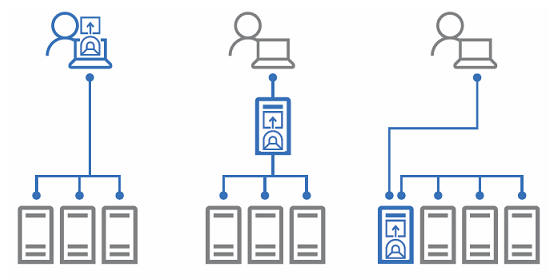
Remote Management of Other Servers
If you thought you had to install Windows Admin Center on every server in your environment, think again. Windows Admin Center actually only needs to exist on a single server. Because Windows Admin Center does all of its work under the hood with PowerShell, all you need to do is have PowerShell Remoting enabled on your servers!
Let’s show that in this article by remoting into the domain controller.
If you are following in a production domain, you may not have permission to manage your domain controller remotely. Do not test any features on sensitive equipment before checking your IT policies!
- Navigate back to the server list by clicking on the Windows Admin Center title in the top left
2. Click the Add button.
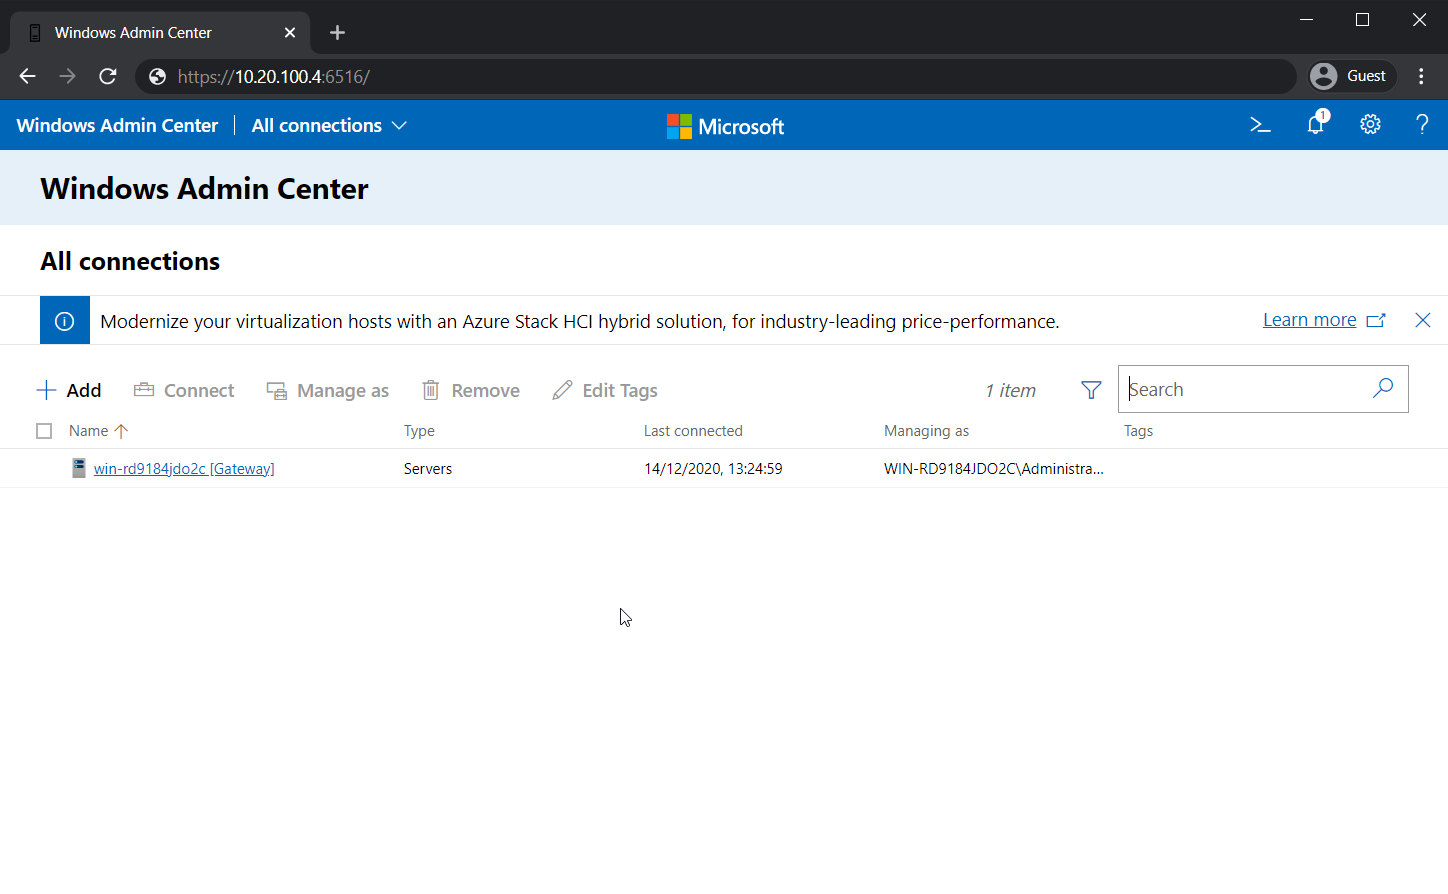
3. Click Servers.
4. Either manually enter the computer name of the domain controller, or search for it in the Search Active Directory box.
5. Add the server to the list.
6. Select the server, and enter your domain credentials.
You can see these steps in the animation below:
You’ve now added a web interface to your domain controller, and you don’t even need to install anything!
Your browser is just using the Windows Admin Center server as a host and is running all the backend commands on the domain controller!
If you have remote desktop enabled for the controller, you can even use the Windows Admin Center server as a jump box to manage the domain controller! See the fully functional RDP session below:
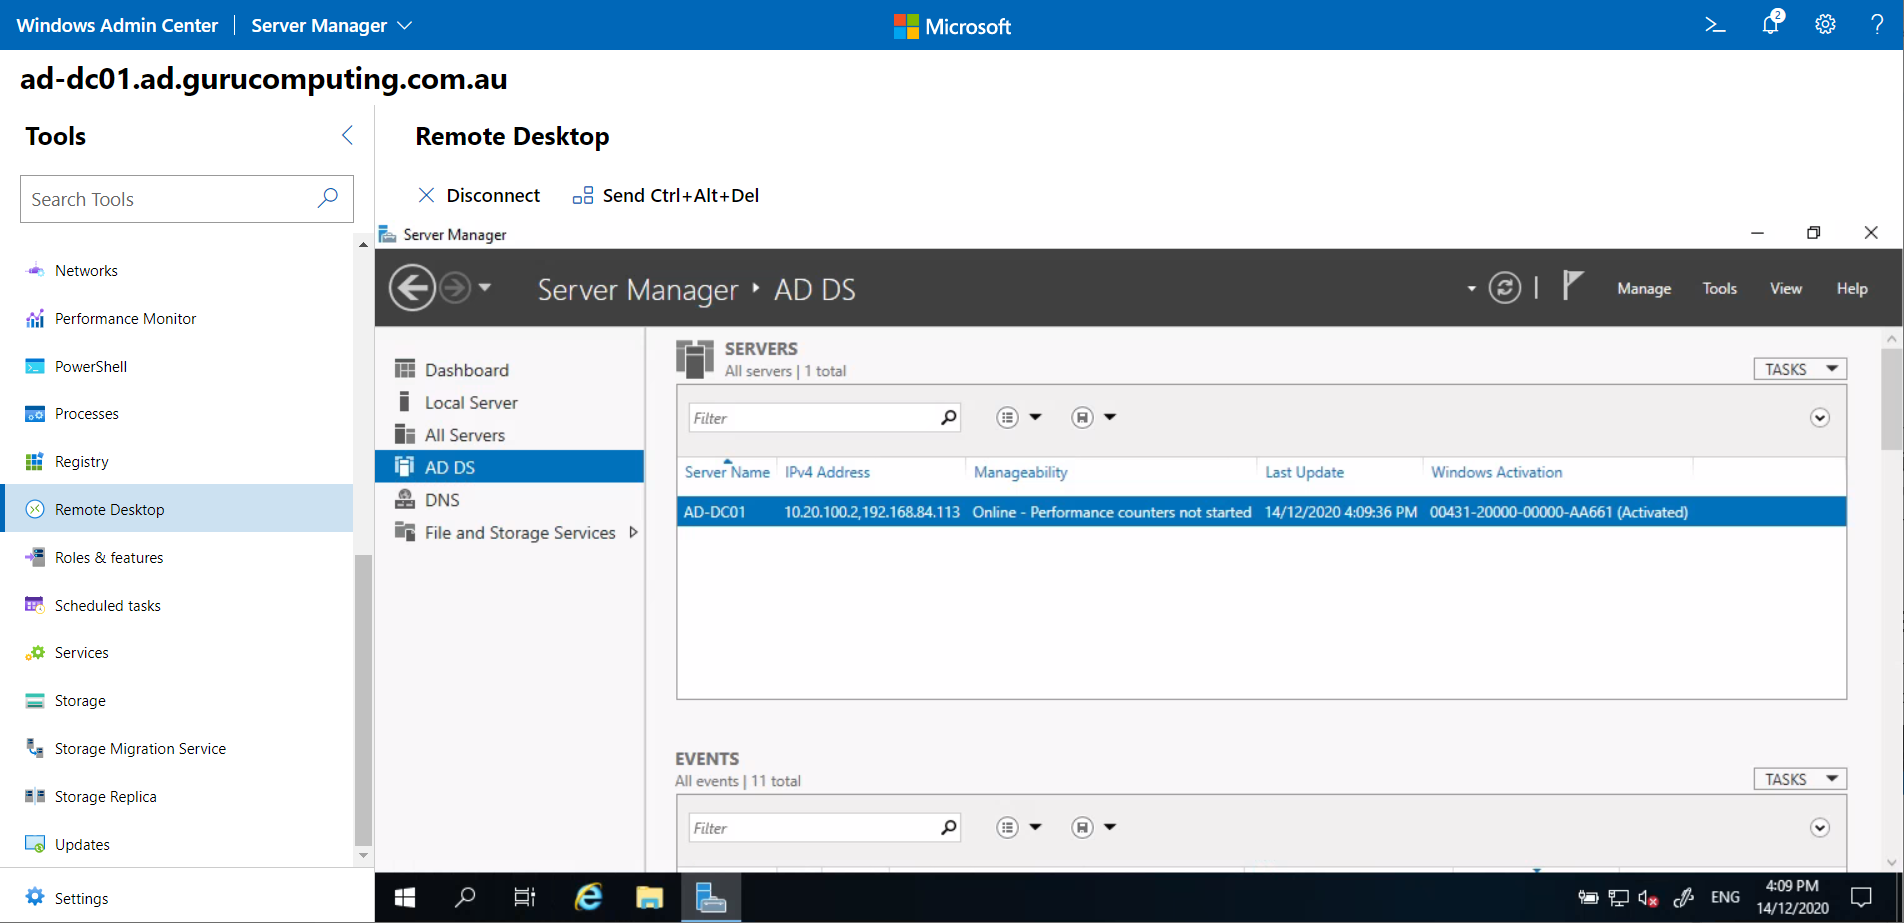
In the above example, the PC running the browser cannot directly access the Domain Controller. Instead, the browser is interacting with the Windows Admin Center server, and the Windows Admin Center server is talking to the Domain Controller. You can use this method to remotely access restricted or sensitive devices.
Where to go From Here
Windows Admin Center, if you so choose, can be used to manage your entire fleet of servers. You can find extensive documentation on Microsoft’s website. To a certain extent, Windows Admin Center can even manage your entire fleet of endpoints (albeit, an RMM tool like Meshcentral or TeamViewer would be more appropriate for endpoints).
Windows Admin Center is another tool to add to your arsenal and is incredibly useful for managing GUI-less environments.
В 2017 году Microsoft анонсировала работы по разработке бесплатного HTML5 веб-интерфейса для администрирования и централизованного управления серверами Windows Server. Проект получил кодовое название Project Honolulu. В апреле 2018 года Microsoft выпустила RTM решение и теперь данный продукт официально называется Windows Admin Center.
Идея Microsoft заключается в замене традиционных MMC консолей и других графических инструментов управления серверами Windows возможностью управления из браузера через единый веб интерфейс (по аналогии с веб-клиентом управления VMware vCenter). Admin Center разворачивается локально и может быть использован в том числе для управления серверами, изолированных от Интернета.
На данный момент проект Гонолулу находится в стадии preview и доступен как часть программы Windows Server Insider. В текущей версии из веб-интерфейса возможно выполнить около 80% типовых задач администрирования серверами Windows Server. По информации от Microsoft, RTM версия продукта будет доступна в марте 2018 года (вместе с выходом обновления 1803).
Содержание:
- Особенности, требования и ограничения Windows Admin Center
- Установка Windows Admin Center в Windows 10/ Windows Server 2016
- Использование консоли Admin Center для управления серверами Windows
Особенности, требования и ограничения Windows Admin Center
Windows Admin Center поддерживает управление следующими версиями ОС: Windows Server 2016, Windows Server 2012 / R2, Hyper-V 2016/2012R2/2012, Windows 10, северами Azure, а также Core редакциями. Возможно также управление целыми кластерами: Failover Clusters, Hyper-V Clusters и виртуальными машинами Hyper-V на них.
На управляемый хост не нужно устанавливать никаких агентов или дополнительных расширений. Коммуникация осуществляется выполняется через Remote PowerShell и WMI over WinRM с помощью RESTful API. На управляемых серверах должен быть установлен как минимум Management Framework (WMF) 5.0 (Powershell 5.0). На Windows Server 2012 / R2 WMF 5.0 нужно становить отдельно.
Узнать поддерживаемую версию Powershell можно с помощью команды:
$PSVersionTable
Сам веб интерфейс Windows Admin Centerнаписан на HTML 5 и корректно работает в Edge и Chrome (Internet Explorer пока полностью не поддерживается).
В последней доступной версии Windows Admin Center прямо из окна браузера поддерживается RDP подключение через веб-интерфейс и консоль PowerShell.
На Windows Server 2016 можно установить Windows Admin Center в режиме шлюза (Gateway Mode), в этом режиме возможно удаленно подключаться к консоли управление с других компьютерах. На Windows 10 / Windows Server 2012 клиент устанавливается в режиме Desktop Mode (консоль доступна только с локального компьютера).
Для авторизации на удаленных серверах можно вручную вводить данные для авторизации, или использовать Local Administration Password Solution (LAPS).
Установка Windows Admin Center в Windows 10/ Windows Server 2016
Установить Windows Admin Center можно на Windows 10 или на Windows Server (2016 и 1709) в режиме Gateway. Чтобы скачать msi дистрибутив Windows Admin Center (около 30 Мб), можно на странице https://docs.microsoft.com/en-us/windows-server/manage/windows-admin-center/understand/windows-admin-center
Установить дистрибутив Windows Admin Center можно из командной строки (с самоподписанным сертификатом сроком действия 60 дней)
msiexec /i HonoluluTechnicalPreview1712-05002.msi /qn /L*v log.txt SME_PORT=6516 SSL_CERTIFICATE_OPTION=generate
Либо с помощью обычного мастера установки. По умолчанию для управления используется порт 6515 (можно изменить). На Windows Server компонент Admin Center устанавливается в виде отдельной службы.

После установки веб интерфейс консоли Honolulu можно открыть, перейдя по адресу:
https://ip_сервера:6516
или с помощью значка на рабочем столе.

Использование консоли Admin Center для управления серверами Windows
По умолчанию в веб-консоли добавлен только один локальный сервер.
С помощью кнопки Add можно добавить
- Отдельный сервер (Server Manager)
- Отказоустойчивый кластер (Failover Cluster Manager)
- Кластер Hyper-V (Hyper-Converged Cluster Manager)
В нашем случае у нас только один сервер. Выберем его, чтобы открыть веб консоль управления. На этой странице отображаются характеристики сервера, а также его состояние в реальном времени (производительность, нагрузка и т.д.). прямо из этой панели можно выключить или перезагрузить сервер, изменить его имя.
В левом сайдбаре представлен список доступных функций, которыми можно управлять из веб-интерфейса. Кратко пробежимся по основным:
Список возможностей веб консоли Windows Admin Center пока не дотягивает до полноценного функционала всех инструментов управления Windows, однако со временем доступный функционал веб интерфейса будет существенно расширен. В дальнейшем Microsoft планирует опубликовать SDK, позволяющий партнерам расширять функционал консоли Admin Center.
Общая информация
Одним из новых инструментов администрирования серверов на базе операционной системы Windows является Windows Admin Center. Он реализует современный подход к управлению, когда с любого устройства через веб-браузер можно подключиться к панели управления инфраструктурой и получить информацию о состоянии сервера или произвести изменение его конфигурации.
При подключении пользователя к центру администрирования используются протоколы HTTP/HTTPS. Сам же центр администрирования использует WinRM/PowerShell для подключения к контролируемым серверам, получения от них информации и внесения изменений в конфигурацию. Соответственно, внедряя Windows Admin Center, нужно принимать во внимание каким образом будут производиться подключения компонентов друг к другу, и использовать защищенные версии протоколов (HTTPS и WinRM через HTTPS) когда соединения происходят через публичные сети (интернет).
Windows Admin Center устанавливается отдельно. Он не входит в состав операционной системы, поэтому дистрибутив необходимо скачать с сайта Майкрософт. Там же можно найти дополнительную информацию об этом продукте.
Загрузка и установка Windows Admin Center
Пройдем по всем шагам, необходимым для успешной установки консоли управления:
Открыв сайт Майкрософт в браузере, находим и нажимаем на ссылку для скачивания Windows Admin Center:

На открывшейся странице жмем Continue:

Заполняем форму, чтобы получить свою копию дистрибутива и нажимаем Continue, после чего начнется загрузка:

Дождавшись окончания загрузки запускаем установочный файл, принимаем лицензионное соглашение и жмем Next:

Выбираем использовать или нет службу обновлений Майкрософт (рекомендуется использовать), нажимаем Next:

На следующей странице содержится общая информация о способах использования устанавливаемого компонента, а также ссылка на статью с возможными сценариями установки. Нажимаем Next:

На странице конфигурирования шлюза содержатся два параметра — Allow Windows Admin Center to modify this machine`s trusted hosts settings — ставим галку, если серверы, которые будут подключаться к центру администрирования, не входят в домен Active Directory; Use WinRM over HTTPS only — ставим галку в том случае, если подключения от центра администрирования к другим серверам будут проходить через публичные сети (интернет). Если мы планируем управлять только локальным сервером, на котором установлен Windows Admin Center, можно оставить настройки по умолчанию и нажать Next:

Выбираем порт, по которому будут приниматься подключения к веб-консоли (для указанного порта будет создано разрешающее правило в брандмауэре операционной системы), а также указываем сгенерировать ли самоподписанный сертификат или же использовать другой сертификат, установленный на сервере. Чтобы не получать сообщений о недоверенных соединениях, можно использовать приобретенный и установленный заранее цифровой сертификат. Не забываем ставить галку Redirect HTTP port 80 traffic to HTTPS, чтобы использовались только зашифрованные соединения:

После нажатия кнопки Install ожидаем завершения процесса установки:

Процесс завершен, нажимаем Finish:

Подключение к Windows Admin Center
Для подключения к Windows Admin Center требуется использовать поддерживаемый браузер. Internet Explorer для этих целей не подходит. Можно использовать Microsoft Edge, но по умолчанию он может быть не установлен в серверной операционной системе. Самый оптимальный вариант — использовать Google Chrome. При подключении с локального сервера вводим в адресной строке браузера адрес https://localhost (если при установке был указан нестандартный порт для подключения, добавляем номер порта через двоеточие, например https://localhost:10443). Если подключаемся с удаленного компьютера, нужно указать либо внешний IP-адрес сервера, либо доменное имя, сопоставленное с внешним IP-адресом. При использовании нашего сервиса внешний IP-адрес сервера можно увидеть в панели управления сервером.
Если при конфигурировании мы выбрали использование недоверенного сертификата и получаем соответствующее предупреждение, чтобы продолжить подключение нажимаем кнопку Дополнительные:

В новой форме кликаем по ссылке Перейти на сайт … :

Вводим учетные данные для подключения и попадаем на главную страницу административной веб-консоли. Если понадобится сменить язык отображения консоли, кликаем по шестеренке в правом верхнем углу страницы:

В настройках переходим в раздел Язык/Регион и в выпадающих списках выбираем нужные значения. После чего жмем кнопку Сохранить и перезагрузить в самом низу страницы:

Для возврата на главную страницу нужно кликнуть левой кнопкой по надписи Windows Admin Center в левом верхнем углу. С главной страницы можно подключиться к имеющемуся серверу (клик по серверу в списке), либо добавить дополнительные серверы (клик по кнопке Добавить):

При добавлении сервера потребуется указать его имя или IP-адрес. Если сервер будет доступен, система запросит реквизиты для подключения. В случае успеха сервер появится в списке подключенных:

Кликнув по серверу в списке мы попадем в раздел администрирования. На главной странице будет отображена общая информация о сервере и статистика использования ресурсов (процессорные мощности, оперативная память, пропускная способность сети) в реальном времени в виде графиков:

С левой стороны расположена навигационная панель, с помощью которой можно переключаться между разными разделами административной консоли и получать доступ к управлению:
1. Настройками и правилами брандмауэра:

2. Процессами операционной системы:

3. Локальными каталогами и файлами:

4. Учетными записями пользователей и группами пользователей:

5. Интерактивной консолью PowerShell:

и многим, многим другим.
191028
Санкт-Петербург
Литейный пр., д. 26, Лит. А
+7 (812) 403-06-99
![]()
700
300
ООО «ИТГЛОБАЛКОМ ЛАБС»
191028
Санкт-Петербург
Литейный пр., д. 26, Лит. А
+7 (812) 403-06-99
![]()
700
300
ООО «ИТГЛОБАЛКОМ ЛАБС»
In this post, you will learn how to install Windows Admin Center on Windows 11 PC. We will download the latest version of Windows Admin Center and install it on Windows 11 PC.
Windows Admin Center can be installed on Windows 11 and is fully compatible with computers running Windows 11.
According to Microsoft, Windows Admin Center is a lightweight, browser-based GUI platform and tool set for IT Admins to manage Windows Server, Windows 10 and Windows 11.
It’s the evolution of familiar in-box administrative tools, such as Server Manager and Microsoft Management Console (MMC) into a modernized, simplified, integrated, and secure experience.
Windows Admin Center is a locally deployed, browser-based app for managing Windows servers, clusters, hyper-converged infrastructure, as well as Windows 11 PCs.
On a Windows 11 PC, when you install Windows Admin Center, it offers the following benefits :
- Simple and modern management experience
- Hybrid capabilities
- Integrated tool set
- Designed for extensibility
This post covers the manual installation of Windows Admin Center on Windows 11 computer. For deploying Windows Admin Center on multiple Windows 11 PCs, refer to deploy Windows Admin Center using SCCM.
Download Windows Admin Center
On Windows 11 PC, you can download the latest version of Windows Admin Center from Microsoft evaluation center. Under Window Server products and resources, look for Windows Admin Center and select Continue.
The Windows Admin Center installer is available as .msi installer. If you are deploying this WindowsAdminCenter.msi using SCCM or ConfigMgr, the installation commands will be populated automatically.
Read: how to deploy Windows Admin Center using SCCM.
Before you download the Windows Admin Center setup file, you will be asked for few details, enter them and click Download. What you get is the WindowsAdminCenter.msi installer.
The Windows Admin Center updates are released frequently by Microsoft. You can update Windows Admin Center using Windows Updates.

Let’s see how to install Windows Admin Center on Windows 11 PC. Right click WindowsAdminCenter.msi and click Install. On the Windows Admin Center setup screen, select I accept these license terms and click Next.

For sending diagnostic data to Microsoft, there are two options :-
- Required diagnostic data – Select this option if you want to send info about your installation of Windows Admin Center, it’s settings and capabilities to Microsoft.
- Required and optional diagnostic data – Select this option to send info about how you use features, plus additional info about application health, activity, error reporting.
Select the appropriate option and click Next.

As mentioned earlier, on your Windows 11 PC, you can update the Windows Admin Center via Microsoft Update. Select Use Microsoft Update when I check for updates and click Next.

Once you install Windows Admin Center, you can manage computers directly from this PC using a web browser. Click Next.

You must select a port for the Windows Admin Center site. By default, the Windows Admin Center uses port 6516, however you can enter a different port number.
You can also allow the installer to create a shortcut to launch Windows Admin Center.
The option Automatic update Windows Admin Center ensure the latest updates are installed via Windows Updates on Windows 11.
Click Install.

The Windows Admin Center installation on Windows 11 is complete. The next important step is to select a certificate which is covered in the next step. Click Finish.

Launch Windows Admin Center on Windows 11 PC
There are two ways to launch Windows Admin Center on the Windows 11 PC:
- On your Windows 11 PC, Click Start > type Windows Admin Center in the Search box and open the Windows Admin Center application.
- You can also launch the Windows Admin Center by using the desktop shortcut created by Windows Admin Center setup.
When you start Windows Admin Center from the Start menu, it opens in your default browser. I recommend using Microsoft Edge browser because it is secure, and the performance is excellent.
Configure Windows Admin Center Certificate for Authentication
After you install Windows Admin Center on Windows 11 PC and launch it, the first step involves selecting a client certificate. You should see a Windows Admin Center client certificate prompt.

If you select Client Information, the certificate details are displayed. To use this certificate, select OK.

With Windows Admin Center installed, you can manage almost everything from your local browser. For example, you can select Server Manager tool and add your Windows Servers existing in the AD domain.
You can also add tool such as Computer Management, Cluster Manager and the possibilities are endless. As I explore these tools, I will publish the information. Keep following my blog for more updates on Windows Admin Center.


Prajwal Desai is a Microsoft MVP in Intune and SCCM. He writes articles on SCCM, Intune, Windows 365, Azure, Windows Server, Windows 11, WordPress and other topics, with the goal of providing people with useful information.