В 2017 году Microsoft анонсировала работы по разработке бесплатного HTML5 веб-интерфейса для администрирования и централизованного управления серверами Windows Server. Проект получил кодовое название Project Honolulu. В апреле 2018 года Microsoft выпустила RTM решение и теперь данный продукт официально называется Windows Admin Center.
Идея Microsoft заключается в замене традиционных MMC консолей и других графических инструментов управления серверами Windows возможностью управления из браузера через единый веб интерфейс (по аналогии с веб-клиентом управления VMware vCenter). Admin Center разворачивается локально и может быть использован в том числе для управления серверами, изолированных от Интернета.
На данный момент проект Гонолулу находится в стадии preview и доступен как часть программы Windows Server Insider. В текущей версии из веб-интерфейса возможно выполнить около 80% типовых задач администрирования серверами Windows Server. По информации от Microsoft, RTM версия продукта будет доступна в марте 2018 года (вместе с выходом обновления 1803).
Содержание:
- Особенности, требования и ограничения Windows Admin Center
- Установка Windows Admin Center в Windows 10/ Windows Server 2016
- Использование консоли Admin Center для управления серверами Windows
Особенности, требования и ограничения Windows Admin Center
Windows Admin Center поддерживает управление следующими версиями ОС: Windows Server 2016, Windows Server 2012 / R2, Hyper-V 2016/2012R2/2012, Windows 10, северами Azure, а также Core редакциями. Возможно также управление целыми кластерами: Failover Clusters, Hyper-V Clusters и виртуальными машинами Hyper-V на них.
На управляемый хост не нужно устанавливать никаких агентов или дополнительных расширений. Коммуникация осуществляется выполняется через Remote PowerShell и WMI over WinRM с помощью RESTful API. На управляемых серверах должен быть установлен как минимум Management Framework (WMF) 5.0 (Powershell 5.0). На Windows Server 2012 / R2 WMF 5.0 нужно становить отдельно.
Узнать поддерживаемую версию Powershell можно с помощью команды:
$PSVersionTable
Сам веб интерфейс Windows Admin Centerнаписан на HTML 5 и корректно работает в Edge и Chrome (Internet Explorer пока полностью не поддерживается).
В последней доступной версии Windows Admin Center прямо из окна браузера поддерживается RDP подключение через веб-интерфейс и консоль PowerShell.
На Windows Server 2016 можно установить Windows Admin Center в режиме шлюза (Gateway Mode), в этом режиме возможно удаленно подключаться к консоли управление с других компьютерах. На Windows 10 / Windows Server 2012 клиент устанавливается в режиме Desktop Mode (консоль доступна только с локального компьютера).
Для авторизации на удаленных серверах можно вручную вводить данные для авторизации, или использовать Local Administration Password Solution (LAPS).
Установка Windows Admin Center в Windows 10/ Windows Server 2016
Установить Windows Admin Center можно на Windows 10 или на Windows Server (2016 и 1709) в режиме Gateway. Чтобы скачать msi дистрибутив Windows Admin Center (около 30 Мб), можно на странице https://docs.microsoft.com/en-us/windows-server/manage/windows-admin-center/understand/windows-admin-center
Установить дистрибутив Windows Admin Center можно из командной строки (с самоподписанным сертификатом сроком действия 60 дней)
msiexec /i HonoluluTechnicalPreview1712-05002.msi /qn /L*v log.txt SME_PORT=6516 SSL_CERTIFICATE_OPTION=generate
Либо с помощью обычного мастера установки. По умолчанию для управления используется порт 6515 (можно изменить). На Windows Server компонент Admin Center устанавливается в виде отдельной службы.

После установки веб интерфейс консоли Honolulu можно открыть, перейдя по адресу:
https://ip_сервера:6516
или с помощью значка на рабочем столе.

Использование консоли Admin Center для управления серверами Windows
По умолчанию в веб-консоли добавлен только один локальный сервер.
С помощью кнопки Add можно добавить
- Отдельный сервер (Server Manager)
- Отказоустойчивый кластер (Failover Cluster Manager)
- Кластер Hyper-V (Hyper-Converged Cluster Manager)
В нашем случае у нас только один сервер. Выберем его, чтобы открыть веб консоль управления. На этой странице отображаются характеристики сервера, а также его состояние в реальном времени (производительность, нагрузка и т.д.). прямо из этой панели можно выключить или перезагрузить сервер, изменить его имя.
В левом сайдбаре представлен список доступных функций, которыми можно управлять из веб-интерфейса. Кратко пробежимся по основным:
Список возможностей веб консоли Windows Admin Center пока не дотягивает до полноценного функционала всех инструментов управления Windows, однако со временем доступный функционал веб интерфейса будет существенно расширен. В дальнейшем Microsoft планирует опубликовать SDK, позволяющий партнерам расширять функционал консоли Admin Center.
Skip to content
Where I work, the “OS Support” and “Application Support” functions are different verticals. Sometimes what constitutes an “OS” and what constitutes an “application” is nebulous. In this case, we needed to install a web-based application but found TCP port 443 was already bound to Windows. Unfortunately, the OS support group disclaims any ownership of “Windows Admin Center” and told me I was welcome to fix it myself. So … oddly, there isn’t any easily located configuration for this thing. You have to go through the add/remove programs and modify the installation of Windows Admin Center.
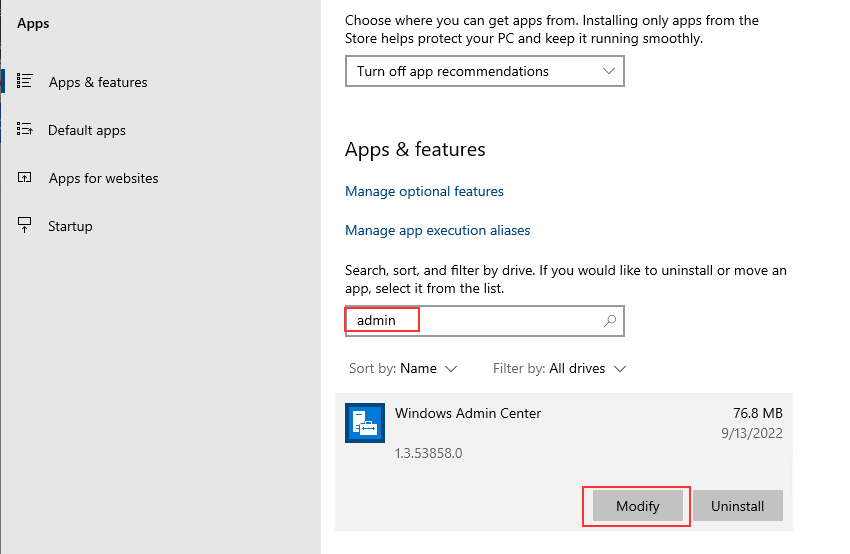
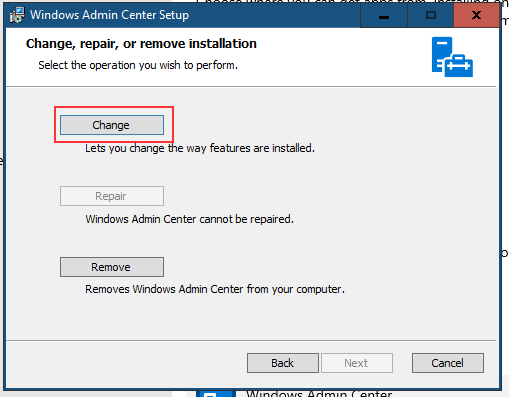
Select “Change”
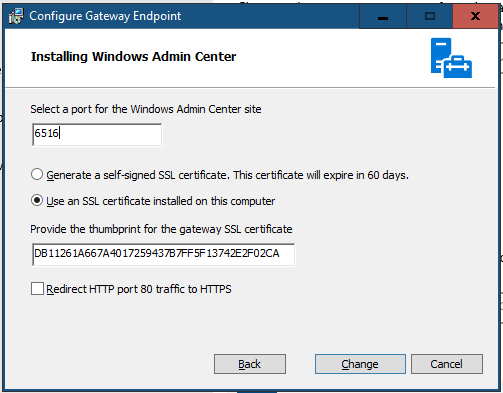
You will get the configuration panel — here, you can specify a different port for the Admin Center.
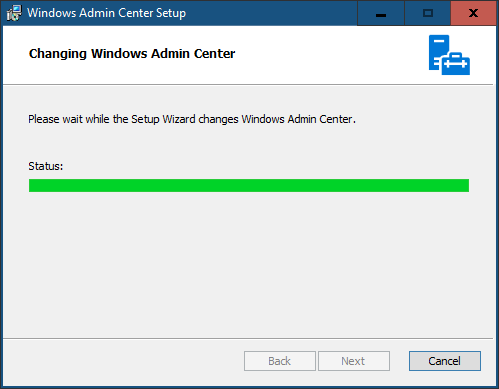
Let the installer complete …
Voila — not using port 443!
If you want to learn how to download Windows Admin Center, set it up including tweaking the Windows Admin Center port, you’ve come to the right place.
Not a reader? Watch this related video tutorial!
Not seeing the video? Make sure your ad blocker is disabled.
In this tutorial, you’re going to learn how to set up Windows Admin Center from scratch from download all the way to installing new extensions!
Prerequisites
To fully examine the capabilities of Windows Admin Center, you need to have more than just a desktop in place. To follow along, you will need the following:
- A test Windows domain with a domain controller. This guide is a good place to start if you do not have one in place.
- A fresh install of Windows Server 2016 or Windows Server 2019 (This article will be using Windows Server Core 2019). You can find the installation media on Microsoft’s Website.
Windows Admin Center works on Windows 10, but will not allow remote access. It will launch like an application instead of service and can only be used from the computer it launches from. Windows Server allows for Windows Admin Center to be used from any computer with a web browser.
Downloading Windows Admin Center (with Installation)
Windows Admin Center is freely available as an MSI on Microsoft’s Website. Windows Admin Center has no licensing costs and is available to install on Windows 10 (1709 or later), or Window Server 2016 and up.
Downloading and installing Windows Admin Center is typically a seamless process. You can find it via the Windows Server Evaluation Portal, or just using a direct download link.
To save you some time downloading Windows Admin Center below is a PowerShell snippet that will both download and install on your Windows Server.
Note the SME_PORT=6516 option below. By default, the Windows Admin Center port is 6516. If you’d like to change the port upon installation, you can do that here. The SSL_CERTIFICATE_OPTION option is creating a self-signed certificate for Windows Admin Center to use.
## Download the msi file
Invoke-WebRequest 'https://aka.ms/WACDownload' -OutFile "$pwd\WAC.msi"

## install windows admin center
$msiArgs = @("/i", "$pwd\WAC.msi", "/qn", "/L*v", "log.txt", "SME_PORT=6516", "SSL_CERTIFICATE_OPTION=generate")
Start-Process msiexec.exe -Wait -ArgumentList $msiArgs
Adding Firewall Rules
The MSI installer will automatically allow remote access to the Windows Admin Center port, however, that only applies to your network’s current state. but if your network profile changes (for example, from private to domain), that access will become invalid.
A network profile is a set of firewall rules that can change depending on the state of your server. You can think of it is as a security group for firewall settings. Typically there are four profiles: Public, Private, Work, and Domain.
If your server is currently in a workgroup (for this tutorial we’ll assume so), ensure you create inbound Windows firewall exceptions for the Windows Admin Center port of 6516 (or whatever port you set of the SME_PORT option above.
When the Winodws server is added to a domain, the network profile will change to Domain and, if not defined for the Domain network profile, you might not be able to access Windows Admin Center.
Below you will find a few PowerShell commands to run to open up the Windows Admin Center port.
> New-NetFirewallRule -DisplayName "Allow Windows Admin Center" -Direction Outbound -profile Domain -LocalPort 6516 -Protocol TCP -Action Allow

> New-NetFirewallRule -DisplayName "Allow Windows Admin Center" -Direction Inbound -profile Domain -LocalPort 6516 -Protocol TCP -Action Allow
Logging into Windows Admin Center
Now that you have initially installed Windows Admin Center, you can now start managing your server using a web browser, like Chrome or the new Microsoft Edge.
To access Windows Admin Center:
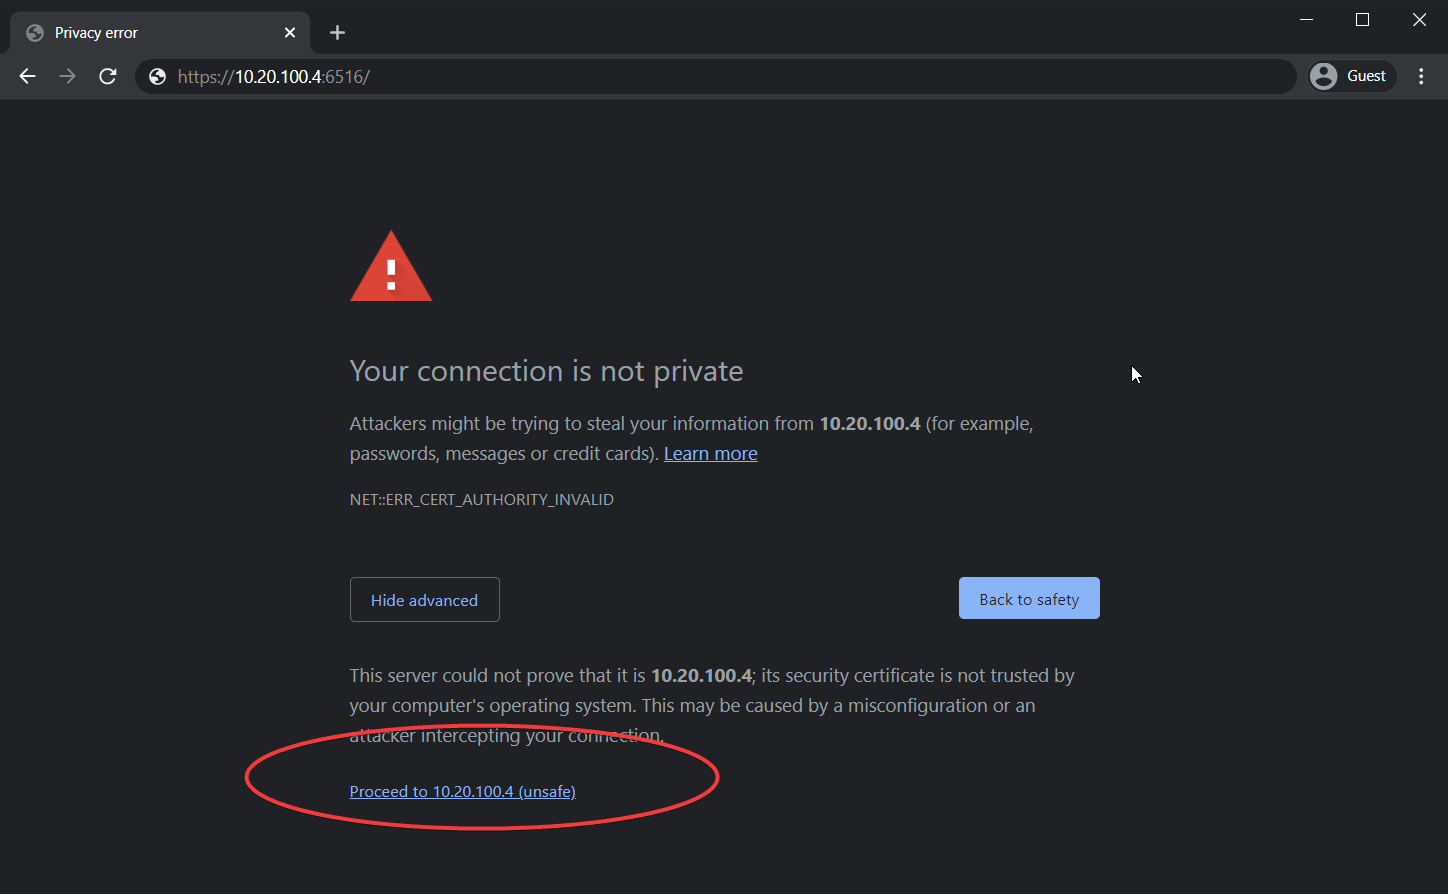
- Open up a web browser on any computer on the same LAN as the Windows server and go to https://<server ip>:6516. This guide is using https://10.20.100.4:6516.
If you do not know the IP of your server, you can retrieve it by running ipconfig in the PowerShell console on the server.
Related: The ipconfig Commands You Need to Know
2. You will likely be greeted with a big warning saying Your Connection is not private. Select “show advanced” and then “Proceed to <IP> (unsafe). Click on Proceed to <server IP> (unsafe).
You are seeing this warning because Windows Admin Center is using a self-signed certificate and your local browser does not trust it.
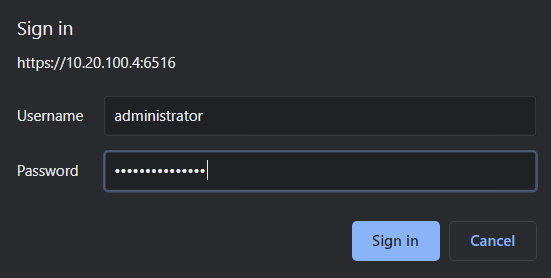
3. Provide the local administrator username and password at the Sign in prompt.
This tutorial is using the local administrator account for convenience. But you can get much more advanced in this area by checking out the User Access Options documentation.
Joining a Domain with Windows Admin Center
Windows Admin Center has a slew of features and ways to manage Windows Server. To provide a demonstration of what Windows Admin Center can do, let’s briefly cover how to add the Windows Server to a domain.
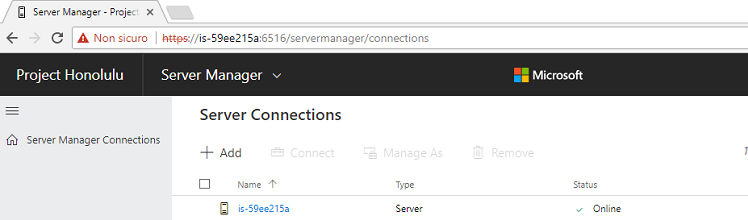
Whenever you first log in, you will be greeted by a list of computers, of which, there’s actually only a single computer: the one you installed Windows Admin Center on. You can see an example of what this screen looks like below.
- To select a server to work with, click on the (probably only) Windows server in the list.

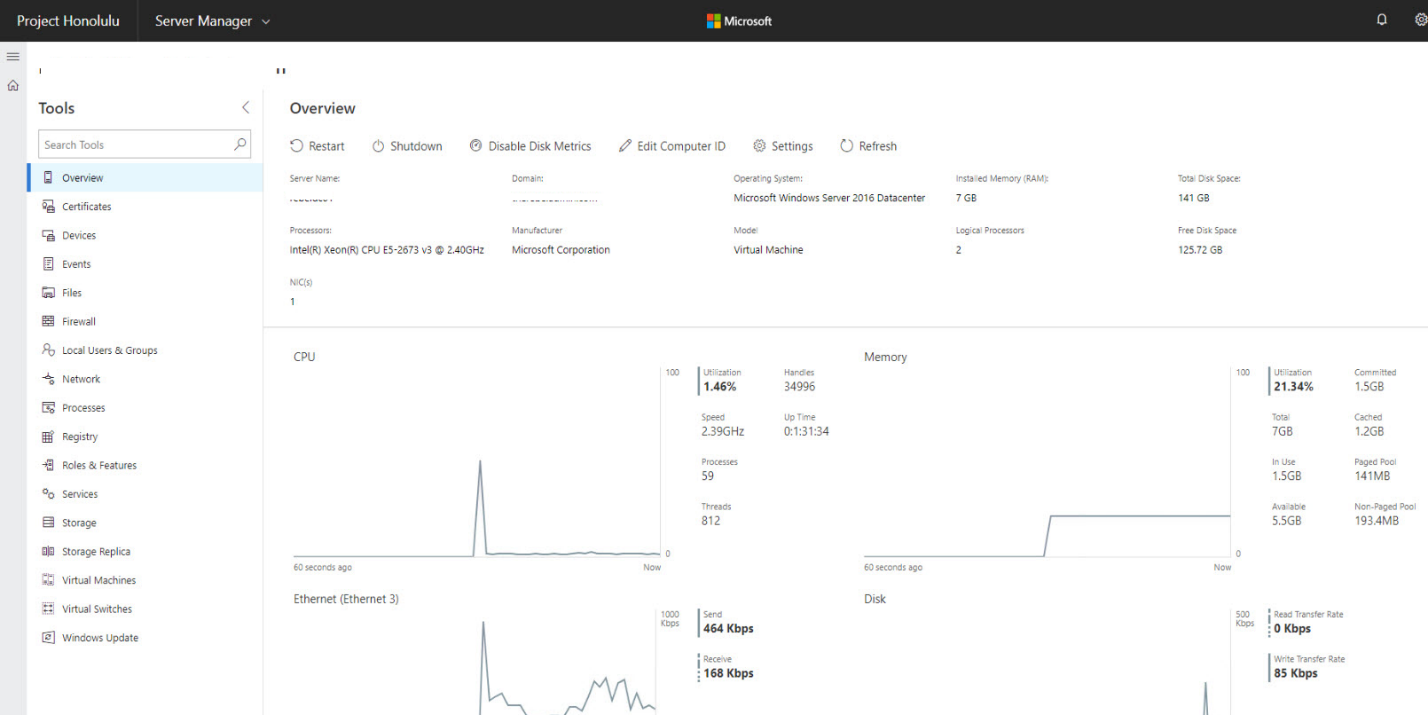
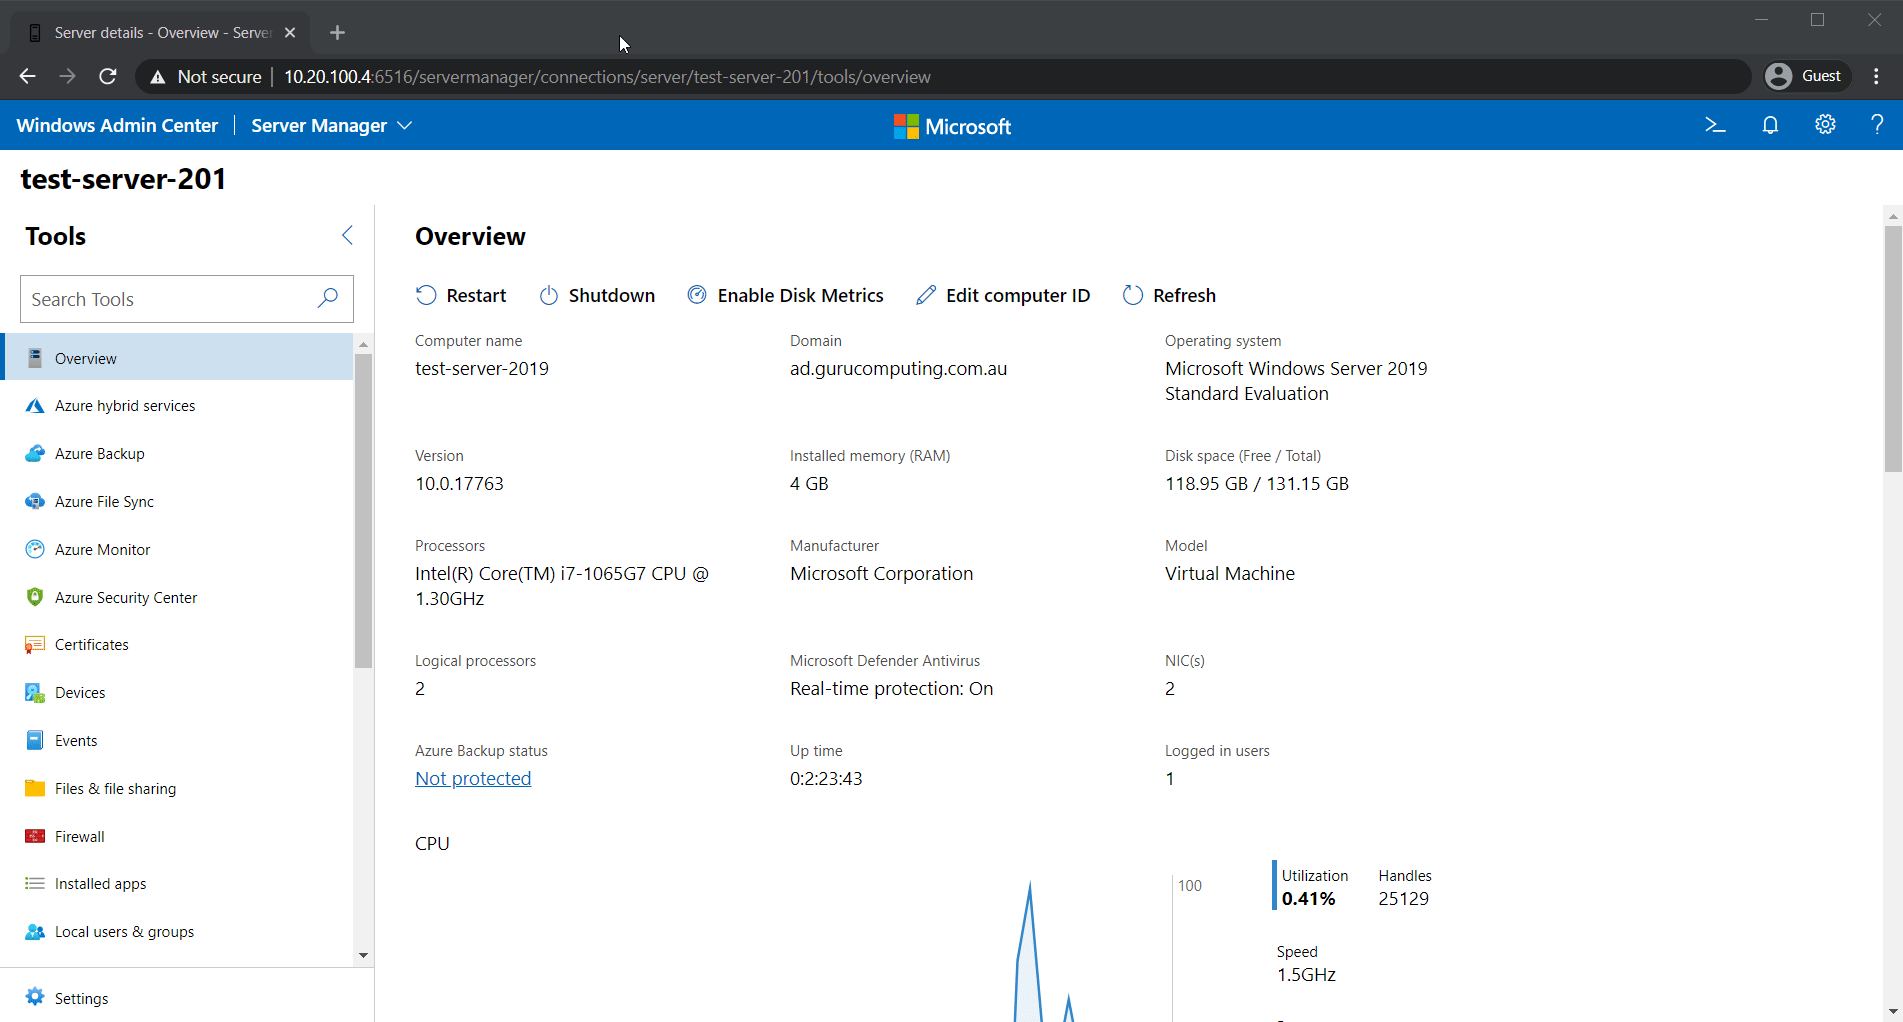
2. Once selected, Windows Admin Center will present you with a dashboard of your Windows Admin Center server (as seen below). You will also notice that the computer name (1) is randomly generated (if you used the Windows installer), and the Domain (2) doesn’t exist.
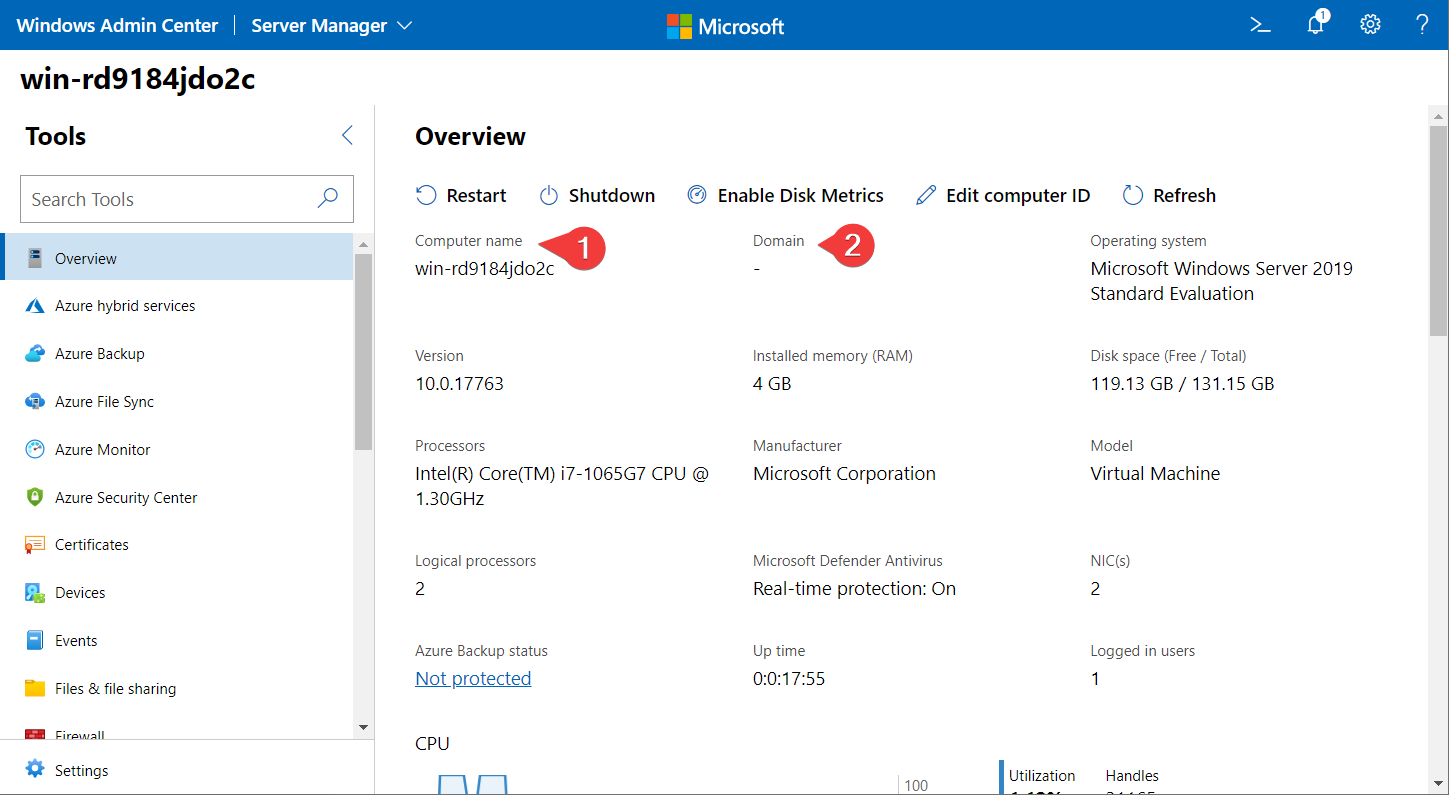
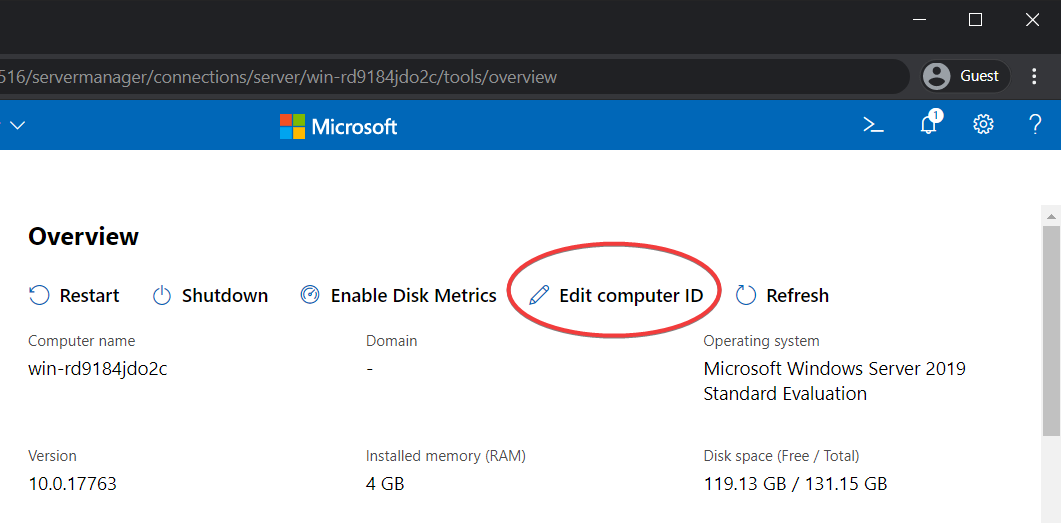
3. Select Edit Computer ID on the dashboard. The Computer ID is how Windows Admin Center defines common properties like hostname and domain membership.
4. Enter your desired computer name and domain. This tutorial is using a domain called ad.gurucomputing.com.au and Test-Server-2019 as the computer name.
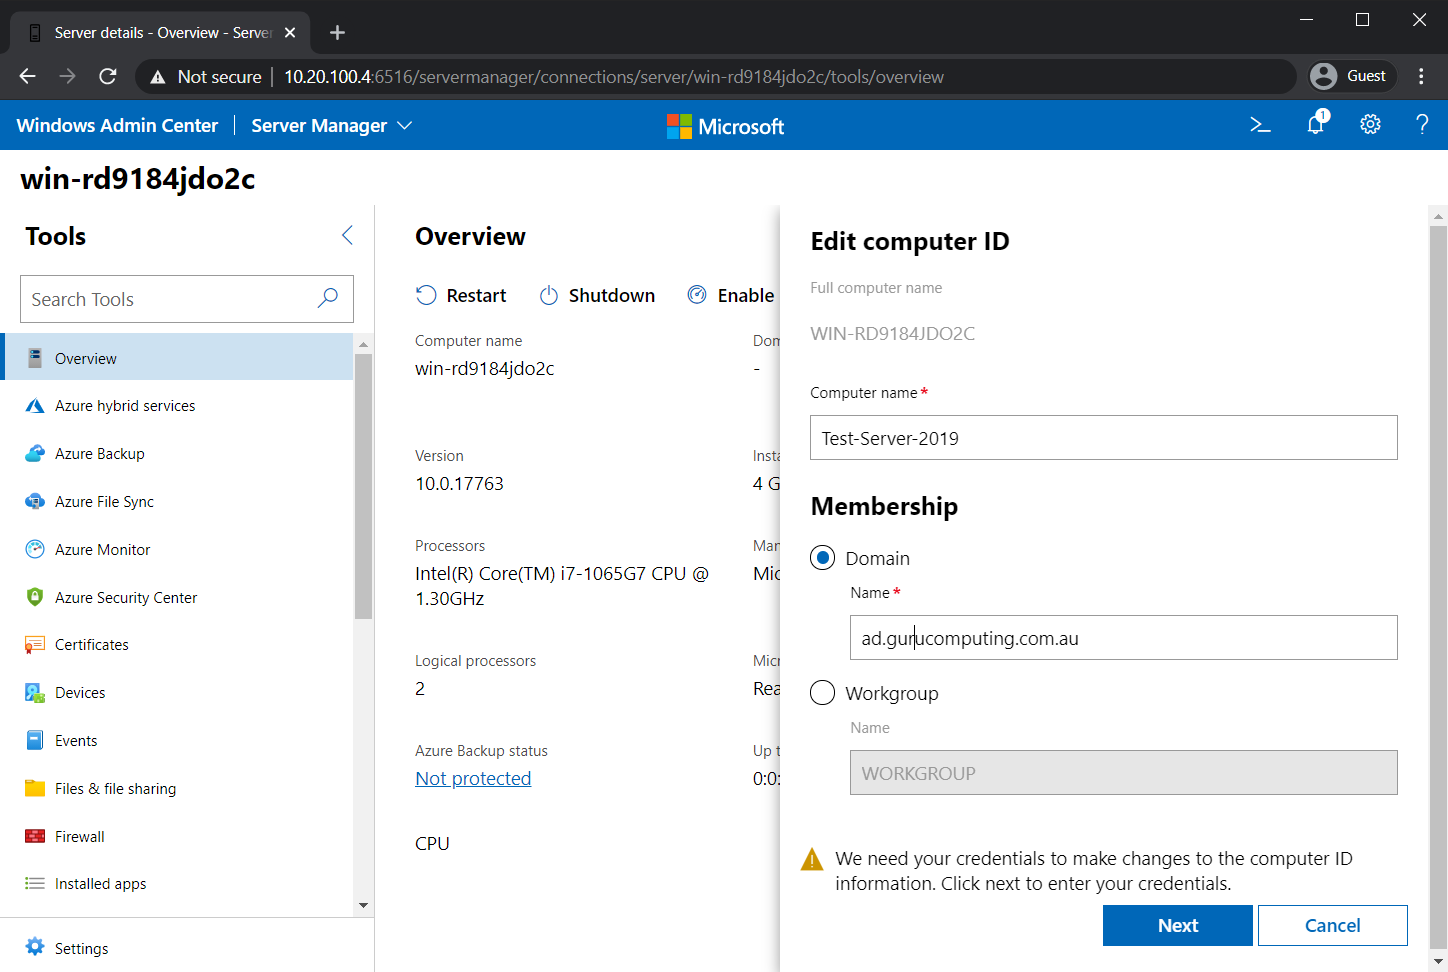
5. Supply the Domain User and Password with rights to join the domain (this article us using ad.gurucomputing.com.au/christopher.bisset), enable the Restart immediately checkbox, and click on Save. You will then be prompted to reboot and choose to do so.
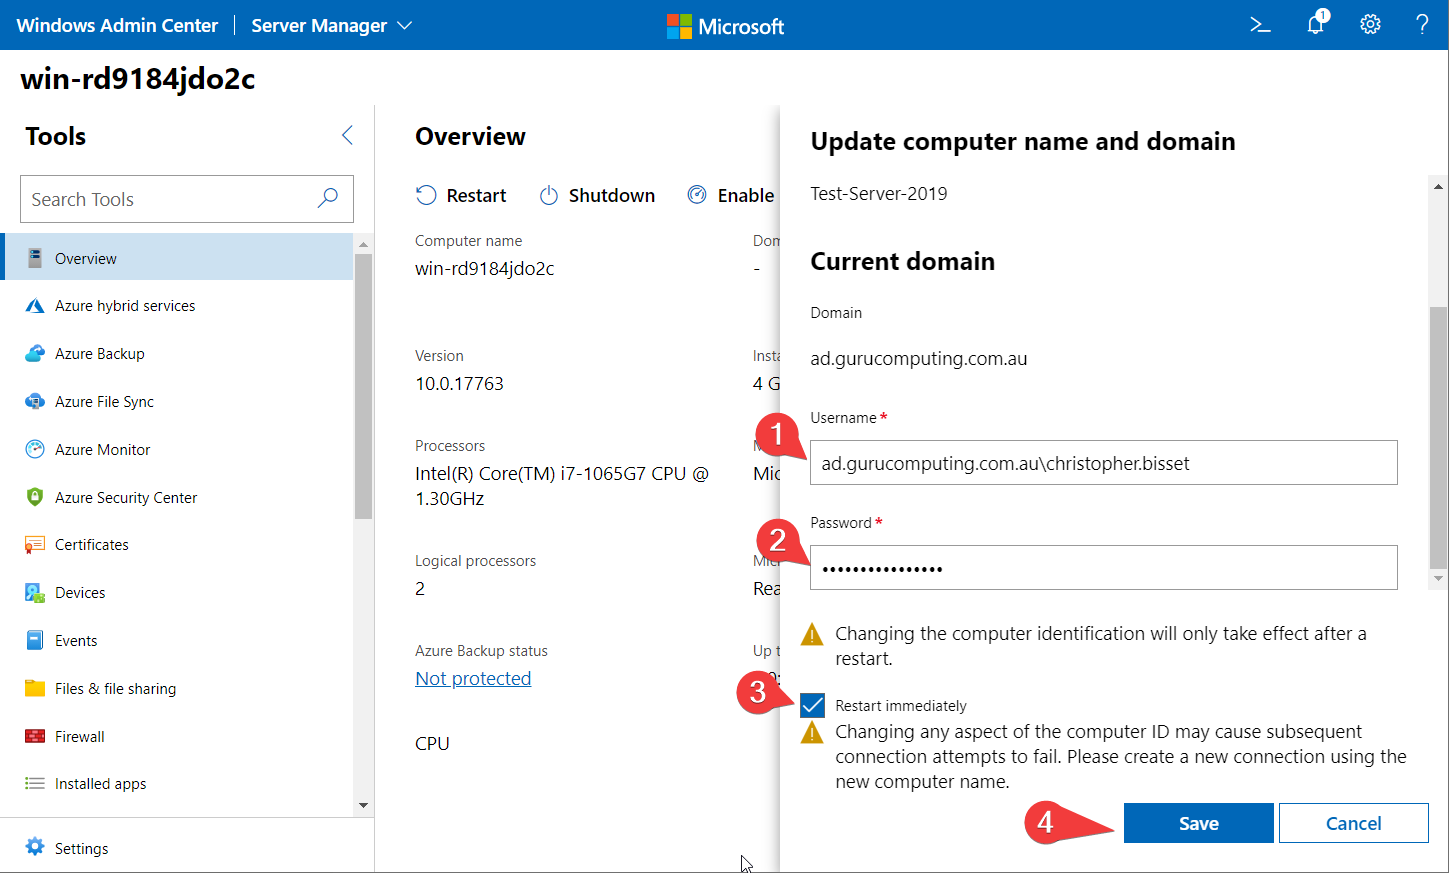
6. Upon reboot, log back into Windows Admin Center (https://10.20.100.4:6516 in the example) with your domain admin credentials (not the local administrator user account) and click on the test Winodws server again.
You should now see a view of the updated dashboard. You will now notice in the below screenshot that the computer name is updated as well as the domain.
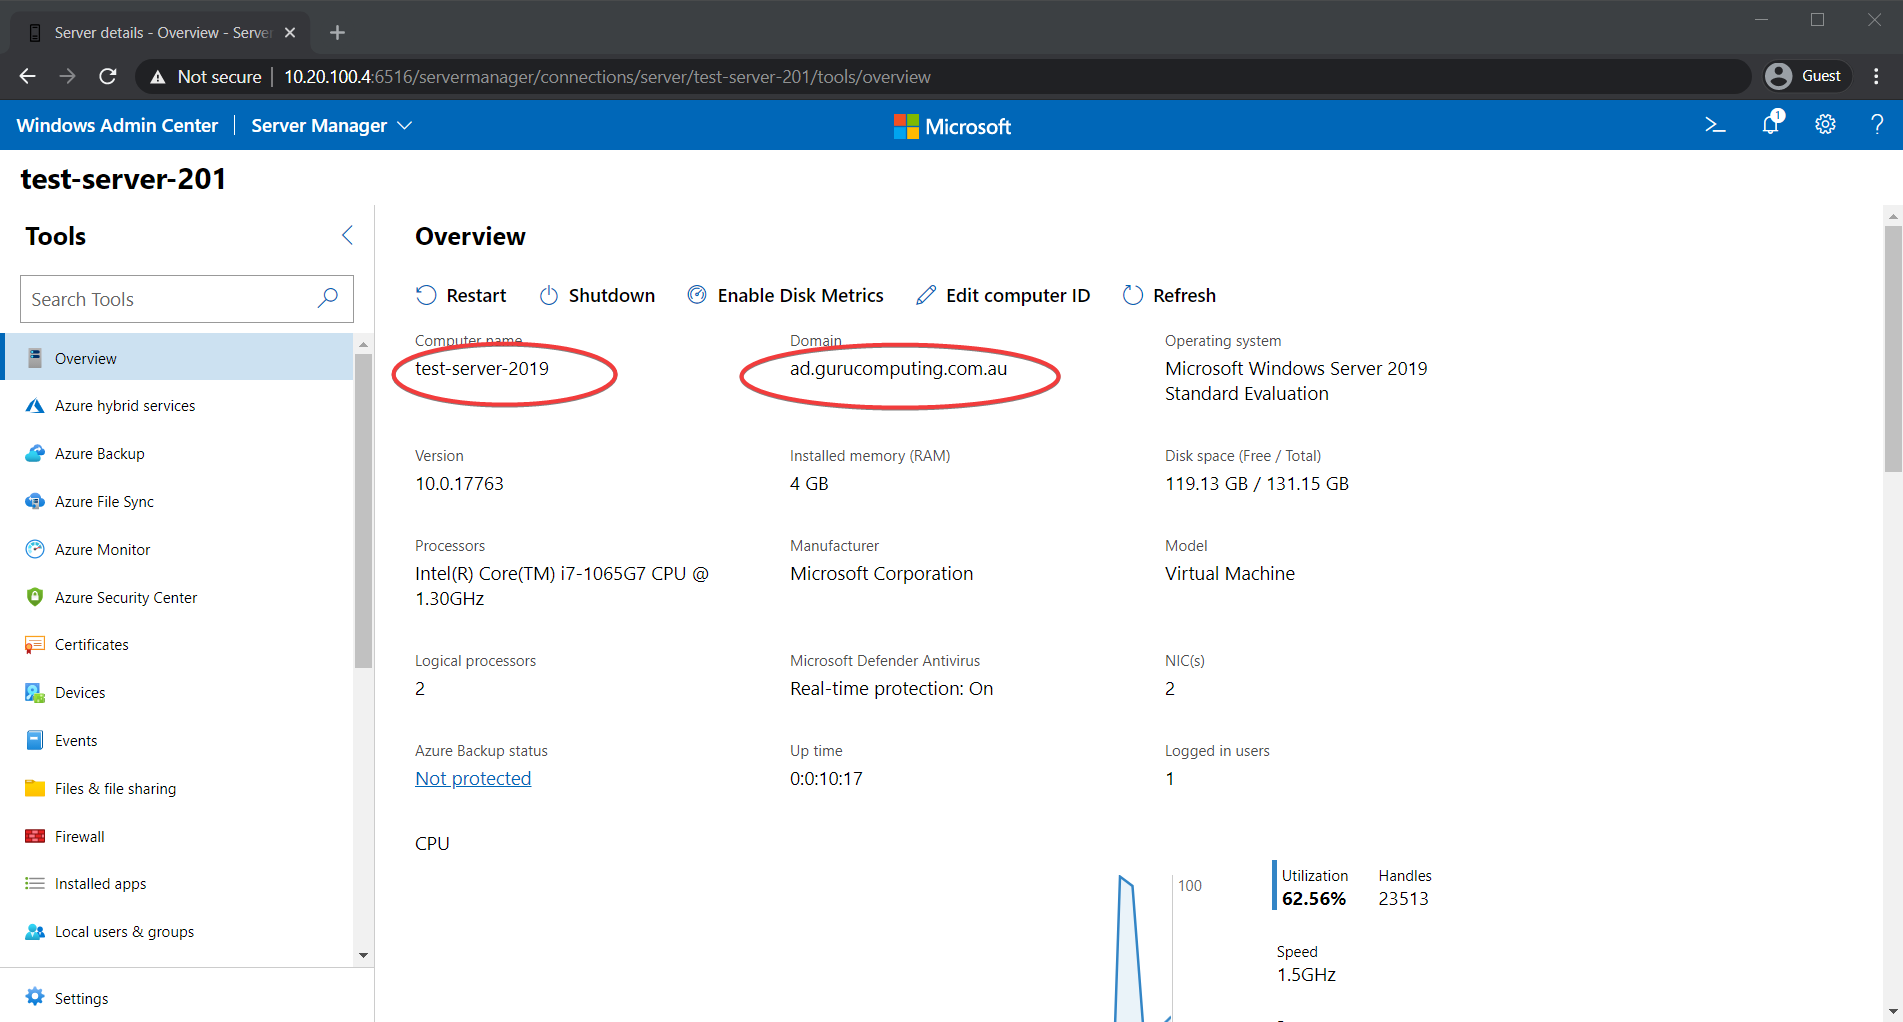
Note that the Name in the Top Left has been cut off, as older systems expect a max of 15 characters.
Now that you have successfully joined the domain, you can start exploring the options that Windows Admin Center provides. You will immediately notice that most of the sidebar categories (the left side menu in the screenshot below) look suspiciously like control panel categories, and in fact, most of them are.
Windows Admin Center is designed to be a web replacement for server management. Most of the categories (such as Firewall, Installed apps, etc.) are a direct replacement for the control panel.
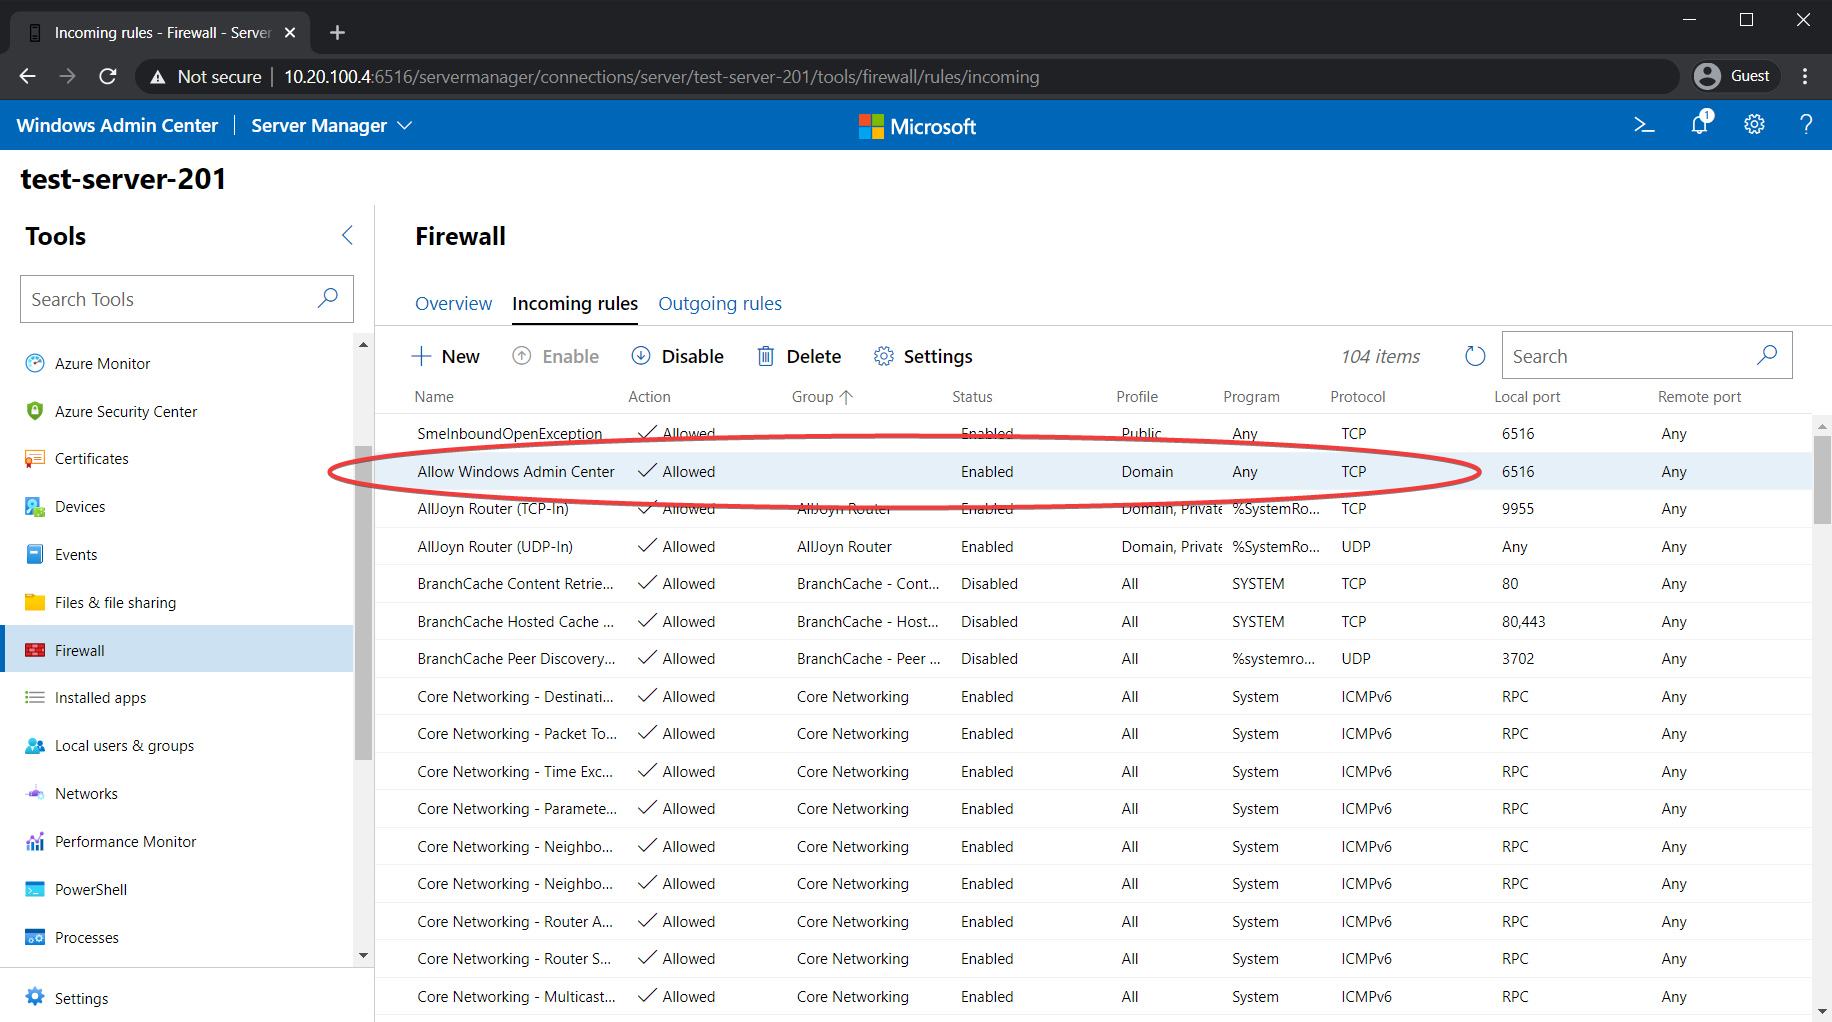
For example, when viewing a Windows server, select the Firewall category. You’ll see that firewall exception you made using PowerShell earlier.
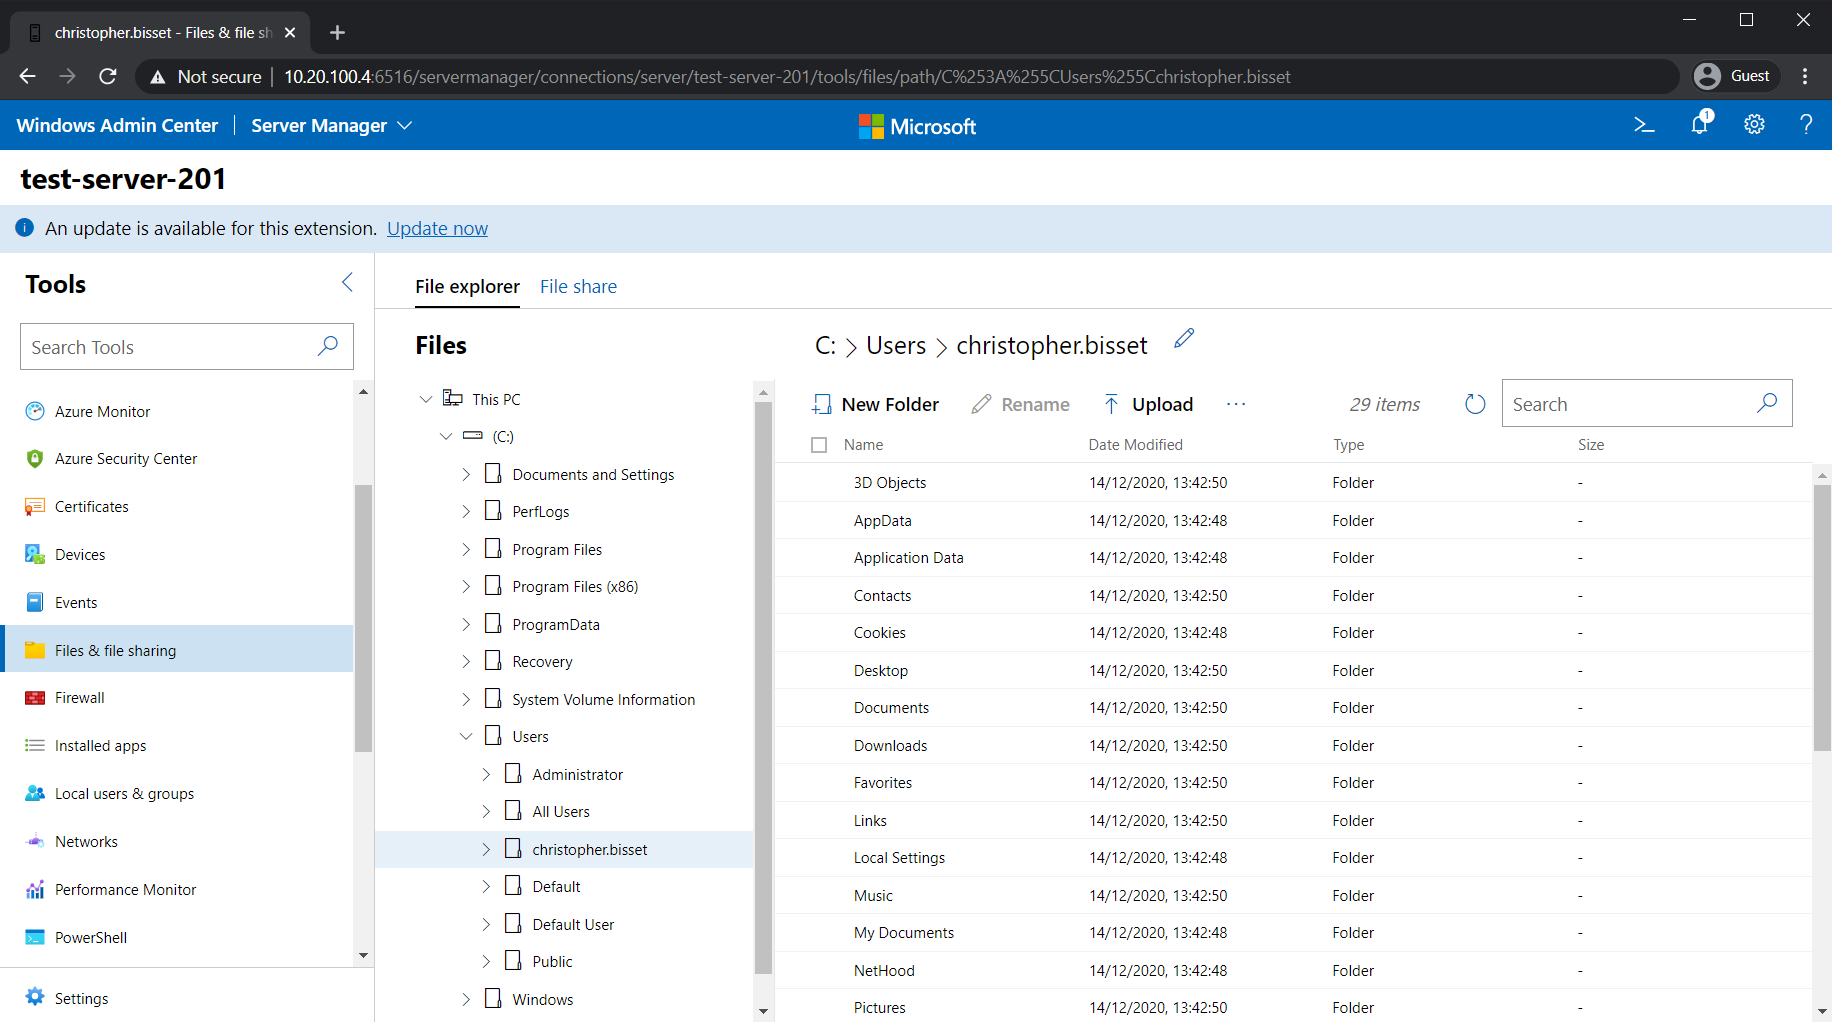
There are also several categories designed for remote management of the server. Files & File Sharing allows you to directly upload, download, or modify files on your server as shown in the following screenshot.
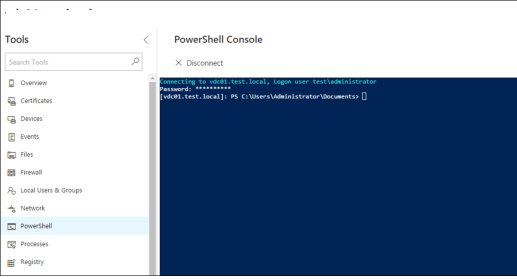
The PowerShell and Remote Desktop categories, in particular, are extremely interesting. PowerShell allows you to open a remote terminal directly on the machine as if you were using remote PowerShell natively!
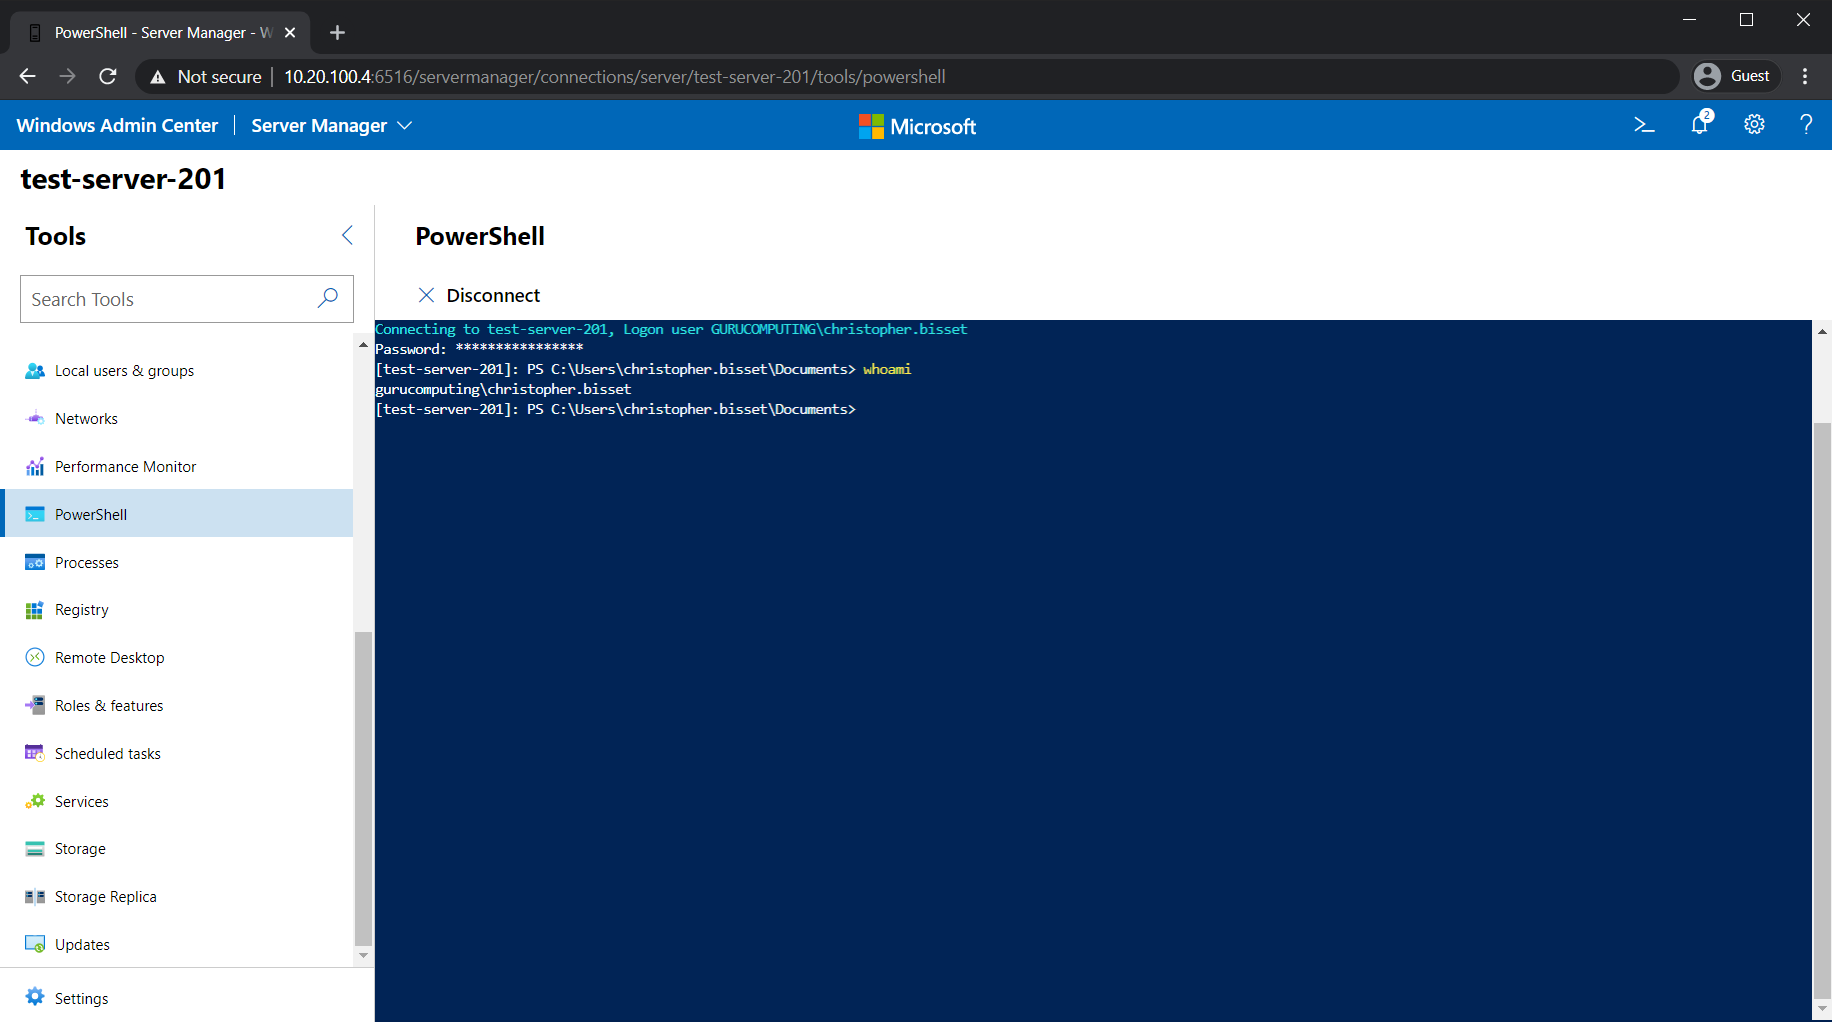
This remote PowerShell console is especially helpful for workgroup servers, remotely managing a workgroup server can be extremely tricky without a Domain.
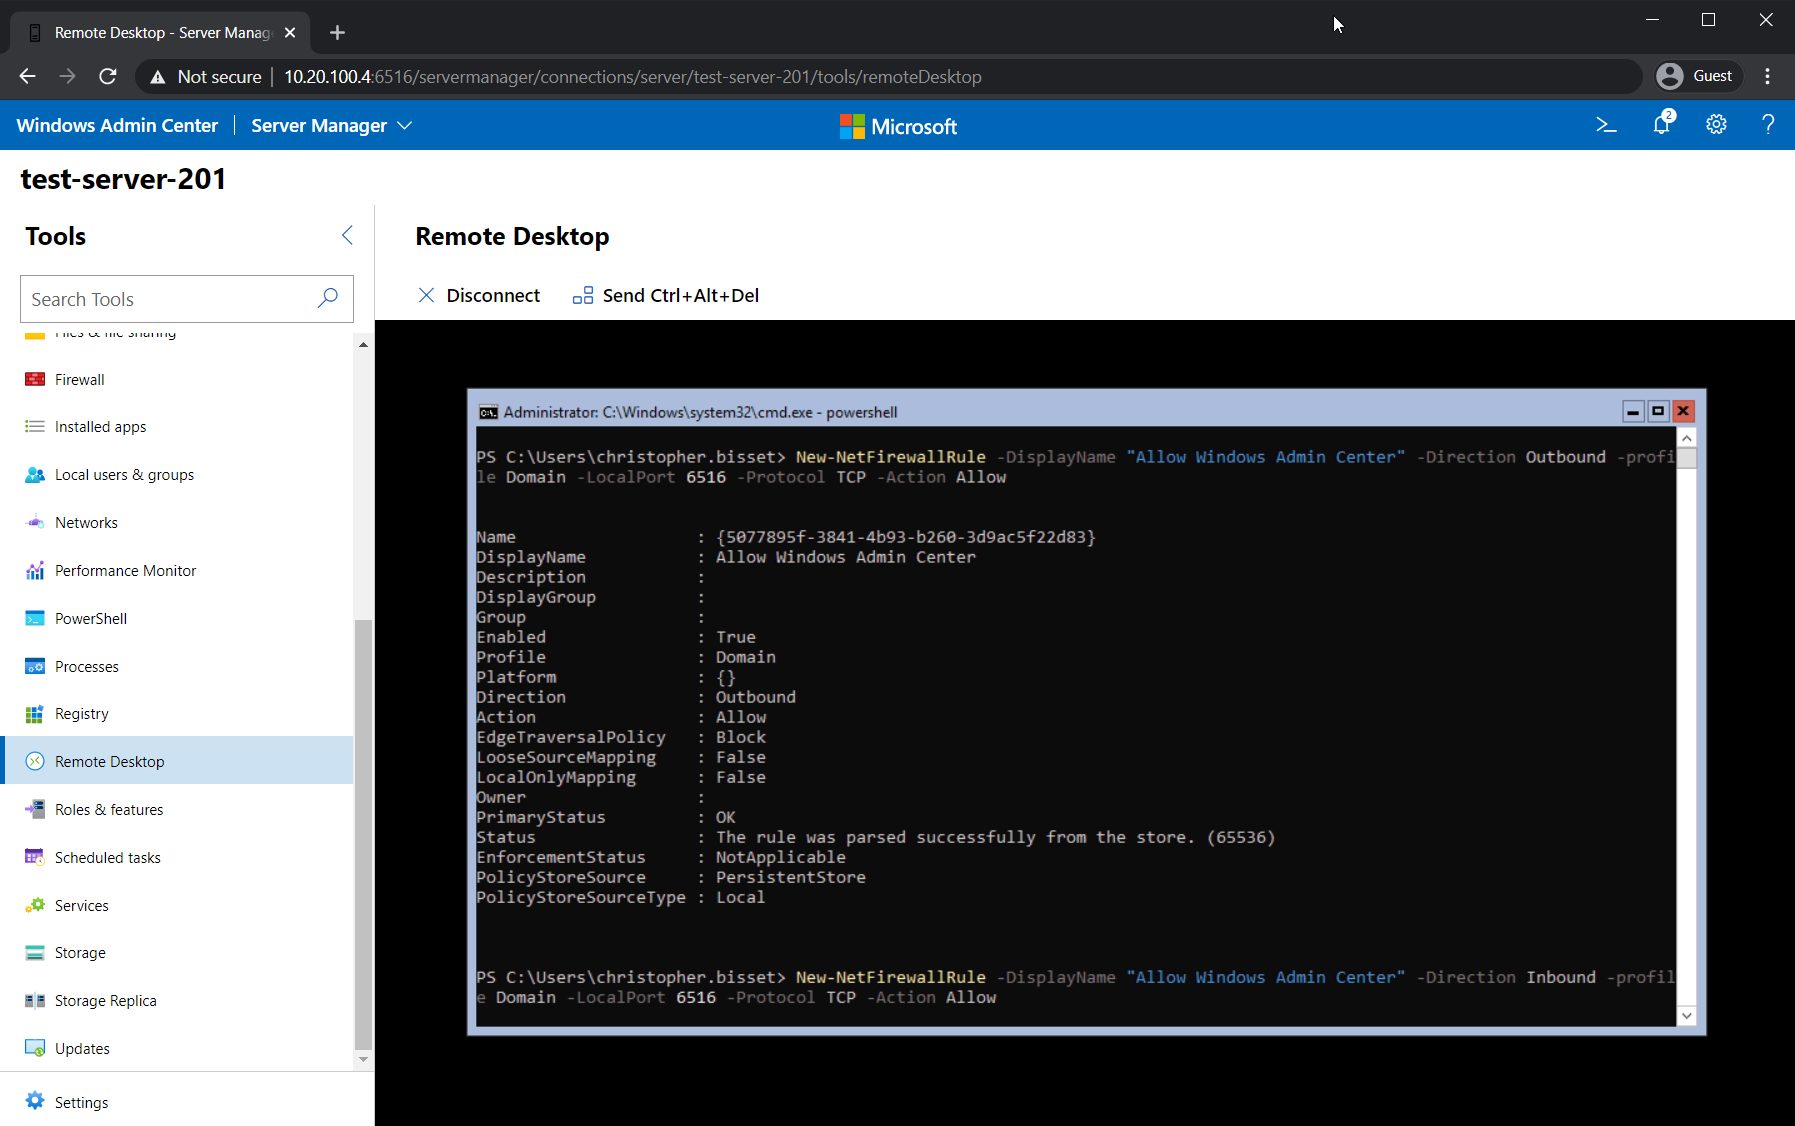
The Remote Desktop option allows you to open up RDP directly in your browser. RDP in a browser means you can have a full-blown remote desktop session inside Windows Admin Center!
There are over a dozen other categories, which this article will gloss over for the time being. Most of them are analogous to the control panel and are fairly self-explanatory. Instead, let’s explore managing Active Directory with a Windows Admin Center extension.
Managing Active Directory with Windows Admin Center Extensions
Windows Admin Center has an extensible system with support for adding on more functionality in the form of extensions. It supports a large swathe of extensions for various administrative tasks (in fact, some of the sidebar categories are Microsoft bundled extensions).
A Windows Admin Center Extension is an optional extra that adds additional functionality. This could include cluster management, virtual machine management, or active directory management (as seen below)
To demonstrate extensions, let’s install the Active Directory extension.
For a full demonstration of the Active Directory extension, this website did a great job.
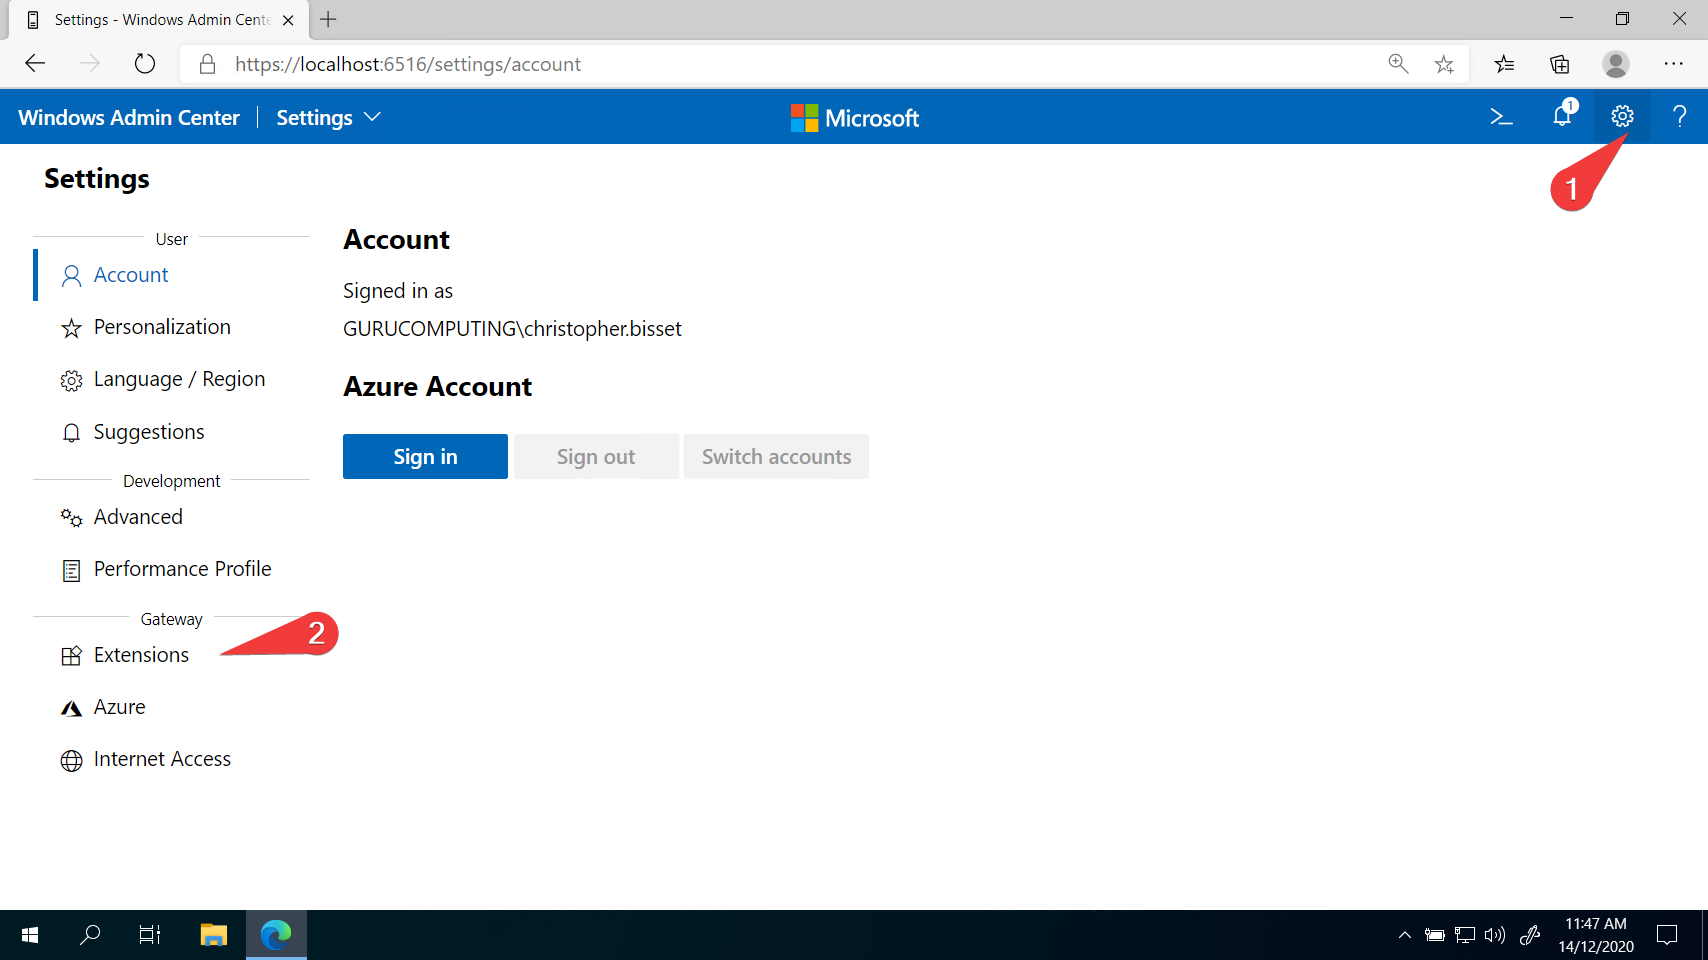
- While on the main Windows Admin Center page, select the Settings cog (1) in the top right
2. Click on Extensions (2) on the left-hand side as shown below. You should be presented with a list of installed and available extensions:
3. Click on the Active Directory extension and click on Install.
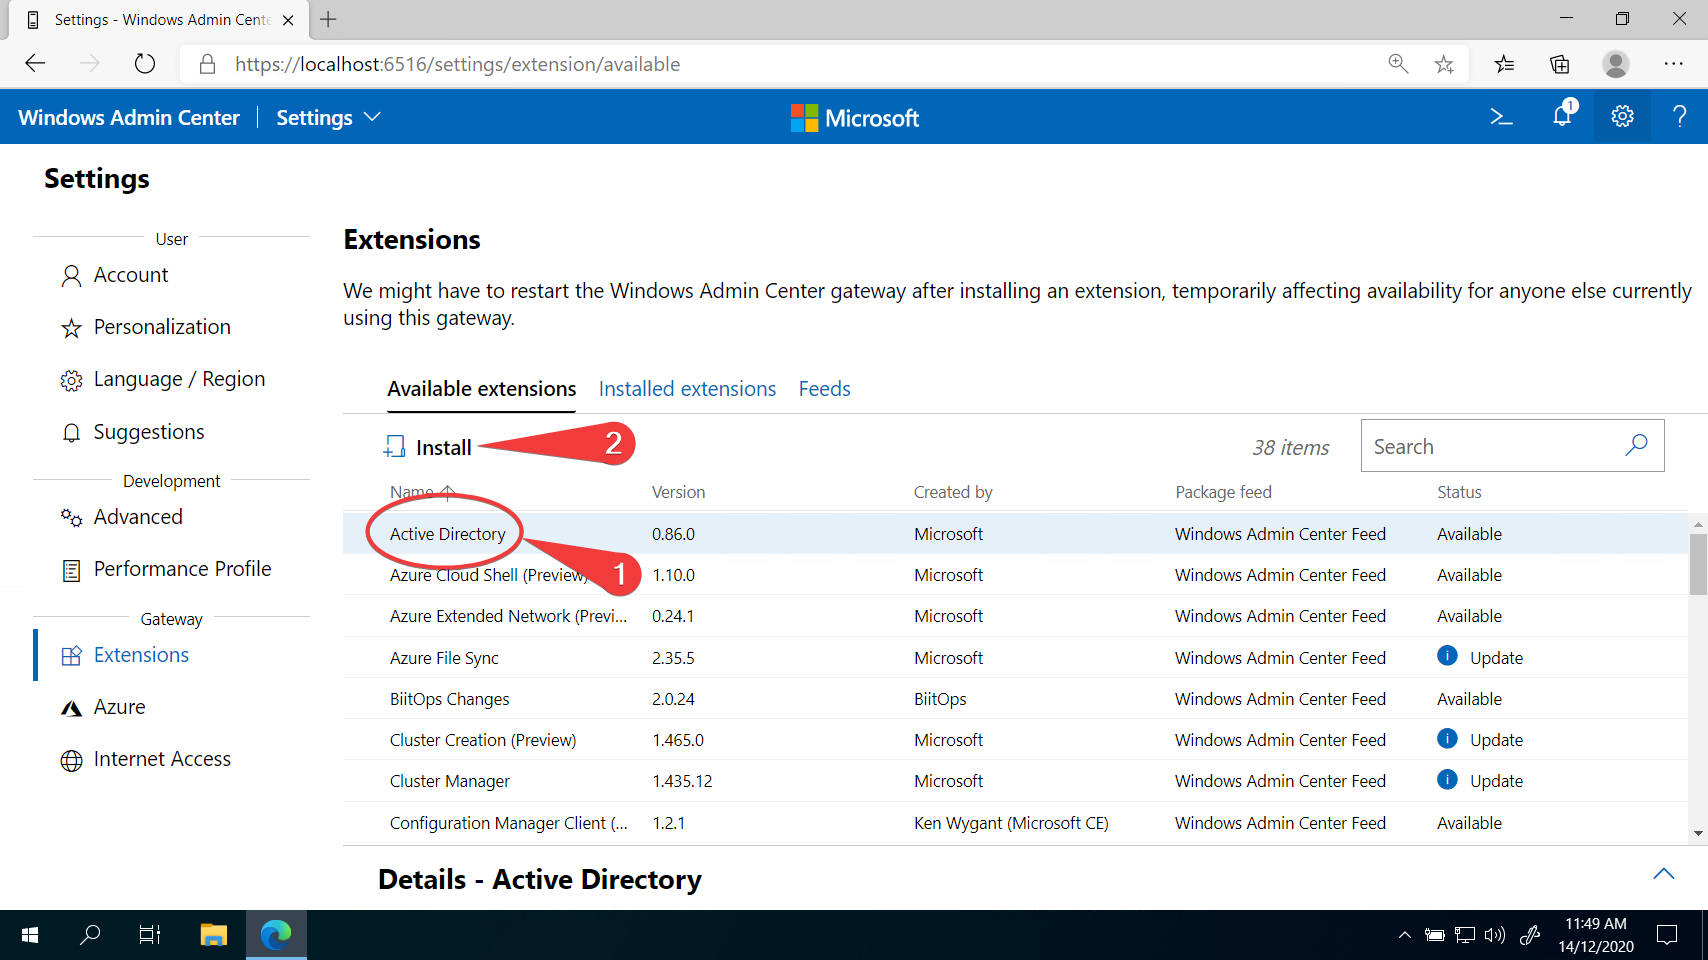
It is worth browsing through the list of extensions to see what is available. Many Microsoft related services have a Windows Admin Center extension available.
Once installed, the Active Directory option will move from Available Extensions to Installed Extensions.
4. If you are remotely managing your Domain Controller (addressed later in the article), you can see in the sidebar that you now have an Active Directory option. Click on it and begin managing Active Directory.
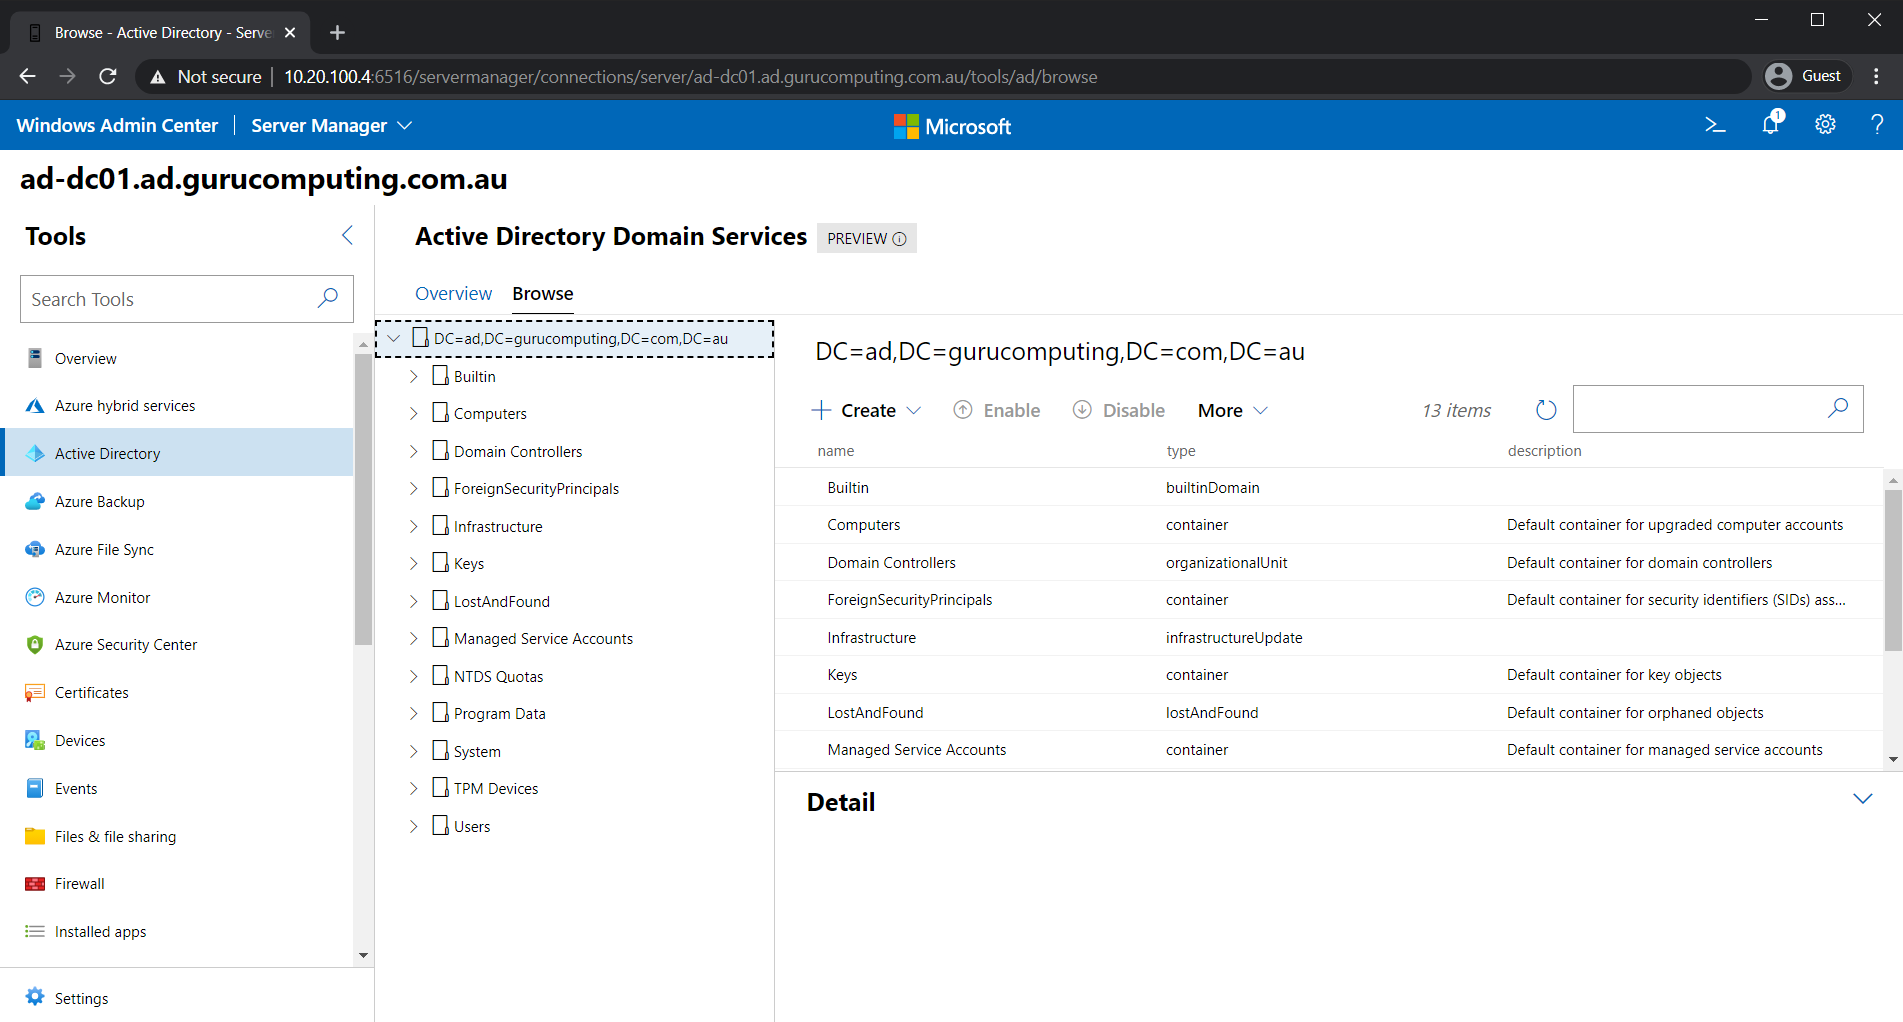
As you are most likely not using Windows Admin Center on a domain controller, the Active Directory section will not appear in the sidebar as in the above screenshot. This problem will be addressed shortly.
For those familiar with the Active Directory Administrative Tools (not to be confused with Windows Admin Center), this will be a very similar experience. The main difference is you are not using Microsoft’s Remote Server snap-ins: You’re using a web interface with no locally installed tools at all.
It’s all PowerShell Under the Hood
Something you might not be aware of is that PowerShell drives the entire backend of Windows Admin Center. Every time you change a setting or view a dashboard, a corresponding PowerShell script runs in the background to enact that change. In fact, you can peek behind the curtain in Windows Admin Center and directly extract the PowerShell it runs!
Inspecting Firewall PowerShell Functions
Navigate back to the Firewall Category again and click the View Powershell Scripts icon as seen below. Doing so brings up a new panel, showing a dropdown list of PowerShell functions. Choosing an option (as seen with the Disable-FirewallRule option below) displays the corresponding function that Windows Admin Center uses to perform its tasks.
This type of inspection can be done for every category in the sidebar.
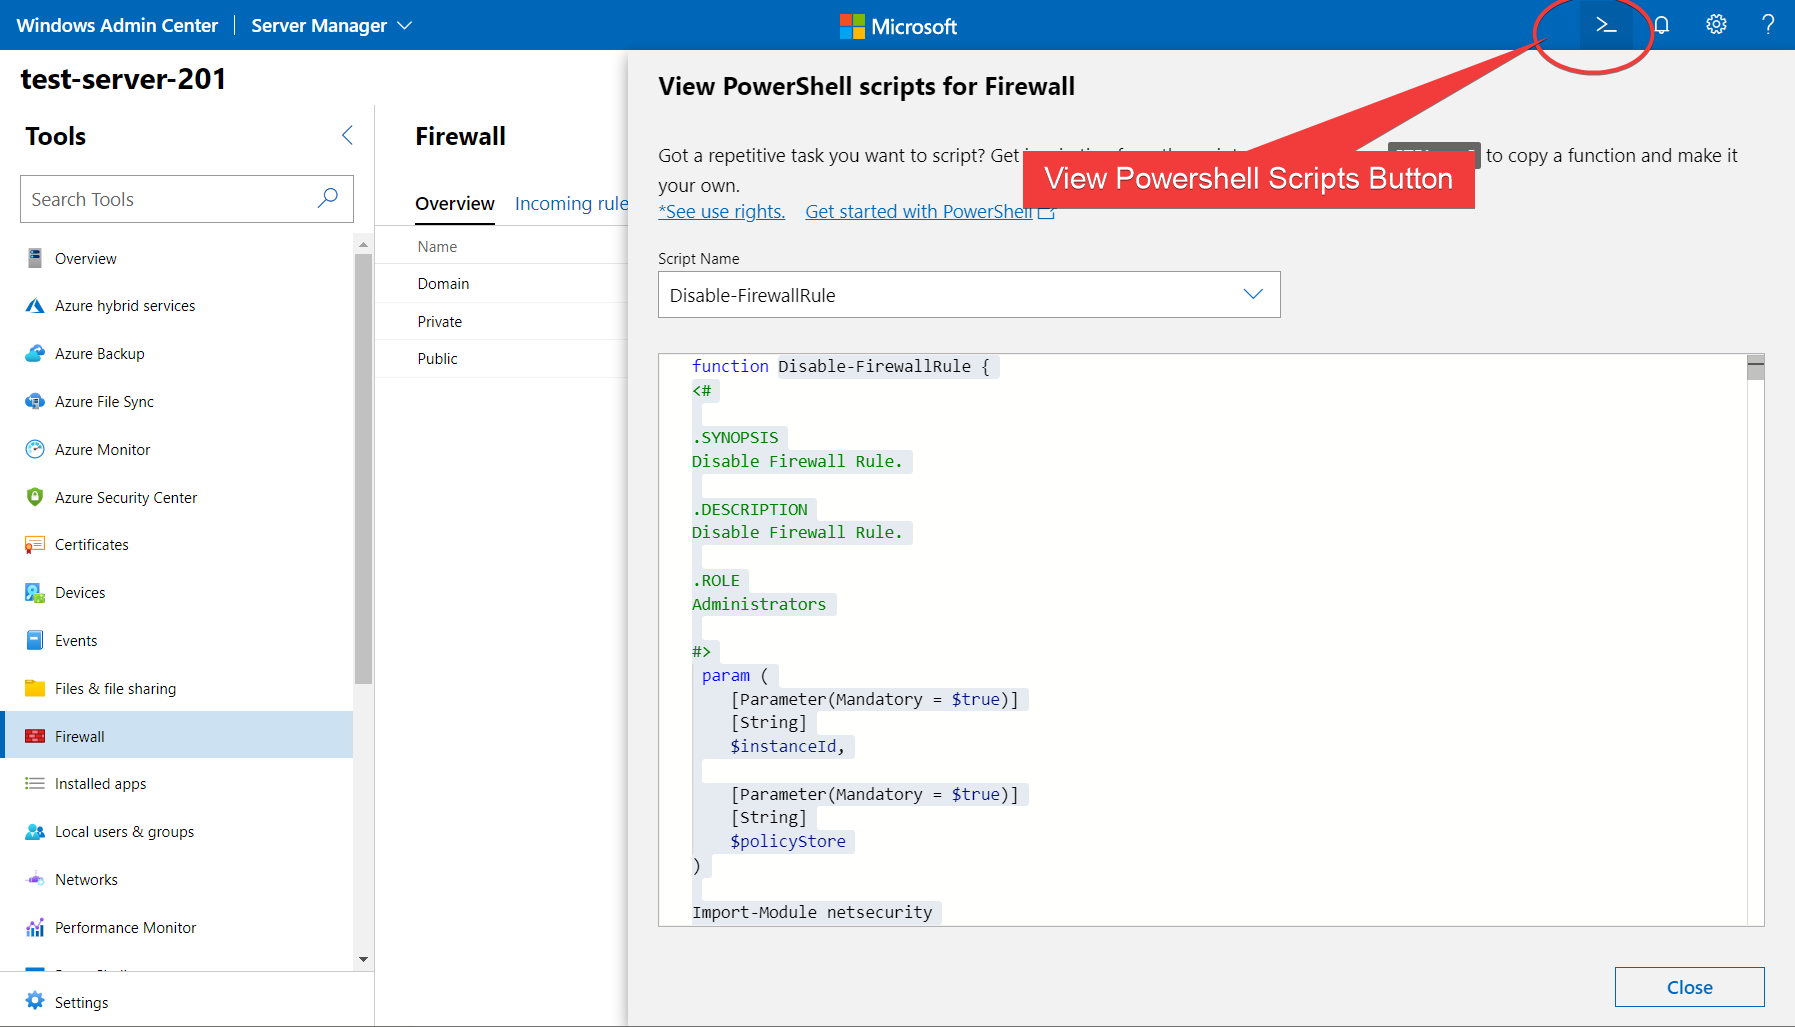
This is a handy tool because it lets you directly view exactly how Microsoft structures all of their PowerShell and gives you tons of best practice examples when writing your own PowerShell!
Remote Management of Other Servers
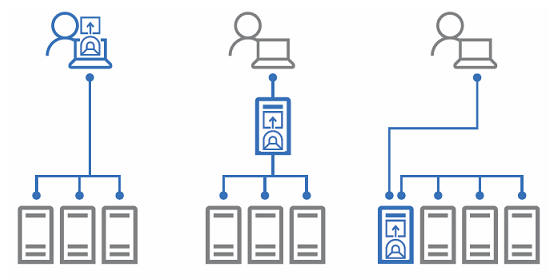
If you thought you had to install Windows Admin Center on every server in your environment, think again. Windows Admin Center actually only needs to exist on a single server. Because Windows Admin Center does all of its work under the hood with PowerShell, all you need to do is have PowerShell Remoting enabled on your servers!
Let’s show that in this article by remoting into the domain controller.
If you are following in a production domain, you may not have permission to manage your domain controller remotely. Do not test any features on sensitive equipment before checking your IT policies!
- Navigate back to the server list by clicking on the Windows Admin Center title in the top left
2. Click the Add button.
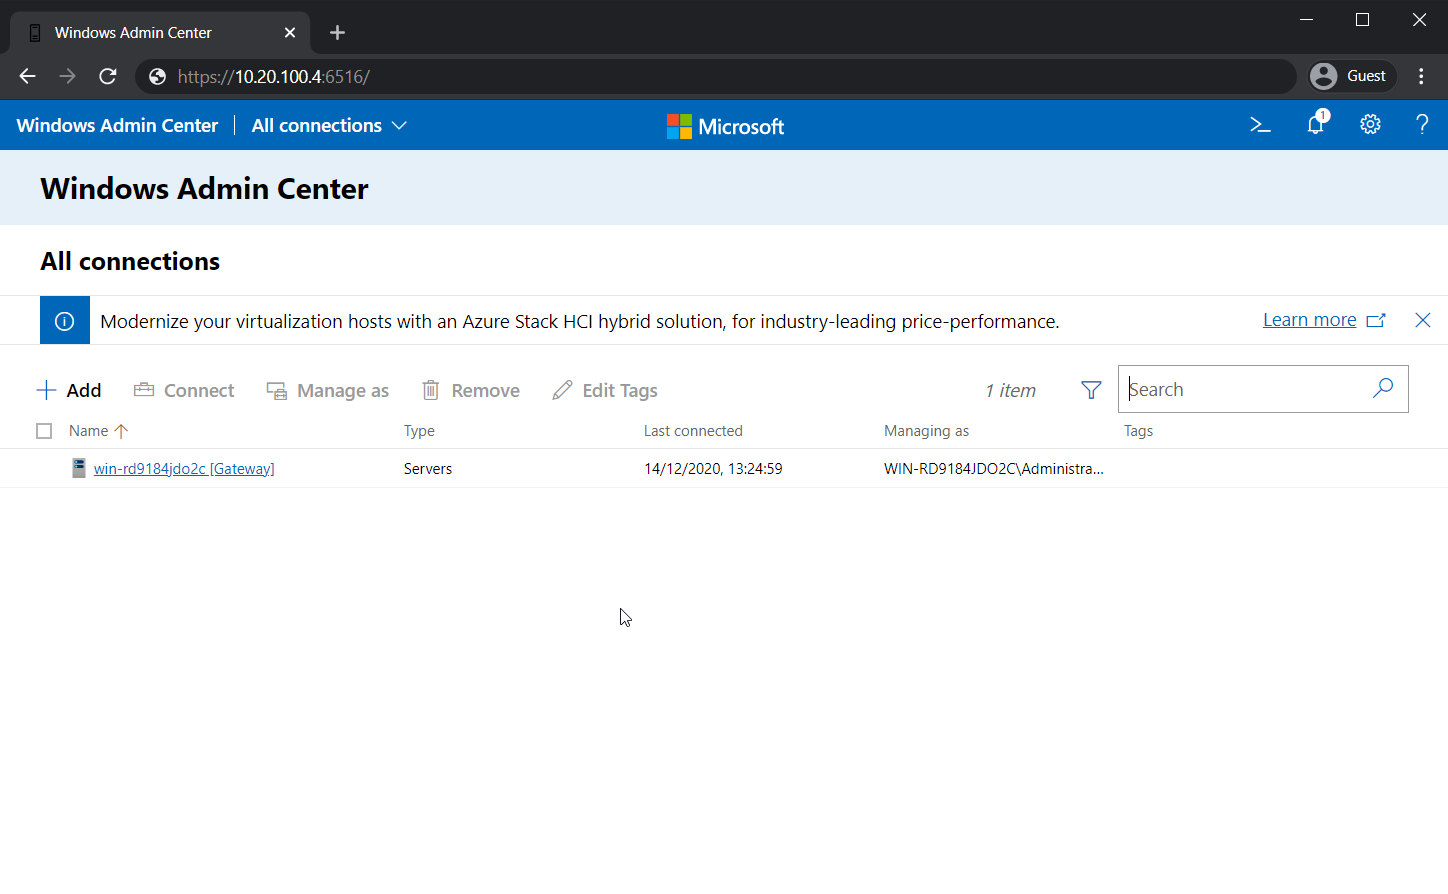
3. Click Servers.
4. Either manually enter the computer name of the domain controller, or search for it in the Search Active Directory box.
5. Add the server to the list.
6. Select the server, and enter your domain credentials.
You can see these steps in the animation below:
You’ve now added a web interface to your domain controller, and you don’t even need to install anything!
Your browser is just using the Windows Admin Center server as a host and is running all the backend commands on the domain controller!
If you have remote desktop enabled for the controller, you can even use the Windows Admin Center server as a jump box to manage the domain controller! See the fully functional RDP session below:
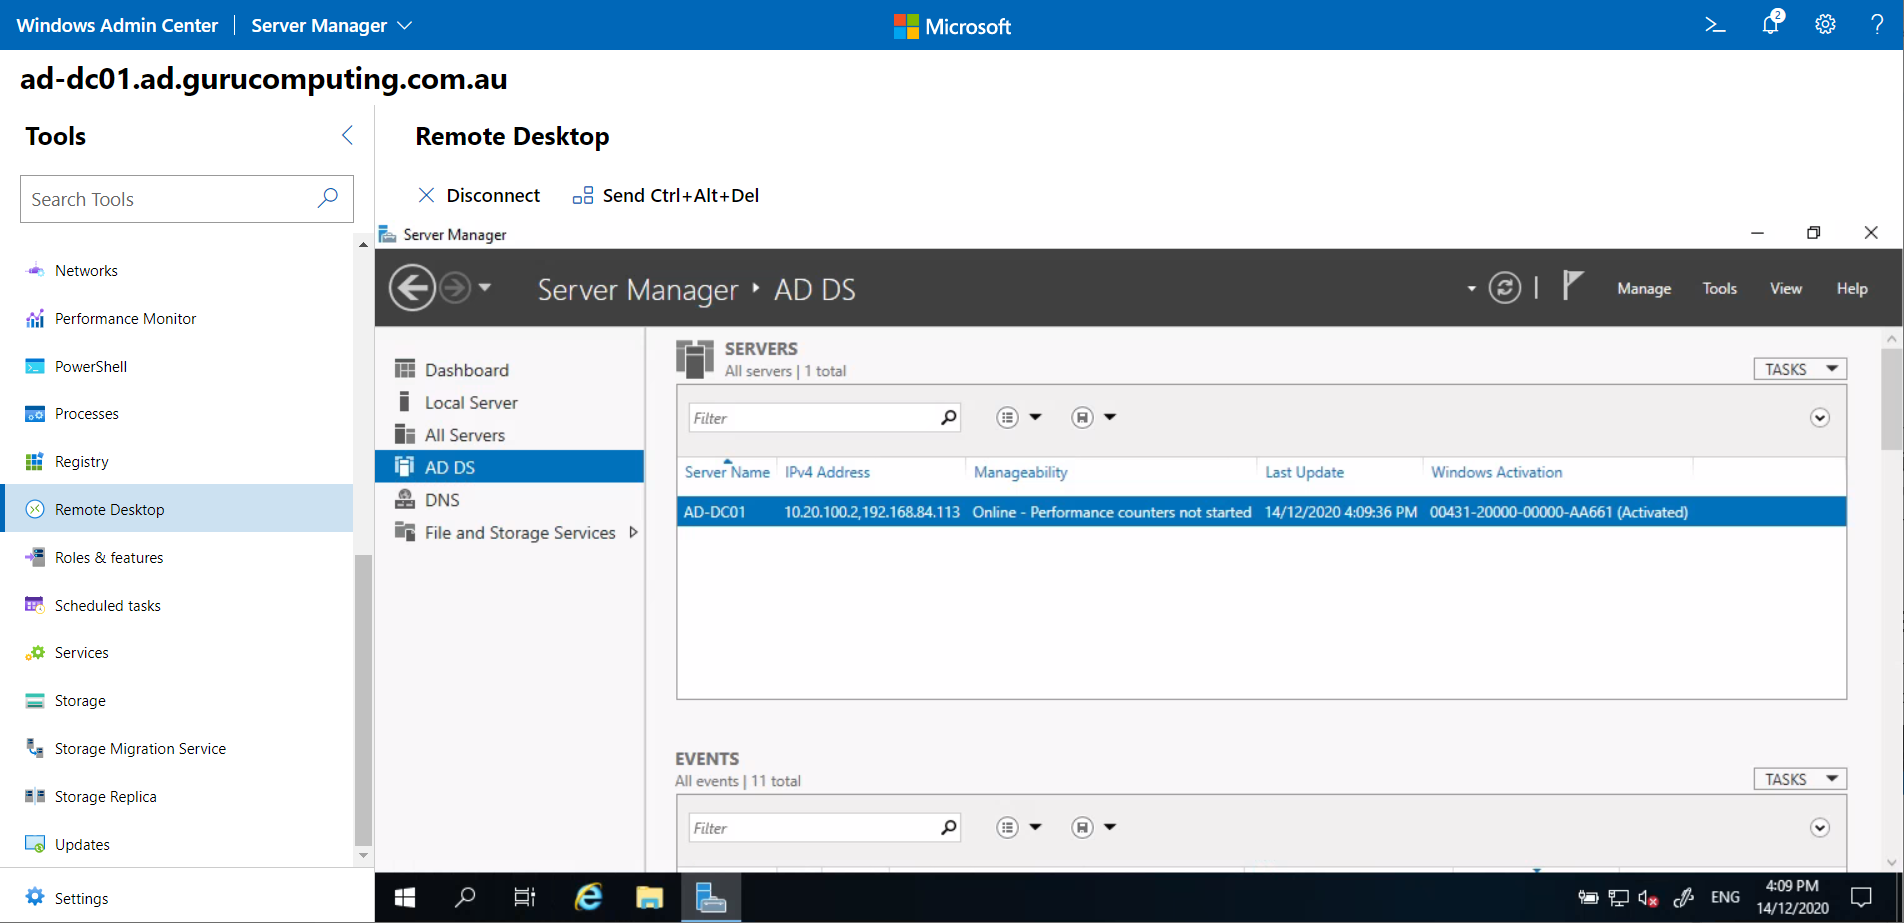
In the above example, the PC running the browser cannot directly access the Domain Controller. Instead, the browser is interacting with the Windows Admin Center server, and the Windows Admin Center server is talking to the Domain Controller. You can use this method to remotely access restricted or sensitive devices.
Where to go From Here
Windows Admin Center, if you so choose, can be used to manage your entire fleet of servers. You can find extensive documentation on Microsoft’s website. To a certain extent, Windows Admin Center can even manage your entire fleet of endpoints (albeit, an RMM tool like Meshcentral or TeamViewer would be more appropriate for endpoints).
Windows Admin Center is another tool to add to your arsenal and is incredibly useful for managing GUI-less environments.
Время на прочтение
4 мин
Количество просмотров 26K

Недавно я шерстил Хабр и встретил комментарий от Inskin:

Я впервые познакомился в Windows Admin Center, когда в нем был только счетчик управления файлами и больше ничего. Сейчас все инструменты из RSAT потихоньку переезжают в Windows Admin Center.
Пока я не видел ни одного толковой русской статьи про настройку Windows Admin Center и решил написать ее сам. Под катом подробный обзор, две скрытые кайфовые фишки WAC, а также инструкции по установке и настройке.
Какие фичи реализованы на текущий момент?
Чуть больше года назад WAС был практически неюзабельным, в превью версии был только красивый дашборд и управление процессами.
Теперь, можно делать полноценный деплой новых серверов прямо из браузера.
- Диспетчер задач
- Управление сертификатами
- Управление устройствами
- Просмотр событий
- Проводник
- Брандмауэр
- Установка и удаление программ и служб и ролей
- Regedit
- Планировщик задач
А еще WAC может служить шлюзом для WinRM и RDP.
Кстати, для подключения, Windows Admin Center использует WinRM и общий runspace вместе с WSMan’ом, поэтому, если у вас подключены сетевые диски, то подключаться к серверам что хостят эти диски можно будет без ввода логина и пароля.
Попробуйте сделать Enter-PSSession без указания Credentials, если команда не попросит логин или пароль, то значит можно будет войти и через WAC без ввода логина и пароля.
Что вы могли упустить:
Часть функционала все еще скрыта за плагинами, поэтому, вы могли упустить две очень крутые фишки и одну не очень крутую.
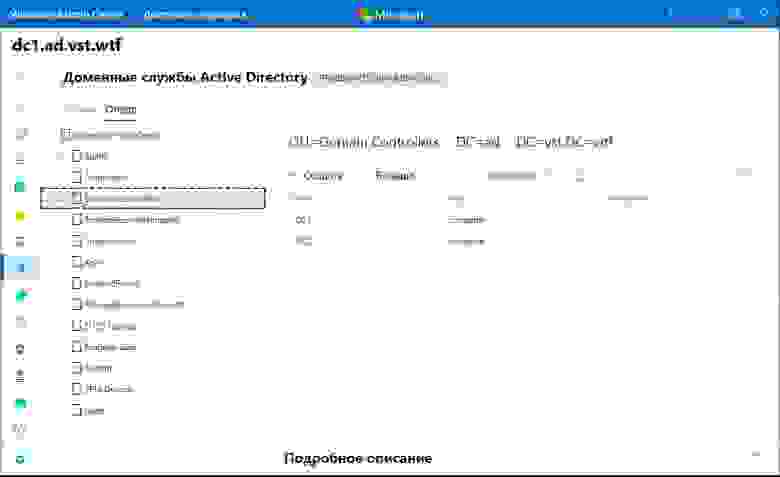
Управление AD (превью):
Органы управления Active Directory тут похожи на что-то между ADAC и ADDC. Хорошо, что они переосмыслили интерфейс, в целом это выглядит даже удобнее, чем через RSAT. В еще одном вопросе можно целиком перейти на WAC.
Управление DNS (превью):
В WAC переехал полностью функционал управления DNS. Создание новых зон, PTR записей, теперь все это доступно через Windows Admin Center.

Управление Windows Defender (превью):
Пока что можно только управлять сканированием и отключать защиту в реальном времени. Отсутствуют все пункты защитника, плюс нельзя управлять защитой от программ-шантажистов.

Установка на Windows Server / Windows 10
По моему мнению, самая правильная установка это – установка на локальный компьютер. Сначала нужно скачать установочный файл по ссылке:
http://aka.ms/WACDownload
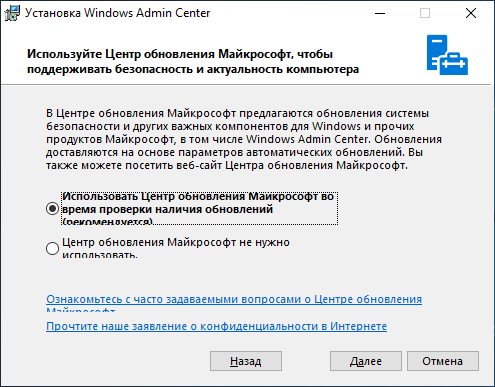
Установка очень проста, «далее, далее, готово», но пару рекомендаций дать нужно. Обязательно выберите пункт об автоматическом обновлении WAC, гарантирую, вам это пригодится, но по непонятным причинам, этот пункт по умолчанию снят.
WinRM работает по HTTP протоколу, поэтому, чтобы Windows Admin Center не подключался к удаленным серверам по HTTP обязательно включите этот пункт. Он тоже снят по умолчанию.

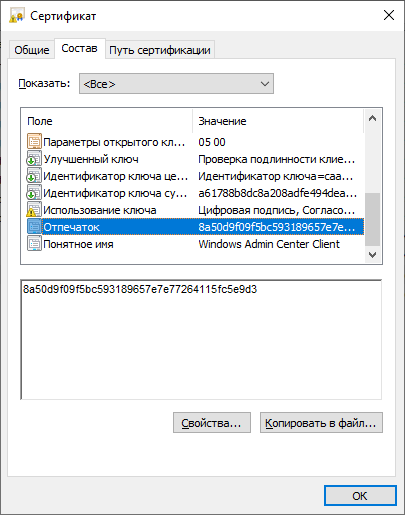
Если вы используете WAC на домашней системе, рекомендую оставить самоподписанный сертификат. Он автоматически добавляется в доверенные и не доставляет неудобств, но если у вас есть свой собственный сертификат и вы хотите использовать его, то впишите его отпечаток в графу, как показано ниже:
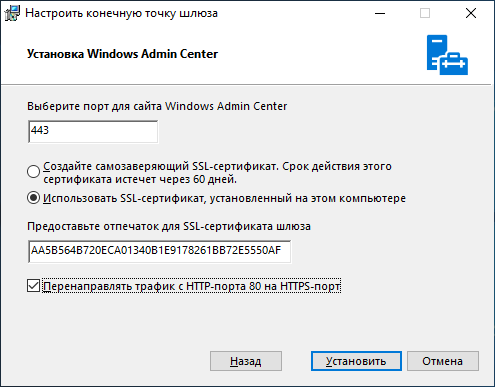
Можно перейти в certmgr → Личное → Сертификаты, перейти в свойства сертификата и найти его отпечаток.
Тоже самое с помощью PowerShell:
Get-ChildItem -Path Cert:LocalMachine\MY | Select-Object FriendlyName, ThumbprintУстановка на Server Core

VPS с Windows Server Core можно взять прямо из маркетплейса
Чтобы использовать Windows Admin Center в качестве управляющего узла, обязательно нужна Active Directory. Войти в Windows Admin Center развернутую на Server Core можно только под административной ролью в AD.
Скачиваем WAC:
Start-BitsTransfer -Source http://aka.ms/WACDownload
-Destination C:\Users\Administrator\Downloads\wac.msi
Устанавливаем с самоподписанным сертификатом:
Start-Process -FilePath "C:\Users\Administrator\Downloads\wac.msi" -ArgumentList " /qn SSL_CERTIFICATE_OPTION=generate"Если у вас есть купленный сертификат или серитфикат от Let’s Encrypt, установленный в системной хранилище сертификатов, то впишите его Thumbprint в аргументы установщика.
Получить отпечаток сертификата можно вот так:
Get-ChildItem -Path Cert:LocalMachine\MY | Select-Object FriendlyName, Thumbprint
Вписать отпечаток нужно после SME_THUMBPRINT, как в примере:
Start-Process -FilePath "C:\Users\Administrator\Downloads\wac.msi" -ArgumentList " /qn SME_THUMBPRINT=AA5B564B720ECA01340B1E9178261BB72E5550AF SSL_CERTIFICATE_OPTION=installed"
Чтобы изменить сертификат, нужно будет еще раз запустить установщик, вписав в отпечаток нового сертификата.
Выводы
С каждой новой версией Windows Admin Center становится все функциональнее и функциональнее.
До полного счастья нужно разве что доделать все диспетчеры связанные с AD, добавить поддержку RRAS, IIS, перенести целиком проводник вместе с нормальным управлением SMB и Bitlocker, управление групповыми политиками и нормальный Windows Defender, и чтобы все диспетчеры, которые работают с файлами умели открывать и выбирать пути с диска машины, к которой ты подключен. А еще чтобы когда ты закрываешь WAC, нужно чтобы он закрывал PSSession и освобождал память на сервере, еще неплохо было бы, чтобы можно было ставить на Server Core без обязательного наличия AD, а когда закончат, можно перейти к MS SQL Server.
А в целом очень даже неплохо, очень рекомендую ознакомиться.

Follow the 3-step process for enabling ports in Firewall using Windows Admin Center:
Step 1: Log-in to Windows Admin Center
In the Login to Windows Admin Center, enter your credentials.
Ex. https://apps4rentdemo.vdi.hostingcloudapp.com


Step 2: Select Firewall and Incoming Tools
After your demo screen is displayed, select the “Firewall” option from the left-hand side of the menu. In the example of apps4rentdemo below, you can see the firewall option selected.

After you select the Firewall option, you need to select the “Incoming rules” option in the next screen.

Step 3: Select “+New” and Fill the Form
After selecting on the “Incoming Rules”, click on the “+New” option.

A form will appear on your screen like this:

All fields are not mandatory. Only the following fields need to be filled:
Name: Name of the Firewall Rule.
Description: Detail description about Firewall Rule.
Direction: Which direction traffic this rule will be applied: Incoming or Outgoing?
Action: What action this rule should take: Allowed or Blocked?
Enable Firewall Rule: Should this rule be active or not: Yes or No?
Protocols and ports: Should this rule be applied on specific protocol and Port or any type of traffic. (If you are not sure about protocol then don’t select “Any”, select TCP instead)
Local port: On which local Port traffic will be received?
Once you have filled all the necessary information, click on the “Create” option.
Once you create the new rule, you will get the below notification:

It’s done. You’ve successfully created the rule and enabled ports in Firewall using Windows Admin Center.
Still facing problems? If you want a training session with our expert, please write to us.