Learn to manage the certificates on your device
by Matthew Adams
Matthew is a freelancer who has produced a variety of articles on various topics related to technology. His main focus is the Windows OS and all the things… read more
Updated on
- Root certificates help your browser determine whether certain websites are genuine and safe to open.
- A trusted certificate is required in case the digital certificate is not from a trusted authority.
- Although Windows 10 already has built-in certificates, you can also install new ones.
- Read on to find out how to install trusted root certificates on Windows 10/11.

XINSTALL BY CLICKING THE DOWNLOAD
FILE
Root certificates are public key certificates that help your browser determine whether communication with a website is genuine and is based upon whether the issuing authority is trusted and if the digital certificate remains valid.
Suppose a digital certificate is not from a trusted authority. In that case, you’ll get an error message like There is a problem with this website’s security certificate, and the browser might block communication with the website.
Windows 10 has built-in certificates and automatically updates them. However, you can manually add more root certificates to Windows 10 from certificate authorities (CAs).
Where is the Trusted Root Certificate Store in Windows 10?
The Trusted Root Certificate store in Windows 10 is a collection of root certificates for Certificate Authorities (CAs) considered trustworthy by the operating system.
This store is used to validate digital certificates and establish secure connections over the internet.
You must access the Microsoft Management Console to access the Trusted Root Certificate store in Windows 10.
The trusted Root Certificate store is, however, located in the root of the Registry path below:
How we test, review and rate?
We have worked for the past 6 months on building a new review system on how we produce content. Using it, we have subsequently redone most of our articles to provide actual hands-on expertise on the guides we made.
For more details you can read how we test, review, and rate at WindowsReport.
Computer\HKEY_LOCAL_MACHINE
How do I add a certificate to the trusted root on Windows 10?
- Install certificates from trusted CAs
- Install Trusted Root Certificates with the Microsoft Management Console
1. Install certificates from trusted CAs
- First, you’ll need to download a root certificate from a CA. For example, you could download one from the GeoTrust site.
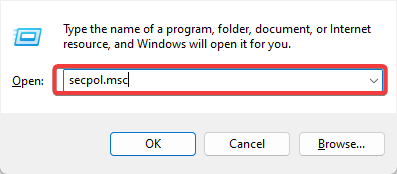
- Next, press Win key + R, enter secpol.msc in Run’s text box, and hit Enter (Windows 10 Home edition doesn’t include the Local Security Policy editor. If your Windows key doesn’t work, check our quick guide to fix it).

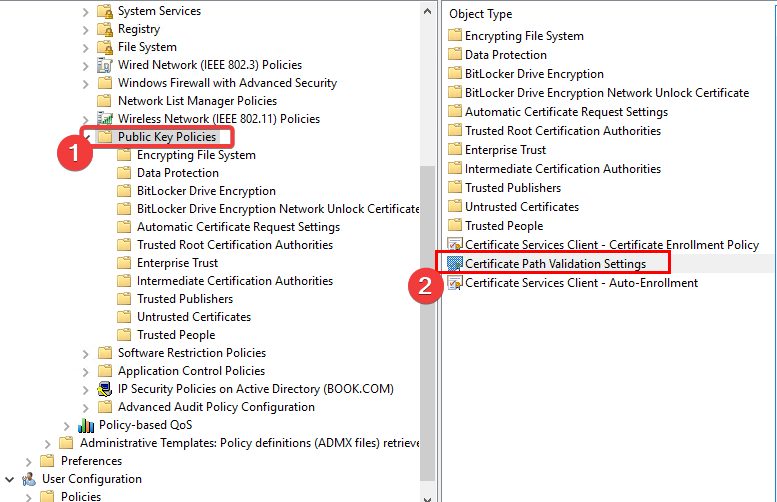
- Then, click Public Key Policies and Certificate Path Validation Settings to open a Certificate Path Validation Settings Properties window.

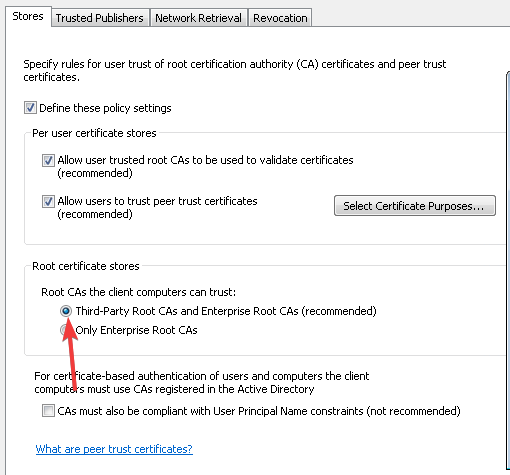
- Click the Stores tab and select the Define these policy settings check box, then tick its two checkboxes.

- Select the Third-Party Root CAs and Enterprise Root CAs checkboxes and press the Apply then OK buttons to confirm.

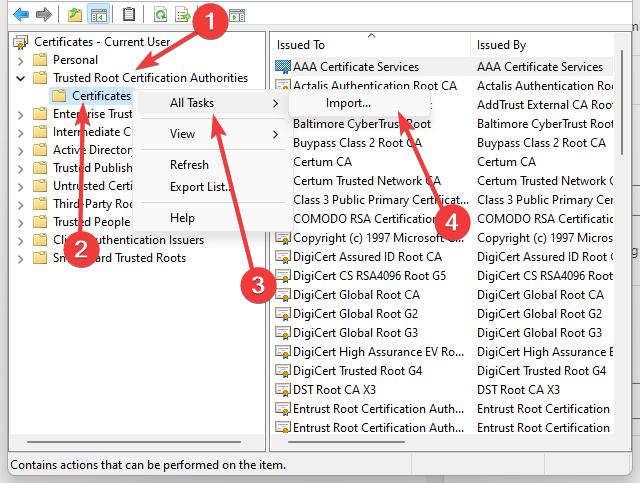
- Press the Win key + R hotkey, type certmgr.msc in Run’s text box, and hit Enter.
- Click Trusted Root Certification Authorities, right-click Certificates, select All Tasks, and Import.

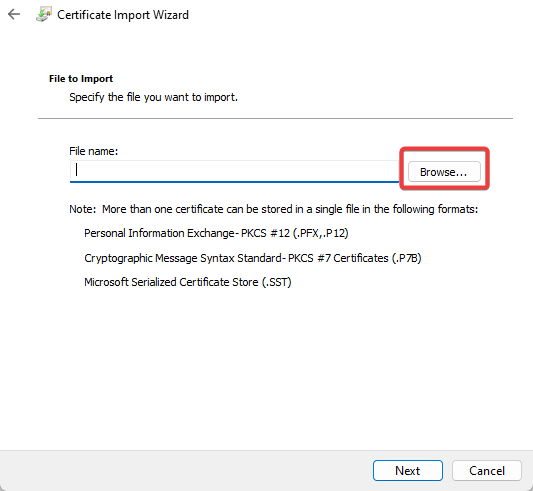
- Press the Next button, click Browse, and select the digital certificate root file saved to your HDD.

- Press Next again to select Automatically select the certificate store based on the type of certificate option.
- Then you can press Next and Finish to wrap up the import wizard. A window will open, confirming that the import was successful.

Most Windows 10 users have no idea how to edit the Group Policy. Learn how you can do it by reading our simple article.
If you don’t have the Group Policy Editor on your Windows PC, get it right now in just a couple of easy steps with our guide on installing the Group Policy Editor on Windows 10.
2. Install Trusted Root Certificates with the Microsoft Management Console
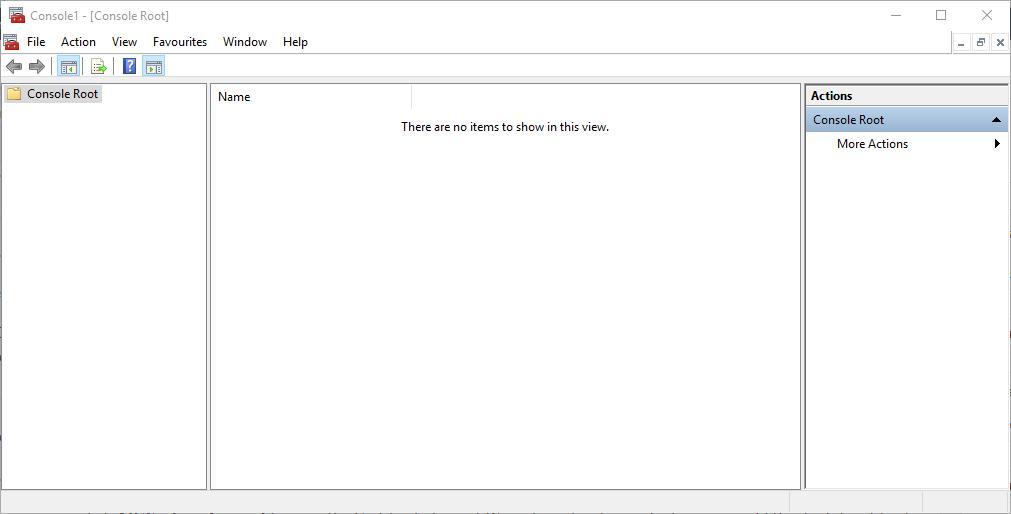
1. Press the Win key + R hotkey to open the Run dialog.
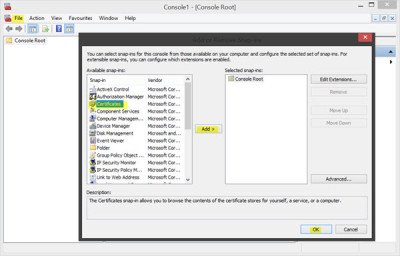
2. Input mmc in Run and press Enter to open the window below.
3. Click File and then select Add/Remove Snap-ins to open the window in the snapshot below.
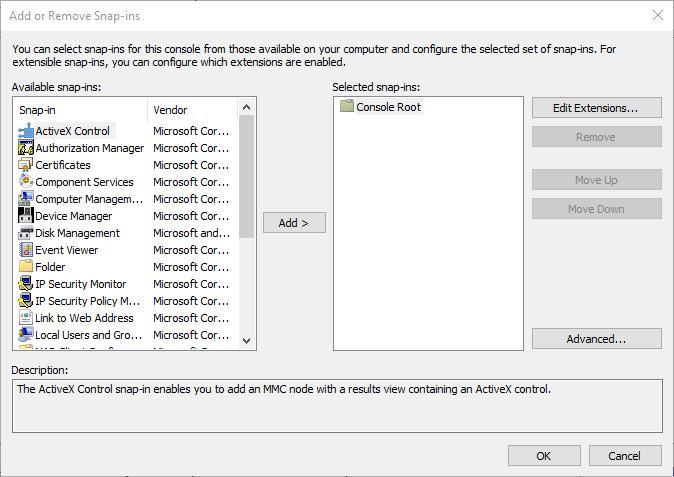
4. Next, you should select Certificates and press the Add button.
5. A Certificates Snap-in window opens from which you can select Computer account >Local Account, and press the Finish button to close the window.
6. Then press the OK button in the Add or Remove Snap-in window.
7. Now you can select Certificates and right-click Trusted Root Certification Authorities on the MMC console window as below.
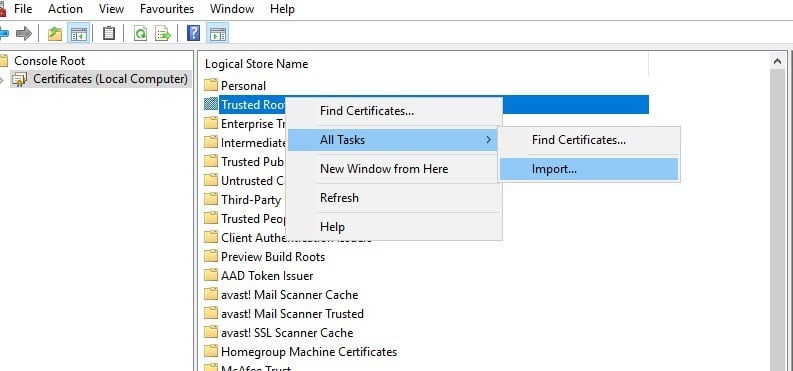
8. Then you can click All Tasks > Import to open the Certificate Import Wizard window.
9. From the Certificate Import Wizard window, you can add the digital certificate to Windows.
You can also install root certificates on Windows 10/11 with the Microsoft Management Console. The process is easy and simple, and the console can be accessed via the Run dialog.
If Microsoft Management Console can’t create a new document, follow our guide’s easy steps to solve the issue.
Can’t load the Microsoft Management Console? Our step-by-step guide will help you sort things out.
How to add the certificate to Trusted Root Certification Authorities store using the command line?
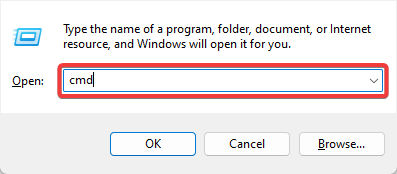
- Press Windows + R, type cmd, and hit Ctrl + Shift + Enter.
- Type the script below and hit Enter (Substitute your certificate’s path for C:\Users\Downloads and your certificate’s name for mycertificate):
certutil -addstore root C:\Users\\Downloads\mycertificate.cer
Now you’ve installed a new trusted root certificate in Windows 10. Similarly, you can add many more digital certificates to that OS and other Windows platforms.
Ensure that the third-party digital certificates come from trusted CAs, such as GoDaddy, DigiCert, Comodo, GlobalSign, Entrust, and Symantec.
If you have any more suggestions or questions, leave them in the comments section below, and we’ll certainly check them out.
![]()
Download Windows Speedup Tool to fix errors and make PC run faster
In one of our earlier posts, we have seen what Root Certificates are. There may be times, when some companies or users may feel the need to manage and configure Trusted Root Certificates, to prevent other users in the domain from configuring their own set. In this post, we will see how to manage Trusted Root Certificates & add certificates to the Trusted Root Certification Authorities store in Windows 11/10/8/7.
To add certificates to the Trusted Root Certification Authorities store for a local computer, from the WinX Menu in Windows 11/10/8.1, open Run box, type mmc, and hit Enter to open the Microsoft Management Control.
Press the File menu link and select Add/Remove Snap-in. Now under Available snap-ins, click Certificates, and then click Add.
Click OK. In the next dialog box, select Computer account and then on Next.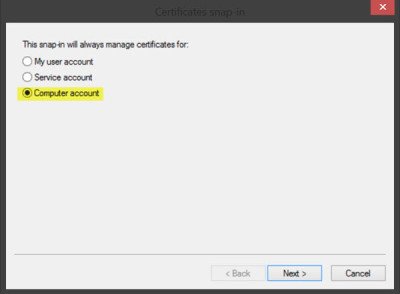
Now select Local computer and click on Finish.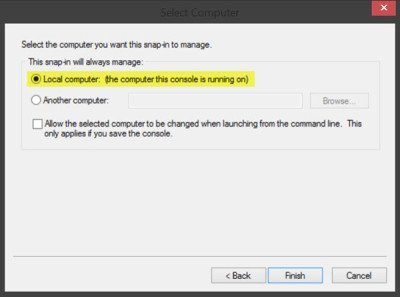
Now, back in MMC, in the console tree, double-click on Certificates and then right-click on Trusted Root Certification Authorities Store. Under All tasks, select Import.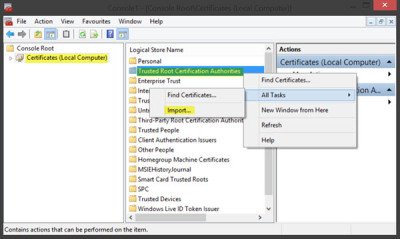
The Certificate Import Wizard will open.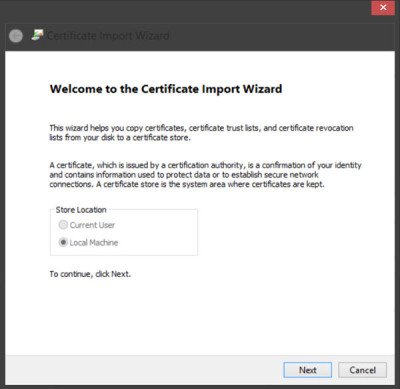
Follow the instructions in the wizard to complete the process.
Now let us see how to configure and manage trusted root certificates for a local computer. Open MMC and press the File menu link and select Add/Remove Snap-in. Now under Available snap-ins, click Group Policy Object Editor, and then click Add. Select the computer whose local GPO you want to edit, and click Finish / OK.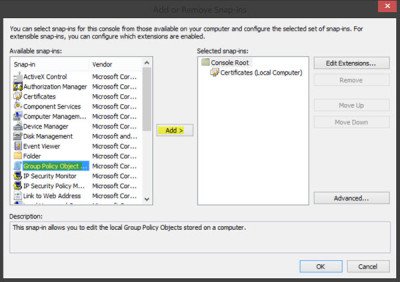
Now, back in the MMC console tree, navigate to Local Computer Policy > Computer Configuration > Windows Settings > Security Settings. Next Public Key Policies. Double-click Certificate Path Validation Settings, and then select the Stores tab.
Read: Manage certificates using Certificate Manager or Certmgr.msc.
Here, select the Define these policy settings, Allow user trusted root CAs to be used to validate certificates and Allow users to trust peer trust certificates checkboxes.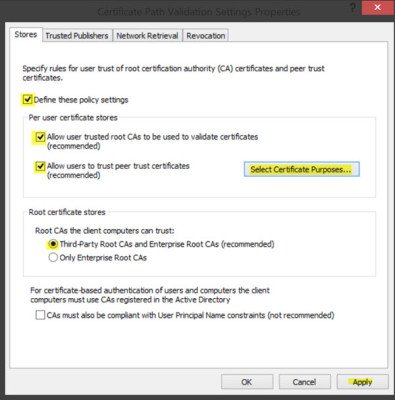
Finally, under Stores tab > Root certificate stores, select one option under Root CAs that the client computers can trust and click OK. If in doubt, go with the recommended option.
To see how you can manage trusted root certificates for a domain and how to add certificates to the Trusted Root Certification Authorities store for a domain, visit Technet.
RCC is a free Root Certificates Scanner that can help you scan Windows Root Certificates for untrusted ones.
Anand Khanse is the Admin of TheWindowsClub.com, a 10-year Microsoft MVP (2006-16) & a Windows Insider MVP (2016-2022). Please read the entire post & the comments first, create a System Restore Point before making any changes to your system & be careful about any 3rd-party offers while installing freeware.

Trusted Root Certification Authorities certificate store is configured with a set of public CAs that have met the requirements of the Microsoft Root Certificate Program. Administrators can configure the default set of trusted CAs and install their own private CA for verifying software. In this article, I will sho you how to Import certificates into Trusted Root and Personal certificate store. Please see how to Change your root password: How to enable and disable the root user on your macOS. How to add languages to your Personal PC, how to Generate a self-signed SSL certificate: How to enable LDAP over SSL with a self-signed certificate. And how to fix there was an error opening the Trusted Platform Module snap-in: You do not have permission to open the Trusted Platform Module Console.
On how to create a certificate signing request, see the guide “create a certificate signing request using the MMC”. Be aware that all current user certificate stores except the Current User/Personal store inherit the contents of the local machine certificate stores. For example, if a certificate is added to the local machine Trusted Root Certification Authorities certificate store. All current user Trusted Root Certification Authorities certificate stores (with the above caveat) also contain the certificate.
What is a Trusted Root CA store?
In a nutshell, the Trusted Root CA store is for root CA certificates you want to trust. You rarely want to put certificates here due to its security implementation and the Personal store is for certificates you want to trust. You will put your certificate here. Please see the following interesting related how-to articles on how to import a certificate into the Trusted Root and Personal file certificate store, and how to export a certificate in PFX format in Windows. You may also be interested in this guide: How to install and configure Active Directory Certificate Services.
Note: This can also be done via the command line. For what a PEM file is, see this link. On Windows, this can be achieved with the following steps below without using a 3rd party tool and there are different ways to accomplish this.
Ensure the certificate that you would like to convert is first imported to the certificate store. In this way, you can export and save it in the desired format.

On the Welcome to Certificate Import Wizard, Click on Next as shown below.

Browse to the file you would like to import and click on Next

Note: Remember to select the wildcard file type, or else this might not work. Place the certificate in the Personal certificate store.

Complete the Certificate Import Wizard as shown below

If successfully imported, you will get a certificate Import Wizard Success.

Additional piece if you are interested
The certificate store is central to all certificate functionality. The certificates are managed in the store using functions with a "Cert" prefix. Certificates, CRLs, and CTLs can be kept and maintained in certificate stores. They can be retrieved from a store where they have been persisted for use in authentication processes.
Certificates in a certificate store are normally kept in some kind of permanent storage such as a disk file or the system registry. Certificate stores can also be created and opened strictly in memory. A memory store provides temporary certificate storage for working with certificates that do not need to be kept.
I hope you found this blog post helpful on how to Import certificates into Trusted Root and Personal certificate store. If you have any questions, please let me know in the comment session.
A certificate authority is an organization that issues digital identity documents so your computer can tell it’s connecting to the right entity for sensitive transactions. They’re commonly used behind the scenes for secure web transactions, like online purchases or accessing your email. Your computer generally has a list of security authorities it trusts, but in some cases, you may need to tell your computer to trust a certificate authority it doesn’t already know so it can access other sites, such as business sites, without an error. Make sure you trust a certificate authority if you’re telling your computer to trust it.
Understanding Certificates and Authorities
When you connect over a secure web connection or other secure online systems, your connection is encrypted so unauthorized people can’t spy on what you’re doing or try to alter the messages the computers send back and forth. But encryption isn’t enough to guarantee your security: Your computer also needs to know that the computer it’s connecting to actually belongs to who it claims to belong to, so that you don’t open a secure connection to an imposter and send sensitive data.
This is where digital certificate authorities come in. They can issue a computer a certificate, which is a small digital file electronically signed by the authority attesting to who owns the machine. A certificate authority can also essentially delegate its authority by signing certificates for other authorities, who ultimately sign certificates for computers. When a web browser, operating system or other program is trying to validate and see whether it can trust a certificate, it will follow the chain up until it reaches an authority it knows or finds the ultimate parent or root certificate.
Browsers and operating systems come with a list of certificate authorities they trust. If a certificate authority experiences a security breach or has other issues, it can be revoked from a vendor list.
Make Sure You Trust Wisely
Make sure you understand the reason to trust a particular authority and that you trust the organization running the authority and whoever is giving you the certificate. Don’t install certificates from untrusted services or that you downloaded over insecure connections. They could be used to hijack your computer’s connections to sensitive websites and resources.
Trust a Certificate Authority: Windows
If you want your Microsoft Windows computer to trust a new certificate authority, you can add its root certificate to your computer’s database. You’ll normally get this certificate from the authority, either online via a secure connection or, if it’s an internal authority to your business, through your IT department.
If you’re using Microsoft Windows, click the search box on the taskbar or in the Start menu, and type «mmc» to launch the Microsoft Management Console. Click the «File» menu and click «Add/Remove Snap-In.» Click «Certificates» under «Available Snap-ins,» then click «Add.» Click «OK,» then click «Computer account» and the «Next» button.
Click «Local Computer,» then click the «Finish» button. Double-click «Certificates (Local Computer)» in the tree menu, then right-click «Trusted Root Certification Authorities Store.» Click «All Tasks» in the pop-up menu, then click «Import.» Follow the instructions to find and import the certificate in question.
Trust a Certificate Authority: Mac
If you’re using an Apple Mac computer, you can import a root certificate for a certificate authority using the Keychain system.
Type «Keychain Access» in the Spotlight search box, opened by clicking the magnifying glass in the top right of macOS. Click the icon to launch the app, then click the «File» menu and «Import Items.» Browse to find the root certificate file, and choose «System» in the «Destination Keychain» drop-down menu.
Enter your password if prompted to do so, and log in and out of the computer, or restart it. If the certificate doesn’t seem to be immediately trusted – for example, you’re receiving warnings or errors attempting to access resources – reopen «Keychain Access.» Right-click the certificate and click «Get Info.» Open the «Trust» menu, and under «When Using This Certificate,» check «Always Trust.»
I am trying to import two certificates to my local machine using the command line.
I have one certificate to add to the Personal Store of the local machine, and another one to add to the Trusted Root Certification Authorities.
Here is the command to had to Personal Store and not to add at root:
certutil -f -importpfx CA.pfx NoRoot
And to add at Trusted Root and not personal ? Is there any tag ? I didn’t found at command help «/?»
![]()
Kiquenet
14.6k35 gold badges148 silver badges243 bronze badges
asked May 26, 2014 at 11:34
![]()
Look at the documentation of certutil.exe and -addstore option.
I tried
certutil -addstore "Root" "c:\cacert.cer"
and it worked well (meaning The certificate landed in Trusted Root of LocalMachine store).
EDIT:
If there are multiple certificates in a pfx file (key + corresponding certificate and a CA certificate) then this command worked well for me:
certutil -importpfx c:\somepfx.pfx
EDIT2:
To import CA certificate to Intermediate Certification Authorities store run following command
certutil -addstore "CA" "c:\intermediate_cacert.cer"
answered May 26, 2014 at 14:45
![]()
pepopepo
8,6642 gold badges27 silver badges42 bronze badges
2
The below ‘d help you to add the cert to the Root Store-
certutil -enterprise -f -v -AddStore "Root" <Cert File path>
This worked for me perfectly.
answered Jan 17, 2018 at 19:28
![]()
2
To print the content of Root store:
certutil -store Root
To output content to a file:
certutil -store Root > root_content.txt
To add certificate to Root store:
certutil -addstore -enterprise Root file.cer
answered Oct 4, 2019 at 6:30
![]()
If there are multiple certificates in a pfx file (key + corresponding certificate and a CA certificate) then this command worked well for me:
certutil -importpfx c:\somepfx.pfx
this works but still a password is needed to be typed in manually for private key.
Including -p and «password» cause error too many arguments for certutil on XP
answered Jun 26, 2017 at 12:43
![]()
There is a fairly simple answer with powershell.
Import-PfxCertificate -Password $secure_pw -CertStoreLocation Cert:\LocalMachine\Root -FilePath certs.pfx
The trick is making a «secure» password…
$plaintext_pw = 'PASSWORD';
$secure_pw = ConvertTo-SecureString $plaintext_pw -AsPlainText -Force;
Import-PfxCertificate -Password $secure_pw  -CertStoreLocation Cert:\LocalMachine\Root -FilePath certs.pfx;
answered Nov 16, 2020 at 3:08
![]()
teeks99teeks99
3,5832 gold badges31 silver badges38 bronze badges