Содержание
- 1 Установка Windows 7 на SSD
- 1.1 Что такое SSD и как его использовать
- 1.2 Установка Windows 7 на SSD
- 2 SSD под windows 7
- 2.1 Установка SSD в компьютер или ноутбук
- 2.2 Оптимизация Windows под SSD диск
- 2.3 Перенос Windows с HDD на SDD диск
- 2.4 Программа SSDlife
- 3 NVMe драйвер для Windows 7 x64
- 3.1 Page 3
- 3.2 Page 4
- 4 Настраиваем диск SSD на работу под Windows 7
- 4.1 Выполнение оптимизации
- 4.2 Способ 1: SSDTweaker
- 4.3 Способ 2: Применение встроенных инструментов системы
- 4.4 Помогла ли вам эта статья?
Установка Windows 7 на SSD-накопитель выполняется в два простых шага, которые подробно описаны в нашем сегодняшнем посте.
Если вы внимательно читали предыдущие статьи посвященные работе с фирменной операцинки от Microsoft, тогда у вас не должно возникать много вопросов. Конечно, кроме тех «непоняток», которые связаны с использованием твердотелого накопителя.
Следующий абзац начинается с традиционной рубрики для малоопытных юзеров, где мы немного познакомимся с этим устройством, после чего уже смело приступим к настройке винды.
Что такое SSD и как его использовать
Итак, прежде, чем переходить к основной стадии раздела «Установка Windows 7 на SSD», попробуем расшить наши представления о современных носителях информации. Как вы уже догадались, SSD прозвали «твердотелым» девайсом, который служит для постоянной записи, а так же хранения ваших файлов.
В отличие от старинных жестких дисков, этот экземпляр использует немного другой принцип работы – флеш память.
Именно благодаря ей после установки многие пользователи ахеревают от того, что их новенькая «семерка» загружается за 9-10 секунд, да и вообще быстрота отклика системы по сравнению с обычным диском увеличивается в разы!
Успешная установка Windows 7 на SSD не требует максимального познания принципов работы сего устройства, поэтому мы не будем углубляться в подробности. Главное, что «твердотелые» могут использоваться практически везде, где и кроется их главный козырь. Большинство таких дисков работают через SATA, поэтому они включаются в работу быстрее, чем обычные жесткие диски.
Кроме того, накопители такого класса имеют приличный запас прочности, низкий шумок при работе, а иногда вообще отсутствует, внутренне охлаждение, состоящее из медных трубок, а так же пары вентиляторов. Целая электростанция в маленькой коробочке из пластика! Все же, за такие удобства и огромное количество Гигабайт или даже Терабайт, приходится платить и платить немало.
Пожалуй, это единственный минус сей устройств, который не помешал этой линейке устройств выйти на первый подиум технологического рынка.
Установка Windows 7 на SSD
Итак, установка Windows 7 на SSD начинается, не забудьте взять ручку и блокнотик. Можно и перекусить перед долгой дорогой… SSD-накопитель с установленной Windows можно использовать и на ноутбуке, поэтому данный пост будет полезен всем слоям населения.
Как обычно, вам необходимо раздобыть диск или флешку с установочным пакетом 7-ки. Если вы еще не забыли, то установка винды с этих носителей выглядит практически одинаково.
Подробнее об установке Windows 7 с флешки можно прочитать здесь, а с диска здесь.
Далее, подключите диск или флешку к компьютеру. Обратите внимание на то, что к этому времени SSD диск уже должен быть установлен и подключен. Установка Windows 7 на SSD выполняется как обычно. Нам потребуется войти в БИОС и произвести установку нового накопителя в системе, для того, чтобы его можно было использовать в качестве «родного» жесткого диска. Внутри вкладки Advanced необходимо найти меню SATA Conf.
После этого без страха и риска для собственного здоровья переходим в меню на более нижнем ярусе – Sata Mode Selection. Эта настройка характеризует работу вашего SSD. Там необходимо установить режим AHCI. После этого, покидаем наш красочный Биос, сохраняя настройки! Попутно, вам необходимо выбрать устройство, с которого будет производиться считывание – это тот самый накопитель, в котором лежит ваша сборка Windows 7.
Подробнее о том как в BIOS выставить загрузку с диска или флешки читайте здесь.
Установка Windows 7 на SSD начнется сразу после повторной перезагрузки компа. Как обычно, система попросит вас указать кое-какие данные, после чего выскочит окошко с найденными жесткими дисками. Здесь необходимо выбрать ваш твердотелый девайс, отформатировать его, после чего начать установку.
Компьютер будет перезагружаться несколько раз, параллельно с этим, вы введете данные о своем часовом поясе и настроите языковую раскладку клавиатуры.
Лицензионный ключ, который потребуется ввести чуть позже, можно проигнорировать, после чего скачать специальный активатор и наслаждаться славной жизнью цифрового пирата.
Как только установка Windows 7 на SSD завершится, вам необходимо настроить вашу новенькую операционную систему. Подробнее о том, что именно нужно сделать читайте в статье: «После установки windows 7»
Также вы можете посмотреть видео ниже, в котором подробно показано как устанавливать операционную систему Windows 7.
Источник: https://pomoshkomp.ru/%D1%81%D1%82%D0%B0%D1%82%D1%8C%D0%B8/%D1%83%D1%81%D1%82%D0%B0%D0%BD%D0%BE%D0%B2%D0%BA%D0%B0-windows/%D1%83%D1%81%D1%82%D0%B0%D0%BD%D0%BE%D0%B2%D0%BA%D0%B0-windows-7-%D0%BD%D0%B0-ssd/
SSD под windows 7
Все что нужно знать про установку, настройку и оптимизацию SSD (Solid-State Drive) диска на вашем компьютере при апгрейде или сборке нового ПК..
Какой твердотельный накопитель SSD выбрать?
Рассмотрим три противостоящих накопителя на борту которых разные контролеры:
- Crucial M4 CT064M4SSD2 Имеет сверх надежный серверный контроллер Марвел который отличается 100% надежностью.
- OCZ Vertex 2 контроллер SandForce SF-1222
- OCZ Agility 3 контроллер SandForce SF-2281
Тесты SSD
Сравнительный тест двух дисков:
твердотельный Crucial M4 CT064M4SSD2
и обычный ноутбучный WDC WD5000BEVT
тест сделан программой Everest disk benchmark
[singlepic id=54 w=320 h=240 float=center]
Мой самый быстрый результат, подключение SATA III
тест скорости Crucial M4 CT064M4SSD2 sata III 64GB
(использовалась программа as ssd benchmark)
[singlepic id=53 w=320 h=240 float=center]
Мой самый медленный результат, подключение SATA II
тест скорости OCZ Vertex2 sata II 40GB
диск установлен в старый ноутбук sata II
(использовалась программа as ssd benchmark)
[singlepic id=52 w=320 h=240 float=center]
Скачать программу для теста твердотельного диска AS ssd Benchmark:
▼ СКАЧАТЬ as-ssd-benchmark-1.6.4237.30508.zip 258.11 Kb
Установка SSD в компьютер или ноутбук
Внешний вид дисков SSD. Куплены в НИКС. Все диски на данный момент установлены в различные компьютеры 1 марта 2012г , используются под операционную систему, полет нормальный.
[singlepic id=45 w=320 h=240 float=center]
[singlepic id=46 w=320 h=240 float=center]
так выглядит адаптер 3,5″ для установки ноутбучных 2,5″ дисков в обычные настольные компьютеры (десктопы)
[singlepic id=47 w=320 h=240 float=center]
Установка SSD диска в настольный компьютер. Сначало необходимо прикрутить диск идущими в комплекте винтами к адаптеру. Далее открыть компьютер чтобы иметь доступ к отсеку для жестких дисков, установить диск в свободный отсек и прикрутить его, или закрепить так, какие предусмотрены крепления у вас в компьютере. Лично у меня в отсеке есть крепления двух видов, и защелки и обычные винты.
[singlepic id=48 w=320 h=240 float=center]
Теперь рассмотрим установку диска в ноутбук. Тут возможно большое количество вариантов открывания отсека для диска и масса нюансов конкретно установки самого диска в ноутбук.
[singlepic id=49 w=320 h=240 float=center]
Обычно трудностей в установке не возникает. Даже скорее установка жесткого диска в ноутбук обычно гораздо проще чем установка диска в обычный, десктоп компьютер.
[singlepic id=50 w=320 h=240 float=center]
Будем считать что вы удачно поставили и подключили себе диск.
Теперь качаем необходимый софт.
Оптимизация Windows под SSD диск
Мини программка для настройки и оптимизации ОС Windows специально под диск SSD. Там все просто и понятно, ставим все галочки и сохраняем и все будет гуд.
[singlepic id=51 w=320 h=240 float=center]
Работает программа только на Windows 7 и Windows 8 x32/x64.
Особенно актуальна для тех кто переносит свою винду c HDD диска на SSD накопитель, потому что если устанавливать новую винду сразу на диск SSD то винда сама делает массу адаптационных настроек.
SSD Mini Tweaker x32/x64_1.6
▼ СКАЧАТЬ ssd_mini_tweaker_1.6.rar 990.99 Kb
Перенос Windows с HDD на SDD диск
Единственная в своем роде программа которая поможет без проблем перенести Windows с HDD диска на SDD диск.
Создана для миграции системного раздела, даже решает проблему меньшего размера диска SSD относительно HDD. Работает просто и понятно.
Установка программы имеет некоторые нюансы,
Делаем все как на скриншотах, устанавливаем программу, потом из нее уже ставим сам Paragon Migrate OS
[singlepic id=55 w=320 h=240 float=center]
Теперь просто жмем далее, далее..
После установки программы Paragon Migrate OS запускаем её и копируем вашу операционку на новый SSD диск, там уже разберётесь сами.
Paragon_Migrate_OS_to_SSD_2.0_Special_Edition
▼ СКАЧАТЬ paragon_migrate_os_to_ssd_2.0_special_edition.7z 39.21 Mb
Переключение режима с IDE на ACHI
Еще один важный момент, система с диском SSD работает значительно быстрей когда включён ACHI режим для жесткого диска.
Этот набор софта поможет быстро и легко переключить режим. Внутри архива два варианта перехода с IDE на ACHI.
Для правильной работы SSD должен работать в режиме AHCI и быть не системным.
Вариант 1:
Для переключения режима с IDE в AHCI, добавьте в реестр инфу запустив exe файл соответствующий битности вашей ОС, выполните перезагрузку, сразу же заходите в биос и меняете режим на AHCI, затем загружаетесь, компьютер установит драйверы на диск и попросит сделать перезагрузку – соглашаетесь.
Данный способ изменения режима работы контроллера на живой системе, проверялся на Windows 7 ULTIMATE 64bit, как на XP сказать не могу…
Вариант 2:
используйте MicrosoftFixit50470 IDE to ACHI.msi
IDE to ACHI
▼ СКАЧАТЬ ide-to-achi.rar 187.74 Kb
Программа SSDlife
Программа SSDlife служит в первую очередь для определения даты TEC, тоесть для определения дня когда наконец диск выработает свой ресурс (ресурс от 1млн до 2 млн часов) и откажет.
Программа для постоянного мониторинга диска SSD
Скриншот и описание программы SSDlife
[singlepic id=56 w=320 h=240 float=center]
Тесты проводил не я, а техномоньяк.рф , но проверка показала что всё так и есть, замена диска на ssd на порядки ускоряет работу системы, я даже не заменил диск а поменял его вместо DVD через переходник.
Источник: https://creng.ru/soft/ssd-pod-windows-7/
NVMe драйвер для Windows 7 x64
megazuzдля начала раборы SSD дисков формата NVMe (это те самые, что работают не через контроллер SATA, а через шину PCI-E о четырёх линий) нужно:
1) специальный патч от MicroSoft для Windows 7 / Server 2008R2 — https://support.microsoft.com/ru-ru/help/2990941/update-to-add-native-driver-support-in-nvm-express-in-windows-7-and-wi
— качать сам патч по этой ссылке https://hotfixv4.trafficmanager.net/Windows%207/Windows%20Server2008%20R2%20SP1/sp2/Fix487764/7600/free/477475_intl_x64_zip.exe
2) драйвера контроллера RAID от AMD, причём на сайте самой AMD лежит версия только под Windows 10 (под семёрку дрова выпилили), и их приходится искать на сайтах производителей материнских плат * , например вот тут — http://drivers.softpedia.com/get/MOTHERBOARD/Intel/ASUS-PRIME-B350M-A-AMD-RAID-Driver-8-1-0-26-64-bit.shtml
— прямая ссылка на закачку — https://us.softpedia-secure-download.com/dl/388eebf2e45059af500f93af2f7dce33/5a9aacb7/300558994/drivers/mb/AMD_RAID_driver_Win7-10_V81026.zip- reboot- PROFIT!!!Можно клонироваться.
_________________________________________
* B350 RAID Driver — not signed / wrong driver? — https://community.amd.com/thread/222575megazuzЕсли вы ценитель чистого и качественного звука, как и я, то вам определённо нужно настроить вывод звука на всех плеерах напрямую на свои колонки и наушники через ASIO — Audio Stream Input/Output (ASIO), «ввод-вывод потоковых аудиоданных» — протокол передачи данных с малой задержкой.
Для использования вывода при помощи ASIO в одних только аудиоплеерах достаточно установить лишь саму основу — ASIO4ALL.
Для задействования ASIO в видеоплеерах нужно дополнильно установить примочку Multichannel DirectShow ASIO Renderer.
Рассматриваем Windows 7 (в Windows 10 всё должно работать/настраиваться аналогично).
0) Качество выходного потока звука.Не забываем настроить колонки и наушники в Панели управления на максимальное качество потока.
Это не влияет на ASIO, но влияет на все остальные источники звука — браузеры, игры и плееры, не поддерживающие вывод звука через ASIO:
а) — в настройках колонок (кнопка Настроить) ставим галочку о том, что они широкополостные (то есть не будут обрезатся самые низкие и высокие частоты (это нужно только на самых простеньких динамиках дешёвых ноутбуков):
б) далее уже в свойствах колонок (кнопка Свойства) в правой вкладке Дополнительно выбираем самую нижнюю строчку (максимальное качество):
а) В Меню — Настройки самая первая вкладка — Воспроизведение
б) Выбираем выход через ASIO: ASIO4ALL v2
Теперь при первом старте воспроизведения должно появится сообщение об успешном начале работы ASIO4ALL
2) foobar2000 — http://www.foobar2000.org/
качаем стабильную версию 1.4.1 — http://foobar2000.org/getfile/25891646c05a0b038fabb2c06c03368a/foobar2000_v1.4.1.exe
Качаем с сайта Audiophile’s Software плагины:
- ASIO support (foo_out_asio.dll) 2.1.2 — Добавляет возможность вывода звука через ASIO.
- Bauer Stereo-to-Binaural (foo_dsp_bs2b.dll) 3.1.0 — Предназначен для улучшения прослушивания аудио стерео программ в наушниках (!).
- Resampler DSP (SSRC X) (foo_dsp_ssrcX.dll) 0.57 — Высококачественный DSP ресемплер для foobar2000.
Устанавливаем плеер.
Распаковываем содержимое (а именно сами dll и exe) скачанных плагинов в каталог — C:\Program Files (x86)\foobar2000\components
а) Запускаем и лезем в Настройки (File — Preferences) и выбираем вывод через ASIO:
б) Лезем в DSP Manager и добавляем/настраиваем плагины:
в) в настройках (кнопка многоточее) SSRC X выбираем профиль Otachan Ultra и Sample rate поставить 192000:
г) плагин Bauer Stereo-to-Binaural нужен при прослушивании музыки в наушниках (если это не специально записанная музыка для этого).
2. проигрователи:
В дополнение к ASIO4ALL нам понадобиться также Multichannel DirectShow ASIO Renderer
Страничка проекта — http://blog.familie-buchberger.at/2015/12/15/multichannel-directshow-asio-renderer/Качаем и ставим.В видеоплеерах появляется вывод звука через данный плагин.
0) Улучшить звук в ffdshow Audio Decoder.
а) включаем все форматы на входе и на выходе:
б) включаем и настраиваем ресемплирование звука:
1) MPC-HC
Качаем либо сам плеер — https://mpc-hc.org/downloads/
или пак, содержащий его и все-все кодеки для вопсроизведения вадеофайлов — http://www.codecguide.com/download_k-lite_codec_pack_mega.htm
Или вообще качаем SVP — SmoothVideo Project (в него входит последняя версия MPC-HC 64 bit) — — https://www.svp-team.
com/wiki/Main_Page
а) Запускаем, лезем в Настройки
б) Переходим в Воспроизведение ->Вывод и выбираем в выпадающем списке Рендер аудио нужный нам Multichannel ASIO Renderer Filter
в) при начале воспроизведения также появляется сообщение от ASIO4ALL
г) для изменения настроек данного плагина-фильтра кликаем правой кнопкой по области вопсроизведения (или лезем в меню) и находим там в Фильтрах нужный нам Multichannel ASIO Renderer Filter
д) и меняем качество дескритизации на максимальную:
е) предварительно не забываем также
И вот тут-то мы наконец и получаем ачишуительный звук в фильмах.
Page 3
megazuzВ один прекрасный день при включени компа появилась строчка:
Грузимся с другого диска с виндой и видим, что SmartBuy Iginition 4 120Gb потерял все разделы и стал не 111Gb, а всего 2Mb.Известно, что этот ssd основан на контроллере Phison S10c и памяти MLC, и его версия прошивки SAFM01.7.
После очень вдумчивого гугления и отбрасывания кучи мусора находим вот это — http://forum.ru-board.com/topic.cgi?forum=84&topic=5360&start=0&limit=1&m=18 :
Phison_Flash_ID.rar — утилита, которая определяет, какая именно (MLC или TLC, и сколько nm) память распаяна на плате (есть три производителя Micron, SanDisk и Toshiba), от этого зависит, каую прошивку шить;
repairs_10.rar — утилита, котороя сконфигурирует ssdшник, если пришивальщик зависает на 30% (не может полностью стереть диск, так как диск несконфигурирован) — запускать при выключенном ACHI (в режиме IDE) после прошивки;
build-s10-flasher.rar — утилита, которая генерирует прошивальщик с нужной прошивкой, который уже и шьёт диск (у меня получилось прошится только в режиме rom-only).
подходящая прошивка под нашу память (у меня это оказалась 19nm MLC Toshiba) — то есть как раз это SAFM01.7_02032016.BIN — забирать весь пак прошивок тут — https://www.usbdev.ru/files/phison/ps3110fw/
Page 4
Источник: https://megazuz.livejournal.com/24024.html
Настраиваем диск SSD на работу под Windows 7
В настоящее время все большей популярностью в качестве винчестеров пользуются твердотельные накопители SSD, которые, в отличие от привычных жестких дисков HHD, имеют гораздо более высокую скорость работы, компактность и бесшумность.
Но в то же время не каждый пользователь знает, что для того, чтобы при подключении данного запоминающего устройства к компьютеру работа была корректной и максимально эффективной, нужно соответствующим образом настроить как сам диск, так и ПК.
Давайте разберемся, как произвести оптимизацию системы Windows 7 для взаимодействия с SSD.
Выполнение оптимизации
Основной причиной, по которой требуется производить оптимизацию ОС и запоминающего устройства, является максимально эффективная возможность использования главного преимущества SSD – высокой скорости передачи данных.
Также есть ещё один важный нюанс: данный тип дисков, в отличие от HDD, имеет ограниченное количество циклов перезаписи, а поэтому нужно произвести настройку так, чтобы вы могли использовать дисковый накопитель как можно дольше.
Манипуляции по настройке системы и SSD можно выполнять как при помощи встроенных утилит Windows 7, так и используя стороннее ПО.
Прежде всего, перед подключением SSD к компьютеру убедитесь, что в BIOS включен режим ANSI, а также в наличии необходимых для его функционирования драйверов.
Способ 1: SSDTweaker
Использование сторонних программ для настройки системы под SSD гораздо целесообразнее, чем решение задачи при помощи встроенных инструментов. Этот способ предпочитают менее опытные пользователи. Мы рассмотрим вариант оптимизации на примере специализированной сторонней утилиты SSDTweaker.
Скачать SSDTweaker
- После скачивания распакуйте Zip-архив и запустите исполняемый файл, который в нем находится. Откроется «Мастер установки» на английском языке. Жмите «Next».
- Далее нужно будет подтвердить лицензионное соглашение с правообладателем. Переставьте радиокнопку в положение «I accept the agreement» и жмите «Next».
- В следующем окошке предоставляется возможность выбора директории установки SSDTweaker. По умолчанию это папка «Program Files» на диске C. Советуем не менять данную настройку, если на то у вас нет веских оснований. Жмите «Next».
- На следующем этапе можно указать название иконки программы в стартовом меню либо вообще отказаться от её использования. В последнем случае нужно установить пометку около параметра «Don’t create a Start Menu folder». Если же вас все устраивает и вы ничего менять не хотите, тогда просто жмите «Next» без выполнения дополнительных действий.
- После этого вам будет предложено добавить иконку также и на «Рабочий стол». В этом случае необходимо установить пометку около «Create a desktop icon». Если же вам не нужен этот значок в указанной области, то оставьте чекбокс пустым. Жмите «Next».
- Теперь откроется окно с общими данными установки, скомпилированными на основе произведенных вами действий на предыдущих этапах. Для активации инсталляции SSDTweaker жмите «Install».
- Будет выполнена процедура установки. Если вы хотите, чтобы программа запустилась сразу же по выходу из «Мастера установки», то не снимайте пометку около параметра «Launch SSDTweaker». Жмите «Finish».
- Откроется рабочая область SSDTweaker. Прежде всего, в нижнем правом углу из выпадающего списка выберите русский язык.
- Далее для запуска выполнения оптимизации под SSD одним кликом нажмите кнопку «Конфигурация авто настройки».
- Процедура оптимизации будет выполнена.
При желании во вкладках «Стандартные настройки» и «Расширенные настройки» вы можете указать конкретные параметры оптимизации системы, если вас стандартный вариант не удовлетворяет, но для этого нужно уже обладать определенными знаниями. Часть этих знаний вам станет доступна после ознакомления со следующим способом оптимизации системы.
К сожалению, изменения во вкладке «Расширенные настройки» можно производить только в платной версии SSDTweaker.
Способ 2: Применение встроенных инструментов системы
Несмотря на простоту предыдущего способа, многие пользователи предпочитают действовать по старинке, настраивая компьютер для работы с SSD с помощью встроенного инструментария Виндовс 7. Это обосновывается тем, что, во-первых, не нужно скачивать и устанавливать сторонние программы, а во-вторых, более высоким уровнем уверенности в корректности и точности вносимых изменений.
Далее будут описаны этапы настройки ОС и диска под накопитель формата SSD. Но это не значит, что вы должны все их обязательно применять. Некоторые этапы настройки можно пропустить, если вы считаете, что для конкретных нужд использования системы так будет правильнее.
Этап 1: Отключение дефрагментации
Для дисков SSD, в отличие от HDD, дефрагментация несет не пользу, а вред, так как увеличивает изнашиваемость секторов. Поэтому советуем проверить, включена ли эта функция на ПК, и если это так, то следует отключить её.
- Щелкайте «Пуск». Зайдите в «Панель управления».
- Жмите «Система и безопасность».
- Далее в группе «Администрирование» кликните по надписи «Дефрагментация жесткого диска».
- Открывается окно «Дефрагментация диска». Если в нем отображается параметр «Дефрагментация по расписанию включена», щелкайте по кнопке «Настроить расписание…».
- В открывшемся окошке напротив позиции «Выполнять по расписанию» снимите отметку и жмите «OK».
- После того как в основном окне настройки процедуры отобразится параметр «Дефрагментация по расписанию выключена», жмите кнопку «Закрыть».
Этап 2: Отключение индексации
Ещё одна процедура, которая регулярно требует обращений к SSD, а значит, увеличивает его изнашиваемость, является индексация. Но тут решайте сами, готовы ли отключить эту функцию или нет, так как с её помощью происходит поиск файлов на компьютере. Но если вы через встроенный поиск ищите расположенные на ПК объекты довольно редко, то данная возможность вам точно не нужна, а в крайнем случае вы можете воспользоваться сторонними поисковиками, например, на Total Commander.
- Щелкайте «Пуск». Переходите в «Компьютер».
- Откроется перечень логических дисков. Щелкните правой кнопкой мышки (ПКМ) по тому из них, который является накопителем SSD. В меню выбирайте «Свойства».
- Откроется окошко свойств. Если в нем имеется пометка напротив параметра «Разрешать индексировать…», то в этом случае снимите её, а потом щелкайте «Применить» и «OK».
Если к SSD относится несколько логических дисков или к компьютеру подключен не один SSD, то проделайте вышеуказанную операцию со всеми соответствующими разделами.
Этап 3: Деактивация файла подкачки
Ещё одним фактором, который увеличивает изнашиваемость SSD, является наличие файла подкачки. Но удалять его стоит только тогда, когда на ПК есть соответствующий объем RAM для выполнения привычных операций. На современных ПК рекомендуют избавляться от файла подкачки в том случае, если объем памяти ОЗУ превышает 10 Гб.
- Жмите «Пуск» и снова щелкайте «Компьютер», но теперь уже ПКМ. В меню выбираем «Свойства».
- В открывшемся окне переходите по надписи «Дополнительные параметры…».
- Открывается оболочка «Свойства системы». Перемещайтесь в раздел «Дополнительно» и в области «Быстродействие» жмите «Параметры».
- Открывается оболочка параметров. Переместитесь в раздел «Дополнительно».
- В отобразившемся окне в области «Виртуальная память» жмите «Изменить».
- Откроется окно параметров виртуальной памяти. В области «Диск» выберите раздел, который соответствует SSD. Если их несколько, то нижеописанную процедуру следует проделать с каждым. Снимите пометку около пункта «Автоматически выбирать объем…». Ниже переставьте радиокнопку в позицию «Без файла подкачки». Жмите «OK».
- Теперь перезагрузите ПК. Щелкайте «Пуск», жмите на треугольник рядом с кнопкой «Завершения работы» и кликните «Перезагрузить». После активации ПК файл подкачки будет отключен.
Урок:
Нужен ли файл подкачки на SSD
Как отключить файл подкачки на Виндовс 7
Этап 4: Отключение гибернации
По аналогичной причине следует отключить и файл гибернации (hiberfil.sys), так как в него регулярно записывается очень большой объем информации, что ведет к износу SSD.
- Жмите «Пуск». Войдите во «Все программы».
- Откройте «Стандартные».
- В перечне инструментов отыщите наименование «Командная строка». Произведите по нему щелчок ПКМ. В меню выбирайте «Запуск от имени администратора».
- В отобразившейся «Командной строке» введите команду:
powercfg -h off
Щелкайте Enter.
- Перезагрузите компьютер тем же методом, который был описан выше. После этого файл hiberfil.sys будет удален.
Урок: Как отключить гибернацию на Виндовс 7
Этап 5: Активация TRIM
Функция TRIM выполняет оптимизацию диска SSD, обеспечивая равномерный износ ячеек. Поэтому при подключении вышеуказанного типа винчестера к компьютеру её обязательно нужно включить.
- Чтобы узнать, активирован ли на вашем компьютере механизм TRIM, запустите «Командную строку» от лица администратора, как это было выполнено при описании предыдущего этапа. Вбейте:
fsutil behavior query DisableDeleteNotify
Жмите Enter.
- Если в «Командной строке» будет отображено значение «DisableDeleteNotify = 0», то все в порядке и функция включена.
Если же отображается значение «DisableDeleteNotify = 1», то это означает, что механизм TRIM выключен и его следует обязательно активировать.
- Для активации TRIM введите в «Командную строку»:
fsutil behavior set DisableDeleteNotify 0
Щелкайте Enter.
Теперь механизм TRIM активирован.
Этап 6: Отключение создания точек восстановления
Конечно, создание точек восстановления – это важный фактор безопасности системы, с помощью которого можно будет возобновить её работоспособность в случае неполадок. Но отключение данной функции все-таки позволяет увеличить жизнь накопителю формата SSD, а поэтому мы не можем не упомянуть и об этом варианте. А вы уже сами решайте, стоит ли его применять или нет.
- Жмите «Пуск». Кликайте ПКМ по наименованию «Компьютер». Выберите в списке «Свойства».
- На боковой панели открывшегося окна щелкайте «Защита системы».
- В открывшемся окошке во вкладке «Защита системы» щелкайте по кнопке «Настроить».
- В появившемся окне настроек в блоке «Параметры восстановления» переставьте радиокнопку в позицию «Отключить защиту…». Около надписи «Удаление всех точек восстановления» жмите «Удалить».
- Откроется диалоговое окно с предупреждением о том, что вследствие проведенных действий будет удалены все точки восстановления, что приведет к невозможности реанимации системы в случае неисправностей. Жмите «Продолжить».
- Будет проведена процедура удаления. Появится информационное окошко, сообщающее о том, что все точки восстановления удалены. Жмите «Закрыть».
- Вернувшись в окно защиты системы, жмите «Применить» и «OK». После этого точки восстановления формироваться не будут.
Но напоминаем, что действия, описанные на данном этапе, вы производите на свой страх и риск. Выполняя их, вы увеличиваете срок жизни носителя SSD, но лишаетесь возможности произвести восстановление системы в случае различных неисправностей или краха.
Этап 7: Отключение ведения журнала файловой системы NTFS
Для увеличения срока использования SSD есть также смысл отключить ведение журнала файловой системы NTFS.
- Запустите «Командную строку» с административными полномочиями. Введите:
fsutil usn deletejournal /D C:
Если у вас ОС инсталлирована не на диске C, а в другом разделе, то вместо «C» укажите актуальную букву. Жмите Enter.
- Ведение журнала файловой системы NTFS будет отключено.
Произвести оптимизацию компьютера и самого твердотельного диска, используемого в качестве системного на Windows 7, можно как эксплуатируя сторонние программы (например, SSDTweaker), так и применяя встроенные механизмы системы. Первый вариант предельно простой и требует минимальный набор знаний.
Использование для указанной цели встроенных инструментов гораздо сложнее, но этот способ гарантирует более точную и надежную настройку ОС. Мы рады, что смогли помочь Вам в решении проблемы.
Опишите, что у вас не получилось.Наши специалисты постараются ответить максимально быстро.
Помогла ли вам эта статья?
ДА НЕТ
Источник: https://lumpics.ru/configuring-an-ssd-for-windows-7/
SSD (Solid-State Drive, твердотельный накопитель) является быстрой и надежной альтернативой обычному жесткому диску. Однако для оптимальной работы SSD диска в Windows 7, иногда требуется установить специальный драйвер. В этой подробной инструкции мы расскажем, как установить драйвер для SSD диска на вашем компьютере с Windows 7.
Первым шагом перед установкой драйвера для SSD диска в Windows 7, мы рекомендуем вам сделать резервную копию важных файлов. Хотя установка драйвера обычно безопасна, всегда есть маленький риск потери данных. Поэтому лучше быть готовым.
После создания резервной копии важных данных, вам необходимо скачать драйвер для SSD диска. Обычно производители SSD дисков предоставляют такие драйверы на своих официальных сайтах. Проверьте модель вашего SSD и найдите подходящий драйвер для Windows 7. Обратите внимание, что в комплекте с SSD дисками часто идет CD-диск с необходимыми драйверами.
Содержание
- Как установить драйвер для SSD диска в Windows 7?
- Подготовка к установке
- Скачивание драйвера
- Установка драйвера
- Проверка успешной установки
Как установить драйвер для SSD диска в Windows 7?
Драйверы необходимы для правильной работы аппаратного обеспечения, включая SSD диски. Если у вас установлен SSD диск и вы хотите установить соответствующий драйвер в операционную систему Windows 7, следуйте приведенной ниже инструкции:
- Первым шагом нужно определить модель вашего SSD диска. Для этого можно воспользоваться программами для анализа системы, такими как Speccy или CrystalDiskInfo. Запустите одну из программ и найдите информацию о модели SSD диска.
- После определения модели SSD диска вам нужно посетить официальный веб-сайт производителя. Найдите раздел «Поддержка» или «Скачать драйверы» и найдите драйвер, соответствующий модели вашего SSD диска.
- Скачайте драйвер в соответствии с разрядностью вашей операционной системы Windows 7 (32-битная или 64-битная).
- После завершения загрузки драйвера откройте его файл. В большинстве случаев драйверы для SSD дисков представлены в виде исполняемых файлов (с расширением .exe) или архивов (с расширением .zip или .rar).
- Если у вас есть архив, распакуйте его с помощью программы для работы с архивами, такой как WinRAR или 7-Zip. Если у вас исполняемый файл, просто дважды кликните на нем для запуска.
- Следуйте инструкциям установщика драйвера. Обычно это простой процесс, где нужно нажать кнопку «Далее» несколько раз и подождать завершения установки.
- После установки драйвера перезагрузите компьютер. После перезагрузки ваши SSD диск будет работать с установленным драйвером.
Важно помнить, что SSD диски обычно не требуют драйверов для базовой функциональности. Однако, установка драйвера может обеспечить лучшую совместимость и производительность, поэтому это может быть полезно в некоторых случаях.
В случае возникновения проблем с установкой драйвера или его поиска, рекомендуется обратиться к документации, поставляемой с вашим SSD диском, либо связаться с технической поддержкой производителя.
Подготовка к установке
Перед установкой драйвера для SSD диска в Windows 7 следует выполнить несколько подготовительных действий.
- Сделайте резервную копию важных данных
- Загрузите драйвер для SSD диска
- Разберитесь в системе своего компьютера
- Отключите антивирусное программное обеспечение
Перед установкой любого драйвера рекомендуется создать резервную копию всех важных данных на компьютере. В случае возникновения проблем или неудачной установки, вы сможете восстановить данные с помощью резервной копии.
Перед установкой драйвера необходимо скачать его с официального сайта производителя SSD диска или с сайта производителя материнской платы. Убедитесь, что у вас есть последняя версия драйвера, совместимая с операционной системой Windows 7.
Прежде чем устанавливать драйвер, важно понять, какая система на вашем компьютере: 32-битная или 64-битная. Также обратите внимание на производителя и модель SSD диска, чтобы установить соответствующий драйвер.
Чтобы установка драйвера прошла без ошибок, рекомендуется временно отключить антивирусное программное обеспечение. Это поможет избежать возможных конфликтов и блокировок во время установки.
После выполнения всех подготовительных действий можно приступать к установке драйвера для SSD диска в Windows 7.
Скачивание драйвера
Перед тем как начать установку драйвера для SSD диска в Windows 7, необходимо скачать его с официального сайта производителя или с других надежных источников. Важно убедиться, что выбранный драйвер совместим с вашей операционной системой.
Следуйте этим шагам, чтобы скачать драйвер:
- Откройте веб-браузер и перейдите на официальный сайт производителя SSD диска.
- На сайте найдите раздел «Поддержка», «Драйверы» или что-то подобное.
- Выберите модель вашего SSD диска из списка или введите ее в поиск на сайте.
- На странице с драйверами найдите соответствующую операционную систему (Windows 7) и нажмите на кнопку «Скачать».
После скачивания драйвера его следует сохранить в удобном для вас месте на компьютере, например, на рабочем столе или в папке «Загрузки».
Установка драйвера
Для корректной работы SSD диска в операционной системе Windows 7 необходимо установить соответствующий драйвер. В этом разделе мы рассмотрим процесс установки драйвера для SSD диска.
- Скачайте последнюю версию драйвера для вашего SSD диска с официального сайта производителя.
- Сохраните скачанный файл на вашем компьютере.
- Откройте файл и следуйте инструкциям мастера установки.
- Примите условия лицензионного соглашения и нажмите кнопку «Далее».
- Выберите папку, в которую вы хотите установить драйвер, или оставьте значение по умолчанию.
- Нажмите кнопку «Установить», чтобы начать процесс установки драйвера.
- Дождитесь завершения установки. Вам может быть предложено перезагрузить компьютер после установки драйвера.
- После перезагрузки компьютера драйвер будет полностью установлен и готов к работе.
После установки драйвера для SSD диска в Windows 7, система будет успешно распознавать и работать с вашим SSD диском. Обратите внимание, что драйверы могут различаться в зависимости от производителя и модели SSD диска, поэтому важно устанавливать именно подходящий драйвер для вашего устройства.
Проверка успешной установки
После выполнения всех предыдущих шагов установки драйвера для SSD диска в Windows 7, необходимо проверить, была ли установка успешной.
Для этого выполните следующие действия:
- Перезагрузите компьютер, чтобы завершить процесс установки драйвера.
- После загрузки операционной системы, откройте меню «Пуск» и выберите «Панель управления».
- В окне «Панель управления» найдите раздел «Управление устройствами» или «Устройства и принтеры».
- Откройте раздел «Управление устройствами» или «Устройства и принтеры».
- В списке устройств найдите ваш SSD диск.
- Если устройство отображается в списке без ошибок или восклицательных знаков, значит установка прошла успешно.
- При необходимости, вы можете дополнительно проверить работу SSD диска, запустив утилиту CrystalDiskMark или другую программу для проверки производительности дисков.
Теперь вы можете быть уверены, что драйвер для SSD диска в Windows 7 успешно установлен и ваш диск готов к использованию.
Чтобы установить windows 7 на новый игровой ноутбук или персональный компьютер, первым делом нужно скачать Windows 7 для установки на SSD диск 64bit 32bit Pro торрент на высокой скорости и бесплатно. Жёсткие диски HDD уже отжили своё время и сейчас все ноутбуки продают уже на SSD под систему. Грубо говоря у SSD в десятки рас быстрей скорость чтения и записи, они не шумят и потребляют меньше энергии по сравнению с HDD. Особенно ноутбучные HDD очень тормозят систему, даже если всё остальное железо самое крутое.
Предлагается скачать профессиональную windows 7 x64 для ssd диска и windows7 x86 professional для ssd жёсткого диска всё в одном образе, который поместится на DVD болванку либо флешку, абсолютно чистая, ничего лишнего, вырезан шпионский функционал и добавлены драйвера USB 3.0 и USB 3.1
Дата обновлений: все важные обновления за 2019
образ обновлён
Версия Windows 7: SP1 Professional VL Build 7601 [64-32]bit русская
Язык Интерфейса: RUS Русский
Таблетка: Нужна активация windows 7
Первоисточник: www.microsoft.com
Размер ISO файла: 4.30Gb
Windows 7 для установки на SSD диск 64bit 32bit Pro скачать торрент
Минимально-рекомендуемые требования к «железу» для инсталляции системы:
• Проц (CPU):
— разрядность x64: с частотой 2 ГГц или выше;
— разрядность x32: с частотой 1 ГГц или выше.
• Объем оперативной памяти:
— разрядность x64: не менее 4 Гб;
— разрядность x32: не менее 2 ГБ.
• Объем свободного пространства на жестком диске:
— разрядность x64: не менее 30 Гб;
— разрядность x32: не менее 20 ГБ.
• Необходимо наличие USB-порта или DVD-привода.
• Видеокарта: совместимая с DirectX 9.0 или выше.
• Flash-накопитель или DVD-disk.
Скриншоты
Описание:
Возник вопрос о переустановке Виндовс 7 на ноутбуке? Вы хотите установить чистую систему, содержащую свежие обновления и с поддержкой USB 3.0? Мы поможем с решением данных вопросов.
Для инсталляции Виндовс 7 с flash-носителя. Вам необходимо скачать Виндовс 7 64\32-bit для ноутбука Скачивание производим любой удобной torrent-программой. Этот файл в виде iso-образа операционной системы мы и будем записывать на flash-носитель. В образ интегрированы обновления за Июль 2019 года. Из операционной системы удалены шпионские службы и телеметрия. Все остальные системные приложения оставлены без изменений. Сборка Виндовс 7 64\32-bit для ноутбука содержит драйвера портов USB 3.0/3.1, поддерживает твердотельные жесткие диски (SSD), дополнена системным soft’ом и возможность инсталляции на любые компьютеры. Iso-образ Виндовс 7 64\32-bit для ноутбука скачать бесплатно можно по torrent-ссылке ниже.
Наглядное описание установки windows 7 на SSD жёсткий диск:
За основание сборки взят оригинальный образ Майкрософт Виндовс 7 Профессиональная VL SP1. Из оригинала ничего не вырезалось и не подвергалось изменениям. Оригинал был дополнен необходимыми драйверами для более полноценной инсталляции на новейшие компьютеры. Установлено и встроено необходимое для стабильной работы компьютера программное обеспечение. Вы можете скачать Виндовс 7 с поддержкой USB 3.0 для ноутбука, soft и обновления, содержащиеся в образе по прямой ссылке.
Перечень дополнений Виндовс 7 Профессиональная VL SP1:
• Интеграция обновлений за Июль 2019 года;
• Интеграция драйверов USB 3.0/3.1 для AMD, Intel, Renesas и других производителей;
• Дополнение последними версиями:NET Framework, Visual C++, Internet Explorer 11;
• Встроены массивы данных библиотек DirectX за Июнь 2019 года;
• Для очистки системы встроены мощные программы-клинеры;
• исправлены ошибки SmartFix и MSDaRT в среде восстановления системы.
VL (Volume License) — «корпоративная лицензия». Данный вид лицензии рассчитан на поставки только для крупных корпоративных клиентов и отлична от обычной версии тем, что не требует никакой активации. Эта лицензия в течение длительного времени обеспечена поддержкой Майкрософт. Ваша система будет обновляться только самым стабильным программным обеспечением Виндовс 7 64\32-bit на протяжении долгого времени.
Инсталляция и активация.
Для экономии места, образ системы был сжат в формате ESD (разработка команды Майкрософт 2014 года). Это ещё один тип сжатия — «Recovery» (максимальней максимального), позволяющий уменьшить образ системы на 30% (в отличие от файла WIM). Применен современнейший загрузчик от Виндовс 10 для инсталляции на новых, более современных компьютерах.
Для того, чтобы скачать образ Виндовс 7 Профессиональная 64\32-bit для ноутбука необходима любая установленная torrent-программа. После скачивания запишите iso-образ Виндовс 7 на USB-носитель или DVD-disk и произведите стандартную инсталляцию на ноутбук.
Перед началом инсталляции, войдите в меню «Пуск» и в поисковой строке наберите diskmgmt.msc. Нажмите «Ввод» («Enter») – перед вами откроется окно управления дисков. Выбирайте жесткий диск, куда вы хотите поставить Виндовс — (к примеру: диск F) и кликните по нему правой кнопкой мыши. В окне, которое высветится, необходимо перейти на вкладку «Тома».
Стиль раздела: Основная загрузочная запись – это MBR.
Стиль раздела: Таблица с GUID разделов – это GPT.
При инсталляции рекомендуем вам придерживаться правил:
• Для инсталляции на диск MBR работайте через BIOS Legacy.
• Для инсталляции на диск GPT работайте в режиме UEFI.
• Если на вашем компьютере таблица разделов MBR, а инсталляция Виндовс 7 UEFI выполняется автоматически, то необходимо переключиться в стандартный BIOS.
• Во время первого запуска системы нажмите ESC или Delete, или F10 (это зависит от модели вашего компьютера). Отыщите в настройках «UEFI Security Boot» (этот протокол загрузки «зашивает» в BIOS ключи проверки сигнатур загрузочного кода) и выключите эту опцию. Далее необходимо найти и переключиться в режим «Legacy BIOS». Выберите функцию «Сохранить настройки» и, после этого, выполнится перезагрузка системы. Выполнение этих действий даст возможность без препятствий инсталлировать Виндовс 7 для ноутбука через BIOS с flash’ки.
• Для современных ноутбуков и жестких дисков с разметкой GPT инсталляцию Виндовс 7 с флешки производить можно в режиме UEFI. Выберите устройство загрузки в настройках системы или совершите выбор, вызвав меню загрузки, нажав F11 или F12 при включении компьютера.
Каким образом выполнить активацию Виндовс 7 Профессиональная? Оставляем выбор за вами. У вас есть возможность приобретения лицензионного ключа активации или вариант использовать специальные программы-активаторы. Их всегда можно найти у нас на сайте в разделе «Активаторы», где подробно описана инструкция их использования. В ISO образах допускается установщик браузера и некоторые пользовательские изменения по умолчнию для браузера Chrome, каждый может без проблем изменить настройки браузера на свои предпочтительные. Все авторские сборки перед публикацией на сайте, проходят проверку на вирусы. ISO образ открывается через dism, и всё содержимое сканируется антивирусом на вредоносные файлы.
Upgrading to an NVMe SSD can bring significant speed improvements to your computer, but if you’re still running Windows 7, you may wonder how to make it work. And because Windows 7 has been around for a decade, it doesn’t have native support for the more recent NVMe drives. But that doesn’t mean it’s impossible.
With a few extra steps, you can install Windows 7 on an NVMe SSD for your laptop and PC and enjoy the benefits of faster boot times and improved performance. This article will describe how to install Windows 7 on an NVMe SSD for your laptop or PC.
Preparation for Windows 7 Installation on NVMe SSD
Before you begin installation process, there are a few important things you’ll need to do to prepare your computer for Windows 7 on an NVMe SSD:
- Ensure your computer meets the system requirements before installing. This includes firmware with UEFI 2.3.1, 4GB RAM, recommended processor, display, and graphics card, among others.
- Create a backup for all your files on another drive or device if you have any on your SSD.
- Check your computer’s BIOS settings. You’ll need to ensure your computer’s BIOS settings are configured correctly to boot from the USB drive and properly detect the NVMe SSD.
These steps will prepare you for the installation, ensuring a smooth process.
How to Connect NVMe SSD to Laptop or PC
Connecting an NVMe SSD to your laptop or PC is a straightforward process, but there are a few key differences to remember depending on whether you’re working with a desktop or a laptop.
For desktop PC connection:
First, power down and unplug your PC.
- Open the case of your desktop PC and locate the PCIe slots where you’ll install the NVMe SSD.
- Carefully align the NVMe SSD with the PCIe slots and secure it with the screws provided.
- Connect the power and data (SATA) cables to the NVMe SSD and SATA port on your motherboard.
- Close the case and plug your PC back in.
For laptop connection:
- Start by turning off and unplugging your laptop.
- Remove the battery and locate the NVMe SSD slot on the bottom of the laptop.
- Carefully insert the NVMe SSD into the slot, ensuring it’s securely connected.
- Replace the battery and power your laptop.
If your laptop doesn’t have an NVMe SSD slot, you can consider using a USB drive by following these steps:
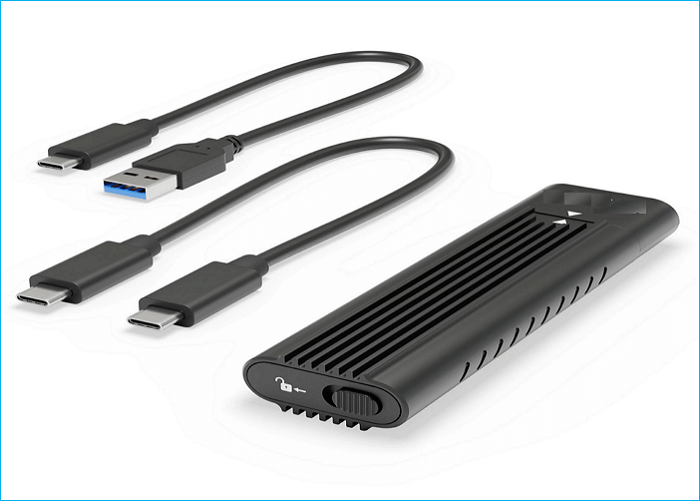
- Get a USB to NVMe SSD adapter like Inateck FE3001.
- Connect the NVMe SSD USB cable to the adapter.
- Plug another end of the USB cable into your laptop.
With that, your laptop will detect the NVMe SSD as an external drive.
You can now install Windows 7 with your NVMe SSD connected. Remember to set the NVMe SSD as the primary boot disk in BIOS.
3 Ways to Install Windows 7 on an NVMe SSD
Installing Windows 7 on an NVMe SSD can be tricky, as the operating system doesn’t have native support for NVMe drives. But there are still a few ways to work around this and get Windows 7 up and running on your NVMe SSD. Here are three we recommend:
| Workable Solutions | Step-by-step Troubleshooting |
|---|---|
| Way 1. Clone Windows 7 to NVMe SSD | Cloning your Windows 7 installation onto an NVMe SSD is a simple and effective…Full steps |
| Way 2. Add NVMe Driver to Windows 7 ISO | Including an NVMe driver in the Windows 7 installation ISO is another option…Full steps |
| Way 3. Manually Load NVMe Driver at Windows Setup | Some might find this method easier than the last or more complicated…Full steps |
Way 1. Clone Windows 7 to NVMe SSD
Cloning your Windows 7 installation onto an NVMe SSD is a simple and effective way to get it done. This method requires third-party disk cloning software, and the best one for the job is EaseUS Disk Copy.
EaseUS Disk Copy is a practical and professional cloning tool for Windows 11/10/8/7. It allows you to clone a hard drive with bad sectors. It also supports back-and-forth cloning from MBR to GPT while being compatible with any Windows version from 7 to 11. And it also allows you to clone C drive to an external hard drive and allows for full disk and partition level cloning. It can also enable you to migrate Windows 10 to NVME or M.2 and resize a partition when cloning disks.
Here’s how EaseUS Disk Copy can help you clone Windows 7 to an NVMe SSD in a few easy steps:
Prior Notice:
- The «Sector by sector copy» asks the size of your destination disk to be at least equal to or larger than that of the source disk. Leave this feature unchecked if you wish to clone a larger hard disk to a smaller hard disk.
- All data on the destination disk will be completely erased, so take care.
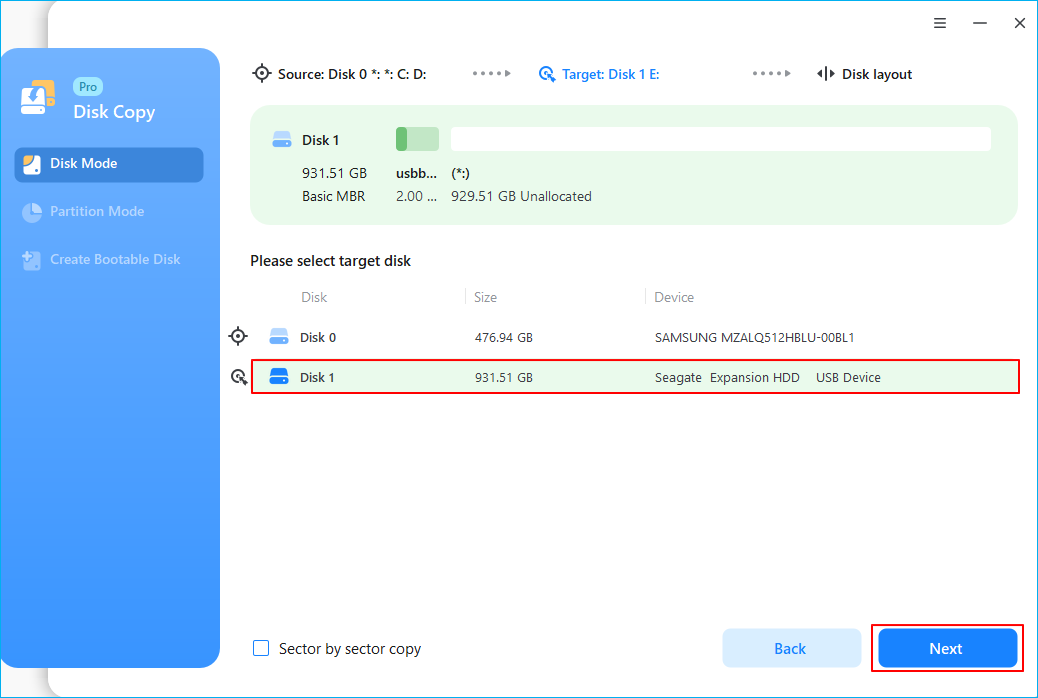
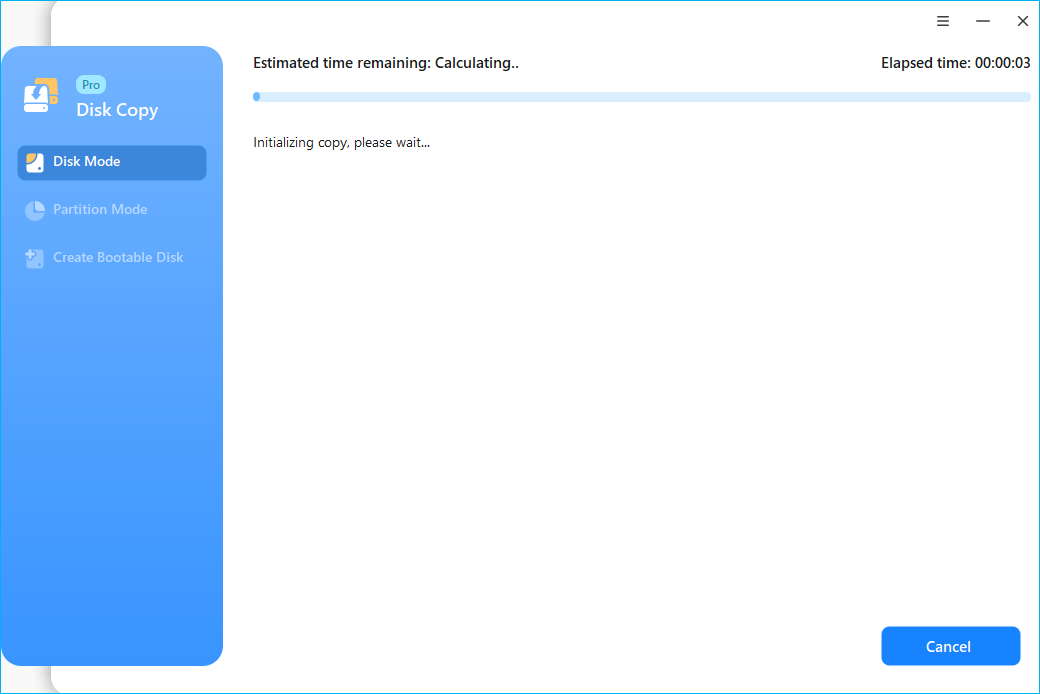
Step 1. To start copying/cloning an entire disk to another, choose this disk as the source disk under «Disk Mode» and click «Next».

Step 2. Choose the other disk as the destination disk.
Step 3. Check the disk layout of the two disks. You can manage the disk layout of the destination disk by selecting «Autofit the disk», «Copy as the source» or «Edit disk layout».
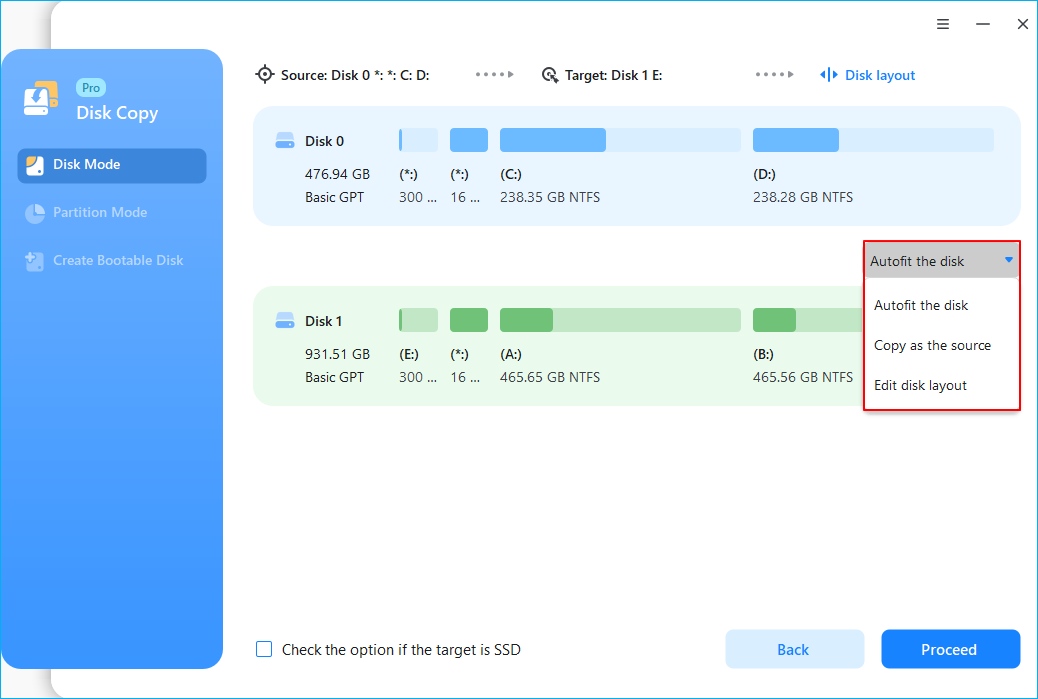
- «Autofit the disk» makes some changes by default on the destination disk layout so that it can work at its best status.
- «Copy as the source»does not change anything on destination disk and the layout is the same as source disk.
- «Edit disk layout» allows you to manually resize/move partition layout on this destination disk.
Tick the «Check the option if the target is SSD» option to put your SSD in its best performance.
A message now appears, warning you that data will be lost. Please confirm this message by clicking «OK» and then click «Next».
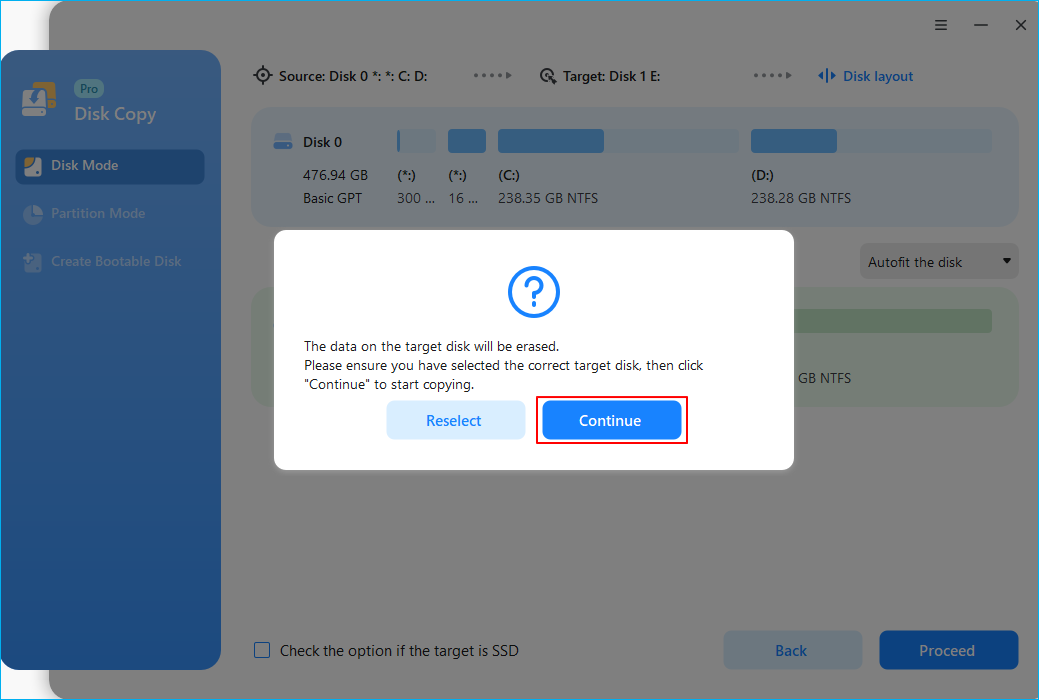
Step 4. Click «Proceed» to officially execute the task.
Way 2. Add NVMe Driver to Windows 7 ISO
Including an NVMe driver in the Windows 7 installation ISO is another option for installing the operating system on an NVMe SSD. This method is more complicated, but it lets you install Windows 7 on an NVMe SSD if you don’t want to go through our most recommended method — cloning. Here are the steps to follow:
Step 1. Download the NVMe driver for your specific SSD model from the manufacturer’s website.
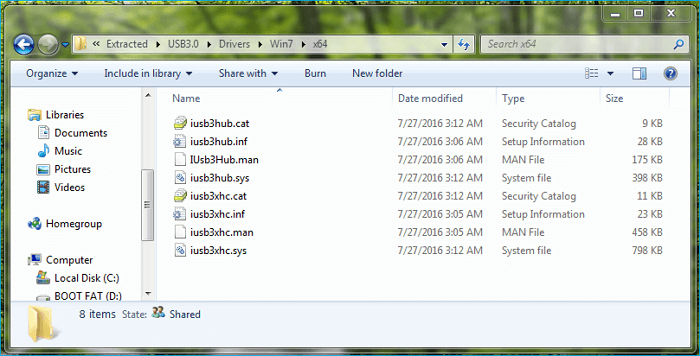
Step 2. Extract the driver files to a folder on your computer.
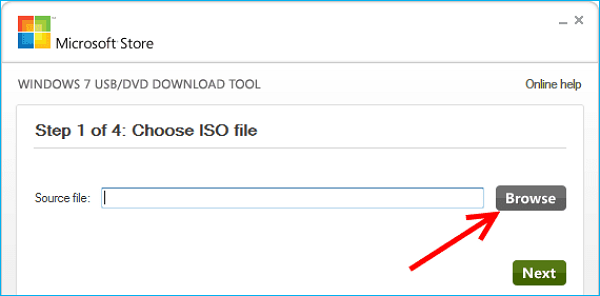
Step 3. Download the Windows 7 USB/DVD Download Tool and create a bootable USB drive with the Windows 7 installation ISO
Step 4. Mount the bootable USB drive, and copy the extracted NVMe driver files to the USB drive.
Step 5. Use the newly created bootable USB drive to install Windows 7 on the NVMe SSD; the NVMe driver will automatically be installed during the setup process.
Way 3. Manually Load NVMe Driver at Windows Setup
Some might find this method easier than the last or more complicated. But there are more steps to take.
Here’s how you can do it manually:
Step 1. Create a bootable USB drive with the Windows 7 installation files and connect your NVMe SSD as a secondary drive.
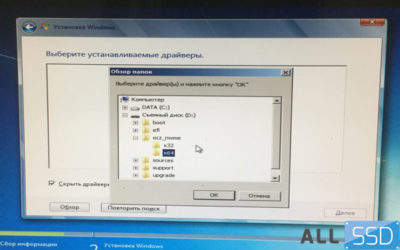
Step 2. Locate the driver and copy it to the USB bootable drive that you created
Step 3. Restart your PC.
Step 4. Enter the BIOS or UEFI setup, look for the option to change the boot order, and set the USB drive as the first boot device.
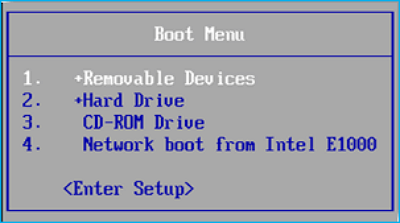
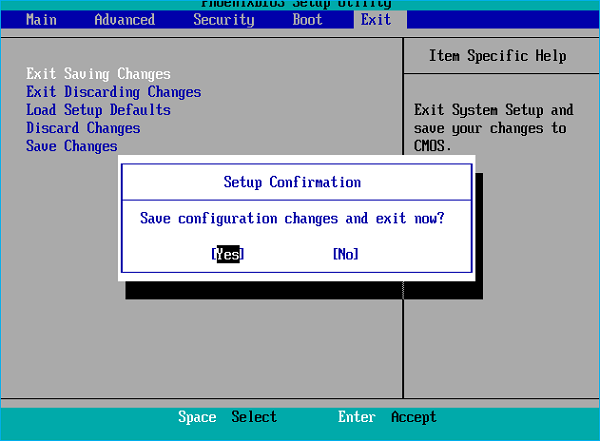
Step 5. Press the F10 key to save and exit, and Windows setup will begin.
Step 6. Prepare NVMe for installation by manually loading the driver.
Step 7. Point the installation to the driver location during the setup process.
Step 8. Continue with the setup process, and you should be able to select NVMe SSD to install Windows 7
Final Words
That is all about how to install Windows 7 on NVMe SSD. Installing Windows 7 on an NVMe SSD can be done easily through the three methods explained above: cloning, adding an NVMe driver to the ISO, and manual loading. Each method has its steps, which in this guide have been well explained to help you successfully install Windows 7 on an NVMe SSD.
Among the three ways, using EaseUS Disk Copy may be the easiest and simplest one. Its user-friendly interface and relatively fast cloning speed can help you clone Windows 7 to an SSD easily and quickly. In addition, it can also help you to clone M2 SSD with only one slot and clone Windows 10 to an external hard drive.
FAQs
1. Can I install Windows on an NVMe SSD?
Yes, Windows can be installed on an NVMe SSD. The process is a bit more complex than installing it on a traditional hard drive, but it can be done with the right tools and instructions.
2. Can Windows boot from NVMe?
Yes, any version of Windows with support for UEFI will support booting from NVMe. This is true for Windows 7 through 11.
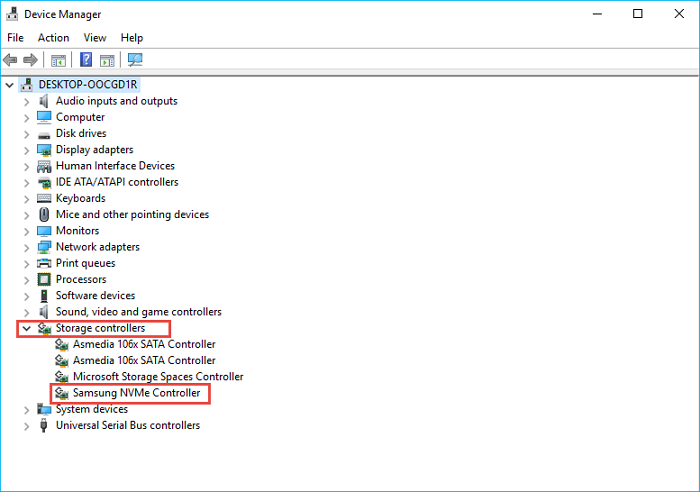
3. How do I know if Windows is installed on NVMe?
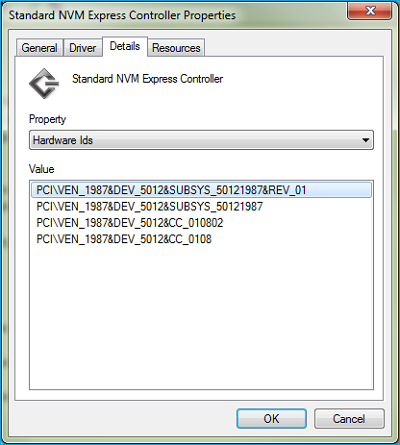
To confirm if Windows is installed on an NVMe SSD, you can check the BIOS or Disk Management to see the SSD type. You can also use the Windows key + X to open the Device Manager and look for the NVMe controller.
4. How can I use an old PC with NVMe?
To use an old PC with an NVMe SSD, you will need to install an NVMe driver, clone your Windows to it, or reinstall Windows on the NVMe SSD. This will let your old PC use the faster speeds and better performance NVMe technology offers.
Installing Windows 7 on NVMe SSD involves creating a bootable Windows 7 USB, integrating NVMe SSD drivers into the USB, and then installing Windows 7 from the USB onto the NVMe SSD.
NVMe SSD is a type of solid-state drive that uses the Non-Volatile Memory Express protocol to communicate with your computer.
This protocol provides faster data transfer speeds compared to traditional SSDs. However, Windows 7 doesn’t natively support NVMe SSDs, so you need to integrate the NVMe drivers manually.
Creating a bootable Windows 7 USB: You need a minimum 4GB USB stick and a Windows 7 ISO file. You can use tools like Rufus to create bootable USBs.
Integrating NVMe SSD drivers to the USB: This can be done using a tool like NTLite. You need to download the NVMe drivers from your SSD manufacturer’s website.
Installing Windows 7 from the USB onto the NVMe SSD: This involves booting from the USB, selecting the SSD as your install location, and following the on-screen instructions.
Updating Windows 7 after the installation: This is important to ensure that you have the latest security patches and updates.
Installing Windows 7 on an NVMe SSD can be a bit tricky because Windows 7 does not natively support this type of drive.
However, by integrating the necessary drivers into the installation media, you can achieve a successful installation. Remember to update the system after installation for optimal performance and security.
12 Steps Of Installing Windows 7 on Nvme SSD
| Steps | Description |
|---|---|
| 1 | Purchase or acquire a Windows 7 installation disk with a valid product key |
| 2 | Purchase or acquire an NVMe SSD |
| 3 | Install the NVMe SSD into your computer |
| 4 | Enter the BIOS or UEFI settings on your computer |
| 5 | Enable NVMe support (if not already enabled) |
| 6 | Assign the NVMe SSD as the primary boot device |
| 7 | Save changes and exit the BIOS or UEFI settings |
| 8 | Insert the Windows 7 installation disk into your computer |
| 9 | Reboot your computer |
| 10 | Follow the on-screen instructions to install Windows 7 on the NVMe SSD |
| 11 | Once installation is complete, check if Windows 7 can boot from the NVMe SSD |
| 12 | Update drivers and software as necessary for optimal performance |
Key Takeaway
Installing Windows 7 on NVME SSD can significantly enhance the system’s performance due to the faster reading and writing speed of SSDs.
Preparation is a critical step in installing Windows 7, involving backing up important data and ensuring proper NVME SSD compatibility.
It’s important to leverage the right tools like Rufus to create a bootable USB, containing the Windows 7 installation setup.
Updating system BIOS to support NVME SSD and having the latest drivers can ease the installation process and improve system compatibility.
Five Facts About: Installing Windows 7 on Nvme SSD
NVME SSD stands for Non-Volatile Memory Express Solid State Drive which is a newer technology that offers faster data transfer speeds compared to traditional SSDs or HDDs.
Installing Windows 7 on an NVME SSD can be complicated because it doesn’t come with in-box support for NVME, which means it requires additional drivers to recognize the drive during installation.
Creating a Windows 7 Installation USB with integrated NVME SSD drivers can solve the driver issue, and tools like Rufus or Zadig can help with this.
If the computer’s BIOS does not support NVME, a PCIe adapter can be used to connect the NVME SSD for Windows 7 installation.
For a successful Windows 7 installation on NVME SSD, it’s essential to format the drive to the NTFS file system as it is compatible with Windows.
Preparing For Installation
Learn how to efficiently install Windows 7 on an NVMe SSD with these step-by-step guidelines. Ensure a smooth installation process and optimize your system for enhanced performance.
Necessary Hardware And Software Requirements:
- NVMe SSD: You will need an NVMe SSD to install Windows 7. Make sure you have a compatible NVMe SSD with sufficient storage capacity.
- Motherboard compatibility: Ensure that your motherboard supports NVMe SSDs. Check the manufacturer’s website or user manual for compatibility information.
- Windows 7 installation media: You will need a bootable USB drive containing the Windows 7 installation files.
- USB port: Make sure your computer has a working USB port for connecting the bootable USB drive.
- Internet connection: To download the Windows 7 ISO file, you will need a stable internet connection.
Minimal System Requirements For Windows 7 Installation:
- Processor: At least a 1 GHz or faster processor.
- RAM: Minimum 1 GB (32-bit) or 2 GB (64-bit) of RAM is required.
- Storage: Ensure that your NVMe SSD has sufficient storage capacity for Windows 7 installation and future updates.
- Graphics card: A DirectX 9 graphics device with a WDDM 1.0 or higher driver is necessary.
- Display: A screen resolution of at least 800 x 600 pixels is recommended.
How To Check If Your System Is Compatible With Nvme Ssd:
- Check motherboard specifications: Consult your motherboard’s manual or visit the manufacturer’s website to verify NVMe SSD compatibility.
- Check BIOS version: Make sure you have the latest BIOS version installed on your motherboard, as older versions may not support NVMe SSDs.
- Use manufacturer’s tools: Some SSD manufacturers provide compatibility tools that can check if your system supports NVMe SSDs.
Creating A Bootable Windows 7 Usb Drive:
- Download the Windows 7 USB/DVD Download Tool: This tool allows you to create a bootable USB drive from the Windows 7 ISO file. You can find it on the Microsoft website or other trusted sources.
- Connect a USB drive: Insert a USB drive with at least 4 GB of storage capacity into your computer.
- Run the Windows 7 USB/DVD Download Tool: Launch the tool and follow the on-screen instructions to create the bootable USB drive.
- Select the ISO file: When prompted, browse for the Windows 7 ISO file you downloaded earlier and select it.
- Choose USB device: Select the USB drive you connected earlier as the destination for creating the bootable drive.
- Start the process: Click on the “Begin copying” button to start copying the Windows 7 files to the USB drive.
- Wait for the process to complete: The tool will copy the necessary files to the USB drive, and you’ll be notified when it’s finished.
Downloading The Windows 7 Iso File:
- Visit the Microsoft website: Go to the official Microsoft website to download the Windows 7 ISO file. Note that you will need a valid product key to activate Windows 7.
- Choose the correct version: Select the appropriate Windows 7 edition and language from the available options.
- Click on the download link: Start downloading the Windows 7 ISO file by clicking on the corresponding link.
- Wait for the download to complete: The download time will depend on your internet connection speed, so be patient.
Using A Usb Bootable Tool To Create A Bootable Usb Drive:
- Download a USB bootable tool: There are various USB bootable tools available online. Choose a reliable tool that suits your requirements.
- Install the tool: Follow the installation instructions provided by the tool’s developer to install it on your computer.
- Launch the tool: Open the USB bootable tool and locate the option to create a bootable USB drive.
- Select the Windows 7 ISO file: Browse for the Windows 7 ISO file you downloaded and select it.
- Choose the USB drive: Select the USB drive you want to make bootable.
- Start the process: Initiate the process of creating the bootable USB drive by clicking on the appropriate button.
- Wait for the tool to complete the task: The tool will format the USB drive, copy the necessary files, and make it bootable. Once finished, you’ll have a bootable USB drive ready for Windows 7 installation.
By following these steps, you can ensure that you are well-prepared for installing Windows 7 on an NVMe SSD.
Double-check the hardware and software requirements, verify system compatibility, create a bootable USB drive, and download the Windows 7 ISO file.
This ensures a smooth installation process and allows you to take advantage of the benefits offered by an NVMe SSD.
Configuring Bios For Nvme Ssd
Configuring the BIOS for NVMe SSD is essential for installing Windows 7 on these high-performance drives.
Follow these steps to optimize your system and ensure a smooth installation process.
To successfully install Windows 7 on an NVMe SSD, configuring your BIOS settings is essential. This step allows your system to recognize and utilize the full potential of NVMe technology.
In this section, we will guide you through the process of accessing the BIOS settings, enabling NVMe support, and locating the relevant options within the BIOS interface.
Accessing The Bios Settings:
Accessing the BIOS settings is the first step towards configuring your system for NVMe SSD installation.
Here’s how you can do it:
- Restarting your computer and accessing the BIOS: When your computer is restarting, you can enter the BIOS settings by pressing a specific key (such as F2 or Del) repeatedly during the boot process. The key required may vary depending on your computer manufacturer.
Different Methods To Access Bios On Different Systems:
The process of accessing the BIOS may differ depending on the system you are using.
Here are some common methods:
Method 1:
Pressing the designated key (e.g., F2 or Del) during the boot process.
Method 2:
Accessing the BIOS through the Windows Start menu. Go to the Settings menu, select Update & Security, then choose Recovery.
Under the Advanced Startup section, click Restart Now. On the reboot, you can access the BIOS through the Troubleshoot menu.
Method 3:
Using a specific key combination such as Ctrl+Alt+Del or Ctrl+Shift+Esc during the boot process.
Enabling Nvme Support In Bios:
Once you have accessed the BIOS settings, you need to enable NVMe support to ensure your system recognizes the NVMe SSD.
Follow these steps:
- Locate the “Storage” or “Advanced” tab in the BIOS interface.
- Look for an option related to “SATA Operation” or “Storage Configuration.”
- Set the option to “AHCI” or “NVMe” mode to enable NVMe support.
- Save the changes and exit the BIOS.
Locating The Nvme Settings In Bios:
After enabling NVMe support, you need to locate the relevant NVMe settings within the BIOS interface.
The exact location may vary depending on your system’s BIOS version, but here are some common places to look:
Boot or Boot Order tab:
Check for options related to boot devices or boot priorities, where you may find NVMe listed alongside other storage options.
Peripherals or Peripheral Configuration tab:
Look for options related to storage devices or disk controllers, where you might find NVMe settings.
Advanced or Advanced Settings tab:
Explore this section for options related to storage configurations, SATA settings, or disk management.
Enabling Nvme Support For Windows 7 Installation:
To ensure a successful Windows 7 installation on your NVMe SSD, follow these steps:
- Insert the Windows 7 installation media and boot your computer.
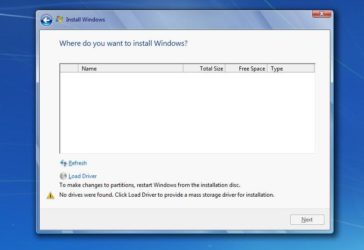
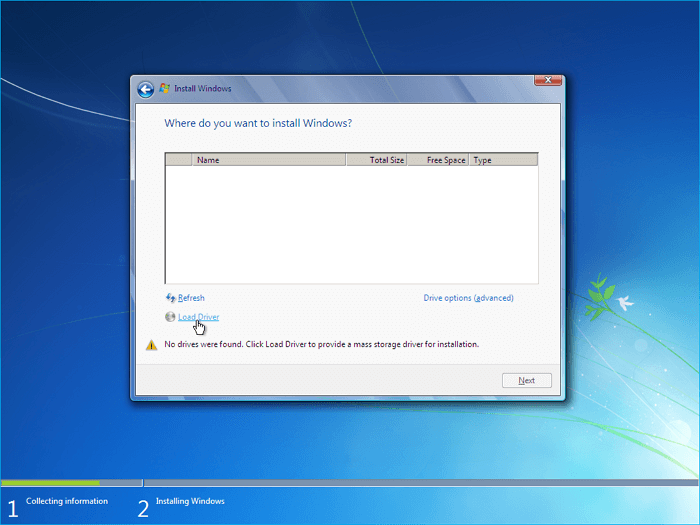
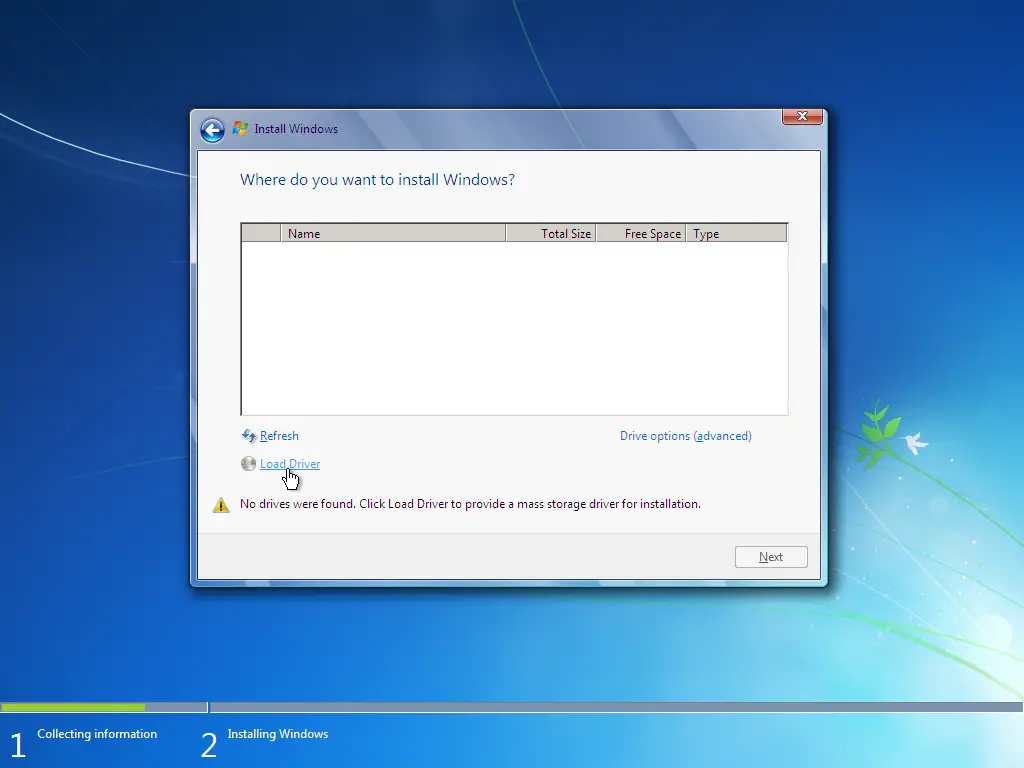
- During the installation process, when prompted to select a drive for installing Windows, check if your NVMe SSD is listed.
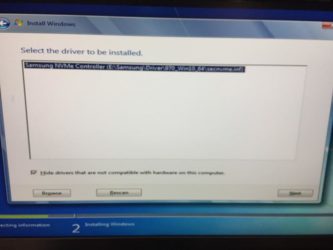
- If the NVMe SSD is not detected, you may need to load the NVMe drivers manually by selecting the “Load Driver” option and providing the necessary driver files.
- Once the NVMe SSD is recognized, proceed with the Windows 7 installation as usual.
By configuring your BIOS for NVMe SSD, you’re ready to install Windows 7 on this advanced storage device.
Ensure you follow the steps accurately and refer to your system’s documentation for any specific instructions.
Now, let’s move ahead to the next section:
Installing Windows 7 on NVMe SSD.
Installing Windows 7 On Nvme Ssd
Get step-by-step instructions for installing Windows 7 on an NVMe SSD, ensuring a fast and efficient system.
Discover the simple process and enjoy the benefits of improved performance on your computer. Installing Windows 7 on an NVMe SSD can help improve the performance of your system.
Follow these steps to successfully install Windows 7 on your NVMe SSD:
Booting From The Usb Drive:
To begin the installation process, you need to boot your computer from a USB drive containing the Windows 7 setup files.
Here’s how you can do it:
- Restart your computer and press the key to enter the BIOS or boot menu.
- Look for the option to change the boot order and prioritize the USB drive.
- Save the changes and exit the BIOS. Your computer will now boot from the USB drive.
Changing The Boot Order In Bios:
In order to boot from the USB drive, you may need to change the boot order in the BIOS.
Here’s how you can do it:
- Restart your computer and enter the BIOS by pressing the designated key.
- Navigate to the Boot menu and look for the boot order settings.
- Change the boot order and prioritize the USB drive over your internal storage devices.
- Save the changes and exit the BIOS.
Selecting The Usb Drive As The Boot Device:
After changing the boot order, you need to select the USB drive as the boot device to start the Windows 7 installation.
Follow these steps:
- Restart your computer and press the key to access the boot menu.
- Select the USB drive from the list of boot devices.
- Your computer will now boot from the USB drive and start the Windows 7 installation process.
Starting The Windows 7 Installation Process:
Once the computer has booted from the USB drive, you can start the Windows 7 installation process.
Here’s how:
- Choose the language, time, and currency format that you prefer.
- Click on “Install now” to begin the installation.
Selecting Language And Other Preferences:
During the installation process, you will be prompted to select the language and other preferences.
Follow these steps:
- Choose the desired language for Windows 7 installation.
- Select the appropriate time and currency format.
Entering The Product Key And Accepting The License Terms:
To proceed with the installation, you need to enter the product key and accept the license terms.
Here’s what you should do:
- Enter the product key provided with your Windows 7 copy.
- Read and accept the license terms to continue the installation.
Formatting And Partitioning The Nvme Ssd:
Before installing Windows 7 on the NVMe SSD, you will need to format and partition the drive.
Follow these steps:
- Select the NVMe SSD as the installation drive.
- Click on the “Drive options (advanced)” to access formatting and partitioning options.
Selecting The Nvme Ssd As The Installation Drive:
To install Windows 7 on the NVMe SSD, you need to select it as the installation drive.
Here’s what you need to do:
- Choose the NVMe SSD from the available drives.
- Click on “Next” to proceed with the installation.
Formatting The Drive And Creating Partitions:
Before the installation begins, you can format the NVMe SSD and create partitions as per your requirements.
Here’s how you can do it:
- Click on “Format” to format the drive.
- Click on “New” to create partitions and allocate disk space.
- Follow the on-screen instructions to partition the drive.
Completing The Windows 7 Installation:
After formatting and partitioning the NVMe SSD, you can proceed with the installation process.
Follow these steps:
- Wait for the installation process to complete.
- Your computer will then restart, and you can remove the USB drive.
- Follow the on-screen instructions to finalize the Windows 7 setup.
Installing Necessary Drivers:
After completing the Windows 7 installation, you may need to install additional drivers for optimal performance.
Here’s what you can do:
- Install the necessary drivers provided by the manufacturer.
- Update the drivers for your NVMe SSD to ensure compatibility and maximum performance.
Setting Up User Account And Password:
To secure your Windows 7 installation, you need to set up a user account and password.
Here’s what you should do:
- Create a user account with an appropriate username.
- Set a strong and secure password for your account.
- You may also set up a password hint for easier account recovery.
By following these steps, you can successfully install Windows 7 on your NVMe SSD, enhancing your system’s performance and efficiency.
Post-Installation Optimization
Optimize your Windows 7 installation on an NVMe SSD for maximum performance. Follow these steps to ensure smooth post-installation optimization.
Windows 7 is a highly popular operating system, and if you’re planning to install it on an NVMe SSD, optimizing its performance is crucial.
In this section, we will discuss the post-installation optimization steps to ensure that your Windows 7 installation on the NVMe SSD runs smoothly and efficiently.
Let’s dive in!
Updating Windows 7 And Device Drivers
Keep your Windows 7 installation up-to-date by regularly checking for and installing available Windows updates.
These updates often include important bug fixes and security patches that can enhance the overall performance and stability of your system.
Similarly, make sure to update the device drivers for your NVMe SSD and other components.
The manufacturers frequently release driver updates that can improve compatibility, speed, and functionality.
Connecting To The Internet And Checking For Updates
Connect your computer to the internet to enable the automatic update feature in Windows 7.
This will allow your system to download and install the latest updates and patches, ensuring that your operating system remains secure and efficient.
Installing Updated Drivers For Nvme Ssd And Other Devices
Visit the manufacturer’s website or use a driver update utility tool to download and install the most recent drivers specifically designed for your NVMe SSD.
These updated drivers often provide better performance, stability, and compatibility with Windows 7.
Additionally, make sure to install the latest drivers for other devices connected to your system, such as your graphics card, sound card, and network adapter.
This will ensure optimal functionality and compatibility for all your hardware components.
Configuring Power Management Settings
Adjusting power management settings can have a significant impact on the performance and lifespan of your NVMe SSD.
Head to the Power Options in the Control Panel and select the power plan that suits your needs. For optimal performance, choose the High Performance plan.
Adjusting Power Saving Options For Nvme Ssd
Within the Power Options, locate the advanced power settings and expand the Hard Disk section.
Set the Turn off hard disk after option to a higher value or select Never to prevent Windows from powering off your NVMe SSD, improving its responsiveness and reducing wear and tear.
Optimizing Power Management For Optimal Performance
- In the advanced power settings, navigate to the PCI Express section. Set the Link State Power Management to Off to prevent the NVMe SSD from entering a low-power state, ensuring maximum performance.
Testing Nvme Ssd Performance
After completing the optimization steps, it’s important to test the performance of your NVMe SSD to ensure everything is functioning as expected.
Running benchmarking tools can help you evaluate the speed, latency, and overall performance of your NVMe SSD.
Using Benchmarking Tools To Measure Ssd Performance
Utilize benchmarking tools like Crystal DiskMark or AS SSD Benchmark to measure the read and write speeds, IOPS (Input/Output Operations Per Second), and access times of your NVMe SSD.
These tools provide valuable insights into the performance of your SSD and can help identify any potential issues.
Monitoring Temperatures And Health Status
Monitor the temperatures and health status of your NVMe SSD regularly using software utilities provided by the manufacturer or third-party applications.
This helps ensure that your SSD is running within safe operating temperatures and keeps you informed about any potential health issues.
By following these post-installation optimization steps, you can ensure that your Windows 7 installation on the NVMe SSD is running at its best, delivering enhanced performance, stability, and longevity.
Troubleshooting Common Issues
Learn how to troubleshoot common issues that may arise while installing Windows 7 on an NVMe SSD.
With step-by-step guidance and practical tips, you can overcome any obstacles and enjoy a smooth installation process.
When it comes to installing Windows 7 on an NVMe SSD, you may encounter some common issues.
Don’t worry, though – in this section, we will discuss how to troubleshoot these problems and get your installation up and running smoothly.
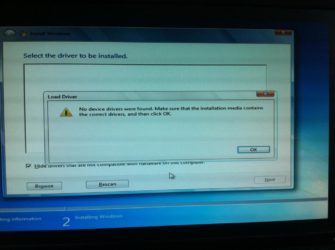
Windows 7 Installation Not Detecting Nvme Ssd
If your Windows 7 installation is not detecting your NVMe SSD, there are a few steps you can take to address the issue:
- Make sure your NVMe SSD is properly connected to your computer.
- Check if your NVMe SSD requires specific drivers. If so, you will need to load the drivers during the installation process.
- Ensure that your motherboard BIOS firmware is up to date.
- Try switching the NVMe SSD to a different PCIe slot.
Updating Motherboard Bios Firmware
Updating your motherboard BIOS firmware can often resolve compatibility issues and improve overall system stability.
Here’s how you can update it:
- Identify your motherboard model and visit the manufacturer’s website to download the latest BIOS firmware.
- Follow the instructions provided by the manufacturer to flash the updated BIOS onto your motherboard.
Ensuring Nvme Ssd Is Properly Connected
To ensure that your NVMe SSD is properly connected, follow these steps:
- Power off your computer and unplug it from the power source.
- Open your computer case and locate the NVMe SSD slot.
- Gently remove the NVMe SSD from the slot and reinsert it firmly.
- Double-check that all connections are secure, including power and data cables.
Blue Screen Errors During Installation
If you encounter blue screen errors during the installation process, consider the following troubleshooting steps:
- Make sure that your NVMe SSD is compatible with Windows 7. Check the manufacturer’s specifications for Windows 7 compatibility.
- Verify that your system meets the minimum requirements for Windows 7 installation.
- Ensure that all hardware components, such as RAM and graphics card, are securely installed.
- Try installing Windows 7 using a different installation media or USB drive.
- If the problem persists, check for any conflicting drivers or software.
Checking Compatibility Of Drivers And Software
Before installing Windows 7 on your NVMe SSD, it’s essential to verify the compatibility of your drivers and software.
Here’s what you need to do:
- Visit the manufacturer’s official website for each hardware component and check for Windows 7 drivers. If any are unavailable, consider upgrading to a newer version of Windows.
- Ensure that all software programs you intend to use are compatible with Windows 7. Consult the software vendor’s website for compatibility information.
Resolving Driver Conflicts And Issues
If you encounter driver conflicts or issues during or after the installation, follow these steps to resolve them:
- Use the Device Manager in Windows 7 to identify any problematic drivers.
- Visit the manufacturer’s website to download and install the latest drivers for your hardware components.
- Consider uninstalling any unnecessary drivers or software that may be causing conflicts.
Slow Performance After Installation
If you experience slow performance after installing Windows 7 on your NVMe SSD, there are a few optimizations you can try:
- Disable unnecessary startup programs using the System Configuration utility (msconfig).
- Ensure that your NVMe SSD is set as the primary boot device in the BIOS settings.
- Update your graphics card drivers to the latest version for improved performance.
- Install the latest Windows 7 updates to ensure system stability and performance.
Configuring Windows 7 For Optimum Performance
To optimize Windows 7 for better performance on an NVMe SSD, consider the following steps:
- Enable TRIM support for your NVMe SSD by using the command “fsutil behavior set disable delete notify 0″.
- Adjust the power settings to prioritize performance over energy savings.
- Disable unnecessary visual effects and animations in the Windows settings to reduce resource usage.
- Regularly defragment your NVMe SSD using the built-in Disk Defragmenter tool.
Troubleshooting Potential Hardware Or Software Issues
If you continue to experience issues with your Windows 7 installation on an NVMe SSD, it’s essential to troubleshoot potential hardware or software problems.
You can try:
- Running a diagnostic tool to check for any hardware issues.
- Scanning your system for malware or viruses using reliable antivirus software.
- Contacting the manufacturer’s support for further assistance if the problem persists.
Remember, installing Windows 7 on an NVMe SSD may require additional steps and precautions compared to traditional storage devices.
By troubleshooting common issues and following the recommended solutions, you can ensure a successful installation and optimal performance of your Windows 7 system on an NVMe SSD.
What is an NVMe SSD?
An NVMe SSD (Non-Volatile Memory Express Solid State Drive) is a type of storage device that utilizes the NVMe protocol to provide faster read and write speeds compared to traditional SATA-based solid-state drives.
How do I install Windows 7 on an NVMe SSD?
Installing Windows 7 on an NVMe SSD is a relatively simple process.
You will need to make sure that your motherboard is compatible with the NVMe protocol, and that you have a Windows 7 installation disc or ISO file.
Once you have those components ready, you can follow the instructions in the Windows 7 installation guide to correctly install Windows 7 on your NVMe SSD.
Do I need to make any changes to the BIOS settings to install Windows 7 on an NVMe SSD?
Yes, you will need to make some changes to the BIOS settings in order to install Windows 7 on an NVMe SSD.
Depending on your motherboard, you may need to enable the NVMe protocol, or select the NVMe drive as the primary boot device.
Refer to your motherboard’s user manual for more information on enabling the NVMe protocol.
Conclusion
Installing Windows 7 on an NVMe SSD can greatly improve your computer’s performance and speed.
By following the step-by-step process outlined in this blog post, you can ensure a successful installation without any hiccups.
The first step is to ensure that your computer’s BIOS is compatible with NVMe drives, and then proceed to format and partition the SSD to prepare it for installation.
Next, you will need to create a bootable USB drive with Windows 7 installation files and boot your computer from it.
The installation process may take some time, but once completed, you can enjoy the benefits of a faster and more efficient system.
Remember to backup your important files before starting the installation, and always double-check that you have the correct drivers and updates for your hardware.
With these guidelines in mind, you can confidently install Windows 7 on your NVMe SSD and experience improved performance like never before.
Bonus About The Topic: How To Install Windows 7 on Nvme SSD
Does Windows 7 Support Nvme Ssd?
Windows 7 does support NVMe SSDs, but there are a few caveats.
- First, you need to have the correct drivers installed.
- Secondly, your system must be configured to boot from an NVMe drive.
- And lastly, you may need to make some changes to your BIOS settings.
Let’s take a closer look at each of these requirements. To use an NVMe SSD with Windows 7, you’ll need to install the correct drivers.
You can usually find these on the manufacturer’s website or through a third-party driver site like Driver Booster.
Once you’ve downloaded and installed the drivers, restart your computer and check that they’re working by opening the Device Manager (search for it in the Start menu). If everything looks good, you’re ready to move on to the next step.
Next, you need to configure your system to boot from an NVMe drive. This is usually done in the BIOS settings, but it depends on your specific motherboard and BIOS version.
Consult your motherboard manual or look up your model online to see how to change this setting.
Once you’ve done that, save your changes and restart your computer again. It should now boot from the NVMe drive without any problems.
If you’re still having trouble getting Windows 7 to work with an NVMe SSD, there’s one more thing you can try: changing the SATA mode in BIOS from AHCI to IDE.
This is another BIOS setting that can be found in different places depending on your motherboard model, so consult your manual or do a web search for more specific instructions.
After making this change, save and restart once again and hopefully everything will now be working correctly!
Can I Install Windows 7 on M2 Ssd?
M2 SSDs are becoming more popular as a boot drive option, but can you install Windows 7 on an M2 SSD? The answer is yes, but there are some things to keep in mind.
First, make sure your motherboard supports M2 SSDs. Most newer motherboards do, but it’s always best to check before buying anything.
Second, Windows 7 does not have built-in drivers for M2 SSDs, so you’ll need to install them yourself. The good news is that most manufacturers provide easy-to-use installation software that will walk you through the process.
Third, because M2 SSDs are still relatively new, there aren’t a lot of them on the market yet. That means prices are high and capacities are low. If you’re looking to use an M2 SSD as your primary boot drive, be prepared to pay a premium.
Fourth and finally, remember that Windows 7 is no longer supported by Microsoft. That means if you do encounter any problems down the road, you’ll be on your own in terms of finding fixes or workarounds.
Overall, installing Windows 7 on an M2 SSD is perfectly possible and shouldn’t give you any major headaches.
Can I Install Windows on Nvme Ssd?
Windows can be installed on an NVMe SSD, but there are a few things to keep in mind.
First, you’ll need to make sure that your motherboard supports NVMe drives. If it doesn’t, you won’t be able to take advantage of the faster speeds that NVMe drives offer.
Secondly, you’ll need to install the latest version of Windows 10, as older versions don’t have built-in support for NVMe drives.
Finally, you should only install Windows on an NVMe drive if you plan on using it as your primary boot drive; installing it on a secondary drive will offer no performance benefits.
Can I Install Windows 7 on Ssd?
Yes, you can install Windows 7 on an SSD. In fact, many new computers come with SSDs installed. If you’re looking to upgrade your current computer to an SSD, the process is pretty straightforward.
Just make sure you have a backup of your data before you begin!
Windows 7 Nvme Driver Install
Windows 7 Nvme Driver Install If you have a Windows 7 computer and an M.2 NVME SSD, you may be wondering how to install the drivers for the drive.
The process is actually pretty simple, and we’ll walk you through everything you need to know:
- First things first – what is an NVME SSD? NVME stands for Non-Volatile Memory Express, and it’s a new type of storage technology that is much faster than traditional SATA SSDs.
- If you want to get the most out of your new drive, it’s important to make sure that you have the latest drivers installed.
- The good news is that there are already NVME drivers available for Windows 7, so you don’t need to do anything special to get them installed.
- Just head over to your manufacturer’s website and download the latest driver package for your specific model of drive.
- Once you’ve downloaded the ZIP file, extract it to a folder on your hard drive and then double-click on the setup program inside.
- Follow the prompts and agree to any terms and conditions, then let the installer do its thing.
- Once it’s finished, restart your computer and boot into Windows 7 as normal – your new drive should now be operational!
Microsoft Hotfix for Installing Windows 7 on Nvme
As the release of Windows 7 approaches, Microsoft has released a hotfix that enables users to install the operating system on Nvme drives.
This means that those with newer computers and SSDs can take advantage of the speed benefits that come with using an Nvme drive.
To install the hotfix, simply download it from Microsoft’s website and then run it on your computer. After doing so, you should be able to install Windows 7 on your Nvme drive without any issues.
Keep in mind, however, that this hotfix is only necessary if you’re trying to install Windows 7 on an Nvme drive – it isn’t required for other versions of Windows or for older drives.
If you’re planning on upgrading to Windows 7 or buying a new computer with an Nvme drive, then this hotfix is a must-have.
It’ll make the installation process much smoother and ensure that you can take full advantage of your new hardware.
Windows 7 Nvme Driver Download
Windows 7 is now officially out of support, which means that Microsoft will no longer be releasing security updates or patches for the operating system.
This means that any vulnerabilities that are discovered in Windows 7 will not be fixed by Microsoft, leaving users at risk of potential attacks.
One of the most important things to do if you’re still using Windows 7 is to make sure all your software is up to date.
This includes your web browser, as well as any other programs you have installed on your computer.
Attackers can exploit vulnerabilities in outdated software to gain access to your system, so it’s important to keep everything up to date.
Another thing to keep in mind is that many antivirus and security programs will no longer support Windows 7 after January 14th.
This means that they may not be able to protect you from new threats that emerge after this date.
If possible, you should upgrade to a newer version of Windows or switch to a different antivirus program altogether.
If you’re determined to stick with Windows 7 for now, there are a few things you can do to try and improve your security posture.
First, make sure you download and install all available updates from Microsoft. While these won’t fix any new vulnerabilities that are discovered, they will help close off any known attack vectors.
You should also consider installing an anti-exploit program like Malwarebytes Anti-Exploit Free.
These types of programs can help protect you from common exploits even if the underlying vulnerability hasn’t been patched yet.
Finally, it’s always a good idea to create backups of your important data before installing any major updates or upgrading your operating system.
Nvme Ssd Windows 7
If you’re looking to upgrade your Windows 7 PC to an NVMe SSD, there are a few things you need to know.
First, NVMe is a new storage protocol that delivers faster read/write speeds and lower latency than traditional SATA SSDs.
Second, because NVMe is still relatively new, there aren’t a lot of options when it comes to drives or adapters.
And third, the process of upgrading isn’t as simple as just swapping out your old drive for a new one – you’ll need to do some prep work first.
Here’s everything you need to know about upgrading to an NVMe SSD on Windows 7:
What is NVMe?
NVMe (Non-Volatile Memory Express) is a newer storage protocol that was designed specifically for Solid State Drives (SSDs).
It offers several advantages over the older SATA standard, including faster read/write speeds and lower latency.
Because of these benefits, many manufacturers are now releasing their newest SSDs in the NVMe format.
However, since NVMe is still fairly new technology, there aren’t a lot of drives or adapters available yet.
And because it uses a different connector than SATA drives (PCIe rather than AHCI), upgrading from a SATA SSD to an NVME one isn’t as simple as just swapping out the drive – you’ll also need an adapter card or motherboard with an M keyed M.2 slot.
If your computer doesn’t have an M keyed slot , then unfortunately you won’t be able to upgrade to an NVME SSD .
How much faster are NVME SSDs?
Depending on the specific model and brand , but in general ,you can expect around 3 times the speed of a regular SATA III solid state drive .
So if your current boot time is 60 seconds , switching over should get that down under 20 .
Obviously , this will also depend on other factors such as CPU speed and amount of RAM , but it gives you some idea of what kind of performance increase you can expect .
Are there any other benefits ?
Yes, In addition to speed improvements ,NVME ssd ‘ s often offer better power efficiency which could lead to slightly longer battery life on laptops .
They also tend to run cooler due tot heir more efficient design which reduces wear and tear on both the drive it self and other components in your system by reducing heat buildup .