Содержание
- Обновляем Windows Vista до Windows 7
- Минимальные системные требования Windows 7
- Шаг 1: Подготовка съемного носителя
- Шаг 2: Конфигурация BIOS для инсталляции с флешки
- Шаг 3: Обновление Windows Vista до Windows 7
- Шаг 4: Настройка ОС для работы
- Вопросы и ответы

На данный момент актуальной версией операционной системы Windows является 10. Однако не у всех компьютеры соответствуют минимальным требованиям, чтобы использовать именно ее. Поэтому они прибегают к инсталляции более ранних ОС, например Виндовс 7. Сегодня мы поговорим о том, как установить ее на ПК с Vista.
Процесс обновления не является чем-то сложным, однако требует от пользователя выполнения ряда манипуляций. Всю процедуру мы разделили на шаги, чтобы вам было проще ориентироваться в инструкциях. Давайте разберем все по порядку.
Минимальные системные требования Windows 7
Чаще всего обладатели ОС Vista имеют слабые компьютеры, поэтому перед началом обновления мы рекомендуем сравнить характеристики ваших комплектующих с официальными минимальными требованиями. Особое внимание обратите на количество оперативной памяти и процессор. В определении этого вам помогут две наши статьи по ссылкам ниже.
Подробнее:
Программы для определения железа компьютера
Как узнать характеристики своего компьютера
Что касается требований Windows 7, читайте их на официальном сайте Microsoft. После того, как вы убедились, что все совместимо, переходите непосредственно к инсталляции.
Перейти на сайт поддержки Microsoft
Шаг 1: Подготовка съемного носителя
Устанавливается новая версия операционной системы с диска или флешки. В первом случае не нужно производить никаких дополнительных настроек – просто вставьте DVD в дисковод и переходите к третьему шагу. Однако если вы используете флешку, сделайте из нее загрузочную, записав образ Windows. С руководством на эту тему ознакомьтесь по следующим ссылкам:
Подробнее:
Инструкция по созданию загрузочной флешки на Windows
Как создать загрузочную флешку Windows 7 в Rufus
Шаг 2: Конфигурация BIOS для инсталляции с флешки
Для дальнейшего использования съемного USB-накопитель вам потребуется настроить BIOS. Нужно изменить всего один параметр, переключающий загрузку компьютера с жесткого диска на флешку. О том, как это сделать, читайте в другом нашем материале ниже.

Подробнее: Настраиваем BIOS для загрузки с флешки
Обладателям UEFI следует произвести другие действия, поскольку интерфейс немного отличается с БИОС. Обратитесь за помощью к статье по следующей ссылке и выполните первый шаг.

Подробнее: Установка Windows 7 на ноутбук с UEFI
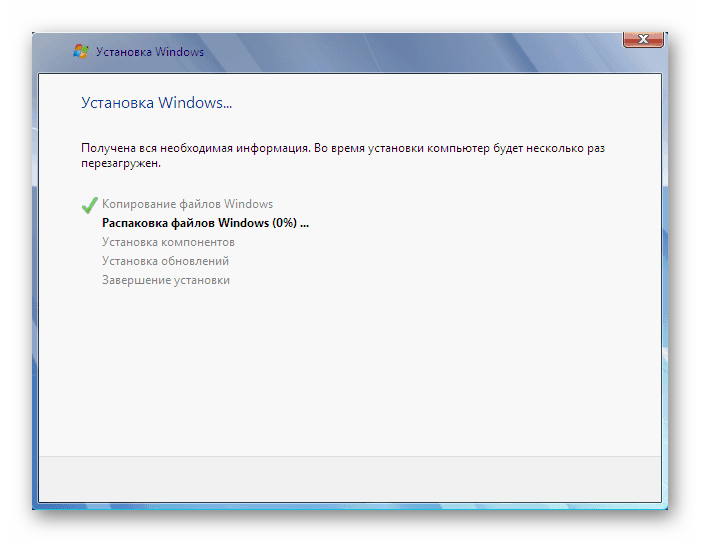
Шаг 3: Обновление Windows Vista до Windows 7
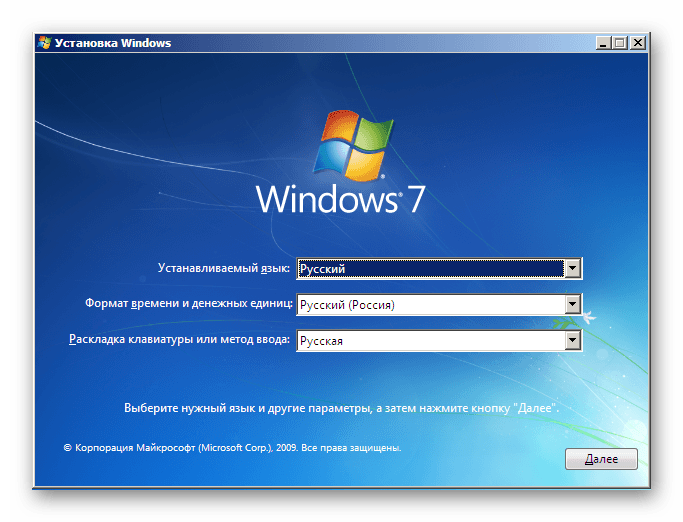
Теперь рассмотрим основной процесс инсталляции. Здесь вам нужно вставить диск или флешку и перезагрузить компьютер. При повторном включении запуск будет производиться с этих носителей, загрузятся основные файлы и откроется окно начала установки. После выполните следующее:
- Выберите удобный основной язык ОС, формат времени и раскладку клавиатуры.
- В отобразившемся меню Виндовс 7 нажмите на кнопку «Установить».
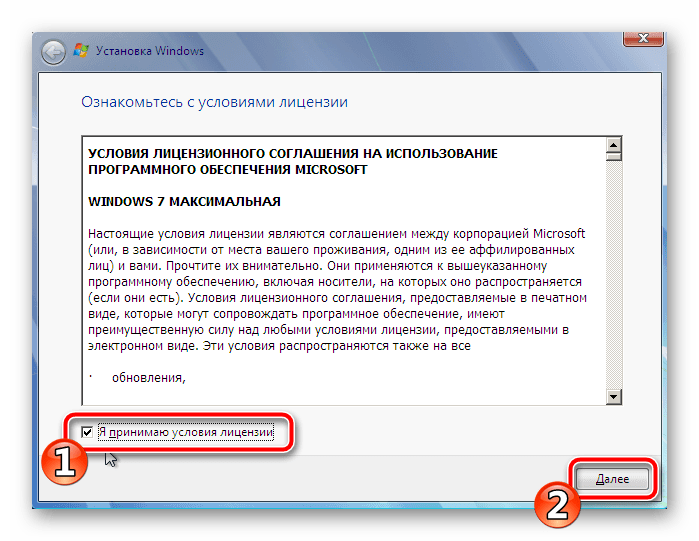
- Ознакомьтесь с условиями лицензионного соглашения, подтвердите их и переходите к следующему шагу.
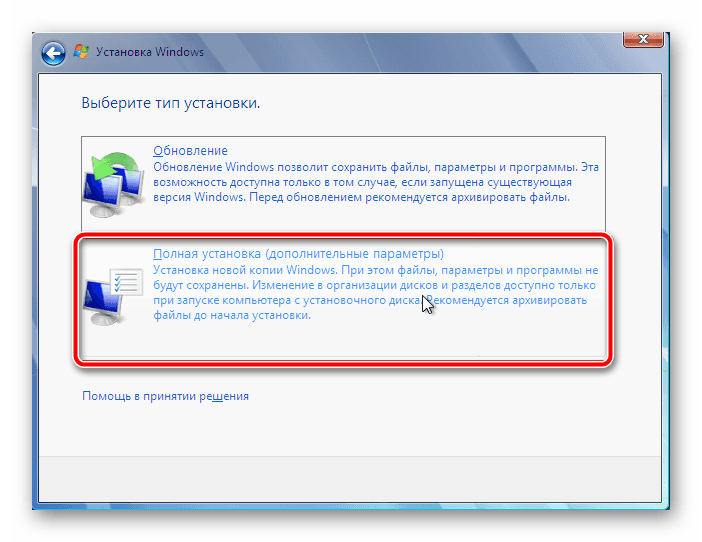
- Теперь вам следует определиться с типом установки. Поскольку вы обладаете Windows Vista, укажите пункт «Полная установка».
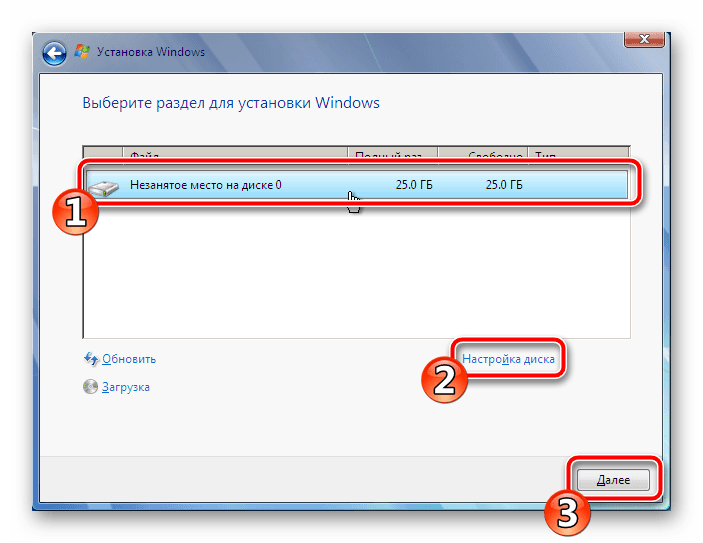
- Выберите подходящий раздел и отформатируйте его, чтобы стереть все файлы и поставить операционную систему на чистый раздел.
- Ожидайте, пока все файлы будут распакованы, а компоненты установлены.
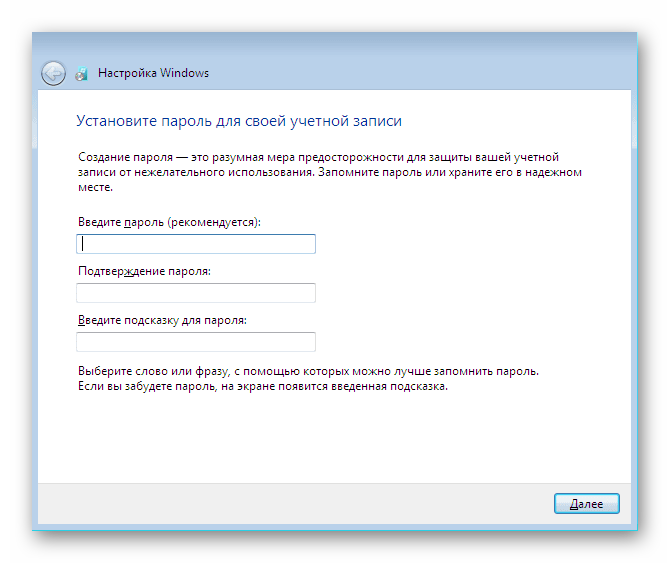
- Сейчас задайте имя пользователя и ПК. Данная запись будет использоваться как администратор, а названия профилей пригодятся во время создания локальной сети.
- Кроме этого следует задать пароль, чтобы посторонние не могли получить доступ к вашей учетной записи.
- Вбейте в специальную строку лицензионный код продукта. Найти его можно на упаковке с диском или флешкой. Если на данный момент ключа не имеется, пропустите пункт, чтобы потом выполнить активацию через интернет.
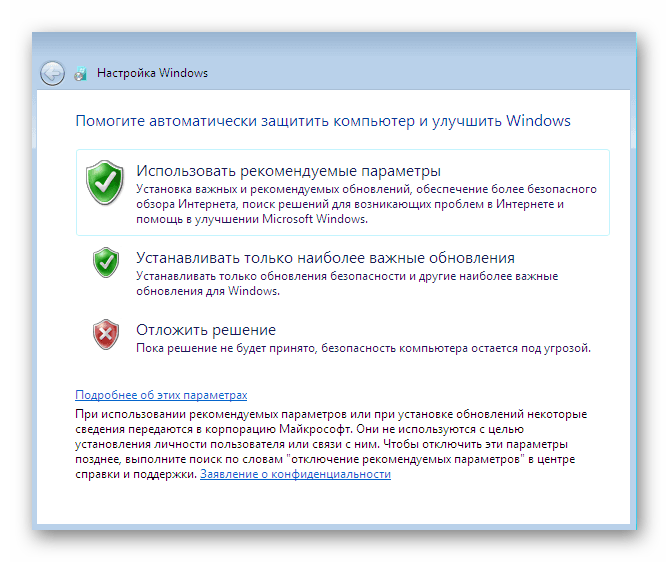
- Установите желаемый параметр для «Центра обновления Windows».
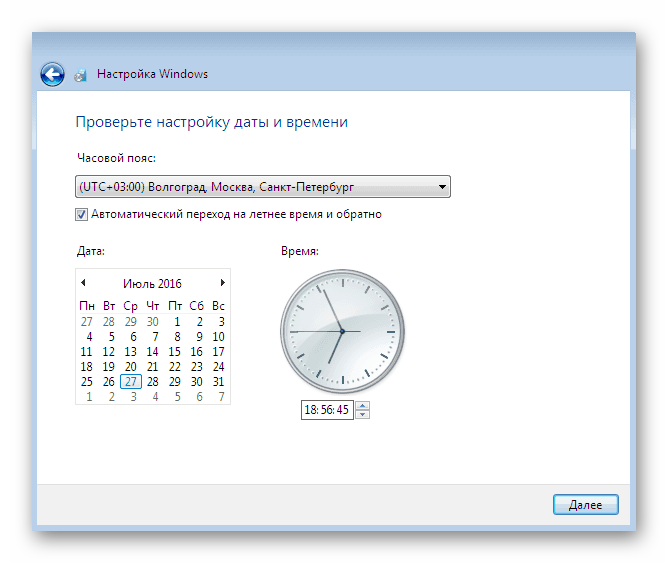
- Задайте текущее время и дату.
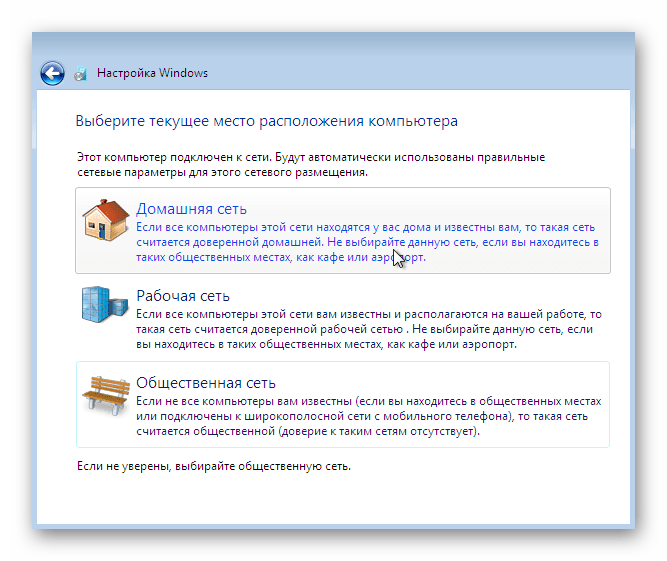
- Последним шагом будет выбор расположения компьютера. Если он находится дома, укажите пункт «Домашняя».


Читайте также: Подключение и настройка локальной сети на Windows 7

Осталось только подождать завершения настройки параметров. Во время этого компьютер будет несколько раз перезагружен. Далее создадутся ярлыки и настроится рабочий стол.
Шаг 4: Настройка ОС для работы
Хоть ОС уже и установлена, однако ПК не может полноценно функционировать. Связано это с отсутствием определенных файлов и программного обеспечения. Перед началом инсталляции нужно настроить соединение с интернетом. Данный процесс выполняется буквально в несколько шагов. Детальные инструкции по этой теме вы найдете в другом нашем материале по ссылке ниже:
Подробнее: Настройка интернета после переустановки Windows 7
Давайте по порядку разберем основные компоненты, которые следует поставить, чтобы перейти к нормальной работе с компьютером:
- Драйверы. В первую очередь обратите внимание на драйверы. Они инсталлируются для каждого комплектующего и периферийного оборудования отдельно. Такие файлы требуются для того, чтобы составляющие могли взаимодействовать с Windows и между собой. По ссылкам ниже вы найдете детальные инструкции по этой теме.
- Браузер. Конечно, в Виндовс 7 уже встроен Internet Explorer, однако работать в нем не очень комфортно. Поэтому мы рекомендуем присмотреться к другим популярным веб-обозревателям, например: Google Chrome, Opera, Mozilla Firefox или Яндекс.Браузер. Через такие браузеры уже будет легко загрузить требуемое ПО для работы с различными файлами.
- Антивирус. Обеспечьте защиту компьютера от вирусов. Прекрасно с этим справляются специальные защитные программы. Используйте статьи по ссылкам ниже, чтобы выбрать наиболее подходящее для себя решение.

Подробнее:
Лучшие программы для установки драйверов
Поиск и инсталляция драйвера для сетевой карты
Установка драйверов для материнской платы
Установка драйверов для принтера
Читайте также:
Пять бесплатных аналогов текстового редактора Microsoft Word
Программы для прослушивания музыки на компьютере
Как установить Adobe Flash Player на компьютер

Подробнее:
Антивирусы для Windows
Выбор антивируса для слабого ноутбука
На этом наша статья подходит к концу. Выше вы могли ознакомиться со всеми шагами инсталляции и настройки операционной системы Windows 7. Как видите, ничего в этом сложного нет, нужно лишь точно следовать инструкциям и внимательно выполнять каждое действие. По завершении всех шагов можно смело приступать к работе за ПК.
![]()
Download Article
![]()
Download Article
Tired of Vista, but feel you have to still use it? Well, why stick with Vista, when you can upgrade to Microsoft’s new release, Windows 7? Follow these steps to join the Windows 7 rave.
The first 4 steps are optional, but strongly recommended.
-

1
Download the Windows 7 Upgrade Advisor from here.
-
2
Run the Windows 7 Upgrade Advisor installer.
Advertisement
-
3
Run the actual upgrade advisor once it is installed. Remember to plug in any devices that you regularly use (printers, scanners, MP3 players etc).
-
4
Once the program’s done its thing, look at the report. Save and/or print it (you will need it).
-
5
Do one of the following:
- If you purchased Windows 7 online, open the installation file. This is the easiest way to install Windows 7 on a netbook. More info on this can be found here.
- If you have an installation disk, insert it into your computer. Setup should begin automatically. If it doesn’t, go to Start>Computer>CD/DVD drive>setup.exe.
- If you purchased Windows 7 online, open the installation file. This is the easiest way to install Windows 7 on a netbook. More info on this can be found here.
-
6
You will now see an Install Windows page. Click the link Install Now.
-
7
You will be taken to a page titled «Get important updates for installation». It is recommended that you choose to install these updates to help ensure a successful installation. (Refer to Tips)
-
8
You should now see a license agreement. If you accept the terms, click «I accept the license terms», and then click Next.
-
9
You will now have a choice of Upgrade and Custom. Click Upgrade. You might see a compatibility report.
-
10
Follow the instructions to install Windows 7.
-
11
You’re done!


Advertisement
Ask a Question
200 characters left
Include your email address to get a message when this question is answered.
Submit
Advertisement
Video
-
If you have a 32-bit version of Vista, you can only upgrade to a 32-bit version of Win7. If you have a 64-bit version of Vista, you can only upgrade to a 64-bit version of Win7. To find out which one of these you can upgrade to, go to Control Panel>System and look at System Type.
-
If you use a fingerprint reader or another biometric device to access your computer, write down your password before upgrading, for you will need to log on using your password when you first log on after the upgrade.
-
You need to be connected to the Internet during Windows 7 installation to install the updates; however, you can still install Windows 7 without them.
Show More Tips
Thanks for submitting a tip for review!
Advertisement
-
Back up your data before you upgrade.
Advertisement
About This Article
Thanks to all authors for creating a page that has been read 81,769 times.
Is this article up to date?
Haven’t you installed Windows 7 yet? It’s time to move on. Tons of positive reviews have been written on Windows 7 ever since the first beta was released back in January 2009.
One can give a number of reasons on why should a XP or Vista user upgrade to Windows 7. I will be focusing only on Vista to Windows 7 upgrade steps that you need to know before starting the actual upgrade process.

To check the Windows 7 compatibility with your system, please use Windows 7 upgrade advisor. Once you get green signal from Windows 7 upgrade advisor, follow the steps given below.
Step 1: Insert your Windows 7 DVD in the optical (CD/DVD) drive. Click Install Now option once you see the screen. If you have disabled autorun, open the root of the DVD drive (Windows 7 DVD) and run setup.exe file.

You can also use an USB stick to install/upgrade to Windows 7. Refer install windows 7 from USB guide to install/upgrade Windows 7 from USB guide.
Step 2: Once you run the setup, you will see two options:
* Check compatibility online
* Install Now

Since you have already verified the system compatibility using Windows 7 upgrade advisor, you can safely click Install Now button.
Step 3: In the next screen, you will see two options:
* Go online to get the latest update for installation
* Do not get the latest updates for installation

If you have the latest version of Windows 7, then you need not to check for updates. You can select Do not check for updates if you wish to check for updates post upgrade process.
Step 4: Accept the license agreement (I accept the license agreement) and click Next to continue the procedure.

Step 5: In the next screen again you will see two options:
* Upgrade
* Custom

Here you need to select Upgrade option to upgrade from Windows Vista to Windows 7. Click Next.
Step 6: Once again, Windows will check for the compatibility and will generate the report. If Windows finds any compatibility problems, it will display the problem and will save the report to the desktop. If no incompatibilities are found, Windows 7 Setup will proceed without further interaction
From here onwards, you need to follow the default Windows installation procedure. You can refer Windows 7 installation procedure guide for more details.
Upgrading from Windows Vista to Windows 7 is a great way to improve the performance of your computer and take advantage of the latest features. Fortunately, it is possible to upgrade from Windows Vista to Windows 7 for free. This guide will provide you with the steps necessary to complete the upgrade.
Before beginning the upgrade process, it is important to ensure that your computer meets the minimum system requirements for Windows 7. These requirements include a 1GHz processor, 1GB of RAM, and 16GB of available hard drive space. Additionally, you should back up any important files and documents before beginning the upgrade process.
Once you have confirmed that your computer meets the system requirements and backed up your files, you can begin the upgrade process. First, you will need to download the Windows 7 Upgrade Advisor from the Microsoft website. This tool will scan your computer and provide you with a report on any hardware or software compatibility issues that may arise during the upgrade process.
Next, you will need to purchase a Windows 7 upgrade license. This license will allow you to upgrade from Windows Vista to Windows 7 for free. Once you have purchased the license, you can download the Windows 7 installation files from the Microsoft website.
Once the installation files have been downloaded, you can begin the installation process. The installation process will take some time, so it is important to be patient. Once the installation is complete, you will be able to enjoy the benefits of Windows 7.
Upgrading from Windows Vista to Windows 7 is a great way to improve the performance of your computer and take advantage of the latest features. By following the steps outlined in this guide, you can upgrade from Windows Vista to Windows 7 for free.
What Are the Benefits of Upgrading from Windows Vista to Windows 7?
Upgrading from Windows Vista to Windows 7 offers a number of benefits. Windows 7 is a more secure, reliable, and efficient operating system than Windows Vista. It is also more user-friendly and offers a number of features that make it easier to use.
One of the main benefits of upgrading to Windows 7 is improved security. Windows 7 includes a number of security features that are not available in Windows Vista, such as improved firewall protection, improved parental controls, and improved malware protection. These features help to protect your computer from malicious software and other threats.
Another benefit of upgrading to Windows 7 is improved reliability. Windows 7 is more stable than Windows Vista, and it is less likely to crash or freeze. This means that you can work more efficiently and with fewer interruptions.
In addition, Windows 7 is more user-friendly than Windows Vista. It includes a number of features that make it easier to use, such as a redesigned Start menu, improved search capabilities, and improved taskbar organization. These features make it easier to find and access the programs and files you need.
Finally, Windows 7 is more efficient than Windows Vista. It uses less memory and processing power, which means that your computer will run faster and more smoothly. This can help to improve your overall computing experience.
Overall, upgrading from Windows Vista to Windows 7 offers a number of benefits, including improved security, reliability, user-friendliness, and efficiency.
What Are the Risks of Upgrading from Windows Vista to Windows 7?
Upgrading from Windows Vista to Windows 7 can be a beneficial move for many users, as Windows 7 offers improved performance, security, and features. However, there are some risks associated with the upgrade process that should be taken into consideration before making the switch.
The first risk is compatibility issues. While Windows 7 is designed to be compatible with most hardware and software that worked with Windows Vista, there is no guarantee that all of your existing programs and devices will work properly with the new operating system. It is important to check the compatibility of your hardware and software before upgrading, as some programs may need to be updated or replaced.
Another risk is data loss. During the upgrade process, it is possible that some of your data may be lost or corrupted. To minimize this risk, it is important to back up all of your important files and documents before beginning the upgrade.
Finally, there is the risk of system instability. While Windows 7 is generally more stable than Windows Vista, there is still a chance that the upgrade process could cause problems with your system. To reduce this risk, it is important to make sure that your computer meets the minimum system requirements for Windows 7 and that you have the latest drivers and updates installed.
Overall, upgrading from Windows Vista to Windows 7 can be a beneficial move, but it is important to be aware of the risks associated with the process. By taking the necessary precautions, you can ensure that the upgrade goes as smoothly as possible.
What Are the Steps to Upgrade from Windows Vista to Windows 7?
Upgrading from Windows Vista to Windows 7 is a relatively straightforward process. However, it is important to ensure that your computer meets the system requirements for Windows 7 before beginning the upgrade process.
1. Check System Requirements: Before upgrading, it is important to check that your computer meets the system requirements for Windows 7. These requirements include a 1 GHz or faster processor, 1 GB of RAM (for 32-bit) or 2 GB of RAM (for 64-bit), 16 GB of available hard disk space (for 32-bit) or 20 GB of available hard disk space (for 64-bit), and a DirectX 9 graphics device with WDDM 1.0 or higher driver.
2. Back Up Your Data: Before beginning the upgrade process, it is important to back up all of your important data. This can be done by copying your data to an external hard drive or other storage device.
3. Purchase Windows 7: Once you have confirmed that your computer meets the system requirements for Windows 7, you will need to purchase a copy of the operating system.
4. Install Windows 7: Once you have purchased a copy of Windows 7, you can begin the installation process. This process will involve inserting the installation disc into your computer and following the on-screen instructions.
5. Activate Windows 7: Once the installation process is complete, you will need to activate your copy of Windows 7. This can be done by entering the product key that came with your copy of Windows 7.
By following these steps, you can successfully upgrade from Windows Vista to Windows 7. It is important to ensure that your computer meets the system requirements for Windows 7 before beginning the upgrade process, and to back up all of your important data before beginning the installation process.
What Are the Best Tips for a Successful Upgrade from Windows Vista to Windows 7?
1. Back Up Your Data: Before upgrading from Windows Vista to Windows 7, it is important to back up all of your data. This includes documents, photos, music, and any other important files. This will ensure that your data is safe in case something goes wrong during the upgrade process.
2. Check System Requirements: Before upgrading, make sure that your computer meets the system requirements for Windows 7. This includes having a processor of at least 1 GHz, 1 GB of RAM, and 16 GB of available hard drive space.
3. Download the Upgrade Tool: Microsoft provides a free upgrade tool that can be used to upgrade from Windows Vista to Windows 7. This tool will guide you through the entire process and make sure that everything is done correctly.
4. Install the Upgrade: Once the upgrade tool has been downloaded, it is time to install the upgrade. This process can take some time, so make sure to set aside a few hours to complete it.
5. Activate Windows 7: After the upgrade is complete, you will need to activate Windows 7. This can be done online or by phone.
6. Update Drivers: After activating Windows 7, it is important to update all of your drivers. This will ensure that all of your hardware is compatible with the new operating system.
7. Install Security Software: Installing security software is essential for keeping your computer safe. Make sure to install an antivirus program and a firewall to protect your computer from malicious software.
Following these tips will help ensure a successful upgrade from Windows Vista to Windows 7.
Q&A
1. Can Vista be upgraded to Windows 7 for free?
No, Windows 7 is not available as a free upgrade for Windows Vista. However, you can purchase an upgrade version of Windows 7 from Microsoft or a retail store.
2. What are the system requirements for upgrading from Vista to Windows 7?
The minimum system requirements for upgrading from Vista to Windows 7 are: 1 GHz or faster processor, 1 GB RAM (32-bit) or 2 GB RAM (64-bit), 16 GB available hard disk space (32-bit) or 20 GB (64-bit), and a DirectX 9 graphics device with WDDM 1.0 or higher driver.
3. What are the benefits of upgrading from Vista to Windows 7?
Upgrading from Vista to Windows 7 offers a number of benefits, including improved performance, better security, and a more user-friendly interface. Additionally, Windows 7 includes a number of new features, such as the ability to create multiple user accounts, improved search capabilities, and improved media playback.
4. Is it possible to keep my files and settings when upgrading from Vista to Windows 7?
Yes, it is possible to keep your files and settings when upgrading from Vista to Windows 7. During the installation process, you will be given the option to keep your existing files and settings.
5. Is it possible to downgrade from Windows 7 to Vista?
No, it is not possible to downgrade from Windows 7 to Vista. Once you have upgraded to Windows 7, you will not be able to go back to Vista.
- Is it still possible to upgrade from Vista to Windows 7 for free …
- How should I upgrade from Windows Vista before it becomes …
- Can I upgrade from a registered version of Vista to Windows 7 …
Introduction
Are you looking to upgrade your Windows Vista operating system to Windows 7? If so, you’ve come to the right place. In this article, we’ll discuss the process of upgrading from Vista to Windows 7, the benefits of doing so, and the potential risks involved. We’ll also provide some tips and tricks to make the upgrade process as smooth as possible. So, if you’re ready to take the plunge and upgrade your Vista to Windows 7, read on!
Upgrading from Windows Vista to Windows 7 is a straightforward process that can be completed in a few simple steps. This guide will walk you through the process of upgrading your system from Windows Vista to Windows 7.
Step 1: Back Up Your Data
Before you begin the upgrade process, it is important to back up all of your important data. This includes documents, photos, music, and any other files that you want to keep. You can back up your data to an external hard drive, a USB flash drive, or a cloud storage service.
Step 2: Check System Requirements
Before you begin the upgrade process, you should make sure that your computer meets the system requirements for Windows 7. You can find the system requirements on the Microsoft website.
Step 3: Download Windows 7
Once you have confirmed that your computer meets the system requirements, you can download Windows 7 from the Microsoft website. You will need to purchase a license key in order to activate the software.
Step 4: Install Windows 7
Once you have downloaded the software, you can begin the installation process. Follow the on-screen instructions to complete the installation.
Step 5: Activate Windows 7
Once the installation is complete, you will need to activate Windows 7 using the license key that you purchased.
Step 6: Update Drivers
Once Windows 7 is installed and activated, you should update your drivers. This will ensure that all of your hardware is compatible with the new operating system.
Step 7: Transfer Data
Once your drivers are updated, you can transfer your data from the backup that you created in Step 1.
Step 8: Enjoy Windows 7
Once your data is transferred, you can begin using Windows 7. Enjoy the new features and improved performance of the latest version of Windows.
By following these steps, you can easily upgrade from Windows Vista to Windows 7. With a few simple steps, you can enjoy the improved performance and features of the latest version of Windows.
What You Need to Know Before Upgrading from Vista to Windows 7

Before upgrading from Windows Vista to Windows 7, it is important to understand the system requirements and the potential risks associated with the upgrade.
System Requirements:
In order to upgrade from Windows Vista to Windows 7, your computer must meet the following system requirements:
• Processor: 1 GHz or faster 32-bit (x86) or 64-bit (x64) processor
• Memory: 1 GB RAM (32-bit) or 2 GB RAM (64-bit)
• Hard disk: 16 GB available disk space (32-bit) or 20 GB (64-bit)
• Graphics card: DirectX 9 graphics device with WDDM 1.0 or higher driver
• Display: 800 x 600 resolution
Risks:
When upgrading from Windows Vista to Windows 7, there are some potential risks that should be taken into consideration. These include:
• Compatibility issues: Some programs and hardware may not be compatible with Windows 7. It is important to check with the manufacturer of the program or hardware to ensure compatibility before upgrading.
• Data loss: It is important to back up all important data before upgrading. There is always a risk of data loss during the upgrade process.
• System instability: There is a risk that the system may become unstable after the upgrade. It is important to ensure that all drivers and software are up to date before upgrading.
By understanding the system requirements and potential risks associated with upgrading from Windows Vista to Windows 7, you can ensure a successful upgrade.
The Pros and Cons of Upgrading from Vista to Windows 7
The decision to upgrade from Windows Vista to Windows 7 is one that many computer users face. While Windows 7 offers a number of advantages over Vista, there are also some potential drawbacks to consider.
Pros
One of the primary advantages of upgrading from Vista to Windows 7 is improved performance. Windows 7 is designed to be faster and more efficient than Vista, with improved boot times and faster response times. Additionally, Windows 7 offers improved security features, such as improved firewall protection and better malware protection.
Windows 7 also offers a number of new features that are not available in Vista. These include the ability to create multiple user accounts, improved search capabilities, and improved support for multimedia files. Additionally, Windows 7 offers improved support for hardware devices, such as printers and scanners.
Cons
One of the potential drawbacks of upgrading from Vista to Windows 7 is the cost. While Windows 7 is generally less expensive than Vista, it can still be a significant expense for some users. Additionally, some users may find that their existing hardware is not compatible with Windows 7, which can add to the cost of upgrading.
Another potential drawback is that some users may find the new user interface of Windows 7 to be confusing or difficult to use. Additionally, some users may find that their existing software is not compatible with Windows 7, which can be a major inconvenience.
In conclusion, upgrading from Vista to Windows 7 can offer a number of advantages, such as improved performance and new features. However, there are also some potential drawbacks to consider, such as the cost and compatibility issues. Ultimately, the decision to upgrade should be based on the individual user’s needs and budget.
How to Troubleshoot Common Issues After Upgrading from Vista to Windows 7
Upgrading from Windows Vista to Windows 7 can be a great way to improve the performance of your computer. However, it is not uncommon for users to experience some issues after the upgrade. This article will provide some tips on how to troubleshoot common issues after upgrading from Vista to Windows 7.
1. Check for driver updates: After upgrading to Windows 7, it is important to check for driver updates. Outdated drivers can cause a variety of issues, including hardware not working properly or not being recognized by the system. To check for driver updates, open the Device Manager, right-click on the device, and select “Update Driver Software.”
2. Check for software compatibility: Some software programs may not be compatible with Windows 7. If you are experiencing issues with a particular program, check the software manufacturer’s website to see if there is a version of the program that is compatible with Windows 7.
3. Check for Windows Updates: Windows 7 includes a built-in feature that allows you to check for and install updates. To check for updates, open the Control Panel and select “Windows Update.”
4. Check for malware: Malware can cause a variety of issues, including slow performance and system instability. To check for malware, use a reputable anti-malware program such as Malwarebytes.
5. Check for hardware issues: If you are experiencing hardware-related issues, such as a device not working properly or not being recognized by the system, check the device manufacturer’s website for updated drivers or instructions on how to troubleshoot the issue.
By following these tips, you should be able to troubleshoot most common issues after upgrading from Vista to Windows 7. If you are still experiencing issues, contact a qualified technician for assistance.
What to Do if Your Computer Won’t Support an Upgrade from Vista to Windows 7
If your computer does not support an upgrade from Windows Vista to Windows 7, there are a few steps you can take to ensure that you can still use the latest version of Windows.
First, you should check the system requirements for Windows 7 to make sure that your computer meets the minimum requirements. If your computer does not meet the minimum requirements, you will need to upgrade your hardware in order to use Windows 7.
Second, you should check to see if your computer is compatible with Windows 7. Microsoft has a compatibility checker that you can use to determine if your computer is compatible with Windows 7. If your computer is not compatible, you may need to purchase a new computer that is compatible with Windows 7.
Third, you should check to see if your computer can run Windows 7 in a virtual machine. A virtual machine is a software program that allows you to run a different operating system on your computer. This can be a good option if your computer does not meet the minimum requirements for Windows 7.
Finally, you should consider using a third-party software program to upgrade your computer from Windows Vista to Windows 7. There are a number of programs available that can help you upgrade your computer without having to purchase a new one.
By following these steps, you can ensure that you can still use the latest version of Windows even if your computer does not support an upgrade from Windows Vista to Windows 7.
How to Make the Most of Your Windows 7 Upgrade from Vista
Upgrading from Windows Vista to Windows 7 can be a great way to improve the performance of your computer and take advantage of the latest features. Here are some tips to help you make the most of your Windows 7 upgrade from Vista.
1. Back Up Your Data: Before you begin the upgrade process, it is important to back up all of your important data. This includes documents, photos, music, and any other files that you don’t want to lose. You can use an external hard drive or a cloud storage service to back up your data.
2. Uninstall Unnecessary Programs: Before you upgrade, it is a good idea to uninstall any programs that you don’t use or need. This will help to free up space on your hard drive and make the upgrade process smoother.
3. Check System Requirements: Make sure that your computer meets the system requirements for Windows 7. If your computer does not meet the requirements, you may need to upgrade your hardware before you can install Windows 7.
4. Install the Latest Drivers: Before you upgrade, make sure that you have the latest drivers for your hardware. This will help to ensure that all of your hardware is compatible with Windows 7.
5. Clean Up Your Hard Drive: Before you upgrade, it is a good idea to clean up your hard drive. This includes deleting any unnecessary files, defragmenting your hard drive, and running a disk cleanup.
6. Upgrade: Once you have completed the steps above, you can begin the upgrade process. Make sure that you follow the instructions carefully and that you have a reliable internet connection.
By following these tips, you can make the most of your Windows 7 upgrade from Vista. With the latest features and improved performance, you can enjoy a better computing experience.
Q&A
1. Can I upgrade my Vista to Windows 7?
Yes, you can upgrade from Windows Vista to Windows 7.
2. What do I need to do to upgrade?
You will need to purchase a Windows 7 upgrade disc and install it on your computer. You will also need to make sure that your computer meets the system requirements for Windows 7.
3. Will my programs and files be preserved during the upgrade?
Yes, your programs and files should be preserved during the upgrade. However, it is always a good idea to back up your data before performing any major system changes.
4. Will I need to reinstall my drivers?
Yes, you will need to reinstall your drivers after upgrading to Windows 7.
5. Will I need to purchase a new license for Windows 7?
Yes, you will need to purchase a new license for Windows 7.
6. Is there a way to test Windows 7 before upgrading?
Yes, you can download a free trial version of Windows 7 from Microsoft’s website. This will allow you to test out the features of Windows 7 before committing to an upgrade.