Содержание
- Убираем окно «System Recovery Options» при загрузке Windows 7
- «System Recovery Options» требует пароль
- Выбор утилиты для восстановления
- Startup Repair
- System Restore
- System Image Recovery
- Windows Memory Diagnostic
- Command Prompt
- Вопросы и ответы

При правильной работе в Windows 7 редко случаются непредвиденные ошибки и сбои. Однако иногда происходят серьезные системные сбои, из-за чего операционная система даже не может до конца загрузиться. Одним из следствий такой ситуации является окно «System Recovery Options», обозначающее переход в «Параметры восстановления системы». Малоопытные опытные пользователи не знают, что делать с этим окном и как вернуть обычную загрузку ОС. Давайте разбираться, как это можно сделать.
Логично, что если система открывает нам это окно, значит в ее файлах произошла некая ошибка, не дающая выполнить загрузку в обычном режиме. От пользователя потребуется выполнить несколько действий, которые должны устранить сбой и нормализовать работу ОС.
«System Recovery Options» требует пароль
Часто юзеры даже не могут попасть в само меню восстановления, поскольку их останавливает окно, демонстрируемое на скриншоте ниже. Первый шаг просто просит выбрать раскладку клавиатуры для дальнейшего ввода. Здесь можно оставить все как есть и просто нажать на «Next>».
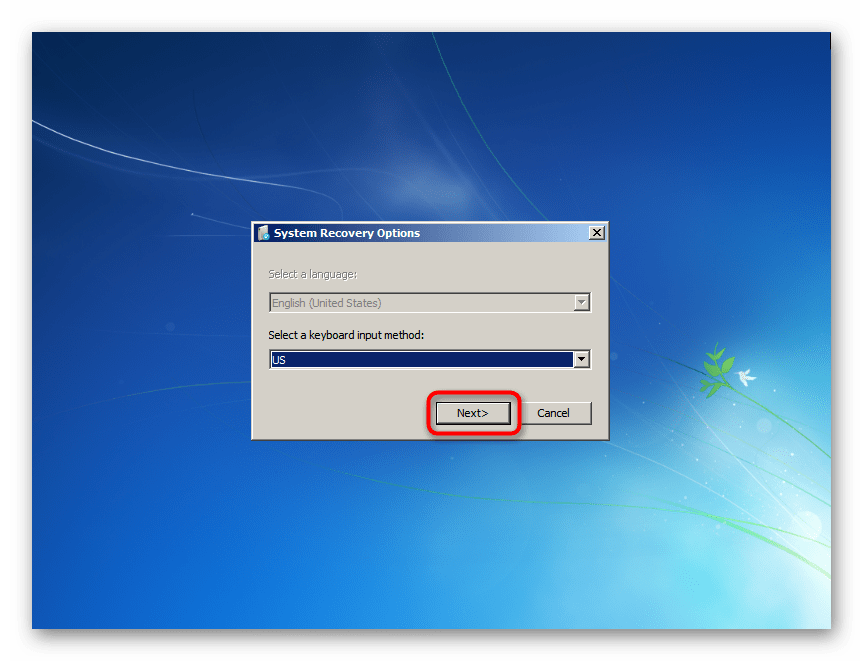
Вот здесь и наступает сложность для большинства новичков, поскольку система просит пароль, которого вроде как у нас и нет. Однако достаточно сменить имя пользователя на то, которое отображается при запущенной Windows (имя вашей учетной записи), а затем нажать «ОК», и вы попадете в меню восстановления.

Выбор утилиты для восстановления
Хорошо, если пользователь знает, что предшествовало появлению окна «System Recovery Options». Благодаря этому он сам сможет выбрать необходимую утилиту для исправления ошибки. Однако если вы не в курсе, почему попали в режим Recovery и у вас совсем нет знаний касательно того, как же возобновить работу «семерки», понадобится поочередно запускать представленные приложения, пока какое-то из них не возымеет успех.

Startup Repair
Утилита автоматического поиска и исправления неполадок.

Запустите ее, чтобы компонент смог просканировать важные системные файлы и восстановить их самостоятельно. Учитывайте, что при восстановлении ПК может перезагружаться несколько раз.
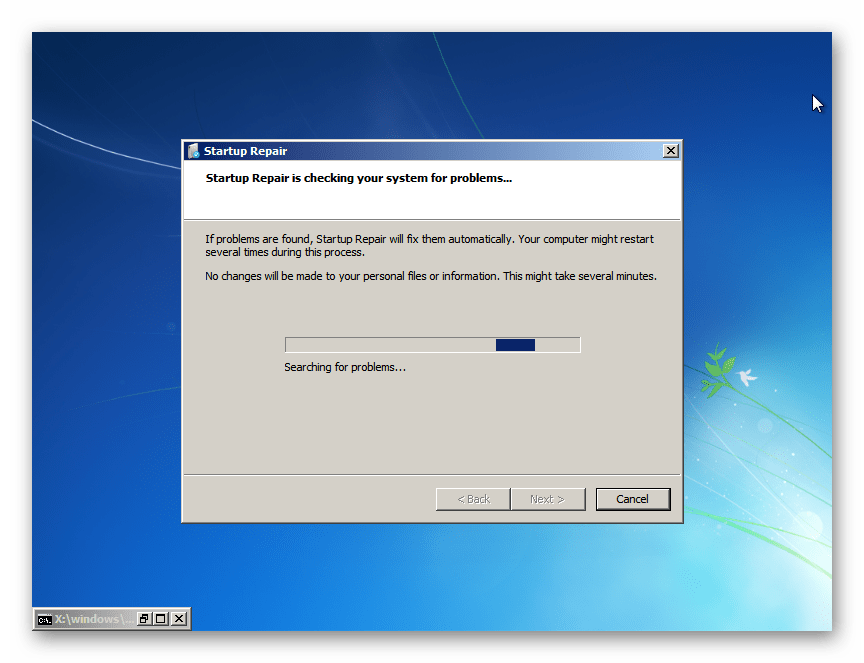
При успешном развитии событий вы сможете попасть на рабочий стол Windows 7 уже через несколько минут. В принципе, довольно часто этот вариант срабатывает и исправляет все возникшие проблемы. Однако в ходе сканирования система может ничего и не обнаружить, уведомив вас об этом. Жмите «Cancel» и переходите к следующему варианту.
System Restore
Знакомый многим инструмент восстановления системы.
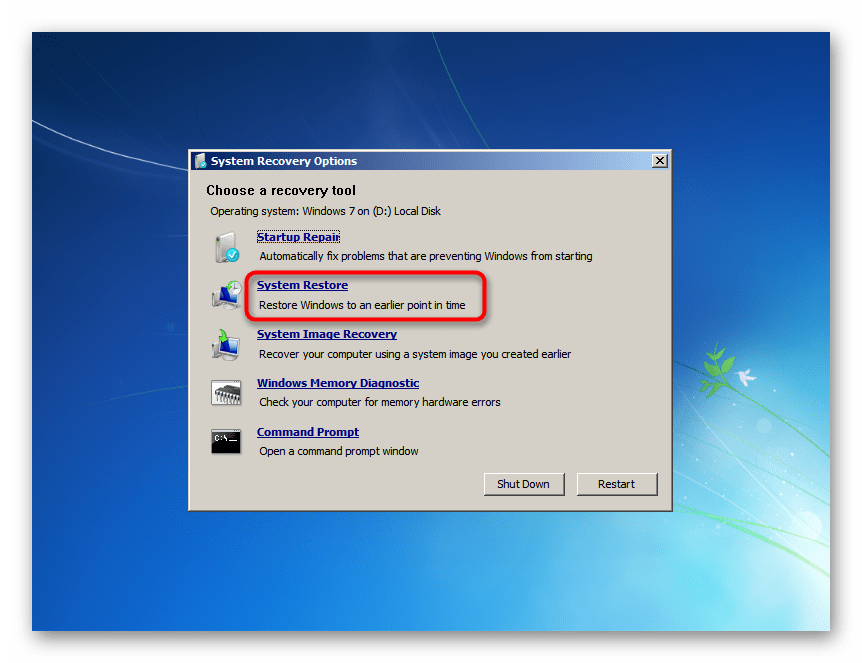
Он будет актуален только в том случае, когда в Windows не отключалась функция «Восстановление системы» и на жестком диске есть созданные автоматически или вручную точки восстановления. Так вы сможете откатиться до предыдущего состояния ОС, когда не наблюдалось никаких сбоев в функционировании. Подробнее о том, как пользоваться восстановлением системы, читайте в другой нашей статье — в этом вам поможет Способ 1, начиная с шага 5. И хотя на том примере показано действие из запущенной Виндовс 7, на самом же деле этот процесс нисколько не отличается от того, что происходит в среде восстановления.
Подробнее: Восстановление системы в Windows 7
При отсутствии точек восстановления вы получите соответствующее уведомление. Остается нажать «Cancel» и переходить далее.

System Image Recovery
Утилита восстановления системы через ее резервный образ, созданный ранее.
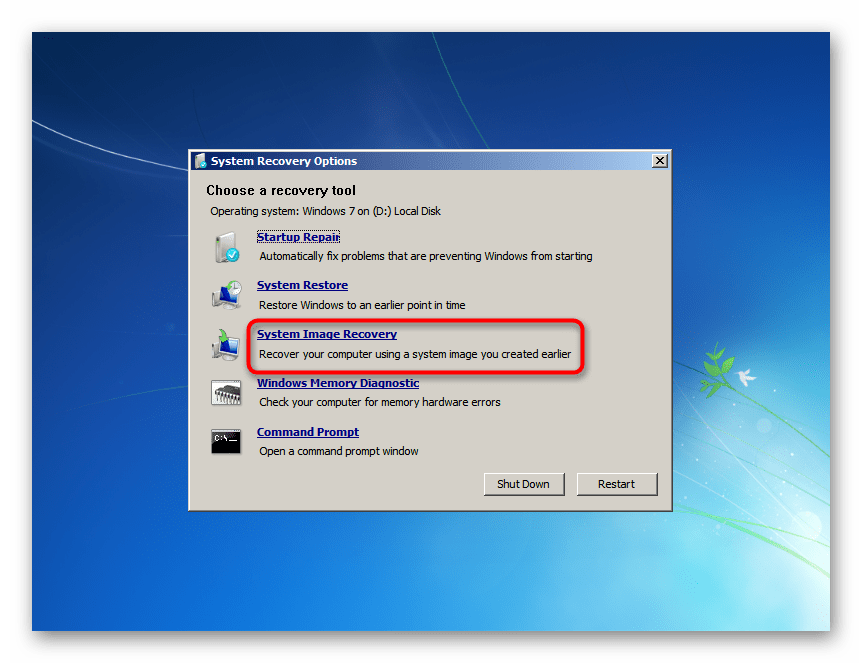
Этот способ подходит только тем, кто вручную создавал ранее архивный образ. Как это сделать, мы показали в отдельной инструкции, а именно в Способе 2, начиная с шага 10 статьи по ссылке ниже.
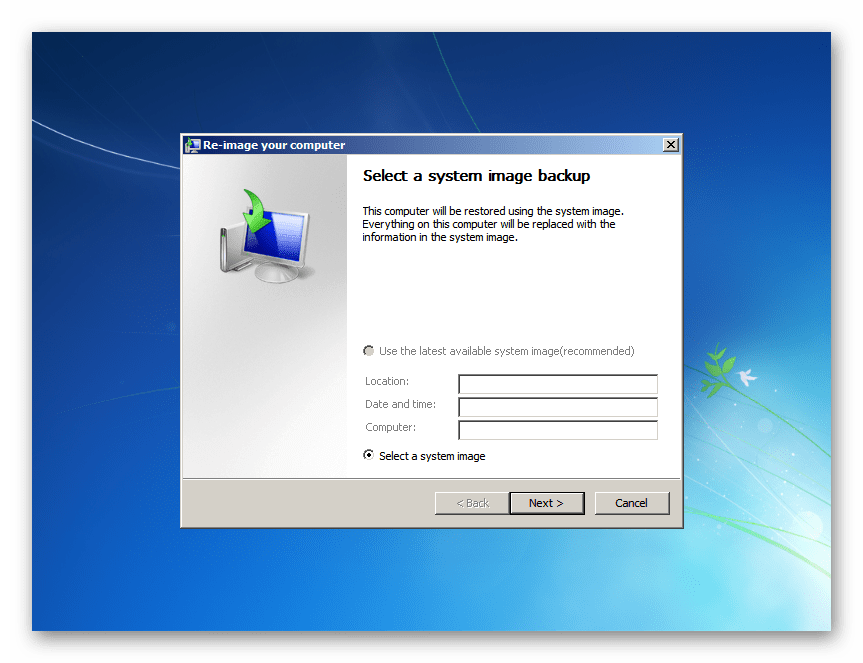
Подробнее: Восстановление системы через архивный образ в Windows 7
Всем остальным, кто ничем подобным не занимался, следует прибегнуть к другим доступным методам.
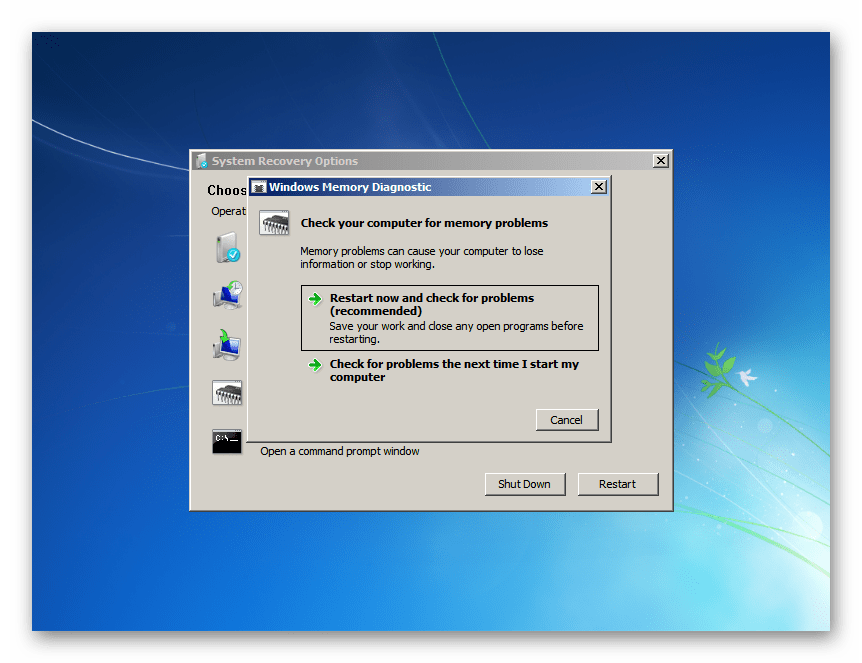
Windows Memory Diagnostic
Проверка оперативной памяти компьютера.
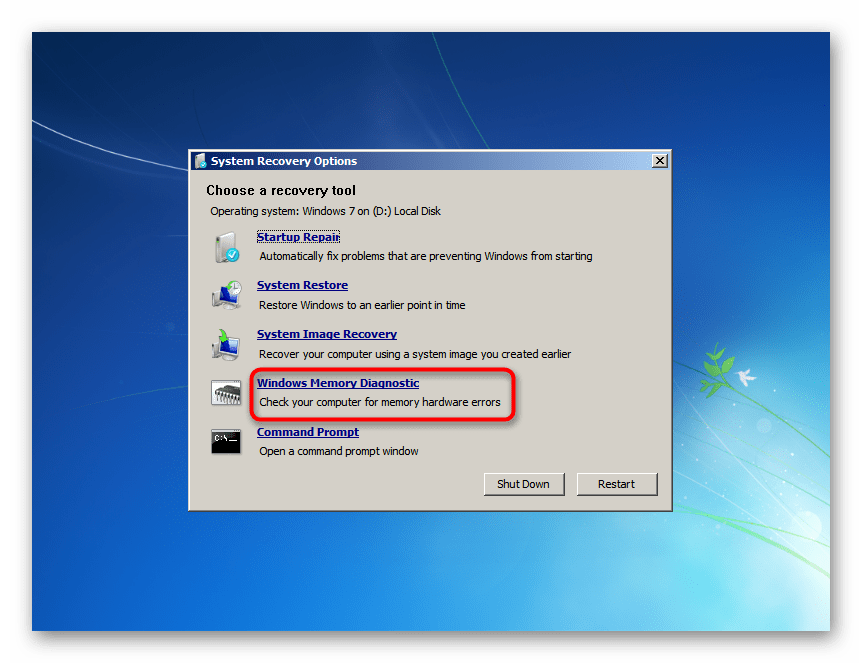
Вполне возможно, что вы попали в это окно восстановления из-за неустранимых ошибок оперативной памяти. Система предлагает либо проверить память сразу после автоматической перезагрузки («Restart now and check for problems») или в другое время. Конечно, выбираем первый вариант. О том, как происходит проверка RAM, мы рассказывали в отдельной статье. Для вас она окажется полезной, начиная со Способа 2, шага 6.
Подробнее: Проверяем оперативную память на компьютере с Windows 7
К сожалению, если будут найдены ошибки, система не сможет их самостоятельно исправить — эта утилита служит исключительно в диагностических целях. Впрочем, побороть аппаратные ошибки RAM не удастся никаким софтом, поэтому если вы получили уведомление о наличии проблем, придется покупать новую оперативную память. Разобраться с тем, как выбрать новые планки для ОЗУ и установить их самостоятельно, помогут наши статьи ниже.
Читайте также:
Как выбрать оперативную память для компьютера
Устанавливаем модули оперативной памяти в ПК
Command Prompt
Запуск классической «Командной строки».
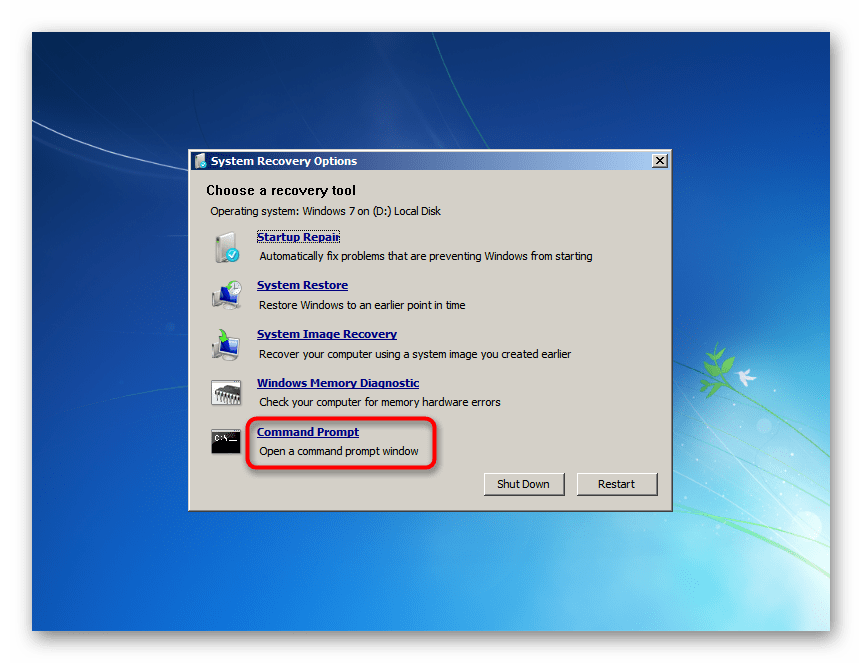
Окно «Командной строки» дает возможность пользователю устранить возникшие неполадки на компьютере путем ввода разных команд. Поскольку мы не знаем, что именно вызвало сбой, будем пробовать запускать различные средства поочередно. После ввода каждой из них дожидайтесь, пока произойдет какое-то действие, например, сканирование или исправление.
Не закрывайте окно раньше времени и не перезапускайте компьютер, не дождавшись окончания работы консольной утилиты! Узнать, что она закончила работать, можно по появлению строчки X:\windows\system32>_, которая будет расположена в самом низу окна.
bootrec.exe /fixmbr— команда, исправляющая главную загрузочную запись;bootrec.exe /fixboot— исправление загрузочного сектора;sfc /scannow /offbootdir=X:\ /offwindir=X:\windows— проверка целостности системных файлов. Вместо X вам необходимо подставить букву того диска, на котором находится операционная система для среды восстановления (то есть если для нас ОС всегда установлена на C, то пока мы не загрузились в Windows, раздел с ней имеет другую букву). Узнать это можно в окне «System Recovery Options» — вверху там есть строчка «Operating system: Windows 7 on (X:) Local Disk». Букву в скобках и используем за основу;dism.exe /cleanup-image /restorehealth— восстановление поврежденных системных компонентов. Актуально, когда утилита предыдущая утилита SFC нашла ошибки, но не смогла их исправить из-за поврежденного хранилища. Воспользуйтесь ссылкой ниже, если сперва хотите посмотреть, как она функционирует (шаги 1-3), а затем в обязательном порядке снова переходите к SFC.Подробнее: Восстановление поврежденных компонентов в Windows 7 при помощи DISM

Мы разобрали основные способы восстановления поврежденной Windows 7, запускающей окно с параметрами восстановления системы. Представленных инструментов должно быть достаточно для того, чтобы суметь устранить возникшие неполадки и вернуть ОС работоспособность.
Я постоянно твержу о важности паролей в контексте безопасности, и под впечатлением жена недавно сменила пароль администратора, чтобы надежнее защитить систему. Но когда ей пару недель спустя понадобилось что-то изменить в системных настройках для установки электронного клиента автоматизации закупок, выяснилось, что новый пароль напрочь забыт. Решать проблему, разумеется, пришлось мне.
Я всегда стараюсь быть внимательным к пользователям, поэтому первым делом заверил свою клиентку, что все будет в порядке. Однако дискеты восстановления пароля (см. также Создание дискеты восстановления пароля для Vista на флеш-диске) для административной учетной записи у нас не оказалось — только для основной рабочей. К счастью, в этот момент я вспомнил о недавно попавшейся мне на глаза
справочной статье Microsoft, в которой рассказывалось об использовании функции Восстановление системы (System Restore) для получения доступа к системе, административный пароль к которой был утрачен.
К моему великому удивлению, это сработало, и жена признала меня лучшим техническим специалистом года. Ну а если серьезно, это действительно очень полезный метод, актуальный и для Windows Vista, и для Windows 7, поэтому я решил рассказать о нем поподробнее для наших читателей.
Подводные камни
Разумеется, для того чтобы воспользоваться этим методом, функция «Восстановление системы» должна быть включена, а у вас в наличии должна быть свежая точка восстановления за тот период, когда вы успешно могли войти в систему.
Стоит также учитывать, что при восстановлении система откатывается до прежнего состояния, поэтому любые приложения, установленные с момента создания последней точки восстановления, придется ставить заново. Могут также сброситься некоторые пользовательские настройки. Однако документы и электронные письма при этом не пострадают.
Приступаем
Для начала вставьте установочный диск Windows Vista или Windows 7 в дисковод и перезагрузите систему. Когда система загрузится с DVD, следуйте указаниям установщика. В диалоговом окне «Установка Windows» (Install Windows) нажмите ссылку «Восстановить компьютер» (Repair Your Computer) (рис. A).

Рисунок A. В диалоговом окне «Установка Windows» нажмите ссылку «Восстановить компьютер».
Вам будет предложено выбрать операционную систему для восстановления (рис. B). Выберите нужный вариант и нажмите «Далее» (Next).

Рисунок B. Выберите операционную систему и нажмите «Далее».
Появится диалоговое окно «Параметры восстановления системы» (System Recovery Options), показанное на рис. C. Выберите пункт «Восстановление системы» (System Restore), чтобы запустить мастер восстановления.

Рисунок C. Выберите пункт «Восстановление системы» в диалоговом окне «Параметры восстановления системы».
Откроется окно мастера восстановления системы, показанное на рис. D. Нажмите «Далее».

Рисунок D. Окно приветствия мастера восстановления системы.
В следующем окне вам будет предложено выбрать точку восстановления системы (рис. E). В моем случае точка всего одна, но у вас может их быть несколько.

Рисунок E. В моем случае точка восстановления системы всего одна.
При загрузке с DVD дисководу присваивается литера X. Мастер восстановления предложит убедиться, что выбран верный диск для восстановления (рис. F).

Рисунок F. При загрузке с DVD дисководу присваивается собственная литера, поэтому вам будет предложено убедиться, что выбран верный диск для восстановления.
После этого можно будет приступать к восстановлению. При нажатии кнопки «Готово» (Finish) появится еще одно диалоговое окно с предложением подтвердить продолжение операции (рис. G).

Рисунок G. При нажатии кнопки «Готово» появится еще одно диалоговое окно с предложением подтвердить продолжение операции.
Чтобы начать восстановление, нажмите «Да» (Yes). Появится диалоговое окно с индикатором прогресса, показанное на рис. H. Процесс восстановления может оказаться продолжительным — сохраняйте терпение.

Рисунок H. Процесс восстановления может оказаться продолжительным.
После завершения операции вам будет предложено перезагрузить компьютер (рис. I). Нажмите кнопку «Перезагрузить» (Restart). Перезагрузка также может оказаться продолжительной.

Рисунок I. После завершения восстановления нажмите кнопку «Перезагрузить».
После перезагрузки войдите в систему под стандартной учетной записью, откройте приложение «Учетные записи пользователей» (User Accounts) и нажмите ссылку «Управление учетными записями» (Manage Accounts). В появившемся окне UAC (рис. J) введите свой прежний пароль администратора. После этого его можно будет поменять.

Рисунок J. После восстановления системы можно использовать прежний административный пароль.
А что думаете вы?
Заинтересовал ли вас описанный способ сброса административного пароля? Поделитесь своим мнением в комментариях!
Автор: Greg Shultz
Перевод
SVET
Оцените статью: Голосов
What to Know
- First, boot from a W7 Setup disc or flash drive. At the first screen, select Next, followed by Repair your computer.
- Note the Windows drive letter on the System Recovery Options screen, and then press Next.
- Select Command Prompt, and then execute two copy commands involving utilman.exe.
There are a number of roads you can take when you need to hack into your own Windows 7 computer, some of which you may have already read about in our What to Do If You Forget Your Windows 7 Password article. Of them all, one of the most successful strategies is the one we’re about to walk you through here.
While this password reset procedure would classify as a «hack» of sorts, there’s no software to download or extraordinary computer skills required. If you can follow directions, you can reset your Windows 7 password this way.
We’ve created this step-by-step tutorial to accompany our original How to Reset a Windows 7 Password how-to guide. There are a number of relatively complicated steps involved, so screenshots with very detailed instructions will make the process much easier. However, if you’re familiar with using commands, booting from portable media, and working with Windows recovery tools, then you’ll probably do fine with the more brief directions.
Boot From a Windows 7 Install Disc or Flash Drive
webphotographer / E+ / Getty Images
To begin, you’ll need to boot from a Windows 7 Setup disc or flash drive. If you’re booting from a disc, watch for the Press any key to boot from CD or DVD or similar message and be sure to do that.
If you’re watching closely, you may catch a Windows is loading files screen. If you see that, or an Install Windows screen, or a System Recovery Options screen, you’re in good shape and can continue on to the next step.
Don’t Have a Windows 7 Disc/Drive or Need Help Booting From One?
If you’re not familiar with booting from something other than your hard drive, see our tutorials on How to Boot From a CD, DVD, or BD Disc or How to Boot From a USB Device, depending on what sort of media you’re using. Most issues getting the computer to boot from a disc or flash drive instead of the hard drive are solved by making boot order changes in BIOS. See our How to Change the Boot Order in BIOS tutorial for help with that.
If you don’t have a Windows 7 disc or flash drive, it’s perfectly acceptable to borrow a friend’s or use one from another Windows 7 computer since you’re just using it for diagnostic purposes. In other words, don’t worry at all about using someone else’s media—you won’t be entering any product keys or invalidating yours or another computer’s activation as part of this process.
A Windows 7 system repair disc will work fine for this, too. If you don’t have access to a Windows 7 Setup disc or flash drive and don’t already have a system repair disc, you can create one for free from any other working Windows 7 computer with an optical drive. See How to Create a Windows 7 System Repair Disc for help.
Here’s an Advanced Tip: If even a system repair disc isn’t an option, you may still be able to follow this tutorial, for the most part, using any bootable recovery media that gives you write-level access to the hard drive. This includes popular third-party bootable recovery media, installation or recovery media designed for later versions of Windows, etc.
Click Next
On the Install Windows screen with the big Windows 7 logo on it, check that the language, time, and keyboard options work for you, and then select Next.
(No, just as a reminder, you’re not going to install or reinstall Windows 7 as part of the password reset process.)
If you booted from a Windows 7 System Repair Disc, what you’ll see here instead is a small System Recovery Options window with just a keyboard option. Select Next.
If you’re looking at your Windows 7 login screen right now, it means that your computer booted «normally» from the hard drive as it always does, not from your disc or flash drive that you intended to boot from. Look back at Step 1 for some help in solving this problem.
Select Repair Your Computer
Once again you’re at the Install Windows screen with the Windows 7 logo. This time, however, you have an Install now button and some options at the bottom.
Select Repair your computer, right above the Microsoft copyright note at the bottom of the screen.
You won’t see this screen if you booted from a Windows 7 System Repair Disc. If that’s what you’re using, just move on to the next step.
Wait While Your Windows 7 Installation Is Found
Next, you’ll see two windows, both labeled System Recovery Options, one on top of the other. The one on top says Searching for Windows installations….
All you need to do here is wait, but this what the process looks like. Once this screen disappears, you can move on to the next step.
Note Your Windows Location & Choose Next
Now that the small window with the progress bar is gone, jot down the drive letter shown under Location. On most computers, this will be D:, but yours could be different depending on how Windows 7 was originally set up.
While you may be used to seeing the drive Windows 7 is installed on as C: while working from within Windows, most computers are set up with a small recovery drive that’s normally hidden from view.
Since drive letter assignment is dynamic, and this small hidden drive is visible when working from System Recovery Options, your main drive has probably been assigned D:, the next available drive letter. Once you’ve committed that drive letter to memory, select Windows 7 from the Operating System column and then select Next.
Don’t worry if nothing is listed under Operating System. System Recovery Options needs to locate Windows 7 only if you plan on performing certain operating system repair tasks, none of which we’ll be doing as part of this password reset process. In any case, be sure to select the Use recovery tools that can help fix problems… radio button before clicking Next.
Choose Command Prompt
From the list of recovery tools available on System Recovery Options, select Command Prompt.
Execute These Two Commands
Now that Command Prompt is open, type the following command exactly as shown and then press Enter:
copy d:\windows\system32\utilman.exe d:\
In case it’s not clear, there are only two spaces in this command: between copy and d:\ and between exe and d:\.
Assuming the command was executed correctly, the text 1 file(s) copied. should have appeared directly under the command string and you should now be at a prompt again.
Next, type this command exactly as shown and press Enter.
copy d:\windows\system32\cmd.exe d:\windows\system32\utilman.exe
In this command, there are also only two spaces: between copy and d:\ and then between exe and d:\. This time, however, you’re presented with a question after executing the command:
Type Y or Yes at the flashing prompt and then press Enter. As with the last command, you should see the 1 file(s) copied. confirmation.
If the Windows 7 drive letter you noted in Step 5 was something other than D:, swap out all instances of d in the commands above with whatever drive letter you noted.
The first command made a backup copy of the utilman.exe file so you can restore it later.
The second command copied the cmd.exe file overtop the utilman.exe file. This action is what makes this whole Windows 7 password reset trick work. You’ll undo this later.
Remove the Boot Media & Press Restart
Now that the two commands have been successfully executed, remove the Windows 7 disc or flash drive you booted from in Step 1.
Next, close the Command Prompt window and then select Restart at the bottom of the System Recovery Options window.
Wait While Your Computer Restarts
There’s nothing to do here but wait for your computer to restart and for the Windows 7 login screen to appear.
Just so you know, we don’t make do-nothing steps just for fun. This was included in our walkthrough because many people overlook the bit in Step 8 where you need to remove the Windows 7 disc or flash drive.
While this might have sounded unnecessary, what usually happens if you forget to remove it is that the Windows 7 setup or repair process begins again, as you saw in Step 2. That’s exactly what you wanted then, but right now you should be booting from your hard drive, as you normally do.
So, if you’ve found yourself back where you started, just remove the disc or flash drive and restart.
Select the Ease of Access Button
You should now have reached your Windows 7 login screen. No, your password is not reset yet, but we’re about to do just that.
See that little icon on the bottom-left of the screen? Click it!
Typically, the Ease of Access menu appears after pressing this button. However, because we replaced the file representing that tool, utilman.exe, with cmd.exe, Command Prompt appears instead!
Reset Your Password Using Net User
Now that Command Prompt is open, you can reset your Windows 7 password to anything you’d like using the net user command.
The net user command is a really easy command to use. Just execute it like this:
net user username password
…replacing username with your Windows 7 account name, and password with your desired new password.
For example, you might change your password to n3verE@Tsn0W by executing the net user command this way:
net user Tim n3verE@Tsn0W
Assuming everything was executed properly, you should have been greeted with a The command completed successfully. message after pressing Enter.
There are spaces between net, user, the username, and the password. If your username has a space, like Tim Fisher, use quotes. Reusing our example above but with a full name as the username, you’d have executed net user «Tim Fisher» n3verE@Tsn0W.
Not Sure What Your Username Is?
If you were the last person to log in to Windows 7 before forgetting your password, your username should be listed right there on the login screen. You can see Tim in big, bold letters in the screenshot above.
However, if you’re resetting the password to another user on the computer and aren’t sure exactly what the username is, you can generate a list by executing the net user command without options.
A list of all the users on the computer will be produced right in the Command Prompt window, which you can then reference for proper spelling when changing the password as described above.
Log in to Windows 7 With Your New Password
Finally, we’re at the exciting part!
Close or click away from the open Command Prompt window and then select the Password field.
Enter your new Windows 7 password you set earlier and then press Enter or choose the little arrow button.
Welcome back to your computer!
If you’re again prompted with a The user name or password is incorrect message, select OK and repeat Steps 10 & 11 again.
YOU’RE NOT DONE YET!
While it may be very tempting to call it quits right now, it’s important that you now take the necessary steps to:
- Prepare for the future event of forgetting your password again so you don’t have to go to all this trouble next time.
- Undo the couple of things that made this password reset trick work.
That’s what we’ll do over the next several steps.
Create a Windows 7 Password Reset Disk
The Windows 7 password reset procedure we just walked you through is perfectly safe but it isn’t exactly «Microsoft approved.» The only Microsoft sanctioned password reset procedure for Windows 7 involves using a password reset disk.
Unfortunately, this wasn’t an option in your original situation because you have to have access to Windows 7 under your account to create one of these disks. In other words, it’s a proactive step. Now that you can access Windows 7 normally, you can create one and never be caught in a situation like this again.
See How Do I Create a Windows Password Reset Disk? for a complete tutorial.
Open that link up in a new window or bookmark it for later but please remember to do it! You only have to make a password reset disk once. It’ll still be good no matter how many times you change your Windows 7 password and it’s much easier to use than the procedure you just followed to reset your password this time.
In the next several steps of this walkthrough is where we’ll undo the hack that allowed you to reset the password. Undoing the changes we made will not undo the password change.
Access Command Prompt From Your Bootable Media Again
To reverse the changes you’ve made, you’ll need to again access Command Prompt via your Windows 7 media.
Here’s a quick summary in case you forgot:
- Insert your bootable Windows 7 media.
- Choose Next.
- Select Repair your computer.
- Wait while Windows is found on your hard drive.
- Select Windows 7 and then Next.
- Choose Command Prompt.
If you need more detailed help, this summary is referring to Steps 1 through 6 in this walkthrough, which you can reference again.
Do I Really HAVE to Undo These Changes?
No, no one says you have to. However, we strongly suggest that you do, for two reasons:
- Having access to Command Prompt from the login screen is a major security concern. If anyone finds out that Command Prompt is accessible this way, he or she could very easily change your password to access your account and delete your most important files, among other serious things. Reversing the changes you made removes this easy access.
- The Ease of Access tools that are supposed to show up when you select that button on the login screen are there for a good reason. You never know when you, or another person using your computer, might need to take advantage of them.
Hopefully, you decide to take a few extra minutes and complete the next steps.
Execute This Command
With Command Prompt now open, type the following command exactly as shown and then press Enter:
copy d:\utilman.exe d:\windows\system32\utilman.exe
As with the previous commands, there are only two spaces here, between copy and d:\ and between exe and d:\. Remember to change the d: to whatever drive Windows 7 is installed on if you need to, just like you may have done in Step 7.
After pressing Enter, you’re presented with the following question:
Type Y or Yes to confirm the overwrite and then press Enter. Assuming things went as planned, you should see the 1 file(s) copied. confirmation.
What you just did was copy the utilman.exe backup that you created using the first command in Step 7 back to its original location. In other words, you took things back to the way they were before you started this tutorial.
Remove the Boot Media & Press Restart
Now that you’ve restored the utilman.exe file to its rightful place, remove the Windows 7 disc or flash drive you booted from in Step 14.
Next, close the Command Prompt window and then select Restart at the bottom of the System Recovery Options window.
Wait While Your Computer Restarts
Wait while your computer restarts.
As we mentioned the last time you restarted after using your Windows 7 bootable media, you want your computer to start normally, so make sure the flash drive or disc has been removed.
Verify That Ease of Access Works at the Login Screen
Remember that little icon you clicked on back in Step 10? Select it again.
This time, however, instead of seeing Command Prompt, you should see the Ease of Access screen. This is the normal behavior of this button and seeing it confirms that you successfully reversed the changes you made to make this Windows 7 password reset hack work.
Congratulations! You’re done!
You can now close the Ease of Access window and log in to Windows 7.
Please remember to create that password reset disk we talked about a few times. It’s really easy to do and then makes it really easy to reset your Windows 7 password in the future. See How Do I Create a Windows Password Reset Disk? for help.
Did This Trick Not Work for You?
While this is one of the more successful password reset strategies for Windows 7, it’s still possible that for some reason it didn’t work out for you. See What to Do If You Forget Your Windows 7 Password for a list of your other options.
Thanks for letting us know!
Get the Latest Tech News Delivered Every Day
Subscribe
Adding an administrator password ensures that files and data in the computer are secured and no one can access data without your permission. But, sometimes, things do not go how you think. Many users forget their Windows 7 password and find a way to recover them.
If you are one of them who forgot Windows 7 password no reset disk, then in this detailed guide, you will learn what to do with Windows 7 professional forgot password no reset disk.
If you do not have a password reset disk with you, don’t worry, because here we have mentioned about four different solutions for forgot Windows 7 administrator password no reset disk. Let’s have a look at different methods or solutions for it.
Methods to Reset Forgot Windows 7 Password No Reset Disk
There are so many tools available in the market, claiming they will successfully reset Windows 7 password without disk. But, it is essential to select the tool or method which is reliable, result-effective and secure.
- Method 1. Forgot Windows 7 Password No Reset Disk? Using Internal Administrator Account to Reset
- Method 2. Forgot Windows 7 Password No Reset Disk? Using Windows Password Reset
- Method 3. Forgot Windows 7 Password No Reset Disk? Using Windows 7 Installation DVD or System Repair Disc
- Method 4. Forgot Windows 7 Password No Reset Disk? Using Offline NT Password & Registry Editor
Let’s understand the process of each method, one by one:
Method 1. Forgot Windows 7 Password No Reset Disk? Using Internal Administrator Account to Reset
Forgot Windows 7 login password no reset disk? Resetting Windows 7 password using an internal administrator account is one of the best methods. To implement this method, you don’t have to go through complicated processes. All you have to do is to follow some simple steps carefully.
As compared to other methods for Windows 7 password reset without disk, this method is more effective, easy and inexpensive. Here you do not have to pay a single penny to reset your admin password. But, if you have set your password for the internal administrator account, then this method might not work for you. To recover your forgotten Windows 7 password, follow the below-given steps carefully:
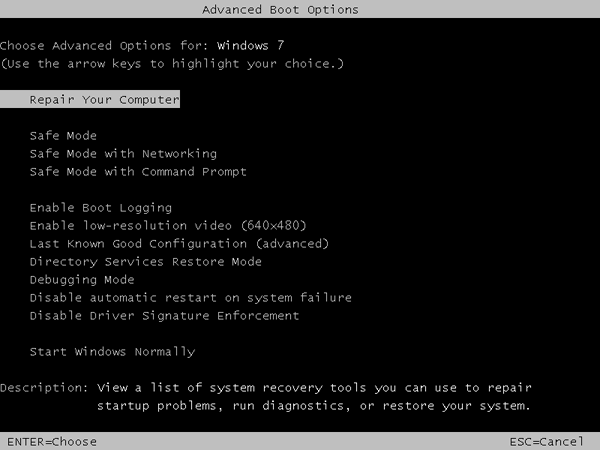
Step 1: To begin the process, first turn on your Windows 7 computer and press on the “F8” key when your computer is booting up.
Step 2: Then, a new screen will appear. You will see the screen with “Advanced Boot Options”. There you need to choose “Safe Mode” option among two other options available under the “Repair Your Computer” section.
Step 3: Once enter the safe mode in your Windows 7 computer, there you will get a new screen showing you hidden accounts on your computer. Once you see the login screen of hidden accounts, just log-in to continue.
Step 4: Now, you can easily reset the password of your admin account. All you have to do is go to the “Control Panel” and open “User Accounts”. Once you do this, you would be able to see the locked user account of Windows 7. Now, select the locked administrator account to reset its password.
So, with this method, you would be able to reset the forgotten Windows 7 password without any password reset disk. This method is considered as simple, easy, quick and inexpensive. But, the only problem in this method is that if you have set the password in your internal administrator account, then this method would not work.
Windows Password Reset is another great method to reset forgot Windows password in a smooth manner. The first method of resetting the password using internal administrator account might be easy, quick and inexpensive but as we have seen, the method would be effective only when you have not set any password in your internal administrator account.
Hence, if you have already set a password in the internal admin account and you do not have any password reset disk with you, then this method is for you. This tool neither ask for the password reset disk nor any other passwords of your Windows 7 computer.
Apart from Windows 7, with this method, you would be able to recover the password of any Windows version, whether it is Windows 7, 8, 8.1, 10, XP, Vista, 2000, 2003, 2006, 2008, 2012, or 2016.
Also Read: Best Windows 7 Password Reset Tools
This tool allows you to select from four different editions as per your requirements. Those five editions are Professional, Ultimate, Special and Raid. Let’s have a look at steps you need to follow to reset forgotten Windows 7 password with Windows Password Reset: Hence, follow the below-given steps of resetting password through Windows Password Reset to recover the Windows password without any hassle:
Step 1: To initiate the process of password resetting, you need to download Windows Password Reset on a computer that can access and install the software.
Free Download
Buy Now(Pro)
Step 2: After the completion of the installation process in your accessible computer, add an empty USB flash drive or CD/DVD. After opening the tool you have installed, you need to select the option which is suitable in your conditions. For example, if you are going to use a USB device, then select the “USB device” option and click on “Begin burning” to continue.
Step 3: Now boot your locked Windows 7 computer from USB or CD/DVD:
Step 4: After that, a new screen will appear stating four steps to reset Windows password on your locked computer. First of all, complete the first two steps there, select the Windows and select a user.
Step 5: Once you select your Windows version and the user in your computer, you will have completed another 2 steps to reset Windows password successfully. Now, in the third Step, you need to click on the “Reset” button to reset your Windows password. And, at last, click on the “Reboot” button to restart your computer.
A new popup window will appear on your computer screen after you will click on the “Reboot” button. The popup message would be about the confirmation, whether you want to reboot your computer or not. But, don’t forget to eject your USB flash drive or CD/DVD device before clicking on the “Yes” option.
Step 6: Once you follow all the steps mentioned here carefully, now, you can log in to your Windows 7 without password.
Method 3. Forgot Windows 7 Password No Reset Disk? Using Windows 7 Installation DVD or System Repair Disc
Forgot Windows 7 Administrator password no reset disk? Resetting Windows 7 password using installation DVD or system repair disc is another effective method. If you do not have your Windows 7 system repair disc, then you can create the one from any other Windows 7 computer.
In this Step by Step procedure, we are considering that you have your Windows 7 installation disc created with you. Follow the below-given steps carefully to reset your Windows 7 computer’s password:
Step 1: To initiate the process, first put your system repair disc in the CD/DVD drive of your locked Windows 7 computer and then restart the computer.
Step 2: Then, for a few seconds, the screen will display “Press any key to boot from CD or DVD”. At that time, you need to press any key to boot from the disc. But, if your computer still boots from the hard drive, then you need to change the boot order in BIOS.
Step 3: Then a new screen showing “System Recover Options” will appear. There you need to select “Use recovery tools that can help fix problems starting Windows” option and click on “Next”.
Step 4: After clicking on the “Next” option, it will ask you to select from different system recovery tool. From those system recovery tools, select “Command Prompt” tool.
Step 5: In the Command Prompt, you need to type some commands given below one by one in order to replace the sethc.exe with the cmd.exe.
c:
cd Windows
cd system32
ren sethc.exe sethc.exe.bak
copy cmd.exe sethc.exe
Step 6: Now, close the command prompt, remove your system repair disc and restart the computer.
Step 7: Once you will get to the login screen of your Windows 7 computer, you need to click on “Shift” key 5 times. Then, it will open Command Prompt instead of the stick keys application.
Step 8: Now, to reset your Windows 7 admin password, you just need to type in the following command by replacing the username and password with your combination.
net user username newpassword
Step 9: Close the Command Prompt and now you would be able to login to your PC using your new password. After starting Windows 7, don’t forget to rename the sethc.exe.bak back to sethc.exe.
That’s it. After following these nine steps properly, you would be able to login to your Windows 7 with the new password that you have set. This is not very easy to understand and implement, but if you follow the steps carefully, you would be able to bypass Windows 7 password successfully.
Method 4. Forgot Windows 7 Password No Reset Disk? Using Offline NT Password & Registry Editor
Offline NT Password & Registry Editor is another tool which is used for forgot Windows 7 password no reset disk. It is the tool which can delete the password from your Windows 7 computer. This tool might seem effective and quick in password resetting but there are certain drawbacks of this tool.
The main drawback of this tool is that it requires a considerable amount of command line work. You may be mistaken with this when you are not comfortable with it. Here, you also need a separate ISO burning software utility to create the USB device or live CD. Hence, before using this tool, make sure you know about its two major limitations.
Here is the Step by Step procedure of resetting Windows 7 computer password using Offline NT Password & Registry Editor:
Step 1: First of all visit the official website of Offline NT Password & Registry Editor. Then download and extract the Offline NT Password & Registry Editor Zipped ISO file.
Step 2: Next, burn the Offline NT Password & Registry Editor ISO file to a disc and restart with the NT Password & Registry Editor disc in the Disc drive.
Step 3: Click on “Enter” at the Boot: Command Prompt
Step 4: Then, you need to wait for the tool to load properly. Once the Offline NT Password & Registry Editor loads properly, choose the right hard drive partition and choose the password reset option.
Step 5: In the command prompt, you will see different options, there select the “Edit User Data and Passwords” option.
Step 6: Enter the username to edit and choose the “Clear (blank) user password”.
Step 7: There, type in “!” to quit or turn off Offline NT Password & Registry Editor tool. Type “q” to quit or turn off the tool and confirm your password reset changes.
Step 8: At last, confirm that you are finished using Offline NT Password Registry Editor tool. Finally, remove the Offline NT Password & Registry Editor disc and restart your Windows 7 computer.
By following this process, you would be able to reset the password of your Windows 7 computer. But, another drawback of this tool is that if you have a Windows 8, 8.1 or 10 computer, then this tool might not work properly in your computer.
Final Thoughts
It becomes very frustrating when you forgot Windows 7 password. At that time, you need an easy, reliable and effective password reset tools. There are so many Windows password recovery tools available in the market, make sure you go with the secure one.
Here we have mentioned about four different methods or tools for Windows 7 password crack. By following the Step by Step procedures of any of these four methods, it would be easy for you to reset forgotten Windows 7 password without any password reset disk.
Free Download
Buy Now(Pro)
July 30, 2014 updated by
Leave a reply »
Need to repair or restore Windows 7 to a previous state but you can’t login with System Recovery Options? The System Recovery Options menu is a collection of repair and diagnostic tools for Windows like Startup Repair, System Restore, and more. It can be accessed by pressing and holding the F8 key when starting a computer. Once the Advanced Boot Options screen appears, highlight “Repair your computer” and press Enter.
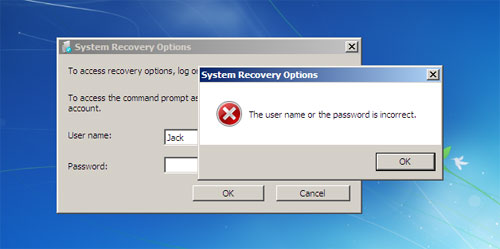
After a while, the System Recovery Options window will show up which prompts you to select the keyboard input method that you prefer, and subsequently asks you to log on as a local administrator account before running the Startup Repair or System Restore tool. But you’ll be stuck at the logon screen if you couldn’t remember the administrator password.
Just take it easy! Simply boot your computer from PCUnlocker Live CD and it enables you to remove forgotten Startup Repair password quickly. The PCUnlocker utility exists as a bootable ISO image, which needs to be burned to a blank CD or placed on a bootable USB drive. It could be used to reset lost administrator password on Windows 8, 7, Vista and XP.
Once you’ve created a PCUnlocker Live CD, put it in the CD drive of the Windows 7 computer that you’re trying to reset the password for. Power on the computer and make the CD-ROM to boot first in the BIOS. If all goes well, you should be booting into a mini Windows Preinstallation Environment (PE). PCUnlocker is launched automatically after the system has booted, and it searches your Windows installation and displays a list of local accounts stored in your SAM database.
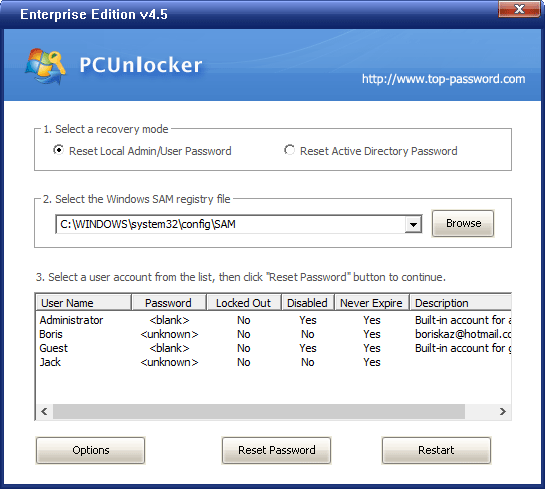
Choose your administrator account and click on “Reset Password” button. The program will remove your forgotten password and tweak the account’s properties so you can later login without a password. Take out the Live CD and reboot your computer. Repeatedly press F8 key to access the Advanced Boot Options screen again, and you can then log on with a blank password and continue to perform a Startup Repair or System Restore. Done!
- Previous Post: 3 Methods to Disable NumLock on a Laptop Keyboard
- Next Post: How to Reset Forgotten Syskey / Startup Password with Freeware