Introduction
This is a set of best practices to follow when installing a Windows Server 2019 guest on a Proxmox VE server 6.x.
Install
Prepare
To obtain a good level of performance, we will install the Windows VirtIO Drivers during the Windows installation.
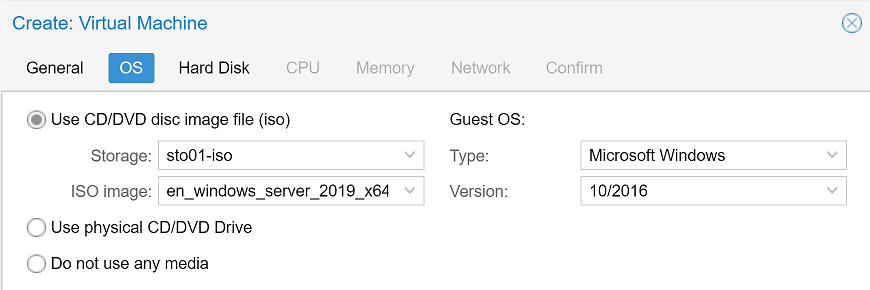
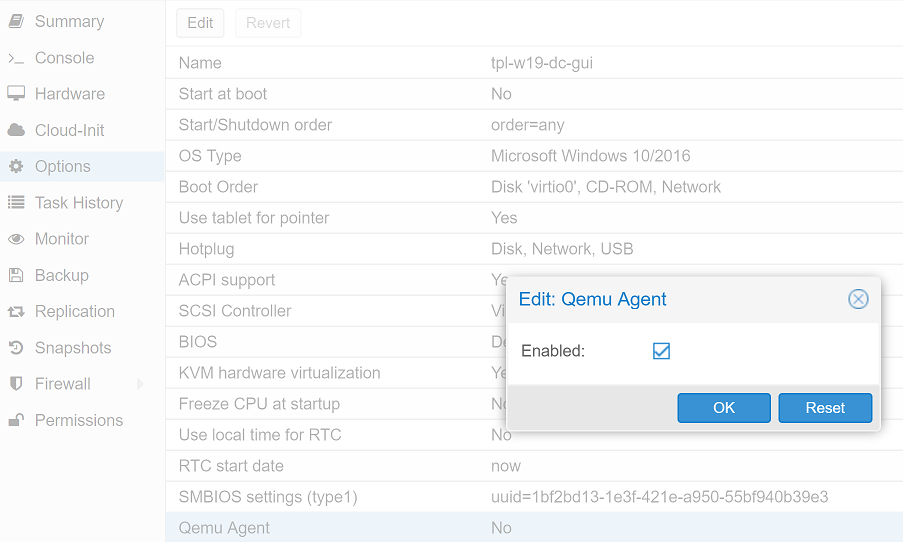
- Create a new VM, select «Microsoft Windows 10/2016/2019» as Guest OS and enable the «Qemu Agent» in the System tab. Continue and mount your Windows Server 2019 ISO in the CDROM drive
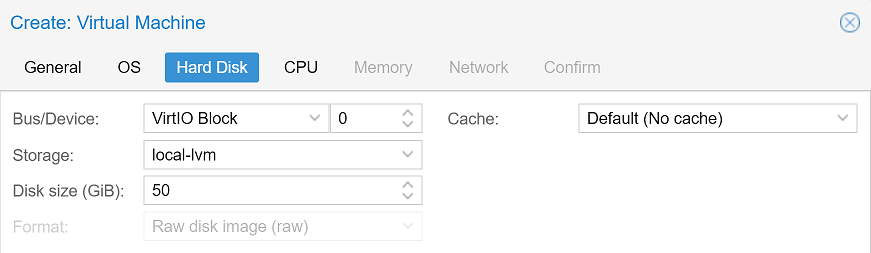
- For your virtual hard disk select «SCSI» as bus with «VirtIO SCSI» as controller. Set «Write back» as cache option for best performance (the «No cache» default is safer, but slower) and tick «Discard» to optimally use disk space (TRIM).
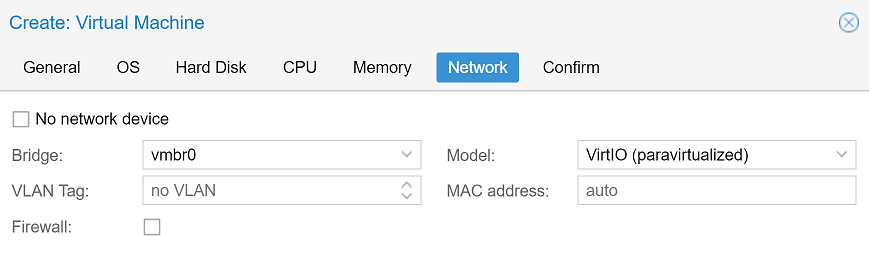
- Configure your memory settings as needed, continue and set «VirtIO (paravirtualized)» as network device, finish your VM creation.
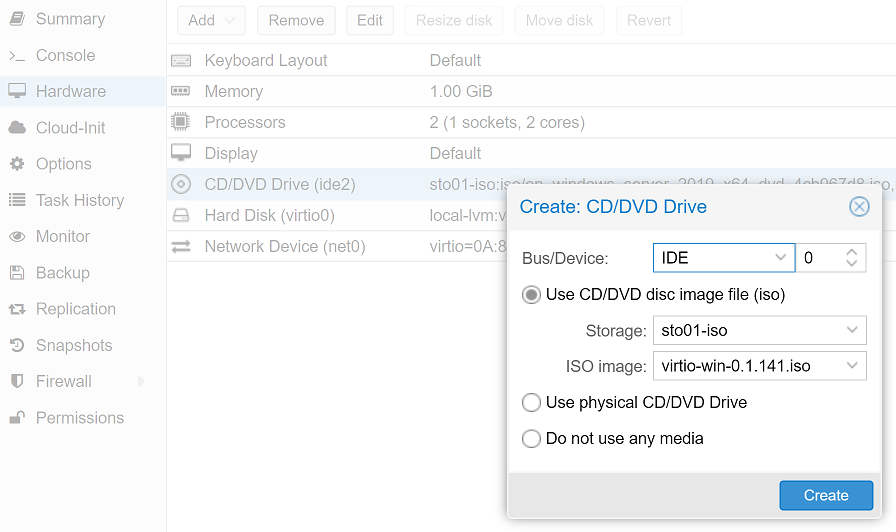
- For the VirtIO drivers, upload the driver ISO (use the stable VirtIO ISO, download it from here) to your storage, create a new CDROM drive (use «Add -> CD/DVD drive» in the hardware tab) with Bus «IDE» and number 0. Load the Virtio Drivers ISO in the new virtual CDROM drive.
- Now your ready to start the VM, just follow the Windows installer.
- Note for Older Version of Windows like Windows-2012 (use the stable older version of VirtIO ISO — virtio-win-0.1.189.iso, download it from here)
Launch Windows install
- After starting your VM launch the noVNC console
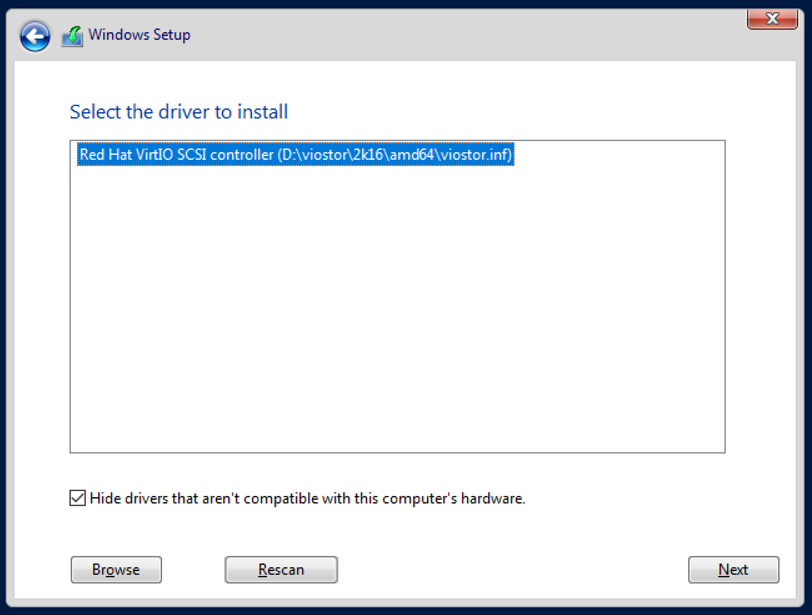
- Follow the installer steps until you reach the installation type selection where you need to select «Custom (advanced)»
- Now click «Load driver» to install the VirtIO drivers for hard disk and the network.
- Hard disk: Browse to the CD drive where you mounted the VirtIO driver and select folder «vioscsi\2k19\amd64» and confirm. Select the «Red Hat VirtIO SCSI pass-through controller» and click next to install it. Now you should see your drive.
- Network: Repeat the steps from above (click again «Load driver», etc.) and select the folder «NetKVM\2k19\amd64», confirm it and select «Redhat VirtIO Ethernet Adapter» and click next.
- Memory Ballooning: Again, repeat the steps but this time select the «Balloon\2k19\amd64» folder, then the «VirtIO Balloon Driver» and install it by clicking next. With these three drivers you should be good covered to run a fast virtualized Windows Server 2019 system.
- Choose the drive and continue the Windows installer steps.
HINT: There is a video showing the process for a Windows Server 2016 installation which is the same as for Windows Server 2019.
Install Guest Agent and Services
Guest Agent
If you enabled the Qemu Agent option for the VM the mouse pointer will probably be off after the first boot.
To remedy this install the «Qemu Guest Agent». The installer is located on the driver CD under guest-agent\qemu-ga-x86_64.msi.
Drivers and Services
VirtIO guest tools installer
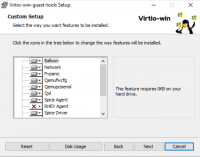
The easiest way to install missing drivers and services is to use the provided MSI installer. It is available on the driver CD since version «virtio-win-0.1.173-2».
Run the «virtio-win-gt-x64.msi» file located directly on the CD. If you do not plan to use SPICE you can deselect the «Qxl» and «Spice» features. Restart the VM after the installer is done.
After all this the RAM usage and IP configuration should be shown correctly in the summary page of the VM.
For more information and configuration about ballooning, see Dynamic Memory Management
Check for missing drivers
- See also: Paravirtualized Block Drivers for Windows
Unknown device in device manager
Make sure to include subfolders
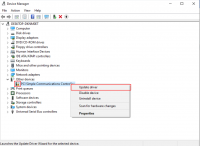
Go to the Device Manager to see if there are any drivers missing.
For any unknown device:
- Right click an select «Update driver».
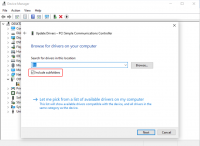
- Select «Browse my computer for driver software».
- Select the Driver CD. Make sure that «Include subfolders» is checked.
- Once a driver has been found you might be prompted with a security warning asking if you «Would like to install this device software». Click «Install».
Installing WSL(g)
To run WSL (Windows Subsystem for Linux) you need to enable Nested Virtualization. Make sure to set your processor to ‘host’; if you already set up your VM and did not select ‘host’ as processor, you can change it in the ‘Hardware’ section of your VM in the web interface.
Follow the official instructions.
If you are using a GPU via PCI(e) passthrough, you might need to add
args: -cpu host,kvm=off
to your config file at /etc/pve/qemu-server/<vm_id>.conf, see the vfio blog
Further information
Disk-Image Format: raw vs qcow2
Raw file format provides slightly better performance while qcow2 offers advanced features such as copy on write and Live_Snapshots.
Since V2.3, qcow2 is the default format.
VirtIO drivers
Make it really easy: Build your ISO with drivers already included:
Windows guests — build ISOs including VirtIO drivers
Latest iso with VirtIO drivers :
https://fedorapeople.org/groups/virt/virtio-win/direct-downloads/latest-virtio/
See also
Windows 2016 guest best practices
Windows 10 guest best practices

This page documents how to set up Windows Server 2019 under QEMU/KVM on Ubuntu 18.04. I suspect the procedure is identical for Windows 10 and somewhat newer Ubuntu versions.
What you will need:
- An Ubuntu 18.04 server
- QEMU/KVM installed on it. This is good documentation: https://help.ubuntu.com/community/KVM/Installation
- A Windows Server 2019 or Windows 10 ISO. You can download them from Microsoft for free and try them for 180 days. Good enough for a test lab.
- The virtio driver iso, which you can download here [deeplink].
ISO locations
It is customary to put boot ISOs in /var/lib/libvirt/boot/ and the disk images in /var/lib/libvirt/images. Other places are fine but if you choose to put your disk images in a different location keep in mind you should tell Apparmor about it lest you get bothered with permissions issues.
This document will not describe backing up and restoring of VMs, nor will it explain snapshotting. Both are interesting in their own right and you should learn about them if you haven’t. I wanted to document specifically the process of installing and configuring a Windows Server 2019/Windows 10 guest.
Overview
1. Setting up the network interface
2. Installing the virtual machine
3. Installing drivers and the guest agent
4. Non-related tips
Setting up the network interface
I’m setting up a bridge interface for the VMs to use. By doing this the VMs will show up in my LAN on a regular LAN IP address. My subnet is 192.168.178.0/24. My host’s IP address is 192.168.178.18.
Open the file /etc/netplan/01-netcfg.yaml, or whatever .yaml file is in /etc/netplan.
Mine looked like this:
network:
  version: 2
  renderer: networkd
  ethernets:
    eno1:
      dhcp4: no
      addresses: [192.168.178.18/24]
      gateway4: 192.168.178.1
      nameservers:
        addresses: [192.168.178.1]
Edit the file to look like this:
network:
  version: 2
  renderer: networkd
  ethernets:
    eno1:
      dhcp4: no
      dhcp6: no
  bridges:
    br0:
      interfaces: [eno1]
      dhcp4: no
      addresses: [192.168.178.18/24]
      gateway4: 192.168.178.1
      nameservers:
        addresses: [192.168.178.1]
Be careful when editing this file; it’s easy to lock yourself out. Things to be aware of:
- netplan is very picky about indentations. You need to get this right.
- Instead of # netplan apply do netplan try <file>:
root@z230:/etc/netplan# netplan try 01-netcfg.yaml
Do you want to keep these settings?

Press ENTER before the timeout to accept the new configuration

Changes will revert in 120 seconds
If all goes well do
# netplan apply.
You will end up with a physical interface that provides both the host and the VMs access to your LAN.
In case you have a separate network interface for your VMs try this configuration (enp7s0 and enp4s0f1 are both interfaces on my server; I want the VMs to use interface enp4s0f1 and use enp7s0 for management of the host machine itself):
network:
  ethernets:
    enp7s0:
      dhcp4: no
      dhcp6: no
      addresses: [192.168.178.14/24]
      gateway4: 192.168.178.1
      nameservers:
        addresses: [192.168.178.1]

  enp5s0f1:
    dhcp4: no
    version: 2

  bridges:
     br0:
       interfaces: [enp5s0f1]
       dhcp4: no
Installing the VM
# virt-install --name=W2K19 --ram=2048 --cpu host --hvm --vcpus=2 --os-type=windows --os-variant=win10 --disk /var/lib/libvirt/images/W2K19.img,size=40,bus=virtio --disk /var/lib/libvirt/boot/17763.737.190906-2324.rs5_release_svc_refresh_SERVER_EVAL_x64FRE_en-us_1.iso,device=cdrom,bus=ide --disk /var/lib/libvirt/boot/virtio-win-0.1.171.iso,device=cdrom,bus=ide --network bridge=br0 --graphics vnc,listen=0.0.0.0,port=5904 --check all=off
Note:
When I tried this on Ubuntu 20.04 with a Windows 10 VM I got a bunch of warning and errors and needed to do this:
virt-install --name=win10 --ram=4096 --cpu host --hvm --vcpus=2 --os-type=windows --os-variant=
win10 --disk /var/lib/libvirt/images/win10.img,size=40,bus=virtio --cdrom /var/lib/libvirt/boot/Windows10.iso --disk /var
/lib/libvirt/boot/virtio-win.iso,device=cdrom --network bridge=br0 --graphics vnc,listen=0.0.0.0,port=5904 --check all=of
f --boot cdrom
The difference is the –cdrom specification instead of the –disk one. Also it now seems to require a –boot parameter. The rest of this article continues from the previous command, not the one in this note.
Let me break that down.
First of all, run the command as root or do sudo. The command for installing new VMs is virt-install. Do read its man page.
--name=W2K19
The VM’s name. In KVM terms this is called it’s domain. please note this name is case sensitive.
--ram=2048
The amount of ram in kilobytes
--cpu host
Tells KVM to use the host’s cpu specifications for caching. If you’re planning on using clustering or live migration read up on this part in virt-install’s man page.
--hvm
Do full instead of para virtualisation, if available
--vcpus=2
Give the VM two virtual CPU cores. Again, read the man file for interesting values, like auto.
--os-type=windows
The VM will be optimized for this OS type.
--os-variant=win10
Do
# apt install libosinfo-bin
# osinfo-query os
for a full list of supported OS variants. Pick the closest one.
--disk /var/lib/libvirt/images/W2K19.img,size=40,bus=virtio
Create a disk at this location with this name. I tend to use the .img extension but .qcow2 is also common. The size is in gigabytes. Because we’re using Qemu we’ll be using the virtio bus driver. Note that we will need to install this driver in order to install Windows on the disk.
--disk /var/lib/libvirt/boot/17763.737.190906-2324.rs5_release_svc_refresh_SERVER_EVAL_x64FRE_en-us_1.iso,device=cdrom,bus=ide
We’re connecting the Windows ISO file to a CD ROM device here.
--disk /var/lib/libvirt/boot/virtio-win-0.1.171.iso,device=cdrom,bus=ide
This is the driver CD ROM ISO file. This contains the driver for the drive we’ll be installing Windows on.
--network bridge=br0
Which network interface to install on the VM.
--graphics vnc,listen=0.0.0.0,port=5904
Tell the VM what to do with graphics output. In this case we’ll send it through a VNC interface listening on any address (0.0.0.0) on port 5904. Check the man page for more options. 5900 is VNC’s default port but I’m already running something on that port so I’m specifying a different number.
--check all=off
Do not verify if the CD ROM is already in use by another VM.
Let’s kick off the installation and connect using your favourite VNC client. I used this one.

Connect VNC to your HOST’s IP address followed by the port you specified. The warning is because we didn’t specify a VNC password. That’s ok for now.

The Windows installer will inform you that there are no drives to install on and would like to add a driver?

Choose the virtio scsi driver. In my case the CD ROM ISO was mounted on e:.

Proceed as normal. At one point the installer will reboot and the connection will get lost. Reconnect and continue the installation.
Installing drivers and the guest agent
The guest agent facilitates communication between host and guest. Among other things this will make the VM shutdown gracefully when rebooting or shutting down the host.
After installation shut down the VM and do
# virsh edit W2K19
This will allow you to directly edit the VM’s definition in the form of an XML file. Look up the <devices> section and within it add this section:
<channel type='unix'>
  <source mode='bind' path='/var/lib/libvirt/qemu/win10.agent'/>
  <target type='virtio' name='org.qemu.guest_agent.0'/>
  <address type='virtio-serial' controller='0' bus='0' port='1'/>
</channel>
The W2K19.agent part (second line) must be unique per server. Again, the path can be anything but if you deviate from this standard you must tell Apparmor about it. I suggest you stick to the path above.
Start the server:
# virsh start W2K19
In the VM start the Device Manager. Note there are two devices that lack drivers. Rightclick them, choose Update driver and have the wizard search e: and subfolders.


One is the virtio Balloon Drivers, which allows for memory thin provisioning. The other is the virto serial driver, which is used by the virtio guest agent to facilitate communication between host and guest.
Shut down the VM and restart it with
# virsh start W2K19
To test agent communication, do
# virsh qemu-agent-command W2K19 '{"execute":"guest-info"}'
This should result in quite a bit of information.

If communication cannot be established your will see “error: argument unsupported: QEMU guest agent is not configured”.
Non-related tips
- Use tmux, a terminal multiplexer like screen. It allows you to do more than one thing at a time on your terminal and is highly customizable.
- Use BgInfo to easily see which VM you are managing.
- Learn about KVM snapshots and backups.
Proxmox documentation is exceptional but we have created a quick guide for setting up a Windows host as it’s not the same defaults to be used when setting up Linux. The guide on Proxmox’s Wiki for Windows 2019 and Windows 10 seems exactly the same. We’ve included both links in the references. When doing this operation you want to focus on Virtio disk.
This article highlights the non defaults.
Table of Contents
TL;DR
- Download Windows (server = 5 GB+):
- https://www.microsoft.com/en-us/evalcenter/download-windows-server-2019
- When installing choose the desktop experience otherwise you’ll have no UI
- https://www.microsoft.com/en-us/evalcenter/download-windows-server-2019
- Download special disk, network, and ballooning drivers here: https://fedorapeople.org/groups/virt/virtio-win/direct-downloads/stable-virtio/virtio-win.iso
- If you’ve downloaded this before, choose IDE / local disk / virtio
- This is stored on Proxmox on /var/lib/vz/template/iso
- If you’ve downloaded this before, choose IDE / local disk / virtio
- In addition to mounting the Windows ISO, also mount that fresh ISO as IDE device #3 (some strange default occurs
- Be sure to mount the ISO when creating the VM otherwise you’ll have to reboot before the OS will recognize it.
- Ensure you select QEMU Agent on the second tab of the wizard.
- So here are interesting disk settings:
- Set “Write back” as cache option for best performance
- Tick “Discard” to optimally use disk space (TRIM)
- Driver locations on Virtio CD:
- Hard disk: vioscsi\2k19\amd64
- Network: NetKVM\2k19\amd64
- Memory Balloon: Balloon\2k19\amd64
- Prep for QEMU Guest Agent
- Device Manager / Look for “PCI Simple Communications Controller”
- Update to D:\vioserial\2k19\amd64
- Device Manager / Look for “PCI Simple Communications Controller”
- You want to install all four drivers, starting with the disk driver which is needed before the disk will be seen.
- Choose SCSI bus as you normally would for the disk
- Choose this network device: VirtIO (paravirtualized)
Proxmox Wizard Steps
If you are import an existing QCOW2, then you probably only need the Proxmox wizard stuff to fill in:
- General Tab
- Name
- OS Tab
- Do not use any media
- Guest OS: Microsoft Windows version 10/2016/2019
- System Tab
- Tick Qemu Agent
- Hard Disk Tab
- Bus/Device: SCSI. That will default next line to VirtIO SCSI
- Storage: raid1 or whatever volume you decide on
- Cache: Write back
- Discard: Tick this
- CPU
- Memory
- Network
- VirtIO (paravirtualized)
Proxmox Wiki Guides
- https://pve.proxmox.com/wiki/Windows_2019_guest_best_practices
- https://pve.proxmox.com/wiki/Windows_10_guest_best_practices
Further Steps
Install QEMU Guest Agent for Windows
- Make sure you’ve followed the step to update the unknown PCI Simple Communications Controller as per previous step
- Browse to the ISO and guest-agent and install the 64bit guest agent.
- Test so:
- Services or Powershell
- Get-Service QEMU-GA
- Services or Powershell
Allow Ping for Windows Server 2019
By default Windows Server 2019 doesn’t allow ping. If you want to set it, do this:
https://kb.vander.host/operating-systems/unable-to-ping-newly-installed-windows-2019-server/
Enable Remote Desktop Connection
You probably want RDP enabled:
https://kb.vander.host/operating-systems/how-to-enable-remote-desktop-protocol-for-administration-purposes-on-newly-created-windows-2019-server/
Next, if you’re internet facing, your RDP will lock out because hacker will target you. Then you have to do this:
Settings > Edit Group Policy
Group Policy > Computer Configuration > Windows Settings > Security Settings > Account Policies > Account Lockout Policy > Account Lockout Threshold
Allow More Than One RDP Connection
- Start / Run / gpedit.msc
- Navigate to Computer Configuration >> Administrative Templates >> Windows Components >> Remote Desktop Services >> Remote Desktop Session Host >> Connections.
- Double click on “Set Restrict Remote Desktop Services user to a single Remote Desktop Services session and set this to Disabled.
- Next, double click on “Limit number of connections”, Enable, and set the RD Maximum Connections allowed to 999999 (6 x 9s)
This post is about creating a template for Windows Server 2019 on Proxmox, selecting some default settings and deploying a first VM from that template.
Warning:
This article is not meant for enterprise use. Looking back at this I also think, DefProf didn’t work with the Administrator user.
Base configuration
To create a new VM on Proxmox we first need to select a name. As this will be a Windows Server 2019 Datacenter template with desktop experience, I will call it tpl-w19-dc-gui.
We will use a little more than the minimum system requirements for Windows Server 2019:
- 2 CPU cores
- 1 GB RAM (you might wish to set this a little higher as the configuration below can get really slow)
- 50 GB disk space
As our first disc image file we will select the installation ISO for Windows Server 2019 datacenter. Selecting Windows 10/2016 as Guest OS is fine for now.
In the next step we select the VirtIO Block as our VMs harddisk device to get a better performance — which requires the VirtIO drivers, which we will install in the next step.
We can now set our CPU cores to 2 and the RAM to 1 GB. For the network device we will change the model to VirtIO (paravirtualized).
The configuration of the VM is now nearly finished. The last step is to activate the QEMU Guest Agent:
VirtIO drivers
To get the VirtIO devices working and some more performance in the OS we need the corresponding drivers (disk, network adapter and balloon driver). The VirtIO bundle also contains the QEMU Guest Agent which allows better integration of the guest OS with QEMU/Proxmox. The VirtIO-win Repository contains a dynamic link to the current stable release of VirtIO. At time of creation of this post the current version was VirtIO-win 0.1.141 which will be used from here on.
To install the OS to our VirtIO harddisk, the corresponding driver needs to be available. Therefore we just add another DVD drive with the VirtIO ISO.
Windows installation
The VM is now prepared and can be started. The installation process will start automatically. Select the desired locale settings and click Install now. Insert your product key (you will have to insert it again after every deployment, but you need an activated version for some settings). You could use KeePasses Auto-Type function to insert the key through the console automatically.
Select your version of Windows Server 2019. For this post I’ll go with Windows Server 2019 Datacenter (Desktop Experience). Select the custom installation option. There will be no drives displayed as we are missing the required drivers. We can load them from our VirtIO ISO using the Load driver option. Select the correct driver using Browse. The storage driver is located at <CD-Drive>:/viostor/2k16/amd64 — yes, you need to select this exact folder.
Click Next and the hard disk will appear. Next again and let Windows take care of the installation process. To set a strong default password, you can use KeePasses Auto-Type again.
Driver and Guest Agent installation
When the installation has finished, we can login with the previously set password. Now the other VirtIO drivers need to be installed. Open up the device manager and select Update driver for each device with an exclamation mark. Browse for the VirtIO CD-drive and let Windows search and install the right drivers each time.
At time of writing the guest agents on the VirtIO ISO are not up-to-date enough for Windows Server 2019. The latest version of QEMU Guest Agent can be found in the VirtIO-win Repository as above. Download and install from there.
Windows Updates
This is the point where you should start searching for and installing Windows Updates. You should check this process multiple times during the customization and again at the end. If you want to override some of the default Update policies, you can do so with local GPOs at Computer Configuration / Administrative Templates / Windows Components / Windows Update.
Customization and default settings
There are a few things you might want to change in your template, some of which could also be set via domain GPO. Here are some ideas:
- Enable RDP:
- Inside the Server Manager select
Local Server. SelectRemote desktopand set it toAllow remote desktop connections to this computer.
- Inside the Server Manager select
- Enable Telnet Client:
- Inside the Server Manager select
Local Server. Scroll down toRoles and Features, click onTasks > Add roles and features. Install the featureTelnet Client.
- Inside the Server Manager select
- Disable IE Enhanced Security Configuration:
- Inside the Server Manager select
Local Server. On the right hand side selectIE Enhanced Security Configuration.
- Inside the Server Manager select
- Disable Server Manager:
- Inside the Server Manager go to
Manage > Server Manager Properties. SelectDo not start Server Manager automatically at logon.
- Inside the Server Manager go to
- Set Windows Explorer to display file extensions.
You can find more recommendations on default Windows Server settings on Google, most simple settings for Windows Server 2016 work on 2019 just fine.
Now is the time to install some often needed tools. Here are some ideas:
- Install Windows Admin Center from http://aka.ms/WACDownload
- Install Chocolatey
choco install 7zipchoco install notepadpluspluschoco install sysinternals
- …
Final steps
To keep all those custom settings the default profile needs to be changed as our current user will be deleted. We can use a tool called DefProf for that. Create a new temporary user if you have been using the Administrator till now and use that one to run defprof Administrator. If you were using a different user, switch to the Administrator and run defprof <username>.
Check Windows Updates again, then clear the event logs using wevtutil el | Foreach-Object {wevtutil cl "$_"}.
Run C:\Windows\System32\Sysprep\sysprep.exe, select Enter System Out-of-Box Experience (OOBE), Generalize and Shutdown.

When the system has shut down
- remove the second CD drive,
- reset the other one to
Do not use any media, - right click the VM in Proxmox and select
Convert to template.
Deploying
To deploy the first VM from the template, just right click it and select Clone. When the cloning process has finished, boot the system. You will be asked for your license key and the new Administrator password, that’s it.
When the system is finally up, just issue these last commands, install Windows Updates and reboot the System.
Rename-Computer <hostname>choco upgrade all -y
You can do the last steps completely via Windows Admin Console, by the way.
Links
- https://wiki.archlinux.org/index.php/QEMU#Preparing_a_Windows_guest
- https://docs.microsoft.com/de-de/windows-server/manage/windows-admin-center/overview
Виртуализация стала неотъемлемой частью современного мире информационных технологий. Виртуальные машины позволяют эффективно использовать ресурсы серверов и упрощают поддержку и развертывание приложений. Однако работа с виртуальными машинами может стать сложной задачей, особенно при необходимости управлять ими удаленно.
Qemu guest agent для Windows является решением, которое облегчает управление виртуальными машинами, работающими на платформе Windows. Этот агент позволяет осуществлять различные операции с виртуальными машинами, такие как перезагрузка, выключение, миграция и т. д., с помощью команд, отправляемых с гипервизора.
Преимуществом использования Qemu guest agent для Windows является возможность получить доступ к гостевой операционной системе виртуальной машины без необходимости подключения к самой виртуальной машине. Это значительно упрощает управление и повышает безопасность, так как не требуется устанавливать дополнительное ПО на гостевой ОС.
Qemu guest agent для Windows поддерживает широкий спектр гипервизоров, таких как KVM, VMware, Hyper-V и др. Он предоставляет разработчикам и администраторам удобный способ управления виртуальными машинами и сокращает время, затрачиваемое на рутинные операции. Благодаря Qemu guest agent, использование виртуальных машин на платформе Windows становится еще более удобным и эффективным.
Содержание
- Qemu Guest Agent: бесплатный инструмент для управления виртуальными машинами
- Возможности Qemu Guest Agent для Windows
- Установка Qemu Guest Agent на виртуальную машину
- Как использовать Qemu Guest Agent на Windows
Qemu Guest Agent: бесплатный инструмент для управления виртуальными машинами
С помощью Qemu Guest Agent можно выполнять различные операции с виртуальными машинами, такие как управление питанием, мониторинг ресурсов, передача файлов и многое другое. Это делает процесс управления виртуальными машинами более гибким и эффективным.
Одна из ключевых функций Qemu Guest Agent — управление питанием. С его помощью можно включать, выключать и перезагружать виртуальные машины удаленно, без необходимости входа в систему. Это очень полезно, например, при необходимости обновления гостевой операционной системы или перезагрузки приложений внутри виртуализированной среды.
Qemu Guest Agent также предоставляет доступ к информации о ресурсах виртуальной машины, таким как использование процессора, памяти, дискового пространства и сети. Таким образом, администраторы могут контролировать и оптимизировать работу своих виртуальных машин, а также предупреждать возможные проблемы, связанные с недостатком ресурсов.
Другой важной функцией Qemu Guest Agent является возможность передачи файлов между хост-системой и гостевой операционной системой. Это упрощает процесс обновления приложений или передачи данных между виртуальными машинами и внешними системами.
В целом, Qemu Guest Agent предоставляет широкий набор функций для управления виртуальными машинами, работающими на платформе Qemu. Благодаря этому инструменту администраторы могут эффективно управлять своими виртуальными машинами, улучшая производительность и удобство работы в виртуальной среде.
Возможности Qemu Guest Agent для Windows
Ниже приведены основные возможности, которые предоставляет Qemu Guest Agent для Windows:
- Управление питанием виртуальной машины: возможность включать, выключать и перезагружать виртуальную машину.
- Мониторинг системных ресурсов: получение информации о состоянии процессора, памяти и дискового пространства в гостевой ОС.
- Управление процессами: возможность просматривать запущенные процессы, завершать ненужные процессы и запускать новые процессы в гостевой ОС.
- Управление сетевыми настройками: изменение IP-адреса, маски подсети и других сетевых параметров.
- Управление монитором: возможность изменять разрешение экрана, положение окон и другие настройки монитора.
- Управление виртуальными дисками: возможность создания, удаления и изменения виртуальных дисков, а также монтирование и размонтирование файловых систем.
- Оповещения и события: получение уведомлений о различных событиях, таких как включение, выключение и перезагрузка виртуальной машины.
- Копирование и вставка информации: возможность копировать и вставлять текстовую информацию между гостевой ОС и хозяйской системой.
С помощью Qemu Guest Agent для Windows администраторы могут эффективно управлять своими виртуальными машинами, осуществлять настройку, мониторинг и улучшение производительности гостевой ОС.
Установка Qemu Guest Agent на виртуальную машину
Чтобы установить Qemu Guest Agent на виртуальную машину, следуйте приведенным ниже шагам:
- Войдите в гостевую операционную систему виртуальной машины.
- Откройте веб-браузер и перейдите на страницу загрузки Qemu Guest Agent.
- Выберите соответствующую версию Qemu Guest Agent для вашей операционной системы.
- Скачайте загруженный файл с расширением .msi.
- Запустите загруженный файл и следуйте инструкциям мастера установки.
- После успешной установке Qemu Guest Agent на виртуальную машину, перезагрузите гостевую операционную систему.
После перезагрузки виртуальной машины Qemu Guest Agent будет активирован и начнет выполнять свои функции. Теперь вы сможете управлять виртуальной машиной с помощью Qemu Guest Agent и осуществлять различные операции, такие как включение и выключение, передача файлов и многое другое.
Установка Qemu Guest Agent на виртуальную машину позволяет значительно упростить процесс управления и контроля за виртуальными машинами, а также обеспечить более надежное взаимодействие между хостом и гостевой операционной системой.
Как использовать Qemu Guest Agent на Windows
Для начала, вам понадобится установить Qemu Guest Agent на Windows виртуальной машине. Сделать это можно двумя способами:
| Способ | Описание |
|---|---|
| 1 | Установка через установщик |
| 2 | Установка через инструмент Chocolatey |
1. Установка через установщик:
Скачайте установщик Qemu Guest Agent с официального сайта Qemu. Запустите установщик и следуйте указаниям мастера установки. После завершения установки, Qemu Guest Agent будет доступен для использования в гостевой ОС Windows.
2. Установка через инструмент Chocolatey:
Установите инструмент Chocolatey на виртуальной машине Windows, если его еще нет. Затем откройте командную строку с правами администратора и выполните команду:
choco install qemu-guest-agent
После установки Qemu Guest Agent, вам может потребоваться настроить его для взаимодействия с Qemu. Для этого откройте файл /etc/qemu/qemu.conf на хостовой машине и добавьте следующую строку:
guest_agent=yes
Сохраните изменения и перезапустите Qemu.
Теперь, когда Qemu Guest Agent установлен и настроен в гостевой ОС Windows, вы можете использовать его для управления виртуальной машиной. Некоторые из основных команд, которые можно выполнить с помощью Qemu Guest Agent:
- Получение информации о гостевой ОС
- Управление энергопотреблением (завершение работы, перезагрузка)
- Управление сессией, пользователями и процессами
- Управление файлами и дисками
- Управление сетью и сетевыми интерфейсами
- Управление графическими драйверами
- И многое другое
Для выполнения этих команд вы можете использовать интерфейс командной строки или API Qemu Guest Agent. Конкретные инструкции по использованию Qemu Guest Agent будут зависеть от вашего конкретного случая использования и требований.
В заключение, использование Qemu Guest Agent на Windows позволяет эффективно управлять виртуальными машинами в гостевой ОС. Убедитесь, что у вас установлена и настроена последняя версия Qemu Guest Agent, чтобы использовать все его функции и возможности.