Solutions provider takeaway: In this chapter excerpt, you will get the steps required to perform both a bare-metal recovery and system state recovery in Windows Server 2008 R2. There is also information on recovering system state data containing Active Directory data and how to use Windows system recovery tools.
Recover Your Data
I hope recovering your data is not a daily task. However, you should know how to recover data just in case. Fortunately, the recovery tool is straightforward to use presuming you have performed a proper backup. The method used to back up your data will always determine what recovery method you will need to perform. Your desired outcome will impact what and how you need to perform your recovery.
Restore Specific Files or a Full Volume
If the time comes that you need to recover the files, it is just a matter of knowing what files and what time frame you need to restore.
- Start Windows Server Backup by selecting Start ⇒ Administrative Tools ⇒ Windows Server Backup.
- To launch the recovery wizard, in the Actions pane on the right, select Recover.
- Select where you have stored the backup, and click Next. If the backup is stored locally on an internal hard drive, verify This Server is selected, click Next, and proceed to step 7. If the backup is stored elsewhere, select A Backup Stored On Another Location, and click Next.
- Depending on the location of the backup, click Local Drives or Remote Shared Folder, and click Next. If you specified Remote Shared Folder, you will need to type in the UNC name for the backup in the form of \\servername\sharename.
- On the Select Backup Location screen, verify your backup set, and click Next.
- Select the server data you want to recover, and click Next.
- On the Select Backup Date screen, select the date and possible time for the backup set you want to recover from, and click Next.
- On the Select Recovery Type page, select what you want to recover.
- Select Specific Files Or Folders if you trying to recover a specific file or folder. When you select this option and click Next, you will see a screen similar to Figure 8.15, allowing you to expand the tree to recover the file from.
- Select Volumes if you need to recover the entire volume from a backup set. When you select this option and click Next, you will be provided with a list of volumes to select from.
- Select System State if you want to recover system state.
-
Figure 8.15: Recovering a specific file

Note: You may also notice a choice called Applications. Depending what applications you have installed on your server, some may have registered with Windows Server Backup. If they have, you have the ability to recover those applications as well.
- After you make your selection for the recovery of files, click Next.
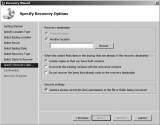
- The Specify Recovery Options screen will look like Figure 8.16. This screen gives you a few options on how you want to recover the file. You can recover to the original location or an alternative location. You can also control whether you create a copy of the file to make sure you have both versions, overwrite any existing version of the file, or do not recover the file if one already exists. You can also bring back any security permissions on the file. After you make your selection, click Next.
- Review the Confirmation screen, and click Recover.
- After the recovery process is complete, review the results, and click Close.
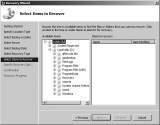
Figure 8.16: Recovery options
Perform a System State Restore
When you want to recover system state data, you need to take an extra bit of precaution and planning when recovering this data. Because of the nature of the data being recovered, you have the potential to render your system unbootable. Specifically, when this restore process is started, it cannot be stopped or interrupted. If it is, this process could render your server unbootable. In other words, use caution when recovering the system state. Of course, if you are using this process, chances are you are not too far from having to rebuild your server anyway.
- Start Windows Server Backup by selecting Start ⇒ Administrative Tools ⇒ Windows Server Backup.
- To launch the recovery wizard, in the Actions pane on the right, select Recover.
- Select where you have stored the backup, and click Next. If the backup is stored locally on an internal hard drive, verify that This Server is selected, click Next, and proceed to step 7. If the backup is stored elsewhere, select A Backup Stored On Another Location, and click Next.
- Depending on the location of the backup, click Local Drives or Remote Shared Folder, and click Next. If you specified Remote Shared Folder, you will need to type in the UNC name for the backup in the form of \\servername\sharename.
- On the backup location screen, verify your backup set, and click Next.
- Select the server data you want to recover, and click Next.
- On the Select Backup Date screen, select the date and possible time for the backup set you want to recover from, and click Next.
- On the Select Recovery Type screen, select System State to recover the system state information, and click Next.
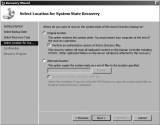
- Select the area you would like to recover your system state data to, either the original location or an alternate location. If you are trying to recover, make your selection, and click Next.
- On the Summary screen, review your selections, and then click Recover.
- After the recovery process is complete, review the results, and click Close.
Restore System State Backup Data Containing Active Directory Data
If your system state backup contains Active Directory information, you will not be able to recover the data via the recovery wizard unless you specify an alternate location to recover to. If you try to recover the data in the Windows Server Backup tool, you will see an error message similar to the one shown in Figure 8.17.
Figure 8.17: System state with Active Directory data error

To perform a system state recovery of your Windows Server 2008 R2 server containing Active Directory information, you need to boot the operating system into Directory Services Restore Mode (DSRM). Specifically, you will be performing an authoritative restore.
Before you can boot into DSRM, you need to configure your boot process:
- Click Start, type msconfig, and click the Msconfig program under Programs.
- Click the Boot tab.
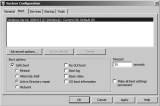
- In the Boot Options section, select the Safe Boot check box, and select the Active Directory Repair option. Click OK. Your screen should look like Figure 8.18.
-
Figure 8.18: Booting into DSRM
- Restart the server.
- Log on to the server with the local administrator ID and the DSRM password you created while installing the server.
- Start Windows Server Backup by selecting Start ⇒ Administrative Tools ⇒ Windows Server Backup.
- To launch the recovery wizard, in the Actions pane on the right, select Recover.
- Select where you have stored the backup, and click Next. If the backup is stored locally on an internal hard drive, verify that This Server is selected, click Next, and proceed to step 12. If the backup is stored elsewhere, select A Backup Stored On Another Location, and click Next.
- Depending on the location of the backup, click Local Drives or Remote Shared Folder, and click Next. If you specified Remote Shared Folder, you will need to type in the UNC name for the backup in the form of \\servername\sharename.
- On the Specify Backup Location screen, verify your backup set, and click Next.
- Select the server’s data you want to recover, and click Next.
- On the Select Backup Date screen, select the date and possible time for the backup set you want to recover from, and click Next.
- On the Select Recovery Type screen, select System State to recover the system state information, and click Next.
- Select Original Location, and select Perform An Authoritative Restore Of Active Directory files, as shown in Figure 8.19.
-
Figure 8.19: Authoritative restore
- You will receive a warning noting that all replicated content on the server will be resynchronized and that this can cause potential latency on your server and network. Acknowledge the message by clicking OK.
- On the Summary screen, review your selections, and then click Recover.
- You will receive another warning message stating that system state recovery cannot be paused or canceled once it has started. Click Yes to proceed with the recovery, or click No to complete the recovery at a later time.
- After the recovery process is complete, review the results, and click Close.
- Before you restart the server, you need to turn off DSRM.
- Click Start, type msconfig, and click the Msconfig program under Programs.
- Click the Boot tab.
- In the Boot Options section, deselect the Safe Boot check box. Click OK.
- Restart the server, and log on with your normal domain credentials.
- If you see a command prompt window notifying you the status of your recovery, review the message, and press the Enter key.
Perform a Bare-Metal Restore
Sometimes you run into problems that a simple file restore or a system state recovery cannot fix. If you have created a bare-metal recovery image, then you can recover your full server using the recovery process. This recovery process is different from recovering just files or the system state. The bare-metal recovery process is part of the Windows Recovery Environment, and to get to it, you need a Windows Server 2008 R2 DVD to boot the operating system to, and you need access to the drive containing the bare-metal backup. Typical USB drives can work really well in this scenario presuming your BIOS supports USB at boot.
Additionally, this recovery process is destructive, meaning when you run a bare-metal recovery all the data on your drives will be replaced with data from the system image. You also have the potential during the recovery process to partition and format the drives, in other words, restoring the server completely to a previous working state.
- Make sure your backup media is attached to the server, and insert and boot to your Windows Server 2008 R2 DVD.
- Select your language preferences, and click Next.
- In the Install Now window, click the Repair Your Computer option located in the lower left of the installation window.
- To recover from your bare-metal backup, select the Restore System Using A System Image You Created Earlier radio option, and click Next. You can also get to the image via the Recovery Tools option.
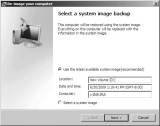
- The system image will scan your system’s drives for an image for you to restore from; you will see a screen similar to Figure 8.20. You can select the image provided to, usually the most current, or you can select a different image by selecting Select A System Image. When you have the proper image selected, click Next.
-
Figure 8.20: Bare-metal image selection
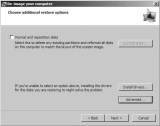
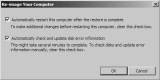
- On the Choose Additional Restore Options screen, you have the ability to control how your drives and partitions are handled, as shown in Figure 8.21. You can repartition and format the drives. You can also exclude drives from the partition, which is particularly useful when you want to keep other drives intact. By clicking Advanced, you will see a window similar to Figure 8.22. This window allows you to control whether you want restart upon completion. It will also allow you to perform a hard disk scan to check and possibly repair errors. After you’re done, select your options, and click Next.
- Review your selections, and click Finish to begin the bare-metal restoration.
-
Figure 8.21: Bare-metal recovery options
Figure 8.22: Advanced options
- You will be presented with a warning reminding you that the process will replace existing data from the bare-metal backup image. If this is what you want to do, click Yes to finalize the restoration process. This process could take a long time to complete based on how much data you need to recover.
- When the recovery is complete, you will prompted to restart, or the system will restart automatically (the default option).
Windows System Recovery Tools
During the bare-metal restore process, you saw an option to load the Windows system recovery tools. The Windows system recovery tools provide you with three options to further troubleshoot your environment:
- System Image Recovery will take you to the bare-metal recovery wizard to allow you to fully recover your system.
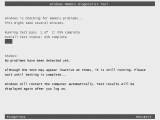
- Windows Memory Diagnostics will perform diagnostic checks on the memory of your system to see whether faulty memory is to blame for any system errors. When you select this option, you will asked to either restart the system immediately to check for problems or schedule the memory check for the next time you restart the system. Pressing F1 will allow to control the types and number of memory tests you can perform. When the test is running, you will see a screen similar to this one.
-
- Command Prompt will load a command prompt to allow you to perform a variety of command prompt actions.
|
|||
Recover via Shadow Copy
Recovering files via a shadow copied shared volume is something you can teach your users to do. It is very straightforward to work with when it is enabled and as easy to access as right-clicking the file or folder you want to perform the recover. To access the shadow copies on your Windows Server 2008 R2 server, the users must be running an operating system that supports the Shadow Copy Client. Windows Vista, Windows 7, Windows Server 2003, Windows Server 2008, and Windows Server 2008 R2 all have built-in support for the Shadow Copy Client. For Windows XP or Windows Server 2000 SP3 or later, you need to download the client located from this location:
http://support.microsoft.com/kb/832217
Using the Shadow Copy Client to recover a file is just a matter of knowing where the file is located and knowing how you want to recover the file. Shadow copies are great if a user has accidentally deleted a file or folder or inadvertently overwritten a file, such as by choosing Save instead of Save As. You can work with the shadow copy files or folders just like you would any regular file or folder.
When restoring with shadow copies, you have three options, as listed in Table 8.3.
Table 8.3: Shadow Copy Options
|
Option |
Usage |
| Open | Allows you to open a shadow copy of the file or folder to view any changes. You can copy and paste between the shadow copy and the original file or folder. This method is very useful when you want only to recover a file from a folder instead of the whole folder. |
| Copy | This will make a copy of the shadow copy and store it in a different location. This is also useful when you want to compare files or folders side by side. |
| Restore | This will restore the file in the original location. Be careful if you restore a folder with this method because it will restore all the contents of the folder. |
You can access the shadow copies either locally if the shadow copy has been enabled on your local volume or via a network share after you have opened the folder or share where you want to recover data from.
- Right-click the file or folder you want to restore with the shadow copy. You can also right-click the whitespace of an opened folder.
- Select Properties.
- Click the Previous Versions tab; your screen will look similar to Figure 8.23.
-
Figure 8.23: Shadow copy restore
- Select the shadow copy you want to use; they are stored by date and time.
- Select Open, Copy, or Restore.
- When you are finished, click OK.
Note: If you do not see any shadow copies listed, the most likely cause is that the file has not changed. Remember, shadow copies store only the changes for the files, and if there are no copies listed, the file is the original.
It is important you also know that shadow copy is not retroactive. The feature will not protect you until the feature is enabled. In other words, if a user makes changes to files or deletes a file prior to enabling shadow copy, the act of enabling shadow copy will not allow you to retroactively make copies of files and folders.
![]()
![]() Backing Up and Recovering Your Server
Backing Up and Recovering Your Server
![]() Windows server backup in Windows Server 2008 R2
Windows server backup in Windows Server 2008 R2
![]() Bare-metal, system state recovery in Windows Server 2008 R2
Bare-metal, system state recovery in Windows Server 2008 R2
Printed with permission from Wiley Publishing Inc. Copyright 2010. Microsoft Windows Server 2008 R2 Administration Instant Reference by Matthew Hester and Chris Henley. For more information about this title and other similar books, please visit Wiley Publishing Inc.
Dig Deeper on MSP business strategy
-
How to configure shadow copies on file servers
By: Damon Garn
-
System Restore (Windows)
By: Rahul Awati
-
virtual hard disk (VHD)
By: Rahul Awati
-
Backup heads to cloud as ransomware hits 76% and RTOs/RPOs fail
By: Antony Adshead


|
Недавно устроился на работу и все не успел проверить, сегодня после автоматического обновления Windows сервер не запускается, запускается лишь средство восстановления системы. Как откатить систему на вчерашнее число? Сервер нужно восстановить к утру, ибо нереальный документооборот на предприятии, куча пользователей доменных и права… Работаю тут пару дней и не знаю какие права для какого пользователя выставлены и прочее. |
|
|
Если коротко — зайти в «средство восстановления системы» и там откатиться на вчерашнюю точку восстановления. Сработает если только прошлый админ не отключил пару служб… |
|
|
В средстве восстановления системы есть лишь, восстановление системы из образа (которых нет), диагностика памяти и командная строка. Может есть альтернативный способ запуска отката системы? Изменено: wishmaster666 — 17.05.2013 22:15:37 |
|
|
Ну давай покрутим, штоле При загрузке нажми F8 и выбери «отключить автоматическую перезагрузку системы» Оно при загрузке выдаст синий экран — напиши тут какой драйвер указан (по аналогии с ) и какой код ршибки. Ещё в безопасном режиме попробуй загрузится — получится? |
|
|
«Безопасный режим, последняя удачная конфигурация, отключение автоматической перезагрузки» — в любом из этих режимов загрузки сразу запускается средство восстановления системы, BSODa нету( Впервые с таким сталкиваюсь( |
|
|
Печально — что-то поломалось серьёзно значит, у меня например такое было когда неверный загрузочный раздел стоял (не твой случай). Ну остаётся два варианта 0) Сделай бэкап СЕЙЧАС, а то сделаешь хуже и вообще пипец будет (стандартный совет от ИБ-шника, хехе) 1) Переставить винды (причём сначала можно попробовать режим обновления — вдруг починит), тут зависит от софта который стоит (если домен то завтра будет печаль) П.С. — с лив сиди кстати диски на ошибки проверь на всякий, ещё можно логирование при загрузке включить и лог почитать, но ни разу за много лет не помогало… |
|
|
Диски на ошибки с утра до обеда тестил, память тоже. Каким образом сейчас делать образ системы? Консоль или c помощью Live дистрибутива (Acronis или что-то типа того)? Изменено: wishmaster666 — 17.05.2013 22:49:09 |
|
|
Да куча вариантов, самые простые — диск лив-цд\флешка с акронисом или просто лив-цд\флешка с каким-нить Drive Snapshot. Проблемы могут возникнуть только если используется како-то рейд-контроллер непопулярный, там да — геморно будет, но тоже решаемо. П.С. — кинул ссыль на лив цд проверенный с доп дровами всякими, но его писать на диск — не всегда удобно. |
|
|
Огромнейшее спасибо, сейчас буду действовать, времени не так много а работа на целый день уже встала. В уме не укладывается что на фирме которая работает не один год не было никакого резервного копирования а расхлебывать приходится мне) P.S. если поможет обновление и все данные с настройками останутся, то какого масштаба могут быть проблемы с доменом и как скоро? Изменено: wishmaster666 — 17.05.2013 23:04:50 |
|
|
Формально никаких ) Реально — если будут видны какие-то проблемы с доступами скажем к шарам и\или много красного в логах то грозит «ненаходимыми» подводными камнями. Ну на новый (читай — чистый) домен перейти если что можно довольно прозрачно, это как раз меньшая проблема |
|
|
Попробую восстановление, если будет хотя бы 70% работоспособности домена то по крайней мере смогу отдохнуть в выходные и в рабочие дни буду поднимать новый домен) |
|
|
SOLDIER Guest |
#12 Это нравится:0Да/0Нет 19.05.2013 09:49:39 На будущее — поднимите то, что называется BDC в дополнение к PDC. Тогда при неработе основного контроллера АД работа в фирме не остановится. И эта. В 2008 не существует такого понятия, как создание точки восстановления. Только бэкап. С последующим поднятием из него. Либо штатными средствами самой Винды, либо сторонними — упоминаемым выше Акронисом, например. |
Ежедневно на страницы моего блога поисковые системы приводят посетителей с различными вопросами, самый распространенный из которых представляет собой, нет, не Data Protection Manager, как можно было бы ожидать, а всего лишь вариации фразы точка восстановления Windows Server 2008. Внимательный читатель заметит, что кроме названия блога, информации о точке восстановления тут пока нет. Да и что особенного может быть в точке восстановления Windows с позиции ищущих — я пока не догадался.
Но так как архивация данных в Windows весьма родственна тематике блога, этим постом я предлагаю начать изменять ситуацию. Интересующиеся темой могут оставлять в комментариях к данной записи свои краткие вопросы касательно точек восстановления. Буду отвечать на них в меру своих сил. А после набора некой критической массы вопросов, мы все их закроем одним мощным ударом постом. Этакий срыв покровов. Вобщем, спрашивайте, не стесняйтесь.
Апдейт:
Состав и процесс восстановления образа системы из точки восстановления Windows 2008 подробно рассмотрены в статьях:
Общие понятия, состав и механизмы создания — Все, что вы хотели знать о DPM 2010 Bare Metal Recovery, но боялись спросить (часть 1)
Пошаговый процесс восстановления — Все, что вы хотели знать о DPM 2010 Bare Metal Recovery, но боялись спросить (часть 2)
Данная информация, в основных моментах, подходит и для образов системы созданных непосредственно в системе архивации данных Windows Server.
In this article, we will overview the System Restore Point feature implemented in desktop Windows versions, and explain how to achieve a similar recovery option in Windows Server 2008.
What Is System Restore Point?
System Restore Point is included in desktop Windows versions (e.g Windows XP, 7, 10), that allows users to roll back system registry changes and crucial system folders content to one of the previously created “snapshots”. It allows recovery after wrong driver installation or changes made by unstable third-party software.
The feature may look like a “silver bullet” in the event of infection of malicious software or corruption of one of the installed apps. But there are a few peculiarities you should know about:
- System Restore Point is not a backup — this mechanism allows you to temporarily save a point-in-time Windows state. This state includes the system registry and crucial system folders necessary for proper work. This feature, for example, will not help to recover deleted user files.
- If you have uninstalled some software and then decided to retrieve it — using System Restore Point is not the solution, since it may not contain all program files your software used. It will just recover its registry data, shortcuts, and, most likely, its main executables.
- System Restore Point cannot guarantee the removal of malicious software since this tool does not contain copies of all areas that could be infected.
As you see, System Restore is not the best way to protect the system or user data. There is a similar and more straightforward mechanism supported by all Windows server versions — System State backup. It also supports command-line interface for better flexibility.
FREE WHITEPAPER
Full System Backup and Recovery
Check out our comprehensive guide covering system image, system state and application-aware backup and recovery:

![]()
System State backup contains copies of the Windows registry and the most important system files and drivers necessary to create and save documents, as well as other Microsoft Apps content:
- Active Directory data — if the computer runs AD services.
- Certification Authority configuration and content.
- Cluster database if the server runs Windows Server Failover Cluster service.
- Windows Performance Counter information and Component Services database.
System State can help fix many system failures if the OS can boot up successfully. If not, you will need additional tools to use this backup type.
The following is how to create a System State backup in Windows Server 2008 (R2):
1 Launch Windows Server Backup using All Programs menu. Click either Backup Schedule or Backup Once, depending on your case. We will use the Backup Schedule as an example.
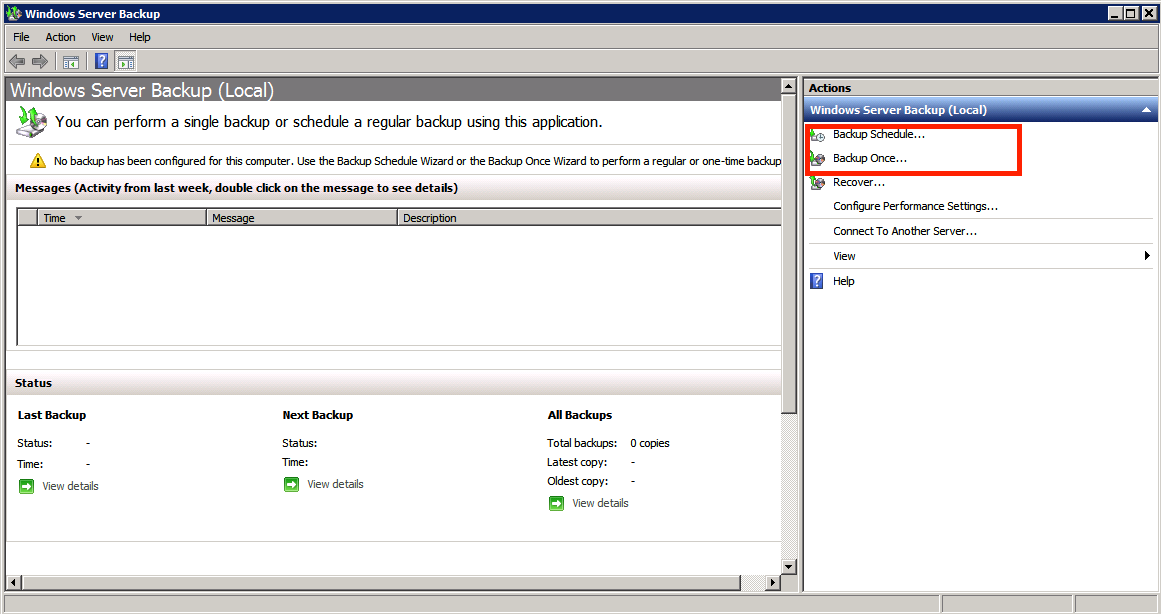
2On the Select Backup Configuration step click Custom and proceed.
3Click Add Items and select System State in the new window. You can also include additional files or folders in the same backup.

4The Specify Backup Timestep allows you to configure the backup schedule. We suggest creating a System State backup every day to minimize RPO — this backup type will not last
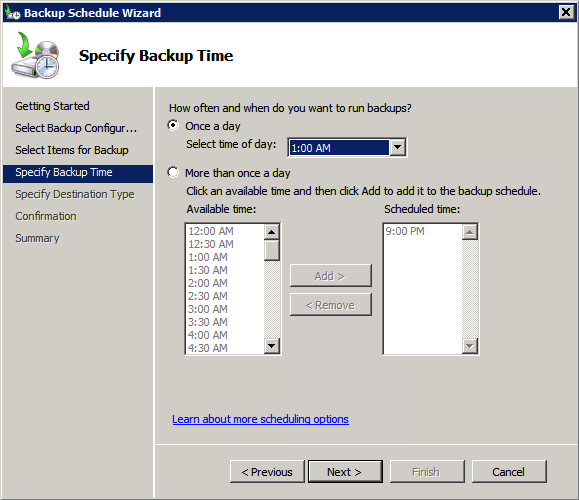
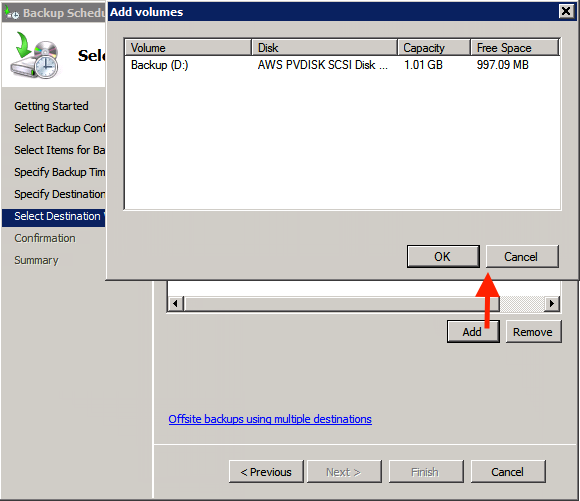
5Choose the backup destination on the next step — either use the entire hard drive, dedicated volume, or network share. If choosing the network share, you need to create a few backup jobs to keep the last N backups, since Windows Server Backup will overwrite backup files every time.
We suggest using the local volume as “the first line of defense”, since you may need to recover the system when the network is not available — for example, if faced with NIC driver-related issues.
6Add the desired volume on the next step and click Finish. The backup is now configured.
Windows Server Backup is free to use, but please note its peculiarities:
- You cannot store a backup in the local folder of your choice. The backup tool only uses the whole drive, dedicated volume, or network share.
- Cloud storage providers are not directly available as a backup target. As a workaround, you can configure a separate tool to synchronize the System State backup folder with cloud or offsite storage.
- Multiple location backups (used as a best practice in the “3-2-1 backup strategy) are harder to implement using the built-in Windows tool — you need to create a separate backup job per target storage. So, every backup copy will actually lead to a few “hot” backups being made.
If you need more flexibility and a full-featured solution, consider using a third-party backup tool.
Here’s how to create a point-in-time backup with ystem State scope using MSP360 Backup.
Windows Server 2008 Restore Point with MSP360 Backup
MSP360 Backup is a cloud backup tool that supports point-in-time backups for the whole server or for only a few files or apps.
To create a local or cloud System State backup:
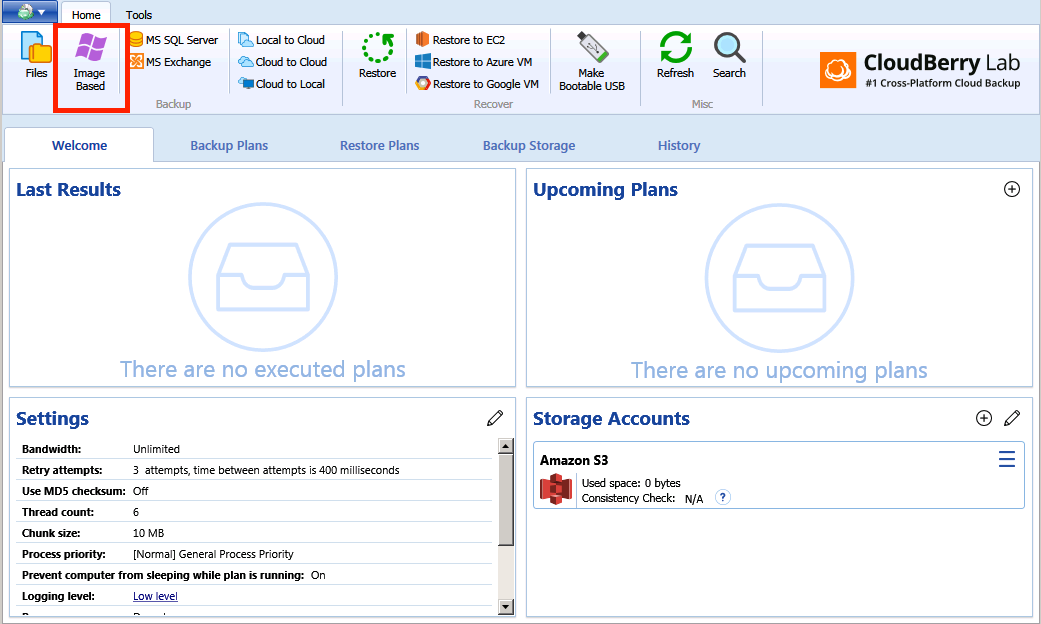
1Launch MSP360 Backup and click the Image Based button at the top-left corner.
2Select Local or Cloud backup and click next.
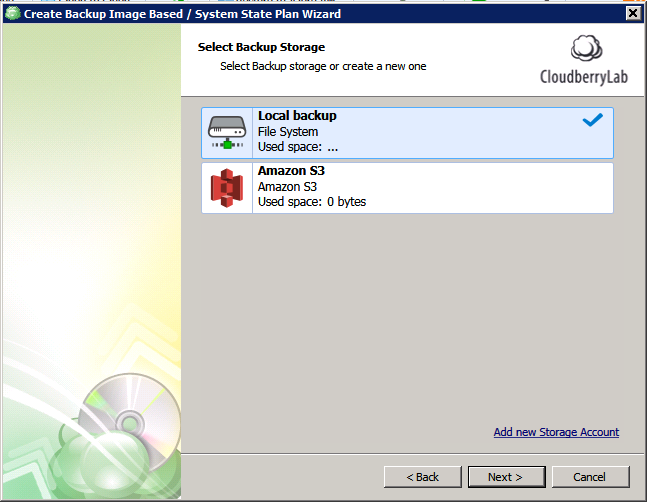
3On the Select Backup Storage step, you can select cloud storage or connect local/network folder. In this example, we will use the local folder on one of the server volumes.
 Since there is no local folder connected, let’s create one. Click Add new Storage Account.
4Select File System in the new window. Type the backup target name and select storage path by clicking the three-dots button.
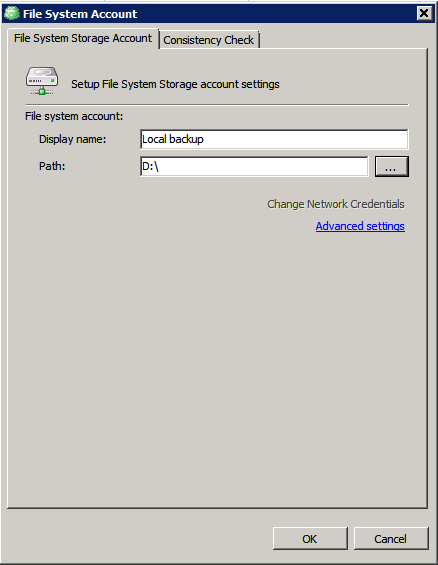
Click OK — now you can select local storage as the backup target.
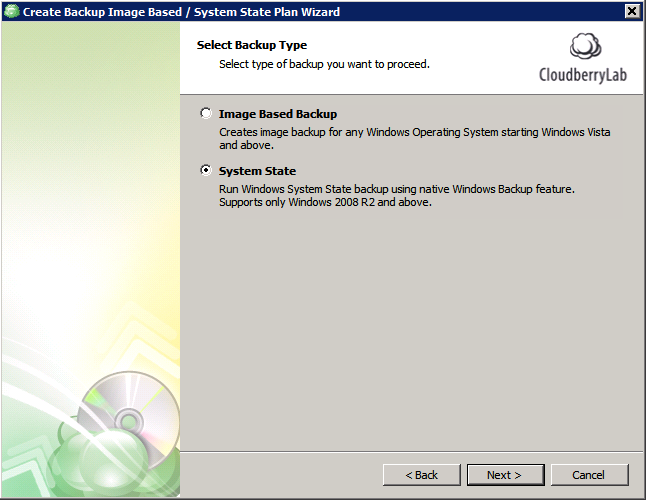
5Proceed to the Select Backup Type step and select the System State option.
6Select one of the available drives for temporary snapshot storage on the next step, and proceed to the Advanced Options step.
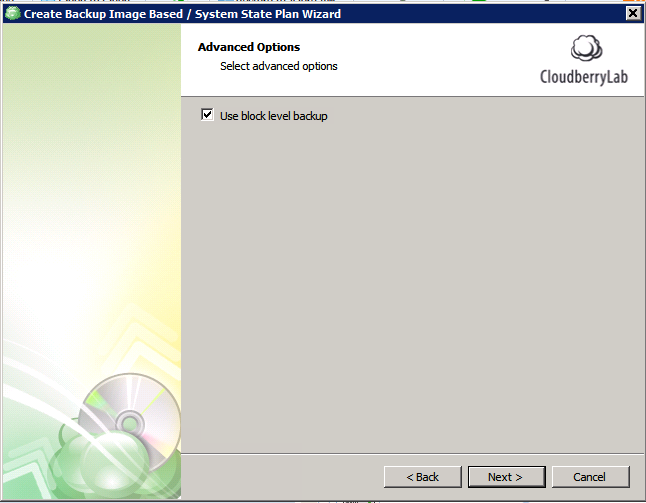
Leave the Use block level backup checkbox enabled to minimize the subsequent backup size by only copying those data blocks changed since the last backup session. Proceed to the Schedule screen leaving the rest of the options on their defaults.
Click Recurring to set the backup schedule on the regular basis.
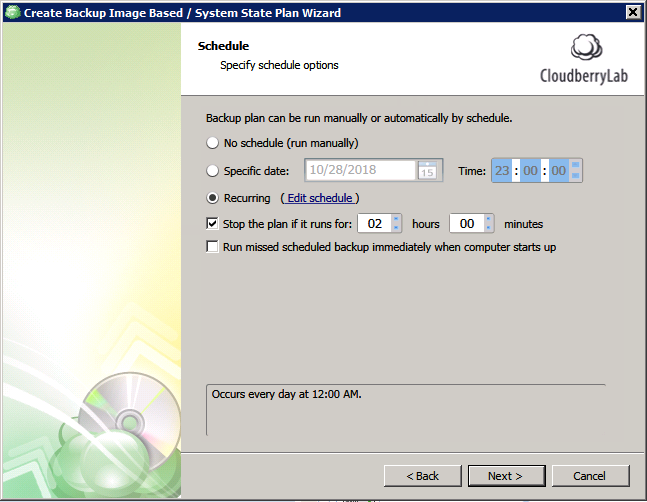
Note: you can avoid running out of a backup window by selecting the Stop the plan if… option, so MSP360 Backup will stop its job if something goes wrong and the backup hangs up.
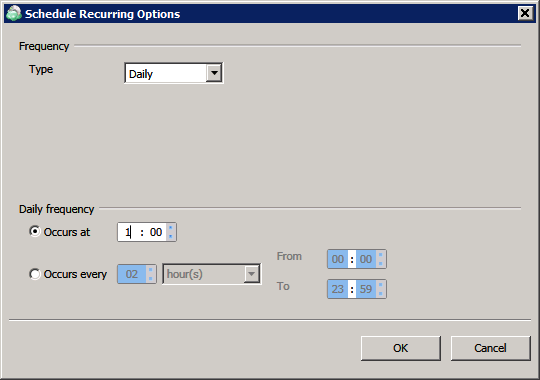
Click Edit schedule and set the desired recurrence.
7The Full Backup Options step allows planning a Full backup. If you have previously chosen the Block-level backup option, MSP360 Backup will create only incremental data copies after the initial backup. Click Schedule Full Backup to select when you would like to create a full data copy.
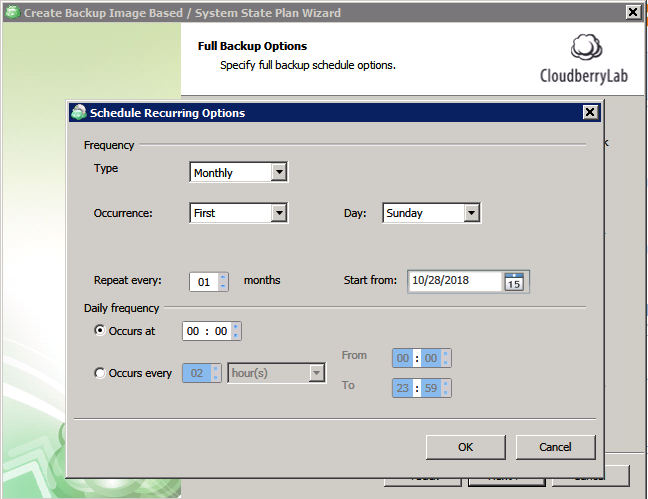
We suggest scheduling Full backups to keep the backup chain the least possible, thus simplifying possible restore operations.
You can leave the rest of the options on their defaults and finish backup plan configuring.
Summary
You can use System State backup as a super-powered server version of the System Restore Point feature. System State covers most OS-critical files and configurations, which allows you to include additional folders in the same backup.
Try out MSP360 Backup to get even better flexibility. It allows you to create a System State backup in local or cloud storage, as well as implement bare metal recovery.

CloudBerry Backup for Windows Server
- Image-based, system state and file-level backup
- Local, cloud and hybrid backup
- Multiple recovery options (bare-metal, USB, cloud)

Table of Contents
- Cases
- Startup Repair Process
Cases
Most of the no boot cases are caused by either of the following reasons:
- Disk metadata corruption in the master boot record (MBR), partition table, or boot sector of Windows RE partition.
- Missing or corrupt boot manager.
- Missing or corrupt boot configuration data.
Startup Repair Process
Startup Repair will try to repair computers that are unbootable because of the following reasons:
- Registry corruption
- Missing or damaged system and driver files
- Disk metadata corruption (MBR, partition table, and boot sector)
- File system metadata corruption
- Installation of problematic or incompatible drivers
- Installation of incompatible Windows service packs and patches
- Corrupt boot configuration data
- Bad memory and hard disk hardware (detection only)
http://technet.microsoft.com/en-us/library/cc722188(WS.10).aspx
How Windows RE Works
Log file location: Startup Repair Log:
After Startup Repair has run, a text log with diagnostic information and repair result is generated within the recovery console. This log file is located at
%WINDIR%\System32\LogFiles\Srt\SrtTrail.txt
- We can execute startrep.exe tool in recovery console to address corrupt registry issues if any in Windows Server 2008 R2
If the Windows registry is slightly or moderately corrupted, you may be able to restart the computer in Safe mode and use System Restore to restore the registry of the computer to the last known good configuration.
However, if the Windows registry is severely corrupted, all types of logon will be prevented. Attempting to log on to Windows causes the system to fail and then to restart. In this situation, you will need to boot the system into the Recovery Console instead
of into Windows. Once in the Recovery Console, you can use the Startup Repair tool. Startup Repair automates common diagnostic and repair tasks of unbootable Windows installations.
a)
Boot from your Windows Vista or Windows Server 2008 DVD
b)
On the first screen of Setup choose Next
c)
In the lower left of the screen choose «repair your computer»
d)
On the System Recovery Options screen choose your installation of Windows and then click next
e)
Click «Command prompt»
f)
Go to X:\sources\recovery> startrep.exe
g)
This will take a while but will address any registry related issues.
Ref:
http://technet.microsoft.com/en-us/library/cc734097(WS.10).aspx
Event ID 4005 — Windows Logon Availability
- Sfc Scannow command address file based corruptions if any.
a)
Boot from your Windows Vista or Windows Server 2008 DVD
b)
On the first screen of Setup choose Next
c)
In the lower left of the screen choose «repair your computer»
d)
On the System Recovery Options screen choose your installation of Windows and then click next
e)
Click «Command prompt»
f)
Type in the following command: SFC.EXE /scannow /offbootdir=c:\ /offwindir=c:\windows
g)
When complete type in exit to see if Windows starts up now.
Ref:
http://blogs.technet.com/b/askcore/archive/2007/12/18/using-system-file-checker-sfc-to-fix-issues.aspx
Using System File Checker (SFC) To Fix Issues
- Chkdsk to address disk and filesystem based issues.
Boot the machine in recovery console mode and run chkdsk on C: drive [Local Fixed Disk]
chkdsk C: /f and then chkdsk c: /r
/f — Fixes errors on the disk. The disk must be locked. If chkdsk cannot lock the drive, a message appears that asks you if you want to check the drive the next time you restart the computer.
/r — Locates bad sectors and recovers readable information. The disk must be locked.
/r includes the functionality of /f, with the additional analysis of physical disk errors.
http://technet.microsoft.com/en-us/library/cc730714(WS.10).aspx
Chkdsk
Hope this helps in addressing some of the no boot issues.