| Previous | Table of Contents | Next |
| Configuring and Managing RAID 5 on Windows Server 2008 R2 | Installing Applications for Windows Server 2008 R2 Remote Desktop Services |
<google>BUY_WINSERV_2008R2</google>
Remote Desktop Services (formerly known as Terminal Services and often abbreviated to RD Services) allow either individual applications or entire desktop sessions to be run on remote server systems, but displayed and interacted with on local client systems. In effect, while the applications and desktops appear to be running on the local machine they are actually running in virtual sessions on the remote server with only the display graphics and keyboard and mouse information passing between the two systems. This allows one or more Windows Server 2008 R2 systems (referred to as Remote Desktop Session Hosts) to provide the applications and desktops for any number of desktop systems. This has a number of advantages in terms of ensuring that all users have the same version of a particular application and also in terms of reducing administrative overheads. With remote desktop services, for example, if an application needs to be upgraded it only needs to be upgraded on the host server, not on every desktop in the enterprise.
There are a number of different Remote Desktop Services configuration options, many of which will be covered in subsequent chapters. In this chapter the configuration of the basic Remote Desktop Services role and installing applications for use by Remote Desktop Services users will be covered.
Contents
Contents
|
||
Installing Remote Desktop Services
Windows Server 2008 R2 Remote Desktop Services may be installed from the Server Manager tool. Within Server Manager, click on Roles in the left hand pane and click on Add Roles in the resulting screen to invoke the Add Roles Wizard. If the introductory screen appears, click on Next to list the available roles. On the Select Server Roles screen, select Remote Desktop Services and click on Next to select the specific services required. For the purposes of this chapter just the basic Remote Desktop Session Host option needs to be selected (the other options will be covered in subsequent chapters):

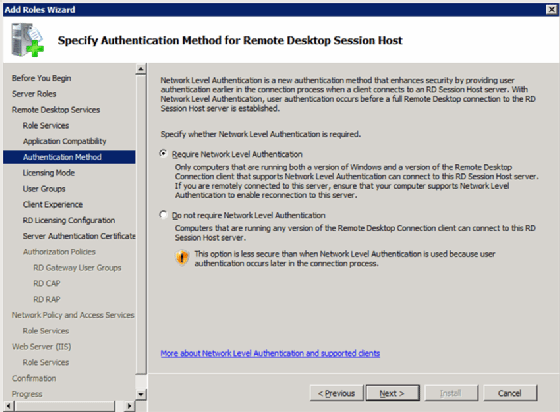
After clicking Next a warning screen will appear recommending that any applications intended to be accessed by remote desktop users not be installed until the Remote Desktop Services role has been installed. In fact, the installation of applications for Remote desktop Services requires some special steps which will be covered in detail in a later chapter. Having read this information, click Next to proceed to the authentication selection screen. Selecting Require Network Level Authentication will prevent users running on older operating systems without Network Level Authentication from accessing Remote Desktop Services. Network Level Authentication essentially performs authentication before the remote session is established. If less strict authentication is acceptable or some users are running older operating systems then the Do not require Network level Authentication option will need to be selected before clicking Next to proceed.
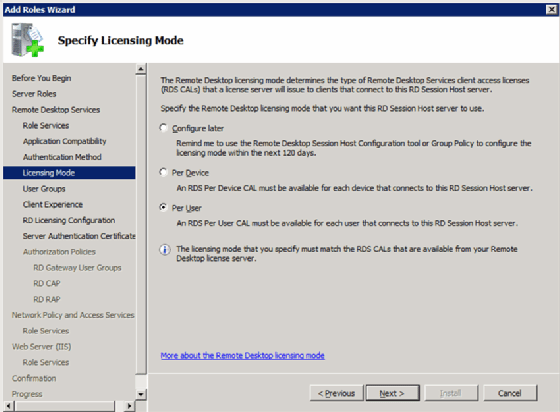
The Specify Licensing Mode screen allows the licensing method to be defined. If Configure later is selected a 120 day grace period allows the system to be used without providing licenses. If this option is selected the licensing must be configured within 120 days. In the case of Per Device mode, this allows a specified number of devices to connect to the service at any one time regardless of who the users are. On the other hand, Per User restricts access to specified users, regardless of the device from which they are connecting.
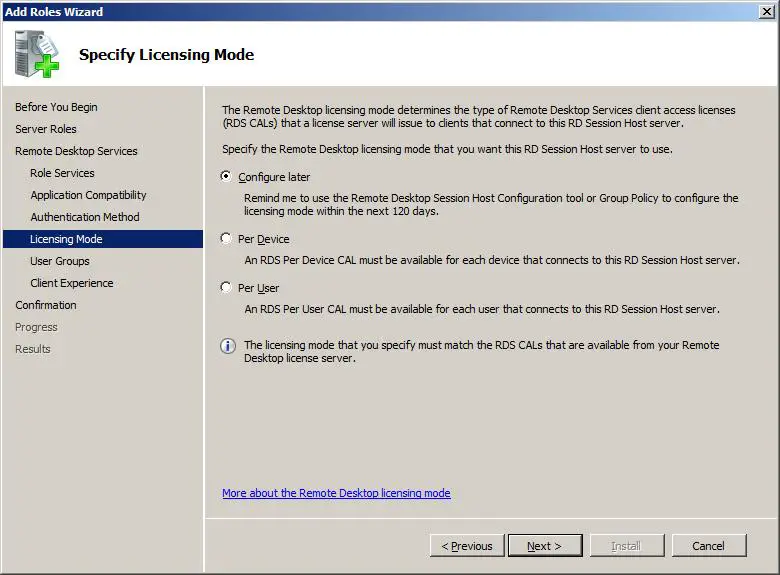
For the purposes of this tutorial, select the Configure later option and click Next to proceed.
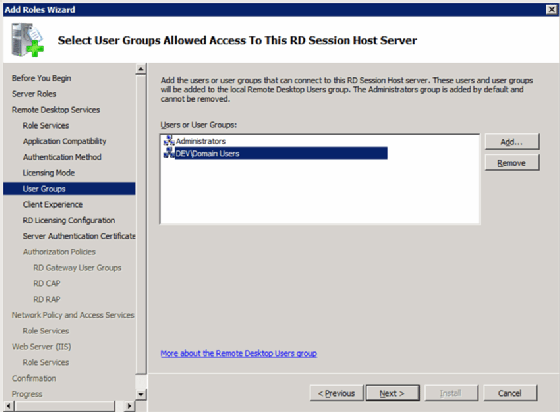
Next, the users and groups allowed to access the RD Session Host need to be specified, although users may be added and removed at any time by changing the members of the Remote Desktop Users Group. Click on Add… to add additional users.
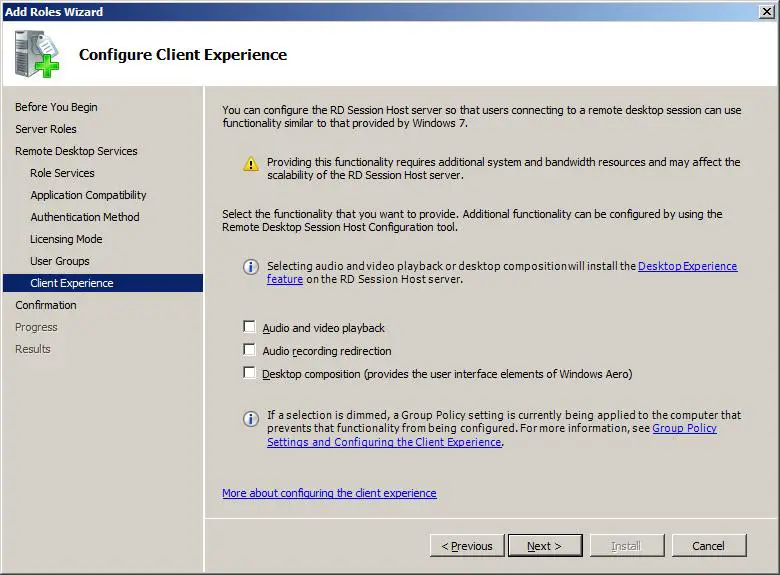
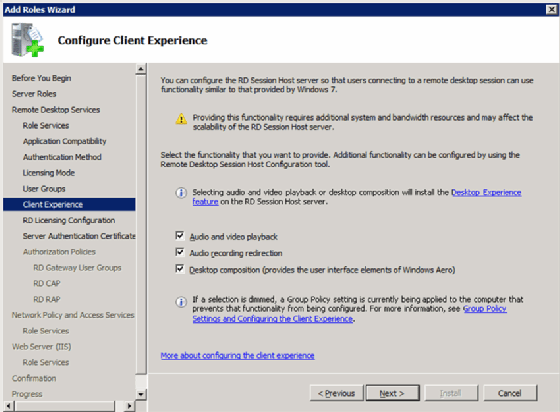
The final configuration screen allows the user experience to be configured. This essentially controls whether or not audio, video and desktop effects (such as the Aero user interface) are enabled on the user’s remote desktops. The reason that these features are not enabled by default is that they consume considerable amounts of bandwidth and place an extra load on the RD Session Hosts. Unless you specifically need users to be able to stream audio (both to and from the session host) and video to the remote desktops and use the latest graphics intensive desktop effects it is recommended that these features remain disabled:
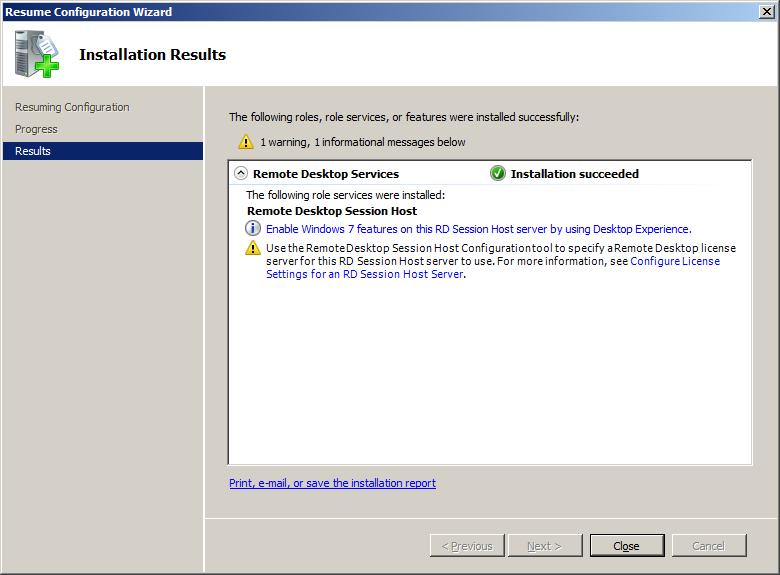
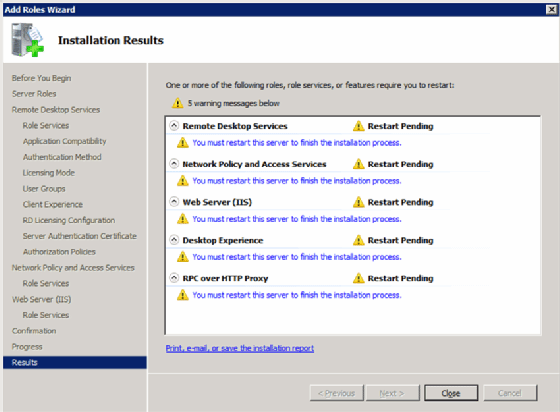
Clicking Next proceeds to the Confirmation screen. Read carefully any warnings that are displayed. Typically the wizard will recommend any currently installed applications should be re-installed before remote access is provided to users (steps to achieve this are outlined in the next chapter). Click Install to begin the installation process. Partway through the installation it will be necessary to restart the Windows Server 2008 R2 system. Once rebooted, be sure to log in as the same administrative user to complete the Remote Desktop Services configuration process. Once the process is complete, a screen similar to the following will appear:
Adding Users to the Remote Desktop Users Group
The default configuration for Remote Desktop Users Group is to allow all members of the Administration group to connect remotely. Active Directory also contains a Remote Desktop Users group to which users may be added to provide Remote Desktop access privileges. To provide users with remote desktop and application access through Remote Desktop Services, open Control Panel -> System and Security -> System -> Remote settings and click on the Select Users button to invoke the Remote Desktop Users dialog illustrated in the following figure:
<google>ADSDAQBOX_FLOW</google>
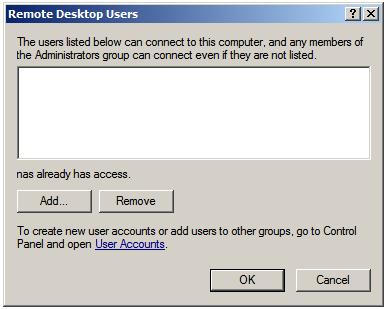
Note that users with administrative privileges do not need to be added to this list, by default they already have Remote Desktop access. To add additional users click on the Add… button to display the Select Users dialog. Enter the name of the user in the text box entitled Enter object names to select and click on Check names to list names that match the name entered. Select the appropriate name from the list. The following example shows user Bill on server winserver-2:

Click on OK to apply the change. The new user will now appear in the list of users with Remote Desktop access on the Remote Users screen. Click OK to close this screen and click on Apply in the System Settings screen. The specified user will now have Remote Desktop Services access to the system.
Accessing Remote Desktop Services from the Client
With Remote Desktop Services installed and configured on the server, the next step is to ensure the services can be accessed from a remote client. Remote Desktop Services provides both remote desktop and remote application access. Under remote desktop access an entire desktop session running on the server is displayed on the client. The user then interacts with the desktop to launch and interact with applications (details on installing applications for use with Remote Desktop Services is covered in Installing Applications for Windows Server 2008 R2 Remote Desktop Services). In the case of remote applications, the remote application running on the server appears in its own window on the client desktop, to all intents and purposes looking like a local application to the user. Remote applications are covered in detail in Configuring RemoteApps on Windows Server 2008 R2.
With the appropriate configuration tasks completed on the remote system the next step is to launch the Remote Desktop Client on the local system.
To invoke the Remote Desktop Client select Start -> All Programs -> Accessories -> Remote Desktop Connection or enter the following in the Run dialog or at a command prompt:
mstsc
Once launched, the following initial screen will appear requesting details of computer to which the client is to connect:
<google>WIN28BOX</google>
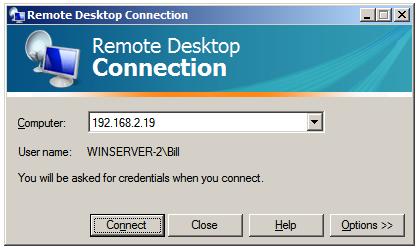
This can either be an IP address or a computer name. If previous connections have been established the User name field will be populated with the user name used in the preceding session. If you need to log in as a different user this option will be provided on the next screen which appears after the Connect button is pressed:
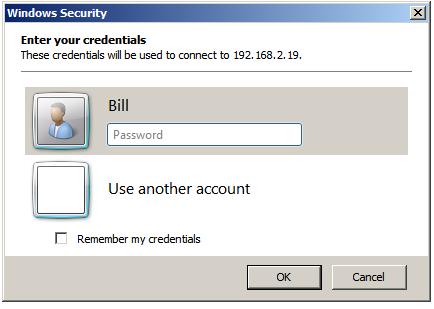
In this screen enter the password for the selected user (note that remote desktop access is only available for user accounts which are password protected). If a user other than the one displayed is required, simply click on the Use another account link and enter the necessary details. Click on OK to establish the connection. After a short delay the remote desktop will appear on the local computer screen.
Remote Desktop Client Configuration Options
The Options>> button displayed on the initial screen of the Remote Desktop Client provides six tabs, each containing a range of configuration options:
- General — Allows login credentials to be configured and session information to be saved.
- Display — Configures the resolution and color settings to be used when displaying the remote desktop on the local system.
- Local Resources — Specifies which local resources (sound, disk drives, printers etc) are to be made accessible to the remote system during the Remote Desktop session. This page also provides options to control the situations under which special key combinations such as Ctrl-Alt-Del are interpreted by the local or remote systems.
- Programs — Allows specified programs to be automatically invoked each time a remote sessions is established.
- Experience — Controls which desktop features are enabled or disabled for the Remote Desktop session. For example, over a slow dial-up connection it is unwise to have the desktop background displayed and font smoothing enabled. Either select the connection type and speed to see recommended settings, or use Custom to configure you own settings. This particular screen also provides the option to have connected automatically re-established in the event that a session is dropped.
- Advanced — Enables and disables remote server verification. This ensures that the remote server to which you are connected is indeed the server you wanted. Also available are RD Gateway settings. By default the Remote Desktop Client is configured to automatically detect RD Gateway settings.
Logging out from a Remote Desktop Session
When the Remote Desktop Client is exited by pressing the ‘X’ on the control panel the remote session continues to run on the server even though no client is connected. Next time the user connects the desktop session will appear exactly as it was left before.
To end the session select Start in the remote desktop session, click on the right arrow button in the bottom right hand corner of the menu and select Log Off. This will close down the remote desktop session and close the remote desktop client.
Running Multiple Remote Desktops
Multiple concurrent remote desktops can be run and managed within a single window using the MMC Remote Desktops snap-in. This may either be snapped into the MMC or launched from the command-line or a Run dialog by typing:
tsmmc.msc
Once launched, right click on the Remote desktops item in the tree in the left hand panel and select Add a new connection from the menu. Once selected, the Add New Connection dialog will be displayed as follows:
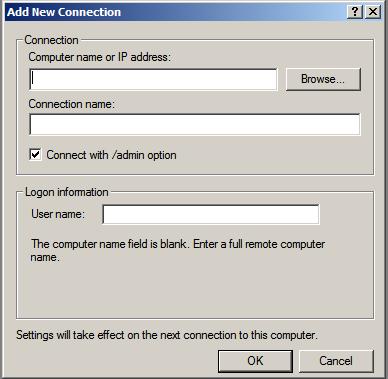
In this dialog enter either the IP address or the computer name of the remote system to which the connection is to be established, together with the User name and the name to be assigned to this connection (this is essentially the name by which this connection will be listed and administered from this point on inside the Remote Desktops snap-in). For an administrative session (as opposed to a virtual session) set the Connect with /admin box. Click OK to add the session to the snap-in. Once added, the session will appear in the left hand panel under Remote Desktops. Repeat these steps to add connections to any additional remote systems required.
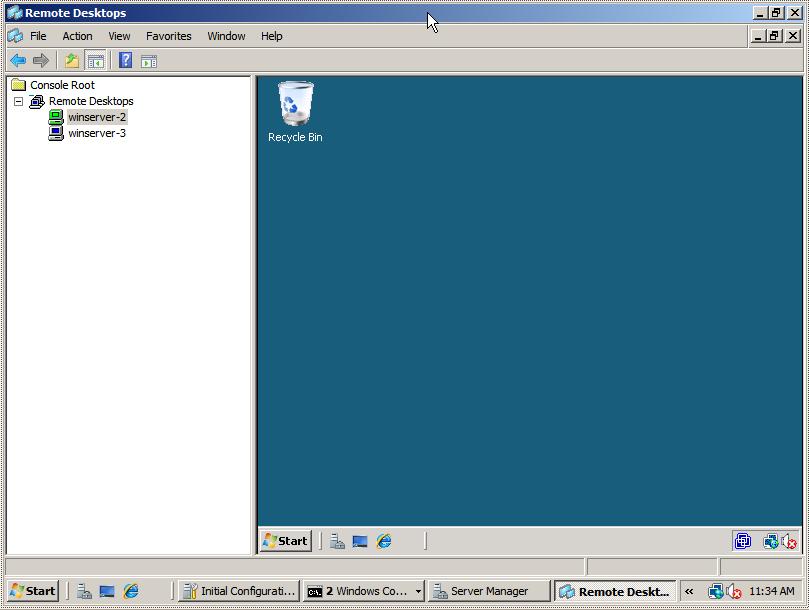
To establish a remote desktop connection, simply right click on the name of the session on the left panel and select the Connect option from the popup menu. The remote session will subsequently appear in the main window. To start another session right click on the required session name and once again select Connect. To switch between sessions simply click on the name of the session in the left hand panel and the corresponding desktop will be displayed. The following figure illustrates two sessions running in Remote Desktops:
To change configuration options for each session right click on the desired session in the left hand panel and select Properties. This panel has a number of tabs which enable credentials, screen size and program start properties to be defined.
Having configured Remote Desktop Services on a Windows Server 2008 R2 system, the next step is to install applications suitable for remote access as outlined in the next chapter.
<google>BUY_WINSERV_2008R2_BOTTOM</google>
Home
> Remote Desktop, Terminal Services, Windows > Installing and Configuring Remote Desktop Services (Terminal Services) on Windows Server 2008 R2
In the latest release of Windows 2008 R2, Terminal Services has been renamed Remote Desktop Services (RDS). There are many enhancements in this release including enhanced multimedia performance and the ability to publish custom applications sets to specific users through Remote Desktop Web Access. The Web Access role as the name suggests allows users to access Remote Desktop applications through a web site. This feature is official known as RemoteApp. The new name for the core Terminal Server running in application mode for user sessions is Remote Desktop Session Host.
In my environment I will configure the Remote Desktop Session Host and Web Access roles on the same server. I will also install the Remote Desktop Licensing role on a dedicated server so that any additional Session Hosts I add in the future can share this service. The License Server role can be installed on your Session Host server if desired. All of my servers are members of an Active Directory domain.
Install Remote Desktop Licensing Role
To start go into the Server Manager on the server that will host the Licensing role service.

Under Roles Summary select “Add Roles”.

Click Next.

Check Remote Desktop Services and click Next.

Click Next.

Check Remote Desktop Licensing and select Next.

Discovery scopes are no longer used for licensing with Windows 2008 R2 Remote Desktop, we can assign these to our Remote Desktop Session Host manually or through a group policy. There is a 120 day grace period allowed for connections to a Remote Desktop Session Host before a license server needs to be activated. Click Next.

Confirm the settings and click Install. Then click Close once the install is completed.
Pages: 1 2 3 4 5
Microsoft’s Remote Desktop Services Virtual Desktop Infrastructure product offers a lot of benefits, but not every IT administrator knows where to start.
As a virtual desktop administrator, you should learn the ins and outs of this VDI product to make the most of it. Learn step by step how to get Remote Desktop Services (RDS) and some of the basic RDS components up and running.
Step 1: Begin the installation
Launch Server Manager and select Server Roles. Once the roles manager screen is up, check the box for Remote Desktop Services. Some other boxes may already be checked, but this is fine — the only box you need to worry about for this step is the Remote Desktop Services box. Click the next button in the bottom right corner to proceed.
Now you should see an introduction to RDS. Select the next button at the bottom of the page.
Step 2: Select Remote Desktop Services roles you want to install
RDS includes several components and settings (Figure 1). These components can be on one machine or many.
- Remote Desktop Session Host. This is the name for Terminal Server.
- Remote Desktop Virtualization Host. This component integrates with Microsoft Client Hyper-V. This allows for the pooling of virtual machines on Hyper-V so they can serve as virtual desktops.
- Remote Desktop Connection Broker. This component bridges the user with a virtual Windows desktop, remote application or Remote Desktop Session Host session.
- Remote Desktop Licensing. This is the modern name of Terminal Server licensing server that also includes licensing for Windows Server.
- Remote Desktop Gateway. This provides a single connection point for clients to connect to a specific virtual desktop, remote app or Remote Desktop Session Host session.
- Remote Desktop Web Access. This provides clients an interface to access their virtual desktop, remote app or Remote Desktop Session Host sessions.
Step 3: Pick the license mode
As with past Terminal Server licensing, there are two license options: per-device and per-user (Figure 2).
Step 4: Allow access to Remote Desktop Session Host (not required)
Select which users to grant access to the local Remote Desktop Session Host. This server component is not required for RDS to work. If you choose to install the Remote Desktop Session Host, you will get this prompt (Figure 3).
Step 5: Configure the client experience
The next screen is called Configure Client Experience (Figure 4). This is where you set the defaults for the end-user experience with the VDI system and remote desktop.
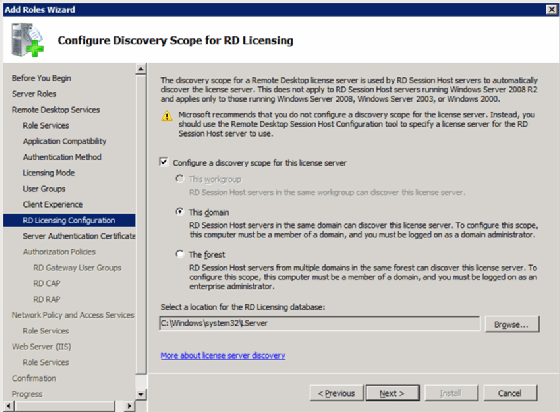
Step 6: Configure license scope
Just as with Terminal Server of the past, you can configure the scope of the Remote Desktop Session Host license server. You have the following two options:
- Domain. This limits the licensing to only servers in the domain (Figure 5).
- Active Directory Forest. This allows any Remote Desktop Session Host server in the Active Directory Forest — the highest-level container in a set of servers — to attain a license.
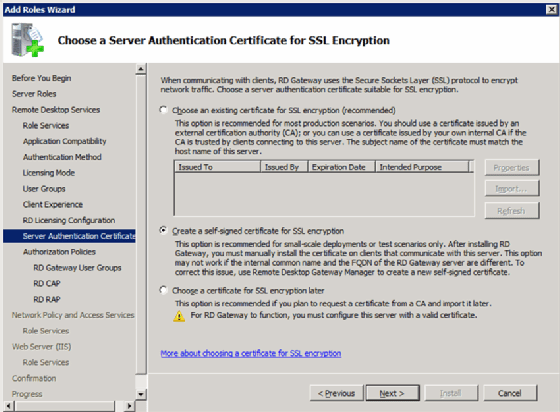
Step 7: Assigning the SSL certificate for Remote Desktop Gateway
The Remote Desktop Gateway uses Secure Sockets Layer (SSL) to tunnel and encrypt traffic from the client. This functionality requires a certificate. There are two options for certificates:
- Specify a certificate from the certificate store.
- Produce a self-signed certificate.
In either case, the client must trust the certificate (Figure 6).
Step 8: Configure network access protection (optional)
These next few screens go beyond the scope of RDS but are related, so this article will just cover the basics.
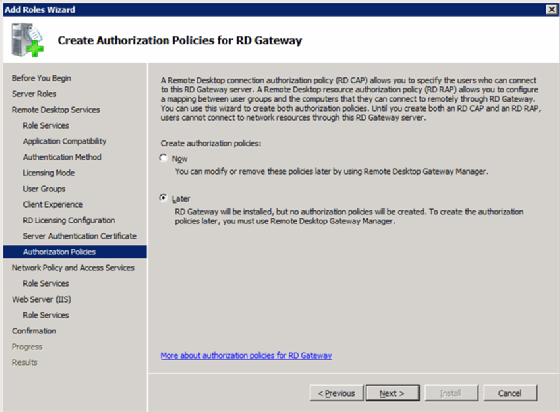
Create authorization policies
This is where you would configure a policy that states who is allowed to establish a desktop connection to the Remote Desktop Gateway
(Figure 7).
Install and configure network access and protection policies
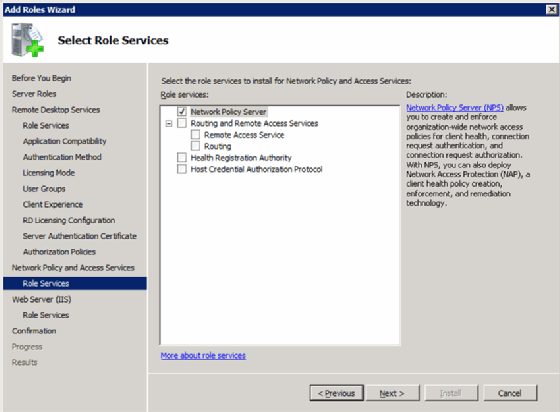
You can use this to configure and enforce network access policies such as Internet Protocol Security (IPsec) and network access protection from the client (Figure 8).
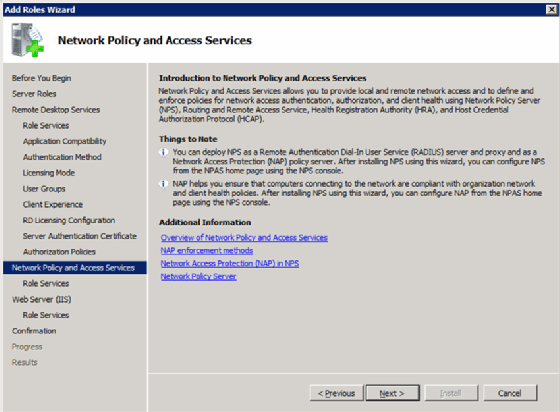
You can also use this feature to define different policies based on users’ connectivity (Figure 9).
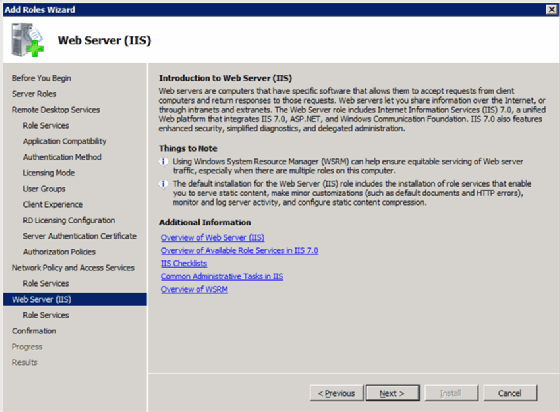
Step 9: Install IIS and Remote Desktop Web Access
Remote Desktop Web Access requires Internet Information Services (IIS), so the next two screens are for installing and configuring IIS. First, there is the overview screen (Figure 10).
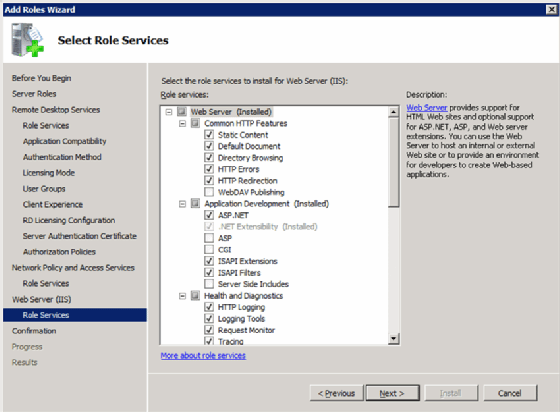
The second screen is the configuration screen (Figure 11).
Step 10: The final steps
At this point, you’re done. The last two screens just let you know what you’re installing (Figure 12).
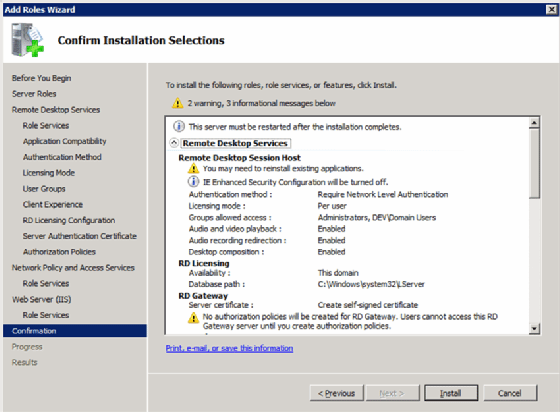
There is also the final screen that lets you know whether any additional steps like rebooting are required (Figure 13).
Now that you have installed and configured RDS, you can start using Remote Desktop Session Host and Remote Desktop Gateway Manager.
Enable Windows® Server 2008 R2 Remote Desktop Services
On the Windows ® Server 2008 R2 computer, click Start > Administrative Tools > Server Manager.
Click Roles, and then click Add Roles.
Select Remote Desktop Services, and then click Next.
Select the Remote Desktop Session Host and Remote Desktop Licensing check boxes.
Click Next.
How do I Install Remote Desktop Services?
Open Server Manager.
Click Manage and select Add Roles and Features.
Select Rolebased or Featurebased installation.
Select the computer as the destination server.
On the Select server roles page, select Remote Desktop Services.
What is Remote Desktop Services in Windows Server 2008 R2?
Overview. Remote Desktop Services is a role in Windows Server 2008 R2 that provides remote access to sessions running on centralized servers. If youve tried Windows Server 2008, then youve probably encountered what used to be known as Terminal Services. Thats what Remote Desktop Services, or RDS, really is.
How do I Install Remote Desktop Services Using PowerShell?
1. Type Start PowerShell in the Command Prompt window to start Windows PowerShell. 2. Type InstallWindowsFeature RemoteDesktopServices and press Enter to install the RDS role.
How do I Open Terminal Services in Windows Server 2008?
From the Administrative Tools menu , click the Terminal Services entry and then click Terminal Services Configuration.
In the middle pane of the Terminal Services Configuration console, double click Terminal Services Licensing mode.
Server 2008 R2 Install and Configure Remote Desktop …
![]() Сегодня я расскажу о том как поднять сервер терминалов (англ. terminal server) на базе Windows Server 2008 R2. В целом это довольно просто, но есть несколько тонких моментов, итак:
Сегодня я расскажу о том как поднять сервер терминалов (англ. terminal server) на базе Windows Server 2008 R2. В целом это довольно просто, но есть несколько тонких моментов, итак:
0. Оглавление
- Что понадобится
- Установка службы удаленных рабочих столов
- Установка сервера лицензирования удаленных рабочих столов
1. Что понадобится
- Мощный компьютер (сервер) с установленной на нем Windows Server 2008 R2. (От том как установить эту ось, я писал здесь)
- Действительная клиентская лицензия сервера терминалов, приобретенная по одной из существующих программ лицензирования. (В данной статье я буду использовать найденный в интернете номер соглашения, по программе Enterprise Agriment. На момент написания статьи рабочими были номера: 6565792, 5296992, 3325596, 4965437, 4526017.)
2. Установка службы удаленных рабочих столов
Запускаем диспетчер сервера («Пуск» — «Администрирование» — «Диспетчер сервера»). Раскрываем вкладку «Роли» и нажимаем «Добавить роли».

Запустится «Мастер добавления ролей» . Жмем «Далее» , затем выбираем в списке роль «Службы удаленных рабочих столов» и 2 раза снова нажимаем «Далее» .

Увидим окно выбора служб ролей. В нем выбираем «Узел сеансов удаленных рабочих столов» и «Лицензирование удаленных рабочих столов» и снова 2 раза «Далее» .

Метод проверки подлинности выбираем «Не требуем проверку подлинности на уровне сети» , чтобы можно было подключаться со старых клиентов. После чего жмем «Далее» .

На следующем шаге нужно выбрать режим лицензирования: «На устройство» или «На пользователя» . Чтобы понять чем отличаются эти режимы рассмотрим простой пример. Предположим, у Вас есть 5 лицензий. При режиме «На устройство» вы можете создать неограниченное число пользователей на сервере, которые смогут подключаться через удаленный рабочий стол только с 5 компьютеров, на которых установлены эти лицензии. Если выбрать режим «На пользователя», то зайти на сервер смогут только 5 выбранных пользователей, независимо с какого устройства они подключаются. Выбирайте тот режим, который вам наиболее подходит и нажимайте «Далее» .

На этом этапе нужно добавить пользователей или группу пользователей, которые будут иметь доступ к службе терминалов. Для этого нажимаем «Добавить», «Дополнительно», в открывшемся окне «Поиск», выбираем пользователя и нажимаем «ОК». Для того чтобы все пользователи без исключения могли подключаться к нашему серверу терминалов добавляем группу «Все» . После чего жмем «ОК» и «Далее» .

Если Вы хотите чтобы через удаленный рабочий стол можно было прослушивать аудиоданные и смотреть видео, то устанавливайте соответствующую галочку. Аналогично с записью звука и Windows Aero. Выбрав нужные параметры жмем «Далее» .

Теперь надо настроить область обнаружения для лицензирования удаленных рабочих столов. Если у Вас поднят Active Directory, то выбирайте «Этот домен» или «Лес» , в зависимости от структуры домена. В противном случае выбираем «Эта рабочая группа» и нажимаем «Далее» .

Проверяем все настройки и нажимаем «Установить».

После установки потребуется перезагрузка.
3. Установка сервера лицензирования удаленных рабочих столов
Если все сделано правильно, то после перезагрузки мы увидим окно, с сообщением, что установка прошла успешно, но с предупреждением, что нужно настроить параметры лицензирования на сервере узла сеансов удаленных рабочих столов.

Укажем сервер лицензирования вручную. Для этого запустим оснастку «Конфигурация узла сеансов удаленных рабочих столов» («Пуск» — «Администрирование» — «Службы удаленных рабочих столов» ). Там мы видим что не указан сервер лицензирования удаленных рабочих столов.

Кликаем 2 раза по этой строке, в открывшемся окне «Свойства» , выбираем вкладку «Лицензирование» и нажимаем кнопку «Добавить» .

Выбираем сервера из известных серверов лицензирования. В нашем случае сервер лицензирования находится на одном компьютере с сервером терминалов. Добавляем его и нажимаем «ОК» .

Теперь, если перейти на вкладу «Диагностика лицензирования» мы увидим что сервер лицензирования выбран, но не включен.

Для запуска и активации сервера лицензирования удаленных рабочих столов, запустим «Диспетчер лицензирования удаленных рабочих столов» («Пуск» — «Администрирование» — «Службы удаленных рабочих столов» ). В диспетчере мы видим наш сервер и статус «Не активирован» . Кликаем по нему правой кнопкой мыши и выбираем «Активировать сервер» .

Запустится «Мастер активации сервера» . Нажимаем «Далее» . В следующем окне выбираем метод подключения «Авто (реком.)» и снова жмем «Далее» . Заполняем сведения об организации. Затем, заполнив дополнительные сведения (не обязательно) и нажав «Далее» , увидим сообщение об успешной активации сервера.

Теперь надо установить лицензии. Если этого не сделать то сервер лицензирования будет выдавать временные лицензии, действующие 120 дней. Чтобы установить лицензии нажимаем «Далее» , оставив галочку «Запустить мастер установки лицензий» . Или же можно запустить данный мастер из «Диспетчера лицензирования удаленных рабочих столов» , кликнув правой кнопкой по серверу и выбрав «Установить лицензии» . Там же мы можем проверить, что сервер активирован.

В запустившемся «Мастере установки лицензий» нажимаем «Далее» и попадаем на окно выбора программы лицензирования. Следующие действия зависят от способа приобретений лицензий. В моем примере это «Enterprise Agreement» . Выбрав нужный тип лицензирования нажимаем «Далее» .

Вводим номер соглашения и жмем «Далее» . В следующем окне выбираем версию продукта: «Windows Server 2008 или Windows Server 2008 R2» , тип лицензий выбираем тот же, который мы выбирали при добавлении ролей («на пользователя» или «на устройство» ) и вводим количество необходимых лицензий.

Нажимаем «Далее» и дожидаемся сообщения об успешной установки лицензии. (Хочу отметить, что по непонятным для меня причинам, данная процедура не всегда заканчивается положительно. Если мастер сообщил что не удалось установить лицензию попробуйте повторить процедуру некоторое время спустя. Рано или поздно лицензия установится. Проверенно не один раз.) Если все прошло хорошо в диспетчере сервера мы должны увидеть параметры нашей лицензии.

И убедимся что нет проблем, зайдя на вкладку «Диагностика лицензирования» в диспетчере сервера.
Все, на этом установка сервера терминалов закончена. Можно подключаться к серверу с помощью встроенного в Windows клиента «Подключение к удаленному рабочему столу».