В этой статье вы найдете все способы включить режим разработчика в Windows 11. Прежде чем вы приступите к включению режима разработки в Windows 11, стоит отметить, что обычному пользователю в этом нет никакой необходимости. Windows 11 позволяет устанавливать подписанные приложения из любых источников, а не только из магазина Microsoft Store.
Если же вы изучаете создание приложений, без режима разработчика попросту не обойтись. Он также может понадобиться в случае, когда надо установить какое-нибудь экзотическое приложение, о чем зачастую разработчики предупреждают на страницах своих проектов.
Важно: включить режим разработчика в Windows 11 можно только при условии, что ваша учетная запись имеет права администратора. Также обратите внимание, что режим разработки доступен на все редакциях Windows 11, а не только в Профессиональной.
Приложение Параметры – самый простой способ включить режим разработчика в Windows 11.
Чтобы включить режим разработчика в Windows 11, выполните следующие шаги.
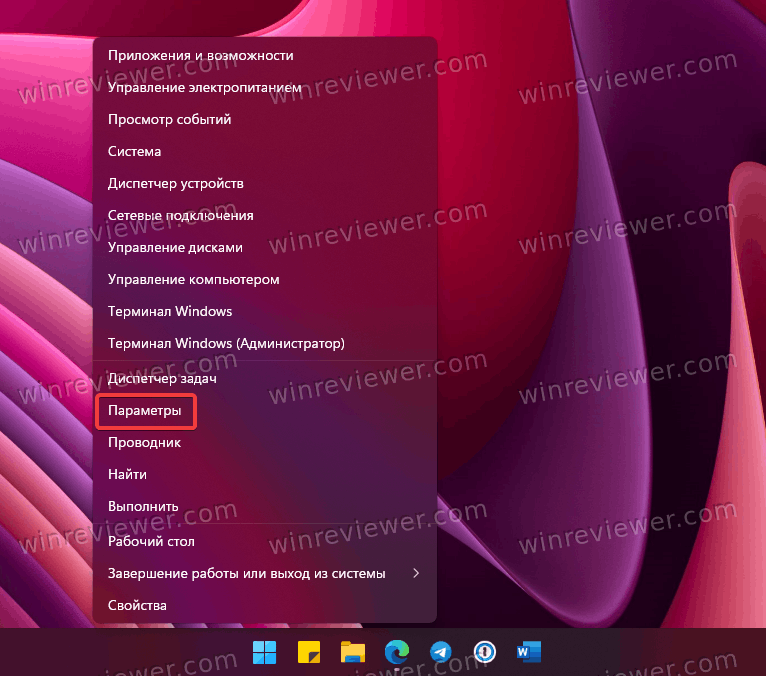
- Щелкните правой кнопкой мыши по кнопке Пуск и выберите Параметры.
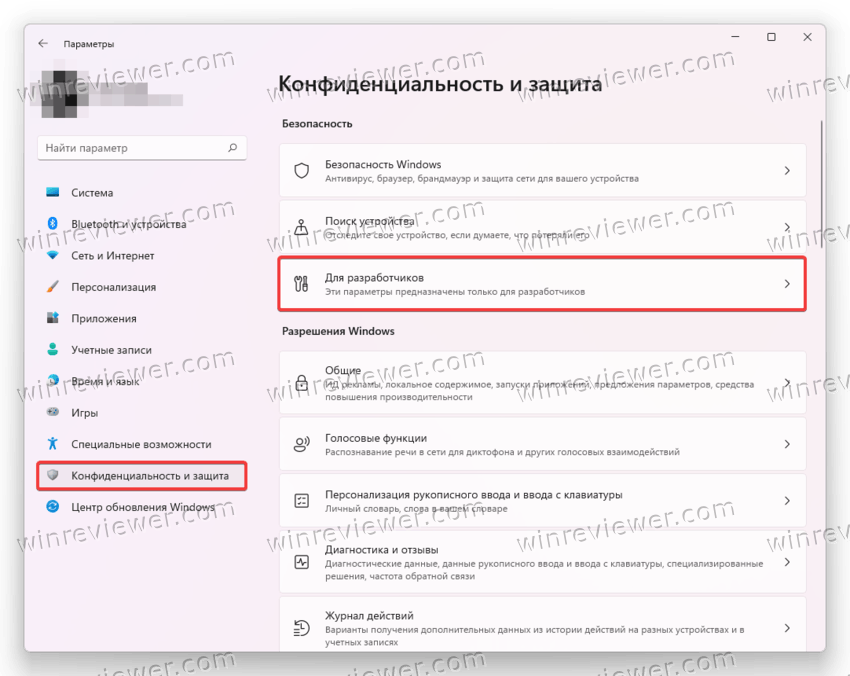
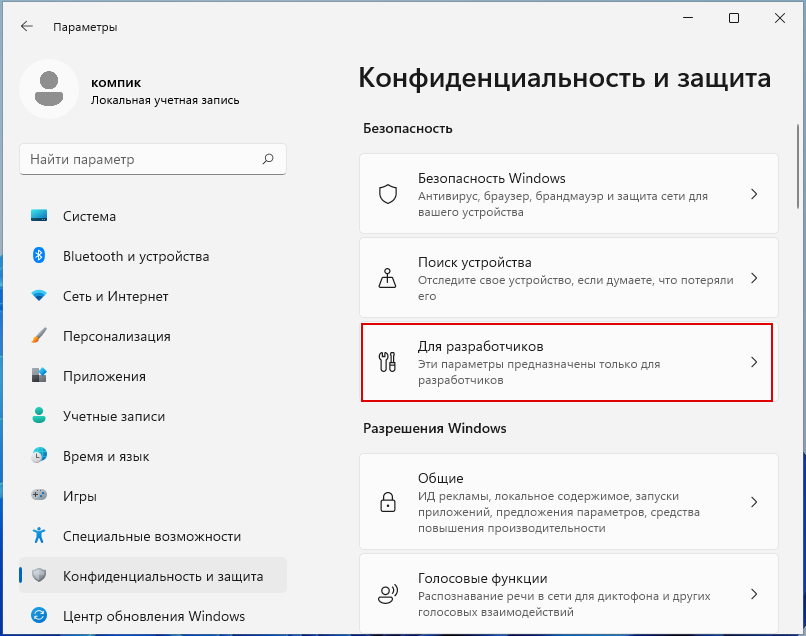
- Перейдите в раздел Конфиденциальность и защита, а затем кликните Для разработчиков.
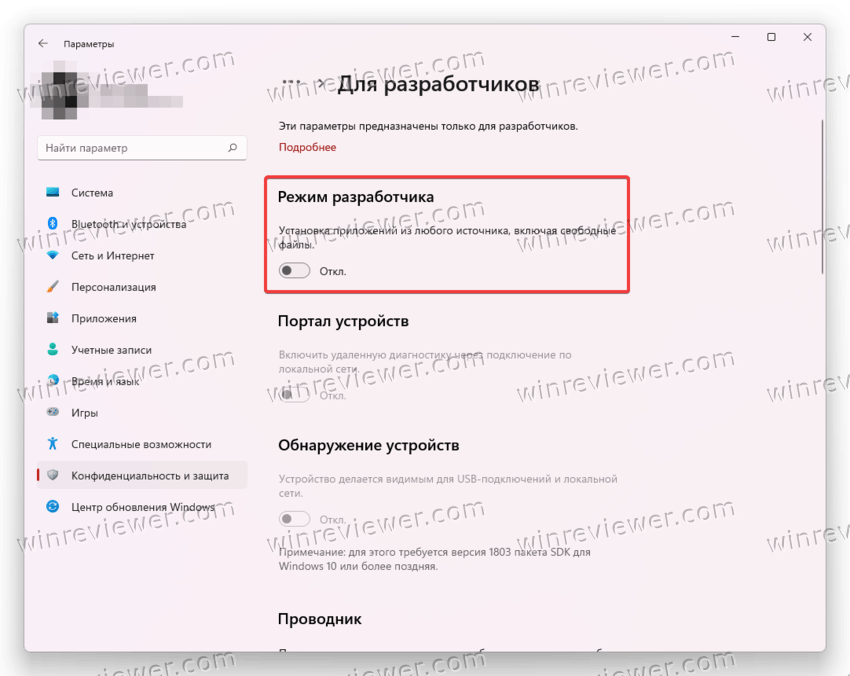
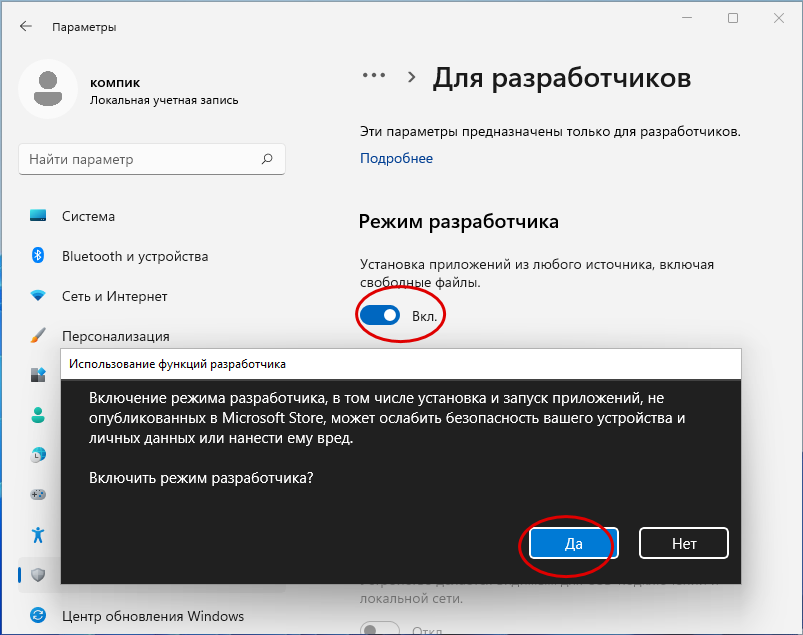
- Найдите пункт Режим разработчика и включите его.
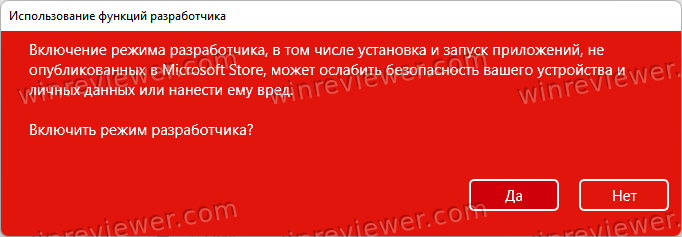
- Windows отобразит предупреждение об активации режима разработки и потенциальном снижении безопасности устройства. Согласитесь, щелкнув по кнопке Да.
Готово. Теперь вы можете использовать встроенные инструменты разработки для установки или отладки приложений.
Включаем режим разработчика Windows 11 в групповой политике
Этот способ подойдет только для пользователей Windows 11 Профессиональная, Корпоративная и Для учебных учреждений, поскольку предусматривает работу с редактором групповых политик, который недоступен в Windows 11 Домашняя. Проверить редакцию вашей копии Windows можно с помощью кнопок Win + R и команды winver.
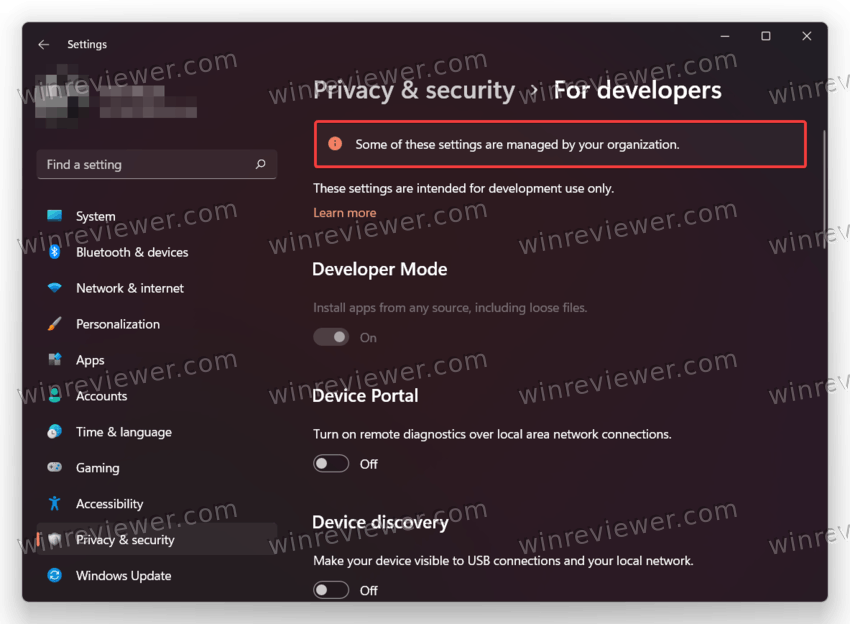
Важно: после включения режима разработчика в Windows 11 с помощью редактора групповых политик в настройках появится надпись, что некоторыми параметрами управляет ваша организация.
Так и должно быть.
Чтобы включить режим разработчика в групповой политике Windows 11, сделайте следующее.
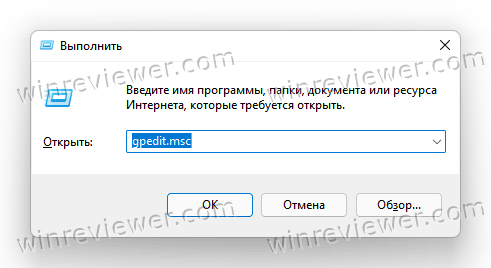
- Нажмите Win + R и введите команду gpedit.msc.
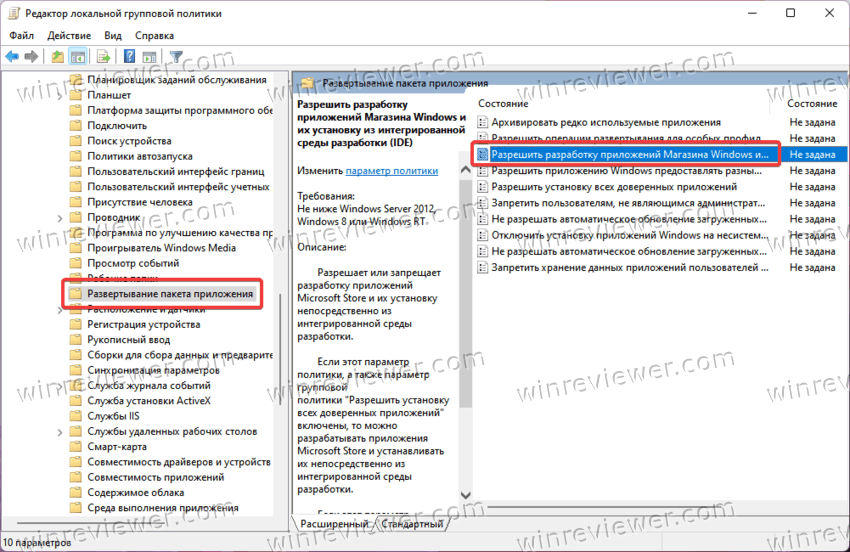
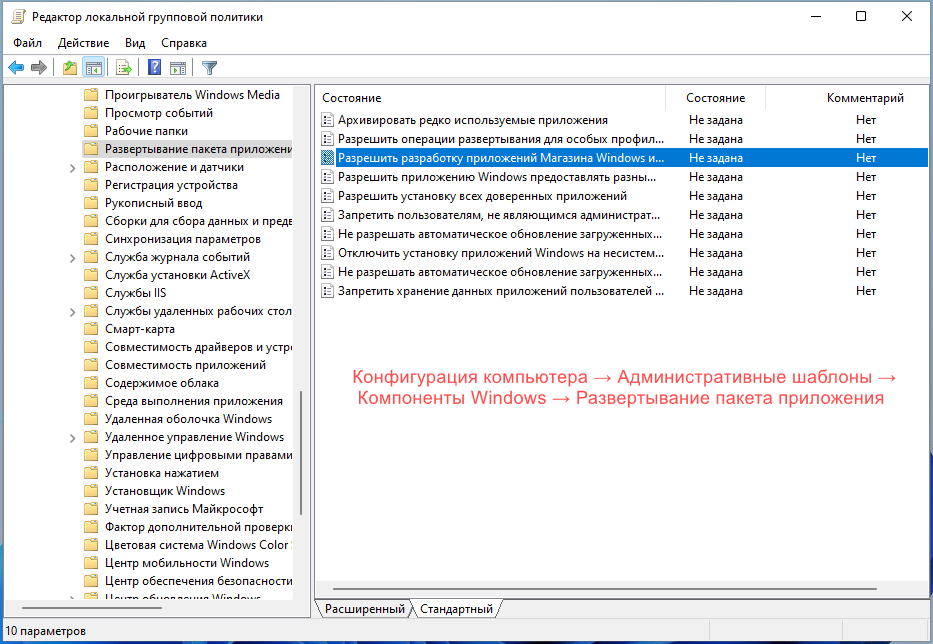
- В левой части окна перейдите в Конфигурация Компьютера > Административные шаблоны > Компоненты Windows > Развертывание пакета приложения.
- Уже в правой части окна найдите правило «Разрешить разработку приложений Магазина Windows» и откройте его.
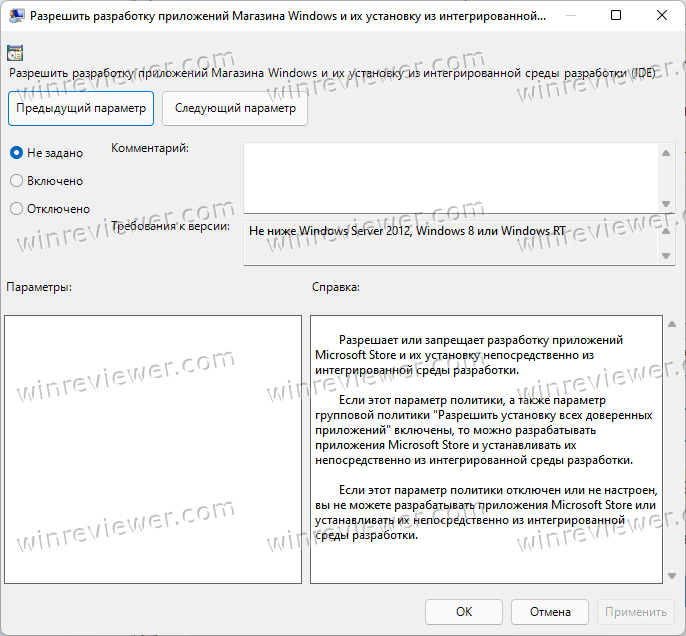
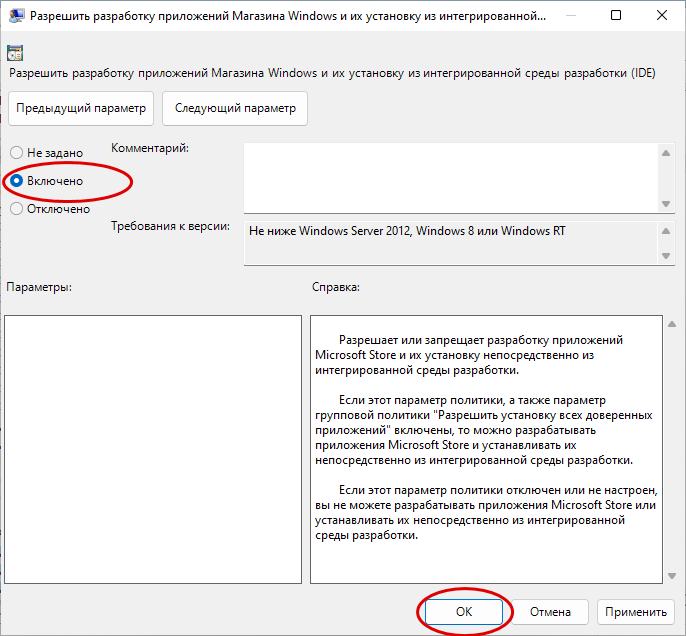
- Установите нужный вам параметр. По умолчанию используется значение «Не задано». Оно позволяет активировать режим разработчика из настроек. «Включено» активирует режим разработчика Windows 11, а «Отключено» выключит и заблокирует возможность активировать его в настройках.
- Нажмите ОК для применения изменений.
Готово. Чтобы вернуть настройки по умолчанию для режим разработчика с помощью редактора групповых политик, повторите шаги выше и установите параметр «Не задано».
Включить режим разработки в Windows 11 можно и с помощью редактора реестра.
В реестре
Важно: после включения режима разработчика в Windows 11 с помощью редактора реестра в настройках появится надпись, что некоторыми параметрами управляет ваша организация. Это норма.
Подсказка: при ручном редактировании реестра Windows лучше всего создавать точку восстановления Windows, в которой будет храниться рабочая копия реестра. Это послужит страховкой на случай неожиданных результатов экспериментов с реестром.
Чтобы включить режим разработчика в Реестре Windows 11, выполните эти шаги.
- Нажмите Win + R и введите команду regedit для запуска редактора реестра. Он доступен на всех выпусках Windows 11.
- Перейдите по адресу
HKEY_LOCAL_MACHINE\SOFTWARE\Microsoft\Windows\CurrentVersion\AppX. Скопируйте путь и вставьте его в адресную строку редактора. - Щелкните правой кнопкой мыши в правой части окна и выберите Создать > Параметр DWORD (32-бита).
- Переименуйте новый параметр в AllowDevelopmentWithoutDevLicense.
- Откройте созданный параметр и поменяйте его значение с 0 на 1.
Для выключения режима разработчика в Windows 11 просто удалите созданный параметр. Как вариант, можно изменить значение параметра на 0, но при этом вы не сможете потом включить режим разработчика из настроек, а система будет сообщать, что некоторыми параметрами управляет ваша организация.
Это в принципе хороший способ предотвратить включение режима разработки Windows 11 на компьютере, к которому имеют доступ другие люди (дети, например).
Готовые REG-файлы
Вышеописанную процедуру можно немного упростить, воспользовавшись готовыми reg-файлами. Они проделают все шаги по редактированию реестра за вас, благодаря чему исключается вероятность ошибки в процессе или изменение не тех параметров, что может повлечь за собой сбои в работе Windows.
- Скачайте REG-файлы в архиве по ссылке и распакуйте в любом удобном месте.
- Запустите файл Включить режим разработчика в Windows 11.reg и подтвердите изменения реестра.
- Для выключения режима разработчика воспользуйтесь файлом Выключить режим разработчика в Windows 11.reg.
- Если вы хотите сделать так, чтобы режим разработчика был недоступен в приложении Параметры, воспользуйтесь файлом Выключить и заблокировать режим разработчика в Windows 11.reg.
Готово. Теперь вы знаете, как включить режим разработчика в Windows 11.
Источник
💡Узнавайте о новых статьях быстрее. Подпишитесь на наши каналы в Telegram и Twitter.
Судя по тому, что вы читаете этот текст, вы дочитали эту статью до конца. Если она вам понравилась, поделитесь, пожалуйста, с помощью кнопок ниже. Спасибо за вашу поддержку!

В этой простой пошаговой инструкции подробно о том, как включить режим разработчика Windows 11 в Параметрах или альтернативными способами: в редакторе реестра, PowerShell или командной строке.
Включение режима разработчика в Параметрах Windows 11
Базовый способ включения режима разработчика — использование соответствующего раздела параметров:
- Откройте Параметры, для этого можно использовать сочетание клавиш Win+I
- Перейдите в раздел «Конфиденциальность и защита» и откройте пункт «Для разработчиков».
- В разделе «Режим разработчика» включите переключатель «Установка приложений из любого источника, включая свободные файлы».
- Подтвердите включение режима разработчика.
По сути, на этом действия закончены, хотя на этой же странице настроек представлены и другие опции:
- Портал устройств
- Обнаружение устройств
- Ряд настроек, имеющих отношение к представлению файлов в проводнике, работе удаленного рабочего стола, терминала по умолчанию и возможности выполнения неподписанных скриптов PowerShell
Более подробная информация доступна на официальной странице Майкрософт.
Дополнительные методы включения режима разработчика
За возможность установки приложений из любого источника отвечает соответствующая локальная групповая политика, изменить которую можно в редакторе локальной групповой политики или редакторе реестра.
В Windows 11 Pro и Enterprise удобнее использовать редактор локальной групповой политики:
- Нажмите правой кнопкой мыши по кнопке «Пуск», выберите пункт «Выполнить», введите gpedit.msc и нажмите Enter.
- Перейдите к разделу Конфигурация компьютера — Административные шаблоны — Компоненты Windows — Развертывание пакета приложения.
- В правой панели редактора нажмите дважды по политике «Разрешить разработку приложений Магазина Windows и их установку из интегрированной среды разработки (IDE)».
- Установите «Включено» и примените настройки.
При отсутствии редактора локальной групповой политики (в Windows 11 Домашняя) можно использовать редактор реестра:
- Нажмите клавиши Win+R, введите regedit и нажмите Enter.
- Перейдите к разделу реестра
HKEY_LOCAL_MACHINE\SOFTWARE\Microsoft\Windows\CurrentVersion\AppModelUnlock
а при его отсутствии — создайте этот раздел.
- В этом разделе создайте параметр DWORD32 с именем AllowDevelopmentWithoutDevLicense и значением 1 (если параметр уже присутствует — дважды нажимаем по нему и изменяем значение с 0 на 1). Также может иметь смысл изменить значение параметра AllowAllTrustedApps в этом разделе на 1 (разрешает установку неопубликованных приложений, отдельно от включения режима разработчика).
- Готово, режим разработчика включен.
То же самое можно сделать в командной строке или PowerShell (требуется запуск от имени администратора), по порядку выполнив следующие две команды:
reg add "HKEY_LOCAL_MACHINE\SOFTWARE\Microsoft\Windows\CurrentVersion\AppModelUnlock" /t REG_DWORD /f /v "AllowAllTrustedApps" /d "1"
reg add "HKEY_LOCAL_MACHINE\SOFTWARE\Microsoft\Windows\CurrentVersion\AppModelUnlock" /t REG_DWORD /f /v "AllowDevelopmentWithoutDevLicense" /d "1"
На этом всё. Если остаются вопросы, жду их в комментариях к статье.
Back at Build ‘23 in May, we announced a host of new experiences with a renewed focus on developer productivity and performance. We are now pleased to share with you that features like Dev Home, Dev Drive, WinGet and improvements to Taskbar, File Explorer and many more will start to become generally available with the latest Windows 11 update. We also have exciting news to share about the developer tools you already know and love: Windows Subsystem for Linux and Windows Terminal.
At Build in May ’23, we announced a new home for developers on Windows – Dev Home. With the latest Windows 11 update, Dev Home is now available as part of the OS, making developer features a key component of Windows 11. Today we are excited to announce a new PC setup experience for developers.
A new PC setup experience for developers on Windows 11
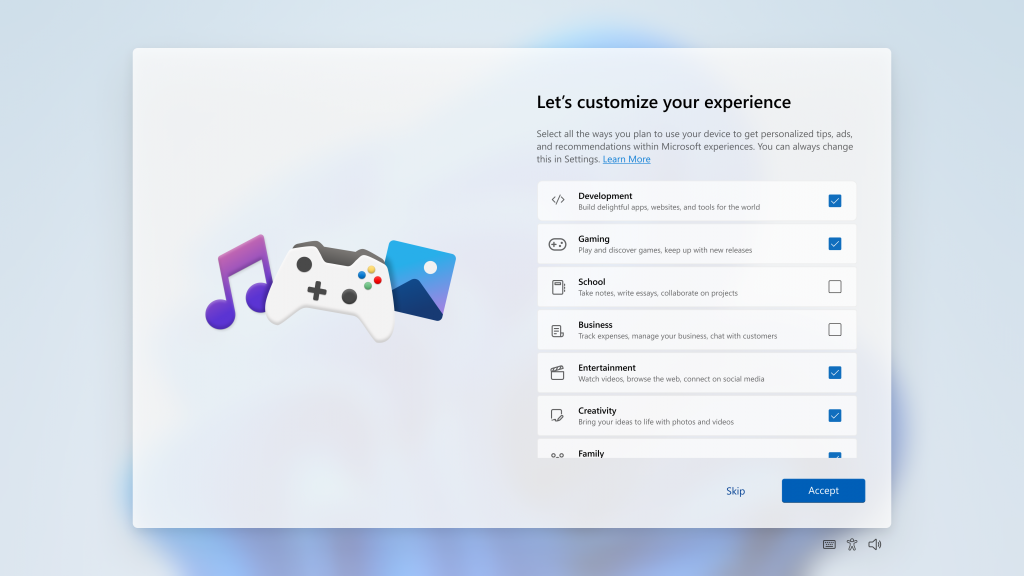
For the first time in Windows, you will be able to identify as a developer during your initial PC setup and Windows will customize your install experience catering to your workloads. To do this, select the “Development” intent on the “Let’s customize your experience” page during setup. Once you set up your PC with “Development” intent it is easier to get all the benefits of Dev Home.
Dev Home: Your productivity companion
Dev Home is a new experience for developers in Windows 11 that helps you get back in the zone and streamlines your workflows, boosting your productivity. Dev Home assists you in setting up your dev environment by downloading apps, packages, or repositories, and lets you connect to your developer accounts and tools (such as GitHub). It also helps you create a Dev Drive for performant storage – all in one place. Dev Home also provides a customizable dashboard to help you monitor both your system and dev projects. We are releasing Dev Home v0.5 alongside the latest Windows 11 update to provide even more functionality like managing your extensions. We are adding a new extensions page on Dev Home, available now, that helps you discover and manage your Dev Home extensions, giving you the control to enhance and personalize your experience. With this addition, the Dev Home GitHub Extension will no longer be automatically installed. For more information see Dev Home for Windows Developers | Microsoft Learn.
Unattended and reliable dev machine setup: Reducing set up time from days to hours
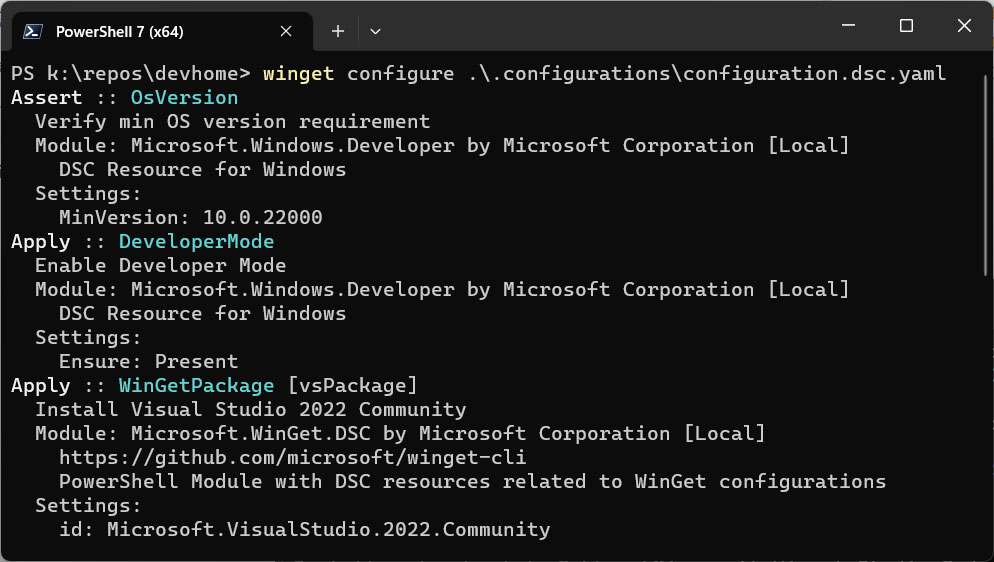
At Build we introduced WinGet Configuration, a fast and reliable mechanism to help developers get ready to code in just a few clicks. WinGet Configuration is now stable and no longer requires enabling experimental features. To help you get started we have several samples that you can try, and several GitHub repos now include configuration files to help you quickly install the tools to build the source code. For example:
vscode/.configurations/configuration.dsc.yaml at main · microsoft/vscode (github.com)
PowerToys/.configurations/configuration.dsc.yaml at main · microsoft/PowerToys (github.com)
WinGet 1.6 makes its debut with several exciting new capabilities. Support for dependencies is now available. Packages that were previously blocked from submission can now be added to our catalog.
WinGet 1.6 introduces the new `winget download` command which allows you to download installers. This feature enables IT professionals to access packages from the community repository and make them available to their enterprise customers.
Support for free Apps rated “e” for everyone from the Microsoft Store with licenses is coming in a future release.
A new Group Policy enables IT professionals to determine if their users can make use of the Windows Package Manager through either the CLI or PowerShell cmdlets. The latest release of the WinGetCLI contains the updated ADMX files. For more information on using winget, see Use the winget tool to install and manage applications | Microsoft Learn.
Dev Drive: A new storage volume tailor-made for developers: supercharged for performance and security
At Build we introduced Dev Drive – a new type of storage volume, tailor-made for developers, with a file system that delivers both performance and security. Starting today, Dev Drive will be available for all developers on Windows with the latest Windows 11 update.
Dev Drive is based on the Resilient File System (ReFS), which, combined with a new performance mode capability in Microsoft Defender for Antivirus, offers up to 30% file system improvement in build times for file I/O scenarios. To reap the benefits of Dev Drive, we recommend moving your package caches and repositories to Dev Drive(s). Learn more.
In addition, to quickly view the status of your Dev Drive volumes, the “For Developers settings page” now has a new Dev Drive section. The section also provides deep links to Disk & Volume settings to create a Dev Drive and launch the Windows Security app to control antivirus behavior.
Performance mode for Microsoft Defender
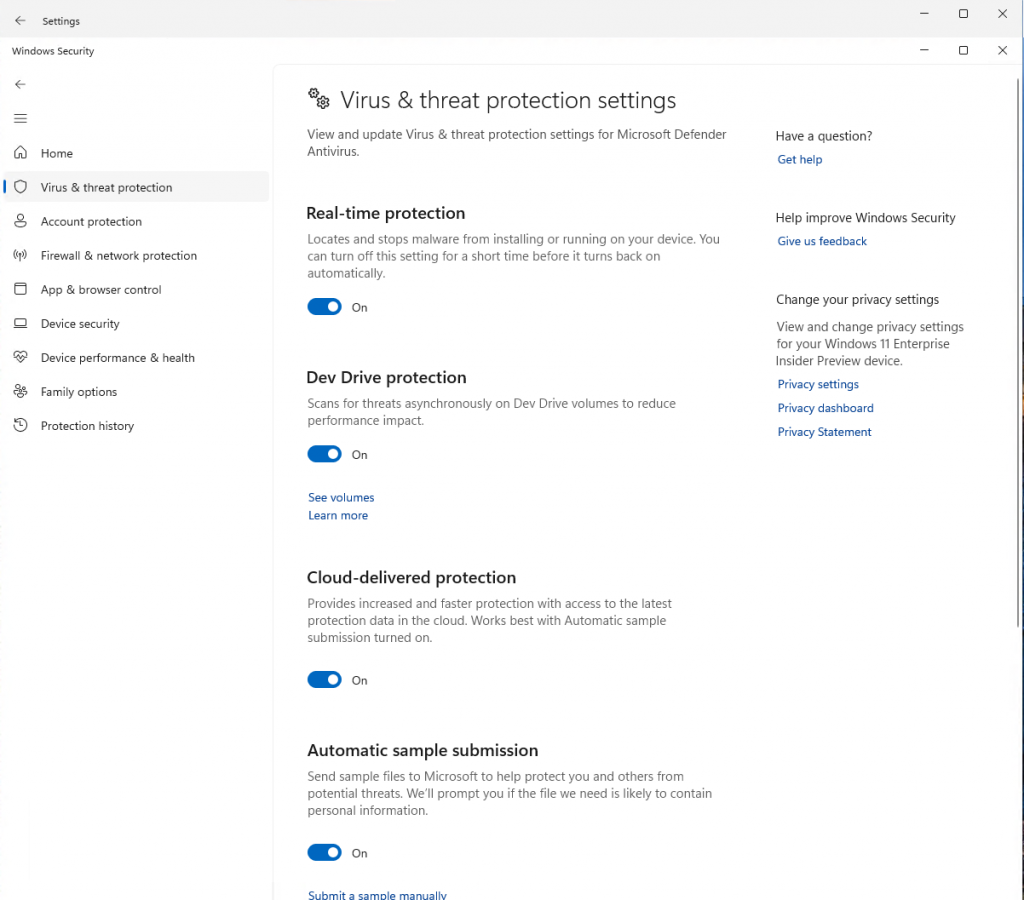
Microsoft Defender Antivirus has released performance mode that provides asynchronous scanning on Dev Drive volumes. Behavior can be controlled via the new improved UI for Dev Drive in the Microsoft Security app under “Virus & threat protection”. If you have multiple Dev Drives, you can now quickly identify which one is in “Performance mode”.
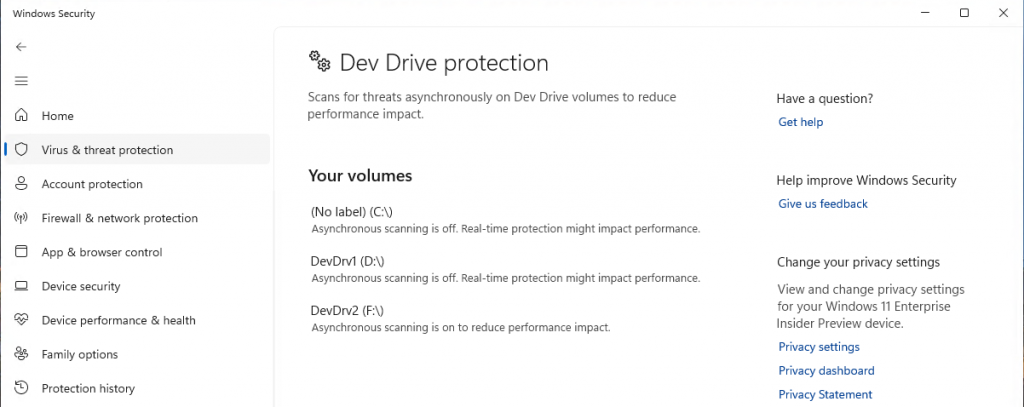
Upon clicking on “See volumes”, you can view all your Dev Drives. In this example below, we have two Dev Drives; (D:\) and (F:\) are both formatted in ReFS but Defender Performance Mode has been enabled only on (F:\).
Reducing toil and unlocking the fun and joy of developing on Windows with new improvements
The team has listened closely to what is top of mind for you, including improvements to the Taskbar that we announced at Build back in May. Starting today, all these improvements will become available in the stable version with the latest Windows 11 update.
- You can now quickly identify and access any instance of each app housed in the taskbar with just one click. All instances of the app are ungrouped with labels on the taskbar.
- You can now hide your Time and Date with a setting on the taskbar.
- You can quickly and easily shut down applications with a simple right-click on the app directly from the taskbar without opening the Task Manager. This setting can be enabled within the Developer settings page to then have “End task” appear within the context menu when you right-click on the icon within taskbar.
- For Developers settings page has moved from “Privacy & Security” to System. This provides a quick and easily discoverable entry point to developer settings.
- You can now get improved performance of archive functionality during compression on Windows. We have added native support for additional archive formats, including tar, 7-zip, rar, gz and many others using the libarchive open-source project.
File Explorer is getting even better
We have introduced new functionality and collection control in WinUI3. ItemsView collection control offers LinedFlowLayout and Island functionality provides an easy way to adopt WinUI3 look and feel in any part of your app without having to change your entire application. File Explorer now runs on WinUI3 and has introduced several new features like Gallery powered by ItemsView and Island functionality, making it easy to access your photo collection. You can also now bring these new WinUI3 capabilities to your apps and offer a rich user experience to your customers.
In addition, we have also added multi-threading capabilities to File Explorer to greatly improve the performance of copy, move, recycle, and delete actions. Large operations should see significant improvements in the calculating phase as well as the actual file operation. As noted in our May 2023 blog, these changes show over 40% improvements in bulk delete operations, giving time back to developers.
Tools you know and love are getting even better and smarter
New and exciting – Suggestions UI, Broadcast Input and Web Search features are coming to Windows Terminal 1.19 Preview
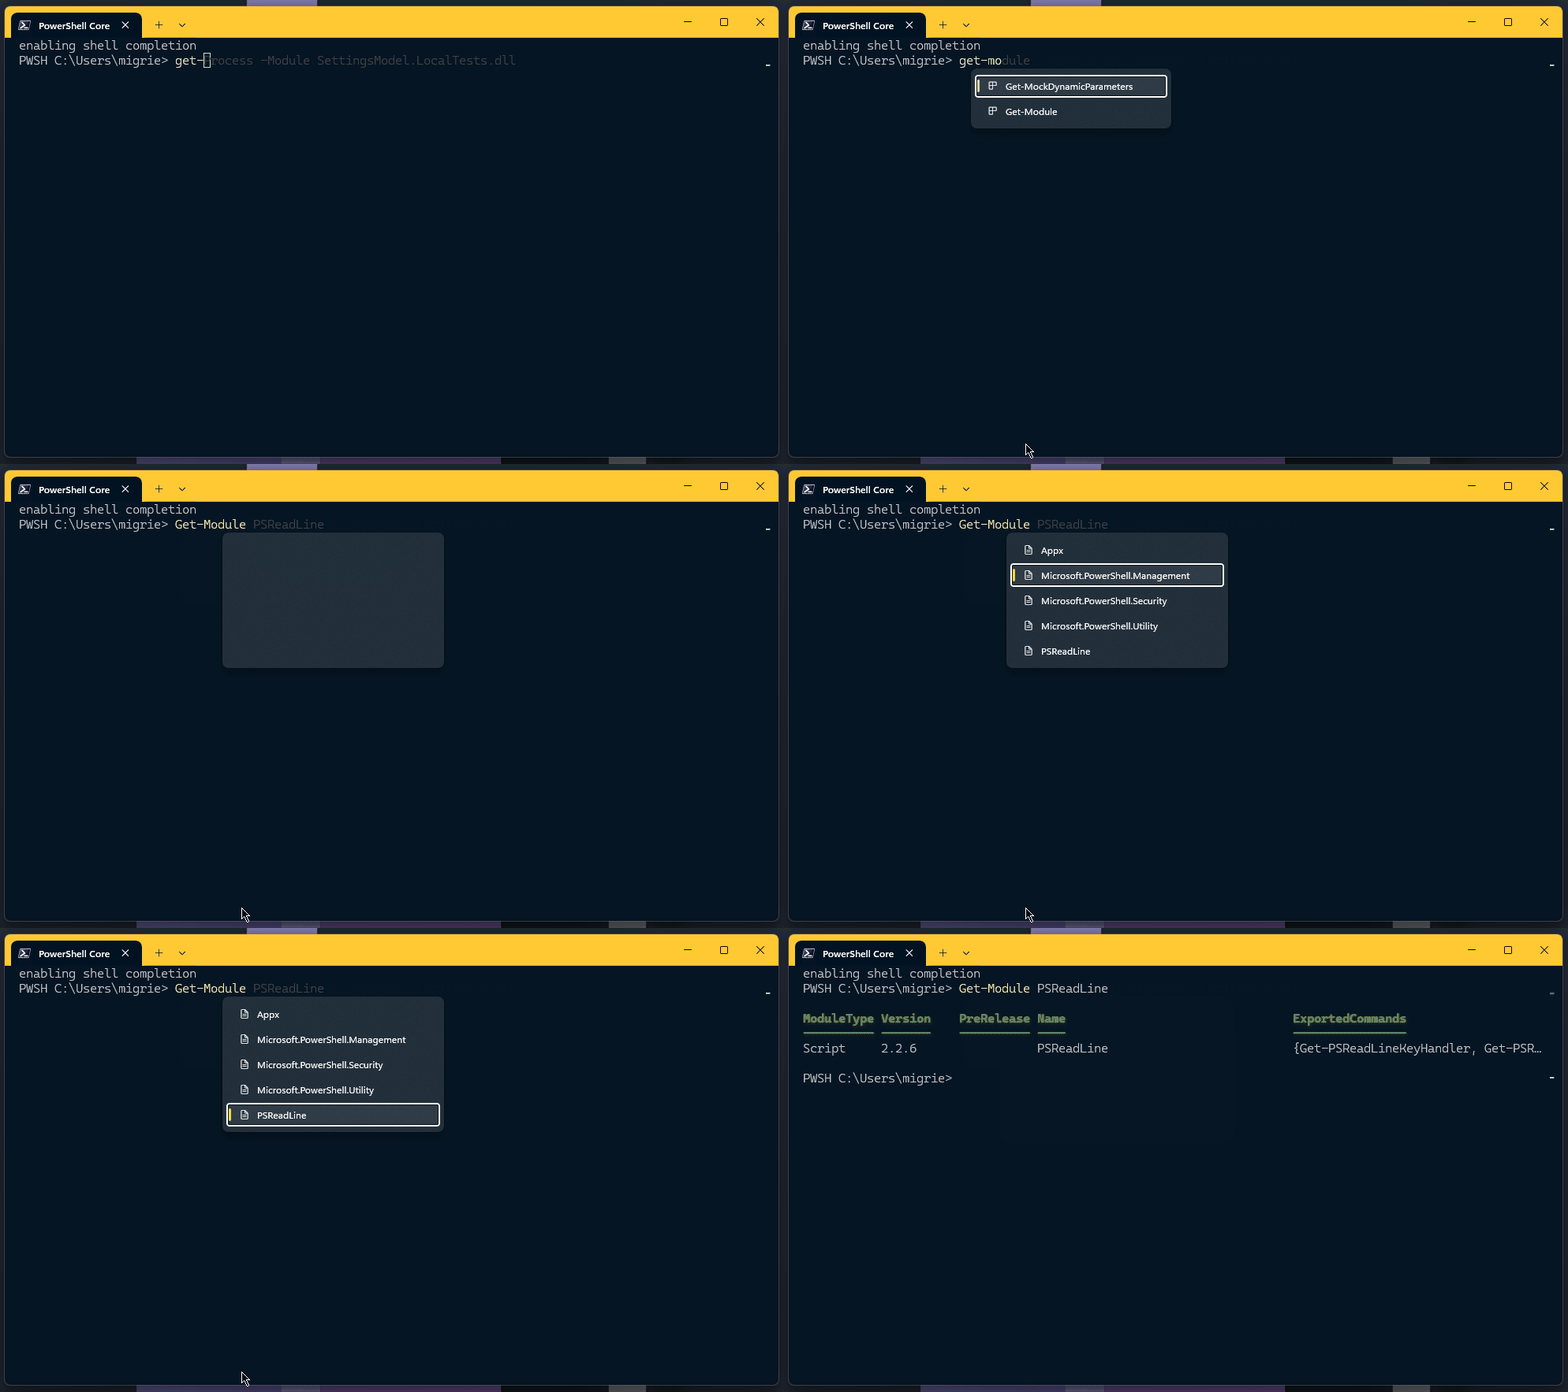
With the Windows Terminal 1.19 Preview we are introducing several new features such as the Suggestions UI, Broadcast Input, and Web Search. The Suggestions UI is a new UI element in Windows Terminal that provides text suggestions to the user. These suggestions can come from recently run commands, saved commands, and more.
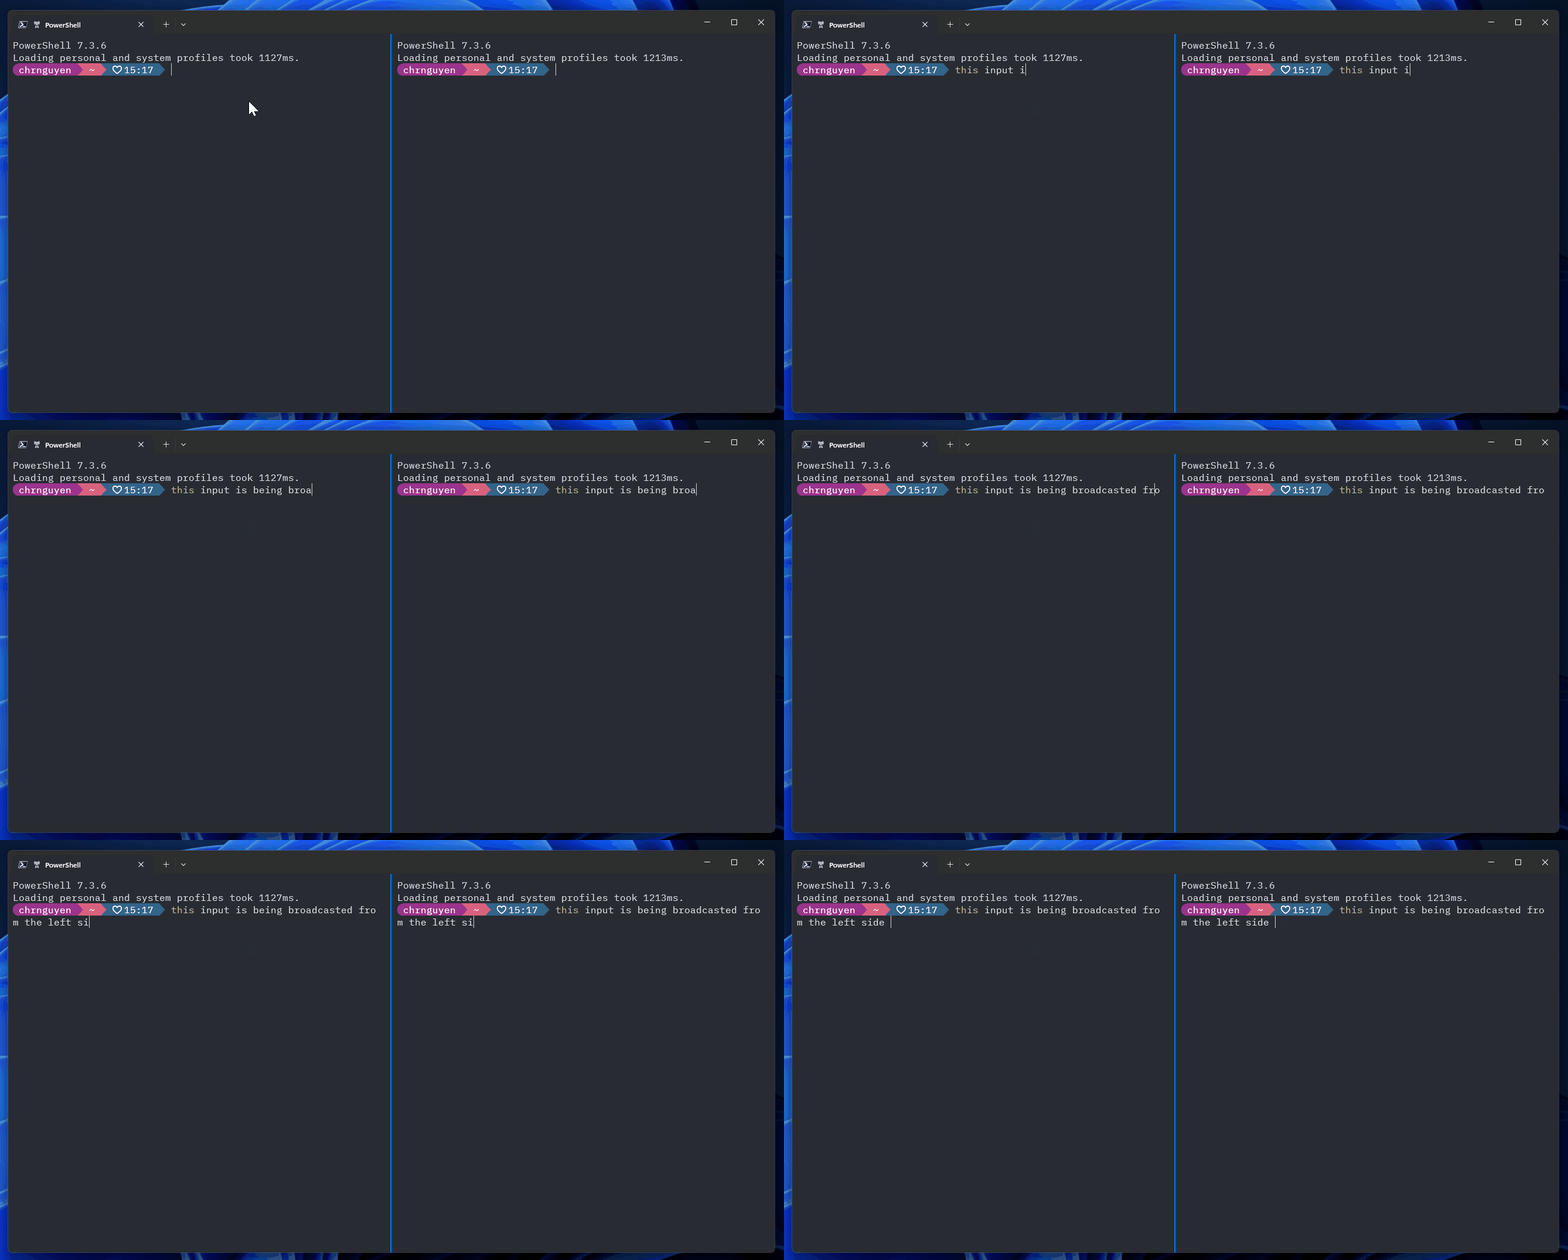
Broadcast Input allows users to broadcast their input from one Terminal pane to another Terminal pane in real time. Broadcast Input was a popular feature request from our community members, and we are thrilled to delight our developers with this exciting feature.
Web Search was a community contribution. When the right-click context menu is enabled, users will have a new option to do a web search on highlighted text. Web Search will default to Bing, and we are providing control to developers to change the default to the search engine of their choice.
Introducing experimental features in Windows Terminal Canary
Windows Terminal is distributed in a variety of formats. We are thrilled to announce that we are adding Windows Terminal Canary to the Windows Terminal family. Windows Terminal Canary is a new canary build of Windows Terminal that includes “hot off the presses” experimental features (including our AI chat feature).
New builds of Windows Terminal Canary are available nightly. This is the least stable channel of Windows Terminal, so you may be the first to discover bugs that no one else has before. If you are eager for the latest bits, then this is the build for you!
New experimental features in Windows Subsystem for Linux (WSL) – Auto Memory reclaim, new networking mode and more
The latest release of WSL brings access to new experimental features and some important quality and bug fixes! We’ve added new experimental features that you can opt-in to using, so you can get early access to WSL improvements that we are investigating making default in the future. This includes having the WSL VM automatically shrink in memory size when you’re not using it, setting your WSL virtual hard disks to be sparse so they will automatically shrink in disk size and conserve your disk space, as well as Hyper-V firewall which allows your Windows firewall rules to affect your WSL distros, and an entirely new networking mode that improves network compatibility, adds IPv6 support and more! Additionally, there are other bug fixes such as you can now run WSL in session 0, WSL GUI apps have Windows snapping support with the keyboard, and more! To see a full list of WSL changes please see this blog post.
We continue to invest in driving developer productivity, convenience and performance with every update, and we are excited to share these features and experiences with you. To learn more and keep up to date with the latest news please visit Windows Dev Center. We also love hearing from you, and we want to continue to work with our developer community to build the experiences and features you want. Share your feedback with us by reaching out on our social channels @WindowsDev on LinkedIn, X (formerly known as Twitter), Facebook and Instagram.
Если в Windows 11 вы хотите устанавливать универсальные приложения из любого источника, а не только из Магазина Microsoft, вам нужно будет активировать специальную функцию, именуемую «Режим разработчика». Эта функция доступна во всех редакциях Windows 11, и включить ее можно в Pro и выше как минимум тремя способами, а в Home как минимум двумя.
Приложение «Параметры»
Это самый простой и очевидный способ.
Откройте приложение «Параметры» и перейдите в раздел Конфиденциальность и защита -> Для разработчиков.
Установите переключатель «Режим разработчика» в положение «Вкл» и подтвердите действие в открывшемся диалоговом окне.
Групповые политики
Этот способ доступен для пользователей Windows 11 редакций Professional, Enterprise или Education.
Воспользоваться им можно в том случае, если вдруг по какой-то причине опция «Режим разработчика» в приложении «Параметры» окажется заблокированной.
Откройте редактор локальной групповой политики командой gpedit.msc и перейдите по указанной на скриншоте цепочке.
Конфигурация компьютера -> Административные шаблоны -> Компоненты Windows -> Развертывание пакета приложения
Справа найдите политику «Разрешить разработку приложений Магазина Windows…», кликните по ней дважды, чтобы открыть окно изменения настроек и активируйте радиокнопку «Включено».
Редактор реестра
В Windows 11 Домашняя нет редактора локальных групповых политик, но есть редактор реестра, с помощью которого можно включить режим разработчика.
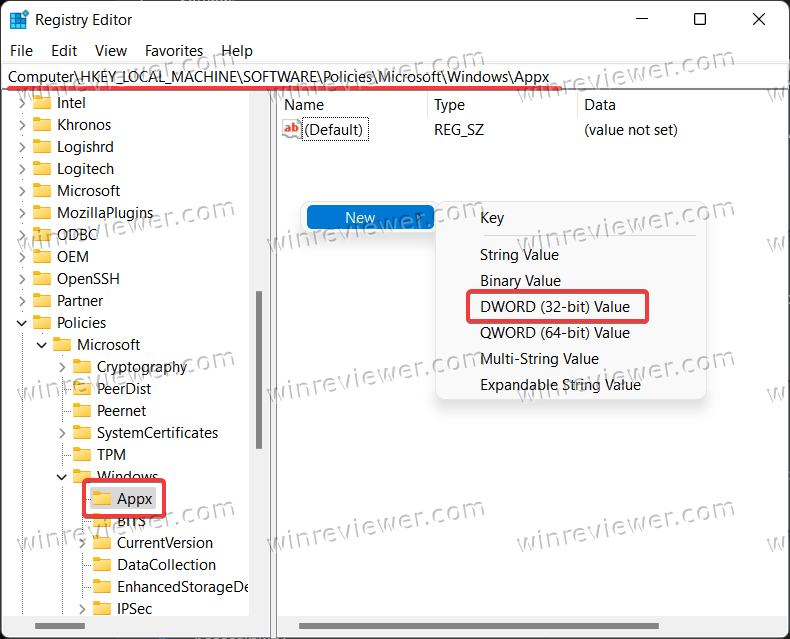
Открываем редактор командой regedit и переходим в раздел:
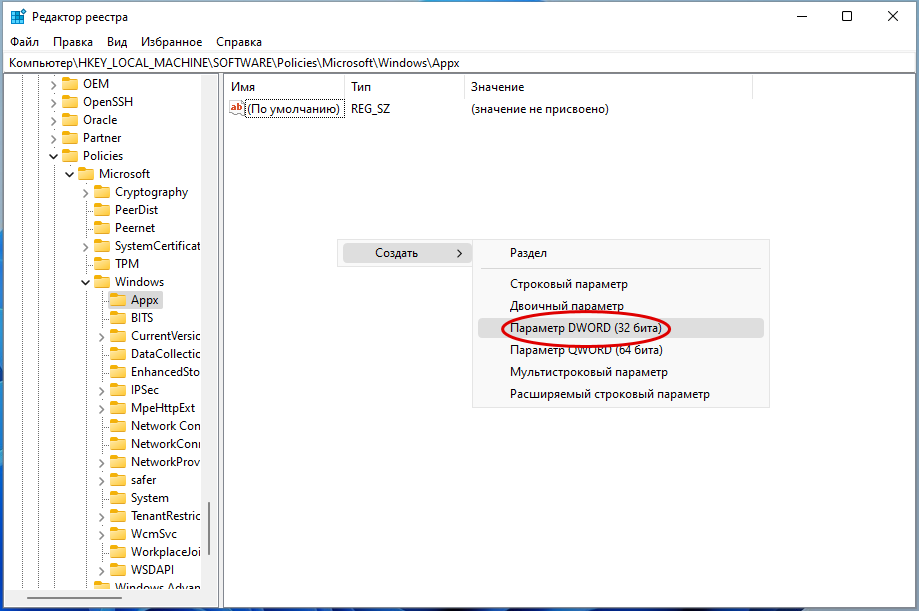
HKLM\Software\Policies\Microsoft\WindowsAppx
В правой колонке создаем DWORD-параметр,
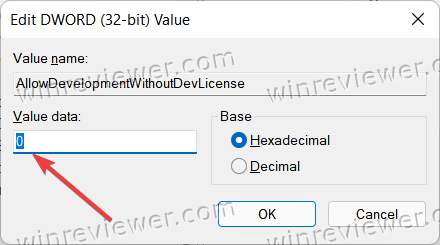
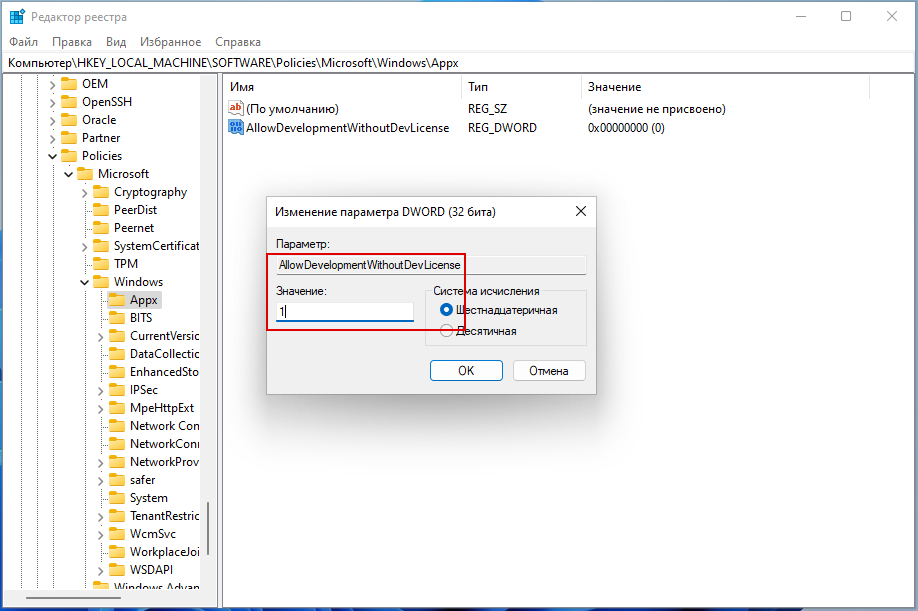
с именем AllowDevelopmentWithoutDevLicense и устанавливаем в качестве его значения 1.
Настройки должны вступить в силу сразу же.
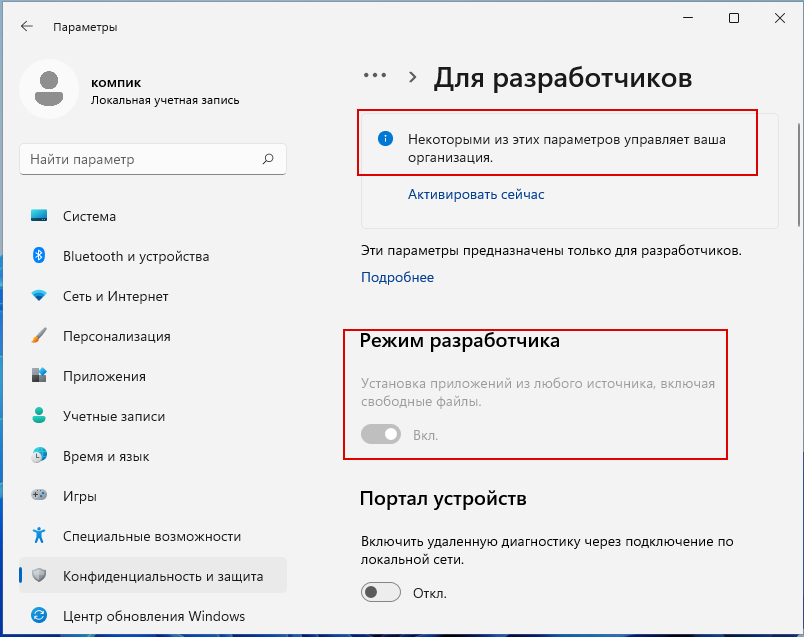
Если вы посмотрите статус функции в приложении «Параметры», то найдете его включенным, причем управление настройкой будет заблокировано, а в верхней части окна раздела появится уведомление «Некоторыми из этих параметров управляет ваша организация». Так и должно быть, поскольку настройка была включена в «режиме системного администратора».
Загрузка…
