As you might be aware by now, the Windows 11 build has leaked online, and it comes with a lot of changes and new features. One major change is the centered Start menu and Taskbar, which seems inspired by the macOS. It has received mixed opinions, but I quite like the new approach. So, if you’re someone who likes the centered taskbar but doesn’t want to install the leaked build yet, here’s how you can get the Windows 11-style centered taskbar on your Windows 10 computer.
Related | Remove News & Interests Widget from Windows 10 Taskbar
Get Centered Taskbar from Windows 11 on Windows 10
There are two ways you can get Windows 11’s centered taskbar on Windows 10. You can do it by either tweaking taskbar settings or through a third-party app. However, note that this only works for taskbar icons and not the Start menu.
The first method doesn’t require any installation but involves multiple steps. On the other hand, the second method is very straightforward- download the app, and you’re good to go. Below, we’ve mentioned both ways. You can use either of them.
Method 1 (Without Any App)
Step 1- Unlock the Taskbar
To start with, make sure the taskbar is not locked. You can disable the taskbar lock by following the steps below:
- Right-click on your taskbar.
- Uncheck “Lock the Taskbar.”
- OR, click on Taskbar Settings.
- Then, disable the toggle for the Lock Taskbar.
You can further hide Cortana if you want to from the same right-click menu.
Step 2- Enable Links
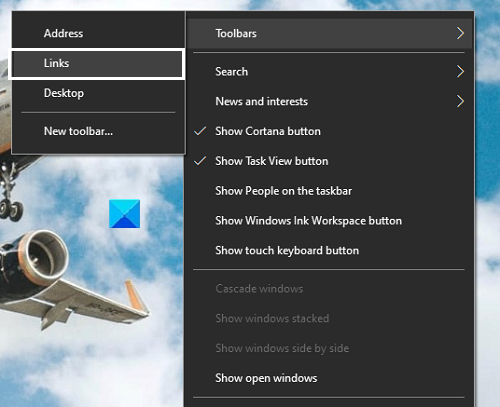
- Right-click the taskbar.
- Hover your mouse over Toolbar.
- Click on Links.
Step 3- Bring the Taskbar to Center
- Tap and hold the Links button.
- Drag it from the right to the extreme left corner, next to the Start menu.
- As soon as you do it, all the taskbar icons will shift to the extreme right.
- Now, tap and hold the parallel lines to the left of these icons and drag them to the center.
- Make sure to align it properly with the center.
Step 4- Lock the Taskbar
- Right-click the taskbar.
- Now, lock the taskbar by tapping Lock the Taskbar.
That’s it. You now have a centered-style taskbar like Windows 11 on your Windows 10 machine. It works perfectly fine, and the icons get auto-adjusted as you open more apps. However, you may lose symmetry.
Method 2 (Using TaskBarX)
There are several third-party software that let you enjoy a macOS-like centered taskbar on your Windows 10 machine. TaskBarX is one such open-source program that can center the taskbar icons. To use it:
Step 1- Download TaskBarX
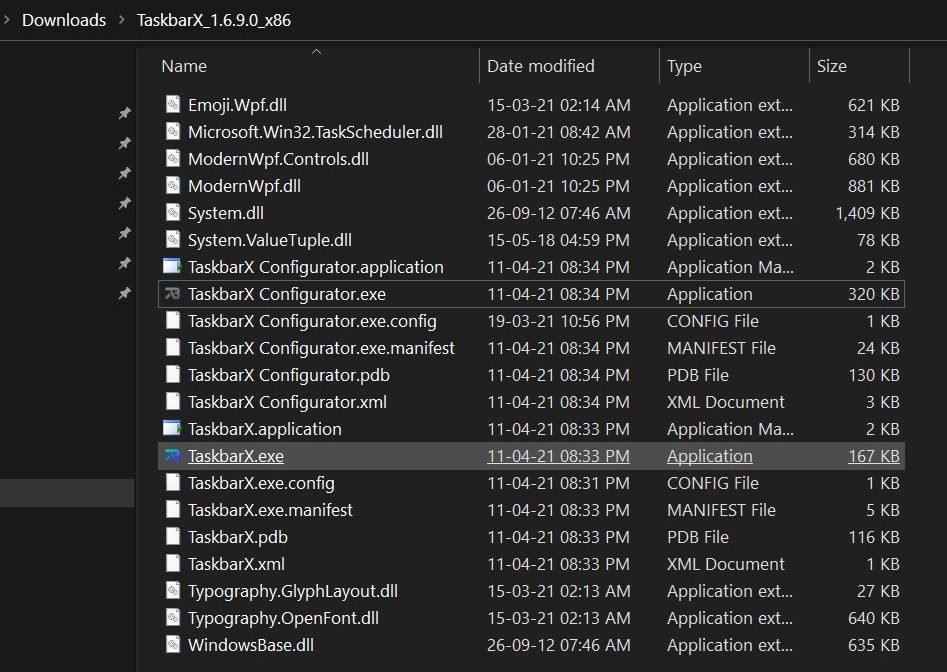
- Download TaskBarX Portable Zip from the link below.
- Extract the downloaded Zip file on your computer.
- Click on TaskBarX.exe.
- Your taskbar icons will automatically move to the middle of the taskbar.
Download TaskbarX
Step 2- Add Customizations
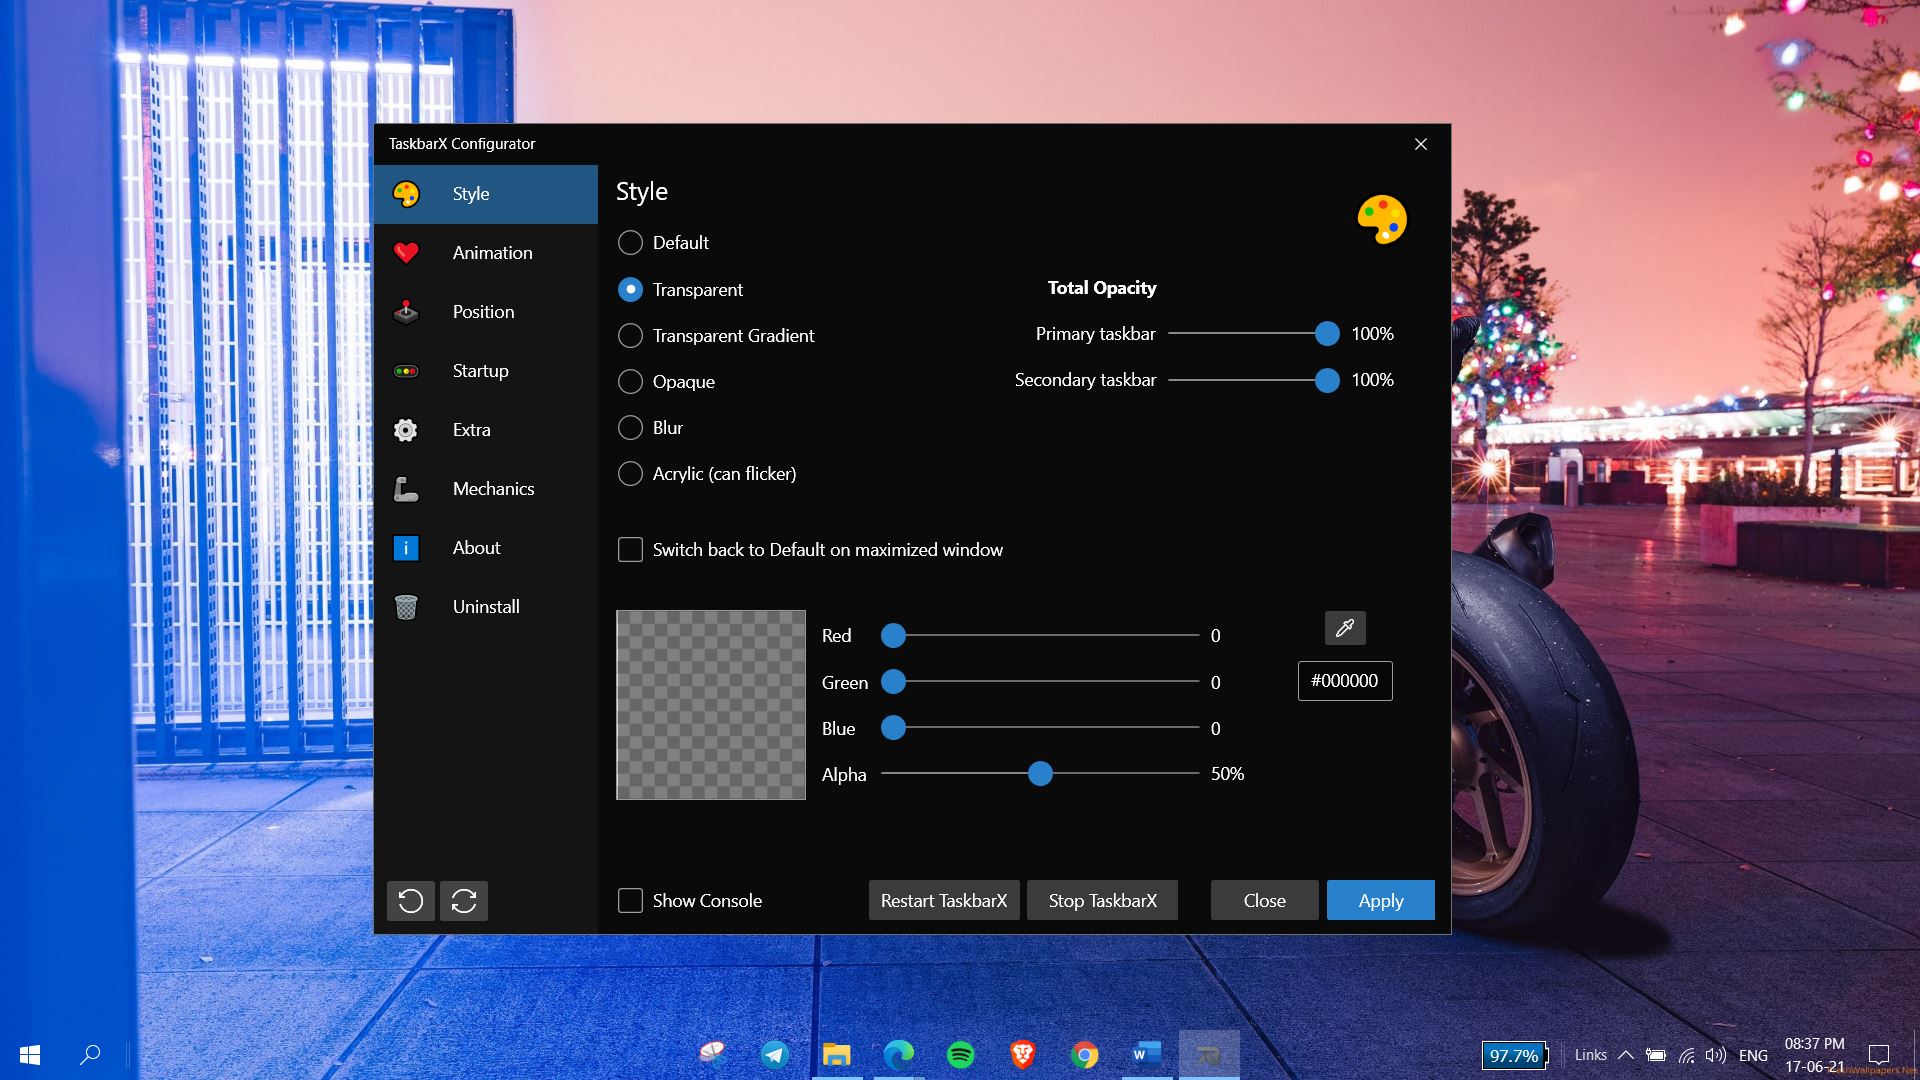
- Now, open TaskbarX Configurator.exe.
- Customize the settings as per your liking.
- Then, click on Apply.
TaskBarX lets you customize the following options:
- Style- Transparent, Transparent Gradient, Opaque, Blur, Acrylic.
- Animation- Style and Speed.
- Taskbar Offset Position.
- Startup Delay.
- Extra Tweaks.
Here, I’ve kept it in Transparent style, which looks super cool on the home screen. You can select “Switch back to Default on Maximized Window” if you want the taskbar to revert to the original style in full-screen apps.
More Ways to Customize Windows 10
Below are some other ways you can customize or change your Windows 10 user interface experience:
- Enable Wallpaper Slideshow in Windows 10
- Show Internet Speed on Windows 10 Taskbar
- Install macOS Dynamic Wallpapers on Windows 10
Wrapping Up
These were two easy ways to enable or get Windows 11’s centered taskbar icons on any Windows 10 computer. For me, the centered taskbar icons are much more aesthetically pleasing and are easier to reach.
Anyways, if you’re already on Windows 11, you do have the option to revert to the old taskbar style through Settings > Personalization > Taskbar. Do let me know if you’ve any questions in the comments below.
You can also follow us for instant tech news at Google News or for tips and tricks, smartphones & gadgets reviews, join GadgetsToUse Telegram Group or for the latest review videos subscribe GadgetsToUse Youtube Channel.
In this post, I will show you multiple ways to get Windows 11 Taskbar in Windows 10 with Start Menu. Here I will mention some free software which you can use to have Windows 11 look like Taskbar as well as stat menu in the center. There are already some popular paid tools put there such as Start11 and StartAllBack but I have found some of their free alternatives that you can use to do the same thing.
The following software can make the default Taskbar of Windows 10 look like Windows 11. Also, I have added 1 tool which can add the Windows 11 Taskbar and start menu and with some other additional features. With these software, you will be able to change the icon of Start button as well centered taskbar items. Not only that but you will be able to tweak the transparency of Taskbar as well.
With all the software below, I will also leave a simple guide to use and the configure them. You just have to do an initial configuration in all of these and then they will keep working on their own.
ExplorerPatcher
ExplorerPatcher is a free and open-source software to have a Windows 11 lookalike taskbar on Windows 10. Basically, it helps you tweak the original Windows 10 taskbar to make it look like Windows 11’s. It helps you center the taskbar items along with the Start button. It can even center the start menu and additionally add rounded corners to it as well.
It can center the Taskbar items as well as the Start menu. You only have to configure it once and then leave it on its own. It comes as a tiny app that you can install and use. And not just Windows 10 but you can use it in Windows 11 as well. One cool feature of this software is that it can permanently remove recommended section from Windows 11.
Here is how to use ExplorerPatcher to have Windows 11 like Taskbar and start menu.
- Download it from here and then double click on it to run it.
- Launch its settings window from the Start.
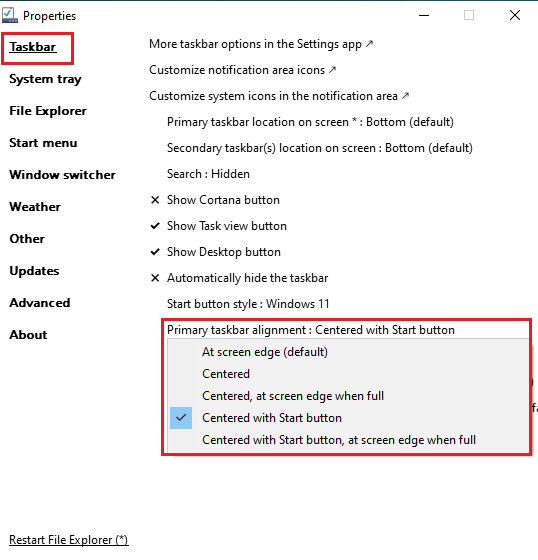
- Now, from the Taskbar section, you can change the Start button type if you want to. Next, you set Primary taskbar alignment parameter to “Centered with Start Button“.
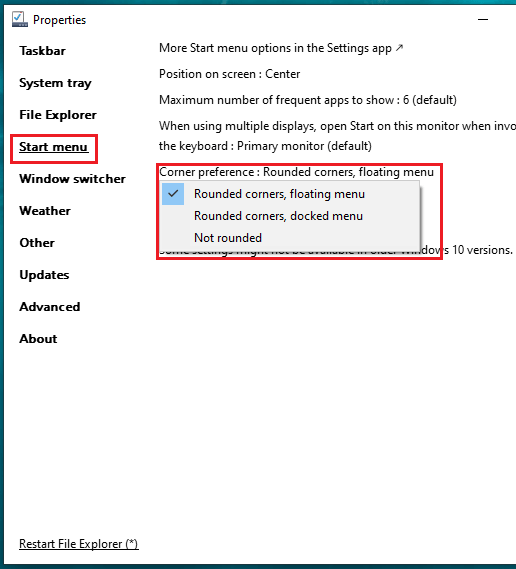
- Now, move to the Start Menu section and from here, you set Corner preferences to “Rounded corners, floating menu“.
- At last, click on the Restart File Explorer link at bottom left and then wait for it to start Explorer again.
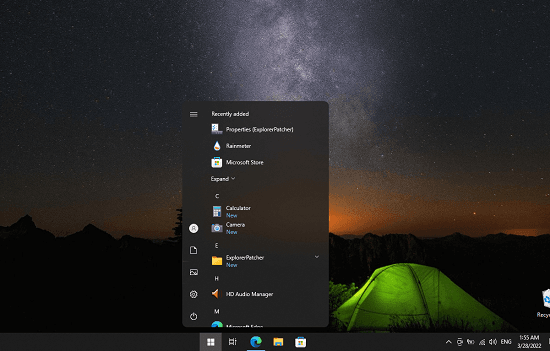
- Now, you will have Windows 11 like Taskbar and Start menu in your Window 10 PC. Best part is that it makes the changes in the original Taskbar which is awesome. The final Taskbar looks like this.
Using ExplorerPatcher in this way, you can make the Taskbar look like Windows 11 as well the Start menu. This is probably the only tool which can set native Start menu in the center on Windows 10. And I hope later Windows update don’t break it in the future.
TaskbarX
TaskbarX is another free and open source software you can use to have a Windows 11 like Taskbar in Windows 10. Here it also makes the changes in the primary Taskbar but it offers way more customization features than ExplorerPatcher. However, it is not really smooth and stable than ExplorerPatcher and hence it is on second number on my list.
After you run it, it will center the Taskbar items and lets you change opacity of the Taskbar as well. However, it keeps the Start button and Start Menu at the left side. To get the Start menu in the center, you will have to hide the main Start menu button and create custom Start button which I will mention about later in the post.
Here are the steps involved to use TaskbarX to add Windows 11 like Start menu and Taskbar to Windows 10.
- After downloading it, you simply run it from the ZIP file. Find the TaskbarX.exe and then double click on it.
- It will change the Taskbar as shown in the screenshot below. It will move the Taskbar items to the center except the Start button.
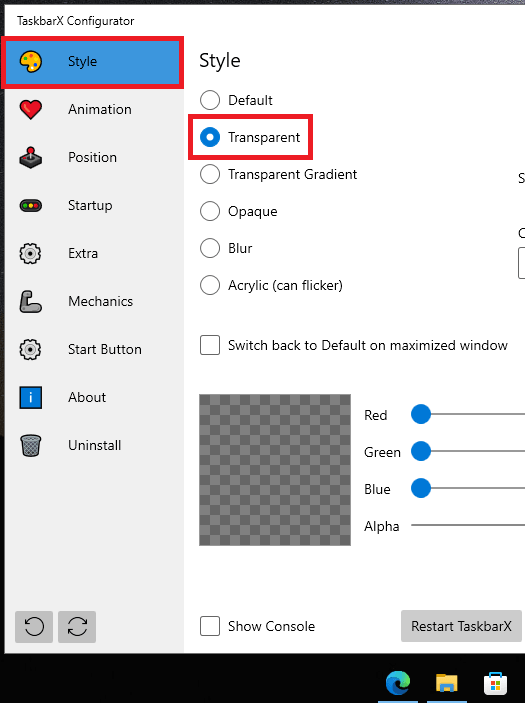
- Now, you can tweak its transparency. Launch the “TaskbarX Configurator” and then from the Style section, select the Transparent option to tweak the opacity.
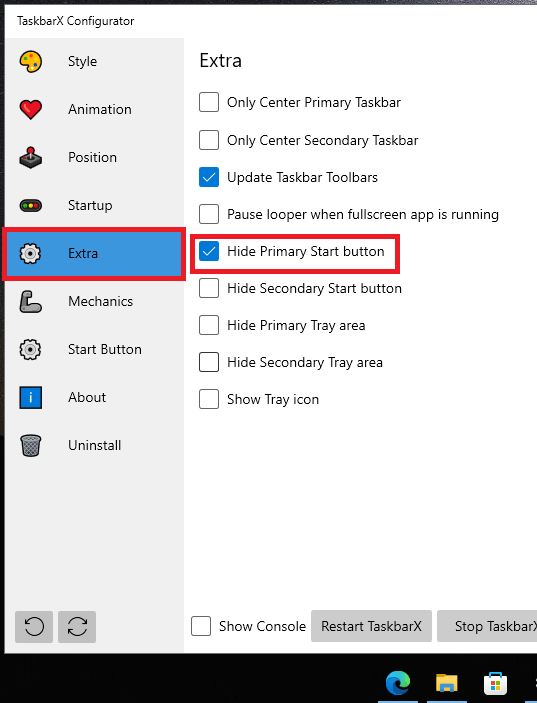
- Next, move to the Extra section and then from here, check the Hide Primary Start button.
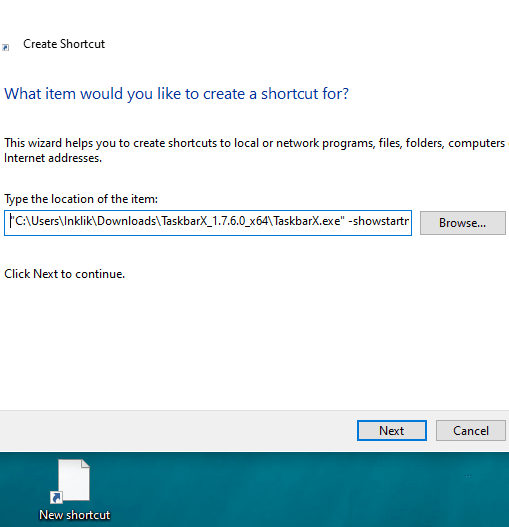
- After the primary Start button is hidden, you have to create a new custom Start button. For that, you create a new shortcut on desktop and set “TaskbarX.exe_Location” -showstartmenu” as the destination. You can copy the destination address from the Stat Button page of the TaskbarX Configurator.
- Change icon of the shortcut files that you created on the desktop. You can use any of these icons.
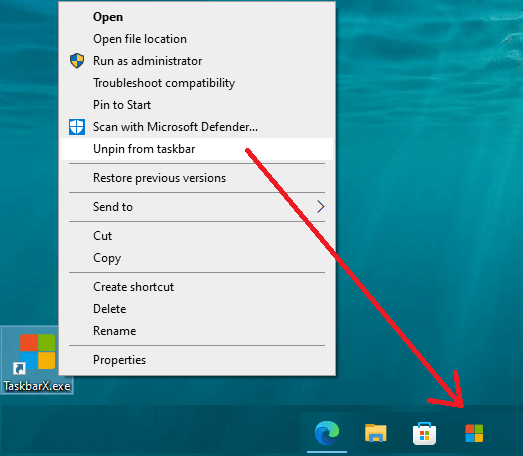
- Now, you right click on the shortcut file and pin it to the Taskbar. Drag it and add it to the beginning and then you are done. You finally have the Windows 11 look like Taskbar as well as the start menu.
In this way, you can make use of this simple and powerful Taskbar customization tool on Windows 10. It can give you Windows 11’s Taskbar and Start menu in a few minutes. It starts automatically at Windows, so the changes you make will not be lost. If you want, then you can use and configure other customization options.
Windows 11 Taskbar and Start Menu for Rainmeter
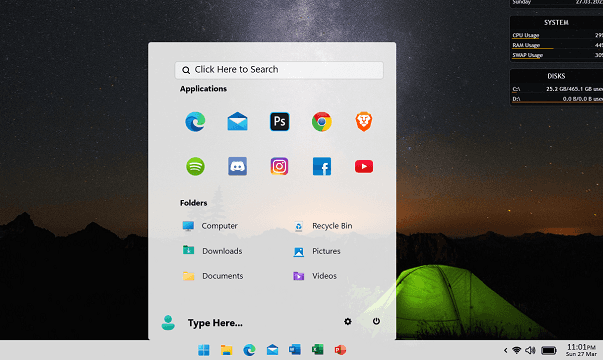
A lot of users use Rainmeter to customize their desktop. If you are using it on Windows 10 PC already then there is a Windows 11 Taskbar skin that you can use. The skin basically mimics the Window 11 Taskbar, Start menu, and then system tray along with Wi-Fi and battery icons.
This is an open-source skin and just released a few days ago. For now, there are some glitches in it, but it does add a Windows 11 look like Taskbar to Windows 10.
However, you have to note that the Taskbar that it adds is a secondary one. No changes will be made to your original Windows 10 Taskbar. And hence, if you want to use it then you will have to keep the primary taskbar hidden.
Follow these steps below to add a Windows 11 Taskbar in Windows 10 using Rainmeter. I am assuming that you have Rainmeter already installed.
- Right click on the main Taskbar and then unlock it. Move it to the top and enable the auto hide property.
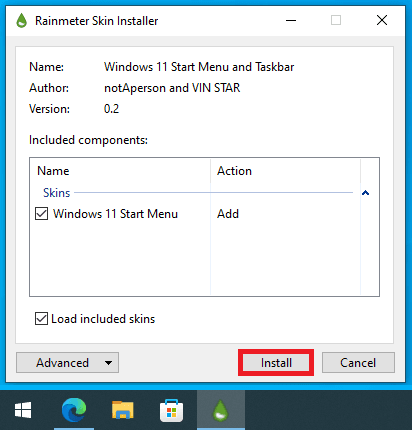
- Now, download the “Windows 11 Taskbar and Start Menu For Rainmeter” skin from here and after it downloads, you just double click on it to install it.
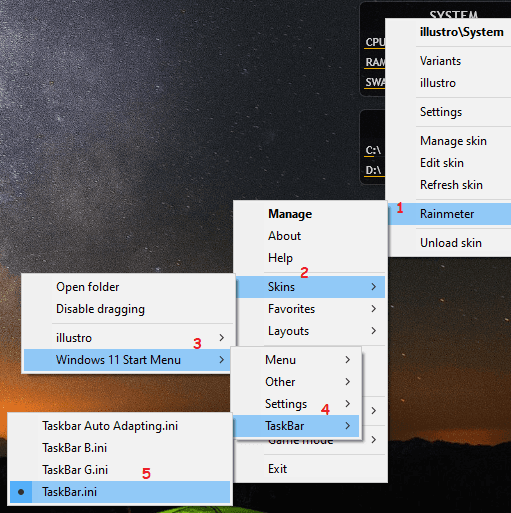
- Now, right click on any Rainmeter tray icon or any screen widget. From the Rainmeter menu click on Skins > Windows 11 Start Menu > TaskBar > Taskbar.ini.
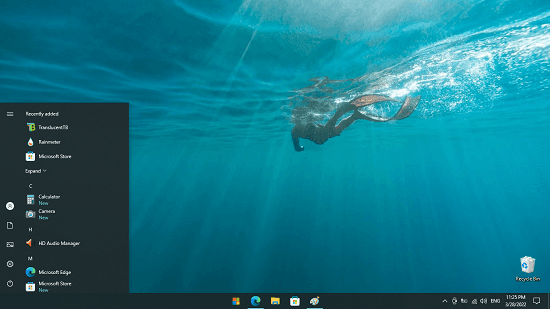
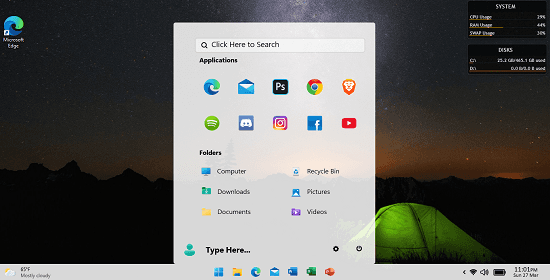
- In the screenshot below, you can see the Windows 11 Taskbar and Start menu that it adds. All the items are clickable; however, it lacks smooth animation.
This way, you can make use of Rainmeter to add a Windows 11 like Taskbar and Star menu in Windows 11. The process is very simple straightforward. This is open source and is in active development., Apart from the above look and feel, there are 2 more Taskbar styles that you can apply if you want to.
Final thoughts:
For free, I could only find these amazing free software that you can use to add Windows 11 like Taskbar and Start menu in Windows 10. They all work perfectly and based on which one you liked more, you can use that one.
Personally, if you want to have a Windows 11 taskbar look in the native Taskbar then use ExplorerPatcher. If you only want to have a Windows 11 look like Taskbar, then use the Rainmeter skin. And if you want a Win 11 look like Taskbar with some extra features such as transparency then TaskbarX is a good option.
The improved Taskbar design must’ve impressed you if you have caught a glimpse of the new Windows 11. The Taskbar in Windows 11 is centered in the middle and bundles a few other features. If you want a similar experience on your Windows 10 computer, you can enjoy it before you decide to jump the gun on the Windows 11 update.
Before we get down to it, let us tell you that Windows 10 doesn’t have a native way to tweak the look of the Taskbar. You’ll have to play around with the system settings. The good thing is that it’s not rocket science.
However, with this method, it’s not possible to replicate the entire look. For example, the Start button will still be on the left. And the icons for Wi-Fi, Volume, etc. will be the standard Windows 10 icons.
If you are still want to go ahead, here’s how you can get Windows 11-like Taskbar in Windows 10.
This should work on all editions of Windows 10.
Step 1: Open Windows Explorer and create two empty folders. The name and location of the folders don’t matter much.
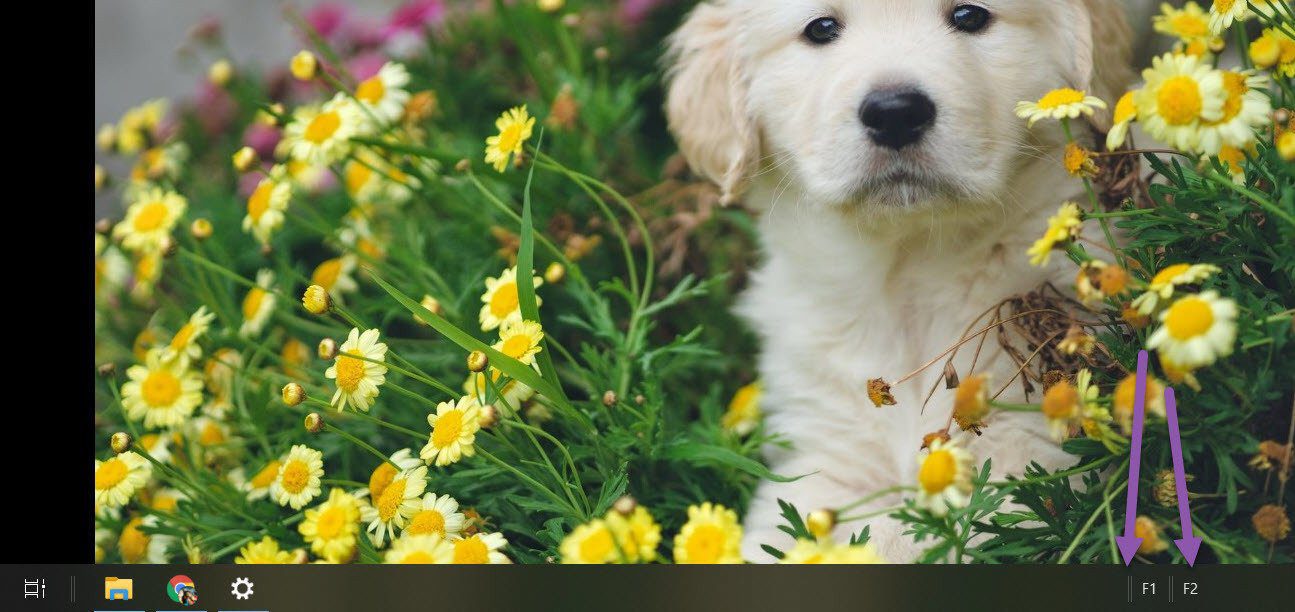
In our case, we have named our folders F1 and F2.
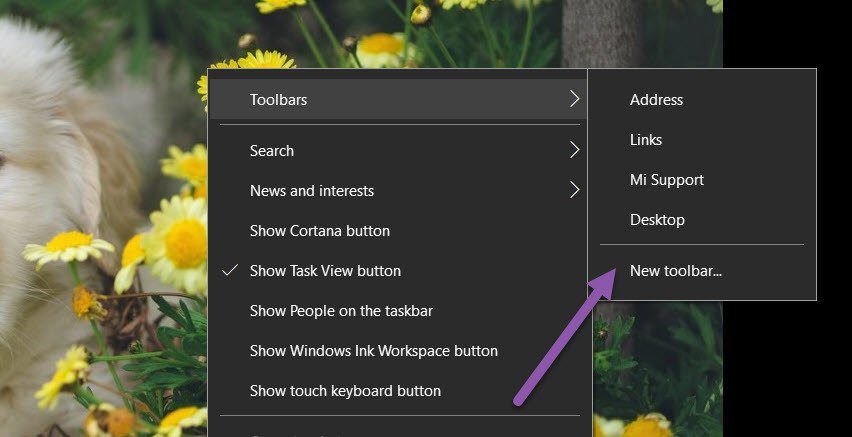
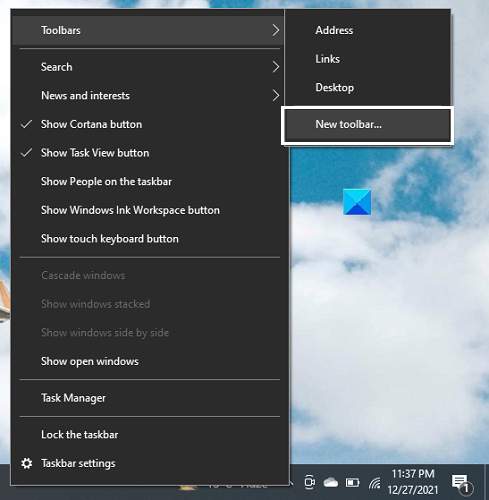
Step 2: Next, right-click on the Taskbar and select Toolbars > New Toolbar. The system will now ask you for a location. Pick one of the empty folders you just created.
Do the same for the second folder as well.
Once down, you will see two toolbars on the taskbar with the names of the folders you just created.
Step 3: Next, right-click on the taskbar and uncheck the Lock all Toolbars option. You will notice vertical markers next to the toolbars you just created. These markers are draggable.
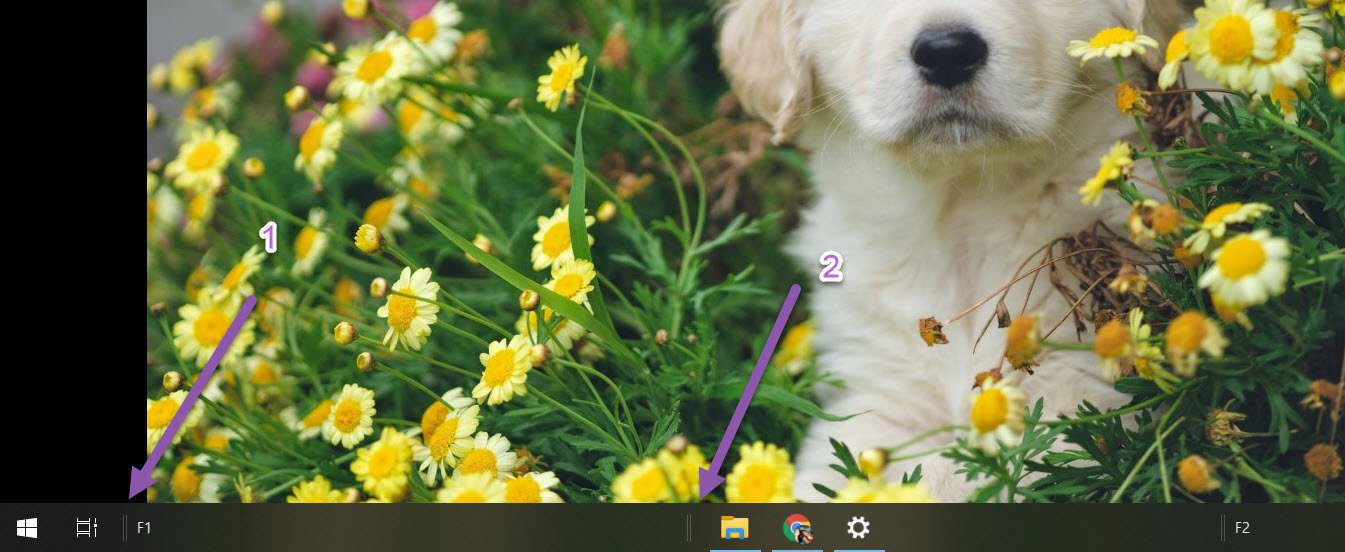
All you need to do is drag one of the toolbars to the left, next to the Start button. Let the toolbar on the right remain as it is.
Step 4: After that, drag the icons folder to right, and align it in the center.
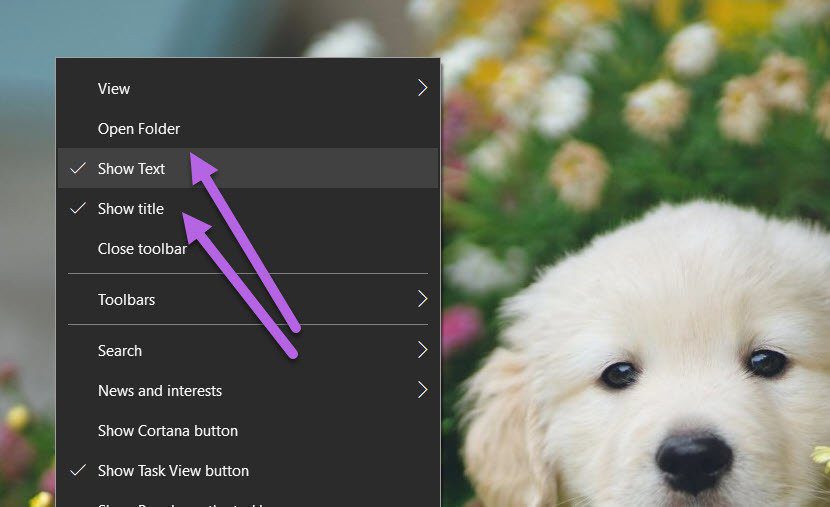
By now, you will see a rough structure forming. For the final touches, right-click on the toolbars and uncheck the option for Show Title and Show Text for both the toolbars.
This will remove the name and text, thereby giving you an empty space on either side of the icons folder, just like Windows 11.
Step 5: Finally, right-click on the taskbar and select Lock Taskbar to well, lock the Taskbar into place. After that, you can’t change the height or location of the Taskbar.
That is how you can change the location of the Taskbar and make it look like Windows 11.
While this process seems tedious, you just have to set it up once.
Taskbar Customizations
In Windows 11, Microsoft has collapsed the entire Taskbar onto the center. By default, the Start button and the Search button are next to the center’s app icons and folder options.
But as we noted earlier, you won’t be able to bring the Start button to the center. Nevertheless, there are a few customizations that you can still do.
1. Remove News and Weather
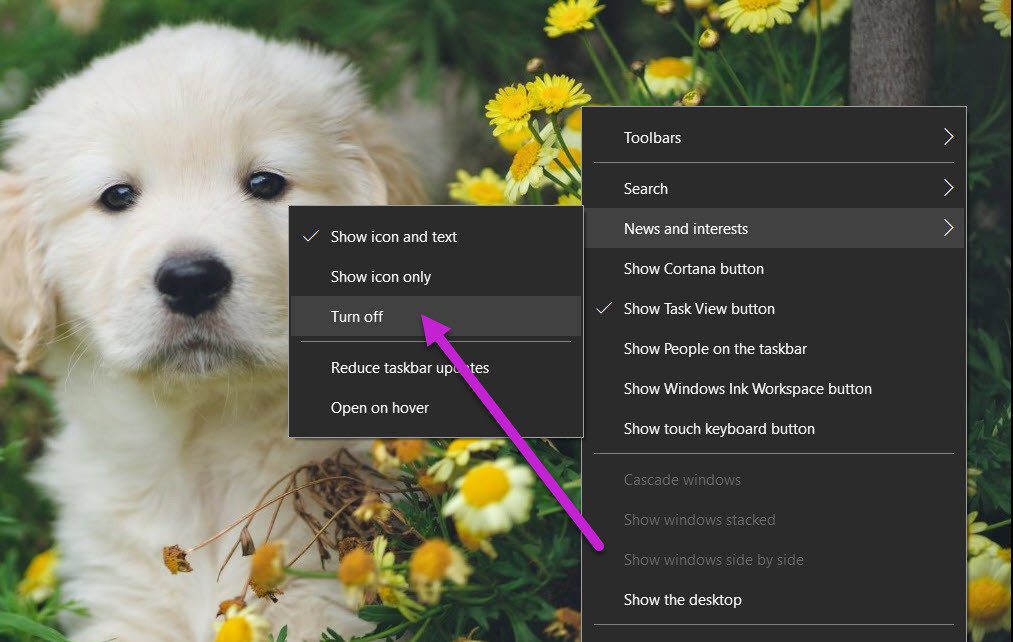
If you want a complete experience, you can remove or disable the News and Weather widget from the Taskbar.
To do so, right-click on the taskbar and select News and interests > Turn Off. That’s it.
The widget will disappear from the Taskbar.
2. De-Clutter System Tray
At the same time, if you want to declutter the System Tray, you can do so by removing some of the icons. By default, Windows 10 displays the Wi-Fi status, volume, battery, among others.
However, if you do not keep checking it regularly, it may overflow with icons. For example, one of our Windows PCs had icons for Meet Now, Windows Update Status, and Dropbox, making it look cluttered.
Step 1: Right-click on Taskbar and select Taskbar settings. Next, scroll down till you see the option for Notification Area.
Select the ‘Select which icon…’ option.
Step 2: Next, toggle the switch for the icons you want to remove. That’s about it.
You will have a clean System Tray like Windows 11, although the user experience and icons will remain the same as Windows 10.
Taste of Windows 11
That’s how you could get Windows 11-like Taskbar in Windows 10. It’s a one-time process, and once the Taskbar is locked, it pretty much stays the same. Of course, you can add your share of icons to it freely without worrying about the icons spilling over.
With the leaked Windows 11 build doing rounds on the internet and everyone trying it out, there might some who would rather stay away from such leaked stuff and wait around for the official Windows 11 release. While they wait around, some would just wish to have some of the Windows 11 stuff on their Windows 10 system especially the new taskbar. And so we are here with a useful guide for you. In this guide, you will learn how to get Windows 11 style taskbar on Windows 10. Yes, you can align Taskbar at the center in Windows 10.
The new central positioned taskbar and start menu are one of the big changes that have been seen in Windows 11. Of course, you can shift it back to the left-hand side if you don’t like the new change. But who doesn’t like new change if it’s good? Everyone wants to try Windows 11 new UI. You can always give your Windows 10 system more Windows 11 look by customizing it with the new Windows 11 wallpapers and making around some changes. Let’s take a look at how you can get the Windows 11 taskbar on your Windows 10 system.
How to get Windows 11 Taskbar on Windows 10
There are two freeways to get the Windows 11 taskbar on your Windows 10 system. Out of these two, only one method requires you to make use of a free third-party program. And the other method will let you customize your Windows 10 taskbar without any app. Let’s start with the simple method to get Windows 11 like taskbar on Windows 10.
Change Taskbar Settings to get Windows 11 Taskbar
This method makes use of all the settings that are available within Windows 10 itself. It will also work if you have got Windows 8 or even Windows 8.1 on your system.
- First things first you will have to unlock the taskbar. It’s quite simple. Simply right-click on the taskbar and unselect the Lock the Taskbar. If the taskbar is locked you will see a checkmark next to it.
- Right-click the taskbar again and select Toolbars > Links. You will see this Links toolbar (||) placed at the right side of your taskbar.
- Now, next to the recently created toolbar, you will see a set of parallel lines. Simply click and drag it to the left side of the taskbar (drag it to the last on left side).
- Once you’ve done that, you will see another set of parallel lines or the divider next to the icons pinned to the taskbar. Simply click and drag it to the center of the taskbar (align it as per icons on your taskbar).
- When you’ve finalized and fixed the position, simply lock the taskbar by right-clicking the taskbar and selecting Lock the Taskbar. If you see the Link text in then right-click on it and hide text & title (you need to unlock the taskbar when you want to change it).
You can make it feel more like a Windows 11 taskbar by right-clicking the taskbar and hiding the search icon, Cortana button, task view button, Windows Inkspace button, touch keyboard button, and also the People icon. Also, drag icons (WiFi, Battery, etc) on the right side to the arrow that contains hidden icons.
And there you have it, the Windows 11 taskbar on your Windows 10, 8, and 8.1 systems.
Use Taskbar X to get Windows 11 Taskbar
Here is a free app that will perform the same functions as the previous method. Just that everything can be done in one simple click.
- Get the taskbar X app. You can find it for free on Github. Or you can use this link to download Taskbar X.
- You have to extract the zip file by either using Winrar, WinZip, or even the built-in file extractor within Windows 10 itself.
- Now open up the extracted folder and run the Taskbar X configurator file.
- The app doesn’t require you to install it, it will simply run right away.
- Once the software opens, leave everything as it is and simply click on the Apply button. Your taskbar will shift to the new Windows 11 style.
- If you wish you can tweak the size, colors and whether you’d like to have a transparent taskbar. You have a lot of customization options to choose from.
- If for some reason you want to revert to the default Windows 10 taskbar simply open up the Taskbar X configurator and click on Uninstall. The program will then revert to the older Windows 10 taskbar style.
There is also a paid version of this app available on the Microsoft Store. However, there is no difference whatsoever, just that you will not get updates automatically as opposed to downloading the new version from the GitHub page. You can also go for the paid version to support developers for their awesome work.
Conclusion
With quite a few days left for Windows 11 to be announced by Microsoft, we can expect to see a lot more changes in the UI, performance as well as other features. With that being said, we can also expect more tools to help customize the current Windows 10 Start menu into the new Windows 11 styled one.
So that’s all on how to get Windows 11 taskbar on Windows 10. These methods are tested and working fine. If you have any queries let us know in the comment section.
Also Check:
- All about Windows 11 Leaked ISO
- How to Create Windows 11 Bootable USB Drive [Guide]
- How to Install Windows 11 on VMWare Workstation or other Emulators
Windows 11 was a major overhaul to the semantics and UI of its predecessor, Windows 10, if not in terms of features. The most prominent change is the one upfront; the taskbar. Windows 11 boasts a greatly different taskbar than Windows 10 which looks both cleaner and more pleasing to the eye – though it may be found wanting by some! Those of you who don’t have the PC requirements to upgrade to Windows 11 worry not. In this article, we will be discussing how you can customize your Windows 10 taskbar to make it look like it’s a Windows 11 taskbar. The major distinctive feature of Windows 11’s taskbar is the pinned app icons centered instead of aligned to the side, so that is what we will be focusing on achieving too.
How do you make the Windows 10 taskbar look like Windows 11?
There are 2 different ways in which you can make your current taskbar look like an upgraded one:
- By customizing the standard taskbar
- By creating two additional folders
1] By customizing the standard taskbar
The first thing you have to do is unlock the Windows 10 taskbar. By default, it is locked. You can unlock it by right-clicking on the Taskbar and clicking on the ‘Lock the Taskbar’ option. You’ll see a checkmark next to it by default which will be removed once you do so. Next up, right-click on the taskbar again, hover your mouse over Toolbars, and click on Links.
You’ll then see Links to the far-right side, next to the System Tray icons. Use the two vertical lines called the Divider to move the Links option to the left, next to the search bar. As you will move Links from right to left, you’ll observe that all the app icons will now be on the extreme right-hand side. Drag the divider towards Links so as to align the pinned Taskbar icons in a manner that they’re in the center.
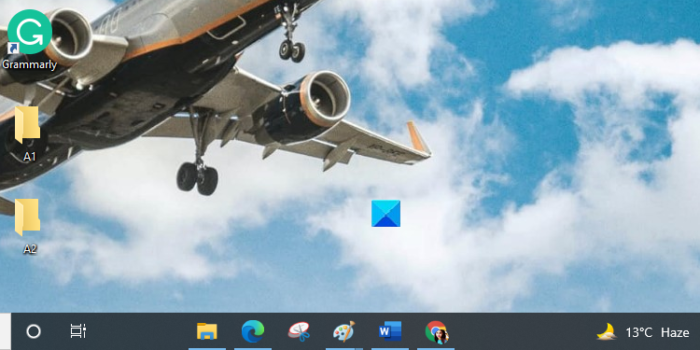
You can make the Taskbar look something like the one in the picture above. You can ensure that these customized elements aren’t messed around by locking the taskbar.
Read: How to center Taskbar icons in Windows 10.
2] By creating two additional folders
While the first process is the quicker one, you can approximate your Windows 10 Taskbar to look even more like Windows 11’s. This process is a little lengthier, but works better and is a one-time measure. Here’s what you need to do.
Open your File Explorer and create two folders. Name them whatever you want (for our convenience, we’ll call them A1 and A2). Now, right-click on your Taskbar, go to Toolbars and click on New Toolbar. Repeat the process twice and select the folders you’ve just made.
Once you can see both these folders next to the system tray, all you have to do is move one of them to the left-hand side. This would bring all the icons in the middle and it is much more convenient to align them now using the same Divider lines we used in the previous process.
Another step towards making the Taskbar opaquer and like the Windows 11 one is to remove the names of these new folders. You can do so by right-clicking on the folders and unselecting the ‘Show text’ and ‘Show title’ options.
This is how the resultant Taskbar will look. As you can see, the result is, more or less, the same. The only difference, and it may not be evident to everyone, is the absence of any additional text on the Taskbar. You can make the divider lines disappear by locking the taskbar.
Read: Live Tiles not working in Windows 10.
How do I get the classic taskbar on Windows 10?
You may be someone who preferred the UI of Windows computers from the past and want to get the classic, retro taskbar on your Windows 10 PC. Don’t worry, since we’ve got you covered there as well. Using a tool called RetroBar, you can get back the look of any of the classic Microsoft Windows versions like Windows 98, Windows XP, Windows Blue, etc.
Can you make Taskbar vertical in Windows 11?
Yes, you can make Taskbar vertical in Windows 11. To do so, you have to modify Windows Registry. Windows Registry is the hierarchical database of Windows configurations and settings. Hence, any mistake while modifying the Registry can lead to serious errors in your system. Therefore, before you proceed, we recommend you create a system restore point and backup Registry.
Read: How to ungroup WiFi, Sound, and Battery Taskbar Icons in Windows 11
We hope this helps!


