Download Windows Speedup Tool to fix errors and make PC run faster
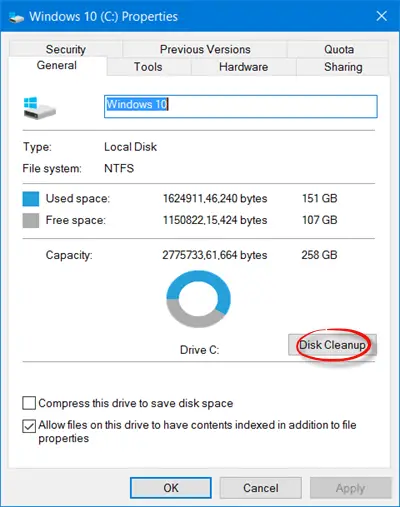
If you find that the Disk Cleanup button is missing from the Drive Properties box of your Drive on your Windows 11/10 PC, then it is quite possible that your Registry may have got corrupted. In such a case you may need to make some changes to it. This post will show you how it is done.
Before you begin, you may want to create a system restore point and/or backup your Registry.

Having done that, Run regedit to open the Registry Editor, and navigate to the following key:
HKEY_LOCAL_MACHINE\SOFTWARE\Microsoft\Windows\CurrentVersion\Explorer\MyComputer
Right-click on MyComputer > New > Key. Name the new key cleanuppath.
Now for cleanuppath, in the right pane, double-click the Default value, and in the Edit String dialogue box which pops up, in the Value Data field, copy-paste the following path:
%SystemRoot%\System32\cleanmgr.exe /D %c
Click OK and exit.
This is sure to fix the problem and you will be able o see the disk Cleanup button now.
Some people have reported that if they had unchecked the Display delete confirmation check box in the Recycle Bin Properties, their Disk Cleanup button disappeared from the Drive Properties box. I was unable to reproduce this on my system, but nevertheless, this is one setting you may want to check up on, and select this checkbox and see if it helps.
If you simply need to access the Disk Cleanup Utility, you could Run cleanmgr.exe to open it. Alternatively, search for Disk Cleanup in taskbar search and pin its shortcut to your Start Menu.
Related: Disk Cleanup is not working properly.
Anand Khanse is the Admin of TheWindowsClub.com, a 10-year Microsoft MVP (2006-16) & a Windows Insider MVP (2016-2022). Please read the entire post & the comments first, create a System Restore Point before making any changes to your system & be careful about any 3rd-party offers while installing freeware.
Если вы обнаружите, чтоКнопка «Очистка диска» отсутствует.из окна «Свойства диска» вашего Диска на ПК с Windows 11/10, то вполне возможно, что ваш реестр поврежден. В таком случае вам может потребоваться внести в него некоторые изменения. Этот пост покажет вам, как это делается.
Прежде чем начать, вы можете создать точку восстановления системы и/или сделать резервную копию реестра.
Сделав это, запустите regedit, чтобы открыть редактор реестра, и перейдите к следующему ключу:
HKEY_LOCAL_MACHINESOFTWAREMicrosoftWindowsCurrentVersionExplorerMyComputer
Щелкните правой кнопкой мыши «Мой компьютер» > «Создать» > «Ключ». Назовите новый ключпуть очистки.
Теперь для пути очистки на правой панели дважды щелкните значение по умолчанию и в появившемся диалоговом окне «Редактировать строку» в поле «Данные значения» скопируйте и вставьте следующий путь:
%SystemRoot%System32cleanmgr.exe /D %c
Нажмите ОК и выйдите.
Это обязательно решит проблему, и теперь вы сможете увидеть кнопку «Очистка диска».
Некоторые люди сообщают, что если они сняли флажок «Показать подтверждение удаления» в свойствах корзины, кнопка «Очистка диска» исчезла из поля «Свойства диска». Мне не удалось воспроизвести это в своей системе, но, тем не менее, это один из параметров, который вы можете проверить, установить этот флажок и посмотреть, поможет ли это.
Если вам просто нужен доступ к утилите очистки диска, вы можете запустить cleanmgr.exe, чтобы открыть ее. Альтернативно, найдите «Очистка диска» в поиске на панели задач и прикрепите его ярлык к меню «Пуск».
Связанный: Очистка диска не работает должным образом.
Одно из ключевых стремлений Microsoft в Windows 11 — объединить как можно больше встроенных возможностей системы в одном месте, а точнее, в приложении «Настройки». Новый шаг на пути к этой цели — отказ от привычной утилиты по очистке дисков, которая в Windows 10 вызывалась через контекстное меню свойств диска. Теперь, в свежей сборке Windows 11, вместо неё открывается соответствующий раздел настроек системы. Впрочем, старую утилиту не удалили из системы. Об этом сообщил портал gHacks.
- В тему: Всё о Windows 11 — секреты, инструкции, лайфхаки и полезные статьи
Новое решение Microsoft подверглось критике, поскольку альтернатива привычного инструмента очистки системы не такая удобная — нужно выполнять больше действий, чтобы добиться желаемого. В то же время «стандартная» утилита сразу показывает в сгруппированном виде все категории файлов и прочего, которые могут засорять диск.
На данный момент в свежей сборке Windows 11 существуют 2 способа вызвать привычную утилиту для очистки дисков: либо найти её через функцию поиска, либо в меню «Выполнить» ввести команду cleanmgr.exe. Скорее всего, Microsoft не удалит эту утилиту из Windows 11 насовсем, и опытные пользователи смогут продолжать использовать её при необходимости вместо альтернативы в настройках системы.
- Теперь не боюсь за Windows: точки восстановления создаются каждый день. Вот как это настроить
- 7 функций, которые сделают Windows 12 лучшей системой. Если Microsoft пойдёт на это
- Эта бесплатная утилита от Microsoft в разы ускоряет работу. Она существует ещё с Windows 95
- Эта утилита показывает, где используется выбранный файл в Windows и что мешает удалить его
- 10 приложений, которые нужно сразу установить на новый компьютер
-
Home
-
News
- Windows 11 Disk Cleanup Not Working: How To Fix It
By Sarah |
Last Updated
Disk Cleanup is a very useful tool in Windows to help users clear unnecessary data and junk files within easy steps. Though Disk Cleanup is replaced with a modern version in the Settings app of Windows 11, you can still use it in the new system to clean up disk space. The question is Windows 11 Disk Cleanup may not work sometimes.
What Is Disk Cleanup
Disk Cleanup is a computer maintenance utility designed by Microsoft to help Windows users free up disk space on a computer’s hard drive easily. In every Microsoft Windows system, more and more unnecessary files and junk data (for example, temporary internet files) will be accumulated over time. It’s important to run Disk Cleanup once in a while to get rid of these useless data and get more free space on your drive. Cleaning up your disk also helps to speed up your computer and improve the performance.
Microsoft decided to replace Disk Cleanup with a modern version in the Settings app in Windows 11. However, it doesn’t mean you can’t use Disk Cleanup anymore for deleting unnecessary disk files. On the contrary, Disk Cleanup still exists as a legacy tool in Windows 11 and it’s available for all users. In the content below, I’ll show you how to use Disk Cleanup Windows 11 briefly and how to troubleshoot Windows 11 Disk Cleanup not working.
Disk Cleanup Cleans Downloads Folder In Windows 10 After Update.
Tip: If you find your needed data are also deleted after performing Disk Cleanup, you should get a recovery tool immediately to get back the missing data. MiniTool Solution provides you with a good choice.
MiniTool Power Data Recovery TrialClick to Download100%Clean & Safe
Fix Windows 11 Disk Cleanup Not Working
Windows 11 Disk Cleanup Missing
Windows 11 users noticed that Disk Cleanup is missing from the new system, but that doesn’t mean you can’t use it anymore. Here’s how to use Disk Cleanup on Windows 11:
- Press Windows + S to open Windows Search.
- Type Disk Cleanup into the search box.
- Press Enter and the Disk Cleanup window will appear.
- Select Drive (C:) or another drive you want to clean.
- Click on the OK button and wait.
- Select the files you want to delete and click OK.
You can also click Clean up system files to delete more data.

If you find your Disk Cleanup stopping working suddenly or Disk Cleanup not deleting files, please try the following methods to fix the problem.
Remove Temporary Files Manually
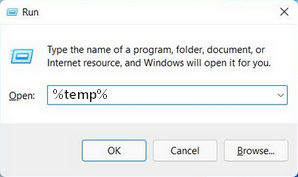
- Open Run by pressing Windows + R.
- Type %temp% and press Enter.
- Select all files in the opening Temp folder.
- Press Delete.
Use Storage Sense Instead
- Open Settings by pressing Windows + I.
- Select System -> Storage.
- Click Temporary files.
- Click on the Remove files button and wait.
Besides, you can try to use a third-party clean tool.
Run SFC or DISM
How to run SFC:
- Press Windows + S.
- Type cmd.
- Right click on Command Prompt.
- Select Run as administrator.
- Type sfc /scannow and press Enter.
- Wait.
How to run DISM:
- Run Command Prompt as administrator.
- Type DISM /Online /Cleanup-Image /RestoreHealth and press Enter.
- Wait.
Get Free Space by Formatting Your Disk
You have a better choice to get more free space if all files on a disk are not needed anymore: formatting the disk.
What Is Disk Formatting
What is disk formatting? Generally speaking, disk formatting refers to the process of preparing a storage device (such as hard disk, USB drive, SD card, and SSD) for initial use. Disk formatting can be divided into two types: low-level formatting and high-level formatting.
- Low-level formatting: low-level formatting, also known as physical formatting, is performed for initializing and preparing a disk for data storage. It creates sectors, tracks, and more.
- High-level formatting: high-level formatting, also known as logical formatting, refers to setting up an empty file system on a disk/partition. It writes specific data into a specific area of the disk according to the file system people selected.
Tip: If there is no special instruction, the hard drive formatting usually refers to a high-level formatting process. As for floppy disk formatting, it often contains both formatting types. Please read Part 3 – Classification of Hard Drive Formatting on this page if you’d like to know more about low-level and high-level formatting.
What Does Reformatting Mean
Well, the word reformatting means to format a drive again. What does reformatting do? Reformatting a drive mainly does 2 things: give the drive a new file system and delete all the data stored on that drive.
Both formatting and reformatting works well in preparing the disk for use and clearing the disk data.
How To Restore Document After System Clean – Safer Is Better.
About The Author
Position: Columnist
Sarah has been working as an editor at MiniTool since she graduated from university. Sarah aims at helping users with their computer problems such as disk errors and data loss. She feels a sense of accomplishment to see that users get their issues fixed relying on her articles. Besides, she likes to make friends and listen to music after work.
В рамках нынешней политики развития нового приложения «Параметры» (принятой, напомним, еще в 2018-м) Microsoft давеча убрала из Windows 11 старую-добрую утилитку «Очистка диска».
Прям как когда-то в Windows 10. И тоже в пользу новой встроенной проги «Контроль памяти» (которая Storage Sense).
То бишь, в диалоговом окошке свойств диска привычную кнопку «Очистка диска» просто заменили на кнопку «Контроль памяти».
По ней стандартно открывается раздел «Память» настроек с графиками, сколько места на каком диске занято и сколько еще свободно. А чтобы глянуть, на что заняты гигабайты, надо кликнуть еще раз по соответствующему диску.
И что характерно, даже в окне «Память» кнопка «Очистка диска» теперь тоже не положена. И по факту просто так, как раньше, эту старую утилиту уже не запустишь. Вместо неё теперь т.н. «Рекомендации по очистке».
И то очень неблизко: надо сначала открыть главную страницу раздела «Память» в Windows 11 (меню «Пуск» > «Параметры» > «Система» > «Память»), там найти и кликнуть ссылку «Рекомендации по очистке» и только в следующем окне откроется список знакомых опций для очистки:
- временные файлы
- большие или неиспользуемые файлы
- файлы, синхронизированные с облаком
- неиспользуемые приложения.

Но старая «Очистка диска» по-прежнему круче!
И дело не только в том, что эти самые «Рекомендации…» еще найти надо, вся новая система не так удобна, как старая утилитка. В «Очистке диска» открывался сразу весь список всего, что можно быстро, просто и сравнительно безболезненно удалить. Плюс, можно было еще кнопку «Очистить системные файлы» кликнуть, чтобы удалить еще больше всего ненужного и освободить больше места для чего-то нужного. Теперь, как видим, всё несколько иначе и хлопотнее.
Наверное поэтому встроенную утилиту «Очистка диска» даже из новой Windows 11 разработчики еще не выкинули насовсем. Более того, велика вероятность, что и после релиза системы она тоже останется. Но, повторимся, включать её теперь можно только вручную:
- либо просто написать очистка диска в строке поиска системы и потом кликнуть по первому значку в результатах поиска (правда, очень вероятно, что это тоже ненадолго);
- либо жмем клавиши Win+R, в строке «Выполнить» пишем cleanmgr.exe и жмем Enter — так даже надёжнее.
Ну а так как старую «Очистку диска» из Windows рано или поздно, но всё равно уберут, то тогда уже точно придется или окончательно привыкать к новым фичам, или юзать сторонние приложения вроде Cleanmgr+. Выглядит эта и прочие проги немного иначе, но функционал по сути тот же.