- On Windows 11, to move the Taskbar, edit the “Settings” binary key in the “StuckRects3” Registry key.
- The 01 value moves Taskbar to the top.
- The 02 value moves Taskbar to the right.
- The 00 value moves Taskbar to the left.
- The 03 value moves Taskbar to the bottom.
UPDATED 8/10/2023: Windows 11 has a redesigned Taskbar with a center alignment for the Start menu and app buttons, a new notification area, new effects and animations, and more. Although it introduces many welcome improvements, it also removes some legacy capabilities, such as the ability to move the Taskbar around.
You can’t move the Taskbar on Windows 11 because this is an entirely new design, and moving it around the screen is challenging. Microsoft has explained that only moving the Taskbar to the right side suddenly changes the entire design (including the Start menu and apps), and the current interface and animations are designed for the bottom placement. As a result, the work implicating it was not worth the effort since there was insufficient demand.
If you are among those who like the Taskbar on another location (such as at the top, left, or right side), it’s still possible to move it. The only caveat is that you can only complete this task by editing the Registry.
In this guide, you will learn the steps to change the Taskbar position to the different sides of the screen on Windows 11. (See also the video tutorial explaining these instructions.)
- Move Taskbar position on Windows 11
- Move Taskbar to top with third-party tool
Warning: Modifying the Windows Registry can cause serious problems if misused. It’s assumed you know what you’re doing and have created a full backup of your system before proceeding. Also, some users have reported that this may or may not work after upgrading to version 22H2. As always, use these instructions at your own risk.
To move the Taskbar to the top, left, right, or bottom of the screen on Windows 11, use these steps:
-
Open Start on Windows 11.
-
Search for regedit and click the top result to open the Registry Editor.
-
Browse the following path:
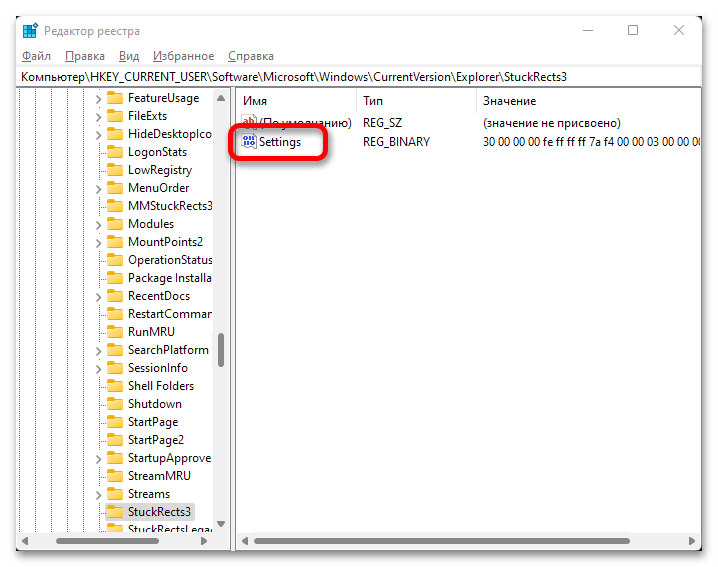
HKEY_CURRENT_USER\Software\Microsoft\Windows\CurrentVersion\Explorer\StuckRects3
-
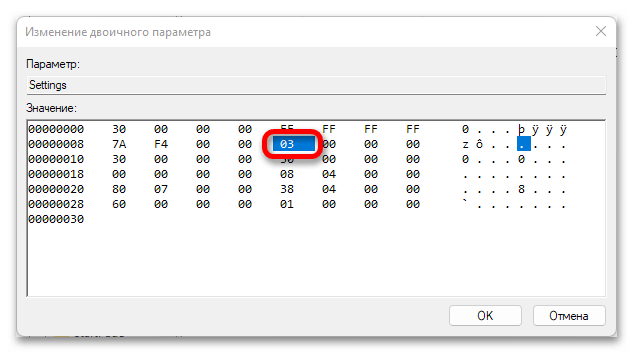
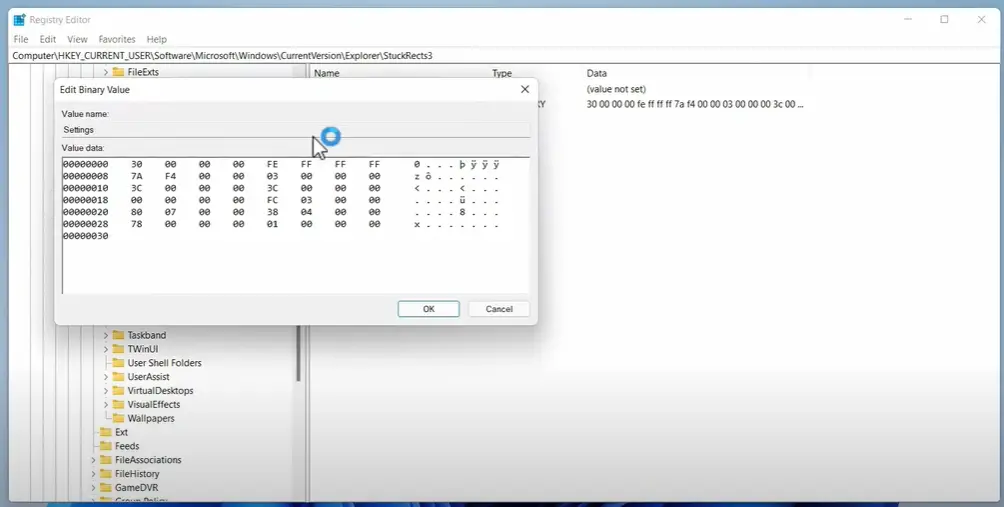
Double-click the Settings binary key.
-
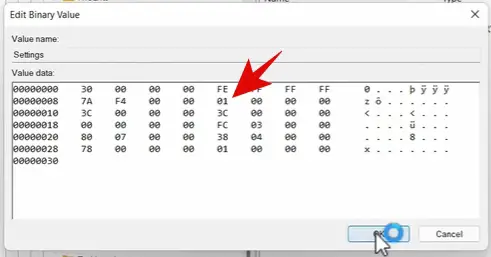
Under the “Value data” section, in the second row and the sixth column, click the 03 value, press the Delete key, and replace the value with 01 to move the Windows 11 Taskbar at the top of the screen.

-
Change the 03 value to 02 to move the Taskbar on the right side of the screen.
-
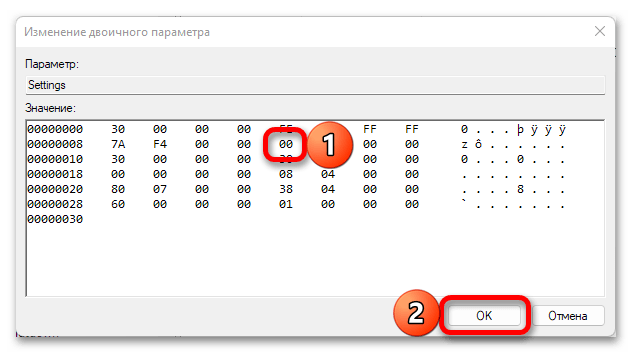
Change the 03 value to 00 to move the Taskbar on the left side of the screen.
-
Change the value to 03 to move the Taskbar at the bottom of the screen.
-
Click the OK button.
-
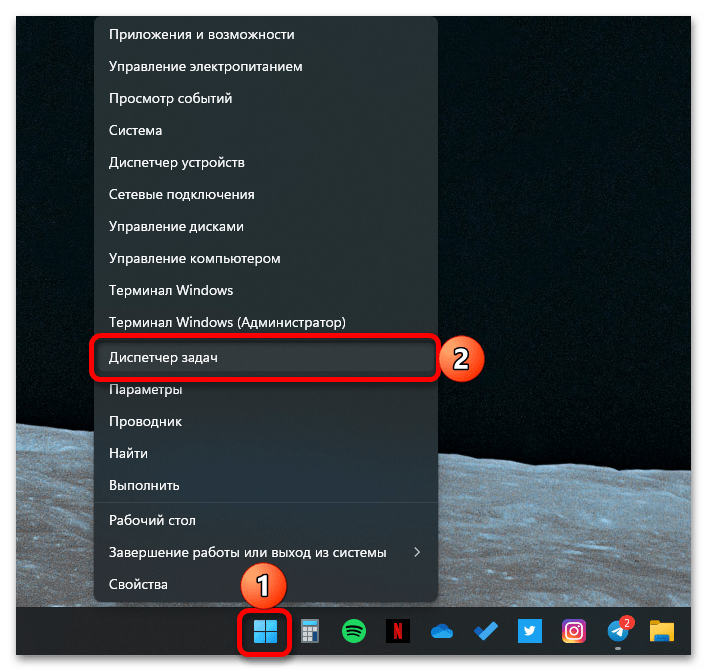
Right-click the Start button and select the Task Manager option.
-
Click the Processes tab.
-
Select the Windows Explorer process.

-
Click the Restart button.


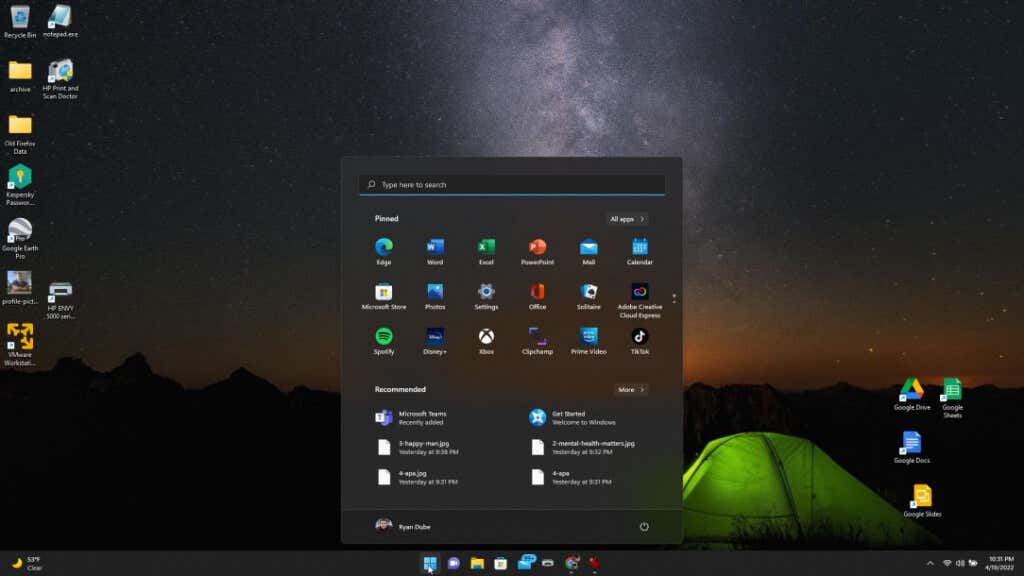
Once you complete the steps, the Windows 11 Taskbar will move to the top or either side of the screen as specified in the binary key.
While you can still change the Taskbar position, this is not a supported feature on Windows 11, which means this behavior may not work as expected.
Alternatively, if you can’t use the Registry settings, you may be able to use third-party tools to move the Taskbar to the top of the screen. For example, ExplorerPatcher is a free solution that brings back the classic design of the Taskbar with legacy functionalities, such as the ability to change the bar position. It’s not a perfect solution, but this might be the best free option if you want to reposition settings.
To move the Taskbar to the top of the screen with ExplorerPatcher, use these steps:
-
Open ExplorerPatcher GitHub page.
-
Under the “Assets” section, click the ep_setup.exe link to download the app.

-
Confirm you want to keep the file in the web browser (if applicable).
-
Double-click the file to install the app.
-
Right-click the Taskbar and select the Properties option.
-
Click on Taskbar.
-
Use the “Taskbar style” setting and select the “Windows 10” option.
-
Use the “Primary taskbar location on screen” setting and select the Top option to move the Taskbar to the top of the screen. (You also have the option to move it to the left or right side.)

-
(Optional) Use the “Start button style” setting and select the “Windows 11” option.
-
(Optional) Use the “Combine taskbar icons on the primary taskbar” setting and select the Always combine option.
-
Click on Start menu.
-
Use the “Start menu style” setting and select the “Windows 11” option.
-
Click the Restart File Explorer option in the bottom-left corner (if you don’t see the changes).


After you complete the steps, you can start using the Taskbar from the top of the screen.
Update March 1, 2023: Microsoft warns that apps like ExplorerPatcher and StartAllBack can cause booting issues on Windows 11 after installing the update KB5022913 or higher releases.
Update March 2, 2023: The developer of ExplorerPatcher has released an updated version of the tool that fixes the problem and works with the new update of Windows 11.
Update August 24, 2023: The developer of ExplorerPatcher has released yet another updated version of the tool that fixes a bug with the Start menu after installing the latest update of Windows 11.
Вариант 1: Кнопка «Пуск» и значки
В случае если вы хотите изменить расположение не самой панели задач (ПЗ), а только значков на ней (кнопка «Пуск», а также последующие за ней элементы и ярлыки), потребуется обратиться к параметрам персонализации операционной системы, отредактировать один из файлов в реестре или воспользоваться специализированным ПО от сторонних разработчиков. Любой из доступных методов приводит к одному и тому же результату – все значки смещаются влево, как это было в Windows 10 и предшествующих ей версиях ОС. Более детально все это ранее рассматривалось нами в отдельной статье, ссылка на которую дана ниже.
Подробнее: Как переместить кнопку «Пуск» влево в Виндовс 11
Вариант 2: Панель задач
Если же вы хотите изменить расположение всей панели задач, переместив ее из нижней части экрана в левую, потребуется отредактировать значение одного из параметров в системном реестре, но стоит иметь в виду следующее:
Обратите внимание! На момент написания настоящей статьи (сентябрь 2022 года) не существует никаких других способов перемещения ПЗ влево или вправо, кроме рассмотренного далее. Однако и он работает некорректно – с панели пропадают все значки, кроме тех, что по умолчанию находятся справа (трей, индикатор языковой раскладки, сетевое соединение, параметры громкости, время и дата), а большинство привычных функций становятся недоступными либо работают некорректно. Возможно, это баг, который исправят в одном из обновлений.
Читайте также: Как переместить ПЗ вправо в Windows 11
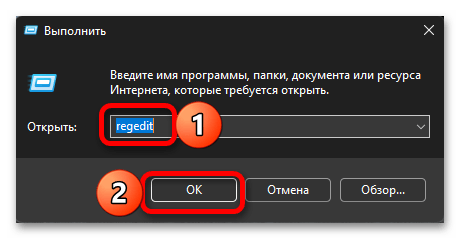
- Любым удобным способом откройте «Редактор реестра». Это можно сделать через поиск либо с помощью оснастки «Выполнить» (вызывается сочетанием клавиш «Win+R»), в которую нужно ввести представленный ниже запрос и затем нажать «ОК» или «Enter».
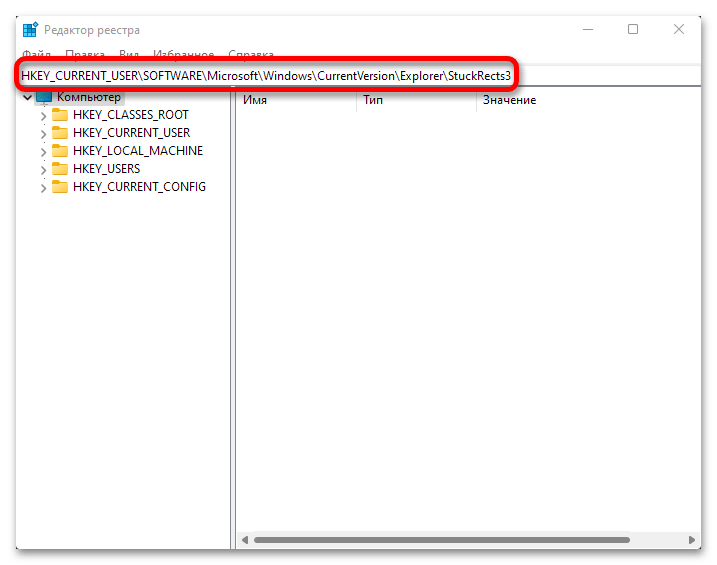
regedit - Перейдите к указанному ниже расположению. Это можно сделать как вручную, последовательно открывая папки, так и более быстро – достаточно скопировать этот путь, вставить его в адресную строку редактора и нажать «Enter».
HKEY_CURRENT_USER\SOFTWARE\Microsoft\Windows\CurrentVersion\Explorer\StuckRects3 - Откройте параметр «Settings», дважды кликнув по нему левой кнопкой мышки (ЛКМ).
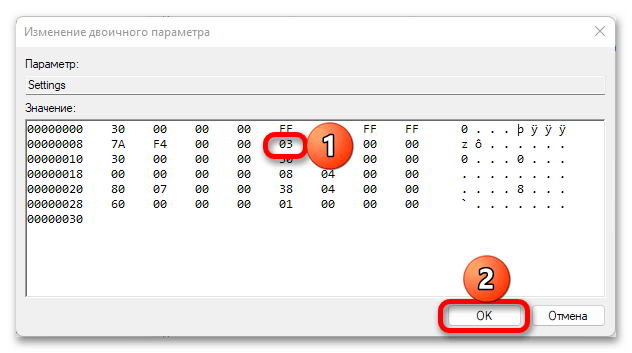
- Выделите значение, указанное в строке 00000008 и столбце FE – для этого дважды нажмите по нему ЛКМ.

Измените заданное по умолчанию 03 на 00, после чего воспользуйтесь кнопкой «ОК» для подтверждения.
- Последнее, что требуется сделать для того, чтобы внесенные изменения вступили в силу – это перезапустить «Проводник». Откройте «Диспетчер задач» (сочетание клавиш «Ctrl+Shift+Esc» или контекстное меню кнопки «Пуск»).

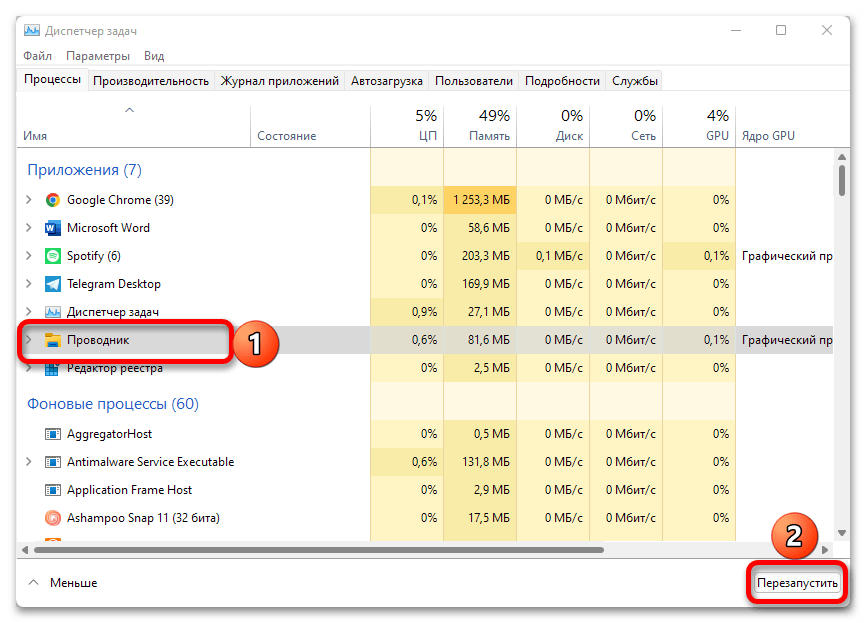
Отыщите в списке активных процессов «Проводник», выделите его и нажмите на кнопку «Перезапустить».

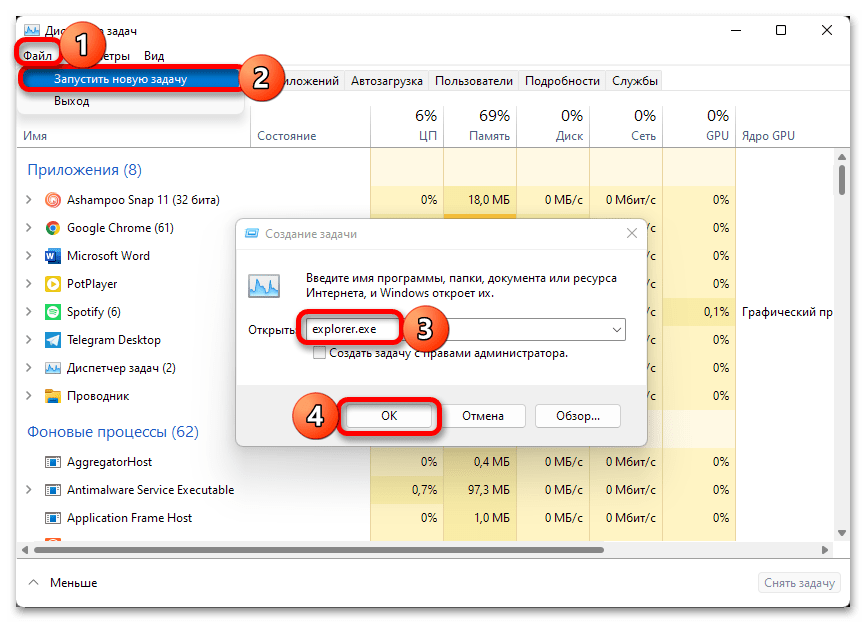
Примечание: Если «Проводник» отсутствует в списке, запустите его вручную – воспользуйтесь для этого сочетанием клавиш «Win+E» или пунктом «Запустить новую задачу» в меню «Файл», затем в появившемся окне потребуется ввести команду
explorer.exeи кликнуть «ОК» для подтверждения. После того как задача появится, снимите ее.
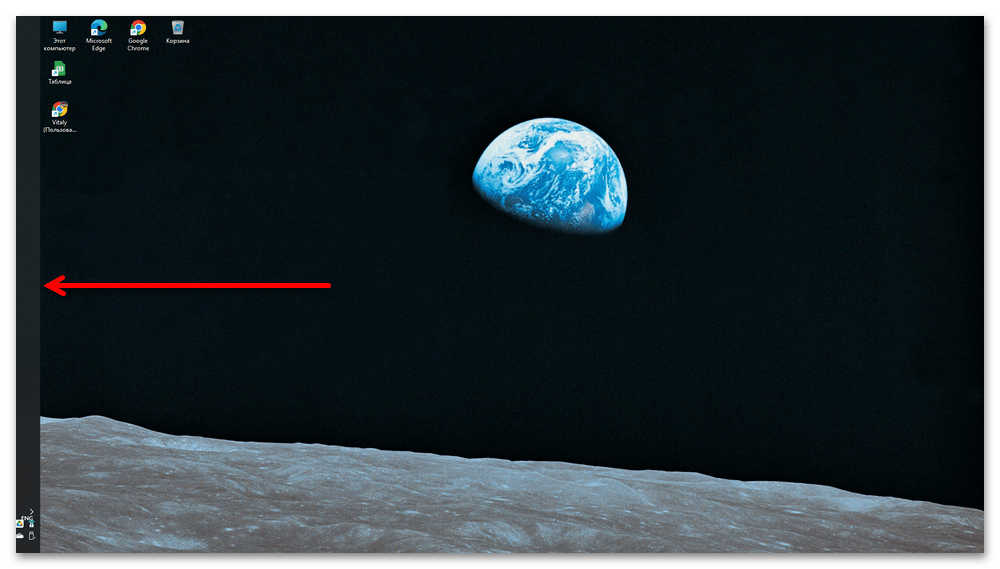
Практически сразу панель задач будет перемещена на левую границу экрана и, как уже было сказано, на ней будут отсутствовать все основные кнопки и ярлыки. То есть можно смело сказать, что в таком виде нормально пользоваться данным компонентом ОС невозможно.
Для того чтобы восстановить расположение ПЗ по умолчанию, повторите все действия из представленной выше инструкции с той лишь разницей, что в пункте №4 потребуется изменить значение, указанное в строке 00000008 и столбце FE на 03 вместо 00.
Читайте также: Как восстановить работоспособность панели задач в Windows 11
Еще статьи по данной теме:
Помогла ли Вам статья?
Windows 11 is here and people are using it on their PCs. One of the places that you interact most on any Windows PC is the Taskbar. Many people like to customize their taskbar on Windows and place it left, right, or top rather than default position, according to their use. Unfortunately, you do not have the option to move the Taskbar position anywhere on Windows 11.
Taking away the customization feature from the newer OS wasn’t expected. Many users like their taskbar on the other sides of the screen. If you are really eager to move the taskbar to left, right, or on top of Windows 11 then this guide is for you.
Moving the Taskbar Icons On Windows 11
As you probably know by now, the taskbar icons are now in the center of the taskbar. You can move them to the left side if you want. Here is how to do it:
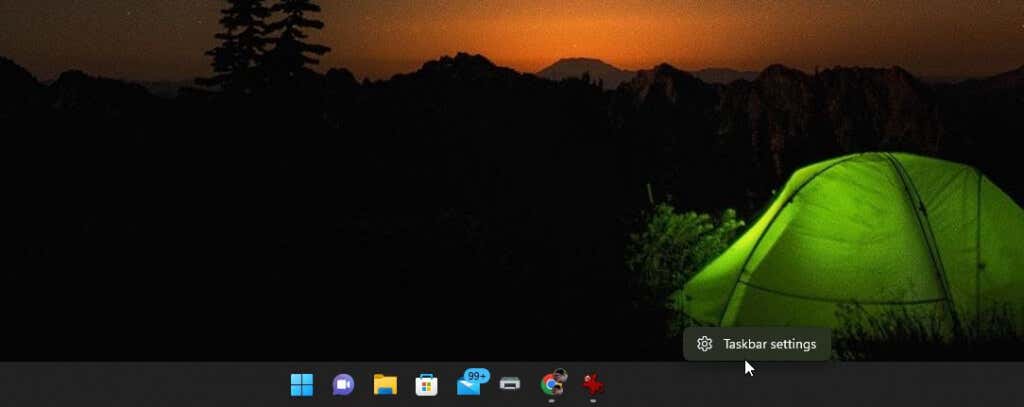
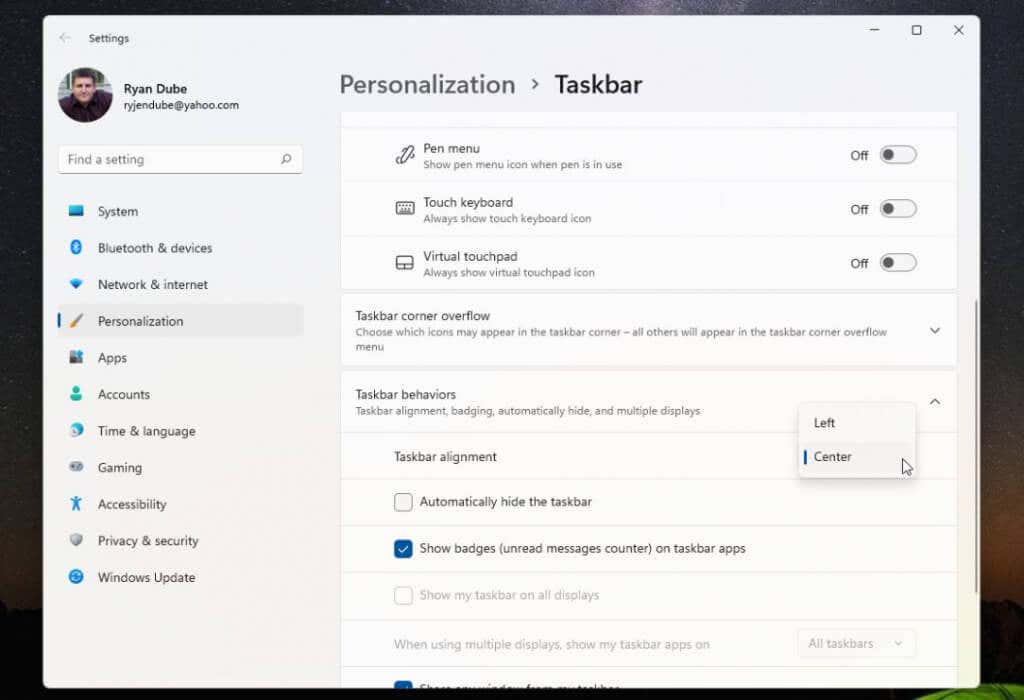
1: Right on the empty space on the taskbar and click on Taskbar settings.
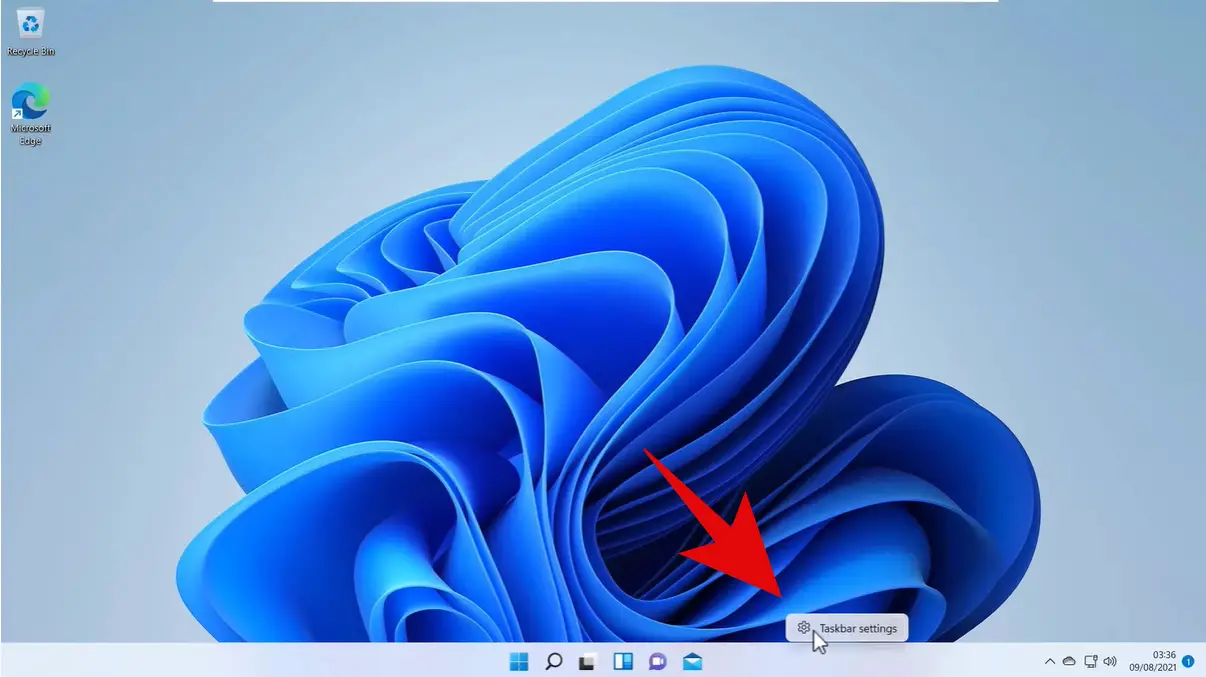
2: Navigate down expand Taskbar behaviors. Use the drop-down menu next to Taskbar alignment to shift the icons to the left or center.
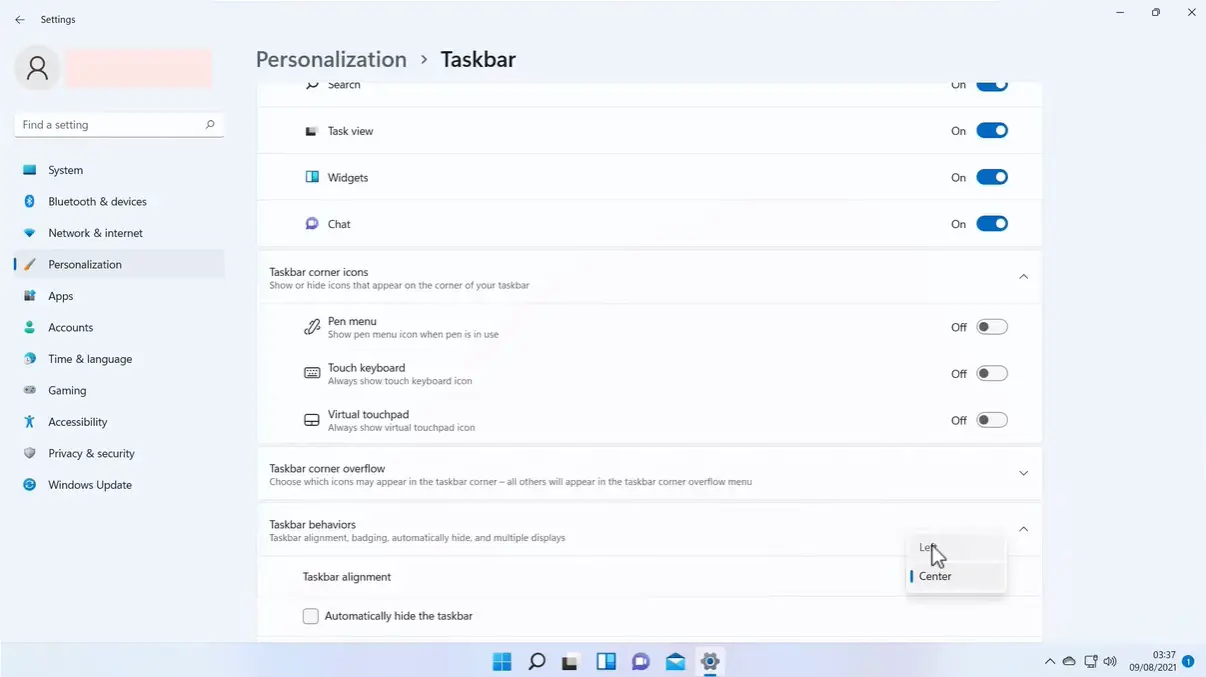
However, doing so will only move the taskbar icons to the left or center. If you want to move the taskbar to some other place, you will have to use the registry editor.
There is no GUI option to move the taskbar in Windows 11, you have to rely on the registry editor to change the taskbar position. Every time you need to move the taskbar you have to access the registry and make the required changes.
Using the Windows Registry
Note: Our team tried the method to move the taskbar using the Windows registry. We were successful in moving the taskbar to the top and bottom with ease. However, when we tried to move it to right and left, the taskbar icons didn’t show up.
Windows 11 is still in its early days, we have notified Microsoft about this problem so they might fix this with an update. Thus if you want to move your taskbar to the top and bottom, then you can follow this guide.
Opening the Registry
Step 1: Click on the search icon on the taskbar and then type “regedit”, hit enter.
Step 2: Once you open the registry editor, expand the menu on the left and go to the following path:
HKEY_CURRENT_USER\SOFTWARE\Microsoft\Windows\CurrentVersion\Explorer\StuckRects3
Taking Registry Backup
It is important to keep a backup before you make any changes to the registry, if anything goes wrong you can easily revert the changes.
Step 3: Select the StuckRects3 registry and then click on the File tab and click on Export.
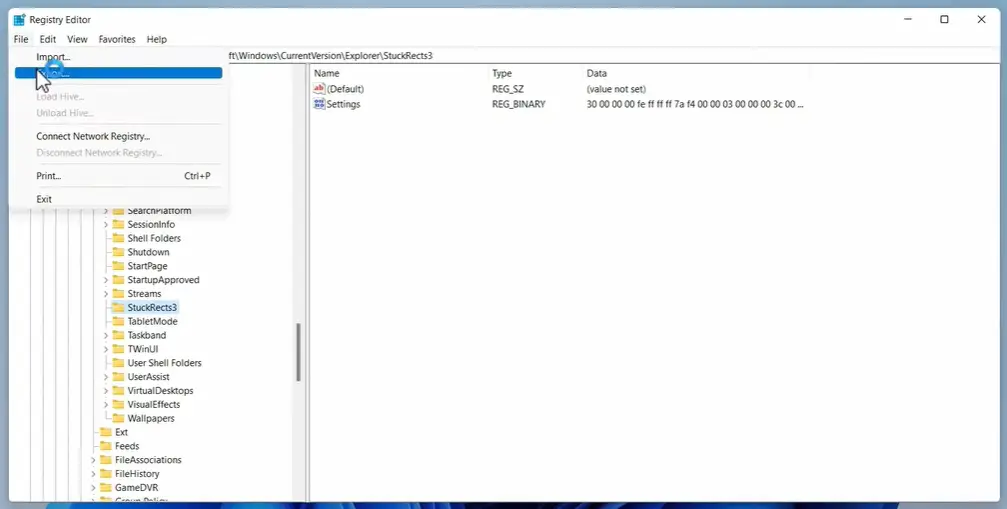
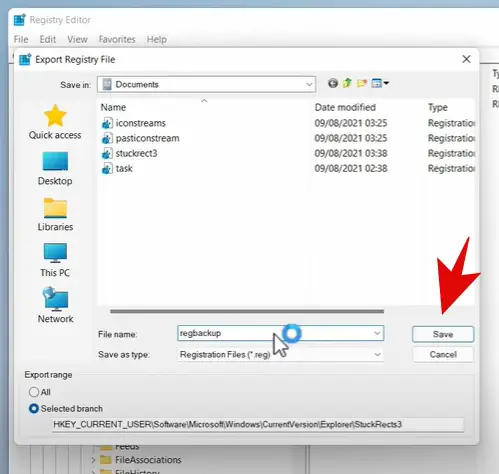
Step 4: Name it anything and then save it. This will work as a backup in case something goes wrong.
Moving the Taskbar
Step 1: Double-click on the Settings registry key on the left side to open it.
Step 2: Check the Value data. In the first row, you will see a column named FE, just below that you will see a number 03. This value decides the taskbar position.
| 00 | Left |
| 01 | Top |
| 02 | Right |
| 03 | Bottom |
Step 3: If you want to move the taskbar, you have to use the values accordingly. Just make sure that you take the pointer to the right of the value data responsible for the position of the taskbar.

Step 4: Once the pointer is on the right side of the value, press backspace and erase that data. Now enter the value for the position you want your taskbar at.
As mentioned earlier, this only works for the top and bottom positions so you can only use 01 and 03 values. However, you can try 00, & 02 to check if it works.
Step 5: Once you enter your desired value under the FE column, click on OK.
That’s it!
Now all you have to do is restart your computer and your taskbar will be shifted to the location of your preference.

Closing Phrase
Taking away the customization control from users wasn’t expected from Microsoft. Maybe they can bring this feature back in future updates, send your feedback to the company.
If you want to change the taskbar position in Windows 11 you can use the registry editor. As of now, you can only move it to the top and bottom without compromising on the icons.
A lot of people prefer their taskbar to be on the left side. I hope Microsoft listens to the feedback and resolves this issue. In my opinion, Microsoft should give users the option to unlock the taskbar and place it anywhere they like.
Also, Read:
- Fix “This PC doesn’t currently meet Windows 11 system requirements” Error for Windows 11
- Windows 11: How To Check if Your PC is Compatible For Upgrade
- How to Create Windows 11 Bootable Media [3 Methods]
One of the first features you may want to play around with is the ability to reposition the Windows 11 taskbar to the left or right, or how to further customize it in different ways. In this tutorial, you’ll learn how.
One of the things you’ve probably noticed the first time you launched the Windows 11 operating system is the fact that the main taskbar icons are centered in the middle of the taskbar at the bottom of the desktop.
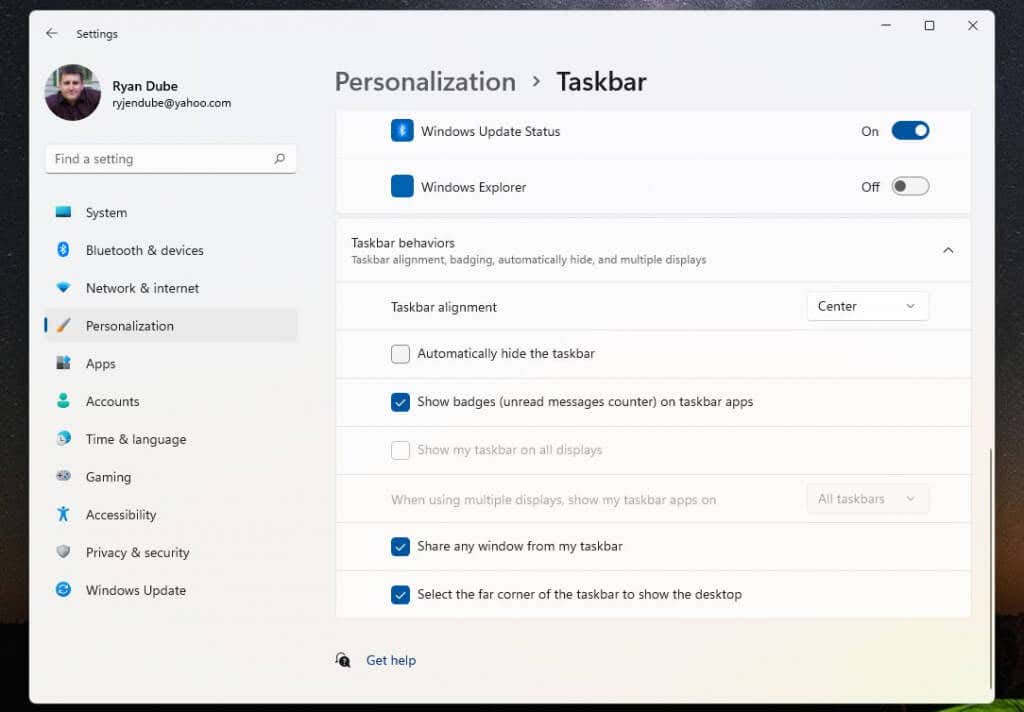
Two positions are available in the taskbar settings for you to reposition where the start menu icon and app icons appear in the taskbar. You can place these to the left or to the right side of the screen (this is actually the center of the taskbar, since the time, date, and system icons are at the far right).
Do you prefer the standard left location for the Start menu and app icons? Setting this is simple.
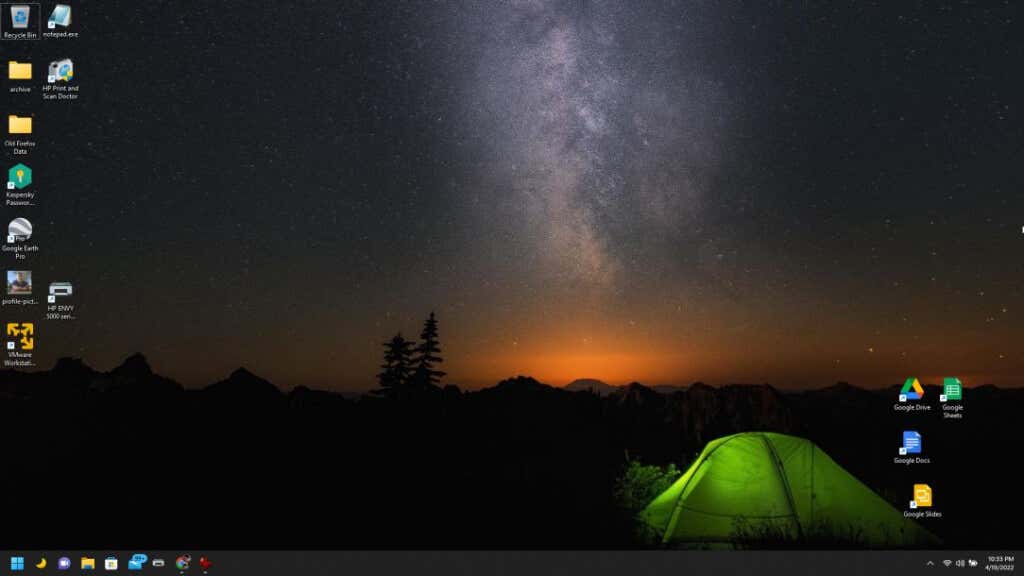
When you changed the setting, you should have noticed that the Start menu and all taskbar icons are now aligned on the left side of the taskbar.
If this is good enough, you can stop reading this article now. But if you’d like to position these taskbar icons in other locations on the desktop or further customize it — read on.
Move Windows 11 Taskbar to Top of the Desktop
If the left or center of the taskbar isn’t enough flexibility for you, you can also place the taskbar at other positions on the desktop as well.
You can do this with a simple registry hack.
Type any of the following values depending on which position you want to move the taskbar to.
00: Left side01: Top of the screen02: Right side03: Bottom of the screen
As you can see, it’s pretty easy to move the taskbar position wherever you’d like to place it on the Windows 11 desktop. But there are a few additional ways you can customize the Windows 11 taskbar as well.
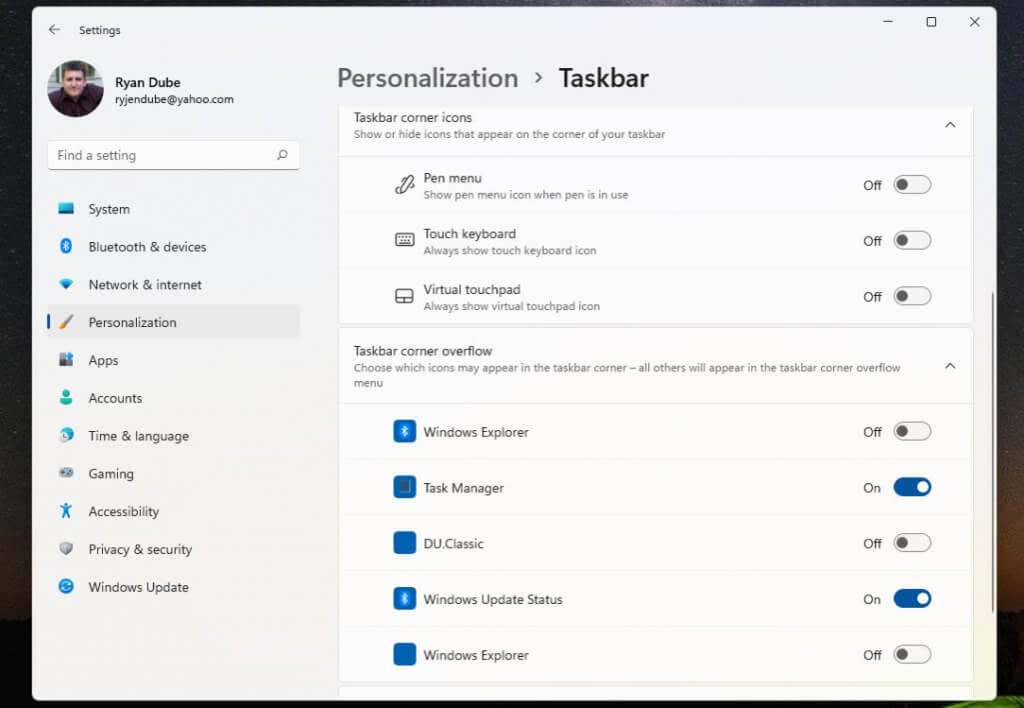
How to Customize the Windows 11 Taskbar
There are a few other ways you can customize the Windows 11 taskbar. You can do this in the Taskbar Personalization settings in Windows Settings.
To do this:
Once you customize the taskbar, just return to the desktop to start using it.
Of course, one last method you can use to customize what shows up on the dashboard is similar to what you could do in Windows 10 — pinning or unpinning app icons.
Just right-click any app that you want to remove and select Unpin from taskbar to remove that app icon from the taskbar permanently.
This is the easiest way to customize which app icons appear on the taskbar whenever you launch Windows 11.
Love it or hate it, Windows 11 gives us a new user interface that may not make everyone happy. However, at least there are some different options to choose from when it comes to the Windows 11 taskbar.


![]()
![]()
Как закрепить в Windows 11 панель задач сверху? Жмите Win+R, введите команду regedit, перейдите по ссылке HKEY_CURRENT_USERSOFTWAREMicrosoftWindowsCurrentVersionExplorerStuckRects3. Жмите на Settings, в строке 0000008 в разделе FE остановите «01» и перезапустите ПК / ноутбук. Как вариант, используйте программу Taskbar11. Ниже рассмотрим, как правильно разместить панель задач Windows 11 слева, сверху, справа, а при необходимости вернуть вниз. Отдельно разберемся с особенностями, как закрепить этот элемент операционной системы.
Как переместить
В Виндовс 10 пользователи могли сдвинуть панель задач в любом направлении. Ее можно было сместить влево, вправо или вверху. В этом отношении Windows 11 не дает такой возможности и позволяет выбрать только одно из трех положений — стандартное внизу, слева или сверху. Смещение в правую сторону пока недоступно, но ситуация может исправиться вместе с очередным обновлением. Зато всегда можно поменять цвет под свое настроение.
Сверху
Для начала разберемся, как переместить панель задач Windows 11 наверх, ведь именно с этим вопросом чаще всего обращаются пользователи. Здесь можно воспользоваться командной строкой или специальным приложением. Рассмотрим каждый из методов подробнее.
Командная строка
Наиболее простой способ, как изменить положение панели задач Windows 11 и поставить ее сверху — применение командной строки. Чтобы подвинуть этот элемент в нужном направлении, сделайте такие шаги:
- Жмите Win+R, чтобы вызвать командную строку.
- Введите в появившееся поле команду regedit.
- Перейдите по следующему пути HKEY_CURRENT_USERSOFTWAREMicrosoftWindowsCurrentVersionExplorerStuckRects3, чтобы добраться до нужного файла.
- С правой стороны кликните на пункт Settings.
- Найдите строчку 00000008 и столбец FE, где должен быть установлен параметр «03».
- Поменяйте это число на «01».
- Перезапустите компьютер / ноутбуке и убедитесь, что панель задач Windows 11 вверху.

Таскбар
Существует еще один способ, как перенести панель задач Windows 11 наверх — реализовать это с помощью программы Taskbar11. Официальную версию софта можно найти по ссылке github.com/HerMajestyDrMona/Windows11DragAndDropToTaskbarFix/releases/. Учтите, что при загрузке файла могут возникнуть трудности из-за фильтра Smart Screen, который предусмотрен в веб-проводнике Майкрософт Эдже. Причиной является небольшая известность, но по факту проблем быть не должно.
Разобраться, как сделать панель задач сверху в Windows 11, не составляет труда. Просто установите приложение по рассмотренной выше ссылке и войдите в окно настроек. Здесь можно задать следующие характеристики Taskbar:
- Position — позиция: сверху или снизу;
- Size — размер: стандартный, большой, маленький (могут обрезаться часы);
- Indentation — позиция кнопки «Пуск»: слева или в центре.
- Icons — включение / выключение значков: поиск, чат и т. д;
- Corner Icons — системные значки в разделе уведомлений: ручной / сенсорный ввод, виртуальная сенсорная панель;
- Behavior — скрытие инструмента с экрана.
После изменения положения панели задач Windows 11 вверх остается нажать на кнопку Save для сохранения изменений. В результате можно будет сразу увидеть результат работы. Если все сделано правильно, интересующий инструмент должен оказаться сверху.

Влево
Следующий вопрос, который может возникнуть — перемещение панели задач в Windows 11 влево. Это означает, что расположение инструмента возможно не только сверху, но и с одной из сторон. Здесь также имеется два варианта.
Стандартный путь
Наиболее простой способ, как добиться расположения панели задач в Windows 11 слева, сделать это с помощью встроенных возможностей. Алгоритм действий имеет следующий вид:
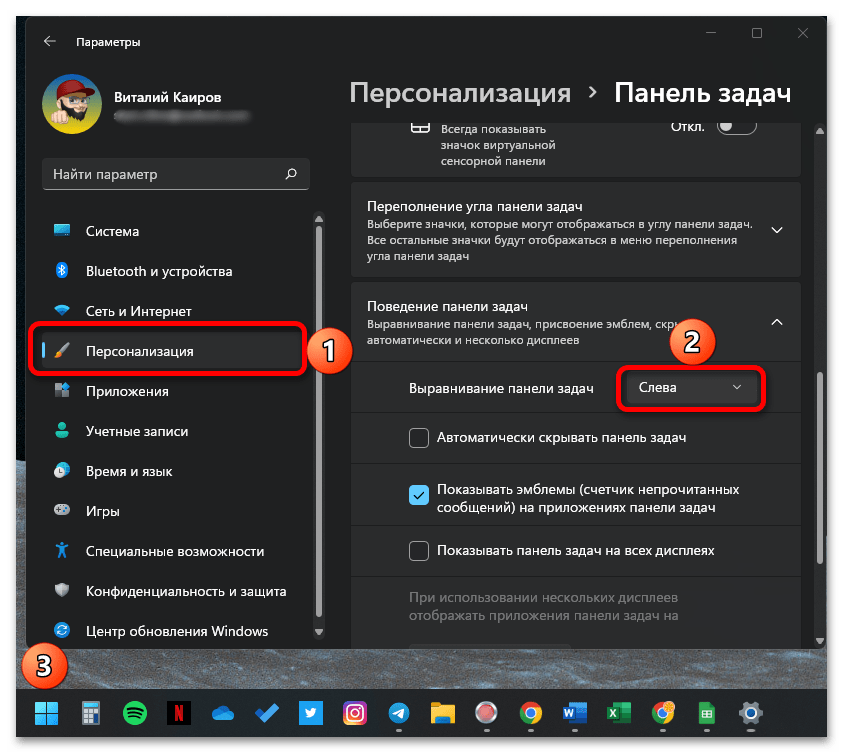
- Войдите в настройки Виндовс. Для этого жмите «Пуск» или «Настройки» / «Параметры». Как вариант, используйте комбинацию Win+I.

- Выберите «Персонализация» с левой стороны.
- Прокрутите вниз и зайдите в «Панель задач».

- Выберите «Поведение …».
- Укажите «Влево».
- Закройте настройки и убедитесь, что вам удалось поставить в Windows 11 панель задач сбоку.

После выполнения рассмотренных выше шагов остается закрыть настроечный раздел.
Через командную строку
Следующий метод переноса панели задач Windows 11 на левую сторону — через командную строку. Здесь нужно действовать по похожему принципу, как и при размещении сверху. Алгоритм такой:
- Кликните на Win+R.
- Введите Regedit.
- Перейдите по адресу HKEY_CURRENT_USERSoftwareMicrosoftWindowsCurrentVersionExplorerAdvanced.
- Найдите значение TaskbarAl. Если такой параметр отсутствует, кликните правой кнопкой мышки с правой стороны редактора реестра и сделайте новый файл DWORD32 с таким именем.
- Поставьте для него параметр «0» вместо «1».
- Закройте редактор реестра. Чаще всего изменения вступают в силу после выполнения рассмотренных выше шагов.
Справа
Часто звучат вопросы, как разместить в Windows 11 панель задач справа. Сделать это не получится. Единственное, что можно реализовать — разместить этот инструмент слева или сверху. Как это сделать правильно, рассмотрено выше.
Внизу
По умолчанию интересующий раздел со значками Windows 11 находится именно внизу. Если вы поставили его сверху или слева, необходимо вернуть все на место с учетом рассмотренной выше схемы. К примеру, если вы ставили отображение сверху через, тогда в строчке 00000008 и столбце FE должен быть установлен параметр «03».
Учтите, что перезапуск оболочки проводника является обязательным. Нельзя просто войти-выйти из учетной записи, ведь такой путь не даст результата. Чтобы правильно поменять расположение, сделайте следующее:
- Войдите в диспетчер задач с помощью Ctrl+Shift+Esc.
- Жмите «Подробнее» для отображения вкладок с приложениями / службами.
- В разделе «Процессы» найдите Проводник Виндовс и жмите его.
- Кликните «Перезагрузить».

Что делать, если сместилось
Бывают ситуации, когда пуск и панель задач не по центру в Windows 11. Если она съехала, проверьте правильность настройки персонализации. Для этого войдите в «Параметры» и разверните блок «Поведение …». Там выберите значение «Слева» или выравнивание «По центру». Изменения должны произойти мгновенно
Как закрепить
В Сети часто встречается вопрос, как в Windows 11 открепить панель задач или закрепить ее. В случае с Виндовс 10 нужно было нажать на пустом месте панели и выбрать в области задач «Параметры …». Здесь можно было поставить флажок возле «Закрепить …», а в дальнейшем отменить закрепление. В Виндовс 11 такой опции нет. Здесь можно закрепить приложение, изменить цвет, поменять расположение (в том числе кнопок), показать эмблемы на кнопках, автоматически скрывать информацию и т. д.
Зная, как в Windows 11 установить панель задач сверху или сбоку, вы сможете настроить удобное для себя расположение и избежать случайных нажатий. В комментариях расскажите, какой способ вы использовали и поделись своим опытом, какое еще метод может подойти.
Отличного Вам дня!