Всем привет!!!
Пару дней назад я заметил, что мой ноутбук странно шумит и оказалось не просто так. Мини приложения постоянно грузят процессор и он греется. Я нашел несколько способов и решил поделиться с вами.
Суть в том, что мини приложения перестали работать после очередного обновления Windows 11 и виновато в этом Windows Web Experience Pack, которое обновилось через Microsoft Store
Временное решение
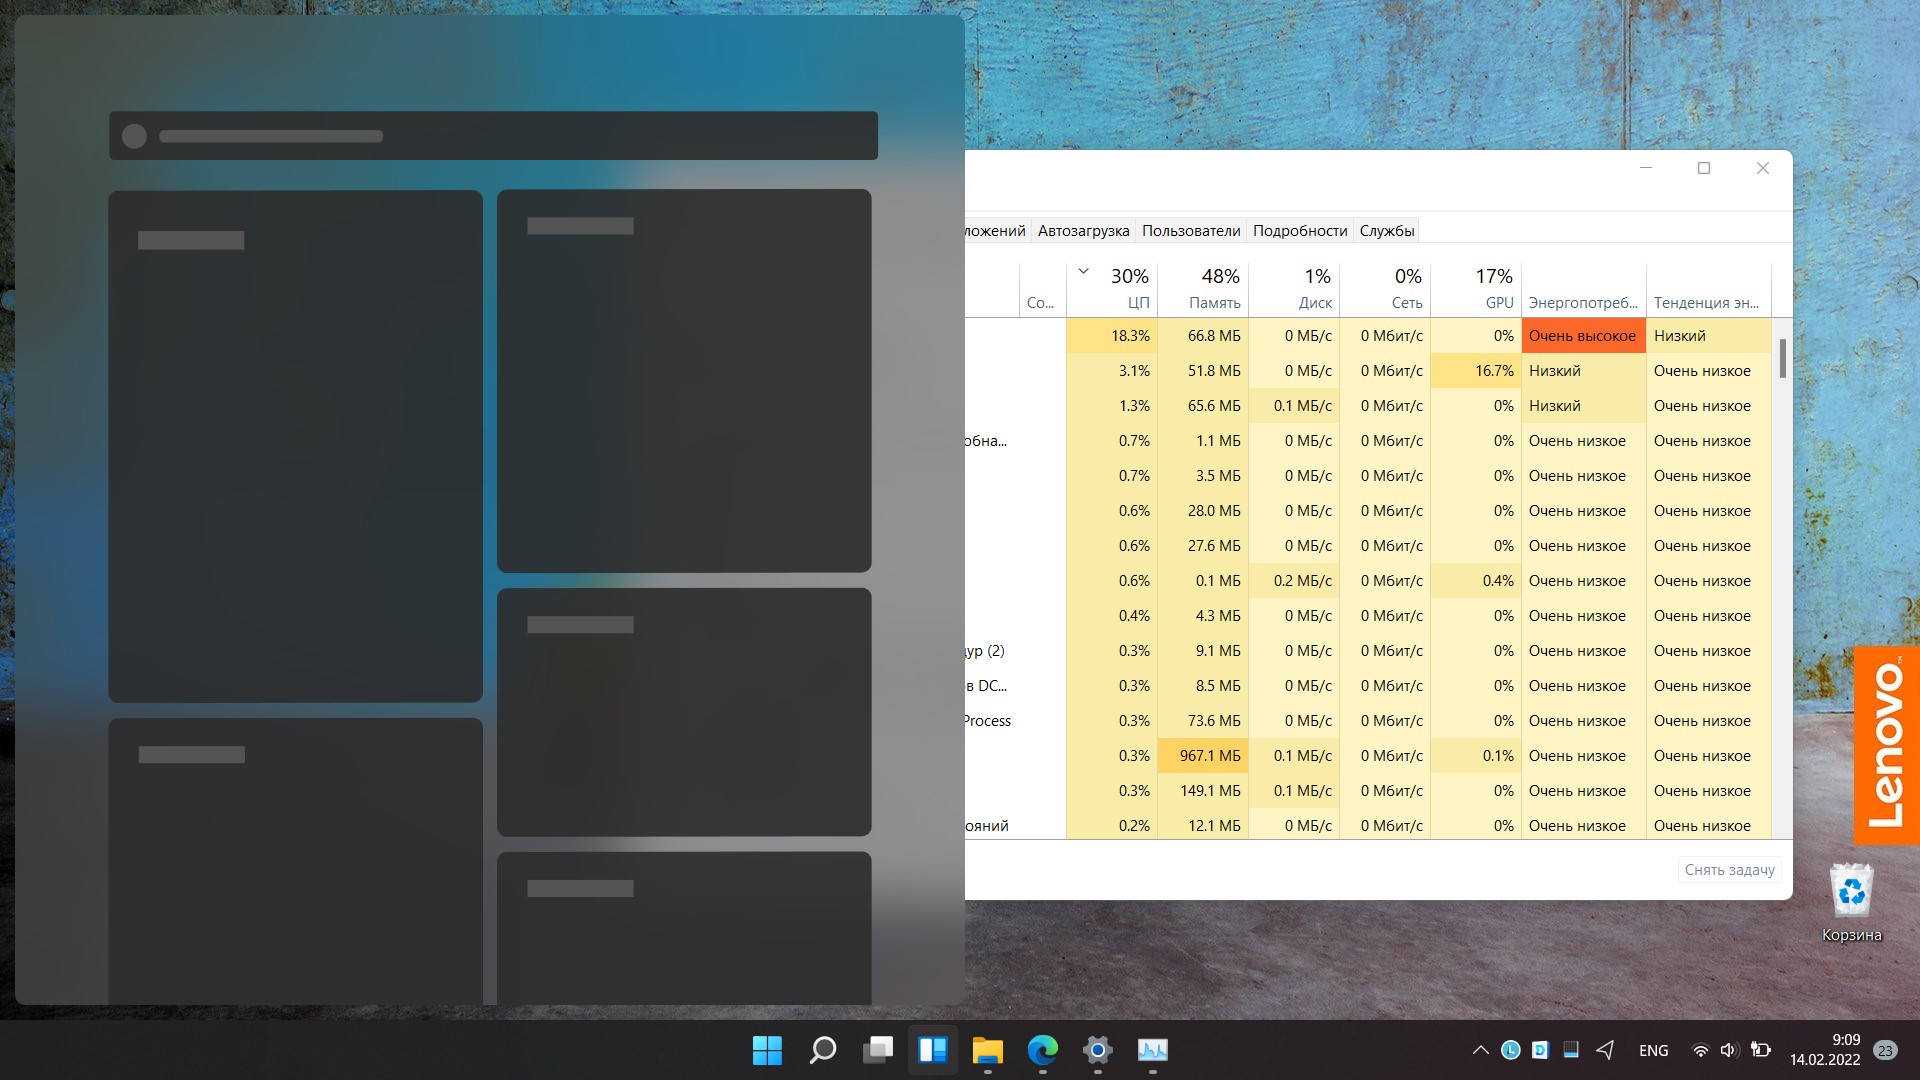
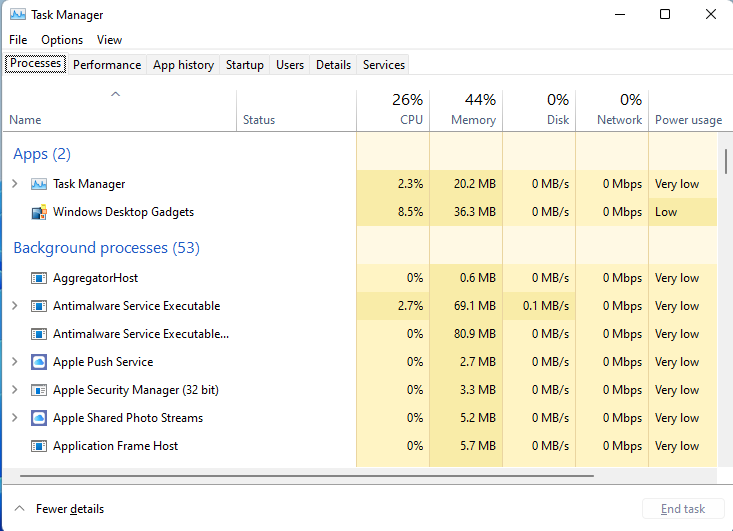
К слову они все временные, но это временно до следующей перезагрузки. Через диспетчер задач снять задачу с этих процессов. По русски говоря завершить их процессы

После этого нагрузка на процессор вернется в норму, но виджеты так и не будут работать. Для меня это не критично, я ими всеравно не пользуюсь. И отвечая на вопрос, а если их отключить в параметрах панели задач, то скажу, это не поможет. Только убивать процесс, что бы он не грузил CPU.
Откатить кривое обновление
Для того что бы процессор не напрягался и виджеты работали, на данный момент есть только один способ: установить Windows Web Experience Pack предыдущей версии. Для этого скачиваем Windows Web Experience Pack по ссылке ниже и устанавливаем. При установке он заругается, что стоит более новая версия, не обращайте внимания на это.
Переключить язык интерфейса
Еще один способ это переключить язык интерфейса на English, так как только на этом языке нет такой проблемы.
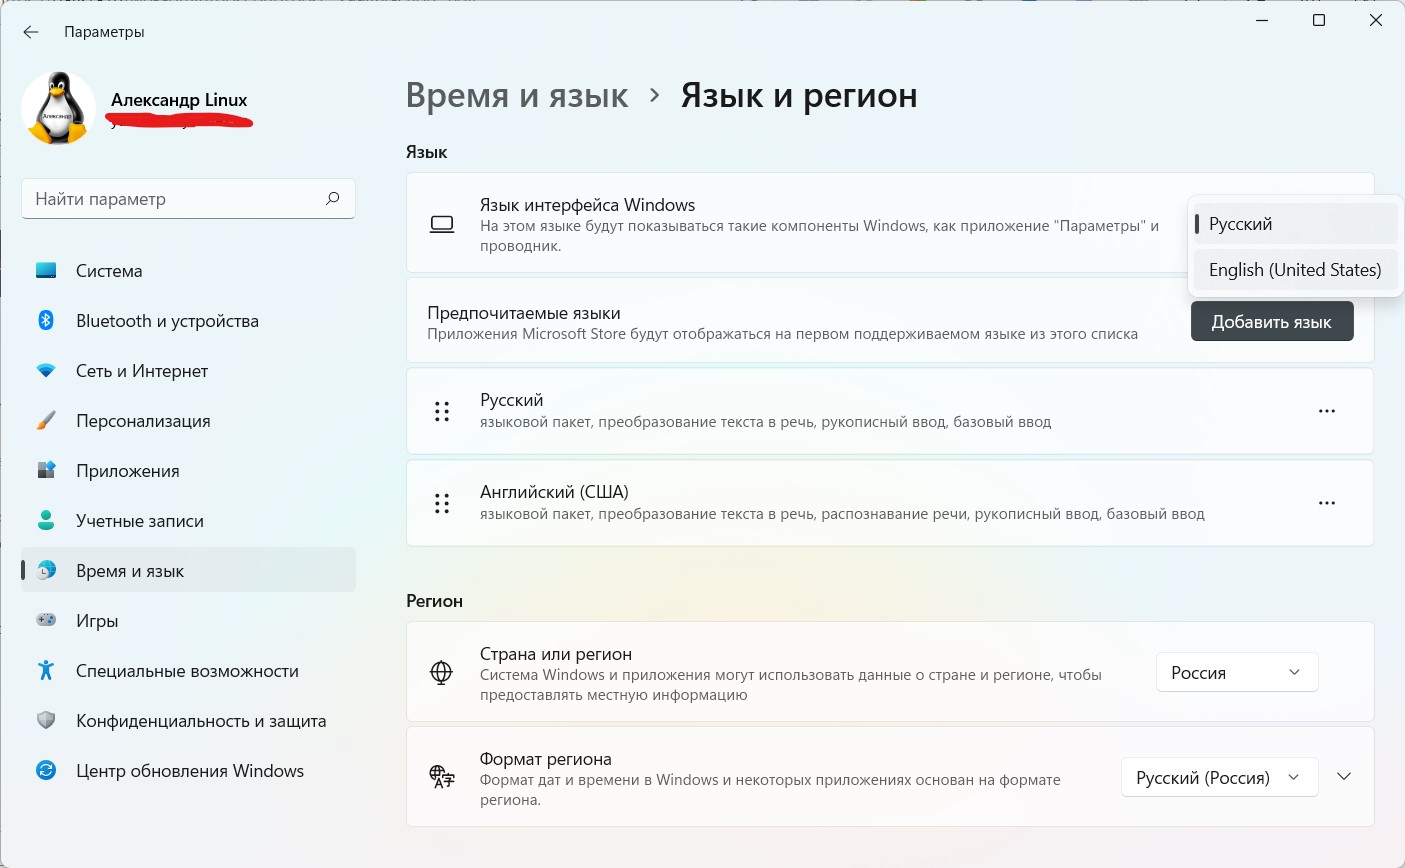
Да, тогда весь интерфейс в Windows станет на английском языке, но скажите себе: как часто вы заходите в настройки или параметры? Помешает ли это вашей работе?
Итог
Я надеюсь, что в ближайшее время Microsoft исправит баг и мы снова заживем как и раньше.

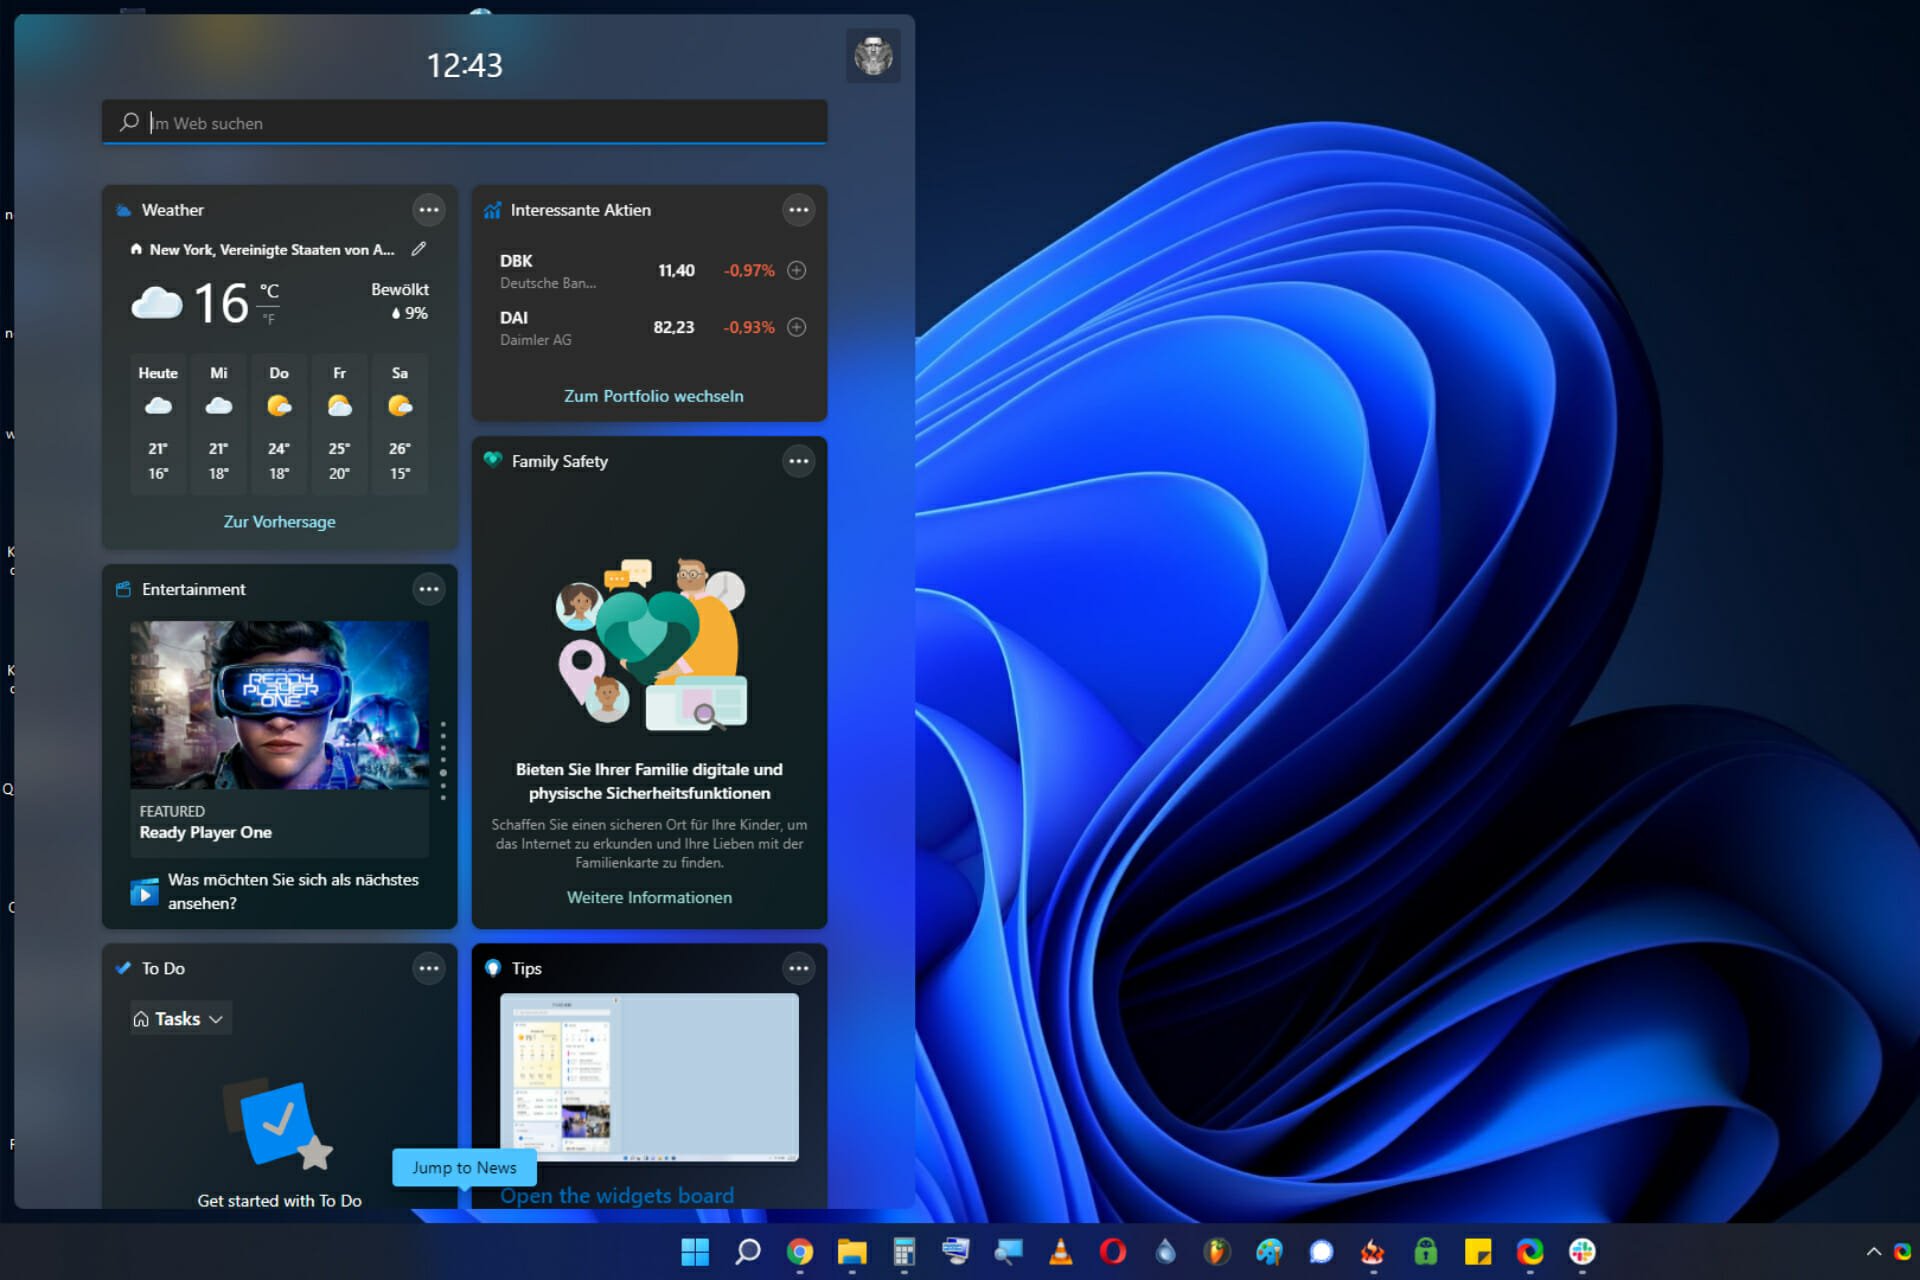
 Один из новых элементов Windows 11 — мини-приложения или виджеты, значок для открытия которых появился на панели задач. Далеко не все пользователи нашли новую функцию полезной для себя и, если вы один из таких пользователей, есть возможность убрать их с глаз долой.
В этой пошаговой инструкции подробно о том, как просто убрать мини-приложения с панели задач Windows 11, полностью отключить их или удалить из системы.
Как убрать мини-приложения Windows 11 с панели задач
Первое и наиболее простое — просто убрать значок мини-приложений или виджетов с панели задач Windows 11, для этого достаточно выполнить следующие простые шаги:
- Нажать правой кнопкой мыши по пустому месту панели задач и открыть «Параметры панели задач» или перейти в Параметры — Персонализация — Панель задач.
- Отключить пункт «Мини-приложения».


Сразу после этого, пункт пропадет с панели задач.
То же самое можно проделать в редакторе реестра:
- Нажмите клавиши Win+R на клавиатуре, введите regedit и нажмите Enter. Откроется редактор реестра.
- В редакторе реестра перейдите к разделу
HKEY_CURRENT_USER\Software\Microsoft\Windows\CurrentVersion\Explorer\Advanced
и установите значение 0 для параметра с именем TaskbarDa (при отсутствии потребуется создать параметр DWORD с этим именем).


Как отключить мини-приложения (виджеты) без их удаления
Вы можете отключить возможность использования мини-приложений, не удаляя их при этом. Для этого в Windows 11 Pro можно использовать редактор локальной групповой политики, а в Домашней редакции — редактор реестра.
Способ с помощью редактора локальной групповой политики:
- Нажмите клавиши Win+R на клавиатуре, введите gpedit.msc и нажмите Enter.
- Перейдите к разделу Конфигурация компьютера — Административные шаблоны — Компоненты Windows — Widgets (не исключено, что в будущих версиях раздел поменяет имя на Мини-приложения или Виджеты).

- Дважды нажмите по параметру «Allow widgets» (Разрешить мини-приложения) в правой панели и установите «Отключено» для него, примените настройки.


Отключение мини-приложений с помощью редактора реестра:
- Откройте редактор реестра (Win+R — regedit).
- Перейдите к разделу
HKEY_LOCAL_MACHINE\SOFTWARE\Policies\Microsoft
, нажмите правой кнопкой мыши по подразделу Microsoft и создайте в нем новый подраздел с именем Dsh
- Перейдите в созданный подраздел, нажмите правой кнопкой мыши в правой панели редактора реестра и создайте новый параметр DWORD с именем AllowNewsAndInterests
- Дважды нажмите по вновь созданному параметру и установите значение 0 для него.
- Примените настройки и закройте редактор реестра.

В результате кнопка мини-приложений исчезнет из панели задач и из Параметров панели задач Windows 11 (может потребоваться перезапуск проводника или перезагрузка компьютера)
Как полностью удалить мини-приложения Windows 11
Если вы хотите удалить приложение, отвечающее за мини-приложения или виджеты в Windows 11, сделать это можно следующим способом:
- Запустите Терминал Windows от имени администратора (используйте меню по правому клику на кнопке Пуск).
- По умолчанию откроется окно Windows PowerShell, именно оно нам и требуется. Введите команду
winget uninstall "windows web experience pack"
и нажмите Enter.
- Подтвердите действие, нажав Y. Если появилась ошибка, сообщающая об отсутствии winget, скачайте и установите «Установщик приложения» из Microsoft Store.
- Дождитесь завершения удаления мини-приложений.


Если в будущем вам потребуется снова установить их, достаточно установить Windows Web Experience Pack из магазина Microsoft Store — https://www.microsoft.com/store/productId/9MSSGKG348SP
Download Windows Speedup Tool to fix errors and make PC run faster
The in-built Widget platform of Windows 11 is an excellent feature that enhances its appeal significantly. However, this helpful feature might use too much CPU. That, in turn, will cause an overall decrease in the system’s performance. Moreover, it will also cause a delay in the individual apps running or even crash them. Did you know that 100% CPU use can make Windows 11 unstable? In that case, it is vital to identify the common causes and learn about the possible fixes. This post will share how you can fix Windows 11 Widgets high CPU usage issue.

Common Reasons for High CPU Usage for Widgets
It is vital to understand that every app or program you run on the computer will take some CPU processing power. Windows has the capacity to run multiple apps and programs simultaneously. However, it is essential to know if the system is getting overloaded. In that case, the app crashing or slowing down is inevitable. That is why you need to find the cause and fix it immediately.
Various reasons can lead to high CPU usage issues for widgets. These include:
- Background apps: Sometimes, we minimize the apps rather than closing them. If kept running for an extended period, it will consume a high CPU power, leading to enhanced usage. It is possible
- Corrupt Files: If any of the supported files needed by Windows Widgets are corrupt, the primary program will keep on probing for it, but since the file is corrupt, it will get no result. It will keep running in the background resulting in high CPU usage.
Knowing these causes will help you resolve the high CPU usage issue with ease.
There are multiple solutions that can aid in resolving the Windows 11 Widgets high CPU usage issue. Here are the fixes
- Update Windows 11
- Run System File Checker or SFC Scan
- Disable Windows Widgets
You will need admin permission to execute some of the suggestions.
1] Update Windows
At times, Microsoft rolls out updates to fix these issues. So you need to check if there is a cumulative or KB update that can fix the problem.
- Open Windows Settings using Win + I
- Navigate to Settings > Windows Update
- Click on Check for Updates button
- If there are any updates available, you can download and install the update.
Once done, restart your PC to ensure the update is complete, and then you can check if the issue persists.
2] Run SFC Scan (to fix any corrupt files related to Widgets)

If files associated with Windows Widgets are corrupt, they will not be able to work properly and can result in high-CPU usage. We can use the System File Checker tool to fix any corrupt files on the system.
- Right-click on the Start menu
- Click on Windows Terminal (Admin)
- Type the following command and press the Enter key
sfc /scannow
- The tool will check for inconsistencies and replace any corrupt files with new ones.
Once it’s done, check if the CPU usage is still high in the Task Manager.
3] Disable Windows Widgets

To disable Windows 11 Widgets:
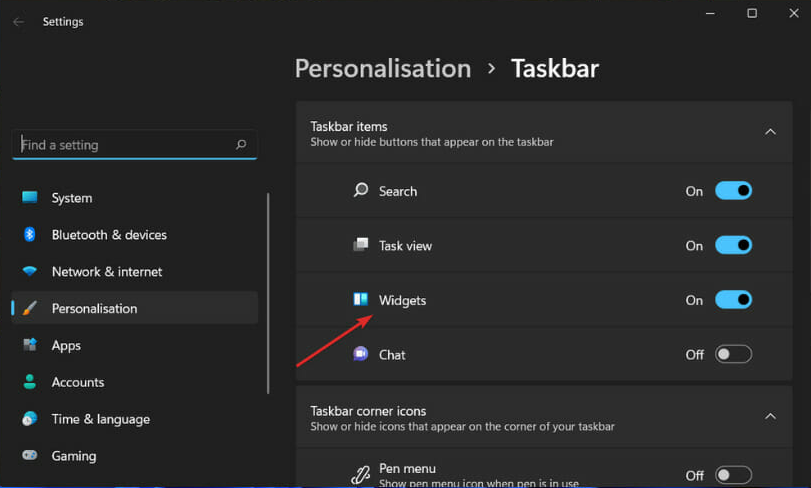
- Open the Settings menu using Win + I or open it from the Start Menu.
- Click on Personalization > Select Taskbar
- Now, make sure that the Widgets toggle is turned off.
- With the Windows widgets disabled, the CPU usage should not be high anymore.
Several causes can lead to high CPU usage in Windows 11. However, if not resolved, it will interfere with the system’s overall performance. That is why you must adopt solutions that will help you to fix the increased CPU usage issue efficiently.
I hope the post was helpful, and you were able to fix the Windows 11 Widgets high CPU usage issue.
Read: Feeds or Search application is showing high memory usage
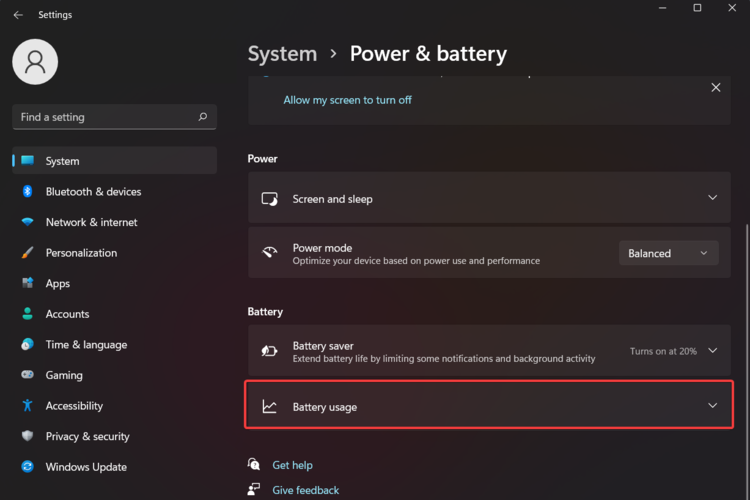
Do Widgets drain the battery?
Yes, widgets drain the battery of the laptop. However, the amount of battery it drains and how often it updates itself depends on your widget. That is why it is essential only to keep the necessary widgets. You can further configure the power usage to turn off background apps to save the battery.
Read: How to fix 100% Disk, High CPU, High Memory usage in Windows.
How to disable background apps?
You can turn off apps from the background by going to Settings >Apps > Apps & features. Under this section, scroll to find the app and click on the three-dot menu and select advanced options. Locate the Background app permissions section and choose to set it as Never.
Ashish holds a Bachelor’s in Computer Engineering and is a veteran Windows and Xbox user. He has work experience as a Database and Microsoft.NET Developer. He has been a Microsoft MVP (2008-2010) and excels in writing tutorials to improve the day-to-day experience with your devices.
by Claire Moraa
Claire likes to think she’s got a knack for solving problems and improving the quality of life for those around her. Driven by the forces of rationality, curiosity,… read more
Updated on
- The most common reason for high CPU usage is that your computer is running too many applications at once.
- Windows 11 is a feature-packed OS and without enough memory, the widgets could end up consuming too much CPU.
- A simple reboot of your system can get rid of temporary files and solve the high CPU usage problem.
- If you notice that one particular app is using an unusually large amount of resources on your PC, then you should consider closing it or uninstalling it to make your PC run more smoothly again.
Windows 11 has a built-in widget platform and can contribute to high CPU usage. These widgets can be used to display the weather forecasts, sports scores, and clock.
Whereas they may be useful to some extent, some users complained that Windows 11 Widgets are using too much CPU. This widget issue is most common on Windows 11 devices, but older versions of Windows can also experience this problem.
The widgets are a useful feature that provides you with information at a glance. But, sometimes, when the Widget panel is open, it starts consuming CPU or memory and the system performance drops down.
The CPU is the brain of your computer. It performs all the calculations and processes that your machine needs to function, so if it’s running unusually slow, you may want to investigate the issue.
If a widget is using up most of your computer’s resources (CPU, memory, disk space, etc.) then you should turn it off because that means it is using up all of the resources that could be used by other processes, thus slowing down your computer.
There are several causes of high CPU usage. It may be that you have installed too many programs on your computer and they are taking up too much space. The best solution to this problem is to uninstall some of those programs from your computer.
It is also possible that there has been an infection on your system that has caused the files to become infected with viruses or spyware. This will cause the computer to run more slowly and use more resources than normal
Does Windows 11 use more CPU than Windows 10?
Windows 11 is more demanding than its older siblings. This is quite evident in the minimum system requirements.
How we test, review and rate?
We have worked for the past 6 months on building a new review system on how we produce content. Using it, we have subsequently redone most of our articles to provide actual hands-on expertise on the guides we made.
For more details you can read how we test, review, and rate at WindowsReport.
The OS has also been designed with security in mind. It includes built-in antivirus and firewall protection, as well as a host of other security features.
The size of Windows 11 itself is demanding. Its download size is more than 4GB which means that you may need more hard drive space than you would with other versions of this operating system, which also leads to higher consumption of memory by default.
Another reason why Windows 11 uses more CPU is that it has several features that were not possible with Windows 10. The inclusion of new application programs has been designed for use only with Windows 11.
With the widgets on Windows 11, it is likely to take up more CPU than Windows 10. If you want to stop your CPU from using too much energy, you will need to turn off some of the features that cause it to do so.
For example, you can tweak the Power Management settings which allow the computer to turn off when it’s not in use.
Be sure to check out the differences and similarities between Windows 10 and Windows 11 to better understand the two operating systems..
1. Disable widgets from Task Manager
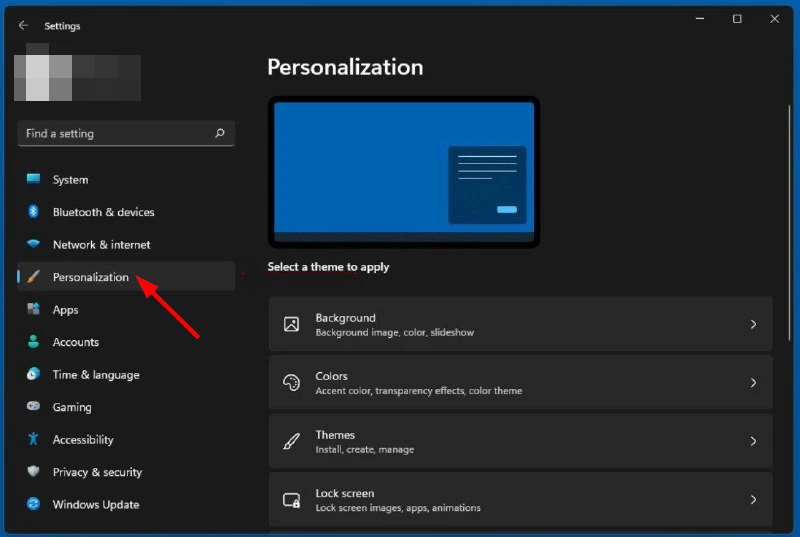
- Hit the Windows key and select Personalization.

- Scroll down and click on Taskbar.

- Toggle the widgets button off.


2. Update drivers
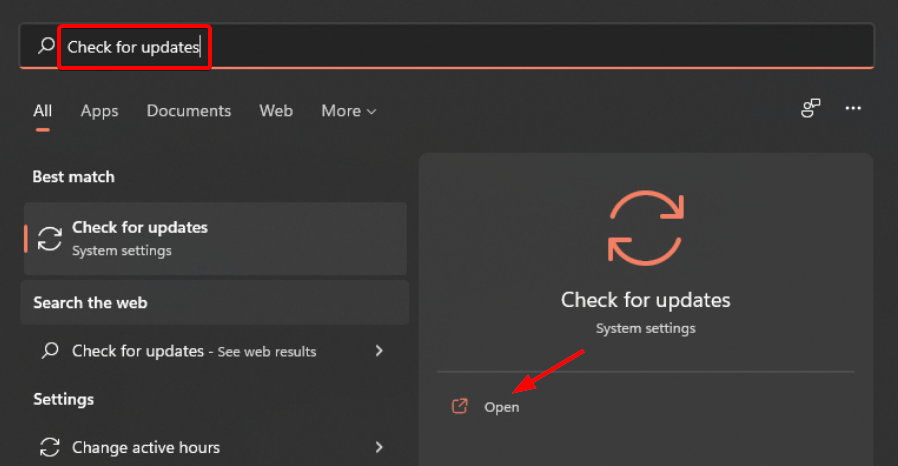
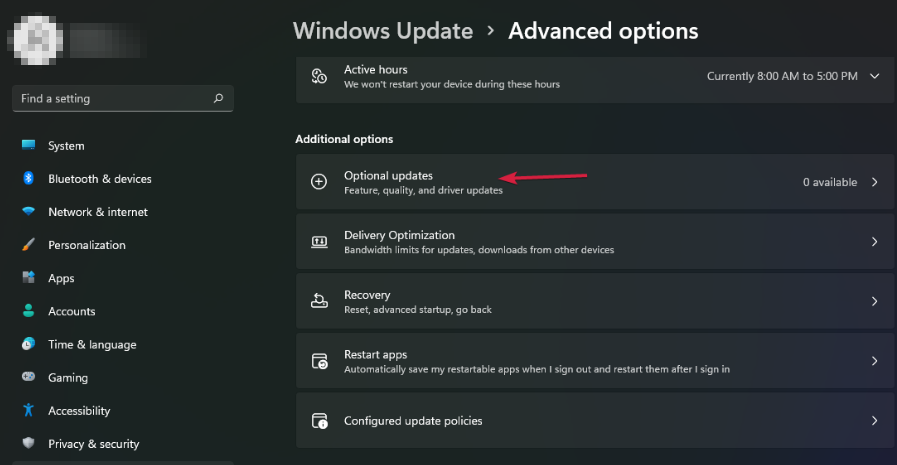
- Press the Windows key, search Check for updates, and click Open.

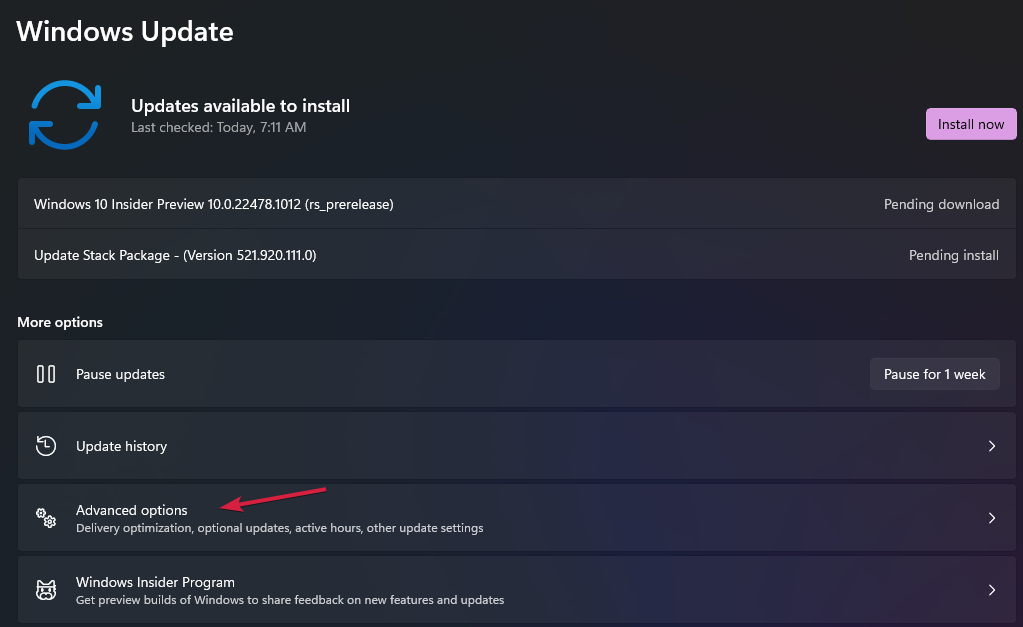
- Select Advanced options.

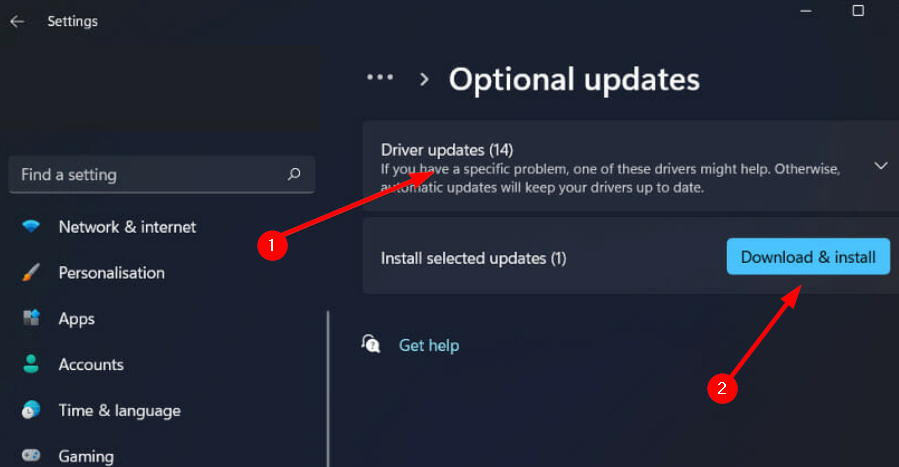
- Go to Optional updates.

- Select Driver updates and proceed to Download & install then restart your system.

You can also choose to go for convenience and use a third-party tool. With Outbyte Driver Updater, you don’t need to worry about making a mistake when installing. A wrong driver can cause serious system problems, but with Outbyte Driver Updater you don’t have to worry about anything. This smart software will do everything for you.
The tool also works in the background and keeps your drivers always up-to-date. It automatically scans your PC for devices and checks if there are new versions of their drivers available.
3. Run a system scan
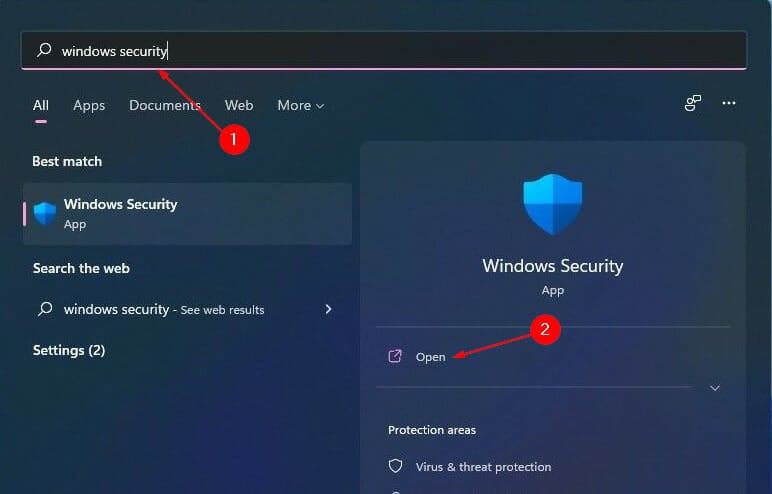
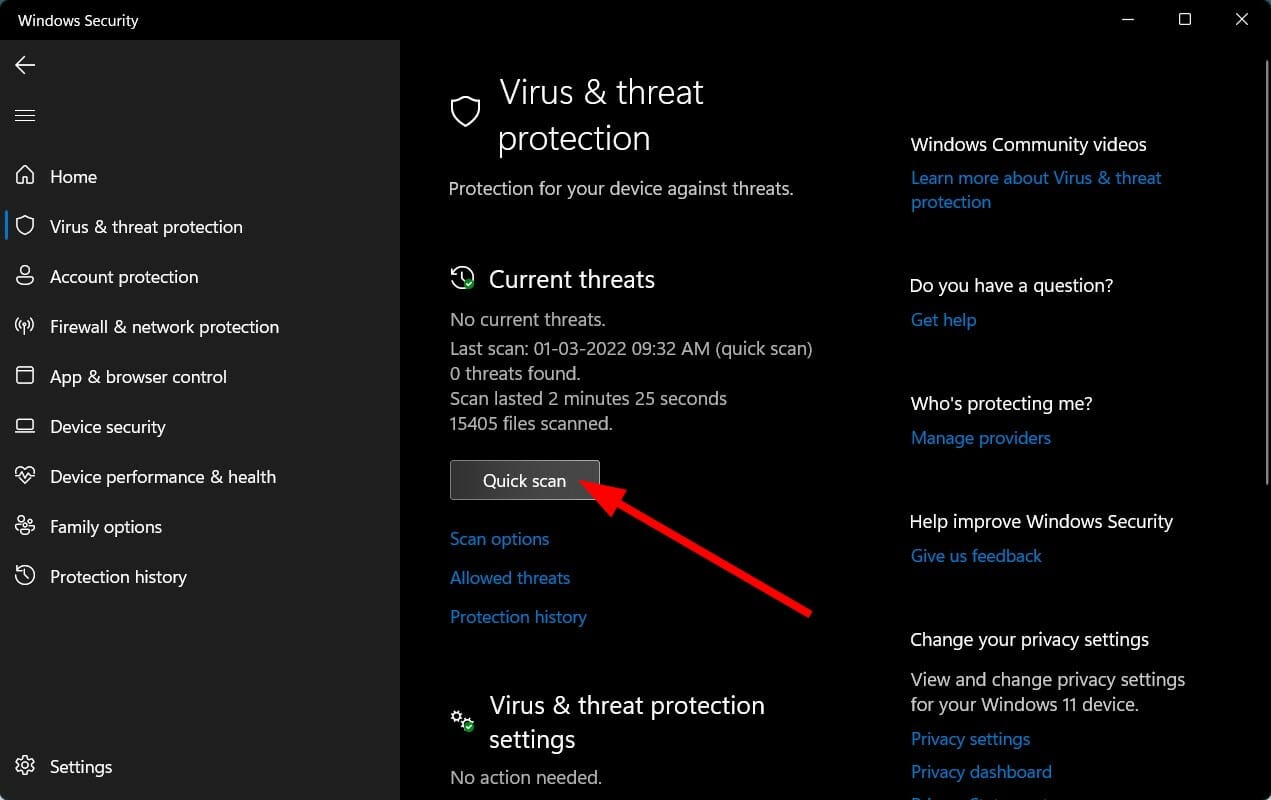
- Press the Windows key, search Windows Security, and click Open.

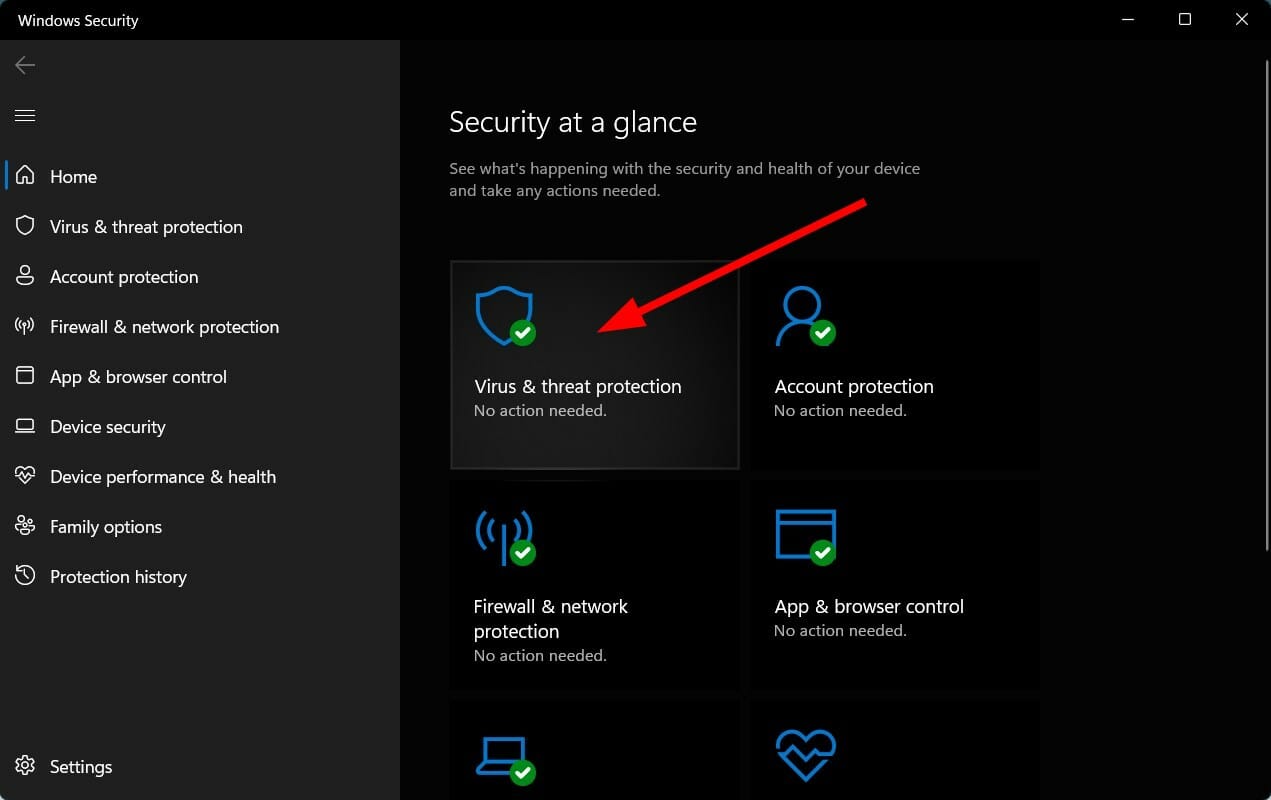
- Select Virus & threat protection.

- Next, press Quick scan under Current threats.
- Wait for the process to finish.
- 5 proven solutions to fix Windows 11 widgets not working
- 5 best desktop clock widgets for Windows 10/11
- Calendar widget not working in Windows 11? Apply these fixes
4. Run DISM command
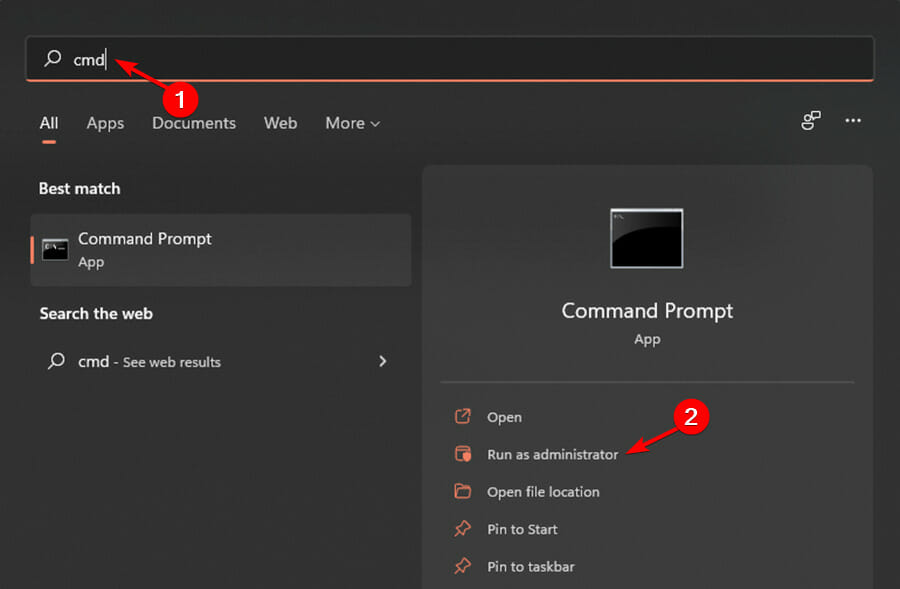
- Press the Windows key, type cmd on the search bar and click Run as administrator.

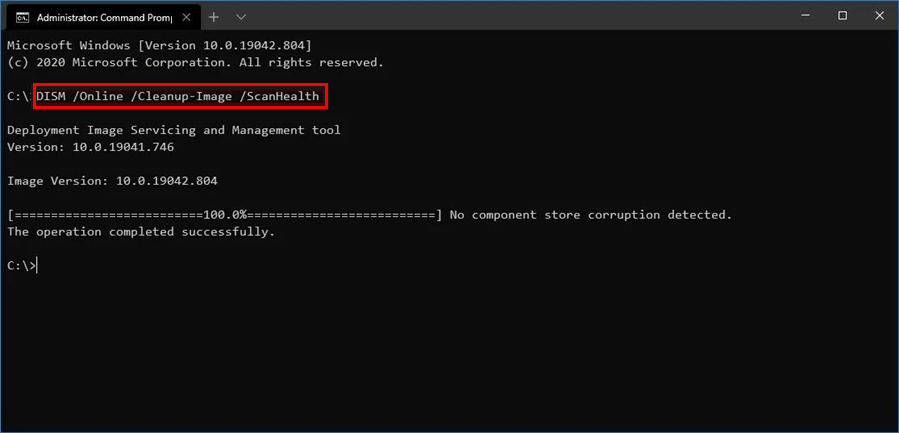
- Type in the following command then press Enter:
DISM /online /cleanup-image /scanhealth
- Restart your PC for the changes to take place.
5. Run SFC command
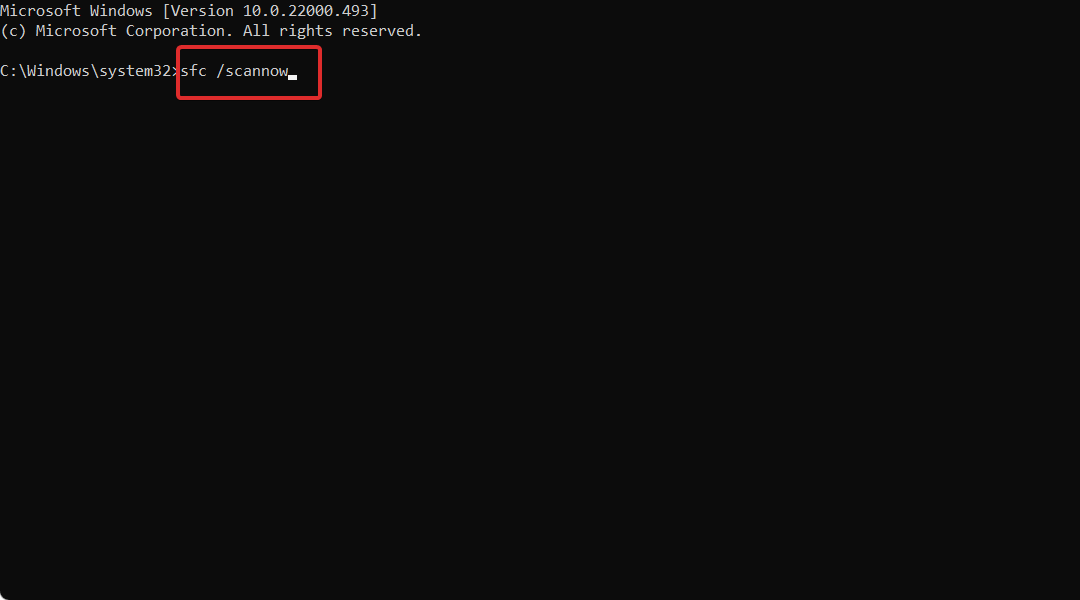
- Press the Windows key, type cmd on the search bar, and click Run as administrator.
- Type in the following command then press Enter:
sfc /scannow
How can I check for CPU usage in Windows 11?
At some point, the performance of your PC will prompt you to check what is consuming too much CPU so you can disable it.
There are many reasons why Windows 11 runs slow, and there are many possible solutions. For example, some programs may require more system resources than others. It is possible that your computer might be running slow because it has an outdated driver or software.
To get to the root of the problem, you will need to check the CPU usage. Here’s how to check your CPU usage in Windows 11:
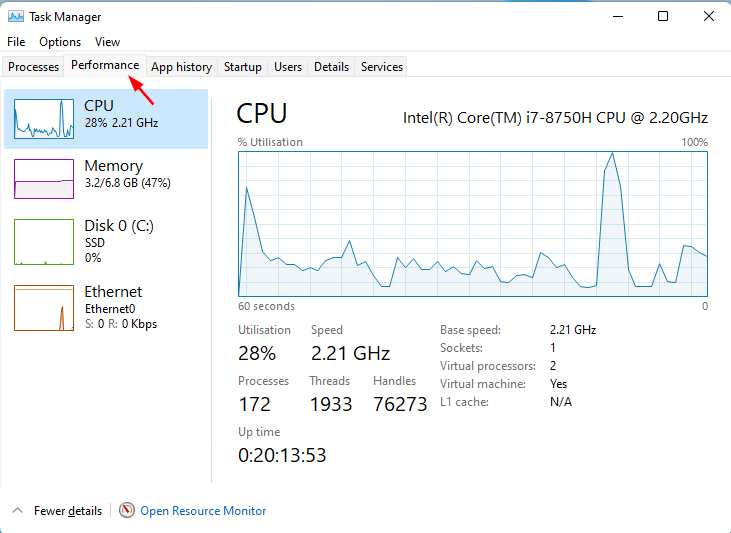
- Hit the Windows key, type Task Manager in the search bar, and click Open.

- Select the Perfomance tab and click on CPU.

- The apps consuming too much CPU can be found at the top.


Do widgets drain battery?
Apart from CPU consumption, another common question that comes up often is whether widgets drain batteries.
Most obviously, if you run more software, the more work your computer will do, and so the faster its battery will drain.
If you are using a widget, it’s a good bet that the app that created it is running in the background, occasionally waking up to update itself.
Depending on what the widget does, and how often it does it, this can use up more battery than you want. If the widget is a clock, for example, the app might be waking up every couple of minutes to update its display.
While it isn’t necessary to delete all of your widgets, it’s best to keep only those that you absolutely need. If you have widgets for weather apps or social media apps that you don’t use very often, consider deleting them from your home screens.
You can also apply some of our recommended solutions to make your Windows 11 faster and more responsive.
We also have an excellent guide on software you can use to fix high CPU usage and save yourself some of these troubles.
If your widgets were consuming a considerable amount of CPU, we hope this article has offered efficient solutions and your PC’s performance has improved.
As always, we love hearing from you so don’t forget to share your thoughts in the comments section below.
![]()
Windows 11, новая операционная система от Microsoft, была представлена с новым понятием — мини-приложениями. Это компактные приложения, которые могут быть установлены и запущены напрямую на рабочем столе пользователя. Однако, с некоторыми из них может возникнуть проблема — они нагружают процессор и замедляют работу системы.
Причина этой проблемы заключается в том, что мини-приложения Windows 11, по умолчанию, работают в фоновом режиме. Это означает, что они продолжают выполнение задач, даже если пользователь не активно взаимодействует с ними. Это может привести к постоянной нагрузке на процессор и, как следствие, замедлению работы системы в целом.
Чтобы решить эту проблему, можно принять несколько мер. Во-первых, стоит проверить, какие конкретные мини-приложения вызывают нагрузку на процессор. Для этого можно воспользоваться диспетчером задач, который покажет загрузку процессора по разным приложениям. Если вы обнаружили, что некоторые мини-приложения слишком активны в фоновом режиме, то можно передать эту информацию разработчикам или отключить их в настройках операционной системы.
Во-вторых, можно установить политику энергосбережения, которая поможет ограничить нагрузку на процессор при работе мини-приложений. Например, вы можете установить ограничение скорости процессора или ограничить максимальное количество ядер, используемых приложением. Это позволит более эффективно распределять ресурсы системы и уменьшить загрузку процессора.
И, наконец, можно провести оптимизацию самого мини-приложения. Это может включать в себя оптимизацию кода, уменьшение количества операций, необходимых для выполнения задачи, а также установку различных параметров, которые могут снизить нагрузку на процессор. Естественно, это требует знания программирования и доступа к исходному коду мини-приложения, поэтому эта мера может быть не доступна для всех пользователей.
В идеале, мини-приложения Windows 11 должны работать эффективно и занимать минимальное количество ресурсов системы. Однако, если вы заметили, что ваш процессор нагружается некоторыми из них, не стоит паниковать. Проблему можно решить, следуя вышеуказанным рекомендациям. И помните, что нагрузка на процессор также может быть вызвана другими факторами, такими как другие приложения, вирусы или неправильные настройки системы.
В чем заключается проблема мини-приложений Windows 11?
Основные причины, по которым мини-приложения могут нагружать процессор, включают:
| 1. | Неэффективное использование ресурсов. Мини-приложения могут быть написаны таким образом, что они крайне неэффективно используют ресурсы процессора. Например, они могут использовать бесконечные циклы или запросы к серверу без необходимости. |
| 2. | Недостаточная оптимизация кода. Если разработчики мини-приложений не обращают должного внимания на оптимизацию своего кода, это может привести к излишней нагрузке на процессор. Например, они могут использовать медленные алгоритмы или ненужные вычисления. |
| 3. | Недостаточное тестирование на различных конфигурациях. Приложения могут быть не тщательно протестированы на различных типах процессоров и компьютеров. Это может приводить к тому, что они работают некорректно и нагружают процессор более, чем требуется. |
Для решения проблемы мини-приложений, нагружающих процессор, рекомендуется:
- Использовать эффективные алгоритмы и методы программирования для оптимизации своего кода.
- Тщательно тестировать приложения на различных конфигурациях процессоров и компьютеров.
- Использовать асинхронные операции и многопоточность для распределения нагрузки на процессор.
- Ограничивать использование ресурсов процессора приложениями, которые не требуют его полной мощности.
Надеюсь, эти рекомендации помогут вам решить проблему нагрузки процессора в мини-приложениях Windows 11 и обеспечат более эффективную работу вашего компьютера.