-
Home
-
News
- Windows 11 Installation Assistant Not Opening? Here’s How to Fix!
By Vera | Follow |
Last Updated
If you try to upgrade Windows 10 to Windows 11 with Installation Assistant, this tool may close automatically. How to fix the common issue of Windows 11 Installation Assistant not opening? Take it easy and you can find solutions from this post on the MiniTool website.
Windows 11 Installation Assistant Closes Automatically
Windows 11 Installation Assistant offers you a good option to install Windows 11 on your computer that you are using currently. That is, you can upgrade Windows 10 to Windows 11 with this Microsoft tool. To use it for Windows 11 update, you should have a Windows 10 license and the PC must run Windows 10, version 2004 or higher. To get this tool, you can click Download Now under Windows 11 Installation Assistant on the Microsoft website. Then, you need to run Windows Installation Assistant as administrator.
However, sometimes you may meet the common problem – Windows 11 Installation Assistant not working. The usual situation is that this tool opens and closes immediately. This issue seems to be common in insider builds of Windows 11, particularly with Dev insider builds. When you try to move away from a Windows 11 insider build to the official release version, you may always face this issue.
When searching for “Windows 11 Installation Assistant not opening” online, you can find some users also report this issue on forums and the following example comes from the Reddit forum.
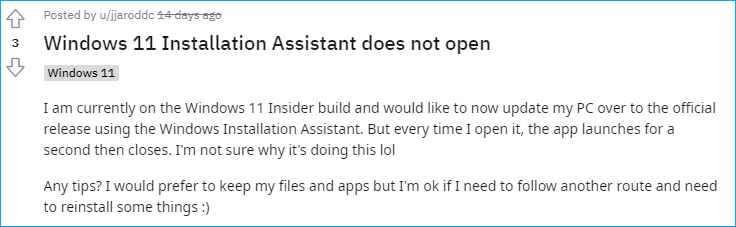
Of course, the issue of Windows Installation Assistant not opening won’t affect a lot of Windows 11 users since few persons run this tool if they have already installed Windows 11.
Tip: In addition, you may encounter Windows 11 Installation Assistant error when performing an update, for example, 0x8007007f, 0xc1900101, etc. To fix the error code, go to find solutions from the Internet.
How to Fix Windows 11 Installation Assistant Not Opening
Run Installation Assistant in Compatibility Mode with Windows 7
According to affected users, you can run the exe file of this tool in Windows 7 compatibility mode and this way is confirmed to be helpful if you are currently using an insider Dev build.
Step 1: Go to find the exe file of Windows 11 Installation Assistant on your computer, right-click on it and choose Properties.
Step 2: In the pop-up window, check the box of Run this program in compatibility mode for under the Compatibility mode section.
Step 3: Choose Windows 7 from the drop-down menu.

Step 4: Click Apply to save the change. Then, you can launch this tool to see if the window keeps open long enough for you to upgrade Windows.
Repair Install or Clean Install Windows 11
If the above way isn’t helpful to fix Windows 11 Installation Assistant not opening, you can only repair install (reset PC or mount an ISO file and use the Windows 11 Setup) or clean install Windows 11. If you don’t want to use an insider dev build, Windows 11 clean install is a final solution.
To know more operations, you can refer to our previous post – How to Reinstall Windows 11? Try 3 Simple Ways Here Now!
Final Words
Is Windows 11 Installation Assistant not opening? If you find this tool closes automatically and immediately after opening, follow the solutions given above to easily fix this issue. If you have any other methods to fix the Windows 11 Installation Assistant problem, tell us.
About The Author

Position: Columnist
Vera is an editor of the MiniTool Team since 2016 who has more than 7 years’ writing experiences in the field of technical articles. Her articles mainly focus on disk & partition management, PC data recovery, video conversion, as well as PC backup & restore, helping users to solve some errors and issues when using their computers. In her spare times, she likes shopping, playing games and reading some articles.
Download Windows Speedup Tool to fix errors and make PC run faster
Windows 11 Installation Assistant is a tool that helps users to update their Operating System to the latest version. However, some users cannot access the tool as Windows 11 Installation Assistant is not opening. According to reports, Windows 11 Installation Assistant launches but crashes immediately.

If Windows 11 Installation Assistant is not opening, follow the solutions and workarounds mentioned below to resolve your issue.
- Run the assistant as administrator
- Disable Antivirus software
- Run System File Checker
- Update the Graphics Driver as well as the OS
- Install Windows 11 using Media Creation Tool
Let us talk about all the solutions in detail.
1] Run the assistant as administrator
The first thing we would suggest is to run the assistant as an administrator to ensure it has permission to access the necessary files needed for launching. To do the same, right-click on the executable file and select run as administrator and then check whether it’s now opening or not.
Read: Windows 11 Installation Assistant is not working
2] Disable security software temporarily
The Installation assistant may not open due to third-party antivirus software; therefore, we recommend disabling all the antivirus software and then trying to open this utility. If there is no issue opening the Installation assistant is open, antivirus software was the one causing the problem. So, go ahead and disable Windows Defender and third-party antivirus if you have one, and then run the assistant; hopefully, it will do the trick.
3] Run System File Checker
Since Windows Installation assistant is a Windows tool, System File Checker can scan the protected system files, and if any corruption is detected, it will replace the file with cached ones.
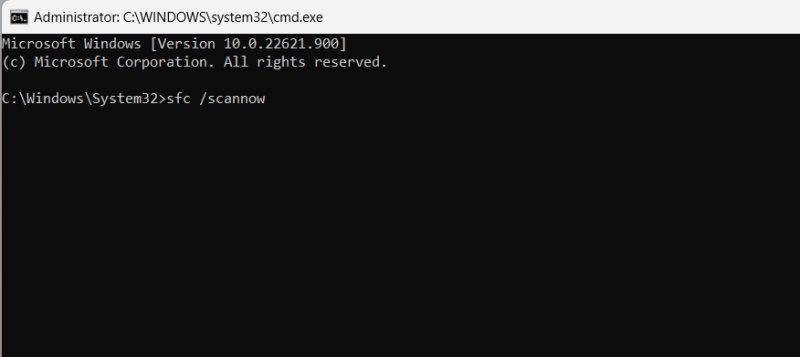
Click Win + S to open the search box, type cmd, and run it with administrator rights. Now, to run System File Checker, type the following command and then hit the Enter button.
sfc/scannow
This will take some time, and once the whole process is completed, check whether the Installation assistant is back to its previous state.
4] Update the Graphics Driver as well as the OS
Outdated or corrupted graphics drivers can also be responsible for why you can’t open Installation Assistant on Windows 11. Hence, we recommend updating your device’s Graphics drivers as well as the current Operating system and then checking if the issue gets fixed.
5] Install Windows 11 using Media Creation Tool
If nothing worked for you, your last resort is to install Windows 11 using Media Creation Tool. Media Creation Tool will allow you to download the ISO file of Windows 11 that you can either run from the folder or mount it using an external drive. Either way, you will be able to install Windows 11 pretty easily.
Hopefully, you can resolve the issue using the solutions mentioned in this post.
Read: Windows Update Assistant is stuck at 99%
Why won’t the Windows 11 installer install?
Windows 11 Installer may not install due to missing updates or outdated software. Apart from these basic reasons, using antivirus software other than Windows Defender can also cause upgrade problems. So it’s necessary to deactivate the antivirus software and then try to do the same.
Also Read: Windows 11 Installation Assistant error 0xc0000409
How do I fix error code 0x8007007f on Windows 11 Installation Assistant?
The error code 0x8007007f appears on the screen along with the “Something went wrong” error message when upgrading to the new Windows 11 using Windows 11 Installation Assistant. This error code is generally due to inadequate storage or disk space, administrator rights, and third-party antivirus software, among other things. So to fix this, we suggest disabling antivirus software and making sure that the PC has enough space.
Read: Windows 11 Installation Assistant is slow.
Anand Khanse is the Admin of TheWindowsClub.com, a 10-year Microsoft MVP (2006-16) & a Windows Insider MVP (2016-2022). Please read the entire post & the comments first, create a System Restore Point before making any changes to your system & be careful about any 3rd-party offers while installing freeware.
Windows 11 was launched in October 2021 and rolled out to most computers globally in a phased manner. Microsoft promised all eligible computers would receive the prompt to upgrade to Windows 11. It was a bold promise, but the prompt failed to appear on a number of devices even though the devices were eligible.
In that situation, users relied on the Windows Installation Assistant. While some users used it successfully and upgraded to Windows 11, others have reported the installation assistant not working. If you are also experiencing the issue check out this guide to fix the installation assistant in Windows 11.
Windows 11 Installation Assistant Requirements
Bbefore jumping into the troubleshooting steps, you must ensure your device meets the requirements for running Windows 11. The installation assistant was designed to upgrade to Windows 11 from Windows 10 and to proceed, the following conditions are required.
- You are using the original Windows 10 with a valid license.
- Your computer meets the required hardware specifications for running Windows 11.
- At least 9GB of disk space for downloading Windows 11.
- Additionally, Windows 11 Installation Assistant doesn’t run on ARM-based computers.
If you are not sure your PC meets these requirements you can install the Microsoft’s PC Health Check App. It willl check your computer’s eligibility for running Windows 11.
Now when you are sure that your PC is compatible but the installation assistant is still not working then proceed with the below fixes.
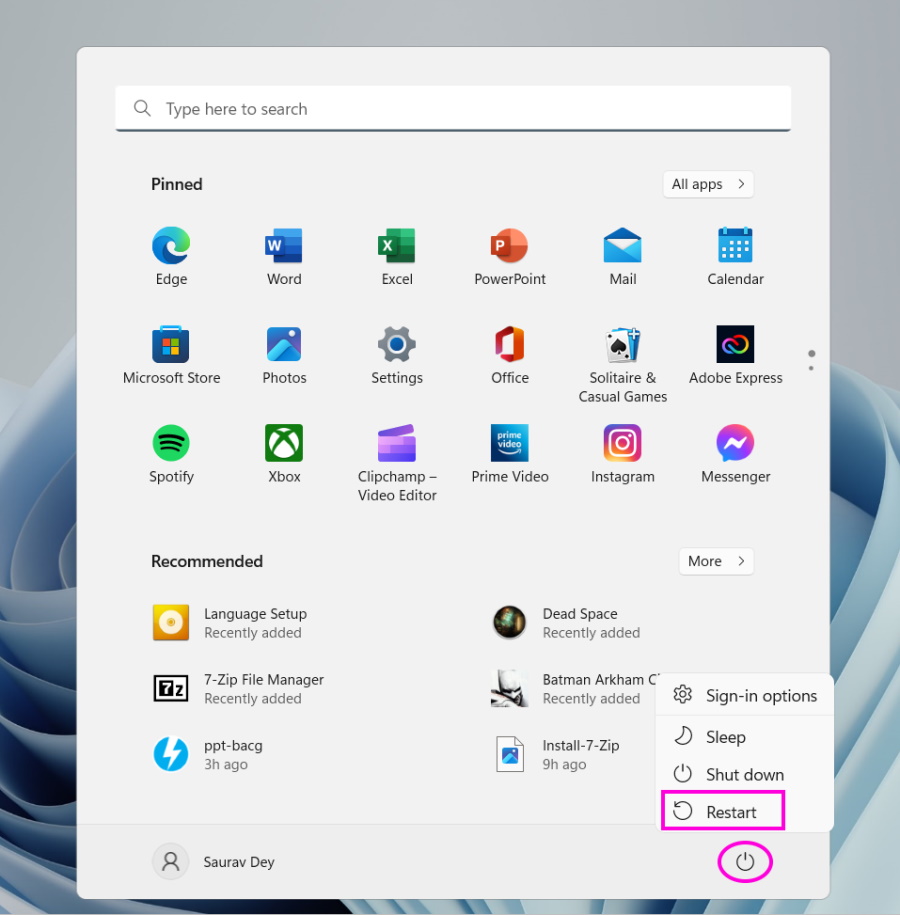
1. Restart the Computer
Restarting the computer is likely to fix the problem if it occurs due to a bug or system glitches. It is a different question if you have bigger internal issues or if your computer doesn’t have the necessary hardware. Whatever the case, at least once restart the computer. Who knows, maybe the problem will disappear, and you will be able to install Windows 11.
Open the Start Menu, click the Power button, and choose the Restart option.
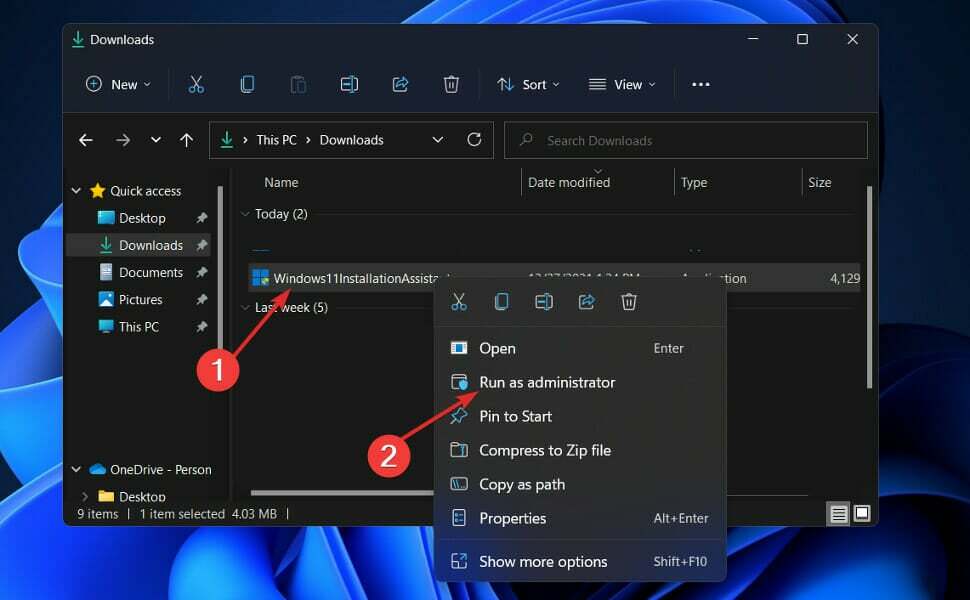
2. Run Installation Assistant with Administrator Rights
If restarting the didn’t fix the installation assistant, try running it with Administrator rights. One or more third-party applications on your computer may interfere with the installation assistant utility making the installation fail. So, running the assistant utility with Administrator privilege may fix the problem. Here’s how to do it.
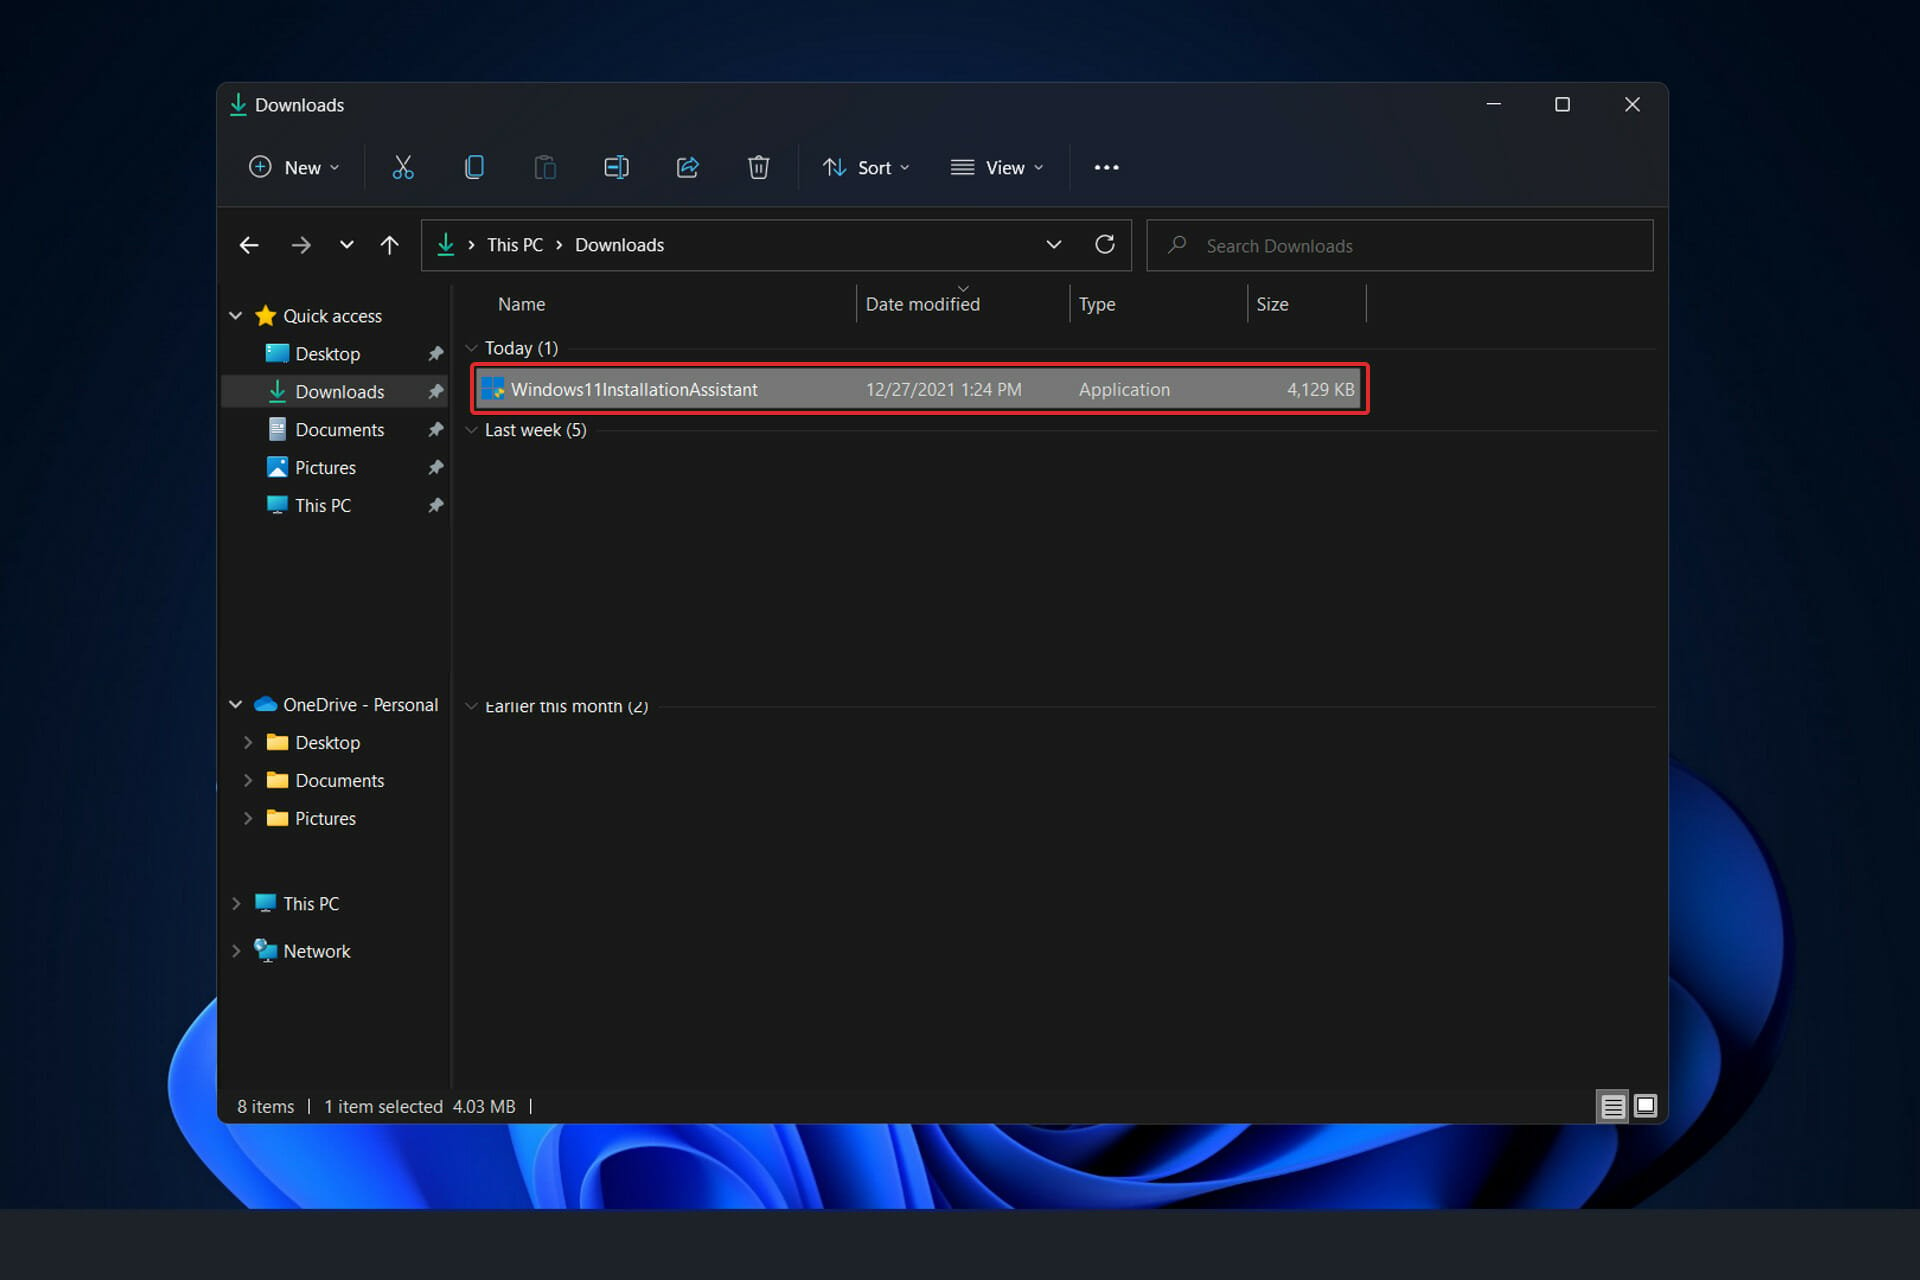
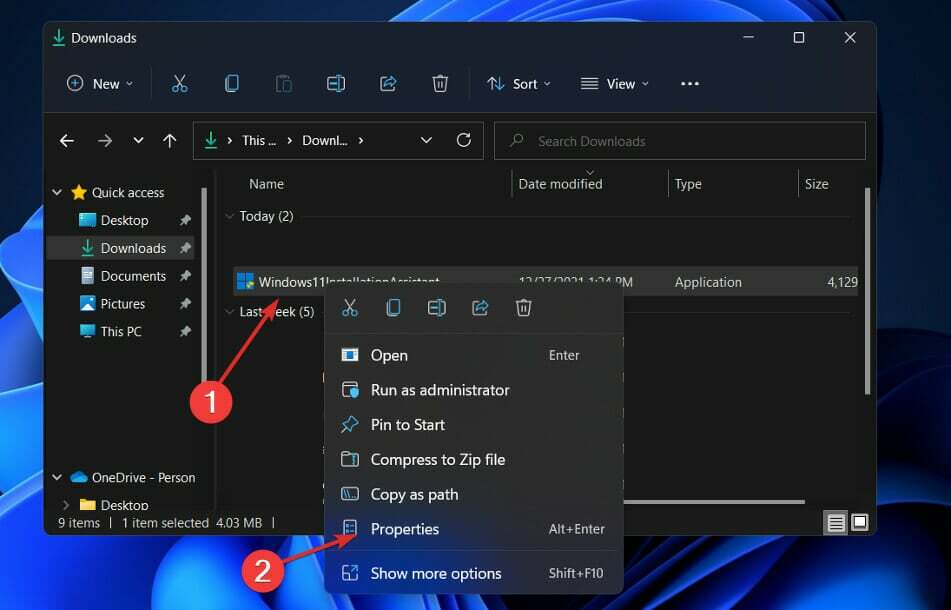
1. Find the Windows 11 Installation Assistant program file. It may be located in the Downloads folder.
2. Right-click the program file and select Run as administrator from the drop-down menu.

3. You will be asked permission to launch Windows 11 installation assistant with Admin rights via a pop-up. Click Yes on the pop-up to allow.
After that, follow the on-screen steps to execute the procedure on your computer successfully.
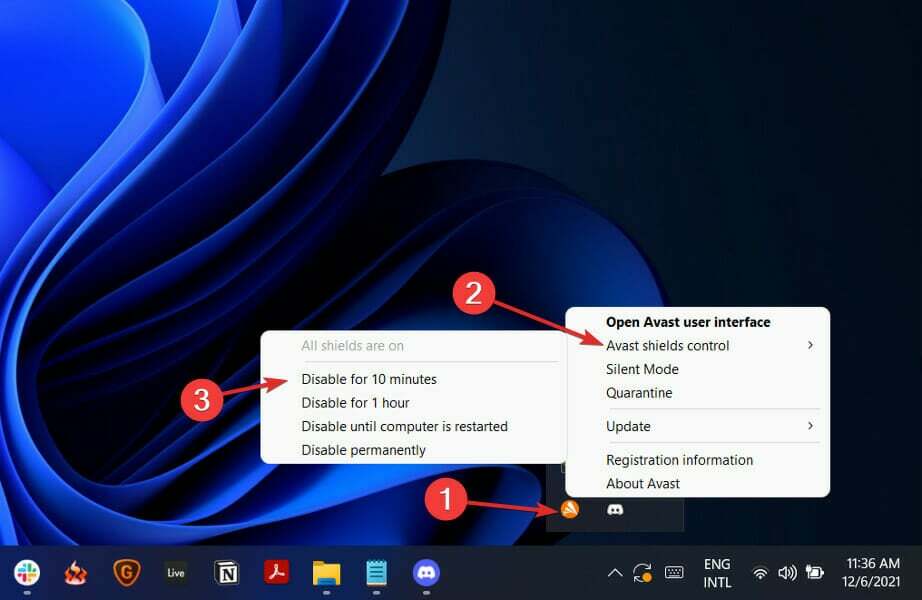
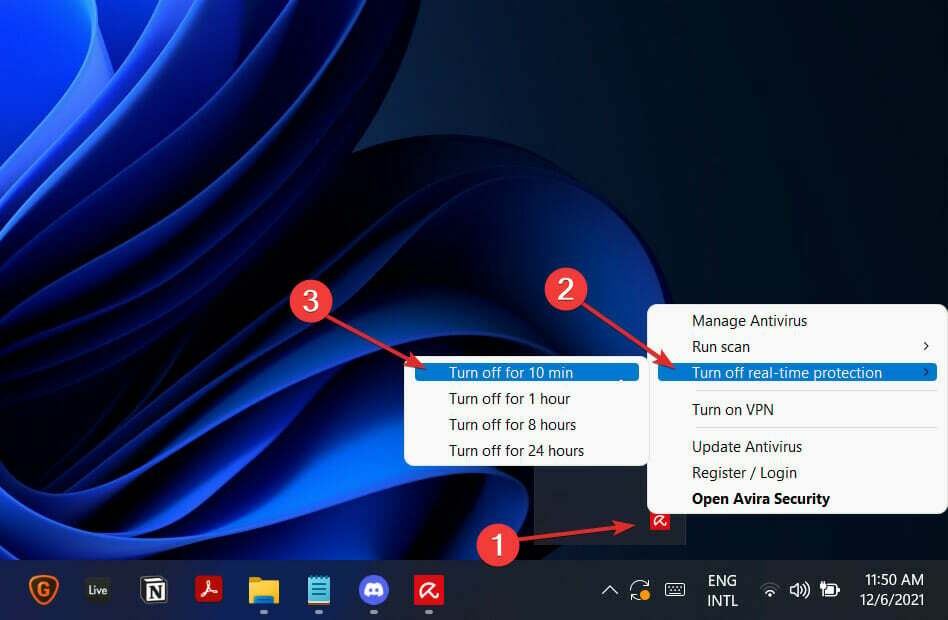
3. Disable Antivirus
It is unlikely Windows Defender will cause any problems with the installation assistant. But if you are using a third-party antivirus program for securing your computer, it might affect the Windows 11 Installation Assistant and cause it to fail. You should disable the antivirus and launch the installation assistant with Administrator privilege.
If you are not aware of how to disable an antivirus program in Windows 11. You can do it from the System Tray. Open the system tray, right-click the program icon, and see the disable option. After that, you will be asked for Administrator access; allow it. Once you disable the antivirus, run Windows 11 Installation Assistant with administrator privilege.
4. Update the Graphics Driver
Graphics drivers are essential for running the PC at an optimum level. But an outdated driver can cause the exact opposite; it can cause many unexpected issues. So, if the Windows 11 Installation Assistant is still not working, check the graphics driver. If the latest update isn’t installed, do it immediately.
1. Press the Win + R keys on the keyboard.
2. Type devmgmt.msc in the dialogue box.
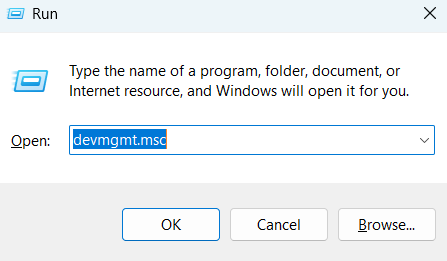
3. Hit Enter or click OK.
4. In the Device Manager panel, click Display adapters to expand.
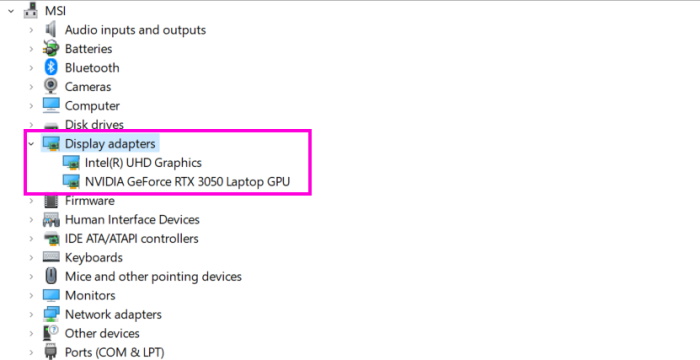
5. Right-click the display adapter and select the Update driver option from the drop menu. Windows will start looking for the latest graphics driver.

6. The alternate option is to choose the Uninstall Device option. After that, you must manually download the latest graphics driver from the manufacturer’s website; for example, Nvidia.
Once the latest driver is installed on your computer, restart it. After that, initiate the Windows 11 Installation Assistant again.
5. System File Checker or SFC
Corrupter system files can also be responsible for this issue. If the previous methods failed to work and the installation assistant is still not working, you should try running an SFC scan. SFC is a built-in utility that detects and fixes issues. Here’s how to run it.
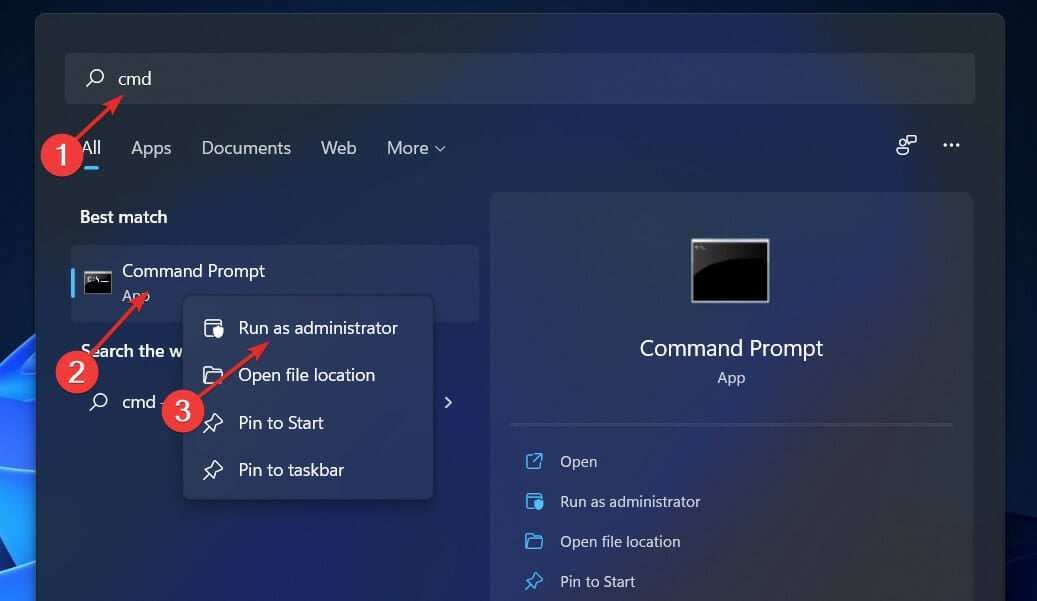
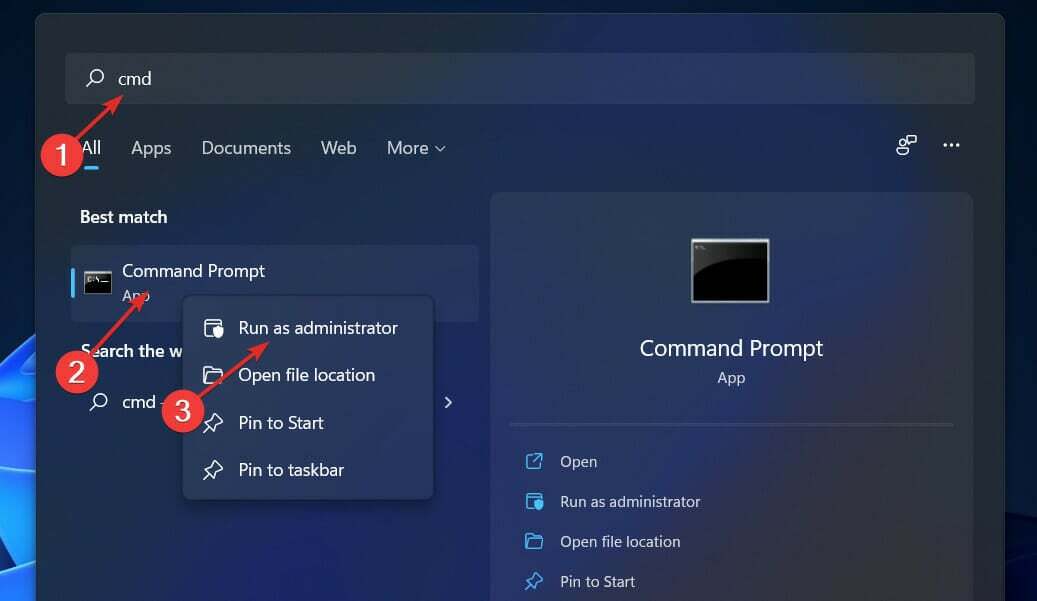
1. Open Command Prompt with Admin privilege.
2. Open the Start menu, and type Command Prompt.
3. Right-click it and select Run as administrator. Choose Yes when prompted.

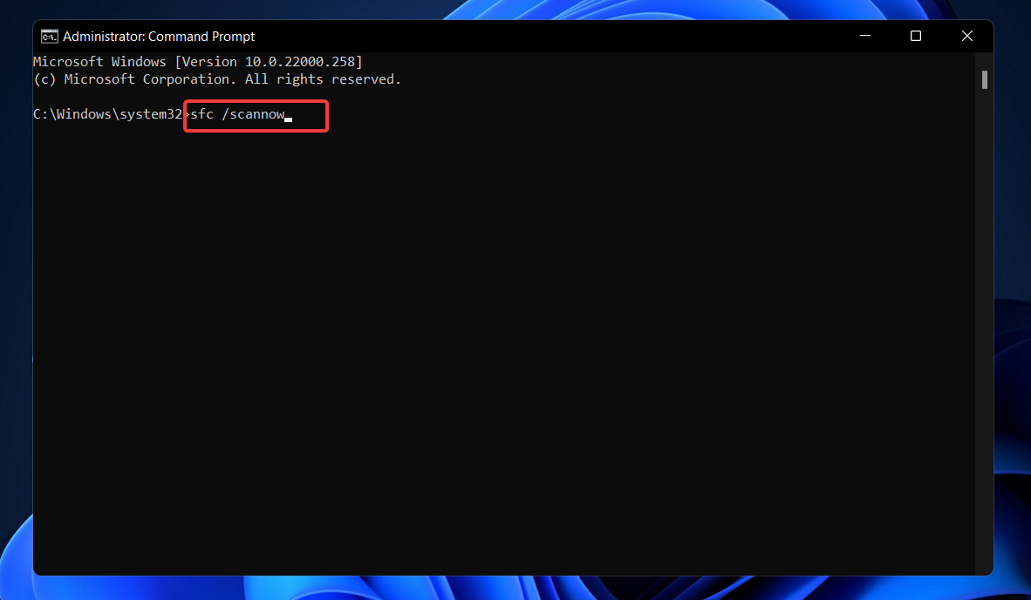
4. In the command prompt window, type the following and hit Enter.
sfc/scannow
SFC will start scanning your computer. It will look for damages and repair them after detection. After the scan is complete, restart your computer. It should be fixed if the corrupted system files were actually the cause of the installation assistant failure.
6. Use Windows Disk Image
If your computer hardware is okay and you have executed all the previous troubleshooting methods and still come up empty, you ultimately have to upgrade using a different method. You can create an installation media using the Windows Media Creation Tool. Check out the below steps.
1. Get the Windows 11 ISO from Microsoft.
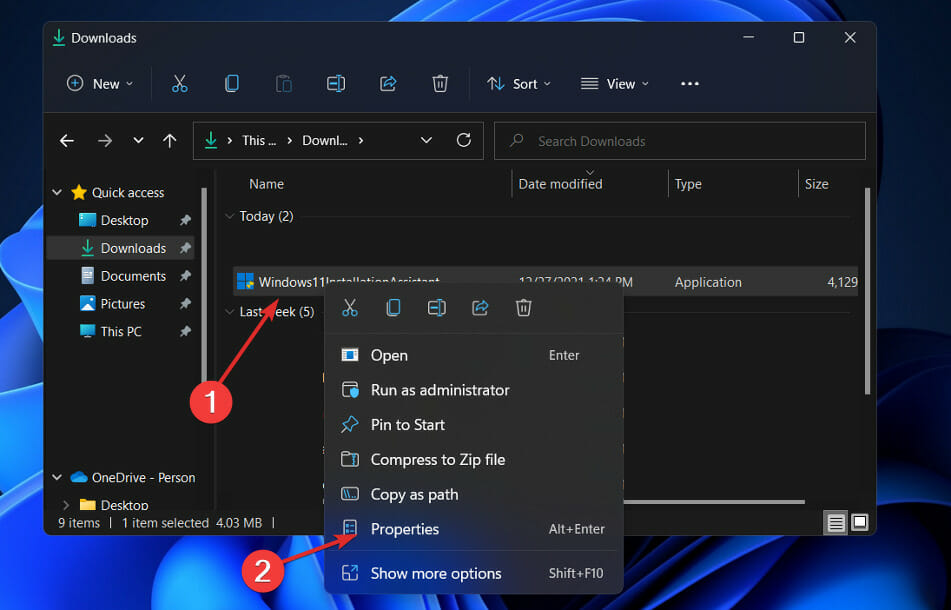
2. Right-click the downloaded file and select Properties from the drop menu.
3. Choose the Change option under the General tab, in order to, mount the ISO file without the help of a USB/DVD drive.
4. After that, select Windows Explorer and click Apply.
5. Right-click the ISO file once again and click Mount for creating a bootable virtual disk.
6. Double-click the ISO file open it and view the setup files.
7. Launch the setup by double-clicking the setup.exe file.
This is it. Complete the process to successfully install Windows 11 on your computer.
Finally, Upgrade to Windows 11
You may have hoped the installation assistant to run seamlessly, but it is failing on a few computers. In most cases, the computer hardware can’t run Windows 11 but some of the issues are genuine. Even though the hardware should support Windows 11, the assistant still shows a failed message.
In such cases, our comprehensive guide will come in handy. Try the fixes we have provided above in the article and yoy should be successfully able to migrate to the new iteration of Windows.
by Loredana Harsana
Loredana is a passionate writer with a keen interest in PC software and technology. She started off writing about mobile phones back when Samsung Galaxy S II was… read more
Updated on
- Users have reported their Windows 11 Installation Assistant hasn’t been working properly after its download and it might have to do with their system’s settings.
- Another possible cause is not having the right permissions to access the file.
- As a solution, you should try running the downloaded file as an administrator by right-clicking it.
Windows 11 has officially been made available, and users are scrambling to get their hands on Microsoft’s operating system.
While many customers have claimed success with the Windows 11 upgrade, some have experienced an error code of 0x8007007f while using the Windows 11 Installation Assistant to complete the update.
Similarly, others have encountered error messages stating that the Windows 11 Installation Assistant is already running, or that something went wrong with it.
You shouldn’t be too concerned about the Windows 11 upgrade problem because bugs are common with big Windows upgrade releases. Continue reading to learn how to resolve it so that you may upgrade to Windows 11.
What’s new in Windows 11?
Windows 11 introduces a completely redesigned UI that is more similar to a Mac. It has a simple design with rounded sides and soft pastel colors to complement it. 
Along with the Taskbar, the Start menu, which is a Windows icon, is moved to the middle of the screen. However, if you like, you can return those to their original positions on the left, as they are in Windows 10.
Android applications will be made available via the Microsoft Store (but not immediately) through the Amazon Appstore, which will be available in Windows 11.
The ability to access Android apps on Windows 10 was previously available through a few methods, including using a Samsung Galaxy phone, but this will make it native.)
For Windows customers, this is something they’ve been waiting for for years, and it represents another step toward the integration of mobile and laptop computers. This functionality is currently in beta and only available to Windows Insiders, who can test it out.
Windows 11 will allow you to create virtual desktops in a manner similar to that of Mac computers. It enables you to switch between numerous computers at the same time for personal, professional, educational, or gaming purposes. This was more difficult to configure and utilize in Windows 10.
The addition of gestures and greater space between icons on the taskbar are two ways in which Microsoft is attempting to improve the touch experience on tablets. When using your digital pen to take notes or sketch, you may now hear and feel vibrations.
To find out more, check out our article with a full Windows 10 vs Windows 11 performance comparison and the best features in the latter operating system.
How we test, review and rate?
We have worked for the past 6 months on building a new review system on how we produce content. Using it, we have subsequently redone most of our articles to provide actual hands-on expertise on the guides we made.
For more details you can read how we test, review, and rate at WindowsReport.
What is Windows 11 Installation Assistant Error code 0x8007007f?
This is a common error that many users report having when trying to run the Windows 11 Installation Assistant.
The error message is not very specific, and Microsoft has not yet officially addressed this problem on its support page.
It may appear right when you start the Assistant, but also when the process is in progress.
As for what causes this issue, there are multiple possible culprits. The most prevalent are storage problems, driver incompatibility, or outdated drivers.
How to fix the Windows 11 Installation Assistant error 0x8007007f
1. Run the Assistant as an administrator
- After you have downloaded the Installation Assistant from Microsoft’s official website, locate the executable program file. It will most probably be in the Downloads folder of your PC.
- Once you found it, right-click on the executable file and choose Run as administrator.

- A dialog box will pop up to ask your permission. Click Yes to allow Windows 11 Installation Assistant to run with administrator privilege.

Now continue with the installation steps that are shown to you. Make sure to follow them carefully.
2. Disable your antivirus
- Tap on the expand arrow from your taskbar then right-click on your antivirus to choose Avast shields control followed by Disable for 10 minutes.

- If you have other antivirus programs installed, you can temporarily disable the app by following the same or similar methods as before.

The likelihood that your antivirus application was the source of the problem is high if the problem no longer occurs. In order to secure your computer, you should consider using another antivirus product that is compatible with Windows 11.
3. Run SFC
- Press the Windows + S key to open the Search bar, then type cmd. Next, right-click on the most relevant result given to you to run it as an administrator.

- Type or paste in the following command and press Enter in order to perform the scan:
sfc /scannow

When you’ve finished waiting for the process to complete, restart your computer (which could take some time). Alternatively, you can give a try to Fortect which will scan your PC and fix any issues related to missing or corrupted system files.
⇒ Get Fortect
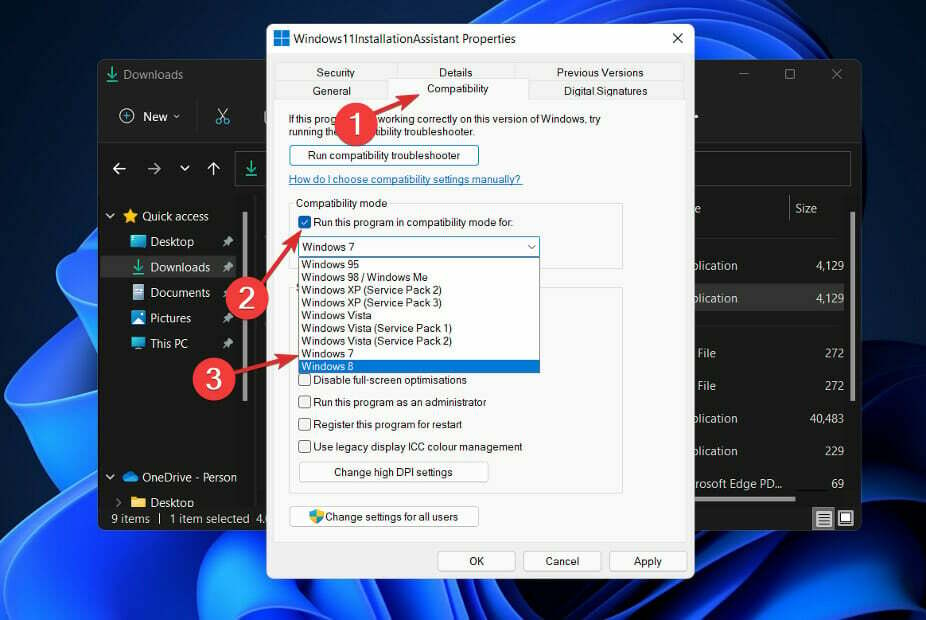
4. Set the compatibility mode
- After you have downloaded the Installation Assistant from Microsoft’s official website, locate the executable program file. It will most probably be in the Downloads folder of your PC.
- Right-click on it, then choose Properties.

- Now navigate to the Compatibility tab, click on Run this program in compatibility mode for: and choose Windows 7.

- Hit Apply to save the changes, then run the executable normally and see if the window nor remains open long enough for you to perform your tasks.

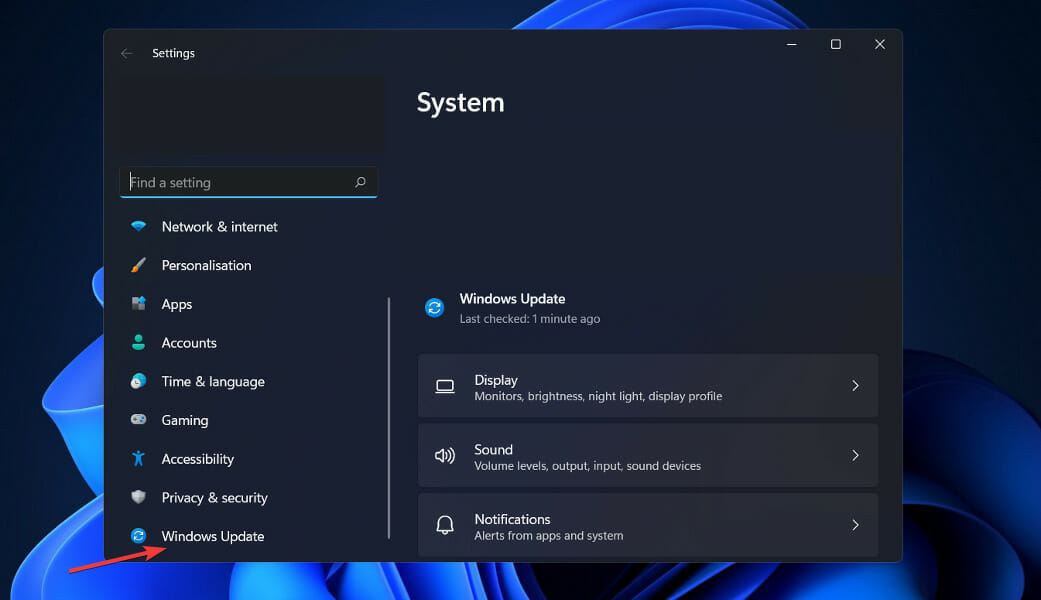
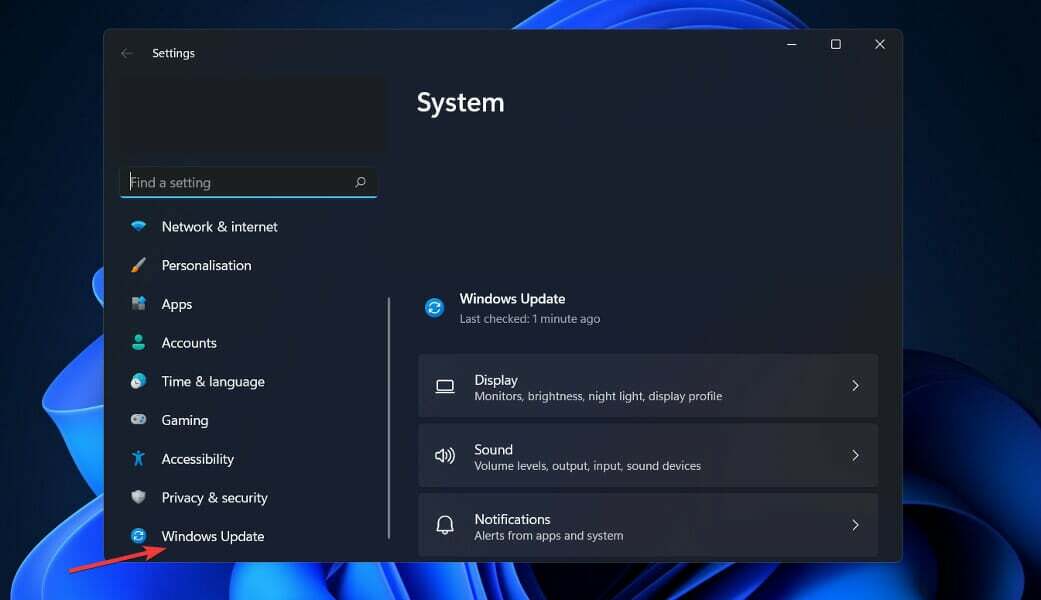
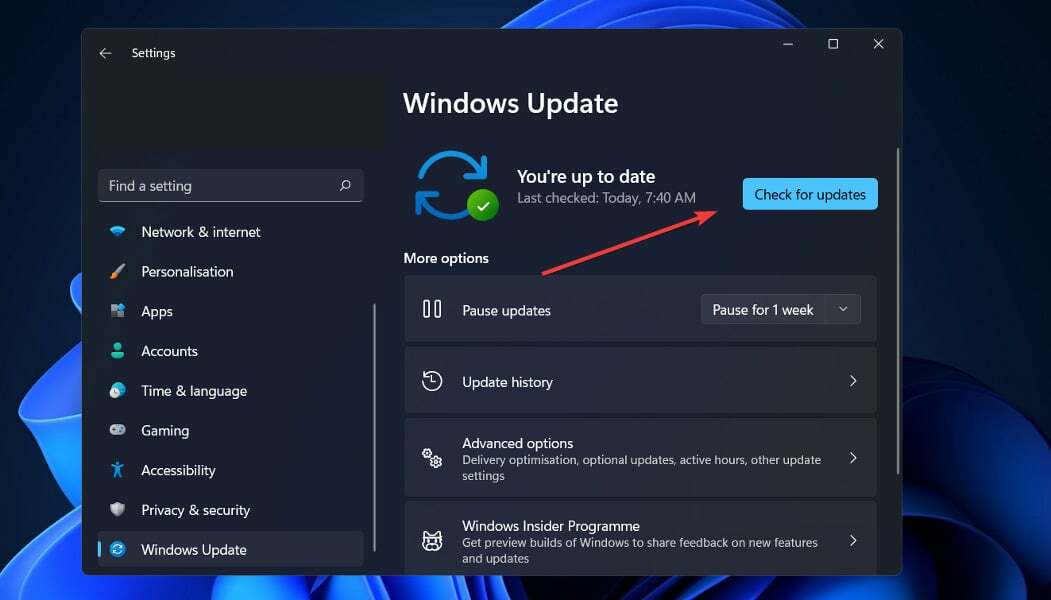
How to check for new updates in Windows 11?
During the development of Windows 11, the developers made a point of analyzing the data to determine which settings are used the most and which settings are used the least.
Without a question, Windows Updates were given top priority, and a new menu was built specifically for them. Manually updating Windows 11 can be accomplished as follows:
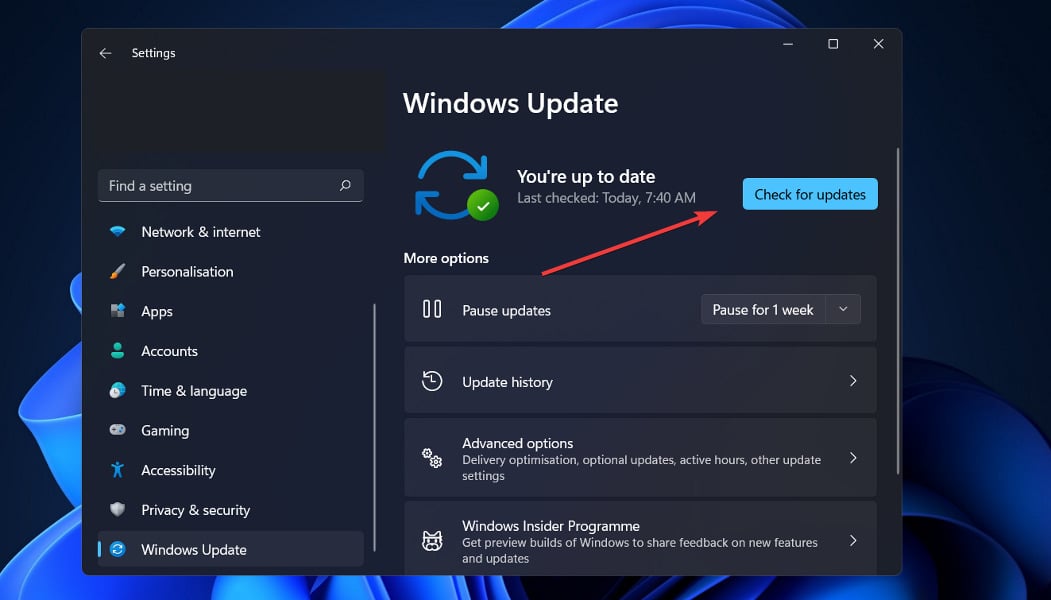
- Press the Windows key + I to open the Settings app, then click on Windows Update in the left panel.

- If you have any new updates to download, click on the Install now button and wait for the process to finish, otherwise click on the Check for updates button.

- If there are any new updates, the system will download and install them right away.
That’s all there is to it! The new OS has been installed on your computer, and we hope that our solutions assisted you in completing the upgrade without difficulty.
Please remember that Windows 11 is recently launched, and there may be a number of glitches and faults to contend with; nevertheless, we will provide solutions for these issues on our website.
If you find that you don’t have the option to upgrade to Windows 11 from the Windows Update settings, you should take a look at our linked guide on what to do if this is the case.
![]()
- Пользователи сообщают, что их помощник по установке Windows 11 не работает должным образом после его загрузки, и это может быть связано с настройками их системы.
- Другая возможная причина — отсутствие прав доступа к файлу.
- В качестве решения попробуйте запустить загруженный файл от имени администратора, щелкнув его правой кнопкой мыши.

ИксУСТАНОВИТЕ, НАЖИМАЯ НА СКАЧАТЬ ФАЙЛ
Для устранения различных проблем с ПК мы рекомендуем Restoro PC Repair Tool:
Это программное обеспечение исправит распространенные компьютерные ошибки, защитит вас от потери файлов, вредоносного ПО, аппаратного сбоя и оптимизирует ваш компьютер для достижения максимальной производительности. Исправьте проблемы с ПК и удалите вирусы прямо сейчас, выполнив 3 простых шага:
- Скачать инструмент восстановления ПК Restoro который поставляется с запатентованными технологиями (патент доступен здесь).
- Нажмите Начать сканирование чтобы найти проблемы Windows, которые могут вызывать проблемы с ПК.
- Нажмите Починить все для устранения проблем, влияющих на безопасность и производительность вашего компьютера
- Restoro был скачан пользователем 0 читателей в этом месяце.
Windows 11 официально стала доступной, и пользователи изо всех сил пытаются заполучить операционную систему Microsoft.
Хотя многие клиенты заявили об успешном обновлении до Windows 11, некоторые из них столкнулись с кодом ошибки 0x8007007f при использовании помощника по установке Windows 11 для завершения обновления.
Точно так же другие сталкивались с сообщениями об ошибках, в которых говорилось, что помощник по установке Windows 11 уже запущен или что с ним что-то пошло не так.
Вы не должны слишком беспокоиться о проблеме обновления Windows 11, потому что ошибки распространены в больших выпусках обновлений Windows. Продолжайте читать, чтобы узнать, как решить эту проблему, чтобы вы могли выполнить обновление до Windows 11.
Что нового в Windows 11?
В Windows 11 представлен полностью переработанный пользовательский интерфейс, который больше похож на Mac. Он имеет простой дизайн с закругленными сторонами и дополняет его мягкими пастельными тонами. 
Наряду с панелью задач меню «Пуск», представляющее собой значок Windows, перемещено в центр экрана. Однако, если хотите, вы можете вернуть их в исходное положение слева, как в Windows 10.
Приложения для Android будут доступны через Microsoft Store (но не сразу) через Amazon Appstore, который будет доступен в Windows 11.
Возможность доступа к приложениям Android в Windows 10 ранее была доступна несколькими способами, в том числе с помощью телефона Samsung Galaxy, но теперь она станет родной.)
Для пользователей Windows это то, чего они ждали в течение многих лет, и это представляет собой еще один шаг к интеграции мобильных и портативных компьютеров. Эта функция в настоящее время находится в стадии бета-тестирования и доступна только для участников программы предварительной оценки Windows, которые могут ее протестировать.
Windows 11 позволит вам создавать виртуальные рабочие столы аналогично компьютерам Mac. Это позволяет вам переключаться между несколькими компьютерами одновременно для личных, профессиональных, образовательных или игровых целей. Это было сложнее настроить и использовать в Windows 10.
Добавление жестов и увеличение расстояния между значками на панели задач — это два способа, с помощью которых Microsoft пытается улучшить работу с сенсорным экраном на планшетах. При использовании цифрового пера для заметок или набросков теперь вы можете слышать и ощущать вибрации.
Узнать больше, ознакомьтесь с нашей статьей с полным сравнением производительности Windows 10 и Windows 11. и лучшие функции последней операционной системы.
Что делать, если помощник по установке Windows 11 не работает?
1. Запустите Помощник от имени администратора
- После того, как вы загрузили Помощник по установке от официальный сайт Майкрософт, найдите исполняемый файл программы. Скорее всего, это будет в Загрузки папку вашего ПК.
- Найдя его, щелкните правой кнопкой мыши исполняемый файл и выберите Запустить от имени администратора.

- Появится диалоговое окно, чтобы спросить вашего разрешения. Нажмите да позволять Помощник по установке Windows 11 для запуска с правами администратора.
Теперь продолжайте выполнять шаги установки, которые показаны вам. Обязательно внимательно следуйте им.
2. Отключите антивирус
- Нажмите на стрелку расширения на панели задач, затем щелкните правой кнопкой мыши антивирус, чтобы выбрать Управление щитами Avast с последующим Отключить на 10 минут.
- Если у вас установлены другие антивирусные программы, вы можете временно отключить приложение, используя те же или аналогичные методы, что и раньше.
Вероятность того, что ваше антивирусное приложение было источником проблемы, высока, если проблема больше не возникает. Чтобы обезопасить свой компьютер, вы должны рассмотрите возможность использования другого антивирусного продукта, совместимого с Windows 11..
3. Запустить SFC
- нажмите Окна + С ключ, чтобы открыть Поиск бар, затем введите команда. Затем щелкните правой кнопкой мыши наиболее релевантный результат, предоставленный вам, чтобы запустить его от имени администратора.
- Введите или вставьте следующую команду и нажмите Входить для выполнения сканирования:
sfc/scannow
Когда вы закончили ждать завершения процесса, перезагрузите компьютер (это может занять некоторое время).
4. Установите режим совместимости
- После того, как вы загрузили Помощник по установке от официальный сайт Майкрософт, найдите исполняемый файл программы. Скорее всего, это будет в Загрузки папку вашего ПК.
- Щелкните его правой кнопкой мыши, затем выберите Характеристики.
- Теперь перейдите к Совместимость вкладка, нажмите на Запустите эту программу в режиме совместимости для: и выбрать Windows 7.
- Ударил Применять чтобы сохранить изменения, затем запустите исполняемый файл в обычном режиме и посмотрите, остается ли окно открытым достаточно долго для выполнения ваших задач.
Как проверить наличие новых обновлений в Windows 11?
При разработке Windows 11 разработчики уделяли особое внимание анализу данных, чтобы определить, какие параметры используются чаще всего, а какие меньше всего.
Без сомнения, обновления Windows получили наивысший приоритет, и специально для них было создано новое меню. Обновление Windows 11 вручную можно выполнить следующим образом:
- нажмите Окна ключ + я открыть Настройки приложение, затем нажмите Центр обновления Windows на левой панели.
- Если у вас есть новые обновления для загрузки, нажмите кнопку Установить сейчас кнопку и дождитесь окончания процесса, в противном случае нажмите кнопку Проверить наличие обновлений кнопка.
- Если есть какие-то новые обновления, система сразу их загрузит и установит.
Вот и все! Новая ОС установлена на вашем компьютере, и мы надеемся, что наши решения помогли вам выполнить обновление без труда.
Помните, что Windows 11 была запущена недавно, и может возникнуть ряд сбоев и сбоев, с которыми нужно бороться; тем не менее, мы предоставим решения для этих проблем на нашем веб-сайте.
Если вы обнаружите, что у вас нет возможности обновиться до Windows 11 из настроек Центра обновления Windows, вы должны взглянуть на наше связанное руководство о том, что делать в этом случае.
В качестве альтернативы вы можете попробовать установить Windows 11 без помощника по установке, как мы показали в статье здесь.
Подобным хорошим источником информации является наш сообщение о том, как загрузить Windows 11 ISO или обновить Windows 10. Обязательно взгляните на него, чтобы, наконец, перейти на Windows 11!
Сообщите нам в разделе комментариев ниже, какое решение сработало для вас лучше всего, а также скучаете ли вы уже по Windows 10 или нет. Спасибо за чтение!