
Contents
- 1 How to install Windows 11 without TPM 2.0 / TPM 1.2
- 2 How to auto-create a Windows 11-ISO without TPM-check for installation
- 3 How to upgrade to Windows 11 with unsupported CPU / without TPM 1.2
- 4 How to upgrade to Windows 11 without any TPM (TPM 2.0 / TPM 1.2)
- 5 Windows 11 supported Intel processors
- 6 Windows 11 supported AMD processors
Much controversy has come from Microsoft’s decision to restrict Windows 11 to machines that support TPM 2.0, with the company itself even seeming uncertain about the move.
The upgrade or installation of Windows 11 also fails on other unsupported hardware such as certain older CPUs.
We have already shown you how to check if your PC has a TPM chip. Today, we’ll be teaching you how to install Windows 11 without TPM 2.0 chip or how to install it if your PC has only TPM 1.2 or an unsupported CPU. If you are unsure about the Windows 11 processor requirements, please check the official lists of Intel and AMD CPUs that will work with Windows 11 at the end of this article.
What is a TPM 2.0 Chip?
TPM stands for Trusted Platform Module, which may not mean much to you alone. Essentially, TPM is a security module typically soldered onto the motherboard in the form of a chip. It acts as a cryptographic processor and offers a hardware-based approach to generating hashes and storing cryptographic keys, biometric data, user data, and more.
Rooting the cryptography in hardware makes it all but impossible for attackers to tamper with and access this data, protecting against malware, ransomware, and sophisticated nation-state attacks. While older PCs might use a TPM 1.2 chip, most PCs using TPM usually run with a newer TPM 2.0 chip. There are no other public versions in between.
Is it safe to install Windows 11 without TPM 2.0 Chip?
Despite what Microsoft’s Windows 11 compatibility tool may tell you, installing Windows 11 without TPM is quite simple. All it requires is putting a few registry entries or using a script based tool to activate a Windows 11 TPM 2.0 bypass.
Before you do so, however, you should consider that TPM 2.0 is used to power many of Windows 11’s security features. This includes measured boot, Windows Hello, SecureBIO, WD System Guard, and Device Health Attestation. When you run Windows 11 without a TPM chip, you won’t have access to these features and may be putting your data more at risk as a result.
If possible, then, we recommend that you install a discrete TPM 2.0 module or wait and upgrade your hardware. It’s likely Windows 11 will only rely on TPM more in the future and we can’t guarantee that Microsoft won’t disable this bypass at a later point.
The Windows 11 TPM 2.0 bypass
If you really can’t do the above or just want to take the new OS for a test drive, however, this is how you install Windows 11 on unsupported hardware. You can either tweak the installation routine yourself (methods 1 & 3), use a wrapper-tool for Microsoft´s Media Creation Tool to get an ISO/USB without the Windows 11 TPM-check (method 2) or apply a Windows 11 TPM 2.0 bypass for upgrading a running Windows 10 system to Windows 11 (method 4).
As mentioned, installing Windows 11 without TPM requires a few registry entries. The easiest way to bypass the Windows 11 TPM check this is to try to install Windows 11 via an ISO or the Insider program, then follow the steps below if you get a “This PC can’t run Windows 11” message.
If you see the message “This PC does not meet the system requirement”, minimize the installer, go to registry, edit the entries, then go back to the installer, Press back button once, and continue. If you prefer to do this the easy way you can avoid the standard setup/installation provided by Microsoft and use one of the methods shown after this one.
- Press Shift + F10 to open Command Prompt and run the “regedit” command

- Add a new key in the “Setup” key
In the Registry Editor, navigate to
Computer\HKEY_LOCAL_MACHINE\SYSTEM\Setup. Right-click on the “Setup” folder in your sidebar and select “New > Key”.
- Name the key “LabConfig” and add a new DWORD
After you name your folder, you can create the DWORD by right-clicking in any blank space in the main pane and selecting “DWORD (32-bit) Value”.
- Name the value “BypassTPMCheck” and set the value data to 1.
It’s important the capitalization and spelling are exactly the same. You can modify the value data by double-clicking your new DWORD and changing the “Value data” text box. Press “OK” when you’re done to save the changes.
- Create another DWORD called “BypassRAMCheck”
Again, make sure the capitalization and spelling is exactly the same as above.
- Change the value data to 1
Remember, you can access the value data field by double-clicking on the “BypassRAMCheck” key. Press “OK” to apply it.
- Create a new DWORD called “BypassSecureBootCheck”
- Change the value data of SecureBootCheck to 1 and press “OK”
- Close the Registry Editor and press the back button on your Windows 11 setup
You’ll find the back button in the top-left corner.

- Install Windows 11 on your unsupported hardware
You can now go through the setup process as normal. Your installer should no longer tell you your PC is incompatible.


How to auto-create a Windows 11-ISO without TPM-check for installation
You can use Microsoft´s Media Creation Tool with the script-based tool Universal MediaCreationTool wrapper (Universal MCT wrapper) to automatically download Windows 11 from Microsoft´s servers and create ISO-files where the TPM check has been removed. If you want to use this ISO to upgrade Windows 10 to Windows 11 dynamically from a running system, you will additionally need to activate the TPM bypass shown in method 4 below.
- Download and unzip Universal MCT wrapper
Download Universal MCT wrapper from GitHub, unpack the ZIP-file and run “MediaCreationTool.bat”. If you want to learn more about the project, you find everything here.

- Click on “11” to select “Windows 11”
- Choose “Create ISO” or “Create USB” based on your preference.
“Create USB” will automatically create a bootable USB-stick which can be used for a fresh installation of “Windows 11”.
- Wait until the Media Creation Tool has finished downloading Windows 11
After the download of Windows 11 has been finished, the Media Creation Tool will close automatically and Universal MCT wrapper will create an ISO/USB which allows installing Windows 11 without TPM.
- Wait for Universal MCT wrapper to finish
- Use ISO/USB to install Windows 11 without TPM
The ISO to install Windows 11 without TPM can be found in the main folder of Universal MCT wrapper.
- Install Windows 11 without Trusted Platform Module
You use the ISO/USB to either install Windows 11 without TPM-check on a PC or as a virtual machine with VMware, Virtualbox, or Hyper-V.


How to upgrade to Windows 11 with unsupported CPU / without TPM 1.2
If your PC fails to upgrade to Windows 11 because of an unsupported CPU and/or that your device only has TPM 1.2 instead of TPM 2.0, you can fix that quickly. Just apply the following registry-tweak to add a bypass for unsupported CPU and TPM 1.2.
- Open Regedit
- Navigate to folder and check for existing DWORD
Use the address bar to navigate to “HKEY_LOCAL_MACHINE\SYSTEM\Setup\MoSetup” and check if the DWORD “AllowUpgradesWithUnsupportedTPMOrCPU” is located there. If it is missing, right-click in the right pane, select “New > DWORD (32-bit) Value”, and name the new DWORD “AllowUpgradesWithUnsupportedTPMOrCPU”.
- Edit DWORD “AllowUpgradesWithUnsupportedTPMOrCPU”
Double click on “AllowUpgradesWithUnsupportedTPMOrCPU”, type “1” in “Value data” and save with “OK”.


How to upgrade to Windows 11 without any TPM (TPM 2.0 / TPM 1.2)
If you want to directly upgrade Windows 10 to Windows 11 without a TPM 2.0 chip, you can use the wrapper tool from the previous step to activate a bypass with a simple click. This method is also needed if you run the Windows 11 upgrade from a previously created ISO created with method 2.
- Run the Windows 11 TPM 2.0 bypass
Double-click on “Skip_TPM_Check_on_Dynamic_Update_v2.cmd” as admin to remove the TPM-check for updates. If this does not work, you can try alternatively “Skip_TPM_Check_on_Dynamic_Update_v1.cmd”.
- Wait for confirmation
If you see a PowerShell window popping up with a green bar stating “Skip TPM Check on Dynamic Update [Installed]…” the TPM 2.0 bypass has been activated and you should be able to upgrade from Windows 10 to Windows 11 without TPM 2.0. Running the respective CMD-script again will re-activate the TPM-check.

![Skip TPM Check on Dynamic Update [Installed]](https://cdn-chilj.nitrocdn.com/gYFaTcLxknXlucWgXPjHDdhAuyobJjHx/assets/images/optimized/rev-63bdcfb/winbuzzer.com/wp-content/uploads/2021/10/Skip-TPM-Check-on-Dynamic-Update-Installed.jpg.webp)
Windows 11 supported Intel processors
Windows 11 supports intel processors from Intel’s 8th generation or newer which means CPUs from mid-2017 onwards. Here we provide a selection of the most popular consumer-level CPUs. Microsoft has a full list of all supported Intel processors for Windows 11, including chips from the Atom, Celeron, Pentium, Xeon and Core series.
Intel 8th generation (Coffee Lake; Whiskey Lake; Amber Lake)
Desktop
- Core i3-8100
- Core i5-8400
- Core i5-8600
- Core i5-8600K
- Core i7-8700
- Core i7-8700K
- Core i7-8086K
Mobile
- Core m3-8100Y
- Core i5-8200Y
- Core i3-8130U
- Core i3-8145U
- Core i3-8100H
- Core i5-8250U
- Core i5-8250U
- Core i5-8400H
- Core i7-8650U
- Core i7-8665U
- Core i7-8750H
Intel 9th generation (Coffee Lake Refresh)
- Core i3-9100
- Core i5-9400
- Core i5-9600
- Core i5-9600K
- Core i7-9700
- Core i7-9700K
- Core i9-9900
- Core i9-9900K
Intel 10th generation (Comet Lake; Ice Lake; Amber Lake)
Desktop
- Core i3-10100
- Core i5-10400
- Core i5-10600
- Core i5-10600K
- Core i7-10700
- Core i7-10700K
- Core i9-10900
- Core i9-10900K
Mobile
- Core i3-10100Y
- Core i3-10100U
- Core i5-10210U
- Core i5-10200H
- Core i5-10400H
- Core i7-10510U
- Core i7-10710U
- Core i7-10750H
- Core i7-10850H
- Core i9-10980HK
Intel 11th generation (Tiger Lake)
Desktop
- Core i3-11100
- Core i5-11400
- Core i5-11600
- Core i5-11600K
- Core i7-11700
- Core i7-11700K
- Core i9-11900
- Core i9-11900K
Mobile
- Core i3-1115G4
- Core i5-1135G7
- Core i5-11300H
- Core i7-1165G7
- Core i7-1185G7
- Core i7-11375H
Windows 11 supported AMD processors
For AMD, Windows 11 CPU compatibility goes back to processors released in 2018 or later. This includes 2nd generation Ryzen (Zen+) chips and above. Microsoft also has a full AMD list, including chips from AMDs Athlon, EPYC, Ryzen and Ryzen Threadripper series. Below is a list of the more common consumer-level CPUs. Unfortunately CPU like the 3300X, 3700, 4600HS and 5900H are missing, even though all are all very recent.
AMD Ryzen 2000 series (Zen+; Zen)
Desktop
- Ryzen 3 2300X
- Ryzen 5 2600
- Ryzen 7 2700
- Ryzen 7 2700X
- Ryzen Threadripper 2920X
- Ryzen Threadripper 2950X
- Ryzen Threadripper 2970WX
- Ryzen Threadripper 2990X
AMD Ryzen 3000 series (Zen 2; Zen+)
Desktop
- Ryzen 3 3100
- Ryzen 5 3600
- Ryzen 7 3700X
- Ryzen 9 3900
- Ryzen 9 3900X
- Ryzen 9 3950X
- Ryzen Threadripper 3960X
- Ryzen Threadripper 3970X
- Ryzen Threadripper 3990X
- Ryzen Threadripper 3995WX
- Ryzen 3 3200G**
- Ryzen 5 3400G**
- Ryzen 3 3300U
- Ryzen 5 3500U
- Ryzen 5 3550H
- Ryzen 7 3700U
- Ryzen 7 3750H
AMD Ryzen 4000 series (Zen 2)
Desktop
- Ryzen 3 4300G
- Ryzen 5 4600G
- Ryzen 7 4700G
Mobile
- Ryzen 3 4300U
- Ryzen 5 4500U
- Ryzen 5 4600H
- Ryzen 7 4700U
- Ryzen 7 4800HS
- Ryzen 7 4800H
- Ryzen 9 4900HS
- Ryzen 9 4900H
AMD Ryzen 5000 series (Zen 3)
Desktop
- Ryzen 5 5600X
- Ryzen 7 5800X
- Ryzen 9 5900X
- Ryzen 9 5950X
Mobile
- Ryzen 3 5400U
- Ryzen 5 5600U
- Ryzen 5 5600HS
- Ryzen 5 5600H
- Ryzen 7 5800U
- Ryzen 7 5800HS
- Ryzen 7 5800H
- Ryzen 9 5900HS
- Ryzen 9 5900HX
- Ryzen 9 5980HS
- Ryzen 9 5980HX
That’s it for this Windows 11 tutorial. Now that you have it installed, you may want to check out all the major features coming to the OS, including focus sessions and the new snipping tool.
If you decide it’s not for you, you may instead want to check out our tutorial on how to roll back a Windows update. Technically, it’s for Windows 10, but as you’ll notice not much has changed between versions, so the process is more or less the same.
Install Windows 11 without TPM, Secure Boot, and a supported CPU! Yes, you heard it right. You can now install Windows 11 on your old PC or laptop without meeting the requirement of TPM, Secure Boot, and a supported CPU. When the leaked developer version was available on the internet, we saw that Microsoft has raised the minimum Windows 11 system requirements with TPM (Trusted Platform Module), Secure Boot, and a supported CPU mandatory. The case is not different even after the release of the official public build.
If you tried to upgrade or install Windows 11 with the normal procedure, you might have faced ‘This PC can’t run Windows 11 error‘ like this:

This error is even faced by several people having high-end PCs. Anyways, in this article, we’ll show you the Windows 11 TPM fix and how we installed Windows 11 without TPM 2.0 and Secure Boot on one of our old laptops. You can also follow this method on your computer if you don’t have the TPM version 2.0 or the TPM chip at all.
Related Read: How to fix error 0x0 0x0 on Windows
We have a couple of Windows 11 TPM workarounds to bypass the security requirements and install the OS on your device without any errors. So here we go.
Before we deep dive into the process, we’ll give you a quick overview of what we are gonna do to bypass TPM on Windows 11 to install it even on your old PC.
How to Clean Install Windows 11 Without TPM
- Download the unofficial Windows 11 media creation tool from Github.
- Extract the zip and run MediaCreationTool.bat.
- Choose 11 as the MCT version.
- Select Create ISO or Create USB.
- Click Yes in PowerShell prompt.
- Choose media (USB or ISO) and then the file location.
- Click Next and you will now get an installation media.
- Now, boot from the newly created media and you’ll be able to install Windows 11 without meeting the system requirements.
Now let’s get into the process in deep where we’ll show you the EXACT screenshots of the installation process.
Since you have a computer that doesn’t meet the Windows 11 requirements, especially TPM, you need to bypass the TPM detection while performing the installation. For this, we are going to make use of a custom-made media creation tool that can easily accomplish the said thing. Thanks to AveYo for developing such a useful tool.
- First, head to this link and download the zip file of the universal media creation tool.

- Extract the zip file and run the MediaCreationTool batch file. If windows flag it as dangerous, fret not. Just click Run anyway to proceed.

- Now, once the program opens choose 11 (at the bottom) as the MCT version.

- Then, choose either Create ISO or Create USB. If you want to create Windows 11 bootable USB to install on another PC select Create USB. If you want to install it on a virtual machine choose Create ISO.

- If prompted, click Yes to allow Windows PowerShell to launch the media creation utility. It will open up and you will see it titled “Windows 10 Setup”. Just ignore that! You’ll be creating a Windows 11 media.
- In the media creation tool window, choose which media you want to use. Select USB flash drive or ISO file.

- Now, select the drive letter for the USB flash drive, or file location for the ISO file. Click Next.
- The tool will now start downloading Windows 11 from the servers and create an installation media for you. And again, don’t be confused with what it says. You may see “Downloading Windows 10”, but don’t worry. You’ll end up with Windows 11.
- Once the installation media is created successfully, Just boot from it as usual. You should be able to install Windows 11 without having a TPM on your system.


You may also like: How to Bypass Windows 11 Requirements (New Method)
How to Install Windows 11 With TPM 1.2 and/or Unsupported CPUs
If your system does have TPM 1.2 instead of TPM 2.0 and/or has an unsupported CPU, and meets all other requirements, then the whole thing becomes a lot easier. To circumvent this issue, we’ve got a simple workaround that uses a registry hack to skip the CPU and TPM version checks.
Warning: The method involves registry editing and may cause issues with Windows installation. If you are not comfortable with editing the registry files, you may want to refrain from upgrading. But if you follow the guidelines correctly, you won’t end up with any issues.
- First off, open Windows Registry Editor. Press Windows key + R, type “regedit”, and hit enter.

- Now, copy and paste the following path address into the registry address bar as shown in the screenshot.
HKEY_LOCAL_MACHINE\SYSTEM\Setup\MoSetup
- Right-click in a blank space on the right pane and choose New > DWORD (32-bit) Value.

- Name it as
AllowUpgradesWithUnsupportedTPMOrCPU. - Double-click on it set the value data to 1, and click OK. Make sure that ‘Hexadecimal’ is already selected as the Base as shown in the screenshot below.


You’re done with it!
Now, if you find this too technical or feel uncomfortable editing the registry, you can do this with a few clicks. Just download our custom-made registry files and double-click the required one to get the job done. If prompted, confirm the action by clicking Yes.

- [Download Registry files]
The above zip file contains a couple of registry files in which Enable Win11 Upgrade.reg will do the registry hack and Undo Enable Win11 Upgrade.reg will revert the registry edits and bring them back to the normal state.
To take the effect of the registry change, reboot your PC and continue with the following step.
Download the Official Windows 11 Installation Assistant and launch it to start upgrading your PC to Windows 11. If prompted, just agree to the warnings.
Upgrade to Windows 11 From Windows 10 Without TPM
If your system currently runs on Windows 10 and doesn’t meet the requirement to upgrade to Windows 11, then we have got a piece of good news for you. You also can follow the above steps to upgrade. But with a twist!
We’re written a dedicated article for upgrading to Windows 11 from Windows 10 without meeting the requirements. Please do check that for detailed instructions.
Wrapping Up
Now that you know how to install Windows 11 without TPM 2.0 and Secure Boot security requirements. And now, it’s pretty obvious that the TPM and Secure Boot is not an inevitable thing to run Windows 11 operating system.
Out of the 2 methods, we recommend you to try the first method first. ie., editing the registry during the installation process. The method is a bit tricky but it works perfectly. The second method is just to show you another possibility to bypass Windows 11 system requirements recommended by Microsoft.
In case if you face any difficulties in the installation process, feel free to comment below. We’ll get back to you with a solution.
Once you install Windows 11 on your desktop or laptop, you may need the following guides to better explore the operating system and make the most out of it.
- How to Enable TPM in BIOS
- How to Rotate Screen in Windows 11
- How to Take a Screenshot on Windows 11
- How to Change Username in Windows 11
- How to Check RAM on Windows 11
- How to Find Computer Specs on Windows 11
- How to Factory Reset Windows 11
- How Much Space Does Windows 11 Take up on Your Disk?

Vishnu Mohanhttps://makmodo.com
Vishnu is the founder and fountainhead of Makmodo and hails from God’s Own Country — Kerala. He has been an ardent tech geek obsessed with technology since he got his first gadget a decade ago. He loves using his technical expertise to write informative and useful content to help people. Besides the techy stuff, he enjoys listening to music, reading books, and playing cricket. Occasionally, you can see him taking candid photographs or nurturing hanging orchids in his front yard.
Для установки Windows 11 (или при обновлении с Windows 10), ваш компьютер должен соответствовать определённом минимальным системам требованиям: наличие чипа TPM 2.0 (Trusted Platform Module), режим UEFI + Secure Boot, 4 Гб RAM, 64 Гб диск и совместимый двухъядерный процессор 1 ГГц (не все процессоры поддерживаются!). Microsoft ограничивает установку Windows 11 на несовместимые компьютеры, выполняя проверку на соответствие системным требования перед началом установки Windows. В этой статье мы покажем, как установить Windows 11 на несовместимые устройства без проверки требований к CPU, TPM, Secure Boot (и т.д.)
Если компьютер не соответствует минимальным требованиям для Windows 11, то при установке ОС появится ошибка:
Запуск Windows 11 на этом компьютере не возможен
. Этот компьютер не соответствует минимальным требованиям к системе для установки этой версии Windows. Дополнительные сведения см. на сайте aka.ms/WindowsSysReq
This PC can’t run Windows 11
. This PC doesn’t meet the minimum system requirements to install this version of Windows. For more information, visit aka.ms/WindowsSysReq<
Чтобы понять, каким конкретно требованиям не соответствует вашим компьютер, нужно изучить лог ошибок установки Windows 11 setuperr.log. В этом файле содержаться только ошибки установки Windows (полный лог установки находится в файле setupact.log, но изучать его сложно из-за большого объема).
Чтобы открыть файл лога ошибок установки Windows, откройте командную строку прямо на экране установки, нажав
Shift + F10
и выполните команду:
notepad x:\windows\panther\setuperr.log
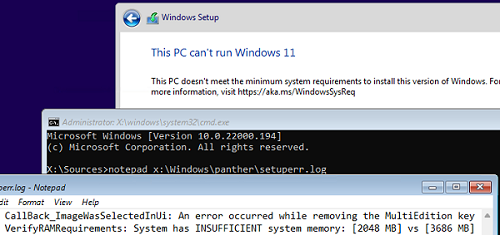
В нашем случае ошибка говорит, что на компьютере недостаточно оперативной памяти (всего 2 Гб вместо 3).
2021-11-11 10:57:51, Error VerifyRAMRequirements: System has INSUFFICIENT system memory: [2048 MB] vs [3686 MB]
Обратите внимание, что если ваш компьютер не соответствует нескольким системным требованиям для установки Windows, то в логе будет указана только первая из причин. Т.е. если вы исправили (или пропустили) одну из ошибок несовместимости, то при следующем запуске установки Windows 11 в логе будет содержаться следующая ошибка совместимости.
После того, как мы добавили RAM появилась другая ошибка:
2021-11-11 11:13:37, Error VerifyTPMSupported:Tbsi_GetDeviceInfo function failed - 0x8028400f[gle=0x0000007a]
Т.е. установщик определил, что на компьютере отсутствует TPM чип.
Если вы устанавливаете Windows 11 в виртуальную машину VMWare, вы можете добавить виртуальный TPM чип в соответствии с этой статьей. Для Hyper-V используется другая инструкция.
Однако вы можете продолжить установку Windows 11, просто игнорировал одно или все требования совместимости.
Для этого нужно в командной строке на экране установки Windows 11:
- Запустить редактор реестра
regedit.exe
; - Перейти в раздел HKEY_LOCAL_MACHINE\SYSTEM\Setup и создать новую ветку с именем LabConfig;
- В этой ветке нужно создать DWORD параметры со значением 1 для тех проверок совместимости, которые вы хотите пропустить при установке
Доступны следующие параметры, позволяющие установить Windows 11 на устройства:
-
BypassCPUCheck
– с несовместимыми процессорами; -
BypassTPMCheck
– без чипа TPM 2; -
BypassRAMCheck
– не проверять минимальное количество RAM -
BypassSecureBootCheck
–с Legacy BIOS (или UEFI с отключенным Secure Boot) -
BypassStorageCheck
– не проверять размер системного диска
Например, чтобы не проверять наличие TPM модуля при установке, нудно создать параметр реестра BypassTPMCheck со значением 1. Параметр можно создать с помощью графического редактора реестра или с помощью команды:
reg add HKLM\SYSTEM\Setup\LabConfig /v BypassTPMCheck /t REG_DWORD /d 1
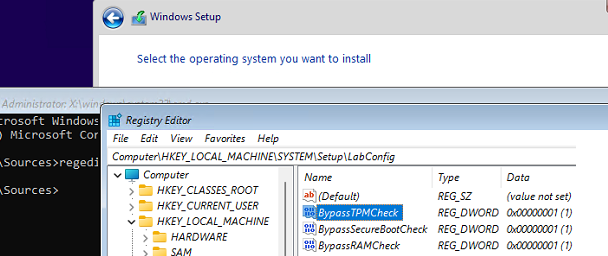
Аналогичным образом нужно создать другие параметры для проверок, который вы хотите пропустить при установке Windows 11.
Затем вернитесь в окно установки Window 11, вернитесь на шаг назад и продолжите обычную установки без проверки совместимости.
Вы можете модифицировать установочный ISO образ Windows 11, чтобы все эти проверки TPM, SecureBoot, диск, память, CPU) пропускались автоматически при установке ОС.
Для этого создайте текстовый файл AutoUnattend.xml со следующим содержимым:
<unattend xmlns="urn:schemas-microsoft-com:unattend">
<settings pass="windowsPE">
<component name="Microsoft-Windows-Setup" processorArchitecture="amd64" publicKeyToken="31bf3856ad364e35" language="neutral" versionScope="nonSxS" xmlns:wcm="http://schemas.microsoft.com/WMIConfig/2002/State" xmlns:xsi="http://www.w3.org/2001/XMLSchema-instance">
<RunSynchronous>
<RunSynchronousCommand wcm:action="add">
<Order>1</Order>
<Path>reg add HKLM\System\Setup\LabConfig /v BypassTPMCheck /t reg_dword /d 0x00000001 /f</Path>
</RunSynchronousCommand>
<RunSynchronousCommand wcm:action="add">
<Order>2</Order>
<Path>reg add HKLM\System\Setup\LabConfig /v BypassSecureBootCheck /t reg_dword /d 0x00000001 /f</Path>
</RunSynchronousCommand>
<RunSynchronousCommand wcm:action="add">
<Order>3</Order>
<Path>reg add HKLM\System\Setup\LabConfig /v BypassRAMCheck /t reg_dword /d 0x00000001 /f</Path>
</RunSynchronousCommand>
<RunSynchronousCommand wcm:action="add">
 <Order>5</Order>
<Path>reg add HKLM\System\Setup\LabConfig /v BypassCPUCheck /t reg_dword /d 0x00000001 /f</Path>
</RunSynchronousCommand>
<RunSynchronousCommand wcm:action="add">
<Order>4</Order>
<Path>reg add HKLM\System\Setup\LabConfig /v BypassStorageCheck /t reg_dword /d 0x00000001 /f</Path>
</RunSynchronousCommand>
</RunSynchronous>
<UserData>
<ProductKey>
<Key></Key>
</ProductKey>
</UserData>
</component>
</settings>
</unattend>
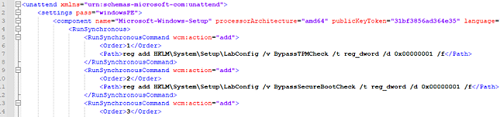
Если вы хотите отключить экран создания онлайн аккаунта Microsoft при установке Windows 11, добавьте в файл следующий секцию компонента:
<component name="Microsoft-Windows-Shell-Setup" processorArchitecture="amd64" publicKeyToken="31bf3856ad364e35" language="neutral" versionScope="nonSxS" xmlns:wcm="http://schemas.microsoft.com/WMIConfig/2002/State" xmlns:xsi="http://www.w3.org/2001/XMLSchema-instance">
<OOBE>
<HideOnlineAccountScreens>true</HideOnlineAccountScreens>
<HideWirelessSetupInOOBE>true</HideWirelessSetupInOOBE>
<ProtectYourPC>3</ProtectYourPC>
</OOBE>
</component>
Скопируйте данный файл в корень установочной USB флешки с Windows 11.
Если вам нужно добавить файл ответов в ISO образ Windows 11, распаккуйте его содержимое в любую папку на компьютере, скопируйте в этот каталог файл AutoUnattend.xml и пересоберите ISO образ.
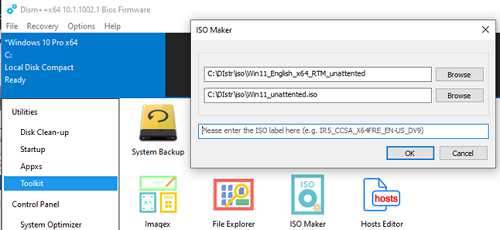
Я использовал для создания образа бесплатную утилиту DISM++ (Toolkit -> ISO maker).
Теперь никакие проверки совместимости не будут производится при установке Windows 11.
В новой версии утилиты Rufus, использующейся для создания загрузочных USB флешек, появилась специальная опция Extended Windows 11 Installation (no TPM/no Secure Boot/8Gb- RAM). Данная опция позволяет создать образ для установки Windows 11 без проверки TPM и Secure Boot:

Windows 11 has a bigger list of minimum system requirements particularly for hardware which your computer may be unable to compete with. When you try to install Windows 11 Secure Boot and TPM requirements may prevent and fail the process. In this case, PC Health Checkup program also confirms this issue and shows an error This PC can’t run Windows 11.
However, you can install Windows 11 without TPM and Secure Boot with a small registry tweak. Microsoft itself has explained a method to do this. This way you can avoid the error appearing during the installation such as “Windows 11 cannot be run on this PC”.
Here is how to install Windows 11 without TPM and Secure Boot –
- First of all, create a reg file and copy this to a USB stick. For this,
- Right-click on the desktop and select – New => Text document.
- Copy the following content –
Windows Registry Editor Version 5.00
[HKEY_LOCAL_MACHINE \ SYSTEM \ Setup \ LabConfig]

"BypassTPMCheck" = dword: 00000001

"BypassSecureBootCheck" = dword: 00000001
- Paste into the document.
- Select – File => Save as.
- Name the file something with .reg extention(remove .txt).
- Click – Save.
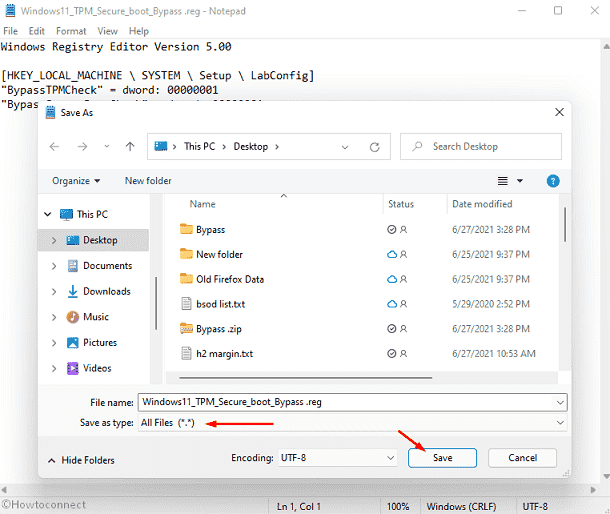
- Alternatively, you can simply download Windows11_TPM_Secure_boot_Bypass.zip file to Install Windows 11 without TPM and Secure Boot. You will have to extract the zip before pasting it to the USB.
- Copy this file to a USB stick.
- Insert the stick into the port.
Microsoft recommended registry modification –
Download this .reg file also and copy it to the USB flash drive – Bypass.zip
Microsoft strongly suggests not installing Windows 11 on a device that does not fulfill the Windows 11 system requirements. However, acknowledging the risks, you are able to create the following registry key values to install Windows 11 without TPM and Secure Boot. This modification will help the system bypass the checking. The Registry change is as follow –
Registry Key: HKEY_LOCAL_MACHINE\SYSTEM\Setup\MoSetup
Name: AllowUpgradesWithUnsupportedTPMOrCPU
Type: REG_DWORD
Value: 1
Source – Microsoft Support.
Install the new version
- Go to Windows 11 download page.
- Click on Download now from Create Windows 11 Installation Media section.
- Double click on MediaCreationToolW11.exe.
- On Windows 11 Setup, select – Accept.
- Click – Next.
- Insert a USB (at least 8 GB) in the laptop’s port and check the option USB flash drive.
- Select – Next.
- After the media is created you will see – Your USB flash drive is ready.
- Click on – Finish.
- Restart the PC and press Esc (depending on manufacturer) when the machine is turning on.
- From Boot device options, select the USB Flash drive.
- Now, on Windows 11 installation file and choose the Language and click “Next”.

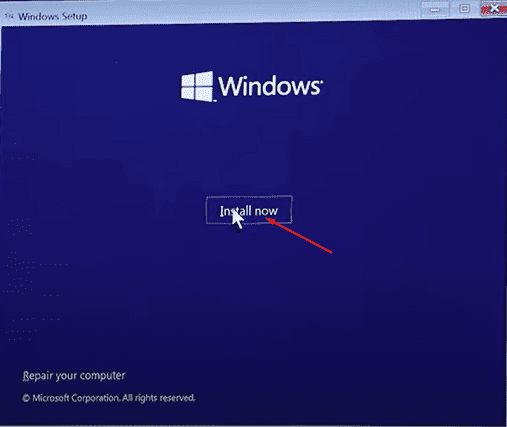
- Click – Install Now.
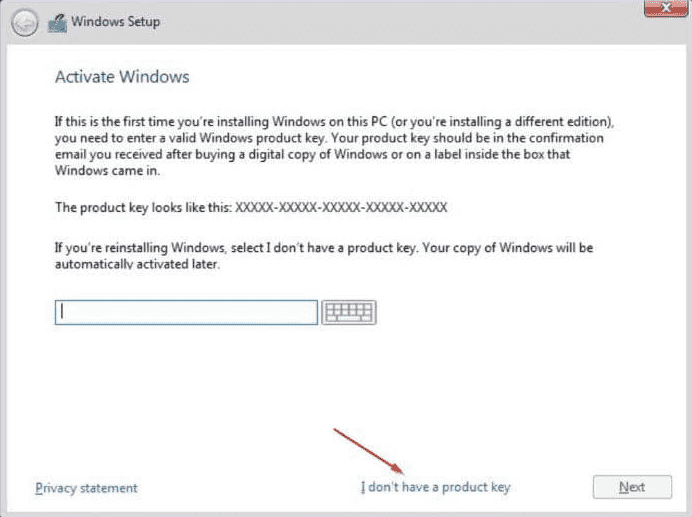
- On the next window, select – “I do not have a product key”.
- Choose the version you are going to install.
- Click – Next.
- If you come across an error message stating that Windows 11 cannot be installed on this device you need to use the reg file. You may also notice “Windows 11 cannot be run on this PC”. Now, you return back to the version selection.
- Press the – Shift key + F10.
- When the command prompt opens, type notepad.exe and press – Enter.
- On the notepad, click File => Open.
- In the open window, switch to “All files” under file type and locate the USB stick.
- Once you have found the reg file, right-click and select – Merge.
- Do the same with both .reg files.
- Click Yes on the confirmation dialog.
- The command prompt and Notepad window will now be closed.
- On the Windows 11 Setup version selection, again click – Next.
- Check the box of license terms and install Windows 11 as usual.
Install Windows 11 without TPM and Secure Boot Using Rufus
If the above methods don’t work Rufus 3.19 Beta has added an option to bypass TPM and Secure Boot when installing Windows 11. This is an Image option named Extended Windows 11 installation (no TPM / no Secure Boot). Using this you can easily install Windows 11 without TPM and Secure Boot. Here are the steps –
- Go to the Windows 11 ISO on the Desktop from the link available in the previous method.
- Click on Download now located under “Create Windows 11 Installation Media”.
- Run the .exe file for the Media creation tool.
- Select Accept on Applicable notices and notices terms window.
- Select Language and Edition and click on Next.
- Check the option ISO file and select ‘Next’.
- Select a path to save the ISO file. Click on Save.
- Once the Windows.iso file is completely saved.
- Open Rufus and select Device and Boot selection.
- Click Image option drop-down.
- Select – Extended Windows 11 installation (no TPM / no Secure Boot).
- Click on Start.
- Now follow the previous method to complete the installation process.
See – How to create Windows 11 bootable USB (Simple methods)
That’s all!!
Недавно стала доступной официальная релизная версия Windows 11. Но, для того чтобы ее установить необходим компьютер с поддержкой TPM 2.0 и Secure Boot (Безопасная загрузка), а установка на несовместимый ПК будет завершаться ошибкой «Windows 11 не может быть запущена на этом ПК», «Запуск Windows 11 на этом компьютере не возможен» или «This PC can’t run Windows 11».
В данной статье мы рассмотрим несколько способов, как можно обойти данную проверку и установить Windows 11 на несовместимый компьютер без TPM 2.0 и Secure Boot. Первый способ является официальным, так как предложен самой Майкрософт. Он предполагает редактирование реестра и обновление до Windows 11 из установленной Windows 10. Остальные способы не официальные и предложены сообществом, их можно использовать для установки на новый ПК или для обновления.
Обновление до Windows 11 без TPM 2.0 и требований к процессору
После выхода финальной версии Windows 11, компания Майкрософт опубликовала официальный способ обхода некоторых системных требований для установки Windows 11 на несовместимый ПК. Этот способ позволяет обойти проверку на наличие совместимого процессора и TPM 2.0. При этом требуется наличие на компьютере как минимум TPM 1.2, а также соответствие остальным системным требованиям, таким как наличие Secure Boot.
Чтобы воспользоваться этим способом обновления до Windows 11 нужно внести изменения в реестр на рабочей Windows 10. Для этого нажмите комбинацию клавиш Win-R и выполните команду «regedit».

После открытия «Редактора реестра» нужно перейти в следующий раздел:
HKEY_LOCAL_MACHINE\SYSTEM\Setup\MoSetup

Создать там ключ REG_DWORD с таким названием:
AllowUpgradesWithUnsupportedTPMOrCPU
И присвоить ему значение «1».

После этого можно запускать обновление с помощью загрузочной флешки с Windows 11. Самый простой способ создать такую флешку это воспользоваться утилитой «MediaCreationToolW11». Скачать данную утилиту можно на странице загрузки Windows 11 в блоке «Создание установочного носителя Windows 11».
- Ссылка: https://www.microsoft.com/ru-ru/software-download/windows11

После запуска «MediaCreationToolW11» нужно согласиться с лицензией, выбрать язык для Windows 11 и начать запись на флешку (пункт «USB flash drive»). Обратите внимание, в процессе с флешки удаляются все имеющиеся на ней файлы, поэтому перед началом нужно скопировать важные данные.

В результате вы получите загрузочную флешку с Windows 11. Теперь нужно ее открыть, запустить файл «setup.exe» и следовать дальнейшим инструкциям для обновления до Windows 11.

Установщик Windows 11 проверит совместимость вашего компьютера и позволит выполнить обновление, даже несмотря на неподдерживаемый процессор и отсутствие TPM 2.0.

Также возможно этот ключ можно будет использовать и для установки Windows 11 с нуля. В этом случае его нужно добавить в реестр во время установки, так как это описано ниже для других способов обхода ограничений. Но, этот вариант пока не проверен.
Обновление через Помощник по установке Windows 11 в режиме совместимости
Еще один способ обновления до Windows 11 на несовместимом или старом компьютере — это приложение «Помощник по установке Windows 11» или «Windows 11 Installation Assistant», которое также можно скачать на странице загрузки Windows 11.
- Ссылка: https://www.microsoft.com/ru-ru/software-download/windows11

Как и другие способы установки Windows 11, данный помощник выполняет проверку на совместимость компьютера с системными требованиями. И в случае несовместимости выдает ошибку. Но, данную проверку можно обойти, если запустить помощник в режиме совместимости с Windows 7.
Для того чтобы сделать это нужно открыть свойства скачанного exe-файла и перейти на вкладку «Совместимость». Здесь нужно включить опцию «Запустить программу в режиме совместимости», выбрать операционную систему Windows 7 и сохранить настройки.

После этого нужно запустить «Помощник по установке Windows 11» и начать обновление.

К сожалению, работоспособность этого способа пока не однозначная. У некоторых пользователей он срабатывает, а у некоторых — нет.
Обновление до Windows 11 с помощью Universal Media Creation Tool
Universal Media Creation Tool — это скрипт от стороннего разработчика, который позволяет скачивать старые версии Windows 10. Кроме этого, данный скрипт также позволяет скачивать Windows 11 и выполнять обновление до Windows 11 даже на несовместимых компьютерах.
Для того чтобы скачать Universal Media Creation Tool нужно перейти на его страницу на GitHub, нажать на кнопку «Code» и выбрать «Download ZIP».
Ссылка:
- https://github.com/AveYo/MediaCreationTool.bat

После этого нужно распаковать скачанный архив в любую папку и запустить из этой папки файл «MediaCreationTool.bat».

После этого может появится предупреждение системы SmartScreen. В этом случае нужно нажать на кнопку «Подробнее» и потом «Выполнить в любом случае»

В результате появится командная строка и меню со списком версий Windows 10, которые можно скачать с помощью Universal Media Creation Tool. Здесь нужно выбрать пункт под номером «11«, который обозначает Windows 11.

После этого появится меню со списком действий.
- Auto Setup — автоматическая установка выбранной версии;
- Create ISO — создание iso-файла в папке C:\ESD;
- Create USB — создание загрузочной USB флешки;
- Select in MCT — ручной выбор в интерфейсе утилиты Media Creation Tool.
Для того чтобы выполнить автоматическое обновление до Windows 11 выберите пункт «Auto Setup».

Дальше запустится утилита Media Creation Tool и начнется скачивание Windows 11, создание носителя и проверка обновлений.

После того как все файлы будут подготовленны, начнется установка Windows 11. Все это выполняется автоматически, участие пользователя не требуется.

В процессе установки обновления компьютер несколько раз перезагрузится, а в конце начнется подготовка к первому запуску Windows 11.

После завершения обновления вы получите готовую Windows 11.
Установка Windows 11 с нуля без TPM 2.0 и Secure boot с помощью редактирования реестра
Для того чтобы выполнить установку без поддержки TPM 2.0 и Secure Boot (безопасная загрузка) понадобится специальный REG-файл, который нужно будет запустить во время процесса установки.
Данный REG-файл добавит в реестр ключи, отвечающие за прохождения проверки TPM 2.0 и Secure Boot. После чего установщик позволит установить Windows 11 на несовместимый компьютер.
Скачать REG-файл можно по этой ссылке:
- windows_11_bypass.zip
Также вы можете создать этот REG-файл самостоятельно. Содержимое REG-файла выглядит так:
Windows Registry Editor Version 5.00

[HKEY_LOCAL_MACHINE\SYSTEM\Setup\LabConfig]
"BypassTPMCheck"=dword:00000001
"BypassSecureBootCheck"=dword:00000001
Обновленно. Как подсказали в комментариях, с помощью редактирования реестра можно обойти и другие проверки на совместимость оборудования. Например, ниже можно скачать REG-файл, который обходит проверку TPM 2.0, Secure Boot, оперативной памяти, накопителя и процессора.
- Win11.zip
Содержимое данного REG-файла выглядит так:
Windows Registry Editor Version 5.00

[HKEY_LOCAL_MACHINE\SYSTEM\Setup\LabConfig]
"BypassTPMCheck"=dword:00000001
"BypassSecureBootCheck"=dword:00000001
"BypassRAMCheck"=dword:00000001
"BypassStorageCheck"=dword:00000001
"BypassCPUCheck"=dword:00000001
Чтобы воспользоваться этим способом скачайте ISO-образ с Windows 11, создайте загрузочную флешку и скопируйте на нее созданный ранее REG-файл. Данный файл можно разместить просто в корне флеш-накопителя, там где лежат файлы «setup.exe», «autorun.inf» и др.
Дальше перезагружаем компьютер, включаем загрузку с флешки и запускаем установку Windows 11. Начинается установка как обычно, выбираем язык, регион, нажимаем «У меня нет ключа продукта», выбираем редакцию операционной системы и т. д. Продолжаем установку до тех пор, пока не появится сообщение «Windows 11 не может быть запущена на этом ПК» или «This PC can’t run Windows 11».

После появления этого сообщения нажимаем на кнопку «Далее/Next» чтобы вернуться к предыдущему шагу, где выбиралась редакция Windows 11. Здесь нужно запустить командную строку при помощи комбинации клавиш Shift-F10 и выполнить команду «notepad».

В результате появится окно программы «Блокнот». Здесь отрываем меню «Файл» и выбираем пункт «Открыть».

В появившемся окне переходим на установочный диск и выбираем «Все файлы», для того чтобы увидеть созданный нами REG-файл.
Дальше кликаем по REG-файлу правой кнопкой мышки и выбираем «Слияние/Merge».

В окне с предупреждением нажимаем на кнопку «Да/Yes».

После внесения изменений в реестр, дальнейшая установка должна пройти нормально, без проверки на TPM 2.0 и Secure Boot. Нужно будет еще раз выбрать редакцию Windows 11, после чего установка пройдет в штатном режиме.
Также вы можете не создавать REG-файл, а внести изменения в реестр самостоятельно. В этом случае, вместо команды «notepad» нужно выполнить «regedit.exe». После этого с помощью редактора реестра нужно перейти в раздел:
HKEY_LOCAL_MACHINE\SYSTEM\Setup
Создать там папку «LabConfig» и создать в ней парамтеры для обхода проверок. Например, для обхода проверки на TPM 2.0 и Secure Boot нужно создать следующие ключи:
- BypassTPMCheck=dword:00000001
- BypassSecureBootCheck=dword:00000001
После этого нужно закрыть редактор реестра и продолжить установку Windows 11 без проверки на TPM 2.0 и Secure Boot
Установка Windows 11 с нуля без TPM 2.0 и Secure boot с помощью AutoUnattend.xml
AutoUnattend.xml — это файл, который используется для автоматизации установки Windows. С его помощью можно задать ответы на вопросы установщика, которые задаются пользователю во время инсталяции, тем самым автоматизировав установку Windows.
Также данный файл можно использовать для того чтобы во время установки внести описанные выше изменения в реестр и тем самым обойти проверку TPM 2.0, Secure Boot и остальных требований Windows 11.
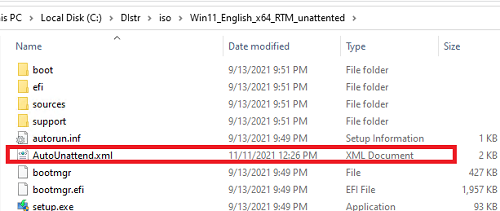
Чтобы воспользоваться этим способом создайте текстовый файл с именем «AutoUnattend.xml» и вставьте в него код приведен ниже. Также вы можете скачать уже готовый файл:
- AutoUnattend.xml
<?xml version="1.0" encoding="utf-8"?>
<unattend xmlns="urn:schemas-microsoft-com:unattend">
<settings pass="windowsPE">
<component name="Microsoft-Windows-Setup" processorArchitecture="amd64" publicKeyToken="31bf3856ad364e35" language="neutral" versionScope="nonSxS" xmlns:wcm="http://schemas.microsoft.com/WMIConfig/2002/State" xmlns:xsi="http://www.w3.org/2001/XMLSchema-instance">
<RunSynchronous>
<RunSynchronousCommand wcm:action="add">
<Order>1</Order>
<Path>reg add HKLM\System\Setup\LabConfig /v BypassTPMCheck /t reg_dword /d 0x00000001 /f</Path>
</RunSynchronousCommand>
<RunSynchronousCommand wcm:action="add">
<Order>2</Order>
<Path>reg add HKLM\System\Setup\LabConfig /v BypassSecureBootCheck /t reg_dword /d 0x00000001 /f</Path>
</RunSynchronousCommand>
<RunSynchronousCommand wcm:action="add">
<Order>3</Order>
<Path>reg add HKLM\System\Setup\LabConfig /v BypassRAMCheck /t reg_dword /d 0x00000001 /f</Path>
</RunSynchronousCommand>
<RunSynchronousCommand wcm:action="add">
<Order>5</Order>
<Path>reg add HKLM\System\Setup\LabConfig /v BypassCPUCheck /t reg_dword /d 0x00000001 /f</Path>
</RunSynchronousCommand>
<RunSynchronousCommand wcm:action="add">
<Order>4</Order>
<Path>reg add HKLM\System\Setup\LabConfig /v BypassStorageCheck /t reg_dword /d 0x00000001 /f</Path>
</RunSynchronousCommand>
</RunSynchronous>
</component>
</settings>
</unattend>
Дальше получившийся xml-файл нужно поместить в корень загрузочной флешки с Windows 11 или в корень ISO-файла, если вы планируете установку на виртуальную машину.
В результате, при использовании такой загрузочной флешки или ISO-файла, изменения в реестр будут внесены автоматически, что вынудит установщик пропустить проверку TPM 2.0, Secure Boot и установить Windows 11 на несовместимый компьютер.
Установка Windows 11 с нуля без TPM 2.0 и Secure boot с помощью Rufus
Rufus — это популярная бесплатная программа для создания загрузочных флешек. В последних версиях данной программы появилась функция обхода проверки на совместимость компьютера с Windows 11. Данная функция позволяет встроить обход проверки прямо в загрузочную флешку буквально в 2 клика.
Обратите внимание, чтобы воспользоваться этим способом вам нужна программа Rufus версии 3.16 или более новая, в старых версиях этой функции нет.
Ссылка:
- https://rufus.ie/
После запуска программы Rufus 3.16 нужно открыть меню «Device» и выбрать USB-флешку, на которую будет записываться Windows 11.

Дальше нужно нужать на кнопку «Select» и выбрать ISO-образ с операционной системой Windows 11.

После этого нужно открыть меню «Image Option» и выбрать вариант «Extenteded Windows 11 Installation (noTPM 2.0/no Secure Boot/8Gb- RAM)». Эта опция включает обход проверки на наличие TPM 2.0, Secure boot и 8 гб оперативной памяти.

Остальные настройки можно оставить по умолчанию. Для того чтобы запустить запись ISO-образа на флешку нужно нажать на кнопку «Start».

В результате вы получите загрузочную флешку с помощью которой можно выполнить установку Windows 11 на несовместимый компьютер без проверки TPM 2.0, Secure boot и оперативной памяти.
Обновление до Windows 11 без TPM 2.0 и Secure boot с помощью замены файлов
Если вы хотите обновиться до Windows 11 из уже установленной Windows 10, то вы можете выполнить замену одного из файлов в установочном образе. Так вы сможете обойти обшибку«Windows 11 не может быть запущена на этом ПК» или «This PC can’t run Windows 11» и установить Windows 11 на несовместимый компьютер.

Для этого создайте из ISO образа Windows 11 загрузочную флешку или просто распакуйте ISO-файл в любую папку на жестком диске. После этого перейдите к файлам Windows 11 на флешке или в папке, откройте папку «Sources» и замените в ней файл «appraiserres.dll» на тот, что лежит в этом архиве:
- appraiserres.zip
После выполнения замены можно начинать обновление до Windows 11. Для этого запустите файл «Setup.exe» и следуйте инструкциям. Если все было сделано правильно, то обновление до Windows 11 должно пройти без проверки на наличие TPM 2.0 и Secure Boot.
Возможно вам будет интересно:
- Что такое TPM 2.0 для Windows 11
- Что такое Secure Boot для Windows 11
Посмотрите также:
- Как проверить совместимость компьютера с Windows 11
- Программа для проверки совместимости с Windows 11
- Запуск Windows 11 на этом компьютере невозможен
- Как записать Windows на диск
- Как установить Windows 10