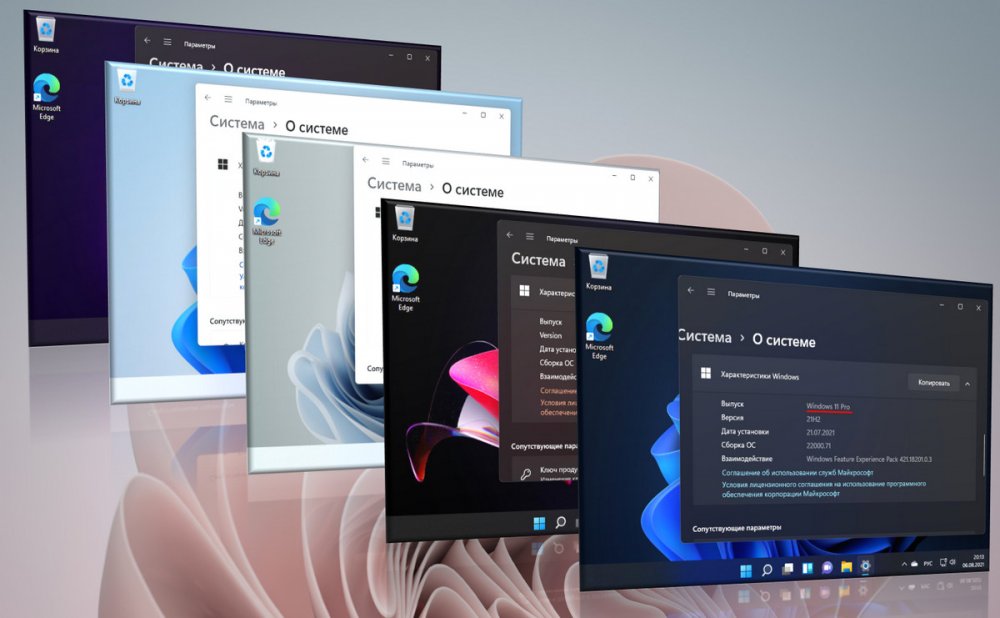
Привет, друзья. В этой публикации поговорим о выпусках Windows 11 – её редакциях и выпусках, у которых разный системный функционал, разное целевое назначение и пользовательские аудитории, разные политики жизненного цикла. И у которых, соответственно, разные стоимости лицензии. Костяк выпусков Windows 11 унаследовала от Windows 10 – это редакции Home, Pro, Pro for Workstations, Education, Enterprise, а также выпуски Pro Education, Enterprise for Virtual Desktops и loT Enterprise. Помимо этого, у новой операционной системы появился ещё один выпуск – специальный выпуск облачной операционной системы Windows 11 Cloud (SE). Также Windows 11 стала первой операционной системой от Microsoft, которая поставляется без 32-битных дистрибутивов. Давайте обо всём этом подробнее.
Все выпуски Windows 11 поставляются только в 64-битных дистрибутивах. Windows 10 стала последней включительно операционной системой с поддержкой дистрибутивов 32-битной разрядности. При создании Windows 11 Microsoft решила поставить жирную точку на устаревшей процессорной архитектуре х86 и не отвлекаться более на создание 32-разрядных выпусков операционной системы, которые принципиально необходимы только для редких сильно устаревших компьютерных устройств. Не то что с сильно устаревшими компьютерами, даже с относительно старыми новая операционная система не дружит в принципе. В число компьютеров, соответствующих официальным системным требованиям Windows 11, попадают выпущенные не ранее 2017 года. У Windows 11 минимальный порог оперативной памяти — 4 Гб, а на таких устройствах необходима только 64-битная операционная система.
Друзья, все какие существуют на данные момент выпуски инсайдерской Windows 11 (кроме редакции Home) можно увидеть в дистрибутиве операционной системы при скачивании его с сайта платформы обновлений Windows Unified Update Platform.
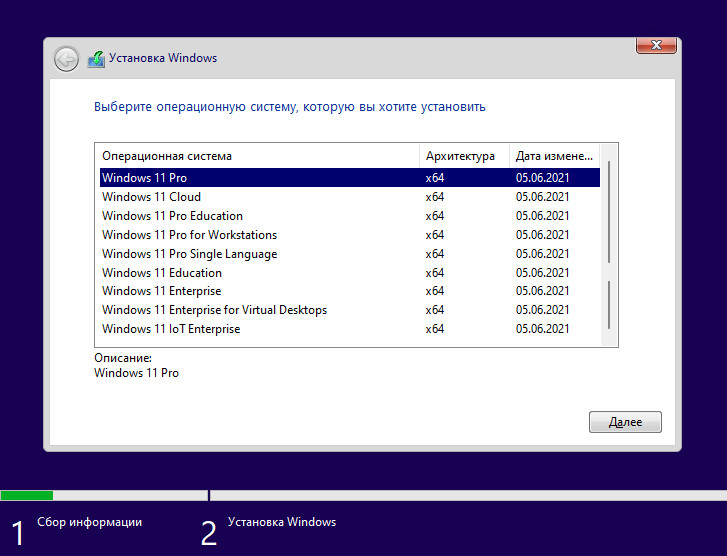 Microsoft же пока что не даёт информации по выпускам новой системы, да у неё наверняка точной этой информации пока что и нет. Всё, так сказать, в процессе активного созидания, а, соответственно, подвержено доработкам и изменениям. В полном же дистрибутиве инсайдерской Windows 11 у нас будут те же редакции, что есть у Windows 10 — Home, Pro, Pro for Workstations, Education, Enterprise, а также выпуски Pro Education, Enterprise for Virtual Desktops и loT Enterprise, и ещё новый выпуск, специальный выпуск облачной Windows 11 Cloud (SE). Ну и давайте кратко о сути каждого из выпусков.
Home – редакция «Домашняя» с базовым функционалом Windows 11. В ней нет доступа к групповым политикам (но это можно исправить), нет BitLocker, гипервизора Hyper-V, средства удалённого подключения по протоколу RDP, возможности подключения к Azure AD и т.п. У Windows 11, как и Windows 10, жизненный цикл с современными политиками Microsoft, т.е. модель поставки операционной системы «Windows как сервис». И это значит, что Windows 11 также будет функционально обновляться наряду с массовым использованием, только с разницей в том, что у неё будет годовой канал поставки обновлений, а не полугодовой, как у Windows 10. И вот у редакции Home не будет возможности отказаться от обновления по истечении срока поддержки текущей версии, тогда как у других редакций такая возможность будет. Срок поддержки каждой версии Windows 11 для редакции Home – 2 года. Ещё редакция Home ограничена в использовании локальных пользовательских учётных записей Windows 11, в этой редакции нужно использовать только аккаунт Microsoft. Причём без него невозможно даже установить операционную систему, для установки Windows 11 Home обязательно нужен Интернет и подключение к аккаунту Microsoft.
Pro – редакция «Профессиональная» с эталонным комплектом функционала Windows 11, т.е. с оптимальной подборкой возможностей операционной системы. Включает отсутствующие в редакции Home системные компоненты. В процессе установки позволяет создать в параметрах входа локальную учётную запись. Срок поддержки каждой версии Windows 11 для редакции Pro – 2 года.
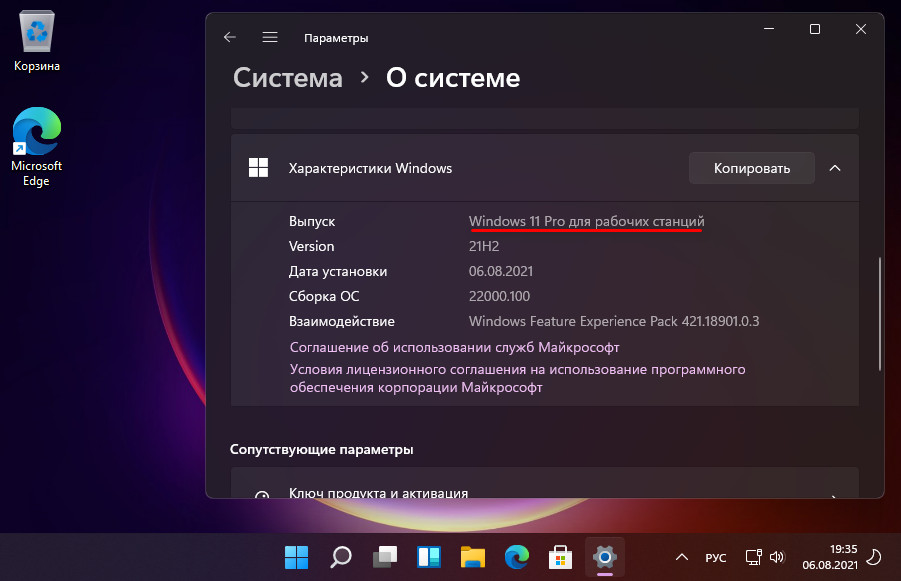
Pro for Workstations – редакция «Профессиональная для рабочих станций», являет собой оптимизированную под использование на серверах и рабочих станциях редакцию Pro Windows 11. Поставляется с активным режимом электропитания «Максимальная производительность». Позволяет использовать на обычных разделах диска файловую систему ReFS, тогда как в Pro и Home это доступно исключительно для функции дисковых пространств (штатный программный RAID). Предусматривает функцию SMB Direct, это поддержка сетевых адаптеров RDMA (с удаленным прямым доступом к оперативной памяти). Работает с энергонезависимыми модулями оперативной памяти NVDIMM-N. Срок поддержки каждой версии Windows 11 для редакции Pro for Workstations – 2 года.
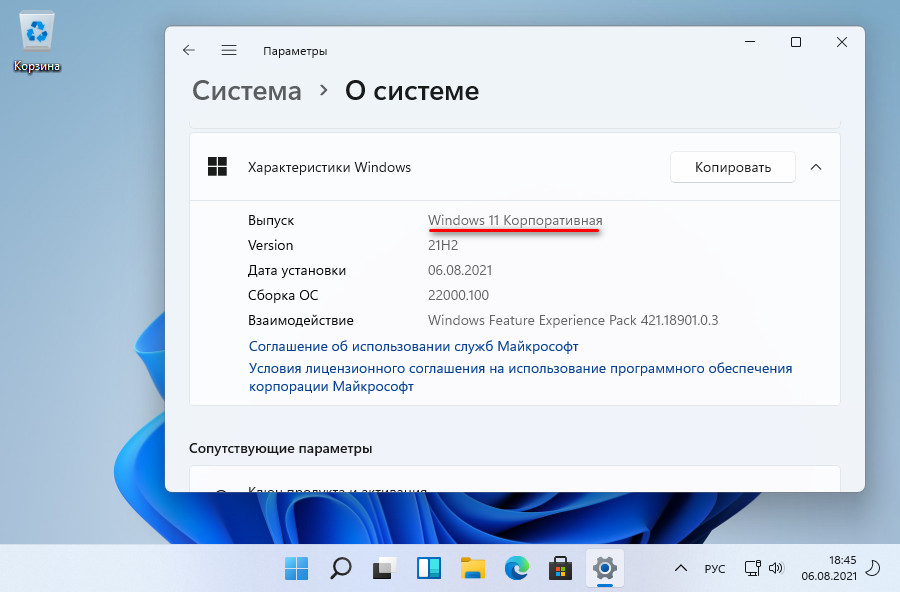
Enterprise – редакция «Корпоративная», ориентированная на корпоративный сектор, т.е. на организации и предприятия. Поверх возможностей редакции Pro имеет функции усиленной безопасности для защиты корпоративных данных. Позволяет использовать файловую систему ReFS на обычных разделах диска. Имеет функцию аналитики компьютеров – облачную службу предоставления данных о работоспособности корпоративных компьютерных устройств и готовности к обновлению операционной системы. Имеет функцию Microsoft Application Virtualization, это виртуализация и потоковая передача софта от Microsoft. В процессе установки Windows 11 Enterprise с включённым Интернетом в параметрах входа нельзя создать локальную учётную запись, для этого необходимо Интернет отключить. Срок поддержки каждой версии Windows 11 для редакции Enterprise – 3 года.
 Вот это, друзья, 4 основные редакции Windows 11, которые отличаются разной поставкой функционала. Более подробно об их отличиях можете почитать в сравнении выпусков Windows 10 на сайте Microsoft. Повторюсь, Windows 11 унаследовала выпуски от Windows 10, потому суть в плане функционала редакций будет той же.
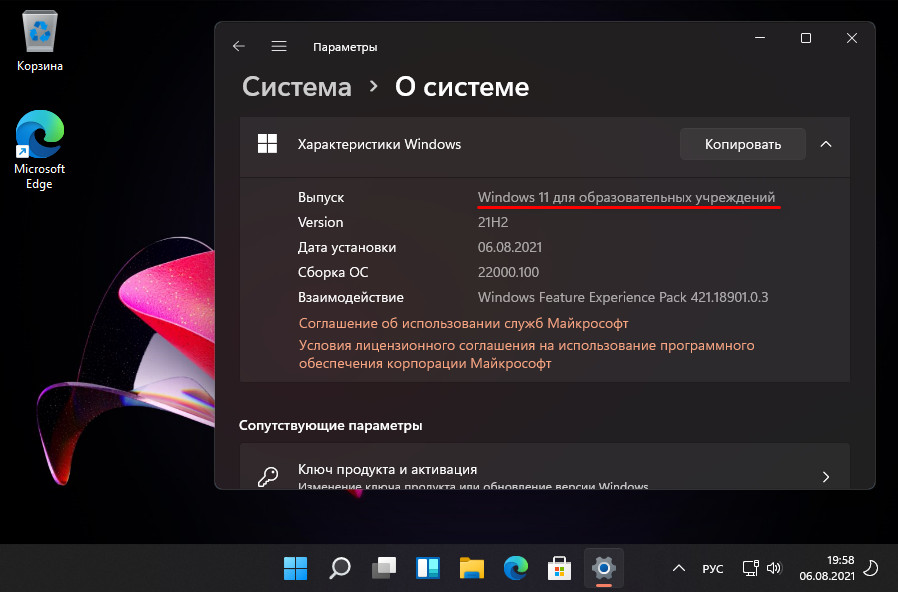
Education – редакция «Образовательная», являет собой редакцию Enterprise с её функционалом, но с возможностью удаления голосового ассистента Cortana. Главное же отличие заключается только в целевом использовании операционной системы и стоимости лицензии. Со времён Windows 10 редакция Education предназначается только для образовательных учреждений и поставляется по льготной цене. Официально приобрести редакцию Education могут ПТУ, ВУЗы, музеи, библиотеки, различные благотворительные организации как юридические лица, а также лично для себя преподаватели и студенты, обучающиеся на стационаре. Срок поддержки каждой версии Windows 11 для редакции Education – 3 года.
Pro Education – это выпуск на базе редакции Pro с возможностью удаления голосового ассистента Cortana, на который распространяется политика целевого использования и цены редакции Education.
Enterprise for Virtual Desktops (он же Enterprise Multi-Session) – это выпуск на базе редакции Enterprise, оптимизированный под работу операционной системы по типу узла сеанса удалённого рабочего стола.
IoT Enterprise – это выпуск на базе редакции Enterprise, оптимизированный под работу на устройствах определённого назначения типа терминалов, банкоматов, почтоматов, вывесок, телекоммуникационных систем, бортового, промышленного, транспортного, медицинского, торгового и пр. оборудования.
Срок поддержки каждой версии Windows 11 для выпусков определяется сроками поддержки редакций, на которых они базируются, если иной срок специально не указан Microsoft.
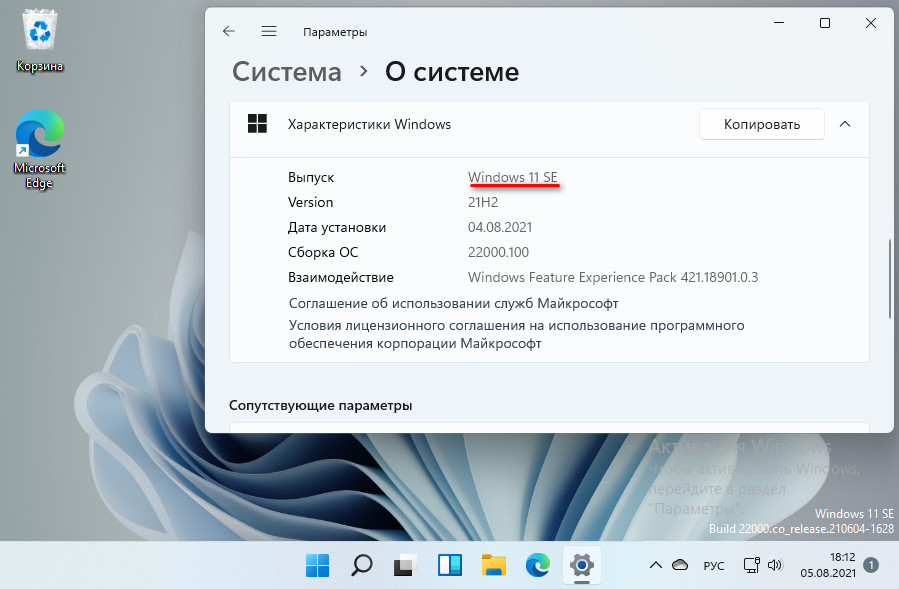
Windows 11 Cloud (SE) – специальный выпуск Windows 11, выпуск облачной операционной системы, изначально базируется на редакции Pro, но урезан в части функциональных возможностей. В спецвыпуске сделан акцент на хранении данных в облаке Microsoft OneDrive. Система не даёт доступа к диску С в системном проводнике, в ней заблокированы Microsoft Store и панель управления, нет виртуальных рабочих столов, панели виджетов и прочих функций. Ориентирована на корпоративный сектор, в частности, образовательные и торговые организации. Вероятно, будет поставляться как операционная система OEM с определёнными условиями Microsoft.
 Более подробно об этом спецвыпуске можно почитать в статье «Windows 11 Cloud (SE) — облачная операционная система Microsoft».
Удаленные пользователи могут подключаться к своим компьютерам Windows 10 или 11 через службу удаленных рабочих столов (RDP). Достаточно включить удаленный рабочий стол (Remote Desktop), разрешить RDP доступ для пользователя и подключиться к компьютеру с помощью любого клиента удаленного рабочего стола. Однако в десктопных версия Windows есть ограничение на количество одновременных RDP сессии. Разрешается только один активный Remote Desktop сеанс пользователя.
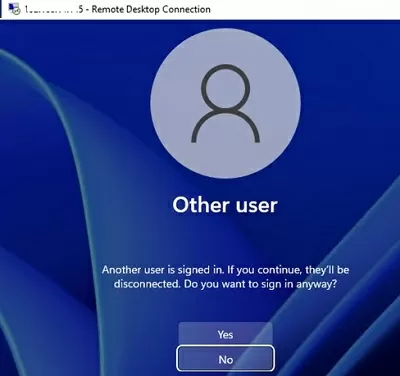
Если вы попробуете открыть вторую RDP сессию, появится предупреждение с запросом отключить сеанс первого пользователя.
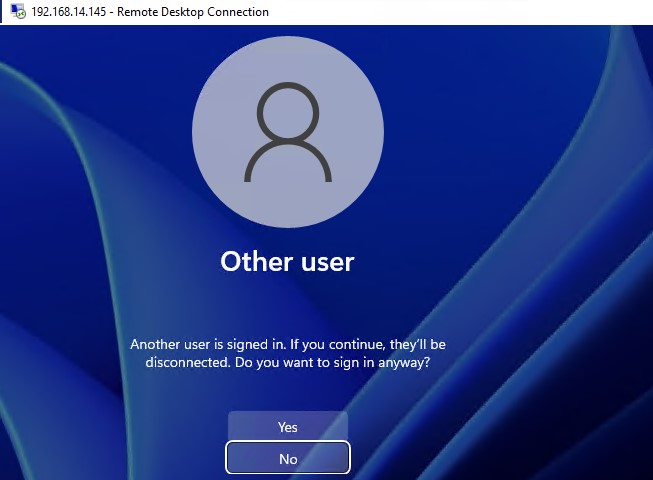
В систему вошел другой пользователь. Если вы продолжите, он будет отключен. Вы все равно хотите войти в систему?
В английской версии предупреждение такое:
Another user is signed in. If you continue, they’ll be disconnected. Do you want to sign in anyway?
Содержание:
- Ограничения на количество RDP сессий в Windows
- RDP Wrapper: разрешить несколько RDP сеансов в Windows
- Не работает RDP Wrapper в Windows
- Модификация файла termsrv.dll для снятия ограничений RDP в Windows 10 и 11
- Встроенная поддержка нескольких RDP сессий в редакции Windows 10 Enterprise Multi-session
Ограничения на количество RDP сессий в Windows
Во всех десктопных версиях Windows 10 и 11 есть ряд ограничений на использование служб удаленного рабочего стола
- Разрешено удаленно подключаться по RDP только к редакциям Windows Professional и Enterprise. В домашних редакциях (Home/Single Language) RDP доступ запрещен;
- Поддерживается только одно одновременное RDP подключение. При попытке запустить вторую RDP-сессию, пользователю будет предложено завершить активный сеанс;
- Если пользователь работает за консолью компьютера (локально), то при удаленном подключении по RDP, его локальный сеанс будет отключен (заблокирован). Также завершается и удаленный RDP сеанс, если пользователь входит в Windows через консоль компьютера.
Ограничение на количество одновременных RDP подключений в Windows является не техническим, но программным и лицензионным. Таким образом Microsoft запрещает создавать терминальный RDP сервер на базе рабочей станции для одновременной работы нескольких пользователей.
Если ваши задачи требуют развертывание терминального сервера, Microsoft предлагает пробрести Windows Server (по умолчанию разрешает 2 активных RDP подключения). Если вам нужно большее количество одновременных сессий пользователей, нужно приобрести лицензии RDS CAL, установить и настроить роль Remote Desktop Session Host (RDSH) или полноценную RDS ферму.
Технически любая редакция Windows при наличии достаточного ресурсов оперативной памяти и CPU может обслуживать одновременную работу нескольких десятков удаленных пользователей. В среднем на одну RDP сессию пользователя требуется 150-200 Мб памяти (без учета запускаемых приложений). Т.е. максимальное количество одновременных RDP сессий в теории ограничивается только ресурсами компьютера.
В этой статье мы покажем три способа убрать ограничение на количество одновременных RDP подключений в Windows 10 и 11:
- Использование RDP Wrapper
- Модификации системного файла termsrv.dll
- Апгрейд до редакции Windows 10/11 Enterprise for virtual desktops (multi-session)
Примечание. Все модификации операционной системы, описанные в этой статье, считаются нарушением лицензионного соглашения Windows, и вы можете использовать их на свой страх и риск.
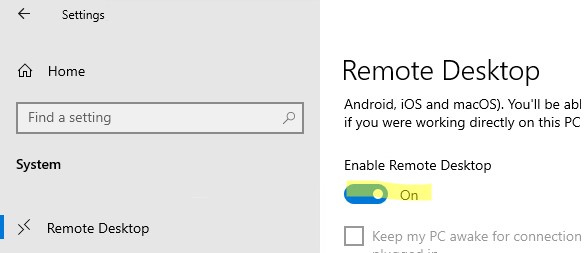
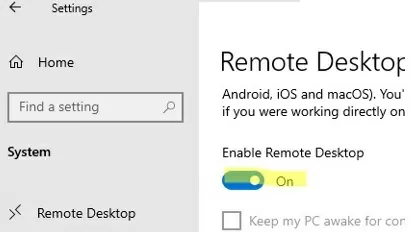
Прежде, чем продолжить, проверьте что в настройках Windows включен протокол Remote Desktop.
- Откройте панель Settings -> System —> Remote Desktop -> включите опцию Enable Remote Desktop;

- Либо воспользуйтесь классической панель управления: выполните команду SystemPropertiesRemote -> Перейдите на вкладку Remote Settings (Удаленный доступ), включите опцию Allow remote connection to this computer (Разрешить удалённые подключения к этому компьютеру).
RDP Wrapper: разрешить несколько RDP сеансов в Windows
Open-source утилита RDP Wrapper Library позволяет разрешить конкурентные RDP сессии в Windows 10/11 без замены системного файла termsrv.dll.
RDP Wrapper работает в качестве прослойки между менеджером управления службами Service Control Manager, SCM) и службой терминалов (Remote Desktop Services). RDP Wrapper не вносит никаких изменений в файл termsrv.dll, просто загружая termsrv с изменёнными параметрами.
Важно. Перед установкой RDP Wrapper важно убедится, чтобы у вас использовалась оригинальная (непропатченная) версия файл termsrv.dll. Иначе RDP Wrapper может работать не стабильно, или вообще не запускаться.
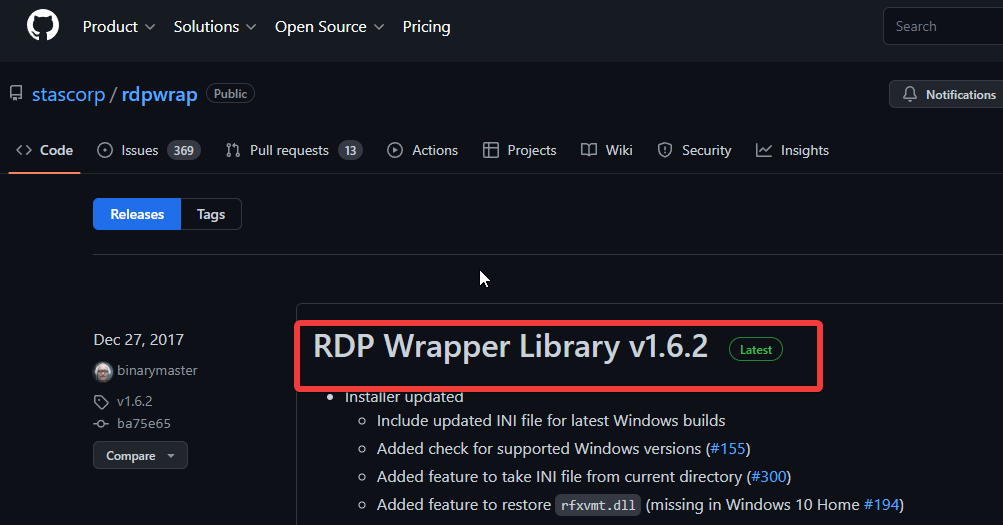
Вы можете скачать RDP Wrapper из репозитория GitHub: https://github.com/binarymaster/rdpwrap/releases (последняя доступная версия RDP Wrapper Library v1.6.2). Утилита не обновляется с 2017 года, но ее можно использовать на всех билдах Windows 10 и 11. Для работы утилиты в современных версиях Windows достаточно обновить конфигурационный файл rdpwrap.ini.
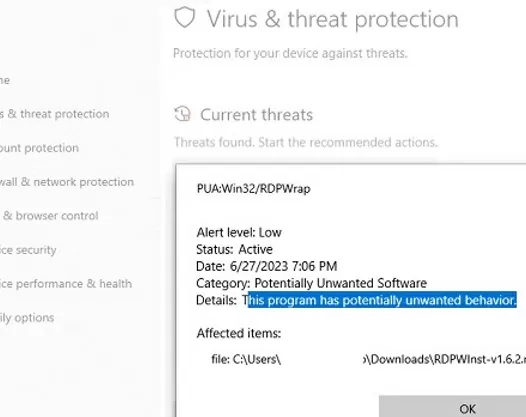
Большинство антивирусов определяют RDP Wrapper как потенциально опасную программу. Например, встроенный Microsoft Defender антивирус классифицирует программу как PUA:Win32/RDPWrap (Potentially Unwanted Software) с низким уровнем угрозы. Если настройки вашего антивируса блокируют запуск RDP Wrapper, нужно добавить его в исключения. 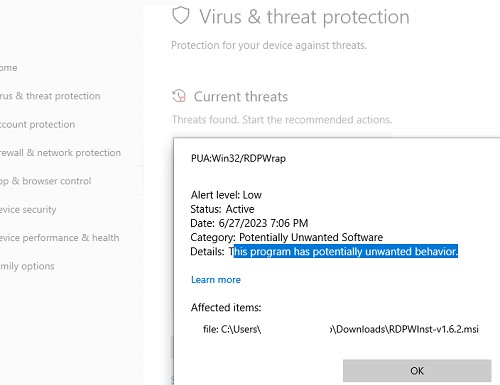
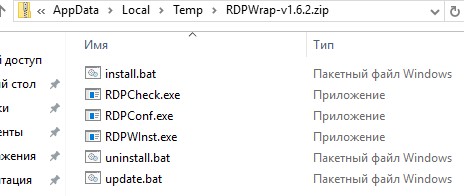
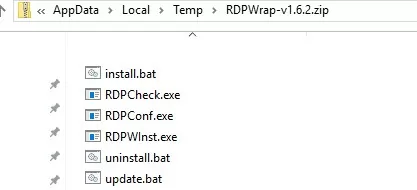
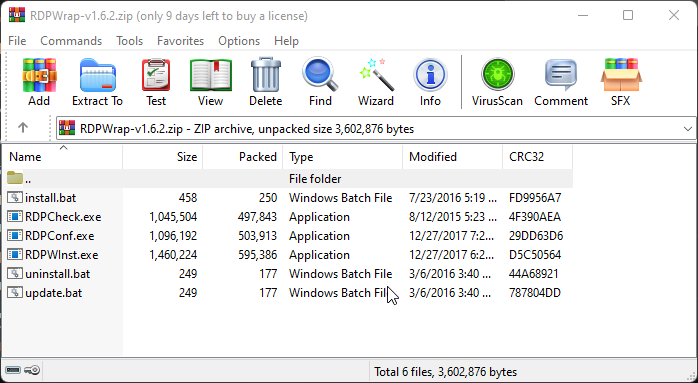
Архив RDPWrap-v1.6.2.zip содержит несколько файлов:
- RDPWinst.exe —программа установки/удаления RDP Wrapper Library;
- RDPConf.exe — утилита настройки RDP Wrapper;
- RDPCheck.exe — Local RDP Checker — утилита для проверки RDP доступа;
- install.bat, uninstall.bat, update.bat — пакетные файлы для установки, удаления и обновления RDP Wrapper.
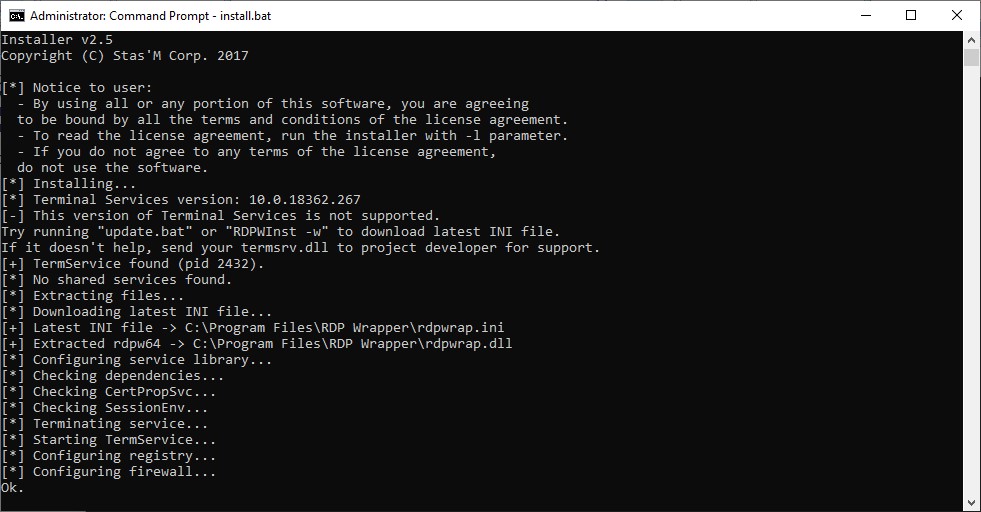
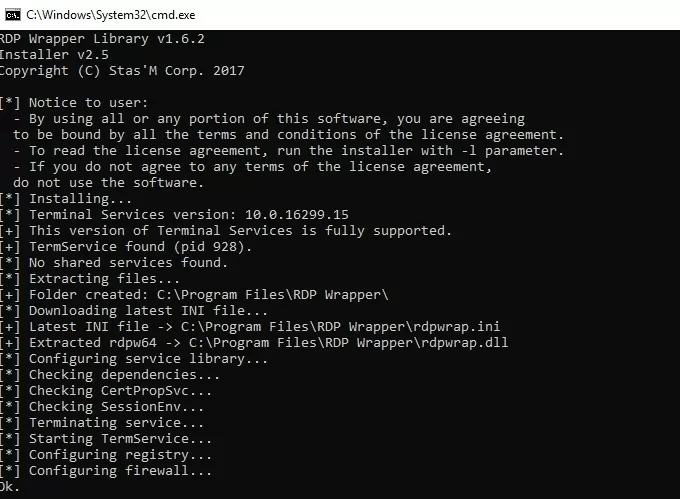
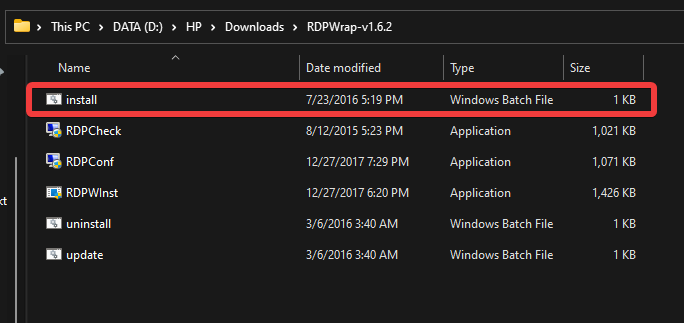
Чтобы установить RDPWrap, запустите файл
install.bat
с правами администратора.
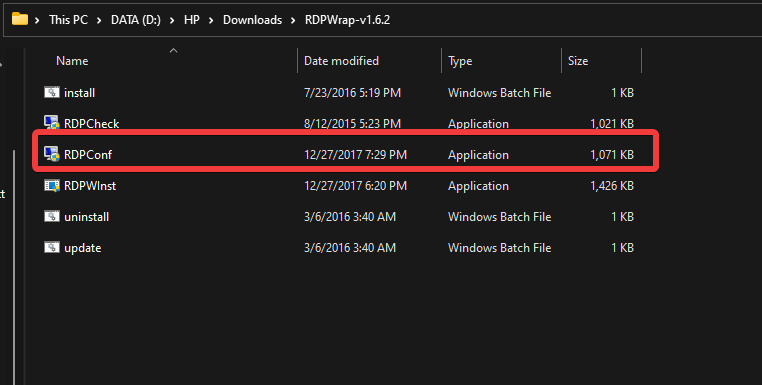
После окончания установки запустите RDPConfig.exe.
![rdp-wrapper: красная надпись не поддерживается [not supported]](https://winitpro.ru/wp-content/uploads/2015/09/rdp-wrapper-ne-podderzhivaetsya.jpg)
Скорее всего сразу после установки утилита покажет, что RDP wrapper запущен (Installed, Running, Listening), но не работает. Обратите внимание на красную надпись. Она сообщает, что данная версий Windows 10 (ver. 10.0.19041.1949) не поддерживается ([not supported]).
Причина в том, что в конфигурационном файле rdpwrap.ini отсутствует секция с настройками для вашего версии (билда) Windows. Актуальную версию файла rdpwrap.ini можно скачать здесь https://raw.githubusercontent.com/sebaxakerhtc/rdpwrap.ini/master/rdpwrap.ini
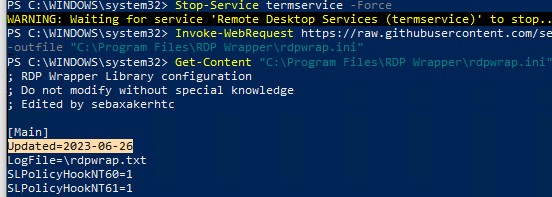
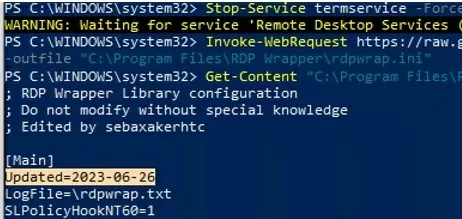
Вручную скопируйте содержимое данной страницы в файл «C:\Program Files\RDP Wrapper\rdpwrap.ini». Или скачайте файл с помощью PowerShell командлета Invoke-WebRequest (предварительно нужно остановить службу Remote Desktop):
Stop-Service termservice -Force
Invoke-WebRequest https://raw.githubusercontent.com/sebaxakerhtc/rdpwrap.ini/master/rdpwrap.ini -outfile "C:\Program Files\RDP Wrapper\rdpwrap.ini"
alert] Можно создать задание планировщика для проверки изменений в файле rdpwrap.ini и его автоматического обновления [/alert]
На данном скриншоте видно, что на компьютере установлена свежая версия файла rdpwrap.ini (Updated=2023-06-26).
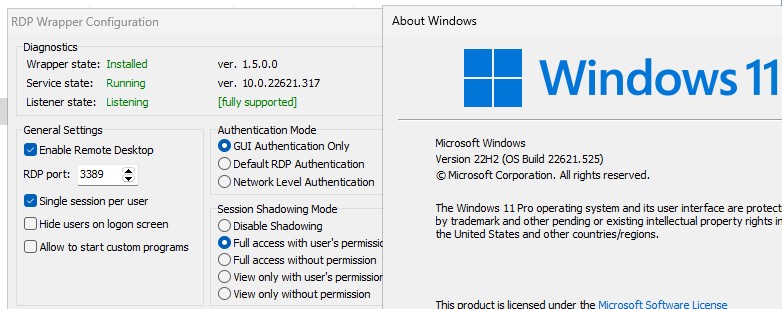
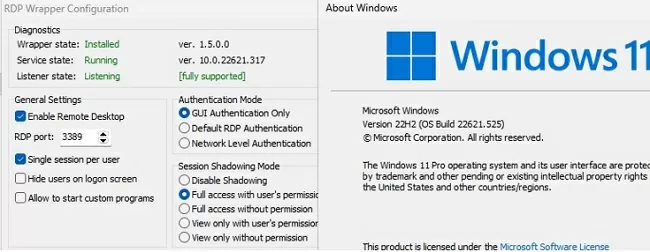
Перезагрузите компьютер, запустите утилиту RDPConfig.exe. Проверьте, что в секции Diagnostics все элементы окрашены в зеленый цвет, и появилось сообщение [Fully supported]. На скриншоте ниже показано, что RDP Wrapper с данным конфигом успешно запущен в Windows 11 22H2.
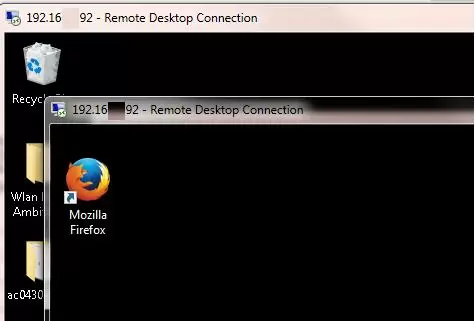
Теперь попробуйте установить несколько одновременных RDP сессий с этим компьютером под разными пользователями (воспользуйтесь любым RDP клиентом: mstsc.exe, RDCMan, mRemoteNG и т.д.).
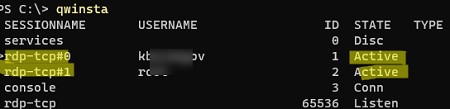
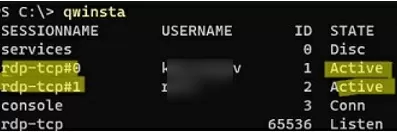
Можете проверить что на компьютере активны одновременно две RDP сессии (или более) с помощью команды:
qwinsta
rdp-tcp#0         user1                 1  Active
rdp-tcp#1         user2                 2  Active

Утилита RDPWrap поддерживается во версиях Windows (включая домашние редакции Windows Home), таким образом из любой клиентской версии Windows можно сделать полноценный сервер терминалов.
В интерфейсе RDP Wrapper доступны следующие опции:
- Enable Remote Desktop — включить/отключить Remote Desktop в Windows доступ
- RDP Port — можно изменить стандартный номера порта удаленного рабочего стола TCP 3389
- Опция Hide users on logon screen позволяет скрыть список пользователей на экране приветствия;
- Single session per user —разрешить несколько одновременных RDP сессий под одной учетной записью пользователя. Эта опция устанавливает параметр реестра fSingleSessionPerUser = 0 в ветке HKLM\SYSTEM\CurrentControlSet\Control\Terminal Server). Также этот параметр настраивается через опцию GPO Restrict Remote Desktop Services to a single Remote Desktop Services session в разделе Computer Configuration > Administrative Templates > Windows Components > Remote Desktop Services > Remote Desktop Session Host > Connections.
- В секции Session Shadowing Mode вы можете настроить режим теневого подключения к рабочему столу пользователей Windows .
Не работает RDP Wrapper в Windows
В некоторых случая утилита RDP Wrapper не работает как ожидается, и вы не можете использовать несколько RDP подключений.
Во время установки обновлений Windows может обновиться версия файла termsrv.dll. Если в файле rdpwrap.ini отсутствует описание для вашей версии Windows, значит RDP Wrapper не может применить необходимые настройки. В этом случае в окне RDP Wrapper Configuration будет указан статус [not supported].
В этом случае нужно обновить файл rdpwrap.ini как описано выше.
Если RDP Wrapper не работает после обновления файла rdpwrap.ini, попробуйте открыть файл rdpwrap.ini и найти в нем описание для вашей версии Windows.
Как понять, есть ли поддержка вашей версии Windows в конфиг файле rdpwrapper?
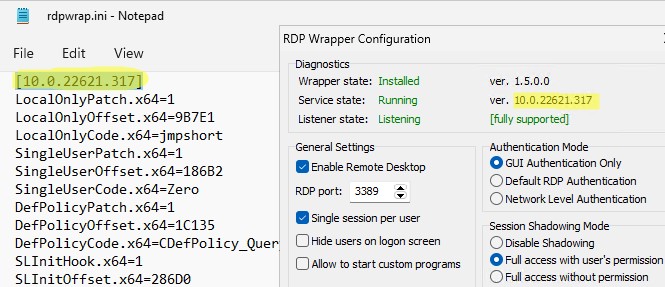
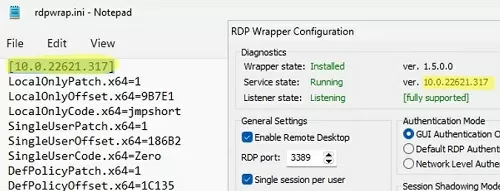
На скриншоте ниже показано, что для моей версии Windows 11 (10.0.22621.317) есть две секции с описаниями:
[10.0.22621.317]
...
[10.0.22621.317-SLInit]
...
Если в конфигурационном файле rdpwrap соответствующая секция отсутствует для вашей версии Windows, попробуйте поискать в сети строки rdpwrap.ini для вашего билда. Добавьте найденные строки в самый конец файла.
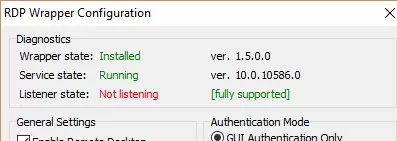
Если после установки обновлений безопасности или после апгрейда билда Windows 10, RDP Wrapper не работает, проверьте, возможно в секции Diagnostics присутствует надпись Listener state: Not listening.

Попробуйте обновить ini файл, и затем переустановить службу:
rdpwinst.exe -u
rdpwinst.exe -i
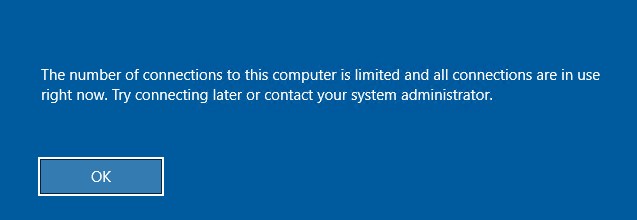
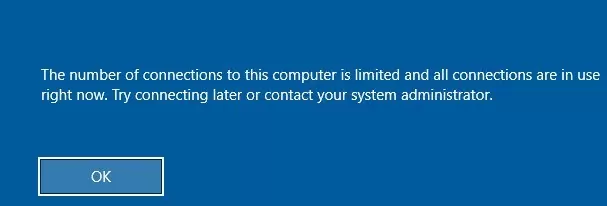
Бывает, что при попытке второго RDP подключения под другим пользователем у вас появляется надпись:
Число разрешенных подключений к этому компьютеру ограничено и все подключений уже используются. Попробуйте подключиться позже или обратитесь к системному администратору.
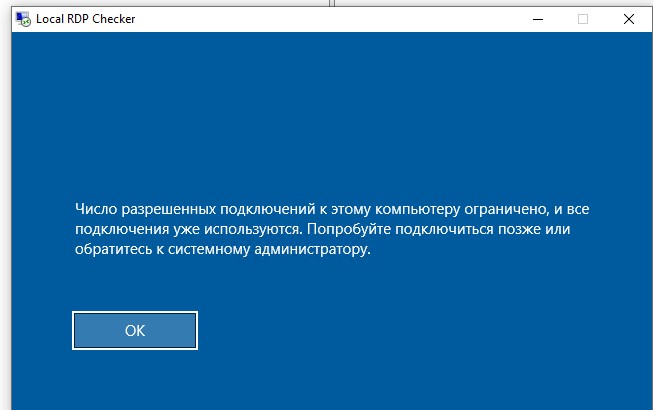
The number of connections to this computer is limited and all connections are in use right now. Try connecting later or contact your system administrator.
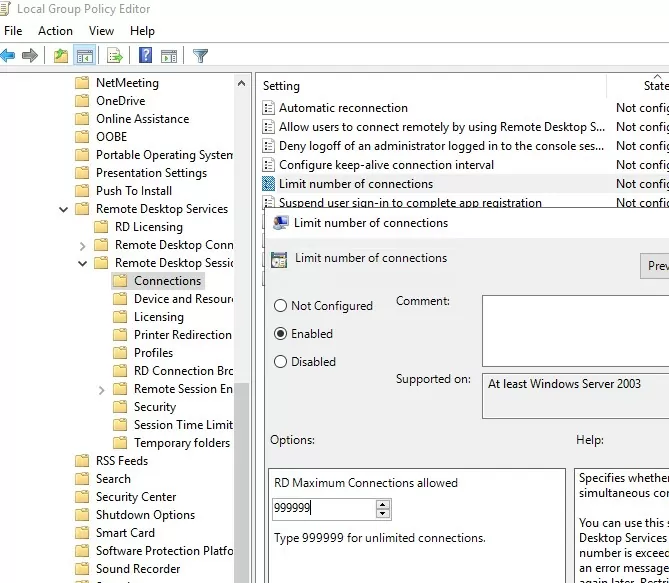
В этом случае нужно с помощью редактора групповых политики gpedit.msc в секции Конфигурация компьютера –> Административные шаблоны -> Компоненты Windows -> Службы удаленных рабочих столов -> Узел сеансов удаленных рабочих столов -> Подключения включить политику “Ограничить количество подключений” и изменить ее значение на 999999 (Computer Configuration -> Administrative Templates -> Windows Components ->Remote Desktop Services ->Remote Desktop Session Host -> Connections-> Limit number of connections).
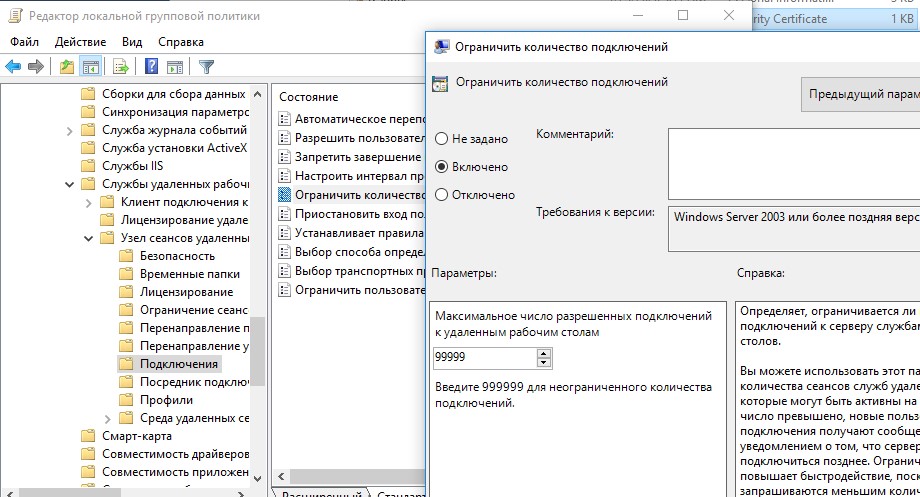
Перезагрузите компьютер для обновления настроек GPO и применения новых параметров.
Модификация файла termsrv.dll для снятия ограничений RDP в Windows 10 и 11
Чтобы убрать ограничение на количество RDP подключений пользователей в Windows без использования rdpwrapper нужно заменить файл termsrv.dll. Это файл библиотеки, которая используется службой Remote Desktop Services. Файл находится в каталоге C:\Windows\System32.
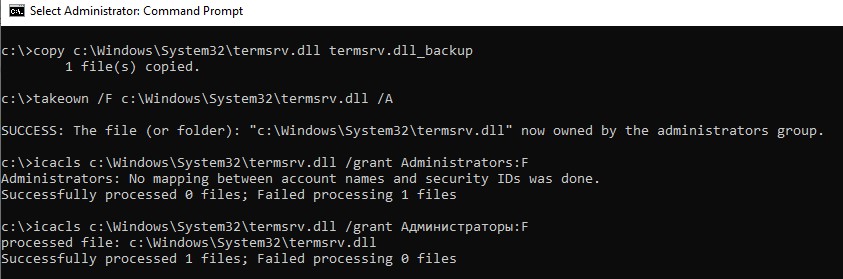
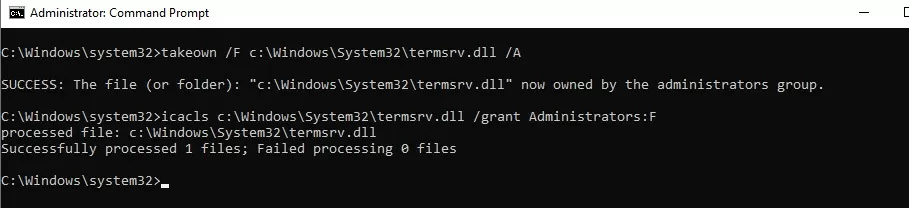
Прежде, чем править или заменять файл termsrv.dll желательно создать его резервную копию. Это поможет вам в случае необходимости можно будет вернуться к исходной версии файла. Запустите командную строку с правами администратора и выполните команду:
copy c:\Windows\System32\termsrv.dll termsrv.dll_backup
Затем нужно стать владельцем файла. Проще всего это сделать из командной строки. Чтобы сменить владельца файла с TrustedInstaller на группу локальных администраторов с помощью команды:
takeown /F c:\Windows\System32\termsrv.dll /A
Должно появится сообщение: «SUCCESS: The file (or folder): «c:\Windows\System32\termsrv.dll» now owned by the administrators group».
Теперь с помощью icacls.exe предоставьте группе локальных администраторов полные права на файл termsrv.dll (Full Control):
icacls c:\Windows\System32\termsrv.dll /grant Administrators:F
(или
Администраторы
в русской версии Windows).
Должно появится сообщение: «processed file: c:\Windows\System32\termsrv.dll Successfully processed 1 files; Failed processing 0 files«.
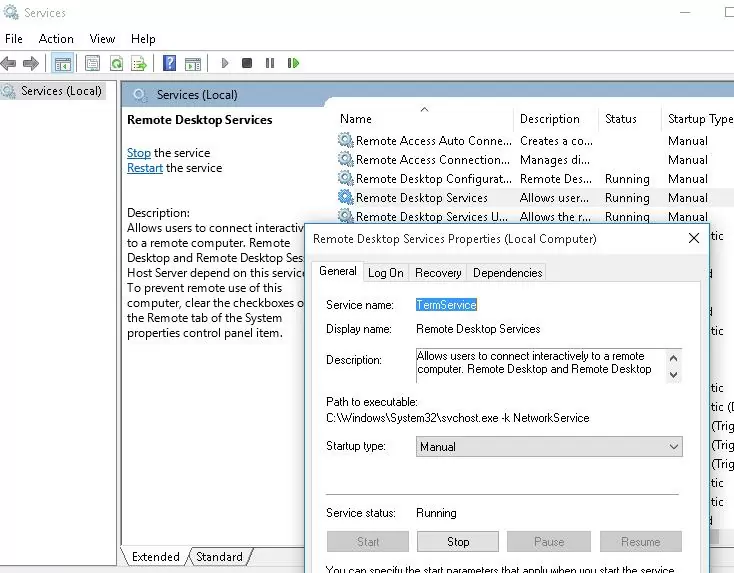
Теперь нужно остановить службу Remote Desktop Service (TermService) из консоли services.msc или из командной строки:
Net stop TermService
Вместе с ней останавливается служба Remote Desktop Services UserMode Port Redirector.

Чтобы узнать номер билда вашей Windows, выполните команду winver или следующую команды PowerShell:
Get-ComputerInfo | select WindowsProductName, WindowsVersion
В моем случае установлена Windows 10 билд 22H2.
Затем откройте файл termsrv.dll с помощью любого HEX редактора (к примеру, Tiny Hexer). В зависимости от билда нужно найти и заменить строку:
| Версия Windows | Найти строку | Заменить на |
| Windows 11 22H2 | 39 81 3C 06 00 00 0F 84 75 7A 01 00 |
B8 00 01 00 00 89 81 38 06 00 00 90 |
| Windows 10 22H2 | 39 81 3C 06 00 00 0F 84 85 45 01 00 | |
| Windows 11 RTM ( 21H2 22000.258) | 39 81 3C 06 00 00 0F 84 4F 68 01 00 | |
| Windows 10 x64 21H2 | 39 81 3C 06 00 00 0F 84 DB 61 01 00 | |
| Windows 10 x64 21H1 | 39 81 3C 06 00 00 0F 84 2B 5F 01 00 | |
| Windows 10 x64 20H2 | 39 81 3C 06 00 00 0F 84 21 68 01 00 | |
| Windows 10 x64 2004 | 39 81 3C 06 00 00 0F 84 D9 51 01 00 | |
| Windows 10 x64 1909 | 39 81 3C 06 00 00 0F 84 5D 61 01 00 | |
| Windows 10 x64 1903 | 39 81 3C 06 00 00 0F 84 5D 61 01 00 | |
| Windows 10 x64 1809 | 39 81 3C 06 00 00 0F 84 3B 2B 01 00 | |
| Windows 10 x64 1803 | 8B 99 3C 06 00 00 8B B9 38 06 00 00 | |
| Windows 10 x64 1709 | 39 81 3C 06 00 00 0F 84 B1 7D 02 00 |
Редактор Tiny Hexer не позволяет редактировать файл termsvr.dll напрямую из папки system32. Скопируйте его на рабочий стол, а после модификации замените исходный файл.
Например, для самой редакции Windows 10 x64 22H2 19045.2006 (версия файла termsrv.dll — 10.0.19041.1949) нужно открыть файл termsrv.dll в Tiny Hexer. Затем найдите строку:
39 81 3C 06 00 00 0F 84 85 45 01 00
И замените ее на:
B8 00 01 00 00 89 81 38 06 00 00 90
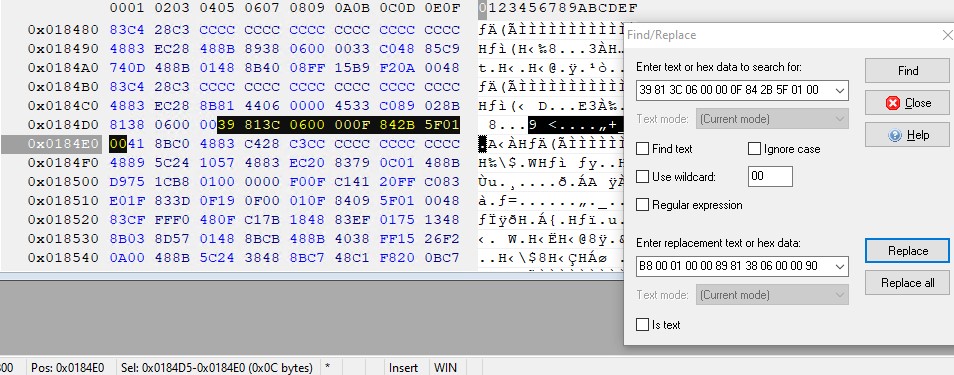
Сохраните файл и запустите службу TermService.
Если что-то пошло не так, и у вас возникнут проблемы со службой RDP, остановите службу и замените модифицированный файл termsrv.dll исходной версией:
copy termsrv.dll_backup c:\Windows\System32\termsrv.dll
Преимущество способа отключения ограничения на количество RDP сессий в Windows путем замены файла termsrv.dll в том, что на него не реагируют антивирусы. В отличии от утилиты RDPWrap, которую многие антивирусов считают Malware/HackTool/Trojan. Основной недостаток — вам придется вручную править файл после каждого обновления билда Windows (или при обновлении версии файла termsrv.dll в рамках ежемесячных кумулятивных обновлений).
Встроенная поддержка нескольких RDP сессий в редакции Windows 10 Enterprise Multi-session
Недавно Microsoft выпустило специальные Enterprise редакции Windows multi-session (ранее назывались Windows 10 Enterprise for Remote Sessions и Windows 10 Enterprise for Virtual Desktops).
Редакция Enterprise multi-session доступна как для Windows 10, так и для Windows 11.
Главная особенность этой редакции – она поддерживает множественные одновременные RDP сессии пользователей прямо из коробки. Несмотря на то, что редакцию Windows multi-session разрешено запускать только в виртуальных машинах Azure, вы можете вам установить эту редакцию в on-premises сети и использовать данный компьютер терминальный сервер (хотоя это будет нарушением лицензионной политики Microsoft).
Далее мы покажем, как обновить компьютер с Windows 10 Pro до Windows 10 Enterprise for Virtual Desktop и использовать его для одновременного подключения нескольких пользователей.
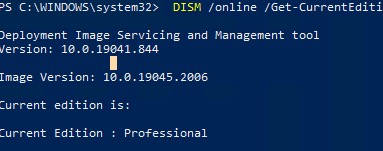
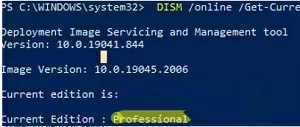
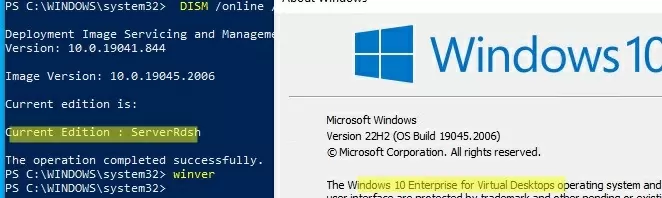
Откройте командную строку и проверьте текущую редакцию Windows (Professional в этом примере):
DISM /online /Get-CurrentEdition
Обновите вашу редакцию Windows с Pro до Enterprise:
Changepk.exe /ProductKey NPPR9-FWDCX-D2C8J-H872K-2YT43
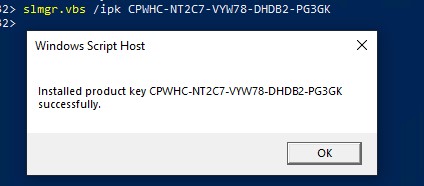
Теперь установить GVLK ключ для Windows 10 Enterprise for Remote Sessions:
slmgr.vbs /ipk CPWHC-NT2C7-VYW78-DHDB2-PG3GK
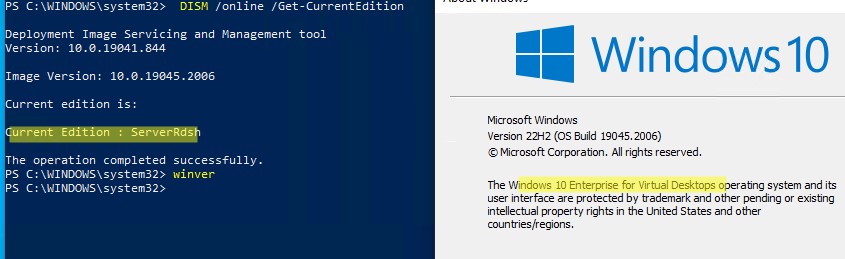
Проверьте, что теперь ваша редакция Windows 10 изменилась на
ServerRdsh
(Windows 10 Enterprise for Virtual Desktops).
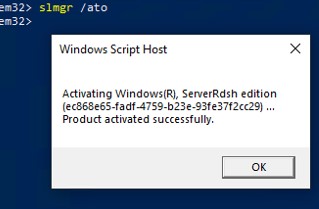
Активируйте вашу копию Windows Enterprise Multi-Session на вашем KMS сервере:
slmgr /skms msk-man02.winitpro.local:1688
slmgr /ato
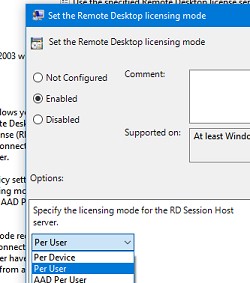
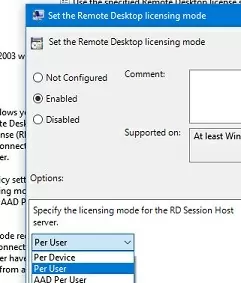
Откройте редактор локальной GPO
(gpedit.msc
) и включите Per-User режим лицензирования в параметре Set the Remote Desktop licensing mode (Computer Configuration -> Policies -> Administrative Templates -> Windows Components -> Remote Desktop Services -> Remote Desktop Session Host -> Licensing).
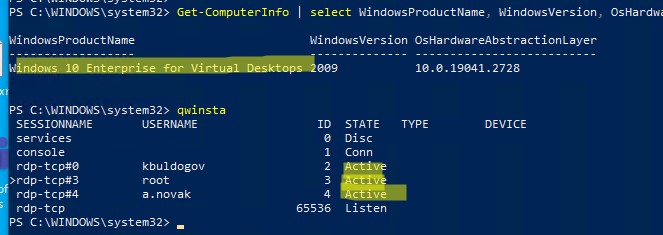
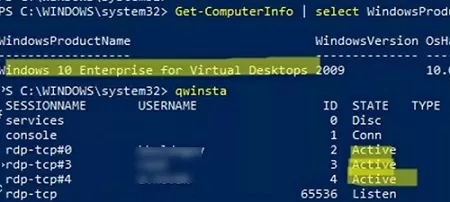
После активации нужно перезагрузить Windows. Теперь попробуйте подключиться к компьютеру по RDP под несколькими пользованиями. Как вы видите, Windows 10 Enterprise multi-session одновременные RDP подключения поддерживаются прямо из коробки.
Get-ComputerInfo | select WindowsProductName, WindowsVersion, OsHardwareAbstractionLayer
Windows 10 Enterprise for Virtual Desktops 2009 10.0.19041.2728
qwinsta
В этой статье мы рассмотрели способы, позволяющие снять ограничение на количество одновременных RDP подключений пользователей, и запустить бесплатный терминальный сервер на клиентской Windows 10 или 11. У каждого из этих способов есть свои преимущества и недостатки. Какой из них использовать — решать вам.
Remote users can connect to their Windows 10 and 11 computers through the Remote Desktop Services (RDP). All you need to do is enable Remote Desktop, grant the user RDP access permissions, and connect to the computer using any remote desktop client. However, the number of concurrent RDP sessions is limited in desktop versions of Windows. Only one active Remote Desktop user session is allowed.
A warning will appear asking you to disconnect the first user’s session if you try to establish a second RDP connection.
Another user is signed in. If you continue, they’ll be disconnected. Do you want to sign in anyway?
Contents:
- Number of Concurrent RDP Connections on Windows
- RDP Wrapper: Enable Multiple RDP Sessions on Windows
- RDP Wrapper Not Working on Windows
- Patch the Termsrv.dll to Enable Multiple Remote Desktop Sessions
- Multiple Concurrent RDP Connections in Windows 10 Enterprise Multi-session
Number of Concurrent RDP Connections on Windows
There are a number of restrictions on the use of Remote Desktop Services in all desktop versions of Windows 10 and 11:
- Only Windows Professional and Enterprise editions can accept remote desktop connections. RDP access is not allowed to Home/Single Language Windows editions;
- Only one simultaneous RDP connection is available. Attempting to start a second RDP session will prompt the user to end the active session;
- If the user is working at the computer console (locally), their local session is disconnected (locked) when they make a remote RDP connection. The remote RDP session will also be terminated if the user logs into Windows from the computer’s console.
The number of concurrent RDP connections on Windows is actually a license limitation. Microsoft prohibits the creation of a workstation-based Terminal RDP server for multiple users to work simultaneously.
If your tasks require the deployment of a terminal server, Microsoft suggests purchasing Windows Server (allows two simultaneous RDP connections by default). If you need more concurrent user sessions, you will need to purchase RDS CALs, install, and configure the Remote Desktop Session Host (RDSH) role or deploy an RDS farm.
Technically, any version of Windows with sufficient RAM and CPU resources can support dozens of remote user sessions simultaneously. On average, an RDP user session requires 150-200MB of memory (excluding running apps). This means that the maximum number of concurrent RDP sessions is limited only by the available resources of the computer.
In this article, we are going to show you three ways to remove the limit on the number of concurrent RDP connections in Windows 10 and 11:
- RDP Wrapper
- Modifying the termsrv.dll file
- Upgrading Windows 10/11 edition to Enterprise for virtual desktops (multi-session)
Note. Any modifications to the operating system that are described in this article are considered a violation of the Windows License Agreement and may be used at your own risk.
Before you proceed, make sure that the Remote Desktop protocol is enabled in Windows.
- Go to Settings -> System —> Remote Desktop -> Enable Remote Desktop;

- Or use the classic Control Panel: run the command
SystemPropertiesRemoteand check the option Allow remote connection to this computer.
RDP Wrapper: Enable Multiple RDP Sessions on Windows
The RDP Wrapper Library OpenSource project allows you to enable multiple RDP sessions on Windows 10/11 without replacing the termsrv.dll file. This tool acts as a layer between SCM (Service Control Manager) and the Remote Desktop Services. The RDP wrapper doesn’t make any changes to the termsrv.dll file, it simply loads the termsrv with the modified settings.
Thus, the RDPWrap will work even in the case of termsrv.dll file update. It allows you not to be afraid of Windows updates.
Important. Before installing the RDP Wrapper, it is important to make that you are using the original (unpatched) version of the termsrv.dll file. Otherwise, RDP Wrapper may become unstable or not start at all.
You can download the RDP Wrapper from the GitHub repository https://github.com/binarymaster/rdpwrap/releases (the latest available version of the RDP Wrapper Library is v1.6.2). The project hasn’t been updated since 2017, but it can be used in all new builds of Windows 10 and 11. To use the wrapper on modern versions of Windows, simply update the rdpwrap.ini configuration file.
RDP Wrapper is detected as a potentially dangerous program by most antivirus scanners. For example, it is classified as PUA:Win32/RDPWrap (Potentially Unwanted Software) with a low threat level by the built-in Microsoft Defender antivirus. If your antivirus settings are blocking the RDP Wrapper from starting, you will need to add it to the exceptions.
The RDPWrap-v1.6.2.zip archive contains some files:
- RDPWinst.exe — used to install/uninstall an RDP wrapper library;
- RDPConf.exe — RDP Wrapper configuration tool;
- RDPCheck.exe —an RDP check tool (Local RDP Checker);
- install.bat, uninstall.bat, update.bat — batch files to install, uninstall, and update RDP Wrapper.
To install RDPWrap, run the install.bat file as an administrator. The program is installed in the C:\Program Files\RDP Wrapper directory.
Run RDPConfig.exe when the installation is complete.
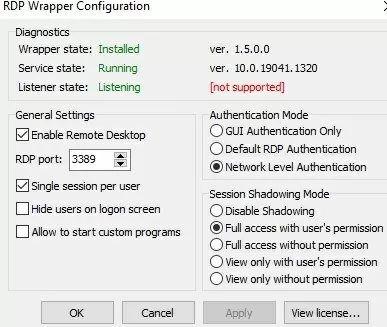
Most likely, immediately after installation, the tool will show that the RDP wrapper is running (Installed, Running, Listening), but not working. Note the red [not supported] warning. It reports that this version of Windows 10 22H2 (ver. 10.0.19041.1949) is not supported by the RDPWrapper.
This is because the rdpwrap.ini configuration file does not contain settings for your Windows version (build). +
✅ Download the latest version of rdpwrap.ini here https://raw.githubusercontent.com/sebaxakerhtc/rdpwrap.ini/master/rdpwrap.ini
Manually copy the contents of this page into the C:\Program Files\RDP Wrapper\rdpwrap.ini file. Or download the INI file using the PowerShell cmdlet Invoke-WebRequest (you must first stop the Remote Desktop service):
Stop-Service termservice -Force
 Invoke-WebRequest https://raw.githubusercontent.com/sebaxakerhtc/rdpwrap.ini/master/rdpwrap.ini -outfile "C:\Program Files\RDP Wrapper\rdpwrap.ini"
You can create a scheduled task to check for changes to rdpwrap.ini and update it automatically.
This screenshot shows that the latest version of the rdpwrap.ini file (Updated=2023-06-26) is used on the computer.
Restart your computer and run the RDPConfig.exe tool. Check that all items in the Diagnostics section are green and that the [Fully supported] message is displayed. The RDP wrapper started successfully on Windows 11 22H2 in my case.
Now try to establish several concurrent RDP sessions with this computer under different user accounts (use your favorite RDP client: mstsc.exe, RDCMan, mRemoteNG, etc).
You can check that two (or more) RDP sessions are active on the computer at the same time by using the command:
qwinsta
rdp-tcp#0         user1                 1  Active
rdp-tcp#1         user2                 2  Active
The RDPWrap tool is supported in all Windows editions, so you can build your own terminal (RDS) server on any Windows device. So you can turn any version of Windows client into a full-featured terminal server.
The following options are available in the RDP Wrapper:
- Enable Remote Desktop
- RDP Port —change the default remote desktop port number (TCP 3389)
- Hide users on logon screen – allow hide the list of users from the Windows Logon Screen;
- Single session per user — allow several concurrent RDP sessions under the same user account. This option sets the fSingleSessionPerUser registry value to 0 (
HKLM\SYSTEM\ CurrentControlSet\Control\Terminal Server\fSingleSessionPerUser). This parameter is also configured through the GPO option Restrict Remote Desktop Services to a single Remote Desktop Services session under Computer Configuration > Administrative Templates > Windows Components > Remote Desktop Services > Remote Desktop Session Host > Connections; - The Session Shadowing Mode allows you to configure the remote control (shadow) connection mode to the RDP users’ desktops
RDP Wrapper Not Working on Windows
In some cases, the RDP Wrapper may not work as you expect it to and you may not be able to use more than one RDP connection on Windows.
The termsrv.dll file version can be updated during Windows Updates installation. If the description for your version of Windows is missing from the rdpwrap.ini file, then the RDP Wrapper will not be able to apply the necessary settings. In this case, the status [not supported]. will be displayed in the RDP Wrapper Configuration window.
✅ In this case, you must update the rdpwrap.ini file as described above.
If RDP Wrapper does not work after updating the rdpwrap.ini file, try to open the rdpwrap.ini file and look for the section for your version of Windows.
How to understand if your Windows version is supported in rdpwrapper config?
The screenshot below shows that for my version of Windows 11 (10.0.22621.317) there are two sections of settings:
[10.0.22621.317]
...
[10.0.22621.317-SLInit]
...
If there is no section in the rdpwrap configuration file for your version of Windows, try searching the web for the rdpwrap.ini file. Add the configuration settings you found to the end of the file.
If RDP Wrapper does not work after you install security updates or upgrade the Windows build, check that there is no Listener state: Not listening warning in the RDPWrap Diagnostics section.
Try updating the rdpwrap.ini file, and then reinstalling the rdpwrapper service:
rdpwinst.exe -u
 rdpwinst.exe -i
It can happen that when you try to make a second RDP connection as a different user, you will get an error message:
The number of connections to this computer is limited and all connections are in use right now. Try connecting later or contact your system administrator.
In this case, you can use the local Group Policy Editor (gpedit.msc) to enable the “Limit number of connections” option under Computer Configuration -> Administrative Templates -> Windows Components -> Remote Desktop Services -> Remote Desktop Session Host -> Connections section. Increase the ‘RD maximum connection allowed’ value to 999999.
Restart your computer to update the local Group Policy and apply the settings.
Patch the Termsrv.dll to Enable Multiple Remote Desktop Sessions
To remove the limit on the number of concurrent RDP user connections in Windows without using rdpwrapper, you can replace the original termsrv.dll file. This is the main library file used by the Remote Desktop Service. The file is located in the C:\Windows\System32 directory.
It is advisable to make a backup copy of the termsrv.dll file before editing or replacing it. This will help you to revert to the original version of the file if necessary. Open an elevated command prompt and run the command:
copy c:\Windows\System32\termsrv.dll termsrv.dll_backup
Then you need to take ownership of the termsrv.dll file. To change a file’s owner from TrustedInstaller to the local Administrators group, use the command:
takeown /F c:\Windows\System32\termsrv.dll /A
SUCCESS: The file (or folder): c:\Windows\System32\termsrv.dll now owned by the administrators group
Now use the icacls.exe tool to grant Full Control permissions to the termsrv.dll file for the local Administrators group:
icacls c:\Windows\System32\termsrv.dll /grant Administrators:F
processed file: c:\Windows\System32\termsrv.dll Successfully processed 1 files; Failed processing 0 files.
Now you need to stop the Remote Desktop service (TermService) using the services.msc console or with the command:
net stop TermService
It also stops the Remote Desktop Services UserMode Port Redirector service.
Run the winver command or the following PowerShell command to find your Windows build number:
Get-ComputerInfo | select WindowsProductName, WindowsVersion
In my case, Windows 10 build 22H2 is installed.
Then open the termsrv.dll file using any HEX editor (for example, Tiny Hexer). Depending on the build of Windows you are using, you will need to find and replace the string according to the table below:
| Windows build | Find the string | Replace with |
| Windows 11 22H2 | 39 81 3C 06 00 00 0F 84 75 7A 01 00 |
B8 00 01 00 00 89 81 38 06 00 00 90 |
| Windows 10 22H2 | 39 81 3C 06 00 00 0F 84 85 45 01 00 | |
| Windows 11 21H2 (RTM) | 39 81 3C 06 00 00 0F 84 4F 68 01 00 | |
| Windows 10 x64 21H2 | 39 81 3C 06 00 00 0F 84 DB 61 01 00 | |
| Windows 10 x64 21H1 | 39 81 3C 06 00 00 0F 84 2B 5F 01 00 | |
| Windows 10 x64 20H2 | 39 81 3C 06 00 00 0F 84 21 68 01 00 | |
| Windows 10 x64 2004 | 39 81 3C 06 00 00 0F 84 D9 51 01 00 | |
| Windows 10 x64 1909 | 39 81 3C 06 00 00 0F 84 5D 61 01 00 | |
| Windows 10 x64 1903 | 39 81 3C 06 00 00 0F 84 5D 61 01 00 | |
| Windows 10 x64 1809 | 39 81 3C 06 00 00 0F 84 3B 2B 01 00 | |
| Windows 10 x64 1803 | 8B 99 3C 06 00 00 8B B9 38 06 00 00 | |
| Windows 10 x64 1709 | 39 81 3C 06 00 00 0F 84 B1 7D 02 00 |
Tiny Hexer cannot edit termsvr.dll file directly from the system32 folder. Copy it to your desktop and replace the original file after modifying it.
For example, my build of Windows 10 x64 is 22H2 19045.2006 (termsrv.dll file version is 10.0.19041.1949). Open the termsrv.dll file in Tiny Hexer, then find the text:
39 81 3C 06 00 00 0F 84 75 7A 01 00
and replace it with:
B8 00 01 00 00 89 81 38 06 00 00 90

Save the file and start the TermService.
If something goes wrong and you experience some problems with the Remote Desktop service, stop the service and replace the modified termsrv.dll file with the original version:
copy termsrv.dll_backup c:\Windows\System32\termsrv.dll
👍 The advantage of the method of enabling multiple RDP sessions in Windows 10 or 11 by replacing the termsrv.dll file is that antivirus software will not react to it (unlike RDPWrap, which is detected by many antivirus products as a malware/hack tool/trojan).
👎The disadvantage of this is that you will have to manually edit the file each time you update the Windows build (or if the monthly cumulative patches update the version of termsrv.dll).
Multiple Concurrent RDP Connections in Windows 10 Enterprise Multi-session
Microsoft has recently released a special edition of the operating system called Windows Enterprise Multi-Session (Previously known as Windows 10 Enterprise for Remote Sessions and Windows 10 Enterprise for Virtual Desktops)
The key feature of this edition is that it supports multiple concurrent RDP user sessions out of the box. Although the Windows multi-session edition is only allowed to be run in Azure VMs, you can install this edition on an on-premises network and use that computer as a terminal server (even though this would be against Microsoft’s licensing policies).
The Enterprise Multi-Session edition is available for both Windows 10 and Windows 11.
Next up, we’re going to show you how to upgrade a Windows 10 Pro edition to Windows 10 Enterprise for Virtual Desktop and use it for multiple RDP users simultaneously.
Open a command prompt and check your current edition of Windows (Professional in this example):
DISM /online /Get-CurrentEdition
Upgrade your edition of Windows 10 from Pro to Enterprise with the command:
changepk.exe /ProductKey NPPR9-FWDCX-D2C8J-H872K-2YT43
Now install the GVLK key for Windows 10 Enterprise for Remote Sessions:
slmgr.vbs /ipk CPWHC-NT2C7-VYW78-DHDB2-PG3GK
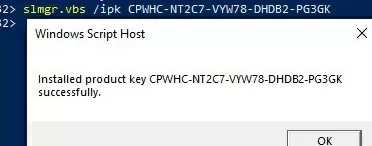
Check that your edition of Windows 10 has now changed to ServerRdsh (Windows 10 Enterprise for Virtual Desktops).
Activate your copy of Windows 10 Enterprise Multi-Session edition on your KMS server:
slmgr /skms kms-srv.woshub.local:1688
 slmgr /ato

Open the Local GPO Editor (gpedit.msc) and enable Per-User licensing mode in the Set the Remote Desktop licensing mode (Computer Configuration -> Policies -> Administrative Templates -> Windows Components -> Remote Desktop Services -> Remote Desktop Session Host -> Licensing).
You must restart Windows after activation. Now try connecting to the computer using RDP with different user accounts. As you can see, Windows 10 Enterprise multi-session supports simultaneous RDP connections right out of the box.
Get-ComputerInfo | select WindowsProductName, WindowsVersion, OsHardwareAbstractionLayer
Windows 10 Enterprise for Virtual Desktops 2009 10.0.19041.2728
qwinsta
In this article, we have looked at a number of ways to get rid of the limit on the number of concurrent RDP user connections and run a free terminal server on desktop versions of Windows 10/11. Each method has its own advantages and disadvantages. Which one you choose is up to you.
Привет, друзья. В этой публикации поговорим о выпусках Windows 11 – её редакциях и выпусках, у которых разный системный функционал, разное целевое назначение и пользовательские аудитории, разные политики жизненного цикла. И у которых, соответственно, разные стоимости лицензии. Костяк выпусков Windows 11 унаследовала от Windows 10 – это редакции Home, Pro, Pro for Workstations, Education, Enterprise, а также выпуски Pro Education, Enterprise for Virtual Desktops и loT Enterprise. Помимо этого, у новой операционной системы появился ещё один выпуск – специальный выпуск облачной операционной системы Windows 11 Cloud (SE). Также Windows 11 стала первой операционной системой от Microsoft, которая поставляется без 32-битных дистрибутивов. Давайте обо всём этом подробнее.
Все выпуски Windows 11 поставляются только в 64-битных дистрибутивах. Windows 10 стала последней включительно операционной системой с поддержкой дистрибутивов 32-битной разрядности. При создании Windows 11 Microsoft решила поставить жирную точку на устаревшей процессорной архитектуре х86 и не отвлекаться более на создание 32-разрядных выпусков операционной системы, которые принципиально необходимы только для редких сильно устаревших компьютерных устройств. Не то что с сильно устаревшими компьютерами, даже с относительно старыми новая операционная система не дружит в принципе. В число компьютеров, соответствующих официальным системным требованиям Windows 11, попадают выпущенные не ранее 2017 года. У Windows 11 минимальный порог оперативной памяти — 4 Гб, а на таких устройствах необходима только 64-битная операционная система.
Друзья, все какие существуют на данные момент выпуски инсайдерской Windows 11 (кроме редакции Home) можно увидеть в дистрибутиве операционной системы при скачивании его с сайта платформы обновлений Windows Unified Update Platform.
Microsoft же пока что не даёт информации по выпускам новой системы, да у неё наверняка точной этой информации пока что и нет. Всё, так сказать, в процессе активного созидания, а, соответственно, подвержено доработкам и изменениям. В полном же дистрибутиве инсайдерской Windows 11 у нас будут те же редакции, что есть у Windows 10 — Home, Pro, Pro for Workstations, Education, Enterprise, а также выпуски Pro Education, Enterprise for Virtual Desktops и loT Enterprise, и ещё новый выпуск, специальный выпуск облачной Windows 11 Cloud (SE). Ну и давайте кратко о сути каждого из выпусков.
Home – редакция «Домашняя» с базовым функционалом Windows 11. В ней нет доступа к групповым политикам (но это можно исправить), нет BitLocker, гипервизора Hyper-V, средства удалённого подключения по протоколу RDP, возможности подключения к Azure AD и т.п. У Windows 11, как и Windows 10, жизненный цикл с современными политиками Microsoft, т.е. модель поставки операционной системы «Windows как сервис». И это значит, что Windows 11 также будет функционально обновляться наряду с массовым использованием, только с разницей в том, что у неё будет годовой канал поставки обновлений, а не полугодовой, как у Windows 10. И вот у редакции Home не будет возможности отказаться от обновления по истечении срока поддержки текущей версии, тогда как у других редакций такая возможность будет. Срок поддержки каждой версии Windows 11 для редакции Home – 2 года. Ещё редакция Home ограничена в использовании локальных пользовательских учётных записей Windows 11, в этой редакции нужно использовать только аккаунт Microsoft. Причём без него невозможно даже установить операционную систему, для установки Windows 11 Home обязательно нужен Интернет и подключение к аккаунту Microsoft.
Pro – редакция «Профессиональная» с эталонным комплектом функционала Windows 11, т.е. с оптимальной подборкой возможностей операционной системы. Включает отсутствующие в редакции Home системные компоненты. В процессе установки позволяет создать в параметрах входа локальную учётную запись. Срок поддержки каждой версии Windows 11 для редакции Pro – 2 года.
Pro for Workstations – редакция «Профессиональная для рабочих станций», являет собой оптимизированную под использование на серверах и рабочих станциях редакцию Pro Windows 11. Поставляется с активным режимом электропитания «Максимальная производительность». Позволяет использовать на обычных разделах диска файловую систему ReFS, тогда как в Pro и Home это доступно исключительно для функции дисковых пространств (штатный программный RAID). Предусматривает функцию SMB Direct, это поддержка сетевых адаптеров RDMA (с удаленным прямым доступом к оперативной памяти). Работает с энергонезависимыми модулями оперативной памяти NVDIMM-N. Срок поддержки каждой версии Windows 11 для редакции Pro for Workstations – 2 года.
Enterprise – редакция «Корпоративная», ориентированная на корпоративный сектор, т.е. на организации и предприятия. Поверх возможностей редакции Pro имеет функции усиленной безопасности для защиты корпоративных данных. Позволяет использовать файловую систему ReFS на обычных разделах диска. Имеет функцию аналитики компьютеров – облачную службу предоставления данных о работоспособности корпоративных компьютерных устройств и готовности к обновлению операционной системы. Имеет функцию Microsoft Application Virtualization, это виртуализация и потоковая передача софта от Microsoft. В процессе установки Windows 11 Enterprise с включённым Интернетом в параметрах входа нельзя создать локальную учётную запись, для этого необходимо Интернет отключить. Срок поддержки каждой версии Windows 11 для редакции Enterprise – 3 года.Вот это, друзья, 4 основные редакции Windows 11, которые отличаются разной поставкой функционала. Более подробно об их отличиях можете почитать в
сравнении выпусков Windows 10 на сайте Microsoft
. Повторюсь, Windows 11 унаследовала выпуски от Windows 10, потому суть в плане функционала редакций будет той же.
Education – редакция «Образовательная», являет собой редакцию Enterprise с её функционалом, но с возможностью удаления голосового ассистента Cortana. Главное же отличие заключается только в целевом использовании операционной системы и стоимости лицензии. Со времён Windows 10 редакция Education предназначается только для образовательных учреждений и поставляется по льготной цене. Официально приобрести редакцию Education могут ПТУ, ВУЗы, музеи, библиотеки, различные благотворительные организации как юридические лица, а также лично для себя преподаватели и студенты, обучающиеся на стационаре. Срок поддержки каждой версии Windows 11 для редакции Education – 3 года.
Pro Education – это выпуск на базе редакции Pro с возможностью удаления голосового ассистента Cortana, на который распространяется политика целевого использования и цены редакции Education.
Enterprise for Virtual Desktops (он же Enterprise Multi-Session) – это выпуск на базе редакции Enterprise, оптимизированный под работу операционной системы по типу узла сеанса удалённого рабочего стола.
IoT Enterprise – это выпуск на базе редакции Enterprise, оптимизированный под работу на устройствах определённого назначения типа терминалов, банкоматов, почтоматов, вывесок, телекоммуникационных систем, бортового, промышленного, транспортного, медицинского, торгового и пр. оборудования.
Срок поддержки каждой версии Windows 11 для выпусков определяется сроками поддержки редакций, на которых они базируются, если иной срок специально не указан Microsoft.
Windows 11 Cloud (SE) – специальный выпуск Windows 11, выпуск облачной операционной системы, изначально базируется на редакции Pro, но урезан в части функциональных возможностей. В спецвыпуске сделан акцент на хранении данных в облаке Microsoft OneDrive. Система не даёт доступа к диску С в системном проводнике, в ней заблокированы Microsoft Store и панель управления, нет виртуальных рабочих столов, панели виджетов и прочих функций. Ориентирована на корпоративный сектор, в частности, образовательные и торговые организации. Вероятно, будет поставляться как операционная система OEM с определёнными условиями Microsoft. Более подробно об этом спецвыпуске можно почитать в статье «Windows 11 Cloud (SE) — облачная операционная система Microsoft».
| title | titleSuffix | description | keywords | author | ms.author | manager | ms.date | ms.topic | ms.service | ms.subservice | ms.localizationpriority | ms.reviewer | ms.suite | search.appverid | ms.custom | ms.collection | |||
|---|---|---|---|---|---|---|---|---|---|---|---|---|---|---|---|---|---|---|---|
|
Using Azure Virtual Desktop multi-session with Microsoft Intune |
Guidelines for using Azure Virtual Desktop multi-session with Microsoft Intune |
smbhardwaj |
smbhardwaj |
dougeby |
08/03/2022 |
conceptual |
microsoft-intune |
fundamentals |
high |
madakeva |
ems |
MET150 |
intune-classic; get-started; references_regions |
|
Windows 10 or Windows 11 Enterprise multi-session remote desktops
Azure Virtual Desktop multi-session with Microsoft Intune is now generally available.
You can now use Microsoft Intune to manage Windows 10 or Windows 11 Enterprise multi-session remote desktops in the Microsoft Intune admin center just as you can manage a shared Windows 10 or Windows 11 client device. When managing such virtual machines (VMs), you’ll be able to use both device-based configuration targeted to devices or user-based configuration targeted to users.
Windows 10 or Windows 11 Enterprise multi-session is a new Remote Desktop Session Host exclusive to Azure Virtual Desktop on Azure. It provides the following benefits:
- Allows multiple concurrent user sessions.
- Gives users a familiar Windows 10 or Windows 11 experience.
- Supports use of existing per-user Microsoft 365 licensing.
You can manage Windows 10 and Windows 11 Enterprise multi-session VMs created in Azure Government Cloud in US Government Community (GCC), GCC High, and DoD.
[!IMPORTANT]
Microsoft Intune support for Azure Virtual Desktop multi-session is not currently available for Citrix DaaS and VMware Horizon Cloud.
Overview
Device configuration support in Microsoft Intune for Windows 10 or Windows 11 Enterprise multi-session is generally available (GA). This means policies defined in the OS scope and apps configured to install in the system context can be applied to Azure Virtual Desktop multi-session VMs when assigned to device groups.
[!NOTE]
Device-based configuration cannot be assigned to users and user-based configuration cannot be assigned to devices. It will be reported as Error or Not applicable.
User configuration support in Microsoft Intune for Windows 11 multi-session VMs is generally available. With this you are able to:
-
Configure user scope policies using Settings catalog and assign to groups of users. You can use the search bar to search all configurations with scope set to «user».
-
Configure user certificates and assign to users.
-
Configure PowerShell scripts to install in the user context and assign to users.
[!NOTE]
User configuration support for Windows 10 multi-session builds will be available in the future.
Prerequisites
This feature supports Windows 10 or Windows 11 Enterprise multi-session VMs, which are:
- Running Windows 10 multi-session, version 1903 or later, or running Windows 11 multi-session.
- Set up as remote desktops in pooled host pools that have been deployed through Azure Resource Manager.
- Running an Azure Virtual Desktop agent version of 1.0.2944.1400 or later.
- Hybrid Azure AD-joined and enrolled in Microsoft Intune using one of the following methods:
- Configured with Active Directory group policy, set to use Device credentials, and set to automatically enroll devices that are Hybrid Azure AD-joined.
- Configuration Manager co-management.
- Azure AD-joined and enrolled in Microsoft Intune by enabling Enroll the VM with Intune in the Azure portal.
- Licensing: The appropriate Azure Virtual Desktop and Microsoft Intune license is required if a user or device benefits directly or indirectly from the Microsoft Intune service, including access to the Microsoft Intune service through a Microsoft API. For more information, go to Microsoft Intune licensing.
[!NOTE]
If you’re joining session hosts to Azure Active Directory Domain Services, you can’t manage them using Intune.
[!IMPORTANT]
If you’re using Windows 10, versions 2004, 20H2, or 21H1 builds, make sure that you install the July 2021 Windows Update or a later Windows update. Otherwise, remote actions in the Microsoft Intune admin center, like remote sync, won’t work correctly. As a result, pending policies assigned to devices might take up to 8 hours to be applied.
See What is Azure Virtual Desktop? for more information about Azure Virtual Desktop licensing requirements.
Windows 10 or Windows 11 Enterprise multi-session VMs are treated as a separate OS edition and some Windows 10 or Windows 11 Enterprise configurations won’t be supported for this edition. Using Microsoft Intune doesn’t depend on or interfere with Azure Virtual Desktop management of the same VM.
Create the configuration profile
To configure configuration policies for Windows 10 or Windows 11 Enterprise multi-session VMs, you’ll need to use the Settings catalog in the Microsoft Intune admin center.
The existing device configuration profile templates aren’t supported for Windows 10 or Windows 11 Enterprise multi-session VMs, except for the following templates:
- Trusted certificate — Device (machine) when targeting devices and User when targeting users
- SCEP certificate — Device (machine) when targeting devices and User when targeting users
- PKCS certificate — Device (machine) when targeting devices and User when targeting users
- VPN — Device Tunnel only
Microsoft Intune won’t deliver unsupported templates to multi-session devices, and those policies appear as Not applicable in reports.
[!NOTE]
If you use co-management for Intune and Configuration Manager, in Configuration Manager, set the workload slider for Resource Access Policies to Intune or Pilot Intune. This setting allows Windows 10 and Windows 11 clients to start the process of requesting the certificate.
To configure policies
- Sign in to the Microsoft Intune admin center and choose Devices > Windows > Configuration profiles > Create Profile.
- For Platform, select Windows 10 and later.
- For Profile type, select Settings catalog, or when deploy settings by using a Template, select Templates and then the name of the supported Template.
- Select Create.
- On the Basics page, provide a Name and (optionally) Description > Next.
- On the Configuration settings page, select Add settings.
- Under Settings picker, select Add filter and select the following options:
- Key: OS edition
- Operator: ==
- Value: Enterprise multi-session
- Select Apply. The filtered list now shows all configuration profile categories that support Windows 10 or Windows 11 Enterprise multi-session. The scope for a policy is shown in parantheses. For user scope it shows as (User) and all the rest are policies with device scope.
- From the filtered list, pick the categories that you want.
- For each category you pick, select the settings that you want to apply to your new configuration profile.
- For each setting, select the value that you want for this configuration profile.
- Select Next when you’re done adding settings.
- On the Assignments page, choose the Azure AD groups containing the devices to which you want this profile assigned > Next.
- On the Scope tags page, optionally add the scope tags you want to apply to this profile > Next. For more information about scope tags, see Use role-based access control and scope tags for distributed IT.
- On the Review + create page, choose Create to create the profile.
Administrative templates
Windows 10 or Windows 11 Administrative Templates are supported for Windows 10 or Windows 11 Enterprise multi-session via the Settings catalog with some limitations:
- ADMX-backed policies are supported. Some policies aren’t yet available in the Settings catalog.
- ADMX-ingested policies are supported, including Office and Microsoft Edge settings available in Office administrative template files and Microsoft Edge administrative template files. For a complete list of ADMX-ingested policy categories, see Win32 and Desktop Bridge app policy configuration. Some ADMX ingested settings won’t be applicable to Windows 10 or Windows 11 Enterprise multi-session.
- ADMX-ingested policies are supported for user targeting only on Windows 11 at this time.
Compliance and Conditional access
You can secure your Windows 10 or Windows 11 Enterprise multi-session VMs by configuring compliance policies and Conditional Access policies in the Microsoft Intune admin center. The following compliance policies are supported on Windows 10 or Windows 11 Enterprise multi-session VMs:
- Minimum OS version
- Maximum OS version
- Valid operating system builds
- Simple passwords
- Password type
- Minimum password length
- Password Complexity
- Password expiration (days)
- Number of previous passwords to prevent reuse
- Microsoft Defender Antimalware
- Microsoft Defender Antimalware security intelligence up-to-date
- Firewall
- Antivirus
- Antispyware
- Real-time protection
- Microsoft Defender Antimalware minimum version
- Defender ATP Risk score
All other policies report as Not applicable.
[!Important]
You’ll need to create a new compliance policy and target it to the device group containing your multi-session VMs. User-targeted compliance configurations aren’t supported.
Conditional Access policies support both user and device based configurations for Windows 10 or Windows 11 Enterprise multi-session.
[!NOTE]
Conditional Access for Exchange on-premises isn’t supported for Windows 10 or Windows 11 Enterprise multi-session VMs.
[!NOTE]
Configuration and compliance policies for BitLocker, Secure Boot, and features leveraging vTPM (Virtual Trusted Platform Module) are not supported at this time for Azure Virtual Desktop VMs.
Endpoint security
You can configure profiles under Endpoint security for multi-session VMs by selecting Platform Windows 10, Windows 11, and Windows Server. If that Platform is not available, the profile is not supported on multi-session VMs.
For more information, see Manage device security with endpoint security policies in Microsoft Intune
[!NOTE]
Tamper protection is not supported on Azure Virtual Desktop VMs today. This functionality will be enabled in a future release.
Application deployment
All Windows 10 or Windows 11 apps can be deployed to Windows 10 or Windows 11 Enterprise multi-session with the following restrictions:
- All apps must be configured to install in the system/device context and be targeted to devices. Web apps are always applied in the user context by default so they won’t apply to multi-session VMs.
- All apps must be configured with Required or Uninstall app assignment intent. The Available apps deployment intent isn’t supported on multi-session VMs.
- If a Win32 app configured to install in the system context has dependencies or supersedence relationship on any apps configured to install in the user context, the app won’t be installed. To apply to a Windows 10 or Windows 11 Enterprise multi-session VM, create a separate instance of the system context app or make sure all app dependencies are configured to install in the system context.
- Azure Virtual Desktop RemoteApp and MSIX app attach aren’t currently supported in Microsoft Intune.
Script deployment
Scripts configured to run in the system context and assigned to devices are supported on Windows 10 or Windows 11 Enterprise multi-session. This can be configured under Script settings by setting Run this script using the logged on credentials to No.
Scripts configured to run in the user context and assigned to users are supported on Windows 11 Enterprise multi-session. This can be configured under Script settings by setting Run this script using the logged on credentials to Yes.
Windows Update for Business
You can use the settings catalog to manage Windows Update settings for quality (security) updates for Windows 10 or Windows 11 Enterprise multi-session VMs. To find the supported settings in the catalog, configure a settings filter for Enterprise multi-session and then expand the Windows Update for Business category.
The following settings are available in the catalog, with the links opening the Windows CSP documentation:
- Active Hours End
- Active Hours Max Range
- Active Hours Start
- Block «Pause Updates» ability
- Configure Deadline Grace Period
- Defer Quality Updates Period (Days)
- Pause Quality Updates Start Time
- Quality Update Deadline Period (Days)
Remote actions
The following Windows 10 or Windows 11 desktop device remote actions aren’t supported and will be grayed out in the UI and disabled in Graph for Windows 10 or Windows 11 Enterprise multi-session VMs:
- Autopilot reset
- BitLocker key rotation
- Fresh Start
- Remote lock
- Reset password
- Wipe
Retirement
Deleting VMs from Azure will leave orphaned device records in the Microsoft Intune admin center. They’ll be automatically cleaned up according to the cleanup rules configured for the tenant.
Security baselines
Security baselines aren’t available for Windows 10 or Windows 11 Enterprise multi-session at this time. We recommend that you review the Available security baselines and configure the recommended policies and values in the Settings catalog.
Additional configurations that aren’t supported on Windows 10 or Windows 11 Enterprise multi-session VMs
Out of Box Experience (OOBE) enrollment isn’t supported for Window 10 or Windows 11 Enterprise multi-session. This restriction means that:
- Windows Autopilot and Commercial OOBE aren’t supported.
- Enrollment status page isn’t supported.
Windows 10 or Windows 11 Enterprise multi-session managed by Microsoft Intune isn’t currently supported for China Sovereign Cloud.
Troubleshooting
The following sections provide troubleshooting guidance for common issues.
Enrollment issues
| Issue | Detail |
|---|---|
| Enrollment of hybrid Azure AD joined virtual machine fails |
|
| Enrollment of Azure AD joined virtual machine fails |
|
Configuration issues
| Issue | Detail |
|---|---|
| Settings catalog policy fails | Confirm the VM is enrolled using device credentials. Enrollment with user credentials isn’t currently supported for Windows 10 or Windows 11 Enterprise multi-session. |
| Configuration policy didn’t apply | Templates (except for Certificates) aren’t supported on Windows 10 or Windows 11 Enterprise multi-session. All policies must be created via the settings catalog. |
| Configuration policy reports as Not applicable | Some policies aren’t applicable to Azure Virtual Desktop VMs. |
| Microsoft Edge/Microsoft Office ADMX policy doesn’t show up when I apply the filter for Windows 10 or Windows 11 Enterprise multi-session edition | Applicability for these settings isn’t based on the Windows version or edition but on whether those apps have been installed on the device. To add these settings to your policy, you may have to remove any filters applied in the settings picker. |
| App configured to install in system context didn’t apply | Confirm the app doesn’t have a dependency or supersedence relationship on any apps configured to install in user context. User context apps aren’t currently supported on Windows 10 or Windows 11 Enterprise multi-session. |
| Update rings for Windows 10 and later policy didn’t apply | Windows Update for Business policies aren’t currently supported. |
Next steps
Learn more about Azure Virtual Desktops.
Key steps to help you access multi remote desktop sessions
by Henderson Jayden Harper
Passionate about technology, Crypto, software, Windows, and everything computer-related, he spends most of his time developing new skills and learning more about the tech world. He also enjoys… read more
Published on September 12, 2022
Reviewed by
Vlad Turiceanu

Passionate about technology, Windows, and everything that has a power button, he spent most of his time developing new skills and learning more about the tech world. Coming… read more
- Windows permit only a single Remote Desktop session (RDP) on one computer by default.
- RDP Wrapper allows you to run multiple Remote Desktop sessions without altering the termsrv.dll file.
- Users can use the Remote Desktop service shortcut keys to switch between two different sessions.
The remote connection feature means users can access another desktop without being present. Hence, we’ll discuss Windows 11 multiple remote desktop sessions and how users can enable it.
The RDP (Remote Desktop) is an operating system feature or software that allows users to connect and interact with a computer in another environment.
It permits you to run a personal computer in an environment and remotely access it on a different client computer in a separate location. In short, it allows a computer (client) to connect to another computer (host) from a different environment.
Furthermore, the multiple Remote Desktop sessions can vary according to the software or operating system.
However, the limit of RDP sessions that can run simultaneously is one. Likewise, Windows 10/11 only allows the establishment of a single Remote Desktop session (RDP) on one computer by default.
It means that Windows will disconnect the current Remote Desktop session if there is any attempt to establish a second connection.
Can you have multiple RDP sessions?
Windows allows users to establish only one Remote Desktop session between the client and the host by default.
Nonetheless, there are some ways you can have multiple Remote Desktop sessions without encountering difficulties. However, having more than one Remote Desktop session can vary depending on your project or program.
Users may find it beneficial to read about how to set up a VPN Remote Desktop in Windows 10 & 11.
How many RDP connections can a server handle?
The maximum number of Remote Desktop connections a server can handle is two simultaneous connections, according to Windows.
However, some programs allow you to set the Remote desktop multiple logins to about 50 users per Windows Server. Also, some users claim that it is possible for 100 concurrent connections to both RemoteApps and Remote Desktop Session Host.
Nonetheless, some factors may determine the limitations of what the hardware and the server can handle.
Some PC issues are hard to tackle, especially when it comes to corrupted repositories or missing Windows files. If you are having troubles fixing an error, your system may be partially broken.
We recommend installing Restoro, a tool that will scan your machine and identify what the fault is.
Click here to download and start repairing.
Some of these factors are speed and type of CPU installed on the server, amount of RAM installed in the Session Host (remote desktop) server, and lots more.
Quick tip:
Using a software that provides you access to applications and desktops can be very helpful. We recommend Parallels Remote Application Server (RAS) because it offers an excellent and intuitive experience.
You can have easy remote access across devices and networks to maximize your productivity and efficiency. You can also convert raw data into custom visual reports to reveal traffic and resource usage from your network infrastructure.

Parallels Remote Application Server
Manage your applications with centralized controls and permissions with this outstanding software.
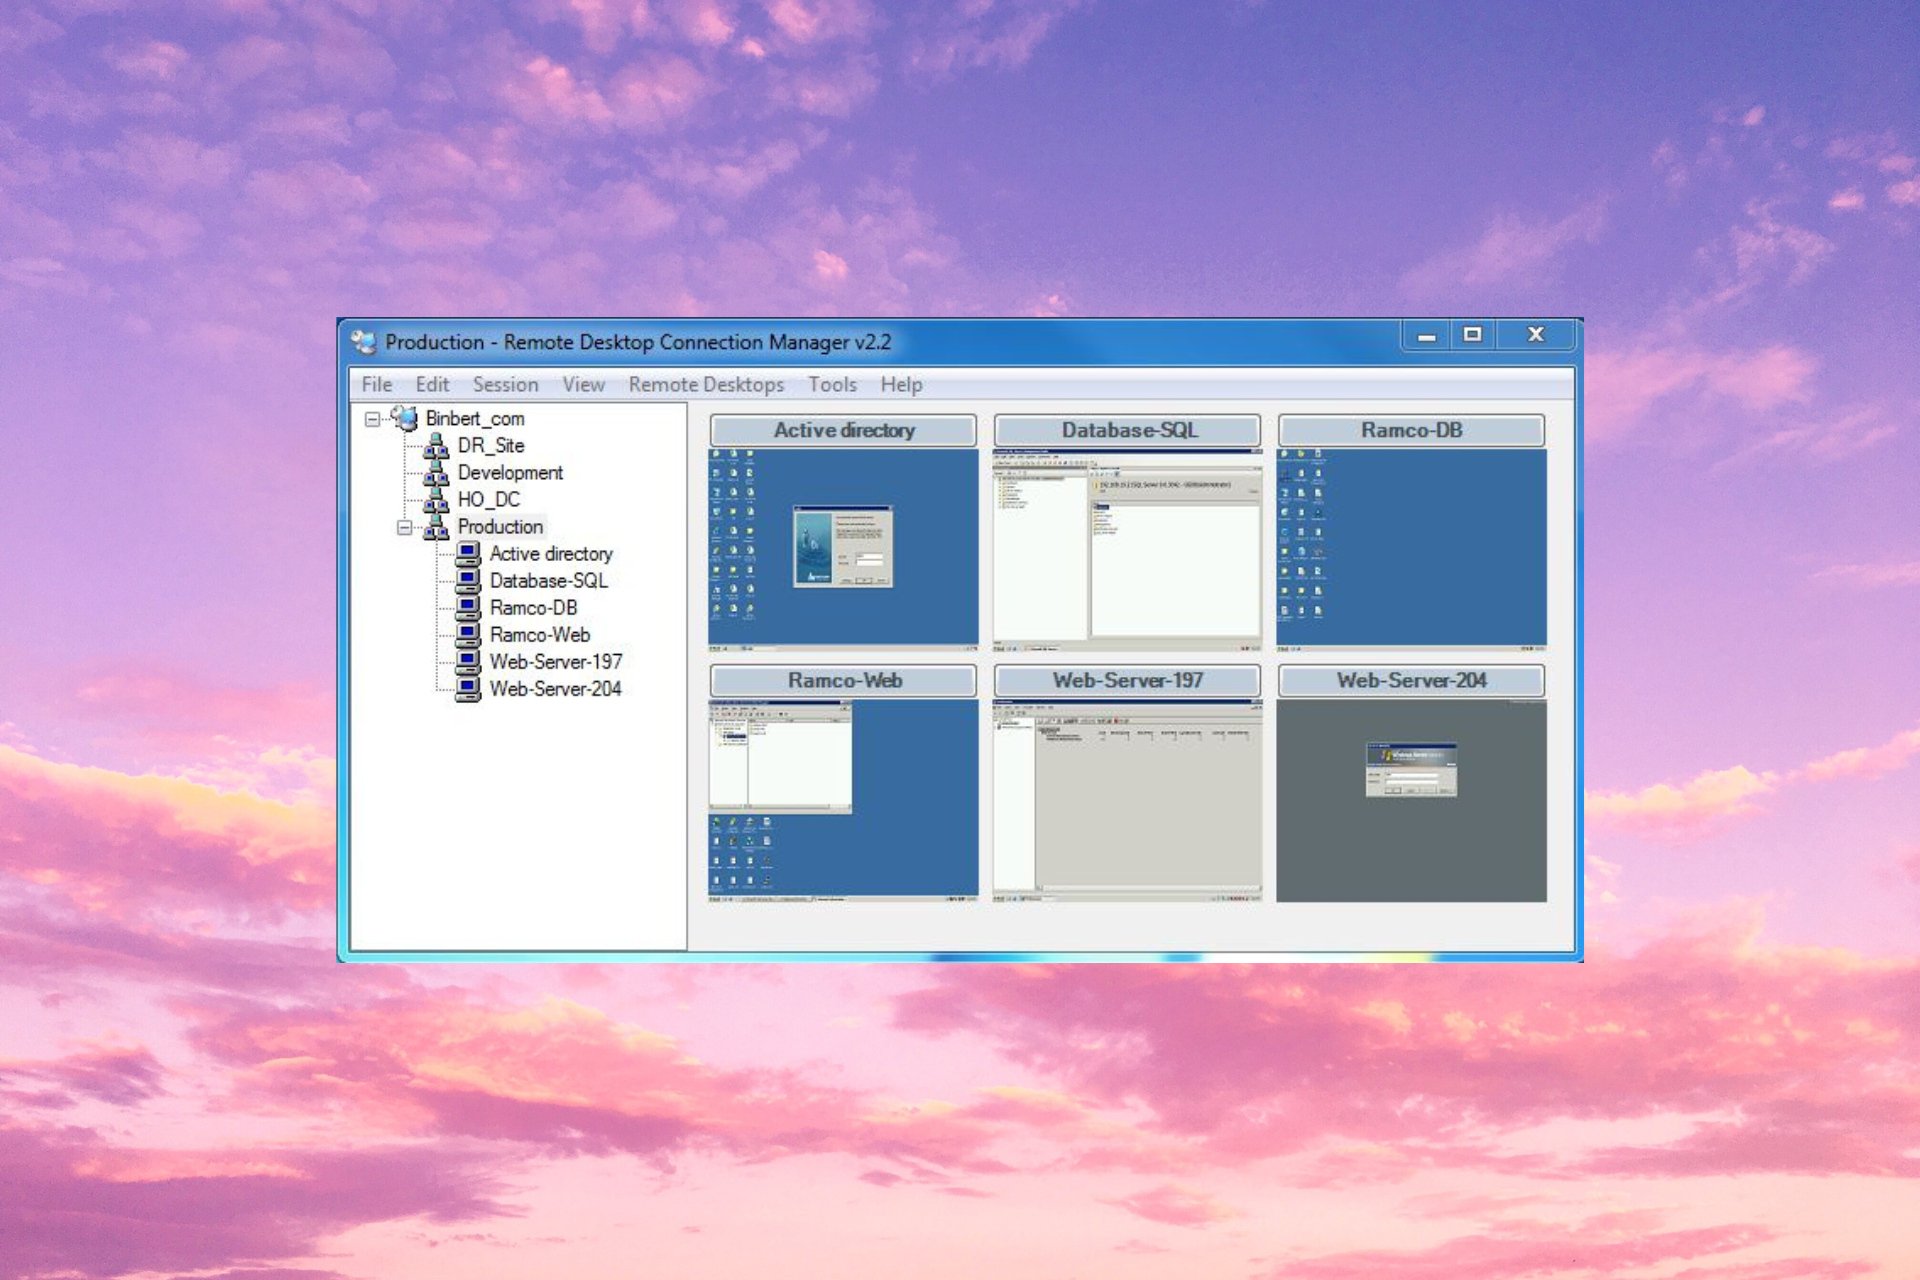
How can I have multiple remote desktop sessions in Windows 11?
1. Download and run RDP Wrapper
- Go to GitHub Stascorp and download the RDP Wrapper from the GitHub Repository.

- Open the file and unzip the RDPWrap-v1.6.2.zip file.

- Run the install.bat file.

- Go back to the RDPWrap-v1.6.2.zip file in downloads and run the RDPConf.exe (RDP Wrapper configuration utility) file.

- In the Diagnostics window, ensure that the Wrapper, Service, and Listener states are all green.
- Run the RDPCheck.exe file.
Connect multiple RDP sessions from remote computers and see how it works. However, Windows will allow users to access various RDP sessions simultaneously.
Likewise, using the RDP Wrapper to enable multiple RDP sessions allows you to do it without altering the termsrv.dll file.
- Error 0x80071129: How to Fix This OneDrive Tag Issue
- How to Remove Quick Access in Windows 11
- No Location Tab in Properties: How to Enable It
- How to Delete a Partition on Windows 11 [Quick Ways]
2. Modify Remote Desktop service (termsrv.dll)
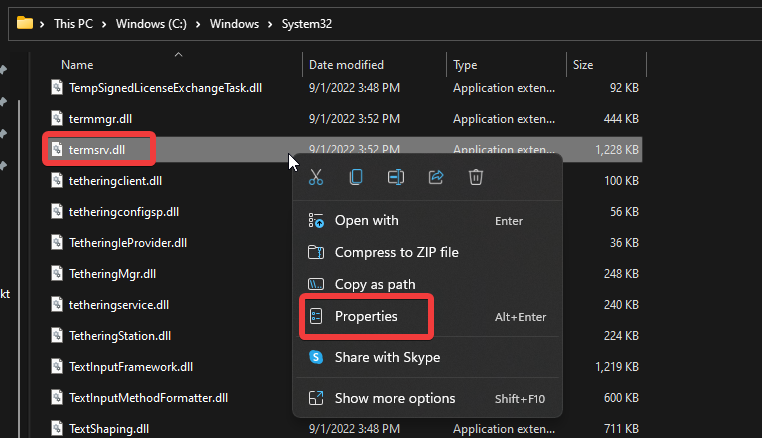
- Go to this directory:
C:WindowsSystem32 - Right-click on termsrv.dll.

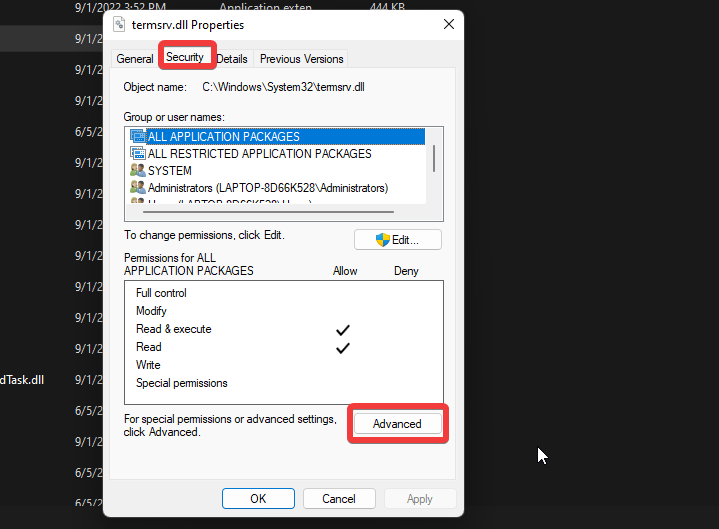
- Go to the Context menu and select Properties.
- Click on Security and select Advanced.

- Change the ownership to your username.


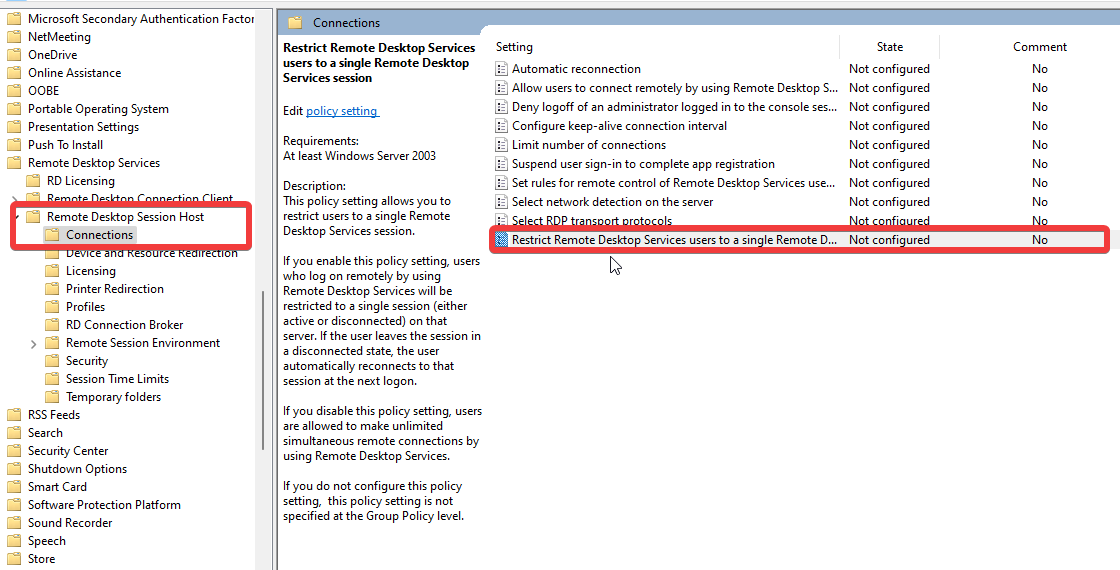
3. Modify local group policies
- Click Start and type gpedit.msc, then press Enter to prompt the Local Group Policy Editor window.
- Go to:
Computer Configuration > Administrative Templates > Windows Components > Remote Desktop Services > Remote Desktop Session Host > Connections - Disable the Restrict Remote Desktop Services user to a single Remote Desktop Services session policy option.

- Go to the Limit number of connections tab and enable it.
- Navigate to the RD Maximum Connections allowed tab and set it to 999999.
- Click OK to apply the changes.
We recommend that you restart your computer to sync the changes properly.
How do I switch between two RDP sessions?
Users can use some Remote Desktop Service shortcut keys to perform functions like switching between two RDP sessions.
However, the Alt + PAGE DOWN keys combination can help users switch between programs running on the Remote Desktop from right to left.
Likewise, ALT + PAGE UP is another shortcut users can use to switch from left to right between RDP sessions. Also, the ALT + INSERT keys combination is a way of switching between the running programs.
Moreover, users may be interested in reading more about how to enable and use Remote Desktop connection in Windows 10.
Also, we have an extensive list of the best remote control software for Windows 10/11. Do not hesitate to take a closer look.
Leave your questions and suggestions in the comments section. We’d love to get feedback from you.
Still having issues? Fix them with this tool:
SPONSORED
If the advices above haven’t solved your issue, your PC may experience deeper Windows problems. We recommend downloading this PC Repair tool (rated Great on TrustPilot.com) to easily address them. After installation, simply click the Start Scan button and then press on Repair All.
![]()
Newsletter
The following steps are for manually preparing a VM that has a Microsoft Windows 10 or Windows 11 Enterprise multi-session operating system, prior to installing the agents. You perform these steps using the Microsoft Azure portal and connecting into the new VM.
Remember: As described in the
Microsoft documentation FAQ, Microsoft Windows 10 or Windows 11 Enterprise multi-session is a Remote Desktop Session Host (RDSH) type that allows multiple concurrent interactive sessions, which previously only Microsoft Windows Server operating systems could provide. When your
Horizon Cloud tenant account configuration allows for its use, you can make use of Microsoft Windows 10 or 11 Enterprise multi-session in your
Horizon Cloud environment.
At a high-level, the steps to prepare the VM prior to actually installing the agents are:
- Set the VM’s local administrator account properties to Password never expires. By default, the created VM’s local security policy has accounts set to a maximum password age of 42 days. Preventing this local administrator account’s password from expiring prevents the possibility of not being able to use this local account at a later time. The Horizon Cloud image publishing workflow uses the VM’s local administrator account and removes the resulting sealed VM from the domain. If you allow the account’s password to expire, at a future point in time you might encounter issues when publishing the image.
- Download the Horizon Agents Installer to the VM.
Prerequisites
Complete the steps in Create the Virtual Machine Manually in Your Pod in Microsoft Azure. If you are using a base VM that you created in Microsoft Azure outside of those documented steps, ensure your base VM meets the criteria as listed in Manually Build and Import a Virtual Machine from Microsoft Azure into Horizon Cloud.
Caution: Ensure that the VM was created with
Storage — Use managed disk set to
Yes and with the correct virtual network and subnet, as described in
Manually Build and Import a Virtual Machine from Microsoft Azure into Horizon Cloud. Otherwise, this VM will be unusable in
Horizon Cloud even after you configure it and install the agent-related components, and then you will have to recreate it from scratch.
To verify the VM meets that criteria before you spend time configuring it, log in to Horizon Cloud and navigate to the Inventory VMs page to see if the VM is listed. If it is listed, then the VM meets the above criteria and you can safely proceed with further configuration.
Procedure
- Connect to the VM using your chosen method, such as RDP or a method you normally use when you connect to Windows VMs in Microsoft Azure.
In your connection method, connect using the default user name and password that you specified in the VM creation wizard. Include a backslash () in front of the user name to log in without a domain. The following screenshot is an example of using an RDP client. You might have to say yes to warnings about certificates to proceed to the remote system.

Because this is the first login to the operating system, Windows might display a Networks prompt question on the right hand side. The prompt asks about automatically finding PCs, devices, and other items on the network. If the Networks prompt is displayed, dismiss it by clicking
No. - In the VM, set the VM’s local administrator account password to Password never expires.
One way to set the local administrator account password is to open Local Users and Groups by running
lusrmgr.mscand updating the account properties.

What to do next
To install the agent-related software components, complete the steps described in the topic that applies to your pod manifest version:
- Pod manifests 1600 and higher
- Pod manifests lower than 1600
Note: If you want to be able to log in to the VM using a domain account, you can optionally join the VM to your Active Directory domain. Otherwise you use the local administrator account to log in to the VM when installing the agent software and customizing the VM.
Remote users can connect to their Windows 10 and 11 computers via the Remote Desktop Services (RDP). It is enough to enable RDP in the device settings and connect to the computer using any Remote Desktop client. But there is a restriction on the number of simultaneous RDP sessions – only one remote user can work simultaneously. If you try to open a second RDP session, a warning will appear asking you to disconnect the first user’s session.
Another user is signed in. If you continue, they’ll be disconnected. Do you want to sign in anyway?
All desktop Windows versions (including Win 10 and 11) have a number of restrictions on the Remote Desktop Service usage:
- You can remotely connect via RDP only to higher Windows editions (Professional and Enterprise). In Windows Home and Single Language editions the incoming remote desktop connections are forbidden;
- Only one simultaneous RDP connection is supported. When you try to open a second RDP session, the user is prompted to close the active connection;
- If there is a user who works on the console of the computer (locally), then when you try to create a new remote RDP connection, the console session will be disconnected. A remote RDP session will be also forcibly disconnected if the user will try to log in locally.
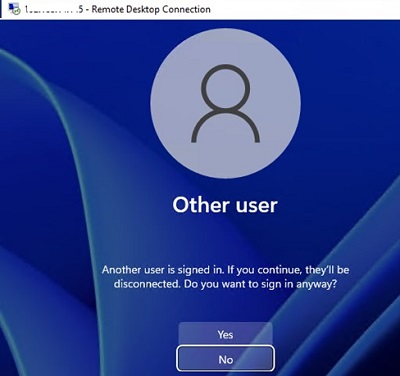
Actually, the number of simultaneous RDP connections on Windows is limited by the license (and not by any technical aspect). Thus, this restriction doesn’t allow to create a terminal RDP server based on the workstation that can be used by multiple users. Microsoft’s logic is simple: if you need a terminal server – buy a Windows Server license, RDS CALs, install and configure the Remote Desktop Session Host (RDSH) role.
Technically, any Windows version with a sufficient amount of RAM can support the simultaneous operation of several dozens of remote users. On average, 150-200 MB of RAM is required for one user session (excluding running apps). Those, the maximum number of simultaneous RDP sessions is theoretically limited only by computer resources.
Let’s consider two ways on how to allow simultaneous RDP connections on Windows 10 and 11: using the RDP Wrapper tool or patching the termsrv.dll system file.
Contents:
- RDP Wrapper: Enable Multiple RDP Sessions on Windows
- RDP Wrapper Not Working on Windows 10
- Modify the Termsrv.dll to Enable Multiple RDP Sessions
- Patching Termsrv.dll on Windows Using PowerShell
Note. System modifications described in the article are considered as a violation of the Microsoft License Agreement and you may perform them at your own risk.
RDP Wrapper: Enable Multiple RDP Sessions on Windows
The RDP Wrapper Library OpenSource project allows you to enable multiple RDP sessions on Windows 10 without replacing the termsrv.dll file. This tool works as a layer between SCM (Service Control Manager) and the Remote Desktop Services. RDPWrap allows you to enable not only support for multiple simultaneous RDP connections but also to build an RDP server on Windows Home editions. RDP Wrapper doesn’t make any changes to the termsrv.dll file, it’s just loading termsrv library with the changed parameters.
Thus, the RDPWrap will work even in the case of termsrv.dll file update. It allows you not to be afraid of Windows updates.
Important. Before installing RDP Wrapper, it is important to make that you are using the original (unpatched) version of the termsrv.dll file. Otherwise, RDP Wrapper may become unstable or not start at all.
You can download the RDP Wrapper from the GitHub repository https://github.com/binarymaster/rdpwrap/releases (the latest available version of the RDP Wrapper Library is v1.6.2). The project hasn’t been updated since 2017, but it can be used in all new builds of Windows 10 and even Windows 11.
The RDPWrap-v1.6.2.zip archive contains some files:
- RDPWinst.exe — an RDP Wrapper Library install/uninstall the program;
- RDPConf.exe — an RDP Wrapper configuration tool;
- RDPCheck.exe —an RDP check utility (Local RDP Checker);
- install.bat, uninstall.bat, update.bat — batch files to install, uninstall, and update RDP Wrapper.
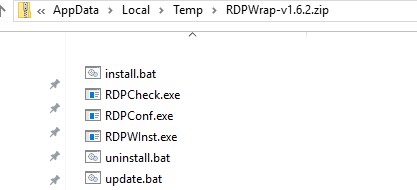
To install RDPWrap, run the install.bat file as an administrator. The program will be installed to the C:Program FilesRDP Wrapper directory.
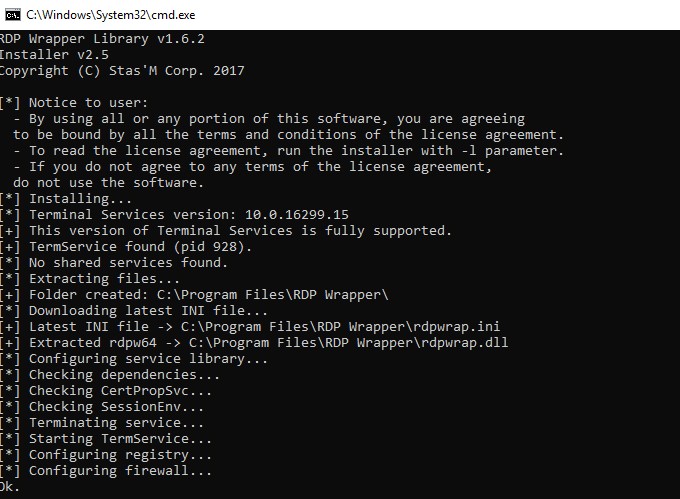
After the installation is complete, run the RDPConfig.exe. Most likely, immediately after installation, the tool will show that the RDP wrapper is running (Installed, Running, Listening), but not working. Note the red warning [not supported]. It reports that this version of Windows 10 (ver. 10.0.19041.1320) is not supported by the RDPWrapper.
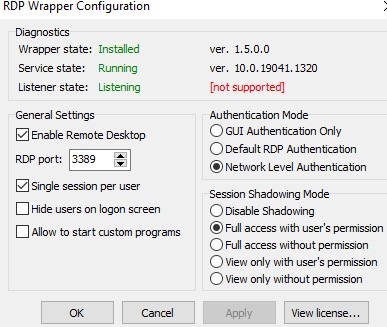
The fact is that for each version of Windows 10 there must be a description in the rdpwrap.ini configuration file. Your config file simply doesn’t have any settings for your Windows 10 build.
The current version of the rdpwrap.ini file can be downloaded here https://raw.githubusercontent.com/sebaxakerhtc/rdpwrap.ini/master/rdpwrap.ini
Manually copy the contents of this page to the “C:Program FilesRDP Wrapperrdpwrap.ini” file. Or download the file using the PowerShell cmdlet Invoke-WebRequest (you must first stop the Remote Desktop service):
Stop-Service termservice -Force

Invoke-WebRequest https://raw.githubusercontent.com/sebaxakerhtc/rdpwrap.ini/master/rdpwrap.ini -outfile "C:Program FilesRDP Wrapperrdpwrap.ini"
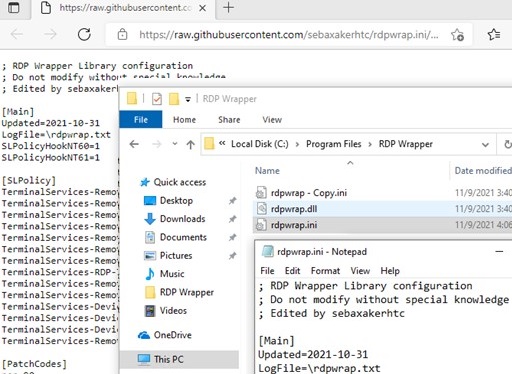
Restart your computer, run the RDPConfig.exe tool. Check that all items are green in the Diagnostics section and the caption [Fully supported] appears. The screenshot below shows that the RDP Wrapper with this new config works fine on Windows 11 as well.
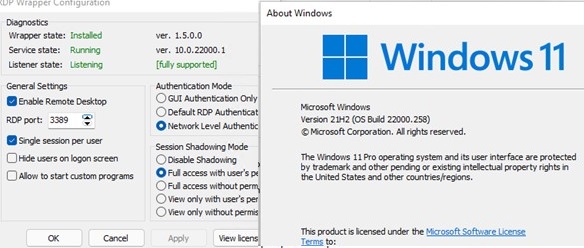
Try to establish several RDP sessions to your computer (use any RDP client: mstsc.exe, rdcman, etc.). It worked out well (you can even use saved RDP credentials)! Now your Windows 10 allows two (and more) remote users to use different RDP sessions simultaneously.

The RDPWrap tool is supported in all Windows editions, so you can build your own terminal (RDS) server on any Windows device.
Also, RDP Wrapper allows to:
- Enable Remote Desktop;
- The option Hide users on logon screen allows you to hide the list of users from the Windows Logon Screen;
- If you disable the Single session per user option, multiple simultaneous RDP sessions will be allowed under the same user account (the registry parameter fSingleSessionPerUser = 0 is set under the reg key
HKLMSYSTEM CurrentControlSetControlTerminal ServerfSingleSessionPerUser); - RDP Port — you can change the Remote Desktop port number from TCP 3389 to any other;
- In the Session Shadowing Mode section, you can configure the remote control (shadow) connection mode to RDP sessions.
RDP Wrapper Not Working on Windows 10
In some cases, the RDP Wrapper tool doesn’t work as expected and you cannot to your Windows host using multiple RDP sessions.
If the utility showed [not supported] in the status section, then the rdpwrap.ini file doesn’t contain configuration for your Windows build. Update the rdpwrap.ini file as described above.
If the RDP Wrapper doesn’t work after updating the rdpwrap.ini file, try opening the rdpwrap.ini file and looking for a description section for your Windows version. How to know if there is support for your version of Windows in the rdpwrapper config file?
The screenshot below shows that for my version of Windows 10 (10.0.19041.1320) there are two description sections:
[10.0.19041.1320]
…..

[10.0.19041.1320-SLInit]

…..
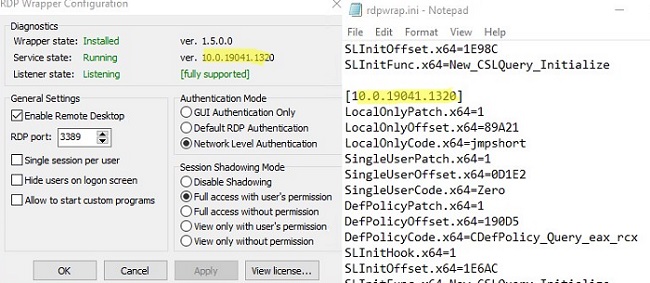
If there is no section in the config file for your version of Windows, try using Google to search for the rdpwrap.ini strings for your Windows build. Add the lines you find to the end of the file.
If after installing security updates or upgrading the Windows 10 build, RDP Wrapper doesn’t work correctly, check if the “Listener state: Not listening” is displayed in the Diagnostics section.
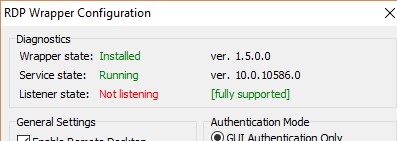
Try updating the rdpwrap.ini file, and then reinstalling the service:
rdpwinst.exe -u

rdpwinst.exe -i
It happens that when you try to establish a second RDP connection under a different user account, you see a warning:
The number of connections to this computer is limited and all connections are in use right now. Try connecting later or contact your system administrator.
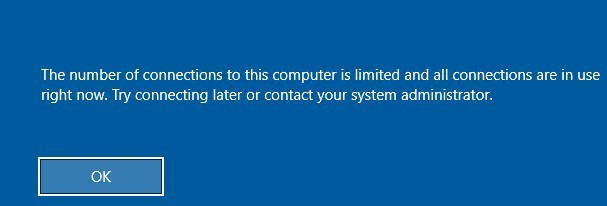
In this case, you can use the Local Group Policy Editor (gpedit.msc) to enable the policy “Limit number of connections” under Computer Configuration -> Administrative Templates -> Windows Components -> Remote Desktop Services -> Remote Desktop Session Host -> Connections section. Change its value to 999999.
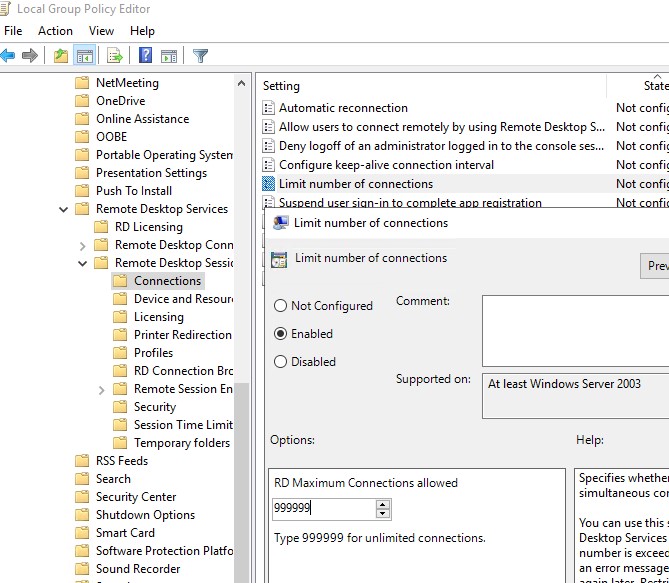
Restart your computer to update the GPO and apply the settings.
Modify the Termsrv.dll to Enable Multiple RDP Sessions
To remove the restriction on the number of concurrent RDP user connections in Windows 10 without using rdpwrapper, you can replace the original termsrv.dll file. This is the main library file used by the Remote Desktop Service. The file is located in C:WindowsSystem32 directory.
Before you edit or replace the termsrv.dll file, it is advisable to create its backup copy. This will help you to revert to the original version of the file if necessary. Open the elevated command prompt and run the command:
copy c:WindowsSystem32termsrv.dll termsrv.dll_backup
Then you need to take ownership of the file. To change the owner of a file from TrustedInstaller to the local Administrators group using the command:
takeown /F c:WindowsSystem32termsrv.dll /A
SUCCESS: The file (or folder): c:WindowsSystem32termsrv.dll now owned by the administrators group
Now grant the local administrators group Full Control permissions on the termsrv.dll file using the icacls.exe:
icacls c:WindowsSystem32termsrv.dll /grant Administrators:F
processed file: c:WindowsSystem32termsrv.dll Successfully processed 1 files; Failed processing 0 files.
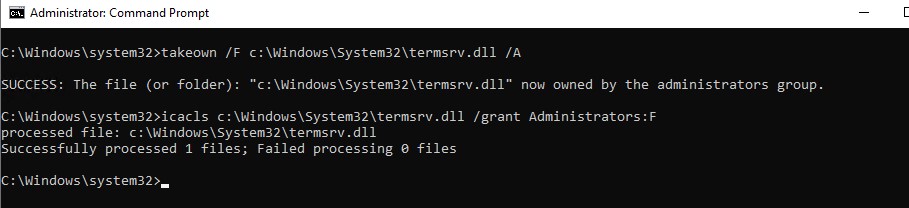
After that, stop the Remote Desktop service (TermService) using the services.msc console or from the command prompt:
Net stop TermService
The Remote Desktop Services UserMode Port Redirector service stops with it.
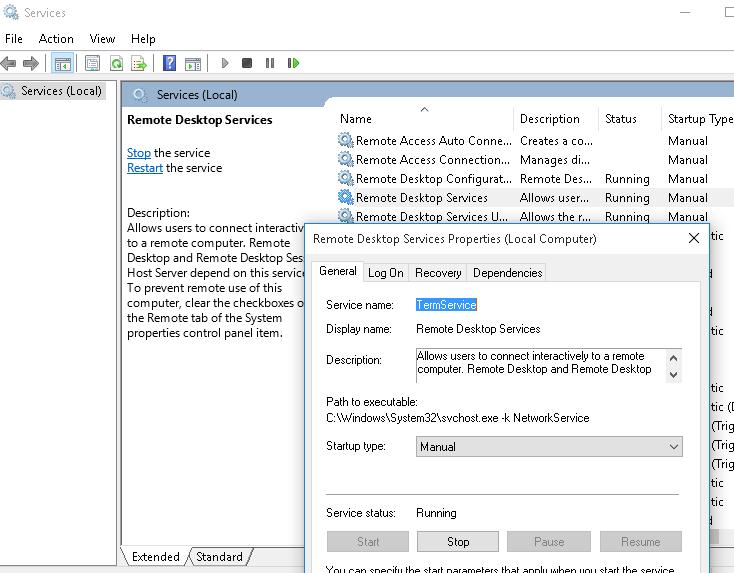
Before moving on, you need to find out your version (build number) of Windows 10. Open the PowerShell console and run the command:
Get-ComputerInfo | select WindowsProductName, WindowsVersion
In my case, Windows 10 build 21H1 is installed.
Then open the termsrv.dll file using any HEX editor (for example, Tiny Hexer). Depending on your Windows build, you need to find and replace the string according to the table below:
| Windows build | Find the string | Replace with |
| Windows 11 RTM (
21H2 – 22000.258) |
39 81 3C 06 00 00 0F 84 4F 68 01 00 |
B8 00 01 00 00 89 81 38 06 00 00 90 |
| Windows 10 x64 21H2 | 39 81 3C 06 00 00 0F 84 DB 61 01 00 | |
| Windows 10 x64 21H1 | 39 81 3C 06 00 00 0F 84 2B 5F 01 00 | |
| Windows 10 x64 20H2 | 39 81 3C 06 00 00 0F 84 21 68 01 00 | |
| Windows 10 x64 2004 | 39 81 3C 06 00 00 0F 84 D9 51 01 00 | |
| Windows 10 x64 1909 | 39 81 3C 06 00 00 0F 84 5D 61 01 00 | |
| Windows 10 x64 1903 | 39 81 3C 06 00 00 0F 84 5D 61 01 00 | |
| Windows 10 x64 1809 | 39 81 3C 06 00 00 0F 84 3B 2B 01 00 | |
| Windows 10 x64 1803 | 8B 99 3C 06 00 00 8B B9 38 06 00 00 | |
| Windows 10 x64 1709 | 39 81 3C 06 00 00 0F 84 B1 7D 02 00 |
Tiny Hexer editor cannot edit termsvr.dll file directly from system32 folder. Copy it to your desktop, and after modification replace the original file.
For example, my build of Windows 10 x64 is 21H1 (19043.1320) with the termsrv.dll file version 10.0.19041.1320. Open the termsrv.dll file in Tiny Hexer, then find the text:
39 81 3C 06 00 00 0F 84 2B 5F 01 00
and replace it with:
B8 00 01 00 00 89 81 38 06 00 00 90

Save the file and run the TermService.
If something goes wrong and you experience some problems with the Remote Desktop service, stop the service and replace the modified termsrv.dll file with the original version:
copy termsrv.dll_backup c:WindowsSystem32termsrv.dll
Patching Termsrv.dll on Windows Using PowerShell
In order not to modify the termsrv.dll file manually using a HEX editor, you can use the following PowerShell script to apply the patch automatically. This script is based on the Windows PowerShell version and doesn’t work on modern PowerShell Core. The script is universal and can be used to patch the termsrv.dll file on all editions of Windows 10 (1809+) and Windows 11.
# Stop RDP service, make a backup of the termsrv.dllfile and change the permissions

Stop-Service UmRdpService -Force

Stop-Service TermService -Force

$termsrv_dll_acl = Get-Acl c:windowssystem32termsrv.dll

Copy-Item c:windowssystem32termsrv.dll c:windowssystem32termsrv.dll.copy

takeown /f c:windowssystem32termsrv.dll

$new_termsrv_dll_owner = (Get-Acl c:windowssystem32termsrv.dll).owner

cmd /c "icacls c:windowssystem32termsrv.dll /Grant $($new_termsrv_dll_owner):F /C"

# search for a pattern in termsrv.dll file

$dll_as_bytes = Get-Content c:windowssystem32termsrv.dll -Raw -Encoding byte

$dll_as_text = $dll_as_bytes.forEach('ToString', 'X2') -join ' '

$patternregex = ([regex]'39 81 3C 06 00 00(sSS){6}')

$patch = 'B8 00 01 00 00 89 81 38 06 00 00 90'

$checkPattern=Select-String -Pattern $patternregex -InputObject $dll_as_text

If ($checkPattern -ne $null) {

$dll_as_text_replaced = $dll_as_text -replace $patternregex, $patch

}

Elseif (Select-String -Pattern $patch -InputObject $dll_as_text) {

Write-Output 'The termsrv.dll file is already patch, exitting'

Exit

}

else {

Write-Output "Pattern not found "

}

# patching termsrv.dll

[byte[]] $dll_as_bytes_replaced = -split $dll_as_text_replaced -replace '^', '0x'

Set-Content c:windowssystem32termsrv.dll.patched -Encoding Byte -Value $dll_as_bytes_replaced

# comparing two files

fc.exe /b c:windowssystem32termsrv.dll.patched c:windowssystem32termsrv.dll

# replacing the original termsrv.dll file

Copy-Item c:windowssystem32termsrv.dll.patched c:windowssystem32termsrv.dll -Force

Set-Acl c:windowssystem32termsrv.dll $termsrv_dll_acl

Start-Service UmRdpService

Start-Service TermService
The complete script code is available in my GitHub repository at https://github.com/maxbakhub/winposh/blob/main/termsrv_rdp_patch.ps1
To execute the script, download it to your computer. Change the PowerShell execution policy settings for the current session:
Set-ExecutionPolicy Bypass -Scope Process -Force
And run the script:
C:usersrootdesktoptermsrv_rdp_patch.ps1

The script can be run after installing Windows updates to immediately make changes to the termsrv.dll file (you don’t have to modify the termsrv.dll file in the HEX editor after each update installation).
The advantage of the method of enabling multiple RDP sessions in Windows 10 or 11 by replacing the termsrv.dll file is that antiviruses do not respond to it (unlike the RDPWrap, which is detected by many antiviruses as a Malware/HackTool/Trojan).
The main drawback is that you will have to manually edit the termsrv.dll file each time you upgrade the Windows 10 build (or when updating the version of the termsrv.dll file during the installation of monthly cumulative updates). And if you are using RDPWrapper, you will also need to update the rdpwrap.ini file after installing Windows updates.
In this article, we looked at how to remove the restriction on the number of simultaneous RDP user connections and run a free terminal server on desktop versions of Windows.
Время на прочтение
1 мин
Количество просмотров 619
Microsoft признала ошибку, затрагивающую некоторые приложения Windows 11 и вызывающую проблемы с их запуском. Она возникает после восстановления системы.

Компания заявила, что «после запуска восстановления системы на устройстве под управлением Windows 11 версии 22H2 некоторые приложения, использующие формат пакета MSIX для Windows, могут столкнуться с различными проблемами нестабильности, включая сбои при запуске, зависание и аварийное завершение работы». Известно, что проблема затрагивает «Блокнот», Paint, приложения Microsoft Office, Cortana и приложение Windows Terminal. Однако потенциально список может быть шире.
Приложения при запуске могут отображать сообщение об ошибке «Это приложение не может быть открыто» или не отвечать.
Ошибка затрагивает выпуски Windows 11 22H2 SE, Home, Pro, Enterprise, Enterprise Multi-Session, Education и IoT Enterprise.
Microsoft не сообщила, исследует ли она эту проблему и работает ли над её исправлением, но поделилась путём обхода ошибки.
Те, у кого возникают проблемы при попытке запуска приложений после восстановления системы, могут:
-
запустить приложение снова;
-
переустановить его из Windows Store или оригинального источника;
-
запустить Центр обновления Windows.
Ранее Microsoft устранила ложное срабатывание Microsoft Defender ASR, которое удаляло ярлыки приложений Windows с рабочего стола, из меню «Пуск» и панели задач, а в некоторых случаях делало их нерабочими.
Удаленные пользователи могут подключаться к своим компьютерам Windows 10 или 11 через службу удаленных рабочих столов (RDP). Достаточно разрешить RDP доступ и подключиться к компьютеру с помощью любого клиента. Но есть ограничение на количество одновременных RDP сессии – допускается одновременная работа только одного удаленного пользователя. Если вы попробуете открыть вторую RDP сессию, появится предупреждение с запросом отключить сеанс первого пользователя.
В систему вошел другой пользователь. Если вы продолжите, он будет отключен. Вы все равно хотите войти в систему?
В английской версии предупреждение такое:
Another user is signed in. If you continue, they’ll be disconnected. Do you want to sign in anyway?
Во всех десктопных версиях Windows (включая Win 10 и 11) есть ряд ограничений на использование службы удаленного рабочего стола
- Вы можете удаленно подключаться по RDP только к старшим редакциям Windows (Professional, Enterprise). В домашних редакциях (Home/Single Language) RDP доступ заблокирован;
- Поддерживается только одно одновременное RDP подключение. При попытке запустить вторую RDP-сессию, пользователю будет предложено завершить активное подключение;
- Если пользователь работает за консолью компьютера (локально), то при удаленном подключении по RDP, его локальный сеанс будет отключен (заблокирован). Правильно и обратное утверждение: удаленный RDP сеанс принудительно завершается, если пользователь входит через консоль Windows.
Ограничение на количество одновременных RDP подключений в Windows является не техническим, но программным и лицензионным. Таким образом Microsoft запрещает создавать терминальный RDP сервер на базе рабочей станции для одновременной работы нескольких пользователей. Логика Microsoft проста: если вам нужен терминальный сервер — купите лицензию Windows Server, лицензии RDS CAL, установите и настройте роль Remote Desktop Session Host (RDSH).
Технически любая редакция Windows при наличии достаточного количества оперативной памяти может обслуживать одновременную работу нескольких десятков удаленных пользователей. В среднем на одну RDP сессию пользователя без учета запускаемых приложений требуется 150-200 Мб памяти. Т.е. максимальное количество одновременных RDP сессий в теории ограничивается только ресурсами компьютера.
Мы рассмотрим два способа убрать ограничение на количество одновременных RDP подключений к Windows 10 и 11: с помощью приложения RDP Wrapper и с помощью модификации системного файла termsrv.dll.
Содержание:
- RDP Wrapper: разрешить несколько RDP сеансов в Windows
- Не работает RDP Wrapper в Windows 10
- Модификация файла termsrv.dll для снятия ограничений RDP в Windows 10 и 11
- Патчинг файл termsrv.dll с помощью PowerShell скрипта
Примечание. Модификации системы, описанные в этой статье, считаются нарушением лицензионного соглашения Windows, и вы можете выполнять их на свой страх и риск.
RDP Wrapper: разрешить несколько RDP сеансов в Windows
OpenSource проект RDP Wrapper Library позволяет включить конкурентные RDP сессии в Windows 10 без замены системного файла termsrv.dll. Эта программа работает в качестве прослойки между менеджером управления службами (SCM — Service Control Manager) и службой терминалов (Remote Desktop Services). RDPWrap позволяет включить не только поддержку нескольких одновременных RDP сессии, но и реализовать RDP сервер на домашних редакциях Windows 10. RDP Wrapper не вносит никаких изменений в файл termsrv.dll, просто подгружая termsrv с изменёнными параметрами.
Таким образом, RDPWrap будет работать даже при обновлении версии файла termsrv.dll, что позволяет не опасаться обновлений Windows.
Важно. Перед установкой RDP Wrapper важно убедится, чтобы у вас использовалась оригинальная (непропатченная) версия файл termsrv.dll. Иначе RDP Wrapper может работать не стабильно, или вообще не запускаться.
Вы можете скачать RDP Wrapper из репозитория GitHub: https://github.com/binarymaster/rdpwrap/releases (последняя доступная версия RDP Wrapper Library v1.6.2). Утилита не развивается с 2017 года, но ее можно использовать на всех билдах Windows 10 и даже в Windows 11.
Архив RDPWrap-v1.6.2.zip содержит несколько файлов:
- RDPWinst.exe —программа установки/удаления RDP Wrapper Library;
- RDPConf.exe — утилита настройки RDP Wrapper;
- RDPCheck.exe — Local RDP Checker — утилита для проверки RDP доступа;
- install.bat, uninstall.bat, update.bat — пакетные файлы для установки, удаления и обновления RDP Wrapper.
Чтобы установить RDPWrap, запустите файл
install.bat
с правами администратора.
После окончания установки запустите RDPConfig.exe. Проверьте, что в секции Diagnostics все элементы окрашены в зеленый цвет.
После окончания установки запустите RDPConfig.exe. Скорее всего сразу после установки утилита покажет, что RDP wrapper запущен (Installed, Running, Listening), но не работает. Обратите внимание на красную надпись. Она сообщает, что данная версий Windows 10 (ver. 10.0.19041.1320) не поддерживается ([not supported]).
Дело в том, что под каждую версию Windows 10 должно быть описание в конфигурационном файле rdpwrap.ini. В вашем файле конфигурации просто нет настроек для вашего билда Windows 10.
Актуальную версию файла rdpwrap.ini можно скачать здесь https://raw.githubusercontent.com/sebaxakerhtc/rdpwrap.ini/master/rdpwrap.ini
Вручную скопируйте содержимое данной страницы в файл «C:Program FilesRDP Wrapperrdpwrap.ini». Или скачайте файл с помощью PowerShell командлета Invoke-WebRequest (предварительно нужно остановить службу Remote Desktop):
Stop-Service termservice -Force
Invoke-WebRequest https://raw.githubusercontent.com/sebaxakerhtc/rdpwrap.ini/master/rdpwrap.ini -outfile "C:Program FilesRDP Wrapperrdpwrap.ini"
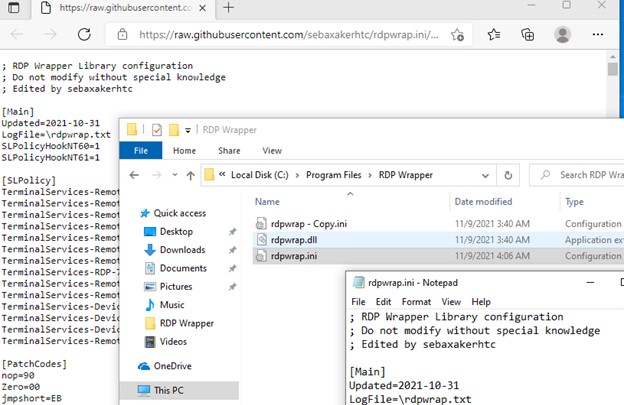
Перезагрузите компьютер, запустите утилиту RDPConfig.exe. Проверьте, что в секции Diagnostics все элементы окрашены в зеленый цвет, и появилось сообщение [Fully supported]. На скриншоте ниже показано, что RDP Wrapper с данным конфигом прекрасно работает и в Windows 11.

Осталось перезагрузить компьютер. Попробуйте подключиться к своим компьютерам несколькими RDP сессиями (воспользуйтесь любым RDP клиентом: mstsc.exe, rdcman и т.д.). Все получилось (можно даже использовать сохранённые RDP пароли)! Теперь ваша Windows 10 позволяет одновременно подключаться по RDP сразу двум (и более) удаленным пользователям.
Утилита RDPWrap поддерживается во редакциях Windows, таким образом из любой клиентской версии Windows можно сделать сервер терминалов.
Также из интересных возможностей RDP Wrapper можно выделить:
- Enable Remote Desktop — включить RDP доступ
- Опция Hide users onlogon screen позволяет скрыть список пользователей на экране приветствия;
- При отключении опции Single sessionper user — будут разрешены несколько одновременных RDP сессий под одной учетной записью (устанавливается параметр реестра fSingleSessionPerUser = 0 в ветке HKLMSYSTEM CurrentControlSetControlTerminal ServerfSingleSessionPerUser).
- RDP Port — можно изменить номера порта удаленного рабочего стола со стандартного TCP 3389 на любой другой;
- В секции Session Shadowing Mode вы можете настроить режим теневого подключения к рабочему столу пользователей Windows 10.
Не работает RDP Wrapper в Windows 10
В некоторых случая утилита RDP Wrapper не работает как ожидается, и вы не можете использовать несколько RDP подключений.
Если утилита в окне статуса показывала [not supported], значит в файле rdpwrap.ini отсутствует конфигурация для вашей версии Windows. Обновите файл rdpwrap.ini как описано выше.
Если RDP Wrapper не работает после обновления файла rdpwrap.ini, попробуйте открыть файл rdpwrap.ini и найти в нем описание для вашей версии Windows. Как понять, есть ли поддержка вашей версии Windows в конфиг фафле rdpwrapper?
На скриншоте ниже показано, что для моей версии Windows 10 (10.0.19041.1320) есть две секции с описаниями:
[10.0.19041.1320]
…..

[10.0.19041.1320-SLInit]

…..
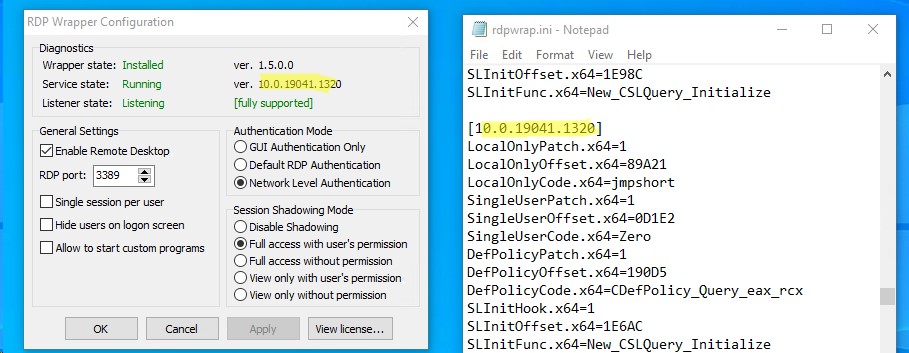
Если для вашей версии Windows нет секции в конфигурационном файле, попробуйте поискать в сети строки rdpwrap.ini для вашего билда. Добавьте найденные строки в самый конец файл.
Также при проблемах с RDPWrap вы можете открыть ветку в https://github.com/stascorp/rdpwrap/issues. Здесь же можно найти актуальные файлы rdpwrap.ini до момента обновления в официальном репозитории.
Если после установки обновлений безопасности или после апгрейда билда Windows 10, RDP Wrapper не работает, проверьте, возможно в секции Diagnostics присутствует надпись Listener state: Not listening.
Попробуйте обновить ini файл, и затем переустановить службу:
rdpwinst.exe -u
rdpwinst.exe -i
Бывает, что при попытке второго RDP подключения под другим пользователем у вас появляется надпись:
Число разрешенных подключений к этому компьютеру ограничено и все подключений уже используются. Попробуйте подключиться позже или обратитесь к системному администратору.
The number of connections to this computer is limited and all connections are in use right now. Try connecting later or contact your system administrator.
В этом случае нужно с помощью редактора групповых политики gpedit.msc в секции Конфигурация компьютера –> Административные шаблоны -> Компоненты Windows -> Службы удаленных рабочих столов -> Узел сеансов удаленных рабочих столов -> Подключения включить политику “Ограничить количество подключений” и изменить ее значение на 999999 (Computer Configuration -> Administrative Templates -> Windows Components ->Remote Desktop Services ->Remote Desktop Session Host -> Connections-> Limit number of connections).
Перезагрузите компьютер для обновления GPO и применения настроек .
Модификация файла termsrv.dll для снятия ограничений RDP в Windows 10 и 11
Чтобы убрать ограничение на количество RDP подключений пользователей в Windows 10 без использования rdpwraper, можно заменить файл termsrv.dll. Это файл библиотеки, которая используется службой Remote Desktop Services. Файл находится в каталоге C:WindowsSystem32.
Прежде, чем править или заменять файл termsrv.dll желательно создать его резервную копию. Это поможет вам в случае необходимости можно будет вернуться к исходной версии файла. Запустите командную строку с правами администратора и выполните команду:
copy c:WindowsSystem32termsrv.dll termsrv.dll_backup
Затем нужно стать владельцем файла. Проще всего это сделать из командной строки. Чтобы сменить владельца файла с TrustedInstaller на группу локальных администраторов с помощью команды:
takeown /F c:WindowsSystem32termsrv.dll /A
Должно появится сообщение: «SUCCESS: The file (or folder): «c:WindowsSystem32termsrv.dll» now owned by the administrators group».
Теперь с помощью icacls.exe предоставьте группе локальных администраторов полные права на файл termsrv.dll (Full Control):
icacls c:WindowsSystem32termsrv.dll /grant Administrators:F
(или
Администраторы
в русской версии Windows). Должно появится сообщение: «processed file: c:WindowsSystem32termsrv.dll Successfully processed 1 files; Failed processing 0 files«.
Теперь нужно остановить службу Remote Desktop Service (TermService) из консоли services.msc или из командной строки:
Net stop TermService
Вместе с ней останавливается служба Remote Desktop Services UserMode Port Redirector.
Прежде чем идти дальше, вам нужно узнать вашу версию (билд) Windows 10. Проще всего это сделать с помощью следующей команды PowerShell:
Get-ComputerInfo | select WindowsProductName, WindowsVersion
В моем случае установлена Windows 10 билд 21H1.
Затем откройте файл termsrv.dll с помощью любого HEX редактора (к примеру, Tiny Hexer). В зависимости от билда нужно найти и заменить строку:
| Версия Windows | Найти строку | Заменить на |
| Windows 11 RTM ( 21H2 22000.258) | 39 81 3C 06 00 00 0F 84 4F 68 01 00 |
B8 00 01 00 00 89 81 38 06 00 00 90 |
| Windows 10 x64 21H2 | 39 81 3C 06 00 00 0F 84 DB 61 01 00 | |
| Windows 10 x64 21H1 | 39 81 3C 06 00 00 0F 84 2B 5F 01 00 | |
| Windows 10 x64 20H2 | 39 81 3C 06 00 00 0F 84 21 68 01 00 | |
| Windows 10 x64 2004 | 39 81 3C 06 00 00 0F 84 D9 51 01 00 | |
| Windows 10 x64 1909 | 39 81 3C 06 00 00 0F 84 5D 61 01 00 | |
| Windows 10 x64 1903 | 39 81 3C 06 00 00 0F 84 5D 61 01 00 | |
| Windows 10 x64 1809 | 39 81 3C 06 00 00 0F 84 3B 2B 01 00 | |
| Windows 10 x64 1803 | 8B 99 3C 06 00 00 8B B9 38 06 00 00 | |
| Windows 10 x64 1709 | 39 81 3C 06 00 00 0F 84 B1 7D 02 00 |
Редактор Tiny Hexer не может редактировать файл termsvr.dll напрямую из папки system32. Скопируйте его на рабочий стол, а после модификации замените исходный файл.
Например, для самой редакции Windows 10 x64 21H1 19043.1320 (версия файла termsrv.dll — 10.0.19041.1320) нужно открыть файл termsrv.dll в Tiny Hexer. Затем найдите строку:
39 81 3C 06 00 00 0F 84 2B 5F 01 00
И замените ее на:
B8 00 01 00 00 89 81 38 06 00 00 90
Сохраните файл и запустите службу TermService.
Если что-то пошло не так, и у вас возникнут проблемы со службой RDP, остановите службу и замените модифицированный файл termsrv.dll исходной версией:
copy termsrv.dll_backup c:WindowsSystem32termsrv.dll
Патчинг файл termsrv.dll с помощью PowerShell скрипта
Чтобы не редактировать файл termsrv.dll вручную с помощью HEX редактора, вы можете использовать следующий PowerShell скрипт для автоматического патчинга файла. Данный скрипт написан для версии Windows PowerShell, и не работает на PowerShell Core. Скрипт универсальный и может использоваться для внесения изменений в файл termsrv.dll на всех версиях Windows 10 и Windows 11.
# Остановить службу, сделать копию файл и изменить разрешения
Stop-Service UmRdpService -Force
Stop-Service TermService -Force
$termsrv_dll_acl = Get-Acl c:windowssystem32termsrv.dll
Copy-Item c:windowssystem32termsrv.dll c:windowssystem32termsrv.dll.copy
takeown /f c:windowssystem32termsrv.dll
$new_termsrv_dll_owner = (Get-Acl c:windowssystem32termsrv.dll).owner
cmd /c "icacls c:windowssystem32termsrv.dll /Grant $($new_termsrv_dll_owner):F /C"
# поиск шаблона в файле termsrv.dll
$dll_as_bytes = Get-Content c:windowssystem32termsrv.dll -Raw -Encoding byte
$dll_as_text = $dll_as_bytes.forEach('ToString', 'X2') -join ' '
$patternregex = ([regex]'39 81 3C 06 00 00(sSS){6}')
$patch = 'B8 00 01 00 00 89 81 38 06 00 00 90'
$checkPattern=Select-String -Pattern $patternregex -InputObject $dll_as_text
If ($checkPattern -ne $null) {
$dll_as_text_replaced = $dll_as_text -replace $patternregex, $patch
}
Elseif (Select-String -Pattern $patch -InputObject $dll_as_text) {
Write-Output 'The termsrv.dll file is already patch, exiting'
Exit
}
else {
Write-Output "Pattern not found"
}
# модификация файла termsrv.dll
[byte[]] $dll_as_bytes_replaced = -split $dll_as_text_replaced -replace '^', '0x'
Set-Content c:windowssystem32termsrv.dll.patched -Encoding Byte -Value $dll_as_bytes_replaced
# Сравним два файла
fc.exe /b c:windowssystem32termsrv.dll.patched c:windowssystem32termsrv.dll
# замена оригинального файла
Copy-Item c:windowssystem32termsrv.dll.patched c:windowssystem32termsrv.dll -Force
Set-Acl c:windowssystem32termsrv.dll $termsrv_dll_acl
Start-Service UmRdpService
Start-Service TermService
Полный код скрипта доступен в моем GitHub репозитарии по ссылке https://github.com/winadm/posh/blob/master/Desktop/RDP_patch.ps1
Чтобы выполнить скрипт, скачайте его на свой компьютер. Измените настройки политики запуска скриптов PowerShell:
Set-ExecutionPolicy Bypass -Scope Process -Force
Запустите скрипт:
C:usersrootdesktoprdp_patch.ps1
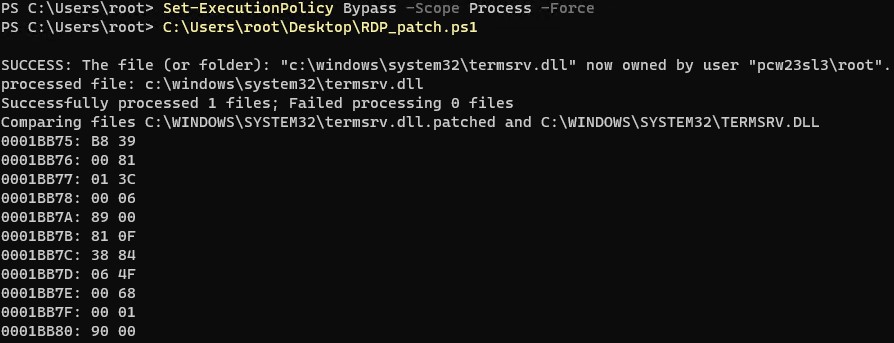
Скрипт можно запускать после установки обновлений Windows, чтобы немедленно внести изменения в файл termsrv.dll (защищает вас от ручной правки файла после каждой установки обновлений). Скрипт подходит для всех версий Windows 10 старше 1809 и для Windows 11.
Преимущество способа включения нескольких RDP сессий в Windows 10 путем замены файла termsrv.dll в том, что на него не реагируют антивирусы. В отличии от утилиты RDPWrap, которую многие антивирусов считают Malware/HackTool/Trojan. Основной недостаток — вам придется вручную править файл при каждом обновлении билда Windows 10 (или при обновлении версии файла termsrv.dll в рамках ежемесячных кумулятивных обновлений). А если вы используете RDPWrapper, то после установки обновлений Windows вам придётся обновлять файл rdpwrap.ini.
В этой статье вы рассмотрели, как снять ограничение на количество одновременных RDP подключений пользователей, и запустить бесплатный терминального сервера на клиентской Windows 10 или 11.
-

Stop hovering to collapse…
Click to collapse…
Hover to expand…
Click to expand…
-
Staff Member
-
1. It’s been working since 2019 up until the past month or so on KMS, 2. How to do HWID activation on a virtual machine?
Stop hovering to collapse…
Click to collapse…
Hover to expand…
Click to expand…
-
Get a genuine copy of MAS (check my signature) and run the AIO cmd and select HWID.
Stop hovering to collapse…
Click to collapse…
Hover to expand…
Click to expand…
-
Thanks, did that, successful, but it still shows unactivated in the settings app.
Stop hovering to collapse…
Click to collapse…
Hover to expand…
Click to expand…
-
Stop hovering to collapse…
Click to collapse…
Hover to expand…
Click to expand…
-
-
-
-
First as I suggested many times, use Azure HCI, instead of rdsh.
Its a way better SKU practically on everything.
Second, looks like MS updated their RDSH certs, just replace them with original ones and activation will be OK
-
Thank you!
Are certificates fixed only in 22H2 or in 21H2 too? When I clean installed 22H2, I found that ServerRdsh activated without issue with the original SKUs. -
-
I have no idea, I just tested the ones on Win10 (which suffers the same loss of activation, after being updated
-
Stop hovering to collapse…
Click to collapse…
Hover to expand…
Click to expand…
-
Latest updates have blocked the activation on 22621 and on 19044 as well.
Stop hovering to collapse…
Click to collapse…
Hover to expand…
Click to expand…
-
Depends on your definition of fine.
Mine is offline permanent activation, w/o any kms emulator/massgravel/whatever
-
when its activated, how many connections will it allow ?
Also is there a tutorial how to do Azure Stack HCI ? -
-
thank you sir. i’ll give it a try and report back
-
#1 Go to the uupdump website and create the download stipt for W11 Professional, no additional images, no updates, whatever)
#2 download the script and edit convertconfig.ini
[Store_Apps]
SkipApps = 1#3 Create the image (you can skip the ISO creation), deploy the image with dism/imagex or (better for newbies winntsetup.exe), in a vhdx(*)
You can use a real partition but a vhdx is way more practical and flexible.#4 until the vhdx is still mounted change the edition to ServerRDSH (using dism /set-edition)
#5 unmount the vhdx and boot it in Hyper-V, you will get the old school OOBE, set keyboard/location and whatever to your liking, after that the system will reboot and will go straight to the desktop (user administrator, no password)
That is.
Create a new user (with admin rights!!!) using lusrmgr.msc, create a password for administrator, and possibly disable the the administrator user after logging in with the new user.
No appx will be downloaded!!!, your Win 11 will be as clean as a Server or LTSC with zero hassle and a huge amount of spared time).
If you need to, you can now switch the edition back to Pro (or Enterprise or whatever you like) using
slmgr /ipk <serial-of-the-SKU-you-need>
Depending on what you need to do leave it as a Hyper-V machine, or add it to your bootloader to boot it natively.
(*) If you want to boot the vhdx natively is better that you set
HKEY_LOCAL_MACHINE\SYSTEM\CurrentControlSet\Services\FsDepends\Parameters\VirtualDiskExpandOnMount to 4
before the first boot, otherwise your vhd will be expanded to its maximum size on boot
P.S. to be clear this works on any machine, no matter if the requirements are met or not


