Для установки Windows 11 требуется процессор с поддержкой TPM 2.0 и совместимая материнская плата, но в настоящее время она не полностью доступна на компьютерах Mac. Но — есть обходные пути.
В четверг Microsoft анонсировала Windows 11 с совершенно новым пользовательским интерфейсом и улучшенными функциями многозадачности. Одно требование — необходимость поддержки TPM 2.0 — может помешать компьютерам Mac когда-либо официально запускать ОС.
Некоторые компьютеры Mac поддерживают TPM 2.0 в процессоре, но в настоящее время ни один из них не поддерживает его на материнской плате. Это может быть невозможно в программном обеспечении, но для того, чтобы Intel Mac официально запускал Windows 11, Apple придется обновить Mac для этой совместимости, или Microsoft придется удалить это требование.
Короче говоря, на данный момент нет официальной поддержки для запуска Windows 11 на Mac.
Прежде чем пользователи попытаются установить Windows 11, сначала проверьте совместимость. Независимо от используемых обходных путей, для запуска операционной системы должны быть соблюдены минимальные требования.
Системные требования для Windows 11:
«Современный 64-разрядный процессор» в соответствии с тактовой частотой Microsoft 1 ГГц 2 ядра 64 ГБ памяти 4 ГБ RAMUEFI, поддержка Secure Book и 2,09-дюймовый дисплей TPM с разрешением 1366×768 Графика, совместимая с DirectX 12 / WDDM 2.x
Требование Microsoft TPM 2.0 и другие требования ограничивают поддержку процессоров теми, которые были поставлены примерно за последние шесть лет. Линейка Mac от Apple соответствует большинству этих спецификаций в своей конфигурации по умолчанию, появившейся несколько лет назад, но ограничение TPM 2.0 затрудняет определение совместимости.
Следующие Mac являются первыми моделями с TPM 2.0 в ЦП.
MacBook (Retina, 12 дюймов, 2017 г.) MacBook Air (13 дюймов, 2017 г.) MacBook Pro (15 дюймов, 2016 г.) MacBook Pro (13 дюймов, 2016 г., четыре порта Thunderbolt 3) MacBook Pro (13 дюймов, 2016 г.) , Два порта Thunderbolt 3) Mac mini (2018) iMac Pro (2017) iMac (Retina 5K, 27 дюймов, 2017) iMac (Retina 4K, 21,5 дюйма, 2017) iMac (21,5 дюйма, 2017) Mac Pro (2019 )
Любой Mac в линейке, выпущенный до упомянутых моделей, никогда официально не будет поддерживать Windows 11. Любой Mac, выпущенный после этих моделей, все еще работающий на процессорах Intel, будет иметь необходимые требования для запуска операционной системы, но официальная поддержка не предоставляется, и мы этого не ожидаем.
Но, используя обходной путь, пользователи могут обойти требование TPM 2.0. Это означает, что с помощью обходного пути Windows 11 будет работать на любом Mac, поддерживающем Windows 10, который соответствует другим минимальным требованиям.
Как установить Windows 11 на Mac с пользовательским файлом ISO

Создайте собственный ISO-файл для установки Windows 11 на Mac
Что вам нужно
Mac, отвечающий минимальным системным требованиям для Windows 11 Windows 10 ISO Windows 11 ISO Любое приложение для создания файлов ISO.
Обратите внимание, что Mac должен соответствовать минимальным системным требованиям для запуска Windows 11, таким как 64 ГБ памяти и двухъядерный процессор. Однако обходной путь обходит требование TPM 2.0, поэтому его можно игнорировать.
Как создать собственный файл ISO, чтобы обойти требование Windows 11 TPM 2.0
Откройте ISO-файл Windows 10 с помощью DiskImageMounter Скопируйте содержимое ISO-файла в новую папку на рабочем столе Отключите ISO-файл Windows 10 Откройте ISO-файл Windows 11 с помощью DiskImageMounter Откройте папку «sources» Скопируйте «Install.wim» на рабочий стол Отключите ISO-файл Windows 10 Редактировать расширение файла «Install.wim» с помощью «Получить информацию» в меню, вызываемом правой кнопкой мыши. Выберите «Имя и расширение» и переименуйте файл в «Install.esd». Откройте новую папку, содержащую содержимое ISO-образа Windows 10 из более ранней версии. Откройте папку «Источники» Удалить файл «Install.esd», расположенный там. Переместите новый файл «Install.esd», который вы изменили, в «исходную» папку. Используйте приложение для создания файлов ISO, чтобы преобразовать папку в файл ISO.
Установите Windows 11 из пользовательского ISO-файла в Boot Camp
Откройте Boot Camp. Выберите пользовательский ISO-файл для «ISO-образа». Нажмите «Установить».
Установщик Windows 11 должен запускаться через Boot Camp отсюда. Следуйте инструкциям на экране, чтобы запустить Windows 11.
Установщик Windows 11 Boot Camp будет открыт при первой загрузке операционной системы. Следуйте инструкциям, чтобы установить драйверы совместимости и завершить установку.
Whether you have a shiny new Apple Silicon Mac with the coveted ‘M’ chip inside, or a trusty old and faithful Intel Mac, it is now possible to run Windows 11 right from your macOS desktop using an awesome free tool called UTM.
UTM is a free and open source app that can be used to create virtual machines on Mac, available for both Apple Silicon and Intel machines.
In this article you will learn how to create a virtual machine using UTM and install Windows 11 as the guest operating system (OS).
Table Of Contents
- Is it Possible to Run Windows For Free on macOS?
- Prerequisite
- How to Download the Windows Installation Disk Image
- Download Window 11 for Intel Mac
- Download Windows 11 for Apple Silicon Mac
- How to Create a New UTM Virtual Machine to Run Windows 11
- Create a New Virtual Machine in UTM
- Creating a virtualized VM for Windows 11
- Choose an operating system
- Choose the boot image
- Choosing the hardware settings
- Choosing the disk size
- Choosing a shared location
- Finalizing and starting the VM
- How to Install Windows 11 on a UTM Virtual Machine
- Disable Windows 11 TPM and CPU Checking
- Install Windows 11
- How to Install the SPICE Guest Tools in Windows 11 on a UTM Virtual Machine
- Conclusion
Is it Possible to Run Windows For Free on macOS?
Yes, the process of running Windows on macOS is free, so long as you have a licence for the copy of Windows that you are running.
With that said, Microsoft don’t actually prevent you from installing and running Windows 11 on your Mac, even if you don’t enter a licence during the installation.
Windows will boot to the desktop and will periodically remind you to add a licence, which you can do at your convenience.
Disclaimer: you are responsible for ensuring that you run Windows 11 with the correct licence. This article is provided for educational purposes only and I do not accept any responsibility for any copyright related infringement caused from running Windows 11 using this method.
With that out of the way, let’s begin!
Prerequisite
In order to complete this tutorial, you will first need to download and install the latest version of UTM. You can download UTM for free from GitHub.
You can also download UTM from the official Apple App store for a small fee, if you wish to support the project.
- Scroll to the bottom of the latest release page and download the UTM.dmg file.
- Double click the UTM.dmg file to mount it and then drag the UTM app to your applications directly.
- Launch UTM by double clicking the icon in your applications directory.
You will also need the Windows 11 installation disk image, which can be downloaded for free from Microsoft. You will need to download the correct disk image for your machine, depending on whether you have an Apple Silicon or an Intel Mac.
How to Download the Windows Installation Disk Image
If you are unsure whether your Mac is an Intel or Apple Silicon machine, you can check by clicking the Apple logo in the top left-hand corner of the screen and then click About This Mac.
In the dialog box that opens, check the chip version of your machine. Once you have established the architecture of your machine, use either of the following to download the correct version of Windows 11:
- Apple ‘M’ type processor – your Mac is an Apple Silicon machine (ARM architecture)
- Intel type processor – your Mac is an Intel machine (x86_64 architecture)
Download Window 11 for Intel Mac
Downloading the Windows 11 installation disk image for Intel machines is straightforward:
- Goto the Windows 11 download page on the official Microsoft site
- Scroll down to the Download Windows 11 Disk Image (ISO) for x64 devices section of the page.
- Choose Windows 11 (multi-edition ISO for x64 devices).
- Click Download Now.
Download Windows 11 for Apple Silicon Mac
If you have an Apple Silicon process then you will need the version of Windows that is compatible with ARM processors.
At the time of writing this version is not available from the main download page, although you may want to check first in case this has changed since the article was published.
Windows 11 for ARM is officially only available to developers, however there is a way that you can download it without a Developer account. First we need to install some prerequisites:
- Open the Terminal app located in the applications/utilities folder (or use Spotlight search).
- Enter the following command to install Homebrew:
/bin/bash -c "$(curl -fsSL https://raw.githubusercontent.com/Homebrew/install/HEAD/install.sh)"
- Once the installation script has completed, enter the following command:
brew tap sidneys/homebrew && brew install cabextract wimlib cdrtools sidneys/homebrew/chntpw
Once you have finished installing the prerequisites you can close the terminal window. Next, complete the following steps to download Windows 11 for ARM:
- Head over to the website https://uupdump.net/
- Under Quick Options, locate the Latest Public Release Build and then click the arm64 option.
- Click the Windows 11 link in the search results.
- Choose your desired language and then click Next.
- Under Edition, check the edition that you wish to download, either Windows Home or Windows Pro, and then click Next.
- Ensure that the Download and convert to ISO option is selected.
- Click Create download package to download the installation script
.zipfile. - If the downloaded
.zipfile does not automatically extract, double-click it to extract the files. You should see a folder with the same name. - Right-click the newly created folder and click New Terminal at Folder.
- A terminal window will open, enter the following command and enter your user account password if prompted:
chmod +x uup_download_macos.sh && sudo ./uup_download_macos.sh
Upon execution of this command the terminal should download the Windows 11 .iso disk image and save it into the folder created in step 8. This is the file that you will need during the next stage.
If you encounter any problems, open the readme.unix.md file using TextEdit, located in the folder created in step 8 and complete the instructions listed under macOS. Once done, repeat steps 9 and 10.
How to Create a New UTM Virtual Machine to Run Windows 11
In this section you will learn how to create a new virtual machine in UTM that can run Windows 11.
Before beginning you should make sure that you have the Windows 11 installation disk image .iso file saved somewhere on your Mac. If you don’t it yet, complete the previous steps in in the guide.
Create a New Virtual Machine in UTM
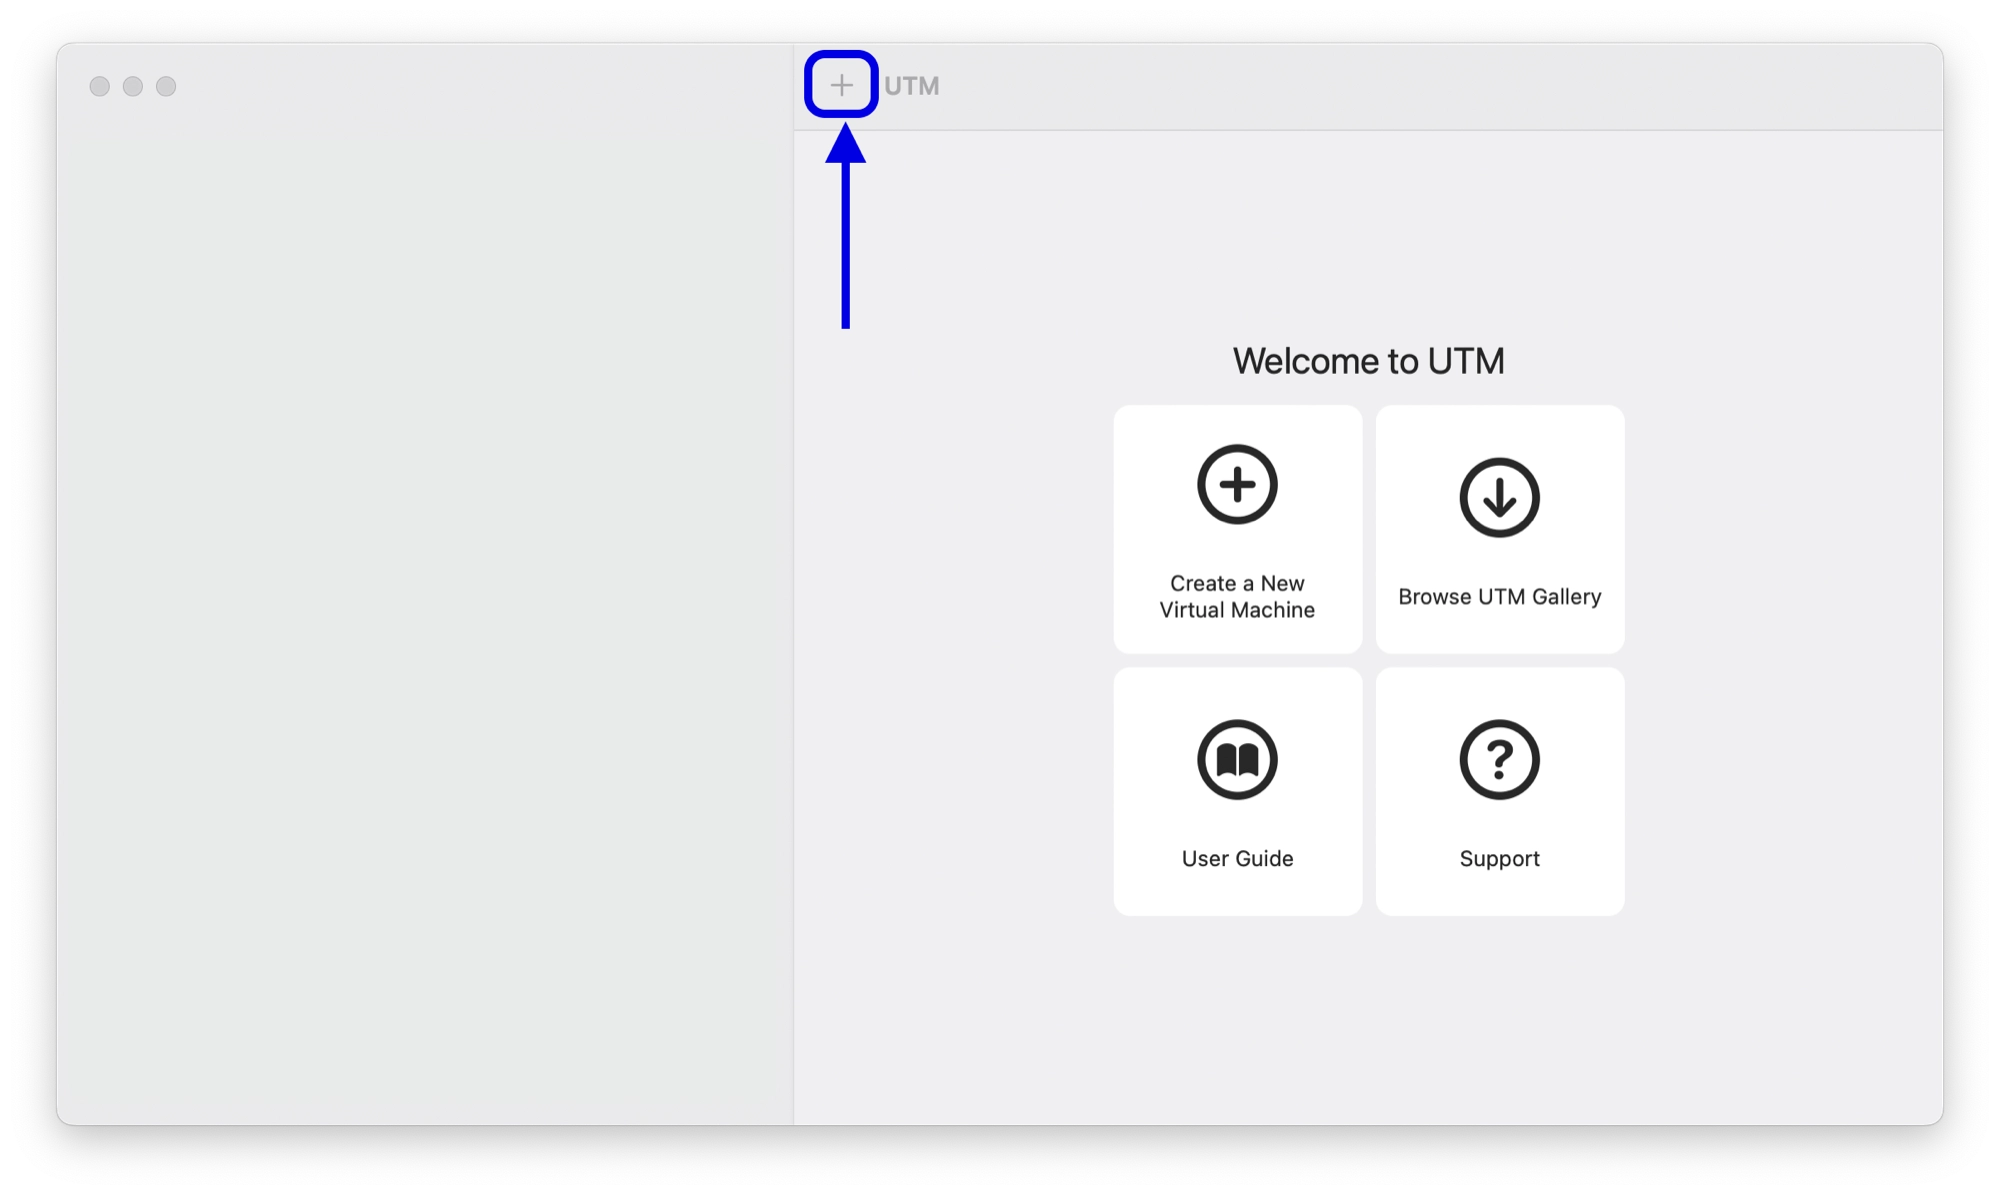
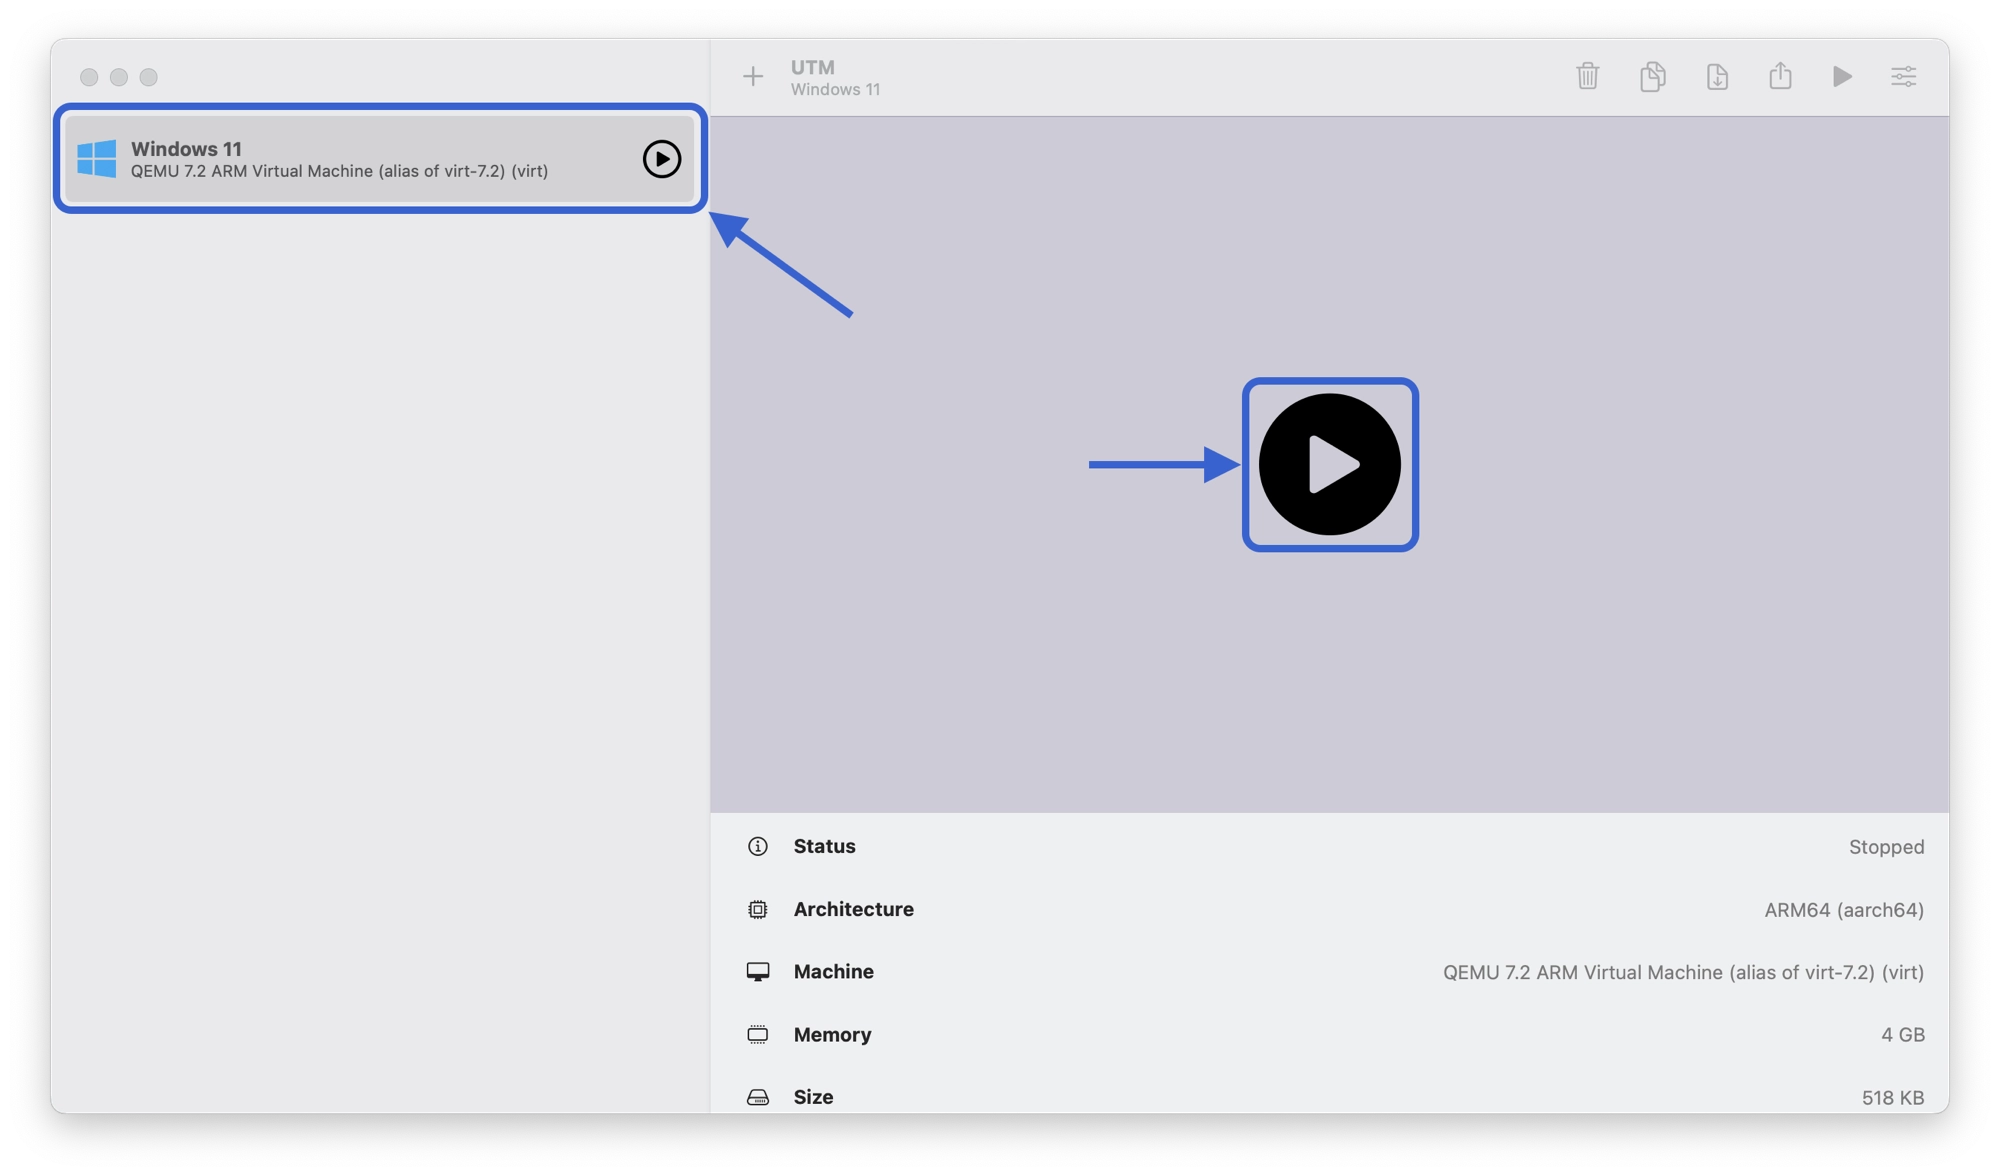
First, goto your applications folder and double-click the UTM icon to launch the UTM application. This will open the main UTM window.
In order to add a new virtual machine in UTM, click the ‘+’ button at the top of the main window:
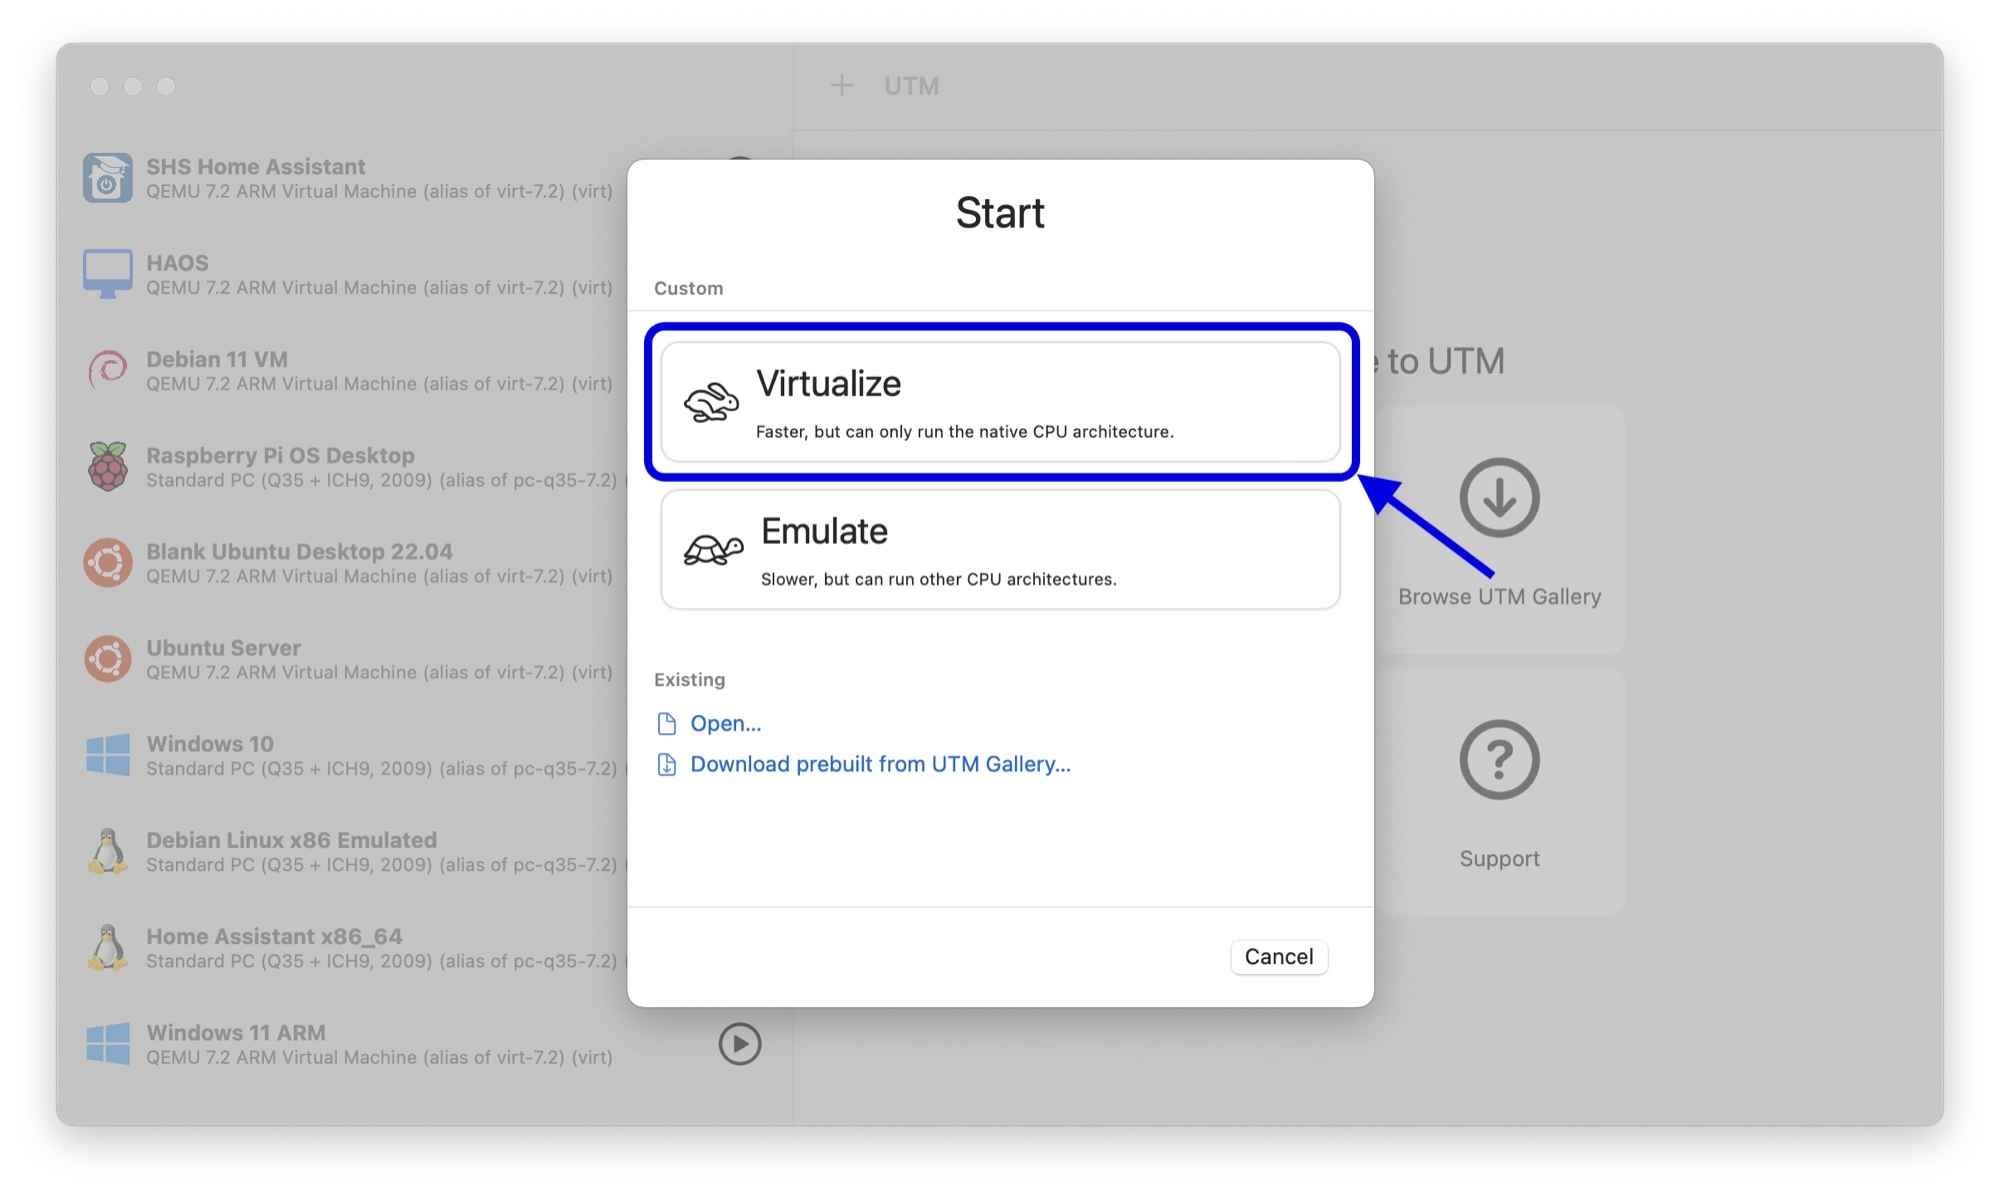
Creating a virtualized VM for Windows 11
On the first screen you will be given a choice of whether to use virtualization or emulation. Select the virtualization option by clicking the large button. This will give the virtual machine the best performance:
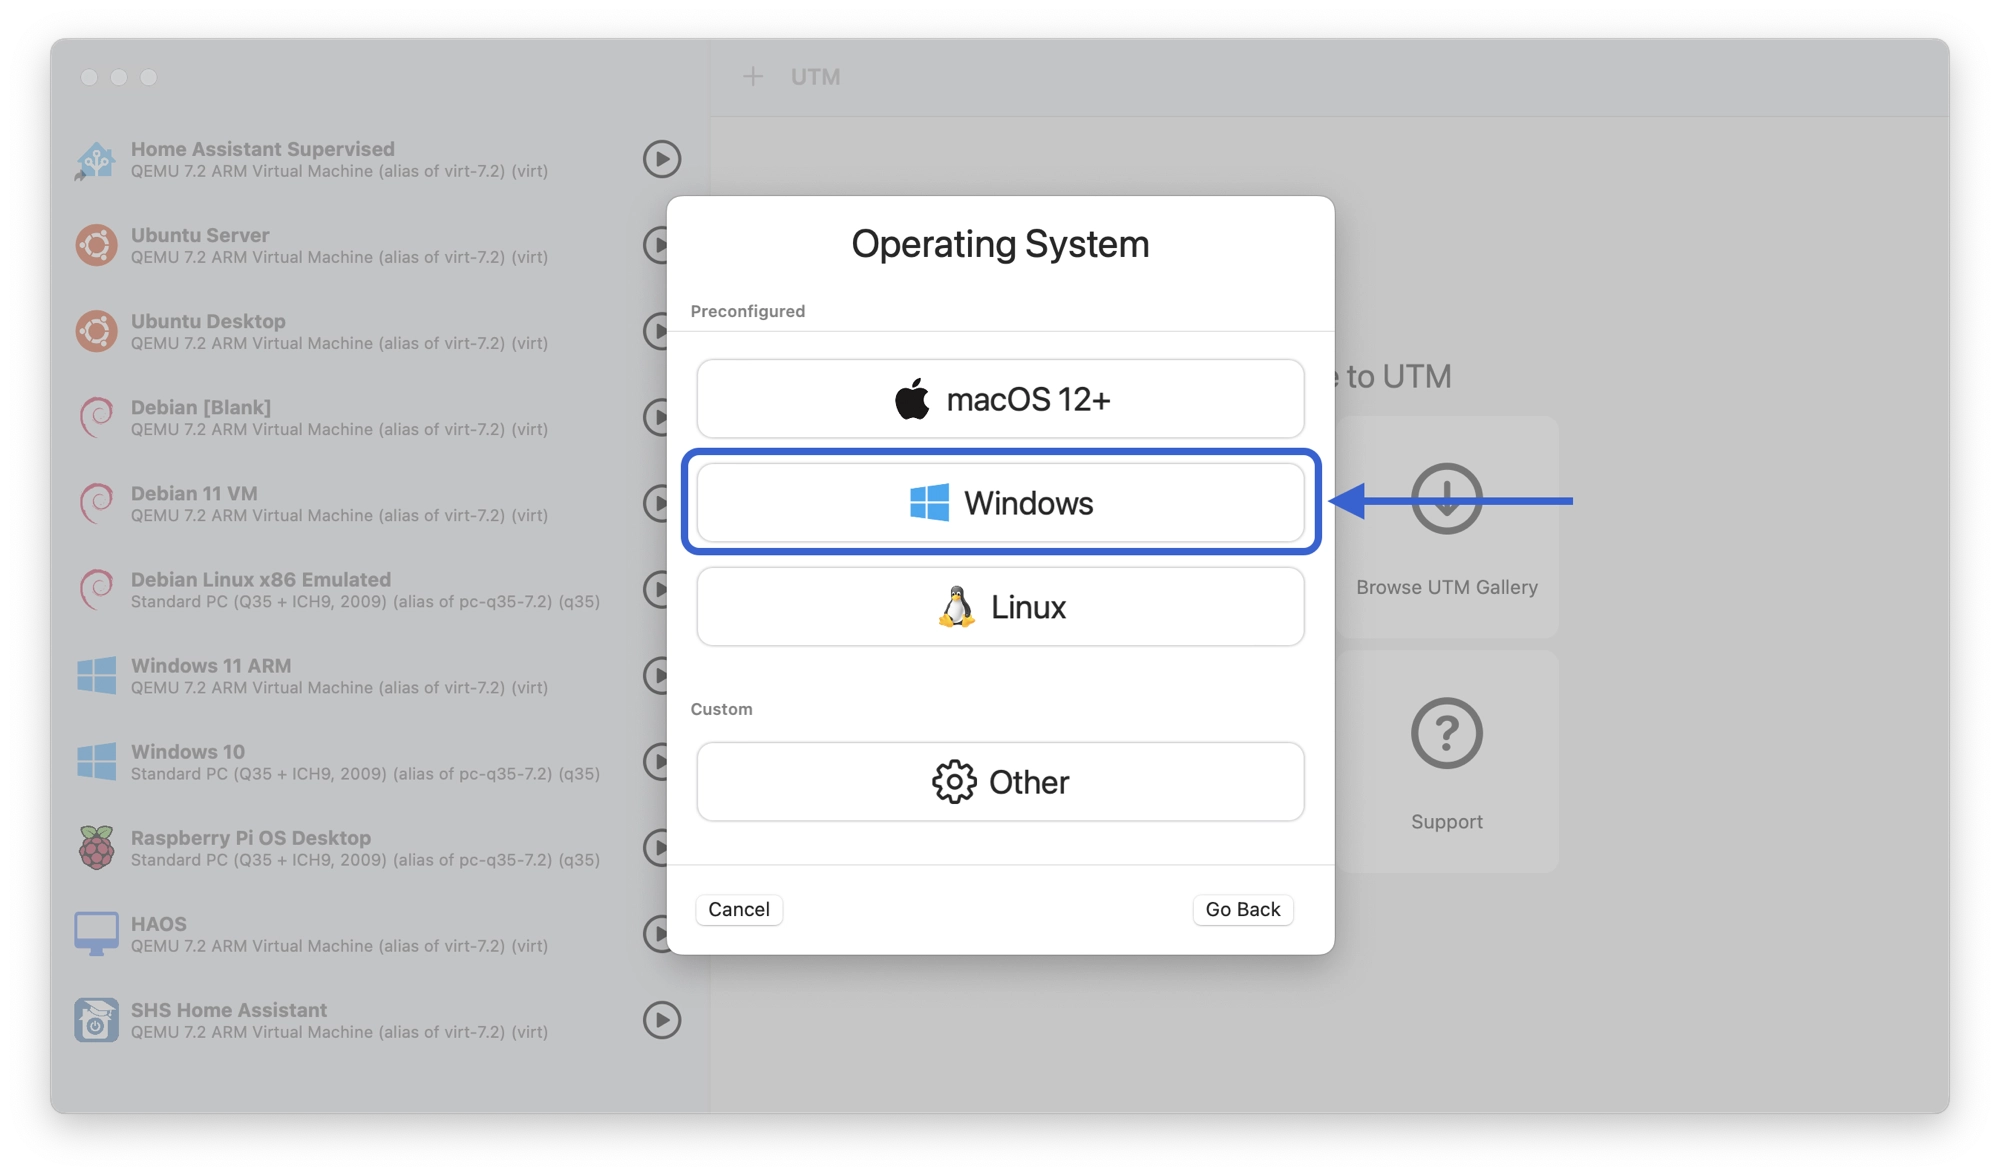
Choose an operating system
On the next screen we are given the option to choose the type of operating system, which can simplify the configuration. Choose Windows.
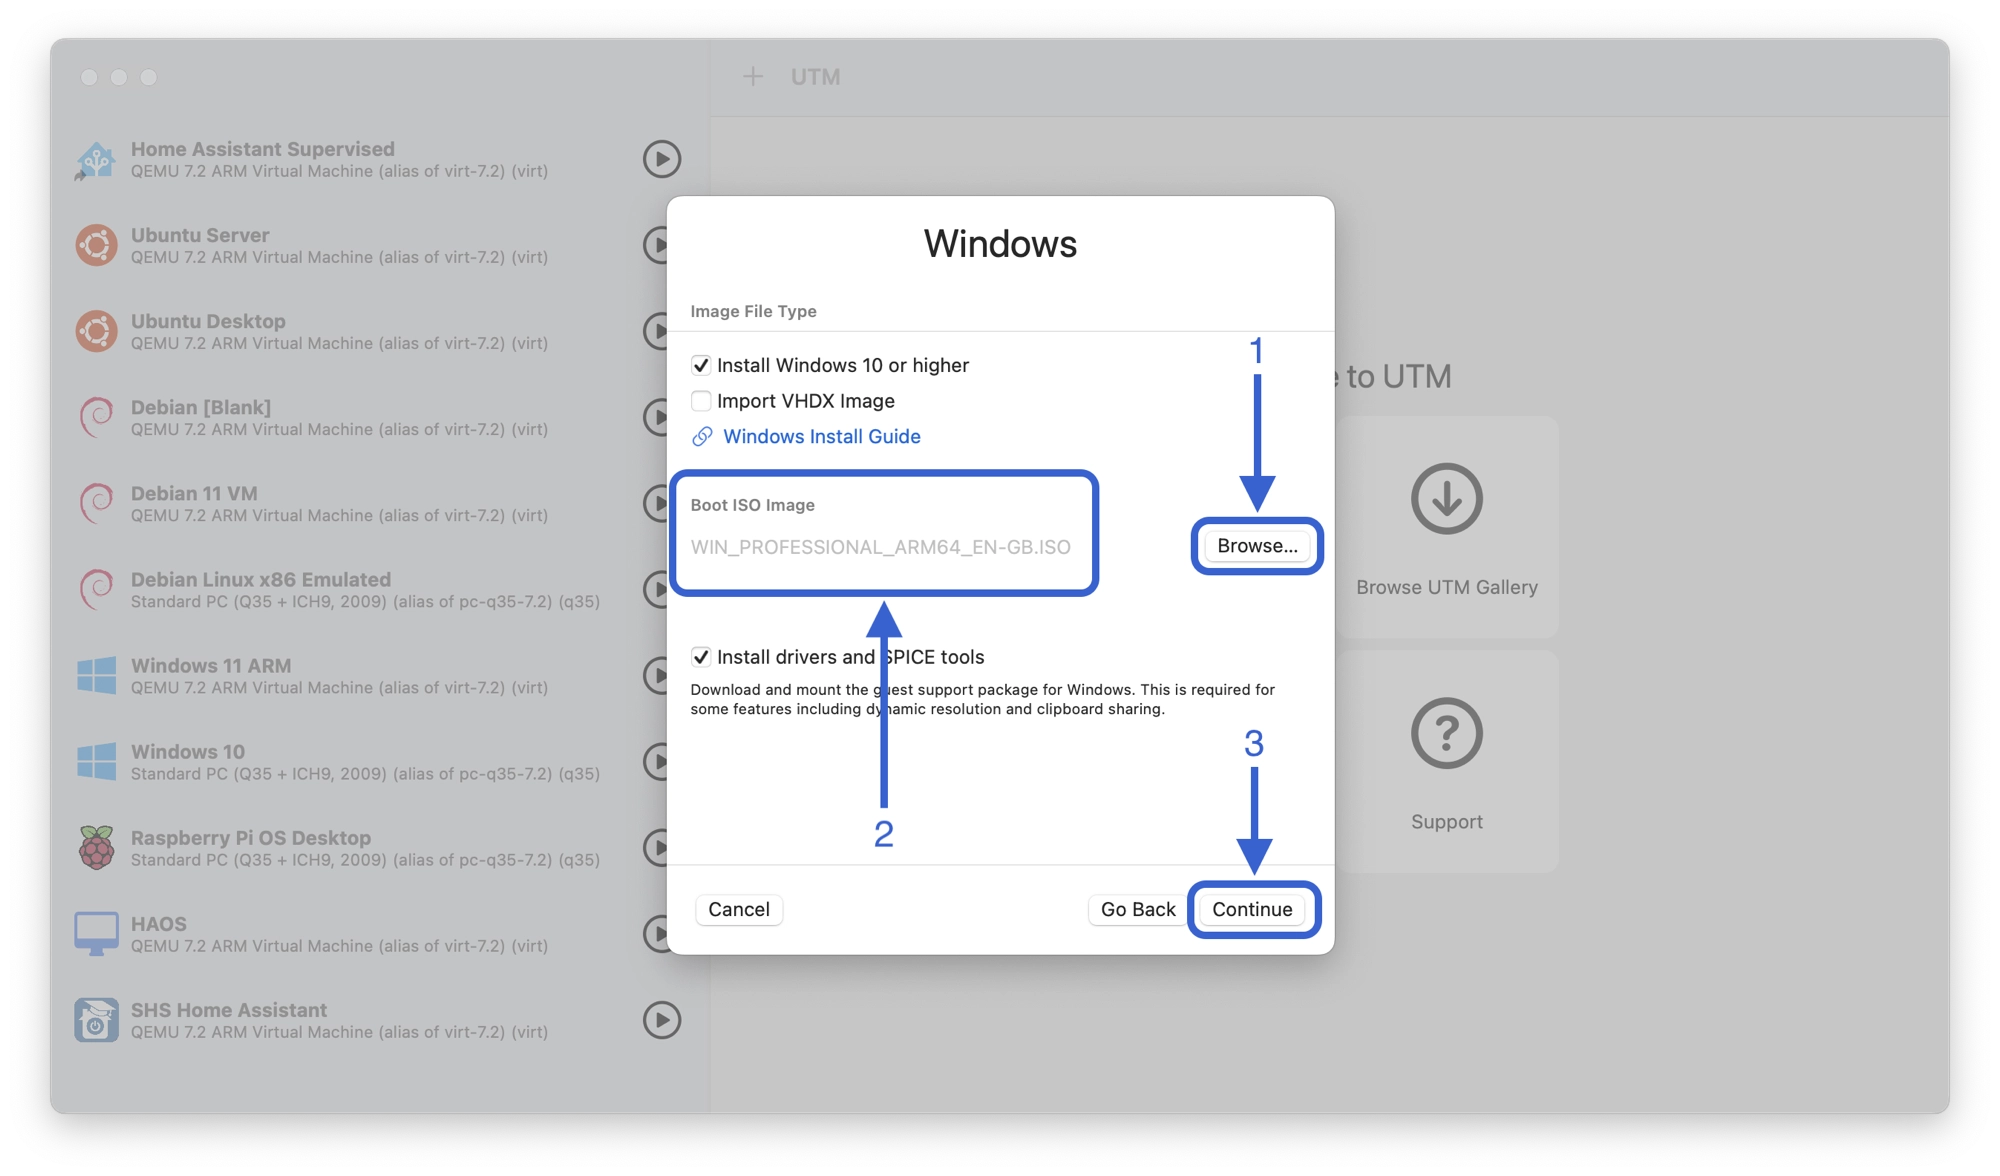
Choose the boot image
Next we need to supply UTM with a disk image that contains the Windows 11 installer that you downloaded earlier.
We need to point our virtual machine to this disk image. Under the boot ISO image section, (1) click browse and select the Windows .iso file that you downloaded earlier.
Once selected, (2) you will see the path to the .iso file. Note that your filename might vary, depending on the version of Windows 11 that you downloaded. (3) Click continue to move to the next step.
Choosing the hardware settings
Next, we can choose the hardware settings for our virtual machine.
For choosing the amount of RAM, a good rule of thumb is to choose somewhere between the Windows 11 minimum requirement and half of the amount of RAM that you have available on your Mac.
You can see how much RAM your Mac has by clicking the Apple logo in the top left-hand corner and then click About This Mac.
- If your Mac has 8 GB of RAM, choose 4 GB for the virtual machine.
- If your Mac has 16 GB of RAM, choose 8 GB for the virtual machine.
- If your Mac has more than 16 GB of RAM, choose a value that is half the amount of RAM that your Mac has.
For optimum performance you should leave at least half of your RAM available for macOS to use.
The number of cores can also be specified, but for a virtualized Windows system we can leave this set to default and let UTM manage it.
If you are unsure of the best settings to use, most likely the default settings will work just fine.
Click Continue to progress to the next step.
Choosing the disk size
On the next screen you can specify the size of the virtual hard disk. This is the size of disk that will be ‘seen’ by Windows.
You can choose any size that you like with a minimum size as specified by the Windows 11 minimum requirement, which is 64 GB.
It is worth noting that although Windows will see a disk of the size that you choose here, the space will not be used on your host system’s physical disk until you actually use the space in Windows.
Although it is possible to change the actual size of the disk after creating the virtual machine, the process can be quite complex so I would recommend choosing the required disk size at this stage, during the creation of the virtual machine.
Click Continue to progress to the next step.
Choosing a shared location
If you wish to share files between Windows and your Mac, you can choose a shared folder.
So long as you install the guest support (more on that later), you will be able to access this folder from both the guest and host operating systems, allowing you to easily transfer files.
Click browse and navigate to a folder that you want to share between the two operating systems, then click open to select it. Once selected, you will see the path appear under the shared directory path.
You can also check the share is read only box if you wish to prevent Windows from writing to the directory.
Click Continue to progress to the next step.
Finalizing and starting the VM
On the final screen you have the opportunity to give your new VM a name, such as Windows 11.
You can review the settings and then click Save to add the new virtual machine to UTM.
Now we can start the virtual machine and begin the Windows installation process. Select your new VM from the left-hand sidebar menu and then click the large play button to boot up the virtual machine.
How to Install Windows 11 on a UTM Virtual Machine
Installing Windows 11 on a UTM virtual machine is fairly straightforward and for most part it simply involves following the standard Windows 11 installation wizard.
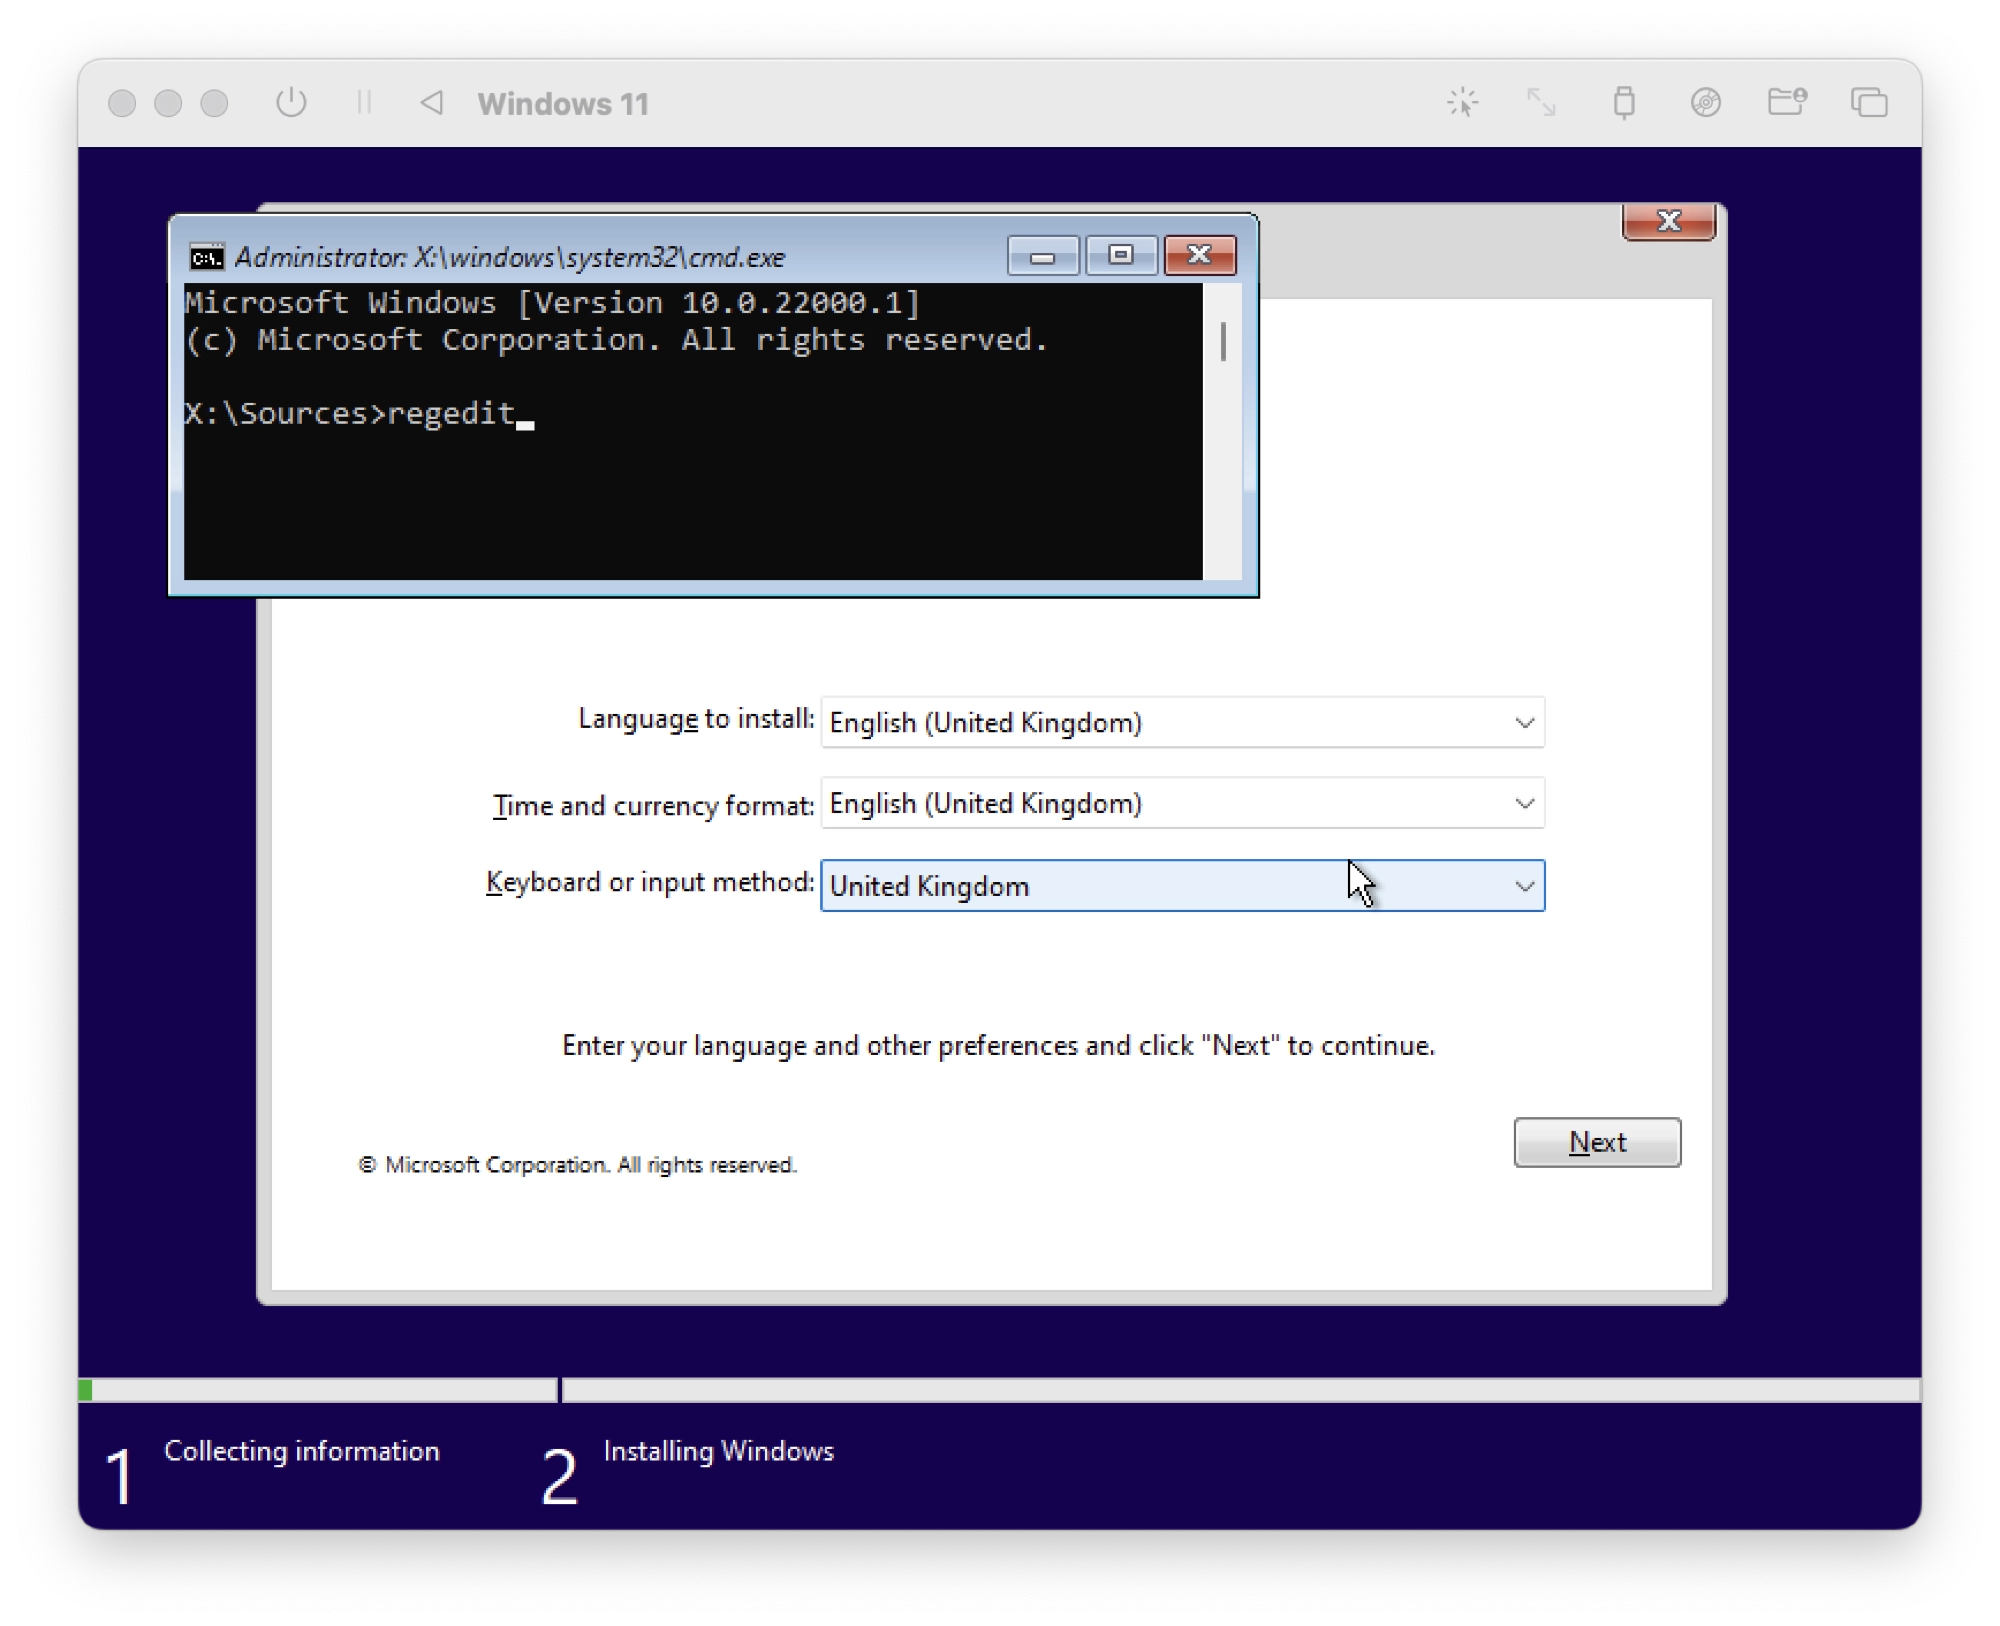
When you see the press any key to boot from CD/DVD, ensure that you press any key to begin the installation, otherwise the installation will not start. In this case, reset the virtual machine and repeat this step.
When the installation starts sucesfully a basic windows GUI will load, presenting you with the options to choose language.
However before you begin we need to make some modifications in order to bypass the minimum system requirements.
Disable Windows 11 TPM and CPU Checking
There is one small nuance whereby the Windows 11 installation will complain that the minimum system requirements are not met, even if you configured the virtual machine to meet or exceed the minimum requirements.
The solution is to bypass the minimum requirements check with the following steps:
- Whilst on the language selection screen, press shift + fn + 10 to open the command line.
- At the command line, enter the command regedit and press enter.
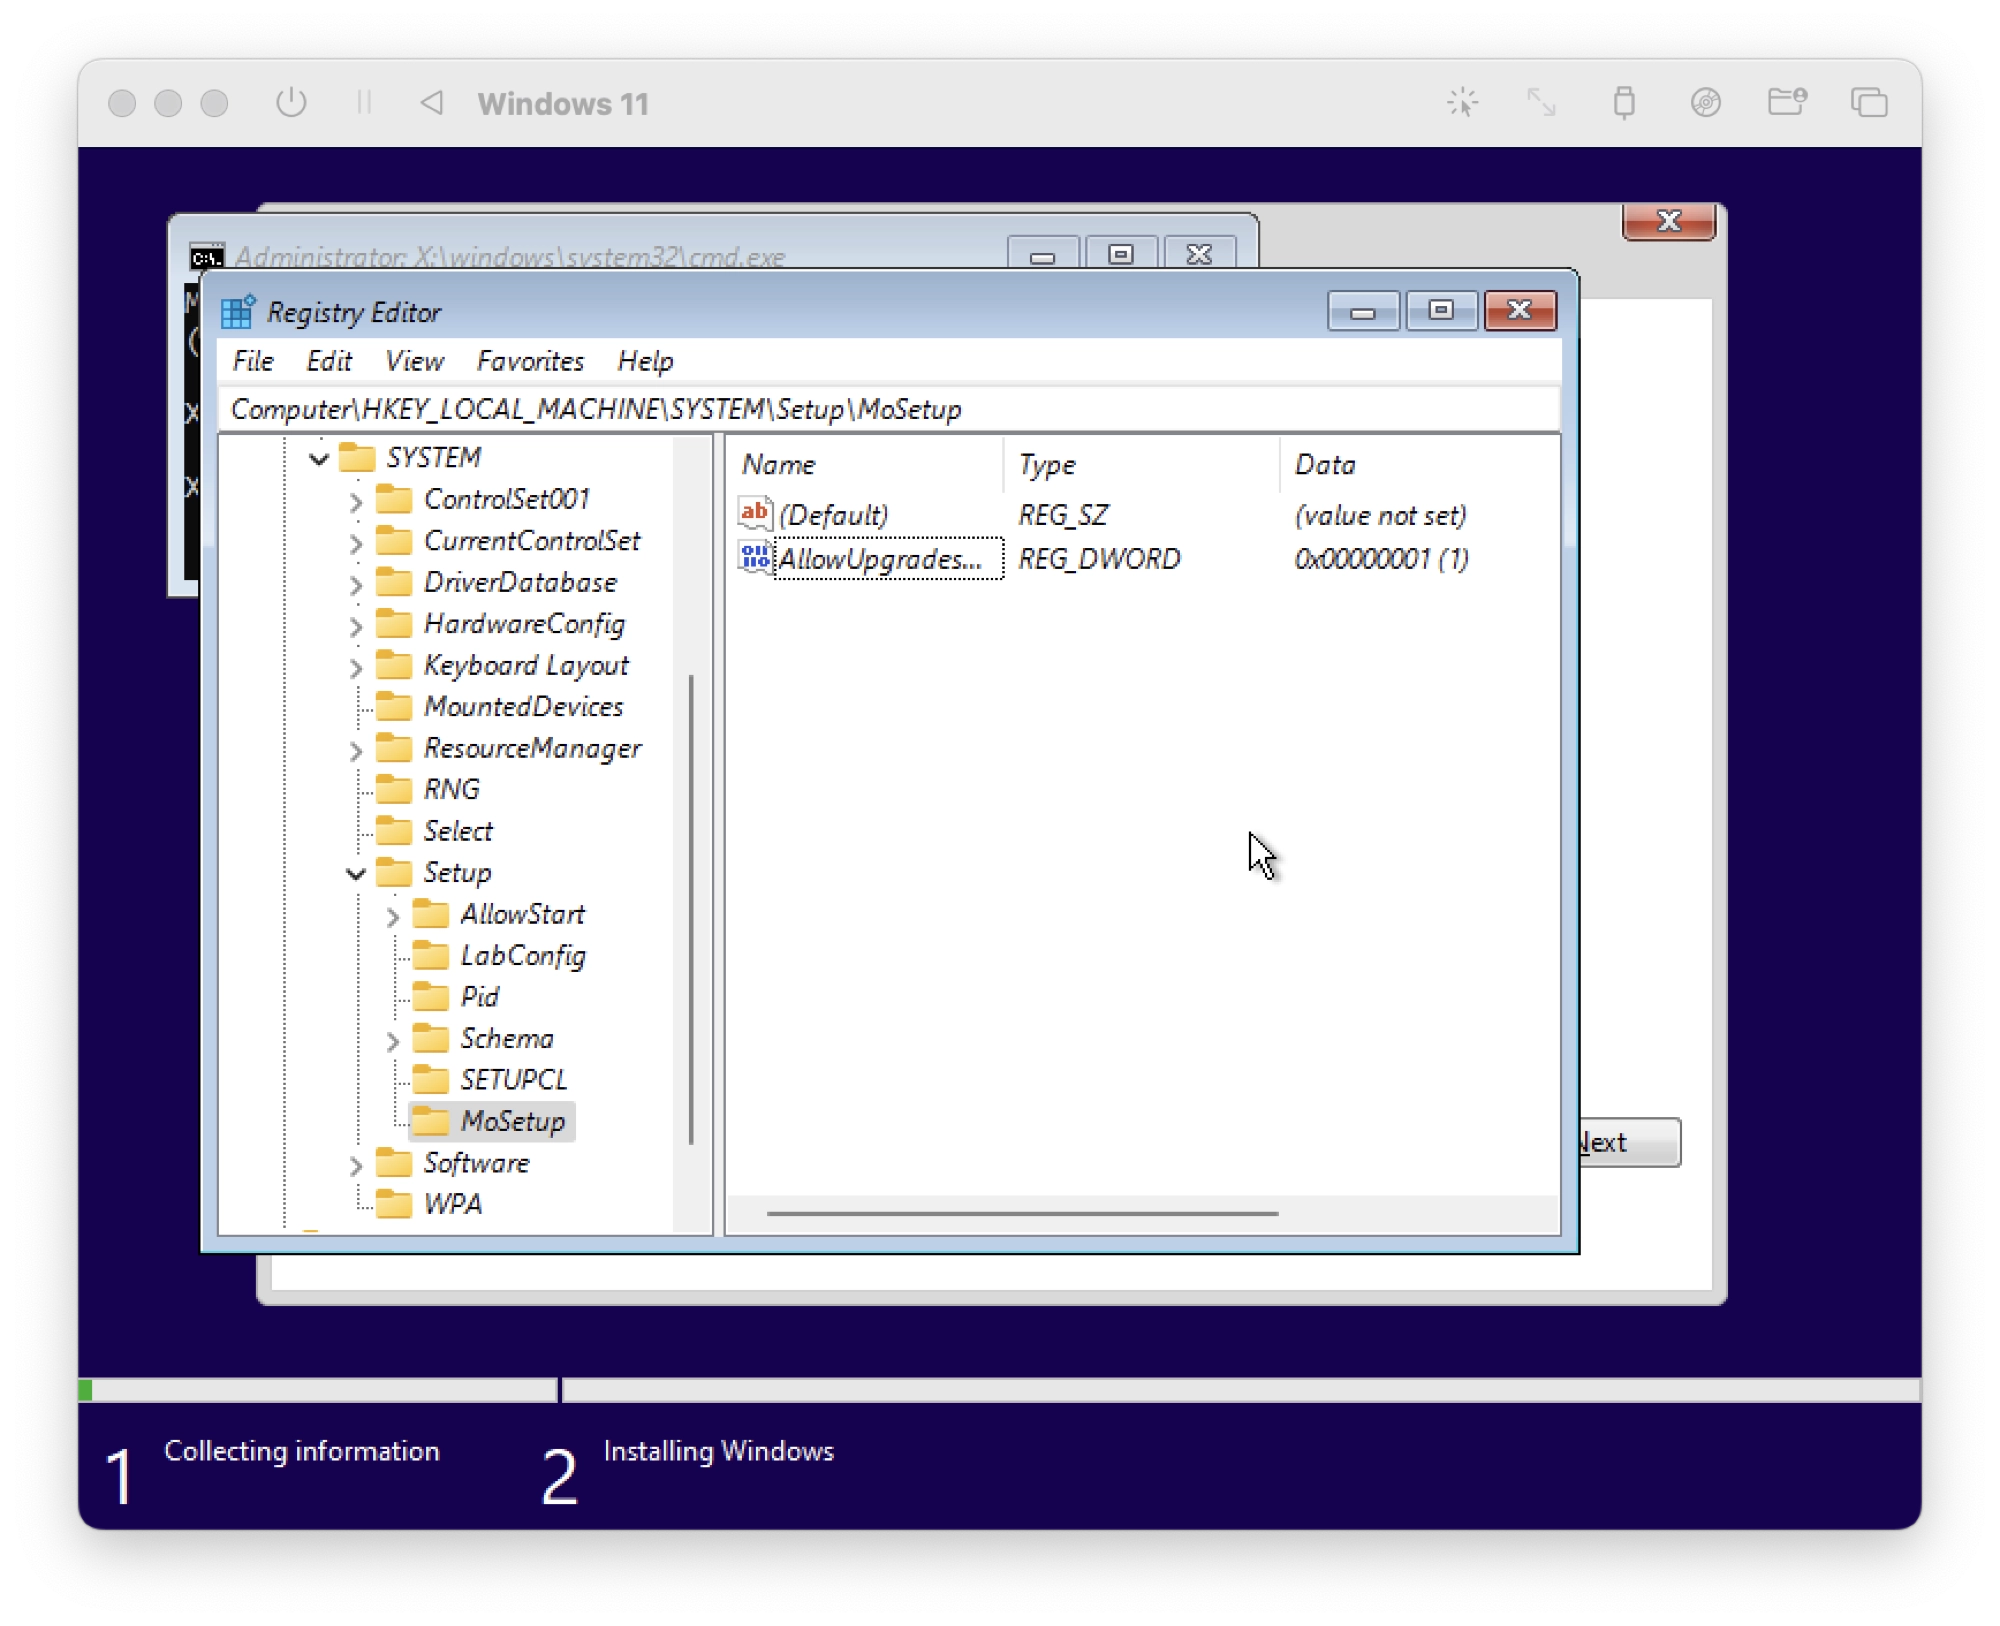
- In the folder tree on the left-hand sidebar, check if the folder HKEY_LOCAL_MACHINE\System\Setup\MoSetup is present.
- If the MoSetup folder does not exist you will need to create it, right-click the Setup folder, click New > Key and name the key MoSetup.
- Click the MoSetup folder to display the key in the right-hand window.
- Click View > New > DWORD (32-bit), name it AllowUpgradesWithUnsupportedTPMOrCPU and press enter to set the name.
- Double click the newly created AllowUpgradesWithUnsupportedTPMOrCPU to open its settings.
- Change the Value Data to the value 1 and press OK.
- Close the registry editor window and command line windows.
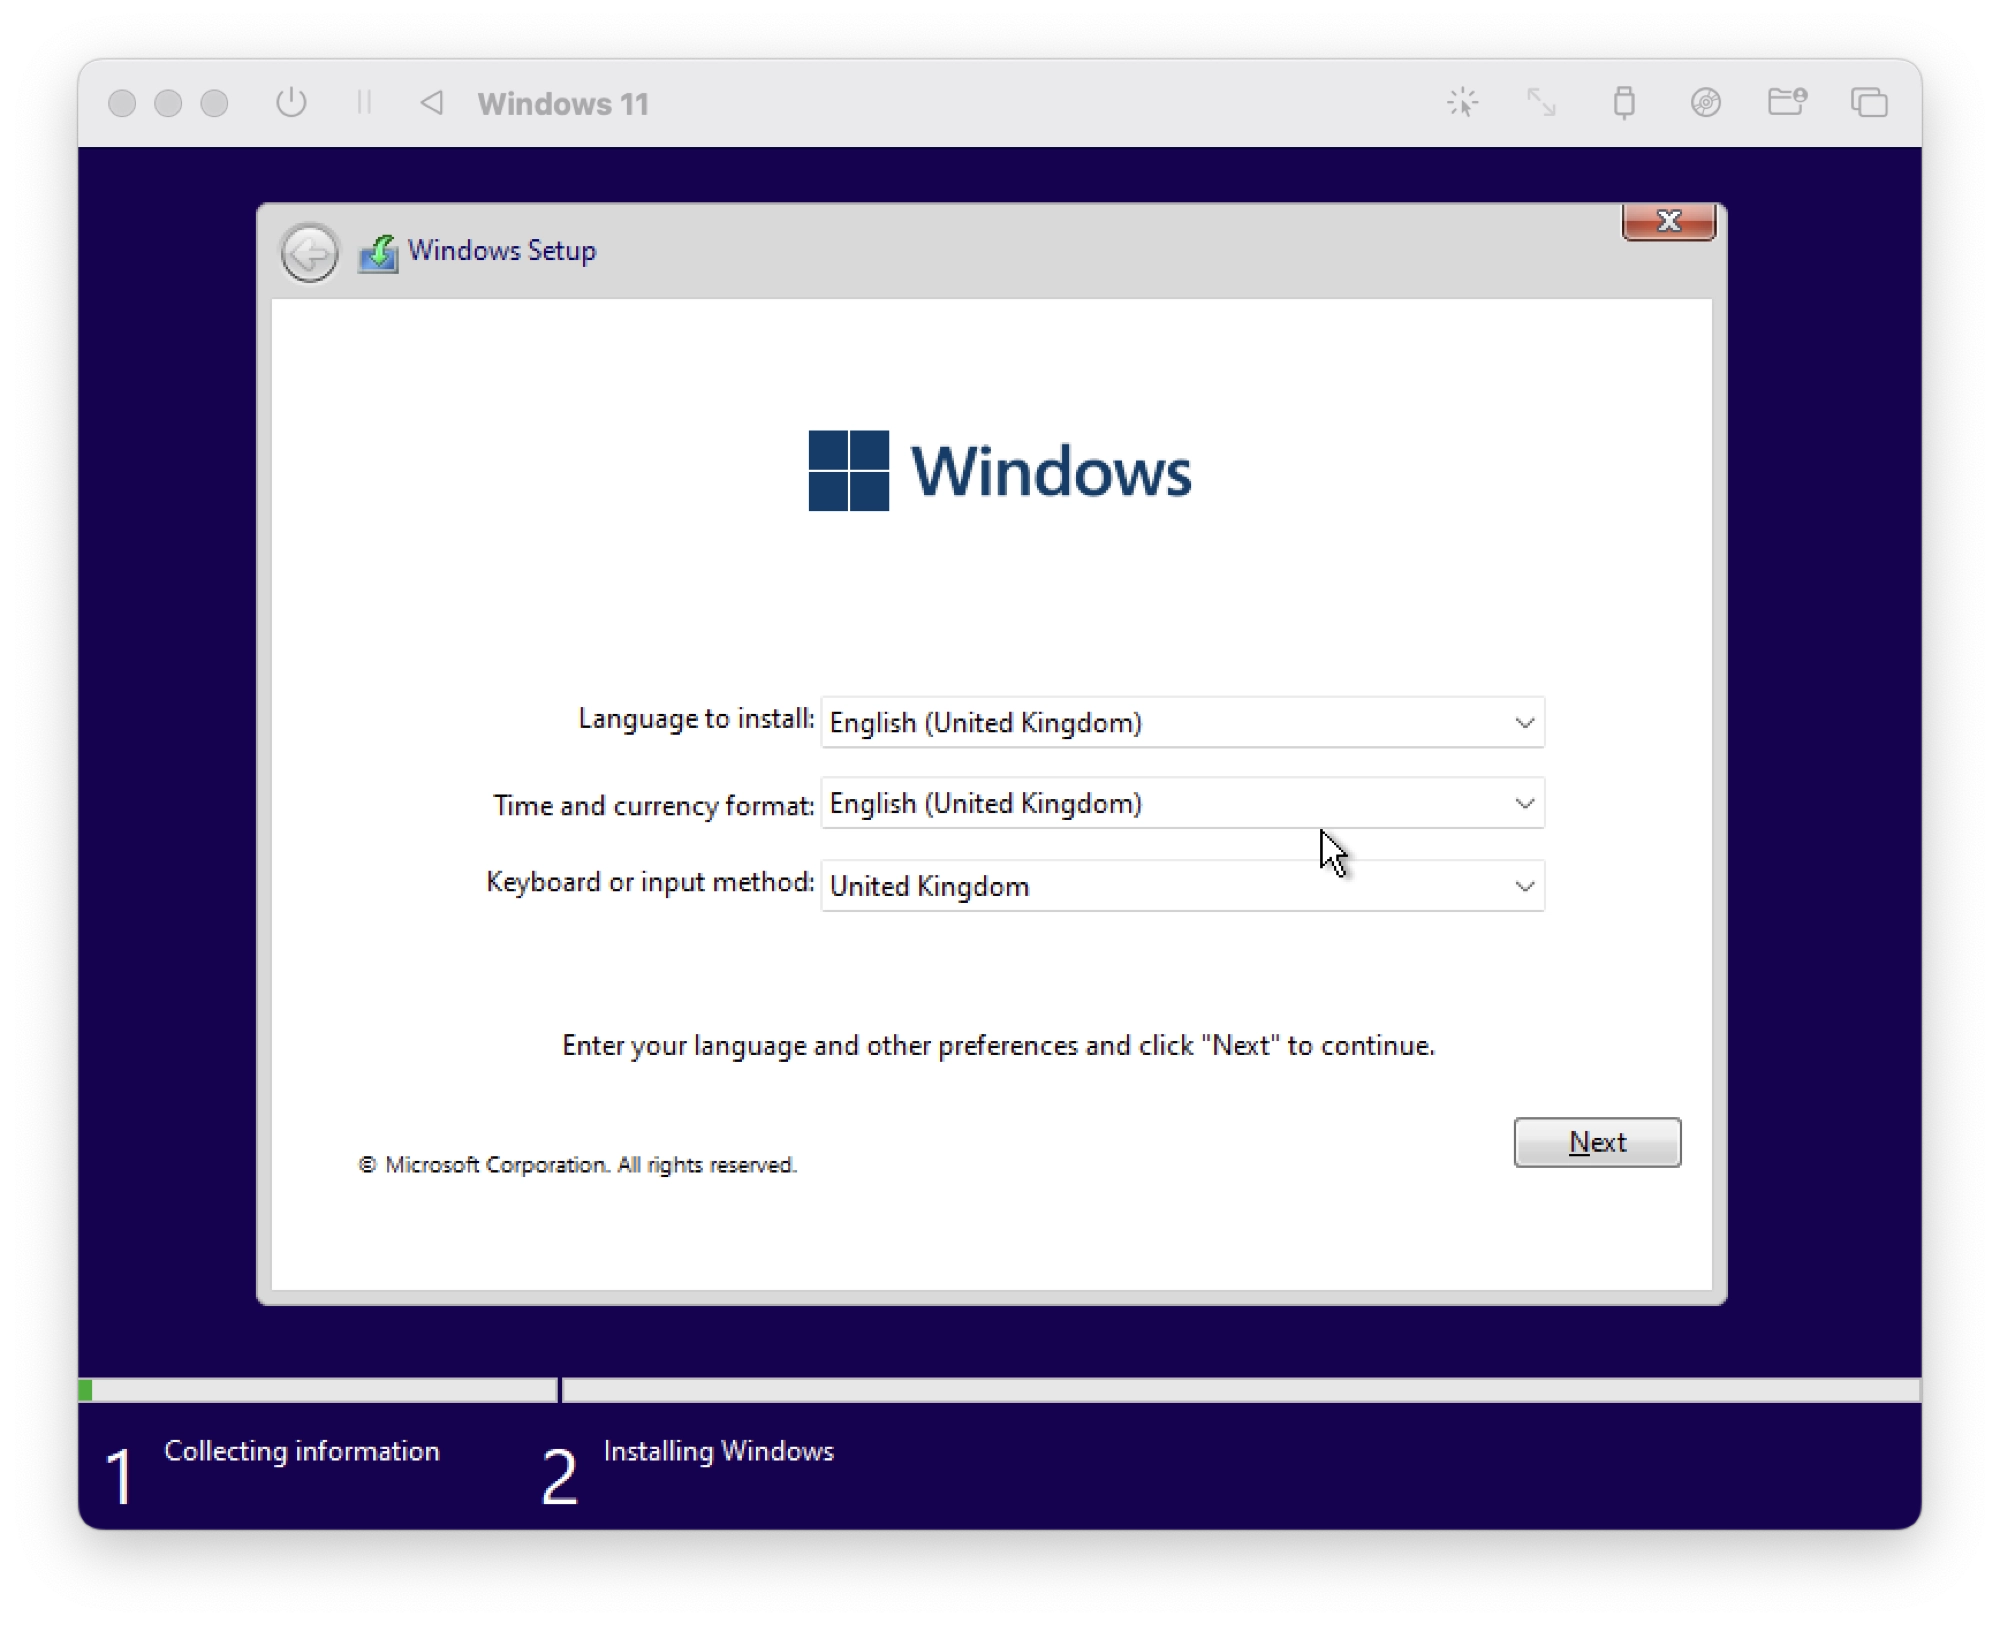
Install Windows 11
With TPM and CPU checking disabled, it should now be possible to install Windows 11 on the virtual machine. You can now continue with the installation process as normal.
- On the first screen, input your desired language and keyboard settings:
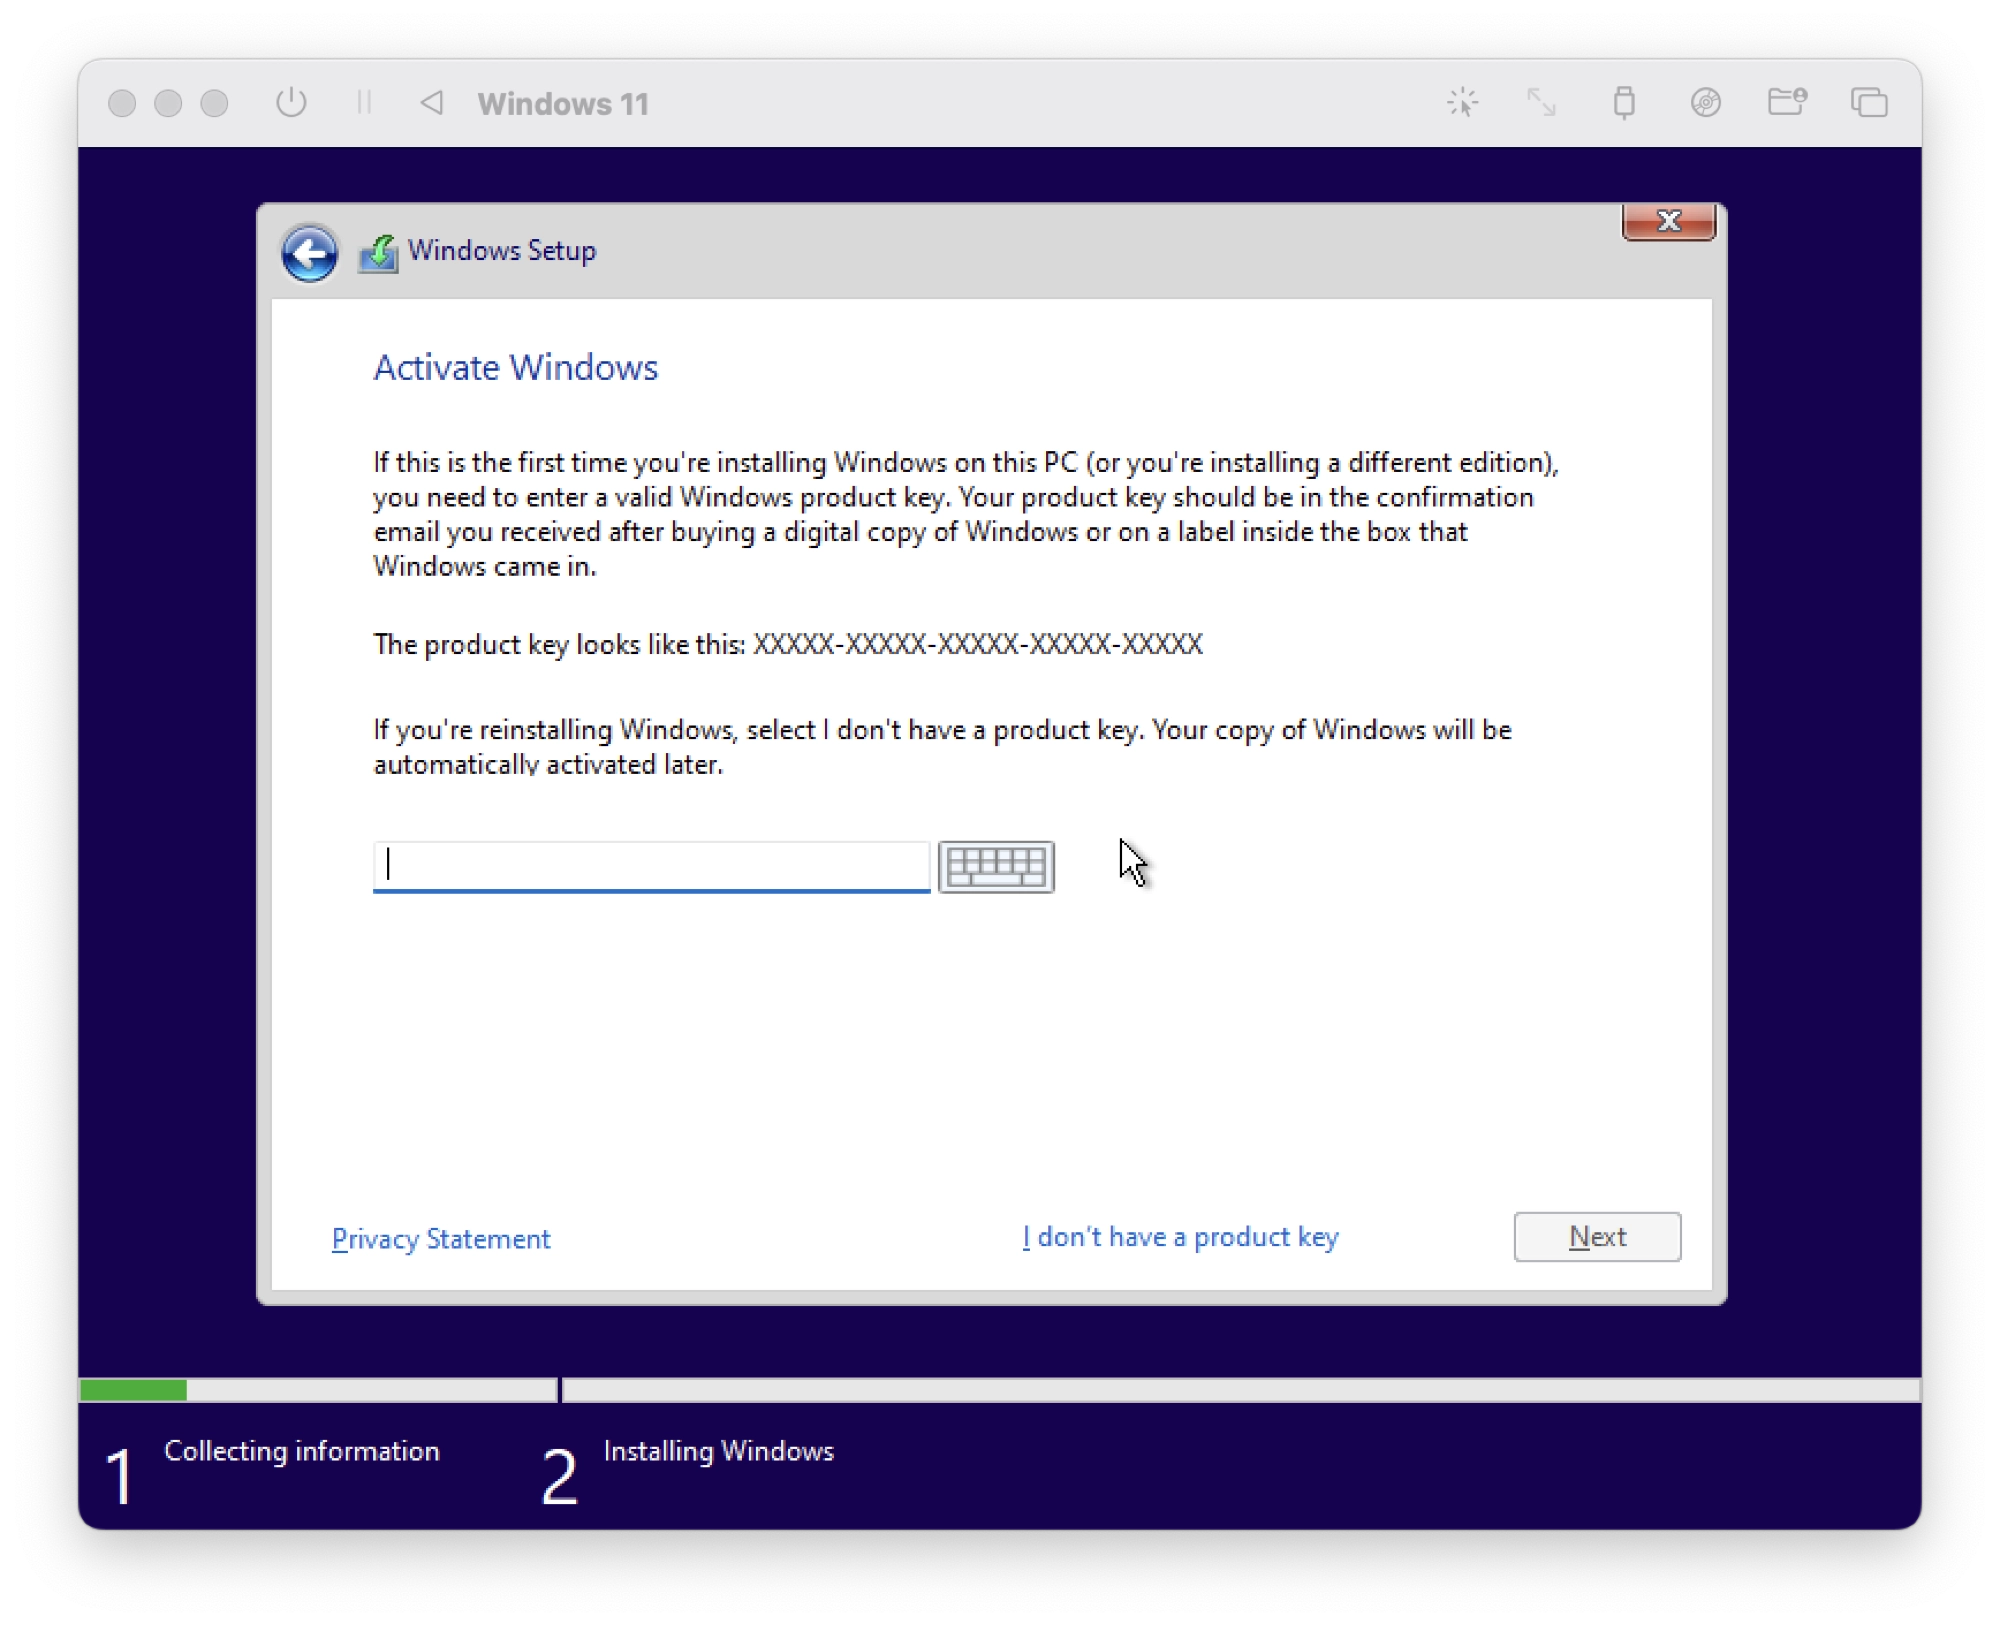
- Next, input your windows product key and click Next. If you don’t have a product key in hand, click I don’t have a product key (it is also a button):
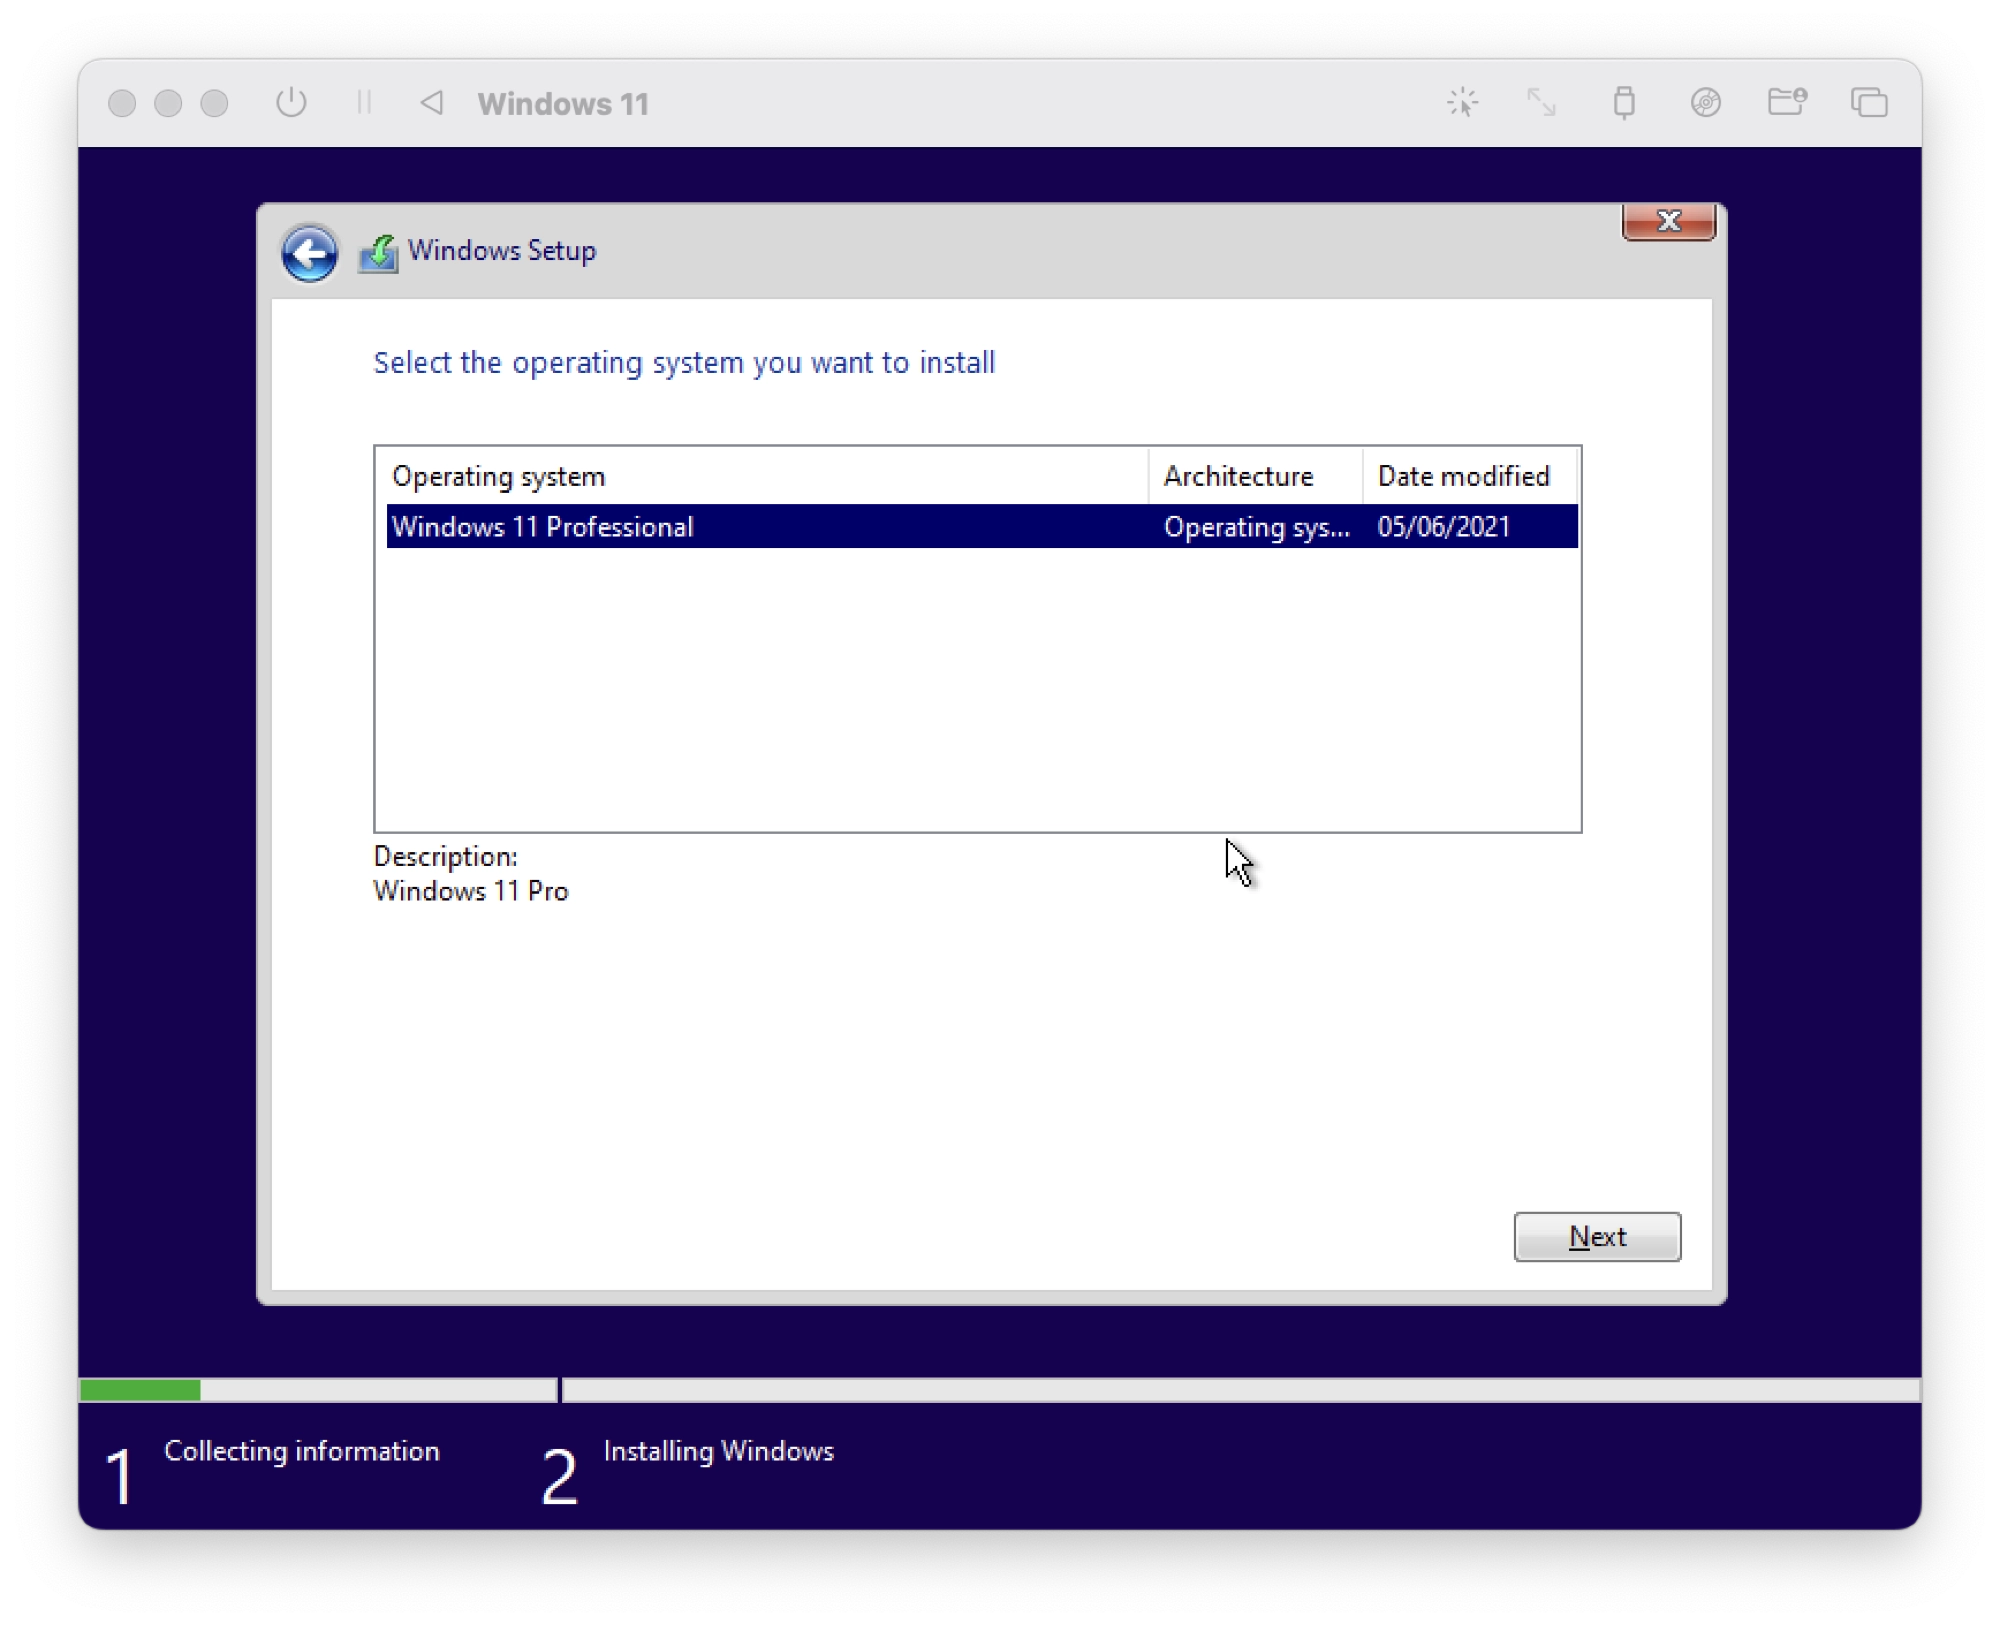
- On the next screen, choose the version of Windows 11 that you wish to install. In this example there is just a single version of Windows 11 Professional available but you may have other options to choose from:
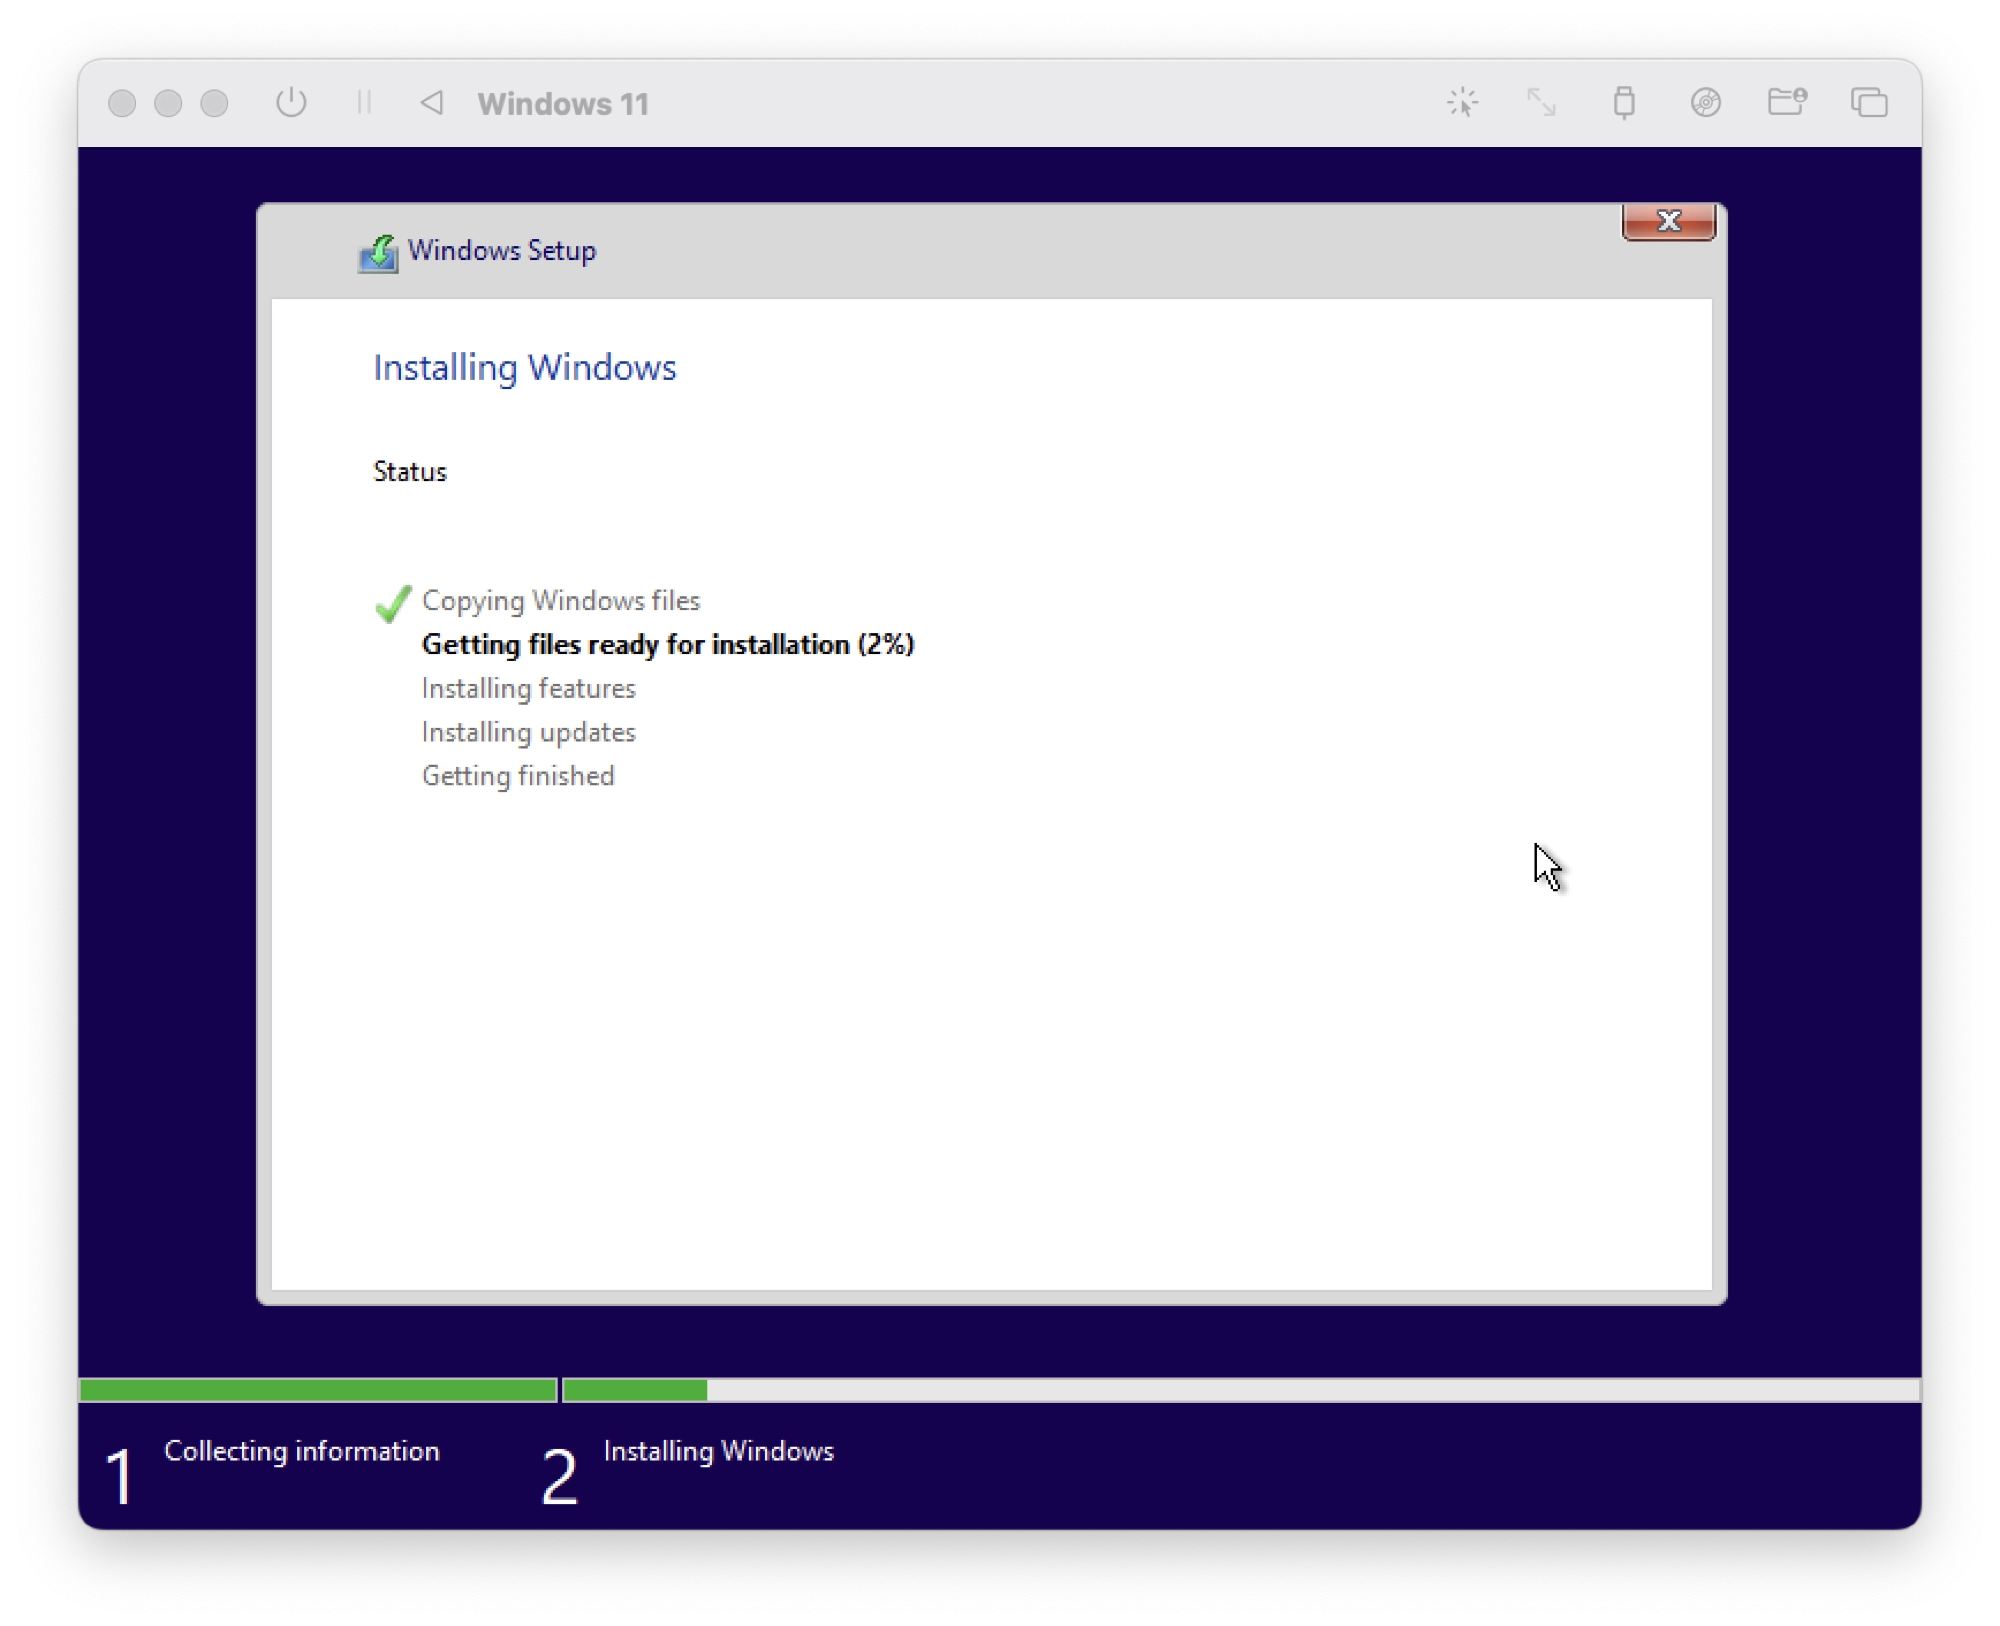
- Sit back and relax whilst the Windows 11 installer completes your installation of Windows!
- When the installation has completed, the virtual machine will restart. On this occasion do not press any key to boot from CD/DVD, otherwise the installation will begin again.
- Windows 11 will now boot the the onboarding screen where you can confirm your location and create a new user account.

- Once you have created a new account, I would recommend completing the final step of installing the guest support, see the next section of this guide.
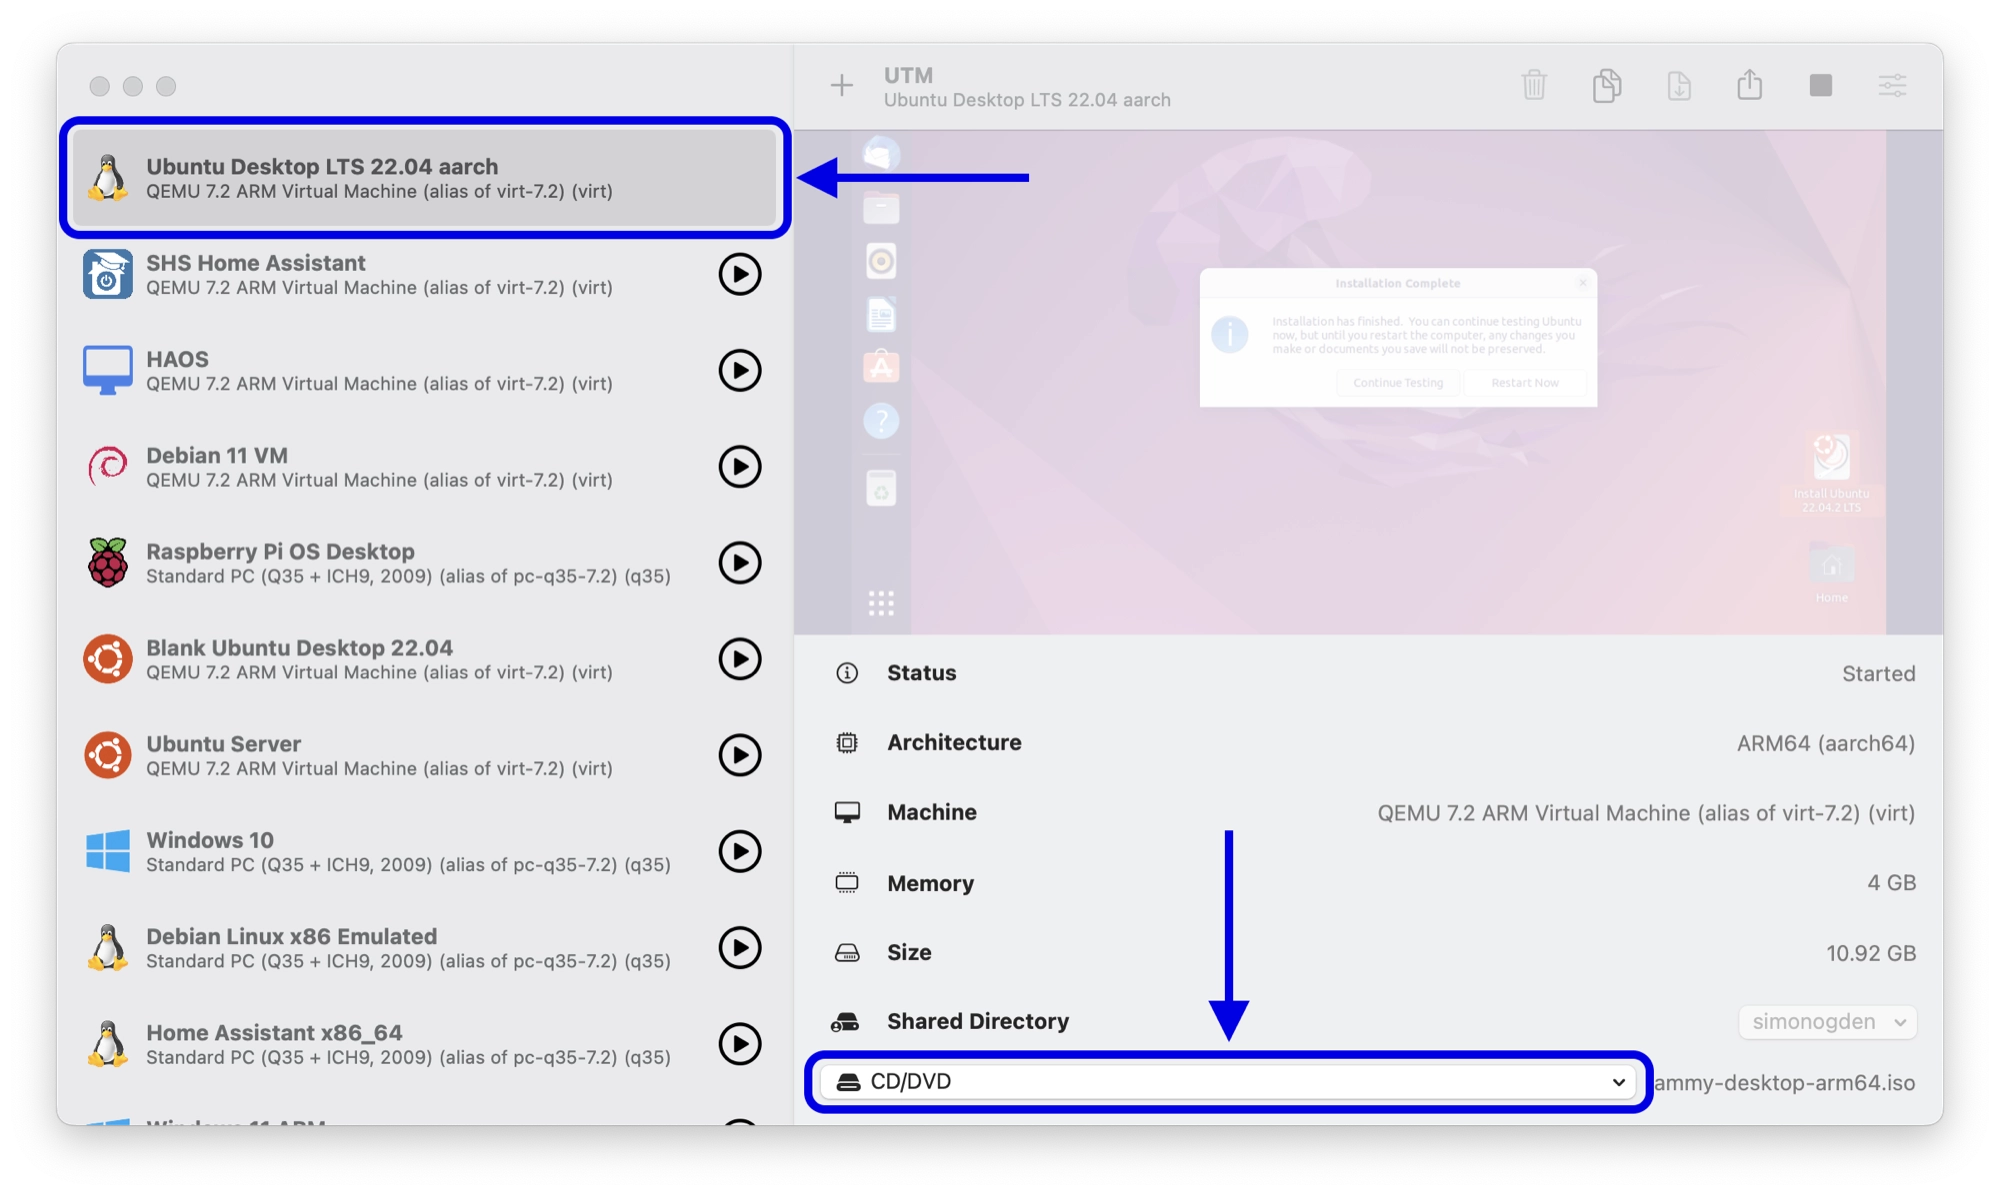
- The last thing to do is to remove the Windows 11 installation disk image from the virtual CD drive. First select the Windows 11 virtual machine in UTM so the details show in the right-hand window.
- Click the CD/DVD drop down menu at the bottom of the main screen.
- Click Clear to remove the Windows 11 installation disk image.
How to Install the SPICE Guest Tools in Windows 11 on a UTM Virtual Machine
The final thing that we need to do in order to complete the installation is to install the SPICE Guest Support tools, which will enable the following functionality:
- Directory sharing
- Clipboard sharing
- Dynamic screen resolution
- Mouse cursor without “capturing”
These are certainly useful functions to have so it is well worth installing the guest tools.
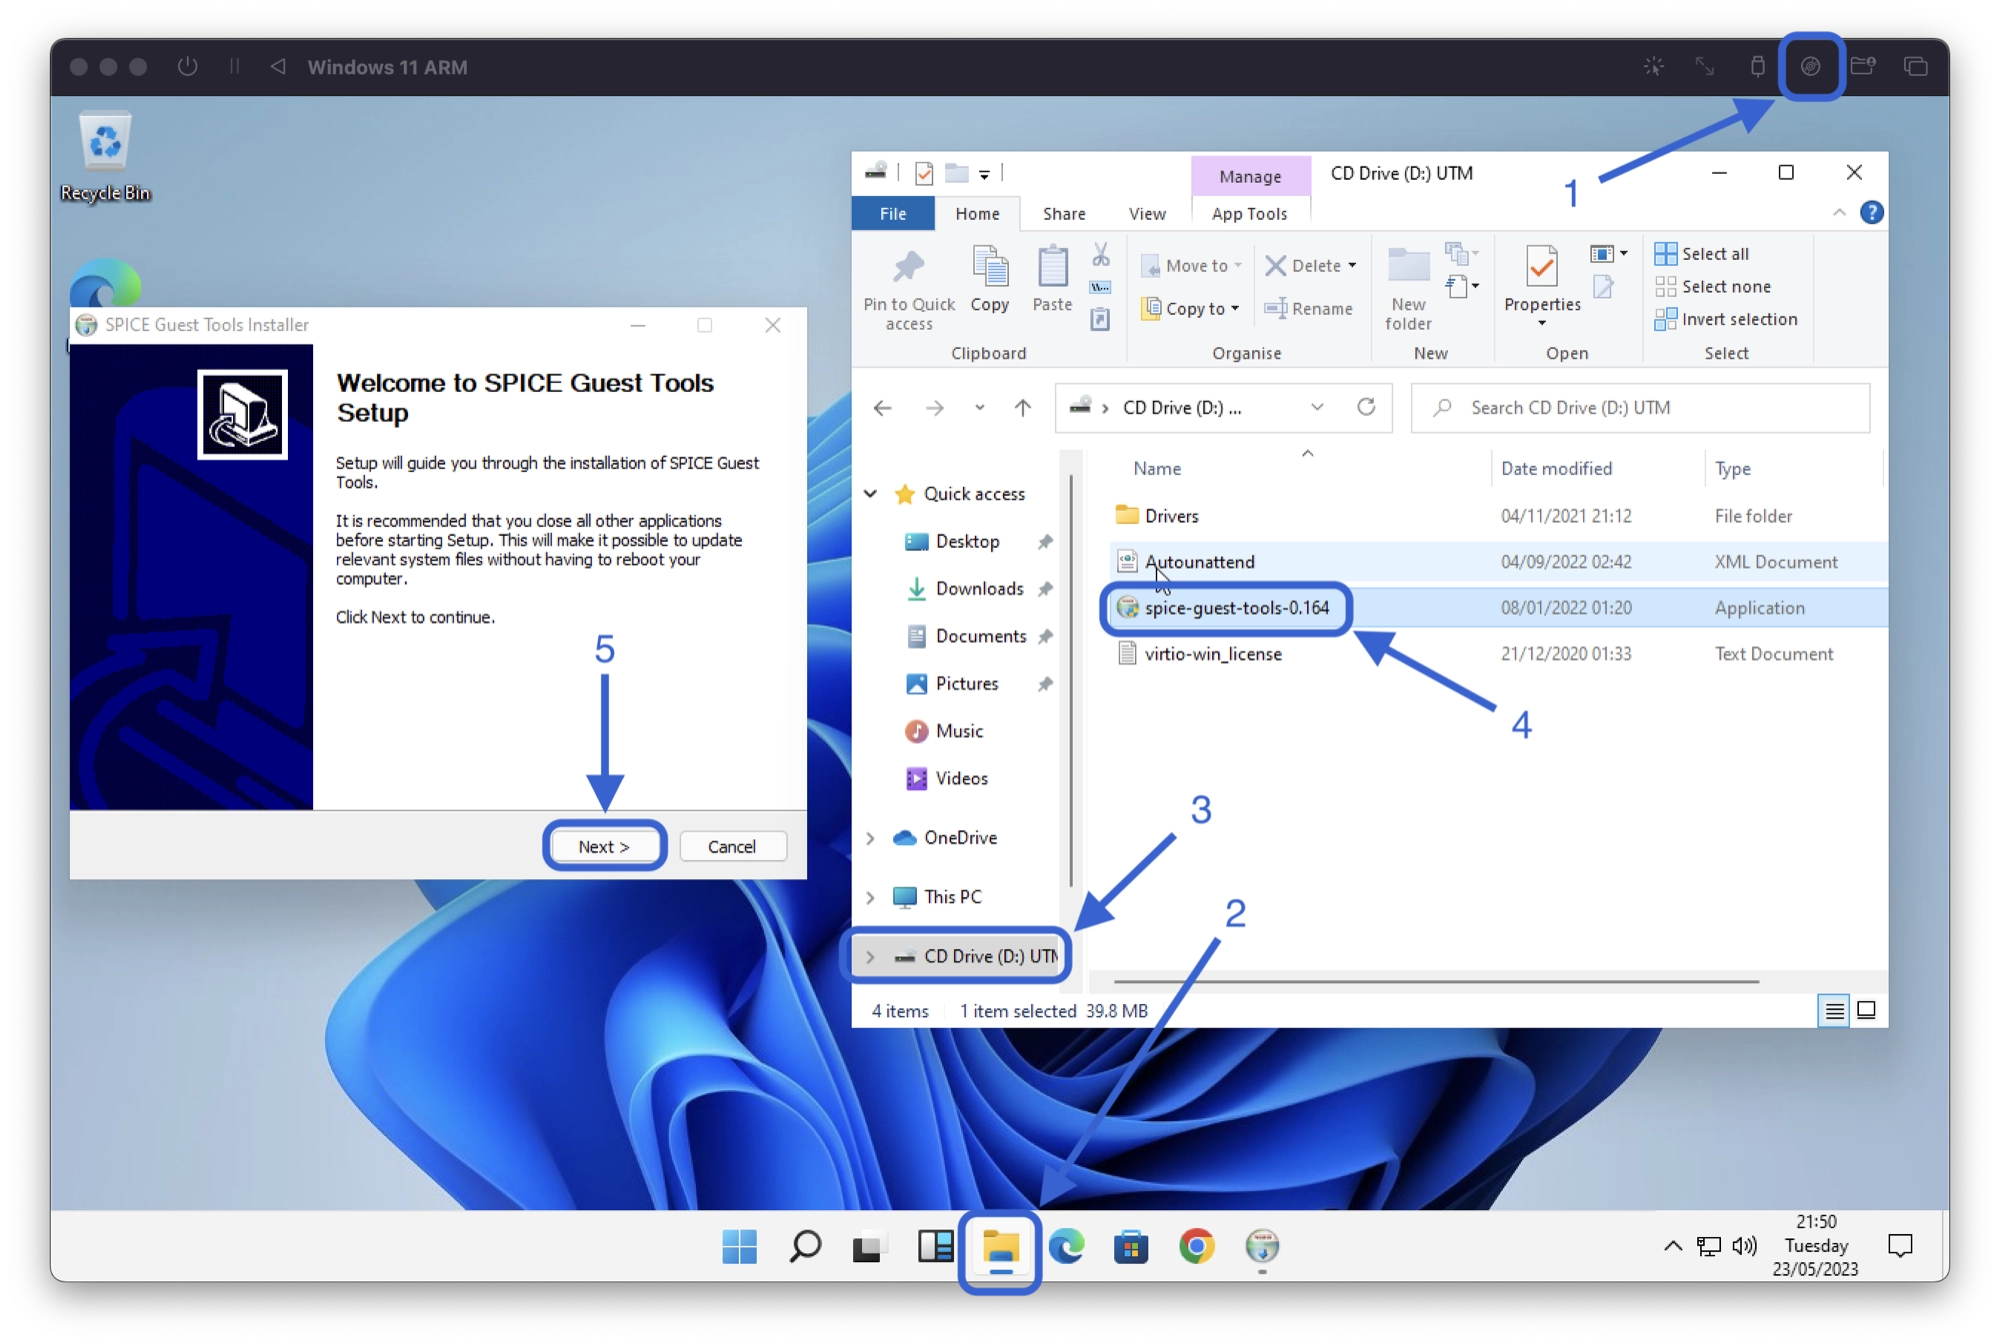
- Click the Drive image options button in the top right-hand corner of the virtual machine window and then click Install Windows Guest Tools.
- Open the File Explorer.
- Click the CD drive in the left-hand sidebar.
- Double click the spice-guest-tools installation file.
- Complete the installation wizard.
Conclusion
It is fantastic that in modern, it is possible to run one operating system on top of another. Running Windows 11 on macOS is a fairly straightforward process even if it is a little time consuming.
All credit must go to the UTM and QEMU developers who make the tools freely available so that we can do such things with ease.
If you did encounter any problems then get in touch by email support@siytek.com, it would be great to hear from you. Thanks for reading!
Thanks so much for visiting my site! If this article helped you achieve your goal and you want to say thanks, you can now support my work by buying me a coffee. I promise I won’t spend it on beer instead… 😏
Windows 11 is compatible with certain newer Intel processors
When it’s finally released, Windows 11 will require a processor with TPM 2.0 support and a compatible motherboard to install, but this isn’t fully available in Macs at present. But — there are workarounds.
Microsoft announced Windows 11 on Thursday with an all-new UI and better multitasking features. One requirement — the need for support for TPM 2.0 — may keep Macs from ever officially running the OS.
Some Macs have TPM 2.0 support in the processor, but as it stands, none of them support it on the motherboard. It may not be possible to do in software, but in order for an Intel Mac to run Windows 11 officially, Apple will have to update Macs for that compatibility, or Microsoft will have to remove that requirement.
So, in short, as of now there is no official support for running Windows 11 on a Mac.
Minimum system requirements for Windows 11
Before users attempt to install Windows 11 verify compatibility first. Regardless of workarounds used, the minimum specs must be met in order to run the operating system.
The system requirements for Windows 11 are:
- A «modern 64-bit processor» according to Microsoft
- 1Ghz clock speed
- 2 cores
- 64GB storage
- 4GB RAM
- UEFI, Secure Book capable & TPM 2.0
- 9-inch display with 1366×768 resolution
- DirectX 12 compatible graphics / WDDM 2.x
Microsoft’s requirement of TPM 2.0 and other requirements limit support of processors to ones delivered in approximately the last six years. Apple’s Mac lineup meet most of these specs in their default configuration going back several years, but the TPM 2.0 cutoff makes determining compatibility difficult.
The following Macs are the first models with TPM 2.0 in the CPU.
- MacBook (Retina, 12-inch, 2017)
- MacBook Air (13-inch, 2017)
- MacBook Pro (15-inch, 2016)
- MacBook Pro (13-inch, 2016, Four Thunderbolt 3 ports)
- MacBook Pro (13-inch, 2016, Two Thunderbolt 3 ports)
- Mac mini (2018)
- iMac Pro (2017)
- iMac (Retina 5K, 27-inch, 2017)
- iMac (Retina 4K, 21.5-inch, 2017)
- iMac (21.5-inch, 2017)
- Mac Pro (2019)
Any Mac in the lineup released before the models mentioned will never officially support Windows 11. Any Mac released after these models still running Intel-based processors will have the necessary requirements to run the operating system, but official support hasn’t been provided, and we’re not expecting it.
But, using a workaround, users can bypass the TPM 2.0 requirement. This means that, with the workaround, Windows 11 will work on any Mac capable of running Windows 10 that meets the other minimum specs.
How to install Windows 11 on Mac with a custom ISO file
Create a custom ISO file to install Windows 11 on Mac
What you need
- A Mac that meets the minimum system requirements for Windows 11
- Windows 10 ISO
- Windows 11 ISO
- Any ISO file maker app
Note that the Mac must meet the minimum system requirements to run Windows 11 like 64GB of storage and a dual-core processor. However, the workaround bypasses the TPM 2.0 requirement, so that can be ignored.
How to create a custom ISO file to bypass the Windows 11 TPM 2.0 requirement
- Mount the Windows 11 ISO file using DiskImageMounter
- Copy contents of the install media into a new folder on the desktop
- Unmount the Windows 11 image file
- Open the Windows 10 install image using DiskImageMounter
- Open the «sources» folder
- Copy «Install.wim» onto the desktop
- Unmount the Windows 10 ISO file
- Edit the «Install.wim» file extension using «Get Info» in the right click menu
- Select «Name & Extension» and rename the file to «Install.esd»
- Open the new folder containing the Windows 11 ISO contents from earlier
- Open the «sources» folder
- Delete the «Install.esd» file located there
- Move the new «Install.esd» file you modified into the «source» folder
- Use an ISO file maker app to convert the Windows 11 folder into an ISO file
Install Windows 11 from a custom ISO file in Boot Camp
- Open Boot Camp
- Choose the custom ISO file for the «ISO Image»
- Click «Install»
The Windows 11 installer should run via Boot Camp from here. Follow the on-screen prompts to get Windows 11 up and running.
The Windows 11 Boot Camp installer will be open when the operating system boots for the first time. Follow the prompts to get the compatibility drivers installed and finish the installation.
We do not recommend this procedure for most. There are no guarantees that the updates between reveal and release will not break the installation, and it remains to be seen if Microsoft will implement more robust TPM 2.0 checks prior to launch.
On October 5 2022 Microsoft officially released Windows 11. This article provides detailed instructions on how to create a Windows 11 virtual machine on a Mac with an Intel processor. To learn more on how to install a new Windows 11 virtual machine on Mac computers with Apple silicon please refer to KB 125375.
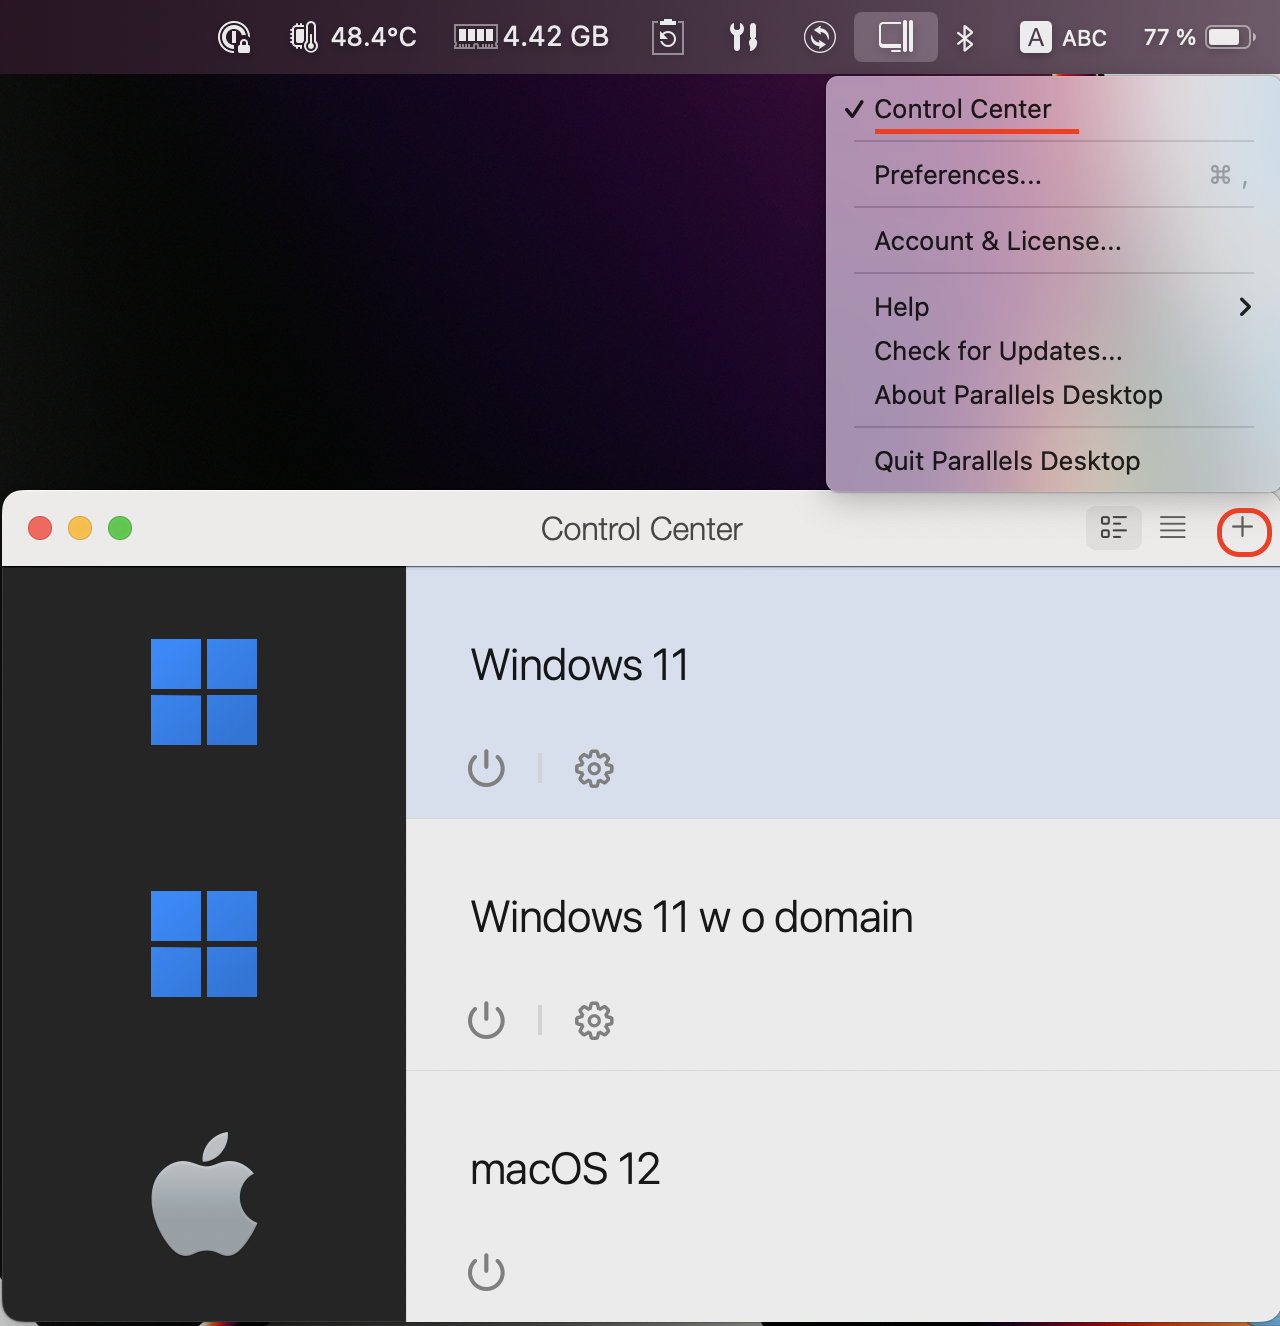
Install Windows 11 automatically
Starting with Parallels Desktop 18, you can create a Windows 11 virtual machine automatically just with a few clicks.
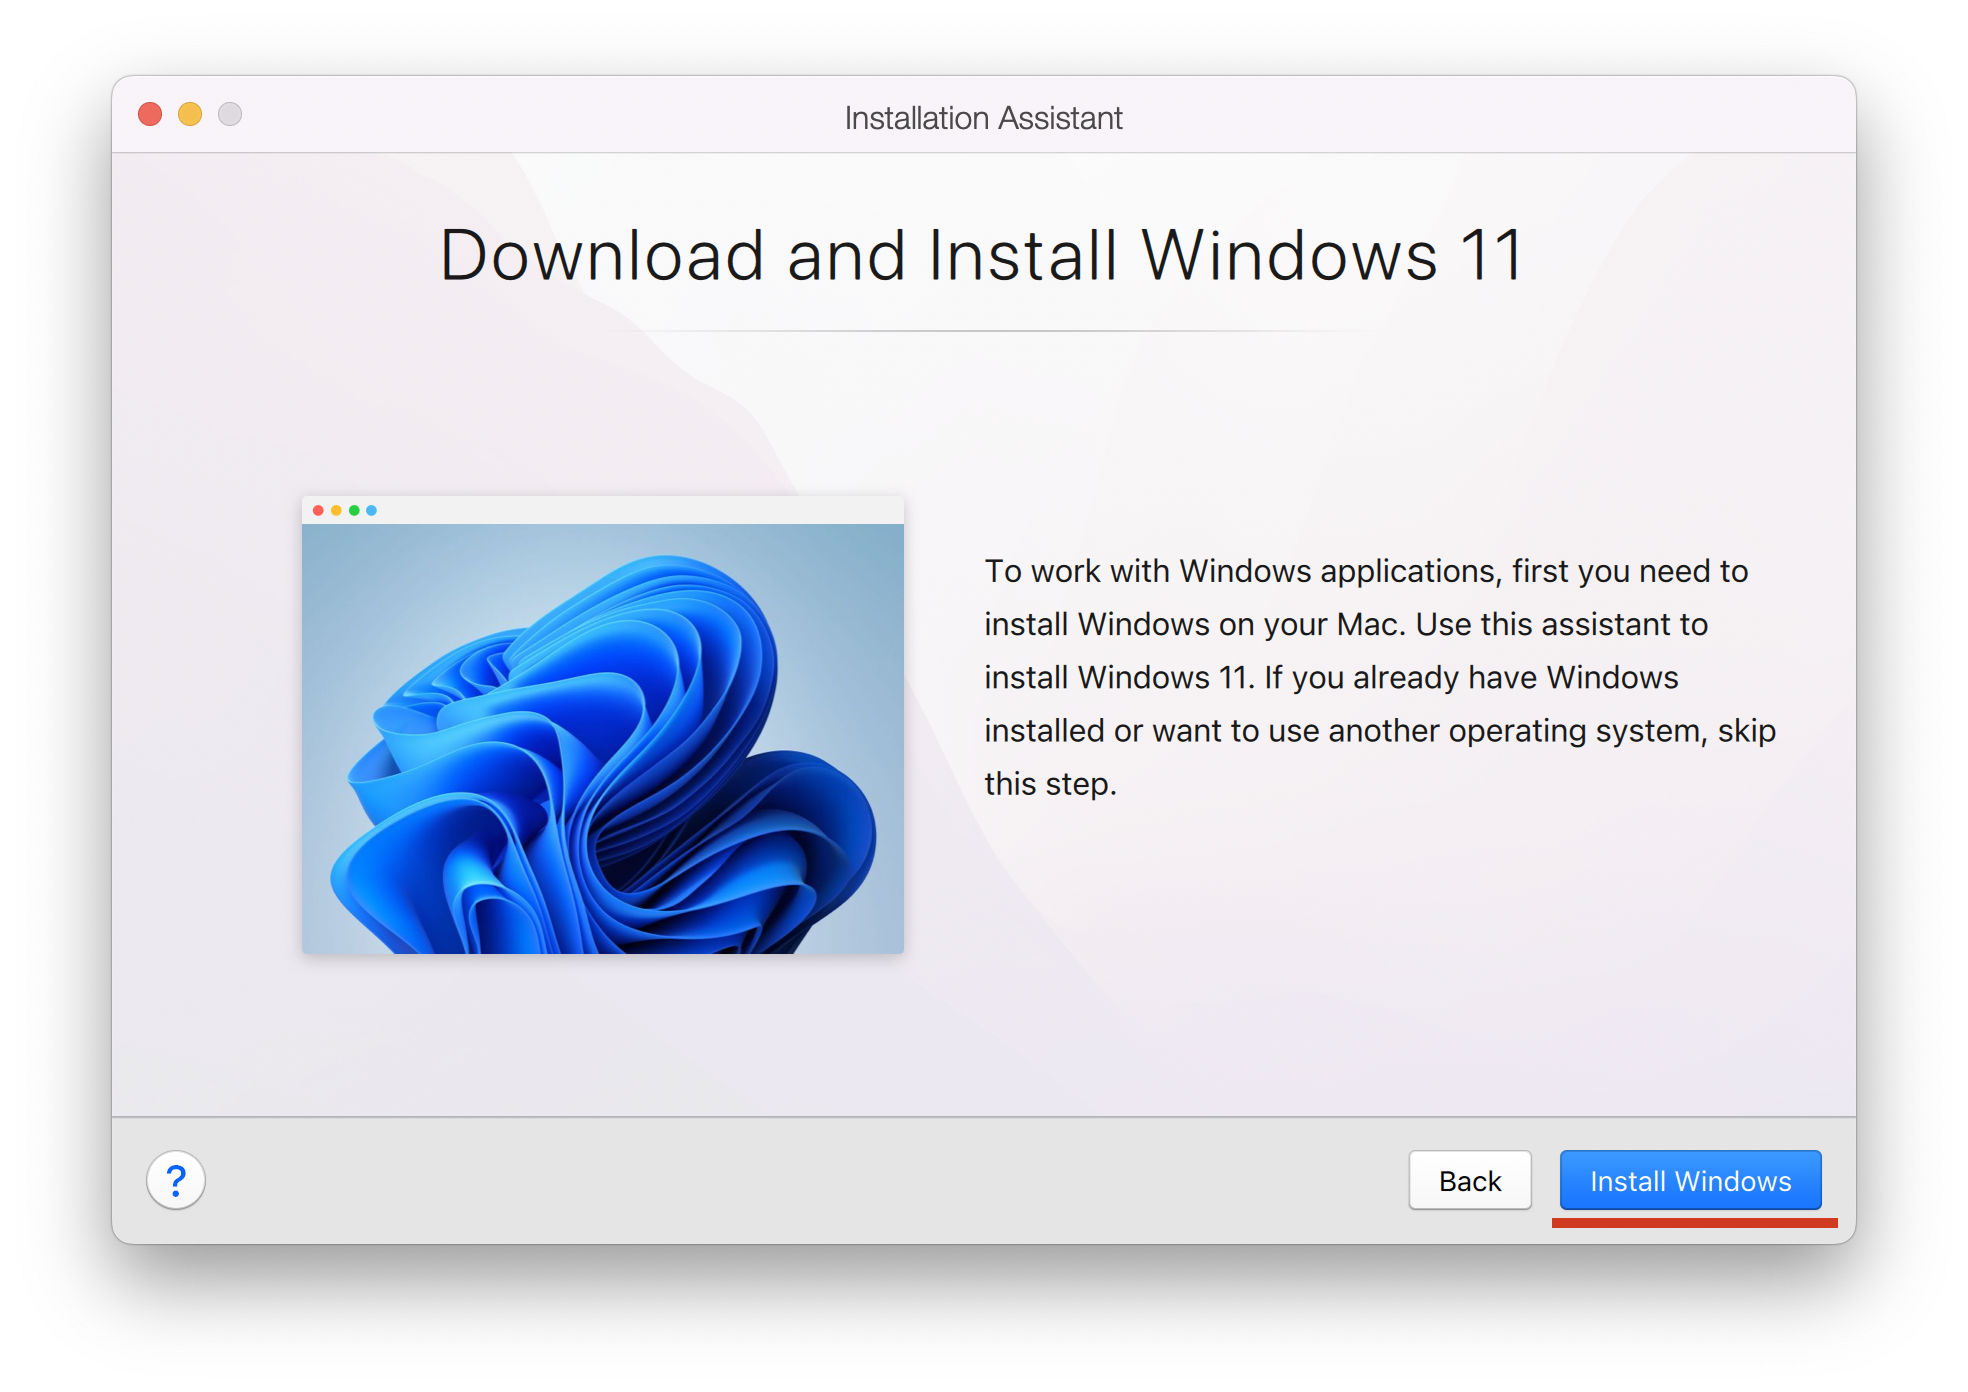
To install Windows 11, run Parallels Desktop, then click on the Parallels icon in the Mac menu bar > Control Center > + > Get Windows 11 from Microsoft > Continue > Install Windows.
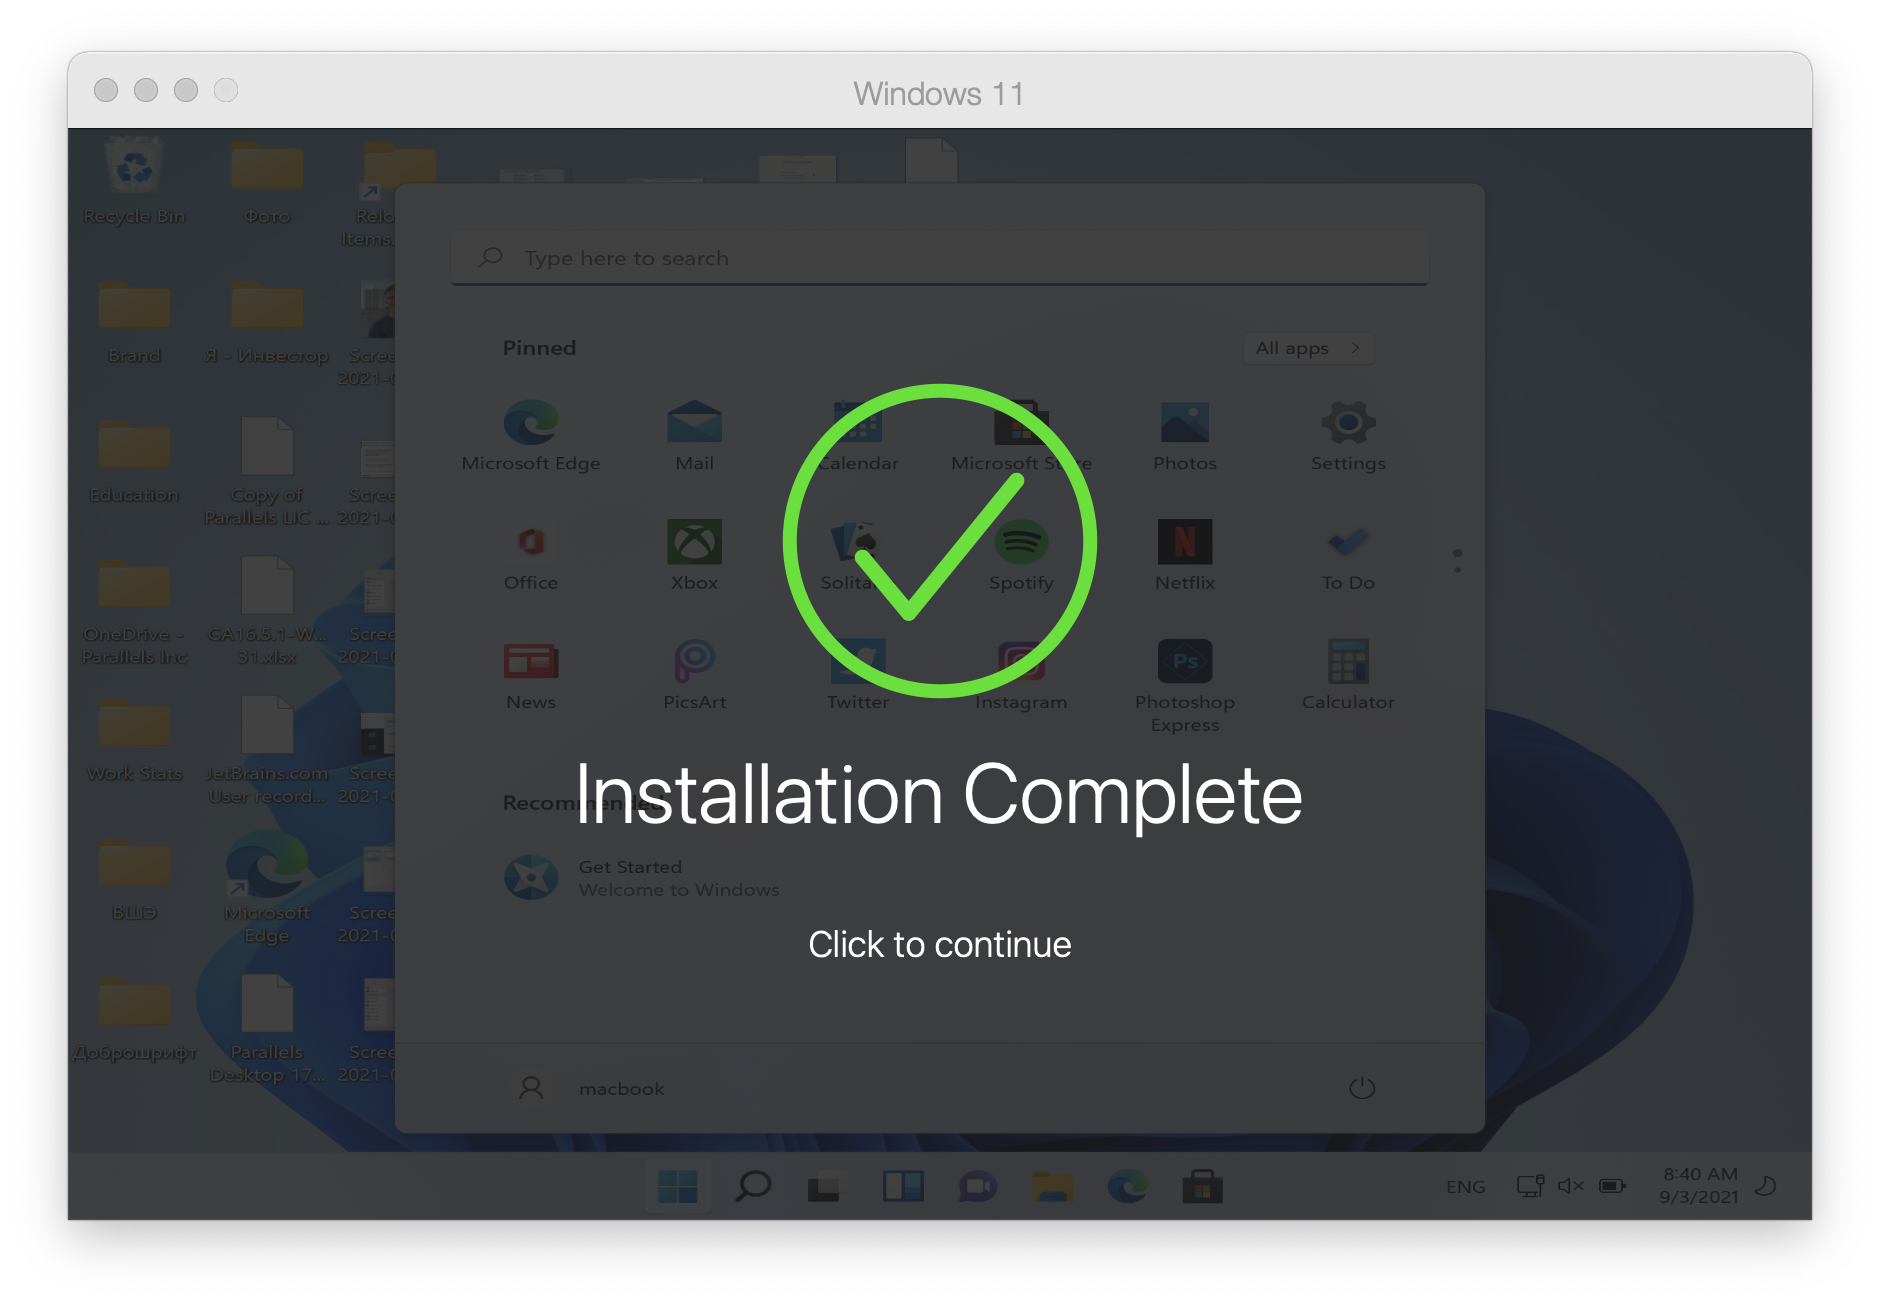
Windows will be downloaded and installed automatically. Once the installation process is over, you’ll get the Installation Complete prompt.
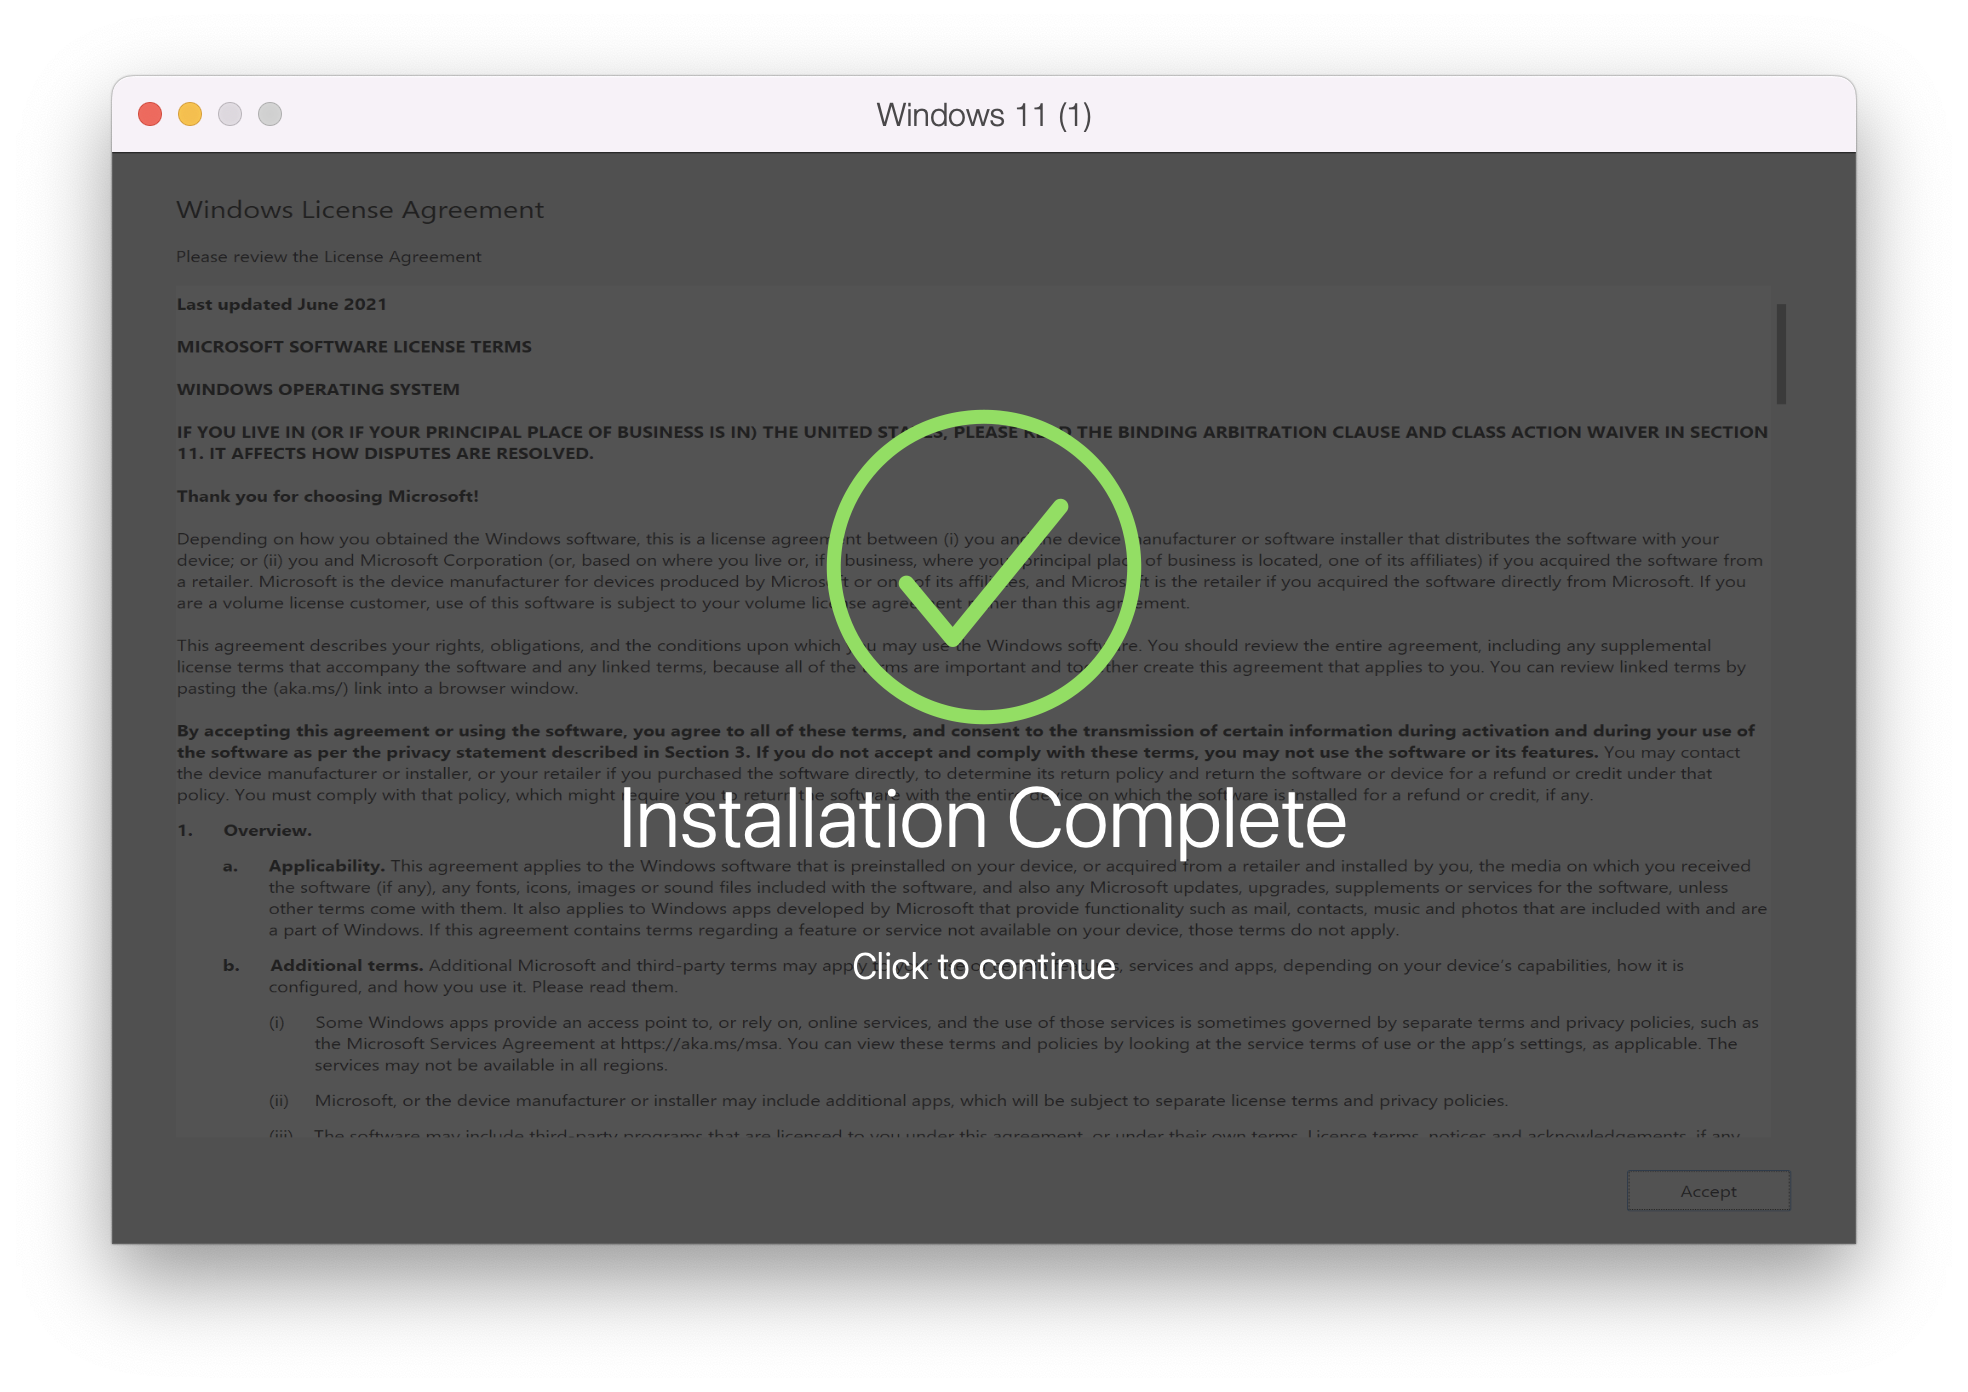
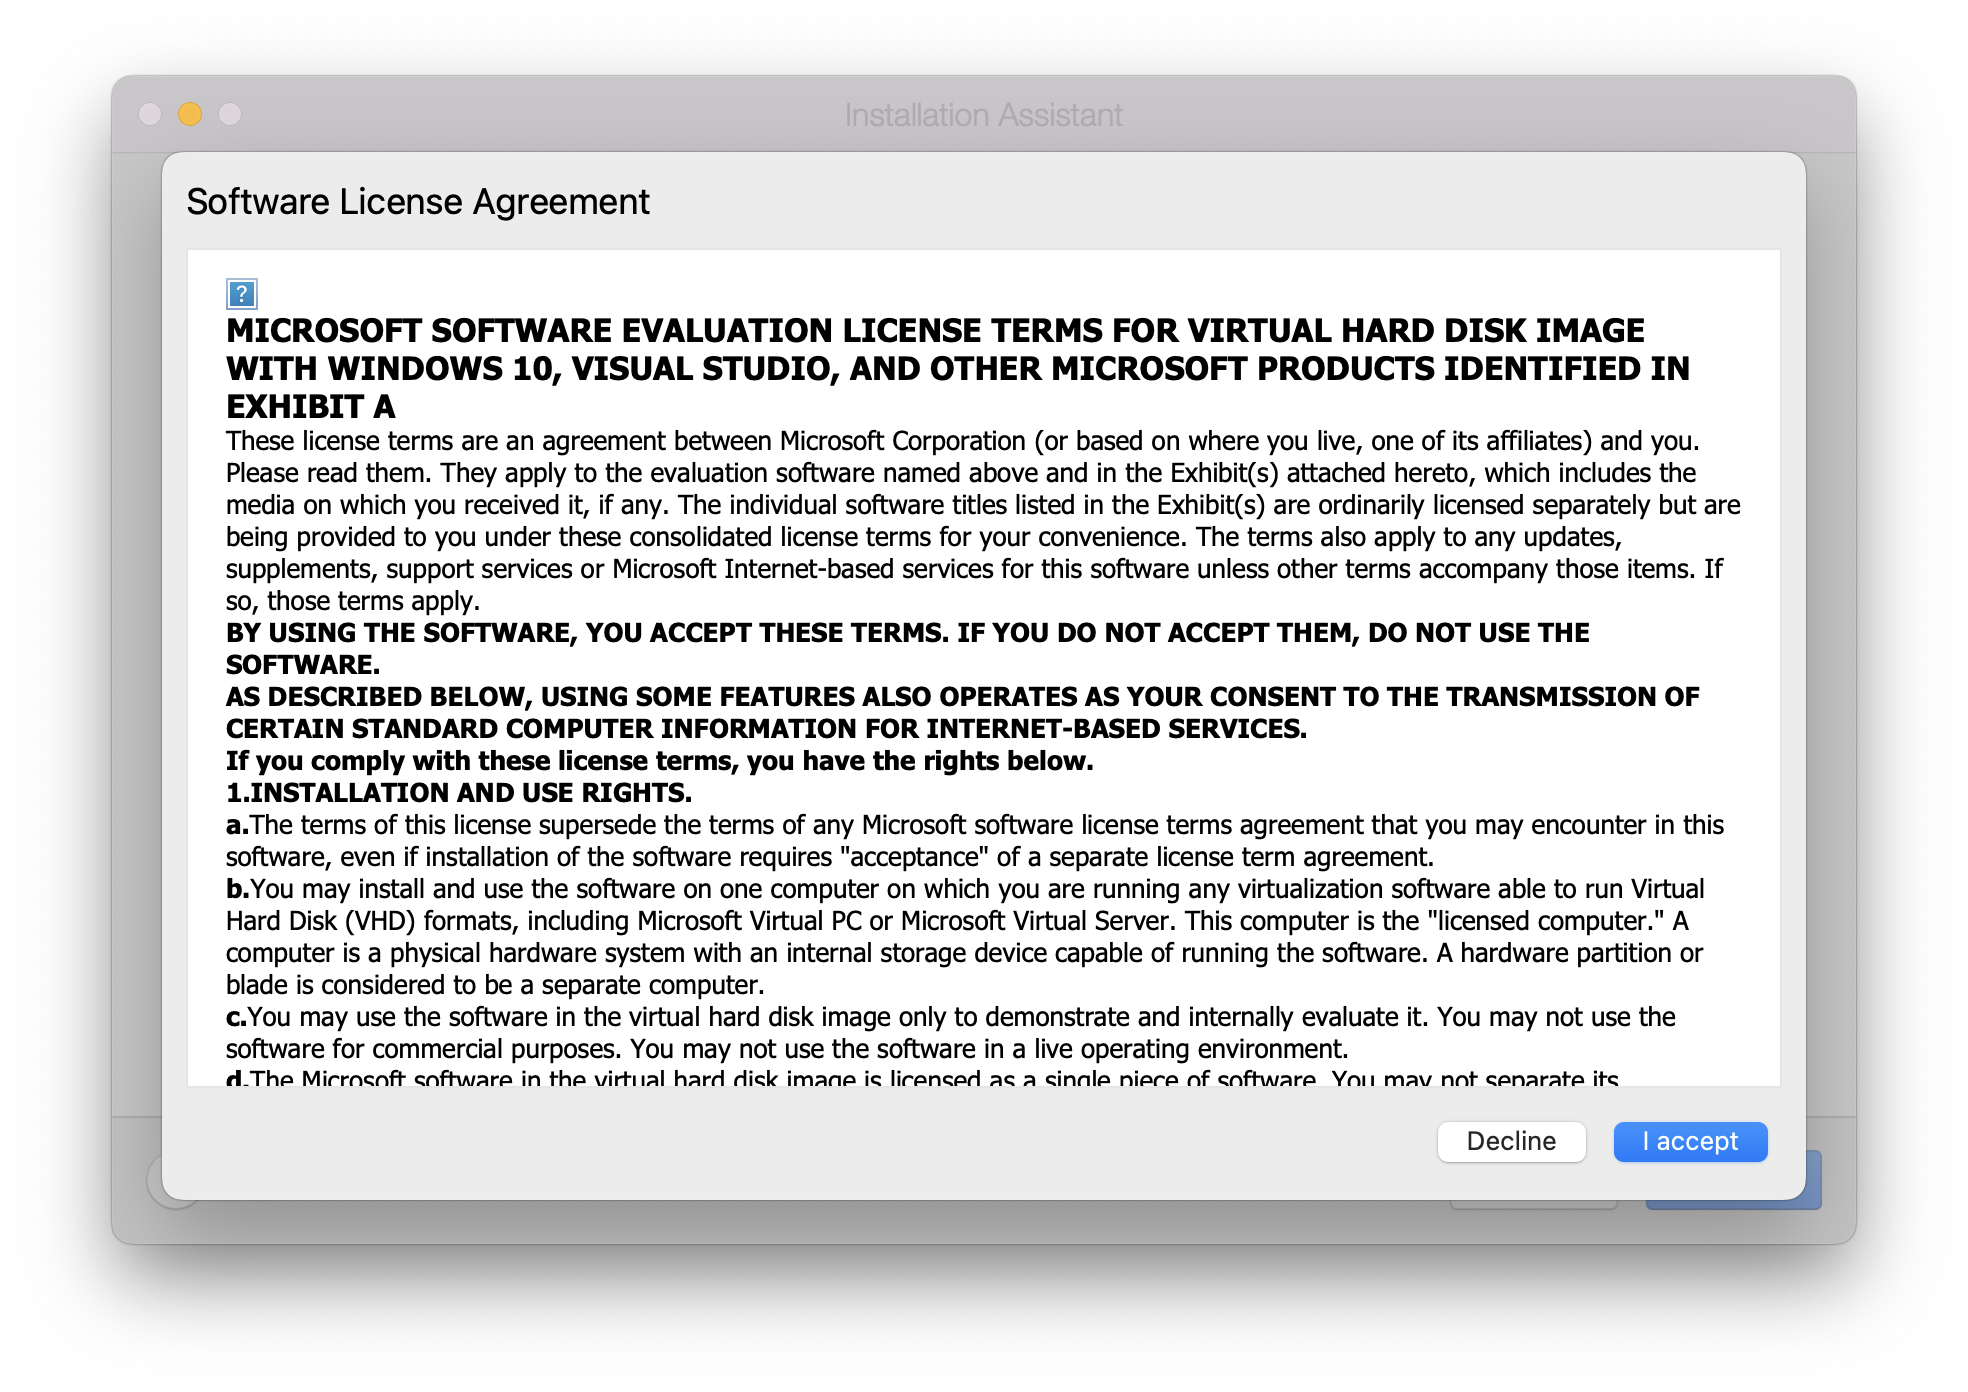
Upon clicking it, you’ll be presented with the Microsoft EULA. Click I accept to complete the process.
Install Windows 11 or other Windows manually
Note: Starting with Parallels Desktop 17.1.0, a virtual TPM chip is added automatically to new Windows 11 virtual machines.
1. To install a new Windows 11 virtual machine, you need to download an official installation image first
Download Windows 11 ISO
Note: If you haven’t installed Parallels Desktop yet, download and try it for free.
2. Once the image is downloaded:
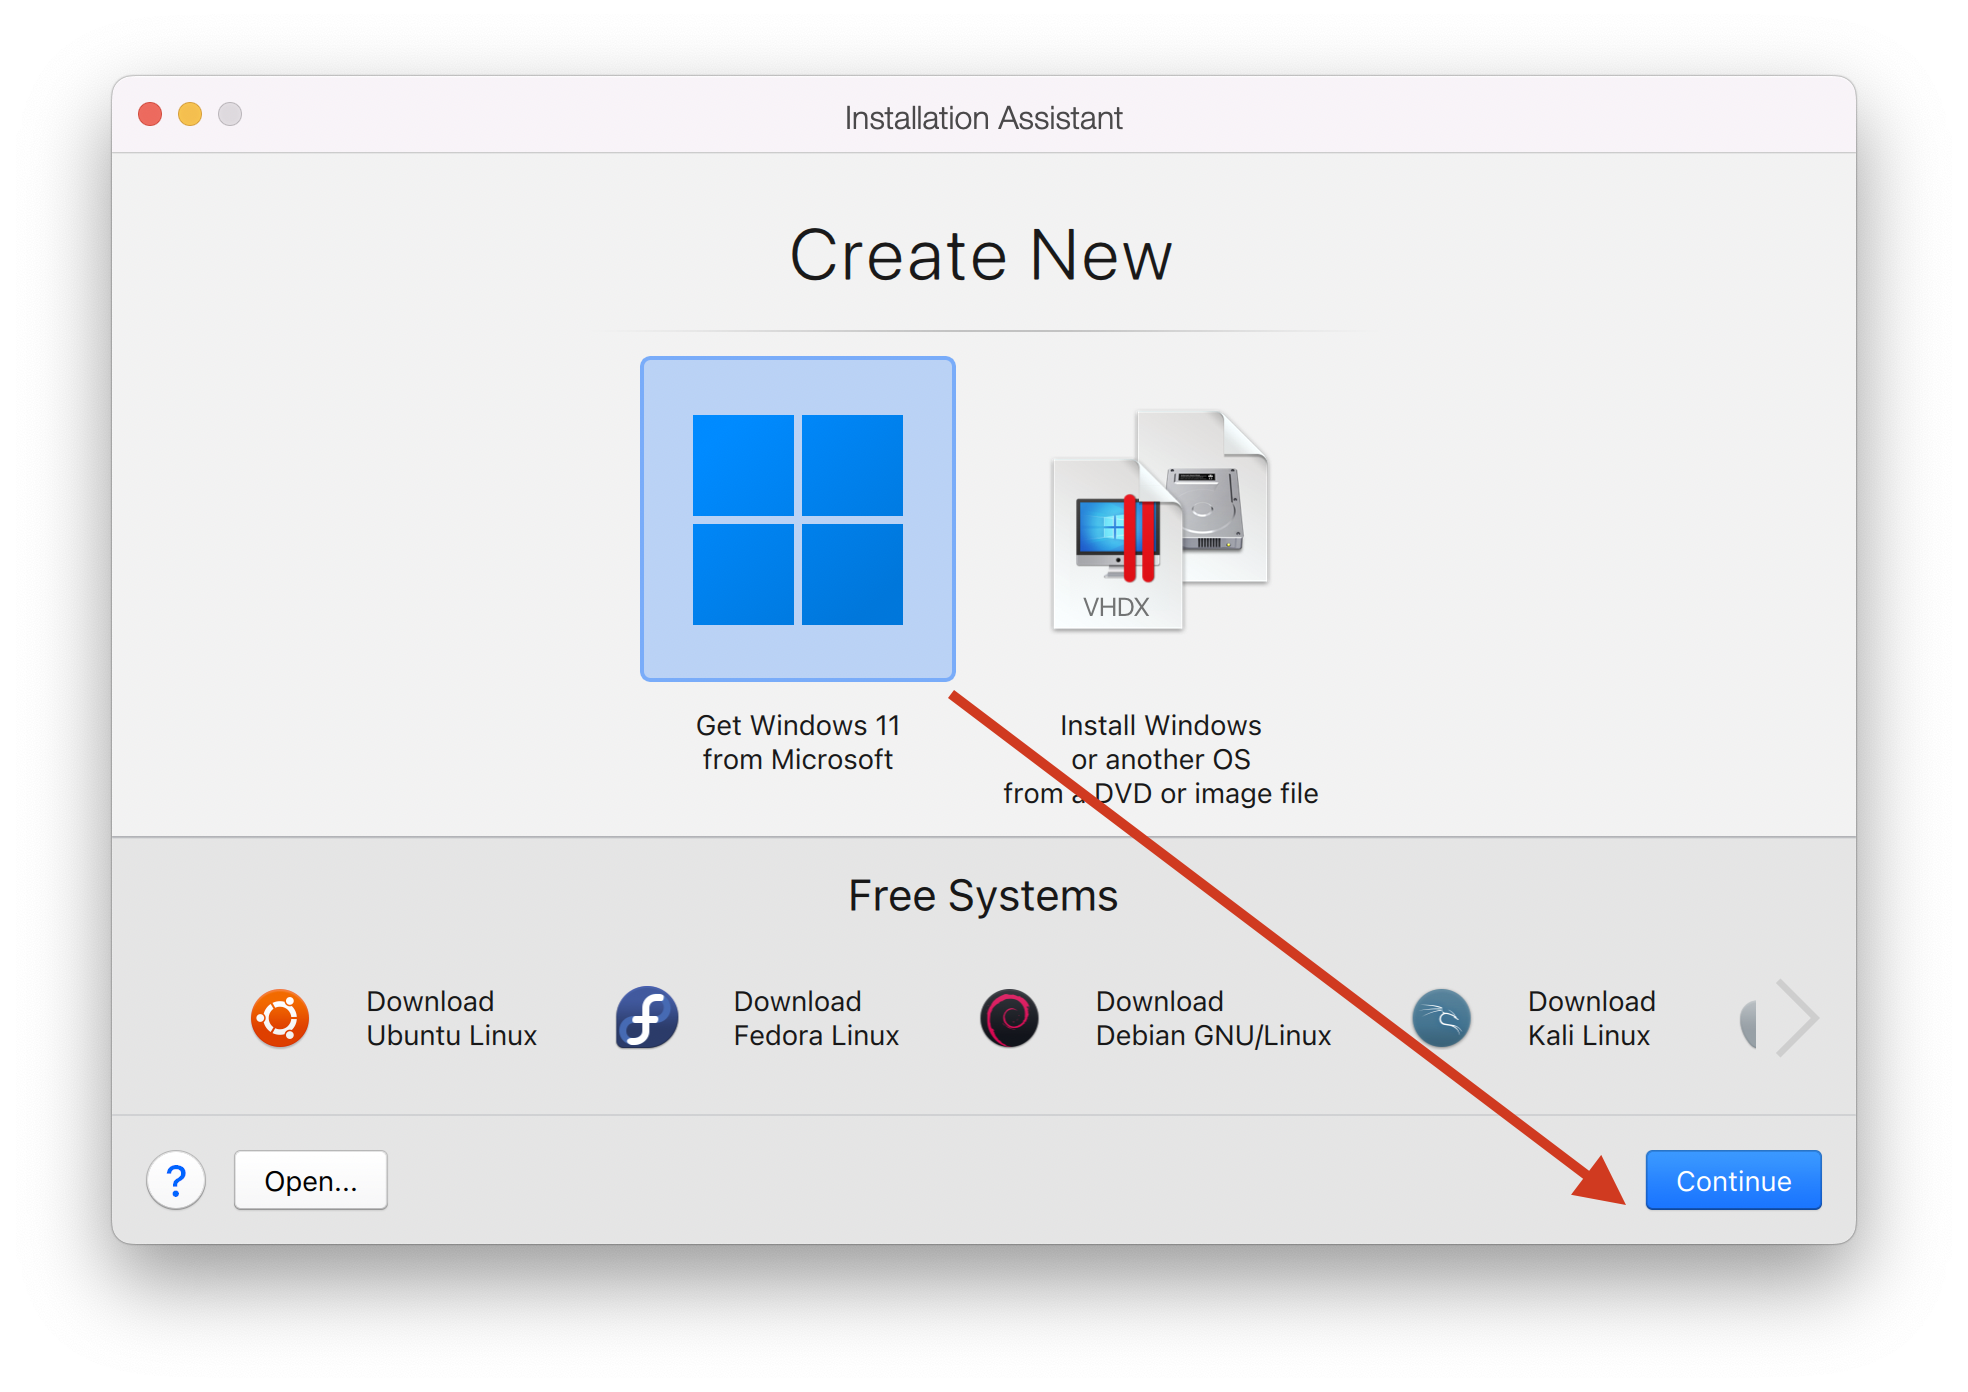
- Click [+] «plus» button in Parallels Desktop Control Center to start a new virtual machine installation

- Select Install Windows or another OS from a DVD or image -> Continue
- Navigate to Windows 11 installation .iso image if it was not recognized automatically
- Follow Installation Assistant instructions until the installation is complete.
You can also choose to use a different version of the Windows operating system, and can follow the same steps but acquire a different installation image for step 1:
To get the installation image for Windows 10, visit the page to Download Windows 10 from Microsoft.
To get the installation image for Windows 8.1, visit the page to Download Windows 8.1 from Microsoft.
To get the installation image for Windows 7, visit the page to Download Windows 7 from Microsoft. Please be advised you need a key from Windows 7 to download the ISO.
However, it’s important to note, that due to Microsoft having stopped the support for some of the systems, Parallels Tools updates may not be available for certain systems, for more details please see Legacy Windows Support article.
Please note that customers who install guest operating systems in Parallels Desktop virtual machines are responsible for making sure that they are compliant with each OS’s end-user licensing agreement (EULA).
Windows 11‘s compatibility checks for Secure Boot and TPM 2.0 don’t translate well on Intel Mac hardware. So, for example, if you try to use the official Windows 11 ISO from Microsoft in macOS 12 Monterey, the Boot Camp Assistant will fail to procure the necessary drivers or stall at Windows Setup.
Thankfully, you can install Windows 11 in macOS Monterey using Boot Camp with a workaround. It requires upgrading a standard Windows 10 Boot Camp installation to Windows 11 with an automated batch script that bypasses the operating system’s stringent system requirements.

The following method is also secure and less complicated than alternative ways of installing Windows 11 on Mac that you may have read about (such as those involving a modified ISO or bootable USB drive).
Note: If you already have Windows 10 set up on your Intel MacBook Air, MacBook Pro, iMac, or Mac mini, skip to the section that focuses on upgrading it to Windows 11.
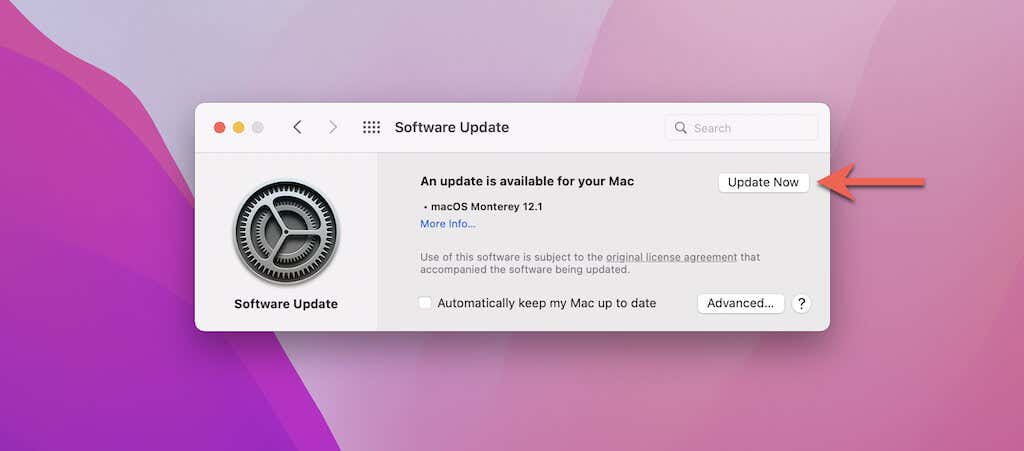
Update Your Mac
You can use the instructions in this tutorial to run Windows 11 on all macOS Monterey-compatible Intel Macs. However, to minimize the chances of running into any Boot Camp Assistant errors, we recommend that you install all available macOS Monterey point updates before you begin.
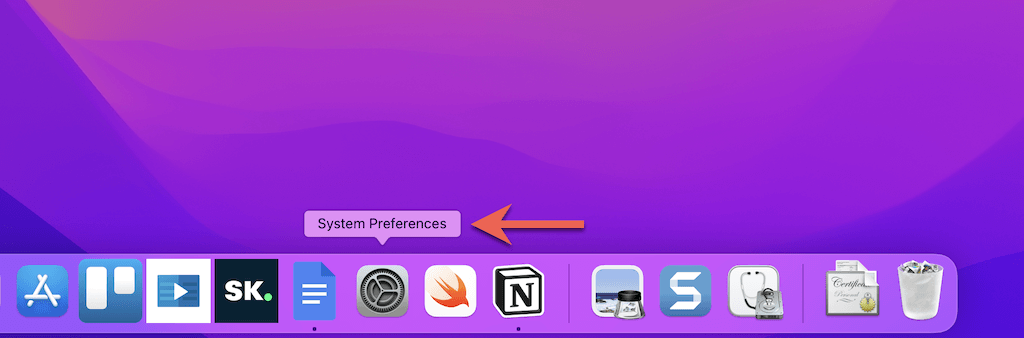
1. Open the System Preferences app.
2. Select Software Update.
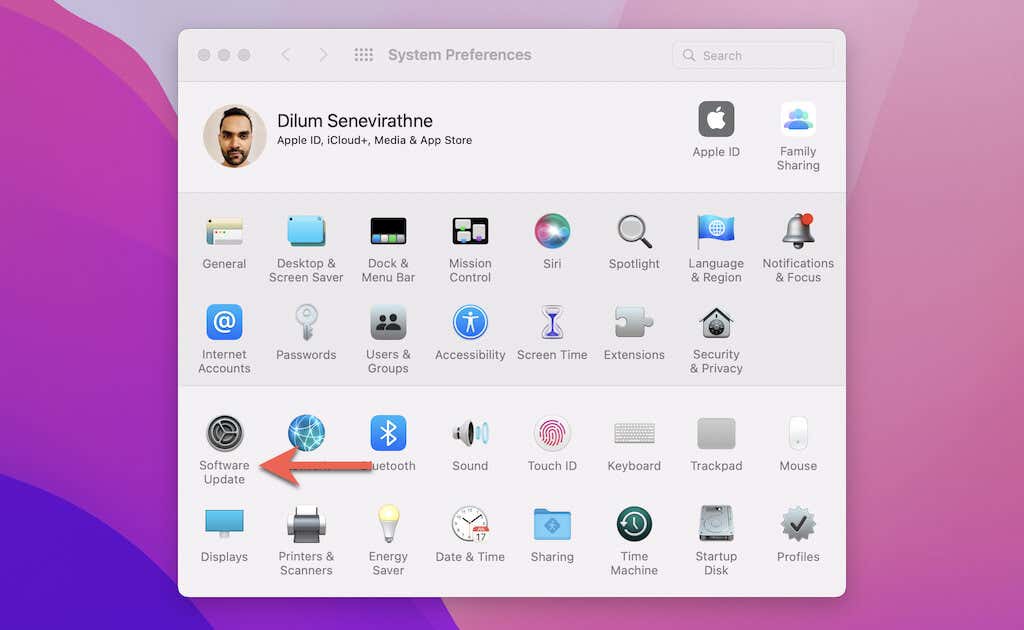
3. Select Update Now to update your Mac to the latest version of macOS Monterey.
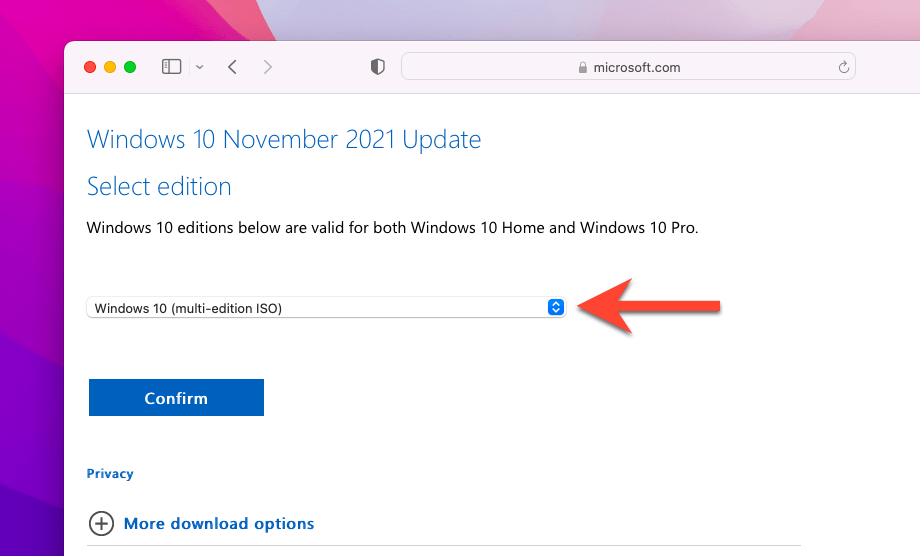
Download Windows 10 ISO
Since you must install Windows 10 on your Mac first, the next step involves downloading an up-to-date copy of a 64-bit Windows 10 ISO image file from Microsoft.
1. Visit the Download Windows 10 Disc Image (ISO File) page on the Microsoft website using Safari or another web browser.
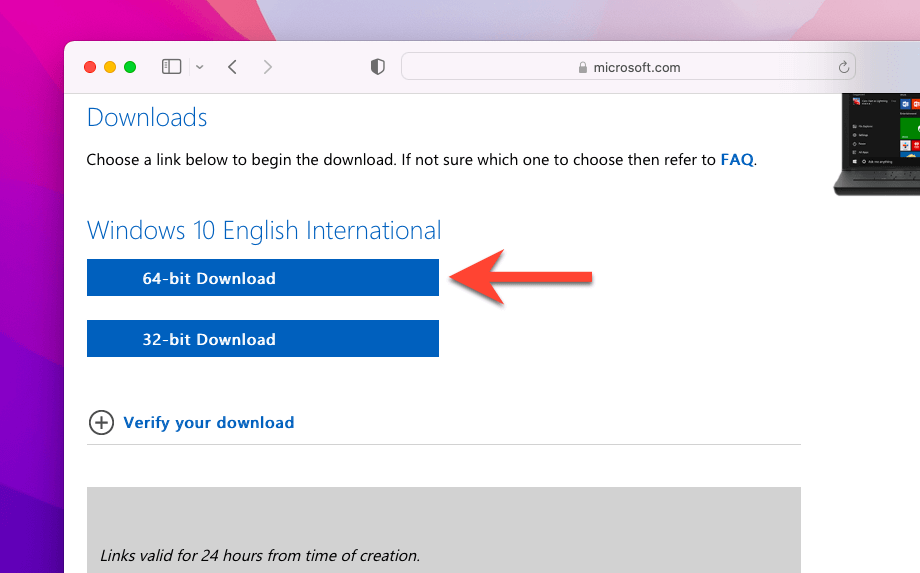
2. Pick the latest version of Windows 10, choose a language (e.g., English or English International), and select Confirm.
3. Select 64-bit Download and wait until your web browser downloads the ISO file to your Mac.
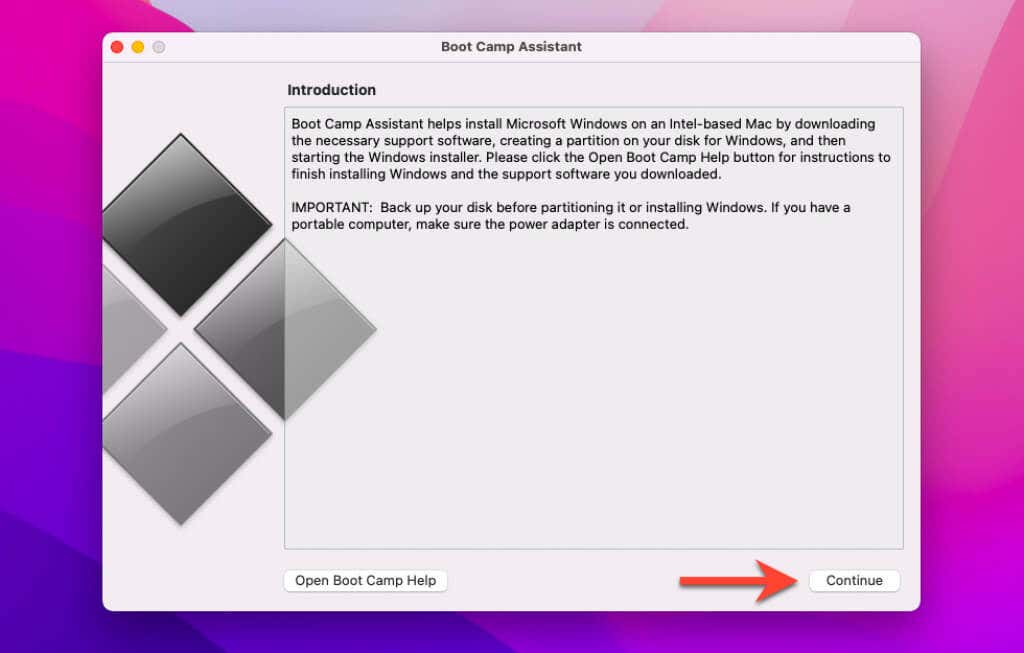
After downloading the ISO file, you can start installing Windows 10 on your Mac. Just make sure to have at least 50 gigabytes of free space before you begin.
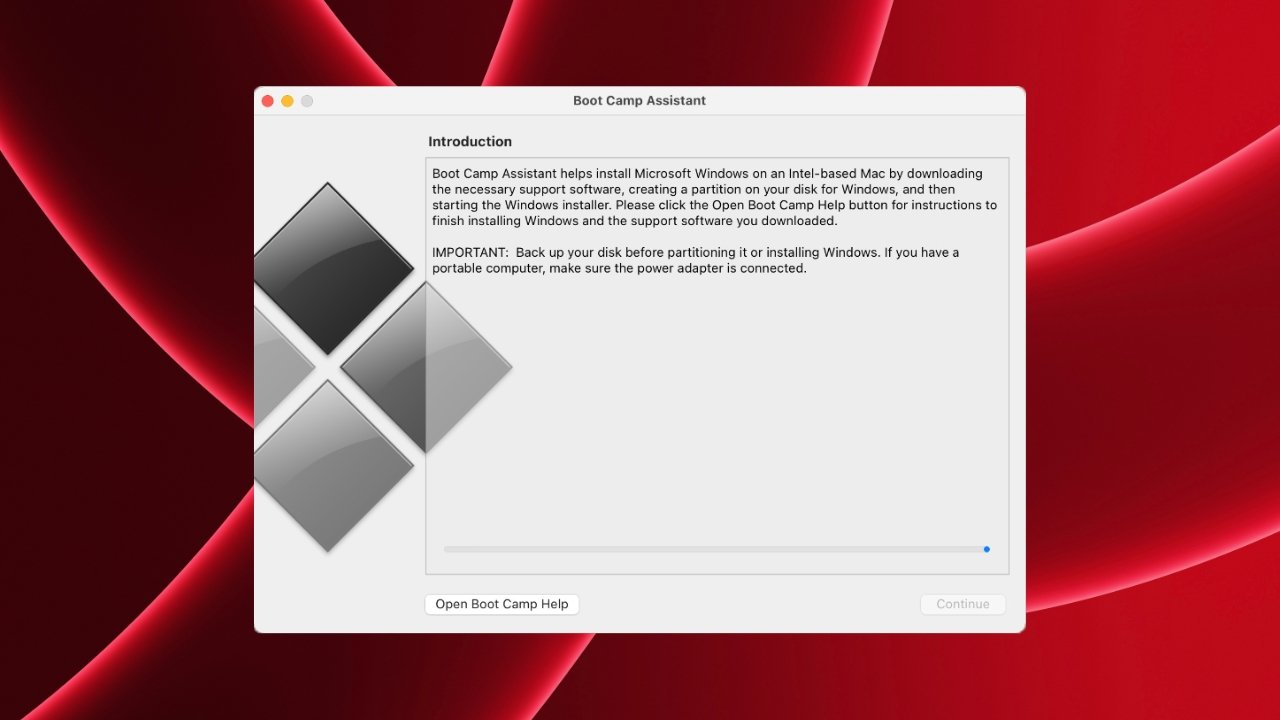
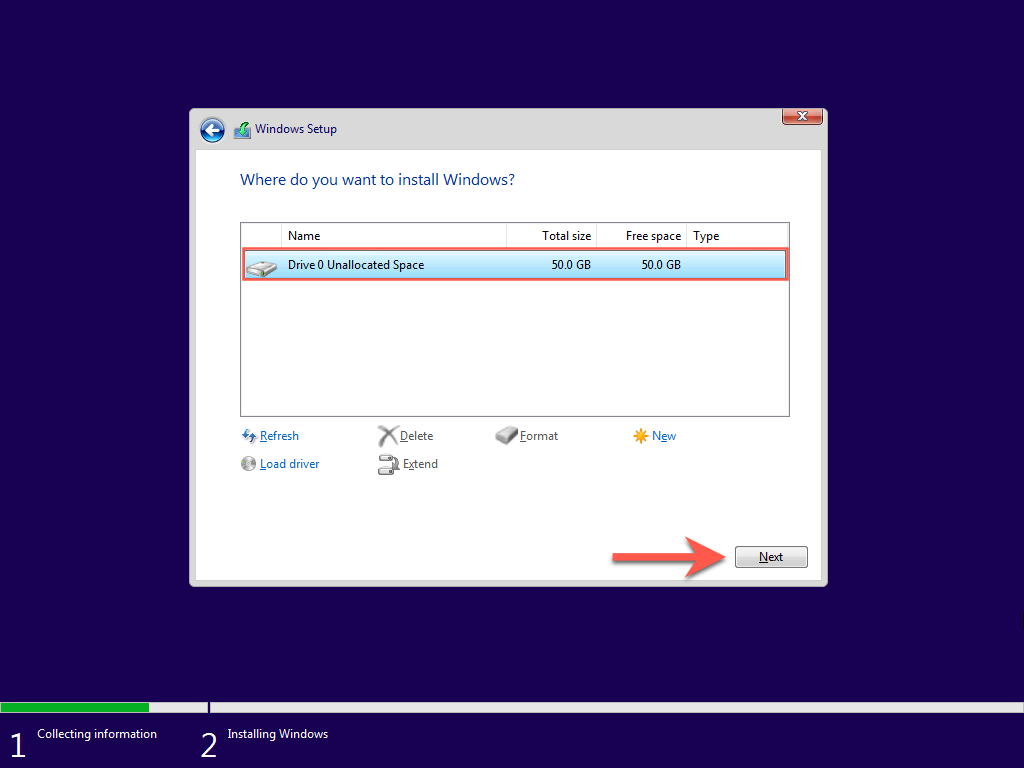
1. Open Boot Camp Assistant via the Mac’s Launchpad.

Note: Boot Camp Assistant is only available on Intel-based Macs. If you use an Apple Silicon M1 Mac, you can’t install Windows via Boot Camp.
2. Select Continue.
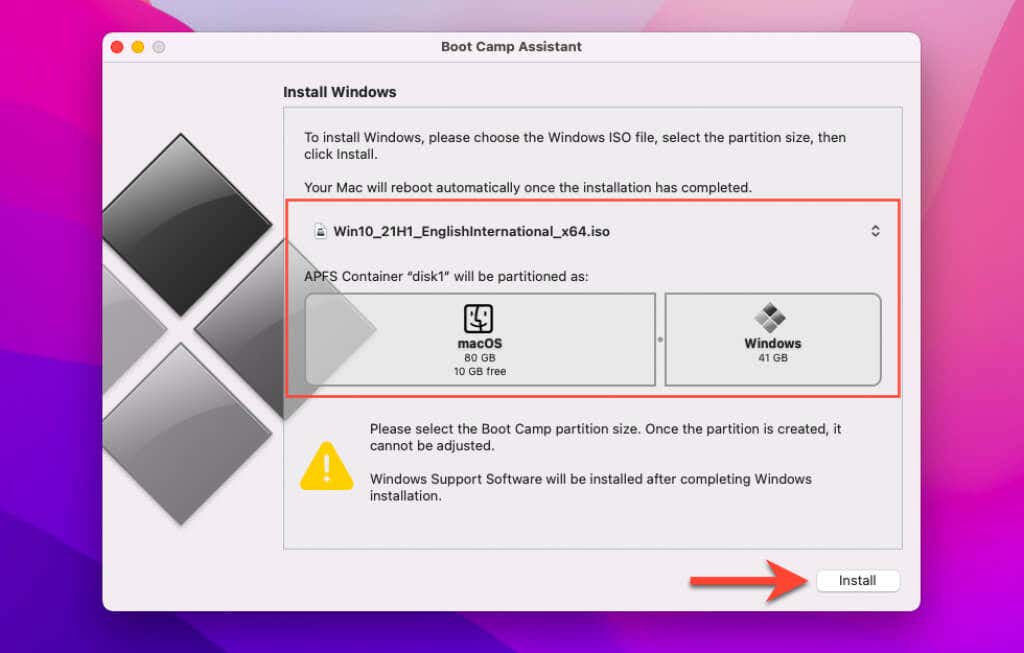
3. Pick the downloaded ISO file from your Mac’s Downloads folder and specify a size for the Windows partition. Then, select Install.
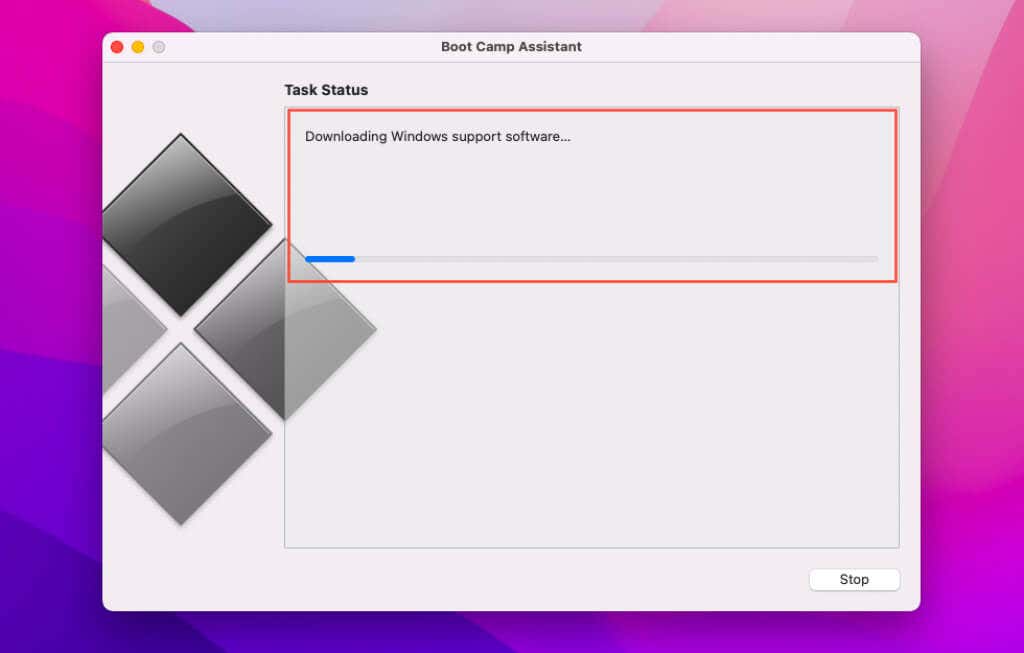
4. Boot Camp Assistant will begin to download Windows support software. Once that finishes, it will create a Windows OS partition and boot your Mac into the Windows Installer.
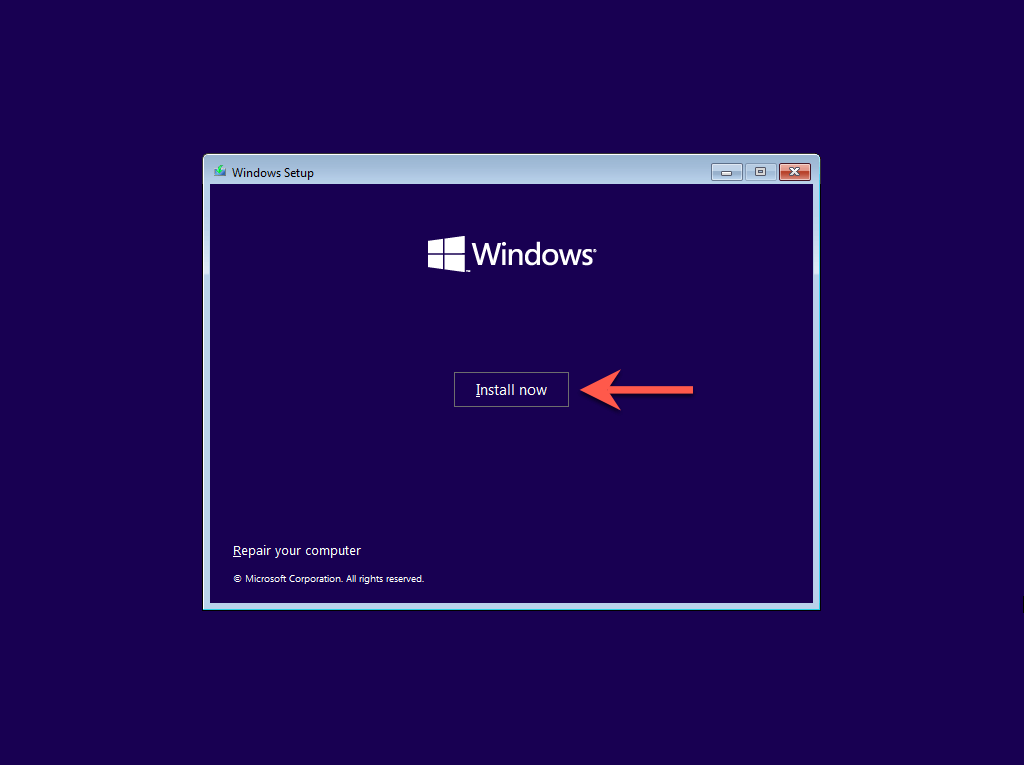
5. Select Install now on the Windows Setup screen.
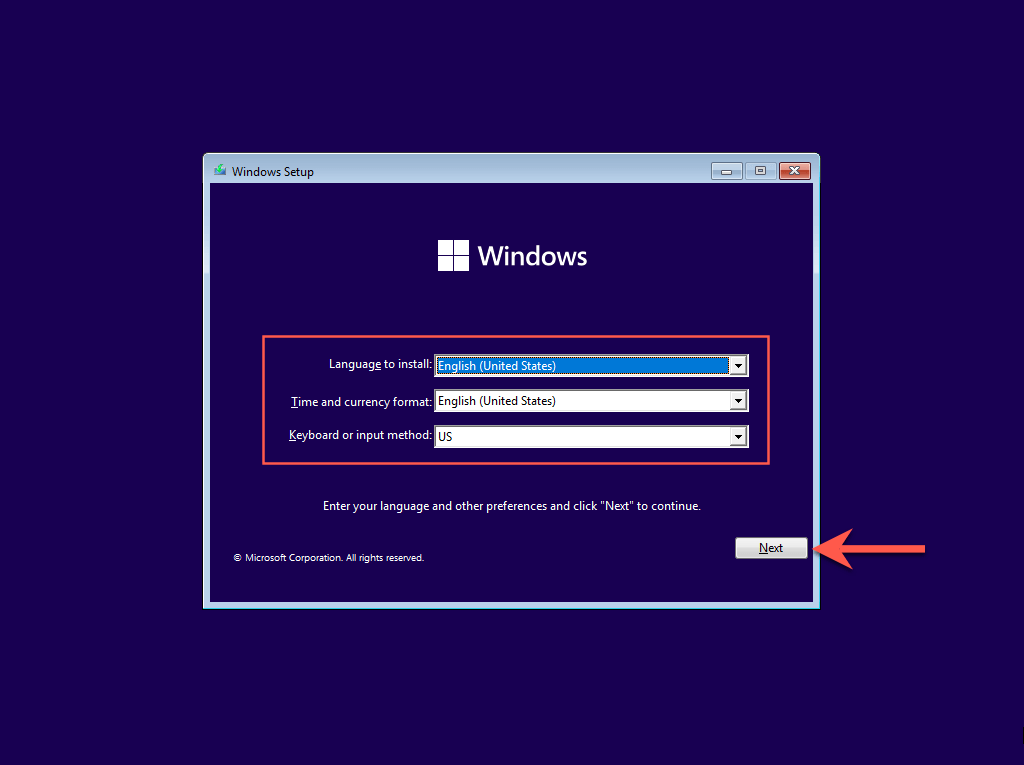
6. Select your language, time and currency format, and keyboard layout. Then, select Next.
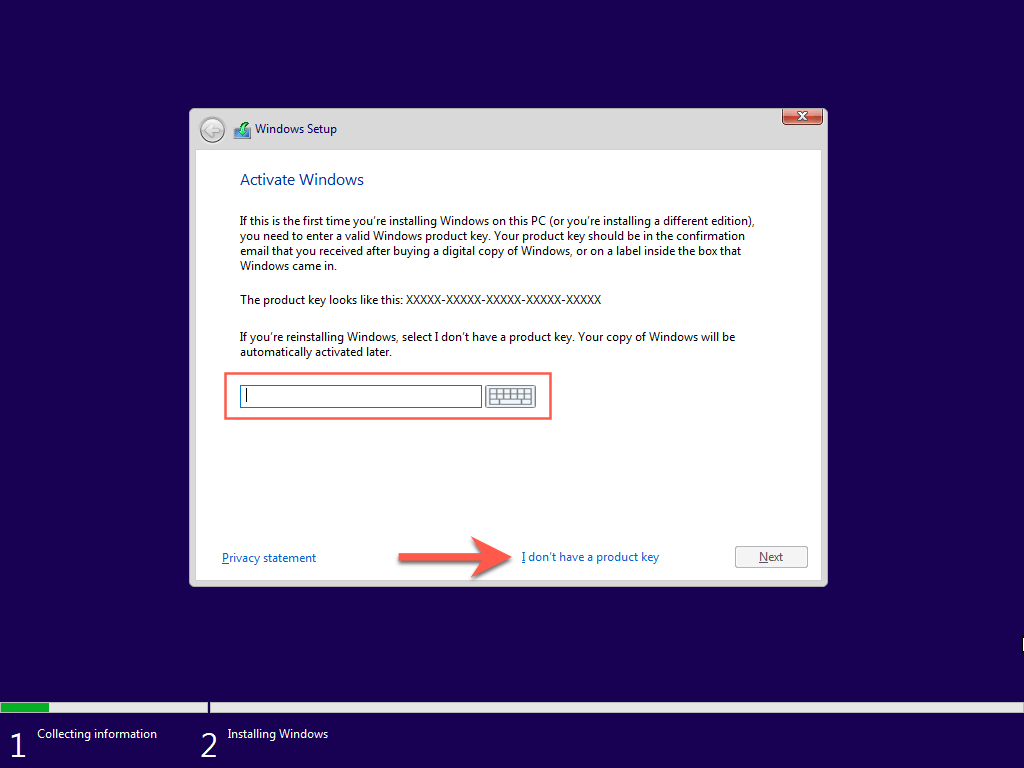
7. Enter your Windows product key. If you don’t have one, select I don’t have a product key.
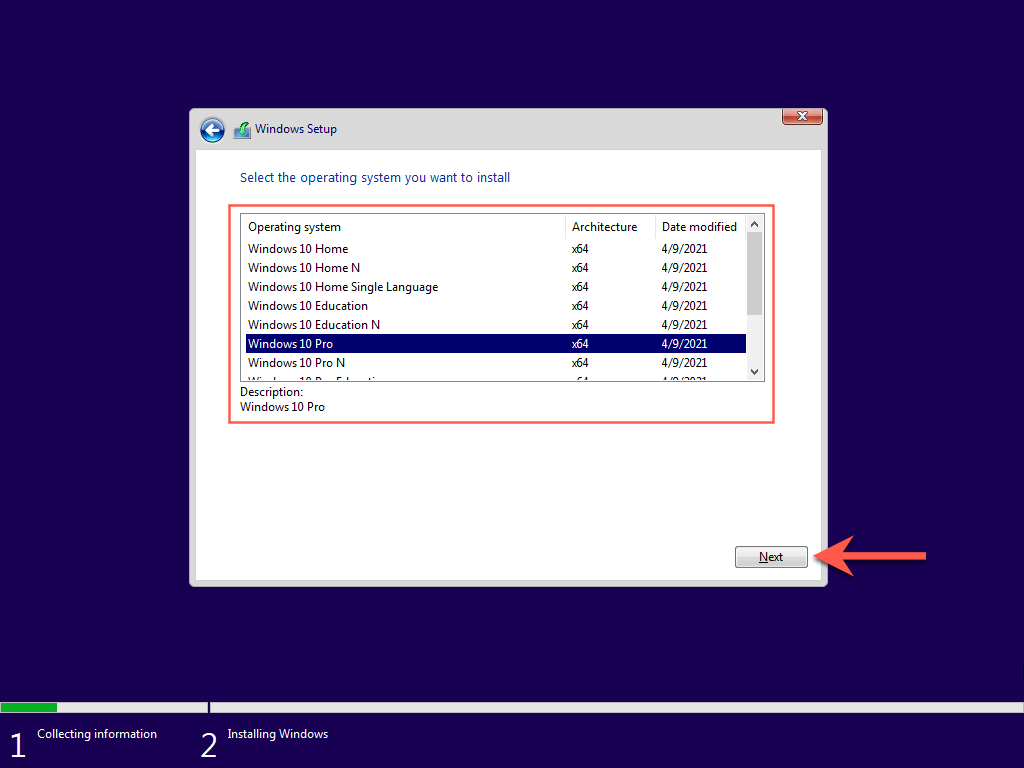
8. Pick the edition of Windows you want to install—Windows 10 Home or Windows 10 Pro—and select Next. Learn about the difference between the versions.
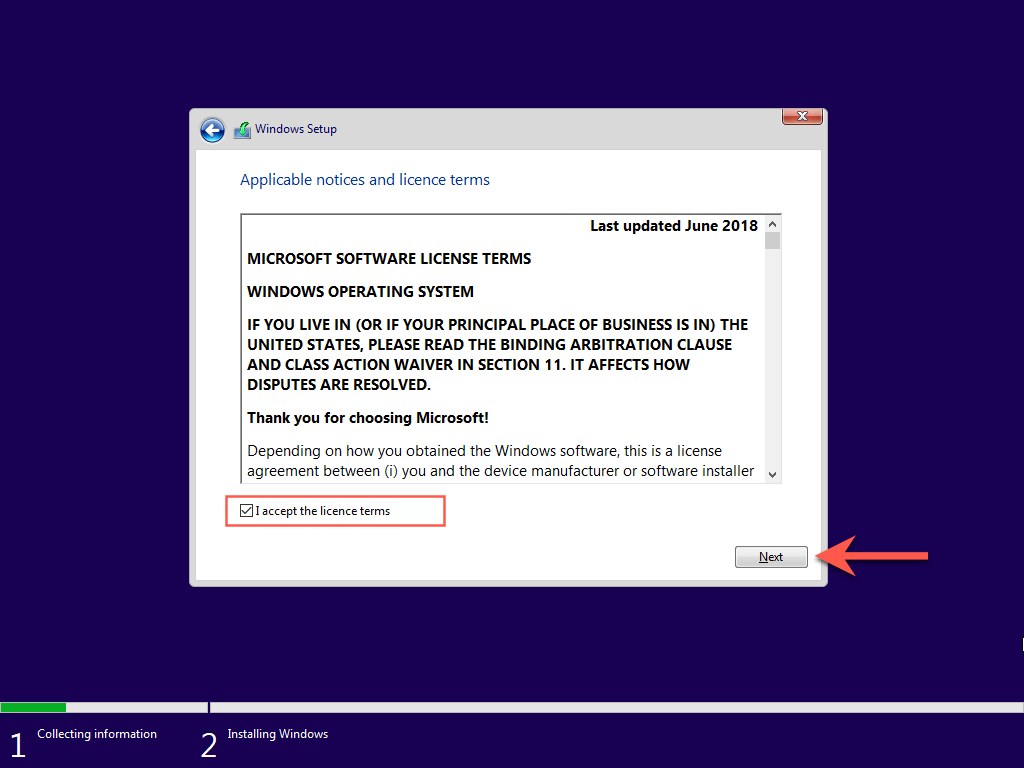
9. Agree to the Microsoft software license terms and select Next.
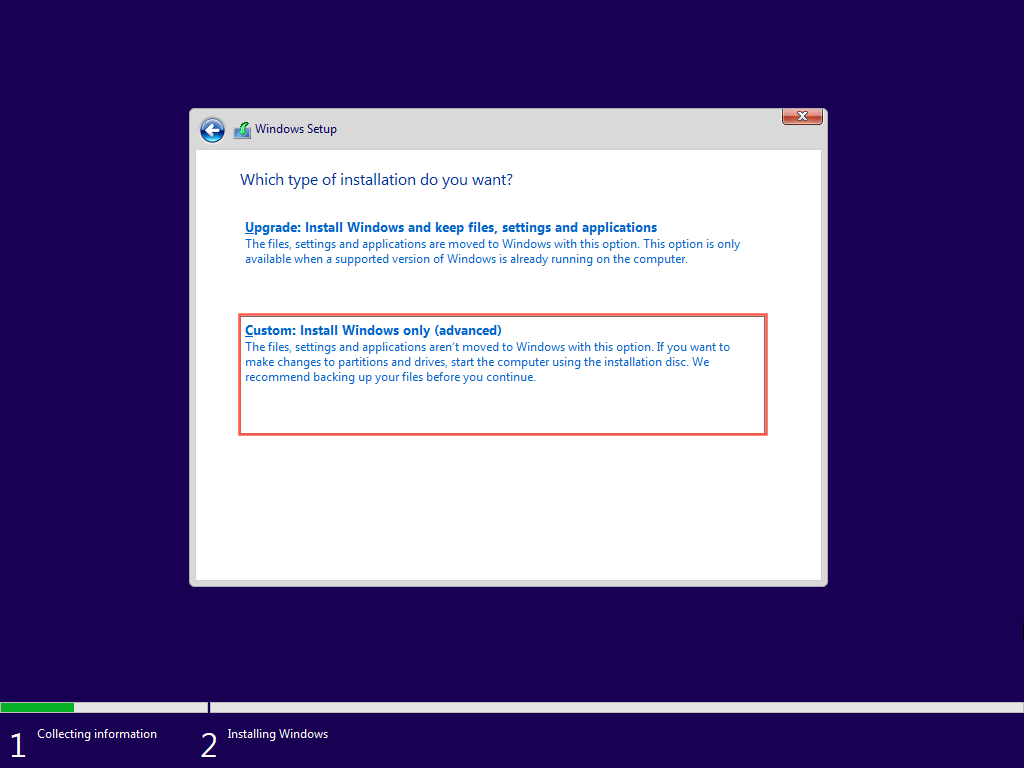
10. Select Custom: Install Windows only (advanced).
11. Pick your BOOTCAMP (Windows) partition and select Next.
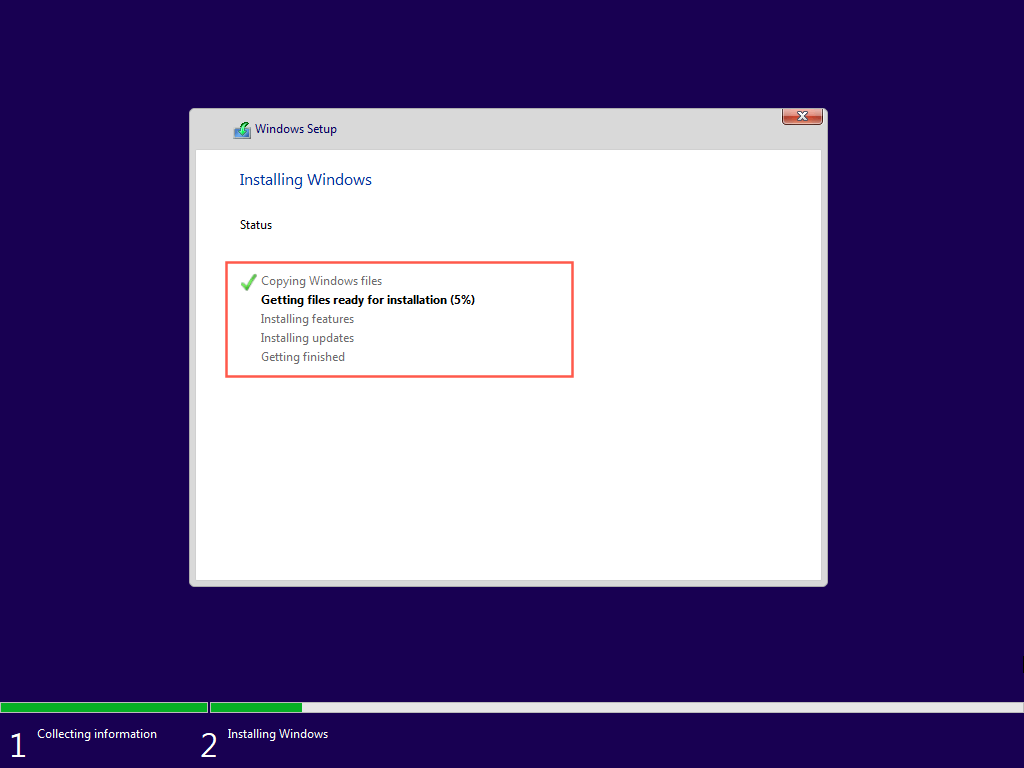
12. Wait until the Windows Setup finishes installing Windows 10 on your Mac.
Set Up Windows 10 on Mac
Once the Windows Setup finishes installing Windows 10, you must specify your language, keyboard, and privacy preferences. You must also create a Windows user account.
Note: Windows Setup will not connect to the internet due to missing network drivers. You can restore online connectivity after reaching the Windows 10 desktop.
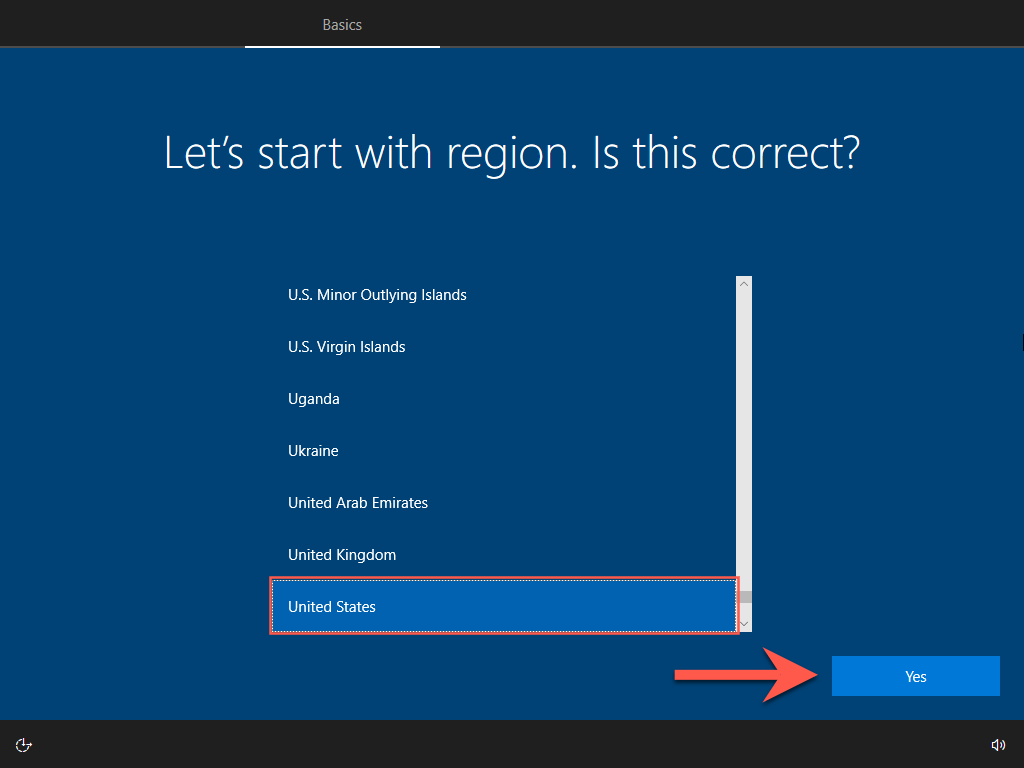
1. Choose a region and select Yes.
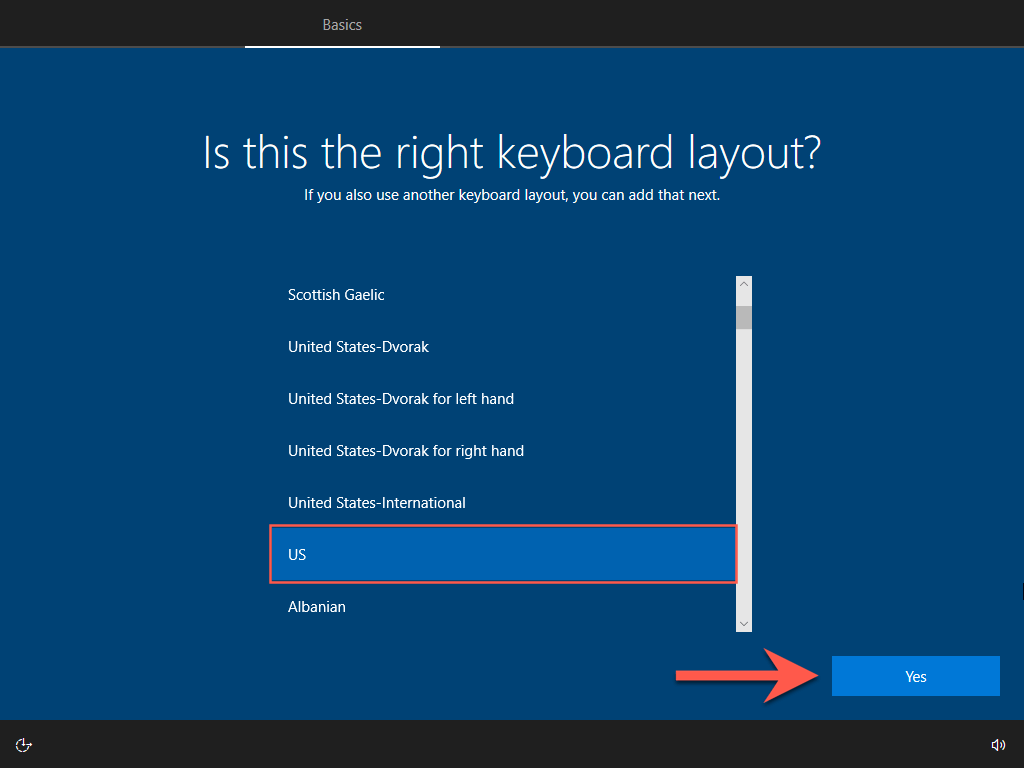
2. Pick a keyboard layout and select Yes.
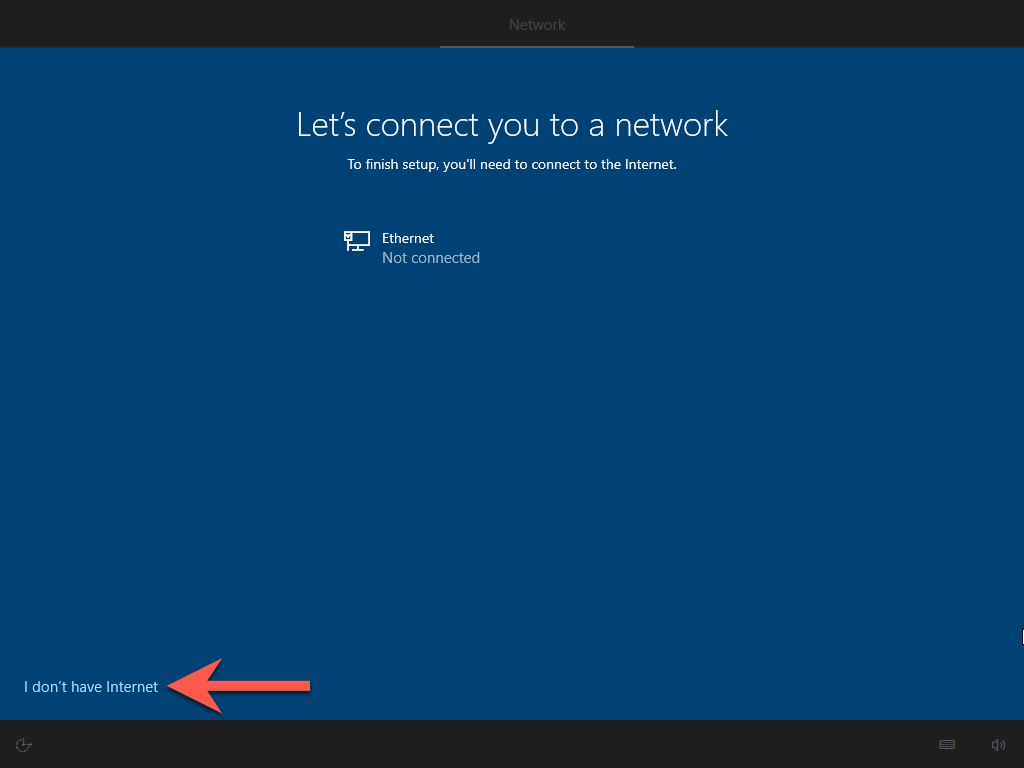
3. Select I don’t have internet.
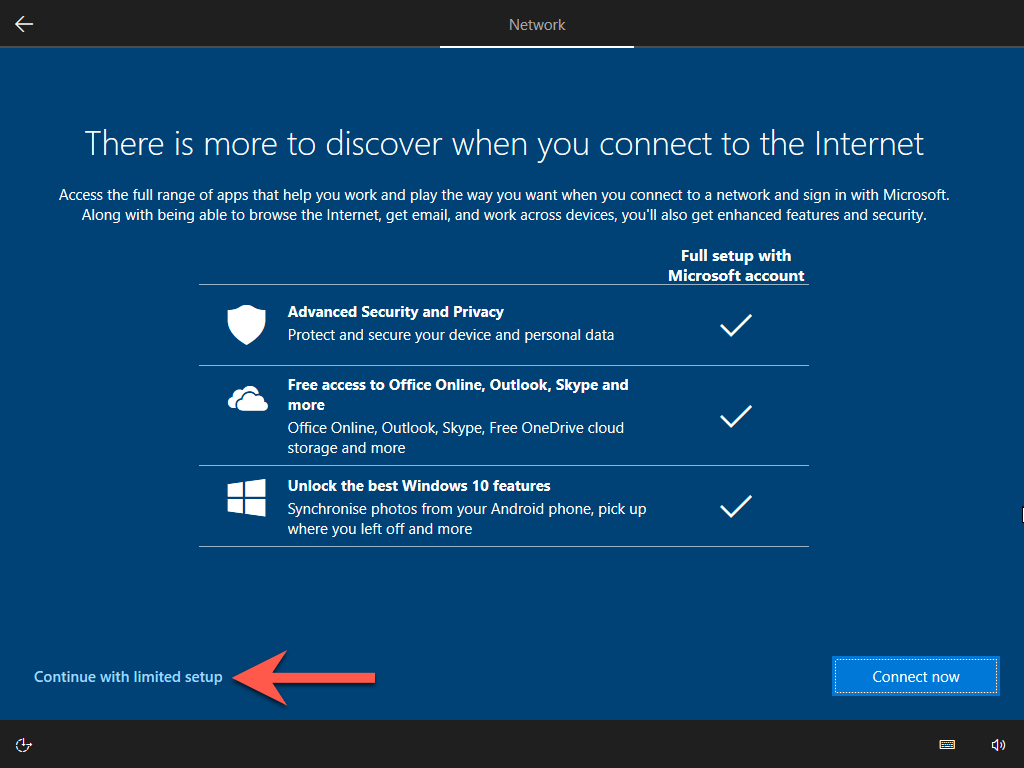
4. Select Continue with limited setup.
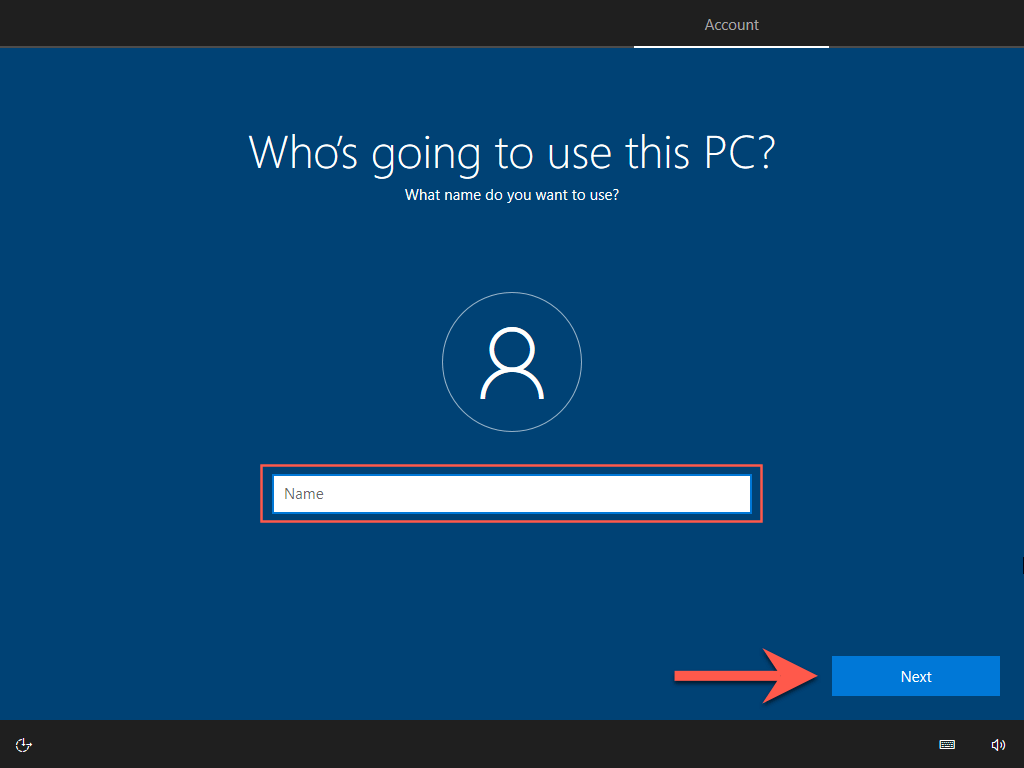
5. Enter your name and select Next to create a local account.
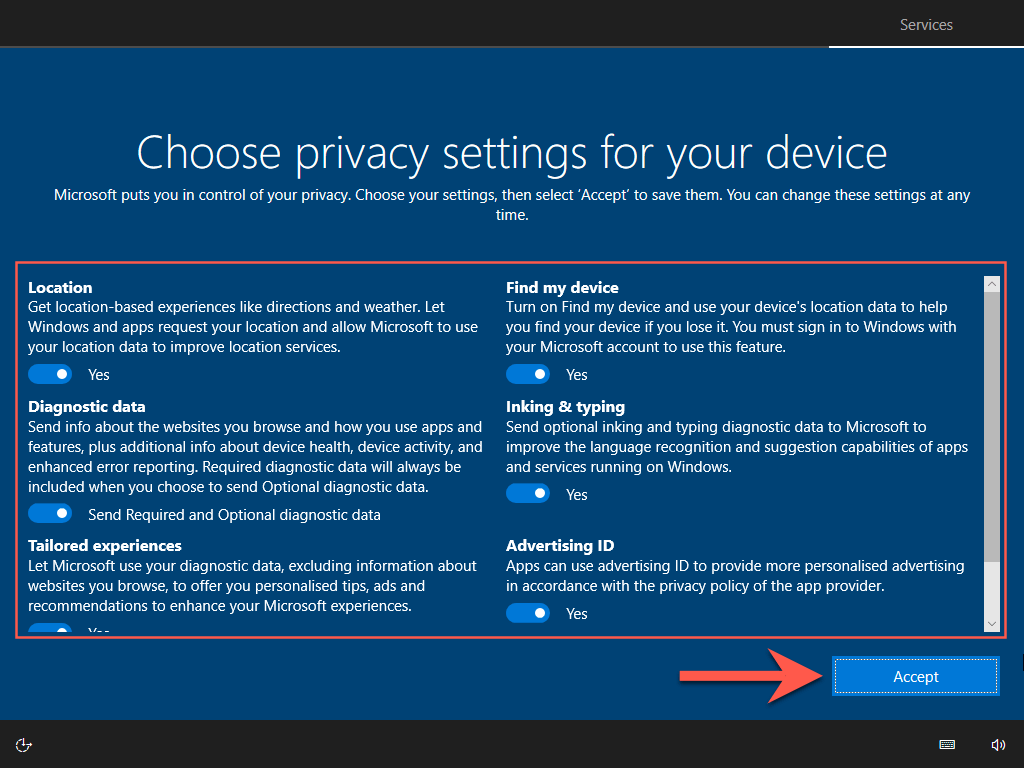
6. Review your privacy settings—e.g., Location, Diagnostic data, and Advertising ID. Disable anything if needed and select Accept.
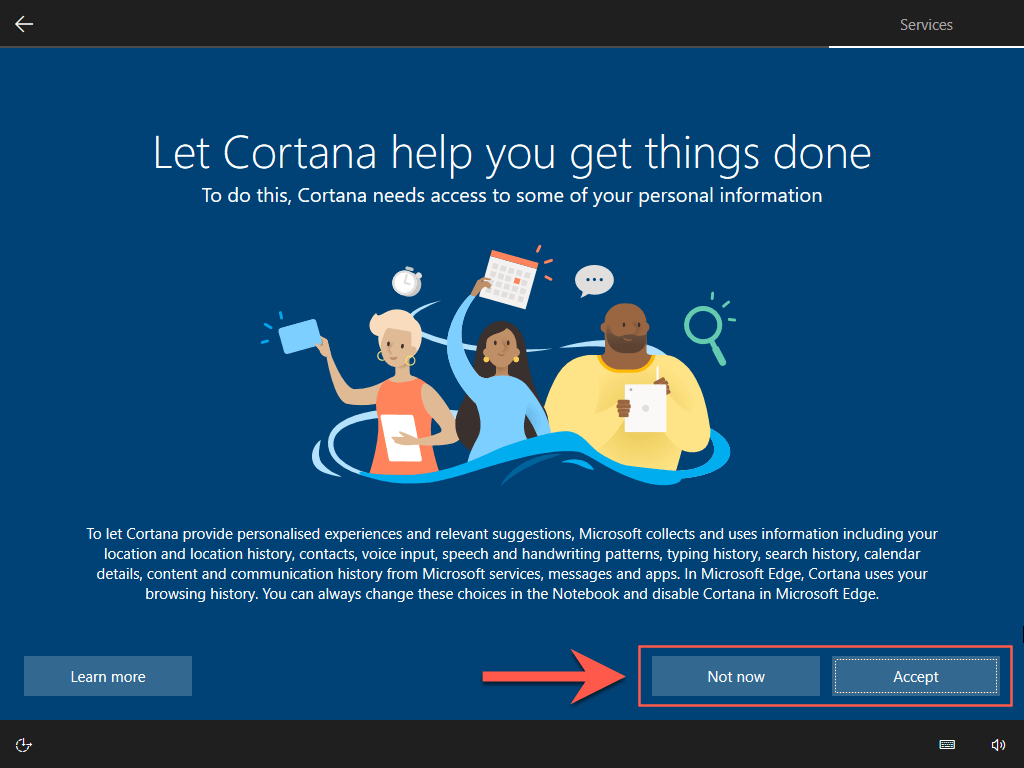
7. Set up Cortana or select Now Now to do that later.
8. Wait for the Windows Setup to finalize the installation.

9. Your Mac will boot into the Windows 10 desktop momentarily. You are halfway there!
Update Windows 10 on Mac
Now that you’ve finished installing Windows 10 on Mac, you must install the hardware drivers, support software, and system updates required to get it working correctly. That also ensures a smooth upgrade to Windows 11.
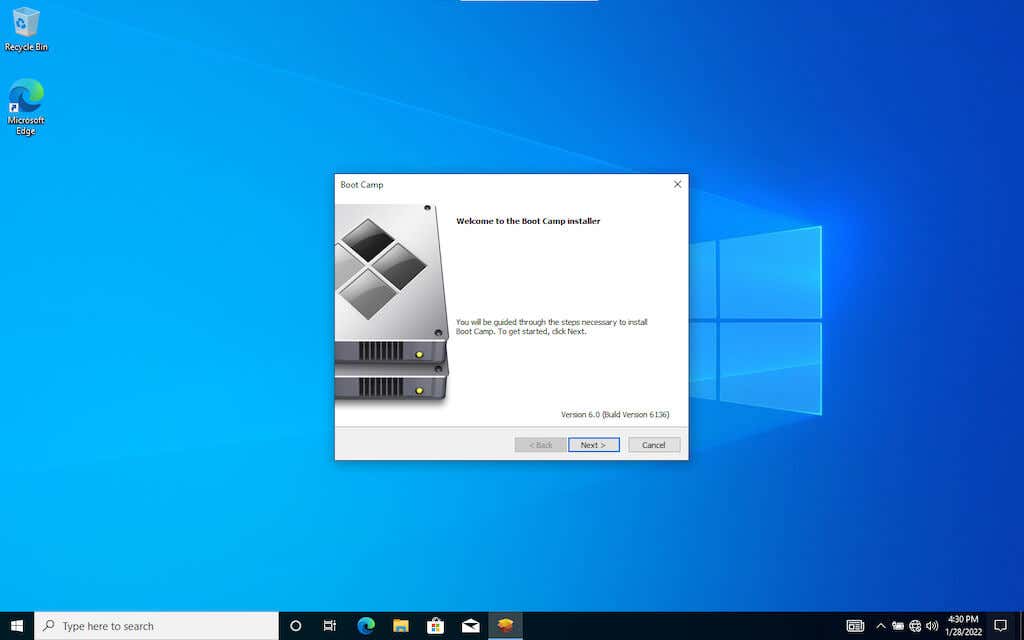
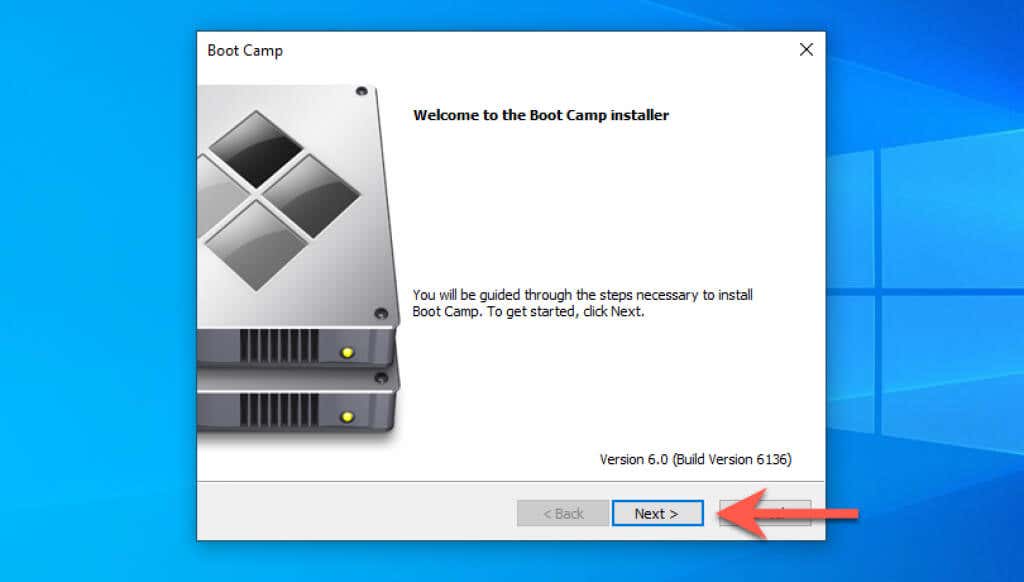
Run Boot Camp Installer
The Boot Camp installer shows up automatically after your Mac boots into Windows 10 for the first time. It contains critical drivers that you must install right away.
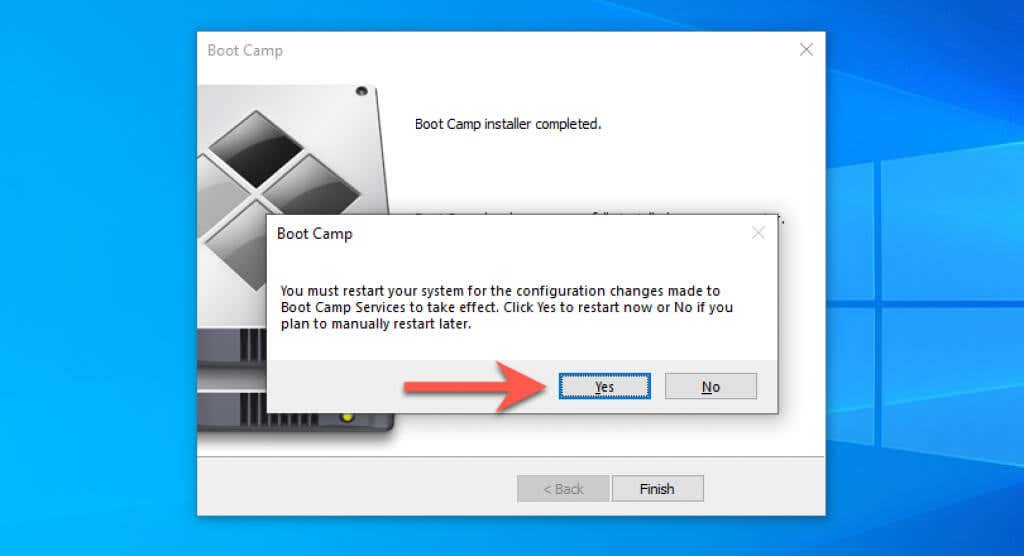
1. Select Next.
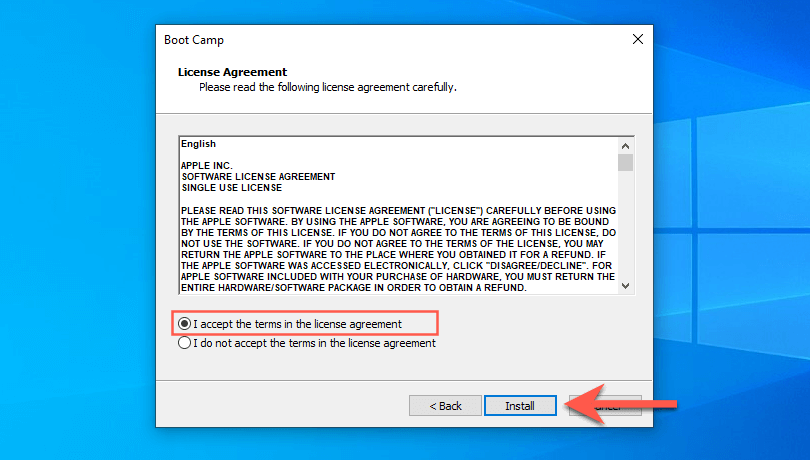
2. Accept the Boot Camp license agreement and select Install.
3. Wait for the Boot Camp installer to finish installing all drivers. Then, select Yes to restart your Mac.
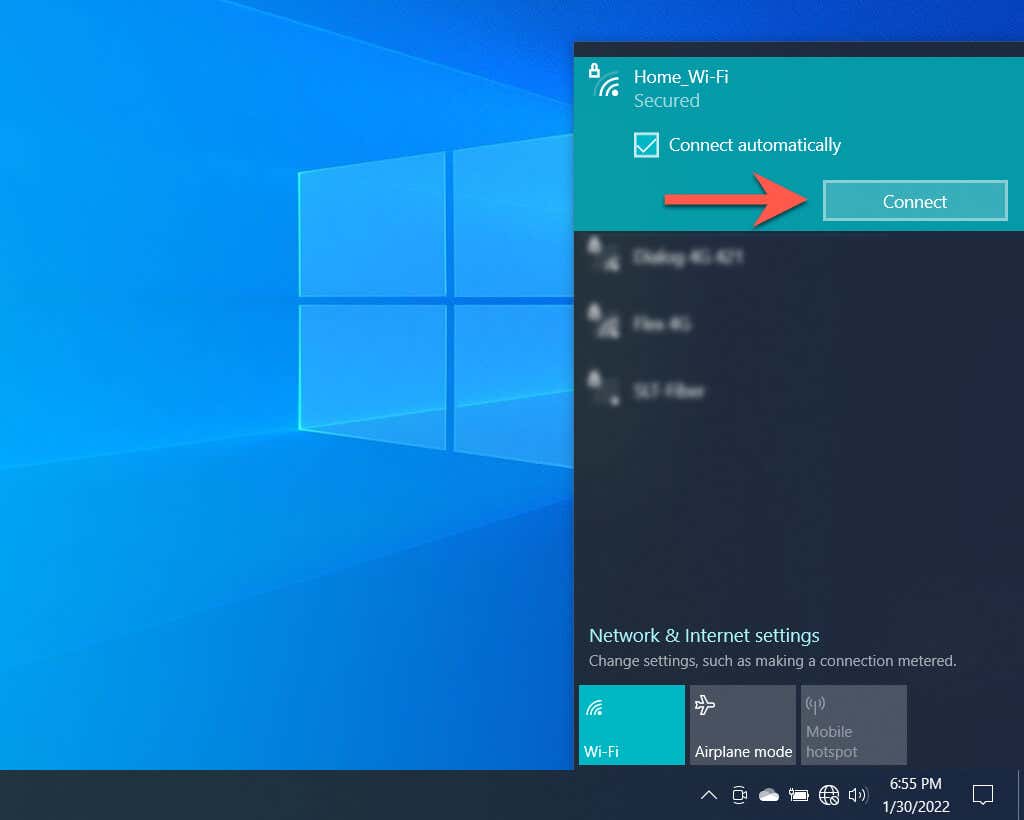
Connect to a Wi-Fi Network
The Boot Camp installer should’ve restored online connectivity in Windows 10. If you don’t use Ethernet, you can connect to Wi-Fi instead. Just select the Globe icon on the system tray (right-corner of the taskbar), pick an available Wi-Fi network, enter its password, and select Connect.
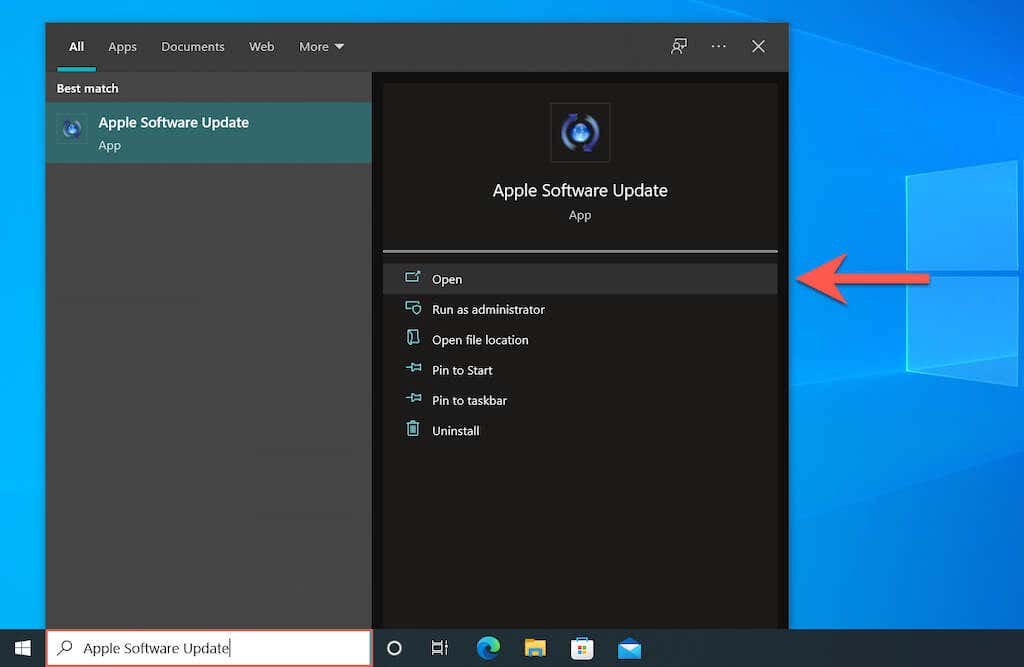
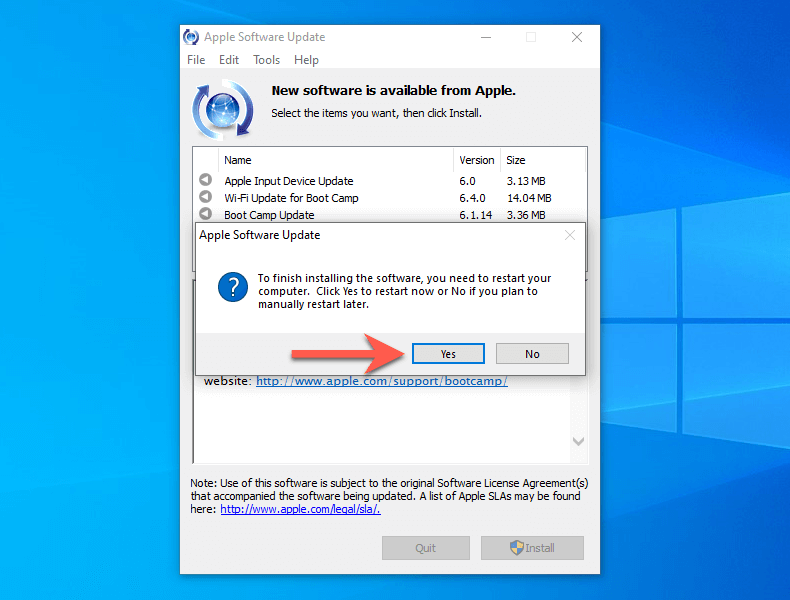
Install Apple Software Update
Next, use the Apple Software Update app to install additional Boot Camp driver updates.
1. Type Apple Software Update into the taskbar and select Open.
2. Check the boxes next to all available Apple software updates and select Install.
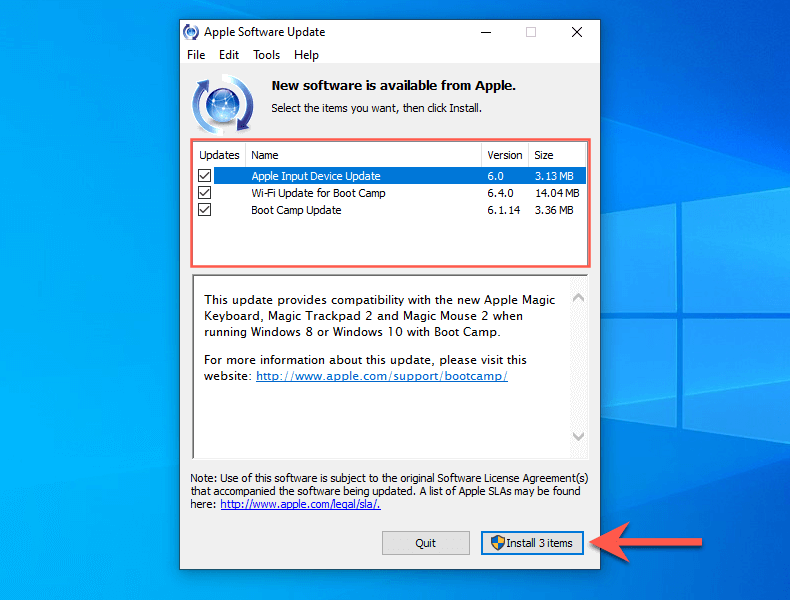
3. Select Yes to restart your PC.
Install Windows Drivers & Updates.
Finally, you must install all Microsoft-verified drivers via Windows Update.
1. Type Windows Update into the taskbar and select Open.
2. Select Check for Updates > View all optional updates.
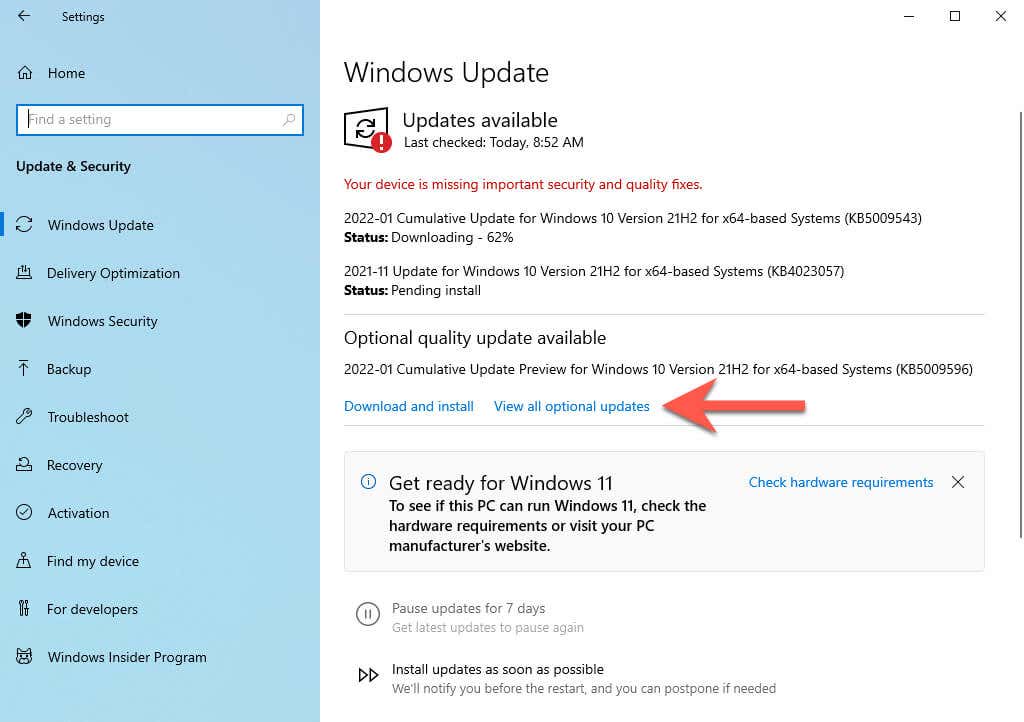
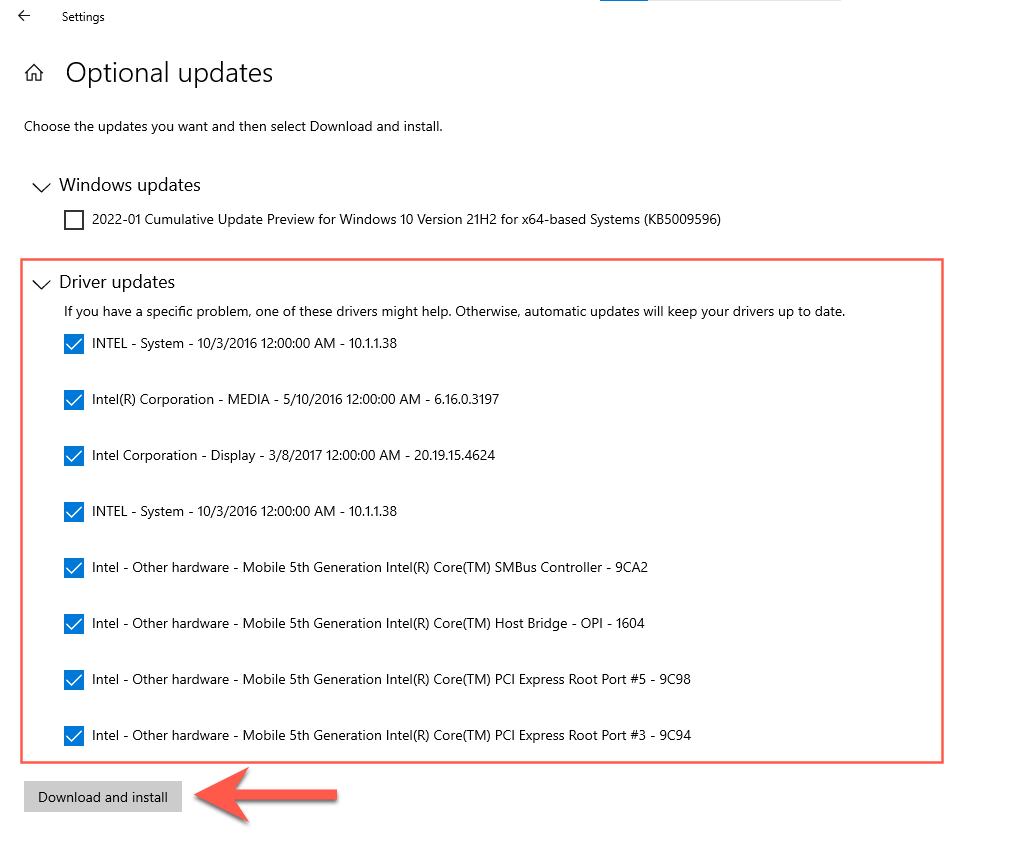
3. Expand Driver updates. Then, check the boxes next to all driver updates and select Download and install.
4. Head back to the previous screen and install the latest Windows 10 updates.
5. Select Restart now.

Download the MediaCreationTool GitHub Script
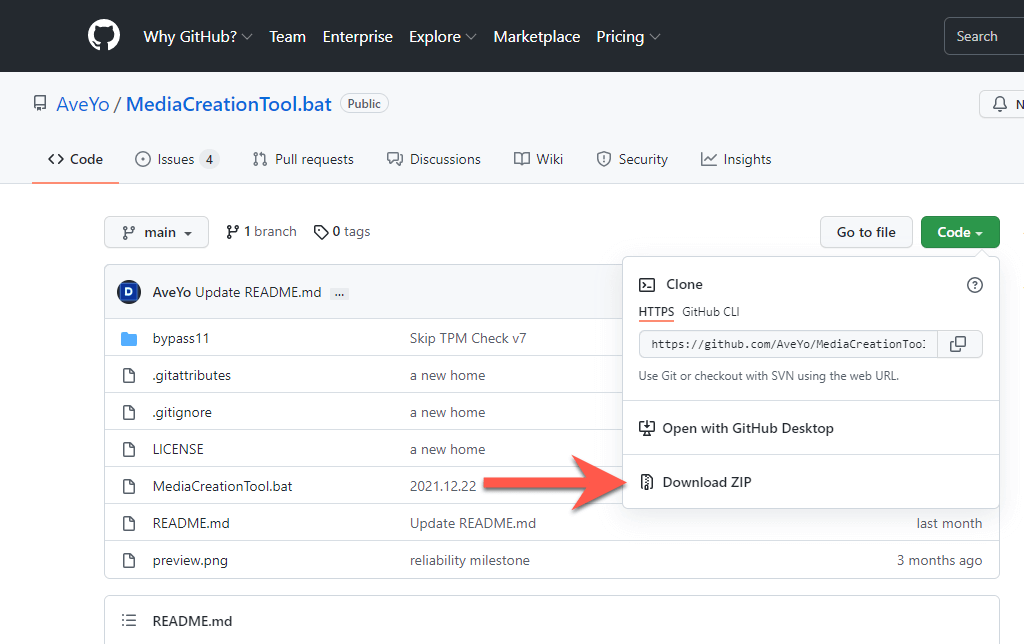
You’re now ready to make the upgrade to Windows 11. To begin, you must download MediaCreationTool (MCT) from GitHub. It’s an automated script that downloads Windows 11 from the official Microsoft servers and installs it by skipping all compatibility checks.
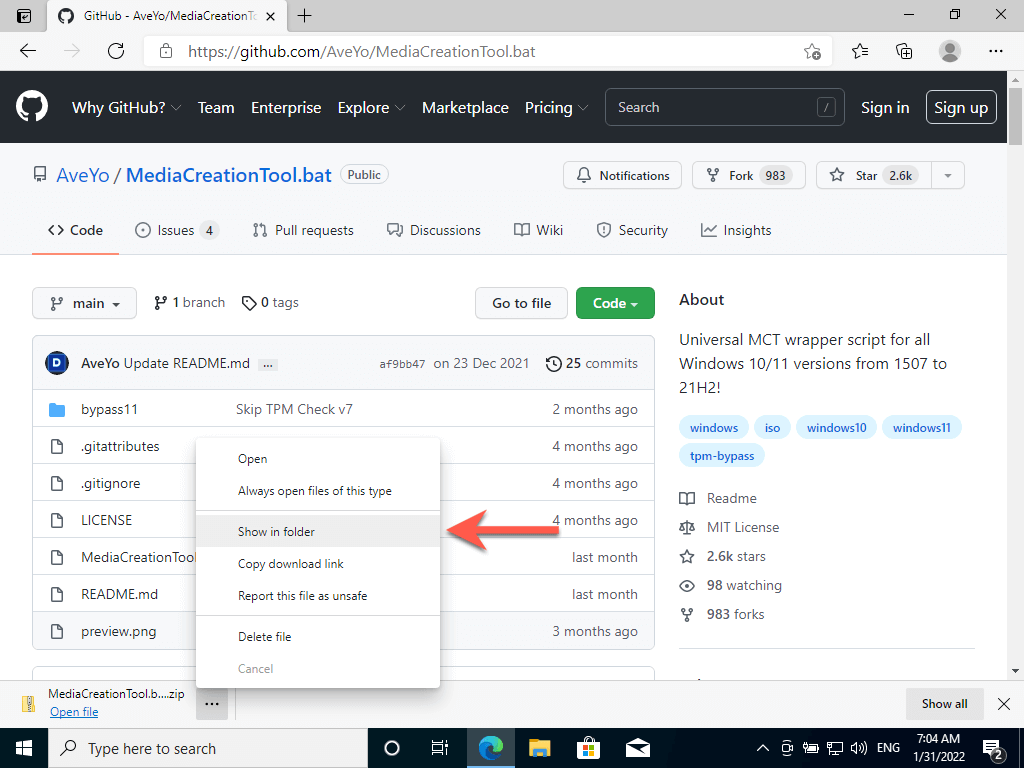
1. Open Microsoft Edge from the Windows 10 taskbar and head over to AveYo’s MediaCreationTool page on GitHub.
2. Select Code and pick the option labeled Download ZIP to download the batch script in ZIP format.
3. Select the More icon (three dots) on the download shelf and choose Show in Folder.
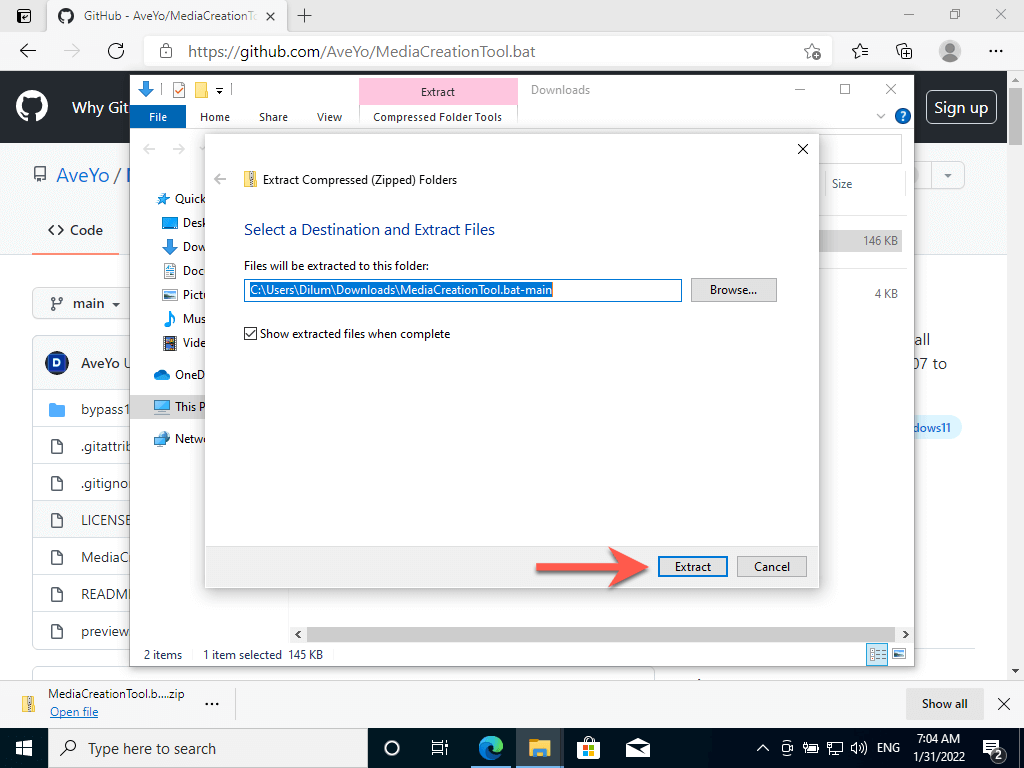
4. Right-click the downloaded ZIP file and select Extract Files. Then, choose Extract. The extracted folder will show up automatically.
Upgrade Windows 10 Installation to Windows 11
Running the batch script will upgrade Windows 10 to Windows 11. If you’re upgrading a previous Windows 10 installation, create a backup of your data before proceeding.
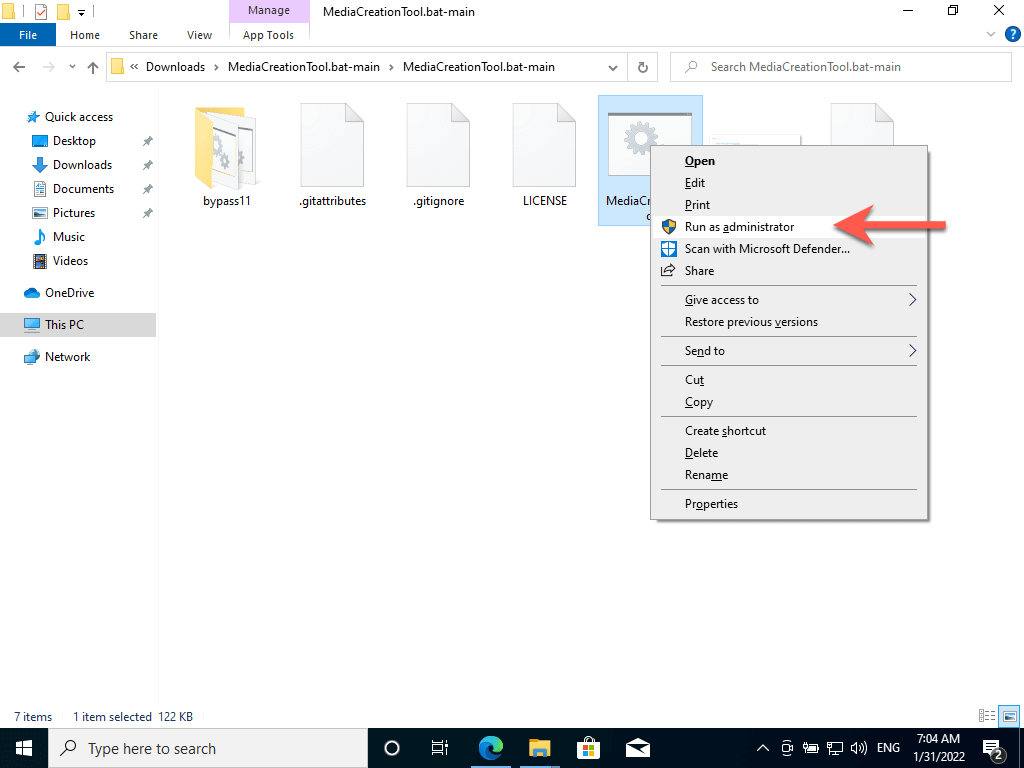
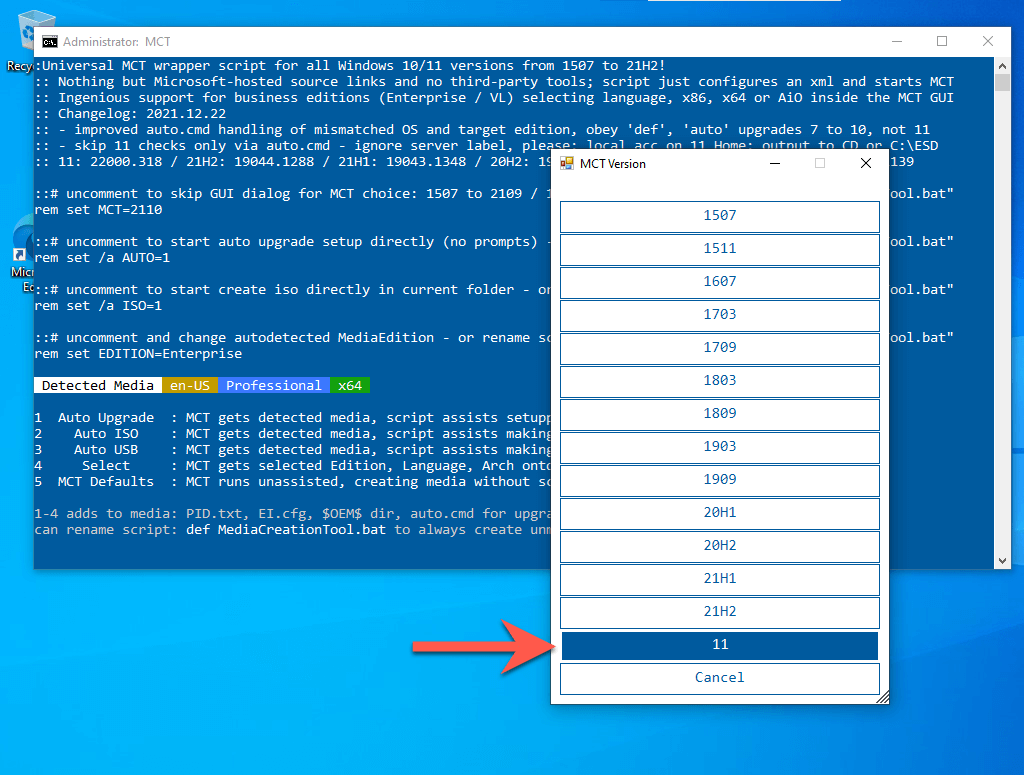
1. Right-click the MediaCreationTool.bat file and select Run as an administrator.
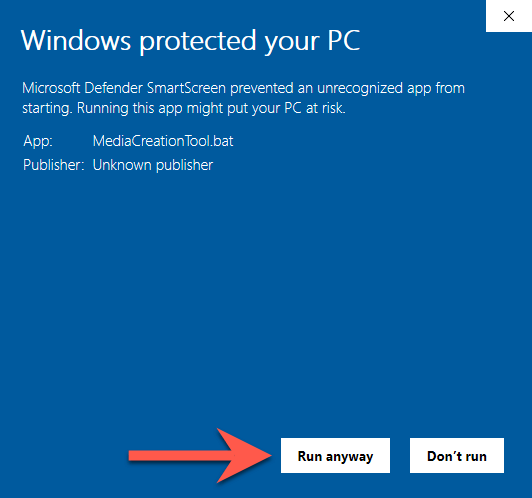
2. Select More info > Run anyway on the Windows SmartScreen pop-up.
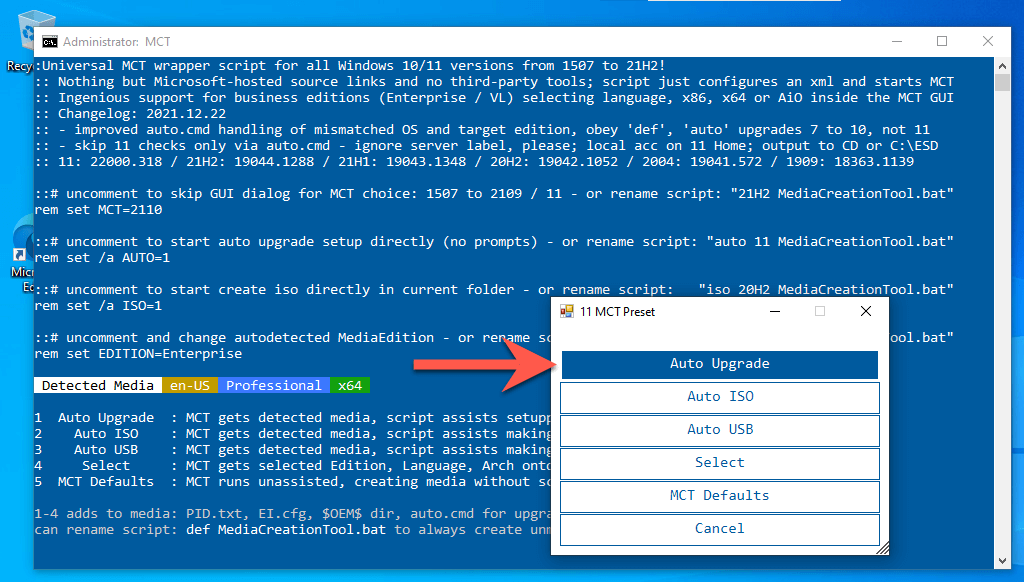
3. Select 11.
4. Select Auto Upgrade.
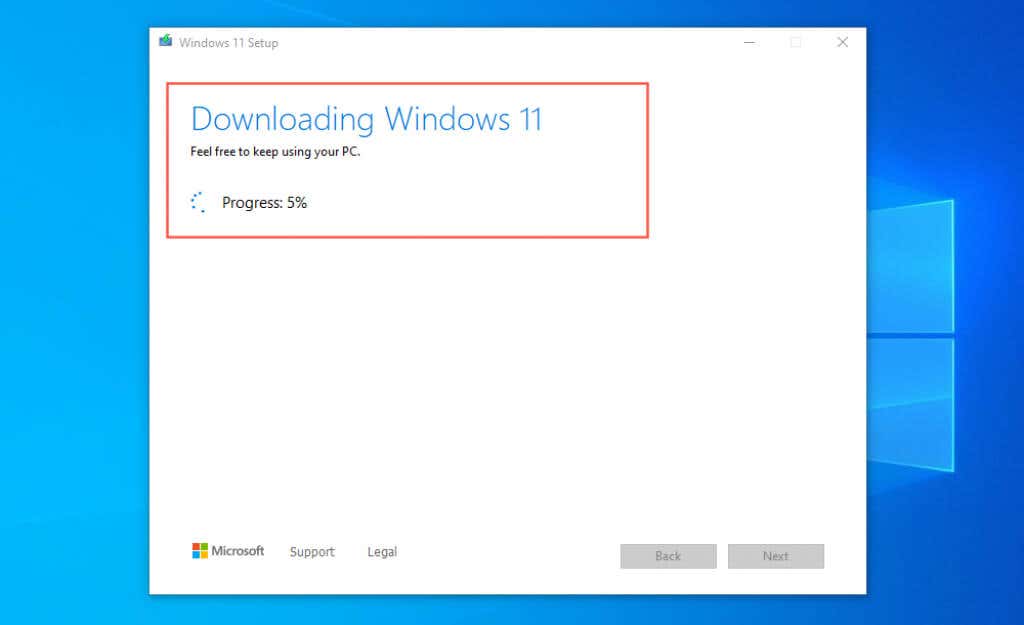
5. Wait until the MediaCreationTool script downloads Windows 11 onto your PC. You don’t have to do anything from this point onward.
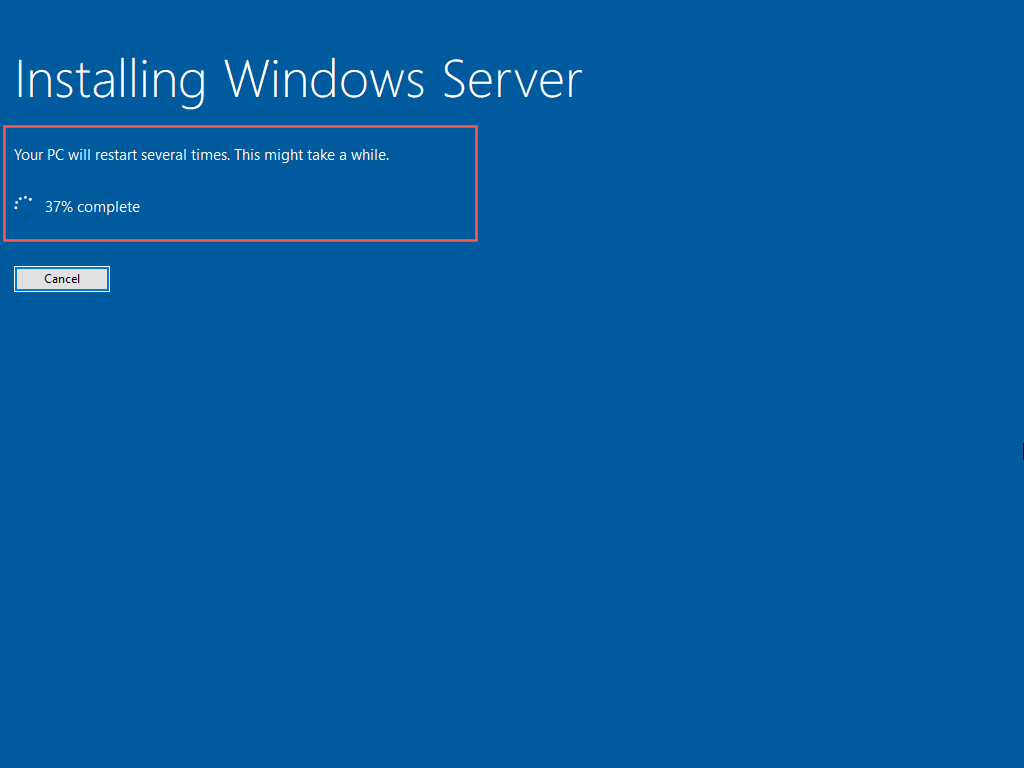
6. The MediaCreationTool will reboot your Mac and begin installing Windows 11. The procedure may take up to an hour or more to complete.
7. Your Mac will boot into the Windows 11 desktop after the upgrade. Congratulations!
Optional: Sign Into Microsoft Account
You’ve finished setting up Windows 11 on your Mac. You can begin using it immediately since you installed all drivers and updates in Windows 10.
You can also sign into Windows 11 with a Microsoft Account to unlock additional features—such as the ability to sync PC settings and download age-restricted content from the Microsoft Store—or activate Windows if it’s linked with a digital license.
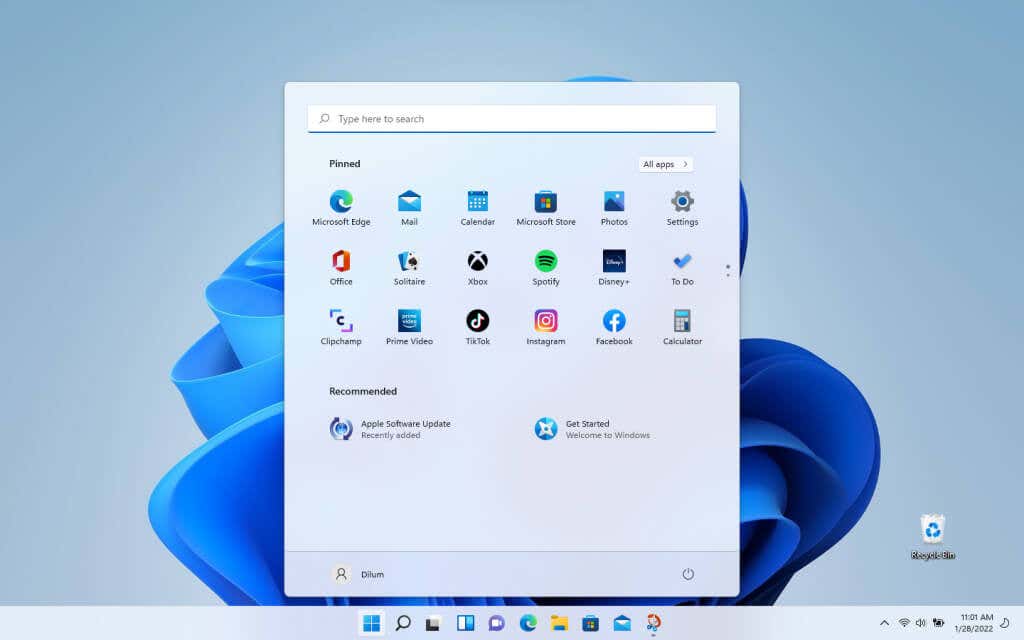
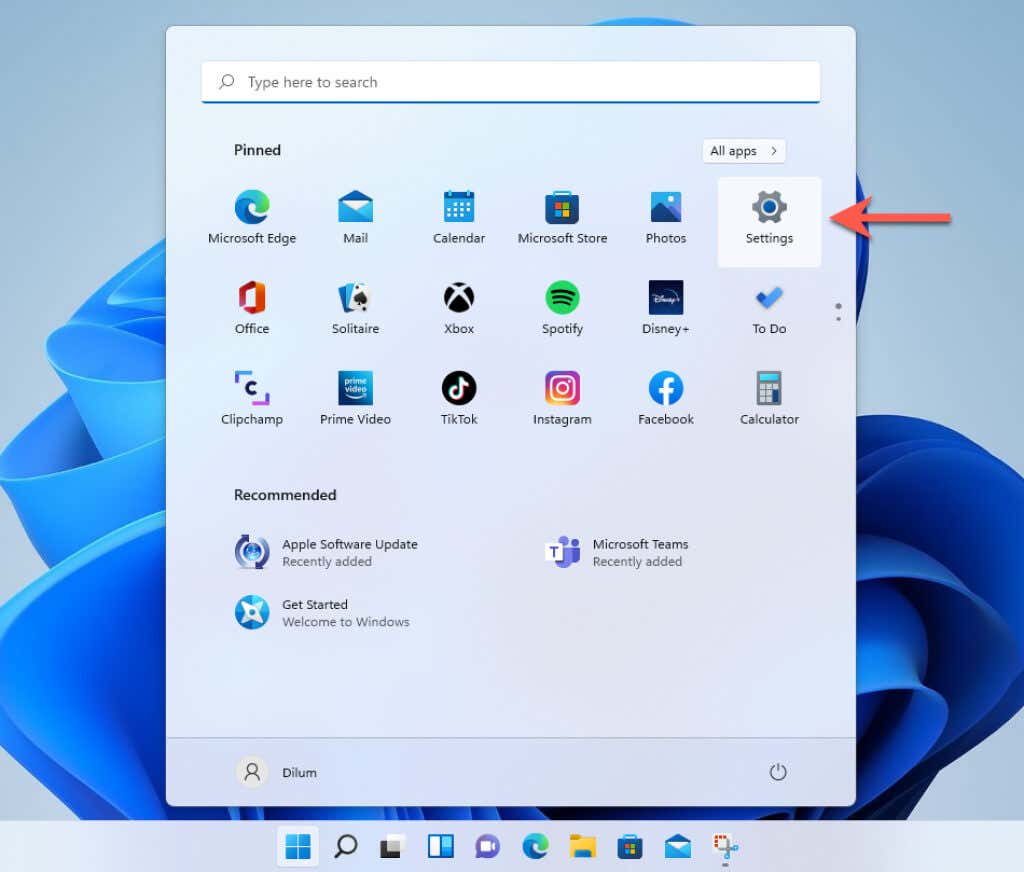
1. Open the Start menu and select Settings.
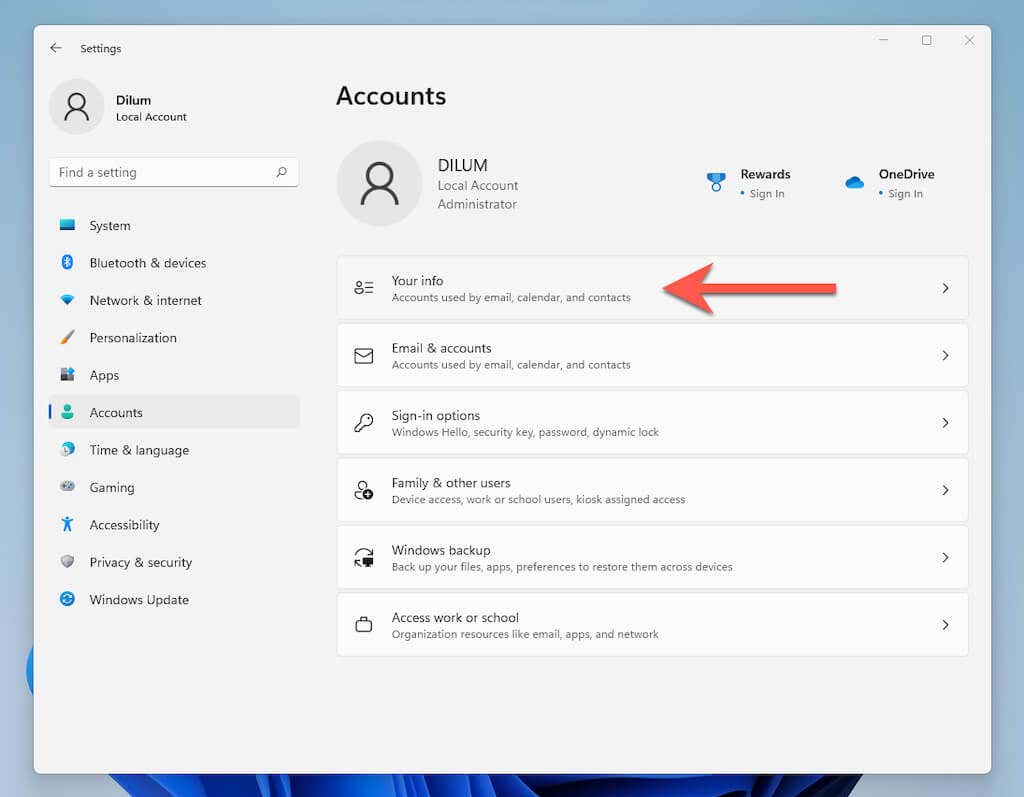
2. Select Accounts > Your info.
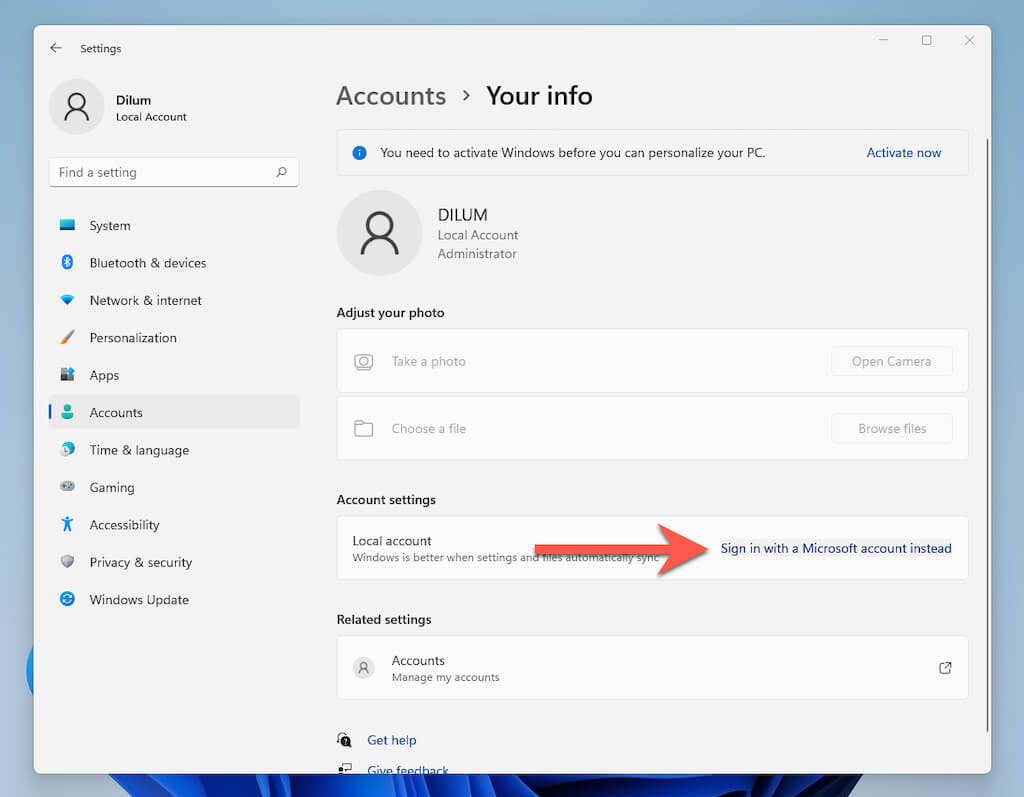
3. Select Sign in with a Microsoft Account instead.
4. Enter your Microsoft Account credentials (or choose to create one) and sign in to Windows 10.
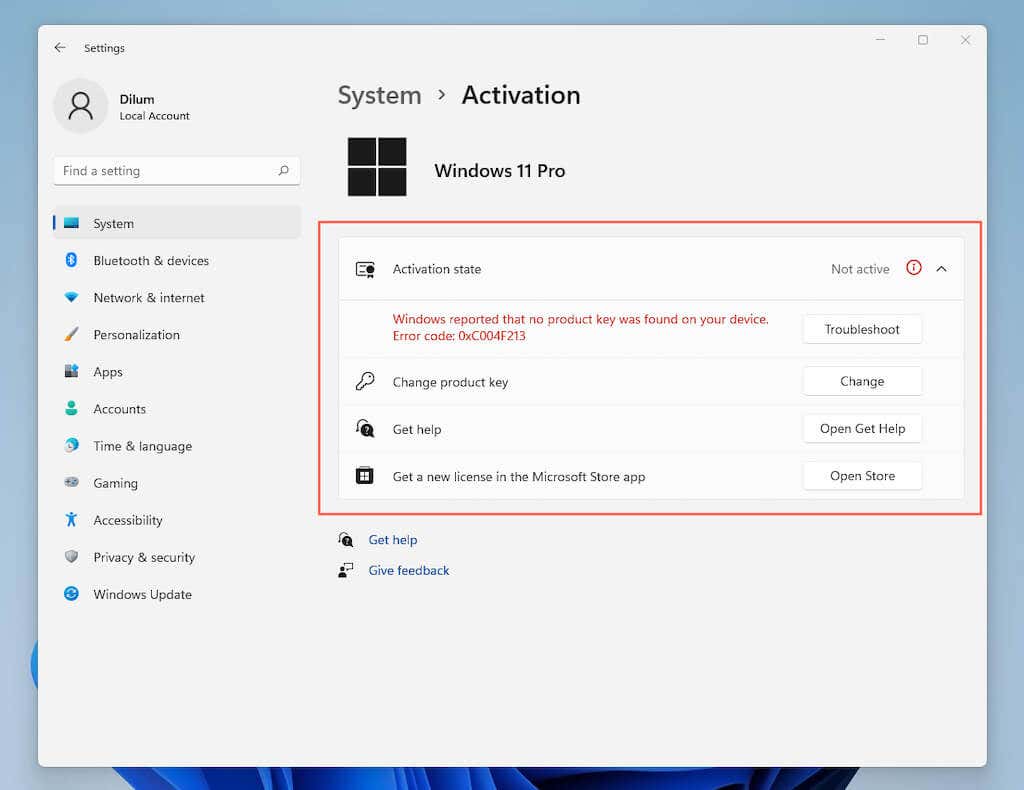
Activate Windows 11 on Mac
You don’t have to activate Windows 11 to keep using it on your Mac, but you will lose the ability to customize your desktop. Regardless, you can check your activation status and enter/purchase a product key by heading to Start > Settings >System > Activation.
Switch Between Windows and macOS
You can switch between your Windows 11 and macOS Monterey installations on your Mac via the boot selection screen.
1. Open the Start menu and select Power > Restart.
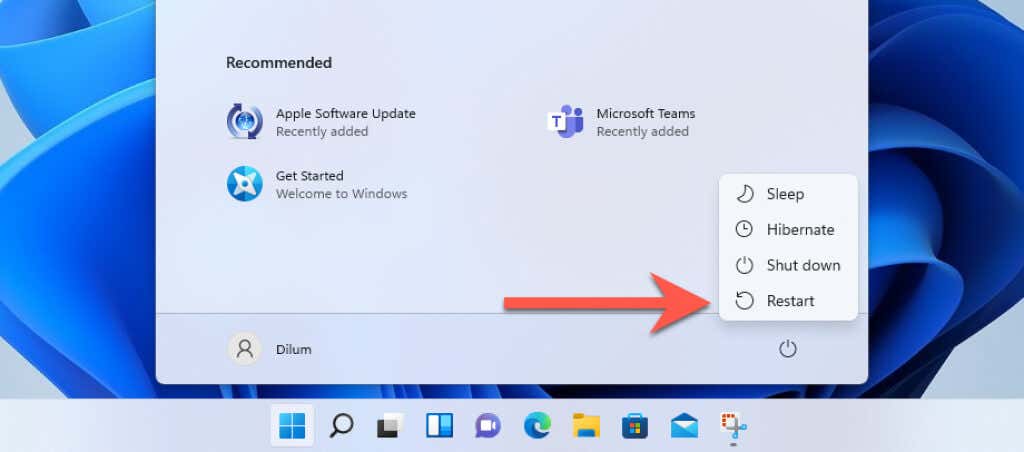
2. Hold down the Option key until you get to the boot selection screen.
3. Select Macintosh HD > Continue to boot into macOS Monterey.
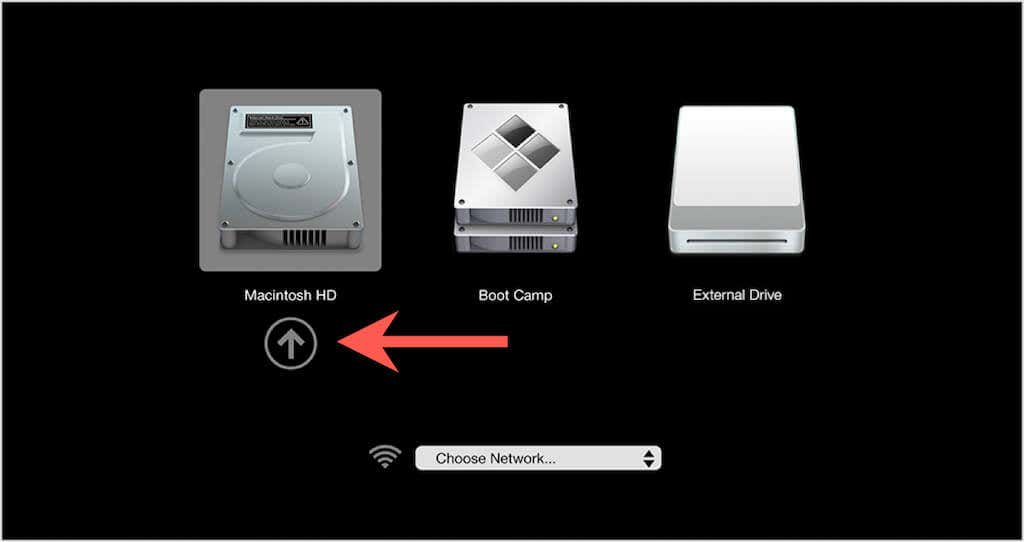
If you want to load Windows 11, restart your Mac while holding down the Option key again and select Boot Camp > Continue.
Note: To manage your default startup disk preferences, open the System Preferences app in macOS Monterey and select Startup Disk.
Using Virtualization Software to Install Windows 11 on Mac
If installing Windows 11 using Boot Camp feels time-consuming and complicated, you can use the following virtualization software to run Windows 11 on Mac.
VirtualBox: Free virtualization software that requires a registry hack to install Windows 11. You can read all about it in the Oracle blog.
Parallels Desktop or VMWare Fusion: Paid virtualization software that works better than VirtualBox. It also lets you install the ARM-based version of Windows 11 on Apple Silicon Macs.