If required, you can make your computer to display time in 12 or 24 hour formats. You can find below the steps to Change Time Format in Windows 11.

By default, Windows 11 displays time in 12 Hour (AM/PM) format, which suits most users and industries that work during the day and remain closed at night.
However, those who work in Travel Industry, Airports, Sea Ports, Railways, Military, Navy, Public safety or Public transport follow a 24 Hour time format.
Hence, Windows 11 provides the option to Change Time Format from 12 hours (AM/PM) to 24 Hour Format, without the AM or PM suffix.
1. Change 12 Hour Clock to 24 Hour
The easiest way to change the time format on your computer from 12 to 24 hours or from 24 to 12 hours is by going to the “Time and Language” Settings on your computer.
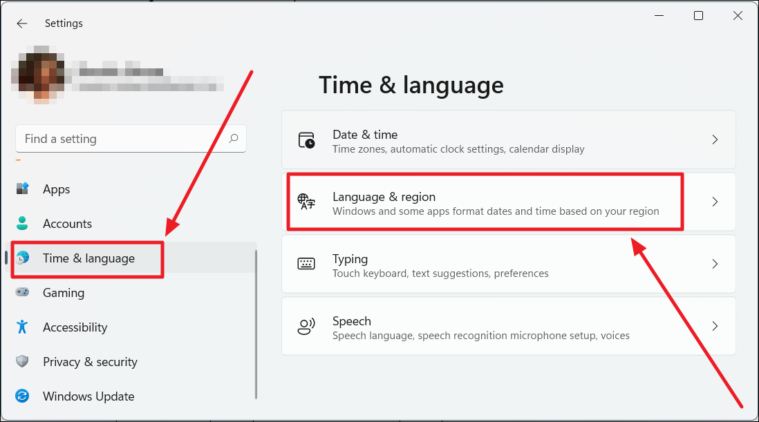
1. Open Settings > select Time and Language in the left-pane) and click on Language & Region card in the right-pane.

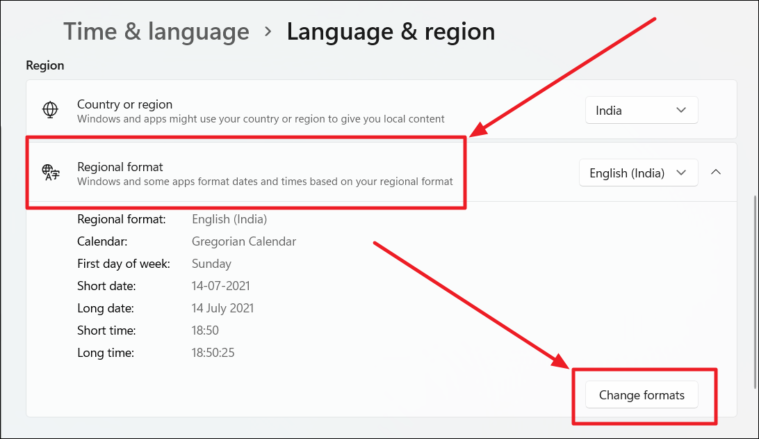
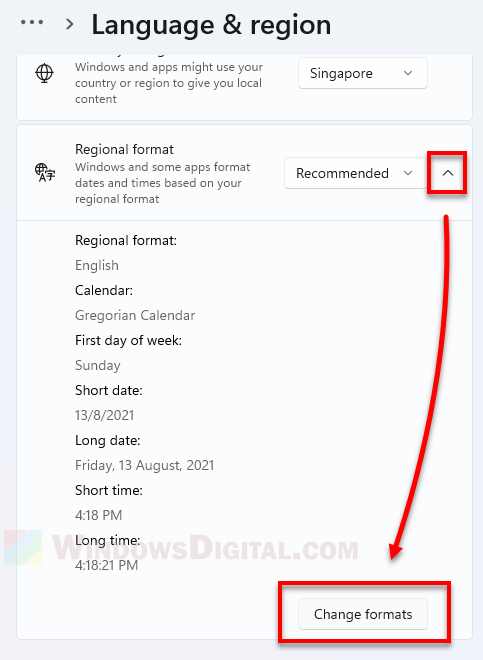
2. Scroll down in the right-pane, click on Regional Format and then click on Change Formats button in the drop-down.

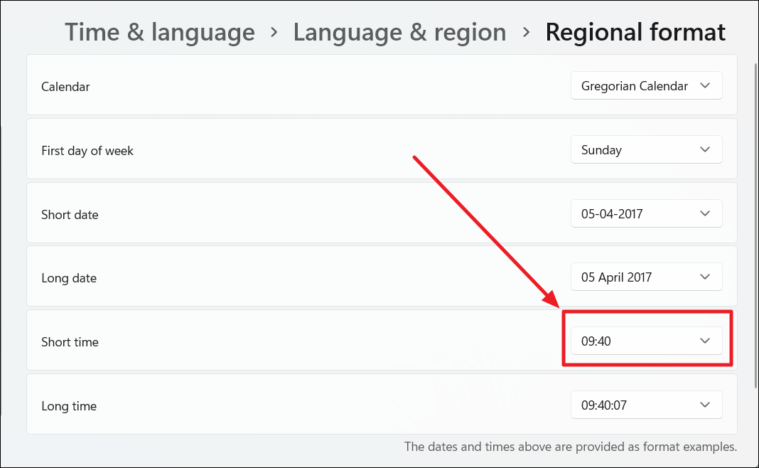
3. On the next screen, use the Down-Arrow to select time without AM/PM suffix for both Long Time and Short Time.

The change in the time format will be immediate and you should now find your computer displaying time in 24 Hour format, without the usual AM/PM Suffix.

2. Change 24 Hour Clock to 12 Hour Clock
If for some reason, your computer is showing time in 24 hour format, you can find below the steps to change 24 Hour Clock to the default 12 Hour Clock Format.
1. Open Settings > select Time and Language in the left-pane) and click on Language & Region card in the right-pane.
2. Scroll down in the right-pane, click on Regional Format and then click on Change Formats button in the drop-down.
3. On the next screen, use the Down-Arrow to select time with AM/PM suffix for both Long Time and Short Time.

The change in the time format will be immediate and you should now find your computer displaying the time in 12 Hour format, with the regular AM/PM Suffix.
![]()
3. Change Time Format Using Control Panel
The option to change Date and Time Format is still available in the Control Panel in Windows 11.
Type Control Panel in the search bar and click on Control Panel App in the Serach results.

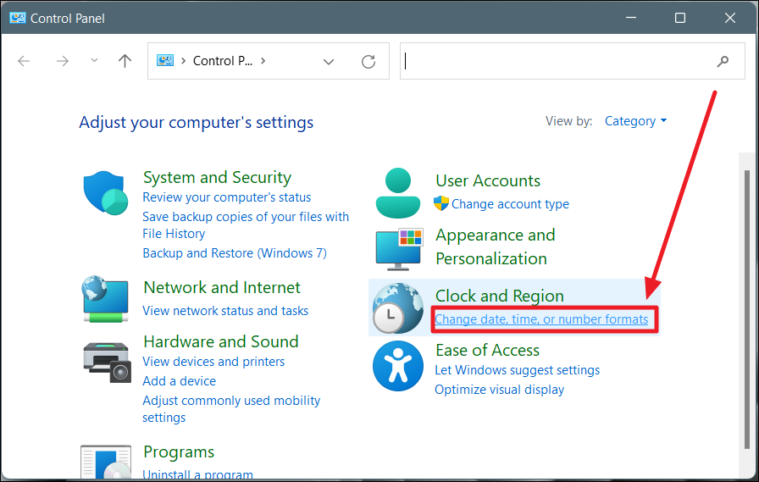
On Control Panel screen, switch to Category view and click on Change date, time or number formats link.

On the next screen, switch to Formats tab and select your desired Time Format (12 Hour or 24 Hour) by using the down arrow in Short Time and Long Time entries.

To set 12 Hour Time Format, select any entry with AM/PM Suffix in the drop-down. If you want to switch to 24 Hour Time Format, select any entry without AM/PM Suffix.
Make sure you click on Apply and OK to save this change in Time Display Format on your computer.
4. Display Time in “Hours:Minutes:Seconds” Format in Windows 11
Many users coming from Windows 10 are looking for a way to change the Taskbar Time Display on the computer from Short Time (Hours:Minutes) to Long Time Format (Hours:Minutes:Seconds).
However, the bad news is that Windows 11 does not provide any option to change the default Short Time Format display in the Taskbar to Long Time Format.
In Windows 10, users could view the Long Time Format in the Calendar by clicking on Date/Time in the Taskbar. Also, it was possible to change the Taskbar Time Display to Long Time Format by editing the registry.
In Windows 11, the Calendar does not display Time and Microsoft has also removed the optional registry hack that could add seconds to the Time Display in Taskbar.
- How to Exit Safe Mode in Windows 11
- How to Find and Delete Duplicate Photos in Windows 11
Microsoft Windows automatically syncs the system time to the respective time zone based on saved information and with the help of Internet Time Servers. In general, the system time is quite accurate. But, sometimes, there can be a situation when Windows may not be showing the right time or the correct time zone. Here are four methods, using which, you can change the time and the time zone of your Windows 11 device.
Manually Change or Adjust Time in Windows 11
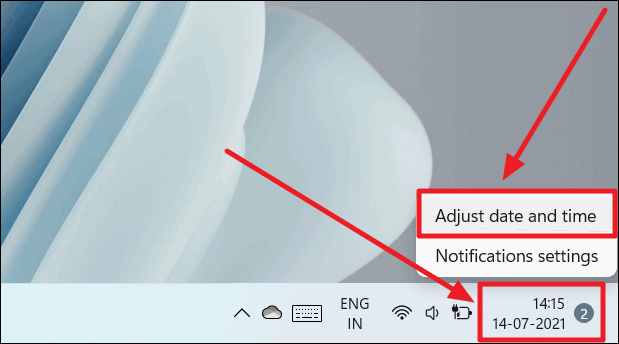
Right-click the date, time, and notifications box on the rightmost corner of the taskbar. Then, select ‘Adjust date and time’ from the menu options.
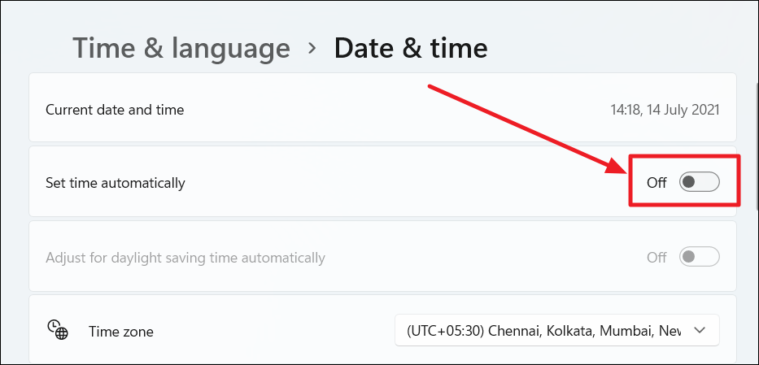
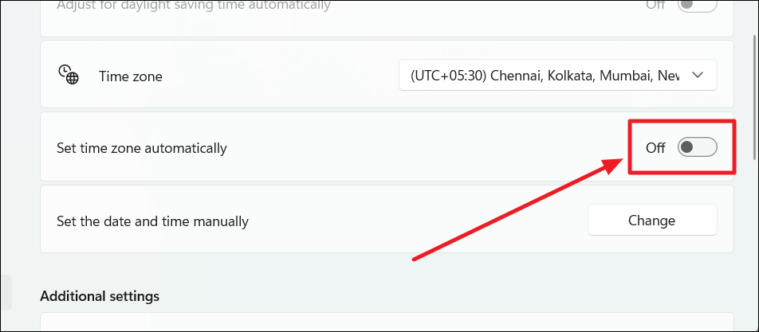
The ‘Date & time’ settings page will open. Click the toggle bar adjacent to the ‘Set time automatically’ option to turn it OFF.
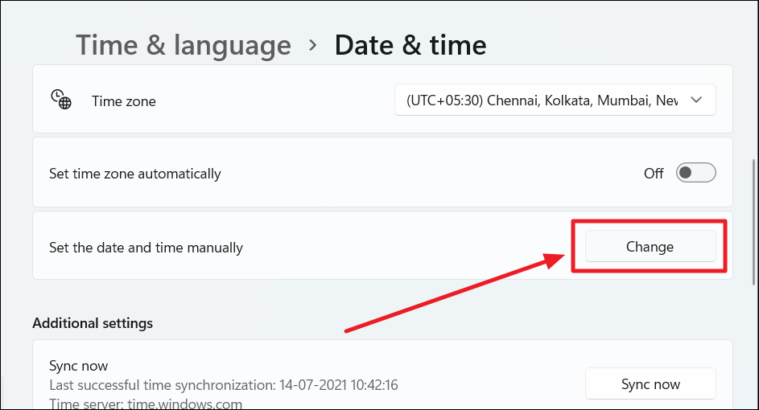
Then scroll down a bit and you’ll see the ‘Set date and time manually’ option. Click the ‘Change’ button next to it.
The ‘Change date and time’ dialog box will open. Click the downward-facing arrowheads next to the hour and the minute boxes under ‘Time’ to change them respectively. Once you’re done, click ‘Change’ to apply the changes.
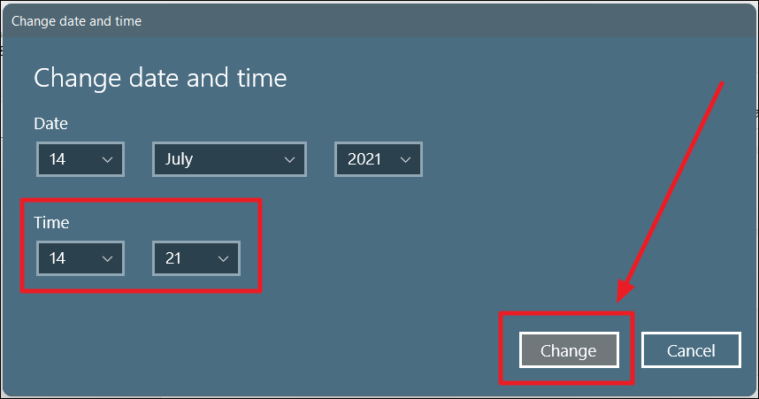
The changed time will appear on your taskbar and will be set system-wide on your computer.
How to Change Time Zone on Windows 11
Changing the time zone is super easy. For this, you need to access the same ‘Date & Time’ settings as described in the above section.
On the ‘Date & Time’ settings screen, scroll down a bit and you’ll see the ‘Set time zone automatically’ option. Click on the toggle switch next to it to turn it OFF.
Next, click the ‘Time Zone’ drop-down on the same screen to choose your time zone.
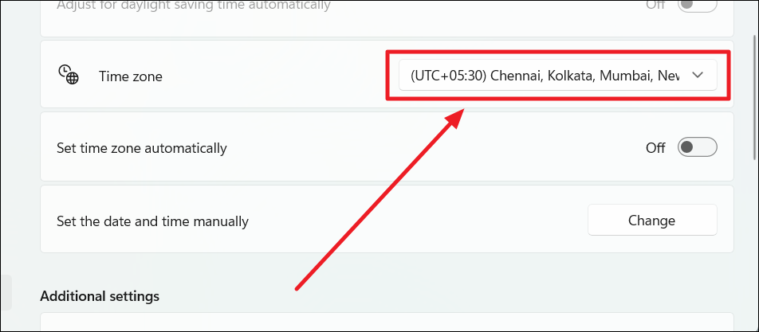
The time zone will be changed and with that, the time as well.
To change the time and time zone to their original settings, just click the time and time zone toggles to set them both to ON. This will display the default time and time zone.
Change Time on Windows 11 From Control Panel
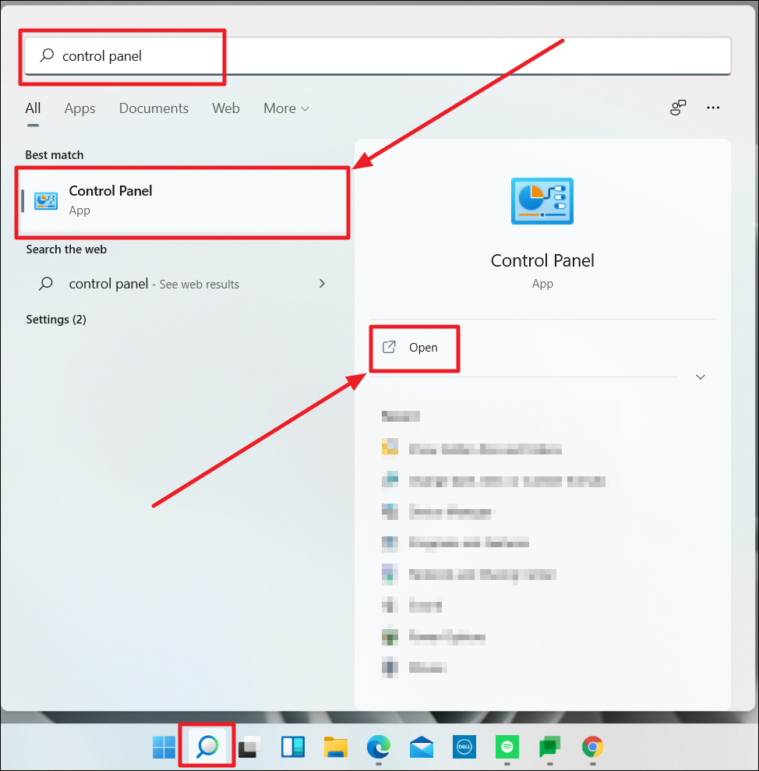
Click the ‘Search’ button in the taskbar and type ‘Control Panel’ in the search bar. To launch the application, select the app name on the left side of the search results (under Best Match) or click the ‘Open’ option below the app name and icon on the right.
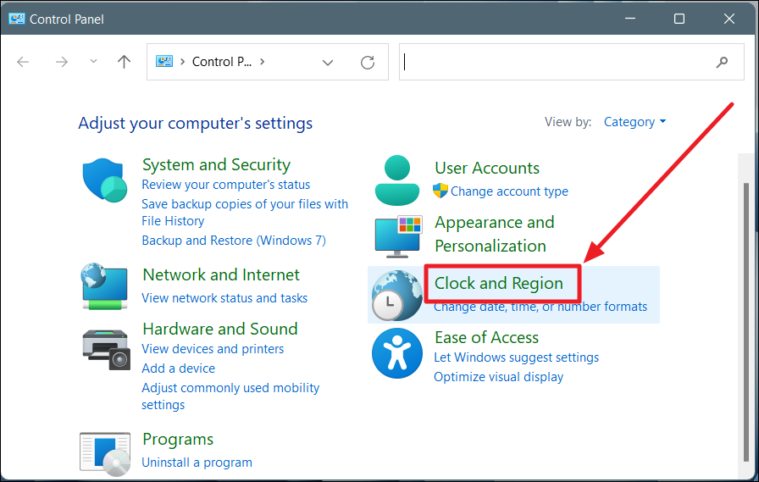
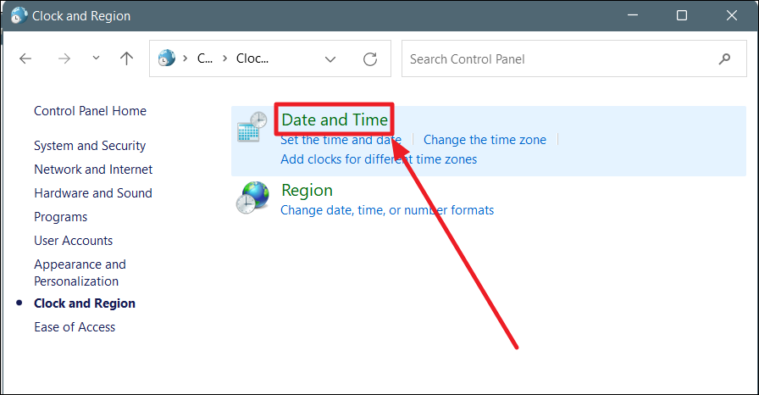
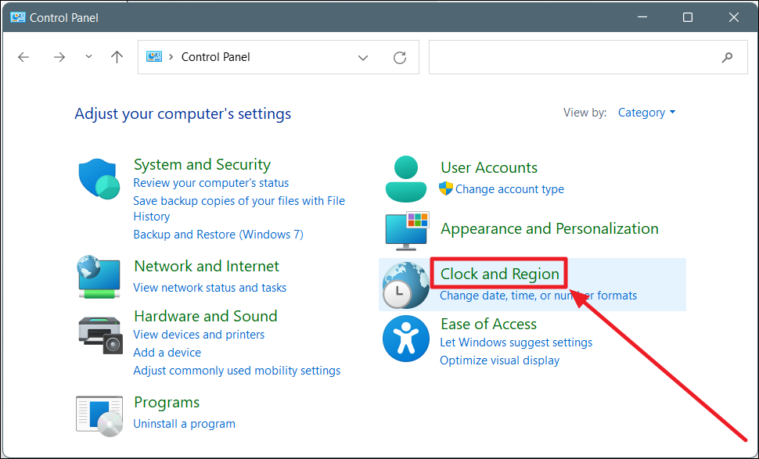
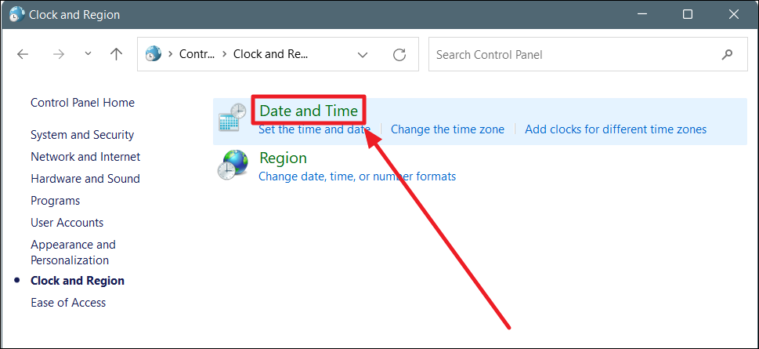
On the Control Panel window, select ‘Clock and Region’.
Now, click on ‘Date and Time’ on the ‘Clock and Region’ page.
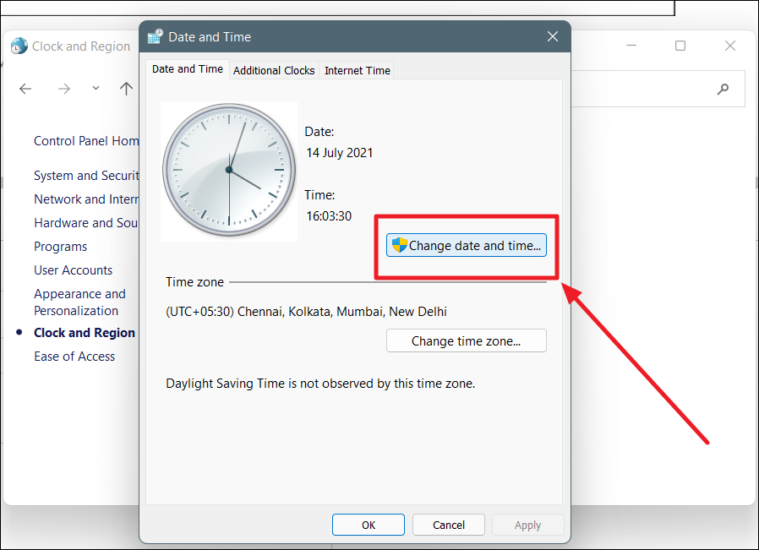
Click the ‘Change date and time’ button on the ‘Date and Time’ tab of the ‘Date and Time’ dialog that opens next.
This will direct you to the ‘Date and Time Settings’ dialog box. Here, you can change the time in two ways.
You can either type in the time (hour, minute, and second) below the analog clock in the ‘Time’ section, or you can select any part of the long-time and click the upward or downward arrowhead to reach the right number corresponding to the time.
Click ‘OK’ once done.
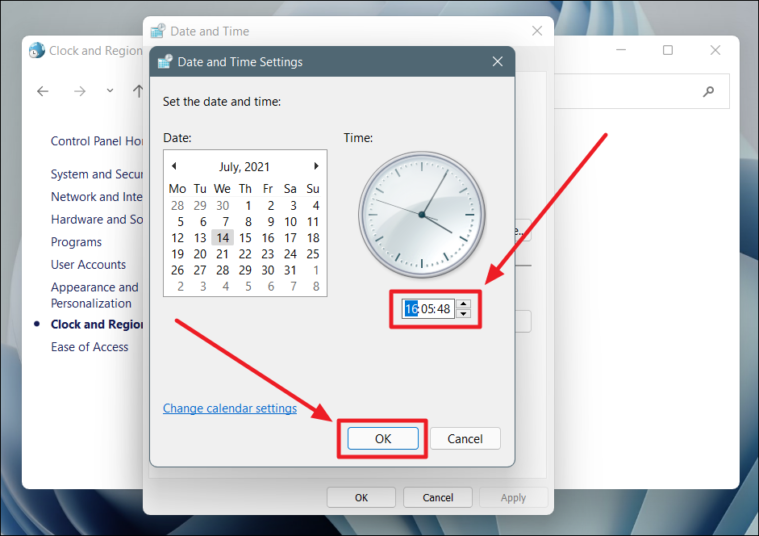
The time is now changed on your device. The time modified in the time box will also reflect on the analog clock above it.
Change Time on Windows 11 from Command Prompt
An instant way to change the time on your device is via command prompt. To change the time using this application, you will need to run the app as the administrator.
Click the ‘Search’ button in the taskbar and enter ‘Command Prompt’ in the search bar. Next, click the ‘Run as administrator’ option below the app name and icon on the right side of the search results.
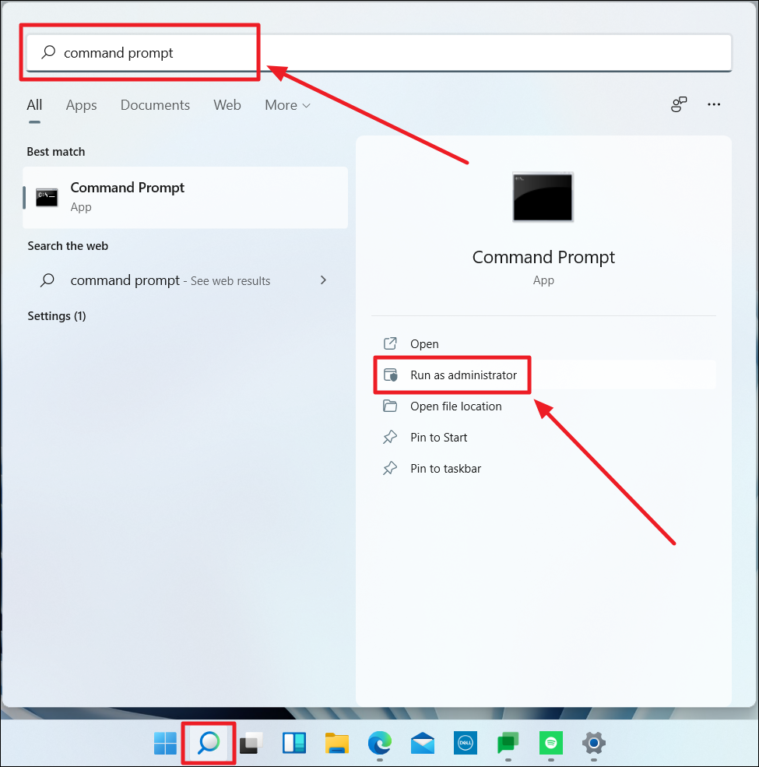
Select ‘Yes’ in the prompt that pops up next. The Command Prompt window then opens.
Type the command time hour:minute on the command prompt screen and hit Enter. Replace hour and minute with the right hour and minute that you wish to set as time on your computer.
For example, to change the time to 08:40, we’ll use the following command in the command prompt.
time 08:40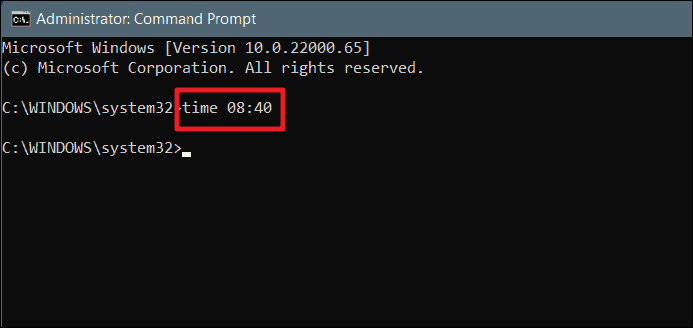
The time is changed in an instant.
Note: You can use the 12-hour or the 24-hour clock formats while typing the time in the command. The time entered here will reflect as it is on the device.
Change Date and Time on Windows 11 from Windows PowerShell
Another way to change time on your Windows device is via PowerShell. This too will need you to run the app as the administrator.
Click the ‘Search’ button in the taskbar and type ‘Windows PowerShell’ in the search bar. Next, click the option ‘Run as administrator’ below the app name and icon on the right.
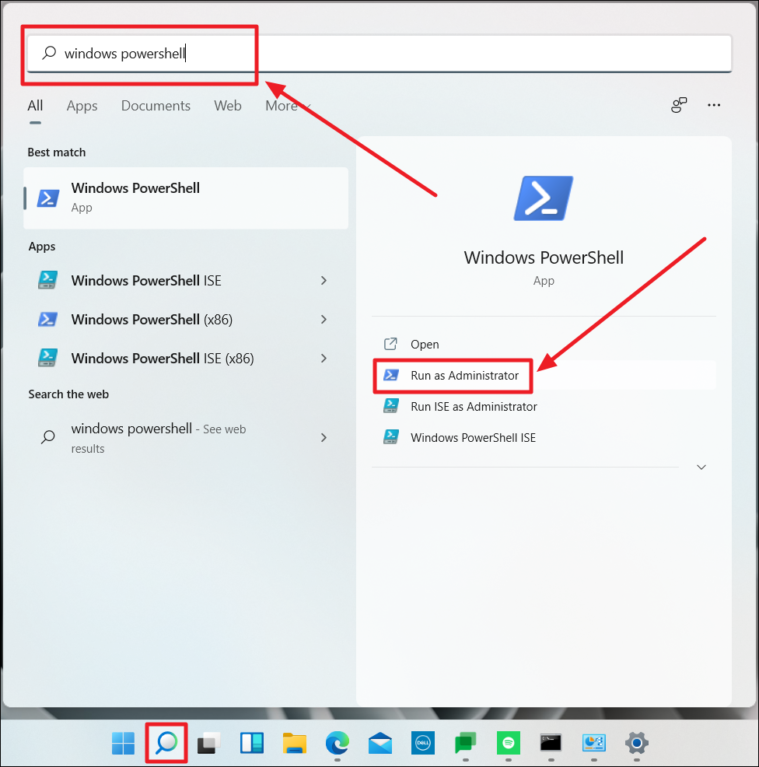
Select ‘Yes’ if you get a prompt to confirm running PowerShell as an administrator.
Enter any of the following commands depending on your requirement in the Windows PowerShell window (enter the date in the manner of your system’s date format). Hit ‘Enter’ once done.
For 12-hour clock format, use the following commands:
Set-Date -Date "dd/mm/yyyy HH:MM AM"Set-Date -Date "dd/mm/yyyy HH:MM PM"For 24-hour clock format, use the following command:
Set-Date -Date "dd/mm/yyyy HH:MM"For example, we’ll use the following command to set the date to 14/07/2021 (14th July 2021) and time to 21:20 on our Windows 11 PC.
Set-Date -Date "14/07/2021 21:20"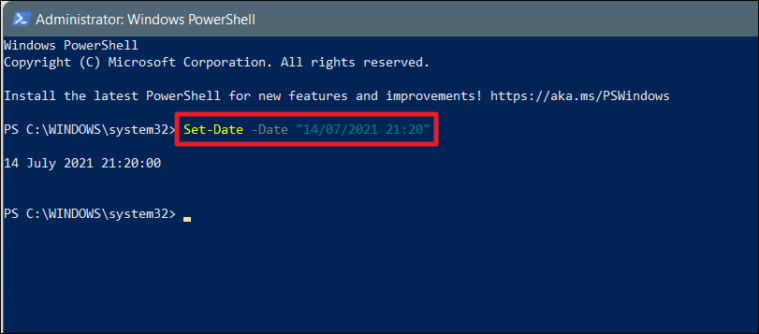
The date and time is now changed. Irrespective of the time format entered in the command, the time will change and appear in your system’s format itself. You could also change the date here, but do follow your system’s format.
Note: If the date does not comply with the system’s date format, you will receive an error message and both, the date and the time remain unchanged.
How to Change Time Format on Windows 11 from Windows Settings
If your system is using a time format that doesn’t sit well with you, you can always change and swap it between the 12-hour and the 24-hour clock formats.
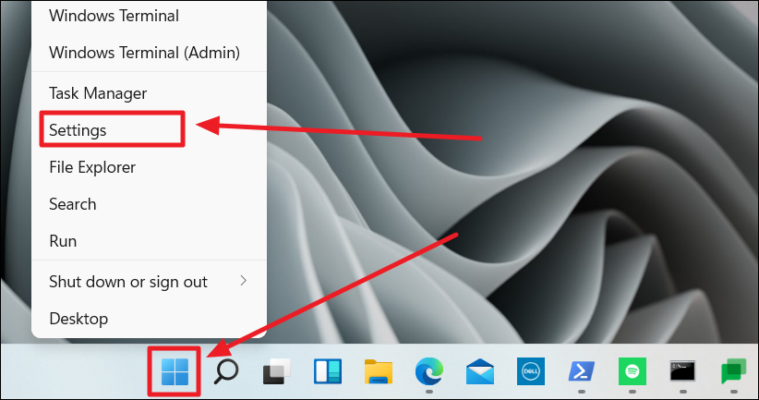
Launch the ‘Settings’ app by right-clicking on the ‘Start’ button and choosing ‘Settings’ from the pop-up menu.
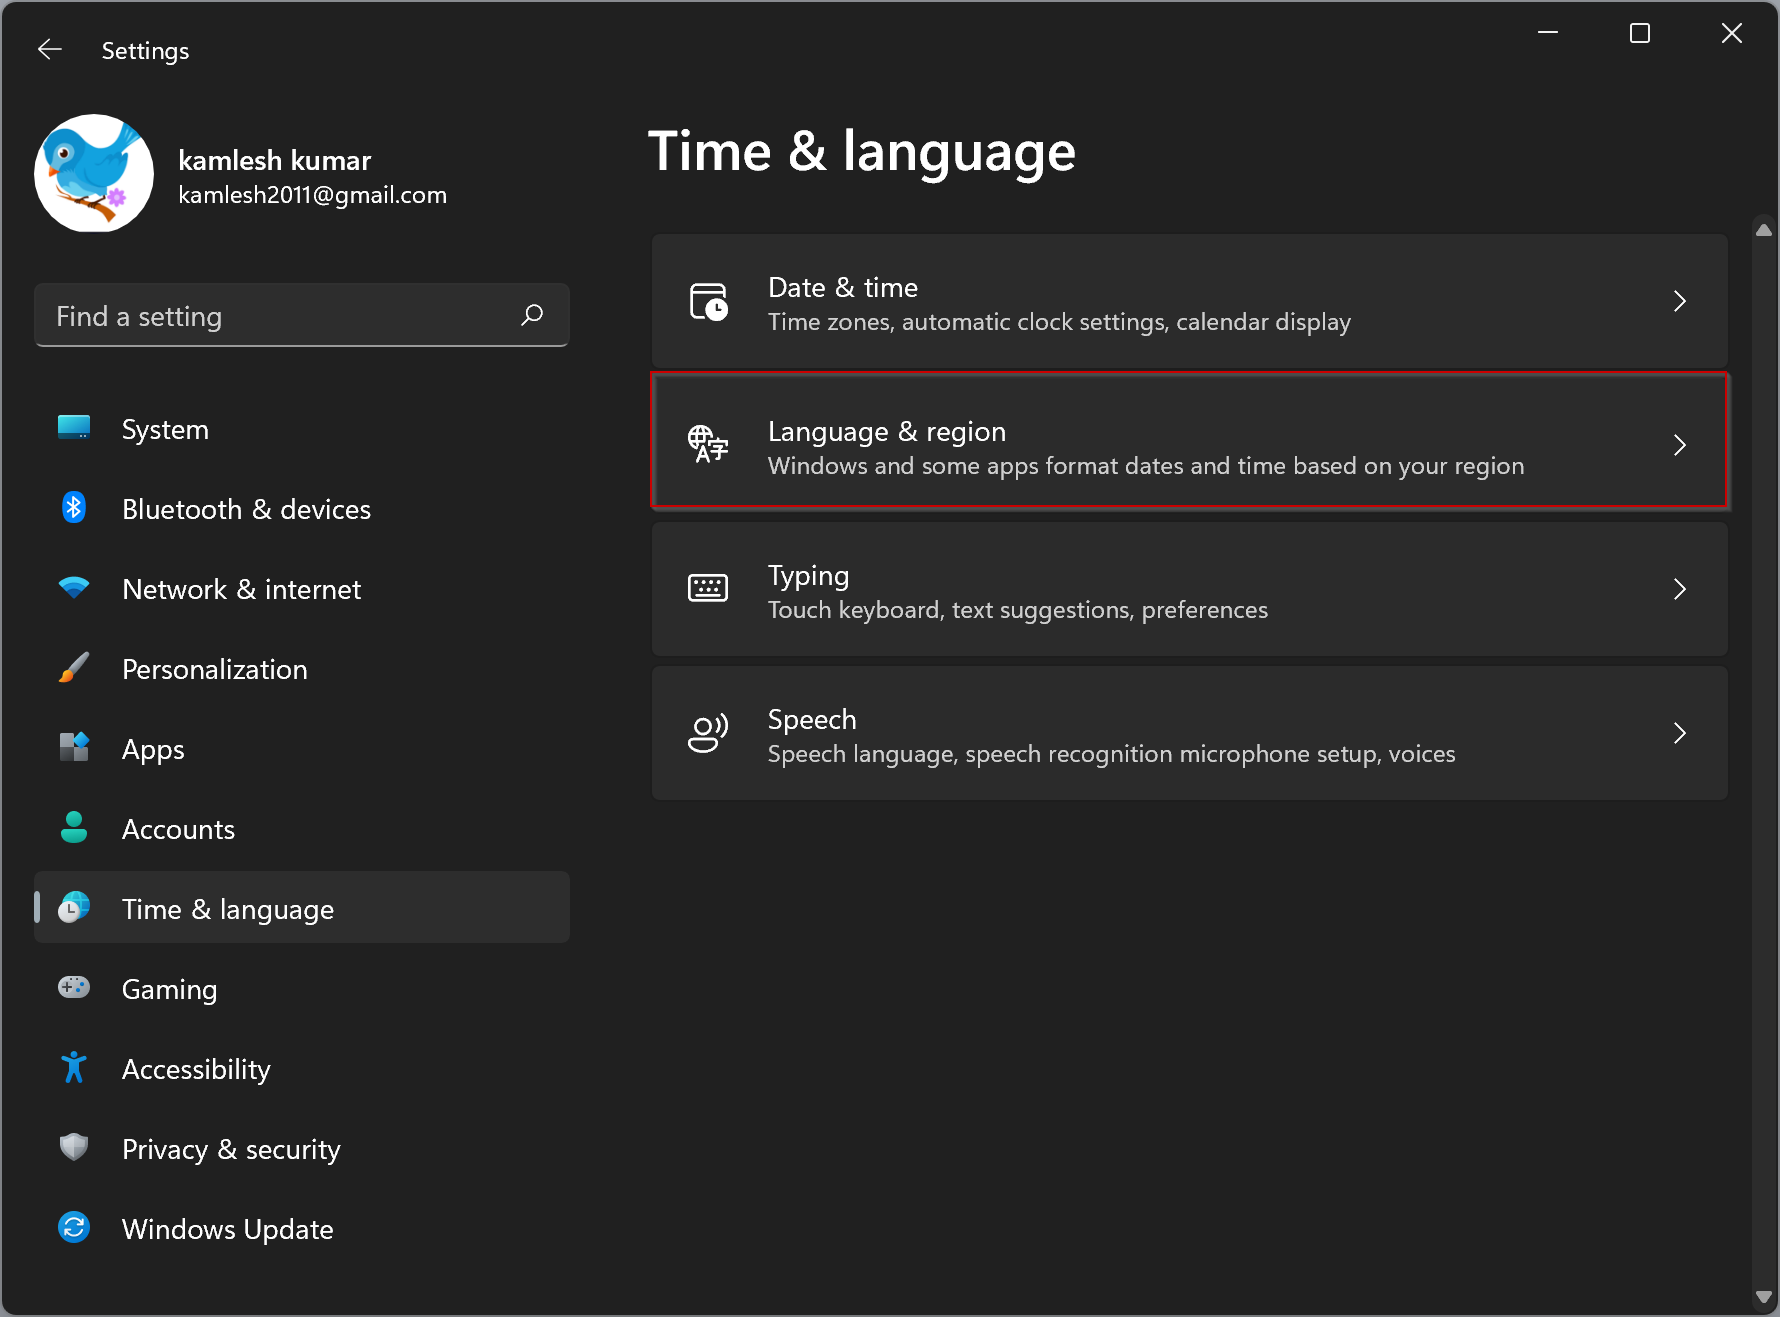
Select the ‘Time & language’ option from the left side of options on the Settings window. Next, click the ‘Language & region’ option on the ‘Time & language’ screen on the right.
Click the ‘Regional format’ option on the ‘Language & region’ page and then click the ‘Change formats’ button at the bottom right corner of the drop-down.
You can now change the time format on the ‘Regional formats’ window. There are two time formats; Short time and Long time. The former appears on the taskbar.
Click the time drop-down on the ‘Short time’ option.
Choose the short time format from the three options in the ‘Short time’ drop-down.
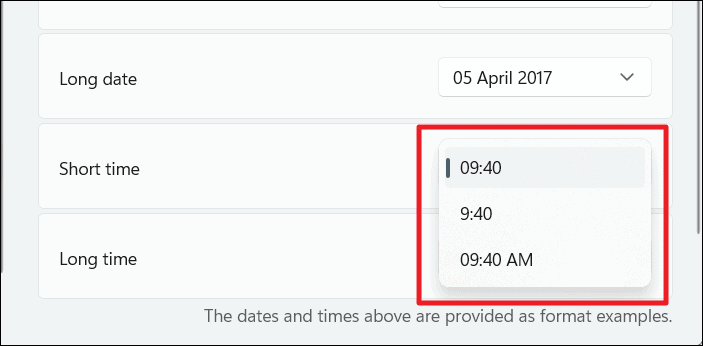
Note: The ‘AM’ option denotes the 12-hour clock format and the other options represent the 24-hour format, only with inclusion or exclusion of a ‘0’ preceding the hour.
The ‘Long time’ format is essentially the same time, only shown with the seconds along with the hour and minute. You can choose to change the ‘Long time’ format or not.
To change the ‘Long time’ format, click the drop-down on the ‘Long time’ option and select the format.
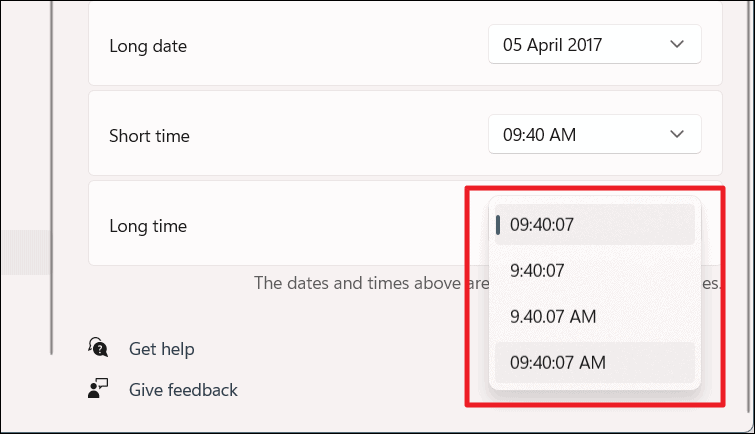
Here, both the 12-hour and 24-hour clock formats have options with ‘0’ in front of the hour, unlike the ‘Short time’ options that have it only for the 24-hour format.
How to Change Time Format on Windows 11 using Control Panel
Launch the Control Panel (refer to the beginning of this guide to know how). Click ‘Change date, time or number formats’ below ‘Clock and Region’ on the Control Panel window.
A ‘Region’ dialog box opens next. Here, you can change the ‘Short time’ and the ‘Long time’ under ‘Date and Time formats’ while observing the changes under ‘Examples’.
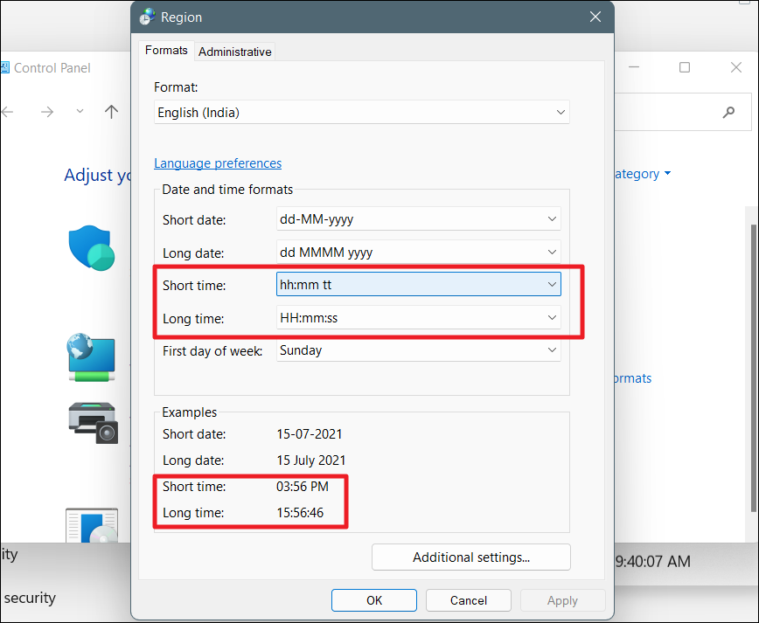
Click the drop-down box next to the time you wish to change and choose the format from the drop-down menu. Click ‘Apply’ once you’re done and then, hit ‘OK’.
The changes made in this section will instantly reflect under ‘Examples’.

Here, the time formats are represented a little differently.
Note: The hours of the 12-hour clock format are shown with lowercase letters (hh) and that of the 24-hour clock format, with uppercase letters (HH).
The time is now changed on your system.
How to Sync Time or Remove Sync with the Internet Time Server
Launch the Control Panel and select ‘Clock and Region’ on the ‘Control Panel’ window.
Click ‘Date and Time’ on the ‘Clock and Region’ page.
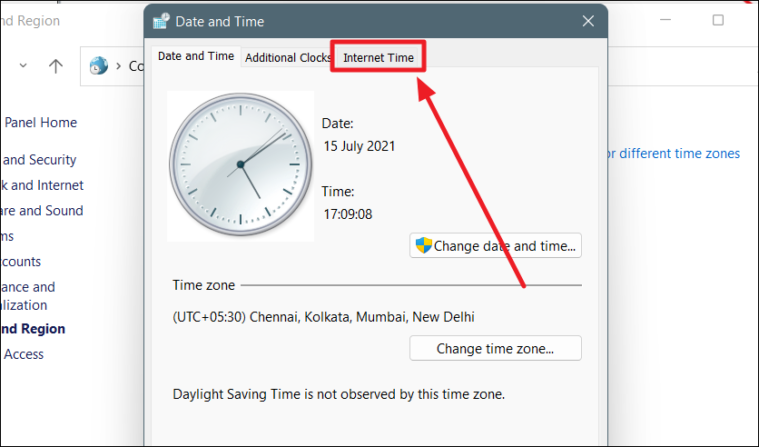
Choose the ‘Internet Time’ tab from the ribbon on the ‘Date and Time’ dialog box.
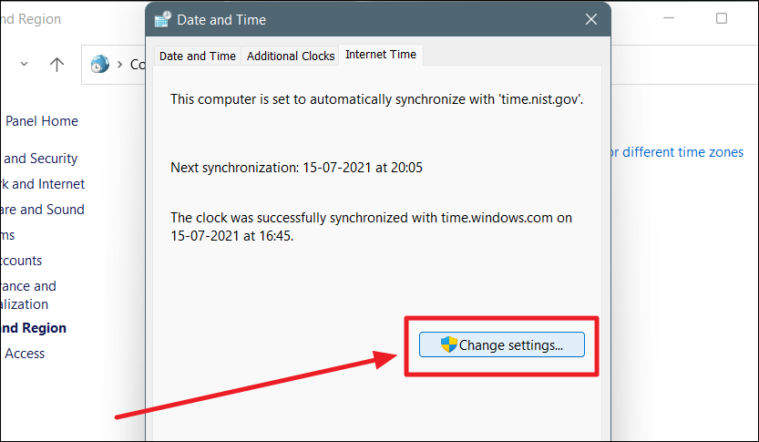
Click the ‘Change Settings’ button on the ‘Internet Time’ tab.
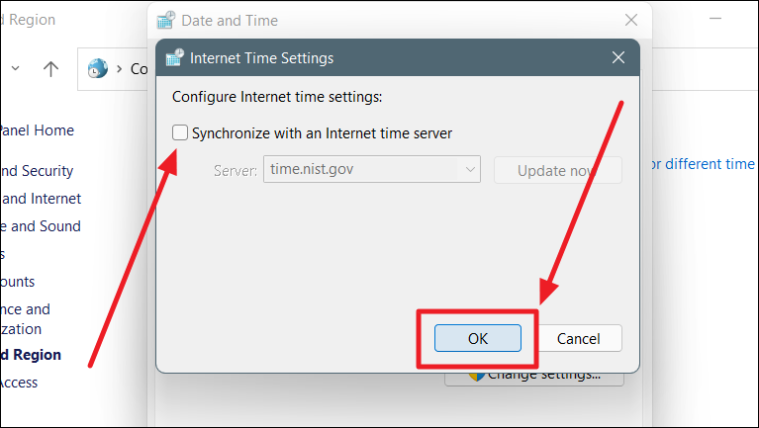
Click and check the box in front of ‘Synchronize with an Internet time server’ option below the ‘Configure Internet time settings:” on the ‘Internet Time Settings’ dialog box. This will sync your system with the internet time server.
Next, click ‘Update now’ and then, finish the process by hitting ‘OK’.
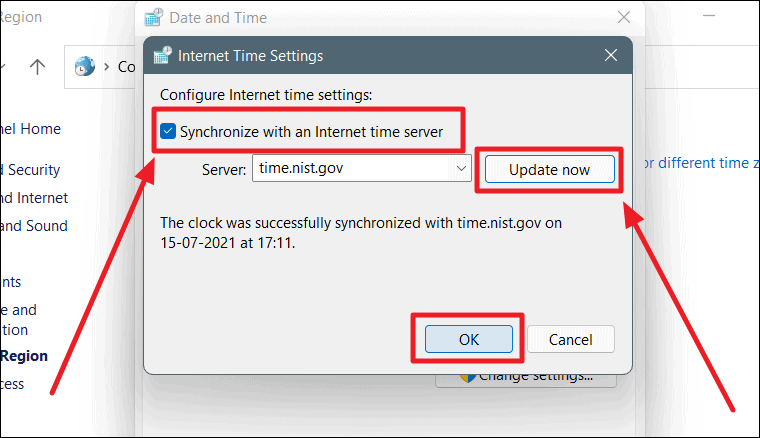
To un-sync the system time from the Internet Time Server, click the box in front of ‘Synchronize with an Internet time server’ on the same ‘Internet Time Settings’ dialog, to deselect the option. Then, click ‘OK’ to apply the changes.
Your system time is now out of sync with the Internet Time Server.
Don’t like the default date and time format? Here is a simple way to change the date and time format in Windows 11 operating system.
On Windows 11, it will automatically set the date and time formats based on your location. Generally, you will give this location information by choosing the country you live in while setting up Windows 11. As most of you know, almost every country follows its own date and time formats. For example, where I live, the date format is DD-MM-YYYY. For you, it might be different.
The default date and time format is good enough for most people. However, if the default Windows Date or Time format is not to your liking or if you want to change it to something logical or readily understandable, you can do that by modifying the regional settings. For example, maybe you want to show weekdays next to the date, switch from 12-hour to 24-hour time format, etc. One of the best things is that Windows provides extensive customization options to modify the date and time formats.
No matter the reason, if you ever want to change the date or time format in Windows 11, follow the steps given below. It will be done in no time.
Jump to:
• Change date format in Windows 11
• Change time format in Windows 11
• Set custom date and time format
You can change the date format from the Windows 11 Settings app. Here is how to do it.
- Right-click on the date and time on the taskbar.
- Select “Adjust date and time.”
- Click on “Language and region” at the bottom.
- Scroll down and click on the “Regional format” option.
- Click the “Change formats” button.
- Select a date format from the “Short date” dropdown menu.
- Close the Settings app.
- With that, you’ve changed the date format in Windows 11.
First, right-click on the date and time on the taskbar and select the “Adjust date and time” option.

Now, click on the “Language and region” option under the “Related Links” section. Next, scroll down, click on the “Regional format” option, and click on the “Change formats” button.

Now, select a date format of your choice from the “Short date” dropdown menu. In Windows 11, changing the “Long date” will do nothing because there is no date in the calendar flyout.

As soon as you select the date format, it will be instantly applied to the taskbar.
If you are wondering, the new Settings app doesn’t allow you to set a custom date format. You can only select from the pre-defined formats. If you want to set a custom format, follow the third section.
Change time format in Windows 11
To change the time format in Windows 11, follow the steps given below.
- Right-click on the date and time on the taskbar.
- Select “Adjust date and time.”
- Click on “Language and region” at the bottom.
- Scroll down and click on the “Regional format” option.
- Click the “Change formats” button.
- Select a date format from the “Short time” dropdown menu.
- Close the Settings app.
- With that, you’ve changed the time format in Windows 11.

Keep in mind that the new Settings app doesn’t allow you to set a custom time format. You can only select from pre-defined formats. This is because the “Long time” no longer appears in the calendar flyout. If you want to set a custom format, follow the third section.
Set custom date and time format
If you want to set a custom date and time format, you have to use the good old control panel. For example, I want to show the weekdays in the date format. That means I have to use a custom date format. Here is how to do it.
First, search for “Control Panel” in the Start menu and open it. Next, set the “View by” to “Large icons” and find & click on the “Region” option.

Now, make sure you are in the “Formats” tab and click on the “Additional settings” button at the bottom.

Go to the “Time” tab and set the custom time format in the “Short time” field. You can use the below notations to set the time format.
- hh = hour (12-hour format)
- HH = Hour (24-hour format)
- m = minute
- tt = A.M or P/m

To set a custom date format, go to the “Date” tab. Next, set the custom date format in the “Short date” field. Use the below notations to set the custom date format.
- d, dd = day
- ddd, dddd = day of week
- M = month
- y = year
For example, to show weekday before date, you set the date format to something like “ddd, dd-MM-yy.”

Note: You cannot set “Long date” or “Long time” because Windows 11 no longer supports date and time in the calendar flyout.
Finally, click the “Apply” and “Ok” buttons to save the changes.
Close the control panel.
—
That is it. It is that simple to change the date and time format in Windows 11.
I hope that helps.
If you are stuck or need some help, comment below, and I will try to help as much as possible.
Windows 11, like its predecessors, allows users to customize how dates and times are displayed on their system. By default, Windows 11 displays dates and times in a specific format based on the language and region settings of your computer. However, you may prefer a different format that better suits your needs or preferences. In this article, we will explain how you can change the dates and times format in Windows 11 and customize it to your liking.
Changing the dates and times format in Windows 11 is a simple process that can be done through the settings menu. By changing the format, you can choose how you want the dates and times to appear on your system, including the order of the day, month, and year, as well as the time format. This is especially useful for users who work with international clients or colleagues and need to display dates and times in a different format than their default system settings. Additionally, changing the format can make it easier for users with visual impairments or dyslexia to read and interpret dates and times.
How to Change Dates Format in Windows 11?
To change the date format on your PC, do the following steps:-
Step 1. Open the Settings app by pressing Windows + I keys from the keyboard or any other method that you like to use.
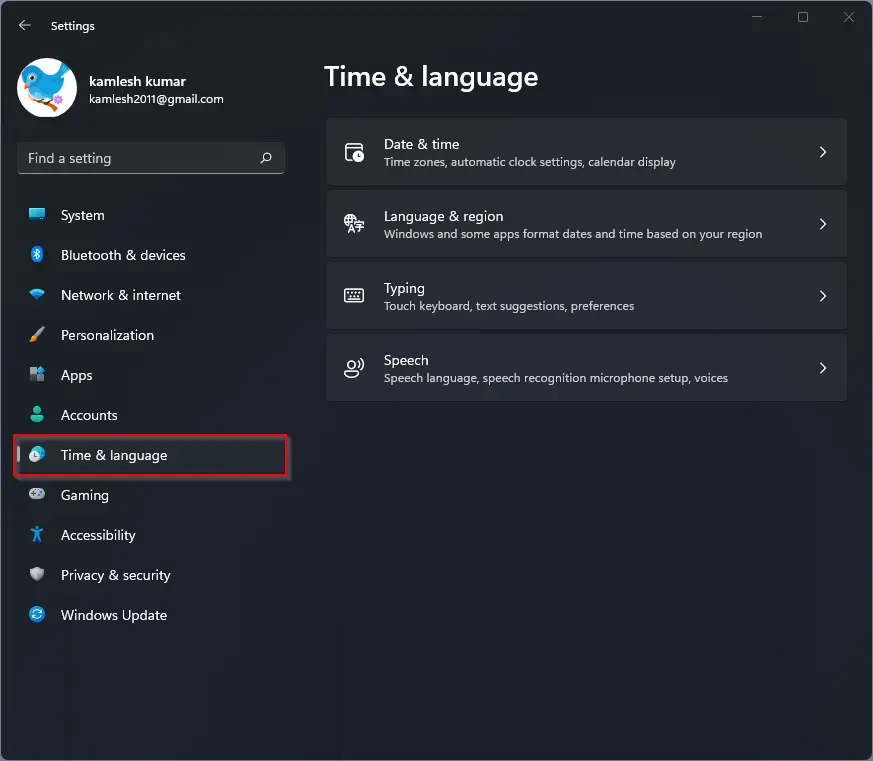
Step 2. When Windows Settings opens, select Time & language category from the left side pane.
Step 3. On the right side pane, click the Language & region.
Step 4. On the Language & region settings page, scroll down to find the Related settings section.
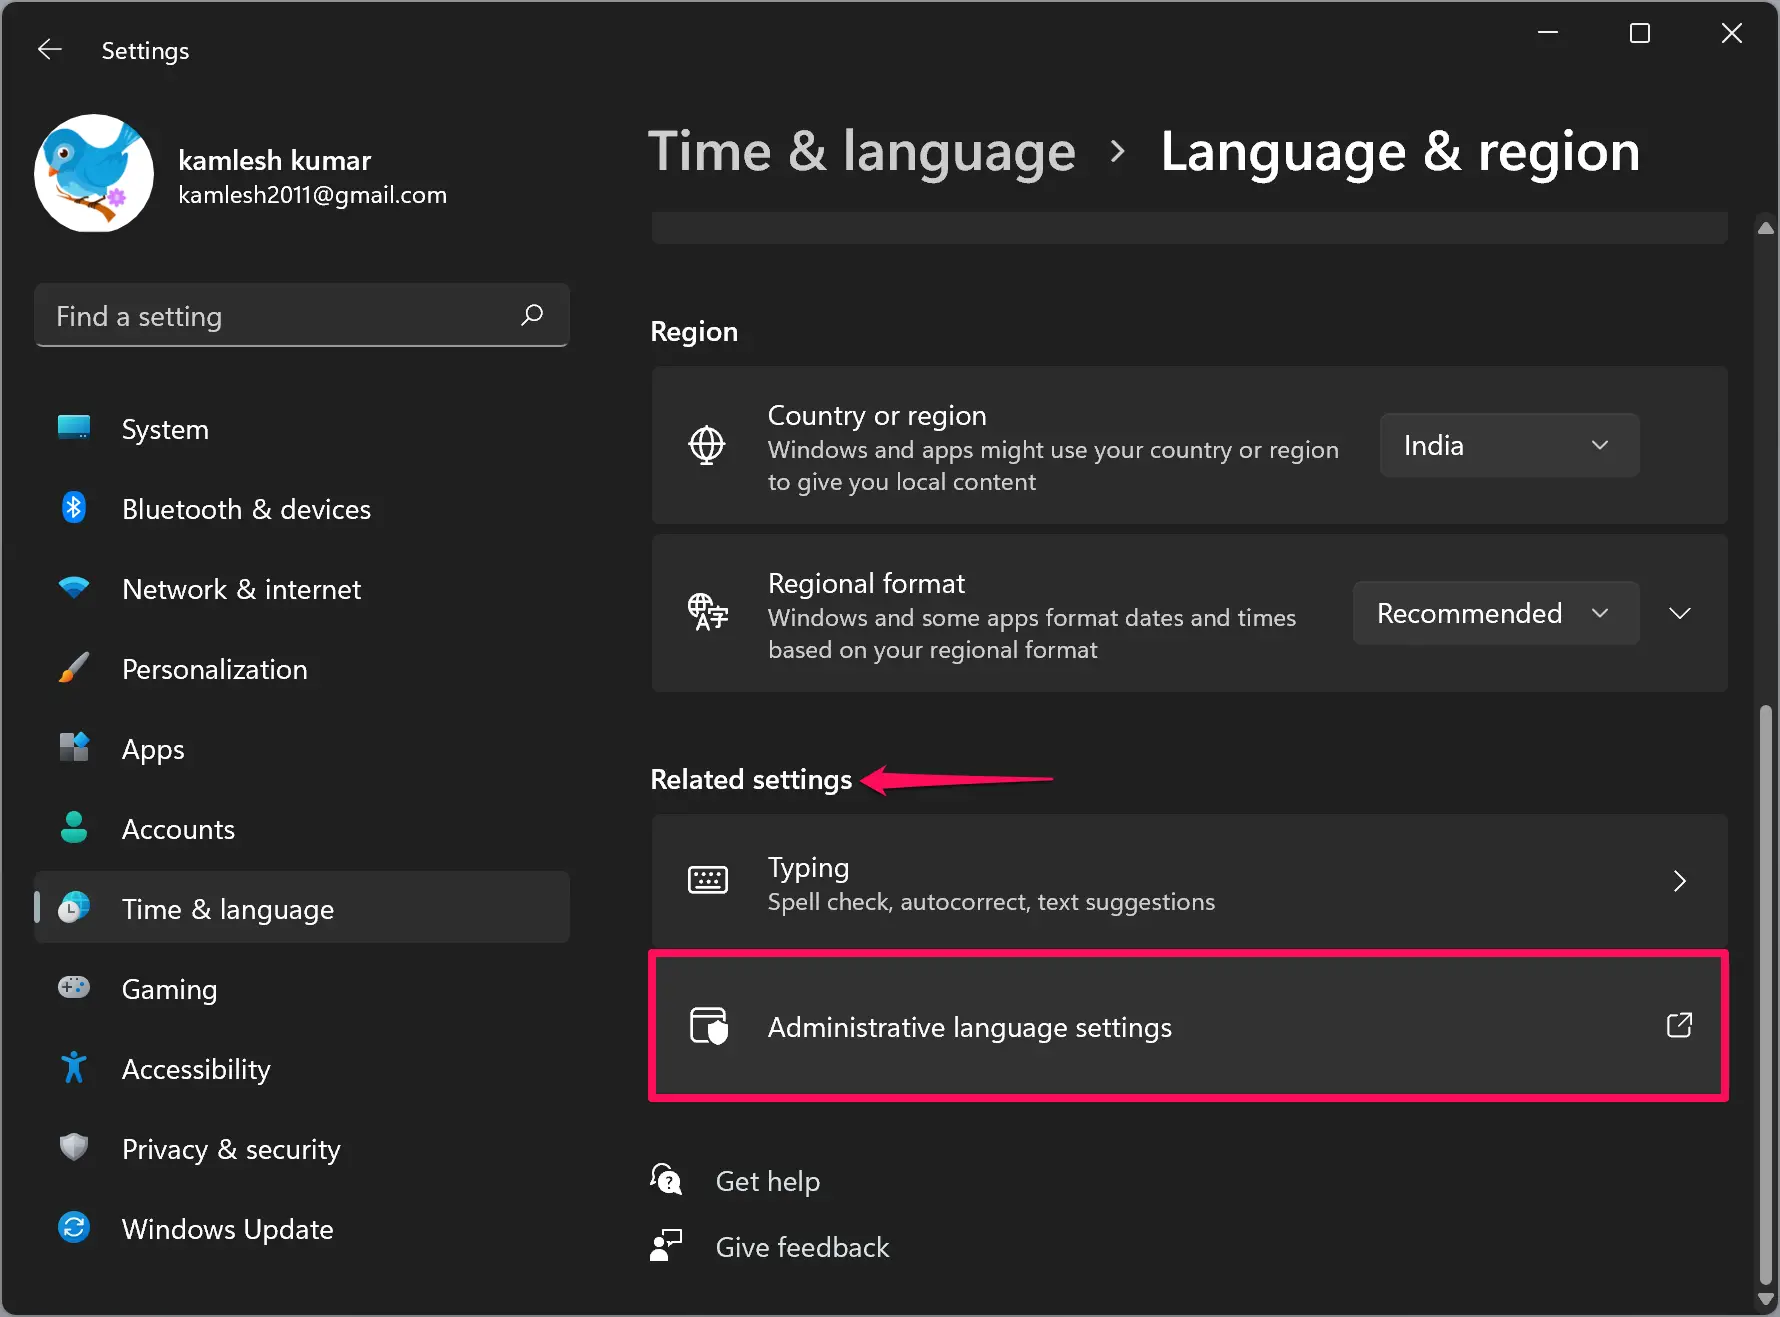
Step 5. Then click the option Administrative language settings.
Step 6. A new pop-up window will open. Navigate to the Formats tab. Here, if you wish, you can select a built-in date and time format. For a custom format, click the Additional settings button.
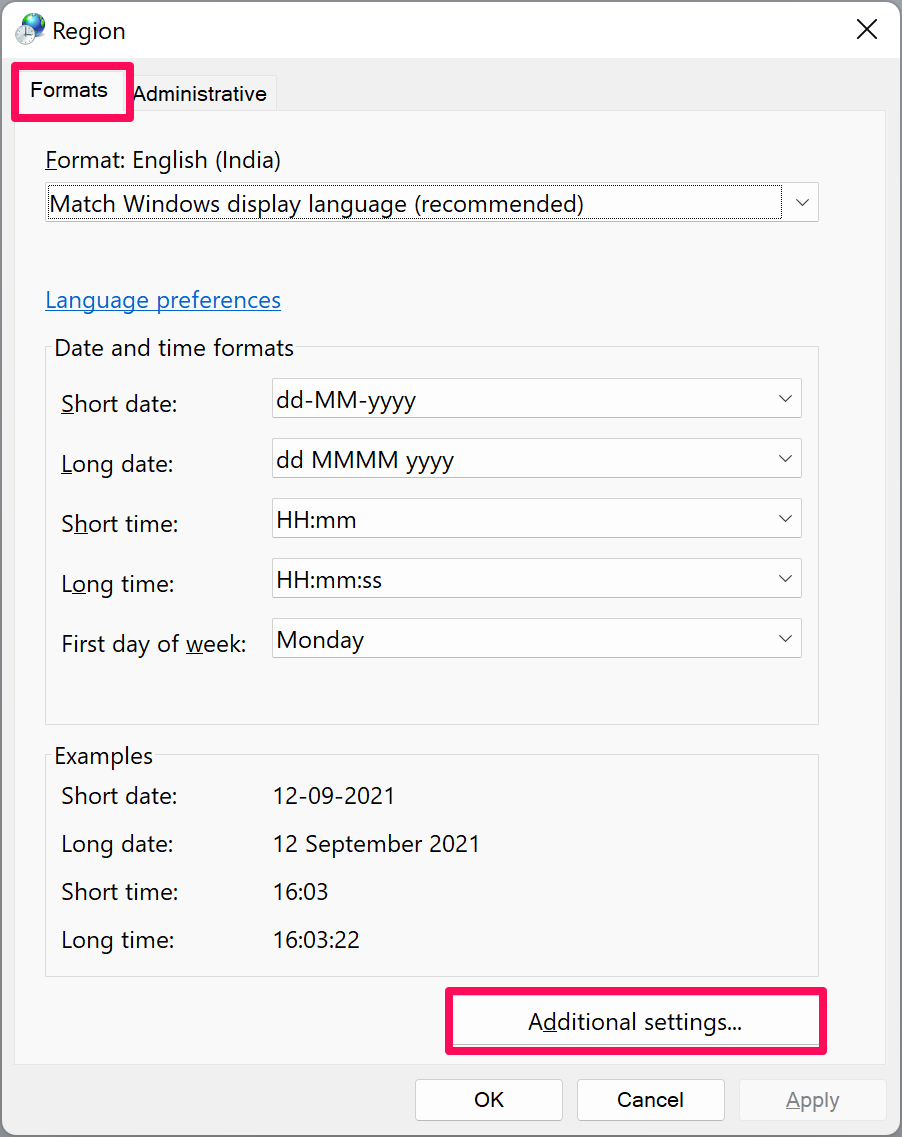
Step 7. On the Customize Format dialog, select the Date tab.
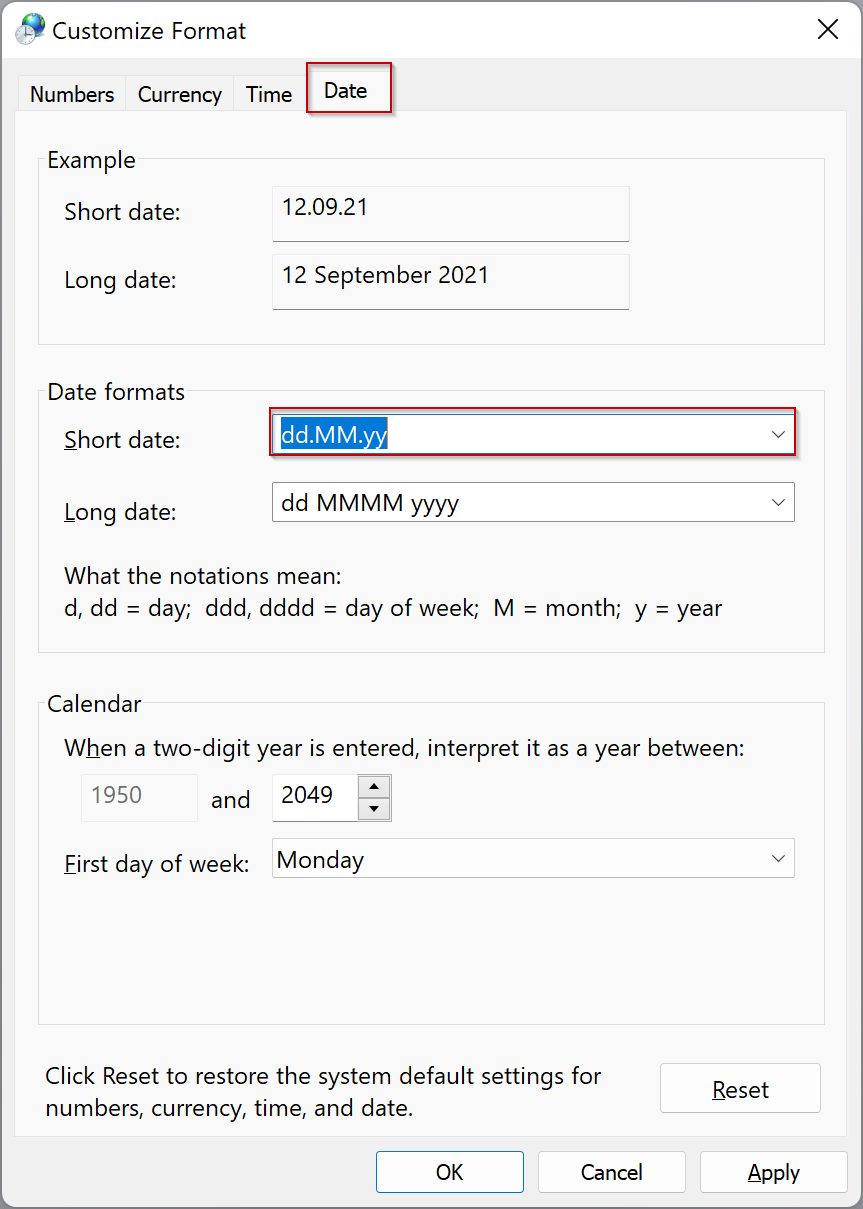
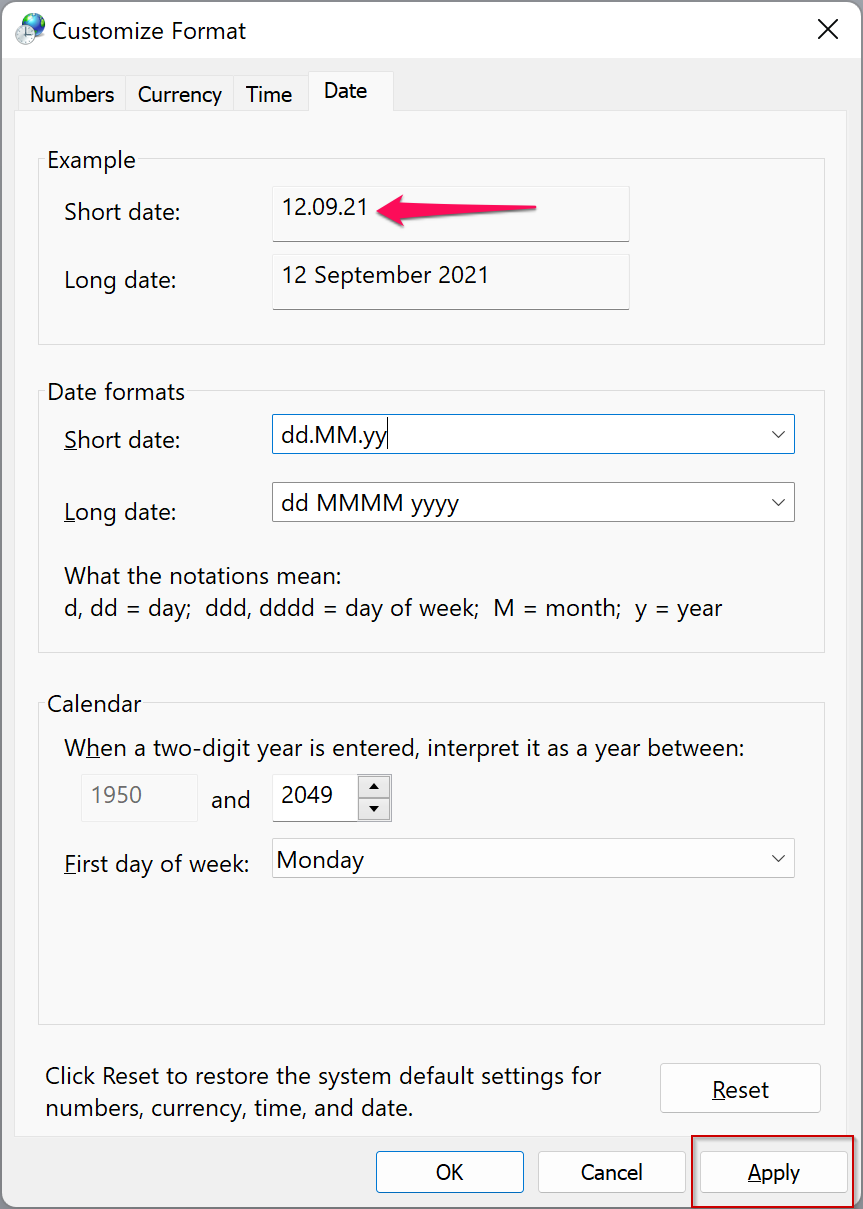
Step 8. Under the Date formats section, select any Short date and edit them according to your choice. For instance, we have used dots (dd.mm.yy) for the date format.
When done, click the Apply button to see the preview under the Example section.
Step 9. Similarly, to change the time format, navigate to the Time tab and edit the Short time format that you want to see in the taskbar.
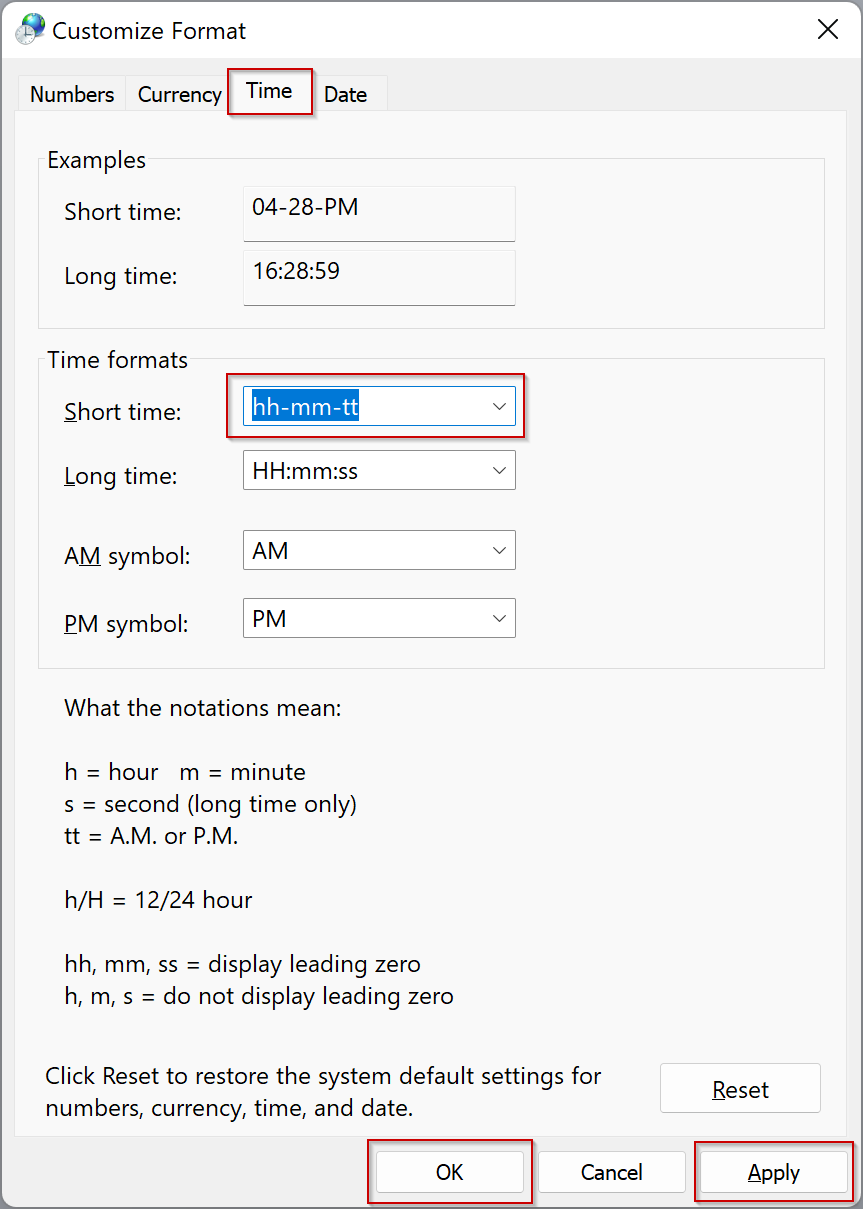
Step 10. Click Apply.
Step 11. Click OK.
Step 12. Click Apply.
Step 13. Click OK.
Now, you can close the Settings app. All the settings are stored automatically.
Conclusion
In conclusion, customizing the date and time format in Windows 11 is a simple and convenient way to personalize your system and make it more accessible for your needs. With just a few clicks in the Settings app, users can change the order and format of dates and times, including the time format, making it easier to read and interpret. This is especially useful for users who work internationally or have visual impairments or dyslexia. Overall, Windows 11 continues to provide users with the ability to customize their experience and improve their productivity.
Also Read:
How to Change or Sync Time in Windows 11?
In Windows 11, the date and time formats are defaulted to the regional format you have set during the Windows setup. If you want to change the date format to mm/dd/yyyy, dd/mm/yyyy, or other format you prefer, and time format to 12-hour or 24-hour clock in Windows 11, here’s how to do it.
Generally, you have two choices on how you can change the date and time format.
- You can change the regional format to any region of your preference which allows Windows and some apps to format automatically dates, times, first day of week and calendar based on the regional format you set.
- Or, you can manually set each of the formats (date, time, calendar and first day of week) individually based on your preference.
This short tutorial will show you both of the mentioned methods on how to change the date and time format in Windows 11.
How to change date and time format in Windows 11 by changing regional format
By changing the regional format, Windows and apps that support the regional format will format dates and times according to the regional format you set. If you want to simply change the date and time format all together to match the format your country or region uses, follow the steps below to change the general regional format in Windows 11.
- Press Win + i keys to open Settings app in Windows 11, or open it via Start menu > Settings.
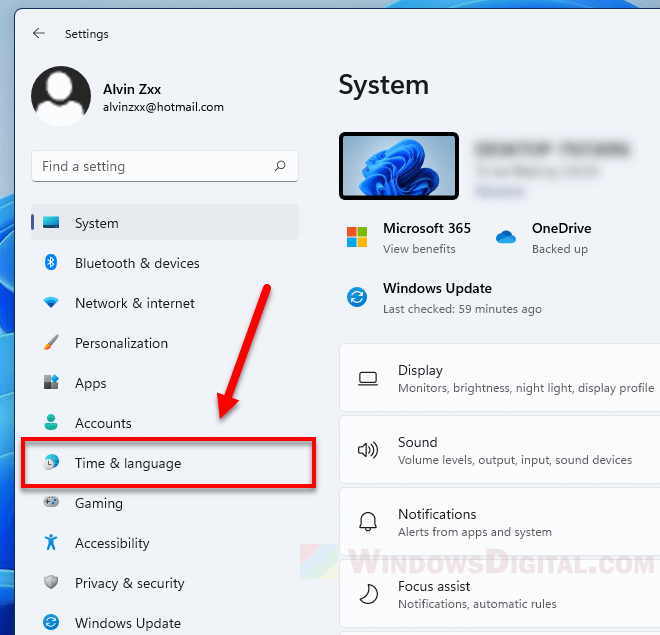
- On the left pane, click on Time & Language.

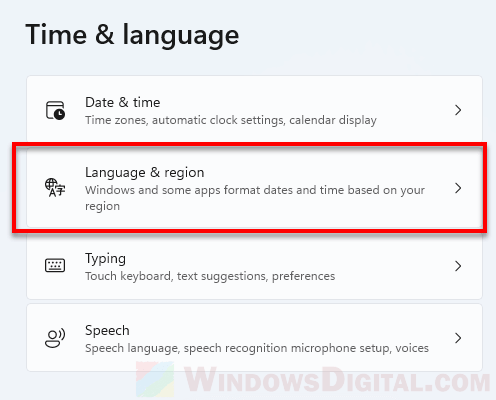
- Next, select Language & region.

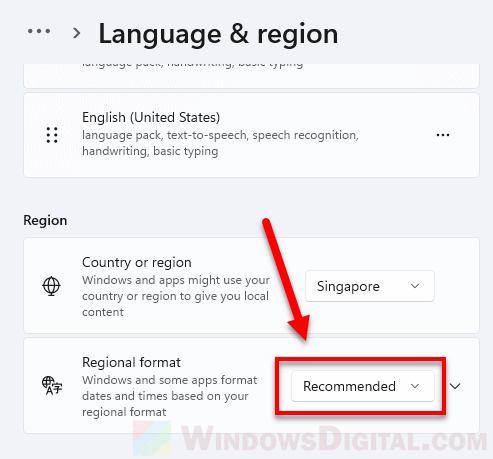
- Under Region, click on the drop-down menu for the Regional format option, then select your preferred region.

After changing the regional format, you may need to close and reopen some apps (such as Microsoft Office apps) to see the formatting changes. However, you can immediately see the changes in the date and time on the taskbar in Windows 11.
The default value for the regional format option is “Recommended” should you want to revert the changes back to its default.
How to change date format and time format individually in Windows 11
If you want to manually change the date, time, first day of week or calendar format individually without affecting one another, you can ignore the regional format and change each of the date and time formats yourself. Here’s how to do so.
- Follow step 1 to 3 in the instruction above to open Settings > Time & Language > Language & region.
- Under Region, instead of clicking on the drop-down menu, click on the down arrow to expand the Regional format option.
- Then, click on Change formats.

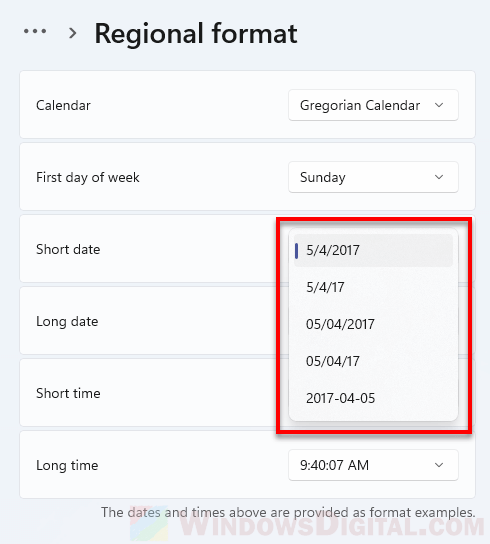
- From here, you can configure each of the formats for Calendar, First day of week, Short date, Long date, Short time and Long time, to any format of your choice.


You can see the new date, time and calendar format on your Windows taskbar immediately after making the changes. However, you may need to close and reopen apps that support Windows date and time format for the changes to take effect.