По-умолчанию настройки Windows запрещают запуск скриптов PowerShell. Это необходимо для предотвращения запуска вредоносного кода на PowerShell. Настройки политик запуска PowerShell скриптов определяются в Execution Policy. В этой статье мы рассмотрим доступные политики запуска PS скриптов, как изменить Execution Policy и настроить политики использования PowerShell скриптов на компьютерах в домене.
Содержание:
- Выполнение PowerShell скриптов запрещено для данной системы
- Как разрешить запуск скриптов PowerShell с помощью Execution Policy?
- Настройка PowerShell Execution Policy с помощью групповых политик
- Способы обхода политики PowerShell Execution
Выполнение PowerShell скриптов запрещено для данной системы
При попытке выполнить PowerShell скрипт (файл с расширением PS1) на чистой Windows 10, появляется ошибка:
File C:\ps\.ps1 cannot be loaded because running scripts is disabled on this system. For more information, see about_Execution_Policies at https:/go.microsoft.com/fwlink/?LinkID=135170.
+ CategoryInfo : SecurityError: (:) [], PSSecurityException
+ FullyQualifiedErrorId : UnauthorizedAccess
Не удается загрузить файл.ps1, так как выполнение скриптов запрещено для данной системы.

Текущее значение политики выполнения скриптов PowerShell на компьютере можно получить командой:
Get-ExecutionPolicy

Доступны следующие значения PowerShell Execution Policy:
- Restricted – запрещен запуск скриптов PowerShell, можно выполнять только интерактивные команды в консоли;
- AllSigned – разрешено выполнять только подписанные PS скрипты с цифровой подписью от доверенного издателя (можно подписать скрипт самоподписанным сертификатом и добавить его в доверенные). При запуске недоверенных скриптов появляется предупреждение:
Do you want to run software from this untrusted publisher? File .ps1 is published by CN=test1 and is not trusted on your system. Only run scripts from trusted publishers


- RemoteSigned – можно запускать локальные PowerShell скрипты без ограничения. Можно запускать удаленные PS файлы с цифровой подписью (нельзя запустить PS1 файлы, скачанные из Интернета, запущенные из сетевой папки по UNC пути и т.д.);
- Unrestricted – разрешен запуск всех PowerShell скриптов;
При запуске сторонних PowerShell скриптов может появляется предупреждение с подтверждением запуска, см. ниже.
- Bypass – разрешён запуск любых PS файлов (предупреждения не выводятся) – эта политика обычно используется для автоматического запуска PS скриптов без вывода каких-либо уведомлений (например при запуске через GPO, SCCM, планировщик и т.д.) и не рекомендуется для постоянного использования;
- Default – сброс настроек выполнения скриптов на стандартную;
В Windows 10 значение политики выполнения PowerShell по-умолчанию Restricted, а в Windows Server 2016 — RemoteSigned.
- Undefined – не задано. Применяется политика Restricted для десктопных ОС и RemoteSigned для серверных.
Как разрешить запуск скриптов PowerShell с помощью Execution Policy?
Чтобы изменить текущее значение политики запуска PowerShell скриптов, используется командлет Set-ExecutionPolicy.
Например, разрешим запуск локальных скриптов:
Set-ExecutionPolicy RemoteSigned
Подтвердите изменение политики запуска PS1 скриптов, нажав Y или A.

Чтобы запрос не появлялся, можно использовать параметр Force.
Set-ExecutionPolicy RemoteSigned –Force
Если вы установили значение политики PowerShell Execution Policy в Unrestricted, то при запуске удаленных скриптов из сетевых каталогов по UNC пути, скачанных из интернета файлов, все равно будет появляться предупреждение:
Security warning
Run only scripts that you trust. While scripts from the internet can be useful, this script can potentially harm your computer. If you trust this script, use the
Unblock-File cmdlet to allow the script to run without this warning message.
Do you want to run?
[D] Do not run [R] Run once [S] Suspend [?] Help (default is "D")

Как PowerShell различает локальные и удаленные скрипты? Все дело в идентификаторе зоны ZoneId, которую выставляет браузер в альтернативном потоке при загрузке файла (см. статью “Как Windows определяет, что файл скачан из Интернета?”). Вы можете разблокировать такой файл, поставив галку “Разблокирвать” в его свойствах или очиститься метку зоны с помощью комадлета Unblock-File.
Также следует различать различные области действия политик выполнения скриптов PowerShell (scopes):
- MachinePolicy – действует для всех пользователей компьютера, настраивается через GPO;
- UserPolicy – действует на пользователей компьютера, также настраивается через GPO;
- Process — настройки ExecutionPolicy действует только для текущего сеанса PowerShell.exe (сбрасываются при закрытии процесса);
- CurrentUser – политика ExecutionPolicy применяется только к текущему пользователю (параметр из ветки реестра HKEY_CURRENT_USER);
- LocalMachine – политика для всех пользователей компьютера (параметр из ветки реестра HKEY_LOCAL_MACHINE);
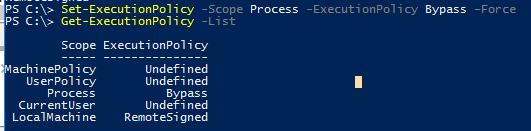
Область применения политики можно указать с помощью параметр Scope командлета Set-ExecutionPolicy. Например:
Set-ExecutionPolicy -Scope Process -ExecutionPolicy Bypass –Force
Проверим текущие настройки ExecutionPolicy для всех областей:
Get-ExecutionPolicy -List
Scope ExecutionPolicy
----- ---------------
MachinePolicy Undefined
UserPolicy Undefined
Process Bypass
CurrentUser Undefined
LocalMachine RemoteSigned
Значение политики выполнения, которые вы задаете с помощью командлета Set-ExecutionPolicy для областей CurrentUser и LocalMachine, хранятся в реестре. Например, выполните командлет:
Set-ExecutionPolicy -Scope LocalMachine -ExecutionPolicy Restricted –Force
Откройте ветку реестра HKEY_LOCAL_MACHINE\SOFTWARE\Microsoft\PowerShell\1\ShellIds\Microsoft.PowerShell и проверьте значение REG_SZ параметра ExecutionPolicy. Оно изменилось на Restricted (допустимые значения параметра Restricted, AllSigned, RemoteSigned, Bypass, Unrestricted и Undefined).
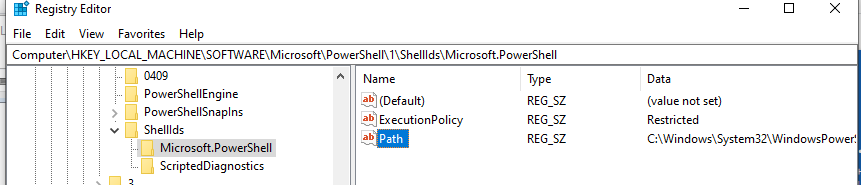
Аналогичные настройки для области CurrentUser находятся в разделе реестра пользователя HKEY_CURRENT_USER\SOFTWARE\Microsoft\PowerShell\1\ShellIds\Microsoft.PowerShell.
Отметим, что чаще всего в корпоративной среде используется ExecutionPolicy со значением AllSigned на уровне LocalMachine. Это обеспечивает максимальный баланс между безопасностью и удобством. Для личного пользования на компьютере можно использовать RemoteSigned. Ну а Bypass политику лучше использовать только для запуска отдельных задач (например для запуска скриптов через GPO или заданий планировщика).
Настройка PowerShell Execution Policy с помощью групповых политик
Вы можете настроить политику выполнения PowerShel скриптов на серверах или компьютерах домена с помощью групповых политик.
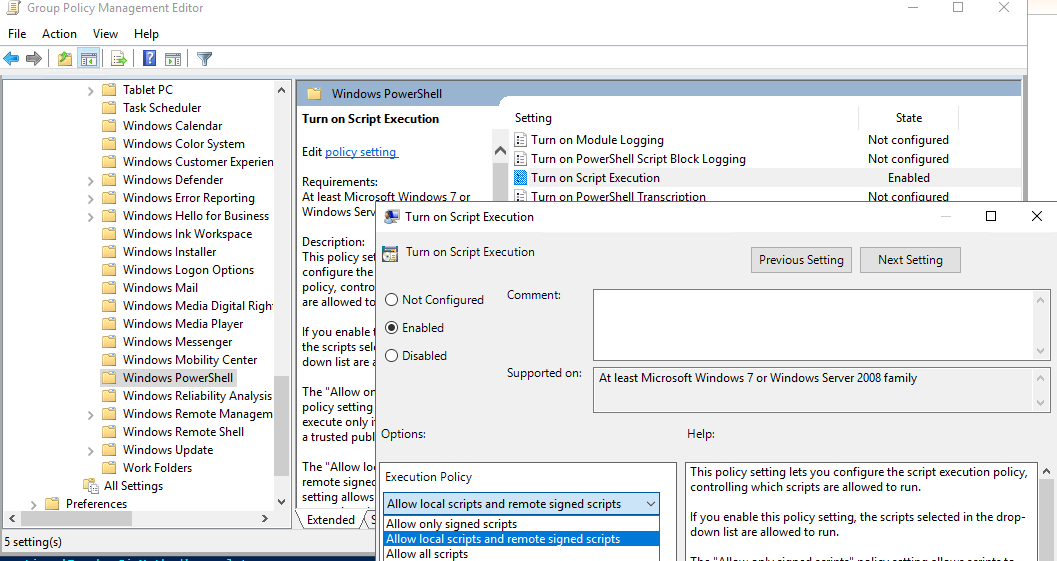
- С помощью редактора доменных GPO (gpmc.msc) создайте новую GPO (или отредактируйте) существующую и назначьте ее на OU с компьютерами, к которым нужно применить политику запуска PowerShell скриптов;
- В редакторе политики перейдите в раздел Computer Configuration -> Policies -> Administrative Templates -> Windows Components -> Windows PowerShell и найдите политику Turn on Script Execution (Включить выполнение сценариев);
Аналогичная политика есть в пользовательском разделе GPO — User Configuration, но политика компьютера имеет приоритет.
- Для политики доступны три значения:
- Allow only signed scripts (Разрешать только подписанные сценарии) — соответствует политике AllSigned;
- Allow local scripts and remote signed scripts (Разрешать локальные и удаленные подписанные сценарии) — соответствует политике PS RemoteSigned;
- Allow all scripts (Разрешать все сценарии) — политика Unrestricted.

- Выберите необходимое значение политики, сохраните GPO и обновите политики на компьютере.
- Проверьте, что для области MachinePolicy теперь действуют новые настройки выполнения.

После настройки политики выполнения через GPO вы не сможете изменить настройки политики выполнения скриптов вручную. При попытке изменить настройки Execution Policy на компьютере, на который применяется такая GPO, появится ошибка:
Set-ExecutionPolicy : Windows PowerShell updated your execution policy successfully, but the setting is overridden by a policy defined at a more specific scope. Due to the override, your shell will retain its current effective execution policy of RemoteSigned. Type "Get-ExecutionPolicy -List" to view your execution policy settings.

Способы обхода политики PowerShell Execution
Есть несколько трюков, которые могут помочь вам, когда нужно запустить на компьютере PowerShell скрипт, не изменяя настройки политики выполнения. Например, я хочу запустить простой PS1 скрипт, который поверяет, что запущен с правами администратора.
Можно с помощью Get-Content получить содержимое скрипта и перенаправить его в стандартныq поток ввода консоли PS.
Get-Content c:\ps\check_process_elevation.ps1 | PowerShell.exe -noprofile –
Либо можно запустить новый процесс powershell.exe с политикой выполнения Bypass:
powershell.exe -noprofile -executionpolicy bypass -file c:\ps\check_process_elevation.ps1

PowerShell — это новая командная оболочка для Windows, которая по задумкам Microsoft должна вытеснить и заменить cmd. По-умолчанию, эта оболочка уже идет в составе Windows 7 и выше. Если у вас более старая операционная система или вы просто хотите скачать более свежую версию PowerShell, сделать это можно здесь: https://technet.microsoft.com/en-us/scriptcenter/dd742419.aspx
Как запустить скрипт PowerShell?
Есть несколько различных способов запуска скрипта, ниже приведены основные:
- Запустить оболочку PowerShell и в ней запустить скрипт (ввести путь до файла и имя файла, например, так: C:\Scripts\test.ps1, или перейти в папку скрипта командой cd C:\Scripts и запустить его командой .\test.ps1)Оболочку можно найти и запустить множеством способов. Один из способов — через меню «Пуск». Для Windows 7 — нужно зайти во «Все программы» — «Стандартные» — «Windows PowerShell» и запустить оболочку «Windows PowerShell». Для Windows 10 — нужно найти группу на букву «W» и в ней вы найдете «Windows PowerShell».
- Запустить «Интегрированную среду сценариев Windows PowerShell ISE» — это программа — среда разработки, позволяющая редактировать и отлаживать скрипты PowerShell, которая так же есть по-умолчанию вместе с самим PowerShell. Запустив ее, нужно просто нажать кнопку «Открыть» или зайти в меню Файл — Открыть и выбрать нужный скрипт, затем нажать F5 или кнопку «Выполнить скрипт».Найти Windows PowerShell ISE можно там же, где и оболочку PowerShell — в меню «Пуск».
- Запустить стандартную коммандную строку и в ней написать:
powershell -file <имя_скрипта> (пример: powershell -file myscript.ps1)
Если вы раньше не запускали скрипты PowerShell, то скорее всего, вы получите сообщение: Не удается загрузить файл <имя_скрипта>, так как выполнение скриптов запрещено для данной системы. Введите «get-help about_signing» для получения дополнительных сведений. Связано это с тем, что из соображений безопасности и недопущения случайного выполнения вредоносного кода, все скрипты должны быть подписаны цифровой подписью.
Как разрешить выполнение неподписанного скрипта PowerShell?
1. В оболочке PowerShell, перед тем как запускать скрипт, выполнить команду, разрешающую выполнение неподписанных скриптов для текущего сеанса оболочки:
Set-ExecutionPolicy RemoteSigned -Scope Process
2. При запуске из стандартной коммандной строки использовать параметр -executionpolicy, т.е. запускать скрипт так:
powershell -executionpolicy RemoteSigned -file <имя_скрипта>
Оба способа устанавливают политику только для текущего сеанса, при этом, политика безопасности выполнения скриптов PowerShell, прописанная в реестре, не будет изменена и останется прежней. Если вы хотите поменять политику безопасности выполнения скриптов «на постоянно», то используйте такой способ:
3. Разрешить запуск навсегда: запустить оболочку PowerShell от имени «Администратора», затем выполните команду:
Set-ExecutionPolicy RemoteSigned
Однако, я бы не рекомендовал такой способ, чтобы не подвергать ваш компьютер возможным угрозам, т.к. так вы разрешаете выполнение скриптов всем и всегда.
Примечание: Если скрипт был загружен из интернета, то чтобы избежать запроса на подтверждение запуска, нужно вместо RemoteSigned использовать Bypass — полное отключение любых запросов и предупреждений.
Как запустить скрипт PowerShell в фоновом режиме?
Для этого достаточно использовать параметр запуска -WindowStyle, который может принимать значения: Normal, Minimized, Maximized и Hidden. Таким образом, чтобы запустить неподписанный скрипт в фоновом режиме, нужно выполнить команду:
powershell -executionpolicy RemoteSigned -WindowStyle Hidden -file <имя_скрипта>
Так же можно еще при желании добавить -NonInteractive, чтобы скрипт не задавал никаких вопросов. Таким образом, скрипт выполнится незаметно для пользователя. Будmте внимательны, используя такой способ.
Запуск скрипта PowerShell c параметрами
Собственно запуск нужно делать как если бы вы запускали обычную программу или bat-файл с параметрами. Например, для запуска скрипта с параметрами из командной, можно написать такую команду:
powershell -executionpolicy RemoteSigned -file <имя_скрипта> param1 param2 «еще один текстовый параметр»
В самом скрипте вы можете получить эти параметры так:
param ($var1, $var2, $var3)
echo $var1, $var2, $var3
В интегрированной среде PowerShell ISE запустить скрипт с параметрами можно аналогично, используя область команд.
Как запустить скрипт PowerShell с помощью ярлыка?
Осуществить такую задачу можно двумя способами:
- Создать bat/cmd файл, в котором прописать команду для запуска скрипта (с параметрами вы ознакомились выше)
- Создать ярлык на PowerShell, который можно найти в папке c:\Windows\System32\WindowsPowerShell\v<версия>\ и в свойствах ярлыка в поле «Объект» дописать необходимые параметры.
Таким образом, например, чтобы запустить скрипт powershell при входе пользователя, можно просто создать ярлык, как описано во 2-м пункте и поместить его в автозагрузку. Так же, создание ярлыка одним из способов выше позволит легко запустить скрипт от имени администратора или от имени любого другого пользователя как обычную программу.
Скриптовый язык PowerShell — довольно мощный инструмент для решения различных задач, но его можно использовать не только для хороших вещей, но и во вред, поэтому, пользуйтесь им с умом 
(Image credit: Future)
On Windows 10 (or 11), PowerShell is a command-line interface (CLI) that allows you to run commands and scripts to automate tasks and change settings on your computer, similar to Command Prompt. However, PowerShell is a more powerful CLI that offers a more extensive set of tools and more flexibility. In addition, unlike Command Prompt, PowerShell is available across platforms, including Windows, macOS, and Linux.
Regardless of the platform, a script is a collection of instructions written to a text file (using the particular «.ps1» extension) that PowerShell understands and executes in sequence to run different actions.
The only problem is that the default security protocol prevents scripts from running on your device. This means that when double-clicking a «.ps1» file, Windows 10 won’t do anything, and if you try to run the script within PowerShell, you will see the «cannot be loaded because running scripts is disabled on this system» error message. However, running scripts on your computer is not impossible. You only need to enable the correct execution policy.
This how-to guide will walk you through the steps to write and run your first script file on PowerShell using Visual Studio Code, Notepad, and the PowerShell Integrated Scripting Environment (ISE) console, whether you use Windows 10 or the newer Windows 11.
How to create PowerShell script file on Windows 10
It’s possible to create PowerShell script files using any text editor or the legacy ISE application. However, the Visual Studio Code editor is the preferred option for writing scripts (whenever possible).
Create a script with VS Code
Visual Studio Code (VS Code) is a free and extensible cross-platform code editor to edit virtually any programming language. And when adding the PowerShell extension, you get an interactive scripting editing experience, which even comes with IntelliSense (code-completion) support.
You can still use PowerShell ISE, but Visual Studio Code with the PowerShell extension is meant to be the new default experience. Also, consider that the legacy experience won’t get any new features and doesn’t support PowerShell 7 or higher releases.
Install VS Code
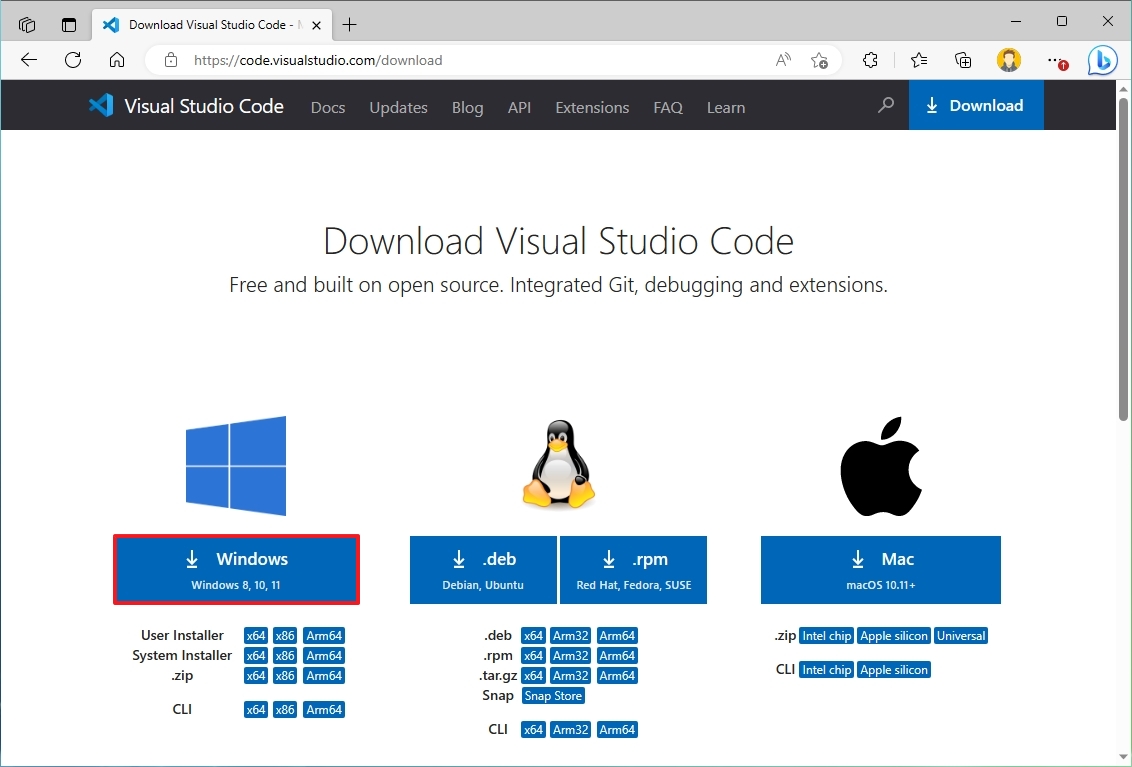
To install Visual Basic Code on Windows 10 (or 11), use these steps:
- Open the Visual Studio Download page.
- Click the Windows button to download the installation file.
- Double-click the installer to begin the process.
- Select the «I accept the agreement» option.
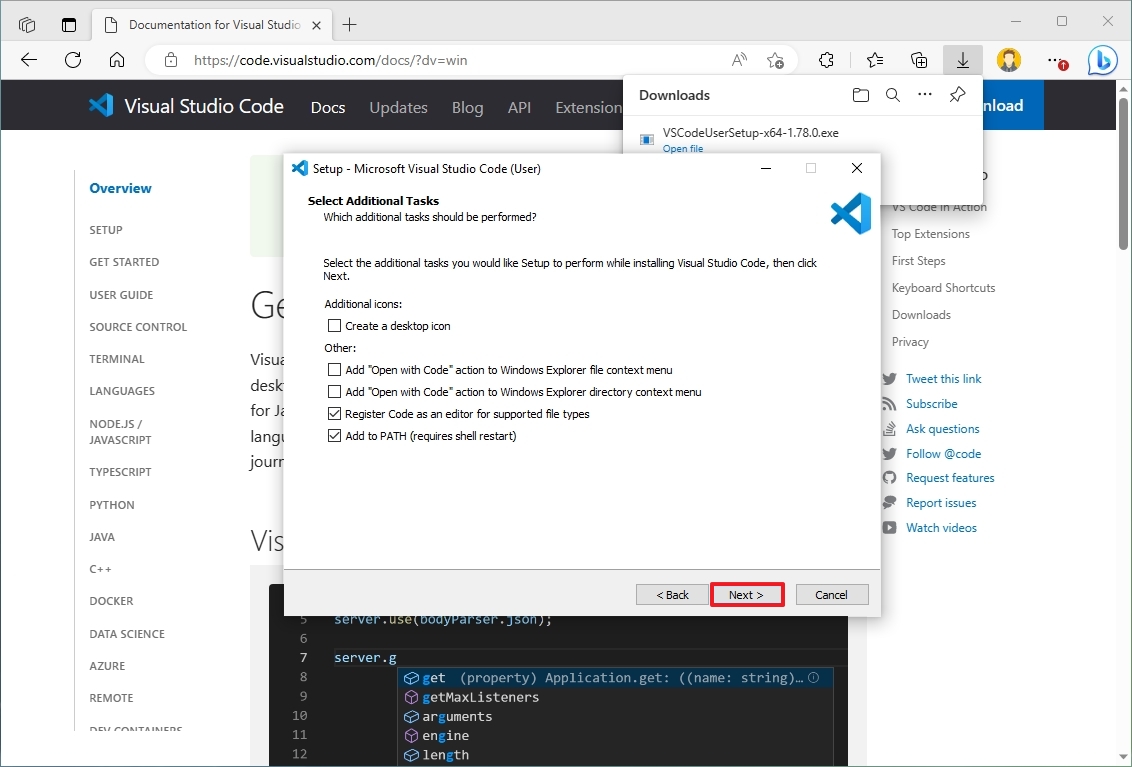
- Click the Next button.
- Confirm additional tasks as necessary.
- Click the Next button again.
- Click the Install button.
- Click the Finish button.
Once you complete the steps, you can continue installing the PowerShell extension for VS Code.
Install PowerShell extension
To install the PowerShell extension on VS Code, use these steps:
- Open VS Code.
- Click the Extensions tab («Ctrl + Shift + X» keyboard shortcut) from the left pane.
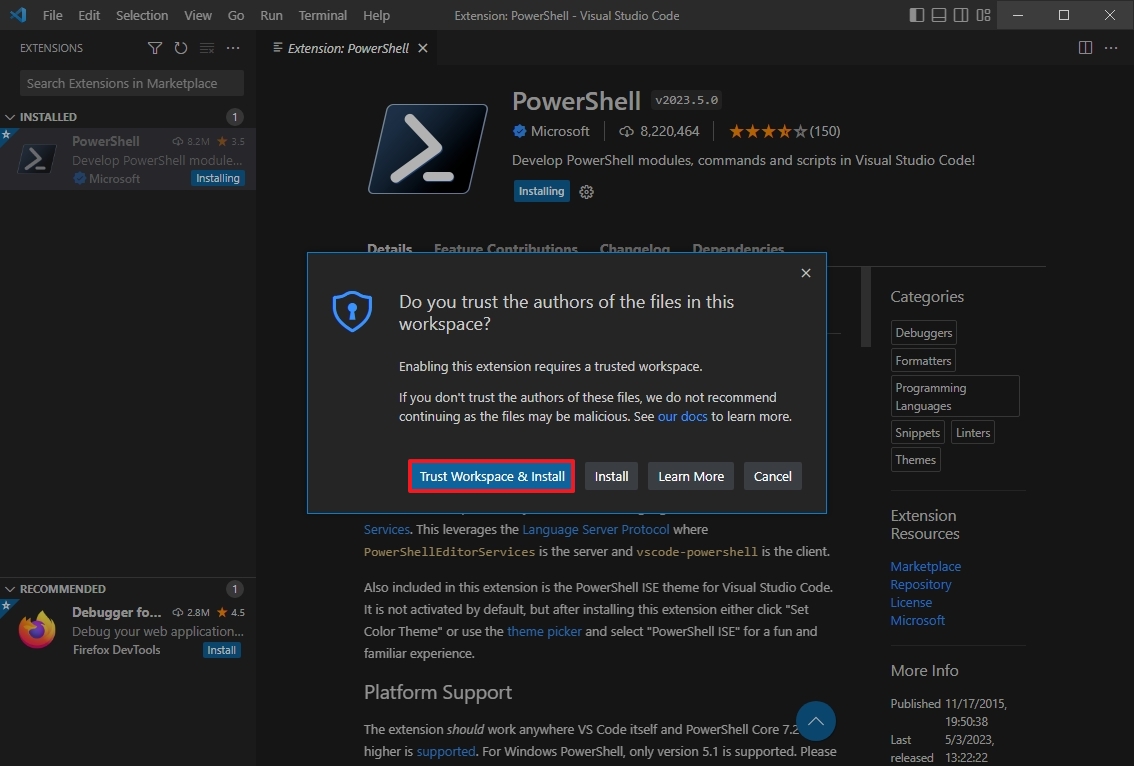
- Search for PowerShell and select the top result.
- Click the Install button.

- Click the «Trust Workspace & Install» button.
After you complete the steps, you can start writing PowerShell scripts from Visual Studio Code.
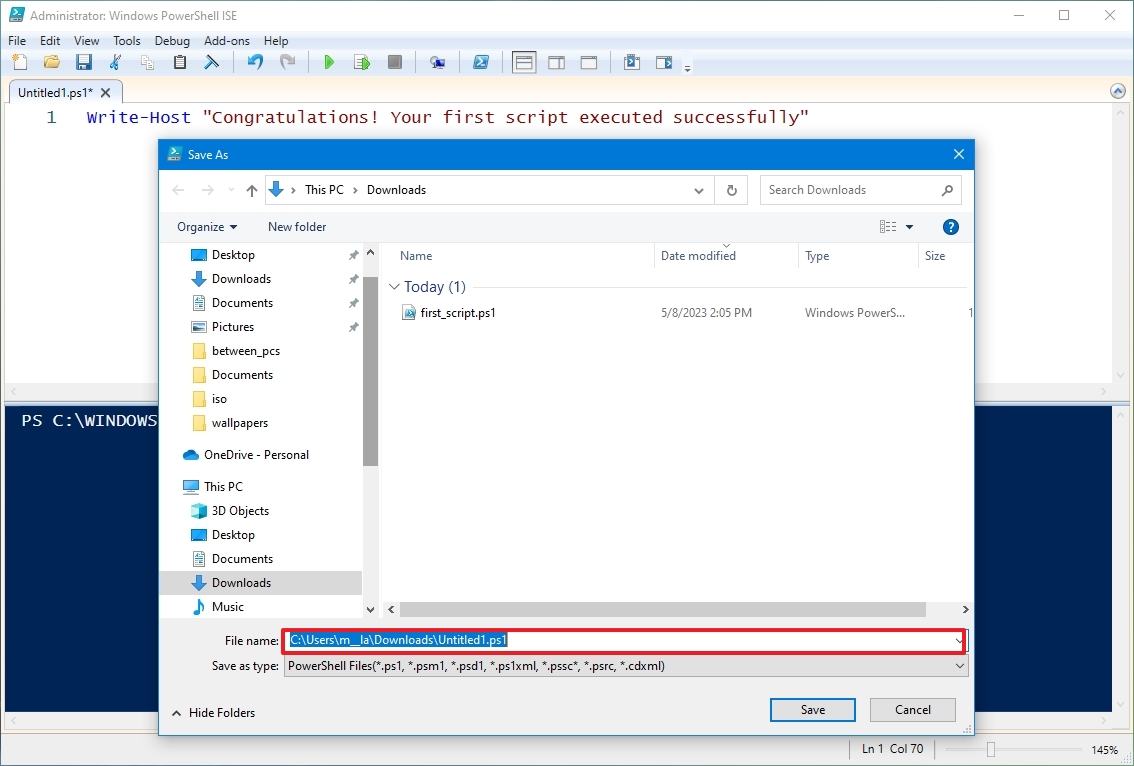
Create PowerShell script with Visual Studio Code
To create a script with Visual Basic Code on Windows 10 (or 11), use these steps:
- Open VS Code.
- Click the File menu and select the «New Text File» option.
- Click the File menu and select the Save As option.
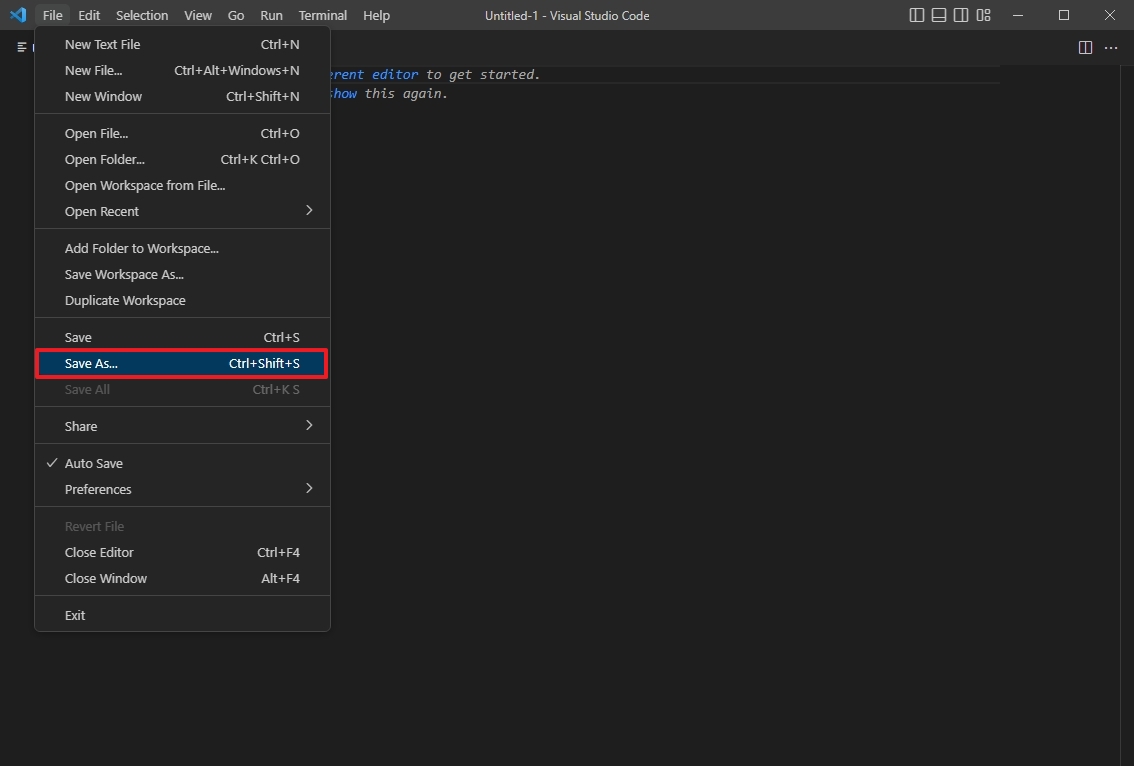
- In the «File name» field, specify a name for the file with the «.ps1» extension — for example, first_script.ps1.
- Click the Save button.
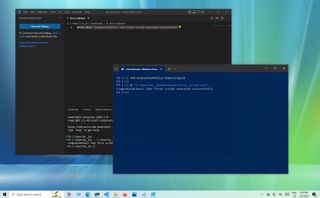
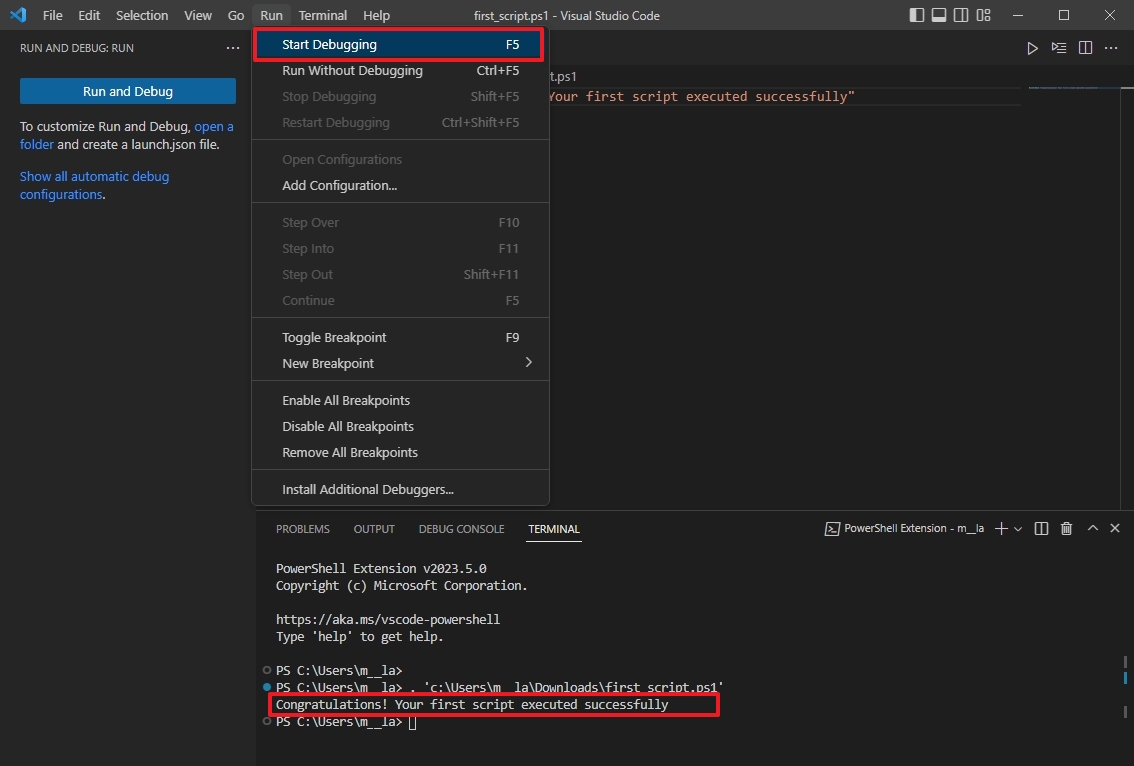
- Write a new or paste the script you want to run — for example, Write-Host «Congratulations! Your first script executed successfully»
- Quick note: The above script will output on the screen that says: «Congratulations! Your first script executed successfully.»
- (Optional) Open the Run menu, select the Start Debugging option from the command bar, or press the F5 key) to run the script.
- Click the File menu.
- Click the Save option.
Create PowerShell script with Notepad
To create a PowerShell script with Notepad, use these steps:
- Open Start.
- Search for Notepad, and click the top result to open the app.
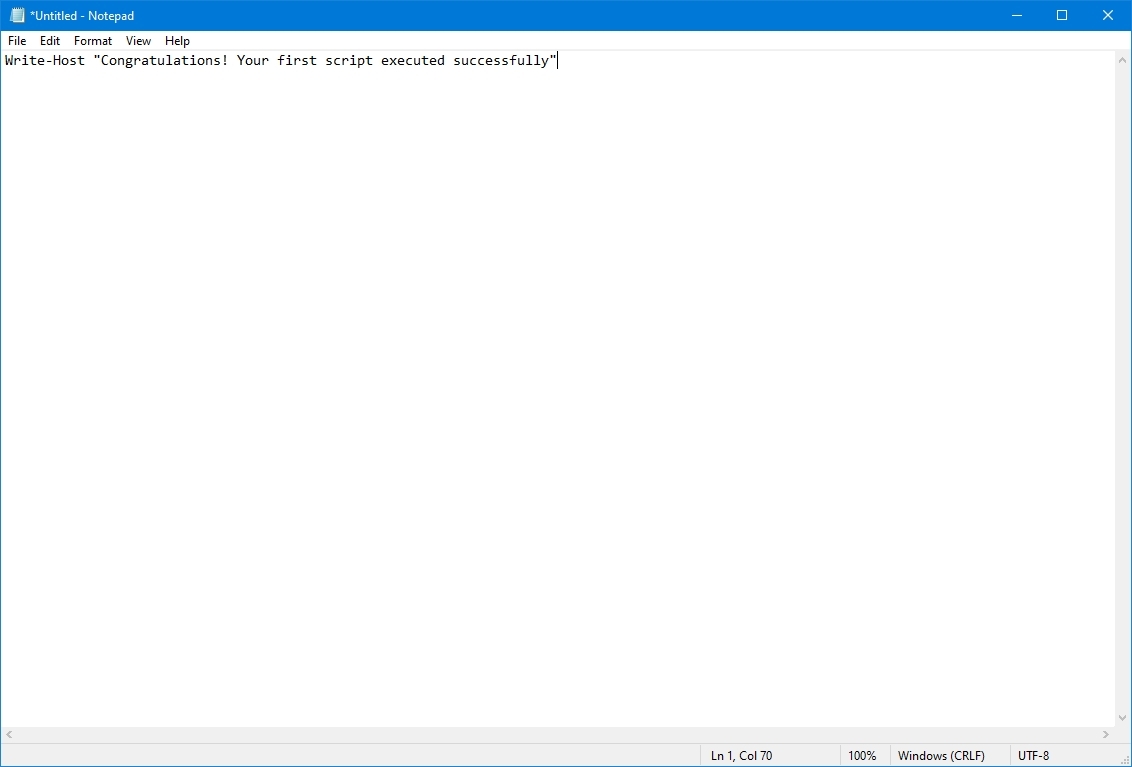
- Write a new or paste your script in the text file — for example, Write-Host «Congratulations! Your first script executed successfully»
- Quick note: Although the Notepad app looks a little different on Windows 11, the instructions will also apply.
- Click the File menu.
- Select the Save As option.
- Confirm a descriptive name for the script — for example, first_script.ps1.
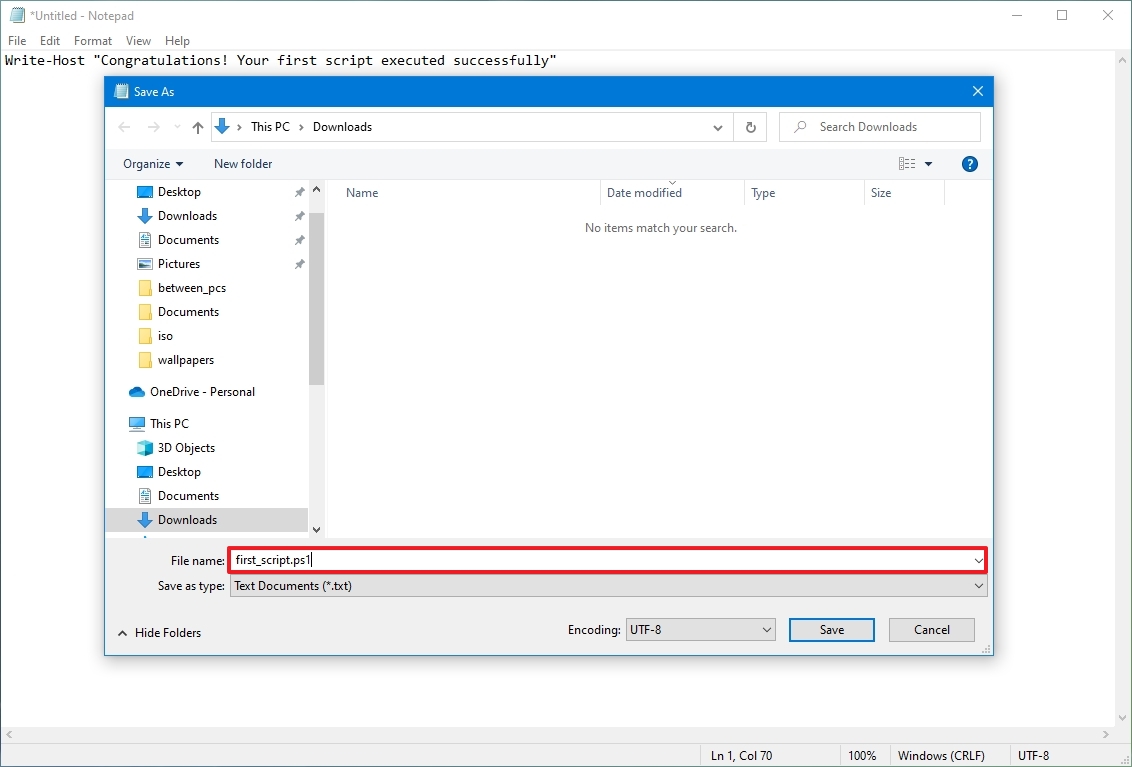
- Click the Save button.
Create PowerShell script with Integrated Scripting Environment
You can also use the built-in PowerShell ISE app to code your scripts on Windows 10 (or 11).
The Integrated Scripting Environment (ISE) is a complex tool, but you can get started using these easy steps:
- Open Start.
- Search for Windows PowerShell ISE, right-click the top result, and select the Run as administrator option.
- Click the File menu.
- Select the New option to create a new empty «.ps1» file.
- Write a new, or paste the script you want to run — for example, Write-Host «Congratulations! Your first script executed successfully»
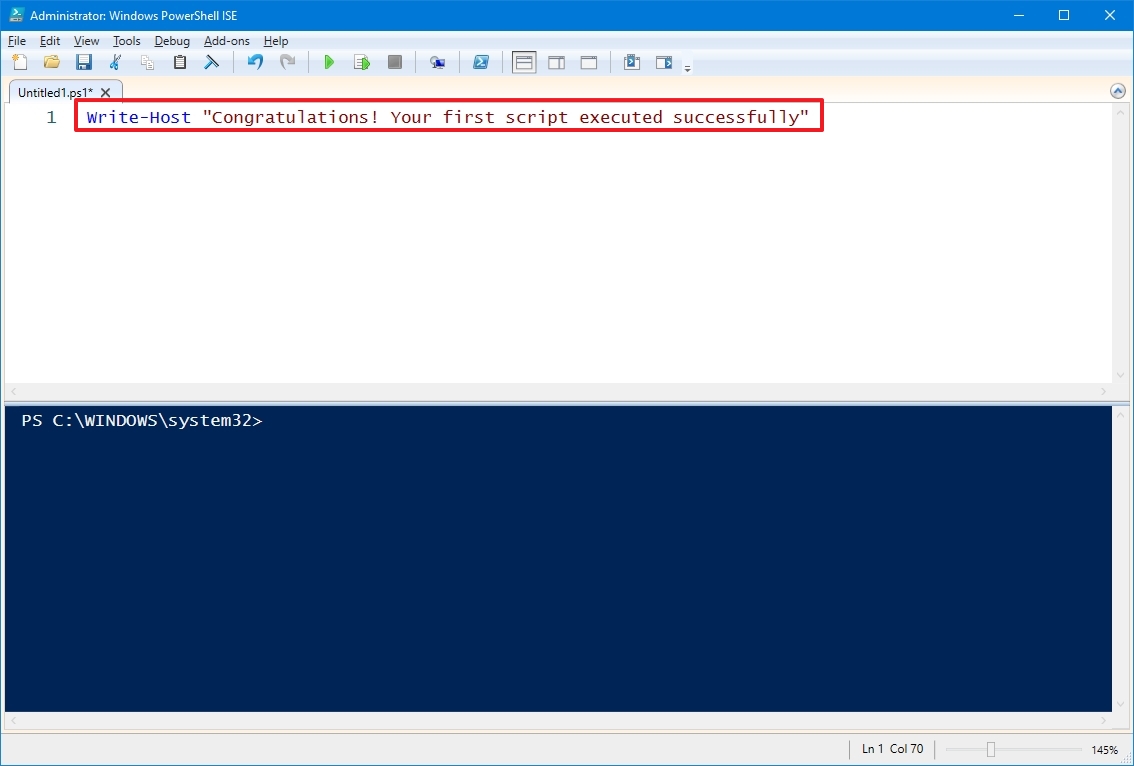
- Click the File menu.
- Click the Save option.
- Type a name for the script — for example, first_script.ps1.
- Select the folder to save the script file.
- Click the Save button.
- (Optional) Click the Run button on the top-right side (or press the F5 key) to run the script.
Once you complete the steps using Notepad, Visual Studio Code, or PowerShell ISE, the script will be ready but fail using the default system settings. The reason is that the default PowerShell settings are configured to block the execution of any script. (The only exception is if you run the script’s contents within Visual Studio Code or PowerShell ISE.)
How to run PowerShell script file on Windows 10
Regardless of the version of Windows, you must change the execution policy to run a script with PowerShell.
To change the execution policy to run PowerShell scripts on Windows 10, use these steps:
- Open Start.
- Search for PowerShell, right-click the top result, and select the Run as administrator option.
- Type the following command to allow scripts to run and press Enter: Set-ExecutionPolicy RemoteSigned
- Type «A» and press Enter (if applicable).
- Type the following command to run the script and press Enter: & «C:\PATH\TO\SCRIPT\first_script.ps1»
In the above command, change «PATH\TO\SCRIPT» to the location of your script. For example, this command runs a script stored in the «Downloads» folder: & «C:\Users\username\Downloads\first_script.ps1»

After you complete the steps, the script will run, and if it was written correctly, you should see its output on the screen without issues.
PowerShell includes four execution policies that apply to Windows 10:
- Restricted — Prevents any script from running.
- RemoteSigned — Allows scripts created on the computer, but scripts created on another device won’t run unless they include a trusted publisher’s signature.
- AllSigned — All the scripts will run, but only if a trusted publisher has signed them.
- Unrestricted — Runs any script without any restrictions.
It’s recommended only to allow local scripts to run a script from a trusted source. If you don’t plan to run scripts regularly, it’s best to restore the default settings to block untrusted scripts using the same instructions outlined above, but in step 4, use the Set-ExecutionPolicy Restricted command.
More resources
For more helpful articles, coverage, and answers to common questions about Windows 10 and Windows 11, visit the following resources:
- Windows 11 on Windows Central — All you need to know
- Windows 10 on Windows Central — All you need to know
All the latest news, reviews, and guides for Windows and Xbox diehards.
Mauro Huculak is technical writer for WindowsCentral.com. His primary focus is to write comprehensive how-tos to help users get the most out of Windows 10 and its many related technologies. He has an IT background with professional certifications from Microsoft, Cisco, and CompTIA, and he’s a recognized member of the Microsoft MVP community.
Windows PowerShell is a powerful tool that can be used by system administrators and power users to perform administrative tasks, including task automation, managing user accounts and groups, etc. Despite this, PowerShell does not allow you to run scripts by default.
Instead, Microsoft pre-installed PowerShell Integrated Scripting Environment (ISE) in Windows 10 and 11, specifically used to run scripts. But what if you need to run scripts and cmdlets simultaneously in PowerShell?
If you try running a script in PowerShell, you will get see the following error message:

In that case, you need to explicitly allow PowerShell to run scripts. Not only that, but you can also define policies used to execute the script, as well as its scope.
Let us now dig into the details of the execution policy and its scope, and then show you how to enable script execution in Windows PowerShell.
Table of contents
- What is a Script?
- PowerShell Execution Policies and Scopes
- How to Allow Scripts to Run in PowerShell
- Set Script Execution Policy to RemoteSigned
- Through Settings App
- From PowerShell
- How to Change Script Execution Policy for Specific Scope
- Set Script Execution Policy to RemoteSigned
- Set Script Execution Policy to Default
- How to Check PowerShell Execution Policy
- Frequently Asked Questions (FAQs)
- How do we allow PowerShell script only this once?
- How do we revert all script execution policies to default?
- How do we allow PowerShell scripts for current user account only?
What is a Script?
A script is a piece of code, in any programming language, which performs a specific function or a task. A script can be as short as a single expression, or as long as running a complex algorithm.
Scripts can be run directly in a scripting environment – an application designed for coding – or saved in a file, such as a batch file.
In the case of PowerShell scripts, we run the code directly inside the PowerShell window or run a PowerShell file with the extension “.PS1” which contains the script.
Before we discuss how to allow script execution in PowerShell, here is some information we think you ought to know beforehand.
PowerShell Execution Policies and Scopes
As we mentioned earlier, you can optionally choose from the different script execution policies that can be configured for PowerShell. Each of these policies is designed to distinguish between the different types of scripts, and which to allow and which to block. The table below lists the policies you can choose from and what each of them allows.
| Execution Policy | Description |
| Default | Sets Windows to the default execution policy (Restricted for Windows and RemoteSigned for Servers). |
| Restricted | This is the default execution policy for Windows 10 and 11. You can’t run any PowerShell scripts and PowerShell is set to interactive mode so that you can only run individual commands. |
| RemoteSignedThis is the default execution policy for Windows Servers. You can run downloaded PowerShell scripts, but they must be signed by a trusted publisher. Self-written (non-downloaded) PowerShell scripts can run without a signature. | |
| AllSigned | You can only run PowerShell scripts from a trusted publisher, regardless of where they come from. |
| Unrestricted | You can run unsigned scripts, but you’ll get a warning before trying to run ones that come from the internet. |
| Bypass | This is the least strict setting. Run any script with no warnings or prompts. Not recommended for anything other than test machines. |
| Undefined | No policy has been implemented, which automatically applies to the Restricted policy. |
Furthermore, each of these policies can be defined for a different scope. By scope, we mean where the policy will be applied. The table below lists the different scopes.
| Scope | Description |
| Process | Set the execution policy for the current Windows PowerShell instance. This will discontinue once PowerShell is closed. |
| CurrentUser | The execution policy is set for the current user only and stored in the HKEY_CURRENT_USER registry key. |
| LocalMachine | Sets the policy for everyone on the machine via a HKEY_LOCAL_MACHINE key. |
| MachinePolicy | Configured using Group Policy for all user accounts on the computer. |
| UserPolicy | Configured using Group Policy for the current user account. |
You can use these execution policies and scopes to manage how to execute scripts in Windows PowerShell.
How to Allow Scripts to Run in PowerShell
You can now use a combination of execution policies and scopes to configure how you want to run your scripts. Each of the sections below gives a different example of how to set a policy.
Set Script Execution Policy to RemoteSigned
Users usually prefer setting the script execution policy for Windows PowerShell to RemoteSigned, as it keeps their system safe by preventing unauthorized scripts from running. There are 2 ways in Windows to configure this policy.
Through Settings App
The Settings app in Windows allows you to manage how, whether you wish to allow scripts to run in PowerShell or not. Here’s how to enable it:
- Navigate to the following:
- Windows 11:
Settings app >> Privacy & security >> For developers - Windows 10:
Settings app >> Update & security >> For developers
- Windows 11:
- Now scroll down to the bottom of the page and check the box next to “Change execution policy to allow local PowerShell scripts to run without signing. Require signing for remote scripts” under the PowerShell section. Then click Apply.


Note that this will only allow scripts from trusted online and local sources in the “CurrentUser” scope.
From PowerShell
If you’d prefer only the Command Line Interface (CLI), here is how to configure the RemoteSigned Execution Policy directly from PowerShell:
- Launch PowerShell with administrative rights.
- Now paste the following command and hit Enter.
Set-ExecutionPolicy RemoteSigned
- Now enter A to confirm.


The command above will set the RemoteSigned execution policy for all users on the computer (scope: LocalMachine). If you want to change the scope of the policy, use the -Scope parameter followed by the scope name. Here is an example:
Set-ExecutionPolicy RemoteSigned -Scope CurrentUserYou will then need to confirm this change as well.

How to Change Script Execution Policy for Specific Scope
You can now use this method to configure any one of the above-discussed policies to any scope using the cmdlet below. Simply replace NewPolicy with the Execution Policy and NewScope with the Scope where you want to define it.
Set-ExecutionPolicy NewPolicy -Scope NewScopeSet Script Execution Policy to Default
If you no longer wish to allow scripts to run in PowerShell, you can always change their value to default, which is Undefined or Restricted. However, if a policy has been applied to a specific scope, then you need to update the policy for that particular scope again.
In the command below, we are going to restore the script execution policy for the LocalMachine scope to its default setting:
Set-ExecutionPolicy Undefined -Scope LocalMachine
You can now run the script again with a different scope to change all scopes to their default (restricted) policy.
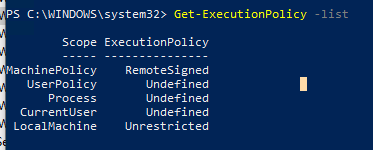
How to Check PowerShell Execution Policy
To check your current script execution policy in PowerShell, run the following command in PowerShell:
Get-ExecutionPolicy -List
You can then use this information to change your script execution policy using the guide given above.
Frequently Asked Questions (FAQs)
How do we allow PowerShell script only this once?
You can use the Process scope to restrict the execution policy to one-time only. The execution policy will then revert once the PowerShell window is closed. Here is an example code to set the execution policy to RemoteSigned for this instance of PowerShell only:Set-ExecutionPolicy RemoteSigned -Scope Process -Force
How do we revert all script execution policies to default?
If you have defined the execution policies scope-wise, then you must revert them scope-wise as well. However, in case you did not define a scope ( where the policy is automatically configured for LocalMachine), use the following cmdlet to change it back to default:Set-ExecutionPolicy Undefined
How do we allow PowerShell scripts for current user account only?
You can define a script execution policy on your current account only by defining the scope to “CurrentUser.” Here is an example:Set-ExecutionPolicy RemoteSigned -Scope CurrentUser
This will prevent all other users from running a script in Windows PowerShell.
PowerShell scripts are a great way to automate tasks, gather information, or modify properties in bulk. Most PowerShell commands are only a single line that you can just copy and paste into PowerShell. But how do you run a complete PowerShell Script?
There are a couple of options when it comes to running PowerShell scripts, simply from the cmd, using the PowerShell ISE, or even a scheduled task.
In this article, I will explain the different options to run a PowerShell script. Also, I will help you with common errors, like “running scripts is disabled on this system”.
Fix Running Scripts is Disabled on this System
We are going to start with a common error that prevents most users from running a PowerShell script, the error “Running scripts is disabled on this system”. This error is caused by the PowerShell Execution Policy.
By default, the PowerShell Execution policy is set to Restricted. This means that PowerShell scripts won’t run at all.
So to run a PowerShell script, we first need to change the execution policy. For the policy we have a couple of options:
| Execution Policy | Description |
|---|---|
| Restricted | Default option – does not allow to run any PowerShell script |
| Unrestricted | Can run any script, shows warning for downloaded scripts |
| RemoteSigned | Requires a digital signature for downloaded scripts. You can run locally written scripts. You can unblock downloaded scripts to run them without signature |
| ByPass | You can run all scripts and no warnings are displayed |
| AllSigned | You can only run signed scripts from trusted publishers |
Execution Policies are not designed as a security model, but more to prevent the accidental execution of a PowerShell script. The best option is to use the RemoteSigned policy, this way you can’t run a downloaded script by accident (you will have to unblock it first). Read more about the execution policy in this article.
Tip
Learn more about writing your own PowerShell scripts in this complete guide
To change the execution policy in PowerShell (and fix “Running scripts is disabled on this system) we need to start PowerShell with administrator privilege:
- Press Windows key + X (or right click on the start menu)
- Choose Windows PowerShell (admin)
- Run the command below:
Set-ExecutionPolicy RemoteSigned
You should now be able to run PowerShell Scripts.
There are a couple of options to run a PowerShell script. The most convenient way is to simply right-click the file and choose Run with PowerShell.
But this method comes with a downside. By default, most PowerShell scripts will close the PowerShell window automatically when the script is done. So the script gets executed, but you won’t be able to read any errors or output.
You can solve this by adding the following line to the end of the PowerShell script, but that is not always a convenient option:
Read-Host -Prompt "Press Enter to exit"
Use Windows PowerShell
Personally, I prefer the start PowerShell scripts from the command line in Windows PowerShell itself. There are two ways to do this, you can first start PowerShell and navigate to the script or open PowerShell in the correct location from the explorer.
We start with the latter, opening the PowerShell in the correct location from the explorer. In the explorer, locate the script that you want to run, in this case, c:\temp\powershell.
- Right-click on the blank area in Explorer (not on the PowerShell file)
- Choose Open PowerShell window here
(In Windows 11 you will need to select Open in Windows Terminal)
As you can see, PowerShell is started in the folder c:\temp\PowerShell. We can now run the script by simply typing the filename (type the first few letters and press Tab to autocomplete it)
You can also first start Windows PowerShell:
- Right-click on the start menu (or press Windows key + X)
- Choose Windows PowerShell
- Navigate to the folder where the script is located
cd c:\path\to\script <enter> - Run the PowerShell script
.\PowerShellExampleScript.ps1 <enter>
Run PowerShell Script from CMD
If you have tried to run a PowerShell from cmd, then you might have noticed that it will just open the script in notepad. Not really the result we are looking for.
To run the PowerShell script, we need to tell the command prompt to open the script with PowerShell. We can use the following cmd for this:
PowerShell c:\path\to\script\PowerShellScript.ps1
Note that you will need to specify the full path to the PowerShell script. The result of the script is displayed in the command prompt.
If you want to keep the PowerShell session open, you can add the -noexit parameter to the command:
PowerShell -noexit c:\temp\PowerShell\PowerShellExampleScript.ps1
Using PowerShell ISE
When you download a script from the internet it’s always a good idea to review the script before you run it. An easy way to review and run a PowerShell script is to use the PowerShell ISE.
To open a PowerShell file in the editor, simply right-click it and choose Edit
When you use the editor for the first time you might need to expand the script pane first, to see the content of the PowerShell script:
To run a script in PowerShell ISE simply click on the green play button in the toolbar. The results of the scripts are displayed in the console:
Run PowerShell Script as Administrator
Some PowerShell scripts require administrator privilege to run correctly. They might need access to all folders on your system drive, or need to interact with other domain computers or servers.
The easiest way to run PowerShell scripts as an administrator is to start Windows PowerShell as administrator.
- Press Windows key + X (or right-click the start menu)
- Choose Windows PowerShell (admin)
- Click Yes on the User Account Security prompt
You can now run any PowerShell command or script with Administrator privilege. Simply navigate to the script (or even drag and drop the script) to run it.
You can also run a PowerShell script as administrator from the command line. When you have PowerShell open, we can start a new PowerShell process and run it as Administrator. Optionally we can even specify the file that we want to run:
# Open a new PowerShell windows with Administrator Privilege
Start-Process PowerShell -Verb runAs

# Run PowerShell script with Administrator Privilege
Start-Process PowerShell -Verb runAs -ArgumentList "-file c:\temp\powershell\powershellexamplescript.ps1"
Wrapping Up
I hope you were able to run your PowerShell script with the steps above. Make sure that you have set the Execution policy correctly before you run a PowerShell script.
If you have any questions, just drop a comment below. Make sure you also read more about setting up your PowerShell profile.