В этой пошаговой инструкции несколько простых способов очистить кэш обновлений в Windows 11 и Windows 10 встроенными средствами системы, все они безопасны и не должны привести к каким-либо проблемам в работе.
Кэш обновлений в утилите «Очистка диска»
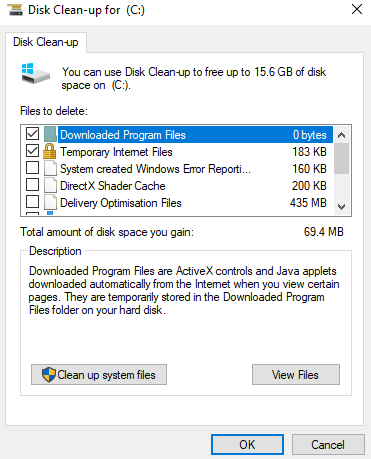
Самый простой способ очистки кэша обновлений — встроенная в Windows утилита «Очистка диска». Шаги будут следующими:
- Нажмите правой кнопкой мыши по кнопке «Пуск» и выберите пункт «Выполнить».
- Введите cleanmgr и нажмите Enter.
- При появлении запроса на выбор диска выберите диск C.
- Нажмите кнопку «Очистить системные файлы».
- Отметьте пункт «Очистка обновлений Windows».
- Нажмите «Ок» и дождитесь завершения очистки.
В Windows 11 и 10 вы также можете использовать функции очистки диска в «Параметрах», подробнее об этом в инструкциях Очистка диска Windows 11 встроенными утилитами, Автоматическая очистка диска Windows 10.
Очистка кэша обновлений вручную в командной строке
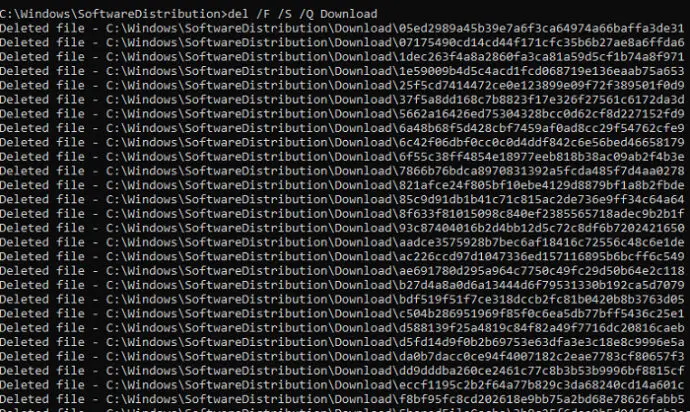
Кэш обновлений хранится в папке C:\Windows\SoftwareDistribution\Download и мы можем удалить её содержимое вручную с помощью командной строки. Для этого потребуется временно отключить службу Центра обновлений Windows с повторным её включением по завершении процесса.
- Запустите командную строку от имени Администратора. Для этого можно использовать поиск по «командная строка» в панели задач и пункт «Запуск от имени администратора».
- По порядку введите следующие команды
net stop wuauserv
cd C:\Windows\SoftwareDistribution
del /f /s /q Download
net start wuauserv
Удаление кэша обновлений Windows в проводнике
Этот способ, по своей сути повторяет предыдущий, но без использования командной строки:
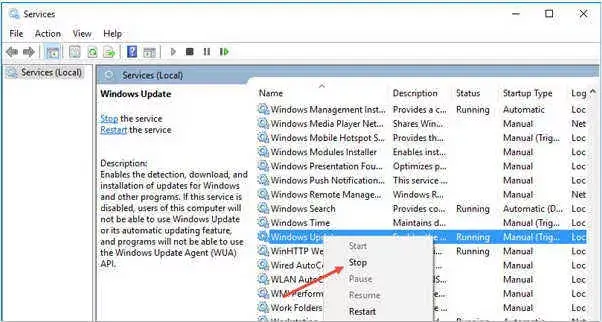
- Нажмите клавиши Win+R на клавиатуре, введите services.msc и нажмите Enter.
- В списке служб найдите «Центр обновления Windows», дважды нажмите по ней и нажмите кнопку «Остановить».
- В проводнике перейдите в папку
C:\Windows\SoftwareDistribution\Download
- Выделите всё содержимое папки (клавиши Ctrl+A) и удалите его.
- Снова зайдите в «Службы» и запустите Центр обновления.
Сброс кэша обновлений и его параметров без фактического удаления
Если задача — исправить ошибки центра обновлений, а не выполнить удаление кэша, можно использовать следующий набор команд в командной строке, запущенной от имени администратора:
net stop wuauserv
net stop cryptSvc
net stop bits
net stop msiserver
ren C:\Windows\System32\catroot2 catroot2.old
ren C:\Windows\SoftwareDistribution SoftwareDistribution.old
net start cryptSvc
net start bits
net start msiserver
net start wuauserv
Если ошибки были исправлены, созданные папки SoftwareDistribution.old в папке Windows и catroot2.old в папке System32 можно будет удалить.
Очистка кэша обновлений также доступна в сторонних утилитах, предназначенных для исправления ошибок при обновлениях, подробно: Как исправить ошибки Центра обновлений Windows.
Также, в контексте рассмотренной темы могут быть полезными следующие материалы:
- Как удалить обновления Windows 11
- Как удалить обновления Windows 10
- Как отключить обновления Windows 11
- Как отключить обновления Windows 10
Содержание
- Шаг 1: Приостановка «Центра обновления» Windows 10
- Шаг 2: Удаление кеша обновлений
- Вопросы и ответы
Для начала нужно приостановить работу «Центра обновлений» Windows 10, чтобы проблем с удалением кеша не возникло:
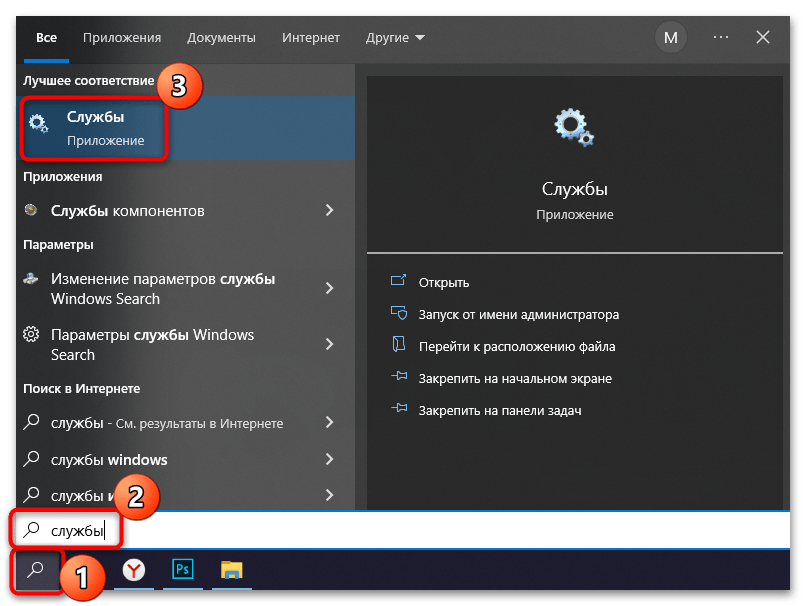
- Откройте окно системного приложения «Службы». Сделать это можно несколькими способами, но самый простой – поисковая строка «Пуска».
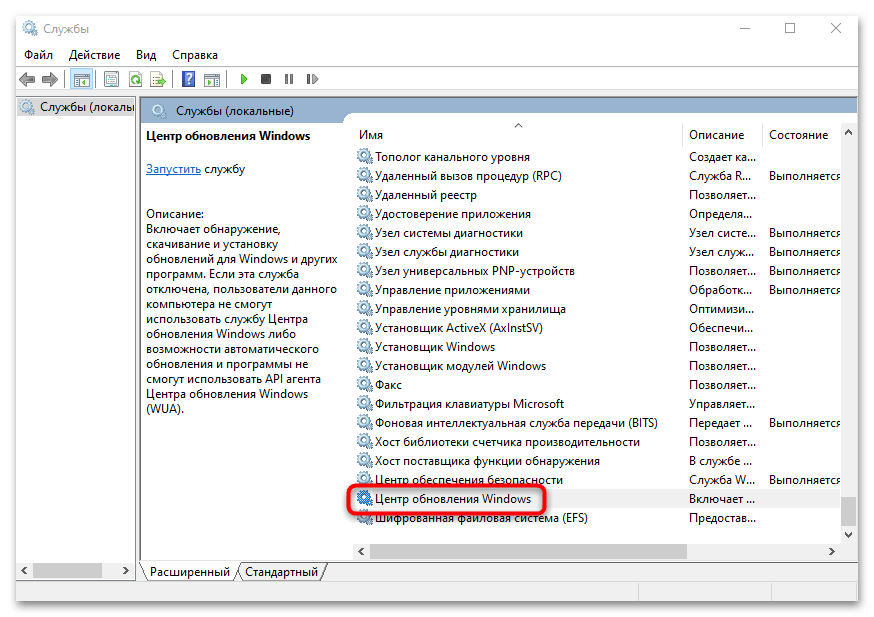
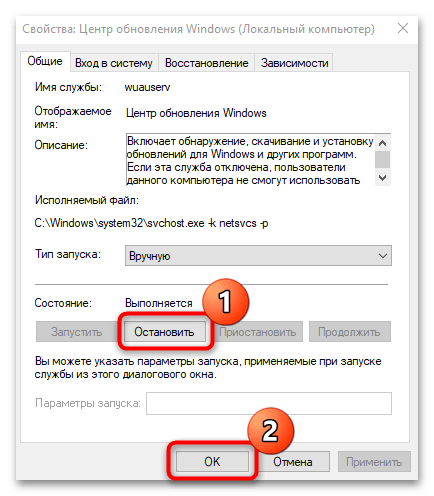
- В списке отыщите службу под названием «Центр обновления Windows». Она находится внизу, если отсортировать службы по алфавиту. Дважды щелкните по службе левой кнопкой мыши.
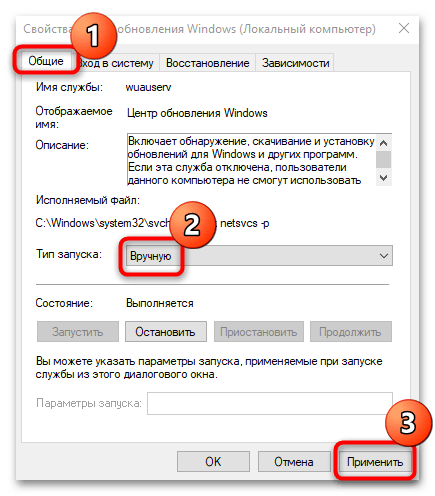
- В новом окне на вкладке «Общие» выберите тип запуска «Вручную» и нажмите на кнопку «Применить».
- Затем нажмите на «Остановить» и на «ОК», чтобы подтвердить настройку.
После того как работа службы обновлений остановлена, можно приступать к непосредственной очистке кеша апдейтов Windows 10.
Шаг 2: Удаление кеша обновлений
Следующий этап – это удаление кеша с накопителя. Искомые данные временно хранятся в специальной папке системного тома:
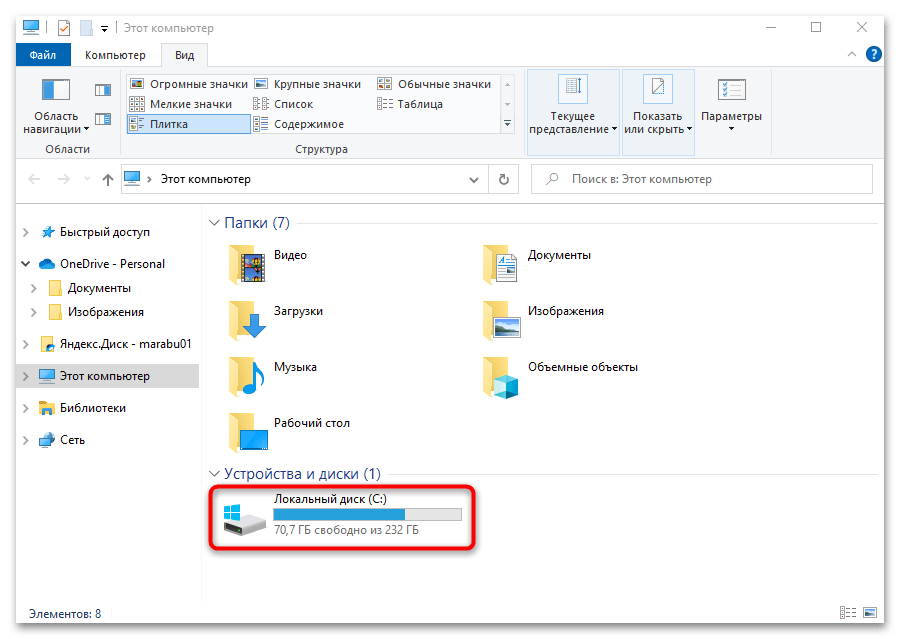
- Запустите «Проводник» или откройте «Этот компьютер» на рабочем столе. Перейдите в содержимое системного диска. Обычно это «Локальный диск (C:)».
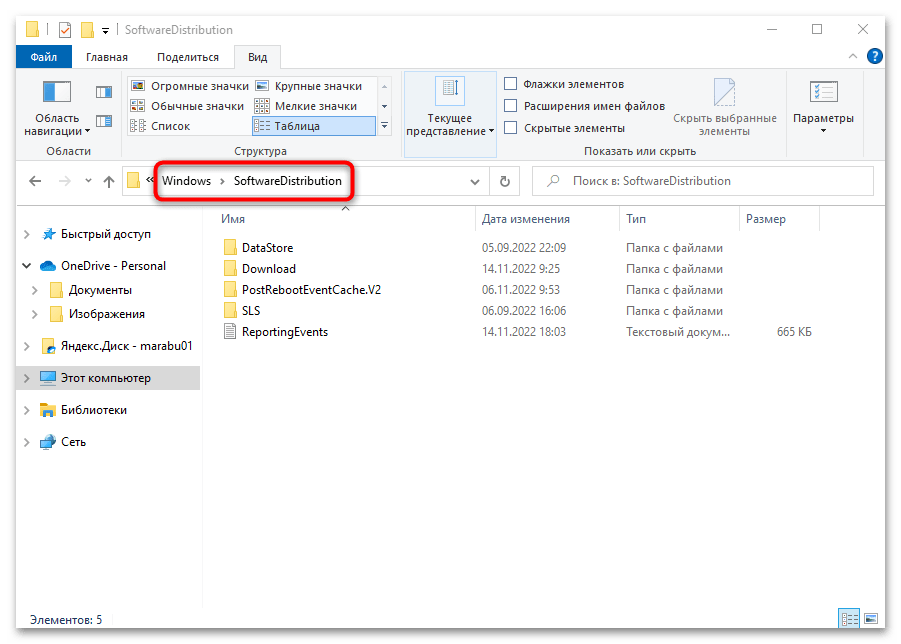
- Затем откройте папку «Windows», а потом «SoftwareDistribution».
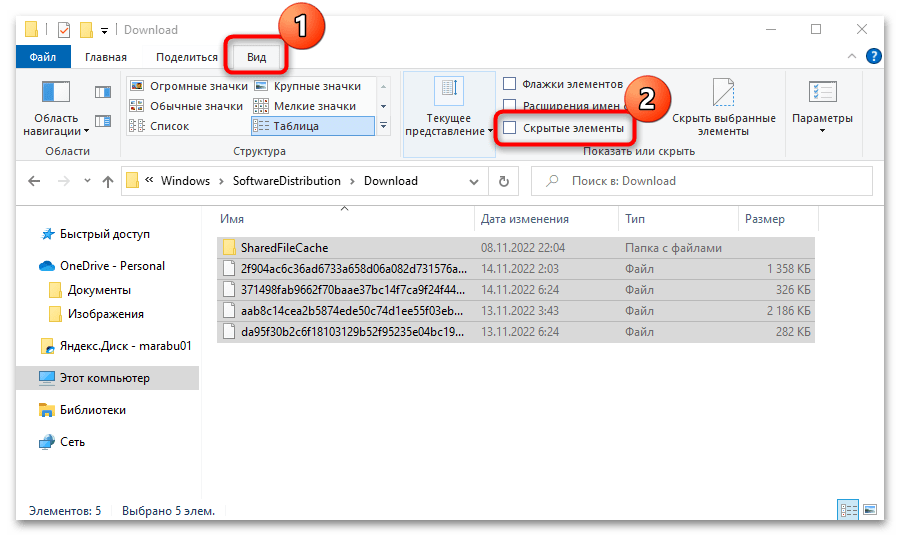
- Очистите содержимое каталога «Downloads» любым способом: выделите все файлы и папки, затем вызовите контекстное меню нажатием правой кнопкой мыши или используйте клавишу «Delete».
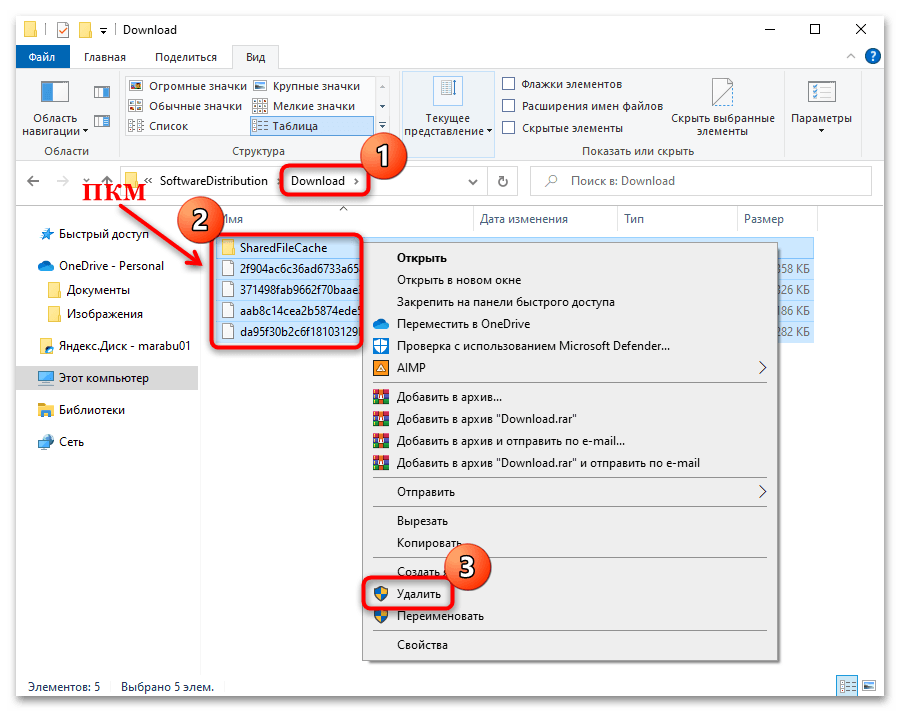
Может потребоваться отображение скрытых элементов в папке. Для этого в окне «Проводника» перейдите на вкладку «Вид», и отметьте галочкой пункт «Скрытые элементы».
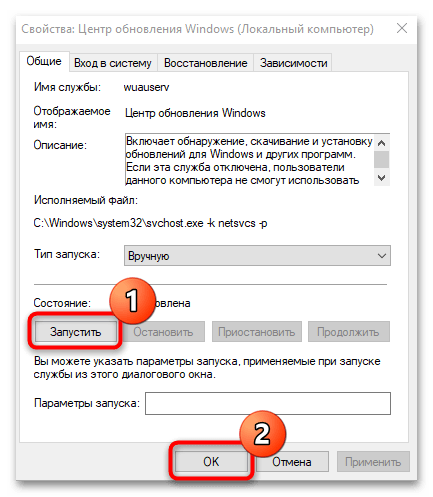
Когда все будет готово, останется вновь запустить работу службы «Центр обновления Windows». Проделайте то же самое, что показано в Шаге 1, только на конечном этапе выберите вариант «Запустить».
Еще статьи по данной теме:
Помогла ли Вам статья?
-
Home
-
News
- How to Clear Windows Update Cache (3 Ways for You)
By Daisy | Follow |
Last Updated
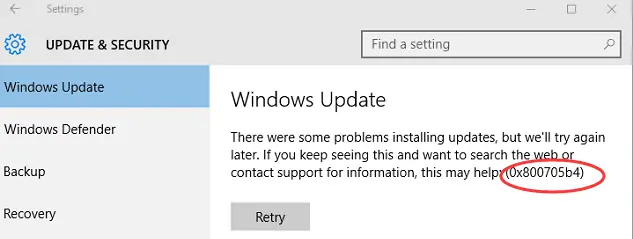
Clearing the Windows 10 update cache manually will solve most of the problems you may have installed the latest Windows 10 update on your computer. This post from MiniTool introduces how to clear Windows update cache.
If you have trouble running Windows Update, it is likely that there is a problem with the update file, or the file is not completely cleared for download or is damaged. Windows update cache location is C:\Windows\SoftwareDistribution\Download. All installation files for Windows updates are stored here.
How to Clear Windows Update Cache
There are 3 ways for you. You can choose one based on your needs. Here is how to do that:
Way 1: Clear Windows Update Cache via File Explorer
First, let’s see how to clear Windows update cache via File Explorer.
Step 1: Type File Explorer in the Search box to open it.
Step 2: Find and right-click Local Disk (C) to choose Properties.
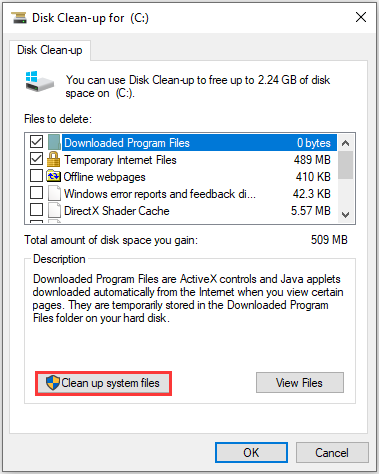
Step 3: Then, click Disk Clean-up. After that, click the Clean up system files option.
Step 4: Then, check the Windows upgrade log files and Temporary Windows Installation files boxes and click OK.
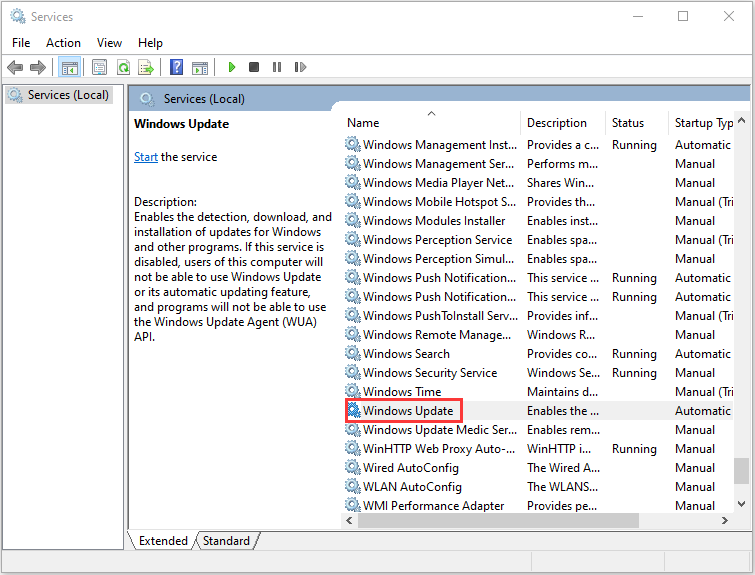
Step 5: Press the Windows and R keys at the same time to open the Run dialogue box. Type services.msc and click OK to open the Services application.
Step 6: From the list of applications, right-click Windows Update to select Stop.
Step 7: Next, open File Explorer and go to C:\ > Windows > SoftwareDistribution. Remove all the files in the folder.
Then, you have cleared the Windows update cache successfully.
Way 2: Clear Windows Update Cache via Command Prompt
The second method for you to reset Windows updates cache is via Command Prompt. The detailed steps are as follows:
Step 1: Type Command Prompt in the Search menu. Then right-click it to choose Run as administrator to open it.
Step 2: Type net stop wuauserv and press the Enter key in the Command Prompt window.
Step 3: Type C: and press Enter. Type cd %Windir%\SoftwareDistribution and press Enter. Type del /f /s /q Download and press Enter.
Then, all of the windows 10 cache files on your machine will now be deleted.
Way 3: Clear Windows Update Cache via Script
You can also try to clear Windows Update Cache via Script. Follow the instructions below:
Step 1: Open Notepad and Insert the below code in bold
@Echo On
net stop wuauserv
C:
cd %Windir%\SoftwareDistribution
Type del /f /s /q Download
pause
Step 2: Save the file as Cleardown.cmd on your desktop.
Step 3: Right-click the Cleardown.cmd file and select run as administrator.
Step 4: When the Script has finished it will pause so you can see the output of what it has done.
How to Reset Windows Update Cache
You may also wonder how to reset Windows update cache. Here are the steps:
Step 1: Type Command Prompt in the Search menu. Then right-click it to choose Run as administrator to open it.
Step 2: Type the following command one by one:
net stop wuauserv
net stop cryptSvc
net stop bits
net stop msiserver
Step 3: Next, run the following command one by one.
ren C:\Windows\SoftwareDistribution SoftwareDistribution.old
ren C:\Windows\System32\catroot2 Catroot2.old
Final Words
This post has introduced how to clear Windows update cache and how to reset Windows update cache. I hope that this post can be helpful to you.
About The Author
Position: Columnist
Having been an editor at MiniTool since graduating college as an English major, Daisy specializes in writing about data backups, disk cloning, and file syncing as well as general computer knowledge and issues. In her free time, Daisy enjoys running and going with friends to the amusement park.
Jason Barrett | 21 May 2019 | Misc
Manually clearing the windows update cache will resolve most issues you might be having installing the latest windows updates on your machine.
In this guide I will show to step by step how to easily clear the windows update cache from your machine.
|
Jump To > How To Clear The Windows Update Cache |
I work in IT and around patch Tuesday I am always visiting people and troubleshooting issues they have with windows updates. I find that clearing the windows update cache will resolve most issues that you will face.
Some times you might also need to reset windows update components which I have also documented how to do below in this post.
- 1 How To Clear The Windows Update Cache
- 2 How To Reset Windows Update Components In Windows
- 3 Register BITS and Windows Update .dll Files
- 4 Frequently Asked Questions
Below I will show you three ways to clear the windows update cache from your machine.
I recommend you try the first manual method and if that does not work try the CMD and powershell method.
Manually
To delete the windows update cache manually do the following
- Click start, type in “File Explorer” and left click on file explorer
- Right click on “Local Disk (C:)” then left click properties
- On the next windows click on “Disk Clean-up”
- Next click on “Clean up system files”
- Make sure you tick the boxes next to “Windows upgrade log files” and “Temporary Windows Installation files” then click on OK. Your system will now remove these files from your machine.
- Now click start and type in services and then left click on services application.
- Scroll down and right click on Windows Update and click stop. Wait for the service to stop which usually takes less than a minute
- Now open file explorer again and browse to C:\Windows\SoftwareDistribution
- Now right click on the download folder and select delete, Hit Yes if you are prompted
- Reboot your machine
We have now managed to manually cleare the windows 10 update cache, Run windows update again to see if your issue is now resolved.
Via Command Prompt (CMD)
To delete the windows update cache via the command prompt (CMD) do the following
- Click start, type in CMD then right click on “Command Prompt” and select run as administrator
- If prompted by UAC click YES
- In the command prompt window type in net stop wuauserv then hit enter (This will stop the windows 10 update application on your machine)
- Type C: and hit enter
- Type cd %Windir%\SoftwareDistribution and hit enter
- Type del /f /s /q Download and hit enter
- All of the windows 10 cache files on your machine will now be deleted
- Restart your machine
Via Powershell
To remove the windows update cache via powershell do the following
- Open powershell
- copy and paste the below in to powershell
net stop wuauserv
net stop cryptSvc
net stop bits
net stop msiserver
remove-item -path “C:\Windows\SoftwareDistribution\Download\*.*” -Force - Now restart your machine and install the update again
Via Script
To create a script to clear down the windows update cache follow these steps
- Open notepad
- Insert the below code in bold
@Echo On
net stop wuauserv
C:
cd %Windir%\SoftwareDistribution
Type del /f /s /q Download
pause - Save the file as Cleardown.cmd on your desktop
- Right click on the Cleardown.cmd file and select run as administrator
- When the script has finished it will pause so you can see the output of what it has done
How To Reset Windows Update Components In Windows
If the above solutions did not fix your issue you can try to reset the windows update components.
To Reset Windows Update Components In Windows 10 follow these steps
- Click start, type in CMD then right click on “Command Prompt” and select run as administrator
- If prompted by UAC click YES
- In the command prompt window type in the following commands one by one
net stop wuauserv
net stop cryptSvc
net stop bits
net stop msiserver - Next run the following commands
ren C:\Windows\SoftwareDistribution SoftwareDistribution.old
ren C:\Windows\System32\catroot2 Catroot2.old - Now restart your computer
Register BITS and Windows Update .dll Files
It is also a good idea to re-register windows 10 bits and windows update .dll file. To do this follow these steps
- Click start, type in CMD then right click on “Command Prompt” and select run as administrator
- If prompted by UAC click YES
- In the command prompt window type in the following commands one by one
cd /d %windir%\system32
regsvr32.exe /s atl.dll
regsvr32.exe /s urlmon.dll
regsvr32.exe /s mshtml.dll
regsvr32.exe /s shdocvw.dll
regsvr32.exe /s browseui.dll
regsvr32.exe /s jscript.dll
regsvr32.exe /s vbscript.dll
regsvr32.exe /s scrrun.dll
regsvr32.exe /s msxml3.dll
regsvr32.exe /s msxml6.dll
regsvr32.exe /s actxprxy.dll
regsvr32.exe /s softpub.dll
regsvr32.exe /s wintrust.dll
regsvr32.exe /s dssenh.dll
regsvr32.exe /s rsaenh.dll
regsvr32.exe /s cryptdlg.dll
regsvr32.exe /s oleaut32.dll
regsvr32.exe /s ole32.dll
regsvr32.exe /s shell32.dll
regsvr32.exe /s wuapi.dll
regsvr32.exe /s wuaueng.dll
regsvr32.exe /s wups.dll
regsvr32.exe /s wups2.dll
regsvr32.exe /s qmgr.dll
regsvr32.exe /s wudriver.dll - Restart your machine
Frequently Asked Questions
Where is the windows update cache location in windows 10?
The windows 10 windows update cache location is C:\Windows\SoftwareDistribution\Download. All of the install files for windows updates are stored here.
Hello, I am the owner of this site. I have 25+ years experience of IT. Check us out on the below social platforms.
Clearing Windows 10 update cache helps in solving Windows update errors in Windows 10 PC. Here’s how to clear Windows Update cache in Windows 10 / 8 / 7.
Have you recently installed updates on Windows 10 computer and experienced Windows Update errors while installing updates?
Or, are you unable to upgrade your Windows 10 computer to the latest build or unable to install the new updates which are available for your system?
If you are having any of these Windows 10 update problems while installing updates then you need to clear Windows update cache from your system.
As soon as a computer running on Windows operating system downloads a new update, it tries to get installed too. And sometimes, it is possible that the updates are not installed on your system due to some issues.
One of the common reasons that Windows Updates are not installed on your computer is because of incomplete download of the update installer files. And as we all know that installing updates on Windows PC is a really important task to keep PC up to date which is why you have to fix Windows update issues.
You can use the inbuilt Windows Update Troubleshooter to find out the reason why Windows updates are not being installed. However, if you know the reason due to which you are having issues related to Windows Updates then you can begin the process to rectify that issue.
In most of the cases, Windows Update cache is one of the prime reasons which restrict updates downloading in Windows operating systems. So, you should clear Windows 10 update cache first before trying any other solutions to the fix Windows Update issues.
We have received many requests from our readers asking how to clear Windows Update cache in Windows 10 PC which is why we are specifically writing this tutorial.
In order to clear Windows 10 update cache, there is no need to go through a lot of complex settings. Only you have to clean up some Windows update files and then start reinstalling Windows update on your computer.
Follow the below mentioned steps to find out how to clear Windows 10 update cache:
Before deleting Windows update cache, you need to stop Windows Update service which is running on our computer.
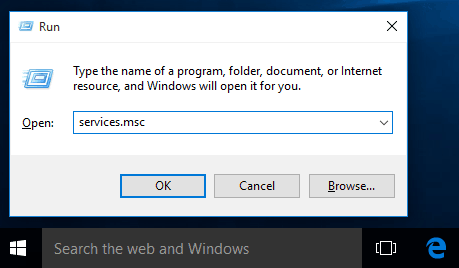
Step (1): To stop Windows Update (wuauserv) service, press Windows + R keys together to open Run dialog box and type services.msc and then hit Enter key.
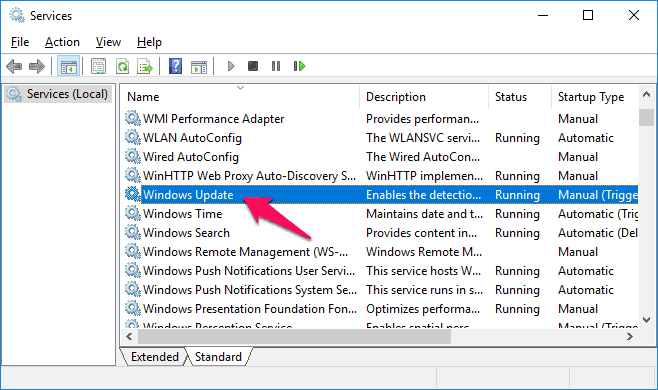
Step (2): On the Services window, find Windows Update service and double click on it to open it.
Step (3): Next on Windows Update Properties dialog box, click on Stop button and then on OK button.
After stopping the Windows Update service on your computer, now you can proceed to clear the Update cache.
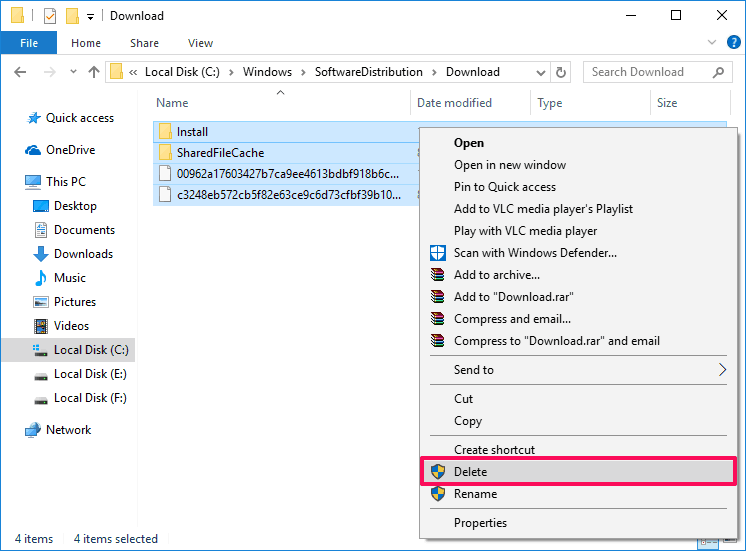
Step (4): If the Windows 10 operating system is installed on “C” drive then navigate to C:\Windows\SoftwareDistribution\Download folder.
Step (5): Now, select all files and folders and right-click on them and select Delete option to clear Windows 10 update cache.
Once you have cleared the Windows Update cache successfully, now you need to start Windows Update service which you stopped in the starting steps.
Step (6): To resume Windows 10 Updates on your machine, press Windows + R keys together to open Run dialog box and type services.msc and then hit Enter key.
Step (7): On the Services window, find Windows Update service and double click on it to open it.
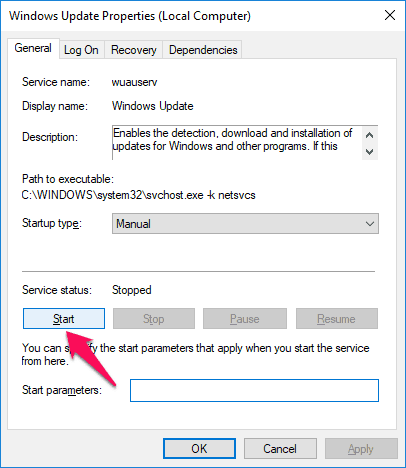
Step (8): Next on Windows Update Properties dialog box, click on Start button and then on OK button. That’s it!
Thus, you can see how simple is to manually clear Windows 10 update cache and fix Windows update errors in Windows 10 PC.
We hope that your Windows 10 update problems (Windows Update Stuck at Checking for Updates or preparing to install updates, Windows Updates Stuck at 0%) are resolved after reading this tutorial.
If you are still having any queries regarding how to clear Windows Update cache in Windows 10 PC then use the comment section below to get in touch with us.
You may also be interested in checking out:
- How to Stop Windows 10 Update in Progress or Pause Windows Update
- How to Fix Windows 10 Update Stuck at Checking for Updates
- How to Fix Windows Updates Stuck at 0% in Windows 7/8/10
- How to Disable Automatic Restart in Windows 10 after Updates Installation
- How to Fix Potential Windows Update Database error detected in Windows 10


