
When working with multiple windows in Windows 10, you might want to keep a window always on top for easy reference. Learn three different ways of accomplishing this.
When you are working in Windows with limited screen space, it’s useful to have certain windows stay on top of others. Some programs in Windows automatically incorporate this “always on top” feature, but most programs don’t, and Windows doesn’t include this feature either.
Today we’ll cover three ways to easily add the “always on top” feature to every single program in Windows.
1. Use a Keyboard Shortcut with an Always on Top AutoHotkey Script
AutoHotkey is a free program that allows you to create scripts to perform multiple actions with a single keyboard shortcut. It runs in the background and sits in the system tray.
We’re going to use AutoHotkey to create a script that will keep a selected window on top of all others when you press Ctrl + Spacebar when that window is active. We’ll show you the script and explain how it works. But we’ll also provide a downloadable AutoHotkey script file you can use.
Download and install AutoHotkey and then run it.
Download the AlwaysOnTop.ahk script file, extract the .zip file, and put the script in a folder on your hard drive that won’t be moved or deleted.
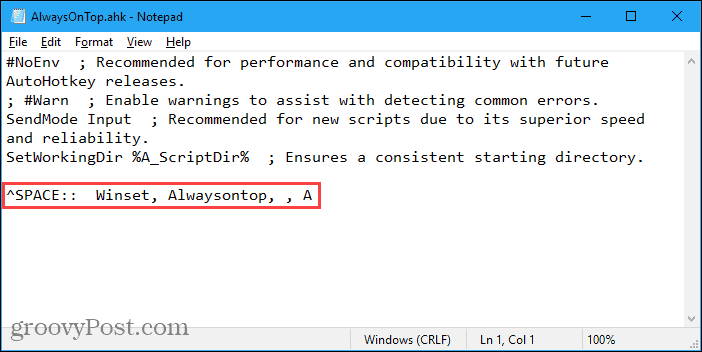
The script contains some comments and then the following command:
^SPACE:: Winset, Alwaysontop, , A
This command sets the currently active window to always be on top when you press Ctrl + Spacebar. If you’d rather use a different key combination, you can change the first part of the command, “^SPACE“. The “^” character represents the Ctrl key. You’ll find the symbols to use for other hotkeys in the Hotkey Modifier Symbols section on this AutoHotkey help page.
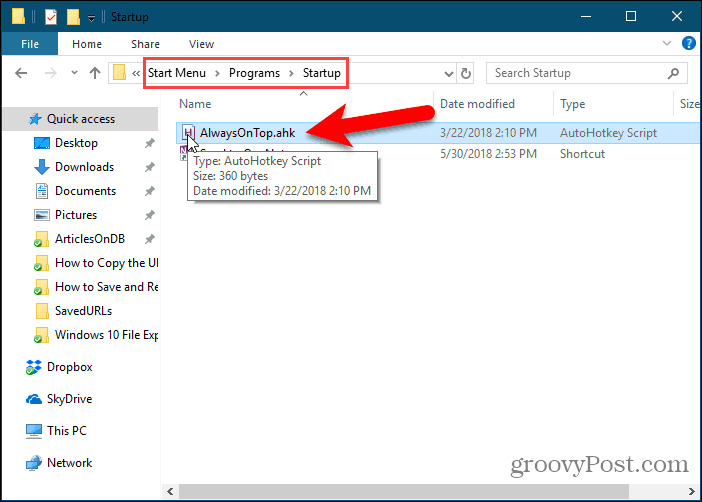
You can put the script in the Windows startup folder (%AppData%\Microsoft\Windows\Start Menu\Programs\Startup), so it starts automatically when Windows starts.
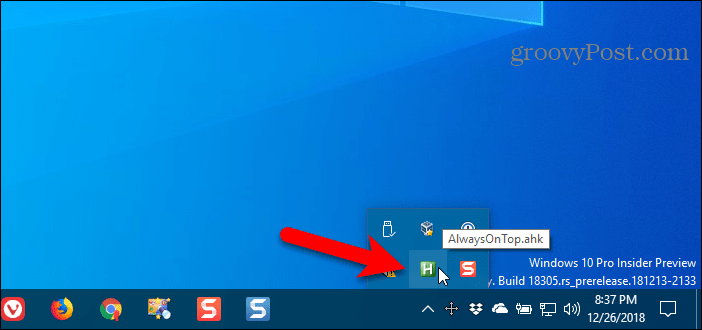
The AutoHotkey script stays in the system tray.
To make the active window always on top, press Ctrl + Spacebar (or the keyboard shortcut you assigned). Press the keyboard shortcut again to disable “always on top” for the active window.
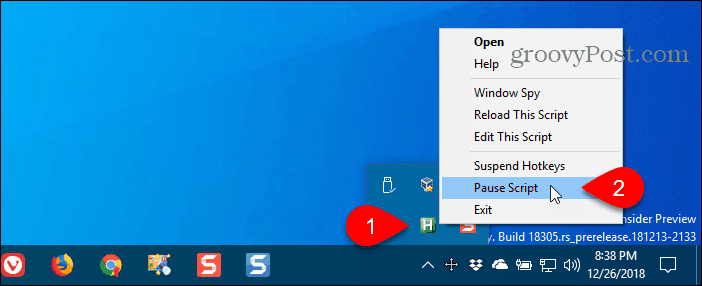
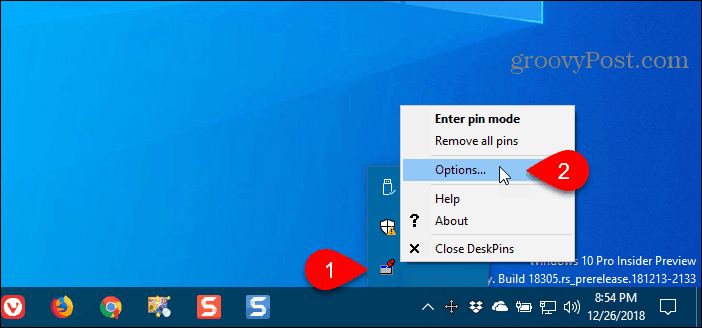
For script options, right-click on the AutoHotkey icon in the system tray.
2. Use Your Mouse with DeskPins
DeskPins provides pins you can grab and use to keep any window on top of all other windows. The program sits in the system tray and uses minimal resources.
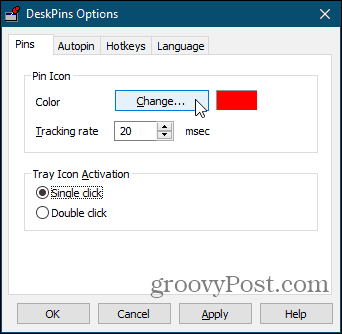
Download and install DeskPins. Run the program, right-click the icon in the system tray, and select Options to change the Pins, Autopin, and Hotkeys settings.
On the Pins tab, you can change the color of the pins. The Tracking rate controls how often each pin checks the pinned window’s position and state. Lower values make the pins more responsive. You can enter any number from 10 to 1000 msec (milliseconds).
If you have an older computer, you may want to increase the Tracking rate number to avoid slowing down your computer.
You can also choose Single click or Double click under Tray Icon Activation to indicate how you get pins from the DeskPins system tray icon. The default is Single click.
You can have DeskPins automatically pin certain types of windows using rules on the Autopin tab.
Check the Enable box and then click Add to add a new rule. Use the checkboxes next to the rules to enable and disable individual rules.
Click Help to access the DeskPins help file for more information about automatically pinning windows.

DeskPins provides default shortcuts for entering pin mode and toggling the active window pin. You can change these shortcuts on the Hotkeys tab.

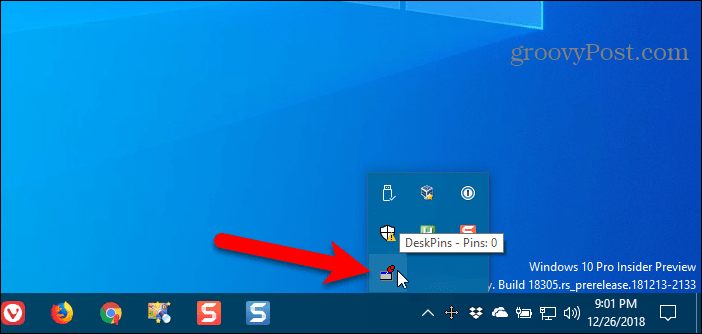
To pin a window on top, click (or double-click, depending on the setting) the DeskPins icon in the system tray.
Then, click the title bar on the window you want to keep always on top.
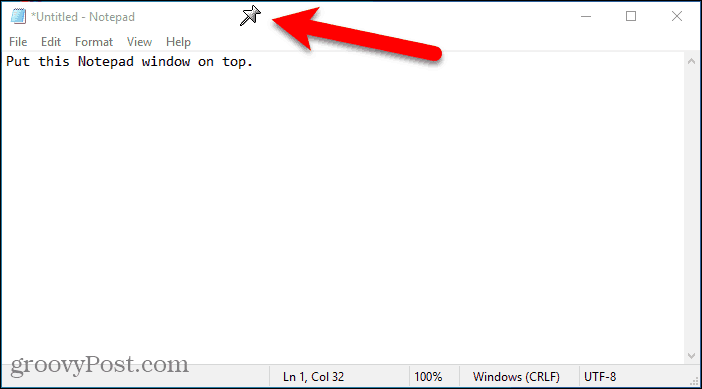
A pin displays on the title bar of the chosen window in the color you specified, or in the default color red.
Click the pin again to disable always on top for the window.
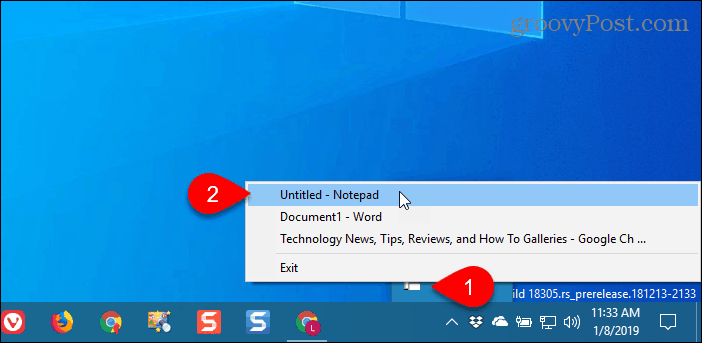
3. Use a System Tray Menu with TurboTop
TurboTop also sits in your system tray like DeskPins. But it operates differently.
Download and install TurboTop. Then, run the program.
To keep a window always on top, click the TurboTop icon in the system tray. A list of all open windows displays. Select the title of the window you want.
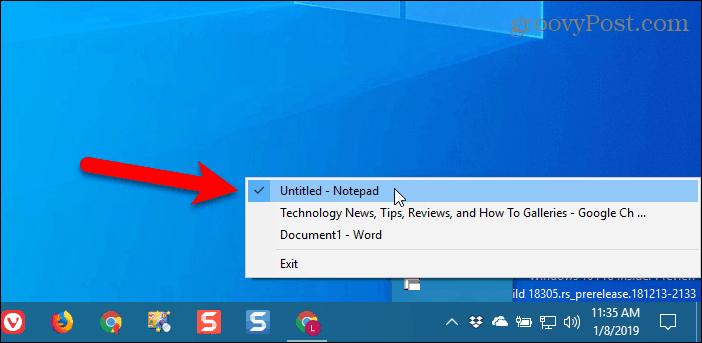
Any windows you choose to be always on top are indicated with a checkmark on the TurboTop menu.
To stop keeping a window always on top, click the TurboTop icon in the system tray and select that window again, so there’s no checkmark next to the window name on the menu.
Bring the Always-on-Top Feature to All Windows
Whether you like using keyboard shortcuts or prefer using the mouse, there’s an easy solution for keeping windows always on top. If you’ve found other options for keeping windows always on top, let us know in the comments.
![]()
24.07.2023
К большому сожалению, Windows почему-то не предлагает штатные средства для того, чтобы можно было закрепить любое окно поверх остальных. Да, некоторые программы (например, AIMP или VLC) имеют опцию «всегда сверху», доступную через настройки, но таких программ очень мало. Остается решать данную проблему своими силами.
- Недостатки софта для закрепления окон
- «Always on top» при помощи AutoHotkey
- Создание скрипта
- Проверка работы скрипта
- Ставим скрипт в автозагрузку
- Краткий FAQ по AutoHotkey
Недостатки софта для закрепления окон
Существует целый ряд софта, как платного, так и бесплатного для того, чтобы закрепить любое окно поверх всех остальных окон в Windows. Наиболее популярными являются:
- DeskPins
- TurboTop
- Microsoft PowerToys
- OnTopper
- PinWin
Однако эти решения имеют недостатки, из-за которых лично я, исходя из своего опыта, не рекомендую ими пользоваться. Например, DeskPins последний раз обновлялась в феврале 2015 года, TurboTop – в 2016. Я пользовался утилитой DeskPins на десятке много лет, пока не столкнулся с тем, что она начала глючить и некорректно себя вести с окнами самых разных программ.
Тогда я перешел на Microsoft PowerToys, которая имеет функцию закрепления любого окна поверх других. Однако это решение я считаю неоптимальным, потому что это все равно как устанавливать Photoshop всего лишь для того, чтобы просто изменить размер одной картинки. Программа PowerToys весит более двухсот мегабайт и помимо «always on top» имеет еще два десятка других возможностей (о них я подробно рассказывал), большинством из которых вы скорее всего никогда не будете пользоваться. Зачем захламлять жесткий диск и замедлять систему лишними трудоемкими процессами, постоянно висящими в памяти?
Оптимальным решением лично я считаю использование утилиты AutoHotkey, про которую я тоже уже рассказывал ранее. Она весит чуть более 3 Мб и позволяет запускать выполнение любых действий в Windows путем нажатия шоткатов. Например, изменить язык раскладки клавиатуры нажатием всего одной клавиши. И всё это доступно бесплатно любому пользователю.
«Always on top» при помощи AutoHotkey
Прямо сейчас я расскажу, как при помощи AutoHotkey можно написать небольшой скрипт, чтобы одним нажатием определенных сочетаний клавиш на клавиатуре закрепить любое открытое окно поверх других.
Итак, для начала надо скачать утилиту AutoHotkey на свой компьютер и установить её (выбирайте для скачивания версию 1.1.).

Создание скрипта
Для создания нового скрипта надо сделать следующие:
- Кликните правой клавишей мыши в любом месте рабочего стола
- Выберите «Создать – AutoHotkey Script»
- Можно присвоить скрипту любое имя либо оставить по умолчанию

Откройте созданный скрипт в любом текстовом редакторе, например Блокноте. Скопируйте и вставьте в него следующую запись:
^SPACE:: Winset, Alwaysontop, , A
Должно получиться вот так:

Сохраните скрипт (CTRL + S) и запустите его двойным кликом мыши. Вы будете знать, что скрипт работает, по соответствующему значку на панели задач.
![]()
Проверка работы скрипта
- Запустите любую программу
- Сделайте её окно активным (оно должно быть на переднем плане, поверх всех остальных)
- Нажмите на клавиатуре сочетание клавиш CTRL + Пробел
- Окно будет закреплено поверх всех других окон
- Чтобы открепить окно, снова нажмите CTRL + Пробел
Отныне при помощи указанного сочетания клавиш вы можете нажать настроить любое активное в данный момент окно любой программы таким образом, чтобы оно всегда было сверху.
Ставим скрипт в автозагрузку
Последнее, что нужно сделать – поместить файл созданного нами скрипта в автозагрузку, чтобы он запускался автоматически при каждом старте Windows. Для этого переносим файл в папку C:\Пользователи\ИмяПользователя\AppData\Roaming\Microsoft\Windows\Start Menu\Programs\Startup
Не забудьте включить в проводнике отображение скрытых элементов, чтобы найти указанные выше системные папки.
Краткий FAQ
Сколько памяти потребляет скрипт для закрепления окон?
AutoHotkey очень нетребовательна к ресурсам компьютера и потребляет в фоне очень мало оперативной памяти – чуть более 1 Мб. Данный процесс никак не замедляет работу ПК, поэтому программу можно спокойно использовать даже на самых слабых машинах.
Можно ли дополнить уже имеющийся скрипт AutoHotkey?
Что делать, если вы уже знакомы с программой AutoHotkey и давно пользуетесь каким-либо скриптом? Создавать новый файл скрипта для функции «всегда сверху»? Нет, в этом нет необходимости. Просто дополните уже имеющийся у вас скрипт приведенной выше записью для закрепления окон.
Вот пример того, как выглядит мой файл:

Иными словами, в одном файле вы можете прописать столько разных скриптов сколько нужно — их выполнение не будет конфликтовать друг с другом.
Можно ли изменить сочетание клавиш для расположения поверх других окон?
Если вам не нравится сочетание Ctrl+Space, вы можете задать любые другие клавиши. Для этого рекомендую изучить документацию AutoHotkey по этому вопросу. https://www.autohotkey.com/docs/v1/KeyList.htm
Похожие публикации:
- Как отобразить секунды в часах на панели задач Windows 10
- Решение проблемы с ошибкой 80240020 при обновлении Windows 10
- 3 способа изменить шрифт в Telegram
- Как самому сделать дизайн квартиры онлайн: от рисования плана до расстановки мебели
- Хостинг Timeweb: оно Вам надо?
Понравилось? Поделитесь с друзьями!

Сергей Сандаков, 43 года.
С 2011 г. пишу обзоры полезных онлайн сервисов и сайтов, программ для ПК.
Интересуюсь всем, что происходит в Интернет, и с удовольствием рассказываю об этом своим читателям.
Are you always finding yourself having to click and drag windows to keep them on top of your screen? It’s a tedious task that can really disrupt your workflow. Luckily, Windows 10 has a trick that will keep those windows on top with just a few clicks of your mouse. In this guide, we’ll show you how to keep a window on top of your desktop in Windows 10.
Windows 10: How to Keep a Window on Top
- Right-click the title bar of the window you want to keep on top.
- Select the “Always on Top” option from the list of options.
- The window should now remain on top of other windows, even when it is not the active window.

How to Keep a Window on Top in Windows 10
Keeping a window on top of other windows can be useful when you are working on multiple windows at once. In Windows 10, there are several ways to keep a window on top. With a few clicks of the mouse, you can keep a window always on top so that it is visible at all times.
Using the Keyboard Shortcut
The quickest way to keep a window on top is to use the keyboard shortcut. To do this, simply select the window you want to keep on top, then press and hold the “Alt” and “Space” keys simultaneously. This will open the window’s system menu. From here, select the “Always on Top” option to keep the window on top. To turn off the feature, simply select the “Always on Top” option again.
Using the Taskbar
Another way to keep a window on top is to use the taskbar. To do this, select the window you want to keep on top, then right-click the window in the taskbar and select the “Always on Top” option. This will keep the window on top until you turn off the feature.
Using Third-Party Software
If you need to keep multiple windows on top, you may want to consider using third-party software. There are several free and paid software programs that allow you to easily keep multiple windows on top. These programs usually allow you to customize the windows on top by resizing, moving, and arranging them in different ways.
Using the Window Menu
The last way to keep a window on top is to use the window menu. To do this, select the window you want to keep on top, then right-click the window’s title bar and select the “Stay Always on Top” option. This will keep the window on top until you turn off the feature.
Using the System Tray
If you need to quickly switch between windows on top and windows that are not on top, you can use the system tray. To do this, simply select the window you want to keep on top, then right-click the system tray icon and select the “Stay Always on Top” option. This will keep the window on top until you turn off the feature.
Using the Context Menu
The last way to keep a window on top is to use the context menu. To do this, select the window you want to keep on top, then right-click the window’s title bar and select the “Stay Always on Top” option. This will keep the window on top until you turn off the feature.
Top 6 Frequently Asked Questions
What Is a Window on Top?
A window on top is a feature on Windows 10 that allows a window to stay in the foreground of your desktop, even when other windows are being actively used. This allows the user to keep track of information from a particular window, such as a chat window or a web page, without needing to constantly switch between windows.
How Do I Keep a Window on Top in Windows 10?
The easiest way to keep a window on top in Windows 10 is to use the “Always on Top” feature. To do this, right-click on the window’s title bar and select “Always on Top” from the menu. The window will then stay in the foreground of your desktop, even when other windows are being used.
How Do I Remove a Window From Being Always on Top?
To remove a window from being Always on Top in Windows 10, right-click on the window’s title bar and select “Always on Top” from the menu. The window will then no longer stay in the foreground of your desktop when other windows are being used.
Are There Other Ways to Keep a Window on Top?
Yes, there are other ways to keep a window on top in Windows 10. You can also use software such as DeskPins and Window On Top to keep a window in the foreground of your desktop. These programs allow you to easily pin any window to the top of your desktop, and keep other windows from overlapping it.
Are There Any Shortcuts to Keep a Window on Top?
Yes, there are several keyboard shortcuts you can use to keep a window on top in Windows 10. You can use the Windows + Up arrow key combination to keep the current window on top, and the Windows + Down arrow key combination to release it.
Are There Any Third Party Apps That Can Keep a Window on Top?
Yes, there are several third party apps that can be used to keep a window on top in Windows 10. These apps include DeskPins, Window On Top, and Stay On Top. These apps allow you to easily keep any window on top of your desktop, and make sure it remains visible even when other windows are active.
How To Keep a Window Always On Top in Windows 10
In conclusion, keeping a window on top of other windows in Windows 10 is a great way to save time and keep important information easily accessible. By using the keyboard shortcut Alt + Space + N, you can ensure that the window will always be visible, even if other windows appear in front of it. With this simple trick, you can make sure that you never have to search for a window again!
Sometimes you need an open window be on top of all other applications and windows for various reasons. It can be beneficial for monitoring a particular application or watching a movie while working or sticking the audio player on top of all windows. Windows 10 does not offer any way to set a window on top of other windows. You can only arrange windows in cascading tiles which forces all windows to share the same screen space.
Table of contents
- WindowTop
- Through Mouse — DeskPins
- AutoHotkey Script for Always on top keyboard shortcut
- StayOnTop
- TurboTop
- Always On Top
- OnTopReplica
- WinLister
- 4t Tray Minimizer
- PowerMenu
In this article, we’ll discuss three utilities which will enable always on top feature in Windows 10. There are some programs which provide built-in option to make them always on top. We will also discuss those programs in this article. All the tools and utilities discussed in this article are free.
WindowTop

WindowTop is a freeware utility that allows you to pin your any app on the top of another app, so you can easily keep on working and do not need to minimize and maximize each page and app again & again. WindowTop also comes with exclusive features such as “Shrink Window”, an innovative way to minimize windows. And it has a dark/read mode, which you can use at night for reading purposes. This is a simple way to solve your issue and show any app on top of another app’s window.
Download WindowTop
Through Mouse – DeskPins

DeskPins is a freeware utility, you can simply use it with a click of your mouse. It gives you an unlimited number of pins and you can use those pins to put any app on the top of other application windows. Firstly, you have to download DeskPins from below link, and after installing, a pin icon will be available in the system tray.
Open any app window, if you want that specific window to stay on top of all another open window, then grab a pin from the system tray and your mouse will turn into a pin. Click on that particular window to pin it on top. The pinned window will have a red pin icon on its bar so you can easily see which window is pinned.
Download DeskPins
AutoHotkey Script for Always on top keyboard shortcut
Another quick way to set any window on top of all other windows is the keyboard shortcut. Just press the key combination to pin any application or tool “Always On Top”. You have to create a script with AutoHotKey which won’t be heavy for your system, then you can get access to it through shortcut keys to lock any app as a top one. Go with below steps to use Keyboard shortcut.
- Download AutoHotkey from here and run the installer to install it on your system.
- Right click on Desktop. Go to New, and select the option of AutoHotkey Script.

- Open the newly created script in the Notepad to edit it. Copy and Paste the following line into Notepad file.
^SPACE:: Winset, AlwaysOnTop, , A
- Now close the Notepad file, Double click on the script to run it. If it runs successfully, a green logo will appear in the System’s tray and represent that script is running in the background.

- You can now use “Ctrl+Space” key to set any active window to always on top of all other windows.


To unpin any window, again press “Ctrl+Space” key. You can also change key combination according to your needs.
StayOnTop

StayOnTop is a simple and useful application with a single function that puts your required app on top of all application windows. No matter how many windows you have opened, just right-click on it to view all open windows, and select your required window to keep it on Always On Top. You can use this tool to fulfill your need of putting any needed app on Always On Top, that was a missing feature in Windows 10. It can be accessed through the system tray.
Download StayOnTop
TurboTop
TurboTop is a very handy tool, you do not have to assign a pin for any app you want to set always on top, or do not need to press the key combination to pin any app on top. TurboTop sits in your System Tray and lets you set any window to be “Always on Top”.
- Download TurboTop from this link
- A system tray icon will appear after downloading it.

- Right click on its icon to see the list of all active windows. to set any one window on top of all other windows, select it from the list.

- To unpin any pinned window, uncheck it from the list shown in TurboTop system tray icon.


Always On Top

Always On Top is a freeware third-party tool to let you make any application window on top of all other windows. It uses a script that configures the priorities of all active and open windows. You can pin any app on above of all other active windows. This would be helpful for you if you are watching a movie while working, or making notes from any website. Download it from the below link. An icon will be available in your system’s notification area. Open any app you want to stay it open as long as you want. After opening that particular app, press “Ctrl+Space” key to pinning it on top of all other active windows.
Download Always On Top
OnTopReplica
OnTopReplica is a real-time third-party tool, based on DWM thumbnails offers you to open window of our choice on the top of another active window. Create a clone by selecting your specific area or window which you want to stay on top. If your selected area of the window is large, you can resize it with OnTopReplica utility to have more space for other windows. You can set hotkeys to clone the window with OnTopReplica for your ease and convenience. .Net framework 4.0 or 4.5 is required by this utility to run on your system.
Download OnTopReplica from here
WinLister

WinLister is a small but a practical utility that can set any application to top-most mode, and that window will show to you on top of all other windows, or as a pinned window.
This utility also displays the list of opened windows on your system. For each window, some useful information is displayed: the title, the handle of the window, location, size, class name, process number, the name of the program that created the window, and more. In addition, you can easily hide, show, close, or save the windows list to text or HTML file. Both 32-bit and 64-bit systems are supported.
Download WinLister from here
4t Tray Minimizer

4t Tray Minimizer is a lightweight but powerful window manager tool that performs several functions, including to pin your required open window as a top window. It can also minimize the window to tray, roll up/roll down, make transparent, hide/show the system tray.
Download 4t Tray Minimizer

PowerMenu is a tool that gives you many working features including letting you put a window on top of all other open windows. You can also minimize an app to system’s tray to have more space on the Desktop and can change the transparency of app.
Download PowerMenu
Always On Top is a useful feature which is missed by Microsoft in Windows 10 Operating System, but I hope by going through above ways, you can use Always On Top feature to pin any windows on the top of any other opened windows easily. From my opinion, I like StayOnTop tool because this performs one function only and that is required one.
 Если вам потребовалось закрепить какое-то окно поверх всех других окон в Windows, а в настройках программы, которой принадлежит это окно такого параметра нет, к сожалению, системных средств для этого действия также нет. Но вы можете поместить окно «всегда сверху» с помощью нескольких бесплатных утилит.
В этой статье несколько способов закрепить окно программы поверх всех окон Windows 10, 8.1 или Windows 7 с помощью бесплатных программ, которые позволят выполнять это сочетанием клавиш, с помощью меню в области уведомлений и другими методами.
Как сделать программу или окно всегда поверх всех окон с помощью AutoHotKey
AutoHotKey — популярная программа, позволяющая создать скрипты для собственных горячих клавиш в различных программах или в Windows в целом. С помощью неё можно создать и сочетание клавиш, которое будет включать режим «Всегда сверху» для активного окна:
- Скачайте и установите AuthoHotKey с официального сайта — https://www.autohotkey.com/
- В любой папке или на рабочем столе с помощью в контекстном меню выберите Создать — AutoHotKey Script.

- Задайте любое имя скрипту, а затем нажмите по нему правой кнопкой мыши и выберите пункт «Edit» (редактировать).
- С новой строке в скрипте введите
^+SPACE:: Winset, Alwaysontop, , A
и сохраните файл скрипта.

- Запустите скрипт (просто двойным кликом) и теперь, когда вы в активном окне нажмете Ctrl+Shift+Пробел, оно будет отображаться поверх других окон до следующего нажатия этой же комбинации клавиш.
- Если вы захотите прекратить использование сочетания клавиш, можно закрыть Autohotkey в области уведомлений Windows или поставить исполнение скрипта на паузу в меню.


Разумеется, вы можете задать свою комбинацию: в моем примере используется ^ (Ctrl), + (Shift) и SPACE (пробел).
Вместо SPACE можно задать какую-либо букву, можно задействовать клавишу «Win» (код для неё — #). Например, если я захочу использовать сочетание Ctrl+Win+A, мне потребуется ввести ^#A:: в начале скрипта. Подробности вы можете найти в документации к AutoHotKey на официальном сайте.
DeskPins — простая бесплатная программа для закрепления окна поверх других окон
DeskPins — не самая новая, но очень простая бесплатная утилита, позволяющая легко закрепить любое окно Windows 10, 8.1 или Windows 7 так, чтобы оно всегда располагалось поверх других окон. Достаточно просто загрузить программу с официального сайта https://efotinis.neocities.org/deskpins/, запустить её, нажать по значку программы в области уведомлений (указатель мыши превратится в кнопку), затем нажать по окну, которое нужно закрепить.

В дальнейшем, если это окно больше не нужно располагать поверх других, поднесите указатель мыши к кнопке в заголовке окна и нажмите по ней для открепления.
PinWin
PinWin — еще одна бесплатная программа для помещения выбранных окон поверх остальных, даже когда они неактивны. После установки и запуска программы ее значок отобразится в области уведомлений Windows, и там можно будет выбрать окно, которое нужно закрепить поверх других окон из списка, либо указав на него (пункт «Select Window From Screen»).

Там же можно открепить все окна (Unpin All Windows). Официальный сайт программы — https://sourceforge.net/projects/pinwin/
На самом деле, программ подобного рода множество, как правило они бесплатны и не занимают много места. Два похожих инструмента со слегка иной реализацией закрепления поверх всех окон — OnTopper и TurboTop.
Дополнительно, если вам требуется закрепить окно какой-то конкретной программы поверх других окон, не исключено, что такая настройка присутствует в параметрах самой этой программы: например, вы найдете такую настройку в диспетчере задач Windows, медиа плеере VLC, для видео в браузере Google Chrome можно использовать расширение Floating Video, для браузера Firefox есть дополнение «Always on Top», во многих других программах также можно отыскать соответствующие возможности.