Используйте удаленный рабочий стол на устройстве с Windows, Android или iOS, чтобы дистанционно подключиться к компьютеру с Windows 10. Вот как настроить компьютер для разрешения удаленных подключений, а затем подключиться к настроенному компьютеру.
Примечание: В то время как сервер удаленного рабочего стола (например, компьютер, к которому вы подключаетесь) должен работать под управлением версии Windows Pro, клиентский компьютер (устройство, с которым вы подключаетесь) может работать под управлением любой версии Windows (Pro или Home). или даже другой операционной системы.
-
Включите удаленные подключения на компьютере, к которому требуется подключиться.
-
Убедитесь, что у вас установлена Windows 11 Pro. Чтобы проверить это, выберитеПуск и откройте Параметры . Затем в разделе Система , выберите О системе и в разделе Характеристики Windows найдите Выпуск. Сведения о том, как получить Windows 11 Pro, см. в статьеОбновление Windows Home до Windows Pro.
-
Когда будете готовы, нажмитеПуск и откройтеПараметры . Затем в разделе Система выберите Удаленный рабочий стол, установите для параметра Удаленный рабочий стол значение Включить, затем выберитеПодтвердить.
-
Запишите имя этого компьютера в поле Имя компьютера. Оно понадобится позже.
-
-
Используйте удаленный рабочий стол для подключения к настроенному компьютеру.
-
На локальном компьютере с Windows: В поле поиска на панели задач введите Подключение к удаленному рабочему столу и выберите Подключение к удаленному рабочему столу. В окне «Подключение к удаленному рабочему столу» введите имя компьютера, к которому необходимо подключиться (из шага 1), а затем нажмите кнопку Подключиться.
-
На устройстве с Windows, Android или iOS: Откройте приложение «Удаленный рабочий стол» (можно скачать бесплатно в Microsoft Store, Google Play и Mac App Store) и добавьте имя компьютера, к которому вы хотите подключиться (см. шаг 1). Выберите имя удаленного компьютера, которое вы добавили, и дождитесь завершения подключения.
-
-
Включите удаленные подключения на компьютере, к которому требуется подключиться.
-
Убедитесь, что у вас установлена Windows 10 Pro. Чтобы это проверить, перейдите в Пуск > Параметры > Система > О системе и найдите Выпуск. Сведения о том, как получить Windows 10 Pro, см. в статье Обновление Windows 10 Домашняя до Windows 10 Pro.
-
Когда будете готовы, выберите Пуск > Параметры > Система > Удаленный рабочий стол, и выберите Включить удаленный рабочий стол.
-
Запомните имя компьютера в разделе Как подключиться к этому ПК. Оно понадобится позже.
-
-
Используйте удаленный рабочий стол для подключения к настроенному компьютеру.
-
На локальном компьютере с Windows: В поле поиска на панели задач введите Подключение к удаленному рабочему столу и выберите Подключение к удаленному рабочему столу. В окне «Подключение к удаленному рабочему столу» введите имя компьютера, к которому необходимо подключиться (из шага 1), а затем нажмите кнопку Подключиться.
-
На устройстве с Windows, Android или iOS Откройте приложение «Удаленный рабочий стол» (можно скачать бесплатно в Microsoft Store, Google Play и Mac App Store) и добавьте имя компьютера, к которому вы хотите подключиться (см. шаг 1). Выберите имя удаленного компьютера, которое вы добавили, и дождитесь завершения подключения.
-
Включить удаленный рабочий стол
Нужна дополнительная помощь?
Нужны дополнительные параметры?
Изучите преимущества подписки, просмотрите учебные курсы, узнайте, как защитить свое устройство и т. д.
В сообществах можно задавать вопросы и отвечать на них, отправлять отзывы и консультироваться с экспертами разных профилей.
*This article was updated to accommodate a guide for enabling Remote Desktop on Windows 11.
Microsoft Remote Desktop is most frequently used to provide technical support or control a computer remotely. It allows you to get full access to your Windows PC from another Windows, Mac, or Linux computer in order to transfer files, play video games, operate locally-attached peripherals, etc.
But before using Remote Desktop Protocol (RDP) to connect to a remote device, you should enable Remote Desktop first.
In this guide, we’ll explain how to allow remote desktop access to your computer using the Settings app in Windows 10/11 or the more traditional Control Panel.
Note: Remote Desktop is not available on Windows 10 and Windows 11 Home edition. Remote Desktop is only available for Pro and Enterprise versions. However, you could still use third-party solutions like Chrome Remote Desktop or Teamviewer to set up Remote Desktop on Windows 10/11 Home.
Enable RDP via System Settings in Windows 11
Let’s take a closer look at how to turn on RDP on Windows 11 with the help of the standard Settings app.
- Open Start → Settings.
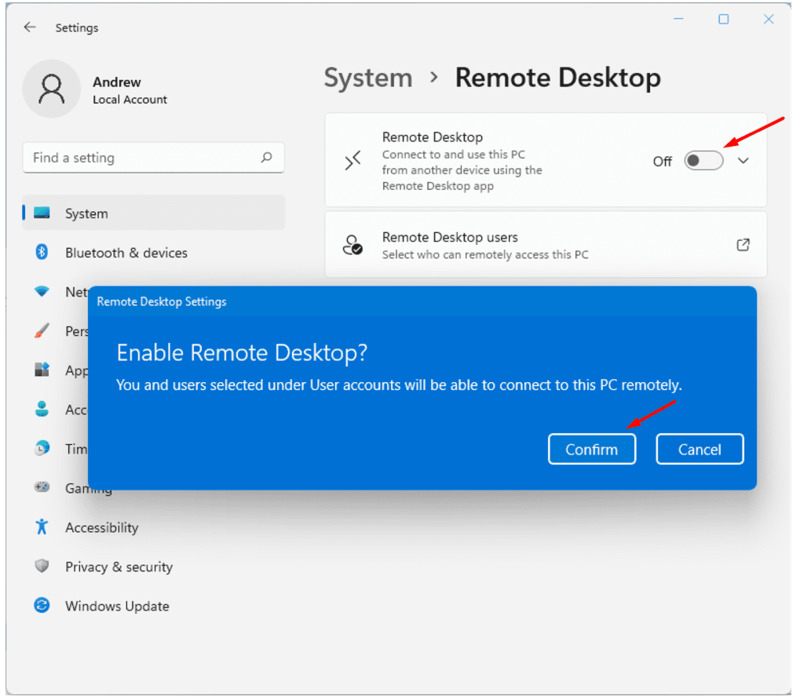
- In the Settings window, select “System”. Then scroll down and click “Remote Desktop” on the right pane.
- Click the toggle switch button to enable the Remote Desktop on your Windows 11 device. Confirm your action in the pop-up window.
Once done, your PC is set up to connect via RDP. To connect to the remote machine, you can use, for example, the new Remote Desktop app or classic Remote Desktop Connection.
Allow RDP connections on Windows 10 using Settings
Using the Settings app, follow the steps below to enable remote access on Windows 10:
-
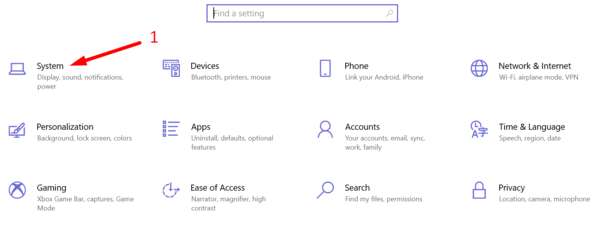
Open Settings on a Windows 10 device and select “System”.
-
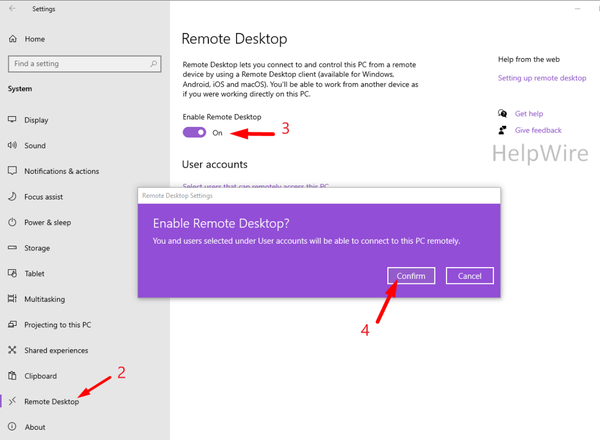
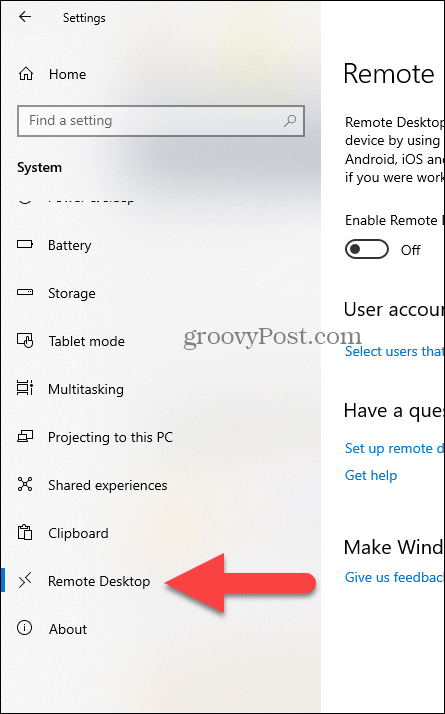
Click “Remote Desktop”.
-
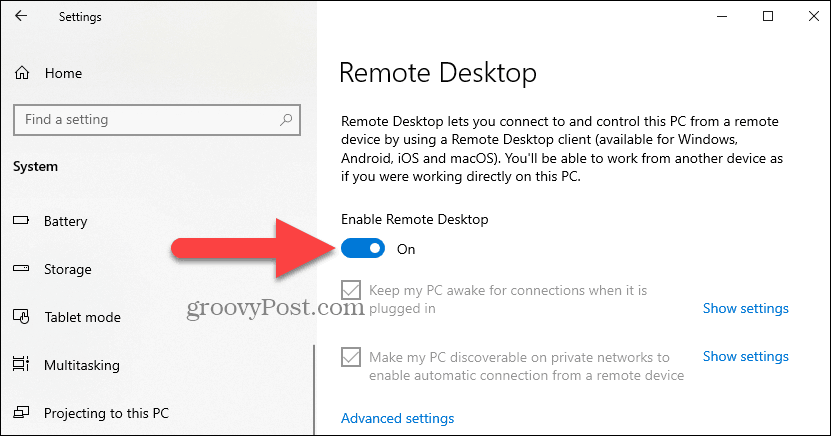
Toggle the “Enable Remote Desktop” switch to “On”.
-
Hit “Confirm”.
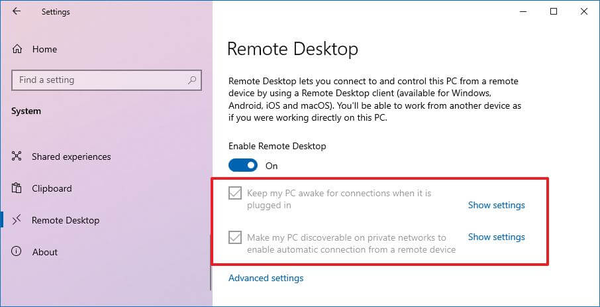
Once you’ve allowed Remote Desktop on Windows 10, there will be two additionally enabled options:
- • Keep my PC awake for connection when it’s plugged in.
- • Make my PC discoverable on private networks to enable automatic connection from a remote device.
These settings ensure that users always can connect to the remote machine whenever they like.
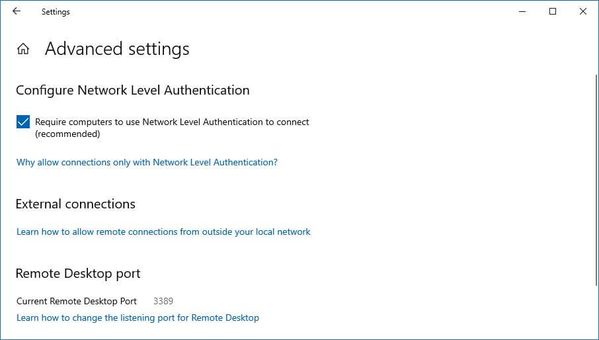
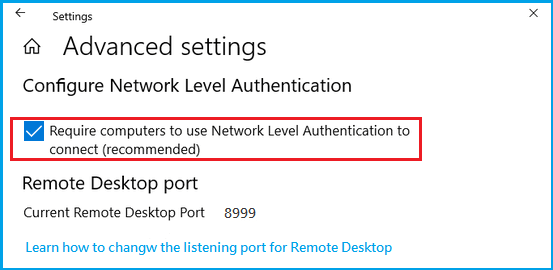
If users go to the “Advanced settings” window, they’ll see extra advanced features, like the option to require computers to utilize “Network Level Authentication” when connecting remotely.
This ensures the connections are more secure by restricting access only to those who can authorize the connection with the network before they can access the device.
Users will also find the current Remote Desktop port on the “Advanced settings” page. This information is useful if the user ever needs to reconfigure a router to permit remote desktop access from outside of their network.
Note: By default, the port number is set to 3389.
Allow remote connections on Windows 10/11 using the Control Panel
Even though the Settings app is an easy option for enabling remote access, it can also be done using the Control Panel. Below you’ll find the instructions on how to enable remote desktop on Windows 10 or 11 via the Control Panel:
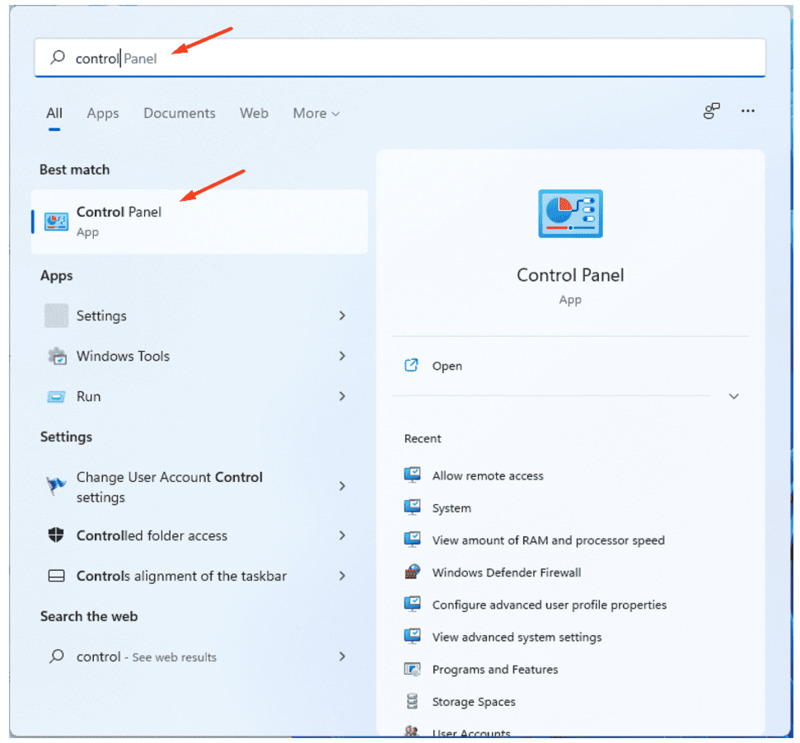
- Open the Control Panel. The most optimal way would be to type in the query in the search box.
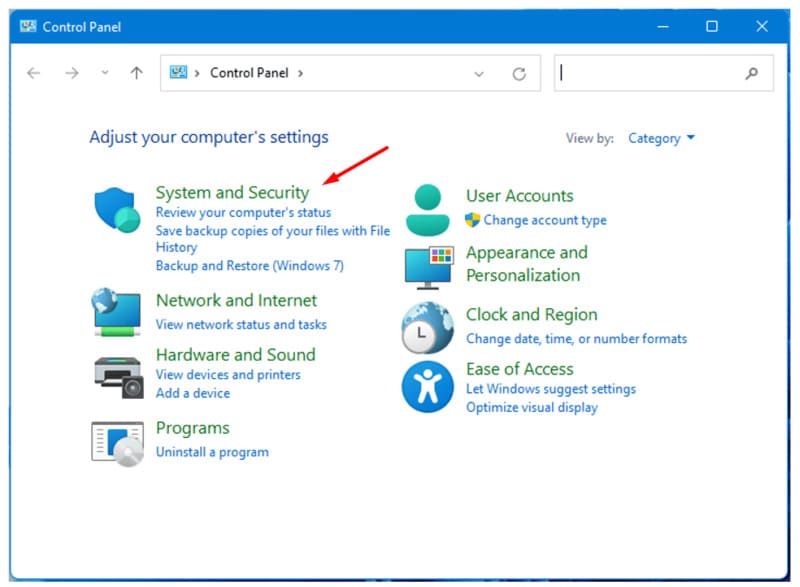
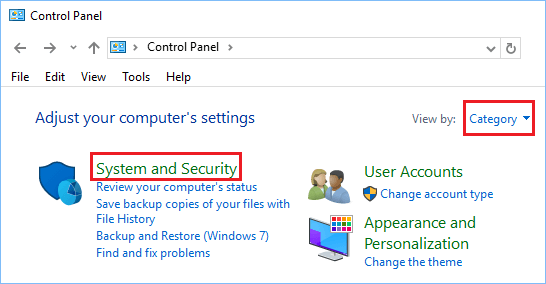
- Select “System and Security”.
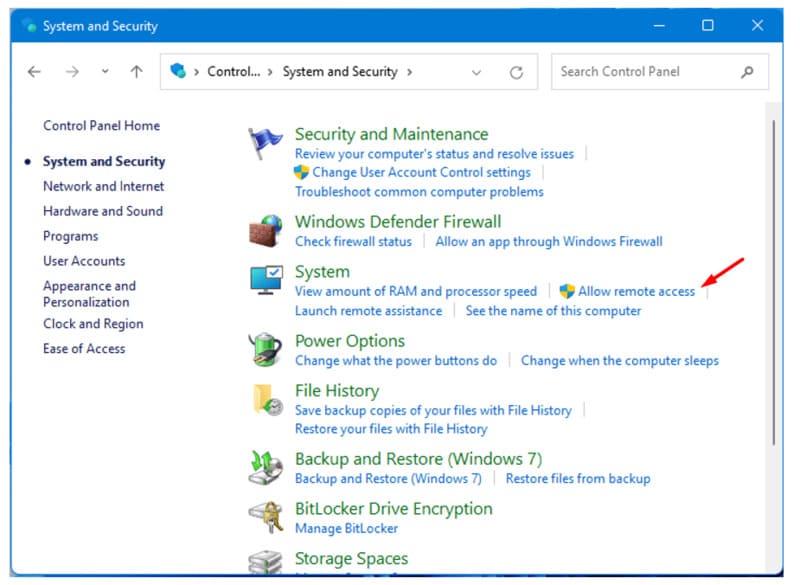
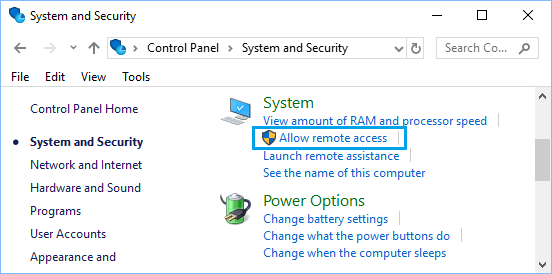
- Under the “System” section, click “Allow remote access”.
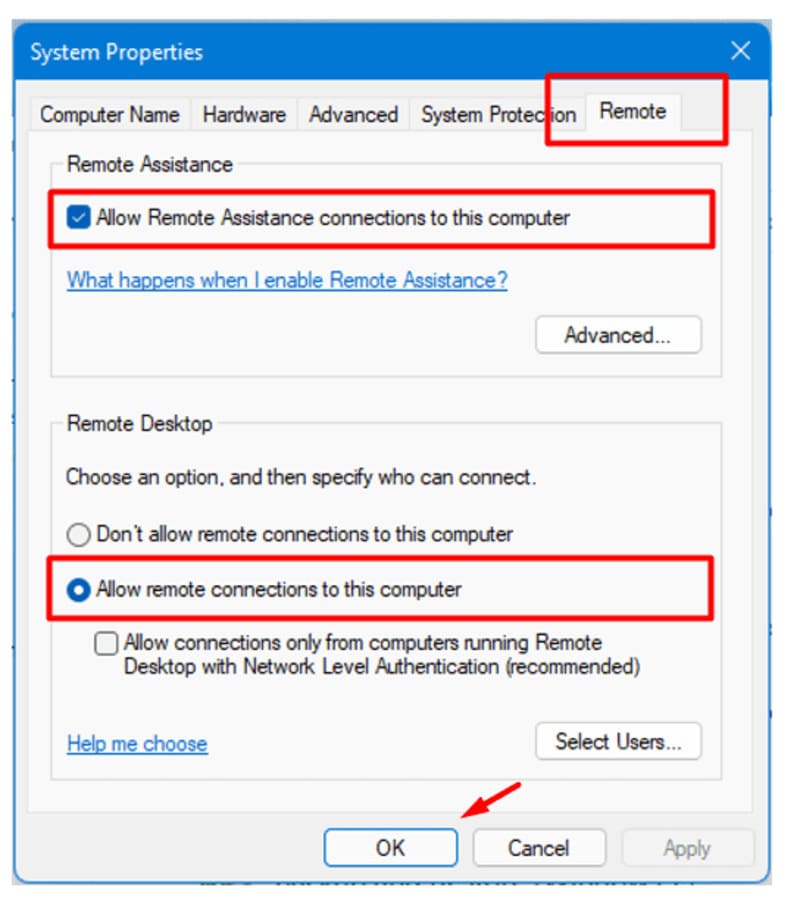
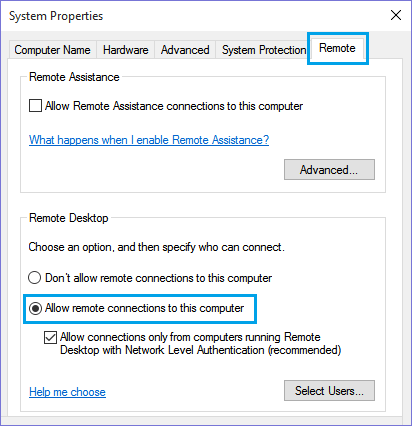
- The System Properties window will appear. In the Remote tab, check the box “Allow Remote Assistance connections to this computer” in the section Remote Assistance. Then, select “Allow remote connections to this computer” in the section Remote Desktop.
- Hit “Apply” and then “OK”.
That’s it! Now, it will be possible to connect to this computer from a remote machine over RDP.
After turning on the remote desktop on Windows 10/11, it’s time to connect to the remote computer using the modern Remote Desktop application (recommended) or with the built-in Remote Desktop Connection (RDC) utility that comes with every Windows version.
If you would then need to disable Remote Desktop access to your Windows 10/11 device, then you should not experience any issues since you will need just to reverse the steps from this guide.
Note: Enabling RDP access in Windows 10/11 via the Control Panel, makes the “Network Level Authentication” option switched on by default (however, it is an option that users should keep on regardless).
Enabling RDP access through the Control Panel is available on previous Windows versions which will allow you to create a remote desktop connection from Windows 10 to Windows 7. However, the Settings app is only present in Windows 10 and 11.
Remote Desktop Protocol (RDP) has been a feature of Windows since the XP Pro days. Here’s a look at using it in Windows 10 with the Remote Desktop app.
Remote Desktop Protocol (RDP) has been a feature of Windows since the XP Pro days. It makes it easy to connect from one PC or device to another to retrieve files or provide PC support.
There are several free utilities out there that will get you set up with a remote connection. Some that come to mind are services such as join.me, TeamViewer, and Chrome Remote Desktop and are especially handy when connecting between different platforms. But if you’re in a pure Windows environment, here’s a look at how to enable the built-in RDP utility in Windows 10, which will allow you to connect to your Windows box remotely.
The Remote Desktop or RDP feature is disabled by default, so you will need to enable it in the settings. There are several ways to do this; let’s review the easiest.
-
- Open Settings
- Click System > Remote Desktop
-
- Click the toggle Enable Remote Desktop
- Click Confirm when prompted.
Expert Note:
You can also enable Remote Desktop using the System Properties. Press the Windows Key and Type: advanced system. Click View advanced system settings.
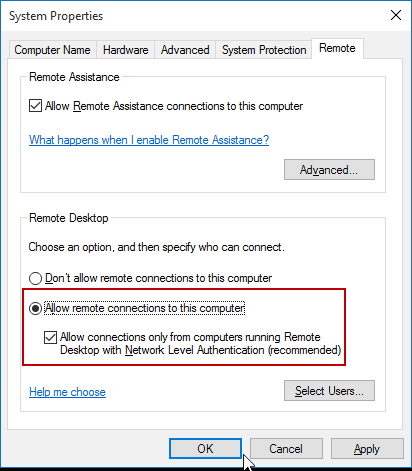
Click the Remote tab and select Allow remote connections to this computer. Keep the box checked for Network Level Authentication for better security. Also, note that you will need to enable incoming remote connections on the PC you’re connecting.
Remote Into Your PC
You have a couple of choices when it comes to how you remotely connect to the other computer. You can use the traditional desktop app or the Remote Desktop universal app. For this, I’m connecting to my Windows Home Server on my home network. I’m also going to use the app that you can install from the Store. It’s more versatile and can be used on mobile platforms, including iOS and Android.
Tip: If you have many PCs and devices on your home network, a useful free utility to use is Advanced IP Scanner.
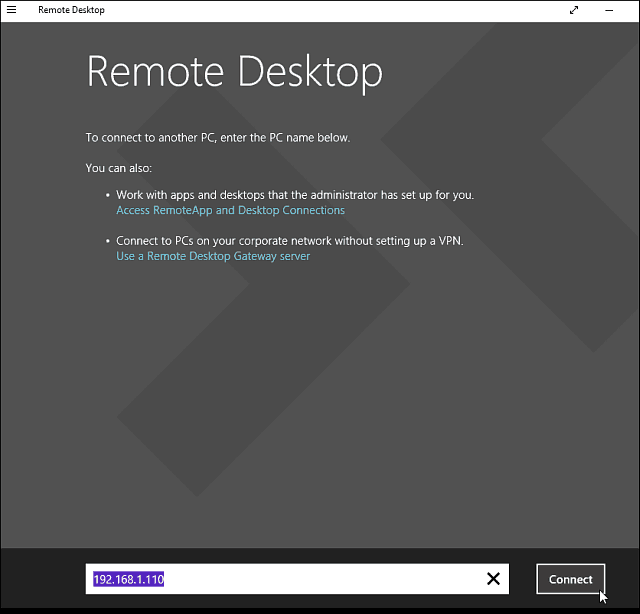
Launch the app and type a name for the PC or device, its hostname or IP address, and select Connect.
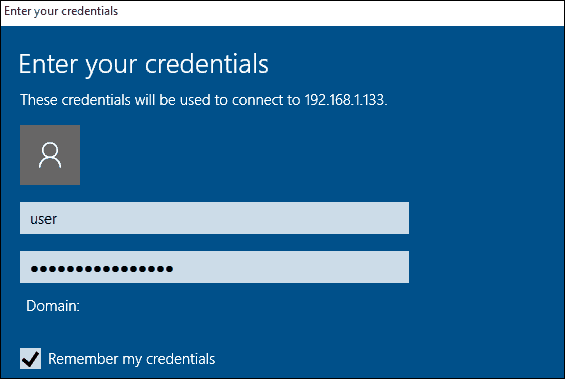
Next, enter the username and password used for the computer you’re connecting into. Also, if you’re going to remote into it often, check the box to remember your credentials.
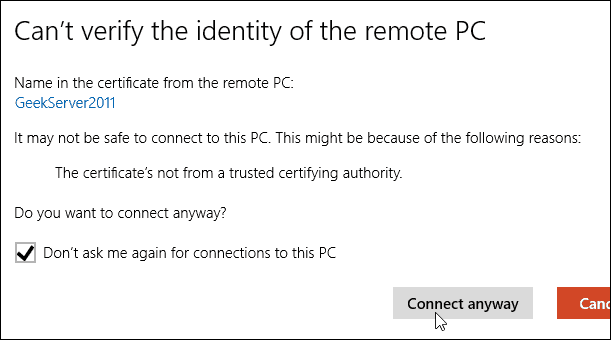
If you get the following security message, click Go ahead and Connect and check the box not to remind you again. You know what you’re doing; no reason for Windows to be constantly nagging you.
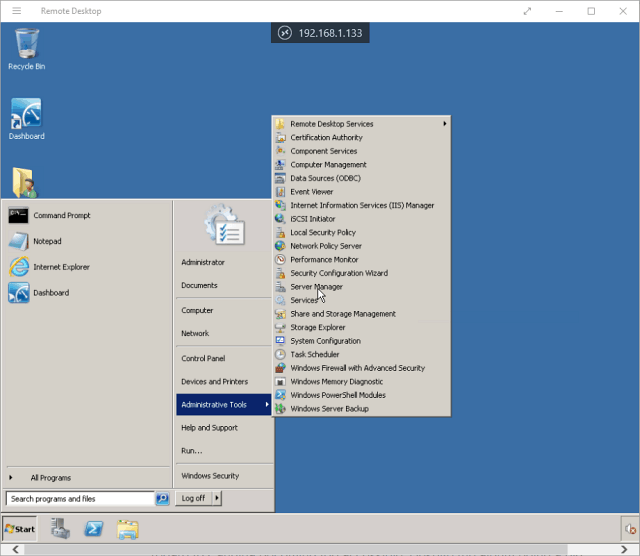
There you have it. You can now start using the remote computer for configuration, remote support, or however you need to use it.
I should also mention that you can go to Settings > connection settings in the app and configure the appearance, devices and make other adjustments that work for you.
More About Remote Desktop Connections
If you’re running a previous version of Windows or looking to remote access your Windows PC from your smartphone or tablets, check out the articles linked below for more.
- How to Enable Remote Desktop in Windows 7
- Make Remote Desktop Connections Work Faster
- Enable Remote Desktop for Windows 8
- Using the Windows Phone Remote Desktop App
- Remote Desktop Into Windows from a Mobile Device
You can access your computer from a remote location by using Remote Desktop Protocol (RDP). You will find below different methods to Enable Remote Desktop in Windows 10.
As mentioned above, you need to Enable Remote Desktop feature on your computer, in order to be able to access your computer from another computer, located far away from your computer.
The downside of enabling Remote Desktop Connection is that it makes your computer vulnerable or open to remote attacks.
However, you can enforce Network Level Authentication, Strong Passwords and other security measures to limit this risk.
Unfortunately, Remote Desktop feature is not available in Windows 10 Home, it can only be enabled on computers running Windows Pro, Windows Enterprise and Windows Server.
Although, Windows 10 Home is equipped with Remote Desktop Client Software, it lacks the propriety RDP server from Microsoft, required for accessing remote computers.
1. Enable Remote Desktop Using Settings
The easiest way to Enable Remote Desktop connection in Windows 10 is by going to Settings on your computer.
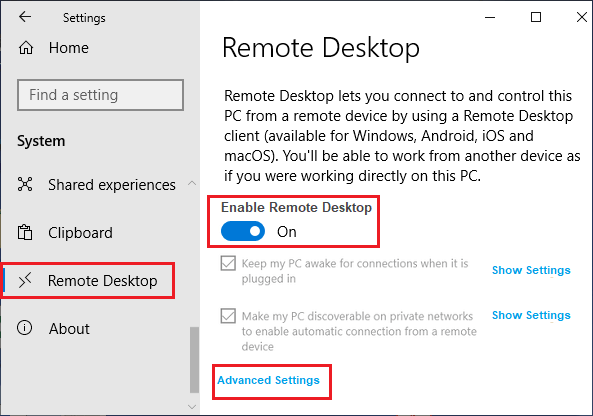
1. Go to Settings > System.
2. Select Remote Desktop in the left-pane. In the right-pane, move the toggle next to Remote Desktop to ON position.
Note: Make sure “Keep my PC awake for connections when it is plugged in” option is selected or you will have to change Power Settings on your computer.
3. On the confirmation pop-up, click on Confirm.
4. On the same screen, click on Advanced Settings and enable Network Level Authentication.
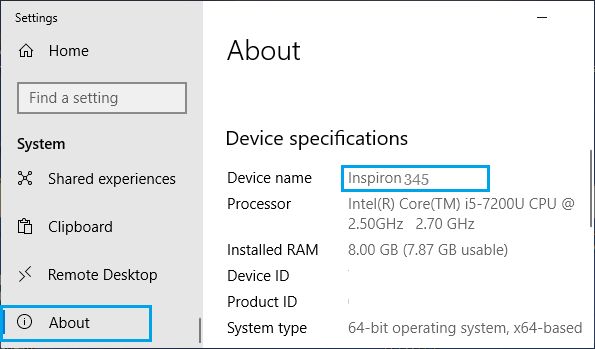
After enabling Remote Desktop Connection, go to Settings > System > About and note down the Name of your computer.
The Name of a Computer is required to connect to a computer from a Remote Location.
Another way to connect to Remote Desktop is by using IP Address of the computer.
2. Enable Remote Desktop Using Sysdm.cpl
This method checks the power settings on your computer and prompts you to change power settings, if they are not compatible.
1. Type sysdm.cpl in the Search bar and select sysdm.cpl Control Panel Item.
2. On System Properties screen, select the Remote tab > check Allow Remote connections to this computer option.
3. Click on Apply and OK to save this setting on your computer.
As mentioned above, you will be prompted to change Sleep Settings on your computer, if they are not compatible.
3. Enable Remote Desktop Using Control Panel
If you like using the Control Panel, you can enable RDP using the following steps.
1. Open Control Panel > click on System and Security.
2. On System and Security Screen, click on Allow Remote Access option.
3. On the next screen, select Allow Remote connections to this computer option.
4. Click on Apply and OK to save this setting on your computer.
4. Enable Remote Desktop Using Run Command
Another way to Enable Remote Desktop connection is by going to System Properties screen using the Run Command.
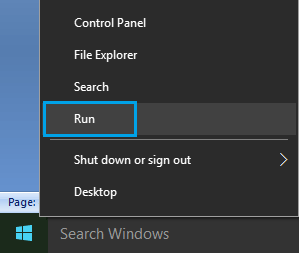
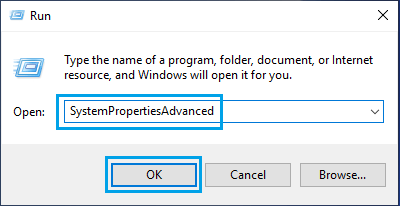
1. Right-click on the Start button and click on Run.
2. In Run Command window, type SystemPropertiesAdvanced and click on OK.
3. On System Properties screen, select the Remote tab > check Allow Remote connections to this computer option and click on Apply and OK.
Note. You may be prompted to change Sleep Settings on your computer, so that your computer never goes to sleep.
Once Remote Desktop is enabled, you will be able to access your computer from remote location using Remote Desktop Protocol (RDP).
- How to Protect Windows Computer From Remote Attacks
- How Access Remote Computer Using RDP
Удаленное управление компьютером — очень удобная функция, которая может пригодиться во многих ситуациях. Для того, чтобы настроить подключение, необязательно скачивать и настраивать какой-то софт. В Windows 10 есть утилита, которая предоставляет такие возможности. Подключение можно осуществлять с операционных систем семейства Windows и даже Mac OS. В том числе управлять компьютером можно со смартфона.
Как включить Microsoft Remote Desktop
Для этого выполните следующие действия:
- Нажмите правой кнопкой мыши по меню «Пуск» в левом нижнем углу и выберите пункт «Система».
- Затем проследуйте в директорию «Удаленный рабочий стол» и переключите ползунок в состояние «Вкл».
После этого можно осуществлять подключение. Сделать это можно, используя имя компьютера или его IP-адрес (об этом чуть позже). Однако учтите, что для первого способа требуется включить сетевое обнаружение. Оно включается в дополнительных параметрах в этом же окне.
Мы рекомендуем подключаться с помощью имени ПК, потому что IP-адрес сейчас практически у всех динамический. Для того чтобы он стал статическим, потребуется провести дополнительные манипуляции. Оно вам надо? Так же можно настроить и другие параметры. Если хотите соединиться с ПК через какое-то время, не имея к нему доступа, отключите спящий режим.
Как подключиться к компьютеру, на котором включен удаленный доступ
Для этого выполните следующие действия:
- Нажмите комбинацию клавиш Win+R и введите команду mstsc.
- Введите имя компьютера и нажмите «Подключить».
В этом же окне можно настроить некоторые полезные опции. Например, можно выбрать размер изображения, начиная от самых малых значений и заканчивая полным экраном, который соответствует максимальному поддерживаемому разрешению. Для удобства управления можно настроить режим использования горячих клавиш. Все это делается в соответствующих вкладках в параметрах.
Если подключение не осуществляется, значит, оно запрещено в настройках системы. Для того чтобы его включить, попробуйте сделать следующее:
- Зайди в свойства компьютера, используя правую кнопку мыши.
- Затем в левой части появившегося окна выберите пункт «Дополнительные параметры системы».
- Перейдите в третью вкладку «Удаленный доступ».
- Выберите соответствующий пункт.
Если и это не помогло, попробуйте поменять профиль с сети с «Общедоступная» на «Частная». Для этого кликнете правой кнопкой мыши по значку доступа к интернету в системном трее, в правом нижнем углу и выберите пункт «Параметры сети и интернет». Затем выберите «Изменить свойства подключения» и поменяйте профиль. Здесь же нужно отключить лимитированное подключение.
Как подключиться к компьютеру, используя смартфон
Нужно скачать приложение «Удаленный рабочий стол» (кто бы мог подумать) и также ввести имя компьютера. Софт полностью бесплатен в Microsoft Store, Google Play и AppStore. Практически никаких настроек в программе нет, но они и не требуются.
Как показывает практика, при использовании встроенной в Windows утилиты и мобильного приложения, подключение намного стабильнее и при этом редко появляются ошибки и краши. С проблемами и вылетами вы столкнетесь намного чаще, если будете использовать софт от сторонних разработчиков. Да и зачем захламлять систему, если нужный функционал уже есть в ОС?
Читайте также:
- Тест антивирусных сканеров 2020: лучшие программы безопасности для Windows
- Упала скорость интернета после самоизоляции: что делать?


