How To Enable Remote Desktop From Command Line


The Windows 10 Remote Desktop feature lets users access remote computers and servers, allowing them to assist end-users without being physically on-site. One example of this would be if users are fixing a system currently in “Recovery Mode”, only possess SSH access to servers lacking KVM, or pre-configuring a build for deployment.
Conveniently, by setting a registry value, it’s possible for users to enable RDP from the command line (or disable) at will.
While users can set up the RDP feature via the Settings app, they can also enable RDP on Windows 10 with Command Prompt. This method can be used by anyone looking to create scripts that expedite configuring Remote Desktop on more than one computer at a time.
Alternatively, users can send the aforementioned scripts to a remote end-user, permitting them to enable/disable Remote Desktop automatically (without them having to take any additional steps).
The guide below demonstrates how to enable Remote Desktop on Windows 10 with CMD, and open the necessary firewall ports that allow for a successful connection on a Windows 10 machine.
Please note: Windows 10 Home lacks the Remote Desktop feature. Only Windows 10 Pro, Enterprise, and Education have Remote Desktop. Additionally, users should also create a complete backup of the computer prior to altering the commands. Why? Because any mistakes made during registry modification can irreversibly ruin a system.
How to enable remote desktop using Command Prompt
To enable Remote Desktop via the command line, follow the steps below:
-
Open the Windows 10 Start menu.
-
Search “Command Prompt”, and right-click the first result that appears.
-
Select “Run as Administrator”.
-
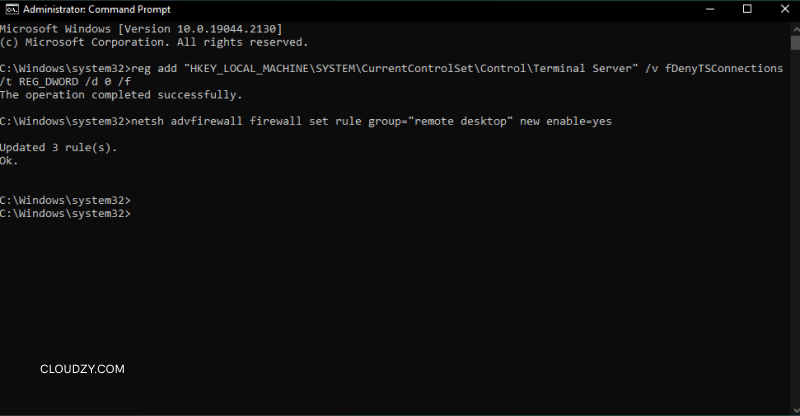
To enable remote desktop via CMD, enter the following command and hit Enter:
reg add "HKEY_LOCAL_MACHINE\SYSTEM\CurrentControlSet\Control\Terminal Server" /v fDenyTSConnections /t REG_DWORD /d 0 /f

Please note: Using Command Prompt to enable RDP doesn’t configure the Windows Firewall with the ports that permit RDP connections.
Additional note: The local Administrator group can connect with Remote Desktop Protocol by default. Additionally, all currently logged-in users can also connect.
The following is optional: Enable Remote Desktop via Windows Firewall by entering the following command:
netsh advfirewall firewall set rule group="remote desktop" new enable=Yes
After completing the steps above, RDP will be enabled, allowing users to remotely access devices.
To finely tune the RDP connection, see this guide for the additional MSTSC command line options that will allow you to access the remote computer as an admin, open the connection in full screen, and much more.
How to disable remote desktop with Command Prompt
Now that we’ve learned how to use CMD to enable RDP, it’s time to go over how to disable RDP using Command Prompt:
Step 1: Open the Start menu.
Step 2: Search “Command Prompt”, then right-click the first result.
Step 3: Choose “Run as Administrator” from the pop-up list.
Step 4: Disable RDP by entering the following command:
reg add "HKEY_LOCAL_MACHINE\SYSTEM\CurrentControlSet\Control\Terminal Server" /v fDenyTSConnections /t REG_DWORD /d 1 /f

The following is optional: Disable Remote Desktop (via the Windows Firewall) by typing the following command, then hit Enter.
netsh advfirewall firewall set rule group="remote desktop" new enable=No
Upon the completion of the steps outlined above, Remote Desktop services are disabled, and the Windows Firewall port is closed.
In this article, we only utilized Command Prompt, but the same commands can be utilized with PowerShell to configure Remote Desktop Protocol.
- To enable Remote Desktop on Windows 10, open Command Prompt (admin) and run the “reg add “HKEY_LOCAL_MACHINE\SYSTEM\CurrentControlSet\Control\Terminal Server” /v fDenyTSConnections /t REG_DWORD /d 0 /f” and “netsh advfirewall firewall set rule group=”remote desktop” new enable=Yes” commands.
On Windows 10, you can use the Remote Desktop feature to remotely access a computer or server to help other users or manage services without being physically present at the location.
Although you can manage the feature through the Settings app, you can also turn Remote Desktop on or off on Windows 10 using commands with Command Prompt or PowerShell. You may want to use this method to create a script to configure Remote Desktop on multiple computers more quickly. Or you can send the script to a user, allowing them to set up the feature without additional steps automatically.
This guide will teach you the steps to use Command Prompt to enable or disable Remote Desktop and open the required firewall ports for a successful connection on Windows 10.
- Enable Remote Desktop from Command Prompt
- Disable Remote Desktop from Command Prompt
Important: Remote Desktop is not a feature available on Windows 10 Home. It is only on Windows 10 Pro, Enterprise, and Education. It is also recommended you create a full backup of your computer before proceeding, as modifying the registry can cause irreversible damage to your system.
To enable the remote desktop protocol with Command Prompt, use these steps:
-
Open Start on Windows 10.
-
Search for Command Prompt, right-click the top result, and select the Run as administrator option.
-
Type the following command to enable the remote desktop protocol and press Enter:
reg add "HKEY_LOCAL_MACHINE\SYSTEM\CurrentControlSet\Control\Terminal Server" /v fDenyTSConnections /t REG_DWORD /d 0 /f

-
(Optional) Type the following command to enable remote desktop through the Windows Firewall and press Enter:
netsh advfirewall firewall set rule group="remote desktop" new enable=Yes

Once you complete the steps, the protocol will enable on Windows 10, and you will be able to access the device remotely.
Disable Remote Desktop from Command Prompt
To turn off the remote desktop protocol with Command Prompt, use these steps:
-
Open Start.
-
Search for Command Prompt, right-click the top result, and select the Run as administrator option.
-
Type the following command to disable the remote desktop protocol and press Enter:
reg add "HKEY_LOCAL_MACHINE\SYSTEM\CurrentControlSet\Control\Terminal Server" /v fDenyTSConnections /t REG_DWORD /d 1 /f
-
(Optional) Type the following command to disable Remote Desktop through the Windows Firewall and press Enter:
netsh advfirewall firewall set rule group="remote desktop" new enable=No

After you complete the steps, the Remote Desktop service will be turned off, and the Windows Firewall port will be closed.
This guide focuses on Command Prompt, but you can use the same commands to manage the remote desktop protocol using PowerShell.
We may earn commission for purchases using our links to help keep offering the free content. Privacy policy info.
All content on this site is provided with no warranties, express or implied. Use any information at your own risk. Always backup of your device and files before making any changes. Privacy policy info.
Microsoft’s remote desktop protocol is one of the most popular and valuable remote access protocols in the world. It is one of the principal protocols that is used by many different software clients and users to establish remote access to server and desktop systems alike. Sometimes, using the predesigned GUI-based platform of Windows cannot be accessed, whether due to technical difficulties or lack of first-hand access. You have to enable RDP in CMD.
RDP is widely used by many companies to create shared servers, and it is even used to host websites with dedicated resources. During the pandemic, the number of users who rely on protocols like RDP has skyrocketed. If you find yourself one of these people who now rely on tools like RDP in order to perform your work, business, or education-based tasks, it is important to know your way around its operational basis.
Therefore, in order to attain this level of proficiency, you need to know how to enable RDP in command line. But before we get to the step-by-step guide, let’s quickly go over what RDP is, the principal use cases of RDP, the properties of CMD, and the root reasons behind using CMD to control RDP. Let’s get to it.
What is RDP?
RDP stands for remote desktop protocol. It is a remote access protocol developed by Microsoft all the way back in 1998. While originally it was intended to run on a Windows desktop-to-desktop basis, it has evolved to become a multi-platform protocol that is used in many different software programs and clients in order to establish connections between computers and servers. For a deeper understanding, I encourage you to take a look at “What is RDP?” if you think you need a comprehensive guide on this topic. As of 2022, Microsoft’s remote desktop protocol covers Windows, Linux, macOS, Android, Unix, and Android. RDPs are an additional extension of the ITU telecommunication standardization sector. By default, the running port of the RDP protocol is 3389 on Transmission Control Protocol (TCP) and port 3389 on User Data Program (UDP).
While RDP was originally an insignificant protocol with lots of errors and incompatibilities, it has grown to become one of the premier remote access protocols in the world. Microsoft constantly updates and improves the protocol. The clients and software that use the RDP protocol, therefore, also use the enhanced and updated versions as they are released. It can be used via Windows itself without any of these clients, although using it through software does make it easier to set up and also offers certain additional utilities. You can read our article with a list of the top ten best RPD providers as well as six recommended RDP clients in it!
What is RDP Used For?
RDP is used to establish high-quality connections, which then can be used in different forms within a server by the admin to create either a direct computer-to-computer connection or even a shared server. These variations include shared servers, dedicated servers, remote access, and even hosting with RDP. The protocol itself has evolved throughout the years to also include a ton of secondary features that makes it easier, more beneficial, and safer to use. For example, smart card authentication and bandwidth reduction are very useful features included as part of the RDP protocol.
RDP is also a great remote access protocol due to its flexibility in establishing connections between different platforms and OS options. Unlike its principal rival, the SSH protocol, it also establishes these connections using a graphical user interface, which makes it much more useful for use cases such as trading on forex with RDP and so on. RDP also has support for many different features, such as live chat and 128-bit encryption for mouse and keyboard data, in order to secure the connection even in the case of a potential breach. So these features can easily be made useful for different clients.
In general, the main use cases that you can employ with these features include establishing a connection in order to perform remote troubleshooting and repairs, establishing remote access to another computer, and of course, remote administration of large servers, as already mentioned.

Need a Remote Desktop?
Reliable, high-performance RDP servers with 99.95 uptime. Take your desktop on the go to all the major cities in the US, Europe, and Asia.
Get an RDP Server
What is CMD?
CMD is a simple acronym denoting the word Command. CMD is a tool within the Windows operating system that acts the same as Terminal in macOS, as well as Unix Shell in all the OS forms that fall under that umbrella. As the principal command interpreter of all Windows versions, it is commonly used in order to give commands to their computer in order to perform tasks and operations. CMD uses the command language and the implementation structure of the Win32 console. A user uses this console to put in command lines and perform the task that they want without manually navigating through the Windows GUI itself.
This is useful for getting tasks done fast, and some operations are not even represented as part of the base Windows GUI and, therefore, can only be performed through the CMD. This command processor shell is one of the oldest, most recognizable, and iconic command shells dating all the way back to 1987, and having command of how it works is incredibly useful. In order to enable RDP in CMD, you are going to need a beginner level of understanding about enabling remote desktop command line. But why open RDP from CMD in the first place?
Why Use CMD for RDP?
There are two main scenarios that could necessitate using CMD in order to operate the RDP terminal in Windows 10 or any other Windows version. The first scenario is when for whatever reason, the client cannot be navigated and opened using the normal options within the Windows GUI. There are several reasons for this happening. One could be a recent broken Windows update or operating on an outdated Windows version. Corrupted system files can also be the reason behind this. Fixing these issues, especially the latter one, can be time-consuming and, in some cases, could even require a fresh reinstall of your Windows. So instead, we bypass the GUI and use CMD to operate it.
The second scenario is when you do not want to directly use the RDP terminal, and you also do not want to use a third-party client. This will allow you to establish your own personal connection and use the features of the RDP connection based on your own personal preferences. This can be utilized both for administering servers via enabling and disabling features as well as on a remotely accessed computer. Knowing your way around the principal concepts of CMD is useful in general, and it does not hurt to also learn how to operate RDP using CMD.
Enable RDP in CMD: Step by Step Guide
Now we are going to use the enabled remote desktop Windows 10 command line in order to activate the Windows RDP terminal and access it without navigating to the Terminal itself from Windows. This guide will be step-by-step and easy to follow. If at any point you need further details on how to do it, you can get assistance by following the pictures.
Note: This guide is viable for all versions of Windows from Windows 98 onwards to Windows 11. With slight variations on how to launch CMD and items like that. You can still use these commands to enable RDP on all versions. Since Windows 10 has the most users right now, we will enable RDP on windows 10 and the pictures will correspond to that version.
Step 1: Make Sure You Have Admin Access
First things first, you need to make sure the account that you currently are logged in on your version of Windows is an Administrator account. This is vital for launching CMD with the required privileges. You can access information on your account by navigating to the Control Panel and then to the User Accounts Section. If the account does not have the Administrator role beneath it, you need to make it admin or create an admin account on that version of Windows.
Step 2: Launch CMD With Admin Privileges
On your desktop, hover over the bottom left corner to bring up the panel and the search bar. They simply type in “CMD,” right-click on the program and then click on the run as administrator. A prompt will then appear, which you will have to click yes on.

Step 3: Enable RDP in CMD with the Command Line
Next, you will see the black Win32 Console; simply enter the following command. This command will adjust the local machine section of your Windows registry and enable RDP once again.
reg add "HKEY_LOCAL_MACHINE\SYSTEM\CurrentControlSet\Control\Terminal Server" /v fDenyTSConnections /t REG_DWORD /d 0 /f
Next, enter this second command to finalize the activation:
netsh advfirewall firewall set rule group=" remote desktop" new enable=yes
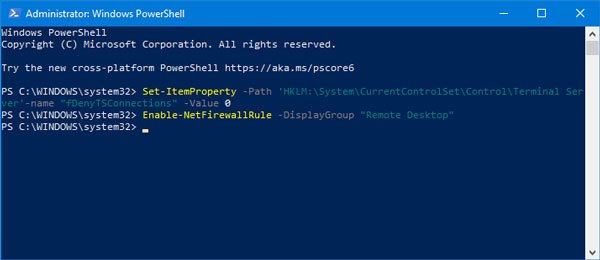
Step 4: Activate RDP in PowerShell

Now there’s a low chance that RDP is not fully activated, so you need to also activate it using Windows Powershell. Navigate to the Windows Panel once again and type in “Powershell,” and right-click and launch it as administrator.
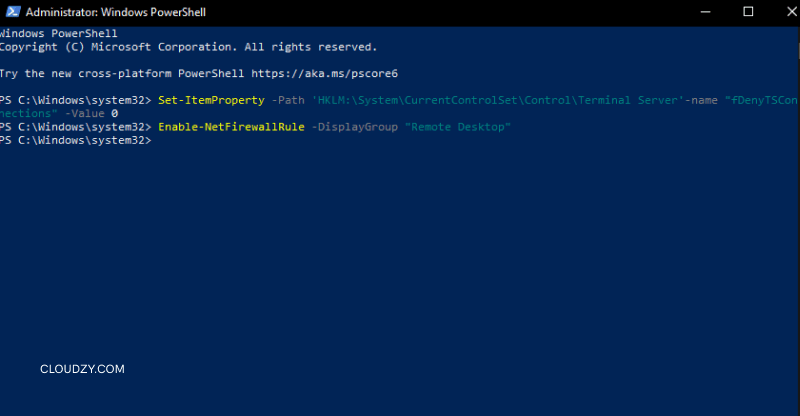
Then enter the following command:
Set-ItemProperty -Path 'HKLM:\System\CurrentControlSet\Control\Terminal Server'-name "fDenyTSConnections" -Value 0
Step 5: Configure Firewall in PowerShell
Now you need to make an exception for RDP ports via PowerShell in order to make sure that the firewall will not attempt to shut the RDP connection down. Enter the following commands into the PowerShell:
Enable-NetFirewallRule -DisplayGroup "Remote Desktop"
You have now set the rules in the firewall, and RDP will work as intended.
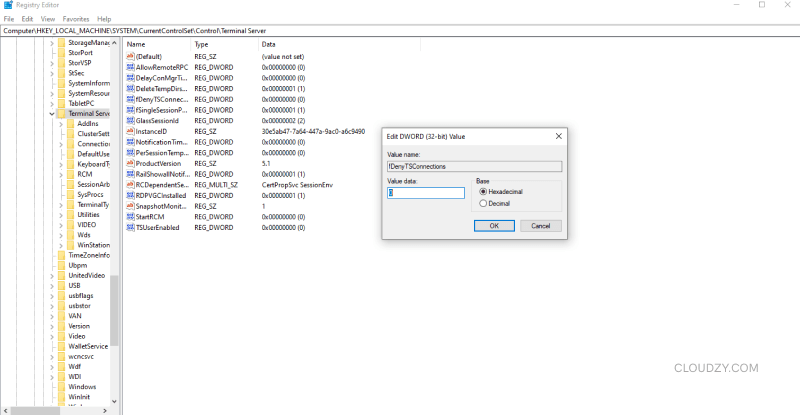
Step 6: Confirm the RDP Activation
Just to make sure that we have done everything correctly, we can quickly go for a confirmation process if you have managed to enable RDP in CMD. Navigate to the Windows registry and navigate to the following address:
HKEY_LOCAL_MACHINE\SYSTEM\CurrentControlSet\Control\Terminal Server
HKEY_LOCAL_MACHINE\SOFTWARE\Policies\Microsoft\Windows NT\Terminal Services
Click on the fDenyTSConnections file and see if the value is set at 0 or at 1. If it is 0, it is active, and if it is 1, it is not.
How to Disable RDP in CMD?
It is also useful to learn the reverse scenario of how to enable RDP with CMD. The main reason to disable RDP with CMD would be if you have no use of RDP at all and, therefore, you seek to make it disabled to prevent a potential security breach.
Step 1: Change the Value
Open the CMD with admin privileges again and enter the following command in order to turn the fDenyTSConnections value back to 1:
reg add "HKLM\SYSTEM\CurrentControlSet\Control\Terminal Server" /v fDenyTSConnections /t REG_DWORD /d 1 /f
Step 2: Reconfigure the Firewall
Then launch the PowerShell with admin privileges and remove the rules you added before from the firewall with these two commands in order to completely block it:
netsh advfirewall firewall set rule group=" remote desktop" new enable=No
Disable-NetFirewallRule -DisplayGroup "Remote Desktop"
Now the RDP service is again disabled, and you won’t have to worry about any threat from RDP.
Conclusion
Once you have mastered how to disable and enable remote desktop CMD, chances are you want to establish an RDP connection of your own. If this connection is on a system-to-system basis, then no servers are needed. But if you want to establish a shared or dedicated server with your own management, then you will need a configurable and scalable RDP server. Cloudzy is here to help you out. Cloudzy offers highly scalable, configurable and reliable RDP VPS Server with excellent connection, low latency, 15 different server locations, and data centers, as well as ironclad security featuring anti-DDoS protocols and protection. Get your own for as low as $7.95 per month, with flexible billing, many payment options, and a 7-day money-back guarantee as the cherry on top.
FAQ
Why Should I Enable RDP in CMD?
The registry or another aspect of accessing RDP from normal means in your computer may be disabled, and a quick workaround would be to quickly use CMD and Powershell in order to execute commands and efficiently operate, enable and disable RDP.
Can I Change my RDP Port?
Yes. You can do so by altering the files in the Windows registry. However, be really careful with the alternate port you use, as it can easily be used against you by malicious online hackers.
Should I Use an RDP Software?
This largely depends on whether you need a simple, bare-bones connection or if you want additional features and options. If the latter is true, programs like Zoho Assist and TeamViewer will be really helpful.
-
Home
-
Partition Magic
- How to Enable Remote Desktop Windows 10 via CMD and PowerShell
By Vicky |
Last Updated
Is Remote Desktop free? Is it secure? How do you know if Remote Desktop is enabled? In this post, MiniTool answers all the above questions. Furthermore, MiniTool also shows you how to enable this feature via Command Prompt and Windows PowerShell.
Windows 10 Remote Desktop
Remote Desktop is a feature that you can use to connect two computers or other devices so that you can access another computer remotely. With this feature, you can control other’s computer as if you have local access to the system in which you can move the mouse cursor, open programs, transfer files, and so on.
The Remote Desktop feature is quite useful if you run into some computer issues and you can ask help for your friends or other people to perform troubleshooting on your system without letting them visit your place.
But there is a pithy that this feature is unavailable on Windows 10 Home, but you can find it on Windows 10 Pro and Enterprise editions.
Is Remote Desktop Free and Secure?
The good news is that Microsoft asks for no charge of this feature. In terms of security, it can be said that the Remote Desktop feature offered by Microsoft is a perfectly viable option if you want to access other’s computer.
How to Know if Remote Desktop Is Enabled?
To check whether the Remote Desktop is enabled, you just need to complete the following steps.
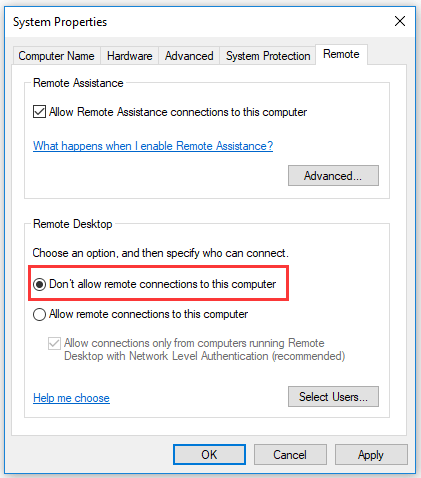
Step 1: Right-click This PC or My Computer on your desktop and then select Properties from the menu.
Step 2: On the Properties window, click Remote settings on the left pane.
Step 3: Under the Remote tab, see if the box next to Don’t allow connections to this computer is checked to check if the Remote Desktop feature is enabled.
How to Enable Remote Desktop Windows 10?
If your Remote Desktop is not enabled on Windows 10, you can enable it now. You can enable this feature via Windows Settings, but some users ran into Windows Setting not working. So, in this post, I would like to show you how to enable Remote Desktop in two different ways, namely using Command Prompt and Windows PowerShell.
Enable Remote Desktop via Command Prompt
Step 1: Run Command Prompt as administrator.
- Type Command Prompt on the Cortana’s search bar.
- Right-click the result and then select Run as administrator.
Step 2: Type the following command on the Command Prompt window and then hit the Enter to run this command.
reg add “HKLMSYSTEMCurrentControlSetControlTerminal Server” /v fDenyTSConnections /t REG_DWORD /d 0 /f
Step 3: When the above command has been executed, you need to run another command and hit Enter to execute it. This command will add and update rules in the Firewall and after that, you can use Remote Desktop.
netsh advfirewall firewall set rule group=”remote desktop” new enable=yes
Enable Remote Desktop via Windows PowerShell
Step 1: Run Windows PowerShell as administrator.
- Type Windows PowerShell on the Cortana’s search bar.
- Right-click the result and then select Run as administrator.
Step 2: Type the following command and then hit the Enter key to run it.
Set-ItemProperty -Path ‘HKLM:SystemCurrentControlSetControlTerminal Server’-name “fDenyTSConnections” -Value 0
Step 3: Type another key and hit Enter.
Enable-NetFirewallRule -DisplayGroup “Remote Desktop”
If you want to disable the Remote Desktop feature on Windows 10, you can also run the following commands in Command Prompt and Windows PowerShell. Please do not forget to hit the Enter key after typing each command.
Disable Remote Desktop via Command Desktop:
- reg add “HKLMSYSTEMCurrentControlSetControlTerminal Server” /v fDenyTSConnections /t REG_DWORD /d 1 /f
- netsh advfirewall firewall set rule group=”remote desktop” new enable=No
Disable Remote Desktop via Windows PowerShell:
- Set-ItemProperty -Path ‘HKLM:SystemCurrentControlSetControlTerminal Server’-name “fDenyTSConnections” -Value 1
- Disable-NetFirewallRule -DisplayGroup “Remote Desktop”
About The Author
Position: Columnist
Vicky is a website editor who has been writing tech articles since she was graduated from university. Most of her articles talk about Windows PC and hard disk issues. Some of her articles also touch on YouTube usage and issues.
During her spare time, she likes to spend time reading, watching videos, and sitting on her Yoga mat to relax.
If you want to use the Remote Desktop feature without opening the Windows Settings panel, then you can enable Remote Desktop using Command Prompt or Windows PowerShell. If you have a remote desktop client on your mobile or another computer, you will be able to connect it and use your PC remotely.
Remote Desktop is a well-known facility for Windows 11/10 computers that lets you connect two computers or mobile so that an individual can access another computer remotely. You can fix some problems on the computer via mobile or do other jobs according to your requirements. You need a Remote Desktop client like Microsoft Remote Desktop or so on your mobile to connect two devices.
It is possible to enable to disable Remote Desktop via Windows Settings. You need to head to System > Remote Desktop to access the option. However, let’s assume that the Windows Settings panel is not opening due to some reasons, and you need to turn on the Remote Desktop feature. Then you can use this method to start the Remote Desktop using the command line.
To enable Remote Desktop using Command Prompt and Windows PowerShell, follow these steps-
- Open Command Prompt or PowerShell with administrator privilege
- Set value of fDenyTSConnections REG DWORD to 0
- Add a Firewall rule
- Restart your computer
- Start using Remote Desktop in Windows 10.
The commands are not the same for Command Prompt and Windows PowerShell.
1] Enable RDP firewall using Command Prompt

To get started, open the Command Prompt with administrator privilege. You can search for it in the Taskbar search box, and click the Run as administrator option that appears on your screen. After that, enter this following command and hit Enter:
reg add "HKLM\SYSTEM\CurrentControlSet\Control\Terminal Server" /v fDenyTSConnections /t REG_DWORD /d 0 /f
By default, the value of fDenyTSConnections is set to 1. This command will change the value to 0.
Next, execute the following command:
netsh advfirewall firewall set rule group="remote desktop" new enable=yes
This command will add and update three rules in the Firewall so that you can start using the Remote Desktop.
2] Enable RDP using Windows PowerShell
You need to open the Windows PowerShell with administrator privilege and enter the following command and hit Enter:
Set-ItemProperty -Path 'HKLM:\System\CurrentControlSet\Control\Terminal Server'-name "fDenyTSConnections" -Value 0
This command will change the fDenyTSConnections value to 0. Now, you need to execute the following command to add rules in the Firewall:
Enable-NetFirewallRule -DisplayGroup "Remote Desktop"
After that, you will be able to use Remote Desktop in Windows 10.
In case you want to disable Remote Desktop using Command Prompt and Windows PowerShell, you need to enter these steps.
Related: Remote Desktop option is greyed out.
Disable Remote Desktop using Command Prompt or PowerShell
To disable Remote Desktop using Command Prompt and Windows PowerShell, follow these steps-
- Open Command Prompt or PowerShell with administrator privilege
- Set value of fDenyTSConnections REG DWORD as 1
- Add a Firewall rule
- Restart computer.
To know more, you need to read on.
Disable Remote Desktop using Command Prompt
You need to set the default value of fDenyTSConnections as 1. For that, use this command-
reg add "HKLM\SYSTEM\CurrentControlSet\Control\Terminal Server" /v fDenyTSConnections /t REG_DWORD /d 1 /f
Now you need to remove rules from the Firewall. For that, use this command-
netsh advfirewall firewall set rule group="remote desktop" new enable=No
Disable Remote Desktop using PowerShell
You need to change the value of fDenyTSConnections as 1. You can do that by using this command-
Set-ItemProperty -Path 'HKLM:\System\CurrentControlSet\Control\Terminal Server'-name "fDenyTSConnections" -Value 1
The second command will let you remove the rules from the Firewall:
Disable-NetFirewallRule -DisplayGroup "Remote Desktop"
How do I know if RDP is enabled or not?
If you want to know the status of the RDP protocol on your Windows 11/10 system, then open the Registry Editor. After that, access the Terminal Services and Terminal Server Registry keys. There, look for the fDenyTSConnections DWORD (32-bit) Value. If the value data of this value is set to 0, then RDP is enabled. If it is set to 1, then RDP is disabled.
How to restart the RDP service using PowerShell?
If you want to restart the Remote Desktop Services using PowerShell, then first open the Windows PowerShell as administrator. After that, execute the command given below:
Restart-Service -Force -DisplayName "Remote Desktop Services"
You can also use the following command to restart the RDP service:
Restart-Service -Force -Name "TermService"
That’s all! I hope this simple tutorial will be helpful for you.