В версиях Windows, отличных от Professional (например Windows 10 Home) отсутствует раздел «Локальные пользователи и группы» в оснастке «Управление компьютером». Однако иногда возникает необходимость создать/удалить/изменить ещё одного пользователя в данной операционной системе. Разберём, как это сделать.
Самым простым вариантом создать пользователя в не-Pro редакциях Windows – через командную строку.
Открытие командной строки
Для следующих манипуляций необходимо запустить командную строку от имени администратора.
Открыть командную строку можно несколькими способами:
-
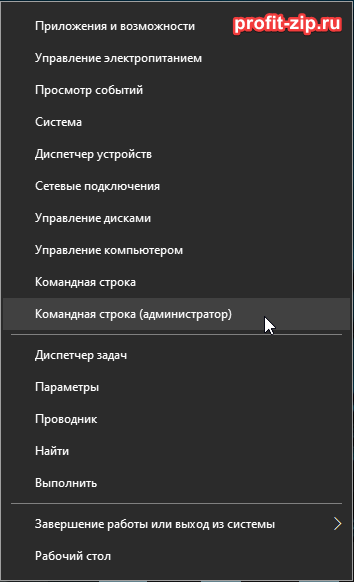
Для версий Windows 8-11
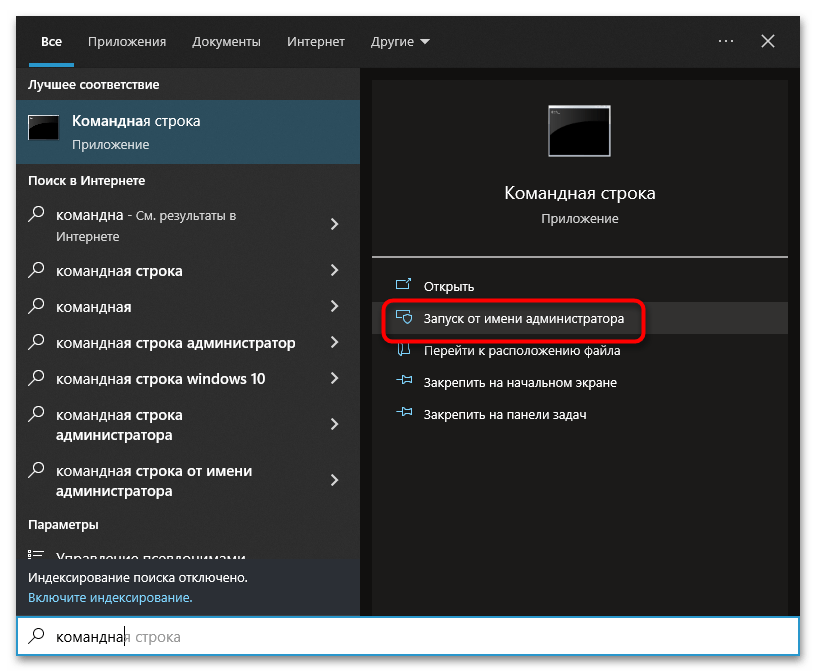
Нажмите по кнопке «Пуск» правой кнопкой мыши и выберите «Командная строка (администратор)», «Powershell (администратор)» или «Терминал (администратор»).
При появлении диалога UAC – согласитесь на запуск.

-
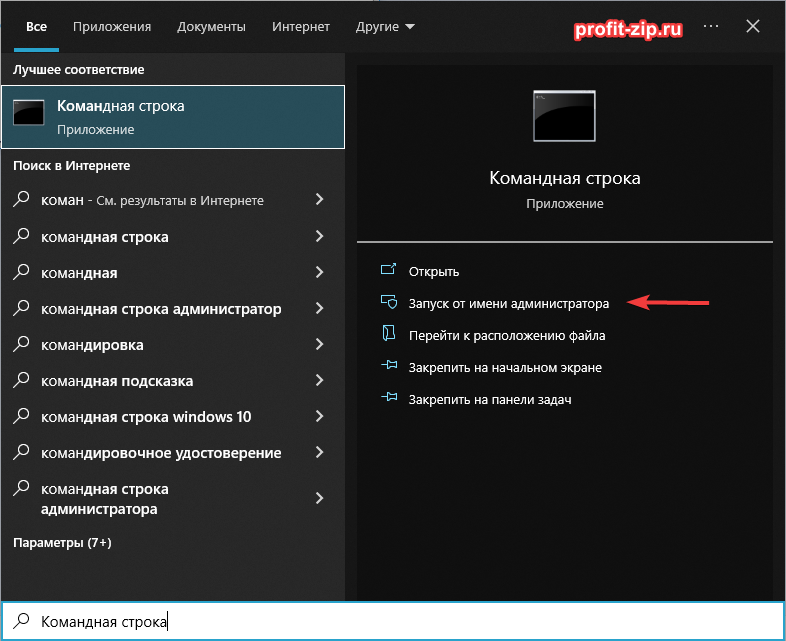
Для всех версий Windows
Найдите «Командная строка» в списке программ в меню «Пуск» или через Поиск среди приложений. Нажмите правой кнопкой мыши по приложению «Командная строка» и/или в контекстном меню выберите «Запуск от имени администратора».
-
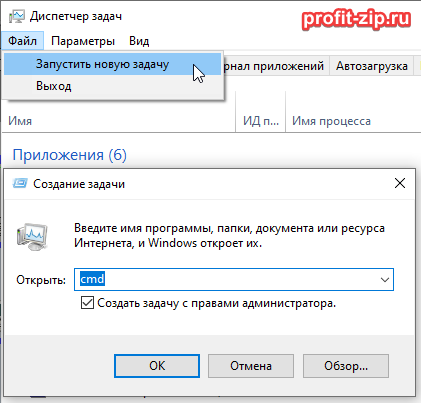
Для всех версий, через Диспетчер задач
Запустите Диспетчер задач. Сверху нажмите Файл – Запустить новую задачу.
В появившемся окне «Создание задачи» введите напротив поля «Открыть» –cmd, установите галочку «Создать задачу с правами администратора» и нажмите «ОК»
Команды управления пользователями через CMD
Заполните данные и команды изменятся автоматически:
- Создать пользователя:
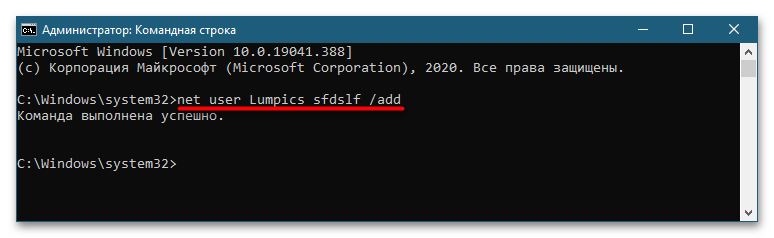
net user "Пользователь" /add
- Создать пользователя с установленным паролем:
net user "Пользователь" "Пароль" /add
- Удалить пользователя:
net user "Пользователь" /delete
- Отключить пользователя:
net user "Пользователь" /active:no
/active:yes – включает пользователя.
Отключенный пользователь остаётся стандартным пользователем системы, но действия от его имени становятся недоступны. Авторизоваться от имени отключенного пользователя также нельзя. - Изменить пароль уже существующего пользователя:
net user "Пользователь" "Пароль"
- Отключить обязательную смену/установку пароля при первом входе пользователя:
net user "Пользователь" /passwordreq:no
/passwordreq:yes – включает обязательную смену/установку пароля.
- Установить срок действия пароля пользователя – неограниченным (убрать срок действия пароля):
wmic useraccount where name="Пользователь" set passwordexpires=false
set passwordexpires=true – включает ограничение срока действия пароля
- Изменить срок действия пароля:
net accounts /maxpwage:30
Вместо 30 – количество дней. Применяется ко всем пользователям системы, у которых срок действия пароля – НЕ неограничен.
Значение по умолчанию – 42 дня, максимальное – 999 дней. - Запретить смену пароля пользователем:
net user "Пользователь" /passwordchg:no
/passwordchg:yes – разрешить смену пароля пользователем
- Добавить пользователя в локальную группу:
net localgroup "Администраторы" "Пользователь" /add
- Удалить пользователя из локальной группы:
net localgroup "Администраторы" "Пользователь" /delete
- Установить рабочее время учётной записи:
net user "Пользователь" /times:X
/times:X – отвечает за установку времени, в которое учётной записью можно пользоваться.
X может принимать значения вида:
Дни_недели, диапазон_времениилиДни_недели, диапазон_времени; Дни_недели, диапазон_времени
Дни недели принимают следующие значения и указываются через символ «дефис» ( — ):- M – понедельник
- T – вторник
- W – среда
- Th – четверг
- F – пятница
- Sa – суббота
- Su – воскресенье
Время может быть в формате
8:00-17:00или8am-17pmКроме того, можно перечислять несколько интервалов через точку с запятой ( ; )
Пример:
M-F,8:00-17:00– учетная запись будет доступна с понедельника по пятницу, с 8:00 до 17:00M-F,8:00-17:00;Sa,8:00-12:00– учетная запись будет доступна с понедельника по пятницу, с 8:00 до 17:00, а также в субботу с 8:00 до 12:00M-F,8:00-17:00;Sa,8:00-15:00;Su,8:00-12:00– учетная запись будет доступна с понедельника по пятницу с 8:00 до 17:00, в субботу с 8:00 до 15:00, в воскресенье – с 8:00 до 12:00M-F,8:00-12:00;M-F,13:00-17:00– учетная запись будет доступна с понедельника по пятницу, с 8:00 до 12:00 и с 13:00 до 17:00 (стандартная рабочая неделя, исключая обеденное время)
Несколько деталей
При создании пользователя, каталог пользователя (по умолчанию C:\Users\Username) не создаётся. Каталог создастся в момент первого входа пользователя в систему.
Создать пользователя с именем уже существующего пользователя нельзя.
При удалении пользователя, каталог удаляемого пользователя не удалится. Все файлы пользователя останутся доступны в каталоге пользователей.
При создании пользователя с именем уже существовавшего ранее пользователя (при условии, что папка удалённого пользователя не удалена), папка пользователя приобретёт название вида Username.PCname (где Username – имя пользователя, а PCname – имя компьютера), а если такая уже существует – название каталога будет иметь вид Username.PCname.000 (где Username – имя пользователя, PCname – имя компьютера, а 000 – порядковый номер папки)
Имя пользователя, пароль и названия групп пользователей, по хорошему, должны обрамляться в кавычки (например: ««Пользователь»»), однако не запрещается ими не пользоваться, но только при условии, что в выражении нет пробелов. В случае, если в имени пользователя, пароле или названии группы пользователей присутствует пробел, использование кавычек обязательно, т.к. иначе команды могут сработать неправильно или не сработать вовсе.
 В этой инструкции для начинающих о том, как создать нового пользователя Windows 10 несколькими способами, как сделать его администратором или наоборот, создать ограниченную учетную запись пользователя компьютера или ноутбука. Также может пригодиться: Как удалить пользователя Windows 10.
В Windows 10 присутствуют два типа учетных записей — учетные записи Майкрософт (требующие адреса электронной почты и синхронизирующие параметры онлайн) и локальные учетные записи пользователей, не отличающиеся от тех, которые могут быть вам привычны по ранним версиям Windows. При этом одну учетную запись всегда можно «превратить» в другую (например, Как удалить учетную запись Майкрософт). В статье будут рассмотрено создание пользователей с обоими типами учетных записей. Также может быть полезным: Как сделать пользователя администратором в Windows 10.
- Создание нового пользователя в Параметрах Windows 10
- Как создать пользователя в командной строке
- Локальные пользователи и группы Windows 10
- Добавление пользователя в control userpasswords2
- Видео инструкция
Создание пользователя в параметрах Windows 10
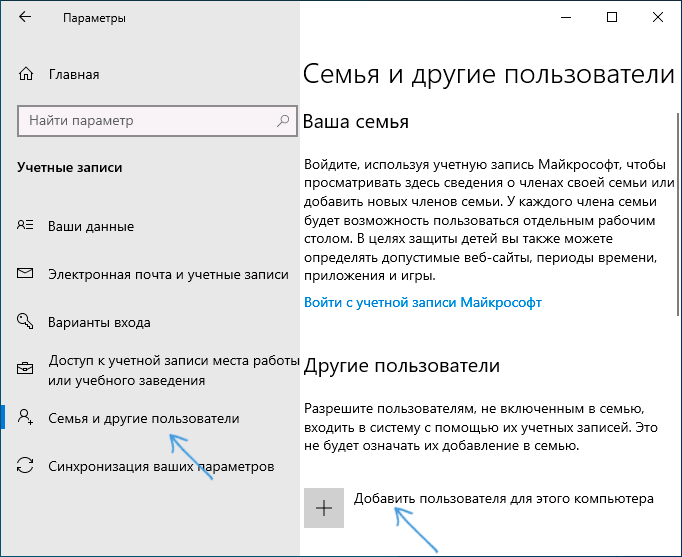
Основной способ создания нового пользователя в Windows 10 — использование пункта «Учетные записи» нового интерфейса настроек, доступного в «Пуск» — «Параметры». В указанном пункте настроек откройте раздел «Семья и другие пользователи».
- В разделе «Ваша семья» вы сможете (при условии, что используете учетную запись Майкрософт) создать учетные записи для членов семьи (также синхронизируемые с Майкрософт), подробнее о таких пользователях я писал в инструкции Родительский контроль Windows 10.
- Ниже, в разделе «Другие пользователи» можно добавить «простого» нового пользователя или администратора, учетная запись которого не будет контролироваться и являться «членом семьи», можно использовать как учетные записи Майкрософт, так и локальные учетные записи. Этот вариант будет рассматриваться далее.
Для создания нового пользователя, не входящего в семью и без возможностей родительского контроля, выполните следующие шаги:
- В разделе «Другие пользователи» нажмите «Добавить пользователя для этого компьютера».

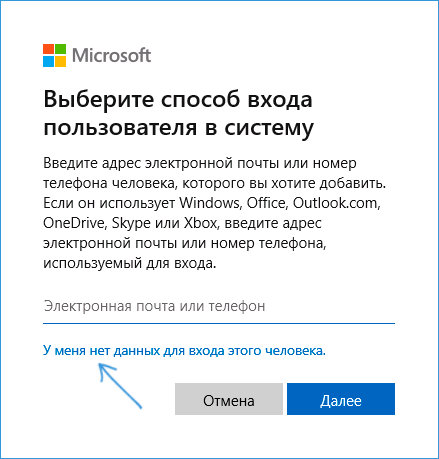
- В следующем окне вам будет предложено указать адрес электронной почты или номер телефона — введите их, при условии, что вы хотите добавить пользователя с уже существующей учетной записью Майкрософт.
- Если вы собираетесь создавать локальную учетную запись (или даже учетную запись Майкрософт, но пока не зарегистрировали e-mail для нее), нажмите «У меня нет данных для входа этого человека» внизу окна.

- В следующем окне будет предложено создать учетную запись Майкрософт. Вы можете заполнить все поля для создания пользователя с такой учетной записью или нажать «Добавить пользователя без учетной записи Майкрософт» внизу.

- В следующем окне останется ввести имя пользователя, пароль (если требуется пользователь без пароля, просто не вводите ничего в соответствующие поля), подсказку для пароля и указать вопросы для восстановления пароля, на случай, если он будет забыт. Этого достаточно, чтобы новый пользователь Windows 10 появился в системе и под его учетной записью был возможен вход.


По умолчанию, новый пользователь имеет права «обычного пользователя». Если нужно сделать его администратором компьютера, выполните следующие шаги (при этом, вы для этого также должны быть администратором):
- Зайдите в Параметры — Учетные записи — Семья и другие пользователи.
- В разделе «Другие пользователи» нажмите по пользователю, которого нужно сделать администратором и кнопку «Изменить тип учетной записи».
- В списке выберите «Администратор» и нажмите Ок.


Войти под новым пользователем можно, нажав по имени текущего пользователя вверху меню пуск или с экрана блокировки, предварительно выйдя из текущей учетной записи.

Как создать нового пользователя в командной строке
Для того, чтобы создать пользователя с помощью командной строки Windows 10, запустите ее от имени администратора (например, через меню правого клика по кнопке «Пуск»), после чего введите команду (если имя пользователя содержит пробелы, используйте кавычки, пароль брать в кавычки не нужно):
net user имя_пользователя пароль /add
И нажмите Enter.
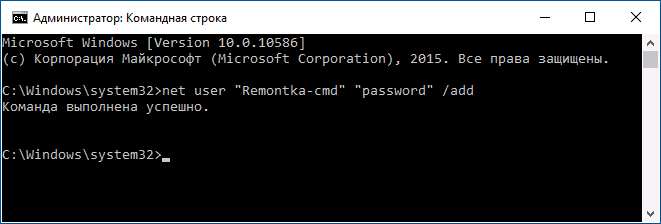
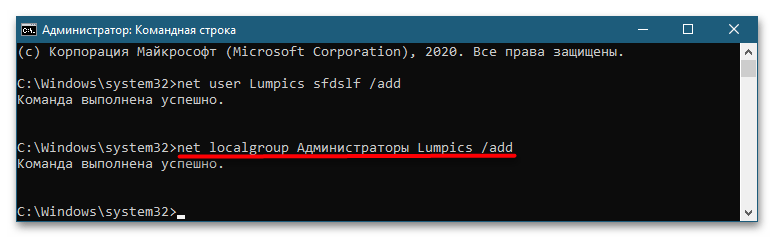
После успешного выполнения команды, в системе появится новый пользователь. Также вы можете сделать его администратором, используя следующую команду (если команда не сработала, а у вас не лицензия Windows 10, попробуйте вместо Администраторы писать administrators):
net localgroup Администраторы имя_пользователя /add
Вновь созданный таким образом пользователь будет иметь локальную учетную запись на компьютере.
Создание пользователя в «Локальные пользователи и группы» Windows 10
И еще один способ создания локальной учетной записи с помощью элемента управления «Локальные пользователи и группы»:
- Нажмите клавиши Win+R, введите lusrmgr.msc в окно «Выполнить» и нажмите Enter.
- Выберите «Пользователи», а затем в списке пользователей кликните правой кнопкой мыши и нажмите «Новый пользователь».

- Задайте параметры для нового пользователя.


Чтобы сделать созданного пользователя администратором, кликните по его имени правой кнопкой мыши, выберите пункт «Свойства». Затем, на вкладке «Членство в группах» нажмите кнопку «Добавить», наберите «Администраторы» и нажмите «Ок».
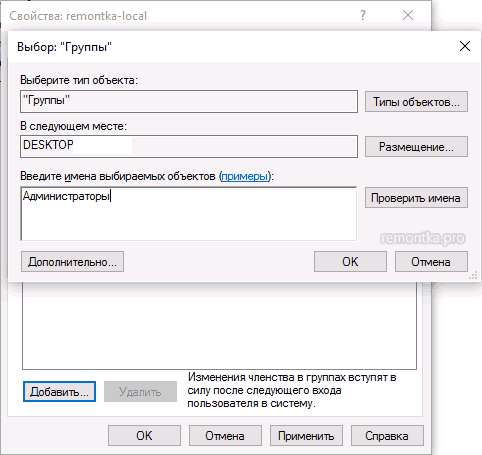
Готово, теперь выбранный пользователь Windows 10 будет иметь права администратора.
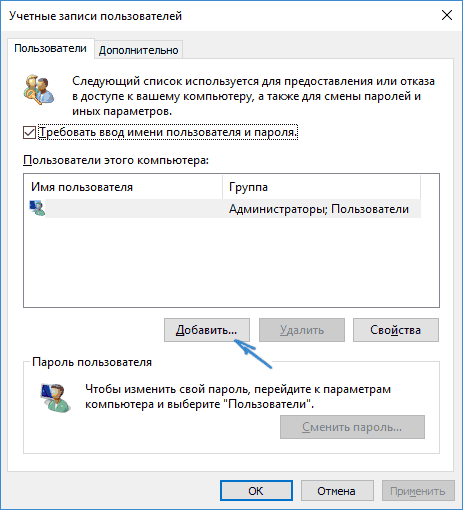
Добавление учетной записи в control userpasswords2
И еще один очень простой способ добавления новой учетной записи пользователя Windows 10:
- Нажмаем клавиши Win+R, вводим control userpasswords2

- В списке пользователей нажимаем кнопку добавления нового пользователя

- Дальнейшее добавление нового пользователя (доступны как учетная запись Майкрософт, так и локальная учетная запись) будет выглядеть тем же самым образом, что и в первом из описанных способов.


Видео инструкция
Если остались какие-либо вопросы или что-то не получается так просто, как это описано в инструкции — пишите, постараюсь помочь.

Способ 1: Классическая «Командная строка»
За создание и управление пользователями из оболочки «Командной строки» в Windows 10 отвечает консольная утилита net.exe, способная принимать порядка двадцати параметров. Чтобы создать с ее помощью пользователя, выполните следующие действия.
- Откройте «Командную строку» от имени администратора из поиска Windows или любым другим известным способом.
- Выполните команду
net user UserName Password /add, где UserName – имя пользователя, а Password – пароль. - В результате в системе будет создан новый пользователь с обычными правами. Если вы хотите сделать его администратором, выполните команду
net localgroup Администраторы UserName /add, где UserName — имя только что созданного пользователя.
В имени пользователя допускается использование кириллицы, а если имя содержит пробел, его следует заключить в двойные прямые кавычки. Наконец, чтобы Windows 10 создала для пользователя необходимые файлы, выйдите из текущей учетной записи и войдите в созданную.
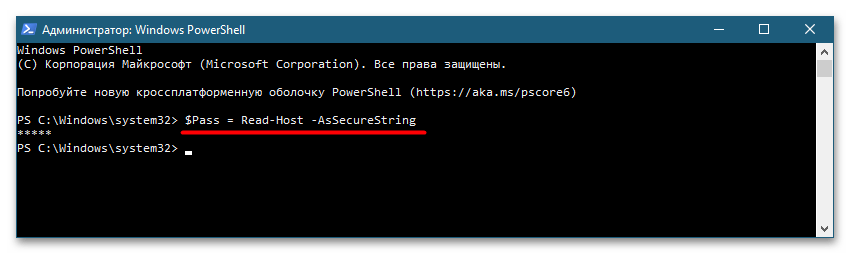
Способ 2: Консоль «PowerShell»
Расширяемое средство автоматизации «PowerShell» позиционируется как продвинутая версия классической «Командной строки». Укомплектованная интерфейсом «Командной строки», консоль «PowerShell» обладает более широкими возможностями, чем интерпретатор CMD. Естественно, в них входит и создание в системе новых пользователей.
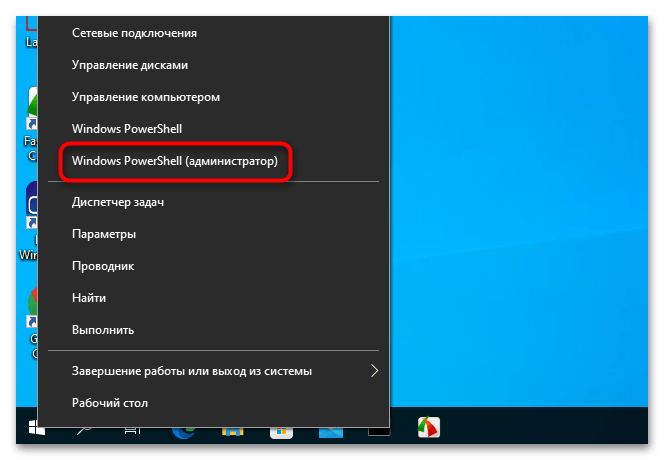
- Запустите «PowerShell» от имени администратора из контекстного меню кнопки «Пуск».
- Придумайте для создаваемого пользователя пароль и сохраните его во временную переменную pass, для чего выполните команду
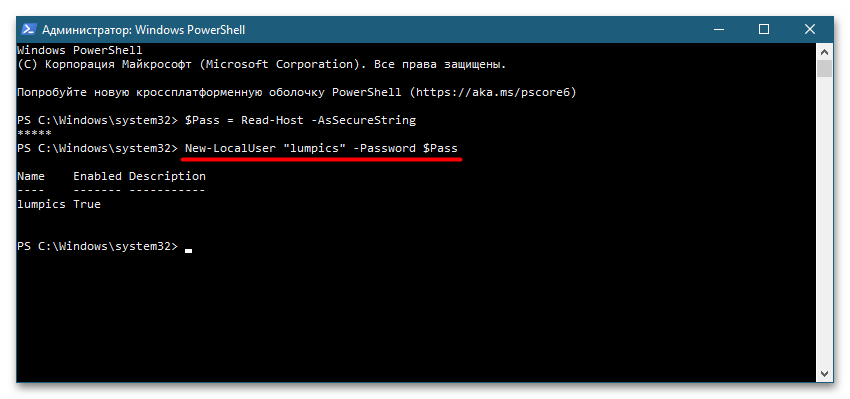
$Pass = Read-Host -AsSecureString, введите в новой строке пароль и нажмите клавишу ввода. - Теперь выполните команду создания нового пользователя
New-LocalUser "UserName" -Password $Pass, где UserName – имя пользователя. При желании можно добавить полное имя пользователя и описание учетной записи. В этом случае команда будет выглядеть так:New-LocalUser "UserName" -Password $Pass - FullName "полное имя" -Description "описание аккаунта". - Если в этом есть необходимость, можете добавить созданного пользователя в группу Администраторов. Для этого выполните команду
Add-LocalGroupMember -Group "Администраторы" -Member "UserName", заменив UserName именем пользователя.
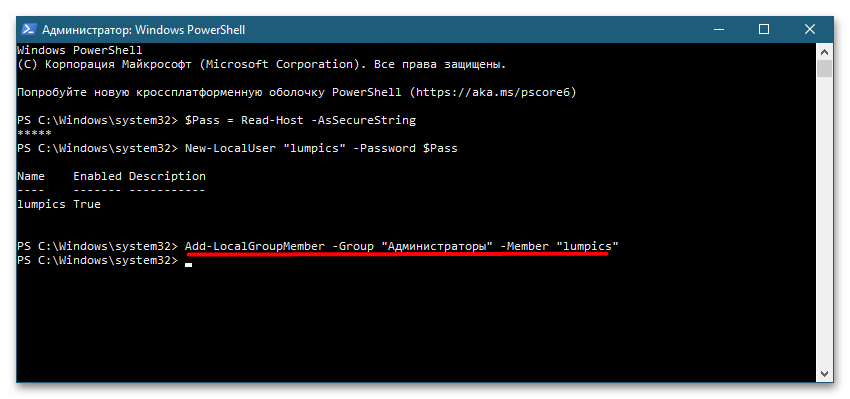
Готово, осталось только перезагрузить компьютер и зайти в новую учетную запись, чтобы Windows 10 создала для нее все необходимые файлы.
Еще статьи по данной теме:
Помогла ли Вам статья?
The Net User command is a Windows command-line utility that allows you to manage Windows server local user accounts or on a remote computer.
The command Net User allow you to create, delete, enable, or disable users on the system and set passwords for the net user accounts.
Windows administrators can perform add or modifications in domain user accounts using the net user command-line tool.
You can get net user account information, enable or disable a user account, sets the home directory path, set account expiration, and so on.

In this article, we will discuss how to use the net user command-line tool with examples to get user account information, domain account status, and password expiry date.
Net User Command Syntax
The basic syntax for the net user command is as follows:
net user [<UserName> {<Password> | *} [<Options>]] [/domain]
net user [<UserName> {<Password> | *} /add [<Options>] [/domain]]
net user [<UserName> [/delete] [/domain]]
Refer to the below most important net user command parameters:
| Parameter | Description |
|---|---|
| Username | Enable or disable the user account |
| Password | It specifies the user account name to add, modify, or display user account information |
| /domain | Perform the operation on the domain controller |
| /active:{no | yes} | Enable or disable user account |
| /comment | Provide descriptive comments for the user account |
| /expires | Specify the date to expire user account |
| net help | Display help for the net user command |
| <Options> | Specify command-line options |
Refer to the following table to know more about options used in net user command.
| Command-line option syntax | Description |
|---|---|
| /active:{no | yes} | Use this option to enable or disable a user account. The default value is yes (active). |
| /comment:”<Text>” | Use this to provide comments for the user account, max 48 characters, and should be enclosed in quotation marks. |
| /countrycode:<NNN> | /countrycode option is used to set the country code for the user account to display help or error messages in their language. The default value is 0, which means the computer’s default country/region code. |
| /expires:{{<MM/DD/YYYY> | <DD/MM/YYYY> | <mmm,dd,YYYY>} | never} | Use this option to specify the date for the user account to expire. If the expiration date is not specified, it will assume never expires. |
| /fullname:”<Name>” | Specify the user’s full name instead of username. |
| /homedir:<Path> | Use this option to set the path for the user’s home directory. |
| /passwordchg:{yes | no} | Use this to specify if the user can change their own password. The default value is yes. |
| /passwordreq:{yes | no} | It specifies if the user must have a password or not. The default is yes. |
| /profilepath:[<Path>] | Use this option to sets a path for the user’s logon profile. This path points to a registry profile. |
| /scriptpath:<Path> | Use this to set a path for the user’s logon script. <Path> should be relative. |
| /times:{<Day>[<-Day>][,<Day>[-<Day>]],<Time>[-<Time>][,<Time>[-<Time>]][;] | all} | It specifies the times that users are allowed to use the computer. |
| /usercomment:”<Text>” | It specifies that an administrator can add or change the “User comment” for the account. |
| /workstations:{<ComputerName>[,…] | *} | It lists as many as eight workstations from which a user can log on to the network. |
Net User – List All User Accounts
Use the Net User command and run it on the Windows command prompt without any parameter to list all user accounts on the local user account.
Open a command prompt to run the net user command below
net user
The above Windows net user command returns the list of all user accounts on the local computer.

You can also use the net users command without any parameters on the cmd to retrieve a list of all user accounts on your computer.
Run the command net user on the domain controller to get a list of all users on the domain.
net user
The output of the above command net user gets the domain username accounts.

You can also use the net user command-line tool to get user account information, modify a user account, and check when the password was last set.
Net User Account – Display User Account Information
Run the net user command in the command line to get user account information.
# Get the user account information for Toms user.
net user Toms
The above net user command uses the username to retrieve user details and display net user account information below
C:\>net user Toms
User name                    Toms
Full Name                    John Paul
Comment                      Built-in account for administering the computer/domain
User's comment
Country/region code          000 (System Default)
Account active               Yes
Account expires              Never

Password last set            7/29/2021 6:55:50 PM
Password expires             9/9/2021 6:55:50 PM
Password changeable          7/30/2021 6:55:50 PM
Password required            Yes
User may change password     Yes

Workstations allowed         All
Logon script
User profile
Home directory
Last logon                   8/2/2021 11:53:32 AM

Logon hours allowed          All

Local Group Memberships      *Administrators
Global Group memberships     *Domain Admins        *Group Policy Creator
                             *Schema Admins        *Domain Users
                             *Enterprise Admins
The command completed successfully.


C:\>
Cool Tip: How to get-aduser in the active directory using PowerShell!
Net User Add Account
To create a new local user account, use the /Add parameter and specify the desired username:
# Create a new user account on local computer with login name Teresa
net user /Add Teresa
To create a domain user account, add the /domain parameter and specify the username and password:
# Create a new user account on domain with login name Peter and password Shell@123
net user /Add /domain Peter Shell@123
The above command creates a user account on the domain with a username Peter and password as Shell@123 as plain text in the command line.
Another option to specify the password is using the * in the command after the username, it will show a prompt to enter the password.
net user /Add /domain Peter *
Net User Delete User Account
To delete a local user account, use the /delete parameter and specify the username, it will delete the user account. It doesn’t ask for confirmation before deleting a user account.
# Delete the user on the local computer
net user /delete Teresa
To delete a domain user account, add the /domain parameter and specify the username.
# Delete the domain user account
net user /delete /domain Peter
Net User Password Change for User Account
If you want to change a user password using the command line, use the net user command-line tool to set the password.
The syntax for the command net user to set a password for a user account is given below:
net user userid password
Let’s consider an example to reset the password for user account GaryW on the local computer, run the below command
net user garyw Test@123
In the above net user command, garyw is a user account id and Test@123 is a password that is used with the command to set the password for the user account on the local computer.
The output of the above command as below

Note: Run Windows command prompt using administrator account privileges else it will display “System error 5 has occurred. Access is denied“
There is an alternative and secure way to change the user password using the net user cmd tool as below
C:\>net user garyw *
Type a password for the user:
Retype the password to confirm:
The command completed successfully.
In the command, use * after the user name and hit enter.
It will prompt you to type the password for the user: and retype the password to confirm.
While typing a password, it won’t display password text on the command line.
Cool Tip: How to get-aduser password expiration date in PowerShell!
Net User /domain – change domain user account password
Using the net user Windows command-line tool, you can set the password for the domain user account.
The syntax for the command net user to set the password for the domain user account is:
net user username /domainRun the following command to reset the domain user account password
net user garyw * /domain
In the above command, the net user command takes the user id as input, * indicates to prompt for the password. /domain specifies to perform domain account password change operation.
The output of the above net user /domain password change as below

Cool Tip: How to use the Get-AdUser cmdlet to manage Active Directory Use Account!
Net User Disable Account
To disable or lock a domain account using the net user command-line tool, use the /Active:No and /domain parameters and specify the username:
# Disable the user account on domain
net user garyw /Active:No /domain
The above net user command disables the user account or locks the domain user account specified using the user name and /Active set to No in the net user /domain command.
Run the command net user garyw /domain to check the user’s account status, it displays Account active : No
C:\>net user garyw /domain
User name                    garyw
Full Name                    Gary Willy
Comment
User's comment
Country/region code          000 (System Default)
Account active               No
Account expires              Never
To disable a local user account, use the /Active:No parameter:
# Disable local user account
net user testadmin /Active:No
Cool Tip: How to find a disabled aduser using PowerShell!
Net User to Enable Domain Account
To enable or unlock the domain user account using the net user command, use the /Active:Yes and /domain parameters and specify the username:
# Enables domain user account
net user garyw /Active:Yes /domain
net user /domain command using /Active option set to Yes enables user account.
To enable a local user account, use the /Active:Yes parameter and specify the username:
net user testadmin /Active:Yes
Net User User Password Policy
If you want users to restrict them to change their domain account password or allow domain account user to change their password, use the /Passwordchg:No parameter and specify the username:
net user garyw /Passwordchg:No
In the above net user command, /Passwordchg:No prevents the user from changing the password.
To allow users to change the password, use the /Passwordchg:Yes and specify the username:
net user garyw /Passwordchg:Yes
The above command, /Passwordchg:Yes allows the user to change their password.
Cool Tip: How to find active directory groups I m in using PowerShell!
Net User to Find User Full Name
You can use the net user command-line tool to find the user’s full name in the domain using the Find /i parameter and specify the “full name” :
net user garyw /domain | Find /i "full name"
The above command finds the full name of the user in the domain, it uses the username /domain to find the user account in the domain and pipes the result to get the full name.
C:\Windows\system32>net user garyw /domain | Find /i "full name"
Full Name                    Gary Willy
Set Home Directory Path For User
Use the net user command-line tool to set a home directory path for a new user or existing user using the homedir option as below
Set the home directory path for the new user:
# Set the home directory path for user adams
net user adams /domain /add /homedir:C:\users\adams
In the above command, the net user creates a new user with the name adams in the domain and set up the home directory path for the user to C:\users\adams
You can set up a home directory for the existing user as below
# Set the home directory path for existing user garyw
net user garyw /domain /homedir:C:\users\garyw
In the above command, it set up the home directory path for the existing user in the domain using the net user command and homdir option.
Cool Tip: How to unlock the ad account in the active directory using PowerShell!
Set Expiry date for User Account on Local and Domain
The expiration date for the user account has been good practice for organizations to manage security and resource management.
Using the net user command, you can easily set an expiry date for the user account on the local computer or domain user account.
To set up an expiry date for user accounts on the local computer or a Windows 11 user account, use the /expires parameter and specify the date in MM/DD/YYYY format:
# Set expire date for local user account
Net User devadmin /expires:03/05/2023
In the above command, the net user command takes the username as the input parameter and uses /expires option to set up the expiry date for the user account on the local computer.
If you want to set up an expiry date for the user account on the domain controller, run the following command.
# Set expire date for domain user account
Net User Toms /domain /expires:09/20/2022
In the above command, the net user takes the user name and uses /domain to set up an expiry date in the domain using /expires option.
Set Login Times for User Account
Using the net user command, you can set log in times for the user account to allow them to be used within specific hours only. Use the /time parameter followed by the allowed login times.
Run the following command to set login times for the user account on the local computer.
# Set login time to allow user login in specific duration
Net User Toms /time:M-F,07:00-16:00
In the above command, the net user command takes the user name to set up login time for the account to allow login between 7 am to 4 pm on Monday-Friday only.
For domain user accounts, add the /domain parameter:
# Set login time to allow user login in specific duration on the domain
Net User garyw /time:M-F,07:00-16:00 /domain
Net User Command Examples and FAQ
How to reset the user password using the net user command?
Open the Windows command prompt with Administrator privileges and run the following command to reset the password for a user account.
net user userid newpassword
How to use the net user command?
The net user is a command-line tool to manage user accounts on local and domain controllers. To use the net user command, open the command prompt and type the net user command, it will list all user accounts.
net user
How to check domain user details in cmd?
Use the net user command to view the user account details on the domain. The syntax to check user account information is:
net user userid
How to use the net user command to see when the password expires?
If you run net user userid on cmd terminal, it retrieves user information that includes the property “Password expires“. Use this property to see the user account password expiry date.
How to use the net user command to check the last login of the user?
To check the last login of the user on the domain using the net user command, run the command prompt and run the below command.
net user Toms /domain | Findstr "Last"
It returns the Last Login date for the user account on the domain.
How to use the net user command to set a password never expires using the command line?
To set the password never expires on the user account using the net user command in the cmd terminal, run the following command.
WMIC useraccount where Name='username' set PasswordExpires=FALSE
For example, to set the administrator password never expires using the net user command,
net user administrator |findstr /C:expires
Returns the output as
Account expires Never
Password expires 2/26/2023 4:10:20 PM
Run the WMIC command to set the PasswordExpires property for the administrator account to false.
WMIC useraccount where Name='administrator' SET PasswordExpires=FALSE
The above command line tool set up the administrator password never set to expire.
Conclusion
I hope the above article on the net user command line tool in the Windows system helps you to understand how to manage net user accounts using the command line.
net user without any option gets all the user accounts on the computer. You can also use the net users command to manage the user accounts on the local and domain controller.
You can find more topics about PowerShell Active Directory commands and PowerShell basics on the ShellGeek home page.
![]()
Загрузить PDF
![]()
Загрузить PDF
В Windows командная строка является аналогом терминала в Mac OS X, то есть в ней можно вводить команды, чтобы настроить систему. Большинство команд можно заменить простым обращением к графическому интерфейсу пользователя, но создать (или удалить) учетную запись пользователя легче и быстрее с помощью командной строки.
-
1
Откройте меню «Пуск». Для этого нажмите кнопку «Пуск» в левом нижнем углу экрана. Чтобы создать или удалить учетную запись, войдите в систему в качестве администратора.
- Также можно нажать кнопку ⊞ Win, чтобы открыть меню «Пуск».
-
2
В строке поиска меню «Пуск» введите «командная» (без кавычек). Значок командной строки появиться в результатах поиска в верхней части меню «Пуск».
- Также можно нажать ⊞ Win+Х, чтобы открыть панель быстрого доступа, на которой есть значок командной строки.
-
3
Щелкните правой кнопкой мыши по значку командной строки. Откроется выпадающее меню.
-
4
Нажмите «Запуск от имени администратора» в выпадающем меню. Вы не получите доступ к командной строке, если вошли в систему в качестве гостя.
- Если вы используете панель быстрого доступа, просто нажмите «Командная строка (Администратор)». Не выбирайте стандартную опцию командной строки.
-
5
Нажмите «Да» во всплывающем окне. Так вы откроете командную строку как администратор.
Реклама


-
1
Щелкните по окну командной строки. Так вы активируете курсор внутри командной строки.[1]
-
2
Создайте учетную запись пользователя. Для этого введите команду net user (имя пользователя) (пароль) /add и нажмите ↵ Enter. Так будет создана новая учетная запись пользователя.
- Замените информацию в круглых скобках на имя пользователя и пароль. Не забудьте удалить круглые скобки.
-
3
Удалите учетную запись пользователя. Для этого введите команду net user (имя пользователя) /delete и нажмите ↵ Enter. Выбранная учетная запись будет удалена.
- Когда учетная запись будет создана или удалена, в командной строке появится строка с сообщением «The command completed successfully» (Команда успешно выполнена).
-
4
Закройте командную строку. Теперь вы знаете, как создавать и удалять учетные записи пользователей с помощью командной строки.
Реклама


Советы
- Если вы открыли командную строку без опции «Запуск от имени администратора», вы не сможете создавать или удалять учетные записи пользователей.
Реклама
Предупреждения
- Будьте осторожны, когда удаляете учетную запись пользователя – если ее удалить, восстановить ее не получится.
Реклама
Об этой статье
Эту страницу просматривали 82 737 раз.