Windows 10 is a great operating system but has some privacy concerns. One of these concerns is the telemetry feature, which sends data back to Microsoft about how you use your computer. This data includes information about your usage habits and other personal information. If you’re uncomfortable with Microsoft collecting this data, you can disable telemetry on Windows 10. This blog post will show you how to do just that!
What is Telemetry
Telemetry is a Windows 10 feature that allows Microsoft to collect data and learn how users use their system. Data collected includes details about how long it takes apps to start, which programs are used most often, and many other performance metrics. This information is beneficial for improving the quality of Windows 10, making it faster and more efficient.
How to Disable Telemetry
While the benefits of telemetry are clear, many people prefer to keep their computer usage private and opt out of data collection. Luckily, it’s easy to do so using one of the methods below!
There are two main ways to turn off telemetry on Windows 10:
Disabling Telemetry Using Group Policy Editor
To Use this method:
-
Open the Group Policy Editor by searching for «gpedit.msc» in your Start menu.
-
In the window that appears, navigate to:
Computer Configuration > Administrative Templates > Windows Components > Data Collection and Preview Builds.
-
Double-click the Allow Telemetry policy and set it to Disabled. Click Okay, and you’re all done!
Disabling Telemetry Using Registry Editor
For the second method, we are using the Registry Editor.
Before making any changes to the registry, it is always advisable to back up the registry. Learn how to do so in this article.
https://www.geekbits.io/how-to-backup-the-windows-registry/
Start by:
-
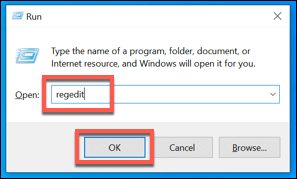
Opening up the Registry Editor by searching for «regedit» in your Start menu.
-
In the window that appears, navigate to:
HKEY_LOCAL_MACHINE > SOFTWARE > Policies > Microsoft > Windows.
-
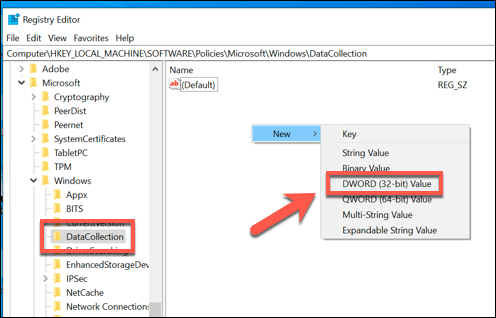
Find a key (folder) with the name DataCollection.
-
If it is not there, right-click the Windows folder and select New > Key. Name this new key as DataCollection.
-
Select this new DataCollection key, right-click in the right pane, and create a new DWORD (32-bit) Value.
-
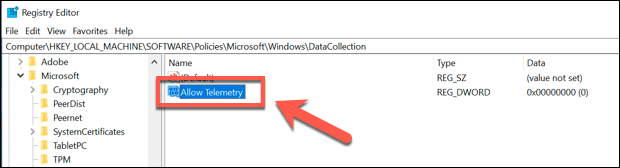
Name it AllowTelemetry.

-
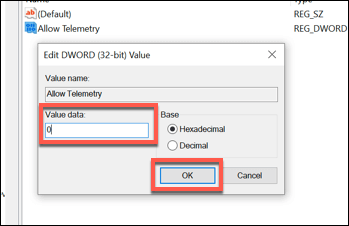
Double-click it and set its value to 0 and you are done.

Enabling Telemetry
You can reverse these steps if you change your mind about wanting telemetry on Windows 10.
- For the case of Group Policy Editor, go back to the same location and set Allow Telemetry to Enabled, then click Okay.
- For the Registry Editor, navigate to the key DataCollection. Double-click on «AllowTelemetry» and set the value to 1.
Ending …
You can disable telemetry on Windows 10 using the Group Policy or Registry Editor tools. Both methods are fairly straightforward, although it is important to be careful when making changes in the Registry Editor, as any errors could cause system instability. That is why you should consider backing up the registry before making any changes. Find out how to back up the registry editor in this article.
https://www.geekbits.io/how-to-backup-the-windows-registry/
If you found the guide helpful, support us by subscribing to «geekbits» and sharing the post.
Thank you for reading 
If you enjoy our content, please consider buying us a coffee to support our work:

Published by
![]()
Just a guy behind the Screen who lacks knowledge about what the future holds. Join me on my Journey.
В этой статье мы будем разбираться, что компания Microsoft узнаёт от нас, когда мы работаем или не работаем за своим компьютером. И как личную жизнь оставить личной.
После первого запуска операционной системы в июле 2015 года, посыпался шквал критики в отношении Microsoft, которые были связаны с обработкой персональных данных пользователей. Например, Microsoft edge (встроенный браузер) собирает информацию с поисков в интернете, Ваше местоположение обрабатывается встроенными сервисами телеметрии, вводимая информация с клавиатуры/рукописным вводом или голосовыми командами считывается и запоминается, постоянное «подслушивание» по микрофону, обработка контактов, текстовых сообщений, чтение жестких дисков и передача ключей шифрования на сервера Microsoft. Все негативно сказалось на первые впечатления об операционной системе
Ни в коем случае не хочу Вас запугать, что все так страшно и невозможно исправить. Раз добровольно согласились на обработку данных при первом запуске операционной системы, также добровольно возможно и отказаться без потерь гарантий компьютера или обслуживания со стороны компаний.
Если вы только планируете ставить операционную систему
Выбирайте ручные настройки, и самостоятельно убирайте все галочки, которые будут встречать нас по пути. Необходимо обязательно создать локальную учетную запись (без наличия интернета), пропустив шаг подключения к Вашему Wi-Fi, либо не вставлять интернет провод в компьютер.

Если Вы уже создали учетную запись Microsoft, то лучше удалить её и пересоздать без привязки к почтовому адресу. Так вы будете оставаться анонимным.
Конфиденциальность и обновления
После того, как мы увидели рабочий стол нашего компьютера, надо изменить политику конфиденциальности. Проходим дальше: Пуск – Параметры – Конфиденциальность. Здесь в разделе: «Общие» запрещаем все манипуляции.

Ниже слева заходим в «диагностики и отзывы» Выбираем Базовый. Отключить весь сбор информации, к сожалению, нельзя, так как большинство вещей являются обычной диагностикой самого устройства.

Пролистав ниже, убираем все галочки. Раз мы не можем отключить диагностику полностью, можем запретить отправлять эти данные самой Майкрософт. В самому низу есть пункт «Частота формирования отзывов», там в выпадающем окне выбираем «Никогда».

Дальше мы отключим обновления. Так как обновления выходят часто, то наши манипуляции будут терять актуальность, в связи с тем, что параметры будут принудительно включаться. Переходим к:
Пуск – Параметры – Обновление и безопасность Windows – Дополнительные параметры. Там убрать галочки с первых 4 пунктов, дальше можно оставить как есть.

Дальше переименуем ПК. Для этого рядом с кнопкой «Пуск» есть значок лупы (поиск).

Нажимаем и вписываем в поле запроса «О компьютере». Заходим в раздел «о компьютере», который находится в строке «Лучшее соответствие».

Пролистав, чуть ниже увидим кнопку «Переименовать этот ПК». Пишем на латыни удобное для нас имя. Это необходимо сделать, так как Windows автоматически раздает имена ПК, и, если ваш компьютер окажется в публичной сети, его будет сложнее идентифицировать.

Это оказалось просто? Тогда давайте повысим сложность.
Изменяем настройки рекламы
Правой кнопкой мыши по меню Пуск – Windows PowerShell Администратор.

начинаем вводить скрипт:
sc delete DiagTrack
sc delete dmwappushservice
C:\ProgramData\Microsoft\Diagnosis\ETLLogs\AutoLogger\AutoLogger-Diagtrack-Listener.etl
notepad C:\Windows\System32\drivers\etc\hosts
Каждый скрипт подтверждаем нажатием «Enter», после чего наш PowerShell должен выглядеть как на приведённом скриншоте ниже.

После ввода скрипта. Появится окно нашего блокнота.

В конце текстовика вписываем следующее:
127.0.0.1 localhost
127.0.0.1 localhost.localdomain
255.255.255.255 broadcasthost
Будет все выглядеть, как на картинке ниже. Сохраняем этот файл. Этим мы отключаем работу с внешними ресурсами и отключением рекламы во многих встроенных или выпущенных программах самой Microsoft.

Встроенная защита и телеметрия
Теперь будем изменять локальные групповые политики, чтобы отключить OneDrive, встроенный антивирус и часть телеметрии.
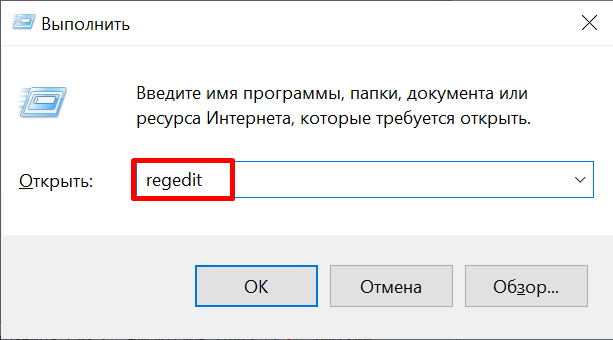
Нажимаем сочетание клавиш: Win+R, открывается окно «Выполнить»:

в нем непосредственно уже пишем в строке «открыть» следующий запрос:
gpedit.msc
У нас откроется Конфигурация компьютера. В этом разделе выбираем Административные шаблоны, практически в самом низу выбираем «Компоненты Windows», далее папку «Сборки для сбора данных и предварительные сборки» и отключаем телеметрию.
 В меню Компоненты сборки выбираем OneDrive и отключаем его.
 Следом тут же отключаем Защитника Windows. Советую воспользоваться посторонним антивирусом, а не в первоначальный встроенный.
Дальше находим в компонентах Windows – Антивирус программа. Выключаем параметр, выделенный на приведённом скриншоте ниже.

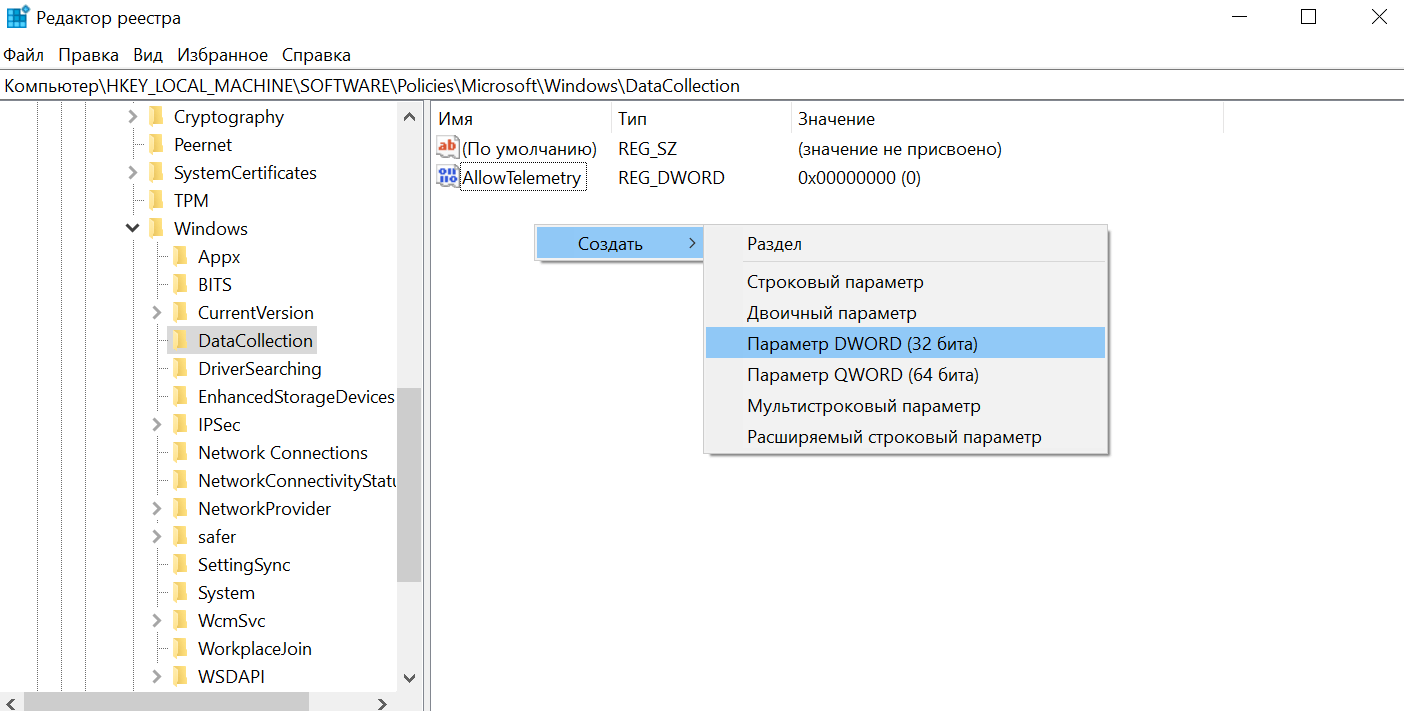
Один из последних моментов – в реестре нужно отключить телеметрию полностью, чтобы ваш ПК меньше собирал технической информации. Нажимаем уже привычные нам Win+R. Пишем regedit. Откроется окно, где нам нужно будет перейти:

нажимая каждый раз на значок стрелочки, и под конец кликаем уже на саму папку «DataCollection»:

Где меняем значение 1 на 0. После нажимаем ОК.

Самое последнее, что мы сделаем, так это проверим нет ли нашего голоса, записанного нашим же ПК. Для этого проследуем по пути:
C:\Windows\Temp
Там можно обнаружить записанный голос в формате WAV. Если есть – можете смело удалять. Как показала практика, слежкой занималась не сама Windows, а фильтры, установленные в микрофон. Самый действующий вариант – отключение микрофона через панель задач.
Вывод
Итак, мы научились контролировать свои действия, как в интернете, так и за его пределами. Необходимо понимание того, что компании действуют в целях больше рекламных, нежели наблюдательных.
Для лучшего эффекта, советуем также не использовать встроенные программы наподобие GrooveMusic, просмотр фотографий, а использовать посторонний софт.
Microsoft Compatibility Telemetry — это служба, которая отвечает за сбор и передачу данных о системе и её использовании. Те самые функции слежения, о которых так много говорили после запуска Windows 10, с помощью которых огромные массивы данных отправляются на серверы Microsoft.
- Отключаем телеметрию через «устранение неполадок»
- Выключаем телеметрию с помощью списка служб
- Отключаем телеметрию через параметры
- Отключаем телеметрию через системный реестр
- Выключаем телеметрию с помощью редактора групповых политик
- Сторонние программы для отключения телеметрии
Представители компании утверждают, что собираемая информация конфиденциальна и используется исключительно в целях диагностики и совершенствования продукта — проще говоря, для понимания того, какие функции обновить и ошибки исправить. Даже если вас не беспокоит сам факт сбора информации, то может возникнуть другая проблема — Microsoft Compatibility Telemetry чрезмерно нагружает процессор и тормозит работу системы.
Если отключать сбор и отправку телеметрии необходимости нет, можно попробовать устранить проблему с высокой нагрузкой на ЦП перезапуском системы. Если и это не помогло, то следующий способ — сканирование системных файлов и устранение обнаруженных неполадок.
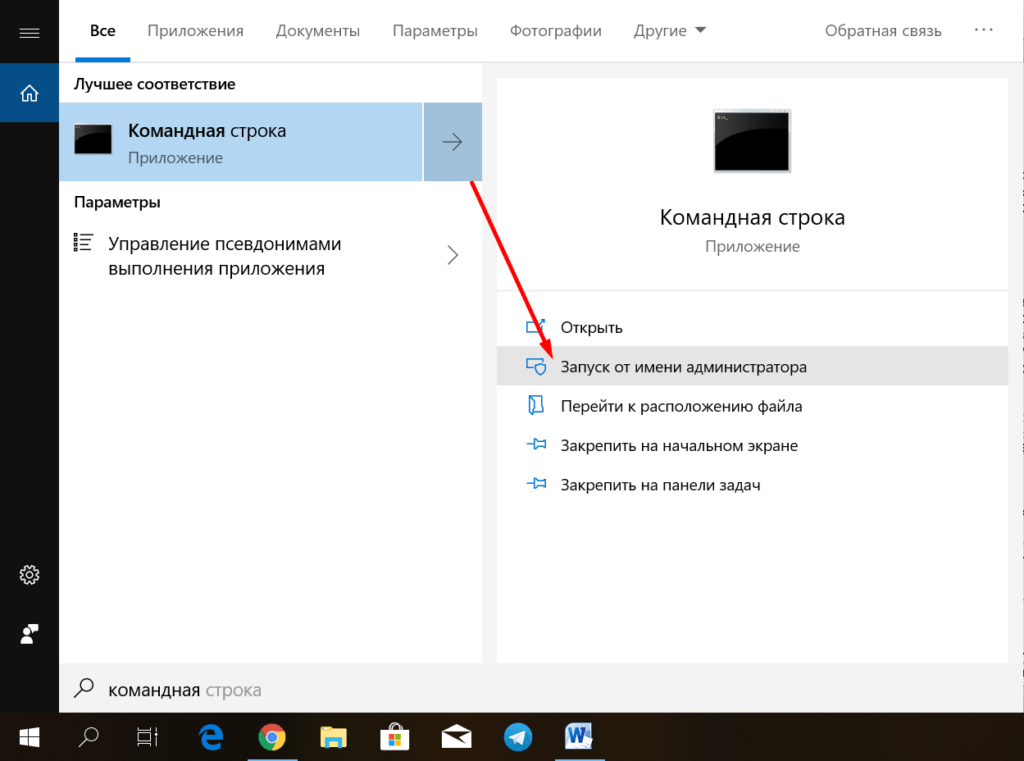
- Находим через поиск Windows 10 командную строку и запускаем её от имени администратора.

Лучший способ запустить командную строку
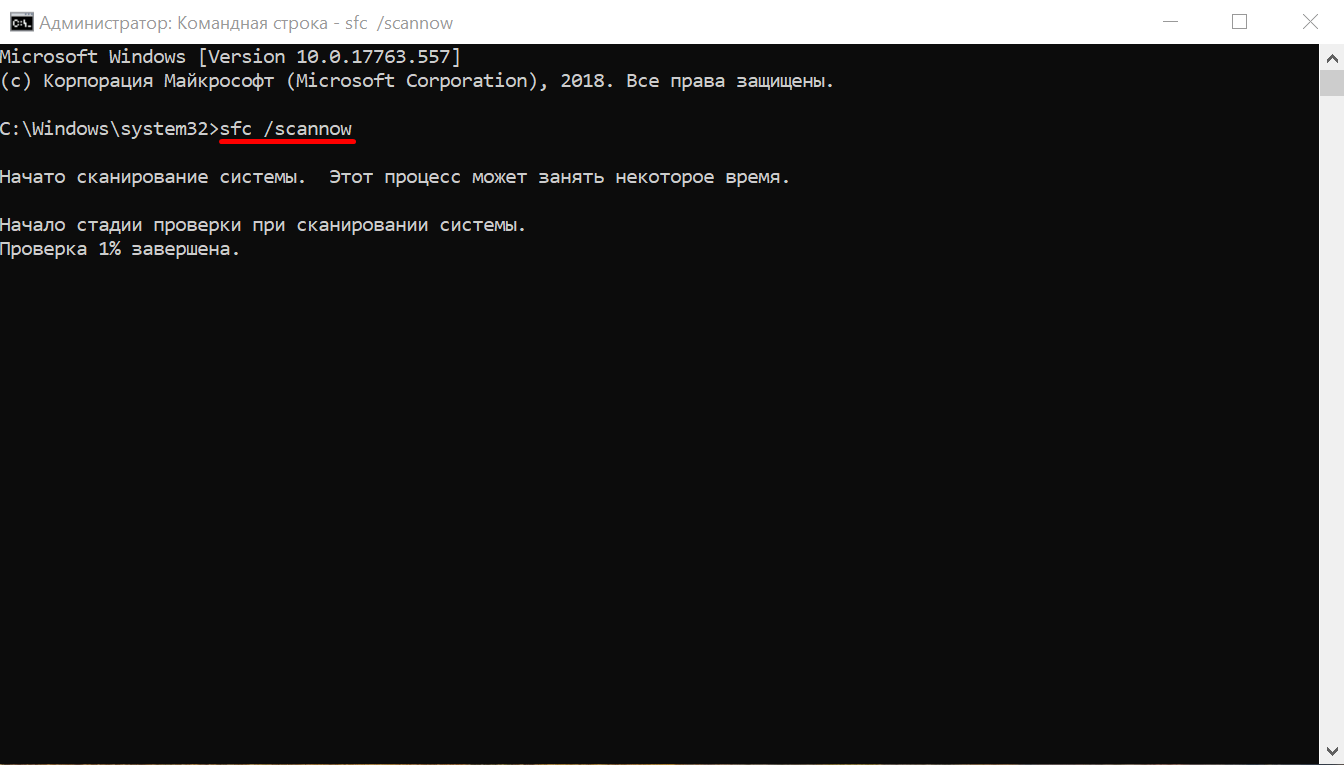
- Вводим команду sfc /scannow (обязательно пробел перед /). Это системная утилита для сканирования файлов, которая умеет самостоятельно исправлять ошибки.
- Ждём завершения сканирования и проверяем, перестал ли процесс Microsoft Compatibility Telemetry нагружать компьютер.

Сканируем системы с помощью инструмента SFC
Если после перезагрузки системы и проверки файлов нагрузка на процессор всё равно остаётся высокой, то придётся отключить службу Microsoft Compatibility Telemetry. Функциональность Windows 10 от этого не пострадает — система просто перестанет собирать и отправлять диагностические данные. При этом апдейты вы будете получать исправно — всю необходимую информацию для совершенствования продуктов компания может собирать и с других пользователей.
С помощью списка служб
Microsoft Compatibility Telemetry — это служба, и потому её можно отключить через приложение для управления системными компонентами.
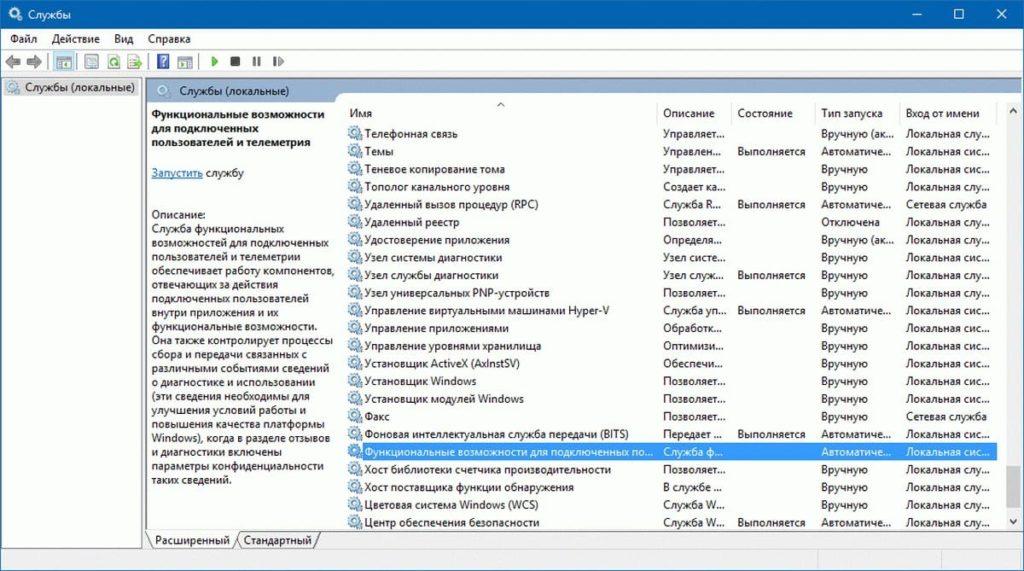
- С помощью поиска Windows 10 находим классическое приложение «Службы».
- Ищем в списке компонент «Служба диагностического отслеживания» (старая версия) или «Функциональные возможности для подключенных пользователей и телеметрия» (новая версия).

Эта служба отвечает за работу телеметрии
- Открываем свойства службы двойным кликом левой кнопкой.
- Нажимаем «Остановить», а в поле «Тип запуска» указываем состояние «Отключена» или «Вручную».
- Сохраняем конфигурацию с помощью кнопки «Применить» или «Ок».
После отключения службы необходимо вернуться в «Диспетчер задач» и посмотреть, снизилась ли нагрузка на процессор. См. также: отключаем службы в Windows 10.
Через параметры
Управлять службой телеметрии можно также через «Параметры Windows 10», в которых есть раздел «Конфиденциальность».
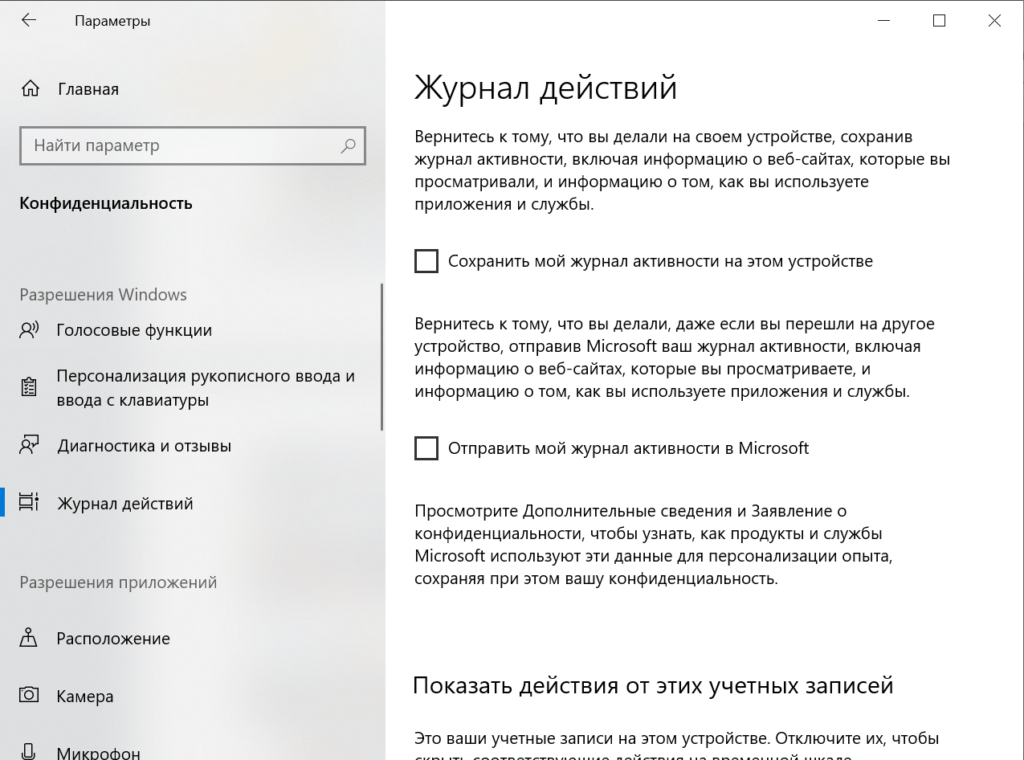
Отключаем отправку данных на серверы Microsoft
Нам нужны две вкладки: «Диагностика и отзывы» и «Журнал действий». По очереди заходим в каждую из них и отключаем все функции, связанные со сбором и передачей данных в Microsoft. Такая настройка не отключает службу совсем, но заметно снижает количество ресурсов, которое требуется для её работы. Соответственно, нагрузка на процессор тоже станет приемлемой.
Через системный реестр
Обычно я стараюсь обходиться без редактирования реестра, так как неосторожное действие в нём может привести к появлению критических ошибок в работе системы, исправление которых занимает очень много времени. Но в случае с настройкой телеметрии опасности нет — мы просто поменяем значение одного параметра.
- Нажимаем сочетание Win+R для вызова окна «Выполнить».
- Вводим команду regedit и нажимаем Enter.

Самый быстрый способ открыть редактор реестра
- Проходим в раздел HKEY_LOCAL_MACHINE\SOFTWARE\Policies\Microsoft\Windows\DataCollection
- В правой части окна кликаем правой кнопкой мыши по свободному пространству и выбираем создание параметра DWORD (32 бита).
- Даём новому параметру имя AllowTelemetry и присваиваем значение 0 (ноль).

Этот параметр запретит службе телеметрии собирать и отправлять данные
Чтобы изменения в реестре вступили в силу, перезагружаем компьютер. После запуска системы нужно проверить, снизилась ли нагрузка на процессор со стороны службы Microsoft Compatibility Telemetry. Такого процесса вообще не должно остаться в «Диспетчере задач», так как мы его вырубили через редактор реестра.
С помощью редактора групповых политик
Если на компьютере установлена профессиональная или корпоративная редакция Windows 10, то отключить Microsoft Compatibility Telemetry можно также с помощью редактора групповых политик. В домашней версии такой возможности нет.
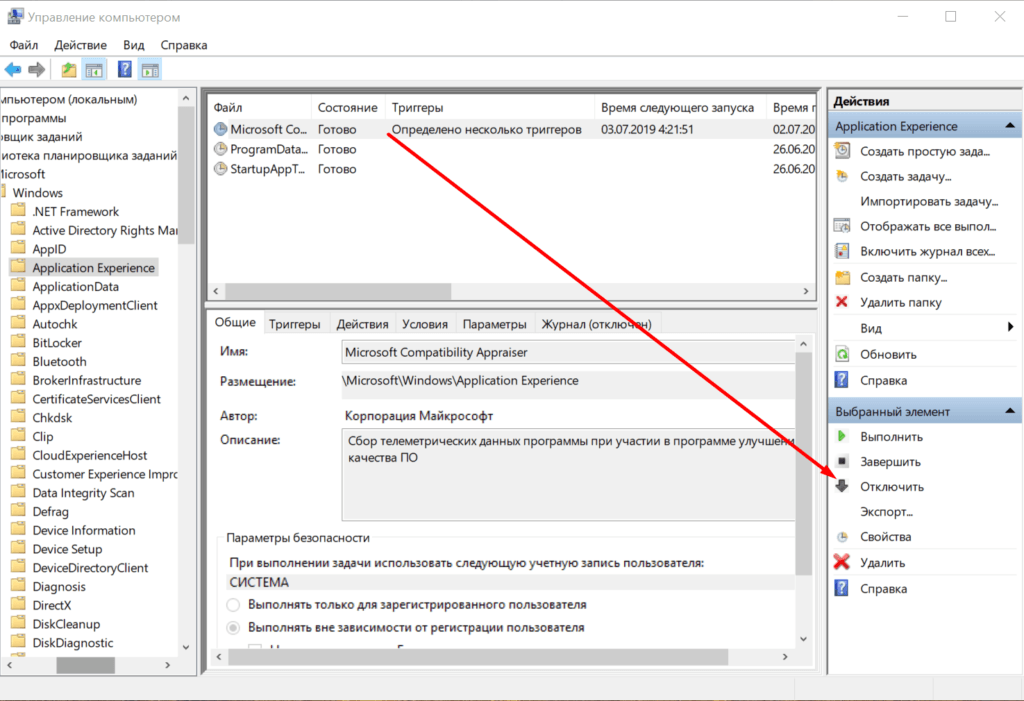
- Щелкаем правой кнопкой по меню «Пуск» и выбираем пункт «Управление компьютером».
- Переходим по пути «Служебные программы» — «Планировщик заданий» — «Библиотека планировщика заданий» — Microsoft — Windows — ApplicationExperience.
- Видим в правой части окна три файла: Microsoft Compatibility Appraiser, ProgramDataUpdater и StartupAppTask. Щелкаем по каждому из них правой кнопкой мыши и выбираем опцию «Отключить».

Отключаем задания по сбору телеметрии
После деактивации трёх задач в библиотеке планировщика необходимо снова проверить состояние центрального процессора в «Диспетчере задач». Нагрузка должна быть в пределах нормы.
С помощью сторонних программ
Отключение телеметрии — это один из способов оптимизации системы и борьбы с функциями слежения. Поэтому такую возможность предоставляют программы от сторонних разработчиков, которые обещают защитить вас от сбора данных со стороны Microsoft. Я такими приложениями предпочитаю не пользоваться — кто знает, кому вы отдаёте информацию, пытаясь защититься от функций слежения? Но быть в курсе функциональности подобных утилит полезно. Вдруг когда-нибудь преимущества от использования перевесят возможные проблемы.
Одна из распространённых программ для отключения функций слежения Windows 10 называется ShutUp10. Скачать её можно бесплатно. После загрузки в главном окне программы вы увидите раздел Security, а внутри него — три пункта, относящиеся к телеметрии. Вам нужно деактивировать их все.
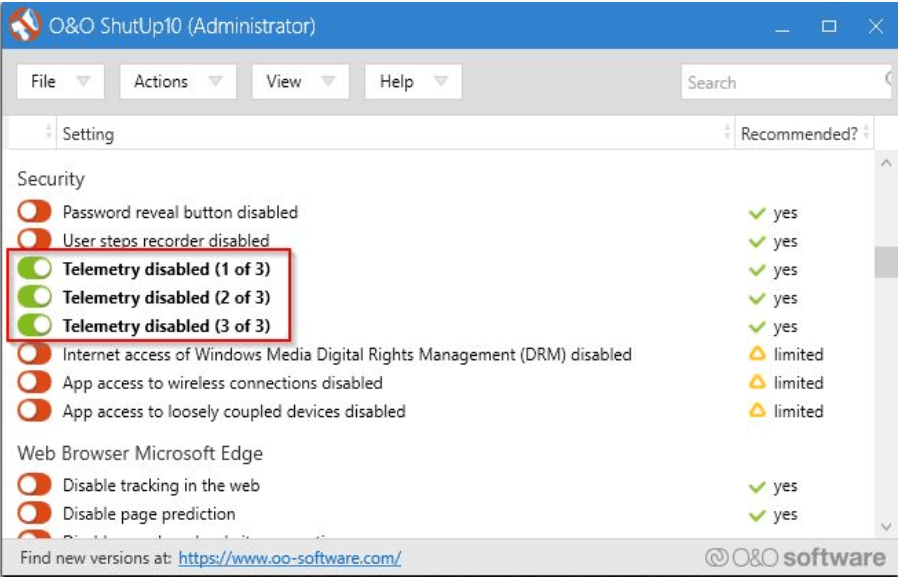
Отключаем эти три пункты для отказа от телеметрии
В принципе, программа делает то же самое, что и мы в редакторе групповой политики. И это как раз смущает — это значит, что ShutUp10 имеет доступ к системным компонентам. Мне это не нравится, хотя признаю, что отключение телеметрии действительно реализовано удобно.
![]() Загрузка …
Загрузка …
Post Views: 28 360
With data breaches and malware infections on the rise, taking your data privacy seriously is now more essential than ever. Without adequate protection in place, you’re leaking data about yourself to every website you visit and to every app you install—even to Microsoft itself, thanks to the Windows 10 telemetry system.
As part of its efforts to help troubleshoot the Windows 10 user experience, Microsoft logs data about the apps and features you use, your system information, your system settings, and more. If you’re worried about this data being shared, you can disable Windows 10 telemetry by following these steps.

What Is Windows 10 Telemetry?
Windows 10 isn’t the first Windows release to collect and share system data with itself, but Microsoft has certainly increased the amount of data it collects and shares in this release. Telemetry, as the practice is called, is how Microsoft does this.
Along with your general privacy settings, such as the data Windows collects to help serve advertisements or filter adult content, Microsoft also collects location data, information on your Windows usage, and other under-the-hood diagnostic information to help monitor and troubleshoot Windows across millions of PCs.
You can see the benefit for Microsoft, but there are some serious privacy concerns to be considered for the standard Windows user here. Microsoft has made it extremely hard to disable Windows 10’s telemetry settings for Windows 10 Home users, instead giving users the option to limit it to only basic data collection.

If you’re using Windows 10 Pro, Enterprise or Education, then you can disable telemetry entirely by editing the registry or using the Group Policy Editor, but this option is disabled for many users.
The choice is yours: you can leave telemetry enabled, and allow Microsoft to collect various bits of information about you, your location, and your activities. Alternatively, you can set telemetry to minimal settings (or disable it entirely) to cut Microsoft off from its data collection activities and put you back in control.
How To Limit Windows 10 Telemetry Data
As we’ve mentioned, Microsoft has prevented Windows 10 Home users from being able to completely disable telemetry data. If you want to limit your telemetry data sharing, you can do so from the Windows Settings menu.
- To access this menu, right-click the Start menu and click Settings. This will load the Windows 10 Settings menu in a new window.
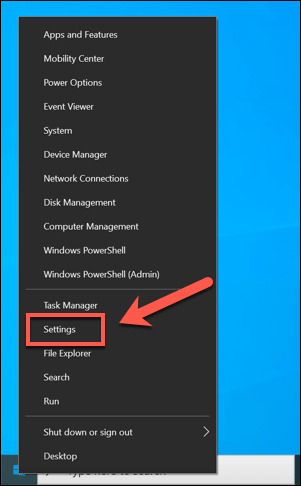
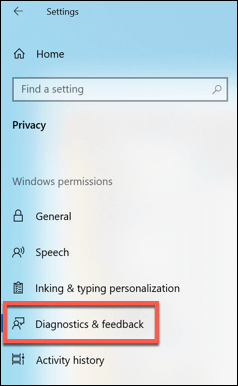
- In the Windows Settings menu, click Privacy > Feedback & diagnostics to access your telemetry settings.
Under the Diagnostic and usage data section, you can change the various data collection levels. At the moment, these include options for basic data collection, which limits the information sent to Microsoft to only include system settings, hardware, and whether or not your system is working correctly.
Alternatively, you could choose full data collection, which sends all diagnostic data, including data on the websites you visit, apps and features you use, device health, and additional error data for troubleshooting.
- Select one of the options in this menu to choose between these options. The option you choose will be applied immediately.
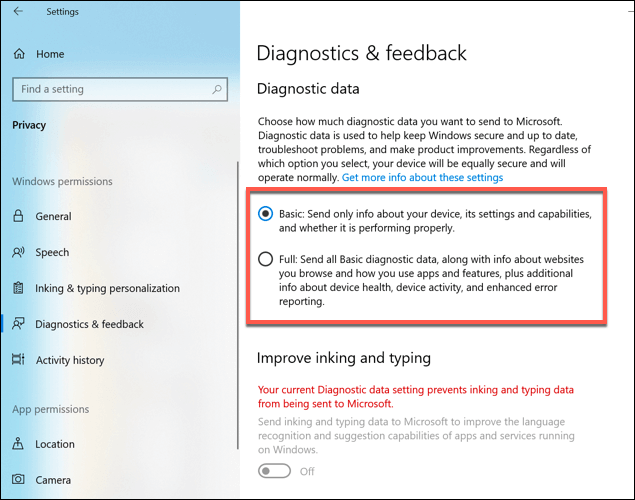
In a future release of Windows 10, these settings will be changed to required diagnostic data (to replace basic data collection) and optional diagnostic data (to replace full data collection). The settings should remain the same, but with replaced setting names.
How To Complete Disable Telemetry In Windows 10 Pro, Enterprise and Education Editions Using GPEditor
While it isn’t an option for Windows 10 Home users, it is possible to disable telemetry data sharing for Windows 10 Pro, Enterprise and Education users.
There are two ways to do this. You can change your telemetry settings using the Group Policy Editor or by modifying the Windows Registry using the Windows Registry editor.
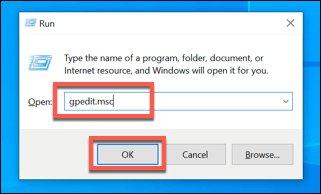
- To do this using the Group Policy Editor, press the Windows Key + R to open the Run command box. From there, type gpedit.msc and click OK.
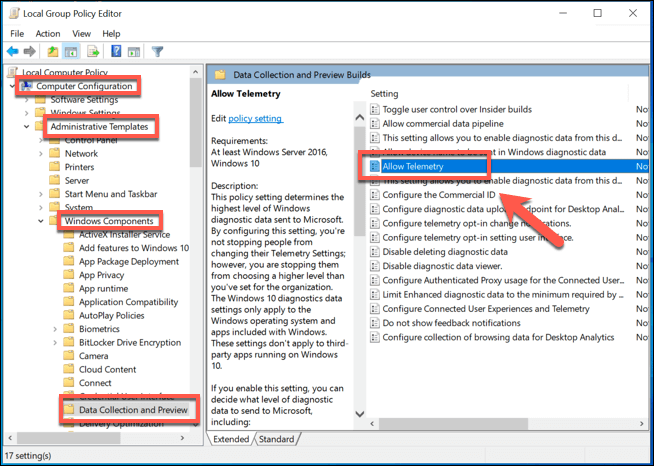
- In the Group Policy Editor, use the left-hand menu to access Computer Configuration > Administrative Templates > Windows Components > Data Collection and Preview Builds. A list of settings will be visible on the right—double-click the Allow Telemetry setting.
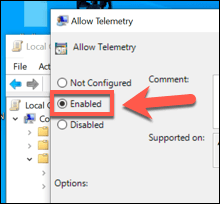
- In the Allow Telemetry settings window, you can change your telemetry settings. Make sure to first click the Enabled option in the top-left corner to allow you to configure this here.
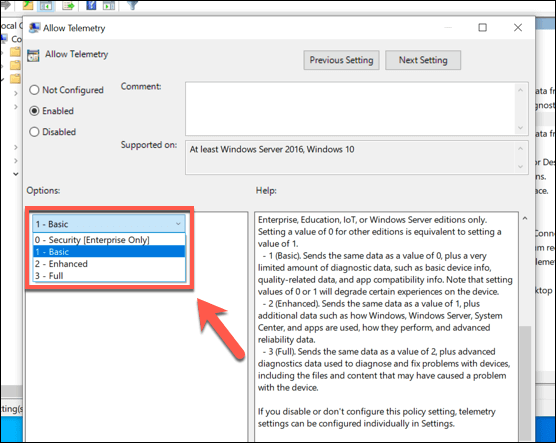
- Under Options, you can change your telemetry collection settings. These range from 0 (disabled) to 4 (full). Only Enterprise, Pro and Education users can set this to 0—if you have these editions, set this. Otherwise, set 0 for disable, 1 for basic or 3 for full. The 2 (enhanced) setting has been phased out, so setting this may result in Windows defaulting to a higher setting instead.
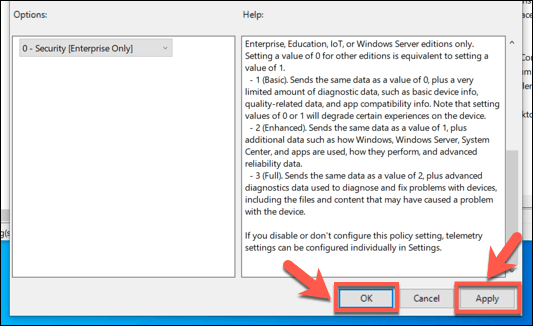
- Once your setting is applied, click OK to save. This will apply the new telemetry settings to your PC.
How To Complete Disable Telemetry In Windows 10 Pro, Enterprise and Education Editions Using Registry Editor
If you want to completely disable telemetry in Windows 10 Pro, Enterprise or Education, you can also use the Windows Registry Editor to do this.
Windows 10 Home users can also do this to change their telemetry settings, but you’ll only be able to limit data collection, rather than stop it completely. For Windows 10 Home users, it’s best to use the Windows 10 Settings menu instead.
- To start, open the Registry Editor by pressing the Windows Key + R and typing regedit into the Run command box that opens. Click OK to launch.
- In the Windows Registry Editor window, use the left-hand tree menu to access HKEY_LOCAL_MACHINE > SOFTWARE > Policies > Microsoft > Windows > DataCollection. In the right-hand panel, right-click and select the New > DWORD (32-bit) Value option.
- Name the new value as Allow Telemetry. Once it’s created, double-click the value to change the value.
- In the edit DWord (32-bit) Value box, type a value in the Value data box. These match the values used by the Group Policy Editor. You can choose 0 (disabled, for Windows 10 Pro, Enterprise and Education users), 1 (basic data collection, for all users), 2 (for enhanced collection, but no longer in use), or 3 (full data collection). Once you’ve made your choice, click OK to save.
Once the value has been edited, the telemetry setting you’ve chosen will be active. You can close the Registry Editor at this point.
Protecting Your Data On Windows 10
If you decide to disable Windows 10 telemetry, you’ll be limiting the amount of personalized support Microsoft can offer to help troubleshoot issues you come across using its operating system. There are no risks to disabling telemetry, however, so if you prefer to limit the data being shared, you should disable it.
Of course, there are other ways you can protect your data while you’re using Windows. You should first check to see if your data has been compromised online and, if it has, change your passwords immediately. If you’re really worried, consider encrypting your hard drive to stay in total control of your data.
How to turn off telemetry on Windows 11 PC – Guide
You need to take steps to protect your information, from breaches at your company to malware infections on your computer. You can do this by setting up strong passwords, using a data encryption program, and by monitoring your computer for signs of infection.
- Open the Start menu and type “netstat -a” to view the active network connections on your computer.
- On the left side of the screen, look for “wlp2s0” and change its status to “not connected.”
- Type “netstat -a | grep wlp2s0” and see if there is a change in the value of this connection. If there is, you can disable Windows 11 telemetry by following these means:
- Type “netstat -a | grep wlp2s0 | setprop wlp2s0 notelemetry” to enable Windows 11 telemetry on this connection.
Methods to disable telemetry and data collection on Windows PC
Set diagnostic and usage data as basic:
You can limit user data collection on Windows 11 by using this option. This does not disable telemetry and data collection. ..
In the Privacy window, you can change how your data is collected and used.
In the next window, click the Diagnosis and Feedback tab in the left pane and set Diagnosis and Usage Data to Basic.
Microsoft is introducing a new security feature that will limit the amount of data sent to Windows in order to decrease the likelihood of users being hacked. ..
To disable telemetry in Windows 11, go to the Privacy tab and select the Disable Telemetry option. ..
Now go to Activity History and disable the options shown here. Uncheck the boxes to – Store my activity history on this device and Send my activity history to Microsoft. ..
Now, in Writing and Typing Personalization, turn off the toggle button for typing suggestions.
Likewise, go to Speech and disable the selector switch so that Microsoft will not provide voice samples from time to time. ..
Disable all options that collect user data and send it to Microsoft.
Disable telemetry and data collection in Windows 11 using Registry Editor:
To Disable telemetry and data collection on your device, follow these steps:
- Open the Settings app and navigate to the Privacy section.
- Scroll down and select the Telemetry and Data Collection category.
- Toggle off the telemetry for your device.
Windows 11 search box: Type Regedit into the Windows 11 search box and press Enter. Alternatively, press Windows key + R to run the command, type regedit and click OK.
The following trees are on the side panel.
In the right pane, right click on the space and go to New, select the DWORD (32 bit) value. Name it AllowTelemetry.
This will allow telemetry to be collected by the device.
Disable connected user experience and telemetry service:
To disable data collection and telemetry:
-
Open the Registry Editor by pressing the Windows key + R, typing “regedit” and clicking OK.
-
In the Registry Editor, navigate to the following key: HKEY_LOCAL_MACHINE\SOFTWARE\Microsoft\Windows NT\CurrentVersion\Winlogon
-
On the Winlogon subkey, double-click on “Login User Experience” and then click on the “Enabled” button to turn it off.
-
Double-click on “dmwappushsvc” and then click on the “Enabled” button to turn it off. ..
-
Open the Start menu and type “cmd”
-
Type “netstat -an” and press enter
-
Look for the line that says “TCP/IPv4: 192.168.1.1:443” and change it to “TCP/IPv6: 636.222.222.222”
-
Save the changes and close the command prompt window
In the Run command window, type services.msc and click the OK button.
In the Services window,Scroll down and double-click Connected User Experiences and Telemetry.
Disable Connected User Experiences and Telemetry on the next screen. Now click Apply to make your changes.
Now, in the Services window, find the dmwappushsvc service and disable it by setting the startup type to Disable. Then click Apply.
Using Group Policy
Open Group Policy with the Run Command. Type gpedit.msc and click OK or press Enter.
You can now open the Local Group Policy Editor by pressing the Windows key and clicking on the three lines in the top left corner of your screen.
Windows Components > Data collection and preview builds. This setting enables you to collect data from your computer’s clipboard and save it as aPreview build.
Now you can choose which features you want to allow the app to collect data on. To allow all features, click on the checkbox next to All Features. To only allow certain features, select the checkboxes next to the features you want to allow. ..
In the Allow Telemetry section, click the Disabled option. To apply the applied changes, click Apply.
Using Task Scheduler
Click on the task scheduler to open it.
The main point of this tab is to see what is happening in the world.
The Microsoft Windows Customer Experience Improvement Program (CXP) is a program that allows users to improve the customer experience by creating and managing task schedules.
Right-click on the task called Consolidator and disable it. Repeat the process with all other tasks mentioned in this section. ..
Final note
Windows 10 has a built-in feature that allows Microsoft to track your activity and collect data on how you use your computer. This can be disabled in the Settings app, but it’s not always easy to find. This guide will show you how to turn off telemetry on Windows 10.
If you’re using a Windows 10 PC, there’s a good chance that Microsoft is tracking your activity and collecting data through its telemetry feature. This guide will show you how to disable this tracking in the Settings app. If you have any questions about this process, don’t hesitate to ask us in the comments below or on our Facebook page. Finally, please share this guide with your friends so they can make the same changes if they want them too! ..