Сенсорные жесты
Эти жесты можно использовать на сенсорном экране Windows 11 устройства. Чтобы включить сенсорные жесты, выберите Пуск > Параметры > Устройства Bluetooth & > Сенсорный > сенсорные жесты с тремя и четырьмя пальцами и убедитесь, что он включен.
Примечание: Если сенсорные жесты включены, взаимодействие с тремя и четырьмя пальцами в приложениях может не работать. Чтобы продолжать использовать эти взаимодействия в приложениях, отключите этот параметр.
|
«Действие» |
Жесты |
|---|---|
|
Выбор элемента |
Коснитесь экрана |
|
Прокрутка |
Поместите два пальца на экран и проведите по горизонтали или вертикали |
|
Увеличение или уменьшение масштаба |
Поместите два пальца на экран и зажмите или протяните |
|
Отображение дополнительных команд (например, щелчок правой кнопкой мыши) |
Нажмите и удерживайте элемент |
|
Показать все открытые окна |
Проведите тремя пальцами вверх по экрану |
|
Показать рабочий стол |
Проведите тремя пальцами вниз по экрану |
|
Переключение на последнее открытое приложение |
Проведите тремя пальцами влево или вправо по экрану |
|
Открытие центра уведомлений |
Проведите пальцем от правого края экрана |
|
Просмотр мини-приложений |
Проведите пальцем от левого края экрана |
|
Переключение рабочих столов |
Проведите четырьмя пальцами влево или вправо по экрану |
Жесты для сенсорной панели
Попробуйте эти жесты на сенсорной панели ноутбука Windows 11. Некоторые из этих жестов будут работать только на высокоточных сенсорных панелях. Чтобы узнать, есть ли у ноутбука, выберите Пуск > параметры > Устройства Bluetooth & > сенсорной панели.
|
«Действие» |
Жесты |
|---|---|
|
Выбор элемента |
Коснитесь сенсорной панели |
|
Прокрутка |
Поместите два пальца на сенсорную панель и проведите по горизонтали или вертикали |
|
Увеличение или уменьшение масштаба |
Поместите два пальца на сенсорную панель и зажмите или протяните |
|
Отображение дополнительных команд (например, щелчок правой кнопкой мыши) |
Коснитесь сенсорной панели двумя пальцами или нажмите вниз в правом нижнем углу |
|
Показать все открытые окна |
Проведите тремя пальцами вверх по сенсорной панели |
|
Показать рабочий стол |
Проведите тремя пальцами вниз по сенсорной панели |
|
Переключение между открытыми приложениями или окнами |
Проведите тремя пальцами влево или вправо на сенсорной панели |
|
Переключение рабочих столов |
Проведите четырьмя пальцами влево или вправо на сенсорной панели |
Изменение сенсорных жестов
Чтобы изменить сенсорные жесты по умолчанию на Windows 11 компьютере, выберите Пуск > параметры > Устройства Bluetooth & >сенсорной панели. Выберите Жесты с тремя пальцами или Жесты с четырьмя пальцами , чтобы изменить действия жестов прокрутки.
Попробуйте эти жесты на сенсорной панели ноутбука под управлением Windows 10.
-
Выбор элемента. Коснитесь сенсорной панели.
-
Прокрутки: Поместите два пальца на сенсорную панель и проведите по горизонтали или по вертикали.
-
Увеличение или уменьшение масштаба: Поместите два пальца на сенсорную панель и сожмите их или разожмите.
-
Отображение дополнительных команд (аналогично щелчку правой кнопкой мыши). Коснитесь сенсорной панели двумя пальцами или нажмите в правом нижнем углу.
-
Все открытые окна. Проведите по панели тремя пальцами от себя.
-
Отображение рабочего стола. Проведите по панели тремя пальцами к себе.
-
Переключение между открытыми окнами: Проведите по панели тремя пальцами вправо или влево.
-
Откройте Кортану: Коснитесь сенсорной панели тремя пальцами.
-
Откройте центр уведомлений: Коснитесь сенсорной панели четырьмя пальцами.
-
Переключение виртуальных рабочих столов: Поместите четыре пальца на сенсорную панель и проведите пальцем вправо или влево.
-
Некоторые из этих жестов будут работать только на высокоточных сенсорных панелях. Чтобы узнать оснащен ли ваш ноутбук такой панелью, выберите Пуск > Параметры > Устройства > Сенсорная панель.
Изменение сенсорных жестов
Чтобы изменить сенсорные жесты по умолчанию на Windows 10 компьютере, выберите Пуск > Параметры > устройства >сенсорной панели. Прокрутите страницу до пункта Жесты с тремя пальцами или Жесты с четырьмя пальцами, чтобы изменить параметры сенсорных жестов.
Touch gestures
You can use these gestures on the touch screen of your Windows 11 device. To turn touch gestures on, select Start > Settings > Bluetooth & devices > Touch > Three- and four-finger touch gestures, and make sure it’s turned on.
Note: When touch gestures are enabled, three- and four-finger interactions in your apps might not work. To continue using these interactions in your apps, turn off this setting.
|
Action |
Gestures |
|---|---|
|
Select an item |
Tap the screen |
|
Scroll |
Place two fingers on the screen and slide horizontally or vertically |
|
Zoom in or out |
Place two fingers on the screen and pinch in or stretch out |
|
Show more commands (like right-clicking) |
Press and hold the item |
|
Show all open windows |
Swipe with three fingers up on the screen |
|
Show the desktop |
Swipe with three fingers down on the screen |
|
Switch to the last open app |
Swipe with three fingers to the left or right on the screen |
|
Open notification center |
Swipe with one finger in from the right edge of the screen |
|
See widgets |
Swipe with one finger in from the left edge of screen |
|
Switch desktops |
Swipe with four fingers to the left or right on the screen |
Touchpad gestures
Try out these gestures on the touchpad of your Windows 11 laptop. Some of these gestures will only work with precision touchpads. To find out if your laptop has one, select Start > Settings > Bluetooth & devices > Touchpad.
|
Action |
Gestures |
|---|---|
|
Select an item |
Tap touchpad |
|
Scroll |
Place two fingers on the touchpad and slide horizontally or vertically |
|
Zoom in or out |
Place two fingers on the touchpad and pinch in or stretch out |
|
Show more commands (like right-clicking) |
Tap the touchpad with two fingers or press down in the lower-right corner |
|
Show all open windows |
Swipe with three fingers up on the touchpad |
|
Show the desktop |
Swipe with three fingers down on the touchpad |
|
Switch between open apps or windows |
Swipe with three fingers left or right on the touchpad |
|
Switch desktops |
Swipe with four fingers to the left or right on the touchpad |
Change your touch gestures
To change the default touch gestures on your Windows 11 PC, select Start > Settings > Bluetooth & devices >Touchpad. Select Three-finger gestures or Four-finger gestures to change what your swipe gestures do.
Try out these gestures on the touchpad of your Windows 10 laptop.
-
Select an item: Tap on the touchpad.
-
Scroll: Place two fingers on the touchpad and slide horizontally or vertically.
-
Zoom in or out: Place two fingers on the touchpad and pinch in or stretch out.
-
Show more commands (similar to right-clicking): Tap the touchpad with two fingers, or press in the lower-right corner.
-
See all open windows: Place three fingers on the touchpad and swipe them away from you.
-
Show the desktop: Place three fingers on the touchpad and swipe them towards yourself.
-
Switch between open windows: Place three fingers on the touchpad and swipe right or left.
-
Open Cortana: Tap three fingers on the touchpad.
-
Open action center: Tap four fingers on the touchpad.
-
Switch virtual desktops: Place four fingers on the touchpad and swipe right or left.
-
Some of these gestures will only work with precision touchpads. To find out if your laptop has one, select Start > Settings > Devices > Touchpad.
Change your touch gestures
To change the default touch gestures on your Windows 10 PC, select Start > Settings > Devices >Touchpad. Scroll to Three-finger gestures or Four-finger gestures to change your touch gesture settings.
If your Windows 10 laptop has a touchscreen, here are the useful Windows 10 touchscreen gestures you should know for better usability.
Windows 10 has built-in support for touchscreen displays. In fact, that is one of the main driving forces behind the ever-evolving user interface of the operating system. When you are using a laptop or even a desktop monitor that has touchscreen functionality, you can use the built-in gesture support to enhance your user experience and navigation. To use the touch screen you don’t have to go through any additional configuration. It just works right out of the box.
To get you started, here are some of the most useful Windows 10 touchscreen gestures every user should know.
The list of touch gestures shown below will work both in regular desktop mode and tablet mode. When there are tablet-mode specific gestures, I will label them as such.
A quick guide to Windows 10 touchscreen gestures
- Single tap — Select file or folder
- Double tab — Open file or folder
- Tap and hold — Show the context menu
- Tap and drag — Select and move
- Pinch or stretch — Zoom out & Zoom in
- Rotate — Rotate onscreen object
- Tap, hold and swipe — Show context commands
- Swipe from right edge — Show action center
- Swipe from the left edge — Show task view
- Swipe from top edge — Show title bar on fullscreen
- Swipe from bottom edge — Show taskbar on fullscreen

Detailed explanation:
1. Single tap — Select file or folder
To select a file or folder, just do a single tap on that object. Doing so will select that file or folder instantly. This is very similar to how you can select using the mouse pointer.
2. Double tab — Open file or folder
To open a file or folder, just double-click on the file or folder. As you can guess, this is very similar to the mouse pointer double-click.
3. Tap and hold — Show the context menu
To show the context menu or right-click menu, tap and hold on the file or folder and then release. You can think of it as long-press and release.
As you can guess, you can use this gesture to show the right-click menu anywhere. Being a context menu, you will see relevant right-click options depending on the object you do the gesture on.
4. Tap and drag — Select and move
To move a file or folder, simply tap and drag it. To drop the object, release the gesture.
When you do the same gesture on an empty space like on the desktop, you will see the selection box which lets you select multiple files or folders at once.
This gesture is very similar to how you use the mouse pointer to move the files or folders or select multiple folders with the selection box.
5. Pinch or stretch — Zoom out & Zoom in
This is one of the most well-known gestures. To zoom in, simply use the two-finger pinch gesture. i.e, place two fingers apart from each other on the screen and contract them to one another.
To zoom out, use the stretch gesture with two-figures. i.e, place your two fingers in a pinch position and spread them apart.
These gestures are very useful to zoom in and out of web pages, photos, etc.
6. Rotate — Rotate onscreen object
To rotate a photo or image, simply place two fingers on the screen and turn them clockwise or anti-clockwise. Depending on which way you turn, the photo or image will rotate in that way.
In general, this gesture is only used for photos, images, and other creative applications. This gesture might not work with regular files.
7. Tap, hold and swipe — Show context commands
Windows has a second type of context menu that has fewer options like copy here, move here, create a shortcut, etc. To open that context menu, tap and hold on the file or folder for a brief second and do a quick swipe in any direction.
8. Swipe from right edge — Show action center
This gesture is pretty simple. Just swipe from the right edge to open the Notification Center or also known as the action center. From there, you can access all notifications and additional controls buttons.
9. Swipe from the left edge — Show task view
To open the Task View, swipe from the left edge. Once the task view has been opened, you can access activity history, select open apps, or create virtual desktops.
10. Swipe from top edge — Show title bar on fullscreen
To show the title bar of a full-screen application, swipe from the top edge of the screen. This gesture is only applicable when you are in tablet mode.
11. Swipe from bottom edge — Show taskbar on fullscreen
To show the taskbar when a full-screen application is active, swipe from the bottom edge of the screen. This gesture is only applicable when you are in tablet mode.
That is all. These are all the touchscreen gestures in Windows 10. If you think I missed any, comment below and share them with me. If you are facing problems with the touch screen, follow how to fix touchscreen problems in Windows 10.
Microsoft rolled out touchpad gestures along with Windows 8. The general consensus is that touch gestures for Windows computers weren’t very useful given the technology widely available at the time, but these days, that’s not true at all. Since then, they’ve given us several new gestures—ones that are actually very useful for everyday use. We might even dare to call them essential.
With the advent of 2-in-1 laptops, many of us don’t even have to decide between touchpads and touchscreens anymore. If you aren’t making full use of Windows touch gestures in your own life, we implore that you give this list a look. You just might be surprised by how useful some of them are, even for casual users.
Touchpad Gestures System Requirements
Before diving in, you should be aware that some Windows touchpad gestures will only work with a precision touchpad. Your laptop should meet these requirements if it was manufactured after the release of Windows 8.1. To check your own PC, open the Start Menu and search for «touchpad«. Select the Touchpad settings option.
Look under the Touchpad section for this phrase: «Your PC has a precision touchpad.» It should be right under the main «Touchpad» heading on the page of settings. Gestures 5 through 8 on this list require a precision touchpad, just so you know.
1. How to Drag and Drop With Touchpad Gestures
To imitate the drag-and-drop functionality of a mouse, select what you would like to drag and drop by either tapping it or double-tapping. Then, with your selection active, click on it again with two fingers and drag it elsewhere. When you’ve made it to your destination, just release your finger to drop the item wherever you need it.
2. How to Scroll With Touchpad Gestures
To scroll with a touchpad, find a window with a scrollbar. Place two fingers on your touchpad and drag them in the direction that you would like to scroll in.
This works for any application that supports scrolling, including word processors, Web browsers, and music players. It works both horizontally and vertically, as well.
3. How to Zoom With Touchpad Gestures
Zooming in and out with touch gestures is intuitive and easy: use two fingers to pinch inward to zoom in. The opposite gesture, pulling your pinched fingers away from one another, will zoom you back out.
Instagrammers of the world already use this touch gesture to take a closer look at what their friends post to the platform. This Windows touch gesture comes in handy for Web pages with tiny text or if you need to navigate quickly while editing an image.
4. How to Rotate Using Touchpad Gestures
Use two fingers and spin them in a circle on the trackpad to rotate whatever item you’ve got selected. Keep in mind that not all items can be rotated—programs like Photoshop, for example, afford you much more freedom in this area than an app like Word would.
5. How to Right-Click on Windows Touchpads
Many touchpads come with a right-click button that you can use, but if you don’t have one, if it’s broken, or if you just don’t want to use it, tapping two fingers at once will emulate the same function. If you need to open a context menu with a touchpad, this is the way to do it.
6. How to Show All Windows With Touchpad Gestures
To see all open windows with a touchpad, swipe up with three fingers at once. Task View is especially useful if you use multiple virtual desktops and need to find a window quickly. Then, tap the window that you want to switch to, or swipe down with three fingers to close Task View without selecting anything.
7. How to Minimize All Windows With a Touchpad
To minimize all open windows, swipe down with three fingers. You’ll then be presented with the desktop Swipe up with three fingers to restore the windows again.
8. How to Use Touchpad Gestures to Switch to Next Application
Cycling through open applications using Alt + Tab is one of those keyboard shortcuts every Windows user should know. If you’ve got a touchpad, you can do the same by swiping to the left or right using three fingers. Swiping left cycles backward and swiping right cycles forward.
9. How to Activate Cortana or Action Center With Touchpad Gestures
You can do a lot of cool stuff with Cortana, like searching the Web or controlling your music. There’s also the new and awesome Action Center for quick settings management. You can access both by tapping three fingers.
You can decide whether this gesture activates Cortana or opens the Action Center under your settings. If you don’t want either, though, you can disable Cortana and tweak the registry to disable the Action Center, as well.
Touchscreen Gestures
If you have a touchscreen device like a tablet or a 2-in-1 laptop, you can use the following Windows touch gestures.
1. Touchscreen Scroll
To scroll with a touchscreen, use one finger to drag your window in the direction that you want to scroll in. This is pretty much a universal gesture. It works in any app, whether horizontally or vertically, much like the scroll touchpad gesture.
2. Dragging With a Touchscreen
To imitate the drag-and-drop functionality of a mouse, tap the item with one finger. Once it’s selected, grab it again with another single-finger tap, dragging it where you want to put it.
3. How to Right-Click on a Touchscreen
To right-click or to open up a context menu with Windows touchscreen gestures, use one finger to tap and hold the relevant item. This will either open up a menu of actions that you can choose from or it will give you more information about whatever item you have selected.
4. How to Open the Action Center With Touchscreen Gestures
To open the Action Center, use one finger to swipe in from the right edge of the touchscreen.
5. Bring Up Task View
To view all open apps, use one finger and swipe in from the left edge. This brings up Task View, which shows you all open windows. Tap the windows you wish to bring forward or touch an empty spot to close Task View.
To snap, move, or close a window, long-tap and release the item to bring up the respective menu.
6. Windows Touchscreen Gestures: App Commands
Some apps offer app-specific commands that you can access by using one finger to swipe in from the top edge or the bottom edge. Examples include Refresh for browsers and New Document for text editors.
7. How to Close Current App With Touchscreen Gestures
To close the app open currently, you can use one finger to swipe in from the top edge all the way down to the bottom edge. This feature only works in Tablet Mode.
8. How to Zoom on a Touchscreen
Zooming in or out on a touchscreen is just the same as zooming in and out on a touchpad. Pinching two fingers in zooms you in and pulling them apart zooms you out.
9. How to Rotate Using a Touchscreen
With two fingers on the screen, drag them in a circle to rotate the selected object. In some apps, you can use this touchscreen gesture to rotate the entire window or UI.
Touchpad vs. Touchscreen: Which Team Are You On?
Even if you’re a diehard mouse advocate, the usefulness of all of these touchpad gestures and touchscreen gestures cannot be denied. You might be surprised at how much you love using them after giving a touchpad or touchscreen interface a try.
Us, personally? Having at least one at our disposal is non-negotiable. Touch gestures for Windows have become just as much a part of our professional lives as our favorite mug of coffee in the morning.
Управление Windows 10 на сенсорных устройствах – новые жесты

В систему Windows 10 внесли несколько изменений и улучшений в использовании жестов. Для того, чтобы использовать их все, на устройстве должна быть точная сенсорная панель. Если у Вас её нет, поэкспериментируйте, чтобы определить, какие из жестов будут работать на вашем компьютере.
Чтобы проверить, оснащен ли компьютер точной сенсорной панелью, откройте меню «Пуск», а затем выберите пункт Параметры → Устройства → Мышь и сенсорная панель.
Когда Вы это проверите, попробуйте некоторые из последних добавленных жестов:

- Быстро проведите тремя пальцами вверх, чтобы открыть вид задач и увидеть все открытые приложения.
- Быстро проведите тремя пальцами вниз, чтобы отобразить рабочий стол.
- Быстро проведите тремя пальцами влево или вправо для переключения между открытыми приложениями. Медленно проведите пальцами по сенсорной панели, чтобы перейти через все открытые приложения.
Это еще не все! Есть ещё несколько новых жестов. Проверьте все:
- Выбор элемента: Нажмите на сенсорную панель.
- Перейти: Поместите два пальца на сенсорной панели и проведите ими по горизонтали или вертикали.
- Увеличение или уменьшение: Поместите два пальца на сенсорной панели и выполните жест сжатия или растяжения.
- Показать дополнительные команды (так же, как и при нажатии правой кнопкой мыши): Коснитесь сенсорной панели двумя пальцами или нажмите в правом нижнем углу.
- Отображение всех открытых окон: Расположите три пальца на сенсорной панели и проведите ими друг от друга.
- Показ рабочего стола: Расположите три пальца на сенсорной панели и проведите ими друг к другу.
- Переключение между открытыми окнами: Расположите три пальца на сенсорной панели и проведите ими вправо или влево.
Некоторые из этих жестов поддерживается только в случае точных сенсорных панелей, поэтому следует считаться с возможностью, что не все из них будут работать на вашем устройстве.
Источник
10 жестов, которые пригодятся пользователям Windows 10
Выполняйте рутинные действия ещё быстрее.
Жесты для тачпада упрощают управление окнами и другими элементами системы. Используйте их, чтобы оптимизировать свою работу на ПК.
Некоторые жесты предназначены для высокоточных сенсорных панелей и могут не работать на вашем устройстве.
Кроме того, отдельные функции могут быть отключены производителем в настройках тачпада. Проверить это и включить необходимые жесты можно в меню «Пуск» → «Параметры» → «Устройства» → «Сенсорная панель».
1. Прокручивайте содержимое окна вверх или вниз
Прикоснитесь двумя пальцами к сенсорной панели и проведите в нужную сторону по вертикали.
2. Прокручивайте содержимое окна вправо или влево
Прикоснитесь двумя пальцами к сенсорной панели и проведите ими в нужную сторону по горизонтали.
3. Вызывайте контекстное меню
Тап двумя пальцами откроет меню, которое появляется обычно после правого клика мышкой. В некоторых моделях сенсорных панелей этого же можно добиться тапом одним пальцем в правом нижнем углу тачпада.
4. Просматривайте все открытые окна
Проведите тремя пальцами снизу вверх, чтобы перед вами появились уменьшенные окна запущенных программ и открытых веб-страниц.
Сейчас читают 🔥
5. Сворачивайте все окна
Если вы развернули одно или несколько окон, то свайп вниз тремя пальцами по тачпаду свернёт все и покажет рабочий стол.
6. Переключайтесь между открытыми окнами
Свайп влево или вправо тремя пальцами позволит вам последовательно переключаться между несколькими открытыми окнами.
7. Вызывайте поиск
Прикоснитесь к тачпаду тремя пальцами, чтобы перед вами появилась панель поиска Windows 10 или виртуальный голосовой помощник Cortana (в тех странах, где доступна эта функция).
8. Регулируйте масштаб
Прикоснитесь двумя пальцами к сенсорной панели, а затем начните разводить их или сводить. Этот жест позволяет не только изменять масштаб изображений в просмотрщиках и графических редакторах, но и работает во многих браузерах, позволяя быстро увеличивать или уменьшать размер текста на странице.
9. Открывайте центр уведомлений
Коснитесь сенсорной панели четырьмя пальцами.
10. Переключайтесь между виртуальными рабочими столами
Положите четыре пальца на сенсорную панель и проведите вправо или влево.
Источник
Как отключить жесты экрана и тачпада в Windows 10
Ещё в Windows 8 разработчики Microsoft начали работать над упрощением управления элементами системы. Много из них переехало и в Windows 10. К примеру, свайпы от края сенсорного экрана или высокоточного тачпада, которые отвечают за те или иные функции (вызов окна просмотра задач, сворачивание программы и так далее). Если вам по каким-то причинам не нравится работа этих жестов, тогда эта инструкция расскажет, как их отключить.
Отключение жестов высокоточного тачпада в Windows 10
Официального способа отключения жестов Microsoft до сих пор не предоставила, но продвинутые пользователи всё-таки отыскали метод сделать это с помощью редактора реестра. Стоит заметить, что указанное руководство отключает жесты лишь для конкретного пользователя компьютера. Для других учётных записей придётся проделать эти же действия.
Предупреждение: все действия в инструкции надо выполнять от имени администратора.
- Нажмите Win + R.
- Введите команду regedit и нажмите Enter.


В Windows 10 Creators Update добавлены более тонкие настройки жестов. Найти их можно в приложении Параметры — Устройства — Сенсорная панель. Возможно, вариант с персонализацией жестов будет для вас более предпочтительным, чем их полное отключение, поскольку позволит настроить тачпад именно для ваших нужд или привычек.
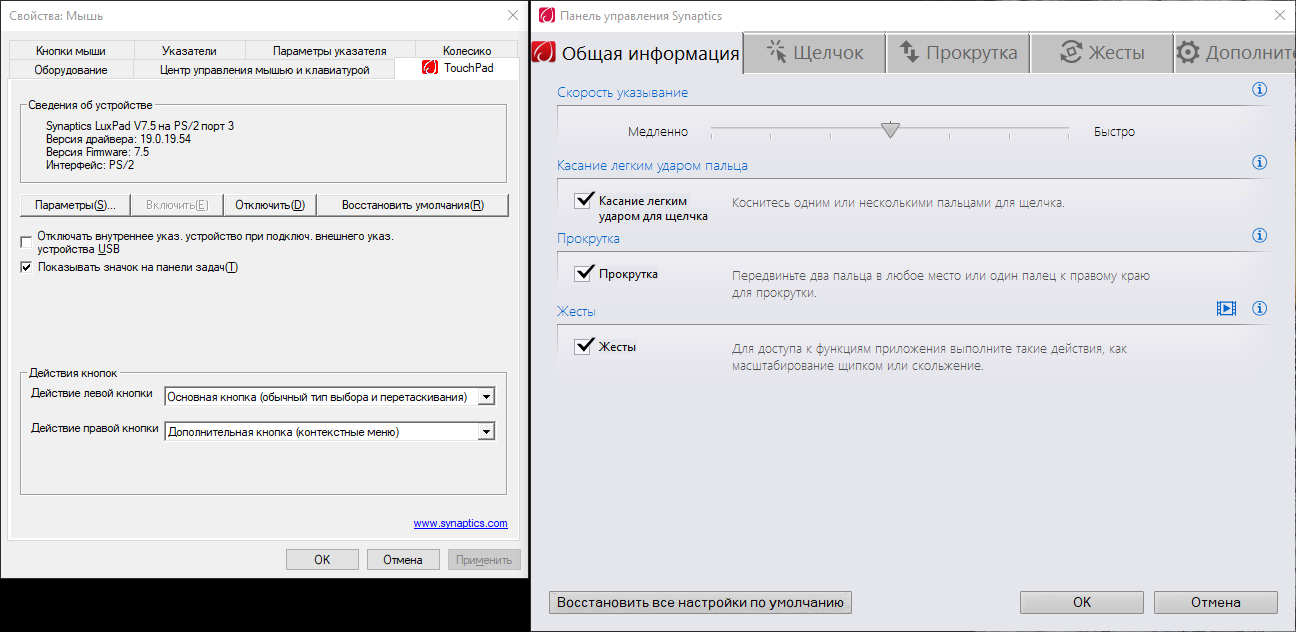
Тачпады Synaptics
В устройствах бюджетного и среднего ценового диапазона обычно встроены более дешевые панели от Synaptics (впрочем, такое встречается даже в топовых девайсах, вроде HP Spectre x360). Если у вас именно такой, тогда вы не найдёте настроек сенсорной панели в приложении Параметры, а приведённое выше решение по отключению жестов не сработает. Для персонализации панели вам нужно использовать фирменную утилиту Synaptics:
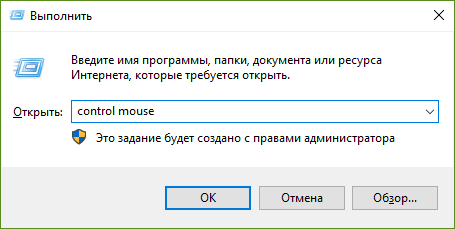
- Нажмите Win + R.
- Введите следующую команду и нажмите Enter: control mouse
- Перейдите во вкладку Touchpad или Настройки ClickPad.
- Найдите кнопку Настройки или Параметры, и в новом окне отыщите нужные вам опции.
Интерфейс этих окон довольно сильно отличается в зависимости от версии драйвера, прошивки тачпада и самой панели. Например, так они выглядят в HP ProBook 450 G1 и HP Spectre x360 G2:
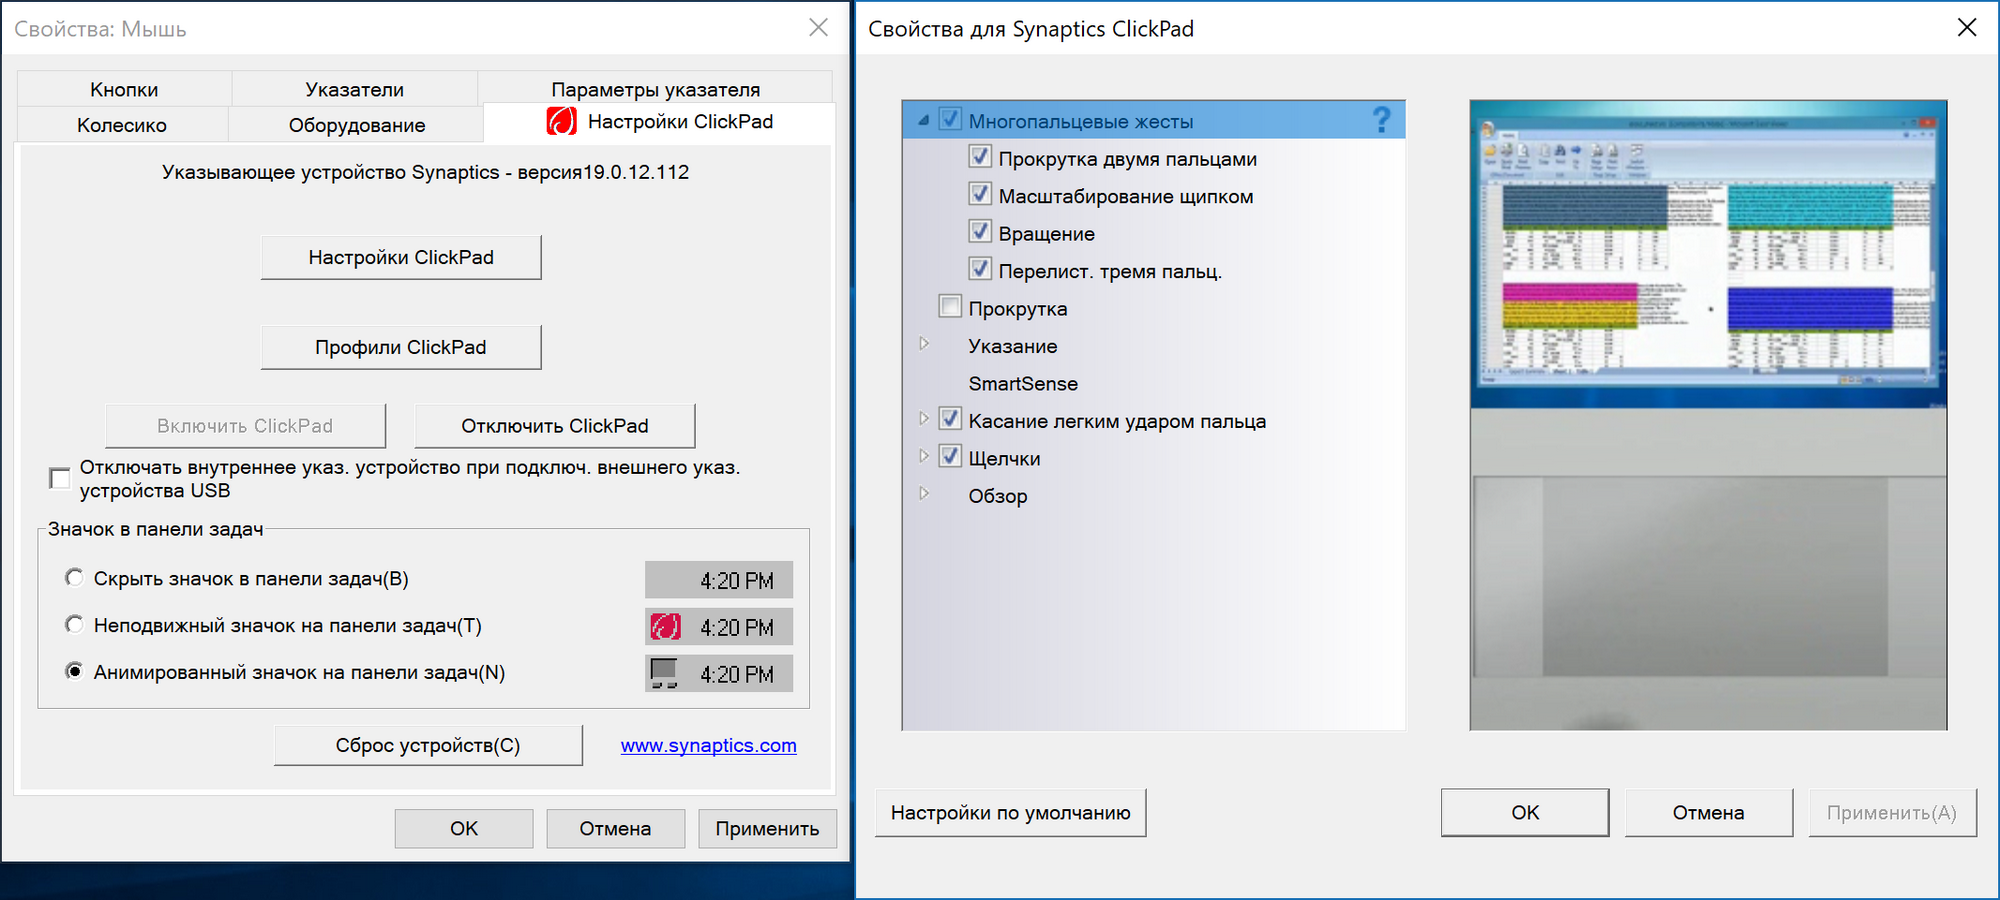
HP Spectre x360 G2
Подробные инструкции по этому поводу обычно можно найти на сайте производителя устройства.
Отключение жестов сенсорного экрана в Windows 10
Владельцам планшетов или трансформеров на Windows 10 повезло больше. Разработчики Microsoft предусмотрели отключение экранных жестов, так что приведённый ниже способ точно должен сработать.
Как выключить жесты экрана с помощью редактора локальных групповых политик
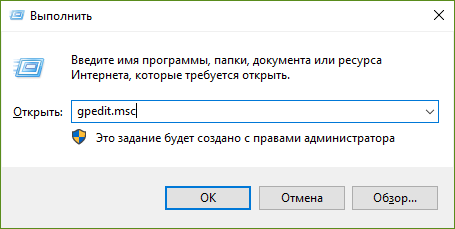
Этот метод работает только в Windows 10 Pro и выше (в том числе Windows 10 S), так как в младших изданиях Windows отсутствует редактор локальных групповых политик.
- Нажмите Win + R. Введите команду gpedit.msc и нажмите Enter.
- Пройдите в раздел Конфигурация пользователя — Административные шаблоны — Компоненты Windows — Пользовательский интерфейс границ.
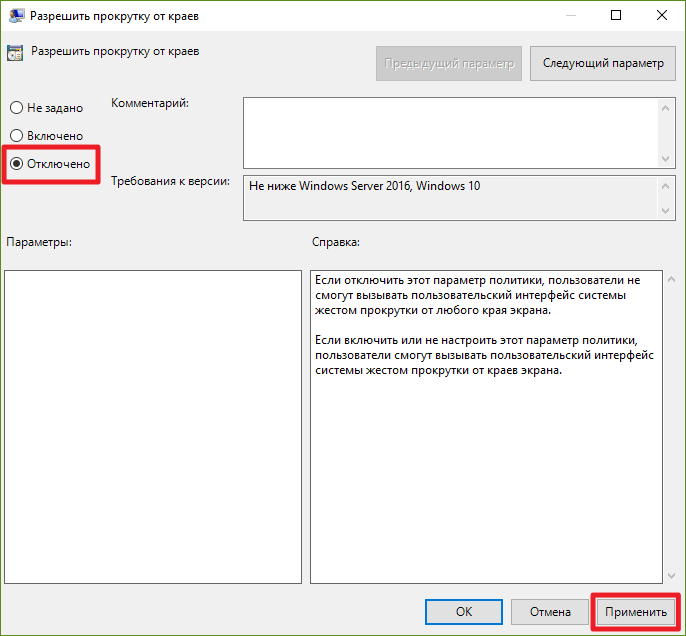
- Найдите справа параметр Разрешить прокрутку от краев и кликните по нему два раза.
- Выберите положение Отключено, нажмите Применить и ОК.
- Перезагрузите устройство.
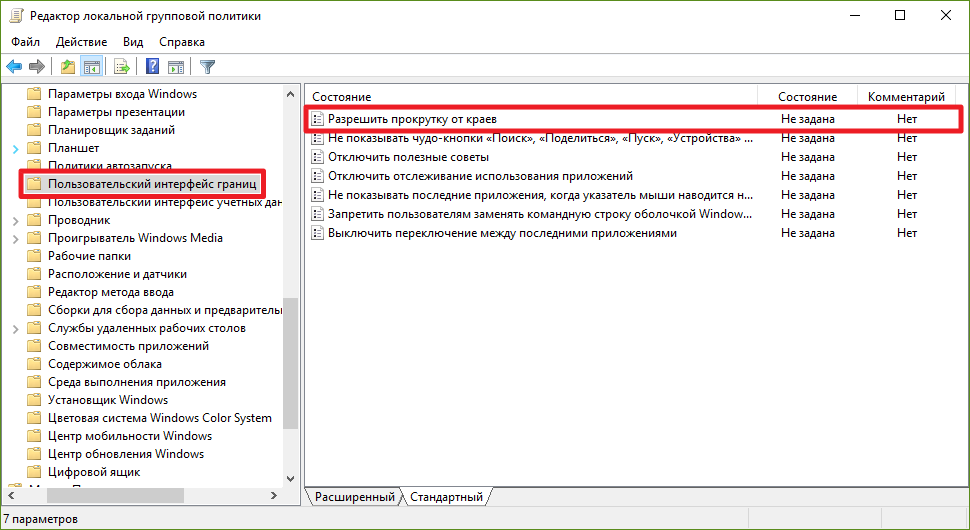
Изменения сработают только для текущего пользователя. Если вы хотите применить их ко всем учётным записям компьютера, измените тот же параметр по пути Конфигурация компьютера — Административные шаблоны — Компоненты Windows — Пользовательский интерфейс границ.
Как отключить жесты экрана с помощью редактора реестра
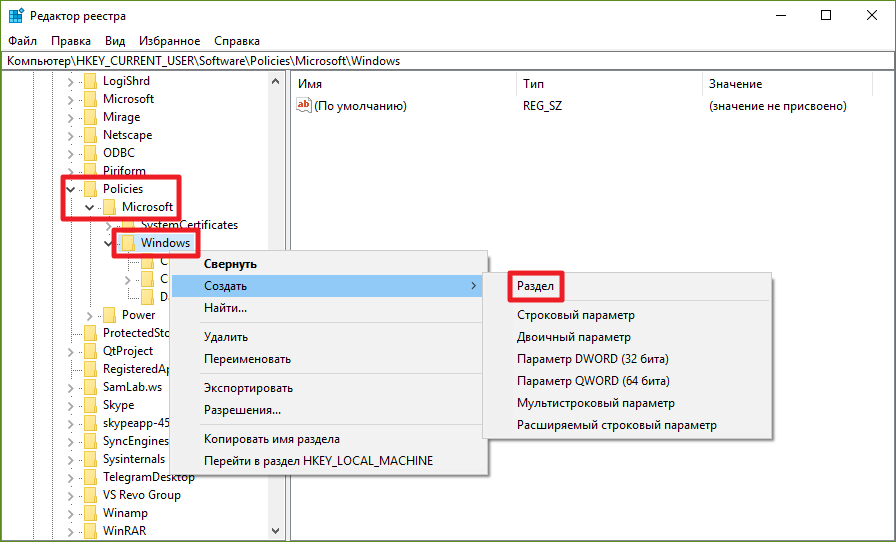
Данный способ предназначен для пользователей Windows 10 Home и Home SL.
- Нажмите Win + R. Введите команду regedit и нажмите Enter.
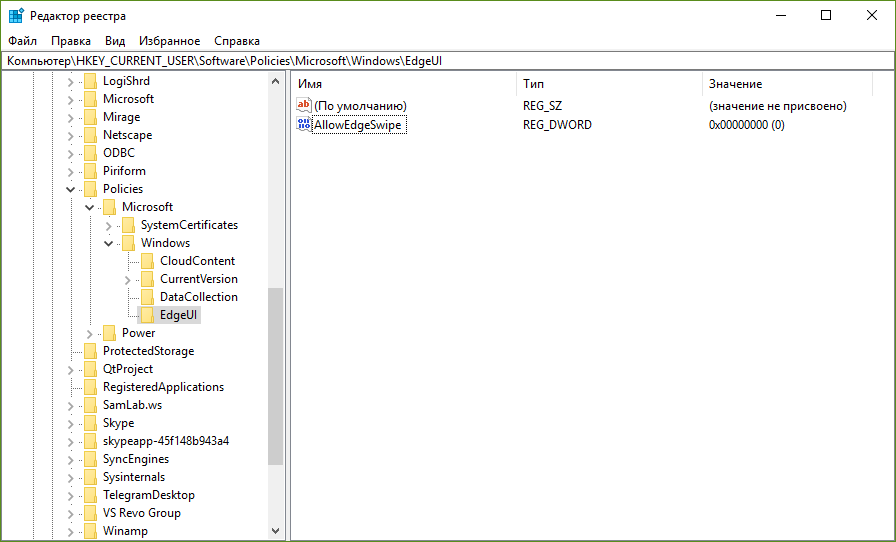
- Пройдите в HKEY_CURRENT_USER\SOFTWARE\Policies\Microsoft\Windows.
- Кликните по папке Windows правой клавишей мыши и выберите пункт Создать — Раздел.
- Назовите новую директорию EdgeUI и зайдите в неё.
- Кликните в правой части редактора реестра правой клавишей мыши и выберите пункт Создать — Параметр DWORD (32 бита).
- Дайте новому ключу имя AllowEdgeSwipe. По умолчанию его значение будет равняться 0.
- Перезагрузите устройство.

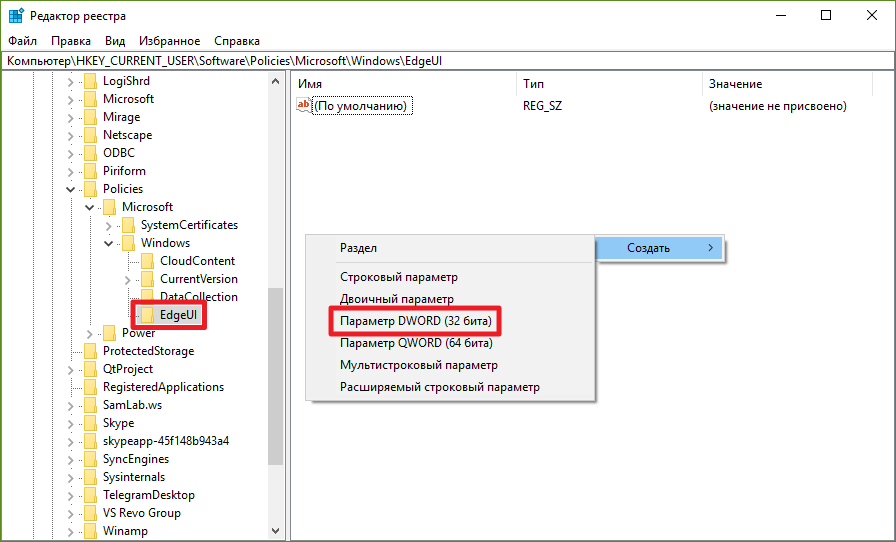
Изменения коснутся только текущего пользователя. Если вы хотите применить их для всех учётных записей, работайте в категории HKEY_LOCAL_MACHINE, а не в HKEY_CURRENT_USER.
Теперь вы умеете отключать жесты на сенсорных экранах или высокоточных тачпадах.
Источник