Skip to content
It is now possible to change Default Terminal Application in Windows 10. The appropriate option is available starting in build 21390 and Windows Terminal 1.9, which can now be set as the default host for console apps in Windows.
The default console host is the application that handles execution of any command line application such as PowerShell, command prompt, etc. They will work inside the specified terminal emulator session by default.
For example, if you select Windows Terminal, PowerShell and command prompt will run sessions will always run inside Windows Terminal.
However, if you select Windows Console Host, this will restore the classic behavior of Windows, and you will have PowerShell, command prompt, WSL, and other console apps running in their own PowerShell and command prompt window.
This post will show you how to change the default terminal app to Windows Console Host or Windows Terminal on Windows 10. This can be done either in command prompt properties or in Windows Terminal settings.
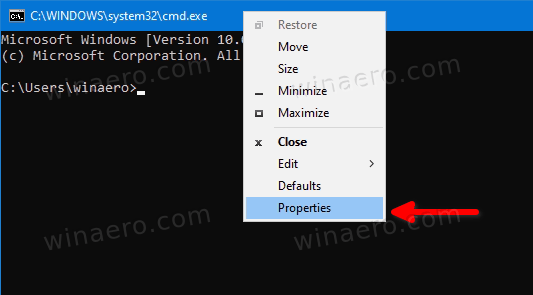
- Open a new Command Prompt or PowerShell window.
- Right-click the title bar and select Properties from the menu.

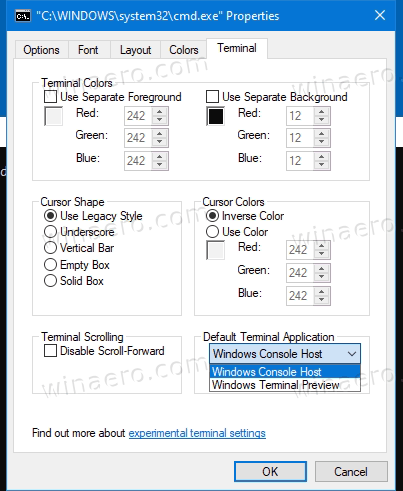
- Switch to the Terminal tab in the Properties dialog.
- Under Default Terminal Application, select either Windows Console Host or Windows Terminal.

- Click OK to apply the change.
You are done.
Note that if the option will not be available if you have already set the default terminal application to Windows Terminal. In this case, you will need to use the following method instead.
Set Default Terminal app in Windows Terminal Settings
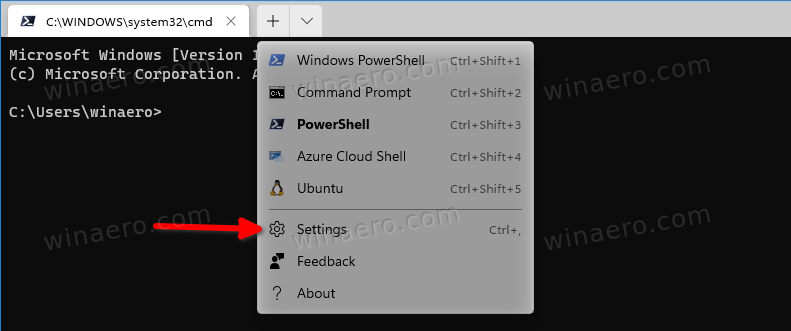
- Open the Windows Terminal app.
- Click on the down arrow icon next to the New tab button.
- Now, select Settings from the menu.

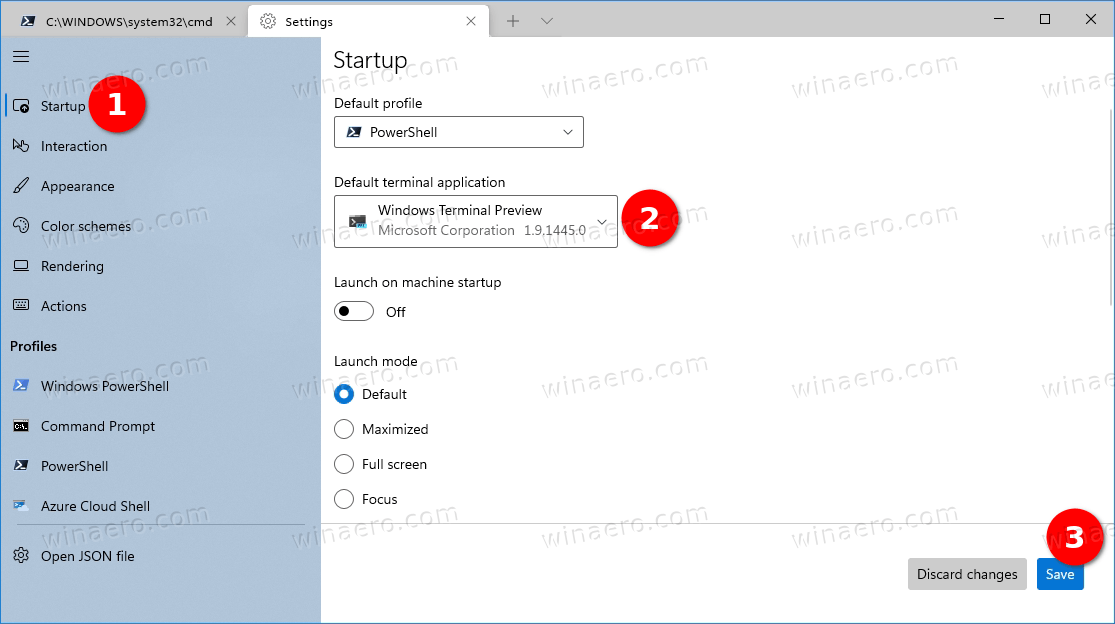
- Click on the Startup section on the left.
- On the right, select Windows Console Host or Windows Terminal for what you want in the Default Terminal Application drop-down list.

- Finally, click on the Save button to apply the changes.
That’s it.
Support us
Winaero greatly relies on your support. You can help the site keep bringing you interesting and useful content and software by using these options:
If you like this article, please share it using the buttons below. It won’t take a lot from you, but it will help us grow. Thanks for your support!
Original author’s edit note: My original answer below is now outdated. Please see @KenvixZure’s answer for information on how to do this in the latest Windows 10 release. I’m leaving this answer here for historical purposes (and at the request of the question-poster).
Sometimes «negative» answers («no») are unfortunately the only answer. While we can always hope that someone has a workaround, I don’t believe that’s likely to be the case.
It seems this menu option was removed on Windows 10 from the current terminals. Probably in order to leave as a special feature of Windows 11.
Not really, no. Those Windows changes in Windows 10 Insider weren’t «removed». Windows 10 Insider was the staging ground for what became Windows 11. Based on that, it’s completely expected that new features will only be available in Windows 11 going forward. I don’t expect Microsoft (or any developer) to backport new features to old releases.
And no, you can’t run one of the old Windows 10 Insider builds, as they expire.
Additional info:
The feature was first made available in some Windows 10 Insider builds coupled, of course, with Windows Terminal preview builds. There are two parts to the feature:
- The Windows/COM interface changes needed to allow a different terminal to be set as default.
- The implementation of a terminal that can implement the COM server necessary to act as the default.
In theory, it’s possible to make changes to any terminal under Windows (ConEmu, Alacritty, etc.) to allow it to be set as default, but as I mention in this answer, the COM implementation needed is quite difficult.
Windows Terminal is a new and improved command-line interface available on the Windows 10 and 11 operating systems, which combines your favorite command lines including Command Prompt, PowerShell, and Bash (Windows Subsystem for Linux (WSL)). Not only that, but it also includes other command-line tools like Azure Cloud Shell Connector, SSH, etc.
Other than that, it offers some new features as well. Windows Terminal has multi-tab support, so you do not have to open separate windows for each command line instance.
In this article, we will discuss how to open and operate the Windows Terminal, how you can take advantage of the easy-open option in the context menu, and how to make Windows Terminal the default command-line app.
This page covers
Download and install Windows Terminal
Windows 11 now comes preinstalled with Windows Terminal. However, this does not mean that the legacy command-line tools (PowerShell and Command Prompt) have been replaced just yet. Even though Microsoft plans on replacing these standalone applications, they are still available as of writing this post.
That said, if you are using Windows 10, you won’t find Windows Terminal installed by default. Instead, you will need to download it from Microsoft Store. Use the following guide to download Windows Terminal on Windows 10:
Note: You can also use the following steps to install Windows Terminal on Windows 11 if you accidentally, or deliberately uninstalled it earlier.
-
Open the Windows Terminal Microsoft Store page using any web browser.
-
Click “Get in Store app.”

Get Windows Terminal from Microsoft Store -
Allow opening Microsoft Store by clicking “Open Microsoft Store.”
Allow opening Microsoft Store -
Click “Get.”

Get Windows Terminal Windows Terminal will now begin downloading and installing
-
When installed, click “Open.”
Open Windows Terminal


Windows Terminal will now be installed on your PC (if previously not available). Once installed, continue to learn the many ways to open and access Windows Terminal.
How to open Windows Terminal
The quickest way to open Windows Terminal is from the context menu. The best thing about this method is that you can open the Terminal at any location. This way, you later do not have to provide commands to change the directory.
All you need to do is right-click on a blank space on the desktop or any directory and click “Open in Terminal”.

The option to open a Windows terminal inside any directory is available by default on Windows 11. However, it is not true for Windows 10. Even after installing Windows Terminal on Windows 10, the option to open Windows Terminal from the context menu is not added.
You can add this option to open Windows Terminal from the context menu on Windows 10 manually using the method given further down this post.
Open Windows Terminal from Run Command box
Another method to open Windows Terminal is from the Run Command box. This method works on both Windows 10 and 11, as long as the application is installed.
-
Press the Windows Key + R shortcut keys to open the Run Command box.
-
Type in “wt” or “wt.exe” and press Enter.

Open Windows Terminal from Run Command box

This will now launch the Windows Terminal.
Another method to open Windows Terminal is by searching for it either from the Start menu or from the search box in the taskbar.
Simply search for “Terminal” and open the highlighted application.

As we mentioned earlier, on Windows 10, you may find the option to open the Windows Terminal from the context menu, even when the app has been installed. Not to worry!
You can add the option to the context menu manually, which will then operate as if it was the real deal.
Note: The method to add or remove the “Open in Terminal” option in the context menu requires making changes in the Windows Registry. Misconfiguration of critical values in the system’s registry could be fatal for your operating system. Therefore, we insist that you create a system restore point or a complete system image backup before proceeding forward with the process.
You can also use our top selection of disk imaging and backup software so you never lose your data or operating system again.
To add the “Open in Terminal” option to the context menu, download the following file by clicking on it, extract the .REG file inside, and execute it. Following prompts to allow the file to run.
Add Open in Terminal context menu.zip (400 bytes, 43 hits)
Once executed, restart the computer for the changes to take effect.
Similarly, if you want to remove the option from the context menu in the future, use this .REG file instead:
Remove Open in Terminal context menu.zip (400 bytes, 62 hits)
How to make Windows Terminal the default command line
The Windows OS, by default, is set to choose the default command-line application depending on the type of file you are opening. It will usually choose between the Command Prompt and Windows PowerShell when you open a file containing commands. However, there are several ways to change this.
You can set your computer to use Windows Terminal instead of the standalone command-line apps. Below are all the available methods.
Make Terminal the default command line from Settings app
One method is to make the Windows Terminal the default command-line application from the Settings app. Use the steps below to set it as the default app.
Note that this method is also valid for Windows 10 once Windows Terminal has been installed from Microsoft Store.
-
Press the Windows key + i shortcut keys to open the Settings app.
-
Go to the following:
Privacy & security >> For developers
-
Scroll down and expand the drop-down menu in front of “Terminal.”

Open Terminal options from Settings -
Select “Windows Terminal.”
Set Windows Terminal as the default terminal


Make Windows Terminal the default command line from the Terminal
Since the Windows Terminal is a modern command-line tool, it also has built-in settings and preferences which you can configure according to your needs and requirements. Moreover, you can also use the built-in settings in the Terminal to set it as the default command-line tool. Here is how:
-
Open Windows Terminal using one of the methods shared above.
-
Click on the down-arrow button at the top and then click “Settings.” Alternatively, you can use the CTRL + , shortcut keys to open the settings.
Open Terminal settings -
In the Startup tab, expand the drop-down menu in front of “Default terminal application” and select “Windows Terminal.”
Set Windows Terminal as the default command line app from the Terminal settings -
Click Save for the changes to take effect.


Make Terminal the default command line app from Windows console
When we say “Windows console,” we mean either the Command Prompt or PowerShell. You can also set the Terminal as the default command-line tool directly from these Windows consoles. Here is how:
-
Open either of the Windows consoles.
-
Right-click the top title bar and then click “Properties.”

Open Windows console properties -
Switch to the “Terminal” tab.
-
Expand the drop-down menu in the “Default Terminal Application” section and select “Windows Terminal.”
Set Windows Terminal as the default command line app from Windows console preferences -
Click Ok.


This concludes the 3 methods to set Windows Terminal as the default command-line tool on your PC. However, there are more configuration options in the Terminal that you ought to know about.
Set the default Terminal profile
As we mentioned, the Windows Terminal has multiple tools built right into the app. When you open the Terminal, you will notice that, by default, it opens a PowerShell tab. You can change it to a different command-line tool, like the Command Prompt, or the Azure Cloud Shell, so you won’t have to re-open a new tab every time.
This is known as the default profile in Terminal. You can use the following steps to change the default profile in Windows Terminal:
-
Open Windows Terminal using one of the methods shared above.
-
Click on the down-arrow button at the top and then click “Settings.” Alternatively, you can use the CTRL + , shortcut keys to open the settings.
Open Terminal settings -
In the Startup tab, expand the drop-down menu in front of “Default profile” and select the profile that you want to set as default.
Select the default profile for Windows Terminal -
Click Save for the changes to take effect.

Tab personalization in Windows Terminal
Now that you have learned the basics for the Windows Terminal here is some extra knowledge that you can benefit from.
Windows Terminal offers some extra personalization features that can potentially help you be more productive. These features include using a split-screen within the same tab, renaming the tab, changing the tab’s color, and some other options.
All these options can be found when you right-click on the tab within the Terminal.

Additionally, you can also find and look for a command or syntax using the “Find” option, or by pressing the CTRL + F shortcut keys.
Conclusion
Windows Terminal is a new and improved, and merged version of the other command-line interfaces within the Windows operating system. Programmers and other people who prefer using different command lines can now benefit from having the combined features under one roof.
If you still find yourself working with Command Prompt and PowerShell, or other supported command-line interfaces, perhaps it is time to shift to Windows Terminal for good.
Windows Terminal is a modern, feature-rich terminal application for users who work on the command line. It provides a multi-tabbed command-line interface where you can run any command-line application, including Windows 10 Command Prompt, PowerShell, WSL, SSH, and Azure Cloud Shell Connector.
Recently, Microsoft announced Windows Terminal 1.9, which now allows you to set the Windows Terminal as your default terminal emulator. If you are a Terminal user, continue reading to learn how to change the default terminal app on Windows 10.

How to change default terminal application in Windows 10
To change the default terminal application in Windows 10, you should be running Windows 10 Build 21390 or above. Then follow the steps as mentioned below to set Windows Terminal as your default terminal app:
- Open the Windows Terminal app version 1.9 or higher.
- Click the down arrow icon, present next to the «New Tab» button.
- Click the Settings menu item.
- On the right-side panel, click the dropdown that says «Default terminal application».
- Select «Windows Terminal Preview» and click Save.


That’s all the changes. The next time you try to run a command-line application, it will be launched through the Windows Terminal app.
Thank you for visiting our website! We value your engagement and would love to hear your thoughts. Don’t forget to leave a comment below to share your feedback, opinions, or questions. We believe in fostering an interactive and inclusive community, and your comments play a crucial role in creating that environment.
- Windows Terminal can be set as the default app for launching PowerShell and Command Prompt.
- Windows Terminal: Open Settings > Startup > Default terminal application > Windows Terminal.
- Windows Console Host: Open Defaults > Terminal > Default Terminal Application > Windows Terminal.
On Windows 10, you can now open Command Prompt, PowerShell, and WSL directly into the Windows Terminal app instead of the legacy Windows Console Host. The ability to set the default terminal emulator for the command-line interpreters is available starting with Windows 10 build 21390 and higher and Windows Terminal version 1.9 and higher releases.
The startup behavior can be set in the Windows Console Host defaults configuration and the Windows Terminal settings. However, you can only undo the option from the Terminal app settings.
In this guide, you will learn the steps to make the Windows Terminal experience the default application for launching Command Prompt and PowerShell on Windows 10.
- Set Windows Terminal default app for Command Prompt and PowerShell
- Set Windows Console Host default app for Command Prompt and PowerShell
To open Command Prompt, PowerShell, and WSL with the Windows Terminal app by default, use these steps:
-
Open Windows Terminal.
-
Click the menu (down-arrow) button and select the Settings option.
-
Click on Startup.
-
Use the “Default terminal application” setting and select the Windows Terminal option.

Windows Terminal default app -
Click the Save button.

Once you complete the steps, the next time you open Command Prompt or PowerShell, the command-line tool will open on Windows Terminal instead of the legacy Windows Console Host.
Set default terminal app in Windows Console Host
Alternatively, you can always enable the feature within the Windows Console Host with these steps:
-
Open Start.
-
Search for Command Prompt or PowerShell and click the top result to open the app.
-
Right-click the title bar and select the Defaults option.

Console context menu -
Click the Terminal tab.
-
Under the “Default Terminal Application” section, select the Windows Terminal option.

Windows Console Host terminal settings -
Click the OK button.


After you complete the steps, the apps will launch automatically using the Windows Terminal application.
Set Windows Console Host default app for Command Prompt and PowerShell
To make again the Windows Console Host the default app experience for PowerShell, WSL, and Command Prompt, use these steps:
-
Open Windows Terminal.
-
Click the menu (down-arrow) button and select the Settings option.
-
Click on Startup.
-
Use the “Default terminal application” setting and select the Windows Console Host option.
Windows Console Host default app -
Click the Save button.

Once you complete the steps, the command-line tools will no longer open by default inside the Windows Terminal application.
Since the applications won’t open with the Windows Console Host option is enabled, the only way to disable this behavior is through the Windows Terminal settings.
We may earn commission for purchases using our links to help keep offering the free content. Privacy policy info.
All content on this site is provided with no warranties, express or implied. Use any information at your own risk. Always backup of your device and files before making any changes. Privacy policy info.