 Одна из проблем, встречающаяся в Windows 10, похоже, чаще, чем в предыдущих версиях ОС — загрузка диска на 100% в диспетчере задач и, как следствие, заметные тормоза системы. Чаще всего это просто ошибки работы системы или драйверов, а не работа чего-либо вредоносного, но возможны и иные варианты.
В этой инструкции подробно о том, почему жесткий диск (HDD или SSD) в Windows 10 может быть загружен на 100 процентов и что делать в этом случае, чтобы исправить проблему.
Примечание: потенциально некоторые из предложенных способов (в частности, способ с редактором реестра), могут привести к проблемам с запуском системы при невнимательности или просто стечении обстоятельств, учитывайте это и беритесь, если готовы к такому результату.
Программы, активно использующие диск
Несмотря на то, что этот пункт сравнительно нечасто оказывается причиной нагрузки на HDD в Windows 10, рекомендую начать с него, особенно если вы не являетесь опытным пользователем. Проверьте, а не является ли какая-то установленная и запущенная (возможно, находящаяся в автозагрузке) программа причиной происходящего.
Для этого вы можете выполнить следующие действия
- Откройте диспетчер задач (сделать это можно через правый клик по меню пуск, выбрав соответствующий пункт в контекстном меню). Если в нижней части диспетчера задач вы увидите кнопку «Подробнее», нажмите ее.
- Отсортируйте процессы в колонке «Диск», нажав на ее заголовок.


Обратите внимание, а не какая-то из ваших собственных установленных программ вызывает нагрузку на диск (т.е. находится первой в списке). Это может быть какой-либо антивирус, выполняющий автоматическое сканирование, торрент-клиент, или просто неправильно работающее ПО. Если это так, то стоит убрать эту программу из автозагрузки, возможно, переустановить ее, то есть искать проблему с нагрузкой на диск не в системе, а именно в стороннем ПО.
Также нагружать диск на 100% может какая-либо служба Windows 10, запущенная через svchost.exe. Если вы видите, что именно этот процесс вызывает нагрузку, рекомендую посмотреть статью про svchost.exe грузит процессор — в ней приводится информация о том, как с помощью Process Explorer узнать, какие именно службы запущены через конкретный экземпляр svchost, вызывающий нагрузку.
Неправильная работа драйверов AHCI
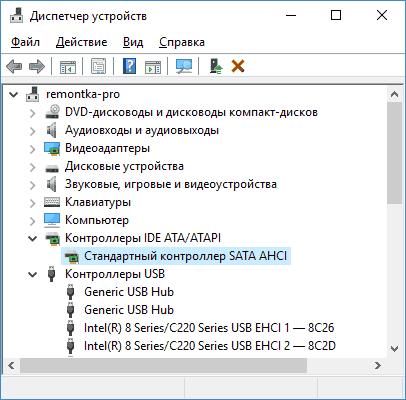
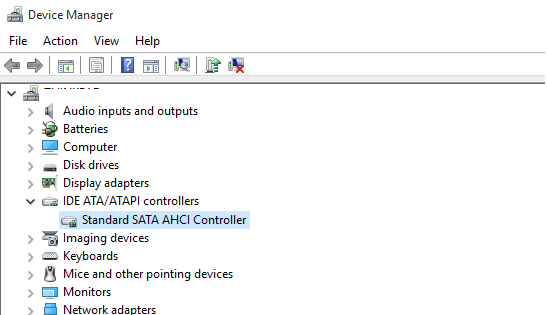
Мало кто из пользователей, устанавливающих Windows 10, выполняет какие-либо действия с драйверами дисков SATA AHCI — у большинства в диспетчере устройств в разделе «Контроллеры IDE ATA/ATAPI» будет значится «Стандартный контроллер SATA AHCI». И обычно это не вызывает проблем.
Однако, если без видимых причин вы наблюдаете постоянную нагрузку на диск, следует обновить этот драйвер на тот, что предусмотрен производителем вашей материнской платы (если у вас ПК) или ноутбука и доступен на официальном сайте производителя (даже если там он в наличии только для предыдущих версий Windows).
Как произвести обновление:
- Зайдите в диспетчер устройств Windows 10 (правый клик по пуску — диспетчер устройств) и посмотрите, действительно ли у вас установлен «Стандартный контроллер SATA AHCI».
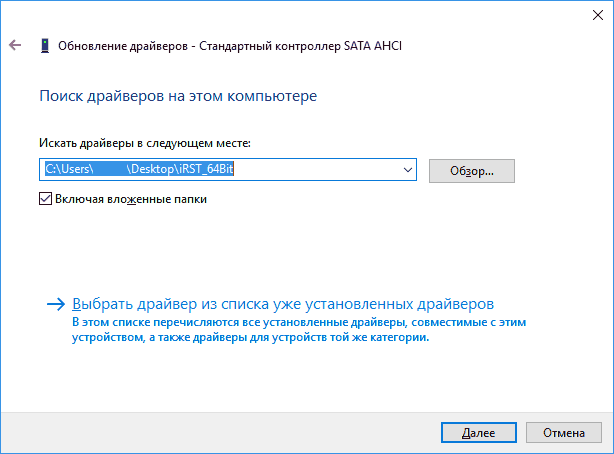
- Если да, найдите раздел загрузки драйверов на официальном сайте производителя вашей материнской платы или ноутбука. Найдите там драйвер AHCI, SATA (RAID) или Intel RST (Rapid Storage Technology) и загрузите его (на скриншоте ниже пример таких драйверов).

- Драйвер может быть представлен в виде установщика (тогда просто запускаем его), либо в виде zip-архива с набором файлов драйвера. Во втором случае распаковываем архив и выполняем следующие шаги.
- В диспетчере устройств нажмите правой кнопкой мыши по Стандартному контроллеру SATA AHCI и нажмите «Обновить драйверы».
- Выберите «Выполнить поиск драйверов на этом компьютере», затем указываем папку с файлами драйвера и нажимаем «Далее».

- Если всё прошло успешно, вы увидите сообщение о том, что ПО для данного устройства было успешно обновлено.


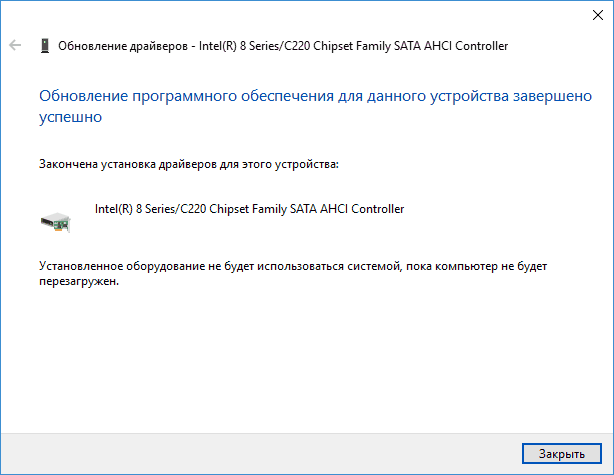
По завершении установки, перезагрузите компьютер и проверьте, остается ли проблема с нагрузкой на HDD или SSD.
Если не удается найти официальные драйвер AHCI или он не устанавливается
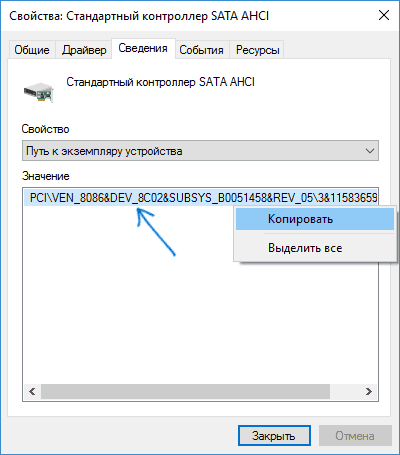
Данный способ может исправить 100-процентную нагрузку на диск в Windows 10 только в тех случаях, когда у вас используется стандартный драйвер SATA AHCI, а в сведениях о файле драйвера в диспетчере устройств указан файл storahci.sys (см. скриншот ниже).
Способ срабатывает в тех случаях, когда отображаемая нагрузка на диск вызвана тем, что оборудование не поддерживает технологию MSI (Message Signaled Interrupt), которая по умолчанию включена в стандартном драйвере. Это достаточно распространенный случай.
Если это так, то выполните следующие шаги:
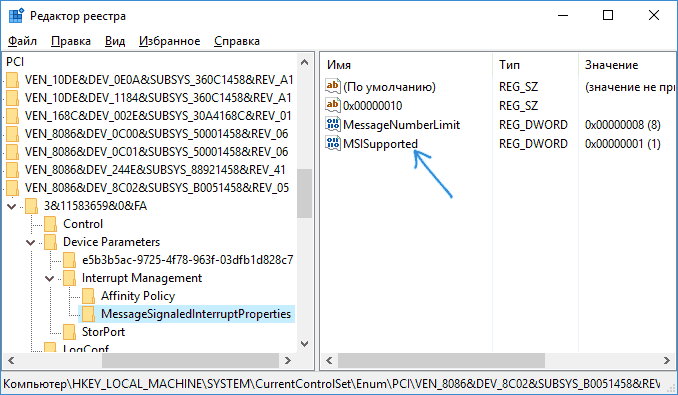
- В свойствах контроллера SATA откройте вкладку «Сведения», выберите свойство «Путь к экземпляру устройства». Не закрывайте это окно.

- Запустите редактор реестра (нажать клавиши Win+R, ввести regedit и нажать Enter).
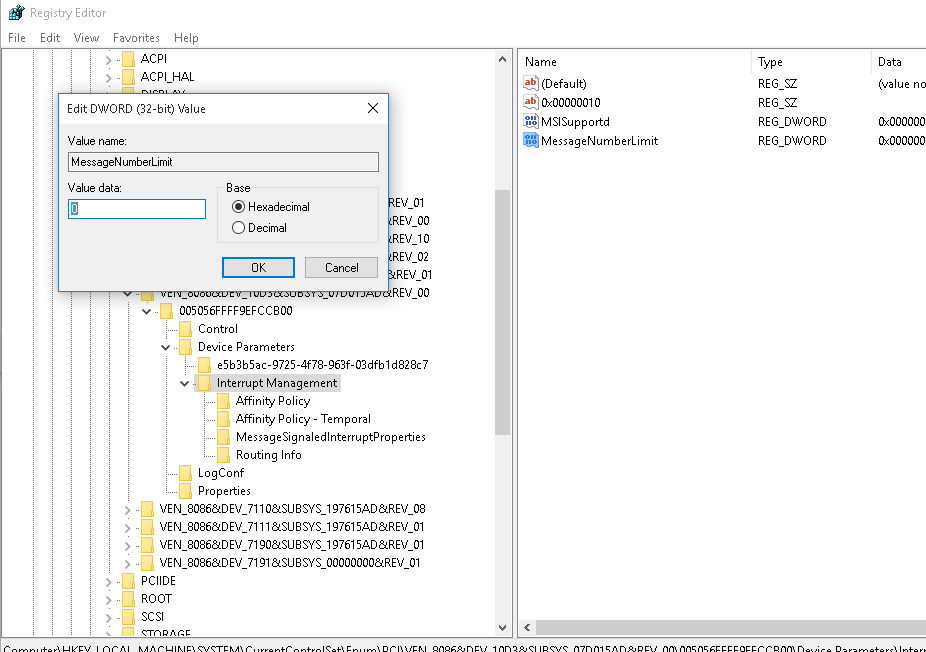
- В редакторе реестра перейдите к разделу (папки слева) HKEY_LOCAL_MACHINE\ System\ CurrentControlSet\ Enum\ Путь_к_контроллеру_SATA_из_окна_в_пункте_1\ Подраздел_со_случайным_номером\ Device Parameters\ Interrupt Management\ MessageSignaledInterruptProperties\

- Дважды кликните по значению MSISupported в правой части редактора реестра и задайте для него значение 0.


По завершении закройте редактор реестра и перезагрузите компьютер, после чего проверьте, была ли исправлена проблема.
Дополнительные способы исправить нагрузку на HDD или SSD в Windows 10
Существуют дополнительные простые способы, которые могут исправить нагрузку на диск в случае некоторых ошибок работы стандартных функций Windows 10. Если ни один из способов выше не помог, попробуйте и их.
- Зайдите в Параметры — Система — Уведомления и действия и отключите пункт «Получать советы, подсказки и рекомендации при использовании Windows».
- Запустите командную строку от имени администратора и введите команду wpr -cancel
- Отключите службы Windows Search и О том, как это сделать, см. Какие службы можно отключить в Windows 10.
- В проводнике в свойствах диска на вкладке «Общие» снимите отметку «Разрешить индексировать содержимое файлов на этом диске в дополнение к свойствам файла».
На данный момент времени — это все решения, которые я могу предложить на ситуацию, когда диск загружен на 100 процентов. Если ничто из перечисленного не помогает, и, при этом, раньше в этой же системе подобное не наблюдалось, возможно, стоит попробовать сброс Windows 10.
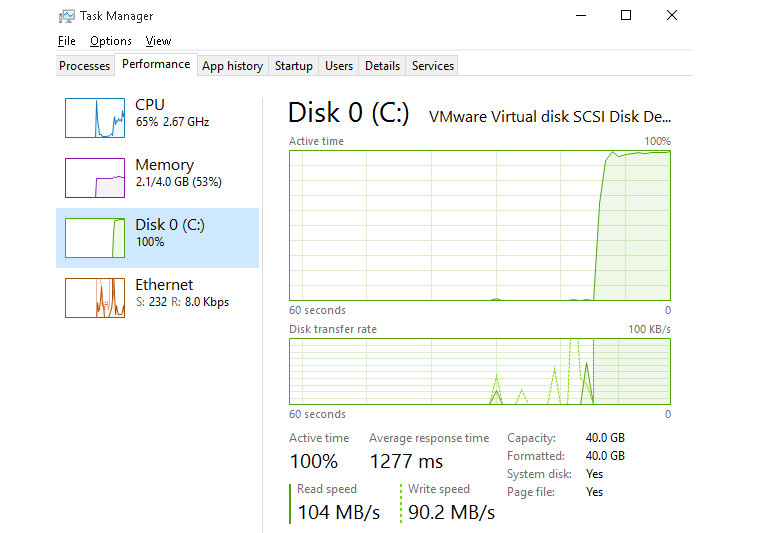
Высокая нагрузка на диск наблюдается в Windows 10 намного чаще, чем в предыдущих версиях ОС. Как, собственно, выглядит проблема: пользователь замечает резкое и продолжительное падение производительности системы, и если открыть окно диспетчра задач (Task Manager), можно заметить, что степень загрузки (использования) диска достигает 100%. Как правило, частое возникновение такой проблемы свидетельствует о некорректности настройки системы, или ошибках в одном из системных драйверов, а не о наличии на компьютере вредоносного ПО (хотя бывают и исключения).
В этой статье мы рассмотрим основные причины, которые могут вызвать высокую загрузку дисковой подсистемы (будь то HDD или SSD) в Windows 10 и типовые способы противодействия.
Примечание. Некоторые из предложенных методов (особенно метод с реестром) следует выполнять с осторожностью, четко понимая что и зачем вы делаете. В противном случае, система может просто перестать загружаться.
Содержание:
- Поиск программ, активно использующих диск
- Проблемный драйвер AHCI
- Еще несколько способов решить проблему с высокой загрузкой HDD или SSD в Windows 10
Поиск программ, активно использующих диск
В первую очередь стоит попытаться обнаружить программу (возможно расположенную в автозагрузке), которая активно использует диск.
Для этого:
- Запустите диспетчер задач Task Manager (Ctrl+Shift+Esc)
- Перейдите на вкладку процессов (Processes) и отсортируйте процессы по столбцу Disk

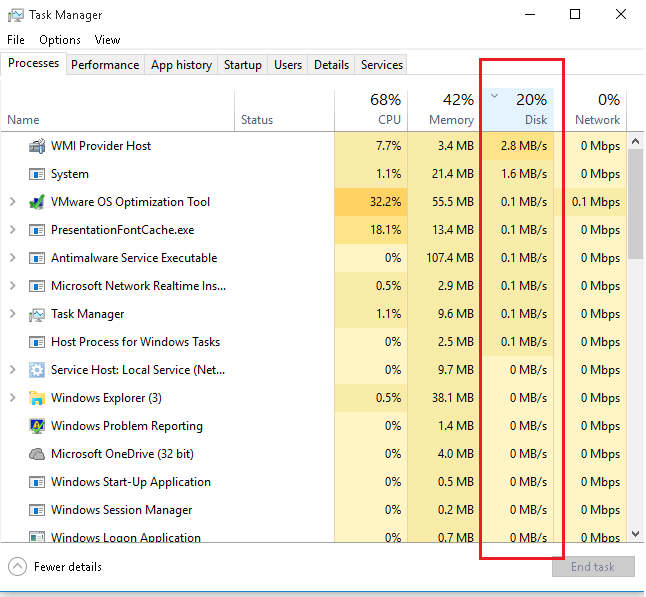
Проверьте, возможно одна из запущенных программ вызывает высокую нагрузку на диск (она будет первая в списке процессов и потреблять существенной количество ресурсов дисковой подсистемы). Это может быть задача антивирусного сканирования, торрент клиент и т.п. В зависимости от ситуации, можно попробовать установить последнюю версию проблемного ПО, удалить его или перенастроить.
Проблемный драйвер AHCI
На большинстве системах с Windows 10 используется стандартных AHCI драйвер для контроллера SATA дисков. В этом можно убедиться, если открыть диспетчер устройств (Device Manager) и посмотреть тип устройства в разделе IDE ATA / ATAPI controllers . Как правило, там будет указано контролер «Standard controller SATA AHCI», и в большинстве случаев это не проблема.
Однако, если без видимых причин на вашем компьютере наблюдается высокая загрузка диска, попробуйте сменить данный драйвер на «родной» драйвер, скачанный с сайта производителя чипсета вашего компьютера.
Совет. На сайте вендора этот драйвер нужно искать по ключевым словам AHCI, SATA (RAID) или Intel RST (Rapid Storage Technology)
После установки драйвера, перезагрузите компьютер и проверьте, осталась ли проблема.
Если вы не смогли найти официальный драйвер AHCI, или он не устанавливается корректно, возможно причина большой нагрузки на диск, в том, что контроллер вашего диска не поддерживает технологию MSI (Message Signaled Interrupt), которая включена по умолчанию в стандартном драйвере. Это довольно распространённое явление.
Совет. Этот метод поможет решить проблему в случае, если используется стандартный драйвер Standard controller SATA AHCI, и в свойствах драйвера в диспетчере устройств присутствует файл storahci.sys.
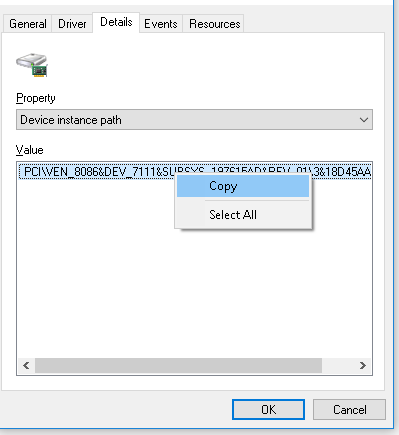
- Откройте свойства драйвера Standard controller SATA AHCI и перейдите на вкладку Details. В списке свойств драйвера, найдите свойство Device Instance Path и скопируйте его значение.
- Запустите редактор реестра, и перейдите в ветку HKEY_LOCAL_MACHINE\System\CurrentControlSet\Enum\PCI\[your_sata_path]\[тут_некий_уникальный_id]\Device Parameters\Interrupt Management\MessageSignaledInterruptProperties\
- Смените значение ключа MSISupported на 0.
- Закройте редактор реестра и перезагрузите компьютер. Проверьте, пропала ли проблема.
Еще несколько способов решить проблему с высокой загрузкой HDD или SSD в Windows 10
Есть еще несколько типовых способов, которое в некоторых случаях могут помочь снизить высокую загрузку на диск путем отключения некоторых некорректно работающих функций Windows 10. И если ни один из рассмотренных способов не помог решить проблему, попробуйте отключить службы Windows 10 (службу поиска, Prefetch и Superfetch) с помощью следующих команд в консоли PowerShell:
- Отключить службу Superfetch
net stop SysMain
set-service SysMain -StartupType Disable - Отключить службу поиска Windows (Windows Search Service)
net stop Wsearch
set-service Wsearch -StartupType Disable - Отключить Prefetch, изменив ключ реестра с помощью PoSh
set-itemproperty -path «HKLM:\SYSTEM\CurrentControlSet\Control\Session Manager\Memory Management\PrefetchParameters» -name EnablePrefetcher -value 0
20 Ways to Fix 100% Disk Usage on Windows 10 PC – Getting 100% disk usage on Windows 10, will make the computer hang and freeze. Find your system drive running at 100%. Surely this is impossible, right? In fact, the latest versions of Windows have issues with overworked drives, which slow down the operating system.

This issue affects both hard disk drives (HDDs) and solid-state drives (SSDs). But you guys take it easy, there are some fixes available to overcome 100% disk usage. But first, you need to know the cause of the problem.
Read more:
- 20 Best Windows 10 Themes Cool And Free Desktop
- 5 Ways to Fix You Need Permission To Perform This Action
- 7 Ways to Fix Error Code 0x80070005 In Windows PC
- 8 Ways to Fix Stop Code Memory Management in Windows 10 PC
#1. Check Using Task Manager
This performance issue is most obvious when trying to use Windows Search to find a file or program, and anything else that requires the drive to do some work (perhaps copying and pasting a group of files).
To determine if this is an issue affecting you when your computer is slowing down press Ctrl + Alt + Del and select Task Manager (Alternatively, right-click on the Taskbar and select Task Manager ).

On the first tab, Processes, look for the Disk column. If you’re having issues with drive performance, it should be 100% and shaded in red to indicate whether or not you have a problem.
Troubled sectors on your HDD can cause 100% disk usage issues in Windows 10. However, using Windows built-in disk check can fix it.
Open Windows Explorer and select This PC, then identify your hard drive. Right-click on C: and select Properties. Here, look for the Tools tab, and under Error-checking click on Check.
In the resulting window, click Scan drive. Wait while the system scans the drive. A reboot may be required for a full disk repair. It has to deal with errors.
#2. Scan Using Anti-Virus Apps
As with any performance issue, the first thing to do is to confirm that your computer has not been infected with malware. Your security software should be able to handle this, whether it’s a free or a paid app.
At the very least, a tool like Malwarebytes Anti-Malware should be able to scan your system drive and detect any issues, although, with a heavy load on your drive, this may take some time.
If a threat is found, use the recommended software to remove it and reboot. Next, check the performance of your drive further. Hope you guys have solved this problem, if not then malware is not the cause so read on.
#3. Perform a Clean Boot on Windows 10
Clean Boot State is used to diagnose and troubleshoot advanced Windows problems. “Clean Boot” starts Windows with a minimal set of drivers and startup programs so you can determine if background programs are interfering with your system’s performance. If you have never done a clean booth, now is the time to learn.
Use Win + R to open the run box, then type MSConfig and press “ Enter ” to open “System Configuration.”
Click the “ General ” tab, then click “ Selective Startup ” Clear the “ Load Startup Items ” checkbox, and make sure “ Load System Services ” and “ Use Original boot configuration ” are checked.

Click the ” Services ” tab. Select the “ Hide all Microsoft services ” checkbox. Select the item and then select “ Disable all “.

Click “ Apply/OK ” and restart the computer. This will put Windows into a Clean Boot State.
If you find that everything loads fine on a clean boot, then slowly enable each startup program one by one until you determine which program is causing the slowdown. You can then delete or disable it. For starters, always start by disabling third-party anti-virus/anti-malware programs as those programs can have a tendency to access the disk at any time.
#4. Uninstall Anti-Virus Applications If You Use Windows Defender
By default Windows 10 has a security application for its operating system, namely Windows Defender. But often users install third-party anti-virus applications, this is good for keeping your privacy safe. But this will be a problem if the computer/laptop used has outdated components.
This can lead to excessive disk usage and many other problems. As a result, this can also be the cause of 100% disk usage in your Windows Task Manager. Consider removing an antivirus or anti-malware program like Norton, Kaspersky, AVG, Avast Behavior Shield or Malwarebytes, etc.
#5. Disable Windows Search For Improved Disk Performance
The next thing to check is whether the disk usage 100% error has something to do with Windows Search.
A bug in Windows 10 resulted in a “search loop” which caused an increase in the load on the system drives.
To stop this and prevent it from happening open Windows PowerShell (Admin). You will find this by right-clicking the Windows 10 Start menu.
Enter the command:
HKEY_net.exe stop "Windows search"
To permanently disable Windows Search or Indexing, press WIN + R, enter services.msc, and press Enter. In the Services window that opens find the Windows Search entry and double-click it to open the Windows Search Properties window.

Under Startup type, select Disable. Here you can click Stop to cancel the service. Click OK to save your changes.
Sometime after disabling Windows Search, your Windows 10 performance will improve greatly. If not, continue…
#6. Disable SysMain To Fix 100% Disk Usage in Windows 10
Another Windows 10 feature identified as a potential cause of the 100% disk usage issue is the superfetch service. Since Windows 10 1809 (Windows 10 October 2018 Update) it has been renamed to “SysMain.”
To prevent this service from causing disk usage issues, open another Windows PowerShell (Admin) and enter:
net.exe stop sysmain
Again, wait a while to check if this has any impact on your computer’s performance. You should also run Check Disk:
chkdsk.exe /f /r
You will be notified that your PC must be rebooted for Check Disk to complete, so make sure you have closed all your applications first.
Or you can use the third-party software AOMEI Partition Assistant Standard, which simplifies things in a few clicks. With this tool, you can check a single partition, or check the entire disk.
This software allows you to check based on the partition and disk type according to your situation. No bundled devices and 100% clean. If this doesn’t work, continue to the next step.
#7. Check Is Flash Causing 100% Disk Usage Bug?
Flash remains one of the most vulnerable aspects of modern computing and should be disabled. Adobe plans to shut down multimedia plugins in 2020, so there’s little reason to stick with it.
Flash also seems to be one of the most common causes for 100% hard disk usage on Windows 10 if you use the Google Chrome browser.
Go to Menu > Settings > Privacy and security and click the section marked Site Settings. Here, search for Flash and set the switch to Block sites from running Flash, then click Back.

Restart the browser and check your HDD performance.
#8. Use the Control Panel To Delete All Web Browsers
Maybe it’s not Flash that affects your browser’s performance. Another cause could be the browser itself.
You can use Control Panel to delete all browsers, except Edge and IE (Internet Explorer). Uninstalling the browser is an effective way to isolate issues with plugins.
Otherwise, you will need to remove the plugins one by one from each browser and test them. Adobe Flash and Shockwave Player are the usual culprits of 100% disk usage on Windows 10.
Fortunately, the browser can be reinstalled in seconds. After uninstalling the browser, please delete files including ‘Temp’, ‘%Temp%’, and ‘Prefetch’. After that, restart the system and check if the problem is solved. If it does, wait 10-15 minutes to verify that it doesn’t reoccur, and you can reinstall the browser.
#9. Fix 100% of Disk Usage Due to Skype
Another widely used app that can also cause 100% of your HDD usage: is Skype.
To find out and disable its OTT resource requirements, start by checking if the software is not running. You can do this by looking in the Task Manager, or checking the System Tray. If Skype is running here, right-click the icon and select Quit.
Next, press WIN + R and paste this address into the box:
C:\Program Files (x86)\Skype\Phone
Click OK to find the Skype.exe file and right-click this and select Properties. On the Security tab click Edit, then select ALL APPLICATION PACKAGES.

Put a checkmark next to Write in the Allow column and finish by clicking Apply, then OK. Return to Task Manager to see the changes. No difference? Keep reading…
#10. Fix StorAHCI.sys Driver Driver
Some drivers don’t run well enough in Windows 10. One that has been found to be causing 100% HDD usage is the StorAHCI.sys driver, which has a firmware bug. StorAHCI.sys is intended for storage devices connected to a PC or laptop motherboard via the Advanced Host Controller Interface PCI-Express. If you have gone so far without success, this could be the cause of the problem.
Open Device Manager (use Windows 10 search, or right-click This PC in Windows Explorer, then Properties>Device Manager ) and expand IDE ATA/ATAPI Controllers. If the AHCI Controller entry is listed, double-click it, then go to the Driver tab and select Driver Details.

Is the driver listed as C:\Windows\system32\DRIVERS\storahci.sys? If so, you may be affected by this bug.

Close the driver details box and switch to the Details tab, select the Device instance path from the drop-down menu. Where Value is listed, right-click, and select Copy. Run your text editor (like Notepad) and Paste in the content.

Next, press WIN + R and type Regedit, followed by the OK button. Navigate to this address: HKEY_LOCAL_MACHINE\System\CurrentControlSet\Enum\PCI\ and use the pasted string above to open the correct AHCI Controller, followed by a random number.

After finding the correct AHCI Controller, then navigate to Device Parameters\Interrupt Management\MessageSignaledInterruptProperties.

There you will see supported MSIS listed in the right pane. Double-click this, then change the Value data: to 0. Click OK to confirm and follow the instructions to restart Windows.

#11. Clear Steam Cache?
Enjoy the game and have Steam installed? There is a high chance that this digital sending system is causing 100% disk usage.
Usually, this is due to update delivery, causing the background downloader to get stuck in a loop. Clear the Steam cache to fix it.
First, make sure you have logged out of Steam. Where Steam is the likely cause of the 100% disk usage error, it may hang when you try to exit. In this case, use Windows 10 Task Manager to close the software. Next, open the run box by pressing the WIN + R keys and enter
steam://flushconfig

You will see a dialog box, notifying you that the content will be deleted.
Click OK to continue. Note that games and saves will be preserved, so there is no risk of being deleted.
#12. Disable Diagnostic Tracking In Windows 10
Finally, it’s worth considering the impact of diagnostic tracking on Windows 10. A feature you may have disabled for privacy reasons, as it causes 100% HDD usage on many PCs.
In terms of reducing hard disk drive usage, it is quicker to disable the DiagTrack service. If this is the source of the 100% disk usage error in Windows 10, you can stop the service from launching.
However, to do this, you have to access the Command Prompt in administrator mode.
Do this by clicking Start and typing cmd in the search box. Wait for the results and right-click Command Prompt, and select Run as administrator.
Enter this command to disable and stop DiagTrack:
sc config "DiagTrack" start= disabled
sc stop "DiagTrack"
![]()
Additionally, you might also go to Settings > System > Notification & actions and disable Get tips, tricks and suggestions as you use Windows. Doing so has been shown to improve things.
#13. Windows Update Can Cause 100% Disk Usage

Apart from affecting the changes you make to your PC while fixing the 100% disk usage issue, Windows Updates can also be the cause. This usually only happens when Windows Update has a problem (which is usually caused by a file refusing to download). You have two options here:
- Let the computer Update Automatically — close all your open applications and wait. Eventually, the file will be downloaded, but depending on how Windows Update is scheduled on your computer, it may require a reboot.
- Shut down your computer— once you’ve done that, restart it and wait for Windows Update to resolve the issue.
Once the update has finished downloading, we recommend running it as soon as possible. Remember to check the previous fix for 100% disk usage before proceeding, as noted above.
#14. Reset Virtual Memory
Virtual Memory is a combination of RAM and hard disk space and can be responsible for overusing your HDD. If there is not enough RAM to perform the task, HDD is used to increase RAM. Data that is moved to the HDD is then returned to RAM when needed.
If you’ve come this far and you haven’t solved the 100% disk usage issue, it might be a good idea to reset your Virtual Memory.
Go to the System screen with Windows + Break/Pause, then Advanced System Settings on the left. In the resulting box, select the Advanced tab, then under Performance click Settings.
Here you will find another Advanced tab, which has a section labeled Virtual memory. Click Change and clear the checkbox to Automatically manage the paging file size for all drives.

Staying at this screen, select your Windows drive (usually C 🙂 and then Custom size. Here, add the Initial size and Maximum size. Note both are measured in MB rather than GB.
These numbers can be confusing, so with the first value, rely on the suggested options. For the maximum value, aim for a number no more than 1.5 times your system RAM.
For example, a computer with 4GB of RAM should have no more than 6.5GB (6144MB). With the value input, click Set, then OK to continue. You now need to delete the temporary files that have been used in the previous virtual memory allocation.
Do this by opening the Run box ( Win + R ) and then entering “temp”. When the temp directory opens, select all files ( Ctrl + A ) and tap Delete on your keyboard.
#15. Enable High-Performance Mode
One last thing to try is changing your Windows power settings. The standard power mode is more prone to the 100% disk usage bug but switching to high performance often fixes the problem.
The downside, of course, is that your computer will use more power. Thanks to the modern processor design this shouldn’t be a big problem. However, desktop replacement notebooks and laptops can affect battery life.
To change to high-performance mode, open the Power & sleep screen with WIN + X > Power Options. Here, click Additional power settings, select High performance, then OK.

If this is not the option shown, you will have to create your own custom power plan. Click Create a power plan, then select High performance. Name the plan, set the personal settings you need, and select it as the power plan to use. In a few moments, the 100% disk usage issue will drop to less than 10%.
#16. Install the Latest SATA Drivers
Your Windows 10 computer will almost certainly use a SATA connection for hard drives, SSDs, and optical drives. If the drivers are not up to date, disk usage errors may occur. Avoid this by upgrading to the latest SATA drivers.
Open the Power User menu with WIN + X and select Device Manager. From here, expand Storage controllers, then identify the correct controller for your SATA device. If you can’t do this, don’t worry about updating both.
To update, right-click on each controller and select Update driver.

Select the Browse my computer for driver software option, then Let me pick from a list of available drivers on my computer. Here, select Standard AHCI Controller and see how it affects performance.
You may need to reboot Windows for this to take effect. Note that if it doesn’t work, you can still try this by checking the manufacturer’s website for new drivers. It can be installed using the instructions that came with it or you can use a third-party app like Driver Booster.
#17. Firmware Upgrade For SSD

If you have an SSD installed on your machine and are experiencing 100% disk usage issues, it’s most likely a firmware issue. SSDs are very fast and unless you have some program accessing your disk all the time, they shouldn’t be at 100% for more than a few seconds. Here are some links to SSD firmware updates for some of the major brands: Crucial, Samsung, Kingston, Intel, and OWC.
#18. Replace/Upgrade the Hard Disk

A hard disk that develops too many bad sectors on it will mostly send your computer into a loop with high disk usage. Or, your computer’s hard disk may be too old to function properly, even though there is a lot of unused space.
However, your computer works like a turtle and consistently reports 100% disk usage. If your motherboard supports the use of an SSD, I suggest you use an SSD, you will see a very drastic difference between the two, so you don’t want to go back to using a hard disk anymore.
#19. Upgrade RAM
Another thing you should check is to see how much RAM you have installed on your computer. Because Windows 10 can run on older devices. This is fine, but you need to make sure your computer has a decent amount of RAM, which means no less than 4 GB.
You can also open Task Manager and click on Performance then click on Memory.

As you can see, the admin has 4 GB of memory and about 3.5 GB is in use. This means if you have 2 GB of RAM on your computer, all the memory will be exhausted. Everything that cannot be entered into memory is mapped to the hard disk. So basically Windows will use your hard disk as a temporary memory device.
If you have a lot of data to write to disk, it will cause your disk usage to spike and your computer to slow down. If you notice that the line in this graph is close to the top, then it means that you may need to upgrade the RAM in your computer.
#20. Replace the PC Power Supply (PSU)
")
There is a possibility that your computer hardware is causing the 100% disk usage problem in Windows, especially the PSU. If the disk usage issue can be attributed to excessive disk activity, then there may be a power-related cause. 100% disk usage has been seen on a Windows 10 laptop running on battery. Once plugged into the power adapter, the problem was solved. Similarly, the problem has been shown to subside once a new PSU is installed in a desktop PC.
Read more:
- 7 Ways to fix Unspecified Error 0x80004005 In Windows 10
- 6 Ways to Fix PAGE_FAULT_IN_NONPAGED_AREA in Windows 10
- 8 Ways to Fix Steam Can’t Open on Windows 10 PC
Conclusion:
Simply put, there is little reason for your disk loading to be anywhere near 100%, certainly not under normal use. A slow computer is a computer with a problem, and if you can’t fix it by disabling browser plugins, stopping the service, or you’ve confirmed that there are no viruses on your computer, then the problem may be hardware related.
Maybe your drive is getting old, it may be damaged, or the cable may need to be replaced. Alternatively, it is possible that the problem is connected to the Windows defrag tool. But I still hope that hopefully, one of the solutions above will work for you guys.
Don’t forget to bookmark and always visit Technowizah.com every day because you can find here the latest Tech Computer Android games How-to Guide Tips&Tricks Software Review etc, Which we update every day.
Opening up your task manager and seeing 100% Disk Usage in Windows 10 can be horrible. Not only is it currently slowing your computer down, but it could also be causing damage by jostling the spinning components of a disk drive.
If left unchecked for long periods, this issue can also create too much heat for other components to deal with and slow your whole system down.
This Article Covers:
What Is Disk Usage and How Do You Know High Disk Usage Is Slowing Down Your PC?
A disk at 100% in Windows 10 error means that your hard drive is running at 100% capacity, which means it’s spinning at its highest rate all the time. Unfortunately, the cause is difficult to pin down. But you can follow these steps to help figure out the cause and then pick the best solution from our suggestions.
To identify high disk usage, Windows 10 can show data in the task manager. This can help to pinpoint if the high disk usage is slowing down your PC. Check with the following steps:
- Press ctrl+shift+esc on your keyboard to open the task manager
- Click on the “Disk” column so the little arrow is pointing down. The task manager will list the processes running on the disk in order of largest to most negligible impact.

- Any dark orange boxes mean the usage is high. Note which processes are putting increased demand on your disk. (You can see Chrome is putting high demand on the Memory in the example.)

How To Identify the Cause of 100% Disk Usage in Windows 10
A lot of the time, it’s hard to pinpoint the cause. But a good rule of thumb is that processes that demand over 1MB/s are not good. It is typical for short bursts of 100% disk usage, but consistent levels of even over 20% can damage your PC or disk drive. Use the method above to check in your task manager to see if any particular program is causing the issue and simply disable it, uninstall it, or reinstall it.
How To Fix 100% Disk Usage In Windows 10
So how do you fix this issue? There are many reasons why your hard drive can be running at 100%, and unfortunately, one solution doesn’t cover all the potential causes. We have assembled some of the most common solutions to the issue so you can quickly reference each and check which solution will work for you.
Because of the high disk usage, Windows 10 may run slower than usual, so you may have to be patient with some of these potential fixes.
Read on to find your fix for the 100% disk usage error.
Solution 1: The Classic Fix-All, A System Reboot

“Why is my disk at 100%, and how do I fix it?” could be answered with another question.
“Have you tried turning it off and on again?”
That question has become a classic turn of phrase since the integration of computers into our daily lives.
It works for many different issues with laptops and desktops, including the 100 percent disk usage error in Windows 10. Sometimes a program can get stuck loading on startup, and a reset will fix that.
The issue may come up again, or it may go away forever just from this simple fix.
Make sure you use “Restart” instead of “Shut down” when you’re performing this task. The restart will be more likely to return to a fresh state, and using shut down may cause the program that was causing the issue to come back on straight away.
Solution 2: Make Sure Windows Is Up To Date
Another classic first-response solution for an IT issue is ensuring the operating system is up to date.
Microsoft releases these updates to improve functionality and safety within the Windows environment. So, the issue you’re currently experiencing may be one of those fixed with the latest patch.
To check whether your system is up to date, go to “Start” > “Settings” > “Update & security” > “Windows update.”

After updating, you may also see other boosts to your computer’s performance.
Solution 3: Check for Viruses and Malware

If you have any software issues that transition into hardware faults, then a malware attack is a likely cause.
Even if you have a quality antivirus program running defense on your computer, it can sometimes miss things. Nothing is perfect, after all.
Run a system scan to help eliminate malware on the disk from the list of potential error causes.
A virus check may take an extremely long time as your disk is already running slowly. But it may also identify the issue. Be prepared to start the process and walk away from your computer for a few hours.
Solution 4: Complete a Cleanup of Junk Files
Junk files are single-use files that accumulate over time on your computer after completing tasks like viewing an image or browsing the web. They can cause performance issues, including high disk usage and a general slowing of your PC.
These files are unavoidable as your system needs to create them to perform certain functions. Still, if you regularly delete them, it should free up disk space and hopefully reduce 100% disk usage down to an acceptable level.
Some antivirus programs do this as part of their regular maintenance, so you can probably skip this method if you have a premium account on Avast, AVG, etc.
Luckily, Windows 10 has a built-in disk cleaner that does a great job of this in these few easy steps:
- Type disk cleanup into the search box of your taskbar and click on the app

- Choose the drive that is causing the issue and press “OK.”

- When given the option for files to delete, select “Downloaded Program Files” and “Temporary Internet Files,” then click “OK.”


Solution 5: Boost the Power Settings
A strange but straightforward potential way to reduce 100% disk usage to a reasonable level is to change the power settings from Balanced to High Performance.
To do this, all you have to do is:
- Open up “Control Panel.”
- Navigate to “System and Security“ > “Power Options“ > “Change plan settings“ > “Change advanced power settings.”
- Select “High performance” and click “Restore plan defaults.”

Solution 6: Disable Windows Search
Sometimes the search function of Windows 10 can cause a loop that ends up being brutal on your disk usage.
You can temporarily turn off Windows Search to see if it’s the issue and then turn it off permanently if you find it to be the cause.
To temporarily stop the Windows Search process, follow these steps:
- Search the command prompt by typing cmd in the search box.
- Right-click the app and click “Run as administrator” or select it from the right side of the taskbar.

3. Type net.exe stop “Windows Search” and press “Enter.”

If you find that Windows Search was causing the 100% disk usage issue, you can disable it permanently by using the following process:
- Press the Windows key + r to open the run dialog box.
- Type in “services.msc” and press “Enter.”

- Double-click on the Windows Search entry.
- Under “Startup type,” change the field to “Disabled.”

- Click “Apply” or “OK” to save the changes.


Solution 7: Disable Windows Superfetch – What Is Superfetch, and Should I Disable It?
Superfetch’s normal function is to reduce boot time by helping programs load more efficiently. However, it can cause a high disk usage error for your Windows 10 device if it malfunctions.
You can temporarily and permanently stop Superfetch with the same process used to disable Windows Search. Just type or find “Superfetch” instead of “Windows Search.”
Solution 8: Turn Off Your Antivirus Software
Although antivirus programs are designed to prevent issues arising on your computer, they can sometimes be the cause of them.
Most antivirus programs are simple to turn off from within their menus. If you see that the disk usage error is fixed after doing so, it may be time to switch the program you use.
Solution 9: Check for Physical Errors
Sometimes it’s not software causing the hardware issue, and maybe you dropped or bumped your laptop, or perhaps it’s just old. In either case, a damaged disk can cause a 100% usage error.
You can use Windows to check the physical health of a disk by using DSKCHK. All you have to do to check a disk is:
- Navigate to “This PC.”
- Right-click on the hard drive causing the problem.
- Click “Properties.”
- Then click “Tools” and “Check.”

The system will then check your hard drive for you. Sometimes it can take a while, but at least you can rule out physical issues without opening up your computer.
Solution 10: How To Fix 100 Disk Usage by Conducting a Virtual Memory Reset
Windows 10 sometimes uses the storage on your disk as though it were RAM to swap out temporary files when your physical ram is running low.
When your system does this, it creates a “pagefile.sys” file that can cause the 100% disk usage error when corrupted. To fix this error, you can reset the virtual memory. To do so, use these steps:
- Type “advanced system settings” into the search box on your taskbar.
- Click and open “View advanced system settings.”

- In the “Advanced” tab, click on “Settings” under the “Performance” heading.

- Click the “Advanced” tab, then “Change.”

- Uncheck the box that says “Automatically manage paging file size.”

- Check the “No paging file” marker.

- Press “OK,” then “Reboot” your computer.


Solution 11: Turn off Extensions in Your Browser (Change settings in Chrome)
It’s well-known that Google Chrome and its extensions can chew up your RAM. But did you know it can sometimes cause issues with your hard disk too?
Turning off any Chrome extensions that have access to your hard drive can sometimes be the answer to your 100% disk usage woes. Or you could even use a different browser.
To turn off extensions in Chrome:
- Click the puzzle button in the top right corner of Chrome.
- Click manage extensions.
- Turn the toggle button off.

Solution 12: How To Reduce Disk Usage by Uninstalling Adobe Flash Player
Since the 90s, Flash Player by Adobe has been one of the most used web applications. It was responsible for animation, interactivity, audio, and video. But they stopped updating the software in late 2020, which made it redundant in all but a few cases.
Windows 10 has Flash Player preinstalled on it, but since Adobe no longer supports the software, they recommend uninstalling it. So, even if you found a different solution to your disk issue, you could still perform this process:
- Click this link to the Adobe Flash Uninstaller and download it.
- Run the software.
- Click “Uninstall.”
- Restart your computer.
Solution 13: How to Lower Disk Usage by Restarting Your Computer With a Clean Boot
When you initiate a clean boot, Windows 10 will restart with fewer startup programs and drivers. Then you can selectively reinstall third-party programs one at a time to identify which program is causing the disk problem.
This option is one of the best to allow you to single out a cause. But, it can also take a long time to reinstall each program one by one and wait a while to see if they were the cause of the disk error.
The following steps will show you how to restart with a clean boot:
- Type “MSConfig” into the search box in your taskbar.
- Open “System Configuration.”
- Under the “General” tab, check the selective startup option.
- Check “Load system services.”
- Uncheck “Load startup items.”
- Keep “Use original boot configuration” checked.

- Click the “Services” tab.
- Check the “Hide all Microsoft services” box.
- Click “Disable all.”

- Click “Apply” or “OK.”
- “Reboot” your computer.
- Optional: Follow steps 1-9, then check one program at a time to add back in and reboot to see if it’s the one causing the 100% disk error.


Solution 14: Upgrade Your Hardware – Will an SSD Solve 100 Disk Usage?
It’s possible that, even after a disk check, the drive itself is still to blame for the Windows 10 100% disk usage issue. Hard Disk Drives (HDD) have a limited lifespan as the spinning parts wear away with friction over time.
So, it may be time to replace the disk to prevent more high disk usage in Windows 10.
If you’re using an old spinning disk drive, you’ll thank yourself for the upgraded speeds by switching to a Solid State Drive (SSD). These drives are much faster and more reliable than traditional HDDs, and many manufacturers make models designed to fit into older computers.
Since they’re not a new technology anymore, SSDs don’t cost that much more than an HDD, so if you need to replace the disk anyway, you might as well splash out on an SSD.
Warning: Don’t Try These Methods
While there are a lot of potential functional fixes for the Windows 10 100% disk error, there are also some that could work in the short term but risk causing more damage to your PC over time.
Disabling Windows Updates
It is very easy to see instances of planned obsolescence in the tech world, and software updates can sometimes be the catalyst for this. It’s still a bad idea to disable Windows updates.
As we mentioned earlier, updates to Windows 10 have solved the 100% disk usage error in the past.
Indeed, operating system updates can sometimes come with their own issues, but it’s in the software companies’ best interest to fix those problems as soon as possible.
Disabling BITS
BITS is another update service for Windows 10 that creates new system parameters to coincide with Windows updates. Turning this service off could result in mismatched software patches, which will cause further problems for your PC.
Manually Modifying Page Files
While we recommended rebooting your “pagefile.sys” in the virtual memory reset solution (solution 10), manually editing the file with custom values could further damage your disk.
It’s best to let Windows manage your virtual memory when possible so as not to cause any long-term issues.
Frequently Asked Questions
Why Is 100% Of My Disk Being Used All the Time? / How Do I Fix 100% Disk Usage in Windows 10?
Unfortunately, there’s not just one cause for the 100% disc usage error. You’ll need to experiment with the solutions in this guide to discover what’s causing it and how to fix it.
How Do I Fix Disk 100% In Task Manager?
If you want to fix the task manager’s 100% disk error and you can see the program that is causing it, you can simply right-click it and select “end task.”
How Much Disk Usage Is Normal?
It is normal for short bursts to reach 100%, but anything that is sustained for long periods of 20% is not normal.
Can Running Windows 10 at 100% Disk Usage Damage My Disk?
Yes, if the disk is running at 100%, the excessive friction can cause wear on it, shortening its lifespan. The heat generated may also be bad for other components in your PC.
Which Solution to the 100% Disk Error in Windows 10 Should I Use?
As the root cause of the 100% Disk Usage in Windows 10 problem is hard to nail down, it’s impossible to say which solution could be the most appropriate. Although the order in which you could test the solutions out could be:
- Complete a hard restart of your computer.
- Check Windows is up to date.
- Check for any viruses and malware.
- Check for physical faults with the drive.
From there, it’s kind of an educated guess-type affair. You’ll have to think of the potential cause and pick a solution from the list that you think will be most effective.
Hopefully, one of the first methods for fixing the issue will work. You could even just consider upgrading your components as the first option if your budget allows for it. The improved speeds offered by a solid-state drive are worth their cost anyway.
Once your computer is back online, its productivity will increase 100-fold. Check out some of our other articles so your personal productivity can accelerate to match, like using remote work communication tools or sharing a Google Calendar.
Related:
- How To Find a Windows 10 Product Key [6 Easy Ways]
- How To Use a Windows Keyboard on a Mac (Guide)
- How To Rotate a Screen in Windows 10 [3 Easy Ways]
Приветствую. Суть в том, что ПК довольно долго включается, как для SSD. То есть когда я ввожу свой пароль, он его проверяет секунд 15. Потом открывает рабочий стол, и там тоже еще тупит некоторое время. Кроме того, на загрузке РДР2 (который стоит на ССД) у него время отклика больше 3х минут бывает показывает в диспетчере задач. Задержки довольно адские в эти моменты. Когда качал из ЕГС РДР2 — было то же самое, даже кинцо было невозможно посмотреть. Верифаил файлы для РДР2 — опять же лагает, запись на диск даже не идет, а чтение на уровне 7мб. Треды на ДТФ на эту тему я читал, но ничего не помогло. Так же гуглил. Отключал superfetch, поиск windows, какие-то msi прерывания, и менял местами провода от SSD и HDD. Я уже думаю на Windows 8 вернуться, она вроде всегда шустро работала как минимум. Буду благодарен за помощь.
Процессор Ryzen 2600x. Остальное вроде видно на скринах. БП на 600вт от Chieftec.