![How to Start Windows 10 Safe Mode From BIOS [Solved]](https://techrapidly.com/wp-content/uploads/2018/02/How-to-Start-Windows-10-Safe-Mode-From-BIOS-Solved.png "How to Start Windows 10 Safe Mode From BIOS [Solved]")
Windows 10 provides many options for settings; if in any case, you can change or solve the problem of your Windows 10. But there are few options which are enabled or disabled using the BIOS. For example, you want to allow Virtualization as it is a requirement of any software. The easy way to allow the virtualization of technology using the BIOS. BIOS is installed in computer’s motherboard and controls your whole operating system. On the other hand, BIOS is the preboot system; it is not possible to use or enter the Windows 10 BIOS directly from the Computer. Similarly, we enter into Safe mode with different ways. Entering the Windows 10 Safe Mode from BIOS is one of these techniques.
How to Activate Windows 10 Product Key
Top Programming Languages 2019
How to Enter the BIOS Configuration
We are just sharing the knowledge to enter the BIOS Configuration for Windows 10. To enter the BIOS, it is not easy to simply click the F2 button from Windows 10.
- Go to Start Menu > right-click on the power button.
- Keep pressing the Shift key and click on the Restart option in the power option.

- Keep pressing the F2 then click on the Power button. Press the power button and F2 until BIOS screen appears.
- You will successfully enter into the BIOS.
How to Enter Safe Mode With BIOS
In the last article, we have seen that how to enter Windows 10 Safe Mode From Command Prompt. BIOS was entering, and Startup settings are like similar and don’t have any difference if you want to enter in Safe Mode. But for Windows users, we are going to explain the way again to get safe mode.
Step-1 Enter Recover Environment
It is said that when System can’t load with standard configuration more than two times then next time, it automatically enters the recovered environment. Now the questions are, How to enable that System can’t load usually.
- Completely Turn Off your Computer.
- Press the Power Button first time(Windows 10 Safe Mode from BIOS).
- After pressing the power button, promptly long press the power button again.
- Then again turn on the power button, and long press the power button for few seconds.
- Repeat this process three times.
- Next time, you will see that you are in Recovery Environment.
![How to Start Windows 10 Safe Mode From BIOS[Solved]](https://techrapidly.com/wp-content/uploads/2018/01/Windows-10-Safe-Mode-From-Boot-How-to-Start-Windows-10-in-Safe-Mode-While-Booting.png "How to Start Windows 10 Safe Mode From BIOS[Solved]")
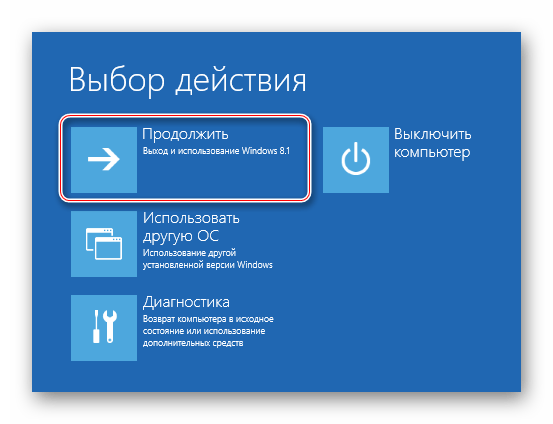
There are three options in recovery environment for How to Start Windows 10 Safe Mode From BIOS.
- Continue
- Troubleshoot
- Turn off your PC
Step#2 Go to Startup Settings (Windows 10 Safe Mode from Startup)
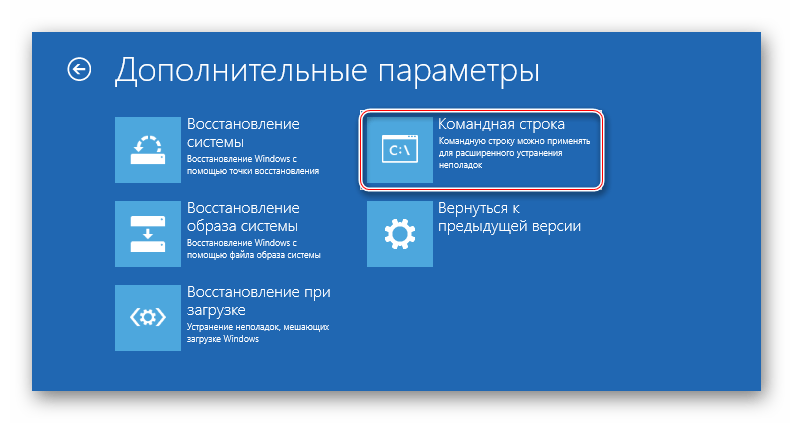
When you clicked on the troubleshoot option, you will see Advanced Options on the next screen. In the Advanced Options, there are many other options in which Startup Settings is one of these options.
- System Restore
- Command Prompt
- System Image Recovery
- Startup Settings.
- Startup Repairs.
- Go Back to previous Built
From the above, these options, select Startup Settings.
Step#3 Enable Safe Mode with different ways
After Startup Settings, you may see that you have to ask for Restart Windows 10 Now. Just Restart your Windows 10. After a restart, you may see different options then.
- Enable debugging.
- Enable boot logging.
- How to Enable low-resolution Video.
- Enable Safe Mode.
- Enable Safe Mode with Networking.
- Disable Automatic restart after failure.
From the above options, you may have two options to choose. Either Windows 10 Safe Mode From Boot or Enable Safe Mode with Networking.
You can choose any option, If you want to use the internet in Safe Mode then go for Windows 10 safe mode with networking. Otherwise, Windows 10 safe mode boot.
At last, What have we concluded about Windows 10 Safe Mode from BIOS?
Above, we have seen that it is possible to enter the Windows 10 safe mode from BIOS. It is just like opening the safe mode without command prompt in Windows 10.
Which method did you use for solving your Windows 10 safe mode? Have you had any issues still? Which feature of Windows 10 in your Windows 10 are you missing? Please let us know your Views and suggestion in the comments!
F8 or Shift-F8 during boot (BIOS and HDDs only) If (and only IF) your Windows computer uses a legacy BIOS and a spinning-platter-based hard drive, you may be able to invoke Safe Mode in Windows 10 using the familiar F8 or Shift-F8 keyboard shortcut during the computer’s boot process.
- How do I start Windows 10 in safe mode from boot up?
- How do I enable F8 in BIOS?
- How do I boot in Safe Mode?
- How do I boot to Safe Mode in UEFI BIOS?
- Can’t even boot into Safe Mode?
- How do I boot into Safe Mode from BIOS?
- Does F8 work on Windows 10?
- When should I press F8 on startup?
- How do I boot into Windows recovery?
- How do I force a restore in Windows 10?
- How can I repair my Windows 10?
How do I start Windows 10 in safe mode from boot up?
How do I start Windows 10 in Safe Mode?
- Click the Windows-button → Power.
- Hold down the shift key and click Restart.
- Click the option Troubleshoot and then Advanced options.
- Go to “Advanced options” and click Start-up Settings.
- Under “Start-up Settings” click Restart.
- Various boot options are displayed. …
- Windows 10 starts in Safe Mode.
How do I enable F8 in BIOS?
Enable F8 Safe Mode boot menu in Window 10
- Click Start button and choose Settings.
- Select Update & security → Recovery.
- Under Advanced startup click Restart now.
- Then select Troubleshoot → Advanced options → Startup Settings → Restart.
- Your PC will now restart and brings up the Startup Settings menu.
How do I boot in Safe Mode?
Starting Your Phone in Safe Mode
First, completely power off the phone. Then, power on the phone and when the Samsung logo appears, press and hold down the Volume Down key. If done correctly, «Safe Mode» will display on the bottom left corner of the screen.
How do I boot to Safe Mode in UEFI BIOS?
You can use start menu -> run -> MSCONFIG . Then, under the boot tab there is a checkbox which when checked, will reboot into safe mode on next reboot. You can also apparently hold down SHIFT when clicking on restart and that should do it as well although I have not tested the second method.
Can’t even boot into Safe Mode?
Using the Shift+ Restart combination when you can’t enter Safe Mode:
- Open the ‘Start’ menu and click or tap on the ‘Power’ button.
- Keeping the Shift key pressed, click on Restart.
- One can also use the Shift+ Restart combination from the ‘Sign In’ screen.
- Windows 10 would then reboot, asking you to select an option.
How do I boot into Safe Mode from BIOS?
F8 or Shift-F8 during boot (BIOS and HDDs only)
If (and only IF) your Windows computer uses a legacy BIOS and a spinning-platter-based hard drive, you may be able to invoke Safe Mode in Windows 10 using the familiar F8 or Shift-F8 keyboard shortcut during the computer’s boot process.
Does F8 work on Windows 10?
But on Windows 10, the F8 key doesn’t work any more. … Actually, F8 key is still available to access the Advanced Boot Options menu on Windows 10. But starting from Windows 8 (F8 doesn’t work on Windows 8, either.), in order to have faster boot time, Microsoft has disabled this feature by default.
When should I press F8 on startup?
You have to press the F8 key almost immediately after the PC’s hardware splash screen appears. You can just press and hold F8 to ensure that the menu shows up, though the computer beeps at you when the keyboard’s buffer is full (but that’s not a bad thing).
How do I boot into Windows recovery?
You can access Windows RE features through the Boot Options menu, which can be launched from Windows in a few different ways:
- Select Start, Power, and then press and hold Shift key while clicking Restart.
- Select Start, Settings, Update and Security, Recovery. …
- At the command prompt, run the Shutdown /r /o command.
How do I force a restore in Windows 10?
To activate the windows 10 «windows recovery mode», you must interrupt the windows startup sequence using the computer power button. You do this by pressing and holding the computer power button when you first see the windows logo. Wait for the computer to power off and then release the button.
How can I repair my Windows 10?
How To Repair and Restore Windows 10
- Click Startup Repair.
- Click System Restore.
- Select your username.
- Type «cmd» into the main search box.
- Right click on Command Prompt and select Run as Administrator.
- Type sfc /scannow at command prompt and hit Enter.
- Click on the download link at the bottom of your screen.
- Click Accept.
 Безопасный режим Windows 10 может быть полезен при решении самых различных проблем с компьютером: для удаления вирусов, исправления ошибок драйверов, в том числе вызывающих синий экран смерти, сброса пароля Windows 10 или активации учетной записи администратора, запуска восстановления системы из точки восстановления. Отдельная инструкция: Как зайти в безопасный режим Windows 11.
В этой инструкции — несколько способов зайти в безопасный режим Windows 10 в тех случаях, когда система запускается и вы можете в нее зайти, а также когда запуск или вход в ОС по тем или иным причинам невозможен. К сожалению, знакомый многим путь запуска безопасного режима через F8 больше не работает (но вы можете сделать, чтобы работала: Как включить вход в безопасный режим клавишей F8 в Windows 10), а потому придется пользоваться иными методами. В конце руководства имеется видео, в котором наглядно показаны способы входа в безопасный режим.
- Как запустить безопасный режим Windows 10 через msconfig
- Вход в безопасный режим через особые варианты загрузки
- Добавление пункта «Безопасный режим» в меню загрузки
- Как зайти в безопасный режим Windows 10 с использованием загрузочной флешки
- Другие способы запуска безопасного режима
- Видео инструкция
Вход в безопасный режим через конфигурацию системы msconfig
Первый, и, наверное, многим знакомый способ запустить безопасный режим Windows 10 (он работает и в предыдущих версиях ОС) — использовать встроенную утилиту конфигурации системы. Минус метода — невозможность попасть в безопасный режим, если система не запускается. Необходимые шаги:
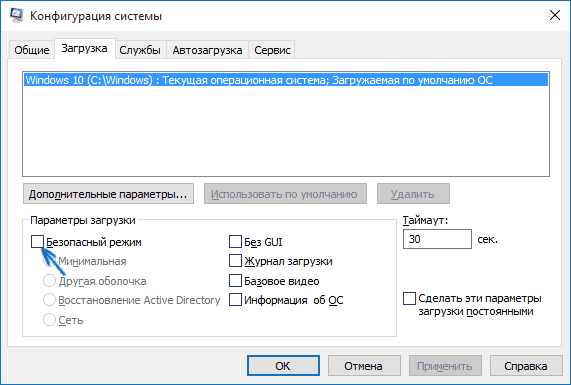
- Нажмите клавиши Win+R на клавиатуре (Win — клавиша с эмблемой Windows), введите msconfig в окно «Выполнить» и нажмите Enter.
- В открывавшемся окне «Конфигурация системы» перейдите на вкладку «Загрузка», выберите ту ОС (обычно присутствует лишь один пункт меню и выбирать не требуется), которая должна запускаться в безопасном режиме и отметьте пункт «Безопасный режим».
- При этом, для него существуют несколько вариантов безопасного режима загрузки: минимальная — запуск «обычного» безопасного режима, с рабочим столом и минимальным набором драйверов и служб; другая оболочка — безопасный режим с поддержкой командной строки; сеть — запуск с поддержкой сети.
По завершении, нажмите «Ок» и перезагрузите компьютер, Windows 10 запустится в безопасном режиме.
Затем, чтобы вернуть обычный режим запуска, тем же методом снова используйте msconfig, но в этот раз снимите установленную ранее отметку запуска безопасного режима, примените настройки и перезагрузите ПК или ноутбук.
Запуск безопасного режима через особые варианты загрузки
Данный способ запуска безопасного режима Windows 10 в общем случае также требует, чтобы ОС на компьютере запускалась. Однако, есть две вариации этого способа, позволяющие зайти в безопасный режим, даже если вход в систему или ее запуск невозможен, которые я также опишу.
В общем случае способ подразумевает выполнение следующих простых шагов:
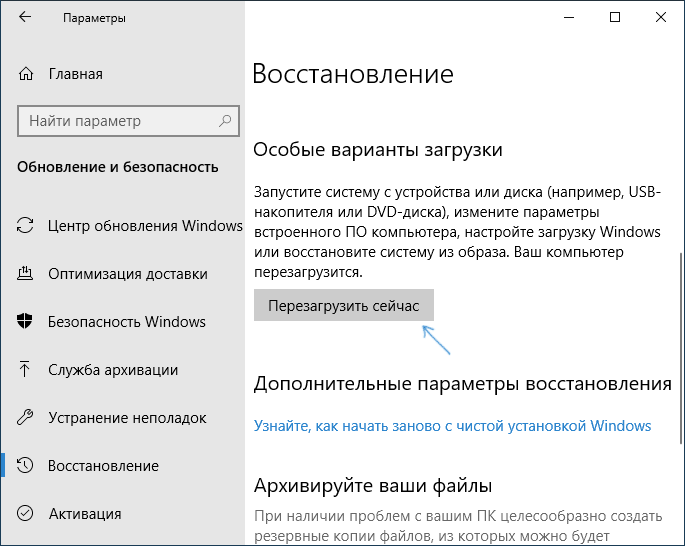
- Открыть Параметры (значок шестеренки в меню Пуск или клавиши Win+I), зайти в пункт «Обновление и безопасность», выбрать «Восстановление» и в пункте «Особые варианты загрузки» нажать «Перезагрузить сейчас». (В некоторых системах данный пункт может отсутствовать. В этом случае, для входа в безопасный режим используйте следующий способ).

- На экране особых вариантов загрузки выбрать «Поиск и устранение неисправностей» — «Дополнительные параметры» — «Параметры загрузки». Если пункт «Параметры загрузки» отсутствует, нажмите «Дополнительные параметры восстановления». На более ранних версиях Windows 10 путь такой: «Диагностика» — «Дополнительные параметры» — «Параметры загрузки». И нажать кнопку «Перезагрузить».

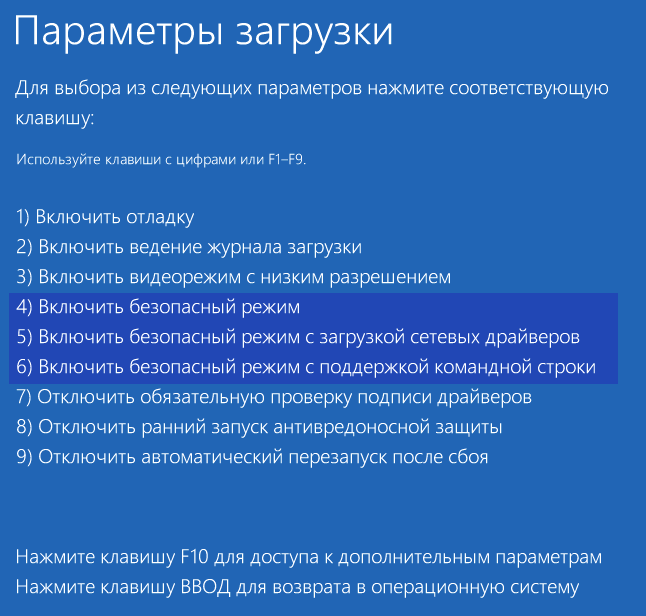
- На экране параметров загрузки, которые появятся после перезапуска системы, нажать клавиши от 4 (или F4) до 6 (или F6) для запуска соответствующего варианта безопасного режима.


Как добавить пункт «Безопасный режим» в меню загрузки Windows 10
При необходимости обезопасить себя от возможных проблем или если вы часто используете безопасный режим Windows 10, вы можете добавить его в меню загрузки вашего компьютера или ноутбука:
- Запустите командную строку от имени администратора и используйте следующие команды, нажимая Enter после каждой из них. После выполнения первой команды отобразится идентификатор GUID, который нужно будет использовать во второй команде.
-
bcdedit /copy {default} /d "Безопасный режим"
bcdedit /set {отобразившийся_GUID} safeboot minimal
- Готово, теперь при включении компьютера у вас будет отображаться меню, в котором, помимо простого запуска Windows 10 можно будет запустить и безопасный режим.


При необходимости, вы можете изменить время ожидания в меню загрузки (то есть то время, по истечении которого произойдет автоматическая загрузка Windows 10 в обычном режиме). Для этого используйте команду
bcdedit /timeout Время_в_секундах
Как зайти в безопасный режим Windows 10 с помощью загрузочной флешки или диска восстановления
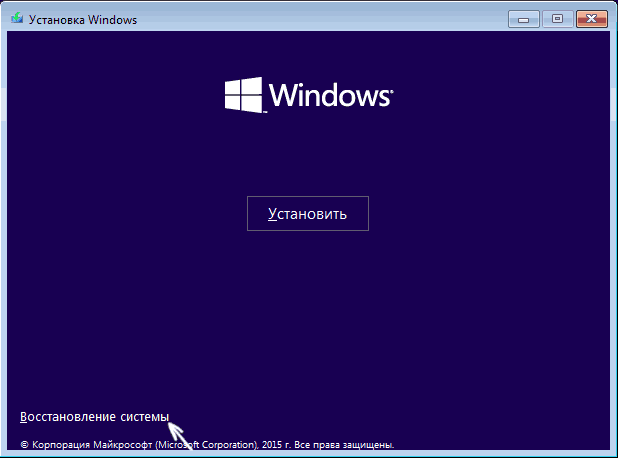
И, наконец, если не удается попасть даже на экран входа в систему, то есть и еще один способ, но вам потребуется загрузочная флешка или диск с Windows 10 (которые можно легко создать на другом компьютере). Загрузитесь с такого накопителя, а затем либо нажмите клавиши Shift + F10 (это откроет командную строку), либо после выбора языка, в окне с кнопкой «Установить» нажмите «Восстановление системы», затем Диагностика — Дополнительные параметры — Командная строка. Также для этих целей можно использовать не дистрибутив, а диск восстановления Windows 10, который легко делается через панель управления в пункте «Восстановление».
В командной строке введите (безопасный режим будет применен к ОС, загружаемой на вашем компьютере по умолчанию, на случай, если таких систем несколько):
- bcdedit /set {default} safeboot minimal — для следующей загрузки в безопасном режиме.
- bcdedit /set {default} safeboot network — для безопасного режима с поддержкой сети.
Если требуется запуск безопасного режима с поддержкой командной строки, используйте сначала первую из перечисленных выше команд, а затем: bcdedit /set {default} safebootalternateshell yes

После выполнения команд, закройте командную строку и перезагрузите компьютер, он автоматически загрузится в безопасном режиме.
В дальнейшем, чтобы включить обычный запуск компьютера, используйте в командной строке, запущенной от имени администратора (или же способом, описанным выше) команду:
bcdedit /deletevalue {default} safeboot
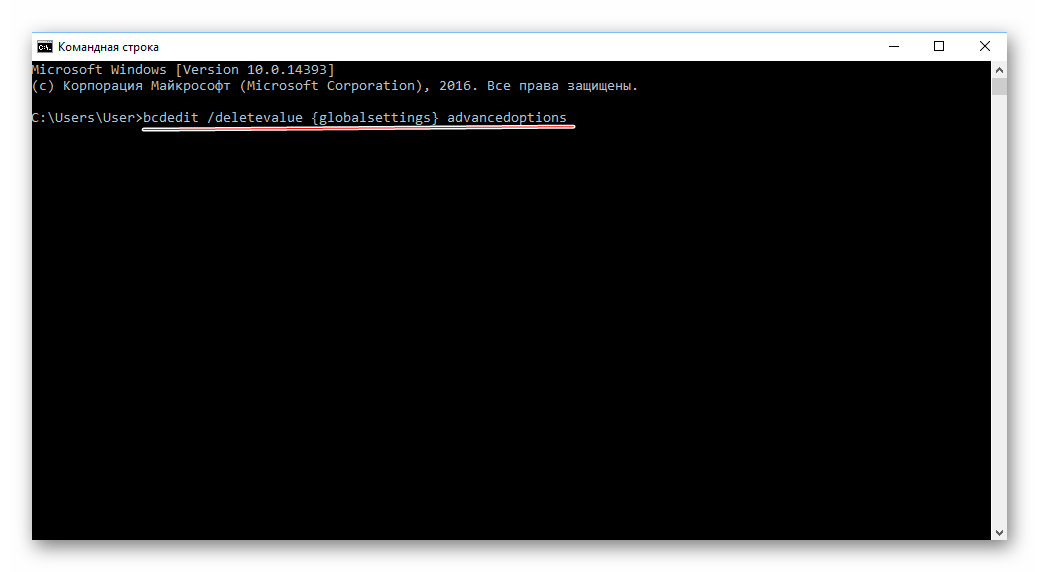
Еще один вариант почти же способа, но запускающий не сразу безопасный режим, а различные варианты загрузки, из которых можно выбрать, при этом применяет это ко всем совместимым ОС, установленным на компьютере. Запустите командную строку с диска восстановления или загрузочной флешки Windows 10, как это уже было описано, затем введите команду:
bcdedit /set {globalsettings} advancedoptions true
И после успешного ее выполнения, закройте командную строку и перезагрузите систему (можно нажать «Продолжить. Выход и использование Windows 10». Система загрузится с предложением нескольких вариантов загрузки, как и в способе, описанном выше, и вы сможете войти в безопасный режим.
В дальнейшем, чтобы отключить особые варианты загрузки, используйте команду (можно из самой системы, используя командную строку от имени администратора):
bcdedit /deletevalue {globalsettings} advancedoptions
Дополнительные способы запустить безопасный режим
В дополнение к вышеизложенным методам, ещё два способа, позволяющих запустить Windows 10 в безопасном режиме, оба также показаны в видео ниже:
- Если вы можете попасть на экран блокировки, но не можете зайти в систему, нажмите по изображению кнопки питания справа внизу экрана блокировки, а затем, удерживая Shift, нажмите «Перезагрузка». Компьютер выполнит перезагрузку в среде восстановления, где как и в способе с особыми вариантами загрузки вы сможете попасть в безопасный режим.
- Этот метод я не могу рекомендовать, так как он потенциально может привести к проблемам с накопителями, но: если при начале загрузки Windows 10 дважды неправильно выключить компьютер или ноутбук (долгим удержанием кнопки питания), то вы попадете в окно «Автоматическое восстановление», где, нажав кнопку «Дополнительные параметры» и перейдя к пункту «Параметры загрузки» вы также сможете зайти в безопасный режим.
Безопасный режим Windows 10 — видео
И в завершение видео руководство, в котором наглядно показаны способы зайти в безопасный режим различными способами.
Думаю, какой-то из описанных способов вам непременно подойдет. Также в данном контексте может оказаться полезным руководство Восстановление Windows 10.

«Безопасный режим» подразумевает ограниченную загрузку Windows, например, запуск без сетевых драйверов. «Безопасный режим» нужен исключительно для решения проблем внутри системы, поэтому для постоянной работы с ОС (редактирование каких-либо документов и т.д.) он плохо подходит. «Безопасный режим» — это упрощённая версия ОС со всем необходимым. Его запуск не обязательно должен быть из БИОСа, например, если вы работаете в системе и заметили в ней какие-либо неполадки, то можете попытаться войти, используя «Командную строку». При этом, перезагрузка компьютера не потребуется. Если же вы не можете войти в операционную систему или уже вышли из неё, то лучше действительно попытаться войти через BIOS, так как это будет безопаснее.
Способ 1: Комбинация клавиш при загрузке
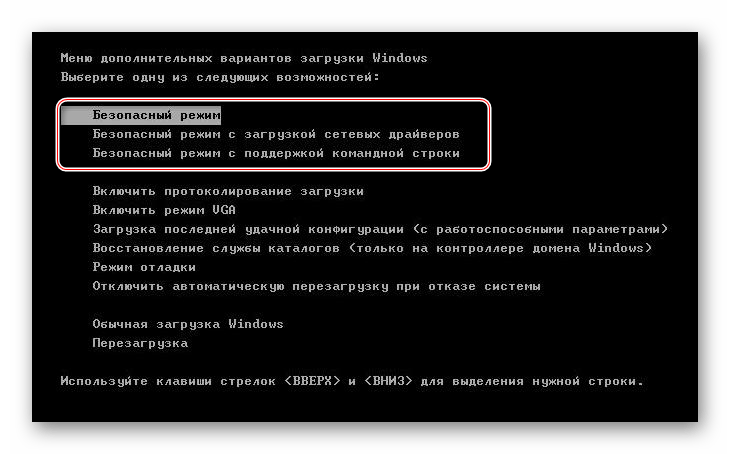
Данный способ самый простой и проверенный. Для этого вам понадобится перезагрузить компьютер и до того, как начнётся загрузка операционной системы, нажать на клавишу F8 или комбинацию Shift+F8. Затем должно появится меню, где потребуется выбрать вариант загрузки ОС. Помимо обычного, вы можете выбрать несколько разновидностей безопасного режима.
Иногда быстрая комбинация клавиш может не сработать, так как она отключена самой системой. В некоторых случаях её можно подключить, но для этого понадобится сделать обычный вход в систему.
Воспользуйтесь следующей пошаговой инструкцией:
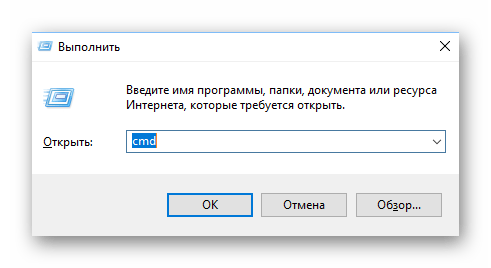
- Откройте строку «Выполнить», нажав Windows+R. В появившемся окне, в поле ввода следует прописать команду
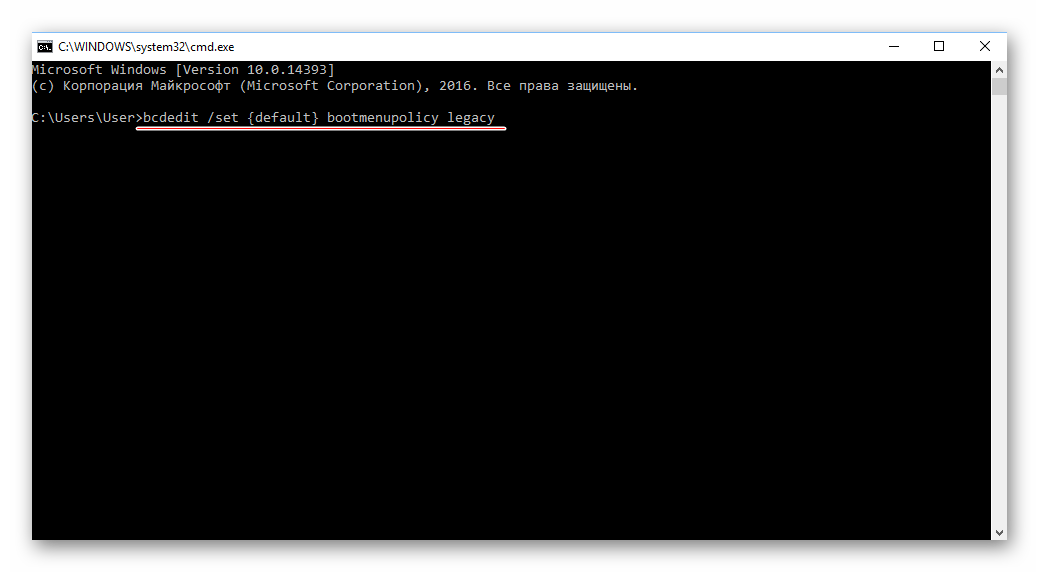
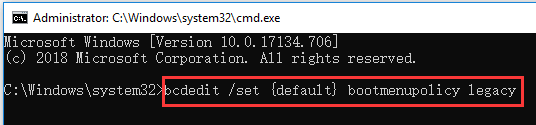
cmd. - Появится «Командная строка», где требуется вбить следующее:
bcdedit /set {default} bootmenupolicy legacyДля ввода команды используйте клавишу Enter.
- Если вам потребуется сделать откат изменений, то просто введите эту команду:
bcdedit /set default bootmenupolicy
Стоит помнить, что некоторые материнские платы и версии BIOS не поддерживают вход в Безопасный режим с помощью комбинаций клавиш во время загрузки (хотя такое встречается очень редко).
Способ 2: Загрузочный диск
Этот способ значительно сложнее предыдущего, но зато он гарантирует результат. Для его выполнения вам потребуется носитель с установщиком Windows. Для начала потребуется вставить флешку и перезагрузить компьютер.
Если после перезагрузки у вас не появляется Мастер установки Windows — значит, нужно сделать распределение приоритетов загрузки в BIOS.
Урок: Как включить в БИОС загрузку с флешки
Если при перезагрузке у вас появился установщик, то можно перейти к исполнению шагов из этой инструкции:
- Изначально выбираем язык, настраиваем дату и время, после чего нажимаем «Далее» и переходим в окно с установкой.
- Так как устанавливать систему заново не требуется, нужно перейти в пункт «Восстановление системы». Он находится в нижнем углу окна.
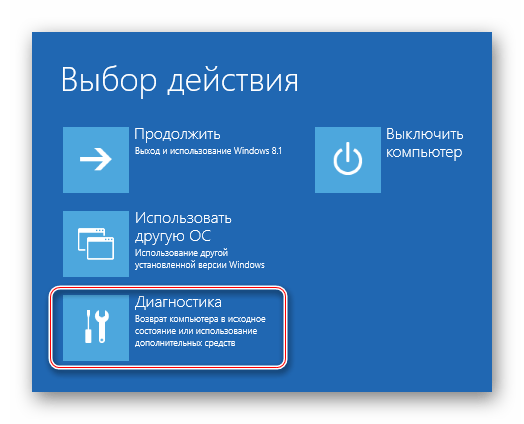
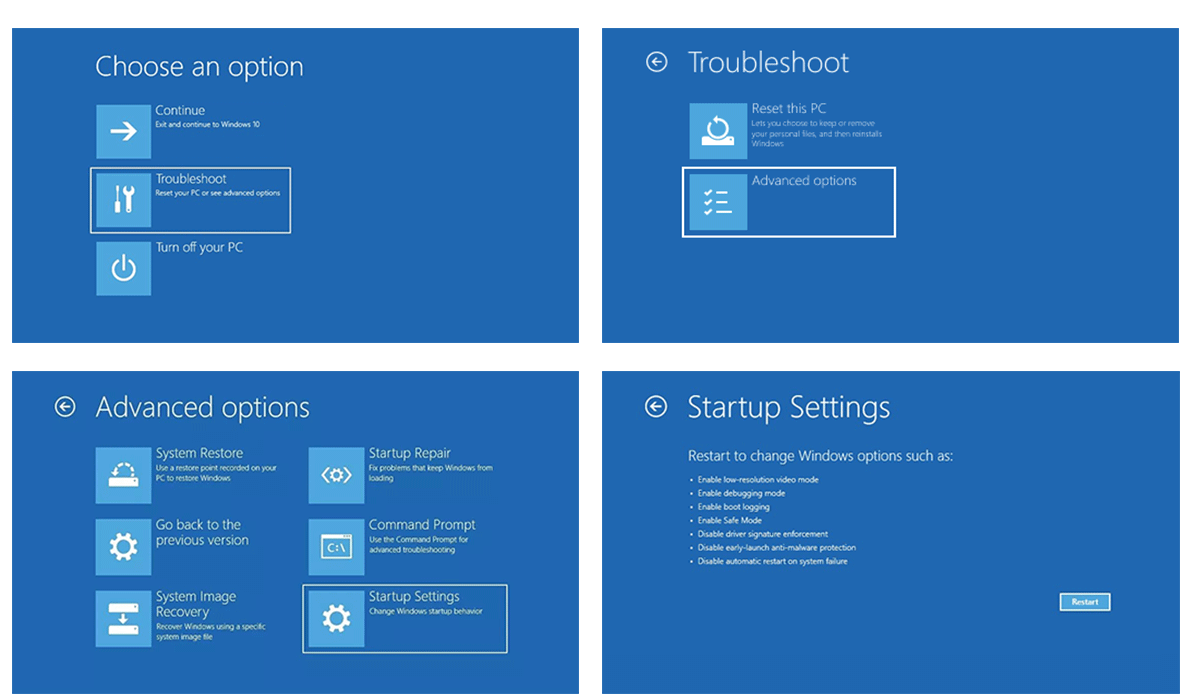
- Появится меню с выбором дальнейшего действия, где вам необходимо перейти в «Диагностику».
- Там будет ещё несколько пунктов меню, из которых выберите «Дополнительные параметры».
- Теперь откройте «Командную строку» при помощи соответствующего пункта меню.
- В ней нужно прописать эту команду —
bcdedit / set globalsettings. С её помощью можно будет начать загрузку ОС сразу в безопасном режиме. Стоит помнить, что параметры загрузки потребуется после выполнения всей работы в «Безопасном режиме» вернуть в исходное состояние. - Теперь закройте «Командную строку» и вернитесь назад к меню, где нужно было выбрать «Диагностику» (3-й шаг). Сейчас только вместо «Диагностики» нужно выбрать «Продолжить».
- Начнётся загрузка ОС, но теперь вам будет предложено несколько вариантов загрузки, в том числе и «Безопасный режим». Иногда нужно предварительно нажать клавишу F4 или F8, чтобы загрузка «Безопасного режима» прошла верно.
- Когда вы закончите всю работу в «Безопасном режиме», откройте там «Командную строку». Win+R откроет окно «Выполнить», в него нужно ввести команду
cmdдля открытия строки. В «Командной строке» введите следующее:bcdedit /deletevalue {globalsettings} advancedoptionsЭто позволит после завершения всех работ в «Безопасном режиме» вернуть приоритет загрузки ОС в норму.

Войти в «Безопасный режим» через BIOS порой бывает сложнее, чем кажется на первый взгляд, поэтому если есть такая возможность, пытайтесь войти в него непосредственно из операционной системы.
На нашем сайте вы можете узнать, как запустить «Безопасный режим» на операционных системах Windows 10, Windows 8, Windows XP.
Еще статьи по данной теме:
Помогла ли Вам статья?
Windows 10 Safe Mode is one essential diagnostic method to help you identify and fix possible causes of Windows 10 PC issues. This MiniTool post provides 6 ways with step-by-step guides on how to start Windows 10 in Safe Mode (while booting) to troubleshoot the problems you are having with your Windows 10 PC.
How to Start Windows 10 in Safe Mode – Quick Guide
- Press and hold Shift key and click Start > Power > Restart.
- Click Troubleshoot > Advanced options > Startup Settings > Restart after you enter into Win-RE.
- Press F4, F5, or F6 key to boot into Safe Mode in Windows 10.
Windows 10 PC is not working well? Once the computer is infected with malware, virus or installed some improper drivers, the PC may not behave normally, and freeze or crash occasionally.
Windows 10 Safe Mode may be helpful to help you diagnose and fix the issues of your computer. So, how to start Windows 10 in Safe Mode (while booting)?
Check the 6 ways with detailed guides on how to boot in Safe Mode Windows 10, and how to use Safe Mode to fix issues on Windows 10 PC.
If you suffer some data loss due to errors in Windows 10 PC, an ultimate data recovery guide is also provided in the second part of this tutorial to help you easily recover deleted files for free.
Also read: Learn the best tips and tricks for data recovery hard drive on Windows 11/10/8/7.
Tip: MiniTool Power Data Recovery, professional data recovery software to help recover any deleted/lost files from Windows computer, USB, memory card, external hard drive, SSD, etc. Rescue data in various data loss situations.
MiniTool Power Data Recovery TrialClick to Download100%Clean & Safe
Windows 10 Safe Mode
What Is Safe Mode?
Safe Mode is a built-in diagnostic mode of Windows 10 (7, 8, etc.) computer operating system. If you start Windows 10 PC in Safe Mode, it will only allow starting up basic system programs and services in booting process. A Windows 10 PC booted in Safe Mode is a stripped down version of computer.
Windows 10 Safe Mode is designed to help users to troubleshoot most problems within the OS of Windows 10 PC. It is also widely used to remove malware or ransomware in computer.
How Does Windows 10 Safe Mode Work?
In Windows 10 Safe Mode, the OS will be started with only core components, and many other non-necessary drivers or services such as video drivers, sound will be disabled. Third-party startup programs are also prevented from loading. And this makes it easier to isolate causes of operating system problems.
For instance, you can start Windows 10 in Safe Mode to identify if it’s the Windows 10 default settings and drivers are causing the misbehaving of Windows 10 PC, or to diagnose if it’s the installation of poor-configured software/programs that prevents Windows 10 PC from booting in a normal state. Windows 10 Safe Mode allows you to safely remove bugged programs, solve driver issues, diagnose hardware conflicts, and more.
Besides, sometimes if you can’t start Windows 10 PC normally, but you can still start Windows 10 in Safe Mode. This makes it a good option to troubleshoot problems of PC, e.g. blue screen, black screen because of malware, virus infection, or inferior hardware drivers.
When You Need to Start Windows 10 in Safe Mode
If your Windows 10 PC seems to have some problems, doesn’t function well, keeps crashing/freezing, or occur blue screen/black screen time to time, then you may try to start Windows 10 in Safe Mode to fix some Windows 10 issues.
The Three Types of Windows 10 Safe Mode
Windows 10 offers three types of Safe Mode. You can choose to boot Windows 10 in any type of Safe Mode based on your own need.

- Enable Safe Mode: This is the most basic type of Safe Mode. It starts Windows 10 by loading the most essential settings and services of the system. Any other unnecessary programs, drivers or services won’t be loaded. This puts the PC in a safer status by cutting off the possible malware or virus that may move through third-party software, drivers, or local networks.
- Enable Safe Mode with Networking: If you choose to start Windows 10 in safe mode with networking, then it will add other necessary drivers and services that are required to access the networks, while keeping the same set of drivers and services of Safe Mode. This is not as safe as Safe Mode, but it’s useful when you need to access the Internet.
- Enable Safe Mode with Command Prompt: If you choose to boot Windows 10 in Safe Mode with Command Prompt, then your computer will display a big Command Prompt window. Professionals can easily use command lines to fix related issues of Windows 10 PC. However, if you don’t know much about CMD, it’s not advised to choose this option. Both Safe Mode and Safe Mode with Command Prompt are not connected to network.
Let’s cut to chase, check how to start Windows 10 in Safe Mode in these 6 ways, namely, through Settings, msconfig (System Configuration), Start menu, F8 key, from sign-in screen, black/blank screen.
How to Start Windows 10 in Safe Mode – 6 Ways
- Start Windows 10 in Safe Mode from Settings
- Boot Windows 10 into Safe Mode through msconfig
- Start Windows 10 in Safe Mode While Booting from Start Menu
- Start Windows 10 PC in Safe Mode from Login Screen
- Start Windows 10 in Safe Mode from a Black/Blank Screen
- Boot in Safe Mode Windows 10 While Booting through F8 Key
Quick Video Guide:
1. How to Start Windows 10 in Safe Mode from Settings
If you’ve already logged into Windows 10 computer, then you can boot into Safe Mode in Windows 10 with Advanced Startup tool.
Step 1 – Open Windows Settings
You can click Start menu and click Settings on Windows 10 PC. Or press Windows and I keys on the keyboard to open Windows 10 Settings.
Step 2 – Enter into Startup Settings Window
Then you can click Update & Security, choose Recovery option from the left panel, and click Restart now under Advanced startup to enter Windows RE (Recovery Environment).
Next you can click Troubleshoot -> Advanced options -> Startup Settings -> Restart.
Step 3 – Choose a Safe Mode Option
You can now choose preferred Safe Mode option to start Windows 10 in Safe Mode.
Press 4 or F4 on the keyboard to start Windows 10 PC in Safe Mode; press 5 or F5 to boot Windows 10 in Safe Mode with Networking; press 6 or F6 to access Windows 10 in Safe Mode with Command Prompt.
2. How to Start Windows 10 in Safe Mode through msconfig
If you can enter into Windows 10 system, you can also try another way to boot into Safe Mode in Windows 10, namely, using Windows System Configuration (msconfig.exe) tool.
Step 1 – Open Windows System Configuration Tool
You can press Windows + R key, input msconfig in Windows RUN window and hit Enter to open the System Configuration utility.
Step 2 – Select a Safe Boot Option
Then you can click Boot tab. Under Boot options, you can choose a preferred Safe boot option based on your own need.
- Minimal equals to Safe Mode.
- Alternate shell refers to Safe Mode with Command Prompt.
- Network refers to Safe Mode with Networking.
- Active Directory repair option is used to repair the Active Directory server.

Generally, you can choose either Minimal or Network option to start Windows 10 in Safe Mode to troubleshoot problems in Windows 10 system.
Tip: Booting Windows 10 in Safe Mode through msconfig, your computer will start in Safe Mode each time you start your Windows 10 PC. To get out of Safe Mode, you can check the part of “How to get out of Safe Mode Windows 10” later in this post.
If you can log in Windows 10, you can also boot into Safe Mode in Windows 10 by using Start menu.
Step 1. You can press and hold Shift key on the keyboard, and click Start menu on Windows 10 at the same time. Then click the Power icon in the Start menu and choose Restart.

Step 2. After you get into the Choose an option screen, you can click Troubleshoot -> Advanced options -> Startup Settings -> Restart, to enter into the Startup Settings window.
Step 3. Next press F4, F5, or F6 to choose a desired Safe Mode option to start Windows 10 in Safe Mode while booting.
4. How to Start Windows 10 in Safe Mode While Booting from Login Screen
If you can’t log in Windows 10, but you can enter into the Sign-in screen, you can also enter Safe Mode in Windows 10 from the login screen by using Shift + Restart.
Step 1. You can restart the Windows 10 PC. When you see the Sign-in screen, you can also press the Shift key and don’t release, and click the Power icon at the bottom-right and choose Restart.

Step 2. After you enter into the WinRE screen, click as follows: Troubleshoot -> Advanced options -> Startup Settings -> Restart.
Step 3. After the Windows 10 PC restarts, you can see a list of Windows startup options. You can then press F4 to boot Windows 10 in Safe Mode, or press F5 to start in Safe Mode in Windows 10 with Networking.
5. How to Start Windows 10 in Safe Mode from a Black/Blank Screen
If your Windows 10 PC can’t start normally, you can also choose to boot Windows 10 in Safe Mode to troubleshoot problems there.
To boot your Windows 10 PC in Safe Mode from a black or blank screen, you need to enter into the Windows Recovery Environment (WinRE) at first by turning off and on the PC 3 times.
Step 1. Enter into WinRE
You can press and hold the Power button on your PC for 10 seconds to turn off the computer, then turn on the PC by pressing the Power button again. When the computer is going to boot the operating system (e.g., the computer manufacturer’s logo appears when restarting), rightly press the Power button again for about 10 seconds to turn off the device.
Follow the same process to turn off and on your Windows 10 PC 3 times. When the PC is turned on for the third time, the computer should enter into the Automatic Repair window now. If not, follow the same steps until the WinRE screen shows.
If the Automatic Repair couldn’t repair your Windows 10 PC problems, you can click Advanced options to enter into Windows Recovery Environment screen to try other options to repair PC.
Step 2. Enter into Startup Settings
In the WinRE window, you can then enter into the Startup Settings window by clicking Troubleshoot -> Advanced options -> Startup Settings -> Restart.
Step 3. Start Windows 10 in Safe Mode with Networking
Then you can press F5 to start Windows 10 PC in Safe Mode with Networking. And this is a suggested option when you need to troubleshoot a black or blank computer screen. You can search on the Internet for solutions to the issues.
6. How to Boot in Safe Mode Windows 10 While Booting through F8 Key
In Windows 7, you can continuously press F8 key to enter into Advanced options window before logging into Windows. And we know that this method isn’t working in Windows 10 and 8 because Windows 10/8 has much faster booting speed.
However, you can still make F8 work again in Windows 10 with the BCD (Boot Configuration Data) Edit command.
Step 1. Open Administrator Command Prompt window
You can press Windows key and R key on computer keyboard at the same time to open RUN window. Then type cmd in the box, and press Ctrl + Shift + Enter key at the same time to run the Administrator Command Prompt window. Please do not simply click OK, because it won’t open the Command Prompt (Admin) window.

Step 2. Reactivate F8 key function
Then you can type this command line: bcdedit /set {default} bootmenupolicy legacy. And hit Enter key.
Step 3. Reboot Windows 10 PC in Safe Mode
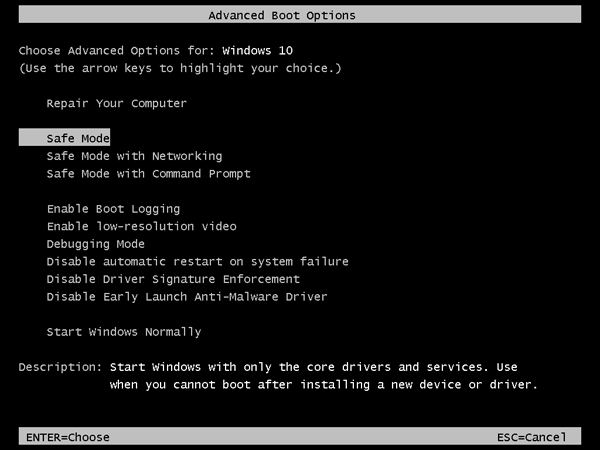
Next you can close the Command Prompt window, and restart your PC. Now before the Windows logo appears, you can constantly press F8 to enter into the Advanced Boot Options screen.
You can then use the arrow keys on the keyboard to choose to start Windows 10 in Safe Mode, Safe Mode with Networking, or Safe Mode with Command Prompt.
Tip: Please be noted that you can only reactivate F8 function in Windows 10 on condition that the Windows PC can start normally. If you can’t access Windows 10 PC, you should try other ways in this post to boot in Safe Mode Windows 10.
If you want to get rid of the F8 key function in Windows 10, you can follow the same operation to get into the Administrator Command Prompt window, and input this command line: bcdedit /set {default} bootmenupolicy standard. Hit Enter and restart computer again.

How to Get Out of Safe Mode Windows 10
To get out of Safe Mode in Windows 10, you can follow the steps below realize it.
Step 1. You can press Windows and R key on the keyboard. And then input msconfig and hit Enter again to open the System Configuration window.
Step 2. Tap Boot icon and uncheck the Safe boot option, and click OK. Then your Windows 10 computer will boot in normal screen next time you start the PC.

Click to Tweet
How to Use Safe Mode to Fix Your Windows 10 PC Issues
Starting Windows 10 PC in Safe Mode can help you fix some problems of your computer.
1. Recover Lost Data/Files in PC
If your computer is infected by malware or virus, or has a system crash or hard drive error, you may lose some important data and files, and can’t start Windows 10 normally.
After you access Windows 10 in Safe Mode, you can use the best free data recovery software like MiniTool Power Data Recovery to easily recover deleted files or lost data in 3 simple steps.
MiniTool Power Data Recovery is a 100% clean data recovery tool which is compatible with Windows 10/8/7.
You can use this software to recover lost or mistakenly deleted files from PC hard drive, external hard drive, SSD, USB flash drive, pen drive, SD card (from Android, cameras, etc.), and more, under various kinds of data loss situations.
Download and install MiniTool Power Data Recovery on Windows 10/8/7, and follow the detailed guide below to recover lost data and files with ease.
MiniTool Power Data Recovery TrialClick to Download100%Clean & Safe
Step 1 – Run MiniTool Power Data Recovery
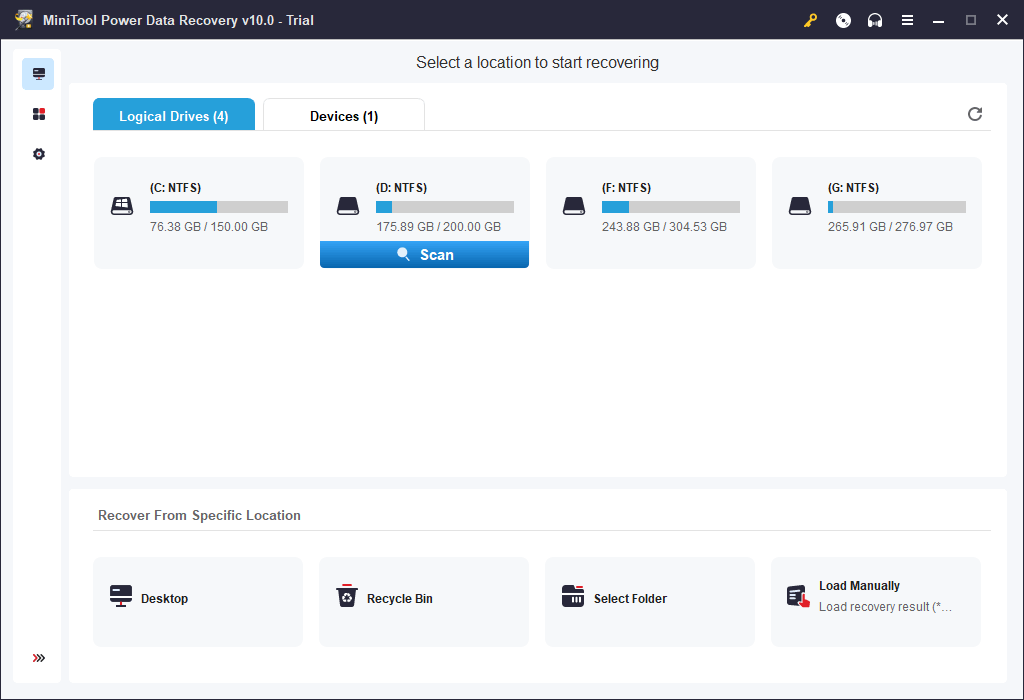
Launch MiniTool Power Data Recovery to enter into the main UI. All the detected drives and devices on PC are displayed.
Step 2 – Scan for Lost Data on PC
Choose one partition under Logical Drives and click Scan button, and it will automatically scan for all lost, deleted and normal files on this partition. If you don’t know which partition contains the deleted/lost files, you can click Devices tab and choose the whole disk to scan.
Step 3 – Preview and save lost files
After the scanning is finished, you can browse from the scan result to find your needed files, and click Save button to store the wanted files to another drive or partition, or external hard drive, USB drive, etc.
MiniTool Power Data Recovery allows you to preview up to 70 types of files.
Show Lost Files, Find, Filter functions are available to help you quickly find the wanted files.

Tip: If your Windows 10 PC can’t boot normally and your computer haven’t installed this software before, it’s advised to start Windows 10 in Safe Mode with Networking. Thus, you can download and install MiniTool Power Data Recovery Free on your PC in Safe Mode to recover lost data in PC.
If your computer can’t boot or even can’t start in Safe Mode, you can still recover data and files in Windows 10 PC with MiniTool Power Data Recovery. Related guide: How to Recover Data When PC Won’t Boot
2. Remove Malware or Virus
If your computer is crashed or stops working because of malware or virus infection, you may boot Windows 10 in Safe Mode to scan and remove malware/virus.
You can also use Windows Defender in Windows 10 to scan and kill the malware and virus in PC. If you don’t have an antivirus program in your Windows 10 PC, it’s also possible to download and install one in Safe Mode only if you start Windows 10 in safe mode with Networking.
3. Uninstall Improper Software
If your Windows 10 computer can’t normally start or work because of some recently installed programs which may have conflicted drivers, you can uninstall the suspicious software from the Control Panel in Windows 10 Safe Mode. Then restart your computer to see if the problem is fixed.
4. Perform System Restore
If your Windows 10 computer runs unstable recently, you can perform a System Restore to restore the system to an earlier state which has a good configuration. But what if Windows 10 System Restore stucks in normal Windows 10 start mode? Then you may try to start Windows 10 in Safe Mode to run a successful System Restore without crashing.
Beyond above, you can also boot Windows 10 in Safe Mode to fix Windows 10 black screen, blue screen issues like the Kernel Data Inpage Error, and more.
Click to Tweet
Bottom Line
This post illustrates 6 ways for how to start Windows 10 in Safe Mode (while booting) with step-by-step guides. If your computer doesn’t run well, can’t boot, or has some other problems, you may try to start Windows 10 in Safe Mode to fix issues of your Windows 10 computer, and recover lost data and files with MiniTool Power Data Recovery Free. Besides, you can also use this MiniTool software to perform RAID data recovery, SD card data recovery, and SSD data recovery.
If you still have problems about how to boot in Safe Mode Windows 10, please contact [email protected].
Windows 10 Safe Mode FAQ
How to start Windows 10 in Safe Mode while booting?
This tutorial introduces 6 ways with detailed guides to allow you to start Windows 10 in Safe Mode while booting. You can try one of them.
How do I start Win 10 in Safe Mode?
You can check the 6 ways in this post to easily enter in Safe Mode on Windows 10.
How do I boot up in Safe Mode?
You can boot into Safe Mode on Windows 10 via Settings, msconfig, Start Menu, Login screen, F8 key, etc. The detailed instructions are included in this tutorial.
Can I boot in Safe Mode from BIOS?
You can press F8 key during booting to enter into Windows Advanced Boot Options screen, and choose a Safe Mode option to boot Windows 10 into Safe Mode.