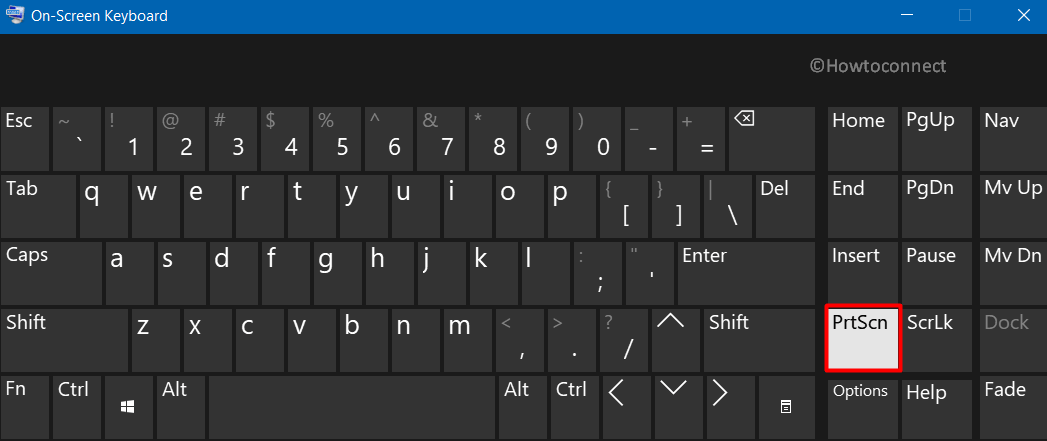
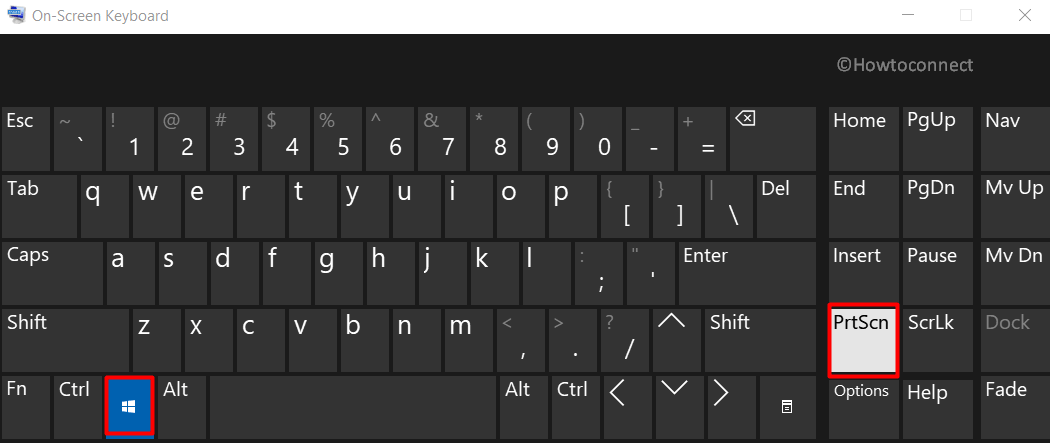
Depending on your hardware, you may use the Windows Logo Key + PrtScn button as a shortcut for print screen. If your device does not have the PrtScn button, you may use Fn + Windows logo key + Space Bar to take a screenshot, which can then be printed.
To locate your screenshots, open File Explorer from the taskbar. On the side navigation pane, select the Pictures folder, and select Screenshots.
View the full list of keyboard shortcuts.
You can also use Snipping Tool to capture screenshots.
Need more help?
Want more options?
Explore subscription benefits, browse training courses, learn how to secure your device, and more.
Communities help you ask and answer questions, give feedback, and hear from experts with rich knowledge.
Создавайте снимки экрана с помощью системных инструментов или дополнительных программ.
Штатные средства Windows
1. Win + PrtSc
Начнём с самого простого. Чтобы мгновенно сделать снимок всего экрана, используйте комбинацию клавиш Win (с флажком) + PrtSc (Print Screen).
Система сделает скриншот и сразу сохранит его на жёсткий диск в формате PNG. Готовый файл вы найдёте по адресу: «Этот компьютер» → «Изображения» → «Снимки экрана».
2. PrtSc + Paint
Этот способ тоже позволяет создать снимок всего экрана, но при необходимости вы можете сразу отредактировать результат.
Нажмите клавишу PrtSc. Windows сделает скриншот, но не покажет его: система не сохранит изображение на жёсткий диск, а только скопирует в буфер обмена.
Чтобы увидеть скриншот, запустите Paint и вставьте изображение в окно программы с помощью клавиш Ctrl + V. Если необходимо, измените картинку с помощью редактора.
Нажмите «Файл» → «Сохранить как» и сохраните снимок экрана в нужном формате. Изображение появится в указанной вами папке. Вместо Paint можно использовать любой другой графический редактор, установленный на ПК.
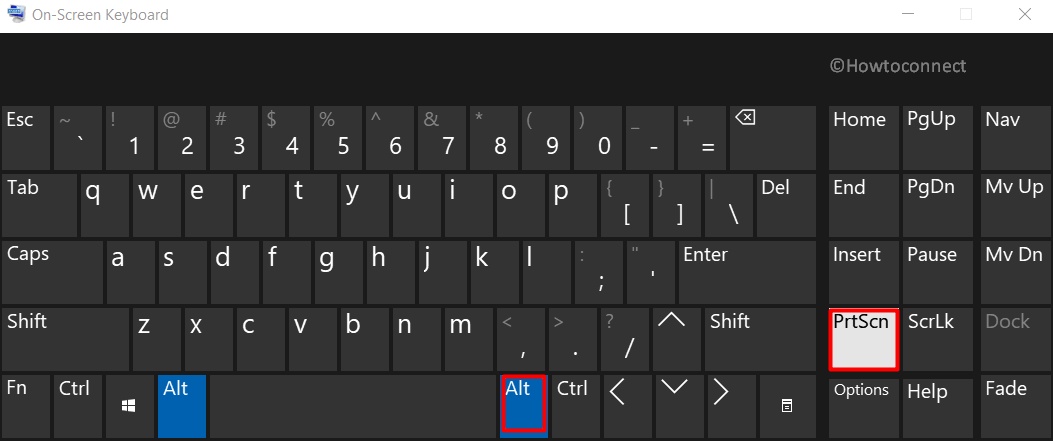
3. Alt + PrtSc
Эта комбинация клавиш делает снимок активного окна и, как и предыдущий способ, копирует получившееся изображение в буфер.
Нажмите Alt + PrtSc. Затем откройте Paint или другой графический редактор и воспользуйтесь клавишами Ctrl + V, чтобы вставить скриншот. Отредактируйте изображение, если нужно, и сохраните его в любую папку в удобном формате.
4. Программа «Ножницы»
В Windows 10 есть встроенный менеджер скриншотов, который позволяет делать снимки всего экрана, отдельных фрагментов и выбранных окон. Это приложение «Ножницы». Его легко найти по названию через поиск по системе.
Запустив «Ножницы», нажмите «Режим» и выберите нужную область дисплея. Затем воспользуйтесь кнопкой «Создать» и кликните по экрану.
Когда скриншот будет готов, программа откроет его в новом окне. Здесь на изображение можно нанести свои пометки и отправить его по почте или просто сохранить на жёстком диске.
5. Программа «Фрагмент и набросок»
Недавно в Windows 10 добавили ещё одно приложение для работы со скриншотами — «Фрагмент и набросок». С его помощью тоже можно делать снимки выделенной области, выбранных окон или всего экрана. Скорее всего, в будущем эта утилита заменит «Ножницы».
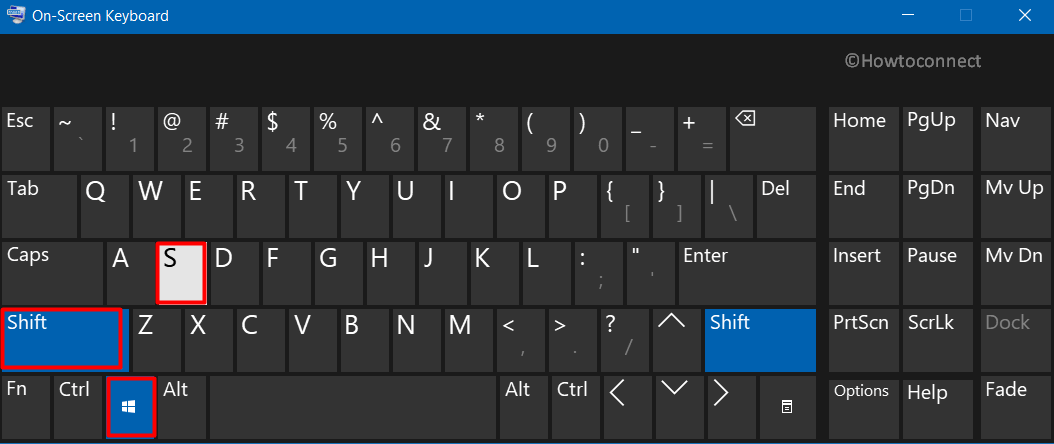
Чтобы вызвать «Фрагмент и набросок», нажмите Win + Shift + S или найдите программу по названию через поиск по системе. Запустив её, выберите область скриншота с помощью появившихся на дисплее кнопок.
Чтобы увидеть снимок экрана, откройте Paint и нажмите Ctrl + V. Когда изображение появится в программе, его можно будет отредактировать и сохранить на жёстком диске. В некоторых сборках Windows во «Фрагменте и наброске» есть встроенный редактор, который позволяет обойтись без Paint.
Сторонние программы
Если стандартных способов вам мало, можете попробовать эти инструменты с дополнительными функциями.
1. Nimbus Capture
Nimbus Capture — это плагин для браузера, с помощью которого очень удобно делать скриншоты веб‑страниц. Помимо обычных снимков всего экрана, окна или выделенного фрагмента, он также позволяет захватывать полную длину страницы, даже если она не помещается в экран.
А ещё в Nimbus Capture вы можете редактировать изображения и сохранять их прямо в Google Drive. Плюс ко всему плагин умеет записывать видео экрана.
Чтобы сделать скриншот, достаточно кликнуть по кнопке Nimbus Capture на панели браузера и выбрать область экрана. Вы также можете настроить горячие клавиши и формат снимков: PNG или JPG.
Все перечисленные функции доступны бесплатно. Но, если вы захотите прицепить к скриншотам свой логотип, сохранять их в Dropbox и получать оперативную техподдержку, придётся оформить подписку стоимостью 15 долларов в год.

![]()
![]()
2. PicPick
Редактор изображений, очень похожий на Paint, с функцией создания скриншотов. PicPick умеет делать снимки всего экрана, любой выделенной области и выбранного окна — в том числе с прокруткой. Что касается редактора, помимо базовых функций вроде добавления текста и пометок, он позволяет корректировать цвета изображений и накладывать различные эффекты.
Вы можете настроить горячие клавиши и сохранять файл в одном из следующих форматы: PNG, JPG, BMP, PDF и GIF. После установки значок программы появляется на панели задач. Чтобы сделать скриншот, нужно кликнуть по нему и выбрать область экрана.
Программу можно использовать бесплатно, но в таком случае новые версии придётся скачивать с сайта вручную. За возможность автообновления разработчики просят одноразовый платёж размером 30 долларов.
Скачать PicPick →
3. LightShot
LightShot — простейший инструмент, который позволяет делать скриншоты выделенной области в пару кликов. Нужно лишь нажать на иконку программы и выделить мышью необходимый фрагмент. После вы сможете добавить текст, стрелки или что‑нибудь нарисовать поверх изображения.
С помощью LightShot очень удобно делиться снимками экрана. Сделав скриншот, вы можете сразу же сохранить его на сервере программы, чтобы получить прямую ссылку для отправки коллегам или друзьям. К вашим услугам два формата: PNG и JPG.
Приложение бесплатное, но перед установкой предлагает загрузить дополнительное ПО. Не забудьте от него отказаться.
Скачать LightShot →
Этот материал был впервые опубликован в январе 2017 года. В марте 2020‑го мы обновили текст.
Читайте также 💻📧📸
- 15 лучших графических редакторов, которые не стоят ни копейки
- Как установить в Windows 10 динамические обои из macOS Mojave
- Как изменить каталог установки программ по умолчанию в Windows
- 12 вещей, которые нужно сделать после установки Windows 10
- 15 лучших фоторедакторов для разных платформ
For some reason, you may need to take a full or partial screenshot on your Windows 10 or Windows 11 computer. You can just use the Windows built-in tools or keyboard shortcuts to do this work and it is very simple. In this post, Winsor Consulting will show you some methods that are suitable for you. There are several methods you can use. Whether you want to save the entire screen or just a piece of it, we’ve rounded up all the best ways to take a Windows screenshot
The Print Screen Button

Here you can see the PrtScn Button. It may require you to use the FN button.
There is a Print Screen key on your keyboard. Just like the name of the key, it is used to print the current screen of your computer. If you are using a wired keyboard, it is usually on the top-right side of the keyboard. If you are using a laptop, you can find it on the top line or the bottom line of the keyboard. The Print Screen can be shown as Print Screen or PrtSc.
- Press the Print Screen Key and you will see a small menu on the top middle side of your computer screen.
- Select the area you want to capture. The screenshot will be saved to the clipboard. Of course, you can click one of the icons in the menu according to your need to take a screenshot.
- Open an application like Paint or Word and paste the screenshot to it.
- Edit the screenshot or save it to a suitable location.
The screenshot will be copied to your clipboard. To save the file, paste the screenshot into any program that allows you to insert images, like Microsoft Word or Paint.

Paste your screenshot into a program like Paint to save and edit it.
The Windows key + Print Screen

To take a screenshot on Windows 10 or Windows 11 and automatically save the file to the Screenshots folder, press the Windows key + PrtScn. Your screen will go dim and a screenshot of your entire screen will be saved to the folder.
Alt + Print Screen
To only capture the active window you’re working in, press Alt + PrtScn. The screenshot will be copied to your clipboard, and you’ll need to paste it into another program to save it.
The Snip & Sketch tool in Windows 10
Windows 10 Snip & Sketch is the best way to screenshot on Windows if you’re looking to customize, annotate, or share your screen captures.
To activate Snip & Sketch, use the keyboard shortcut Windows Key + Shift + S. Your screen will go dim and a mini menu will appear at the top of your screen, giving you the option to take a rectangular, free-form, window, or full-screen capture.
With these Snip & Skitch options, you can choose how you’d like to take a screenshot:

Click the menu to take a rectangular, free-form, window, or full-screen capture (from left to right).
After you capture the screenshot, it’ll be saved to your clipboard and a preview notification will appear in the bottom-right corner of your screen.
Click on the preview notification to open the Snip & Sketch app and save, share, or edit the screenshot with the available drawing tools.
The Snipping Tool in Windows 11
Although the Snipping Tool exists in Windows 10, it’s not usually the screenshot tool you’ll want to use. In Windows 11, the Snipping Tool got a major upgrade and it’s now the best way to take custom screenshots.
To start the Snipping Tool in Windows 11, you can search for it or press the Windows Key + Shift + S. Like Snip & Sketch, your screen will go dim and a toolbar of screenshot options will appear at the top of the screen. This toolbar will let you take a rectangular, freeform, full-window, or full-screen capture.

The snipping tool looks just like Snip & Sketch.
Once you’ve taken your screenshot, it’ll be copied to your clipboard so you can share it right away, and it will be saved to the Screenshots folder. If you click the preview that pops up in the bottom-right corner of your screen, you’ll be able to save and edit it.
Use The Game Bar
The Game Bar is an overlay you can use within most Windows apps and games to take screenshots and record videos. Follow the steps below to open and use it:
1. Press Windows Key + G.
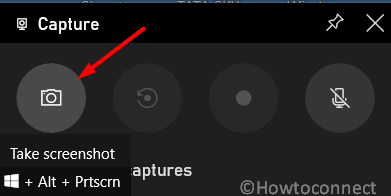
2. In the overlay menu, click the Capture button – the camera icon – in the top menu to bring up the Capture menu.
You can take screenshots or screen recordings with the Game Bar.
3. In the Capture menu, click the camera icon to take a screenshot. You can also record a video clip by pressing the record button, with the option to include audio by clicking the microphone icon.
Screenshots and video clips captured by the Game Bar are saved in PNG and MP4 format and you can find them in the Videos > Captures folder in File Explorer. You can also find them through the Game Bar’s Gallery, by clicking Show my captures > See my captures underneath the screenshot and recording buttons in the Capture menu.
Power + Volume Up
To take a screenshot on Windows 10 with a Microsoft Surface device, press the Power Button + Volume Up Button. The screen will go dim, and your screenshot will save to the Pictures > Screenshots folder.
So, did you learn how to take a screenshot in Windows?
Did you take advantage of our tips for taking prints on your Windows PC?
Oftentimes when working on a computer, the most interesting question that might come to mind is How to Take Screenshot in Windows 10. The need for capturing screen events depends on person to person. Most of the time, it is useful during sharing an image from PC, presentation, education and so on. But each one of you might have a different type of screenshot requirements. Some may want to capture only the active window; whereas a few of them prefer a full-screen snap. Or if you are a game lover, then capturing the achievements with a screenshot might be a preference.
Windows 10 itself includes a wide range of built-in options that satisfy most of the screenshot requirements. However, there are multiple Windows applications, paid or free that lets you take snapshots. So in this article, you will see all the built-in tools, 3rd party apps, and also the way to take screenshots on web pages as well. Let us explore the below section to get familiar with all the methods –
Here is How to Take Screenshot in Windows 10 –
Way-1: Using Built-in Tools
Windows 10 includes some impressive tools that let you easily capture the screen happenings. Among them, some are certain keyboard shortcuts as well. Let us explore all of them in detail –
1] Keyboard Shortcut – Print Screen – Quickest and easiest way
The simplest method to take screenshot in Windows 10 requires a tap on the PrtScn key only. After this action, Windows will capture the entire screen and will further save the same in the clipboard. Here are the steps –
- Press Print Screen (PrtScn or Prt sc) key on the keyboard of laptop or computer.
- It will copy the image in the clipboard and will not automatically get saved.
- So open a tool such as Microsoft Paint, MS Word, PowerPoint, or other and press Ctrl + V to paste the screenshot.
- Click File and choose Save as option to store the picture.
Go through – Alternative for Print screen Button on Windows 10.
2] Windows key + Print Screen
Another easy way to take screenshot in Windows 10 is by using Windows+PrtScn. It does not require any image editor to save the snapshot. By default, it automatically stores it in the Screenshot folder.
- Press Windows logo and PrtScn keys at a time on the keyboard.
- It will dim the screen for a little while which indicates the successful capture of the snapshot.
- Finally, to view the image go to File Explorer > Pictures > Screenshots.
3] Windows key + Shift +S
“Win logo+shift+S” immediately launches Snip & Sketch app on the screen. It will dim the screen briefly and the tiny menu will appear on the top of the screen. Just go ahead with the type of snip you prefer to capture.
4] Alt + Print Screen
To take screenshot of an active window, this keyboard shortcut works wonderfully. See the steps below to do the same –
- Simply hit the key combination Alt+PrtScn.
- This will take screenshot of the active window and the same will be copied to clipboard.
- So, get access to any image editor like Paint and paste the picture to save in a directory.
5] Windows Logo + Volume Down (For Surface users)
This method is applicable to users with Microsoft Surface device. Just like people take entire screen screenshot on any smartphone or tablet, here also the physical buttons will do the job.
- Hold down the Windows Logo touch button.
- Then hit the physical volume-down button. This is available on the side of the tablet.
- Doing this will dim the screen briefly and save the screenshot to the Pictures > Screenshots folder.
6] Screen Snip
You will get this Screen Snip option in the Action Center. This will launch the Snip & Sketch app to proceed further.
- Hit Win logo and A on the keyboard to show up Action Center.
- Click Expand to view all the tiles.
- Find out and select Screen snip tile.
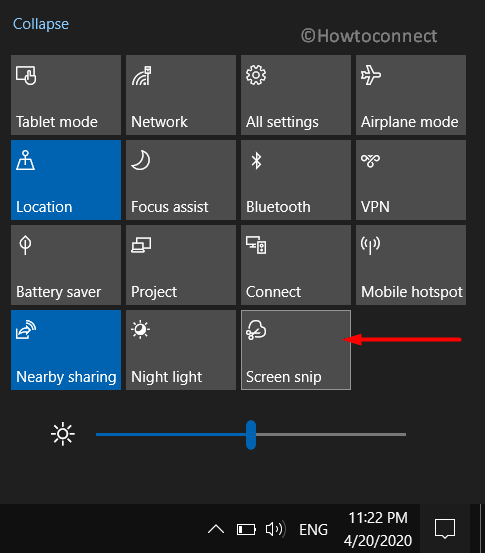
- Now, select the type of screenshot and take it.
7] Snipping Tool
This is one of the oldest desktop apps in Windows 10 for taking screenshots. It provides several snipping options with a few editing tools as well.
- Launch taskbar search box using Win+S keyboard shortcut.
- Type in snipping in the text field and hit Enter.
- Once the utility appears, click Mode. Choose the type of snip.
- Otherwise, click New.
- Select the Save as option on the top to save the screenshot in your preferred location and format.
See Windows 10 – How to Use Snipping Tool – Capture Screenshot
8] Snip & Sketch
Basically, this is meant to replace the traditional Snipping Tool. As the name suggests, the main function of this tool is to modify the screenshots after you capture them. Similar to Snipping tool, it also provides four types of snip to choose from.
- Press Windows logo key, type Snip & Sketch and then press Enter.
- Once the app opens up, click the New button in the upper left corner. This will immediately launch a tiny box at the top of the screen.
- Select the type of snip which includes “Rectangular”, “Freeform”, “Windows”, and “Fullscreen” respectively.
- Simply choose the type and capture the screenshot.
9] Game Bar
- Open Game Bar using Win Logo + G shortcut key.
- Once the app comes into view, click the screenshot button.
- Alternatively, while playing a game, simply use the default keyboard shortcut “Windows+Alt+PrtScn“.
Way-2: Take Screenshot in Web Browsers
1] Firefox
- Open the page whose screenshot you wish to capture.
- Right-click somewhere on the “page” and select Take a Screenshot option.
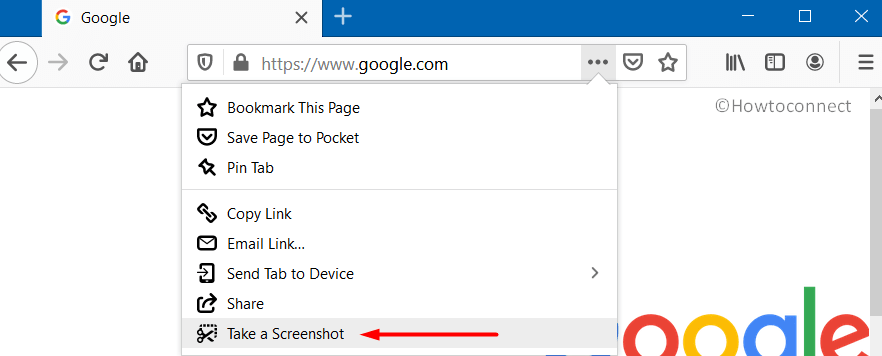
- Drag the area you wish to capture.
- The browser will display 2 options – Copy and Download.
- Click on Copy to save the image in clipboard and then use it on an image editor.
- Or click Download to save a copy of the snapshot on the Downloads folder.
2] Chrome
- Navigate to Chrome Web Store and search for Full Page Screen Capture extension.
- After the page becomes visible, click Add to Chrome.
- Upon pop-up, click on Add extension.
- Once the installation gets over, click on the tiny camera icon of the Full Page Screen Capture.
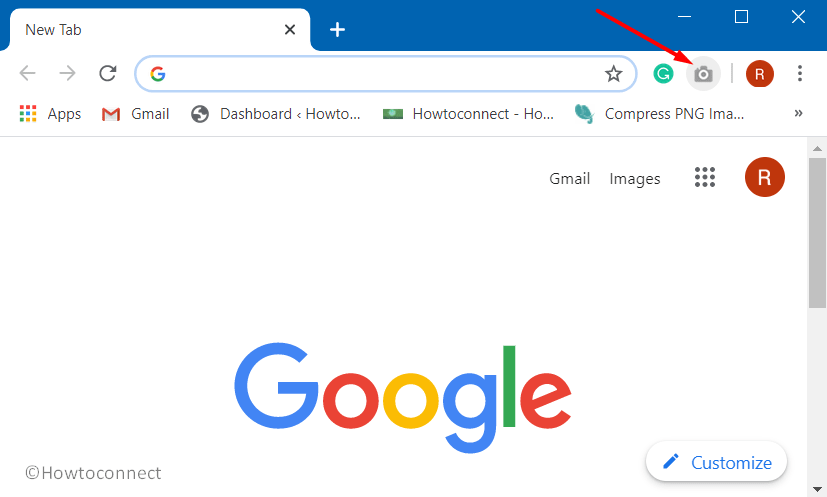
- Chrome will immediately capture the entire page and will further display certain options to annotate, share, edit, or save the image.
Way-3: Take Screenshot Using OneNote
Microsoft Office OneNote gives you the ability to capture screenshots of web pages or other applications. All you need to do is –
- Launch the webpage or application whose screenshot you wish to capture.
- Then, open OneNote.
- Click Insert on the menu bar and choose Screen clipping.
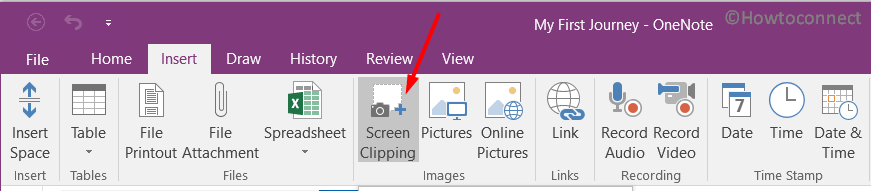
- This will immediately minimize the OneNote app and the entire screen will be dimmed. With the help of the cursor, drag the desired area and the same will be copied in OneNote.
Note – This method is not applicable to the built-in Windows 10 OneNote app.
Read How to take Webpage Screenshots from OneNote Interface
Way-4: Take Screenshot in Windows 10 Through 3rd Party Tools
Plenty of third-party utilities are available on the Internet that lets you take snapshots. Some of the interesting tools are –
1] Lighshot
- Download Lightshot simply from here.
- Install and press PrintSc key.
- Shape the screenshot by moving mouse cursor and clicking on Save icon.
2] ShareX
Download the Sharex application first. Install it following the guide suggested on-screen suggestions.
- Before starting the capturing we recommend to click Upload and uncheck Upload File. It is enabled by default and if you leave the option checked then the captured snaps will be itself uploaded to Imgur.
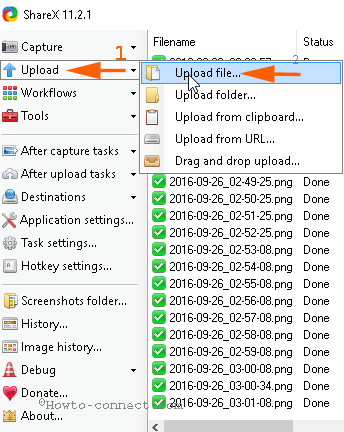
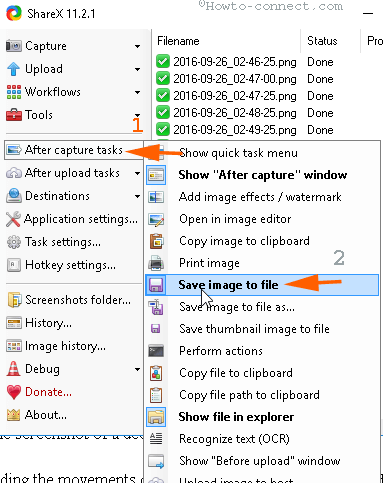
- For determining a new location, click on After capture tasks. Find the option Save Image to File in the Drop-down menu and check it.
- To collect the captured files in the desired folder click Application Settings => Path.
Take Screenshot in Windows 10 –
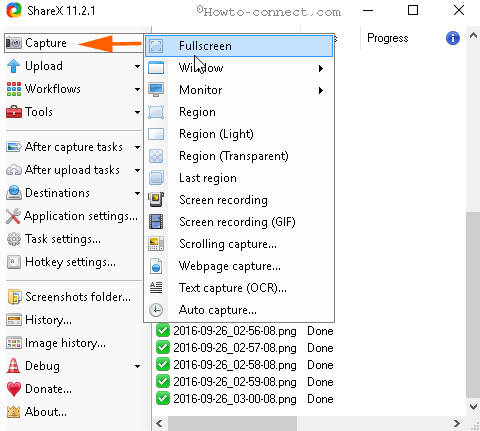
- Now click Capture which will open a list of options.
- On the menu, select the option accordingly need, such as
To snap overall screen – Full screen
To take screenshot with cursor visible of a decided segment – Region.
For recording the movements on system’s screen – Screen recording.
In addition a few more options
To draw the snap for only write up of a web page – Text Capture (OCR)
To snap the complete web page – Webpage capture
Record screen for Animation – Screen recording (GIF)
are available.
- So, click on the option suitable for you.
- Noteworthy is you can also grab screenshots using Sharex simply by pressing the Prt sc key.
Save and See Screenshot
- Once you snap, Sharex – after capture window appears, click on Continue here. As soon as you click Continue the screenshot is stored in the determined location.
- You can see the list in the middle and preview on the right side of Sharex. From the list, you can also go to the screenshot saving location and open it.
- In case, you are doubtful concerning location on your computer simply click Screenshot folder.
See – 4 Best Ways to take screenshot in Windows 11
Methods:
Way-1: Using Built-in Tools
Way-2: In Web Browsers
Way-3: Take Screenshot Using OneNote
Way-4: Through 3rd Party Tools
That’s all!!
Use the keyboard shortcut Windows+PrtSc, the Snipping Tool, Snip & Sketch (Windows+Shift+S), or Game Bar (Windows+G)
Updated on August 22, 2023
What to Know
- The easy way: Use the Windows + PrtSc (Print Screen) key combination on your keyboard.
- Or, use the Snipping Tool, Snip & Sketch (Windows+Shift+S), or Game Bar (Windows+G).
- Screenshots are stored in Pictures > Screenshots by default unless you change that destination manually.
This article covers how to capture a screenshot in Windows 10, including using a keyboard combination, using the Snipping Tool, the Snip & Sketch Tool, or the Windows Game Bar.
Capture a Screenshot in Windows 10 With Print Screen
The easiest way to capture a screenshot in Windows 10 is to press the PrtSc + Windows keyboard combination on your keyboard. You’ll see your screen flash very briefly, and the screenshot will save to the Pictures > Screenshot folder on your computer. But while this is the easiest way, it may not be the best way.
One problem you may encounter if you use this keyboard combination and you’re running Windows 10 with two or more computer monitors, you’ll capture the screens on both monitors, as shown below. If what you’re trying to do is grab a single screen or part of a screen, you have some additional options in Windows 10 that might work better.
An alternative keyboard shortcut that might work a little better if you only want to capture a screenshot of an active window is to use Alt + PrtSc. However, be aware that this send the screenshot to your clipboard, not to the Pictures folder.
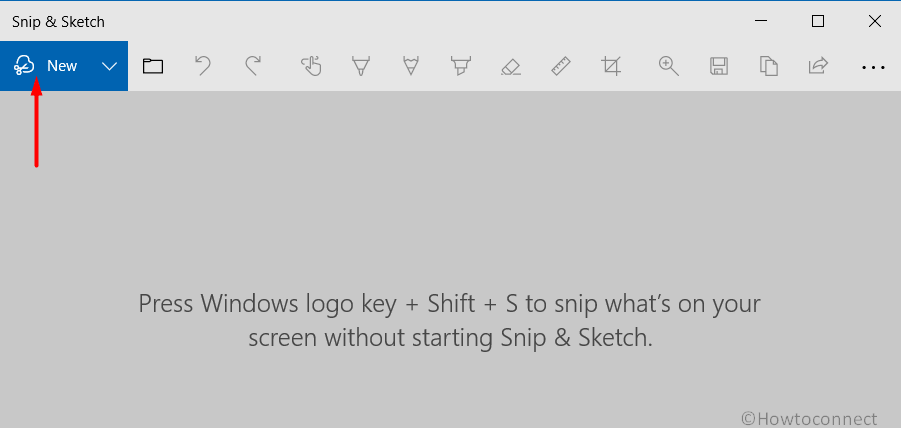
Capture a Screenshot With Snip & Sketch
An alternative way to capture a screenshot in Windows 10 is to use the Snip & Sketch tool. Snip & Sketch can be accessed through the keyboard shortcut Windows key + Shift + S or by choosing Snip & Sketch from the Start menu. Here’s how it works:
-
From the page or window, you want to capture, either use the keyboard shortcut or the Start menu to start the Snip & Sketch tool.
-
Once the tool is activated, you have several options:
- Rectangle: Draw a rectangle around the portion of the screen you want to capture with your mouse.
- Freeform: Draw any freeform shape around the area you want to capture.
- Window Snip: Grabs a screenshot of the active window.
- Fullscreen Snip: Grabs a screenshot of your entire screen (if you’re using multiple monitors, it will capture a screenshot of all monitors).
If you change your mind, you can click the X to close out of the Snip & Sketch tool.
-
Once you’ve captured the screenshot, it will save to your clipboard, and you’ll see a notification pop up in the corner of your screen. Click this notification to markup and share the screenshot.
If you miss the popup notification, you can still access the screenshot through the Notifications bar on the screen’s right side.
-
Click the notification to open the Snip & Sketch tool, where you can mark-up, save, and share the screenshot. When you save the screenshot from here, you can choose where you want to put it.
If you don’t save the screenshot to your hard drive, it stays on your Clipboard. Depending on your clipboard settings, it will disappear when replaced with another item on the Clipboard.
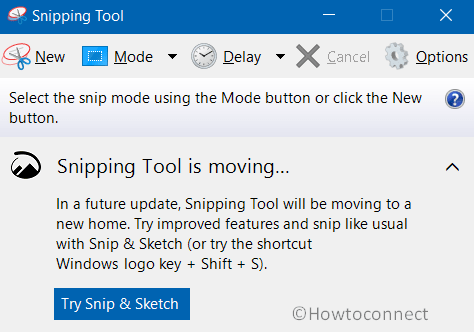
Get the Image With the Snipping Tool
Another option you can use in Windows 10 is the Snipping Tool. This tool has been part of Windows since Windows Vista, and while you can no longer find it in the Start menu, you can still access it by using the Windows Search Bar.
-
When you have something on your screen you want to capture a screenshot of, type Snipping Tool in the Windows Search bar, and select the Snipping Tool from the results.
-
The Snipping Tool will open, and you’ll have some options to choose from:
- Mode: This allows you to choose whether you want to take a Free-form Snip, Rectangular Snip (This is the default.), Window Snip, or Full-screen Snip.
- Delay: Lets you choose to delay the screenshot from 1-5 seconds.
- Options: Lets you change the Snipping Tool options.
-
Once you’ve set up your screenshot, click New to take the shot. The screen appears with a white overlay in the areas you’re not capturing.
-
Once you’ve completed the capture, the screenshot is opened in the Snipping Tool, where you can mark-up, save, or share it.
When you capture screenshots with the Snipping Tool, they are not automatically saved anywhere, including on the clipboard. If you want to keep the screenshot when you close the Snipping Tool, you need to choose File > Save As and save the screenshot to the desired location on your hard drive.
The Snipping Tool is a legacy tool in Windows 10, which is why you won’t find it listed in any menu. When you open it, you’ll even see a notice that it’s going away in a future update. For that reason, this should not be your first choice for taking screenshots.
Capture Screenshots (and Video) With the Game Bar
The Windows 10 Game Bar can capture screenshots, record your screen, and even help you with broadcasts. While Microsoft designed it to capture gameplay recordings, you can also use Game Bar to capture screenshots for other purposes.
Unless you’ve already enabled the Game Bar on your computer, you’ll need to enable it before you can use it to capture a screenshot. To do that, go to Settings > Gaming and make sure Enable Xbox Game Bar for things like… is enabled (the toggle should be blue, and the word «On» should be visible).
-
To start the screenshot process, press the Windows key + G on your keyboard to open the Game Bar.
-
In the menu that appears, click the Capture icon.
-
A Capture dialog box appears. Click Capture to take your screenshot.
A faster alternative is to press the keyboard combination Windows Key + Alt + PrtSc when Game Bar is active.
-
A full-screen screenshot is captured and automatically saved to C:\users\yourname\Videos\Captures, where C: is the name of your Windows hard drive, and yourname is your username.
Use Third-Party Screen Capture Software
Alternatively, you can use a third-party screen capture app like Snagit, Fireshot, or ShareX. These programs offer additional features, such as video recording and tools for annotating images and videos.
Capture Screenshots on a Windows 10 Microsoft Surface
If you have a Microsoft Surface device running Windows 10, press Power+Volume Up. On a Surface 3 or earlier, press the Windows Logo+Volume Down. Screenshots are saved to Pictures > Screenshots.
FAQ
-
How do I take screenshots on Windows 11?
To take screenshots on Windows 11, press PrtScn to save to the clipboard, or press the Windows Key+PrtSc to save fullscreen screenshots to Pictures > Screenshots. Press Win+Shift+S to pick a window or section of the screen.
-
How do I take a screenshot on a Mac using a Windows keyboard?
Press the Windows key+Shift+3 to take a screenshot with a Windows keyboard on Mac. This is the same as taking a Mac screenshot with a Mac keyboard, but you press the Windows key instead of Command.
Thanks for letting us know!
Get the Latest Tech News Delivered Every Day
Subscribe