Командлет Enter-PSSession позволяет создать постоянную интерактивную PowerShell сессию с удаленным компьютером. Все команды, которые вы вводите в вашей командной строке, выполняются на удаленном компьютере. В этой статье мы рассмотрим основные возможности и особенности использования командлета Enter-PSSession для удаленного управления компьютерами с Windows 10 и Windows Server 2019/2016.
Командлет Enter-PSSession работает на базе стека PowerShell Remoting. PSRemoting основан на Web Services for Management (WS-Management). Для связи используется служба WinRM (Windows Remote Management). Трафик между компьютерами шифруется на уровне протокола (можно использовать SSL шифрование). Для аутентификации можно использовать различные методы, в том числе NTLM и Kerberos.
Для подключения в самом простом случае нужно указать только имя компьютера (параметр ComputerName). Чтобы подключиться к удаленному компьютеру, достаточно выполнить команду:
Enter-PSSession hq-srv01.contoso.com
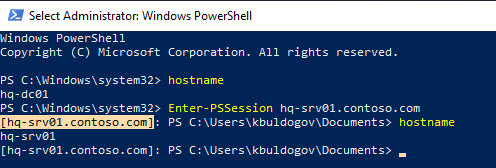
Если у текущего пользователя есть полномочия на подключение к удаленному серверу, вы подключитесь к удаленному компьютеру.
Можно перед подключением запросить учетные записи пользователя:
Enter-PsSession –ComputerName hq-srv01.contoso.com –Credentials contoso\kbuldogov
Или так:
$creds = Get-Credential
Enter-PSSession -ComputerName hq-srv01 -Credential $creds
Обратите внимание, что в начале командной строки PowerShell теперь в квадратных скобках указывается имя удаленного компьютера (
[hq-srv01.contoso.com]
). Это позволяет понять, работаете ли вы в локальной сессии или в удаленной.
В вашей консоли отображаются результаты всех команд, выполненных удаленно. Можно выполнить команду hostname и убедится, что вы выполнили команду на удаленном компьютере.
В этой интерактивной командной строке вы можете выполнять любые команды (в соответствии со своими полномочиями).
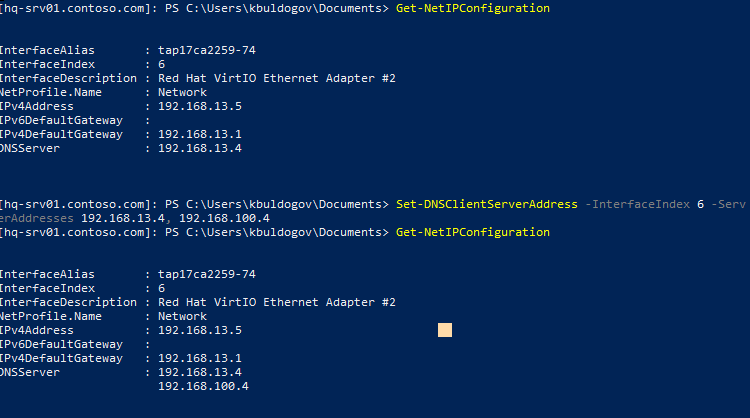
Например, выведем настройки сети:
Get-NetIPConfiguration
Можно изменить настройки DNS на удаленном компьютере:
Set-DNSClientServerAddress –InterfaceIndex 6 –ServerAddresses 192.168.13.4, 192.168.100.4
Чтобы завершить интерактивную сессию удаленного управления, нужно выполнить команду Exit-PSSession или exit. Строка-приглашение PS примет свой обычный вид, и вы вернетесь к своей локальной PowerShell консоли:

Ранее для запуска интерактивной командной строки с удаленным Windows компьютером администраторы в основном использовалась утилиту PsExec. Но с появлением Enter-PSSession необходимость в использовании сторонней утилиты исчезла.
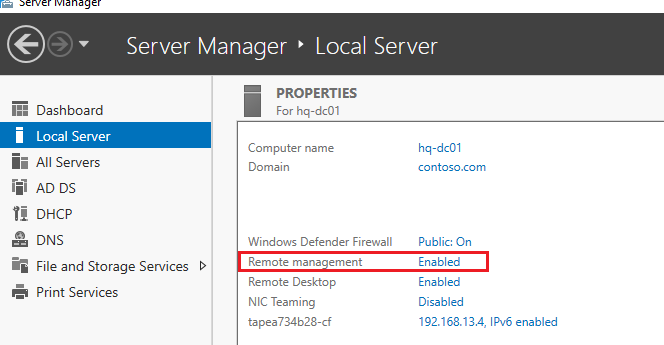
В Windows Server 2016/2019 PowerShell Remoting включен по умолчанию (это видно в консоли Server Manager -> Local Server -> Remote Management = Enabled).
В десктопных версиях Windows (Win10, Win11) PSRemoting и служба WinRM отключены.
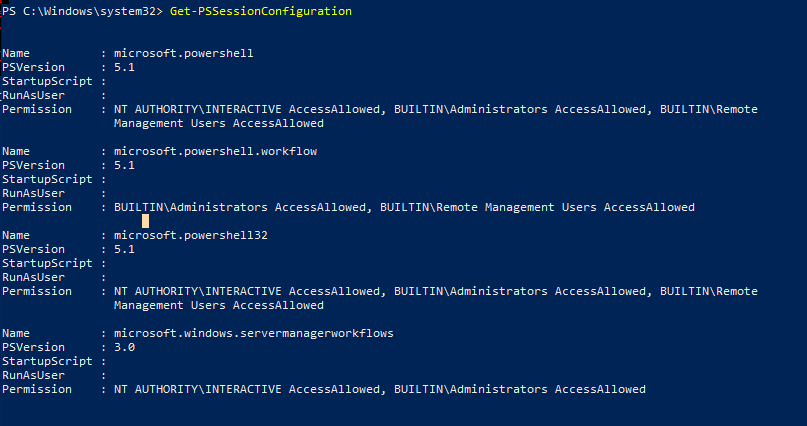
Вы можете проверить, включен ли PSremoting на текущем компьютере:
Get-PSSessionConfiguration
Данная команда также позволяет получить список пользователей и групп, которым разрешено подключаться через WinRM. Для использования PSRemoting учетная запись пользователя должна состоять в группе
Administrators
или
Remote Management Users
. Особенности удаленного использования WinRM без прав администратора описаны здесь.
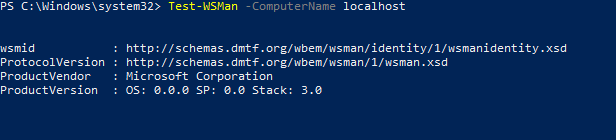
Вы можете протестировать, можно ли подключится через PowerShell Remoting к вашему компьютеру локально:
Test-WSMan -ComputerName localhost
Если команда вернет версию схемы WSMan, значит удаленные подключения к этому компьютеру через PS Remoting разрешены.
Если PowerShell Remoting отключен или не настроен, появился ошибка:
Test-WSMan : <f:WSManFaultxmlns:f="http://schemas.microsoft.com/wbem/wsman/1/wsmanfault" Code="2150858770" Machine="srv02"><f:Message>The client cannot connect to the destination specified in the request. Verify that the service on the destination is running and is accepting requests. Consult the logs and documentation for the WS-Management service running on the destination, most commonly IIS or WinRM. If the destination is the WinRM service, run the following command on the destination to analyze and configure the WinRM service: "winrm quickconfig".
Чтобы включить PowerShell Remoting, выполните команду:
Enable-PSRemoting -Force
Данная команда:
- Включает службу WinRM и настраивает ее на автозапуск;
- Создает точку подключения на стандартном порту WinRM (TCP/5985 для HTTP трафика);
- Добавляет исключения в Windows Firewall для WS-Management (если вы настраиваете PSRemoting вручную, добавьте правило самостоятельно);
- Разрешает удаленные PowerShell сессии;
- Перезапускает службу WinRM.
Убедитесь, что служба WinRM запущена и настроена на автоматический запуск:
Get-Service WinRM | Select MachineName,Name,Status, StartType

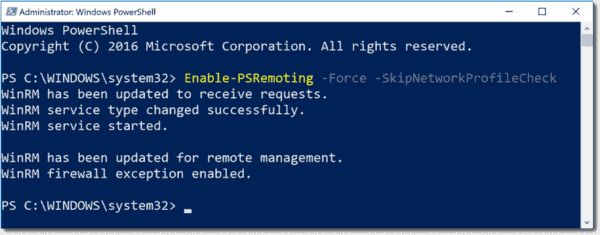
Команда Enable-PSRemoting работает только для доменного и частного сетевых профилей Windows. Если вы хотите включить PSRemoting на компьютере в общей (public) сети, нужно изменить тип сети на частную или воспользоваться командой:
Enable-PSRemoting -SkipNetworkProfileCheck -Force
В домене Active Directory проще всего настроить Windows Remote Management (PSRemoting) на серверах и компьютера централизованно с помощью групповой политики.
В новых версиях PowerShell(v6 и v7) поддерживается использование протокола Secure Shell (SSH) для подключения к удаленному компьютеру через PowerShell Remoting. На удаленном компьютере должен быть доступна точка подключения SSH (в Windows теперь есть встроенный SSH сервер). Вы можете запустить интерактивную сессию PSRemoting поверх SSH с помощью команды:
Enter-PSSession -HostName [email protected]
Или аутентифицироваться по SSH с помощью RSA ключа:
Enter-PSSession -HostName k[email protected]:22 -KeyFilePath c:\PS\your_rsa_key
Enter-PSSession можно использовать совместно с командой New-PSSession:
$s = New-PSSession -ComputerName hq-srv01.contoso.com
Enter-PSSession -Session $s
Enter-PSSession поддерживает несколько способов аутентификации. Вы можете задать нужный способ с помощью параметра
-Authentication
. Поддерживаются Basic, Digest, Kerberos, CredSSP, NegotiateWithImplicitCredential, Negotiate Challenge.
В примере выше мы показали пример интерактивного подключения Enter-PSSession между компьютерами в одном домене Windows (для подключения достаточно указать FQDN или короткое имя, используется Kerberos аутентфикация). Если попробовать подключиться к удаленному компьютеру по IP адресу или CNAME, аутентификация не пройдет:
Enter-PSSession : Connecting to remote server 192.168.13.5 failed with the following error message: The WinRM client cannot process the request. Default authentication may be used with an IP address under the following conditions: the transport is HTTPS or the destination is in the TrustedHosts list, and explicit credentials are provided. Use winrm.cmd to configure TrustedHosts. Note that computers in the TrustedHosts list might not be authenticated.

Для подключения к удаленному компьютеру по IP можно добавить этот хост в список доверенных (Trusted Hosts) или использовать SSL (более безопасно).
Чтобы добавить IP адрес в доверенные, выполните команду:
Set-Item WSMan:\localhost\Client\TrustedHosts -Value 192.168.13.5
Можно добавить в доверенные хосты по маске
Set-Item WSMan:\localhost\Client\TrustedHosts -Value *.winitpro.ru
Вывести список доверенных хостов:
Get-Item WSMan:\localhost\Client\TrustedHosts
Аналогично нужно добавить ваш хост в доверенные на удаленном компьютере.
Перезапустите службу:
Restart-Service WinRM
Чтобы подключиться к удаленному компьютеру по IP адресу, используйте такую команду:
Enter-PSSession -ComputerName 192.168.13.5 -Credential (Get-Credential -UserName contoso\kbuldogov)
Командлеты Enter-PSSession и New-PSSession создают постоянную сессию типа один к одному и используются в основном в интерактивных сценариях. Если вам нужно автоматизация, или есть задачи, которые нужно выполнить сразу на множестве удаленных компьютерах, используйте командлет Invoke-Command.
В Powershell есть несколько методов удаленного подключения. Это через:
- WMI
- CIM
- PS remoting/WinRM
Сегодня мы поговорим о PS remoting/WinRM. В его состав входит, в основном, два командлета — это:
Enter-PSSession -ComputerName CL1Этот командлет устанавливает сессию c удаленным компьютером и мы сможем работать прям на нем. Если сравнивать с Linux, то это почти одно и то же:
ssh CL1И второй командлет, который нужен для удаленного выполнения команд как на одном, так и сотни компьютеров:
Invoke-Command -ComputerName AD,CL1 -ScriptBlock {Get-ComputerInfo}Где:
-ComputerName — имена компьютеров (или одного)
-Scriptblock — скрипт или командлет в скобках {}
Если опять же сравнить с Linux ssh, то это почти одно и то же:
ssh root@192.168.1.1 'ifconfig'Как настроить удаленное управление через Powershell?
Для того что бы суметь настроить нужно понять как это работает. Команды выше могут работать по протоколу HTTP (по порту 5985) и HTTPS (5986), за исключением версии Powershell 1.0, который работал в XP (там порт 80/443). По умолчанию у нас стоит HTTP, но и эти данные шифруются используя симметричный ключ AES-256. Сама аутентификация работает в 2 режимах NTLM и Kerberos(по умолчанию стоит он). Если у вас сеть с домен контроллером, т.е. есть Kerberos, то у вас должны работать команды выше. Если компьютеры в Workgroup, то они используют NTLM и для этого нужна дополнительная настройка. Кроме того, если вы вместо имен используете IP, то вы в любом случае используете NTLM и это по умолчанию не работает.
Если у вас не работают команды выше нужно проверить запущен ли сервис WinRM на том компьютере, к которому мы хотим подключиться:
Get-Service -Name "*WinRM*" | flЕсли не запушен:
Enable-PSRemotingВ этом случае мы ставим запуск сервиса автоматически и настраиваем winrm в дефолтной конфигурации. Этот сервис дает возможность принимать команды Powershell и устанавливать сеансы.
Если вы работаете под профилем сети «Public» (не «Domain» или «Private»), то нужно выполнить еще один командлет, разрешающий работать в таких сетях:
Set-NetFirewallRule -Name "WINRM-HTTP-In-TCP-PUBLIC" -RemoteAddress AnyЕсли мы выполним такую команду:
Invoke-Command -ComputerName 192.168.3.100 -ScriptBlock {Get-Command}Получим ошибку:
Connecting to remote server 192.168.3.100 failed with the following error message : The WinRM client cannot process the request. Default authentication may be used with an IP address under the following conditions: the transport is HTTPS or the destination is in the TrustedHosts list, and explicit credentials are provided.
Которая говорит, что мы можем подключится по IP если используем HTTPS (для этого нужен сертификат) или добавить хост, к которому подключаемся в TrustedHost компьютера с которого хотим запустить команду. Для этого делаем:
Set-Item wsman:\localhost\Client\TrustedHosts -value 192.168.3.134После этого все будет работать, но команды должны исполняться с переменной, в которой будут лежать учетные данные пользователя. Т.е. так:
$cred = Get-Credential
Invoke-Command -ComputerName 192.168.3.134 -ScriptBlock {Get-ComputerInfo} -Credential $cred
Где:
$cred — это переменная, куда мы сохраняем данные с формы Get-Credential
-Credential — сюда мы передаем переменную
Так же отмечу, что все команды, которые мы запускаем для удаленного выполнения через Poweshell, должны происходить от члена группы Администратора того хоста, к которому мы подключаемся.
Теперь мы можем устанавливать множество сессий с помощью командлета:
New-PSSession -ComputerName 192.168.3.134 -Credential $credПолучать ID этих сессий:
Get-PSSessionИ подключаться по этим ID:
Enter-PSSession -Id 9Или использовать с invoke существующую сессию, а командлет для удаленного компьютера запускать с файла:
$cred = Get-Credential
$s = New-PSSession -ComputerName 192.168.3.134 -Credential $cred
Invoke-Command -Session $s -FilePath c:\scripts\test.ps1
А так же, т.к. WinRM настроен, выполнять командлеты где есть ключ -ComputerName, сразу на нескольких компьютерах. Этот командлет пропингует AD сразу с нескольких компьютеров:
Test-Connection -Source CL1,CL2 -ComputerName AD -Credential $credИли же использовать методы описанные выше.
Дополнительные ключи мы можем узнать по командлетам:
Get-Help Enter-PSSession -Examples
Get-Command -Noun PSSession
или по powershell invoke
Get-Help Invoke-Command -Examples…
Теги:
#powershell
If you want to manage Windows computers remotely with PowerShell, you first have to enable PowerShell remoting on the remote machine. You can then use the Invoke-Command and Enter-PSsession cmdlets to execute PowerShell commands on the remote machine. The commands described in this article also work in PowerShell 6 and PowerShell 7.
Contents
- On a local computer with Enable-PSRemoting
- On workgroup group computers
- For non-administrators
- Remotely with Group Policy
- Enable the WinRM service
- Set the WS-Management service to automatic startup
- Allow Windows Remote Management in the Firewall
- Remotely via PsExec
- Via PowerShell Direct
- Testing PowerShell remoting
- With SSH transport
- Author
- Recent Posts

Michael Pietroforte is the founder and editor in chief of 4sysops. He has more than 35 years of experience in IT management and system administration.
Note that this article replaces several smaller wiki docs in a single comprehensive text and covers all possible ways and options to enable PowerShell remoting.
On a local computer with Enable-PSRemoting
To enable PowerShell remoting on a single machine, you can log on to this computer locally or via Remote Desktop and then execute Enable-PSRemoting at a PowerShell prompt with administrator rights.
To avoid the conformation prompts, you can use the -Force parameter:
Enable-PSRemoting -Force
If the computer’s current connection type is set to public, the above command will produce an error message because by default PowerShell remoting is only enabled for private and domain connection types. See this blog post for more details about this issue. To avoid the error message and enable PowerShell remoting on a public network, you can use the ‑SkipNetworkProfileCheck parameter:
Enable-PSRemoting -Force -SkipNetworkProfileCheck
Enable PowerShell remoting with Enable PSRemoting
For more information read Microsoft’s documentation about the Enable-PSRemoting cmdlet.
On workgroup group computers
PowerShell remoting works best in an Active Directory environment. If you want to enable remoting for workgroup or standalone computers you have to consider a few more settings.
In case your network connection type is set to public, you have to use the ‑SkipNetworkProfileCheck parameter as explained above.
Enable-PSRemoting -Force -SkipNetworkProfileCheck
Authentication in PowerShell remoting relies on Active Directory. By default, only computers that are domain members can connect via PowerShell remoting. In a workgroup environment, you have to add the IP addresses of the computers to the TrustedHosts list manually:
Set-Item WSMan:\localhost\Client\TrustedHosts -Value "10.0.2.33" -Force
You also have to ensure that Windows Firewall is opened for Windows Remote Management on the remote computer. On the remote computer, type «firewall» after clicking Start, and click Advanced settings in the Control Panel firewall app. Right-click Inbound Rules and then select New Rule. In the Predefined field select Windows Remote Management and then follow the wizard.

Allow Windows Remote Management on a workgroup computer in the Windows Firewall
To improve security, you might consider of using HTTPS instead of HTTP for PowerShell remoting in a workgroup environment.
For non-administrators
By default, only administrators can connect via PowerShell remoting. If you want to enable PowerShell remoting for a single non-administrator, you can add the user account to the local Remote Management Users group.
Note that the Remote Management Users group exists only on computers running Windows 8 (or Windows Server 2012) and above.
To allow multiple non-administrators to work with PowerShell remoting, you can create a new Active Directory group (perhaps «PowerShell Remoting») and add the corresponding domain users to this group. Then add this new domain group to the local Remote Management Users group on all machines where you want to allow PowerShell remoting for these users with the help of Group Policy Restricted Groups:
Computer Configuration > Policies > Security Settings > Restricted Groups
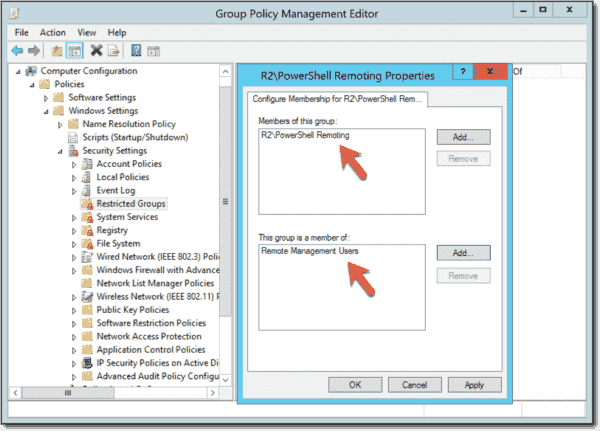
Adding a new domain group to the local Remote Management Users group
Note that this procedure gives standard users only the right to connect via PowerShell remoting. But they will have administration privileges restricted to the rights they have on the corresponding machine.
The blog post enabling PowerShell remoting for non-administrators has more details.
Remotely with Group Policy
To enable PowerShell remoting on multiple computers, you can use Group Policy. Three polices are relevant:
Enable the WinRM service
Computer Configuration > Policies > Administrative Templates > Windows Components > Windows Remote Management (WinRM) > WinRM Service > Allow remote server management through WinRM
You have to enable this policy and set the IPv4/IPv6 filters to all (*).

Allow remote server management through WinRM
Set the WS-Management service to automatic startup
Computer Configuration > Policies > Windows Settings > Security Settings > System Services > Windows Remote Management (WS-Management)
You have to set the startup mode of the WS-Management service to automatic.
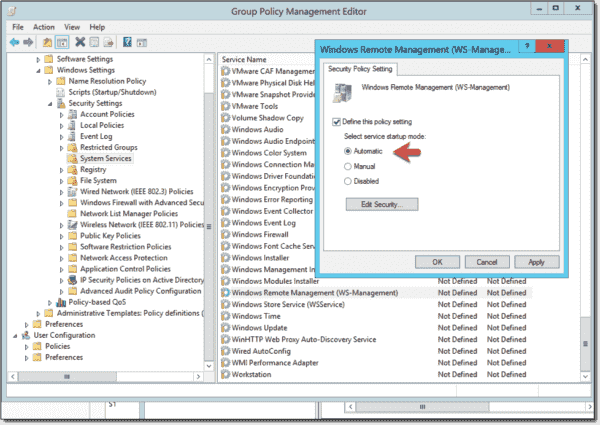
Set WS Management service to automatic startup
Allow Windows Remote Management in the Firewall
Navigate to the following folder in the Group Policy Management Console (GPMC), right-click Inbound Rules, and click New Rule.
Computer Configuration > Policies > Windows Settings > Security Settings > Windows Firewall with Advanced Security
In the Predefined field, select Windows Remote Management and then follow the wizard to add the new firewall rule.
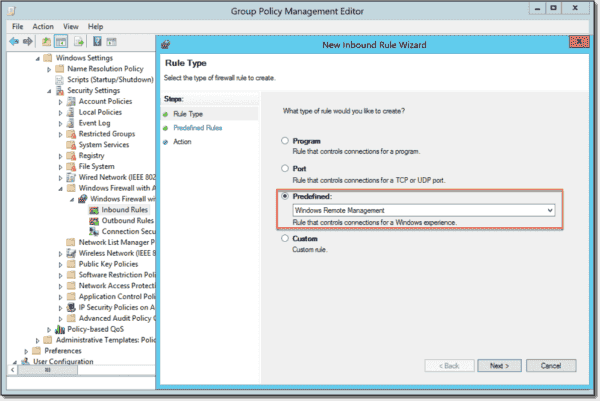
Allow inbound connections for Windows Remote Management
If you allowed the inbound remote administration exception in the Windows Firewall on the remote machines, you can right-click the container icon in GPMC and then click Group Policy Update to activate the policy immediately. If not, you have to restart the computers.
Remotely via PsExec
To enable PowerShell remotely on a single machine, you can use Microsoft’s free remote-control tool PsExec. This option helps if Remote Desktop is not enabled on the remote machine.
However, PsExec requires that the ports for file and printer sharing or remote administration are open in the Windows Firewall. You can open these ports via Group Policy: Computer Configuration > Administrative Templates > Network > Network Connections > Windows Firewall > Domain Profile.
You have to enable Allow inbound file and printer sharing exception or Allow inbound remote administration exception.

Allow file and printer sharing in Windows Firewall with Group Policy
Alternatively, you can also configure the Windows Firewall via Computer Configuration > Windows Settings > Security > Windows Firewall with Advanced Security.
To enable PowerShell remoting with PsExec, open a command prompt with admin rights in the folder where you copied PsExec and then execute this command:
psexec.exe \\RemoteComputerName -s powershell Enable-PSRemoting -Force
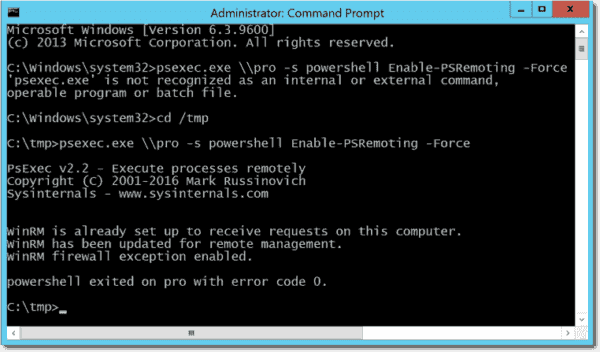
Enable PowerShell remoting with PsExec
Via PowerShell Direct
If you want to enable remoting in virtual machine on a Hyper-V host, you can also use PowerShell Direct if the guest OS is Windows 10, Windows Server 2016 or Windows Server 2019 (see comment below). This is the PowerShell command for the task:
Invoke-Command -VMName <VM name> -ScriptBlock {Enable-PSRemoting -Force} -Credential Administrator
Testing PowerShell remoting
To test you have enabled PowerShell remoting correctly, you can enter this command
Enter-PSSession -ComputerName <hostname>
This will open an interactive session with a remote computer where you can then enter PowerShell commands to execute on the remote machine.

Testing PowerShell remoting
If you want to connect with a different account than the one you logged on the local machine with, you can use this command:
Enter-PSSession -Computername "host" –Credential "host\administrator"
If you no longer need PowerShell remoting on a particular machine, you should disable remoting for security reasons.
With SSH transport
In PowerShell Core 6, you can work with PowerShell remoting via SSH instead of WinRM/HTTP. The step-by-step guide below is from this blog post which has more details.
- Download the PowerShell 6 Core MSI and install it on your Windows machine. This is a simple next-next installation. Note that I am working with PowerShell 6.0 here because 6.1 is still in preview at the time of this writing.
- Download OpenSSH for Windows. I worked with the 64-bit version for this guide.
- Extract the OpenSSH-Win64.zip file and copy OpenSSH-Win64 to C:\Program Files\ (the 32-bit edition is fine too).
- Rename OpenSSH-Win64 to OpenSSH.
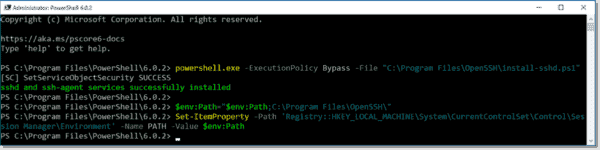
- Execute the command below to install OpenSSH:
powershell.exe -ExecutionPolicy Bypass -File "C:\Program Files\OpenSSH\install-sshd.ps1"
- Next, we’ll add the OpenSSH location to the PATH environment variable to ensure the operating system finds the OpenSSH executables. At a PowerShell console you can run the commands below:
$env:Path="$env:Path;C:\Program Files\OpenSSH\"
Set-ItemProperty -Path 'Registry::HKEY_LOCAL_MACHINE\System\CurrentControlSet\Control\Session Manager\Environment' -Name PATH -Value $env:Path

Installing OpenSSH
- We can now start the SSH service (sshd) with this PowerShell command:
Start-Service sshd
- To automatically star the OpenSSH service sshd, you need this command:
Set-Service sshd -StartupType Automatic
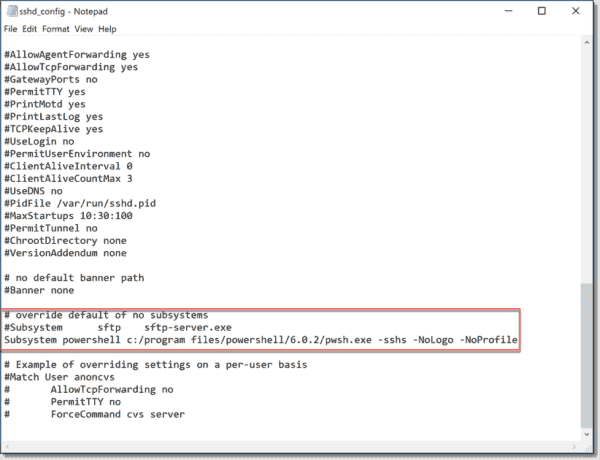
- Launch Notepad as admin (right-click and select Run as administrator) and open sshd_config in C:\ProgramData\SSH\ (change the file type to *.*, otherwise you’ll only see .txt files). Note that the ProgramData folder is hidden, and you will therefore only see the file if you enabled Hidden items in the File Explorer View.
- Comment out this line in sshd_config «Subsystem sftp sftp-server.exe» and add this one instead:
Subsystem powershell c:/program files/powershell/6.0.2/pwsh.exe -sshs -NoLogo -NoProfile

Editing sshd config
Note that the path may vary if you work with another PowerShell Core version.
- To allow remote connections in the Windows Firewall, you have to open the SSH port (22). On a Windows PowerShell console you can do it with this command:
New-NetFirewallRule -DisplayName 'SSH Inbound' -Profile @('Domain', 'Private', 'Public') -Direction Inbound -Action Allow -Protocol TCP ‑LocalPort 22Notice that this command doesn’t work on PowerShell Core 6.0.

Opening the SSH port in the Windows Firewall
This opens the SSH port for all three network profiles (Domain, Private, Public). Depending on your environment, you might want to open port 22 only for one of the profiles
- You now have to reboot the computer to ensure that the environment variable PATH is available systemwide

To connect to the remote host, you have to use the HostName parameter instead of ComputerName parameter:
Subscribe to 4sysops newsletter!
Enter-PSsession -HostName <computer name>
In the blog post you’ll find more details about the different ways to connect via SSH. An advantage of PowerShell remoting via SSH is that you can work with public key authentication.
Table of Contents
Enable PSRemoting
Beginning in Windows PowerShell 3.0, the Enable-PSRemoting cmdlet can enable remoting on client and server versions of Windows.
Windows Server 2012 and newer releases of Windows Server are enabled for PowerShell remoting by default. If the settings are changed, you can restore the default settings by running the Enable-PSRemoting cmdlet.
PS C:\> (Get-CimInstance -Class Win32_OperatingSystem).Caption
Microsoft Windows Server 2019 Standard

PS C:\> Get-Service -Name "*WinRM*"

Status   Name               DisplayName
------   ----               -----------
Running  WinRM              Windows Remote Management (WS-Manag...
On client versions of Windows such as Windows 10/11 when you enable PSRemoring using Enable-PSRemoting with Puclic network. You would get the following error:
PS C:\Windows\system32> Get-NetConnectionProfile

Name                     : Network 2
InterfaceAlias           : Ethernet
InterfaceIndex           : 4
NetworkCategory          : Public
DomainAuthenticationKind : None
IPv4Connectivity         : Internet
IPv6Connectivity         : NoTraffic

PS C:\Windows\system32> Enable-PSRemoting -Force
WinRM has been updated to receive requests.
WinRM service type changed successfully.
WinRM service started.

Set-WSManQuickConfig : <f:WSManFault xmlns:f="http://schemas.microsoft.com/wbem/wsman/1/wsmanfault" Code="2150859113"
Machine="localhost"><f:Message><f:ProviderFault provider="Config provider"
path="%systemroot%\system32\WsmSvc.dll"><f:WSManFault xmlns:f="http://schemas.microsoft.com/wbem/wsman/1/wsmanfault"
Code="2150859113" Machine="Win10"><f:Message>WinRM firewall exception will not work since one of the network
connection types on this machine is set to Public. Change the network connection type to either Domain or Private and
try again. </f:Message></f:WSManFault></f:ProviderFault></f:Message></f:WSManFault>
At line:116 char:17
+                 Set-WSManQuickConfig -force
+                 ~~~~~~~~~~~~~~~~~~~~~~~~~~~
    + CategoryInfo          : InvalidOperation: (:) [Set-WSManQuickConfig], InvalidOperationException
    + FullyQualifiedErrorId : WsManError,Microsoft.WSMan.Management.SetWSManQuickConfigCommand
Enable PowerShell Remoting with Public Networks
In special cases, to enable remoting on client versions of Windows with public networks, use the SkipNetworkProfileCheck parameter of the Enable-PSRemoting cmdlet. This option creates a firewall rule that allows remote access only from computers in the same local subnet.
Enable-PSRemoting -SkipNetworkProfileCheck -ForcePS C:\Windows\system32> Enable-PSRemoting -SkipNetworkProfileCheck -Force
WinRM is already set up to receive requests on this computer.
WinRM has been updated for remote management.
WinRM firewall exception enabled.
Configured LocalAccountTokenFilterPolicy to grant administrative rights remotely to local users.
WARNING: Waiting for service 'Windows Remote Management (WS-Management) (winrm)' to stop...
PS C:\Windows\system32> Get-Service -Name "*WinRM*"
Status Name DisplayName
------ ---- -----------
Running WinRM Windows Remote Management (WS-Manag...Remove the local subnet restriction
Additionally, to remove the local subnet restriction on public networks and allow remote access from all locations on client and server versions of Windows, use the Set-NetFirewallRule cmdlet in the NetSecurity module. Run the following command:
Set-NetFirewallRule -Name "WINRM-HTTP-In-TCP" -RemoteAddress AnyThe name of the firewall rule can be different for different versions of Windows. Use Get-NetFirewallRule to see a list of rules. Before enabling the firewall rule, view the security settings in the rule to verify that the configuration is appropriate for your environment.
PS C:\> Get-NetFirewallRule | Where-Object {$_.Name -like "WINRM-HTTP-In-TCP"}

Name                          : WINRM-HTTP-In-TCP
DisplayName                   : Windows Remote Management (HTTP-In)
Description                   : Inbound rule for Windows Remote Management via WS-Management. [TCP 5985]
DisplayGroup                  : Windows Remote Management
Group                         : @FirewallAPI.dll,-30267
Enabled                       : True
Profile                       : Public
Platform                      : {}
...
How to configure your computer for remoting
Computers running any supported version (Windows Server 2012 +) of Windows can establish remote connections and run remote commands in PowerShell without any configuration. However, to receive remote connections you must enable PowerShell remoting on the computer.
By default, the remoting features of PowerShell are supported by the WinRM service, which is the Microsoft implementation of the Web Services for Management (WS-Management) protocol. When you enable PowerShell remoting, you change the default configuration of WS-Management and add system configuration that allow users to connect to WS-Management.
To configure PowerShell to receive remote commands:
- Start PowerShell with the Run as administrator option.
- At the command prompt, type: Enable-PSRemoting -Force
To verify that remoting is configured correctly, run a test command such as the following command, which creates a remote session on the local computer. If remoting is configured correctly, the command creates a session on the local computer and returns an object that represents the session.
PS C:\> New-PSSession

 Id Name            ComputerName    ComputerType    State         ConfigurationName     Availability
 -- ----            ------------    ------------    -----         -----------------     ------------
2 WinRM2 localhost RemoteMachine Opened Microsoft.PowerShell AvailableWindows PowerShell Remoting
Table of Contents
PowerShell Remoting uses the WS-Management protocol and lets you run any PowerShell command on one or more remote computers. It lets you establish persistent connections, start interactive sessions, and run scripts on multiple computers.
To use PowerShell remoting, remote computer must be configured for remote management. But there are many PowerShell cmdlets with a ComputerName parameter that enables you to collect data and change settings on one or more remote computers without any configuration on remote computer. They use a variety of communication technologies and many work on all Windows operating systems that Windows PowerShell supports without any special configuration.
The cmdlets which does not require any configuration on remote machine are:
- Restart-Computer
- Test-Connection
- Clear-EventLog
- Get-EventLog
- Get-Hotfix
- Get-Process
- Get-Service
- Set-Service
- Get-WinEvent
- Get-WmiObject
All of cmdlets shown above does not use WS-Management protocol. These cmdlets use Microsoft .NET Framework methods to retrieve the objects from remote computers and does not use PowerShell remoting infrastructure. So, these cmdlets can be run on remote computers without the need to any configuration on remote computers.
Typically, the cmdlets which support remoting without special configuration have a ComputerName parameter and do not have a Session parameter. To find these cmdlets, you can use the following command:
PS D:\MyScripts> Get-Command | Where-Object {$_.parameters.keys -contains "ComputerName" -and $_.parameters.keys -notcontains "Sessi
on" -and $_.ModuleName -notlike "*WSMan*"}

CommandType     Name                                               ModuleName
-----------     ----                                               ----------
Cmdlet          Add-Computer                                       Microsoft.PowerShell.Management
Cmdlet          Clear-EventLog                                     Microsoft.PowerShell.Management
Cmdlet          Get-EventLog                                       Microsoft.PowerShell.Management
Cmdlet          Get-HotFix                                         Microsoft.PowerShell.Management
Cmdlet          Get-Process                                        Microsoft.PowerShell.Management
Cmdlet          Get-PSSession                                      Microsoft.PowerShell.Core

[output cut]
Requirements for PowerShell Remoting
To use PowerShell remoting infrastructure, the local and remote computers must have:
- Windows PowerShell 2.0 or later
- The Microsoft .NET Framework 2.0 or later
- Windows Remote Management 2.0
To find the version number of an installed version of Windows PowerShell, you can use the $PSVersionTable automatic variable. The value of the $PSVersionTable.Version.Major property must be at least 2.
Windows Remote Management 2.0 is included in Windows 7 and in Windows Server 2008 R2. It is also included in the integrated installation package for earlier versions of Windows that includes PowerShell. PowerShell Integrated Scripting Environment (ISE) and the Out-Gridview cmdlet require the Microsoft .NET Framework 3.5 with Service Pack 1. The Get-WinEvent cmdlet requires the Microsoft .NET Framework 3.5 or greater. These upgrades are not required for remoting.
Configure PowerShell Remoting
The remoting features of Windows PowerShell are supported by the WinRM service, which is the Microsoft implementation of the Web Services for Management (WS-Magement) protocol. To use the remoting features, you need to change the default configuration of WS-Management on the system.
To configure Windows PowerShell to receive remote commands:
1. Start Windows PowerShell. In Windows Vista and later versions of Windows, start Windows PowerShell with the “Run as administrator” option.
2. At the command prompt, use Enable-PSRemoting –Force command:
PS C:\Windows\system32> Enable-PSRemoting -Force
WinRM has been updated to receive requests.
WinRM service type changed successfully.
WinRM service started.
If you run Enable-PSRemoting command without -Force, you will have to confirm the Y/N prompt two times as shown below:
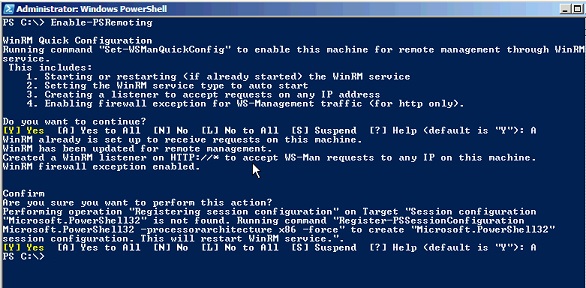
This procedure allows users on other computers to establish remote connections and to run remote commands on the local computer. It also allows you to create a “loopback” connection on the local computer.
The same can be done using Windows cmd.exe (command prompt).
C:\Windows\system32>winrm quickconfig -quiet
WinRM service is already running on this machine.
WinRM is already set up for remote management on this computer.
PowerShell remoting is primarily intended for remotely managing domain-joined computers, and if you are preparing to deploy the first domain controller in a new forest there is no domain to join yet. In other words, the PC on which you are working is in workgroup and the remote server that you want to promote to a domain controller is also in a workgroup, not a domain. If you try to run any command on remote server, you will get the error as shown below:
PS C:\> Get-WindowsFeature -ComputerName DC2
Get-WindowsFeature : WinRM cannot process the request. The following error occurred while using Kerberos authentication: Cannot find the computer DC2. Verify that the computer exists on the network and that the name provided is spelled correctly.
At line:1 char:1
+ Get-WindowsFeature -ComputerName DC2
+ ~~~~~~~~~~~~~~~~~~~~~~~~~~~~~~~~~~~~~~~
  + CategoryInfo     : DeviceError: (Microsoft.Manag...rDetailsHandle):CimException) [Get-WindowsFeature], Exception
  + FullyQualifiedErrorId :  UnSupportedTargetDevice,Microsoft.Windows.ServerManager.Commands.GetWindowsFeatureCommand
The error message clearly states that Error occurred while using Kerberos authentication. This is because by default WS-Man protocol uses Kerberos authentication. Since all computers are yet in workgroup environment; the Kerberos is not supported.
You need to enable the two stand-alone computers to talk to each other using the WS-Management protocol. If the computer from which you are running the remote commands is also running Windows Server 2012 or Windows Server 2012 R2, you just need to add the name of the remote server to the TrustedHosts list in the local computer’s WinRM configuration. Doing this enables the local computer to connect to the remote server using NTLM as the authentication mechanism instead of Kerberos, which is used in domain-based environments.
By default, the TrustedHosts list is empty on every computer. So, it does not allow commands to any remote computer which is not in domain.
PS C:\> Get-Item WSMan:\\localhost\client\TrustedHosts

   WSManConfig: Microsoft.WSMan.Management\WSMan::localhost\Client

Type            Name                           SourceOfValue   Value
----            ----                           -------------   -----
System.String   TrustedHosts
Now, you need to add remote ComputerName to TrsutedHosts list using Set-Item cmdlet as shown below:
PS C:\> Set-Item WSMan:\\localhost\client\TrustedHosts -Value DC2 -Concatenate -Force
That the –Concatenate parameter is mandatory if you want to add multiple conputers, otherwise every time you run the Set-Item command, it will keep overwriting the old values in TrustedHosts list. The -Force parameter is however optional, which is used to suppress the confirmation (Yes/No) prompt. Now, take a look on TrustedHosts list again.
PS C:\> Get-Item WSMan:\\localhost\client\TrustedHosts

   WSManConfig: Microsoft.WSMan.Management\WSMan::localhost\Client

Type            Name                           SourceOfValue   Value
----            ----                           -------------   -----
System.String   TrustedHosts                                   DC2
The DC2 is now listed under TrsustedHosts. You can now run PowerShell remoting commands on this remote computer from local computer.
If you are already in domain environment, you do not need to mess-up with TrustedHosts.
Starting Interactive Remote Session
To start an interactive session with a single remote computer, you can use the Enter-PSSession cmdlet. For example, to start an interactive session with the DC1 remote server, type:
PS D:\MyScripts> Enter-PSSession -ComputerName DC1
[DC1]: PS C:\Users\surender\Documents>
The above command will start an interactive session with remote computer with currently logged-on user credentials. The command prompt changes to display the name of the computer to which you are connected. From then on, any commands that you type at the prompt run on the remote computer and the results are displayed on the local computer. Lets take a look at the syntax and other available optional parameters of Enter-PSSession command.
PS D:\MyScripts> Get-Help Enter-PSSession

NAME
    Enter-PSSession

SYNOPSIS
    Starts an interactive session with a remote computer.

SYNTAX
    Enter-PSSession [-ComputerName] <String> [-ApplicationName <String>] [-Authentication <AuthenticationMechanism>]
    [-CertificateThumbprint <String>] [-ConfigurationName <String>] [-Credential <PSCredential>] [-EnableNetworkAccess] [-Port
    <Int32>] [-SessionOption <PSSessionOption>] [-UseSSL] [<CommonParameters>
Notice that Enter-PSSession cmdlet has a –Credential parameter which you can use to use to provide alternate credentials while connecting to remote computer. To use this parameter, run the command as shown below:
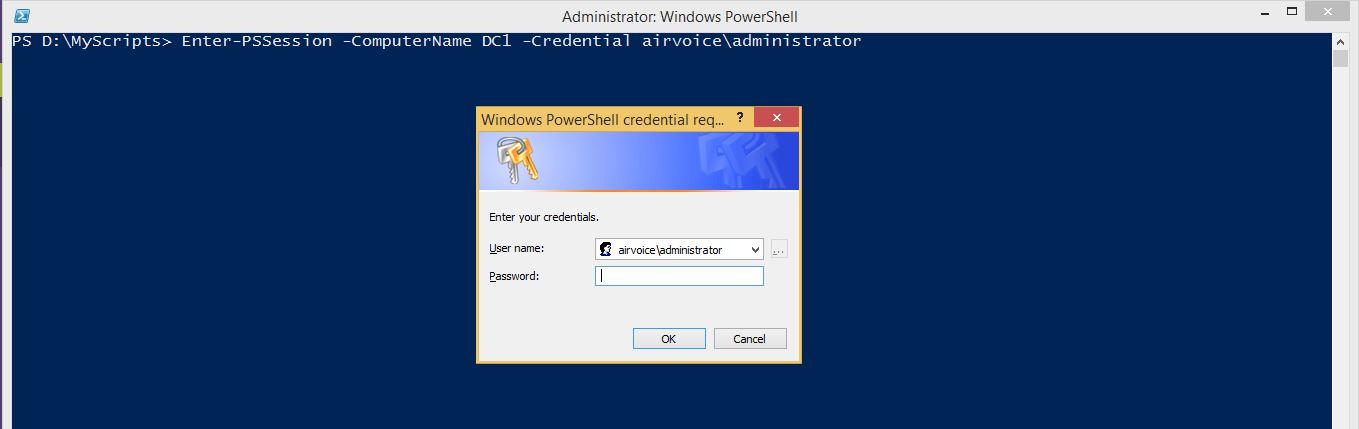
You will see a dialog box prompting for credentials to be used to connect to remote computer.
To end the interactive session, type Exit-PSSession or simply exit command.
[DC1]: PS C:\Users\surender\Documents> Exit-PSSession
PS D:\MyScripts>
Run a Remote Command
You do not always want to start interactive session to remote computer. What if you want to run just a single command on remote computer? PowerShell has Invoke-Command cmdlet to do this. To run any command on one or many remote computers, use the Invoke-Command cmdlet as shown below:
PS D:\MyScripts> Invoke-Command -ComputerName DC1, DC2, FileServer, LocalHost -ScriptBlock {Get-WmiObject -Class Win32_OperatingSystem | Format-List PSComputerName, Caption}

Caption                                     PSComputerName                           RunspaceId
-------                                  --------------                           ----------
Microsoft Windows Server 2008 R2 Standard   DC1                                   4a372458-5ca8-4d64-9e1c-66d2acd40800
Microsoft Windows 8.1 Enterprise            LocalHost                                3a819c2f-17af-47e4-adf3-f5736d1568c4
Microsoft Windows Server 2008 R2 Standard   DC2                                    263a7f27-b1e2-40f2-acd2-6d6e9af8a972
Microsoft Windows Server 2012 R2 Standard   FileServer                             ed664ed8-39f2-448b-99fc-fc8778ede30e
To run a script on one or more remote computers, use the –FilePath parameter of the Invoke-Command cmdlet. The script must be on or accessible to your local computer. The results are returned to your local computer.
For example, the following command runs the Get-DiskUsage.ps1 script on the DC1 and DC2 servers.
PS D:\MyScripts> Invoke-Command -ComputerName DC1, DC2 -FilePath D:\MyScripts\Get-DiskUsage.ps1

Name           Used (GB)     Free (GB) Provider      Root                                      CurrentLocation PSComputerName
----           ---------     --------- --------      ----                                      --------------- --------------
C                  42.06         37.45               C:\                                 ...surender\Documents DC1
D                 191.68        193.95               D:\                                                       DC1
E                                                    E:\                                                       DC1
F                 578.04        352.95               F:\                                                       DC1
C                  57.35        240.64               C:\                                 ...surender\Documents DC2
D                 550.36        381.15               D:\                                                       DC2
PowerShell remote management just begins here. By using the cmdlets installed with PowerShell, you can establish and configure remote sessions both from the local and remote ends, create customized and restricted sessions, allow users to import commands from a remote session that actually run implicitly on the remote session, configure the security of a remote session, and much more.
Back