Do you want to know how to permanently delete files on Windows 10? Accidentally deleting files can be a painful experience, but if you’re looking for a way to ensure they’re gone for good, then you’ve come to the right place. In this article, we’ll outline the steps needed to securely and permanently delete files from your Windows 10 computer. With our simple guide, you can rest assured that those files are gone for good and won’t be coming back to haunt you. So, let’s get started!
Permanently Delete Files on Windows 10:
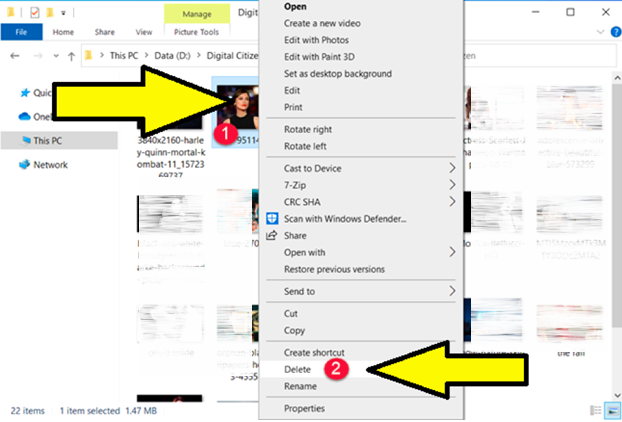
1. Open File Explorer and go to the folder that includes the file you want to delete.
2. Select the file by left-clicking on it once.
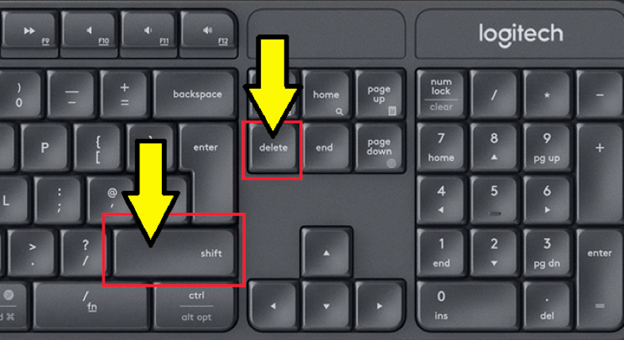
3. Press the Shift + Delete keys on your keyboard. Doing so will delete the file permanently.
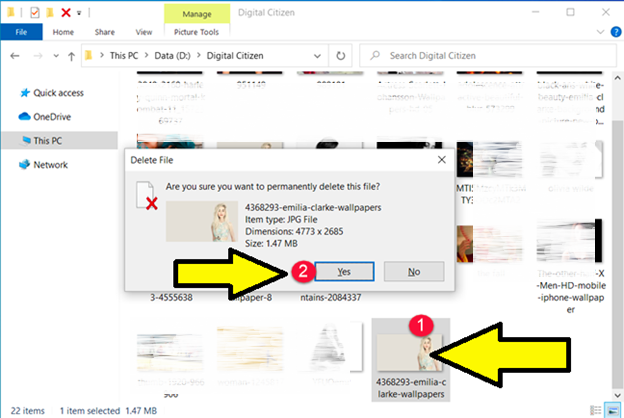
4. You will be asked to confirm your action. Click “Yes” to confirm.
5. The file will be permanently deleted.
Permanently Deleting Files Using Windows 10
Windows 10 is the latest version of Microsoft’s popular operating system, and includes features that make it easy to permanently delete files. Whether you’re looking to clear out space or delete sensitive information, Windows 10 provides you with the tools you need to securely and permanently delete files.
Using the Recycle Bin
One of the easiest ways to delete files in Windows 10 is to send them to the Recycle Bin. This is a temporary storage area for deleted files, and to permanently delete files from the Recycle Bin, simply right-click the file and select “Delete.” This will remove the file from your computer and it will no longer be recoverable.
Emptying the Recycle Bin
In order to permanently delete the files from your computer, you must empty the Recycle Bin. To do this, simply right-click on the Recycle Bin icon and select “Empty Recycle Bin.” This will permanently delete all of the files you have sent to the Recycle Bin.
Deleting Files Directly
You can also delete files directly from Windows 10, without sending them to the Recycle Bin. To do this, right-click on the file and select “Delete.” This will permanently delete the file from your computer, and it will not be recoverable.
Using the Command Line
If you’re looking to delete multiple files at once, you can use the command line. To open the command line, press the Windows key + R and type “cmd.” This will open the command line window. From here, you can type the command “del” followed by the name of the file you want to delete. This will permanently delete the file from your computer.
Deleting Multiple Files
If you want to delete multiple files at once, you can use the “del” command followed by an asterisk. For example, if you want to delete all of the files in a folder, you can type “del *” and it will delete all of the files in that folder.
Using Third-Party Software
If you’re looking for a more secure way to delete files, you can use third-party software. There are a variety of programs available that can securely delete files, such as Eraser and CCleaner. These programs can overwrite the data on your hard drive multiple times, making it virtually impossible to recover the deleted files.
Using File Shredding
Some third-party programs also offer a feature called “file shredding.” This is a process that overwrites the data on your hard drive multiple times, making it virtually impossible to recover the deleted files. It’s a great option if you’re looking to permanently delete sensitive information.
Top 6 Frequently Asked Questions
Q1: What is the process for permanently deleting files on Windows 10?
A1: To permanently delete files on Windows 10, you will need to use the “Shift + Delete” command. This command will bypass the Recycle Bin and delete the file or folder permanently. You can access the “Shift + Delete” command by right-clicking on the file or folder you want to delete and selecting “Delete”. After selecting the “Delete” option, you will need to press and hold down the “Shift” key while you click “OK” or “Yes” to confirm the deletion. This will ensure the file or folder has been deleted permanently from the hard drive.
Q2: How do I access the “Shift + Delete” command?
A2: You can access the “Shift + Delete” command by right-clicking on the file or folder you want to delete and selecting “Delete”. After selecting the “Delete” option, you will need to press and hold down the “Shift” key while you click “OK” or “Yes” to confirm the deletion. This will ensure the file or folder has been deleted permanently from the hard drive.
Q3: What should I do if I accidentally delete the wrong file or folder?
A3: If you accidentally delete the wrong file or folder, you can try to restore the deleted file or folder from the Recycle Bin. However, if you used the “Shift + Delete” command, then the file or folder has been permanently deleted and cannot be restored. In this case, you will need to use third-party data recovery software to try to recover the deleted files or folders.
Q4: Is there any other way to permanently delete files or folders?
A4: Yes, you can use a third-party file shredder program to securely delete files or folders from the hard drive. A file shredder program will overwrite the content of the file or folder multiple times before deleting it, making it impossible to recover the deleted files or folders.
Q5: Will deleting files or folders permanently free up space on my hard drive?
A5: Yes, deleting files or folders permanently will free up space on your hard drive. However, it is important to note that the deleted files or folders will still remain in the Recycle Bin until they are permanently deleted. Therefore, if you want to free up space on your hard drive, you will need to empty the Recycle Bin or use the “Shift + Delete” command to permanently delete the files or folders.
Q6: Is there any way to recover permanently deleted files or folders?
A6: It is possible to recover permanently deleted files or folders using third-party data recovery software. However, it is important to note that the success rate of recovering permanently deleted files or folders is not guaranteed. Therefore, it is always best to backup your important files or folders before deleting them permanently.
How to Securely and Completely Delete Files in Windows 10
Using the steps outlined in this article, you can quickly and securely delete files from your Windows 10 PC. By following these steps, you can ensure your files are gone for good, leaving no trace behind. So, don’t hesitate any further, and start permanently deleting those unnecessary files from your Windows 10 computer today.
Do you know documents, photos, and other files stay on your PC even after they are removed from Recycle Bin?
This is the reason why data recovery tools can get back deleted files. So, if you want to permanently wipe files from Windows 11 or 10 here’s an easy way to do it.
Why should you permanently delete files?
The best way to permanently delete evidence of manual paperwork is to put them in the shredder. But can the same be done for soft copies?
Well, that isn’t possible because when a file is deleted, using the Delete key it is moved to Recycle Bin, which can be restored.
If this makes you think pressing Shift+Delete will do the work then sadly, you are wrong there too. This is because even if the file is no longer visible to you, it still exists. Therefore, if you want a sure-shot way to delete files permanently, you need a secure way. This is what we will discuss in this post.
Read Also: How to Clean Invalid Registry Entries on Windows
How To permanently delete files from the computer?
Not many people know, that by using Windows in-built tool Cipher you can wipe files from Windows 11,10. The tool was launched with Windows XP.
Here’s how to use it.
Note : Cipher securely erases files that have already been deleted. To run it press Windows X Windows PowerShell Admin. Type cipher w C
C is the drive letter. You can change it. Remember, the command won’t delete any other data. It will only wipe deleted files on Windows 11,10.
Besides this, you can use Secure Delete, offered by Advanced System Optimizer. Using this module, you can wipe out the substantial data permanently from the system giving no room for any recovery. This means even when you use the finest the data recovery software you will not get back the deleted data.
Important : Emptying Recycle Bin does not permanently delete data. To do so, you need a tool like Secure Delete to permanently delete files from your PC.
What is Secure Delete?

Secure Delete is the most stable and reliable way to scrap off deleted files permanently from a PC. The tool overwrites the disk space with random patterns thus cutting down the chances of data recovery. This allows permanently wiping out the data from selected files, folders, directories, and drives and deleting temporary files Windows 11, 10.
Why is it important to permanently delete files from the PC?
Many of us would not know when a file is deleted from the system, it’s only the reference that is deleted. This means the files with their contents are still present in an invisible form on the disk. Due to this, unless the space from which the file has been removed is not overwritten using a data recovery tool we are able to restore deleted or lost files, photos, videos, etc.
Also, if the exact file size doesn’t overwrite the whole of the free space, a major or a minor chunk of data will still be readable. Hence, it is necessary to protect our personal information from unauthorized hands using some technique which expertise in deleting the data permanently makes you feel safe.
How To Permanently Delete Files From Windows PC using Secure Delete?
It is a fact that data deleted from the system is not permanently removed, it remains there on the system. Using various recovery tools, available in the market this deleted data can be recovered. But if you don’t want this deleted data to be restored a tool like Secure Delete is needed. This amazing module is provided by Advanced System Optimizer – the free PC Optimizer that overwrites this free space and references of deleted data is required.
Secure Delete makes sure that all the data in free space on the hard disk is no longer readable and recoverable. It identifies the free spaces on the disk where the previously deleted cluster of data still exists and overwrites these spaces with random digits or patterns thus permanently wiping out the data. Data can be overwritten several times to ensure the least chances of recovery.
How To use Secure Delete?
Designed with a user-friendly and comprehensible interface, Secure Delete keeps novice users in mind. The tool helps permanently wipe out the previously deleted files and folders, contents of the Recycle Bin, or some contents of a specific drive, leaving no probable chance for retrieval.
Note : Secure Delete should be used with full caution as files and folders deleted once cannot be retrieved using the finest of recovery utilities.
Secure Delete – Interface
The module to permanently delete files on windows comes with a very simple interface. Here we will explain each tab and the functionality of each button.
Files and Folders Tab
The whole process of securely deleting items from the system can be summarized in 4 steps:

1) Welcome
2) Selection
3) Wipe
4) Finish
Step1: Welcome
The Welcome screen guides walk us in a self-explanatory manner. Firstly, you need to select the files that you want to completely wipe. For this can use Windows Explorer.
On clicking on the “Select Files” button in the middle of the screen, you move to the next step, wherein you may select items to be permanently deleted from the system.
The System Summary is displayed in the lower half of the screen which gives you the details viz Last Wiped, Items Wiped, Space Recovered, Items Wiped to Date.
Step2: Selection

Select Files and Folders to be Permanently Deleted.
Select the files and folders to be securely deleted. You may click on the “Add File” and “Add Folder”. The “Remove” button allows removing added files and folders from the list.
To select the items click the corresponding checkbox and click on the “Next” button.

To wipe out selected files and folders you need to enter the confirmation code in the box and hit Next.

Change Wipe Method

There are three types of wipe methods; Secure Delete uses to wipe out the data permanently.
The Wipe Method used as a default method can be changed by clicking on the “Change” link. This opens a new window showing the three Wipe Methods. You may keep the default Wipe Method or change it to some other depending upon the choice you make. If changed, you may return to the default method by clicking on the “Default” button.
Note : We will explain the three types under Settings.

Once the choice is made, you may click on the “Continue” button to continue the process of secure deletion.
Step3: Wipe
Before permanently wiping out the selected files and folders, Secure Delete asks for the user’s confirmation to do so. If the user types “YES” in the confirmation box, the removal process starts. (Note: Data deleted by Secure Delete is unrecoverable)
The “Cancel” button takes you to the previous screen and the “Next” button starts wiping out the selected files and folders permanently.
To stop the process of secure deletion, you may click on the “Stop” button at any time.
Step4: Finish
The last step shows the summary of the secure deletion process. It shows the total number and volume of files and folders wiped out from the system.

To add some more files for removal, you may click on the button “Wipe More Files”. By clicking on the “Finish” button, you may go back to the main/welcome screen.
Recycle Bin Tab

It is important to remove items from the Recycle Bin that are in it.. These items may hold critical personal information and can be easily recovered if not securely deleted.
Read Also : How To Defrag Disk Windows 10
Secure Delete destroys the already deleted data of the Recycle Bin in 5 simple steps (see left panel):
1) Welcome
2) Scan
3) Results
4) Wipe
5) Finish
Step1: Welcome
The items in the Recycle Bin or already deleted items from Recycle Bin should not be accessible to others. To securely delete the items from the Recycle Bin, click on the “Start Scan Now” button to initiate the scan process.
Step2: Scan

Scanning – Recycle Bin
Secure Delete from windows 11,10 will thoroughly analyze the Recycle Bin and detect files and folders that should be permanently wiped out of the system for keeping the user’s privacy intact.
The process may be aborted by clicking on the “Cancel” button.
Step3: Results

Scan Results
The scan results show the number and volume of items found in the Recycle Bin which need secure deletion.
Clicking on the “Cancel” button stops the scan and click on the “Wipe Now” button initiates the removal process.
Step4: Wipe
Wiping – Recycle Bin
Before removing the items, Secure Delete takes the user’s confirmation and waits unless the security code is not typed in the confirmation box. The “Cancel” button will take you to the main/welcome screen.

Once done, clicking the “Wipe” button starts the removal procedure for the items of the Recycle Bin.
Change Wipe Method

Click on the link “Change” to change the default Wipe Method. A new window opens showing the three different methods. You may keep the default Wipe Method or change it to some other depending upon the choice you make.
If changed, you may return to the default method by clicking on the “Default” button. Once the choice is made, you may click on the “Continue” button to continue the process of secure deletion.
Any time during the process, you may click on the “Stop” button to terminate the wiping process.
Step5: Finish
The last step shows the summary of removal. It shows the number and volume of items wiped out from the Recycle Bin.
To rescan the Recycle Bin for more files and folders click on “Wipe More Files”. Also, by clicking on the “Finish” button, you may go back to the main/welcome screen and perform the same action mentioned above.
Drive Tab

Secure Delete assists in removing the previously deleted items of the drives permanently or helps in wiping out the entire drive with all its contents or securely deletes the free space of the selected drive.
The action is simplified into 5 steps (see left panel):
1) Welcome
2) Scan
3) Results
4) Wipe
5) Finish
Step1: Welcome
Three actions have to be performed on this screen. The first two are numbered.
1) Select Hard Drive for wiping:
From the drop-down list, you may select the hard drive you wish to scan for the files and folders already deleted. This is important because the deleted files are actually not removed from the drive and can be retrieved easily.
2) Select an option:
There are three options provided which are explained hereunder.
- Wipe deleted files only – Choose this option to permanently wipe out the files which have been previously deleted from the selected hard drive.
- Wipe the entire drive – Choose this option to securely delete all the contents (existing and previously deleted) of the selected drive so that nothing is recoverable.
- Wipe free space – Choose this option to identify the free space and overwrite data on it so that no chances of data retrieval are left.
Note: The “Settings” tab can change these settings.
Once you choose the hard drive and the kind of wipe to do, you can continue the process by clicking on “Start Scan Now”.
Step2: Scan

Scanning
Secure Delete performs an extensive scan on the selected hard disk. The progress bar in the screen’s lower half shows the scan’s progress.
In case, you want to discontinue the process, you may click on the “Cancel” button.
Step3: Results

Scan Results
Once the scan is through, the scan results are put forth.
On clicking on the “Wipe Now” button, securely delete the files and folders found in the scan.
The “Cancel” button takes you back to the Welcome screen. You may then select another drive on the hard disk to conduct a scan on it.
Step4: Wipe

Before removing the items, Secure Delete takes the user’s confirmation, enters the code to proceed. The “Cancel” button will take you to the main/welcome screen.

Clicking on “Wipe” starts the wiping process.
Step5: Finish

The last step shows the summary of the wiping process.
Clicking on “Wipe More Files” will take you to the Welcome screen to begin the wiping process for the next drive.
The “Finish” button also does the same job. It takes you back to the Welcome screen to initiate a scan for the remaining drives.
Settings Tab

Some settings can be changed using the option given under this section.
Drive Settings
Under this setting type, you may:
Set default drive for the wiping process
Select the drive from the dropdown menu to set a drive for default scanning. This infers as you hit the button “Start Scan Now”, the default drive will be scanned
Set default option for wiping process
There are three options given for the wiping process.
- Wipe deleted files only – Choose this option to permanently wipe out the files that have been previously deleted from the selected hard drive.
- Wipe the entire drive – Choose this option to securely delete all the contents (existing and previously deleted) of the selected drive so that nothing is recoverable.
- Wipe free space – Choose this option to identify the free space and overwrite data reducing chances of data retrieval.
Wipe Settings

There are three Wipe Methods provided in Secure Delete. Each method is a combination of different levels of speed and security.
Must Read : How to Optimize RAM on Windows 11 & 10?
You may choose either of the three according to your choice. But one thing should be remembered: the faster the removal process, the less secure it is. This is because numerous times, the data is overwritten, more time is consumed in doing this, and it becomes more difficult to recover.
- Fast Secure Delete
This method is the fastest but less secure way of deletion. Deleted data can be recovered using microscopic examination of disks. (Single Pass – data is overwritten once by random digits).
- Random fill data streams
This method is a little slower but more secure. There are remote chances of data recovery using microscopic examination of disks. (Three Passes – data is overwritten thrice by random digits).
- Secure Delete
This method is the most secure but the slowest. There are hardly any chances of retrieving the data using the microscopic examination of disks. (Seven Passes – data is overwritten seven times by random digits). It is the safest mode and, therefore, is recommended.
This is it. Using these simple steps and Secure Delete,, you can permanently delete temporary files and other deleted data from your PC.
Secure Delete module, offered by the best PC cleanup and optimization software, works flawlessly to shred deleted data. We hope we have made our point and you have the answer for permanently deleting files from the computer.
If you have any questions regarding Secure Delete or Advanced System Optimizer please get in touch with our technical support team at support@systweak.com
Read Here : How to Fix Undoing Changes Made To Your Computer In Windows 11,10
Many users are trying to permanently delete files on Windows 10. Have you ever been that user? No. But I’ve been it and in this post, we’ll demonstrate how to permanently delete files on Windows 10.
The purpose of ‘Recycle Bin’ is to save you from any accidental deletion. This feature is already a standard on any device that stores information, including smartphones. However, the files deleted and sent to the Recycle Bin are not freeing up space on the hard drive.
To convert the deleted file into free space, you need to delete them permanently. This means that you won’t see the Recycle Bin file or in any folder anymore unless you utilize a third-party recovery tool. To delete files permanently, here are the steps you can follow.
How To Permanently Delete A File In Windows 10?
Deleting Using Recycle Bin
- Select a file to delete. Make sure that it is NOT a system file, a running and important application, or any usable files within a particular software folder. Press ‘Delete’ on the keyboard or right-click on the file and select ‘Delete.’

- Click on ‘OK.’
- Go to the Recycle Bin tool. Find the file recently deleted.
- Delete the file while inside the Recycle Bin and click on ‘OK.’
- To remove all files in the Recycle Bin, right-click on the icon and select ‘Empty Recycle Bin.’
Deleting Using Keyboard Shortcuts
- Select the appropriate file or multiple files to be deleted.
- To delete without having them moved to the Recycle Bin, press ‘Shift’ and ‘Delete’ on your keyboard at the same time.
- You can review your decision since a confirmation window will appear, prompting if you intend to delete it permanently. If it is final, then select ‘Yes.’
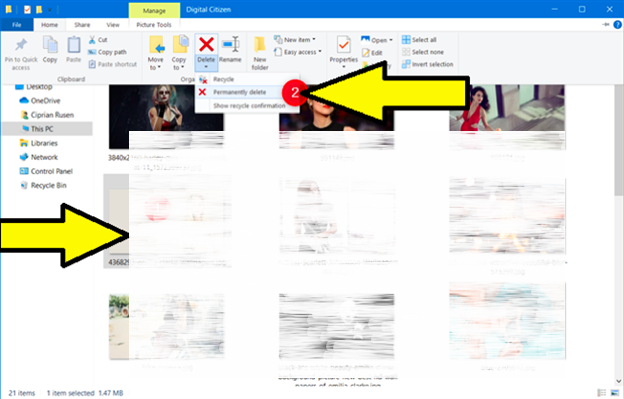
Deleting From File Explorer’s Ribbon
- Select the appropriate file or multiple files to be deleted.
- Tap the ‘Home’ tab on the ribbon. Choose the button ‘Delete’ if you want to move them to the Recycle Bin.
- To delete the file permanently, instead of clicking the button ‘Delete,’ click on the arrow below the said button and select ‘Permanently delete.’
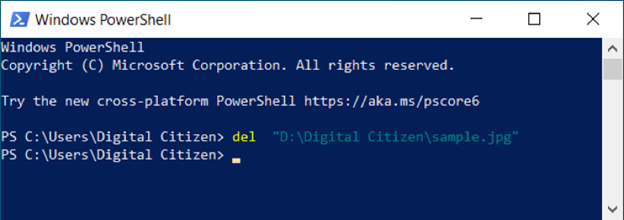
Deleting Using Command Prompt Or Powershell
- Both PowerShell and Command Prompt can be used to delete a file permanently. Open either of the two based on your preference. Enter the command: del «path to file.» An example is del «D:Digital Citizensample.jpg» to delete the file ‘sample.jpg’ located in the folder ‘Digital Citizen’ in drive D.
- To execute the command, press ‘Enter’ on the keyboard. The file is now deleted without requiring confirmation.
- The command can be utilized with several parameters. The parameter /f enables force deletion even in deleting a read-only file that is not normally deleted. To apply this parameter, type in: del /f «path to file.»
- Always press ‘Enter’ to execute the command. Whatever is being deleted using this process, it will not be moved to the Recycle Bin.
Summary: Permanently delete files on Windows 10
- Make a backup of the files you want to delete, so you don’t lose them permanently.
- Create a system restore point.
- Open the Recycle Bin, and find the file you want to delete.
- Select the file or folder you want to delete.
- Right-click on the selected file, and select «Delete» from the drop-down menu.
- Click «Yes» to confirm that you want to delete the files from your computer.
- Select File Explorer from the taskbar, and open the folder with the files you want to delete (e.g., Documents, Downloads).
- Select all of the files in the folder that you want to delete.
- Right-click on one of your selected files, and click «Delete» from the drop-down menu that appears.
- Click «Yes» when prompted to confirm that you want to permanently delete these files.
Conclusion
Permanently deleting files is a practice only to those familiar with a computer that can conveniently do. If you are a beginner and have little understanding about ‘back-up,’ better not practice permanently deleting files so that you can avoid any accidental or unwanted deletion.
If such a bad scenario comes true, third-party tools, like Recuva, can further retrieve a recently ‘permanently’ deleted file. Such a process is left to the computer savvy. The main purpose of deleting a file permanently, aside from burying a secret, is to free more storage space for your hard drive as quickly as possible.
![]()
That one photograph that your friends captured of you doing keg stands, has the potential of ending your love life forever. More so, any file that has the potential of disrupting the path of your life needs to be deleted asap. But, keep in mind that if you simple send it to the Trash Bin, it is still on your drive and taking up precious disk space. So, in order to save yourself from further embarrassment, one will need to learn how to permanently delete files from the hard drive on Windows 10.
There are 2 ways one can go about it. They are mentioned below.
How To Permanently Delete Files In Windows 10 Without Software
1. The Easiest Way: Press ‘Shift + Delete’ on a selected file. A pop up comes asking ‘are you sure you want to permanently delete this file?’ Click on ‘Yes’. You have now managed to permanently delete a single file.

Note: In the event that you sell out or lose your PCs drive, hackers have means of retrieving ‘permanently deleted files’ that are deleted using a powerful file recovery tool.
2. The Fastest Way: This is probably the best way to ensure that all the files that you delete are permanently deleted and not lying in some corner of your drive. It is also one of the fastest way of deleting multiple files. The steps to the same are:
- Go to your Desktop.
- Scroll to the Recycle Bin icon and ‘Right Click’ on it.
- Open the Recycle Bin ‘Properties’.
- Click on the circle ‘Don’t Move files to the Recycle Bin, Remove files immediately when deleted’.
- Then, tick the checkbox for ‘Display delete confirmation dialog’.
- Click ‘Apply’ to save the settings. Next, click on ‘Ok’ to save and exit the Recycle Bin properties.

Note: Here too, when your discarded or stolen hard drives fall in hacker’s hands, they can manage to retrieve all the ‘permanently deleted files’ with a powerful file recovery tool that is easily available in the market. This method is cannot be trusted for permanent deletion of files.
How To Permanently Delete Files In Windows 10 Hard Drive With Tool
When we use a software for deleting files on our hard drive, it ensures that a large number of files or at times entire disks can be cleaned out in one go. One can find plenty of software in the market that claim to do the same, but none of them can ensure overall optimization of your PC. the need of the hour is a software that not only deletes files but also keeps the PC running smoothly in the most Safe and Secure Way.
One thing to always keep in mind is that it isn’t easy to permanently delete files from Windows 10. The reason is simple. The files, folders or images which you want deleted don’t actually get erased after deletion. It is only by file shredding can they be completely irrecoverable. Advanced System Optimizer offers the most safe and secure file shredding feature the chances of them being recovered are absolutely zero.
- Download and register the software to get optimum use of the features:

- Click on ‘Security and Privacy’ on the left panel.
- Click on ‘Secure Delete’.
- Click on ‘Select File’ button.


- Once you click select files, you can either add a single or multiple files or entire folder.
- You can browse to the file or folder you want to add and click ‘Open’

- Once selected files/folders are added, you can uncheck any file/folder you do not wish to delete and This shall immediately delete all the files and folders that were selected, permanently.


Note: One needs to be absolutely sure that they want to permanently delete a file, folder, or drive as this is a powerful tool and there is no manner in which they can ever be retrieved.
There you have it. You now have the most powerful software with which one can permanently delete files or folders and even entire drives at a time. With the knowledge of how to permanently delete files from the hard drive on Windows 10, one can secure their data from hackers. No matter how they get access to your drive, there is now no chance for them to retrieve permanently deleted files.
The Final Word On How To Permanently Delete Files From Hard Drive On Windows 10
I hope you know know the best method on how to permanently delete files from hard drive on Windows 10 using Advanced System Optimizer. You can also use the manually methods but having a PC optimization tool on your PC helps your keep your computer in an optimal shape. Follow us on social media – Facebook, Instagram and YouTube.
Permanently Delete Files Or Folders Quickly On Windows 10 PC or Laptop
In this post, we will be showing you the fastest way to permanently delete a file or folder in Windows 10 on your PC or Laptop.
If you have a file or folder that you would like to delete but you do not want it to go to the recycle bin, then you can do a permanent delete which means you will not be able to restore the file or folder again. However, this does not mean that the file is gone forever as there is still a good chance that the file or folder could be recovered by using a special recovery program. We have listed the steps below for permanently deleting in WIndows 10.
Deleting A File Or Folder Permanently in Windows 10:
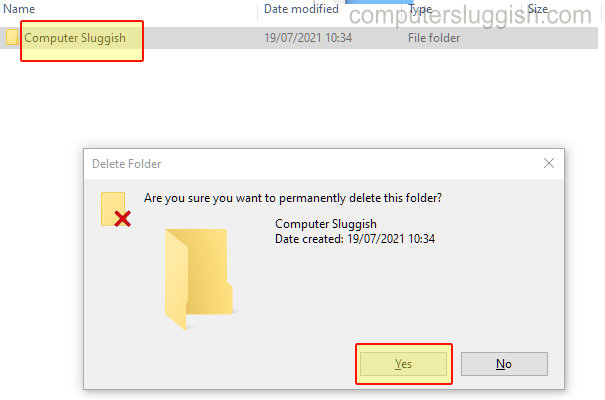
1. Find the Folder or File you would like to delete and select it
2. Now hold down Shift+Delete on your keyboard
3. You will now get a notification saying “Are you sure that you want to permently delete the file or folder?” > Now Click “Yes“
There you have it you have now permanently deleted the file or folder from your Windows 10 computer and you will not be able to recover the file or folder unless you get lucky using a recovery program.
This is a quick way to clear up space on your PC by removing unwanted files without then having to empty the Recycle Bin.
Check out our latest guides: