Search code, repositories, users, issues, pull requests…
Provide feedback
Saved searches
Use saved searches to filter your results more quickly
Sign up
При работе с переменными окружения в Powershell есть ряд проблем, с которыми мы можем столкнуться. Если мы выполним следующую команду, то увидим, что у нас есть диск и именем Env, который и хранит переменные:
Get-PSDrive -PSProvider "Environment"
Мы можем в него перейти и увидеть все переменные окружения:
cd ENV:\
ls
Если мы попробуем изменить переменные следующим способом, то они будут работать только в рамках PS и до окончания сеанса (перезагрузки например):
$variable = (Get-Item -Path 'Env:\Path').Value
$new_path = $variable + ';C:\Git\'
Set-Item -Path Env:\Path -Value $new_path
Способ выше аналогичен этому:
$Env:Path += ";C:\Git\"Если нам нужно сделать переменную среды постоянной есть решение для компьютера и конкретного пользователя.
Изменение переменных окружения пользователя в Powershell
У нас есть ветка реестра, которая отвечает за область пользователя:
HKEY_CURRENT_USER\Environment\PathВ деталях мы уже рассматривали как работать в powershell с реестром и не будем разбирать в деталях. Способом ниже мы обратимся к Path и добавим значение «C:\Git\»:
$variable = Get-ItemPropertyValue -Path 'HKCU:\Environment\' -Name 'Path'
$new_path = $variable + ';C:\Git\'
Set-ItemProperty -Path 'HKCU:\Environment\' -Name 'Path' -Value $new_path
Обращайте внимание, что у вас стоит ; перед новым значением (если вы изменяете Path), и что вы сохраняете предыдущее значение путем сложения.

Изменение переменных Env компьютера в Powershell
У нас есть другая ветка реестра, которая хранит значения переменных компьютера:
HKEY_LOCAL_MACHINE\SYSTEM\CurrentControlSet\Control\Session Manager\EnvironmentИзменяются они так же, как и в случае с пользователем:
$reg = 'HKLM:\SYSTEM\CurrentControlSet\Control\Session Manager\Environment\'
$variable = Get-ItemPropertyValue -Path $reg -Name 'Path'
$new_path = $variable + ';C:\Git\'
Set-ItemProperty -Path $reg -Name 'Path' -Value $new_path
Создание новых переменных Environment в Powershell
Мы можем просто создать новую переменную обращаясь напрямую к реестру, но эти способы были рассмотрены в статье по ссылке выше и есть более простой способ.
Для компьютера:
$var = 'siteName'
$znachenie = 'fixmypc.ru'
[System.Environment]::SetEnvironmentVariable($var,$znachenie,[System.EnvironmentVariableTarget]::Machine)
И для пользователя:
[System.Environment]::SetEnvironmentVariable($var,$znachenie,[System.EnvironmentVariableTarget]::User)
…
Теги:
#powershell
Переменная среды (environment variable) — текстовая короткая ссылка на элемент операционной системы Windows, предназначенная для получения быстрого доступа к объекту системы, или к данным о каталогах и конфигурации компьютера. Переменная среды (переменная окружения) позволяет быстро перейти к нужному месту на компьютере, без использования имени пользователя или полного пути к объекту.
Переменные окружения Windows используются в командной строке, в диалоговом окне «Выполнить» и адресной строке Проводника. Переменная среды может содержать информацию о настройках системы или данные о текущем пользователе компьютера.
Содержание:
- Пример использования переменной среды Windows
- Как посмотреть переменные среды Windows 10
- Доступ к переменным средам из реестра Windows
- Как посмотреть все переменные среды в командной строке
- Открытие списка переменных среды в Windows PowerShell
- Создание переменной среды в Windows
- Список переменных среды Windows в таблице
- Выводы статьи
Переменные среды Windows делятся на два вида:
- Пользовательские переменные среды — содержат указания пути к пользовательским каталогам.
- Системные переменные среды — содержат информацию о каталогах ОС и конфигурации ПК.
Чаще всего переменные среды используются как путь к дискам, файлам или параметрам системы. Использование переменной среды позволяет быстро перейти к нужной директории операционной системы, без ввода полного пути, например, без ввода имени пользователя.
Переменные окружения часто используются при написании скриптов, или при работе в командной строке. Короткие переменные можно использовать вместо полного пути до файла или папки, например, при создании ярлыков, при вводе пути к объекту.
Пример использования переменной среды Windows
Рассмотрим следующий пример: пользователю нужно открыть системную папку «AppData», в которой находятся различные данные программ, установленных в операционную систему Windows. Скрытая папка «AppData» находится в профиле пользователя, обычно на диске «C:». Данные приложений расположены по пути:
C:\Users\Имя_ пользователя\AppData\Roaming
Чтобы получить доступ к этой папке нужно выполнить несколько последовательных действий: открыть Проводник, включить в Windows отображение скрытых папок и файлов, а затем пройти по всему пути до нужной папки.
При помощи переменной «%APPDATA%» (переменная используется без кавычек) можно сразу открыть нужную директорию в системе, без ввода имени пользователя, включения отображения скрытых папок, ввода полного пути. Это экономит много времени.
Чтобы открыть нужный каталог достаточно лишь ввести «%APPDATA%» в поле поиска Windows, в адресную строку Проводника или в диалоговое окно «Выполнить», а затем нажать на клавишу «Enter».
Переменные среды Виндовс заключены в специальный оператор «%», который находится с двух сторон названия переменной. Это необходимо, чтобы система могла обработать запрос.
Пользователь может самостоятельно создавать переменные среды или изменять существующие. В статье мы рассмотрим несколько способов просмотра переменных среды и самостоятельное создание переменной. В руководстве вы найдете таблицу со списком переменных, применяемых в операционных системах Windows 10, Windows 8.1, Windows 8, Windows 7.
Как посмотреть переменные среды Windows 10
Сейчас мы посмотрим, как получить доступ к переменным средам в операционной системе Windows 10. В других версиях Windows необходимо выполнить аналогичные действия.
Чтобы посмотреть переменные окружения Windows 10, выполните следующее:
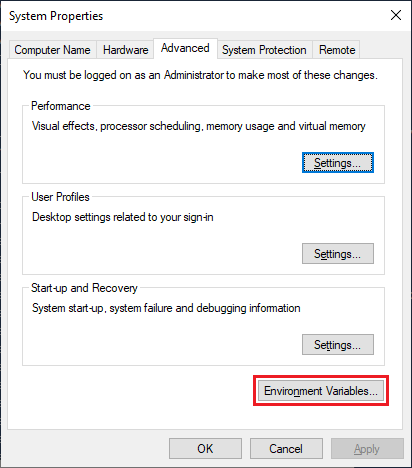
- Нажмите на клавиши» «Win» + «R».
- В окне «Выполнить» введите команду: «systempropertiesadvanced» (без кавычек), а затем нажмите на кнопку «ОК».
- В окне «Свойства системы», во вкладке «Дополнительно» нажмите на кнопку «Переменные среды…».
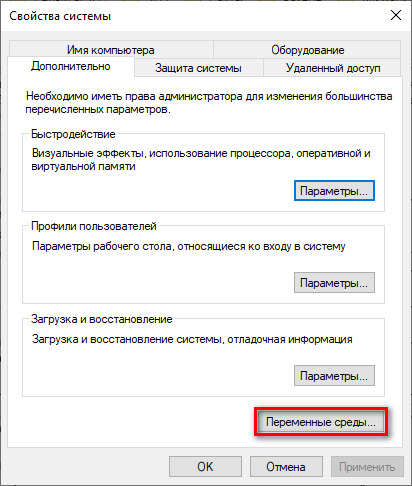
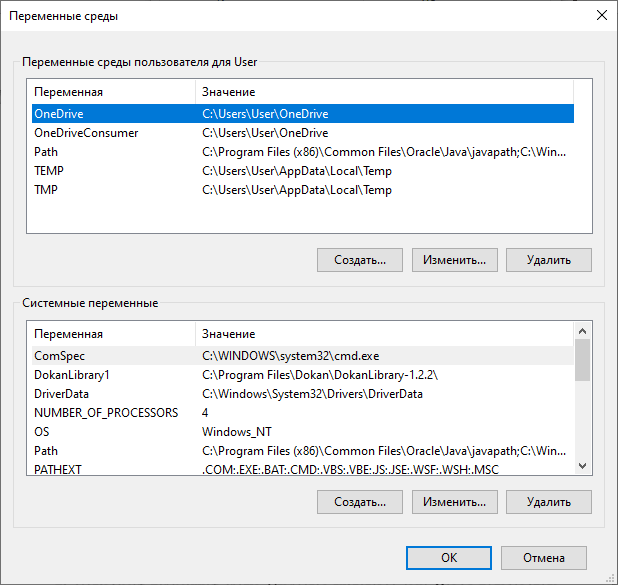
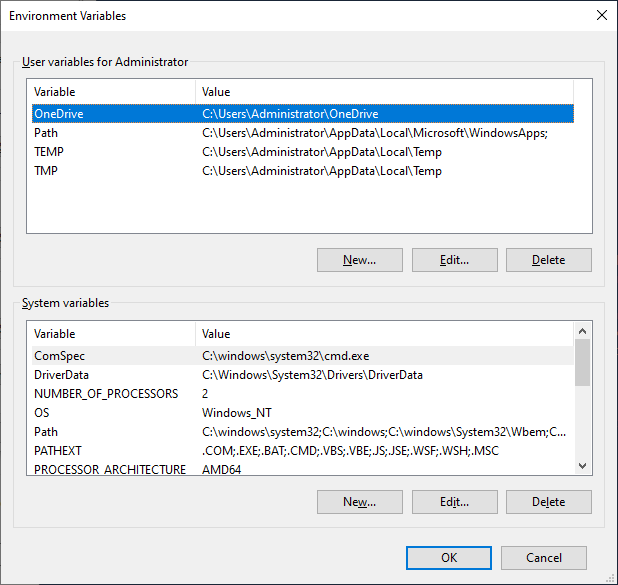
- В окне «Переменные среды» отображаются пользовательские переменные среды и системные переменные среды.
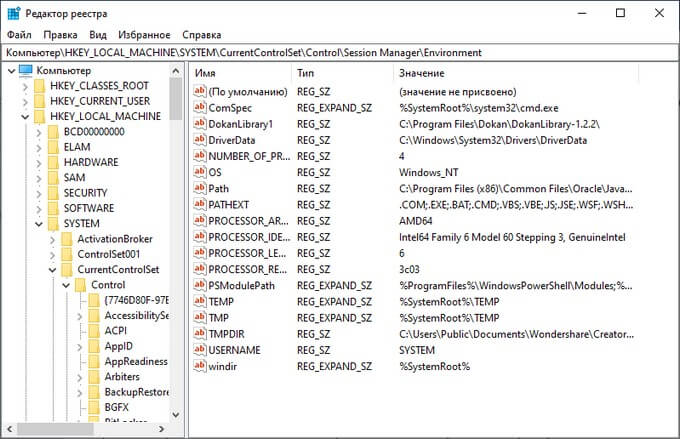
Доступ к переменным средам из реестра Windows
Есть возможность получить доступ к переменным средам из системного реестра Windows. Пользователю нужно будет открыть редактор реестра, а затем пройти по пути до определенной ветки.
Системные переменные среды находятся по следующему пути:
HKEY_LOCAL_MACHINE\SYSTEM\CurrentControlSet\Control\Session Manager\Environment
Переменные среды локального пользователя расположены в следующей ветке реестра:
HKEY_CURRENT_USER\Environment
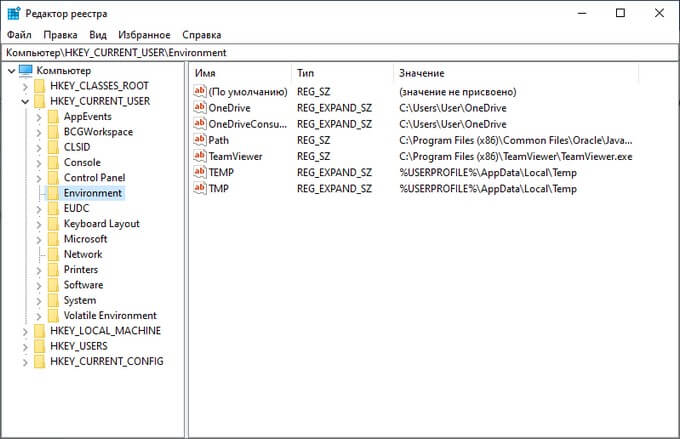
Вы можете создать в редакторе реестра новые переменные или изменить существующие.
Как посмотреть все переменные среды в командной строке
Пользователь может получить список переменных среды при помощи системного инструмента — командной строки Windows.
В cmd переменные среды открываются следующим образом:
- Запустите командную строку от имени администратора.
- Выполните команду:
set
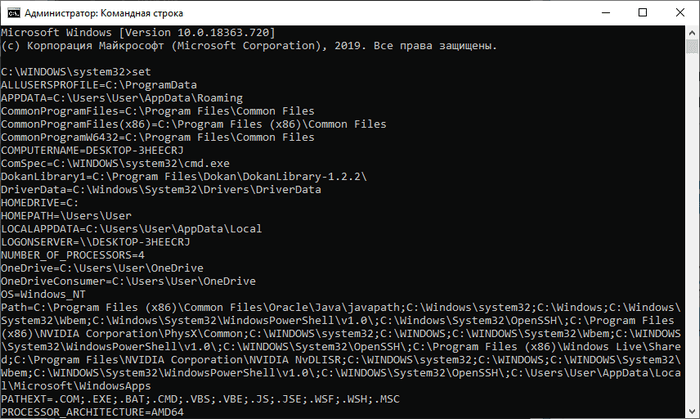
Для получения списка переменных в виде текстового файла, выполните в командной строке команду:
set > C:\Variables.txt
После выполнения этой команды, на Локальном диске «C:» появится текстовый файл с именем «Variables» (имя можно использовать любое), в котором находится список переменных среды Windows.
На моем компьютере файл имеет следующее содержание:
ALLUSERSPROFILE=C:\ProgramData

APPDATA=C:\Users\User\AppData\Roaming

CommonProgramFiles=C:\Program Files\Common Files

CommonProgramFiles(x86)=C:\Program Files (x86)\Common Files

CommonProgramW6432=C:\Program Files\Common Files

COMPUTERNAME=DESKTOP-3HEECRJ

ComSpec=C:\WINDOWS\system32\cmd.exe

DokanLibrary1=C:\Program Files\Dokan\DokanLibrary-1.2.2\

DriverData=C:\Windows\System32\Drivers\DriverData

HOMEDRIVE=C:

HOMEPATH=\Users\User

LOCALAPPDATA=C:\Users\User\AppData\Local

LOGONSERVER=\\DESKTOP-3HEECRJ

NUMBER_OF_PROCESSORS=4

OneDrive=C:\Users\User\OneDrive

OneDriveConsumer=C:\Users\User\OneDrive

OS=Windows_NT

Path=C:\Program Files (x86)\Common Files\Oracle\Java\javapath;C:\Windows\system32;C:\Windows;C:\Windows\System32\Wbem;C:\Windows\System32\WindowsPowerShell\v1.0\;C:\Windows\System32\OpenSSH\;C:\Program Files (x86)\NVIDIA Corporation\PhysX\Common;C:\WINDOWS\system32;C:\WINDOWS;C:\WINDOWS\System32\Wbem;C:\WINDOWS\System32\WindowsPowerShell\v1.0\;C:\WINDOWS\System32\OpenSSH\;C:\Program Files (x86)\Windows Live\Shared;C:\Program Files\NVIDIA Corporation\NVIDIA NvDLISR;C:\WINDOWS\system32;C:\WINDOWS;C:\WINDOWS\System32\Wbem;C:\WINDOWS\System32\WindowsPowerShell\v1.0\;C:\WINDOWS\System32\OpenSSH\;C:\Users\User\AppData\Local\Microsoft\WindowsApps

PATHEXT=.COM;.EXE;.BAT;.CMD;.VBS;.VBE;.JS;.JSE;.WSF;.WSH;.MSC

PROCESSOR_ARCHITECTURE=AMD64

PROCESSOR_IDENTIFIER=Intel64 Family 6 Model 60 Stepping 3, GenuineIntel

PROCESSOR_LEVEL=6

PROCESSOR_REVISION=3c03

ProgramData=C:\ProgramData

ProgramFiles=C:\Program Files

ProgramFiles(x86)=C:\Program Files (x86)

ProgramW6432=C:\Program Files

PROMPT=$P$G

PSModulePath=C:\Program Files\WindowsPowerShell\Modules;C:\WINDOWS\system32\WindowsPowerShell\v1.0\Modules

PUBLIC=C:\Users\Public

SystemDrive=C:

SystemRoot=C:\WINDOWS

TEMP=C:\Users\User\AppData\Local\Temp

TMP=C:\Users\User\App\Data\Local\Temp

TMPDIR=C:\Users\Public\Documents\Wondershare\Creator\Temp

USERDOMAIN=DESKTOP-3HEECRJ

USERDOMAIN_ROAMINGPROFILE=DESKTOP-3HEECRJ

USERNAME=User

USERPROFILE=C:\Users\User

windir=C:\WINDOWS
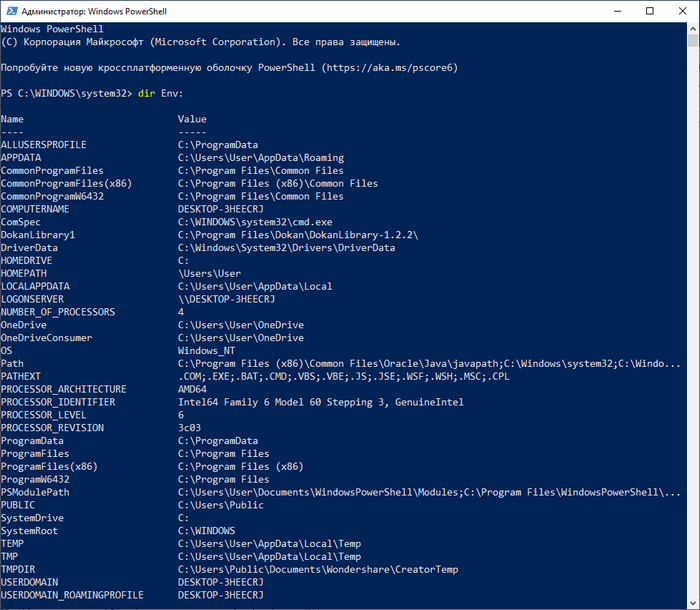
Открытие списка переменных среды в Windows PowerShell
Открытие списка переменных среды возможно при помощи системного средства Windows PowerShell.
Выполните следующие действия:
- Запустите Windows PowerShell от имени администратора.
- Введите команду, а затем нажмите на клавишу «Enter»:
dir Env:
- В окне PowerShell откроется список переменных среды Windows.
Создание переменной среды в Windows
Пользователь может самостоятельно создать новую переменную для открытия директорий на компьютере, или для запуска программ.
Перед внесением изменений в переменные окружения, обратите внимание на то, что бездумное изменение значений переменных среды Windows может привести к сбоям или неполадкам в работе операционной системы.
Проделайте следующее:
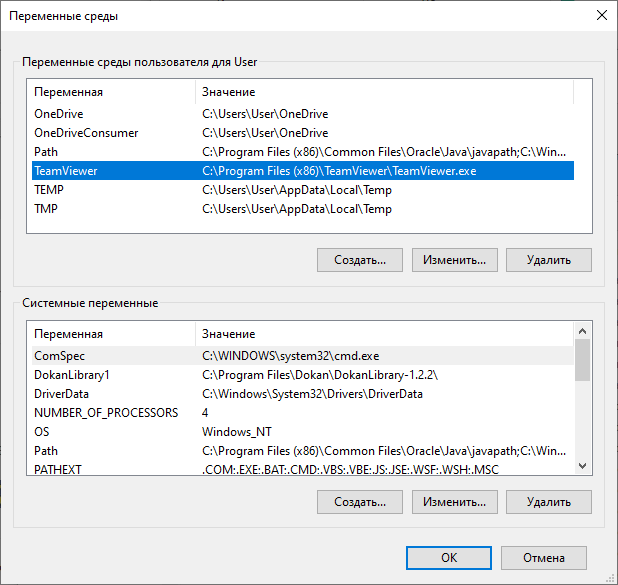
- В окне «Переменные среды» выберите одну из групп переменных: пользовательские или системные переменные.
- Нажмите на кнопку «Создать…».
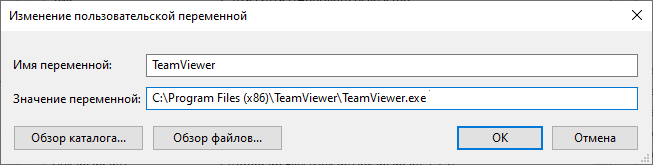
На этом примере я создам отдельную переменную среды для запуска программы TeamViewer.
- В окне «Изменение пользовательской переменной» добавьте имя переменной, а в поле «Значение переменной:» введите полный путь к исполняемому файлу.
- В окне переменных сред добавилась новая переменная. Нажмите на кнопку «ОК» для применения изменений.
- В диалоговом окне «Выполнить» введите «%Имя_переменной%», в нашем случае, «%TeamViewer%», нажмите на кнопку «ОК».
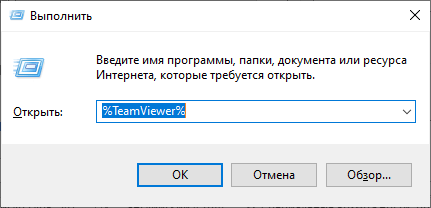
- На Рабочем столе компьютера откроется окно запущенной программы.
Подобным способом, после ввода переменной в адресную строку Проводника, выполняется запуск программы или открытие директории на ПК.
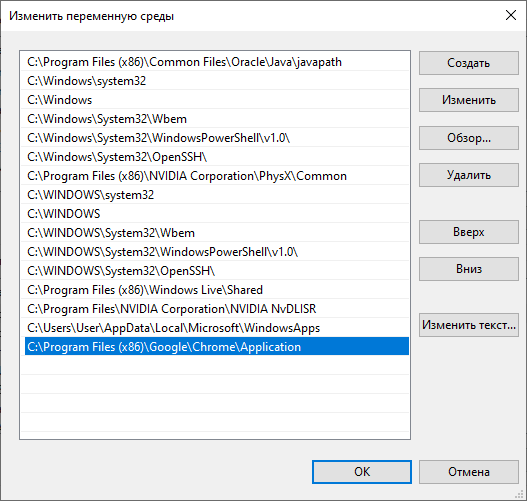
Переменная среды пути «Path» содержит список директорий на компьютере, в которых система должна искать исполняемые файлы. Переменная среды пути «PATH» не добавляется к исполняемым файлам, а только к директориям, где находятся данные файлы.
Если добавить в переменную среды Path Windows путь к директории с исполняемым файлом, например, для браузера Google Chrome: C:\Program Files (x86)\Google\Chrome\Application, то программа запустится из командной строки, после выполнения команды «chrome», без ввода полного пути к исполняемому файлу.
При необходимости, пользователь может удалить ненужную переменную из операционной системы Windows.
Список переменных среды Windows в таблице
Для удобства посетителей сайта я собрал в общую таблицу переменные, их описание и значения в операционной системе Windows. В подавляющем большинстве случаев, системная папка расположена на диске «C:», поэтому пути в значениях даны для этого диска.
| Переменная | Назначение | Значение переменной |
|---|---|---|
| %ALLUSERSPROFILE% | Папка ProgramData | C:\ProgramData |
| %APPDATA% | Папка размещения данных программ | C:\Users\User\AppData\Roaming |
| %CommonProgramFiles% | Папка Common Files в Program Files | C:\Program FilesCommon Files |
| %CommonProgramW6432% | Папка Common Files в Program Files | C:\Program Files\Common Files |
| %COMPUTERNAME% | Имя компьютера | DESKTOP-XXXXXXX |
| %ComSpec% | Запуск командной строки | C:\WINDOWS\system32\cmd.exe |
| %DriverData% | Папка DriverData | C:\Windows\System32\Drivers\DriverData |
| %HOMEDRIVE% | Системный диск | C: |
| %HOMEPATH% | Папка профиля пользователя | C:\Users\User |
| %LOCALAPPDATA% | Папка локальных данных приложений | C:\Users\User\AppData\Local |
| %LOGONSERVER% | Имя контроллера домена | \DESKTOP-XXXXXXX |
| %NUMBER_OF_PROCESSORS% | Количество потоков процессора | |
| %OneDrive% | Папка OneDrive | C:\Users\User\OneDrive |
| %Path% | Путь поиска исполняемых файлов | C:\Windows\system32;C:\Windows;C:\Windows\System32\Wbem;… |
| %PATHEXT% | Исполняемые расширения файлов | .COM; .EXE; .BAT; .CMD; .VBS; .VBE; .JS; .JSE; .WSF; .WSH; .MSC |
| %PROCESSOR_ARCHITECTURE% | Архитектура процессора | AMD64; x86; IA64 |
| %PROCESSOR_IDENTIFIER% | Описание процессора | |
| %PROCESSOR_LEVEL% | Номер модели процессора | |
| %PROCESSOR_REVISION% | Ревизия процессора | |
| %ProgramData% | Папка ProgramData | C:\ProgramData |
| %ProgramFiles% | Папка ProgramFiles | C:\Program Files |
| %ProgramFiles(x86)% | Папка ProgramFiles(x86) | C:\Program Files (x86) |
| %ProgramW6432% | Папка ProgramFiles | C:\Program Files |
| %PROMPT% | Возвращение параметров командной строки | |
| %PSModulePath% | Пути к расположению модулей PowerShell | C:\Program Files\WindowsPowerShell\Modules;C:\WINDOWS\system32\WindowsPowerShell\v1.0\Modules |
| %PUBLIC% | Папка «Общие» в профиле пользователей | C:\Users\Public |
| %SystemDrive% | Системный диск с Windows | C: |
| %SystemRoot% | Папка Windows | C:\Windows |
| %TEMP% | Временный каталог | C:\Users\User\AppData\Local\Temp |
| %TMP% | Временный каталог | C:\Users\User\AppData\Local\Temp |
| %USERDOMAIN% | Имя домена | DESKTOP-XXXXXXX |
| %USERNAME% | Имя пользователя | User |
| %USERPROFILE% | Профиль пользователя | C:\Users\User |
| %Windir% | Папка Windows | C:\Windows |
Выводы статьи
Переменные окружения Windows позволяют пользователю экономить время во время работы на компьютере. Переменными средами Windows могут пользоваться обычные пользователи или системные администраторы для быстрого доступа к объектам операционной системы, чтобы открыть нужную директорию на компьютере, или запустить программу.
Похожие публикации:
- Некоторыми параметрами управляет ваша организация в Windows 10
- Как закрепить папку на панели задач Windows 10 — 5 способов
- Как создать загрузочную флешку Windows 7 — 5 способов
- Как удалить программу в Windows 10 — 9 способов
- Оптимизация Windows 10 для ускорения работы ПК
Using PowerShell to set Windows environment variables, read environment variables and create new environment variables is easy once you know the trick. The tricks you learn in this article will work for Windows 10 environment variables as well as any Windows client/server after Windows 7 SP1/Windows Server 2008.
Not a reader? Watch this related video tutorial!
Not seeing the video? Make sure your ad blocker is disabled.
PowerShell provides many different ways to interact with Windows environment variables from the $env: PSDrive. the registry, and the [System.Environment] .NET class. You’ll learn about each method including understand environment variable scope in this step-by-step walkthrough.
Assumptions
Throughout this article, I’ll be using Windows PowerShell 5.1 on Windows 10. But if you have any version of Windows PowerShell later than v3 on Windows 7 SP1 or later, the techniques I’m about to show you should work just fine.
What are Environment Variables?
Environment variables, as the name suggests, store information about the environment that is used by Windows and applications. Environment variables can be accessed by graphical applications such as Windows Explorer and plain text editors like Notepad, as well as the cmd.exe and PowerShell.
Using environment variables helps you to avoid hard-coding file paths, user or computer names and much more in your PowerShell scripts or modules.
Common Environment Variables
As you begin to learn more about how to work with environment variables in PowerShell, you’ll come across many different variables. Some are more useful than others. Below is a list of some of the common environment variables and their usage for reference.
| Variable | Usage |
|---|---|
| ClientName | The name of the remote computer connected via a Remote Desktop session. |
| SessionName | This helps to identify if the current Windows session is regarded by the operating system as running at the console. For console sessions SessionName will be ‘Console’. Enhanced Session connections to Hyper-V Virtual Machines do not report SessionName as ‘Console’, whereas Standard Sessions do. |
| ComputerName | The name of the computer. |
| SystemRoot and Windir | The path to the current Windows installation. |
| ProgramFiles and ProgramFiles(x86) | The default locations for x64 and x86 programs. |
| ProgramW6432 | The default location for programs, avoiding 32/64 bit redirection. This variable only applies for 32 bit processes running on a 64 bit platform. This means that you can use it to identify when a 32 bit instance of PowerShell is running on a 64 bit system. |
| UserDNSDomain | The Fully Qualified Domain Name of the Active Directory domain that the current user logged on to. Only present for domain logons. |
| UserDomain | The NETBIOS-style name of the domain that the current user logged on to. Can be a computer name if there’s no domain. |
| UserDomainRoamingProfile | The location of the central copy of the roaming profile for the user, if any. Only present for domain logons. |
| UserName | The name of the currently logged on user. |
| UserProfile | The location of the profile of the current user on the local computer. |
Environment Variable Scopes
There are three scopes of environment variables. Think of scopes as layers of variables that build up to give a total picture. Combined, these “layers” provide many different environment variables to any running process in Windows.
Environment Variable Scope “Hierarchy”
Each of these “layers” either combine or overwrite one another. They are defined in a hierarchy like: machine –> user –> process with each scoped variable overwriting the parent variable if one exists in the parent scope.
For example, a common environment variable is TEMP. This variable stores the folder path to Windows’ local temporary folder. This environment variable is set to:
C:\WINDOWS\TEMPin the machine scopeC:\Users\<username>\AppData\Local\Tempin the user scopeC:\Users\<username>\AppData\Local\Tempin the process scope.
If there’s no TEMP environment variable set in the user scope then the end result will be C:\WINDOWS\TEMP.
Environment Variable Scope Types
There are three different environment variable scopes in Windows.
Machine
Environment variables in the machine scope are associated with the running instance of Windows. Any user account can read these, but setting, changing or deleting them needs to done with elevated privileges.
User
Environment variables in the user scope are associated with the user running the current process. User variables overwrite machine-scoped variables having the same name.
Note: Microsoft recommends that Machine and User scoped environment variable values contain no more than 2048 characters.
Process
Environment variables in the process scope are a combination of the machine and user scopes, along with some variables that Windows creates dynamically.
Below is a list of environment variables available to a running process. All of these variables are dynamically created.
ALLUSERSPROFILEAPPDATACOMPUTERNAMEHOMEDRIVEHOMEPATHLOCALAPPDATALOGONSERVERPROMPTPUBLICSESSIONSystemDriveSystemRootUSERDNSDOMAINUSERDOMAINUSERDOMAIN_ROAMINGPROFILEUSERNAMEUSERPROFILE
Environment Variables in the Registry
Environment variables are stored in two registry locations, one for the user scope and one for the machine scope.
Don’t Use the Registry to Manage Environment Variables
There’s a catch when making changes to variables inside of the registry. Any running processes will not see variable changes in the registry. Processes only see the registry variables and values that were present when the process was started, unless Windows notifies them that there has been a change.
Instead of modifying the registry directly, you can use a .NET class instead. The .NET [System.Environment] class can modify machine and user–scoped environment variables and handle the registry housekeeping for you.
Modifying environment variables in the registry directly, whilst possible, doesn’t make sense. The .NET class offers a simpler, Microsoft-supported approach. You’ll learn about using the [System.Environment] .NET class later in this article.
Environment Variable Registry Locations and Querying
I hope you’ve been convinced to not modify the registry directly but if you’d like to take a peek at what’s in there, you can find all user environment variables in the HKEY_CURRENT_USER\Environment key. Machine-scoped environment variables are stored at HKEY_LOCAL_MACHINE\SYSTEM\CurrentControlSet\Control\Session Manager\Environment.
Inside of either of these keys lies registry values of type REG_SZ or REG_EXPAND_SZ. REG_EXPAND_SZ values hold environment variables embedded as part of their value. These environment variables are expanded when the value is retrieved.
To demonstrate this, use the REG utility. This is a small command-line utility included with Windows.
Query the TEMP environment variable as seen below. Run REG with the QUERY parameter to retrieve the value of the TEMP variable.
> REG QUERY HKCU\Environment /V TEMP

HKEY_CURRENT_USER\Environment
    TEMP    REG_EXPAND_SZ    %USERPROFILE%\AppData\Local\Temp
You’ll sometimes notice environment variables displayed surrounded by percentage symbols (
%COMPUTERNAME%) like above. This is the old-school way of showing environment variables via cmd.exe and batch files. Know that PowerShell does not recognize this format.
The REG utility allows us to see the native value of the registry value. The value type is REG_EXPAND_SZ and the value contains the %USERPROFILE% environment variable.
If you’d rather use PowerShell to retrieve the registry value, you can so using the Get-Item cmdlet as shown below.
PS51> Get-ItemProperty -Path HKCU:\Environment -Name TEMP

TEMP         : C:\Users\<your username>\AppData\Local\Temp
PSPath       : Microsoft.PowerShell.Core\Registry::HKEY_CURRENT_USER\Environment
PSParentPath : Microsoft.PowerShell.Core\Registry::HKEY_CURRENT_USER
PSChildName  : Environment
PSDrive      : HKCU
PSProvider   : Microsoft.PowerShell.Core\Registry
View and Set Windows Environment Variables via the GUI
To see a GUI view of the user and system environment variables, run SystemPropertiesAdvanced.exe from PowerShell, a command prompt or from Windows Key+R to display the System Properties Advanced tab. Click on the EnvironmentVariables button, which is highlighted in the image below.
The Environment Variables dialog, shown below, allows you to view, create and modify user and machine-scoped environment variables. Note that the dialog refers to machine scoped variables as System variables.
Now that you have an understanding of environment variables, let’s get to what you’re here for, managing them with PowerShell!
There are a few different ways you can interact with environment variables using PowerShell.
- The
Env:PSDrive and Provider – session-based. Only sets the values of environment variables for the current PowerShell session $env:variables – session-based. Only sets the values of environment variables for the current PowerShell session- The
[System.Environment].NET Class – allows you to persist user and system-scoped environment variables across sessions and reboots
The Env: PSDrive and Provider
One of the best way to read environment variables is a PowerShell concept known as PowerShell drives (PS drives). A PS drive allows you to treat environment variables as if they are a file system through the Env: drive.
Switching to the Env: Drive
Like all PS drives, you reference it via paths like Env:\TEMP, Env:\COMPUTERNAME, etc. But to save some keystrokes, switch to the Env: drive just as you would any file system drive, as shown below.
PS51> cd Env:
PS51 Env:\>

## or

PS51> Set-Location Env:
PS Env:\>
Tab-Completion with the Env: Drive
You can use the same commands you would use to access a file system, such as Get-Item and Get-ChildItem to access environment variables. But instead of the file system, you’re reading the Env: drive.
Because environment variables are stored in a PS drive, you can use the tab completion feature of PowerShell to cycle through the available variables, as shown below.
Let’s now jump into a couple of examples of how you can use the Env: PS drive to work with environment variables.
Listing Environment Variables with Env:
PS51> Get-Item -Path Env:
PS51> Get-Item -Path Env:USERNAME
Listing Environment Variables Using a Wildcard with Env:
PS51> Get-Item -Path Env:user*Finding Environment Variable Values with Env:
The results of these commands are key/value [System.Collections.DictionaryEntry] .NET objects. These objects hold the environment variable’s name in the Name property and the value in the Value property.
You can access a specific value of an environment variable by wrapping the Get-Item command reference in parentheses and referencing the Value property as shown below:
PS51> (Get-Item -Path Env:computername).Value
MYCOMPUTERHOSTNAME
In situations where you need to only return certain environment variables, use standard PowerShell cmdlets such as Select-Object and Where-Object to select and filter the objects returned by the Env: provider.
In the example below, only the environment variable COMPUTERNAME is returned.
PS51> Get-ChildItem -Path Env: | Where-Object -Property Name -eq 'COMPUTERNAME'As an alternative method, use the Get-Content cmdlet. This cmdlet returns a [String] object containing the value of the environment variable. This object is simpler to deal with as it returns only the value, rather than an object with Name and Value properties.
PS51> Get-Content -Path Env:\COMPUTERNAMEDemo: Inserting Environment Values in a String
Using Get-Content, you can find the value of an environment variable and insert the COMPUTERNAME environment variable, for example, into a text string.
PS51> 'Computer Name is: {0}' -f (Get-Content -Path Env:COMPUTERNAME)
Computer Name is: MYCOMPUTER
Setting an Environment Variable (And Creating) with Env:
Create new environment variables with PowerShell using the New-Item cmdlet. Provide the name of the environment variable in the form Env:\<EnvVarName> for the Name value and the value of the environment variable for the Value parameter as shown below.
PS51> New-Item -Path Env:\MYCOMPUTER -Value MY-WIN10-PC
Name                           Value
----                           -----
MYCOMPUTER                     MY-WIN10-PC
Use the Set-item cmdlet to set an environment variable, or create a new one if it doesn’t already exist. You can see below using the Set-Item cmdlet, you can both create or modify and environment variable.
PS51> Set-Item -Path Env:testvariable -Value "Alpha"Copying an Environment Variable with Env:
Sometimes the situation arises that you need to replicate the value of an environment variable. You can do this using the Copy-Item cmdlet.
Below you can see that the value of the COMPUTERNAME variable is copied to MYCOMPUTER, overwriting its existing value.
PS51> Get-Item -Path Env:\MYCOMPUTER

Name                           Value
----                           -----
MYCOMPUTER                     MY-WIN10-PC

PS51> Copy-Item -Path Env:\COMPUTERNAME -Destination Env:\MYCOMPUTER
PS51> Get-Item -Path Env:\MYCOMPUTER

Name                           Value
----                           -----
MYCOMPUTER                     WIN10-1903
Removing an Environment Variable with Env:
Situations will arise where an environment variable is no longer needed. You can remove environment variables using one of three methods:
- Use the
Set-Itemcmdlet to set an environment variable to an empty value
PS51> Set-Item -Path Env:\MYCOMPUTER -Value ''- Use the
Remove-Itemcmdlet.
PS51> Remove-Item -Path Env:\MYCOMPUTER- Use the
Clear-Itemcmdlet.
PS51> Clear-Item -Path Env:\MYCOMPUTERRenaming an Environment Variable with Env:
In situations where the name of an environment variable needs to be changed, you have the option to rename, rather than delete and recreate with the Env: provider.
Use the Rename-Item cmdlet to change the name of an environment variable whilst keeping its value. Below you can see that you can see that the MYCOMPUTER variable is renamed to OLDCOMPUTER whilst retaining its value.
PS51> Rename-Item -Path Env:\MYCOMPUTER -NewName OLDCOMPUTER
PS51> Get-Item -Path OLDCOMPUTER
Name                           Value
----                           -----
OLDCOMPUTER                    WIN10-1903
$Env: Variables
Having mastered the Env: drive to treat environment variables as files, this section shows you how to treat them as variables. Another way you can manage in-session environment variables is using the the PowerShell Expression Parser. This feature allows you to use the $Env: scope to access environment variables.
Getting an Environment Variable with $Env:
Using the $Env scope, you can reference environment variables directly without using a command like Get-Item as shown below.
This method makes it easy to insert environment variables into strings like below:
PS51> "The Computer Name is {0}" -f $env:computername
The Computer Name is WIN10-1809
PS51> "The Computer Name is $env:computername"
The Computer Name is WIN10-1809
Setting or Creating an Environment Variable with $Env:
Setting an environment variable using this method is straightforward. This will also create a new environment variable if one does not already exist like below.
PS51> $env:testvariable = "Alpha"Use the += syntax to add to an existing value, rather than overwriting it.
PS51> $env:testvariable = "Alpha"
PS51> $env:testvariable += ",Beta"

PS51> $env:testvariable
Alpha,Beta
Removing an Environment Variable with $Env:
To remove an environment variable using this method, simple set its value to an empty string.
PS51> $env:testvariable = ''Using the [System.Environment] .NET Class
The .NET class [System.Environment] offers methods for getting and setting environment variables also. This is only method to access various environment scopes directly and set environment variables that survive across PowerShell sessions.
In all of the following examples, if no scope is provided, the process scope is assumed.
When using the [System.Environment], you’ll use a few different .NET static class methods. You don’t need to understand what a static method is. You only need to understand to use any of the techniques you’re about to learn, you’ll need to first reference the class ([System.Environment]) followed by two colons (::) then followed by the method.
Listing Environment Variables with [System.Environment]
If you’d like to see all environment variables in a particular scope, you’d use the GetEnvironmentVariables method. This method returns all environment variables by the scope specified as the method argument (in parentheses).
PS51> [System.Environment]::GetEnvironmentVariables('User')
PS51> [System.Environment]::GetEnvironmentVariables('Machine')
PS51> [System.Environment]::GetEnvironmentVariables('Process')

# The same as Process
PS51> [System.Environment]::GetEnvironmentVariables()
Getting Single Environment Variables with [System.Environment]
If you need to find a specific environment variable you can do so two different ways.
GetEnvironmentVariables().<var name>– not recommendedGetEnvironmentVariable('<var name>','<scope>')
GetEnvironmentVariables()
Using the GetEnvironmentVariables() method, you use dot notation to reference the value. Enclose the [System.Environment] class and static method reference in parentheses followed by a dot then the name of the environment variable like below:
PS51> ([System.Environment]::GetEnvironmentVariables()).APPDATANote that when referencing environment variables this way, you must ensure you match capitalization! In the example above, try to reference the
APPDATAvariable usingappdata. Use theGetEnvironmentVariable()instead.
GetEnvironmentVariable()
Rather than using the GetEnvironmentVariables() method, instead use GetEnvironmentVariable() to find single environment variables. It gets around the issue with capitalization and also allows you to specify the scope.
To use this method, specify the environment variable name and the scope you’d like to look for that variable in separated by comma.
PS51> [System.Environment]::GetEnvironmentVariable('ComputerName','User')
# Blank

PS51> [System.Environment]::GetEnvironmentVariable('ComputerName','Machine')
# Blank

PS51> [System.Environment]::GetEnvironmentVariable('ComputerName','Process')  WIN10-1903

# The same as Process
PS51> [System.Environment]::GetEnvironmentVariable('ComputerName')
WIN10-1903
Setting an Environment Variable with [System.Environment]
Use the SetEnvironmentVariable() method to set the value of an environment variable for the given scope, or create a new one if it does not already exist.
When setting variables in the process scope, you’ll find that the process scope is volatile while changes to the user and machine scopes are permanent.
PS51> [System.Environment]::SetEnvironmentVariable('TestVariable','Alpha','User')

PS51> [System.Environment]::SetEnvironmentVariable('TestVariable','Alpha','Process')

PS51> [System.Environment]::SetEnvironmentVariable('TestVariable','Alpha','Machine')

 # The same as Process
PS51> [System.Environment]::SetEnvironmentVariable('TestVariable','Alpha')
Note: Calling the SetEnvironmentVariable method with a variable name or value of 32767 characters or more will cause an exception to be thrown.
Removing an Environment Variable with [System.Environment]
Use the SetEnvironmentVariable() method to remove an environment variable for the given scope by setting its value to an empty string.
PS51> [System.Environment]::SetEnvironmentVariable('TestVariable', '', 'User')

PS51> [System.Environment]::SetEnvironmentVariable('TestVariable', '', 'Process')

PS51> [System.Environment]::SetEnvironmentVariable('TestVariable', '', 'Machine')

# The same as process
PS51> [System.Environment]::SetEnvironmentVariable('TestVariable', '')
Useful PowerShell Environment Variables
Like many other Windows applications, PowerShell has some environment variables of it’s own. Two useful environment variables to know about are PSExecutionPolicyPreference and PSModulePath.
PSExecutionPolicyPreference
The PSExecutionPolicyPreference environment variable stores the current PowerShell execution policy. It is created if a session-specific PowerShell execution policy is set by:
- Running the
Set-ExecutionPolicycmdlet with aScopeparameter ofProcess - Running the
powershell.exeexecutable to start a new session, using theExecutionPolicycommand line parameter to set a policy for the session.
PSModulePath
The PSModulePath environment variable contains the path that PowerShell searches for modules if you do not specify a full path. It is formed much like the standard PATH environment variable, with individual directory paths separated by a semicolon.
PS51> $env:PSModulePath
C:\Program Files\WindowsPowerShell\Modules;C:\WINDOWS\system32\WindowsPowerShell\v1.0\Modules
Quick tip: Split each folder to get a string array to process each path individually using $env:PSModulePath.split(‘;’)
Summary
Environment variables are a useful method for getting information about a running system, or storing information across sessions and reboots. Whether you’re just reading the default Windows operating system environment variables and creating your own, you now can manage them using a variety of ways with PowerShell!
Further Reading
- about_Environment_Variables
- The .NET [System.Environment] Class on Microsoft docs
- Learn the PowerShell string format and expanding strings
My suggestion is this one:
I have tested this to add C:\oracle\x64\bin to environment variable Path permanently and this works fine.
$ENV:PATH
The first way is simply to do:
$ENV:PATH=”$ENV:PATH;c:\path\to\folder”
But this change isn’t permanent. $env:path will default back to what it was before as soon as you close your PowerShell terminal and reopen it again. That’s because you have applied the change at the session level and not at the source level (which is the registry level). To view the global value of $env:path, do:
Get-ItemProperty -Path ‘Registry::HKEY_LOCAL_MACHINE\System\CurrentControlSet\Control\Session Manager\Environment’ -Name PATH
Or more specifically:
(Get-ItemProperty -Path ‘Registry::HKEY_LOCAL_MACHINE\System\CurrentControlSet\Control\Session Manager\Environment’ -Name PATH).path
Now to change this, first we capture the original path that needs to be modified:
$oldpath = (Get-ItemProperty -Path ‘Registry::HKEY_LOCAL_MACHINE\System\CurrentControlSet\Control\Session Manager\Environment’ -Name PATH).path
Now we define what the new path should look like. In this case we are appending a new folder:
$newpath = “$oldpath;c:\path\to\folder”
Note: Be sure that the $newpath looks how you want it to look. If not, then you could damage your OS.
Now apply the new value:
Set-ItemProperty -Path ‘Registry::HKEY_LOCAL_MACHINE\System\CurrentControlSet\Control\Session Manager\Environment’ -Name PATH -Value $newPath
Now do one final check that it looks like how you expect it to:
(Get-ItemProperty -Path ‘Registry::HKEY_LOCAL_MACHINE\System\CurrentControlSet\Control\Session Manager\Environment’ -Name PATH).Path
You can now restart your PowerShell terminal (or even reboot the machine) and see that it doesn’t rollback to its old value again.
Note the ordering of the paths may change so that it’s in alphabetical order, so make sure you check the whole line. To make it easier, you can split the output into rows by using the semi-colon as a delimiter:
($env:path).split(“;”)