Для работы проектов iXBT.com нужны файлы cookie и сервисы аналитики.
Продолжая посещать сайты проектов вы соглашаетесь с нашей
Политикой в отношении файлов cookie
Сегодня мы установим и оптимизируем Windows 10 для лучшей игровой производительности, а также посмотрим на результат наших трудов.
Внимание!
Гайд рассчитан на создание полностью игровой системы, ибо в результате оптимизаций будет вырезана уйма функций.
Автор не несёт никакой ответственности, если вы что-то сломаете. Все выполняемые действия лишь на вашей совести.
Тестовый ПК и Linux
- Процессор: Intel Pentium G4560 2/4 3.5 Гигагерц
- Видеокарта: Nvidia Geforce 1050 2Gb
- Оперативная память: 2×4 2400
- Материнская плата: H110M-DGS R3.0 Bios 7.50
Выбор редакции Windows
Зоопарк Windows-систем хоть и не большой по сравнению с Linux, но и здесь нужен осознанный выбор, ибо от выбора зависит не только цена лицензии, но и общее потребление ресурсов компьютера, а также наличие фишек. Рассматривать устаревшие системы Windows 7-8.1 смысла никакого нет. Оптимизации в коде работы планировщика Windows 10 и работы над системой сжатия памяти, ставят крест на старых системах в плане игровой производительности.
Основные редакции:
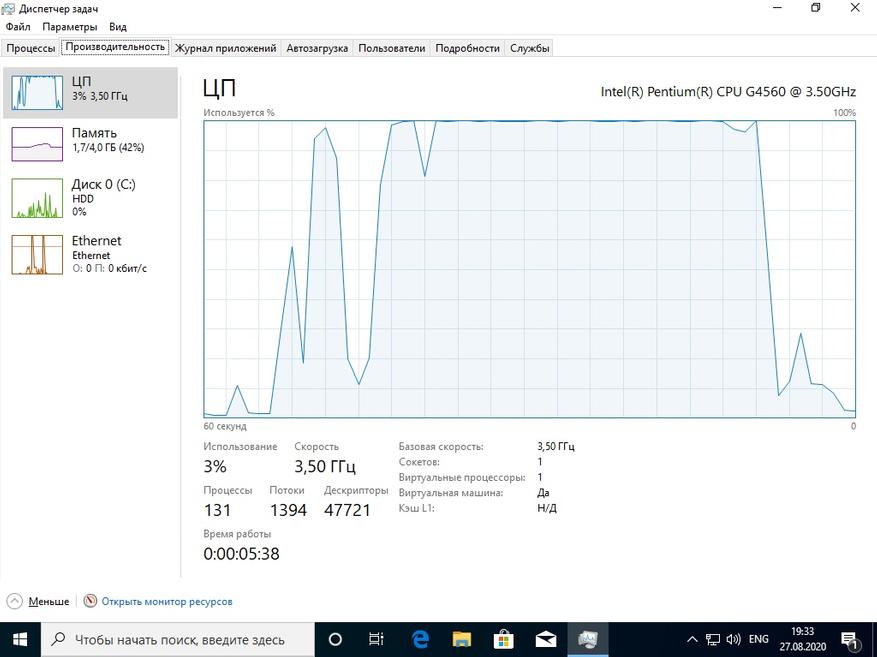
Windows 10 Home (Домашняя) — стандартная версия для обычных пользователей, должна быть лучшей в плане игровой производительности и незагажанности системы, но напичкана процессами-службами по сбору данных пользователя. Не рекомендуется геймерам и киберкотлетам.
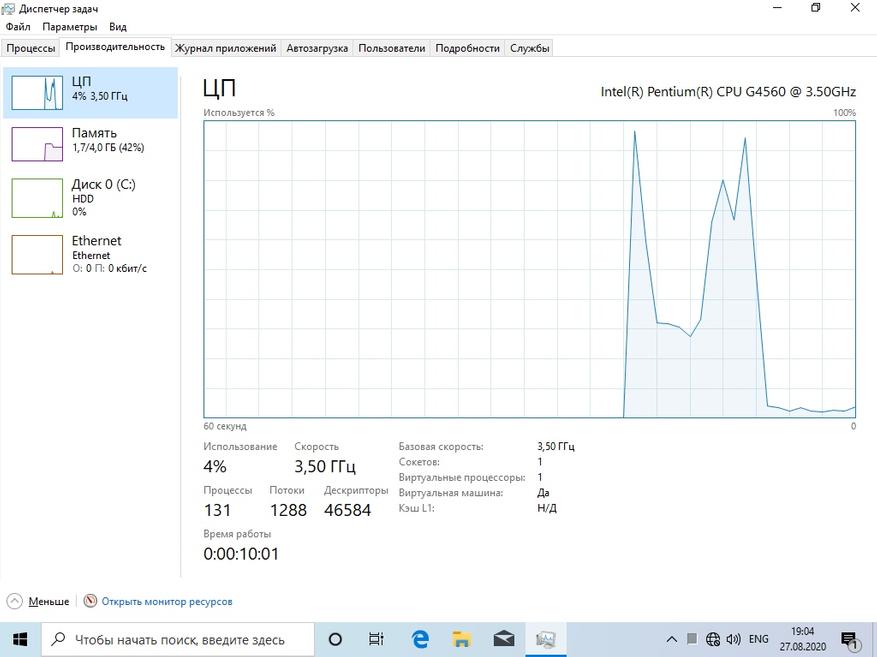
Windows 10 Pro (Профессональная) — расширенная версия, что подходит как для обычных пользователей, так и для системных администраторов, дополнительно напичкана софтом для администрирования разного рода задач. Потребляет чуть больше домашней версии.
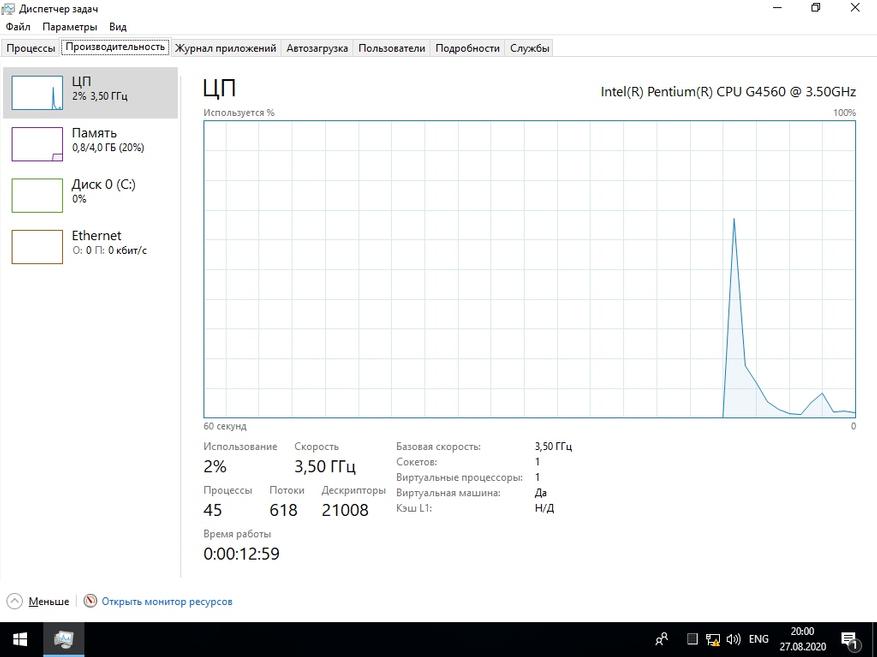
Windows 10 LTSC (Корпоративная-Enterprise) — версия, лишенная большинства новых фич и мусора, базируется для стабильности на устаревшем ядре с опозданием 1-2 года от основной редакции, является лучшим выбором для игроков желающим выжать максимум из компьютера и не желающим резать свой пинг из-за телеметрии. Не продается в розницу физическим лицам, предназначана для работы на маломощных системах предприятия и банкомантах.
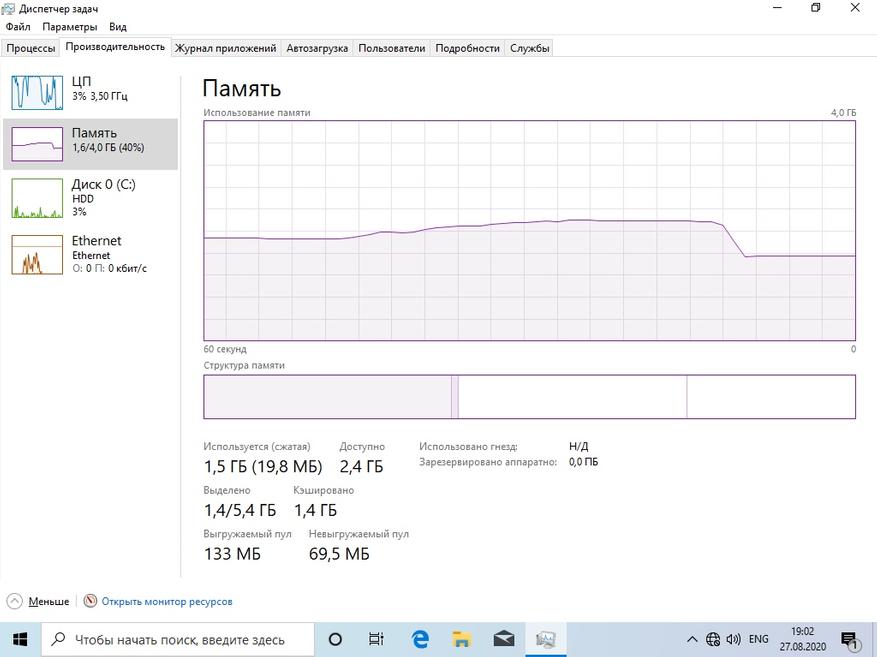
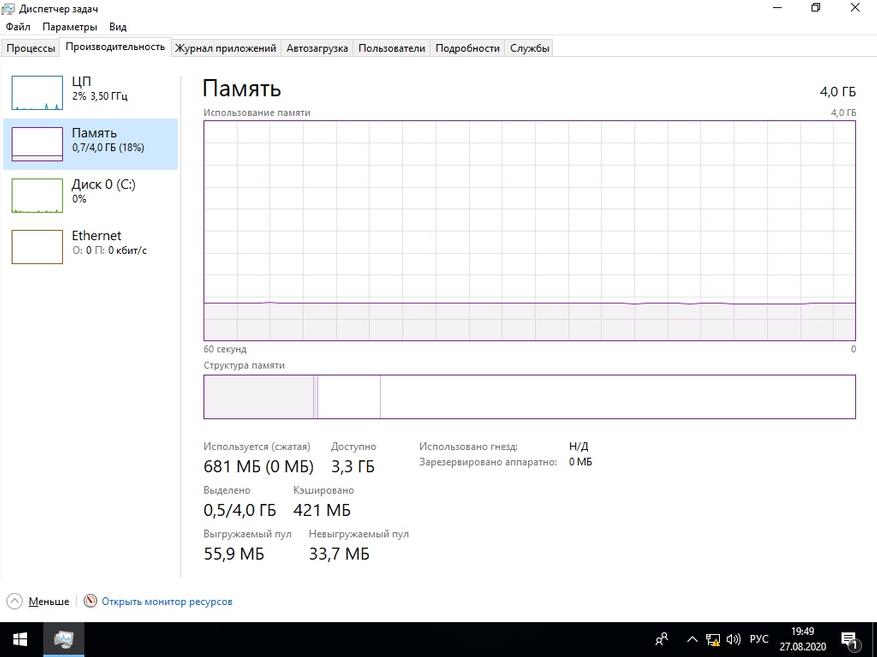
Сравнение потребления оперативной памяти
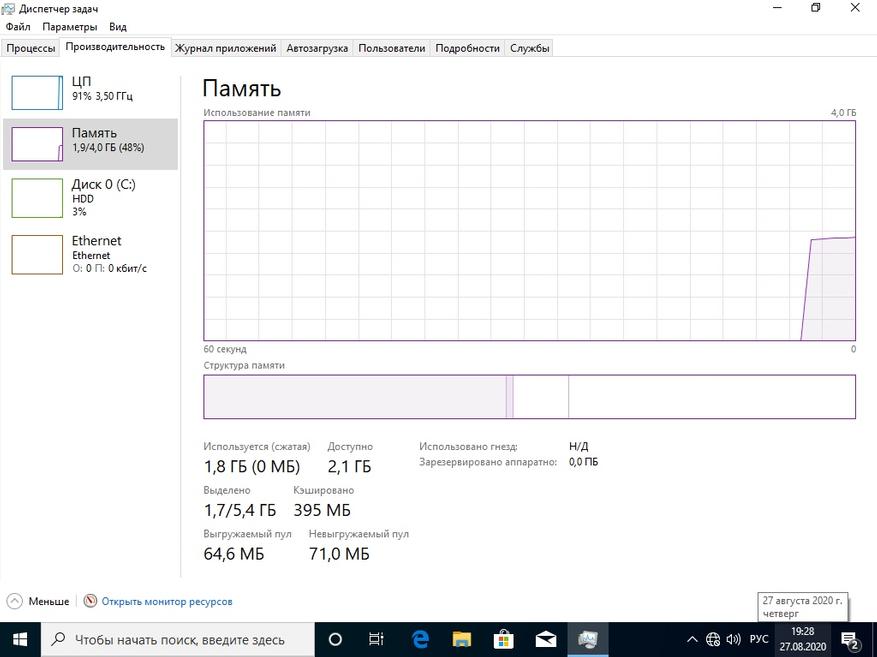
Сравнение нагрузки на центральный процессор
Сравнение занимаемого места папки Windows
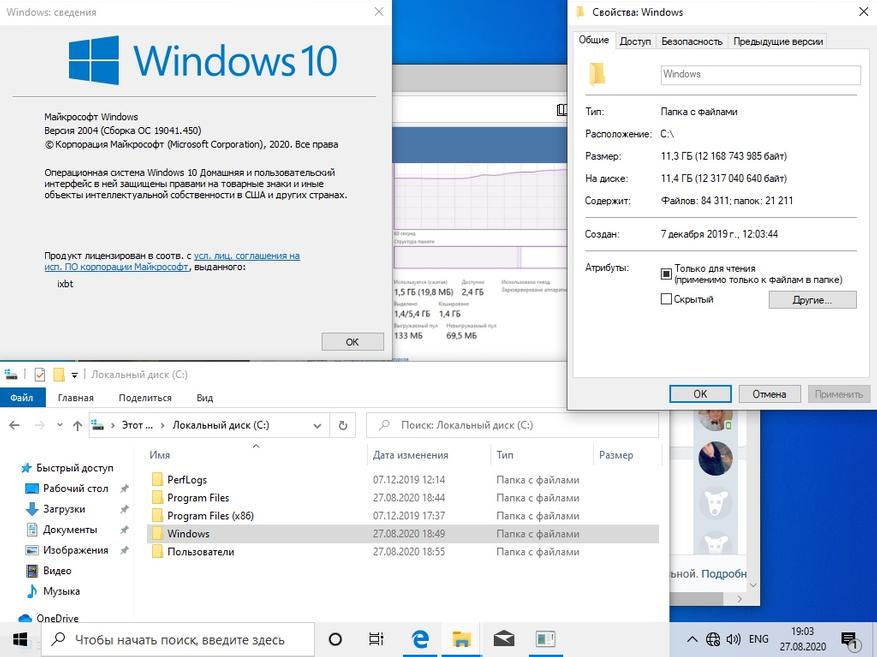
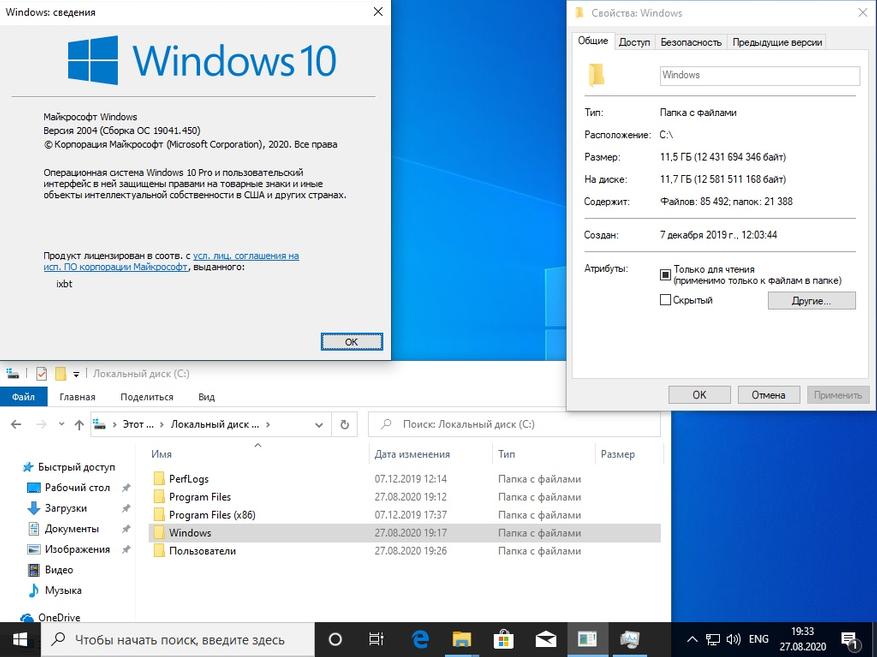
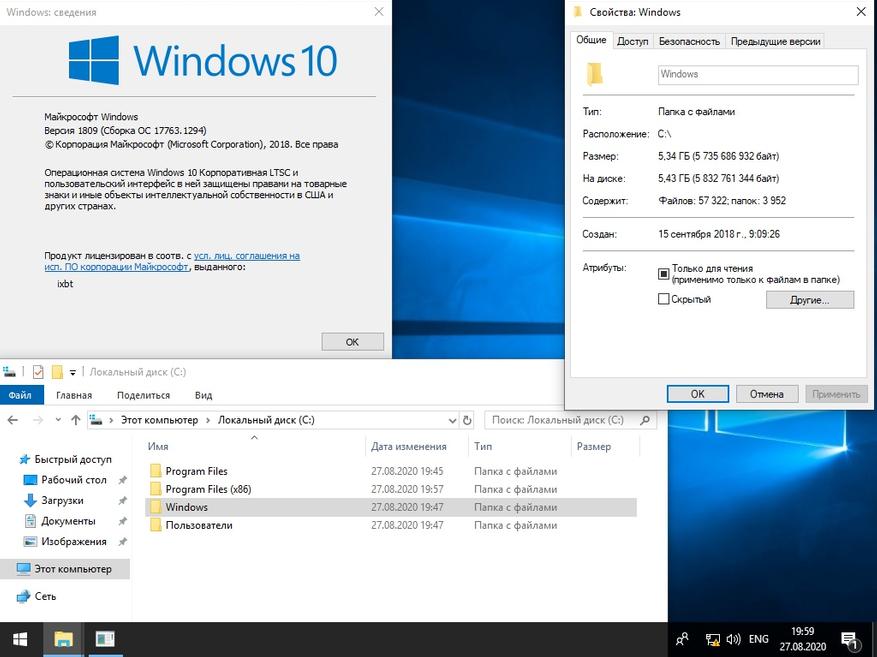
Отчётливо видно, что версия Windows 10 LTSC является самой малопожирающей из тройки и весьма иронично, что, не прибегая к веселому роджеру, обычному пользователю её не достать. Автор также весьма ошарашен принудительной регистрацией на сервесах Microsoft при установке системы с активным интернет-соединением и невозможности создания локального пользователя во всех системах кроме LTSC. Базой для нашей игровой оптимизации послужит LTSC.
Задействуем все ядра центрального процессора
Нажимаем Ctrl+Shift+Esc, в появившемся окне нажимаем Файл>>Запустить новую задачу и вводим Msconfig.
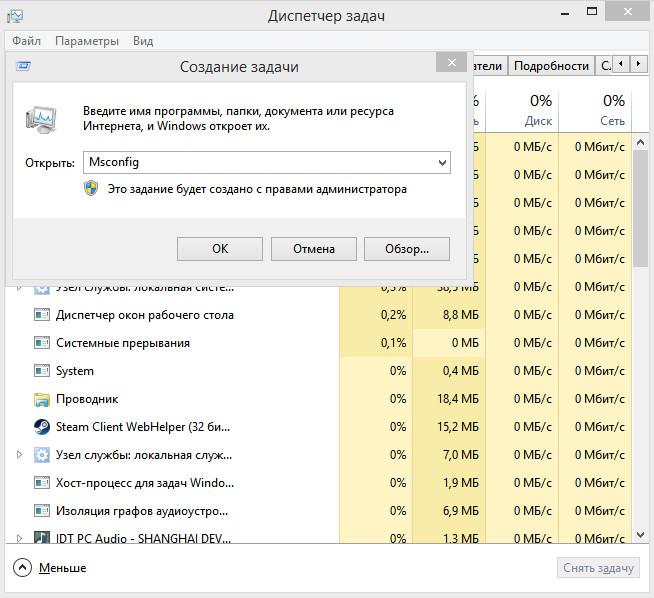
Устанавливаем, как на скриншоте.
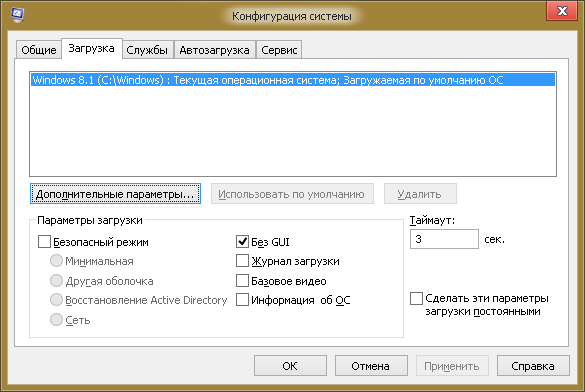
В новом окне идём во вкладку загрузка и жмём по кнопке дополнительные параметры.
Ставим нужное количество работающих ядер (В моём случае их 4).
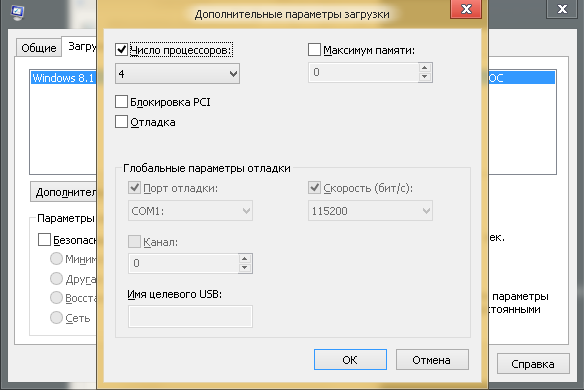
Жмем OK и уходим на перезагрузку.
Мы заставили систему в принудительном порядке использовать все ресурсы центрального процессора, многие «программисты» говорят, что это ненужный костыль, но они ошибаются, ибо это до жути увеличивает скорость загрузки системы.
Установка драйверов оборудования
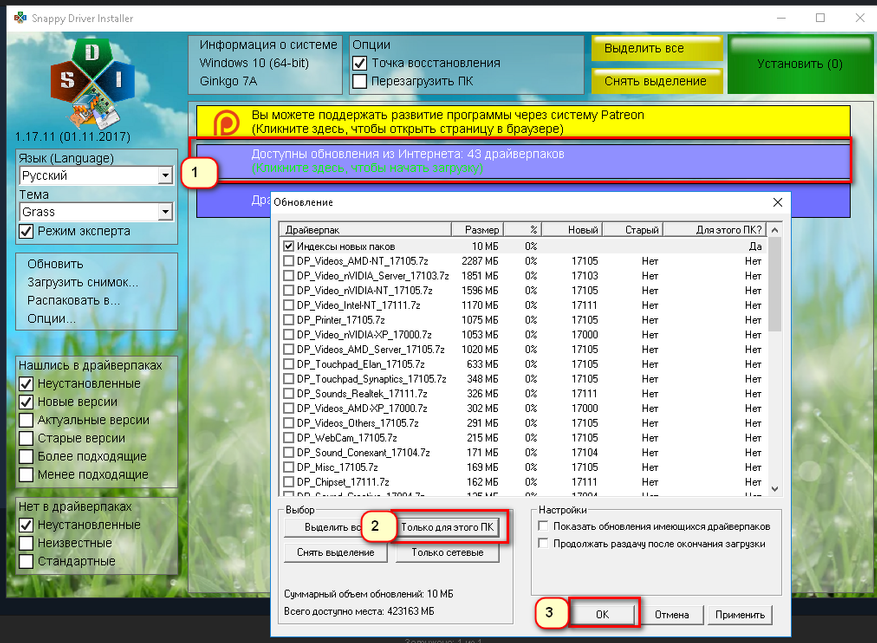
Необходимо удостовериться в свежести программной части вашего компьютера, а именно обновить драйверы. Свежесть драйверов прямо влияет на FPS. Конечно, можно рассчитывать на автоматизированное средство обновления драйверов Microsoft, но оно часто имеет не самые свежие выпуски.
Я использую Snappy driver installer — это бесплатный инструмент от бывшего разработчика Drivers Pack, но в отличие от последнего, Snappy полностью бесплатен и лишён какой-либо рекламы. После скачивания архива, разархивируем его в любую папку и запускаем файл SDI_x64_R2000.exe. Ставим галочки как у меня.
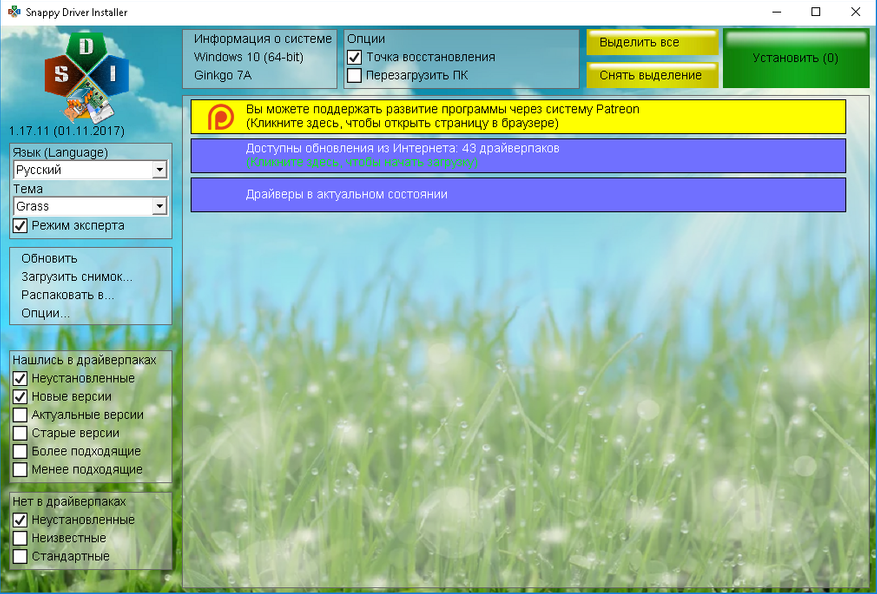
Устанавливаем все драйверы, кроме драйверов видеокарты, это важно.
Правильная установка видеодрайверов Nvidia
Почему вы не должны использовать драйверы с офф сайта Nvidia? Современные пак драйверов Nvidia включает в себя средства телеметрии Nvidia и лишние модули, что влияют на производительность. К счастью, существует способ вырезать всю эту гадость и установить чистый видеодрайвер. Это муторно, но уже есть умельцы, что автоматизировали этот способ. Проста скачиваю Nvidia Driverpack Repack by cuta и устанавливаю чистый драйвер без какой-либо телеметрии и лишних служб.
Электропитание
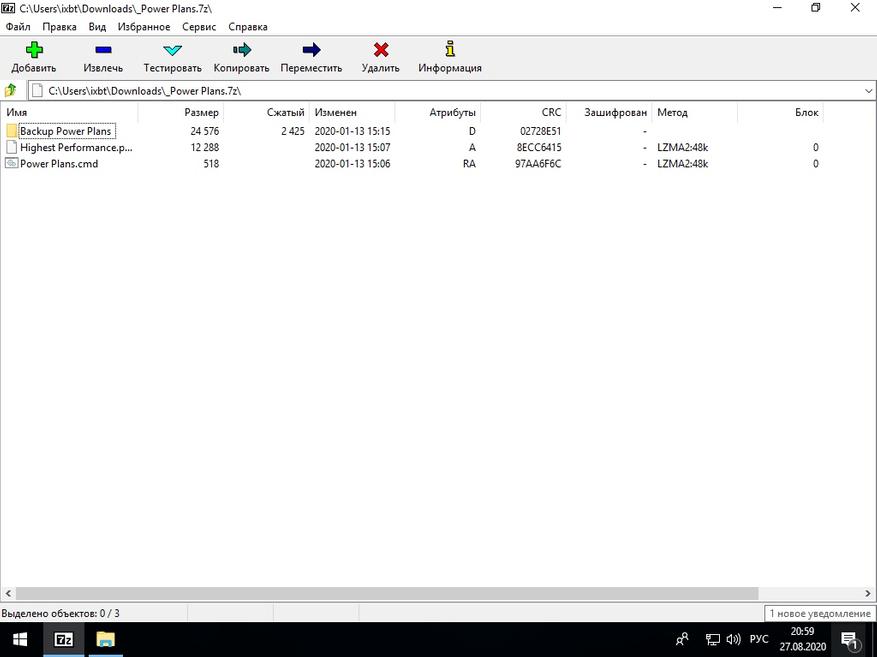
Изначально Windows лишь отчасти игровая платформа и стандартные настройки электропитания выбраны не для выжимки максимума, а на умеренное электропитание. Для исправления ситуации будет использоваться автоматизированный скрипт, что добавит правильно настроенный профиль электропитания.
Извлекаем содержание архива на Диск C.
Запускаем Power Plans.cmd от имени админа.
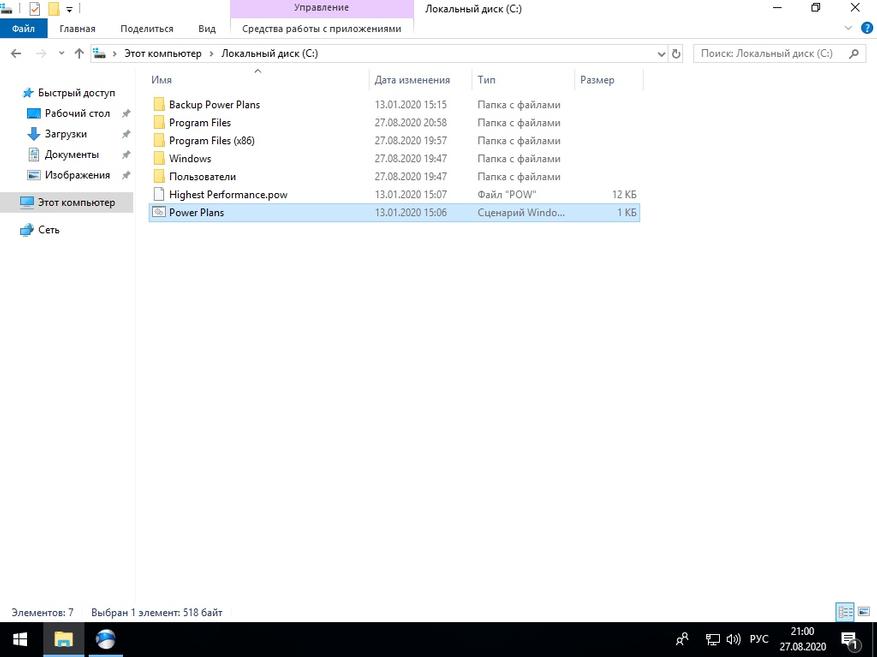
Скачать скрипт.
Мы успешно добавили новую схему электропитания и уменьшили DPC Latency.
Убераем телеметрию Windows
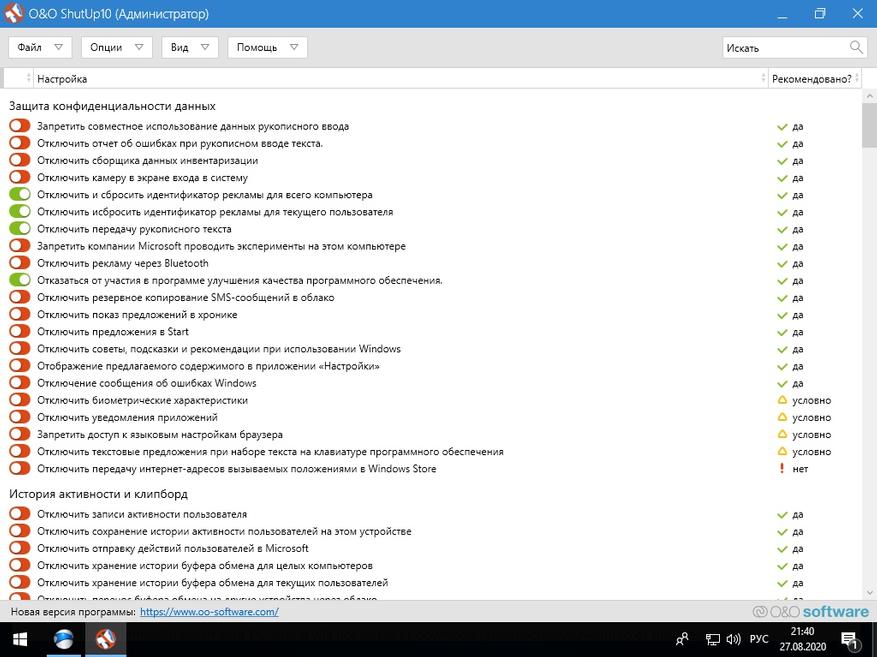
Для блокирования слежки будем использовать Blackbird и Shutup 10 .
Запускаем Blackbird и просто нажимаем ENTER. Дожидаемся конца изменений. Перезагружаемся.
Запускаем Shutup 10 и отключаем всё, кроме доступа к микрофону.
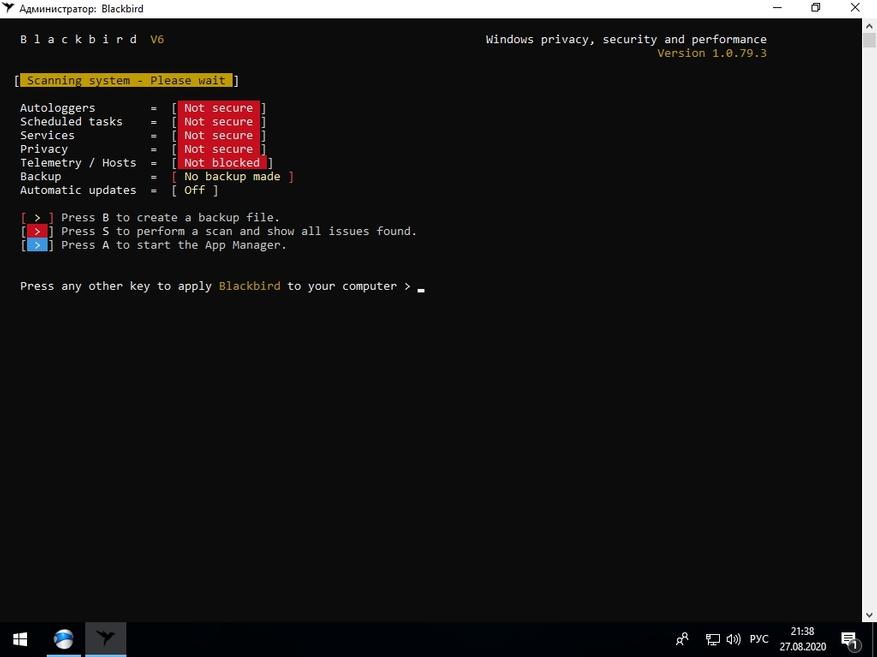
Данные изменения существенно понизят пинг и нагрузку на центральный процессор, но сломают новую панель управления.
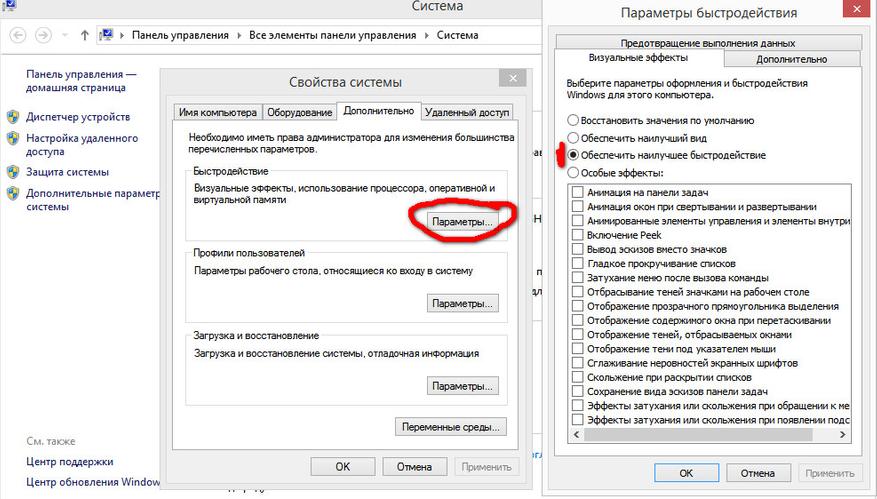
Внешний вид
Ваша система станет уродливой, но быстрее.
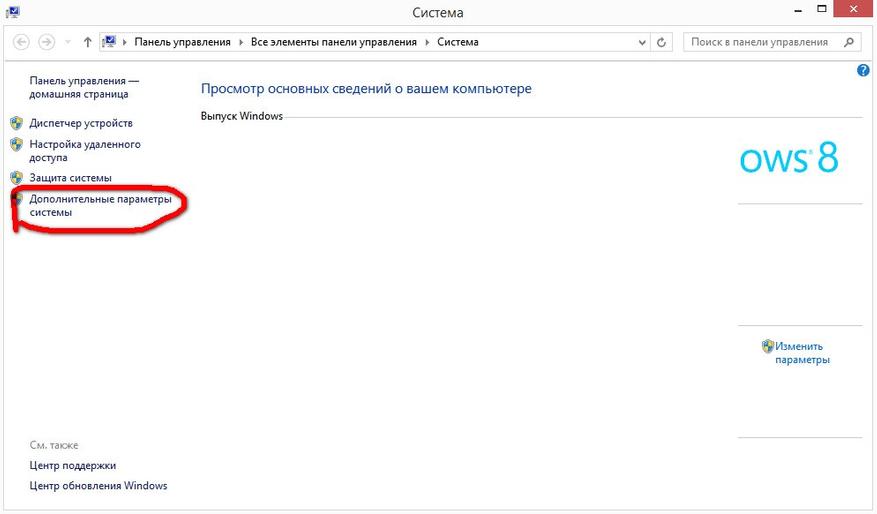
Этот Компьютер>>Свойства>>-Дополнительные параметры системы.
Дополнительно>>Быстродействие>>Параметры>>Визуальные эффекты>>Обеспечить наилучшее быстродействие.
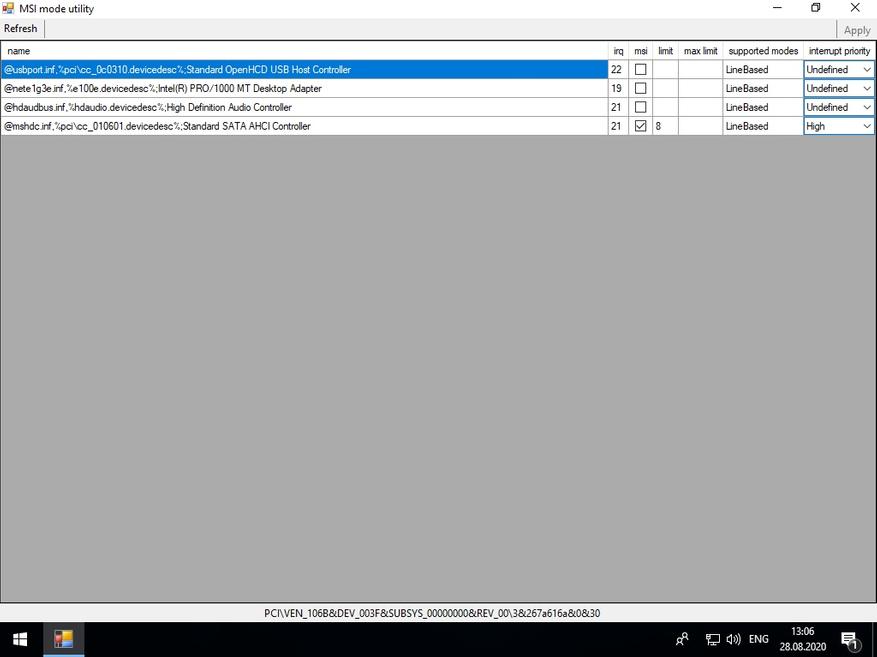
Уменьшаем задержку ввода
Полезный твик для киберкотлет и любителей плавной мышки, ибо обеспечивает возрастание плавности из воздуха, путём включения серверного опроса устройств и перераспределения задач с загруженного первого ядра. По дефолту многие системные процессы обрабатываются первым ядром и это вызывает повышения времени-очереди на выполнение поступающей задачи от процесса. Признаками такой задержки является телепортирование врагов в онлайн-играх и плохая индексация попаданий. MSI util v 2 правит ветки реестра и включает фикс, вам необходимо лишь поставить галочки на желаемых устройствах.
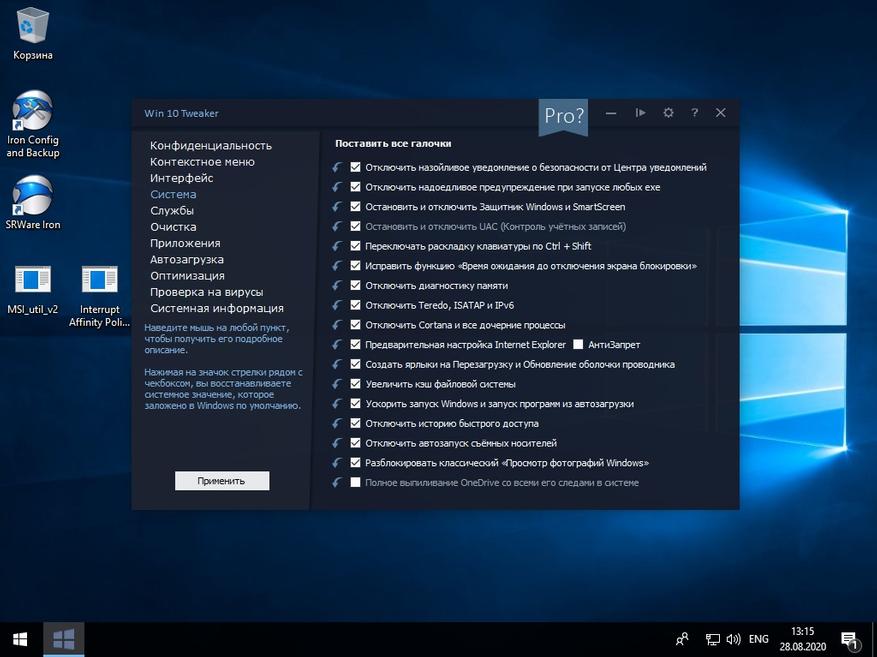
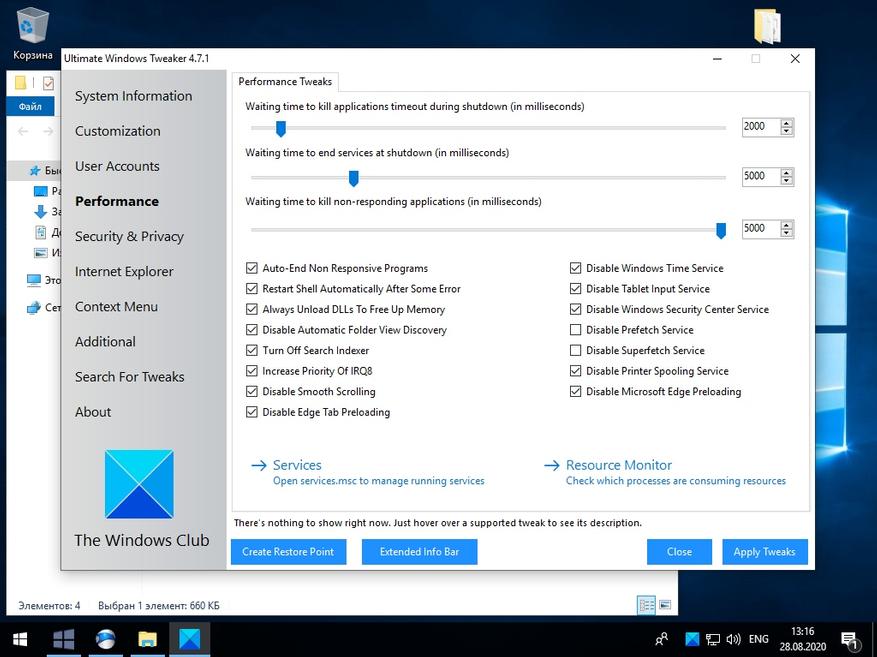
Твикиры
Для настройки и кастомизации системы с отключением гадости, будет использоваться два проверенных твикера, а именно Win 10Tweaker и UWT 4. Программы простые и не требуют пояснений, просто следуйте описанию и ставьте галочки.
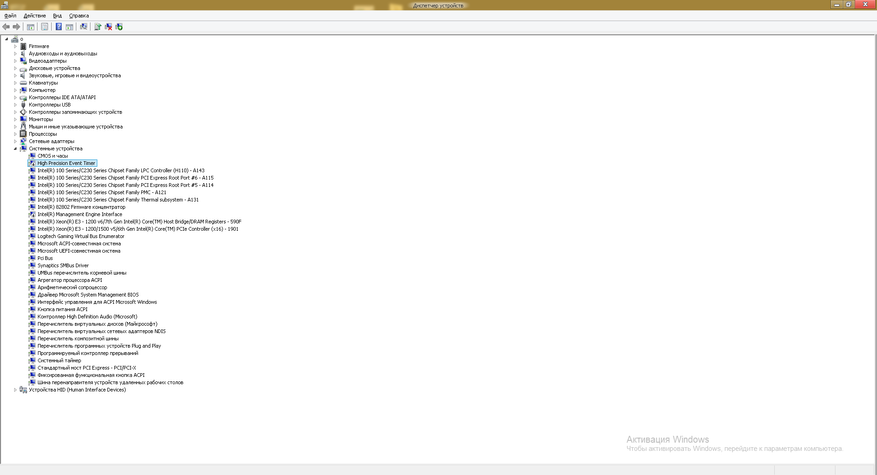
Отключаем HPET и Manager Intel
Данное отключение существенно повысит производительность.
Мой компьютер>>правый клик>>свойства>>диспетчер устройств>>системные устройства.
Правый клик на Hpet (Иногда подписан как высокоточный таймер событий) и Intel manager, всё отключаем и радуемся жизни.
Вводим по очереди в командную строку.
Выключаем HPET
bcdedit /deletevalue useplatformclock
Выключаем таймер
bcdedit /set useplatformtick yes
Выключаем динамические тики
bcdedit /set disabledynamictick yes
Результат работы
Произведем сравнение на примере CS:GO.

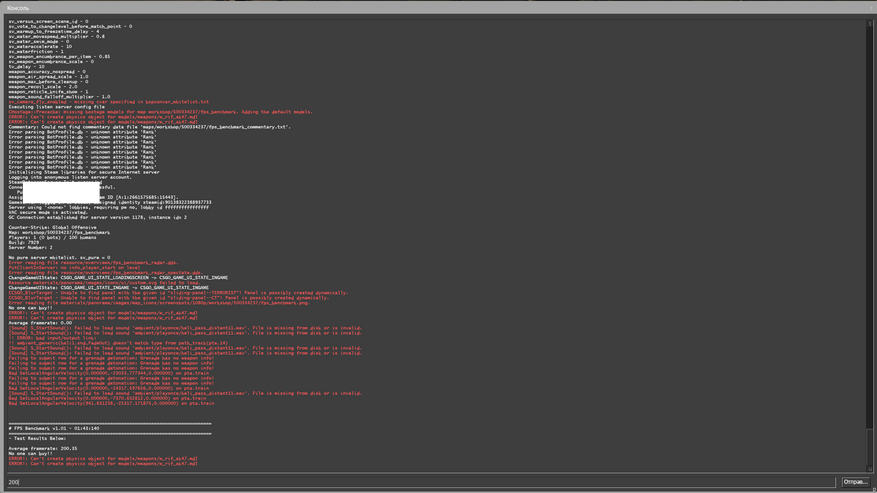
30 FPS из воздуха это отличный буст.
Выводы
Весьма грустно наблюдать засилье мусора и телеметрии в современной Windows 10, а принуждение к сервисам, что мне не нужны, лишь отнимает время. Кастомизация и выпиливание лишнего занимает уйму времени, что в той же Linux делается в две команды в терминале. Совет простой — используйте Linux, чтобы ваш пк был только ваш. С вами был Павел.
Содержание
- 1. Отключите запись экрана в фоновом режиме
- 2. Включите планирование графического процессора с аппаратным ускорением
- 3. Установите режим максимальной производительности
- 4. Активируйте игровой режим
- 5. Отключите акселерацию мыши
- 6. Переключите игровой API
В прошлом гайде мы рассказали, как настроить видеокарту NVIDIA для игр. Теперь рассмотрим, какие настройки нужно сделать в Windows 10 для игровой оптимизации системы. В отличие от многочисленных гайдов в сети, следуя которым вы сломаете систему полностью или убьете часть функционала, мы не будем лезть в дебри. Только те настройки и методы, которые автор статьи лично использует на домашнем ПК.
Технические гайды для геймеров на ПК
Прежде всего убедитесь, что у вас установлены свежие драйверы для материнской платы и других комплектующих. Зайдите на официальный сайт производителя и поищите актуальные драйверы в разделе поддержки. Кроме того, имеет смысл переустановить Windows 10, если она уже захламлена и подлагивает.
Отключите запись экрана в фоновом режиме
Система может записывать геймплей игр в фоновом режиме, что влияет на производительность. Причем вы даже можете не замечать, что запись идет. Ощущаться это будет только в снижении производительности и подтормаживаниях, особенно если компьютер у вас слабый.
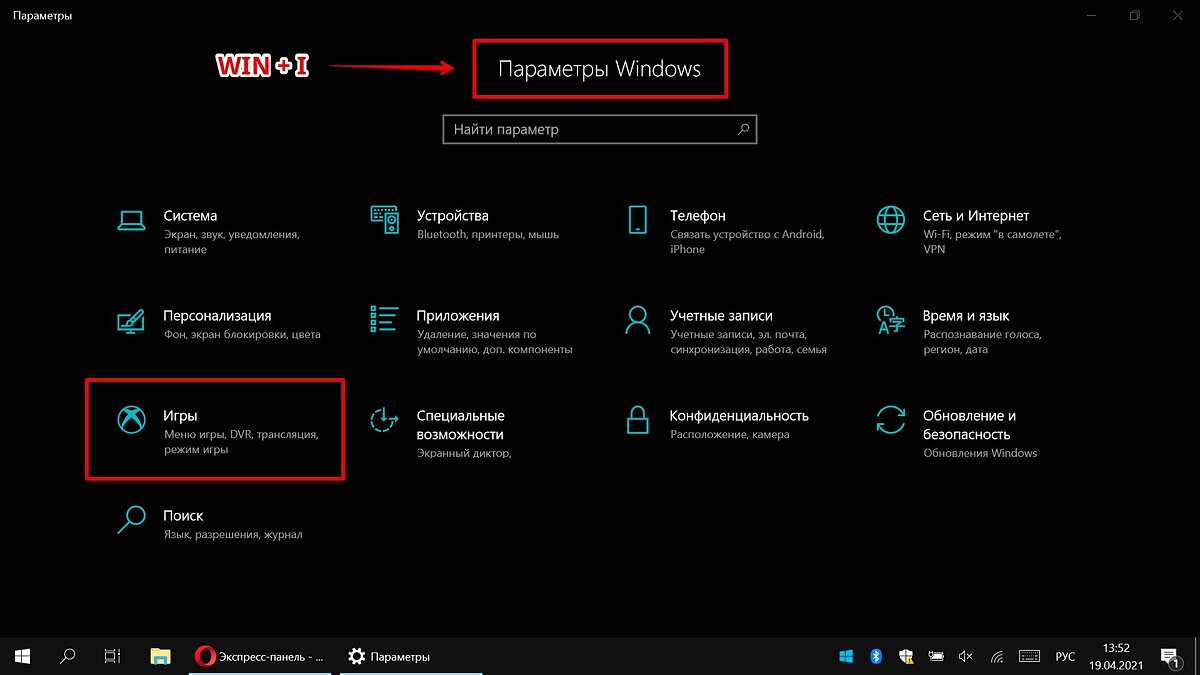
Перейдите в параметры Windows. Сделать это можно по-разному:
- левой кнопкой мыши на «Пуск» и выбрать «Параметры» (значок шестеренки),
- правой кнопкой мыши на «Пуск» и выбрать «Параметры»,
- нажать сочетание клавиш «Win + I» (Win — значок с эмблемой Windows).
Далее перейдите в пункт «Игры». На левой панели выберите пункт «DVR для игр». Отключите ползунок «Вести запись для игр в фоновом режиме».
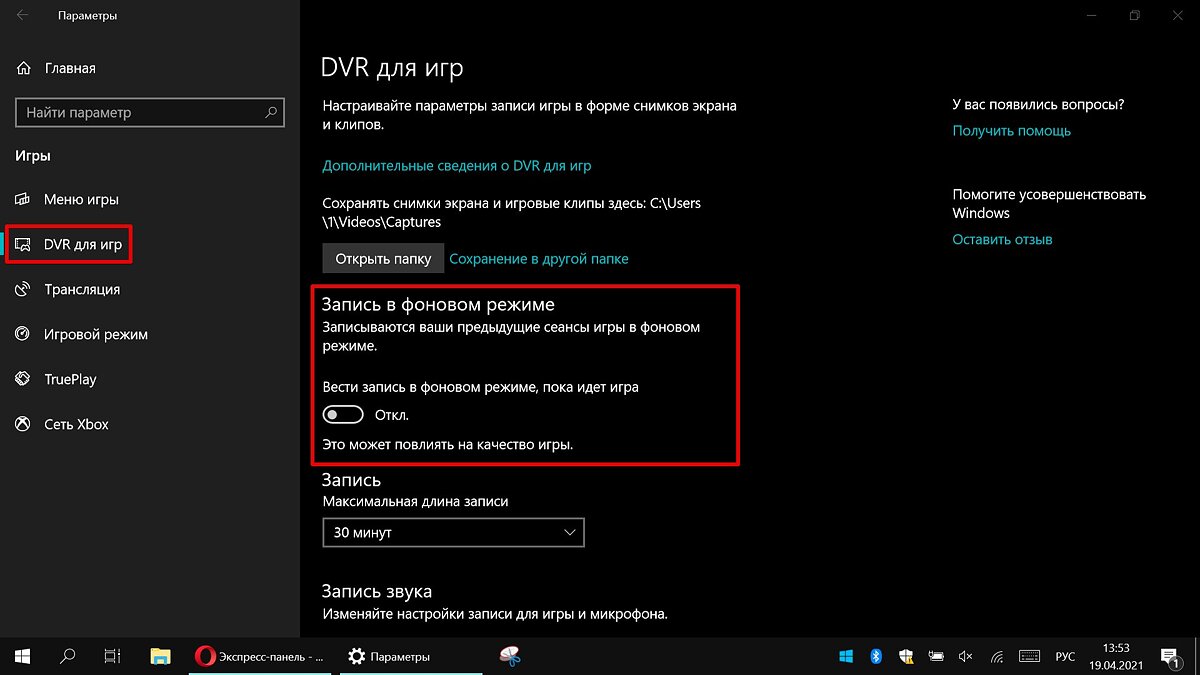
Также по желанию можно и вовсе отключить «Меню игры» и запись видео силами системы. На наш взгляд, удобнее пользоваться оверлеем от производителя видеокарты. Но выбор программы для записи видео и скриншотов целиком на ваше усмотрение.
Включите планирование графического процессора с аппаратным ускорением
Это относительно новая функция, которая появилась с обновлением до версии 2004. Кроме того, работает она только на видеокартах 10-го поколения и выше, начиная с GT 1030. Чудес от нее ожидать не стоит, но минимальный FPS может немного подрасти. Убедитесь, что у вас нужная версия ОС. Проверить это можно в параметрах Windows. Перейдите в пункт «Обновления и безопасность», далее в правой части экрана перейдите по ссылке «Сведения о сборке ОС».
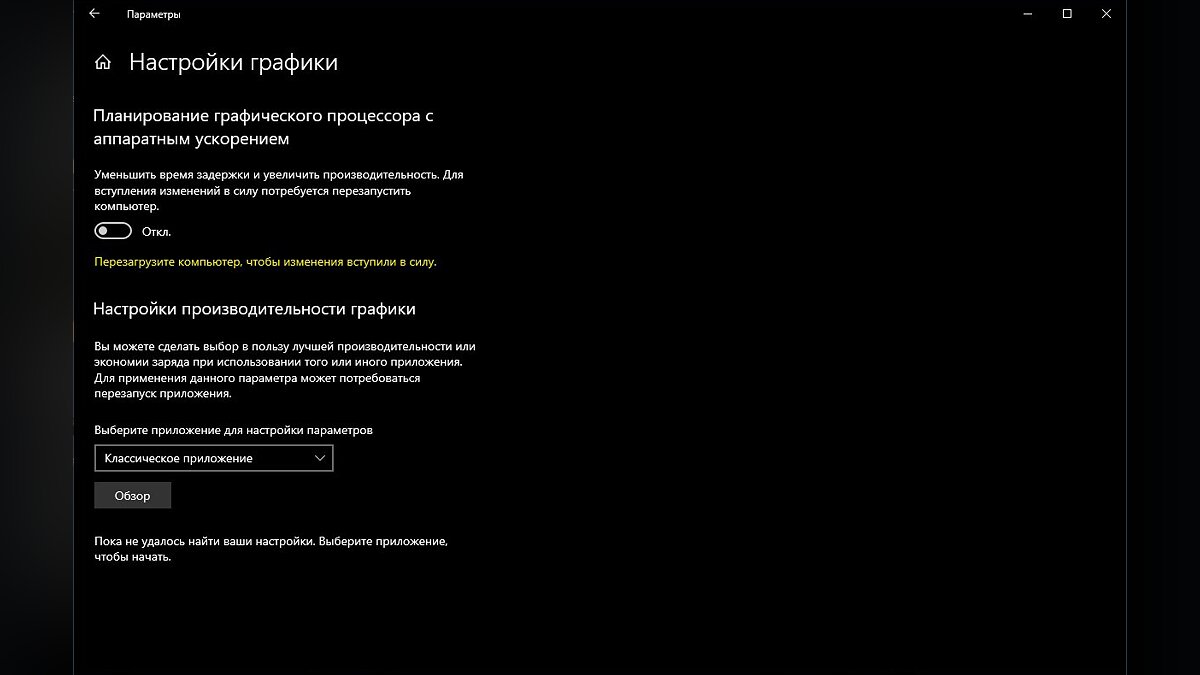
Чтобы включить планирование, перейдите в параметры Windows и далее «Система». Выберите пункт «Дисплей» в левой части экрана и пролистайте в самый низ. Перейдите по ссылке «Настройки графики». Включите переключатель «Уменьшить время задержки и увеличить производительность». Перезагрузите компьютер.

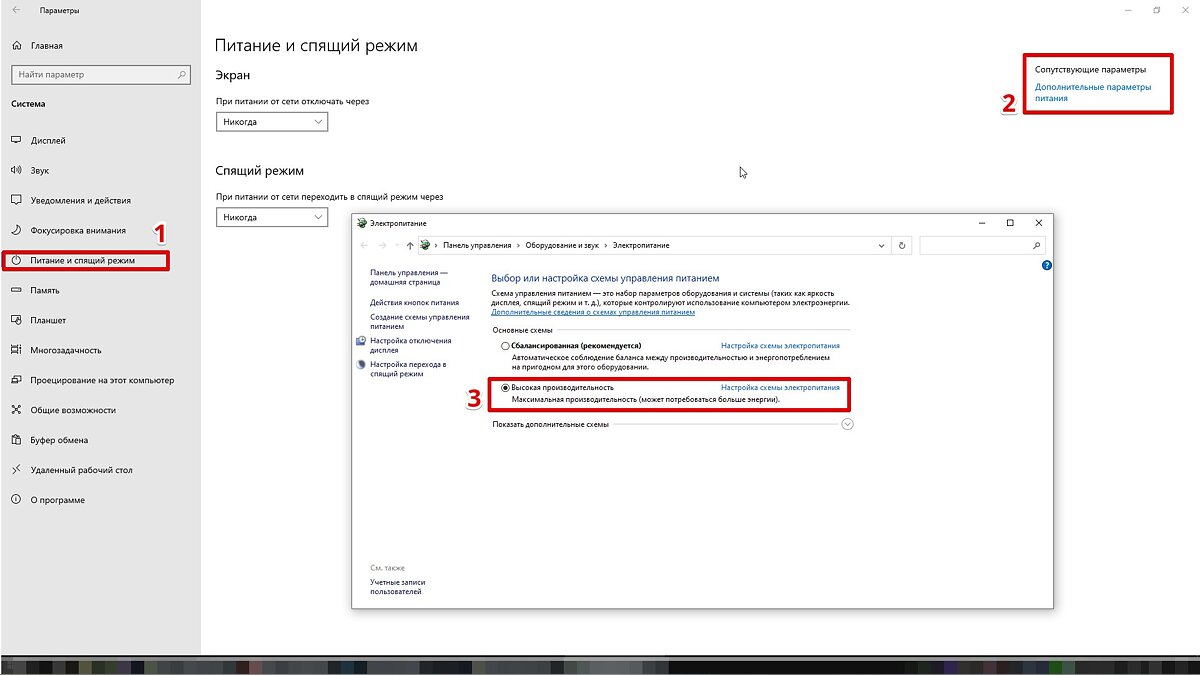
Установите режим максимальной производительности
Перейдите в параметры Windows, далее «Система» и «Питание и спящий режим». В правой части экрана перейдите по ссылке «Дополнительные параметры питания». Включите режим «Высокая производительность». Теперь можно быть уверенным, что никакие настройки энергосбережения не будет сдерживать производительность.
Если хотите пойти еще дальше, то открывайте PowerShell от имени администратора (просто пишите название в поиске системы). Введите следующий код.
powercfg -duplicatescheme e9a42b02-d5df-448d-aa00-03f14749eb61
После этого появится дополнительный режим «Максимальная производительность». Чтобы восстановить исходные режимы, наберите в PowerShell следующее.
powercfg -restoredefaultschemes
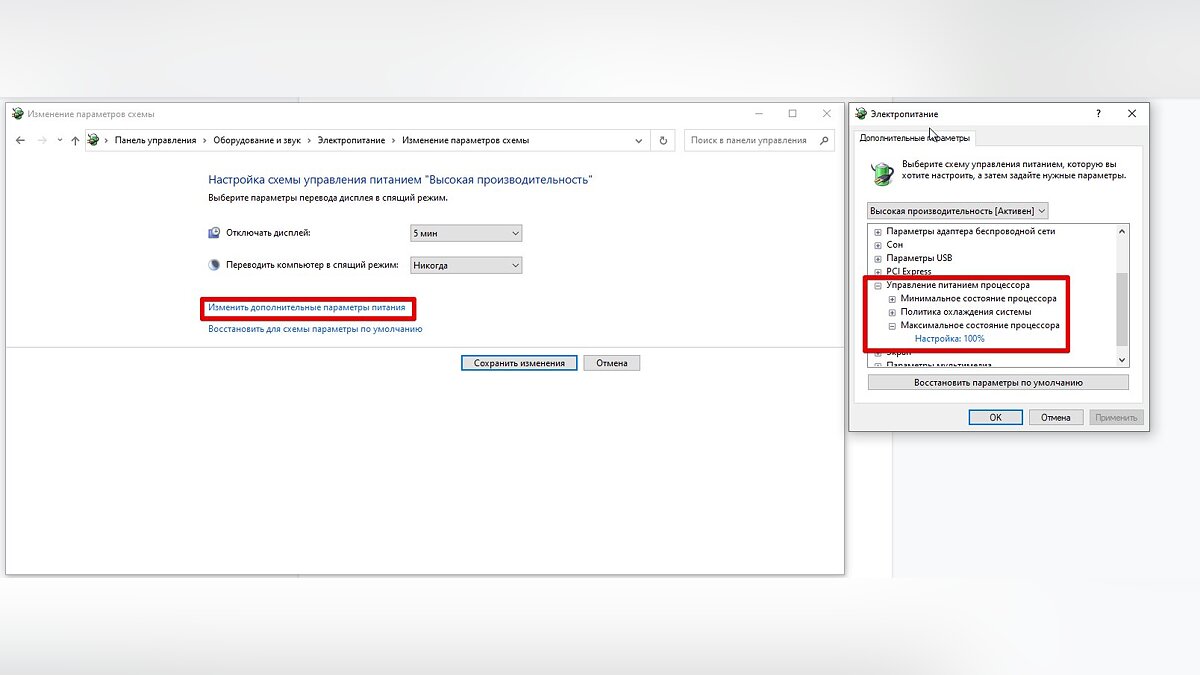
Не мешает проверить и ограничение по использованию процессора. Не выходя из настроек электропитания, кликните по ссылке «Настройка схемы электропитания» и далее «Изменить дополнительные параметры питания». Далее «Управление питанием процессора» и «Максимальное состояние процессора». Убедитесь, что стоит 100%.
Однако этот пункт можно и снизить, если у вас, например, не самый дорогой ноутбук и он перегревается. Таким образом, система не даст процессору работать на полную мощность.
Активируйте игровой режим
В Windows есть специальный игровой режим, который оптимизирует распределение ресурсов для игровых приложений. Таким образом, фоновые задачи не смогут помешать игре. Кроме того, вас не будут беспокоить всплывающие уведомления во время игры.
Чтобы его активировать перейдите в параметры Windows, затем «Игры». Слева будет пункт, который так и называется «Игровой режим». Активируйте ползунок. На более старых версиях Windows режим игры нужно дополнительно запускать из игрового оверлея (Win + G).
Если у вас слабый компьютер, да еще и нагруженный многочисленными фоновыми процессами, то режим может помочь. Но для слабых систем лучше предварительно закрывать все мешающие процессы: не оставлять открытым браузер, выгружать из автозагрузки ненужные процессы. Но в случае снижения производительности или других проблем, режим лучше выключить.
Отключите акселерацию мыши
Функция «Повышенная точность установки указателя» известна также как «Акселерация». Вопреки названию, в играх она скорее мешает, так как мышь становится непредсказуемая. Но при повседневной работе это может быть, наоборот, полезно. Действует она так: чем резче вы поведете мышкой, тем дальше передвигается курсор. То есть достаточно просто резко двинуть мышью, чтобы курсор оказался на другой стороне экрана. Когда у вас маленький коврик, это полезно.
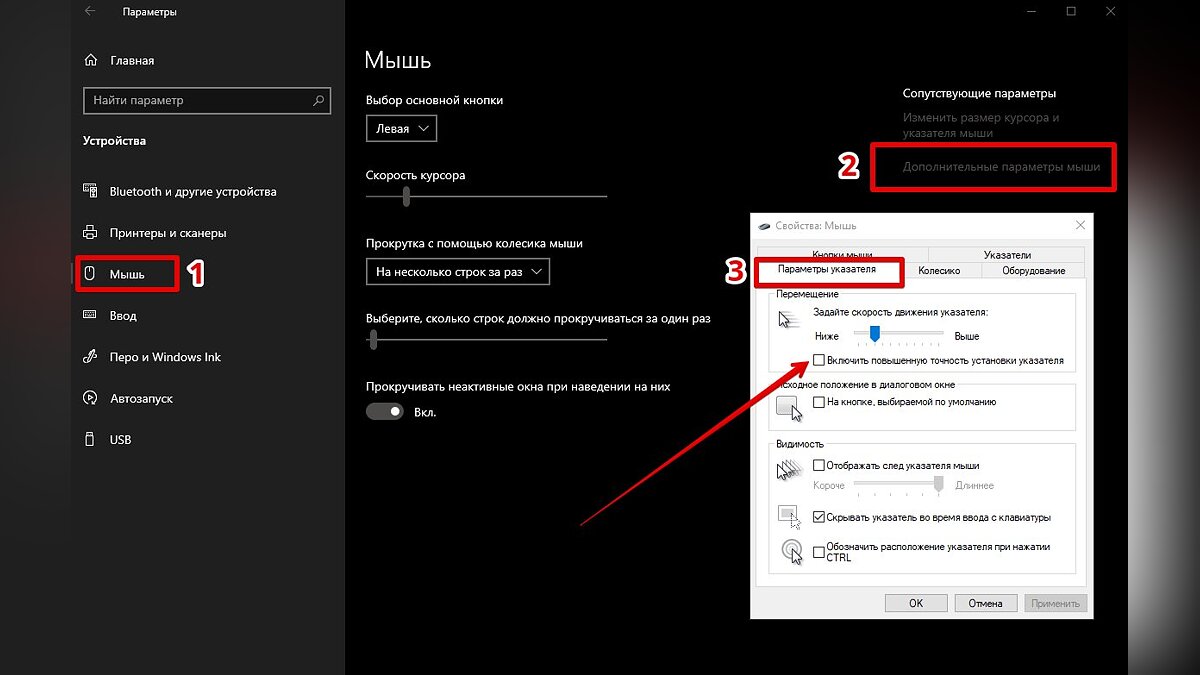
Перейдите в параметры Windows, далее «Устройства». В левой части экрана выберите пункт «Мышь» и далее перейдите по ссылке «Дополнительные параметры мыши». На вкладке «Параметры указателя» снимите галочку с «Включить повышенную точность установки указателя», если она установлена.
Переключите игровой API
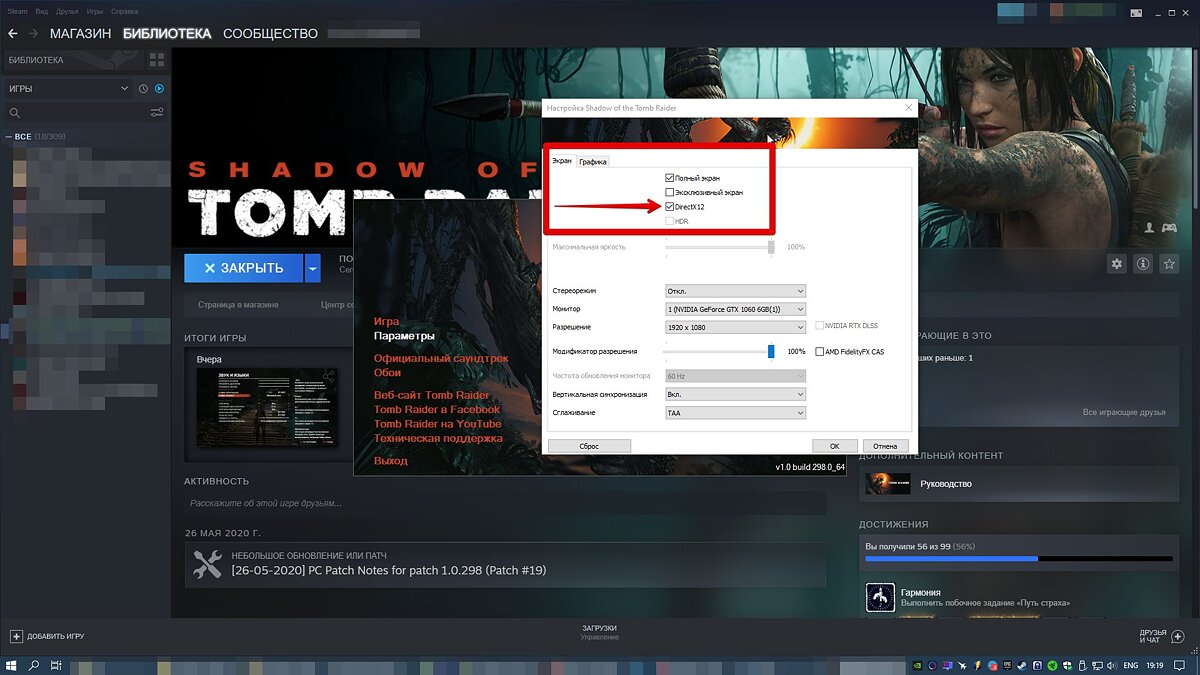
Это не совсем настройка самой Windows, но она с ней тесно связана. Речь идет о DirectX 11 и 12, также Vulkan. Сменить версию API можно в некоторых играх, которые это поддерживают. Например, Shadow of the Tomb Raider или Red Dead Redemption 2. На разных API производительность может отличаться. Например, игры на Vulkan, как правило, работают быстрее.
- Windows 10 позволяет повысить производительность в играх на слабых ПК. Вот как это сделать
- Как настроить мониторинг MSI Afterburner в играх: узнаем температуру и загрузку процессора и видеокарты
- Загрузка видеокарты в играх: как проверить, почему нагружена не на 100%, что такое раскрытие
If you’re a gamer, you know how important it is to have your system running at full capacity. Even a millisecond lag could mean ‘Game Over’. This article will tell you how to optimize Windows 10 for gaming.
A key factor that can slow down your gaming experience is using a sub-par recorder while playing. That’s why our special pick to optimize your PC for gaming on Windows 10 is Gecata by Movavi. This program can record gameplay in 4K and at up to 120 FPS with no performance loss. It’s easy to use and comes with a free trial version.
What is low FPS and how do I check it?
If your game starts to slow down and the picture gets choppy – especially when the picture moves – you’re experiencing a low frame-per-second (FPS) rate. This occurs when your computer hardware is struggling or working overtime to keep your game running. If it works too much, the game’s speed slows.
The graphics card works to render still images, or frames, while you’re playing a game. The card does it so fast that it’s measured by the second, and it works in conjunction with other hardware parts like the RAM, CPU, and GPU to create the full gaming experience. If there’s any sort of stoppage within any of these components, your FPS will start to go down. Most gamers prefer a 60 FPS rate while playing, but most games are actually fine at 30 FPS.
PC tops consoles in this aspect because you can always speed up the FPS on a PC with modifications, whereas modifying a console isn’t possible. PC gamers can also do things like upping your monitor’s refresh rate, change other system settings for gaming, and much more.
This article will let you in on the performance tweaks for gaming you can do on Windows 10 to boost your gaming experience.
Before we start, it’s always a good idea to have an in-game FPS counter, so you can monitor your progress and test out what tweaks are working. Many games have them pre-installed, but if you install MSI Afterburner, you’ll never be without this useful tool in any game.
How to make Windows 10 faster for gaming (quick fixes)
Want to know how to make Windows 10 faster for gaming with a quick fix? Follow these tips and get back to playing!
Adjust a game’s graphics settings
Every game has specific graphics settings that can help with optimizing your gaming experience. Here are three you should check in the game’s settings menu before playing.
-
Anti-aliasing: When a game uses aliasing, it fixes the small irregular and uneven lines around specific textures or objects. Think about the blurry lines you see when grass appears in most games. Every game has different levels of anti-aliasing – SSAA, TAA, MSAA, etc. – and you can usually tweak them in the game settings to allow for better performance.
-
Motion blur: To make things more realistic, games have movement blurs built in to emulate real life. Turning it off can often help you to save graphics power.
-
Vertical sync: Sometimes when you move quickly, the graphics card can’t keep up, and the screen seems to tear down the middle. Vertical Sync helps to solve this issue but adds some lag. One way to correct this is to use Adaptive VSync or Triple Buffering. You’ll use up more graphics card power, but you’ll find a healthy medium between the tears and the lag.
Keep your GPU drivers updated
The GPU (Graphics Processing Unit) is crucial to your gaming experience and to your PC performance in games, but you need to keep your GPU drivers up to date to feel the benefit. What’s more, an outdated driver may result in bugs, glitches and system crashes, so we recommend you take this issue seriously and take care of your drivers.
Although Windows 10 doesn’t update your GPU drivers automatically, manufacturers often create special software in the form of GPU control panels that make regular checks for updates and notify you if a new update is available. Don’t ignore these notifications, as the updating process takes little time and can save you plenty of trouble during gaming.
For example, depending on your GPU’s manufacturer, you can download either Radeon Software Adrenaline or GeForce Experience. Both programs check for auto-updates and suggest powerful optimization options. Additionally, GeForce Experience includes game capture and streaming software and provides special Game Ready drivers, designed by NVIDIA in collaboration with top game developing companies.
You can update your driver directly from the Windows properties, but the safest way to get the latest driver is to go directly to the manufacturer’s website, choose your GPU model, and check for updates.
If you don’t know your GPU specs, right-click on the Desktop, choose Display settings, then Advanced display settings and click Display adapter properties.
Here are some links to the most popular manufacturers’ driver updates:
-
AMD drivers
-
NVIDIA drivers
-
Intel Graphics drivers
Install DirectX 12
DirectX 12 is a real must-have for anyone serious about playing games on Windows 10. Put simply, DirectX is the application the game uses to communicate with your computer and tell it what to do. DirectX 12 is a great improvement over its predecessor, DirectX 11, introducing the ability of graphics cards to draw resources from more than one core of a PC’s CPU, increasing frame rates, enhancing graphical effects, and lowering power consumption. Tests have shown an 85-300% difference in gaming performance between version 11 and version 12.
To benefit from DirectX 12 features, the game needs to have been developed using this version. The good news is that the list of such games gets longer every day as more and more game companies adopt this version.
To verify that you have the latest version of DirectX, hit Windows key + R, type “dxdiag” and click OK. The DirectX Diagnostic Tool will open.
If you don’t have DirectX 12, go ahead and install it; the process will take just a few minutes. Hit Windows key + I, choose Update & Security and click Check for updates in the Windows Update tab. Wait for the installation to finish.
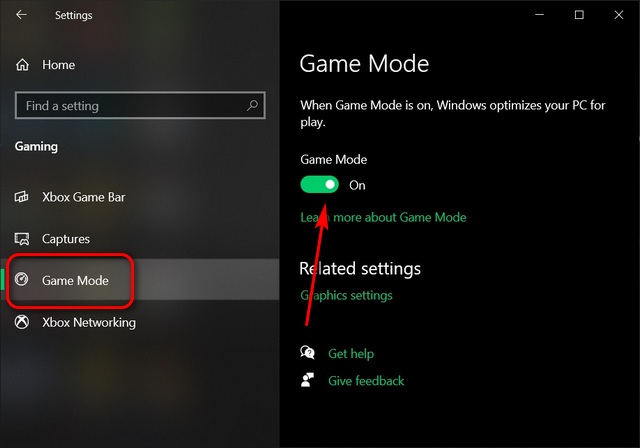
Use Windows 10 Game Mode
Here’s a quick and easy way to optimize Windows 10 for gaming using a tool that’s built into the system. Game Mode appeared in the most recent releases of the OS and is designed to improve the gaming experience by dedicating more system resources to games. It also prevents other programs, such as Windows Update, from hogging system resources while you’re playing.
To locate the Game Mode settings, press Windows key + I, type “game mode” in the search box and click Control Game Mode for optimizing your PC for games.
In the menu that opens, click Game Mode. Switch to On to turn Game Mode on. If your PC supports Game Mode, the system will optimize your PC gaming performance.
If you can’t find these settings, it means the latest Windows Creators Update is not installed on your PC.
Manage your active hours
Yes, Windows 10 can install updates and reboot your computer in the middle of your gaming session without so much as an “excuse me”. Ouch. That can be disappointing, to say the least, especially if you’re a competitive gamer and your unplanned exit may affect your teammates or ranking.
But even without such “in-your-face” restarts, which are actually quite rare, the downloading of updates on the background limits your connection speeds and takes up working memory on your PC.
While your first reaction might be to completely turn off automatic updates, we would advise against it. Windows’ aggressive updating without asking permission is the way it is because in earlier versions users wouldn’t update of their own volition and so their systems were regularly exposed to cyber threats. Remember that Windows auto-updates are there not only to ruin your raid, but also to protect your system, keep it up-to-date and working optimally.
So, another “softer” and far more intelligent solution is to set your active hours appropriately. You can specify your gaming and working schedule in Windows and prevent the OS from downloading updates during those times. Windows will then use your non-active hours to update and restart your system.
To set your active hours, hit Windows key + I, then go to Update & Security and click Change active hours. There you can set up to 18 active hours, leaving a gap of 6 (you have to sleep sometimes, don’t you?) for Windows to install your updates.
If you’re a night gamer or your sleeping hours vary dramatically so that you can’t set a specific non-active time, we would advise you (aside from changing your sleeping habits) to make sure Windows reminds you every time it will want to restart so that, if it happens during your gaming, you can always delay it.
To do this, go back to Windows Update, click Advanced options and make sure the switch under We’ll show a reminder when we’re going to restart is turned on.
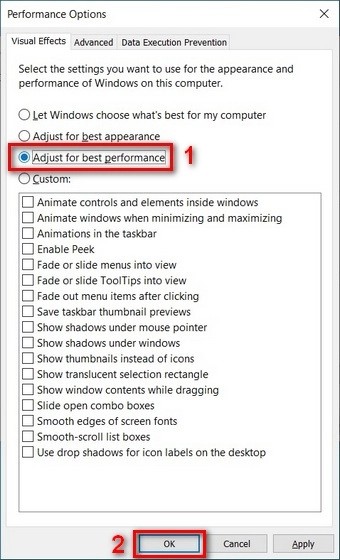
Tweak your visual effects settings
There are plenty of fancy visual effects in Windows 10 graphical user interfaces (GUIs). Nevertheless, those pretty background graphics, most of which are turned on by default, can affect the available processing power of your PC when a game is running in the foreground. So, one way to optimize Windows 10 for gaming performance is to sacrifice some, or even all, of those settings.
Once again, hit Windows key + I. Then, type “performance” and select Adjust the appearance and performance of Windows. In the window that opens, choose Adjust for best performance. Then, go to the Advanced tab and verify that the setting is applied to Programs.
If you want to keep at least the minimum of graphics so that your interface doesn’t look so bleak, we recommend you keep at least these three options from the list checked:
-
Show thumbnails instead of icons.
-
Show window contents while dragging.
-
Smooth edges of screen fonts.
Manage Steam auto-updates
The problem here is the same as with Windows Updates. Steam auto-updates all your games, even those you haven’t played for ages. Updating in the background eats up your PC’s memory and can slow down gaming processes.
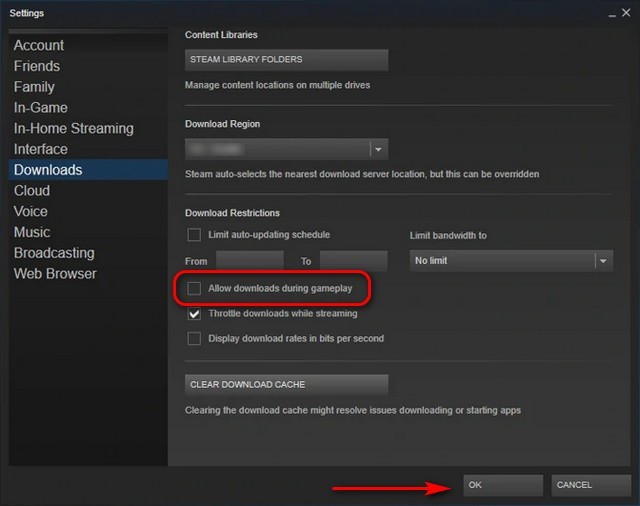
To prevent Steam from updating games while you’re playing, go to your Steam client and find update options in Steam – Settings – Downloads. Uncheck Allow downloads during gameplay.
Also, games on Steam are being updated all the time, and it often happens that new bugs appear in new updates, or some things just stop working, so you may want to wait to hear what others are experiencing before updating a game yourself.
To roll a game version back to the one you need, open Steam, right-click on the game, choose Properties, and go to the Betas tab. Choose the desired version from the drop-down menu.
Turn off notifications
Notifications in the middle of a game take up needed CPU power, and it can impair your field of vision while playing. Follow these steps to disable all notifications before playing:
-
Hit the Windows key or click the Windows icon on the bottom-left of your screen.
-
Type “Notifications” into the search bar and select Notifications and actions settings from the results.
-
When the new window opens, switch the toggle switch next to Get notifications from apps and other senders to Off. Your notifications are now off.
-
You can also scroll down and turn off notifications per application.
Adjust the NVIDIA Control Panel
If you’re running an NVIDIA graphics card, there are settings specific to the card within the control panel. Here are some of the best Windows 10 settings for NVIDIA cards for gaming.
-
Ambient Occlusion: Turn it on a boost the level to 16x.
-
Anisotropic Filtering: Switch to Off.
-
DSR — Factors & Smoothing: Switch to Off.
-
Low Latency Mode: Turn on.
-
Power Management Mode: Change to Prefer Maximum Performance.
-
Threaded Optimization: Change to Auto.
Adjust the AMD/ATI Control Center
AMD graphics cards also have a lot of settings. Some say they even rival competitor NVIDIA. Change these settings for Windows 10 gaming optimization.
-
Enable AMD’s Image Sharpening by clicking on Settings and then Graphics to find the setting. You can turn it on for individual games or globally.
-
Up your graphics performance by using overclocking. To do this, click the Performance tab, then Tuning, select Automatic, and finally GPU Overclocked.
-
If you’re running an AMD card, you don’t need MSI Afterburner for performance monitoring. Just hit Ctrl + Shift + O, and your stats will appear in-game.
Lower the resolution in a game
This is easily in the category of “Quick Fix”. Sometimes your system just can’t handle a game, and there’s no time for more long-term solutions. Go into the game’s system settings and lower the resolution by one-tier. Then monitor your FPS until things smooth out.
Disable mouse acceleration
This one has nothing to do with improving your PC’s performance in gaming, but is rather a tip for you to enhance your personal gaming performance. Mouse acceleration is a setting that makes your mouse move based not only on detection of physical movements but also on speed. This option actually makes your mouse movements less accurate, as it adds an extra parameter to the movement that you convey to the mouse. Given how crucial precision is for accurate aiming in first-person shooters, if you’re a fan of Call of Duty, Counter-Strike, or Overwatch type of games, you should definitely turn this off.
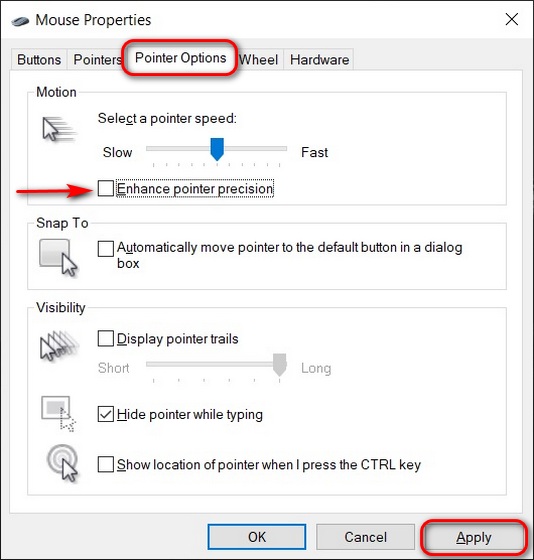
To do this, hit Windows key + I. Type “mouse pointer” in the search box. Choose Change the mouse pointer display or speed. In the window that opens, go to the Pointer Options tab and uncheck Enhance pointer precision.
Also, you may want to tweak the pointer speed slider to create a configuration that suits you best.
How to improve gaming performance on Windows 10 (advanced fixes)
Still unsure of how to make Windows 10 faster for gaming? Use these advanced fixes for a long-term solution.
Go for an SSD
Upgrading from an HDD to an SSD won’t drastically improve your game performance, but it can help you reduce loading times significantly. It is true that SDDs can be quite expensive and it may seem that loading times is not such an important issue to invest your money in. But while it is probably not the first thing to think about when speeding up your laptop, it is not the last either. Today’s games take more and more disk space, so if you want to play the latest ones, changing from an HDD to an SSD can be a real time-saver and your game loading times can go down from 30-40 seconds to 2-3, which is pretty significant.
As for the money side of things, if a big SSD for both your OS and games is too expensive for you, just get one small SSD for your OS, and keep a big HDD for games.
Upgrade your GPU/CPU
Upgrade your GPU and CPU about every four years to keep things running smoothly. But if you’re a gamer, you may need to do it sooner as the technology moves much faster in this sector.
Deciding on which to upgrade first depends on the types of games you play. If you don’t need extreme graphics and play more fast-paced games, the CPU is the better choice. But if you like digital stories or world-based games with lots of non-playable characters and backgrounds, a GPU might serve you better.
Regardless, make sure you have a delicate performance balance between the two, as one doesn’t work without the other. Check the memory and bandwidth of any potential upgrade.
Upgrade your RAM
Upgrading your RAM won’t have as big of an effect as upgrading the processor or GPU. But it can give your hardware the added boost it needs to up your frame rate and improve your overall gaming experience.
Many games have the baseline RAM requirement of 8 GB, but that’s steadily increasing as newer titles have recommendations and requirements at 12 GB.
If you want to stay ahead of the curve, 16 GB will suffice for now. But if you want to run streaming services in the background like Twitch, Discord, and YouTube, you’ll need to update to 32 GB to handle running everything smoothly.
Disable Nagle’s algorithm
Basically, Nagle’s algorithm improves the efficiency of TCP/IP networks by creating bundles of data packets, thus reducing the number of packets that need to be sent over the network. That process affects your internet connection, making it less stable. Having this algorithm disabled on your PC may contribute to latency issues when playing games online.
Open your Windows Registry Editor by clicking Windows key + Q, typing “regedit” and clicking on the regedit file. Scroll down the HKEY_LOCAL_MACHINE menu to find the following path: “\SYSTEM\CurrentControlSet\Services\Tcpip\Parameters\Interface”. That’ll lead you to the menu that comprises folders with many numbers and letters. To access the correct file, match your IP address to the listed DhcpIPAddress in one of those folders.
To find your IP address, press Windows key + X and follow these steps: Control Panel – Network and Internet – Network and Sharing Center – Connections – Details – IPv4 Address.
Now you can track down the folder with the proper IP Address. Right-click on that folder and select New – DWORD (32-bit) Value. You’ll have to create two of those values: TcpAckFrequency and TCPNoDelay. Double-click on each of them and set both of their parameters to 1. The Nagle’s Algorithm is now disabled.
Overclock your graphics card
Overclocking your graphics cards means to push it beyond the specs displayed on the box. Many newer cards have an auto-function to do this in the control settings, but there are also ways to tinker with this manually. Just be sure to educate yourself about your graphics card as pushing the limit can cause it to overheat.
To overclock:
-
Review the standard or benchmark settings for your card.
-
Use a program like MSI Afterburner to increase the core clock on the card. Do this in 10MHz intervals and reset the benchmarks as you go.
-
Optionally, you can also increase the voltage and memory clock, but monitor the temperature of your card closely when doing this.
-
Play a game and check the performance.
Turn off SysMain and Prefetch
This is one of the easy services to disable on Windows 10. These programs try to help you access data faster, but they ultimately add unnecessary operations that slow games down. Here’s how to disable them:
SysMain
-
Press Win + R to open the Run prompt.
-
Type msc and press Enter.
-
Double-click on SysMain.
-
Select Disabled from the drop-down list.
-
Click OK.
Prefetch
-
Press Win + R to open the Run prompt.
-
Type “regedit >” and hit Enter.
-
Click Yes.
-
Go to PrefetchParameters in HKLM.
-
Double-click the EnablePrefetcher REG_DWORD value.
-
Set the Value as 0.
-
Click OK.
How to make games run faster on a Windows 10 laptop
Want to know how to improve gaming performance on a Windows 10 laptop? These tips will help speed things up!
Use an external power supply
Windows 10 has a lot of power-saving functions for laptops to help keep them alive for longer durations. This will affect the gaming experience dramatically as your RAM, graphics cards, and CPU won’t run at full capacity. To fix this, connect your laptop to its external power supply and be sure that your control settings allow full performance with it connected.
Use a high-performance power plan
To change your power plan, click Windows key + I, type “power” in the search box, choose Power & sleep settings and then Additional power settings. If you don’t see a high-performance power plan on the left side of the screen, click Create a power plan and choose High performance.
Keep your laptop from overheating
Laptops are notorious for overheating as all the components are packed tightly within the chassis with little air circulation. When things overheat, the system slows down and so does gaming performance. Use these tips for prevention:
-
Always check and keep your fans cleaned.
-
For ventilation, try to elevate your laptop or use a desk designed for laptops.
-
Adjust your fan settings so they don’t overwork.
-
If you can, play on your laptop in a cool environment.
Upgrade your GPU and RAM
We covered this earlier for PCs, but your laptop may also have the capacity for GPU and RAM upgrades as well. Follow the same protocols, and if you’re inexperienced working with laptops, it’s best to let an experienced technician do the installation.
Disable background Windows services
Laptops often come with a lot of background services running to prevent overheating and to optimize performance with smaller components. These services will easily hinder gaming performance if not shut down. Here are the steps:
-
Press the Windows + R and use the Run prompt.
-
Type “msconfig” in and click OK.
-
Choose the Services tab.
-
Check the Hide all Microsoft services box.
-
Select Disable all; then click the Apply and OK.
-
Select Restart on the dialog box that opens.
We hope this article has given you some ideas on how to make games run faster on Windows 10 and improve your gaming experience. Here are some of the key tips to use when optimizing your system:
-
Change your game settings: You can possibly alter things like resolution, motion blur, and anti-aliasing.
-
Upgrade your hardware: If your RAM, GPU, or CPU aren’t up to speed, it might be time to upgrade things for modern games and a better gaming experience.
-
Tweak your graphics card settings: Modern graphics cards have their own settings you can adjust to optimize your system for gaming. Check your settings for Ambient Occlusion, Anisotropic Filtering, and DSR.
Simple and solid game recorder and streaming program
Frequently asked questions
How do I optimize my computer for gaming?
The article above lists a variety of things you can do to optimize your laptop or computer for gaming. These are the key tips:
-
Check your in-game graphics settings
-
Tweak your graphics card settings
-
Upgrade your GPU and/or CPU
-
Check your Windows performance settings
What is slowing down my computer?
There’s a long list of things that could slow down your computer. Here’s a list of reasons you can check:
-
Nagle’s Algorithm is enabled
-
Your computer is running updates on non-active hours
-
The GPU drivers are not up to date
-
You’re running DirectX 11 and need to update
-
The system is running on lower performance settings to conserve battery.
How to make a computer run faster?
If you want to know how to make your computer faster for gaming, here are a few quick tips:
-
Upgrade to an SSD card
-
Uninstall any unused programs
-
Run a disk cleanup and system maintenance
-
Review your Startup program and disable the ones you don’t use
-
Install additional RAM
Is Windows 10 better for gaming?
When comparing the gaming experience from prior versions of Windows to Windows 10, the performance improvement is extraordinary. If you’re unsure of whether to update, this is a simple decision. Windows 10 will always give a better experience.
How do I get 60 fps in a game?
Getting to 60 FPS in a game isn’t different from tips to speed up your system overall, but here are things you can do:
-
Upgrade your GPU and CPU
-
Upgrade or install additional RAM
-
Put Windows 10 in ‘Game Mode’
-
Review your game’s graphics settings.
-
Install the latest drivers for your graphics card
Why am I getting low fps on my high-end PC?
Lower FPS speeds occur when your computer doesn’t have the memory or power capacity to run the game at full speed. Some common issues that cause lower FPS include outdated graphics card drivers, subpar graphics cards, old processors, and a lack of RAM.
Just because you spend money on a computer doesn’t mean it’s equipped with the latest and greatest. Hardware is more important than other design or software features. Also, modern computer games are always raising the bar for performance capacity, so it’s relative from game to game.
Have questions?
Sign up for news and special offers
Tired of experiencing low FPS, lag, or screen tearing while gaming? Then you’ve come to the right place. In this article, we will provide several methods to help you boost your gaming performance on your Windows 10 and 11 PC. Let’s dive right in.
1. Upgrade to SSD
Quick Note: Skip this step if you already have an SSD inside your computer.
If your computer or laptop runs on a hard disk, it’s time to upgrade to SSD. It’s a one-stop solution to boost your gaming performance. Personally, when I transitioned from my old gaming laptop with an HDD to a new gaming laptop equipped with an SSD, I noticed a remarkable improvement in gaming performance during gameplay.
2. Enable Game Mode
Now that you’ve already got an SSD, the next step would be to enable the Game Mode on your Windows device. This will prevent Windows from performing any system-level update in the background. Furthermore, it prioritizes your game and gives you access to all the system resources, especially CPU and GPU.
To turn the Game Mode on your Windows 11 or 10, Navigate to Windows Settings (Windows Key + I) > Gaming > Game Mode > Enable Game Mode.

3. Adjust Power Settings
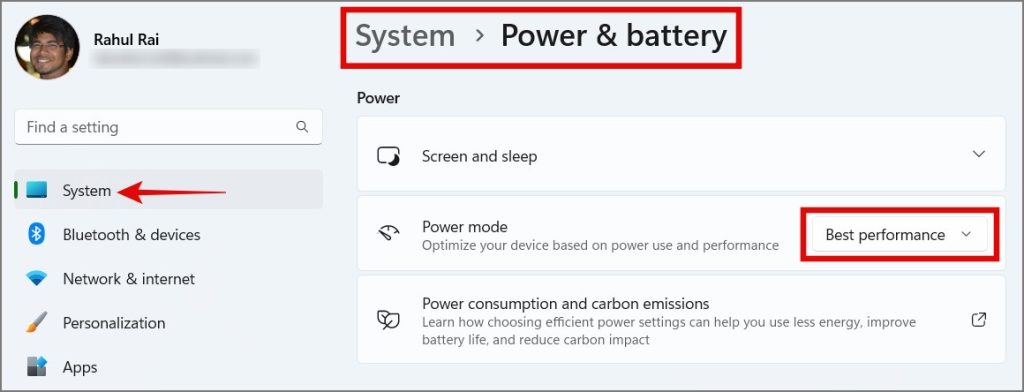
To take your gaming performance to the next level, another step you can take is changing your power setting to the performance mode. This will give a slight boost to your PC performance. However, it’s worth noting that this mode may slightly impact your laptop’s battery backup. Therefore, we recommend enabling this mode only when you’re about to play a game.
To switch to performance mode, Windows 11 users can open the Settings App, navigate to Power & battery, and select the Best performance option under Power mode.
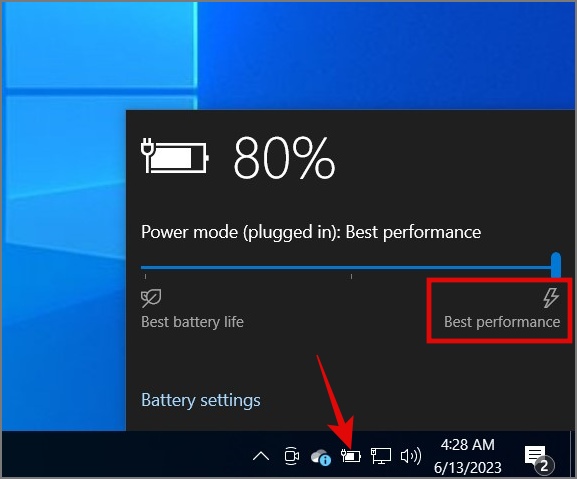
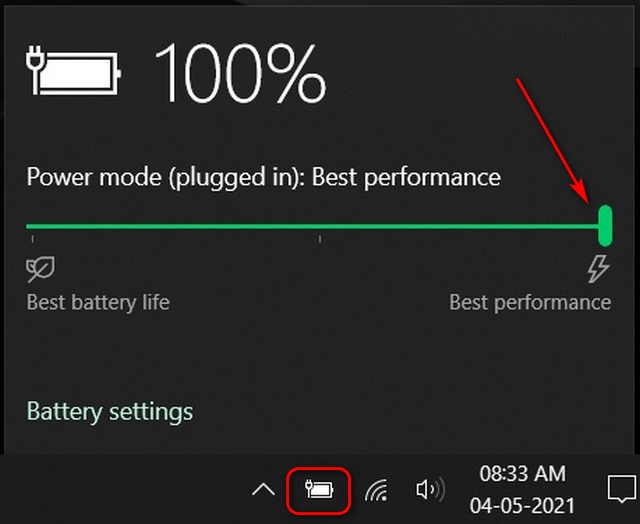
Windows 10 users can simply click on the Battery icon on the Taskbar and then drag the slider to the right side (Best Performance).
4. Update Your Graphics Card Driver
If you experience stuttering on your PC while gaming, it could be related to your graphics driver. Therefore, it is recommended to keep your drivers up to date, as this may fix any bugs that may cause a drop in your gaming performance. Updating a driver is pretty straightforward, just press Windows Key + X hotkey and select the Device Manager. From there, right-click on your graphics card and hit the Update Driver option.

Alternatively, you can also update the graphics card by going to the manufacturer’s site and downloading the latest version of the graphics card driver. Nvidia and AMD are major players in this segment.
Download Nvidia or AMD graphics Driver
Tip: Learn how to reset your graphics card on Windows 11
5. Lower the Game’s Graphics Settings
If your game starts to lag, it might be because you don’t have a powerful enough graphics card to handle the game, or you may be playing a demanding game on a lower-end system. So the best thing you can do to optimize your gameplay is by lowering your game resolution and disabling a few graphics intense settings. That way, you might get a smoother gameplay experience.
6. Disable Nagle’s Algorithm on Windows
Nagle’s Algorithm is a network optimization algorithm used to improve the efficiency of your internet connection by bundling the packages. However, this may also lead to latency issues when playing online multiplayer games. So if you’re also experiencing the frame drop or latency issue during your gameplay session, follow the below guide to fix it:
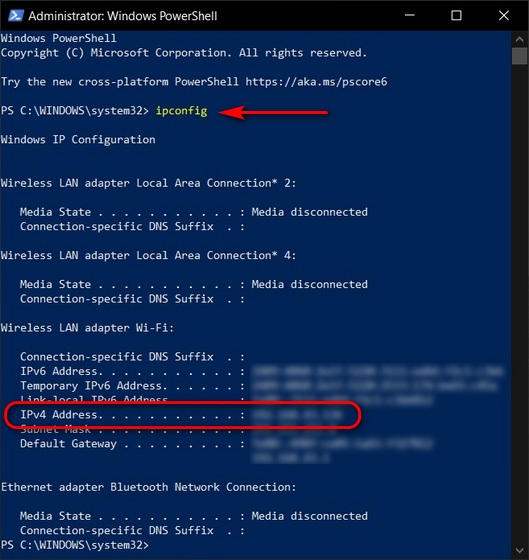
1. Press Windows Key + S to open the Windows Search and look for Command Prompt or Windows Powershell.

2. Open any of them and type “ipconfig” and hit Enter key.
3. Next, note down the IPv4 Address.

Note: Search for the IPv4 address to which you are currently connected, such as through Wi-Fi or Ethernet.
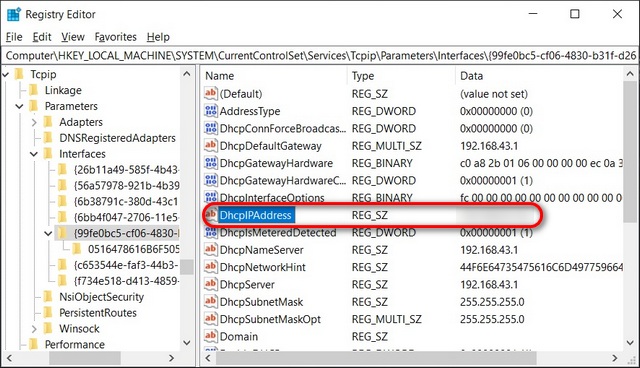
4. After that, again use the Windows Key + S hotkey and this time look for Registry Editor.

5. Open it and copy & paste the following path into your address bar:
HKEY_LOCAL_MACHINE\SYSTEM\CurrentControlSet\Services\Tcpip\Parameters\Interfaces
6. Now under the Interfaces folder, carefully examine each folder individually and look for DhcpIPAddress that matches your IPv4 Address.
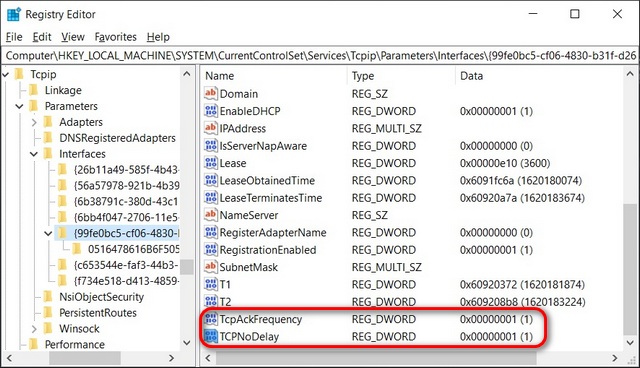
7. Once you find out the matching folder, right-click on the folder (left pane) > click New > Select DWORD (32-bit) Value.

8. Name the file “TcpAckFrequency”.
9. Repeat Step 7 and this time name it “TCPNoDelay”.
10. After that, double-click on each file and change the “Value data” to 1.

That’s it. Restart your PC and Nagle’s algorithm will be disabled. If you run into any problems, you can revert back to your previous settings.
7. Switch to Faster DNS
DNS can also be the reason why you’re witnessing a drop in your gaming performance, particularly in online gaming. Many internet service providers (ISPs) have their own DNS servers, but they often lack reliability. So it’s better to switch to more reliable and safe DNS providers like Google and Cloudflare.
To change the DNS server address, simply navigate to Networks & internet > select Wi-Fi or Ethernet connection (whichever you’re connected to) > Hardware properties > Edit DNS server assignment > select Manual > Enable IPv4 > Enter DNS IP Address > Save.

8. Use a Dedicated Graphics Card
It would be fair to assume that your Windows PC might be using the integrated graphics card instead of the dedicated graphics card during gameplay. This is not a new problem and can easily be fixed. You can read our detailed guide on how to force a game to use a dedicated graphics card on a computer.
9. Disable Background Running Apps
If there are lots of unnecessary apps running in the background, it’s no surprise that your PC starts to lag when playing games. To fix this issue, disable any apps from running in the background that are affecting your computer’s performance. Here’s how:
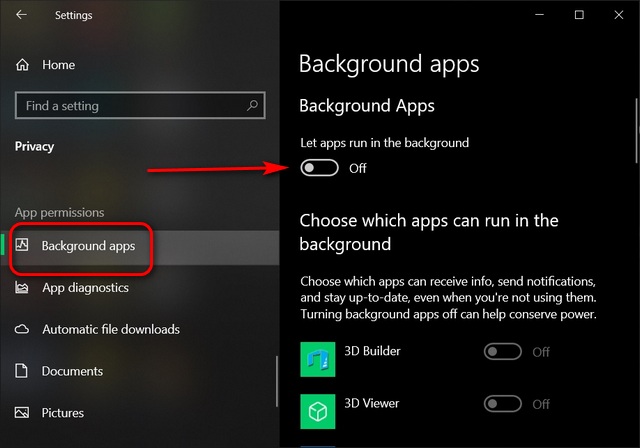
Windows 10: Navigate to Settings > Privacy > Background Apps. Now toggle off the apps that you no longer need.

Windows 11: Go to Settings > Apps > Installed Apps > Select Apps > Click meatball menu (3-dot icon) > Advanced options > Let this app run in the background > Select Never.

Alternatively, you can also use the Task Manager (Ctrl + Shift + Esc) to disable apps from running at the startup.

10. Prevent Steam From Auto-Updating Games in the Background
While there is no option to completely disable auto-update for Steam games, you can at least prevent Steam from automatically updating games in the background. By doing so, you can stop Steam from eating up your system resources while playing games, leading to a smoother gameplay experience on your PC.
Simply go to the game’s Properties, jump to the Updates section, and select the options – Only update this game when I launch it and pause background downloads while I’m playing.

Tip: Slow downloading speed on Steam? Here are 13 ways to fix it.
11. Tweak Windows Visual Effects
If you’re willing to compromise on the appearance and user experience of your Windows PC in exchange for optimal gaming performance, switch to the best performance mode.
Warning: This mode disables all animations, taskbar thumbnail previews, UI shadows, and more.
To enable this mode, press the Windows Key + S and search for “Adjust the appearance and performance of Windows”. This will open the Performance Options. Simply select “Adjust for best performance” and click the OK button.
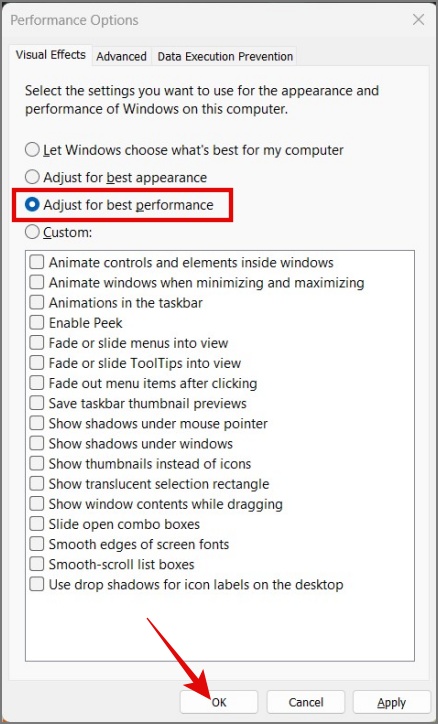
That’s it. You will start to feel your Windows PC has gotten snappier.
12. Use Wired Keyboard and Mouse
When it comes to gaming, we would recommend you use a wired keyboard and mouse over the wireless one. As there’s a possibility that other electronic devices may interfere with your wireless connection and this could lead to choppy movement or delayed input during gameplay.
13. Upgrade Your Mouse
One more way to optimize your Windows for gaming is by upgrading your mouse. Even the slightest delay in mouse input can get you killed in the game ruining your gaming experience. So we would suggest you go with a mouse that has at least a 1000 Hz polling rate.
In case you don’t know what is mouse’s polling rate, it is the frequency at which it reports its position to your computer. For instance, a mouse with a 125 Hz polling rate will report its position 125 times per second or every 8 milliseconds. So basically higher the polling rate, the shorter the delay input.
| Polling Rate | Delay |
|---|---|
| 125 Hz | 8 ms |
| 250 Hz | 4 ms |
| 500 Hz | 2 ms |
| 1000 Hz | 1 ms |
| 4000 Hz | 0.25 ms |
| 8000 Hz | 0.125 ms |
Tip: Is your mouse cursor keeps moving on its own on Windows 10/11? Here are 12 fixes.
14. Uninstall Redundant Apps or Bloatware
When you first time boot your Windows PC, it may come with lots of bloatware, both from Microsoft or PC manufacturers. And most of them are nothing more than pieces of garbage that hog your system resources in the background. So we would recommend you uninstall all the unnecessary apps or bloatware from your computer.
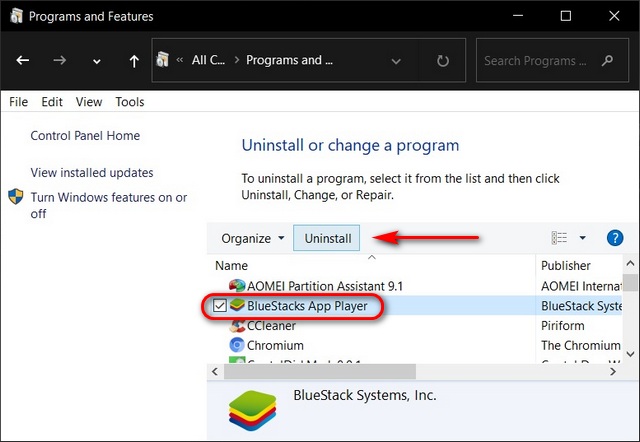
Windows 10: Go to Windows Settings > Apps > Apps & features. After that, select the app and hit the Uninstall button.

Windows 11: Navigate to Windows Settings > Apps > Installed Apps. Once there, click on the three-dotted icon next to the desired app and select the Uninstall button.

Tip: Learn how to disable ads from everywhere on Windows 11
15. Increase RAM Capacity
Another reason could be low RAM availability. If your PC frequently runs low on memory or constantly operates on the edge, it’s high time for you to consider upgrading your RAM. Otherwise, your PC will continue to deliver subpar gaming performance, especially when playing a demanding game.
16. Install the Latest Version of DirectX
With each iteration of DirectX, Microsoft has brought a significant improvement in gaming performance. And with the latest DirectX 12, you will get features like Ray Tracing, Variable Rate Shading, Mesh Shading, and more. This can greatly enhance your gaming experience.
You may already have the latest version of DirectX installed on your computer. However, if you want to manually check the version, press Windows Key + R to open the Run program, then type “dxdiag” (without quotes) and hit the Enter key. This will open the DirectX Diagnostic Tool. From there, you can check your DirectX version. If it is an older version, you can look for updates by navigating to the Windows Update screen.

17. Use Ethernet Over Wi-Fi
If you’re encountering a drop in frame rate or lag during gameplay, it is important to note that the issue may not always be hardware-related. In some cases, it could be because of poor internet connectivity, especially when playing online multiplayer games where Wi-Fi interference can lead to sudden drops in FPS. Therefore, if possible, we would suggest that you use an Ethernet connection to enjoy a smoother gameplay experience.
Tip: Learn why your Wi-Fi is not working, but ethernet is
18. Enable/Disable Enhance Mouse Pointer Precision
By enabling enhance pointer precision on your Windows PC, you will get more accurate, responsive, and smoother cursor movement, allowing you to achieve precise aiming or targeting in the game. However, if you have a mouse with a good sensor and a polling rate of over 1000 Hz, you may need to disable this feature to avoid potential conflicts. If it has the opposite effect, revert back to the original state.
To access the mouse properties, go to Windows Settings > Bluetooth & devices > Mouse > Additional mouse settings > Pointer Options. Once there, check or uncheck the box next to Enhance pointer precision and then hit the OK button.

19. Switch to Better Monitor
Upgrading your monitor can make a world of difference in your overall computing or gaming experience. For instance, if you own a monitor that has a 1 ms response time and 144 Hz refresh rate, you’re more likely to get smoother and more responsive gameplay or visual experience compared to a monitor that has a 4 ms response time and 60 Hz refresh rate.
Recommended Specs for Monitor:
- IPS Panel
- 1 ms response time
- Minimum 120 Hz refresh rate
- 2K or above display resolution
- AMD FreeSync or NVIDIA G-SYNC
20. Upgrade Your Graphics Card
One quick way to boost your gaming performance on Windows 11 or 10 PC is by upgrading your graphics card. By doing so, you can eliminate issues like screen tearing, lag, frame drops, and more, resulting in a smoother and more enjoyable gaming experience.
Of course, buying a good graphics card may come with a higher price tag, and you also have to worry about compatibility with your system. However, the difference you will notice in your gaming performance makes it a worthwhile investment.
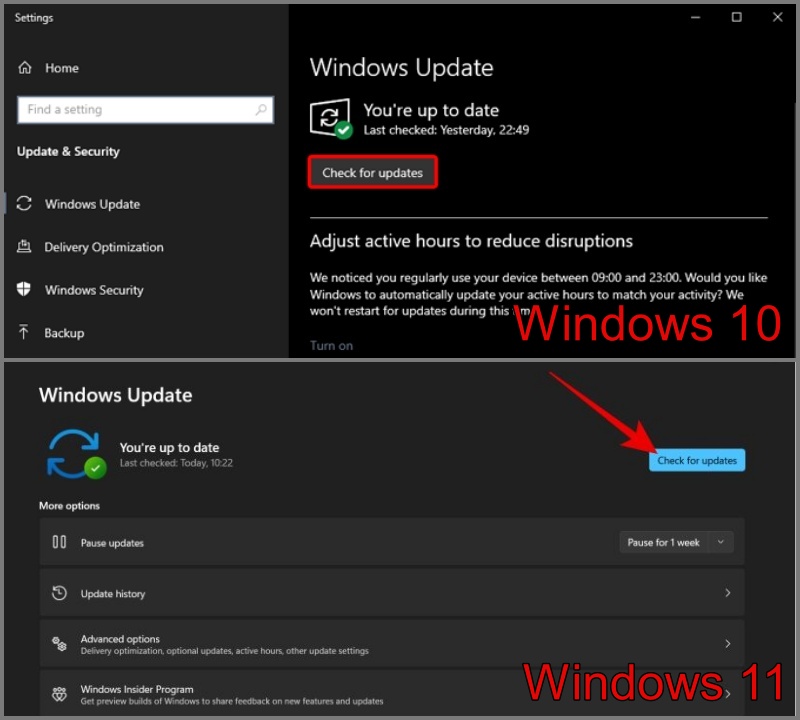
21. Update Windows
Every once in a while Windows delivers a major update but due to some bugs, compatibility issues, or glitches during the update, you may notice a drop in your PC performance. That’s why we strongly urge you to keep your PC updated at all times to avoid any potential issues or disruptions.
To check update availability, open Windows Settings and move to the Windows Update section. Once there, you can click on the Check for updates button.
Maximize Your Gaming Performance on Windows 10 and 11
It can be frustrating if your gameplay always gets ruined because of constant lags and lower picture quality. That’s why we have come up with multiple solutions that would help you figure out the way to optimize your Windows PC for gaming. If things don’t work out, you can try reinstalling Windows on your PC. This may fix any issues that might be impacting your gaming performance.
Windows 10 is the platform of choice for PC gamers for a reason. Not only is Windows 10 compatible with almost all major PC games from the last couple of decades, but you can also tweak a number of built-in settings and third-party software to get the best possible performance for playing your favorite MMORPG or battle royale games. So today, we will discuss the best ways to optimize the performance of your Windows 10 computer for gaming.
In this article, we will discuss different software solutions to optimize the gaming performance of your Windows 10 PC, along with a few hardware upgrades that will offer the best results. So read on to know more about how you can extract the best out of your computer while playing games like Fortnite, Assassin’s Creed Valhalla, GTA V (with mods), Ark: Survival Evolved, Red Dead Redemption 2, Call of Duty, Destiny 2, Apex Legends, Rainbow Six Quarantine, and more.
Table Of Contents
Software Solutions to Improve Gaming Performance in Windows 10
To improve gaming performance on your Windows 10 machine, you can carry out several tweaks and changes. Most of them are software-based, which means you don’t even need to spend any extra money to get them done. Here are our recommendations:
1. Enable Game Mode in Windows 10
Perhaps the easiest and most obvious way to tweak performance on your PC is to enable the ‘Game Mode‘ in Windows 10. The feature stops background activities like Windows updates and app notifications to help boost FPS in your games.
The Game Mode is ‘On’ by default, but it doesn’t hurt to do a quick check. To do that, go to Settings (Windows key + I) > Gaming > Game Mode (left sidebar). You’ll now see a ‘Game Mode’ toggle in the right pane. Switch it on if it isn’t already.
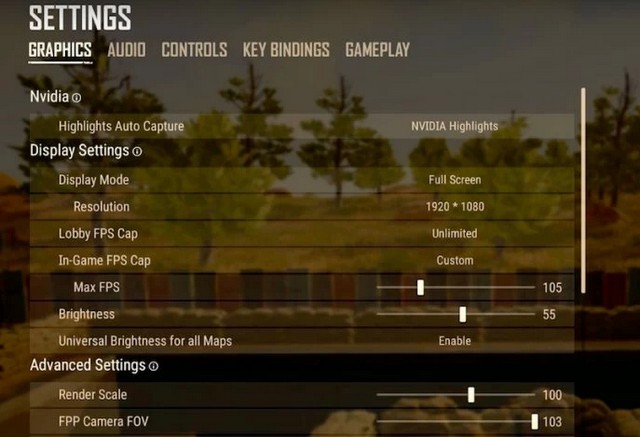
2. Lower Your Game’s Resolution and Graphics Settings
If your PC is a super-high-end beast, you probably don’t need much tweaking anyways. But if you are like the rest of us and have to make do with something less than top-tier, you may need to make some sacrifices in the graphics department for smoother gameplay. Lowering your game’s graphics settings can improve FPS by easing the load on the GPU. It won’t have to support as many pixels with each frame.
Most dedicated gaming PCs of relatively recent vintage can handle 1080p@60FPS in most games. However, some might struggle to support 4K or even 2K resolutions, while your typical office laptop might even struggle with 1080p gaming. So make sure you try out a few options to find the optimal balance between graphics quality and higher FPS.
Some games will have simple settings like ultra, high, medium, and low, while others have sliders, numerical settings, etc. Here’s a quick look at some of the options in PUBG.
3. Update Graphics Drivers to Optimize Windows 10 PC for Gaming
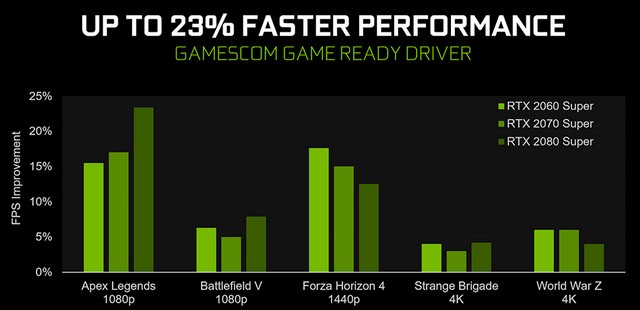
Another classic piece of troubleshooting advice is updating the GPU to the latest drivers can greatly enhance gaming performance. The chart below from Nvidia shows how drivers can help improve FPS in games by as much as 23% in some cases. The same holds for AMD Radeon drivers as well. If you’re new to PC gaming, follow our detailed guide on how to update drivers on your Windows 10 PC.
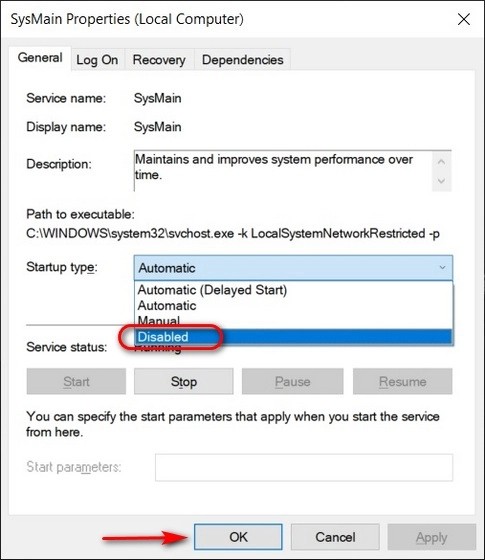
4. Disable SuperFetch (SysMain)
SysMain (formerly SuperFetch) is a built-in Windows feature that improves startup times for apps and Windows itself. However, games do not generally benefit from it. Indeed, background activity often increases when it is enabled, but turning it off can improve gaming performance on your Windows 10 PC. Check out our detailed guide on reducing CPU and memory usage to learn how you can turn off SysMain (SuperFetch) on your computer.
Note: Disabling SysMain (Superfetch) is redundant if you’re using an SSD, but some HDD users might benefit from it.
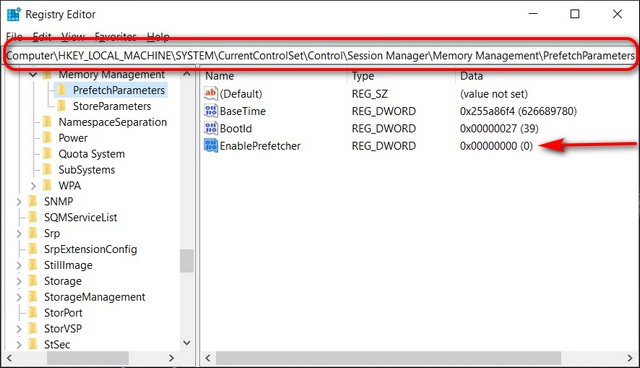
5. Disable Prefetch
To disable Prefetch, you will need to dig around in the Windows registry. So search for ‘regedit’ in the Windows search bar and open the registry editor. Then, navigate to the following key using the left pane: HKEY_LOCAL_MACHINE \ SYSTEM \ CurrentControlSet \ Control \ Session Manager \ Memory Management \ PrefetchParameters. Now double-click on EnablePrefetcher in the right pane and change the DWORD (32-bit) Value to “0” (without quotes).
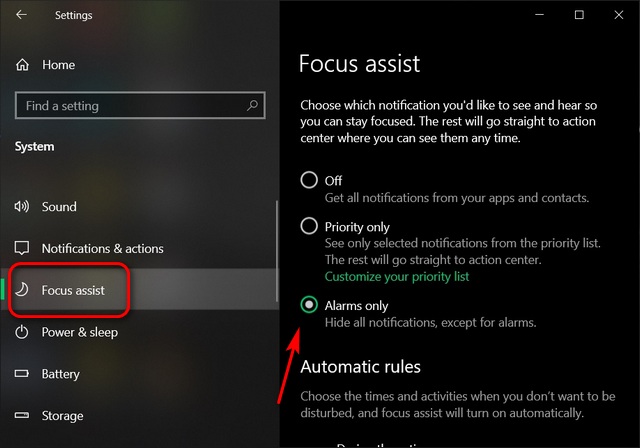
6. Enable Focus Assist
Notification pop-ups and the accompanying chimes can interrupt games, and this is where the Focus Assist feature comes in handy. Focus Assist in Windows 10 lets you specify how and when you receive notifications. So to prevent annoying messages and pop-ups when you’re gaming, open Settings (can also use the shortcut Windows key +I) -> System -> Focus Assist. Now select ‘Alarms Only’ or ‘Priority Only’ to hide all unnecessary pop-ups.
7. Switch Off Background Services
You can also prevent apps, including some Windows 10 services, from running in the background to optimize your PC for gaming. Services running in the background often take up additional system resources, thereby hampering foreground activities, including gaming.
To disable background services, go to Settings -> Privacy -> Background Apps. Now switch off the ‘Let apps run in the background’ toggle in the right pane to prevent apps from using resources in the background. You can also keep the main toggle on and switch off individual apps if you want some apps to run in the background.
8. Uninstall Redundant Programs and Bloatware
Windows tends to get slower with each installed program. One way to speed up your Windows 10 computer and reduce lag is to uninstall programs you no longer use. It improves your PC’s speed as well as power efficiency.
To uninstall programs, go to Control Panel -> Programs and Features. Now select the app or program you want to uninstall and hit the ‘Uninstall’ button at the top. Confirm your choice to remove the app from your PC.
Note: You can also uninstall apps from Settings -> Apps -> Apps and Features. Just scroll down once you reach Apps and Features, click on the program you want to uninstall, and hit the ‘Uninstall’ button.
9. Optimize Power Settings
Some power settings can throttle the CPU irrespective of whether you are using a laptop or a desktop. So selecting a performance-oriented power plan can optimize your Windows 10 PC for gaming.
To do that, right-click on the battery symbol on the notification tray and select Power Options. On desktops, you can open the power settings menu from Control Panel -> Power Options. Now click on ‘Show additional plans’ and enable a high-performance plan.
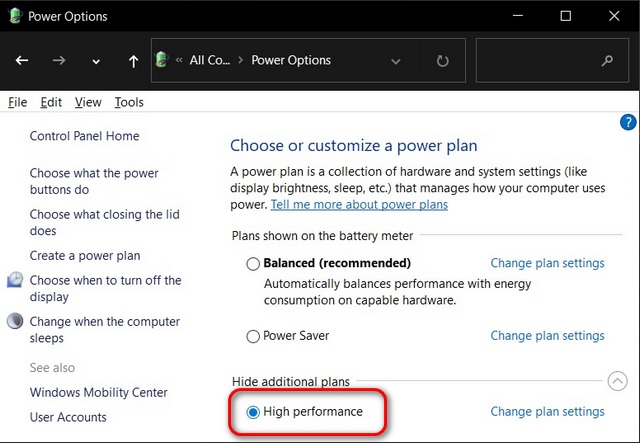
Note: If you don’t see the ‘Show additional plans’ option, click on ‘Create a power plan’ in the left sidebar and then select ‘High Performance’. You can always tweak the options to your requirement.
If you’re using a laptop, you can also tweak your power settings directly from the battery icon on the system tray. To do that, click on the icon and drag the slider over to the ‘Best performance’ option.
10. Disable Mouse Acceleration
Mouse acceleration (Microsoft calls it Pointer Precision) helps you while working with text editors and navigating between GUI elements in Windows and other programs. However, it can adversely impact how your mouse performs in games. Disabling this can help optimize gaming in Windows 10. To do that, go to Control Panel -> Mouse -> Pointer Options. Now de-select the ‘Enhance Pointer Precision’ checkbox. Click Apply or OK, and you are done.
11. Tweak Your Nvidia Control Panel or Radeon Control Center
Graphics drivers from Nvidia and AMD come with their own control panels that let you tweak the graphics settings. For demo purposes, we are using the Nvidia Control Panel, but you can also tweak the corresponding options in the AMD software for similar results.
To access the Nvidia control panel, right-click on an open space on your desktop and select Nvidia Control Panel. Now click on ‘Manage 3D Settings‘ on the left sidebar to change the following settings to optimize your Windows 10 PC for gaming:
- Maximum Pre-Rendered Frames: This setting controls the number of frames that the processor prepares before transferring them to the graphics card. Increasing this value generally results in smoother gameplay. However, you may notice some lag if you use your mouse and keyboard for gaming. To eliminate lag, set this to “1“.
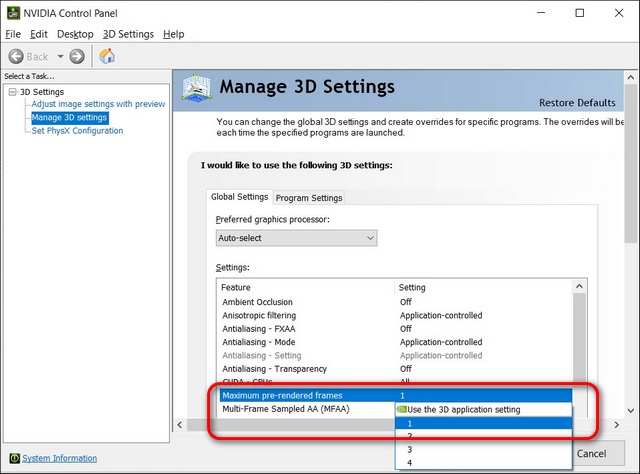
- Threaded Optimization: This option enables multi-threaded optimization for modern multi-core processors, and hence, should always be ‘On‘.

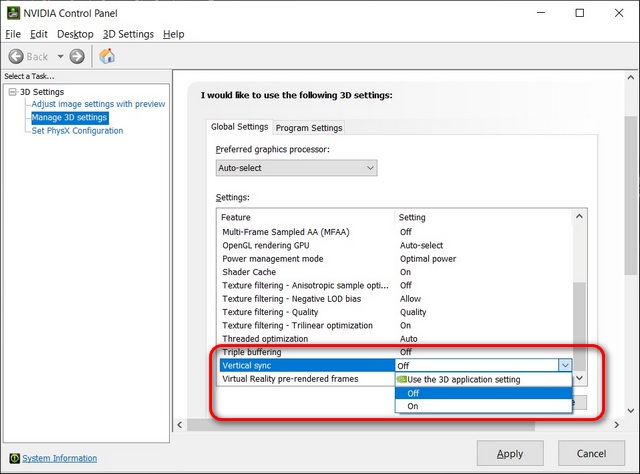
- Vertical Sync: We have already discussed VSync and its importance in gaming in great detail, so check that out if you want to know more. For now, it would suffice to say that keeping it ‘On’ is generally a good idea to prevent screen-tearing and other annoying graphics glitches. However, disabling it allows games to run more smoothly in some cases. Disable VSync only if your monitor has a higher frame rate than your gameplay.
12. Disable Steam Auto-updates
Steam automatically updates all your games, thereby eating up valuable resources, including processing power, memory, and internet bandwidth. To prevent Steam from updating games in the background while you are playing, go to Steam -> Settings -> Downloads. Make sure that ‘Allow downloads during gameplay‘ is unchecked. This setting is ‘Off’ by default, so make sure that it stays that way.
13. Tweak Visual Effects Settings in Windows 10
GUI animations can be a hindrance to the performance of your PC, thereby preventing you from getting the highest FPS in demanding games. By default, Windows 10 appearance settings are tuned towards aesthetics, but turning them off will help improve performance.
You can disable all these UI animations and shadows to optimize Windows 10 for gaming performance. To do it, go to System Properties -> Advanced tab -> Performance Settings -> Visual Effects. Now select the ‘Adjust for best performance’ option, and hit Apply or OK.
14. Disable Nagle’s Algorithm
Nagle’s algorithm improves internet connection by reducing the number of packets that need to be sent over the network. It is helpful for slower connections but can contribute to latency issues when playing online games.
With modern internet connections often running into hundreds of Megabits per second, it’s for the best that you disable it to reduce latency. That should better optimize your Windows 10 computer for gaming. To do it, go to Windows PowerShell -> enter ‘ipconfig‘ (without quotes) -> and note your IPv4 address.
Now open Windows Registry Editor (regedit) and navigate to the following folder: HKEY_LOCAL_MACHINE\SYSTEM\CurrentControlSet\Services\Tcpip\Parameters\Interfaces. You will see several sub-folders here. Click through each to find the ‘DhcpIPAddress‘ value in the right pane that matches your IP address.
Once you find the correct folder with your IP address as the DhcpIPAddress value, right-click and create a new DWORD (32-bit) Value in the same folder. Then, name it ‘TcpAckFrequency‘ (without quotes). Give it a value of ‘1’. Repeat the process for a second entry named ‘TCPNoDelay‘ with a value of ‘1’. Restart your PC, and Nagle’s algorithm will be disabled for good. Any time you want to reverse the decision, delete the two keys you just created.
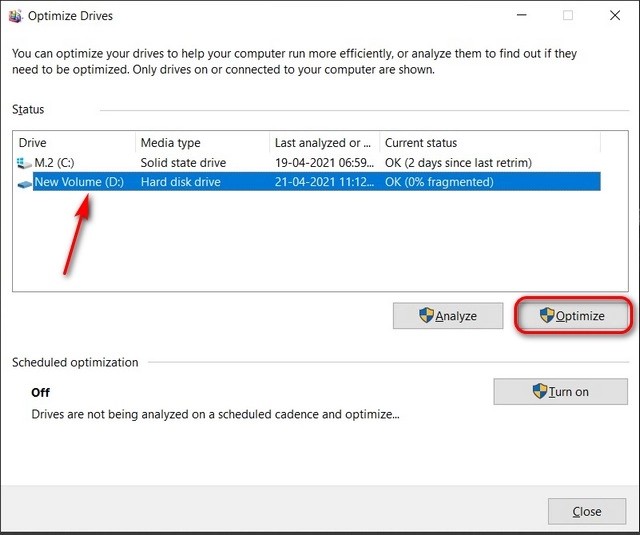
15. Defrag Your Hard Drive (HDD-only)
Another easy way to improve access time for Windows apps is to defrag your hard drive. Windows 10 offers a built-in defragment option, and you can access it by searching for ‘Defrag’ in the Windows Search Box. You can also download and install Piriform’s Defraggler (Free) for more power-user options. Do remember that de-fragmentation is only suitable for mechanical HDDs. You should never defrag SSDs because that reduces their lifespan.
16. Install/ Update DirectX 12
DirectX is a key element of the gaming experience on Windows 10. DirectX 12 is the latest version of the API tool, and it offers support for multiple GPU and CPU cores, better frame rates, lower power consumption, and enhanced graphical effects.
Windows updates generally keep the DirectX version updated, but make sure you check it manually by hopping over to the DirectX diagnostic tool. To do that, open the Run dialog box (Windows key + R), type in ‘dxdiag’ (without quotes), and hit Enter. You can now check your DirectX version.

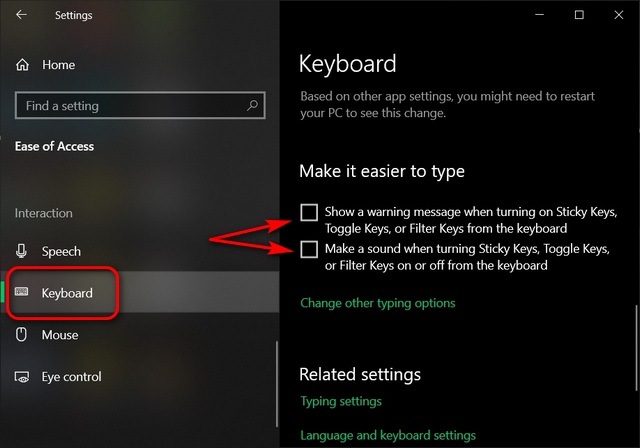
17. Turn Off Accessibility Key Combinations
Nothing is more annoying than accidentally opening up warning windows while playing your favorite game. ‘Sticky keys’ can be a helpful accessibility feature, but it can also be a huge pain while gaming. That’s why we recommend turning off accessibility key combinations when gaming.
To do that, go to Settings -> Ease of Access -> Keyboard (left sidebar). Now move over to the right pane and make sure that the toggles for the following settings are turned ‘Off’: ‘Use Sticky Keys’, ‘Use Toggle Keys’, and ‘Use Filter Keys’. Finally, scroll down to the bottom and uncheck the two following options:
- Show a warning message when turning on Sticky Keys, Toggle Keys, or Filter Keys from the keyboard
- Make a sound when turning Sticky Keys, Toggle Keys, or Filter Keys on or off from the keyboard
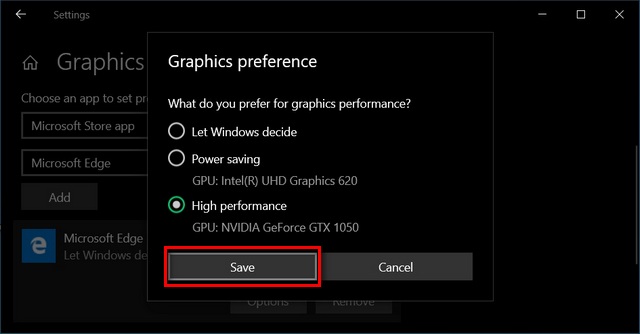
18. Select the Correct GPU as Default for Gaming
In multi-GPU computers running Windows 10, you can manually specify which graphics card a Windows app/ game should use as default to enhance performance. So setting the high-end dedicated graphics card as the default for your games will optimize gaming performance on your Windows 10 PC. We have already discussed the subject in great detail, so check out our dedicated article on how to set default GPU for games and apps in Windows 10.
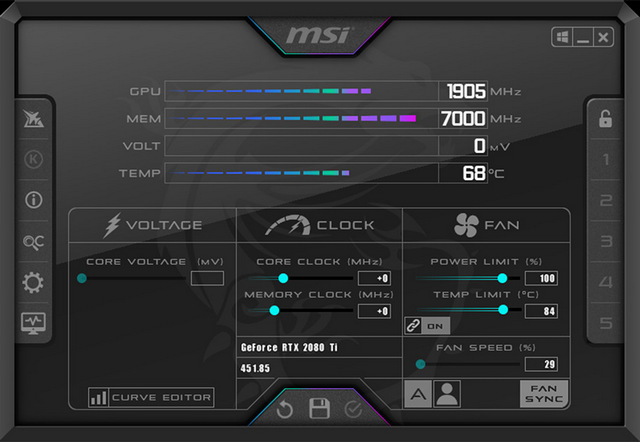
19. Overclock Your GPU Using MSI Afterburner
MSI Afterburner (Free) is one of the most popular free software to tune GPU settings. It is reliable, works on graphics cards from all brands (including non-MSI), and lets you monitor your hardware in real-time.
It not only lets you overclock your graphics card by increasing its clock frequency and voltage but also offers a fan speed control for the right balance between performance and temperature. MSI Afterburner’s OS Scanner feature helps automatically find the highest stable overclock settings for your card, giving you a smooth experience with higher FPS in even the most demanding games. For more details, check out our detailed guide on how to overclock your GPU using MSI Afterburner.
20. Keep Your PC Cool to Prevent Thermal Throttling
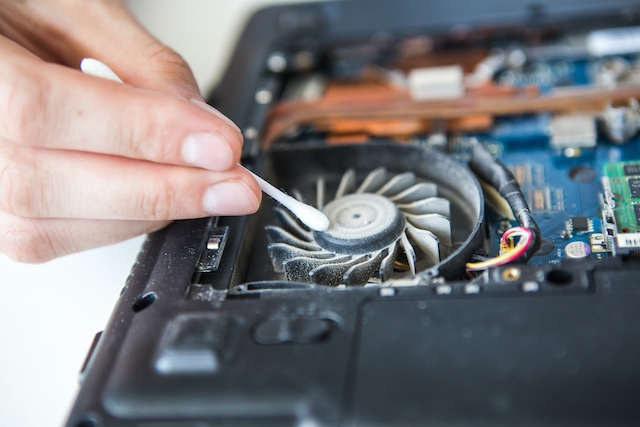
One of the biggest reasons for frame drops and laggy-ness in games is overheating. And one of the biggest causes of excess heating in PCs is a build-up of dust and cobwebs on the fans and other components inside your case. It can inhibit airflow, which is essential for the efficient cooling of any semiconductor chip, including the CPU, GPU, and RAM in your PC.
To prevent your PC from hanging or slowing down frequently, you will need to maintain its optimal thermal range. For that, you need to take several steps, like cleaning your case (or cabinet) regularly with canned air, a cloth, and ethyl alcohol. Check out our dedicated article on how to maintain optimal CPU temperature to know more on the subject.
Hardware Upgrades to Improve Gaming Performance in Windows 10
Alongside the software tweaks and fixes mentioned above, you can also make a few changes to your PC components and network equipment. Here are some of the key changes we recommend:
21. Ensure Optimum Broadband Speed and Latency
A slow internet connection with high latency can cause lag and slower response times in games. While a fast, low-latency broadband connection won’t increase your FPS, it will help reduce lag, thereby improving response times and increasing gaming performance.
So check the quality of your broadband connection, and if it isn’t fast enough or has high ping times to the server of your favorite game, dump it for something better. You can test your internet speed on Ookla, Fast.com, Google, and many other sites and apps. You can also employ a Wi-Fi mesh network or upgrade to Wi-Fi 6/6E routers to ensure optimum speeds.

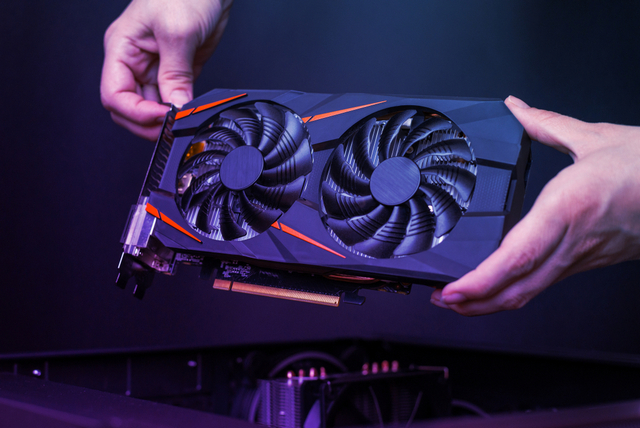
22. Upgrade Your Graphics Card
One of the best ways to upgrade your gaming experience is to upgrade your graphics card. While they can be expensive, having faster GPUs can improve your FPS count significantly, resulting in much smoother gameplay. If your power supply (PSU) permits, you can also add a second unit of your existing GPU (in SLI or Crossfire) to create a multi-GPU setup for enhanced gaming performance.
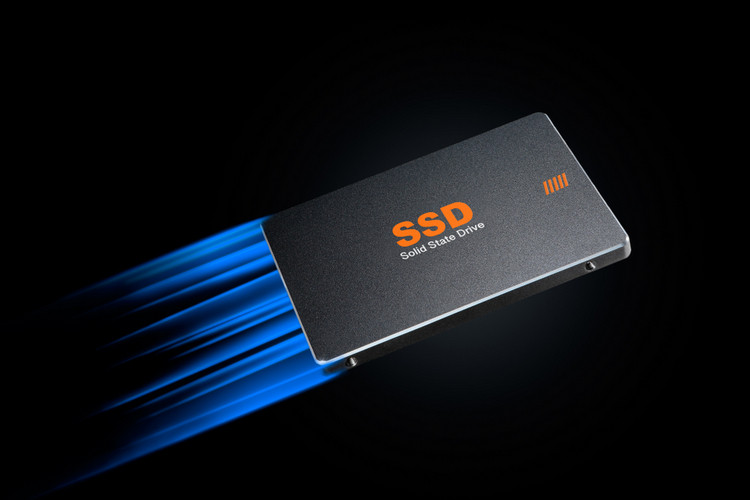
23. Upgrade to an SSD
With SSD prices hitting all-time lows, there’s no good reason not to ditch mechanical hard drives for good. That’s especially true if you are a gamer, given the massive performance gains offered by solid-state drives in terms of read/ write speeds. They not only deliver faster Windows 10 boot times and lightning-fast access to programs, but they also improve your overall gaming performance significantly. Check out the best budget gaming SSDs you can buy in 2022.
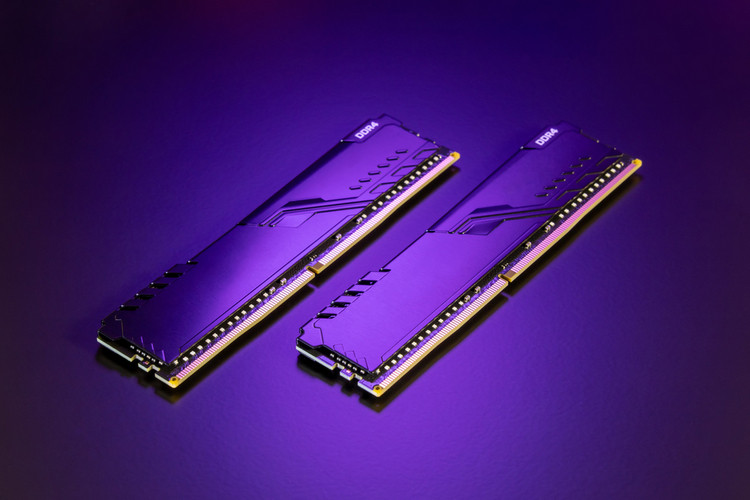
24. Add More RAM
Whether you are upgrading your existing computer or building a new one from the ground up, RAM is one of the essential components that could make or break your rig. With modern games getting more RAM-hungry than ever, adding more RAM can significantly optimize your Windows 10 gaming rig.
As of March 2021, you can easily get a 16GB 3200MHz DDR4 RAM kit without any fancy lighting for under $100. However, fancy modules with RGB and tighter timings can cost significantly more. Check out the best RAM for gaming at all price points.
25. Reinstall Windows or Get a New PC!
This is the nuclear option, the last resort. If nothing else works, chances are, your PC is too old to run modern games with high hardware requirements. So a complete overhaul may be to get the best gaming performance out of your Windows 10 computer. It may cost you a pretty penny but will offer you the best experience.
If you’re unsure about dropping a large chunk of change on shiny new hardware, reinstall Windows 10 to see if that helps optimize your PC for gaming. Sometimes, years of abuse and neglect can mess up Windows installations beyond repair, and a reinstallation may fix that. This way, you can get better performance without spending a penny.

Get the Best Out of Your Windows 10 Gaming Rig with These Simple Fixes
Despite increased support for macOS and Linux from game developers, Windows 10 is the go-to choice for most PC gamers worldwide. However, the OS still has a few issues that you need to iron out before it offers you optimal gaming performance. So use this in-depth guide to optimize your Windows 10 computer for the best gaming performance. Once you have done that, check out the best tips and tricks to speed up Windows 10, the best ways to improve battery life of your Windows 10 laptop, and the best mechanical keyboards for gaming.