При отображении иконок различных программ или типов файлов в проводнике File Explorer, Windows вместо обращения к исходным файлам с иконками, получает копии картинок значков из специальных файлов с кэшем иконок. За счет того, что операционной системе не нужно каждый раз загружать оригинальные файлы иконок, ускоряется работа и прорисовка объектов в проводнике Windows.
В некоторых случаях, при повреждении файла с кэшем иконок, в проводнике (и на рабочем столе) могут отображаться белые иконки ярлыков и файлов, или вместо иконок приложений отображаются стандартные иконки Windows. В этом случае рекомендуется выполнить сброс системного кэша иконок.
На скриншоте ниже видно, что в макете стартового меню Windows 10 вместо значков некоторых приложений отображаются стандартные иконки папок.
![]()
Примечание. Некоторые пользователи при появлении такого бага пытаются переустановить проблемное приложение, что помогает далеко не всегда.
Кэш иконок в различных версиях Windows представляет собой один или несколько db файлов, хранящихся в профиле пользователя.
- В Windows 7 это файл IconCache.db в каталоге %userprofile%\AppData\Local
- В Windows 10 и Windows 8.1 – это множество файлов, имя которых начинается с iconcache_ (iconcache_16.db, iconcache_32.db, iconcache_48.db и т.д. в соответствии с размерами иконки в пикселях) и хранятся в каталоге %userprofile%\AppData\Local\Microsoft\Windows\Explorer
Не путайте файлы кэша иконок с файлами thumbs.db, которые содержат кэш эскизов изображения и видео в папке.

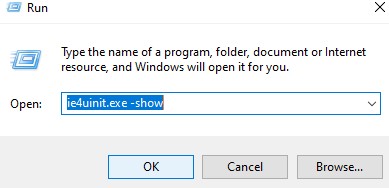
Сброс кэша иконок в Windows с помощью утилиты ie4uinit
В Windows есть специальная встроенная утилита ie4uinit (IE Per-User Initialization Utility), которую можно использовать для быстрого сброса кэша иконок.
- В Windows 10:
ie4uinit.exe -show - Для Windows 7:
ie4uinit.exe -ClearIconCache
Эту команду нужно выполнить через меню Win+R -> команда -> Enter.
Команды абсолютно безопасные, но помогают восстановить нормальное состояние кэша иконок далеко не во всех случаях.
Скрипт удаления файлов с кэшем иконок в Windows
Чтобы сбросить кэш иконок, достаточно удалить db файлы с кэшем. Но предварительно нужно завершить процесс проводника File Explorer, чтобы он не блокировал доступ к файлам iconcache. Рассмотрим, как сбросить базу данных кэша иконок без перезагрузки Windows.
- Закройте все запущенные приложения;
- Откройте окно командной строки (
cmd.exe
или
powershell.exe
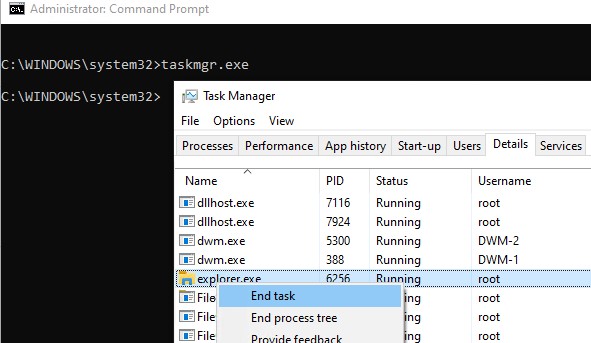
) с правами администратора; - Запустите диспетчер задач
taskmgr.exe - В окне Task Manager перейдите на вкладку Details, найдите процесс explorer.exe и завершите его (End Task);

- Также вы можете завершить процесс из командной строки:
taskkill /f /im explorer.exe - Затем последовательно выполните следующие команды для удаления кэша иконок в профиле пользователя (в зависимости от версии ОС):
Для Windows 10/ 8.1 (просто скопируйте этот код в окно командной строки или сохраните как текстовый файл reset_icon_windows.bat).
taskkill /f /im explorer.exe
cd /d %userprofile%\AppData\Local\Microsoft\Windows\Explorer
 attrib –h iconcache_*.db
del /f IconCache*
del /f thumbcache*
cd /d  %userprofile%\AppData\Local\
attrib –h IconCache.db
del /f IconCache.db
start C:\Windows\explorer.exe
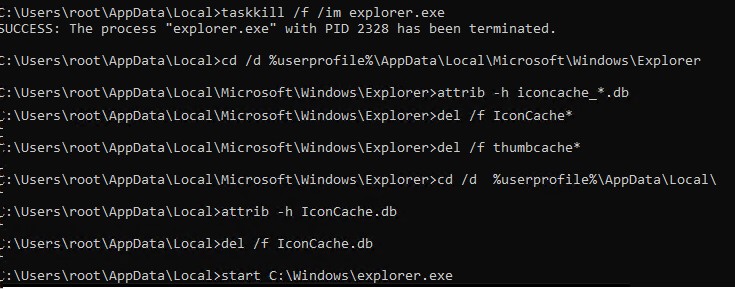
В моем случае скрипт не смог удалить только файл
iconcache_idx.db
(Access is denied), но это не повлияло на итоговый результат. Кэш иконок был успешно сброшен.
Для Windows 7:
cd /d %userprofile%\AppData\Local
del /f /a s IconCache.db
start C:\Windows\explorer.exe<
Последняя команда в обоих случаях перезапустит процесс проводника Windows (
explorer.exe
), который при запуске пересоздаст файлы с кэшем иконок (в соответствии с заданными файловыми ассоциациями).
-
Home
-
Partition Magic
- How to Rebuild Icon Cache Windows 11/10? – To Fix Icon Issues
By Sherry |
Last Updated
Rebuilding icon cache is a nice way to fix Windows icon issues such as a broken icon. In this post from the MiniTool Partition Wizard, you can figure out how to rebuild icon cache Windows 11/10.
What does Icon Cache Do
In Windows 11/10, there is an icon cache database that stores copies of each icon handy, which enables the operating system to display various types of files icons very quickly.
As more and more files go to the database, the icon cache database might get corrupted. When the database is corrupted, you might find that some icons get broken. To solve the problem, you usually need to rebuild icon cache.
How to Rebuild Icon Cache Windows 11/10
Whether you are using Windows 11 or Windows 10, you can try the following methods to rebuild icon cache.
Method 1: Rebuild Icon Cache Windows 11/10 via File Explorer
File Explorer is a built-in tool in Windows 11 and 10. It is mainly used to manage files and folders. Here I’d like to show you how to rebuild icon cache using File Explorer.
Step 1: Press the Windows key along with the E key to open File Explorer.
Step 2: Navigate to the following location: C:Users%username%AppDataLocalMicrosoftWindowsExplorer. You can just copy the location and paste it to the address bar to find it quickly.
Step 3: Delete all the files beginning with iconcache. Then you will see a new folder named IconCacheToDelete.
![]()
Step 4: Restart your computer and the IconCacheToDelete folder will disappear.
Method 2: Rebuild Icon Cache Windows 11/10 using Command Prompt
Alternatively, you can rebuild icon cache Windows 10/11 using Command Prompt, a built-in command-line interpreter that can be used to manage your computer in many aspects.
In the following content, you can learn how to perform icon cache rebuild on Windows 11/10 with Command Prompt.
Step 1: Press Win + S to open the Windows Search utility. Then search for Command Prompt and run it as administrator.
![]()
Step 2: In Command Prompt, input the commands below one by one and press Enter after each:
- cd /d %userprofile%AppDataLocalMicrosoftWindowsExplorer
- attrib –h iconcache_*.db
- del iconcache_*.db start explorer
![]()
Step 3: Restart your computer.
Further Tip: Rebuild Thumbnail Cache with Command Prompt
Windows thumbnails are the small images you see when you access a folder of pictures. Similar to the icon cache, the thumbnails cache database stores those thumbnails so you can view them quickly. When the thumbnails cache doesn’t work properly, some thumbnails might get broken, white, or black.
To solve thumbnail issues, you can rebuild thumbnail cache with Command Prompt. And here are the detailed steps:
Step 1: Run Command Prompt as an administrator.
Step 2: In Command Prompt, input the listed commands one by one. Remember to press Enter after each command:
- cd /d %userprofile%AppDataLocalMicrosoftWindowsExplorer
- attrib –h thumbcache_*.db
- del thumbcache_*.db
Step 3: Restart your computer and the thumbnail cache will be rebuilt.
Tip: You can also rebuild thumbnail cache by deleting thumbnail cache files in File Explorer. Just go to C:Users%username%AppDataLocalMicrosoftWindowsExplorer.
That’s all about how to rebuild icon cache on Windows 11/10. You can have a try when your Windows icons go wrong. Hope it is helpful for you. You can share your experiences and ideas with us by posting them in the following comment section.
About The Author
Position: Columnist
Sherry has been a staff editor of MiniTool for a year. She has received rigorous training about computer and digital data in company. Her articles focus on solutions to various problems that many Windows users might encounter and she is excellent at disk partitioning. She has a wide range of hobbies, including listening to music, playing video games, roller skating, reading, and so on. By the way, she is patient and serious.
Значки и иконки, которые использует Windows для ваших документов и программ, сохраняются в кэш иконок. Поэтому они отображаются быстро, вместо того, чтобы медленно загружать их каждый раз. Если с их отображением возникают проблемы, то есть способы восстановить работоспособность. Иногда кэш значков устаревает, в результате чего значки могут отображаться неправильно или даже теряться. Бывают разные ситуации и сброс icon cache, и автоматическое воссоздание путей решает эту проблему. Покажу, как это сделать в Windows 10, но так же этот способ подходит и для Windows 8 и 7.
Чтобы увидеть директорию AppData, нажмите Win+R и введите %appdata% или включите отображение скрытых элементов и проследуйте по пути. В Windows Vista и Windows 7 кэш-файл значок находится в
C: \ Users \ <ваше имя пользователя> \ AppData \ Local \ IconCache.db
Этот файл по-прежнему присутствует в Windows 8 и 10, но Windows не использует их для хранения кэша иконок. В операционной системе Windows 8 и Windows 10 кэш-файл значок находится в:
C: \ Users \ <ваше имя пользователя> \ AppData \ Local \ Microsoft \ Windows \ Explorer
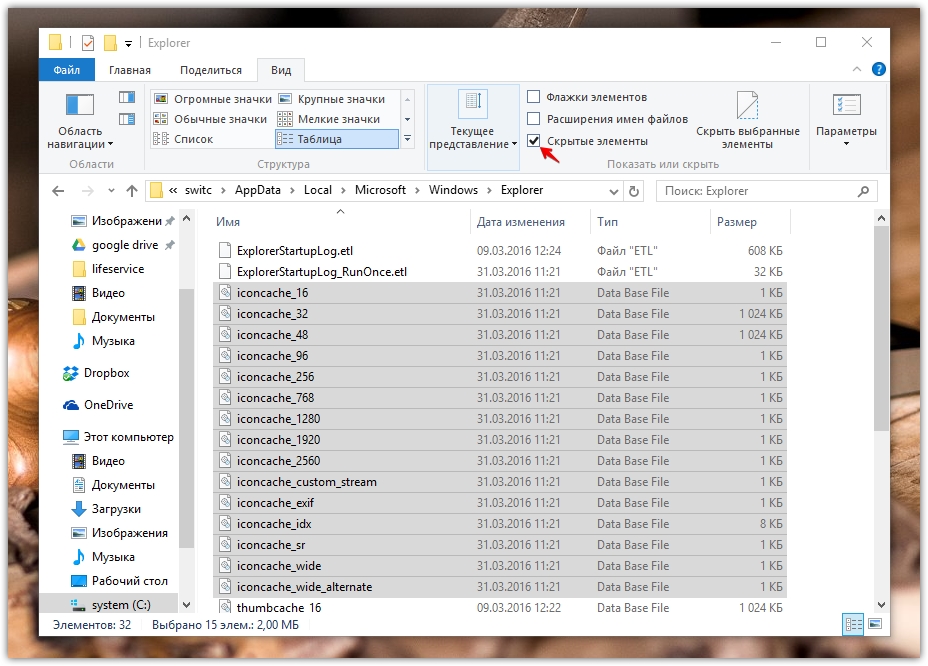
В этой папке вы найдете несколько файлов кэша иконок:
iconcache_16.db
iconcache_32.db
iconcache_48.db
iconcache_96.db
iconcache_256. дБ
iconcache_768.db
iconcache_1280.db
iconcache_1920.db
iconcache_2560.db
iconcache_custom_stream.db
iconcache_exif.db
iconcache_idx.db
iconcache_sr.db
iconcache_wide.db
iconcache_wide_alternate.db
Чтобы перестроить кэш иконок, вы должны удалить все файлы iconcache, которые появляются в этой папке. Просто так удалить их не удастся, потому как проводник все еще использует их.
Как перестроить Icon Cache
Закройте и сохраните программы, которые работают, сохраните открытые документы, прежде чем продолжить. Откройте Проводник и перейдите в следующую папку:
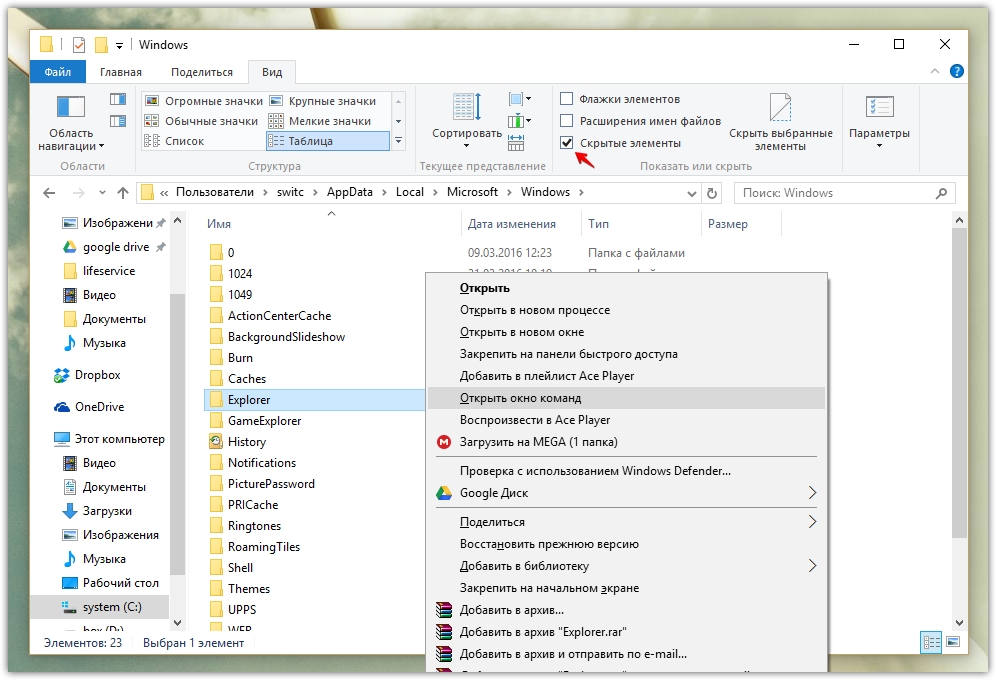
Нажмите и удерживайте нажатой клавишу «Shift«, и щелкните правой кнопкой мыши на папке Explorer. Выберите «Открыть окно команд»
C: \ Users \ <ваше имя пользователя> \ AppData \ Local \ Microsoft \ Windows \ Explorer
Чтобы убедиться, что командная строка находится в нужной папке. Введите dev команду, вы должны увидеть iconcache и thumbcache файлы.

Теперь нужно завершить процесс Explorer в диспетчере задач, или нажмите Ctrl+Alt+Del. Кликните правой кнопкой по проводнику и завершите процесс.
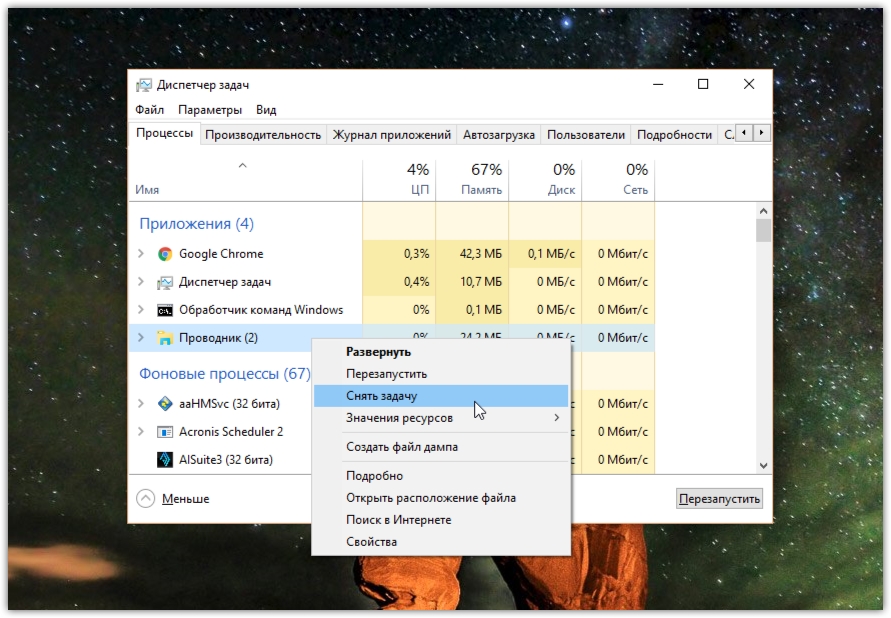
Не пугайтесь! Исчезнет проводник и рабочий стол, экран станет черным, снимите задачу диспетчера устройств. Переключитесь на командную строку и введите команду:
del iconcache*
Если по какой-то причине отказано в доступе, завершите процессы. Убедитесь, что диспетчер задач не запущен и повторите процедуру. Помните, вы всегда можете использовать Ctrl+Alt+Del и диспетчер задач. Простой командой explorer можете вновь запустить проводник, чтобы вернуть привычный рабочий стол и графический интерфейс.
Если все прошло гладко, жмите Ctrl+Alt+Del и выключите, или перезагрузите компьютер. После этого кэш должен пересоздать и значки, и иконки, всё будет отображаться корректно.
Если возникнут вопросы, отвечу в комментариях, жмите поделиться, если статья понравилась, удачи!
У меня есть статья про чудесную утилиту AVZ. С помощью мастера устранения проблем можно очистить кеш в автоматическом режиме. Будьте внимательны и все получится.
В данной статье показаны действия, с помощью которых можно восстановить кэш значков программ и файлов в операционной системе Windows 10.
Значки отображаемые для различных программ или типов файлов в операционной системе Windows 10 сохраняются в кэше значков и поэтому они быстро отображаются, и за счет этого системе не нужно каждый раз обращаться к оригинальным файлам, сканировать и загружать их.
Иногда кэш значков может быть поврежден, что приводит к неправильному или искаженному отображению значков файлов или программ. В этом случае необходимо удалить кэш значков, чтобы сбросить его и автоматически создать заново.
Кэш значков представлен группой файлов с именами iconcache и расширением *.db, которые расположены в скрытом каталоге:
%LocalAppData%\\Microsoft\\Windows\\Explorer
![]()
Как восстановить кэш значков в Windows 10
Чтобы восстановить кэш значков, нужно удалить все файлы iconcache, но предварительно нужно завершить работу Проводника Windows, чтобы он не блокировал к ним доступ.
Запустите командную строку от имени администратора и последовательно выполните следующие команды:
taskkill /IM explorer.exe /F
DEL /A /F /Q «%localappdata%\\Microsoft\\Windows\\Explorer\\iconcache*»
start explorer.exe
![]()
Первая команда завершает работу проводника, вторая команда удаляет файлы iconcache, и последняя команда запускает проводник, который создаст новые файлы iconcache, в которых находится кэш значков.
We may face the icon cache corruption issue sometimes in Windows 10/11 and earlier OS. The icon cache corruption causes the wrong icons to show up for certain programs or in certain areas of the Windows shell, or no icons at all. For example, your pinned taskbar shortcuts may show up with the wrong icon.
My earlier post Incorrect icon shown for a file type tells you how to refresh the shell icons using Default Apps. In some cases, the old icon may still show up after changing the file type association.
To render the icons for various shell objects like folders, special folders, and files, Windows caches the icons in database files so that Windows doesn’t have to read the file or folder icon and extract them every time. Occasionally, you’ll see icon-caching bugs in Windows resulting in incorrect, missing, or out-of-date icons being shown for programs and desktop shortcuts and other areas of the shell.
To resolve the incorrect icons issue, you may want to clear and rebuild the icon cache database completely. This post explains how to accomplish the task using different methods. The instructions apply to all versions of Windows, including Windows 11.
Clear and Rebuild the Icon Cache:
- Method 1: Using ClearIconCache.exe freeware tool
- Method 2: Manually
- Method 3: Using a Script
Before proceeding, try a simple fix like the ie4uinit.exe refresh method. In many situations, all that you need to do is refresh the icons without the need to clear and rebuild them.
If refreshing the icons using ie4uinit.exe or Default Apps doesn’t help, you’ll have to clear the icon cache completely.
How to Clear and Rebuild the Icon Cache in Windows
Let’s see how to clear the icon cache completely and let Windows rebuild it automatically.
1) Clear & Rebuild icon cache using ClearIconCache.exe Utility
Clear Icon Cache (ClearIconCache.exe) utility from Leo Davidson will cleanly exit Explorer, delete the shell icon cache (IconCache*.db), and localized thumbnail cache (ThumbCache*.db), and then restart Explorer.
Leo Davidson is a trusted source — he is the one who wrote the famous PDF x64 thumbnail & preview fix for Windows some years back. And he’s the owner of FileTypeDiag and many other useful portable tools.
With Clear Icon Cache, you double-click the program, and it takes care of the details for you. Clear Icon Cache works in Windows Vista, Windows 7, Windows 8, and Windows 10. Though Windows 11 isn’t mentioned, it should work on Windows 11 without any issues.
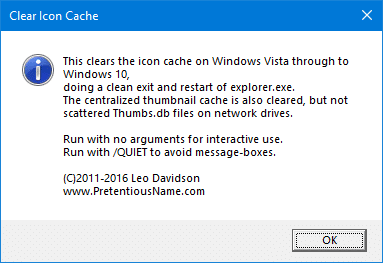
To run the utility in noninteractive or silent mode, run ClearIconCache.exe /QUIET
As said earlier, the utility also clears the thumbnail caches on the computer.
RELATED: How to Restart Explorer Gracefully Using Shortcut or Command-line
2: Clear & Rebuild the Icon Cache Database Manually
The icon cache database files are located in your %LocalAppData% folder with file names prefixed with iconcache_ – each icon size has a separate cache (database) file.
The file names look like this:
iconcache_16.db
iconcache_32.db
iconcache_48.db
iconcache_96.db
iconcache_256.db
iconcache_768.db
iconcache_1280.db
iconcache_1920.db
iconcache_2560.db
iconcache_exif.db
iconcache_idx.db
iconcache_sr.db
iconcache_wide.db
iconcache_wide_alternate.db
![]()
To clear the icon cache manually, follow these steps:
- Close all folder windows that are currently open.
- Launch Task Manager using the Ctrl + Shift + Esc key sequence.
- In the Task Manager Process tab, right-click on the Explorer.exe process and select End Process.
Note: It’s even better if you exit explorer gracefully. See instructions for Windows 7 and Windows 10 to know how to quit the Explorer.exe shell process gracefully. Don’t restart a new explorer.exe process yet!
- Click the End process button when asked for confirmation.
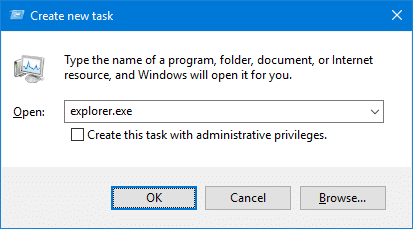
- From the File menu of Task Manager, select New Task (Run…)
- Type CMD.EXE, and click OK
- In the Command Prompt window, type the commands one by one and press Enter after each command:
CD /d %userprofile%\AppData\Local
DEL IconCache.db /a
- Additionally, in Windows 8, Windows 10, and Windows 11, the icon cache database is also stored in
%userprofile%\AppData\Local\Microsoft\Windows\Explorer. To clear them, you must close all running applications, and run these commands in the Command Prompt.CD %userprofile%\AppData\Local\Microsoft\Windows\Explorer DEL IconCache*.db /a EXIT
If you receive Access is Denied error when deleting the IconCache*.db files, then one or more of the open programs is using the icon cache database. Close all programs and try again, or try clearing them from Safe mode.
- In Task Manager, click File, select New Task (Run…)

- Type EXPLORER.EXE, and click OK.
Editor’s note: Instead of using Task Manager to exit Explorer.exe in Step 3 above, an even better way to do this is to terminate the Explorer.exe Shell cleanly using the method described in the article Terminate and Restart Explorer.exe Process Cleanly in Windows 7. If you’re using Windows 8, Windows 10, or Windows 11, check the article How to Exit Explorer and Restart Explorer in Windows 10/11.
Method 3: Automatically Clear & Rebuild the Icon Cache Using Script
This method uses a small script that I wrote to clean up the icon cache completely. Once done, the script restarts the Explorer shell for the change to take effect.
Contents of the Script – Cleariconcache.vbs
'cleariconcache.vbs
'Clears the icon cache databases to lets Windows rebuild them fresh.
'for Windows Vista, 7, 8, Windows 10, Windows 11.
'Written by Ramesh Srinivasan.
'Written on Jan 31 2016
'Updated on Apr 01 2016
'Reviewed on Aug 02 2022
'https://www.winhelponline.com/blog/

Option Explicit
Dim WshShell, objFSO, strICPath1, strICPath2, strmsg, rtnStatus, Process, iDirtyFlags, iDirtyFlags2
Const DeleteReadOnly = True
Set WshShell = WScript.CreateObject("WScript.Shell")
Set objFSO = CreateObject("Scripting.FileSystemObject")
strICPath1 = WshShell.ExpandEnvironmentStrings("%LOCALAPPDATA%")
strICPath2 = strICPath1 & "\Microsoft\Windows\Explorer"

ExitExplorerShell
WScript.Sleep(3000)
ClearIconCache
WScript.Sleep(2000)
StartExplorerShell

Sub ExitExplorerShell()
	strmsg = "Explorer Shell will be terminated now."
	strmsg = strmsg & " Please save all your work and close all programs."
	strmsg = strmsg & "Icon cache may not be cleared if programs are using them. Want to continue?"
	rtnStatus = MsgBox (strmsg, vbYesNo, "Clear the Icon Cache")
	If rtnStatus = vbYes Then
		For Each Process in GetObject("winmgmts:"). _
			ExecQuery ("select * from Win32_Process where name='explorer.exe'")
	   		Process.terminate(1)
		Next
	ElseIf rtnStatus = vbNo Then
		WScript.Quit
	End If
End Sub

Sub StartExplorerShell
	WshShell.Run "explorer.exe"
End Sub

Sub ClearIconCache()
	If (objFSO.FileExists(strICPath1 &"\IconCache.db")) Then
	On Error Resume Next
    	objFSO.DeleteFile strICPath1 &"\IconCache.db", DeleteReadOnly
	On Error Goto 0
    	If Err.Number <> 0 AND Err.Number <> 53 Then
    		iDirtyFlags = 1
    	End If
	End If

	If objFSO.FolderExists(strICPath2) Then
	On Error Resume Next
    	objFSO.DeleteFile(strICPath2 & "\icon*.db"), DeleteReadOnly
	On Error Goto 0
    	If Err.Number <> 0 AND Err.Number <> 53 Then
    		iDirtyFlags2 = 1
    	End If
	End If

	WshShell.Run "ie4uinit.exe -ClearIconCache"
	WshShell.Run "ie4uinit.exe -show"
End Sub

If iDirtyFlags = 1 Then
	rtnStatus = MsgBox ("Some programs are still using the IconCache.db in LOCALAPPDATA. Close all programs and try again", vbOKonly, "Clear the Icon Cache")
End If

If iDirtyFlags2 = 1 Then
	If iDirtyFlags <> 1  Then
		rtnStatus = MsgBox ("Some programs are still using the cache in Location 2. Close all programs and try again", vbOKOnly, "Clear the Icon Cache")
	End If
End If

If iDirtyFlags = 0 And iDirtyFlags2 = 0 Then
 	MsgBox "Successfully cleared the Icon Caches.", vbOKOnly, "Clear the Icon Cache"
End If

Set WshShell = Nothing
Set objFSO = Nothing
How to Use?
- Download
cleariconcache.vbsor create the VBScript file manually using Notepad. - Save all your work and close all programs, so that icon cache files are not locked by any program.
- Double-click the script file
cleariconcache.vbs
- Click Yes when you’re prompted to restart the shell.
Optionally, when the following dialog shows up, you can manually terminate the explorer shell gracefully (instead of the script doing it forcefully). See instructions for Windows 7 and Windows 10/11 to know how to quit the Explorer.exe shell process gracefully. Don’t restart a new explorer.exe process yet! Once done, click Yes.

If the Icon Cache database files can’t be deleted, some programs are using them. Close all applications and try rerunning the script.

It should be able to delete the icon cache files.

After clearing the cache, the Explorer shell should start automatically and rebuild a fresh set of icon cache.
I hope you were able to fix icon rendering issues on your Windows computer by clearing the icon cache completely.
One small request: If you liked this post, please share this?
One «tiny» share from you would seriously help a lot with the growth of this blog.
Some great suggestions:
- Pin it!
- Share it to your favorite blog + Facebook, Reddit
- Tweet it!
So thank you so much for your support. It won’t take more than 10 seconds of your time. The share buttons are right below. 