- Remove From My Forums
-
Вопрос
-
Здравствуйте.
В компонентах не удается установить HYPER-VПри наведении мышки на флажок «Платформа Hyper-V» появляется сообщение: «Невозможно установить Hyper-V: во встроенном ПО отключена поддержка виртуализации»
Параметры:
Моноблок HP PRO 3520, Windows 8 Pro x 64 OEM, Процессор Intel Core i3 (поддерживает по результатам теста программой от Intel технологую виртуализации)
P.S.
Звонил в HP. Сказали, что можно зайти в БИОС: security > system security > virtualization technology … enable.
Не помогло. В самом BIOS нет строчки типас именем процессорв intel или CPU
В чем может быть проблема?
Ответы
-
Проблема решилась. Нужно было помимо включения опции virtualization technology … enable скачать драйвера чипсета с офф. сайта и после их установки HYPER-V заработал.
-
Помечено в качестве ответа
25 февраля 2013 г. 13:38
-
Помечено в качестве ответа
Перейти к контенту

Hyper-V — это система создания виртуальных машин, которая уже встроена в Windows 10, но по умолчанию отключена.
Для функционирования Hyper-V компьютер должен соответствовать следующим требованиям:
- Процессор должен быть 64-разрядным. Hyper-V доступен в 64-разрядных версиях Windows Server 2008, а именно в 64-разрядных версиях Windows Server 2008 Standard, Windows Server 2008 Enterprise и Windows Server 2008 Datacenter.
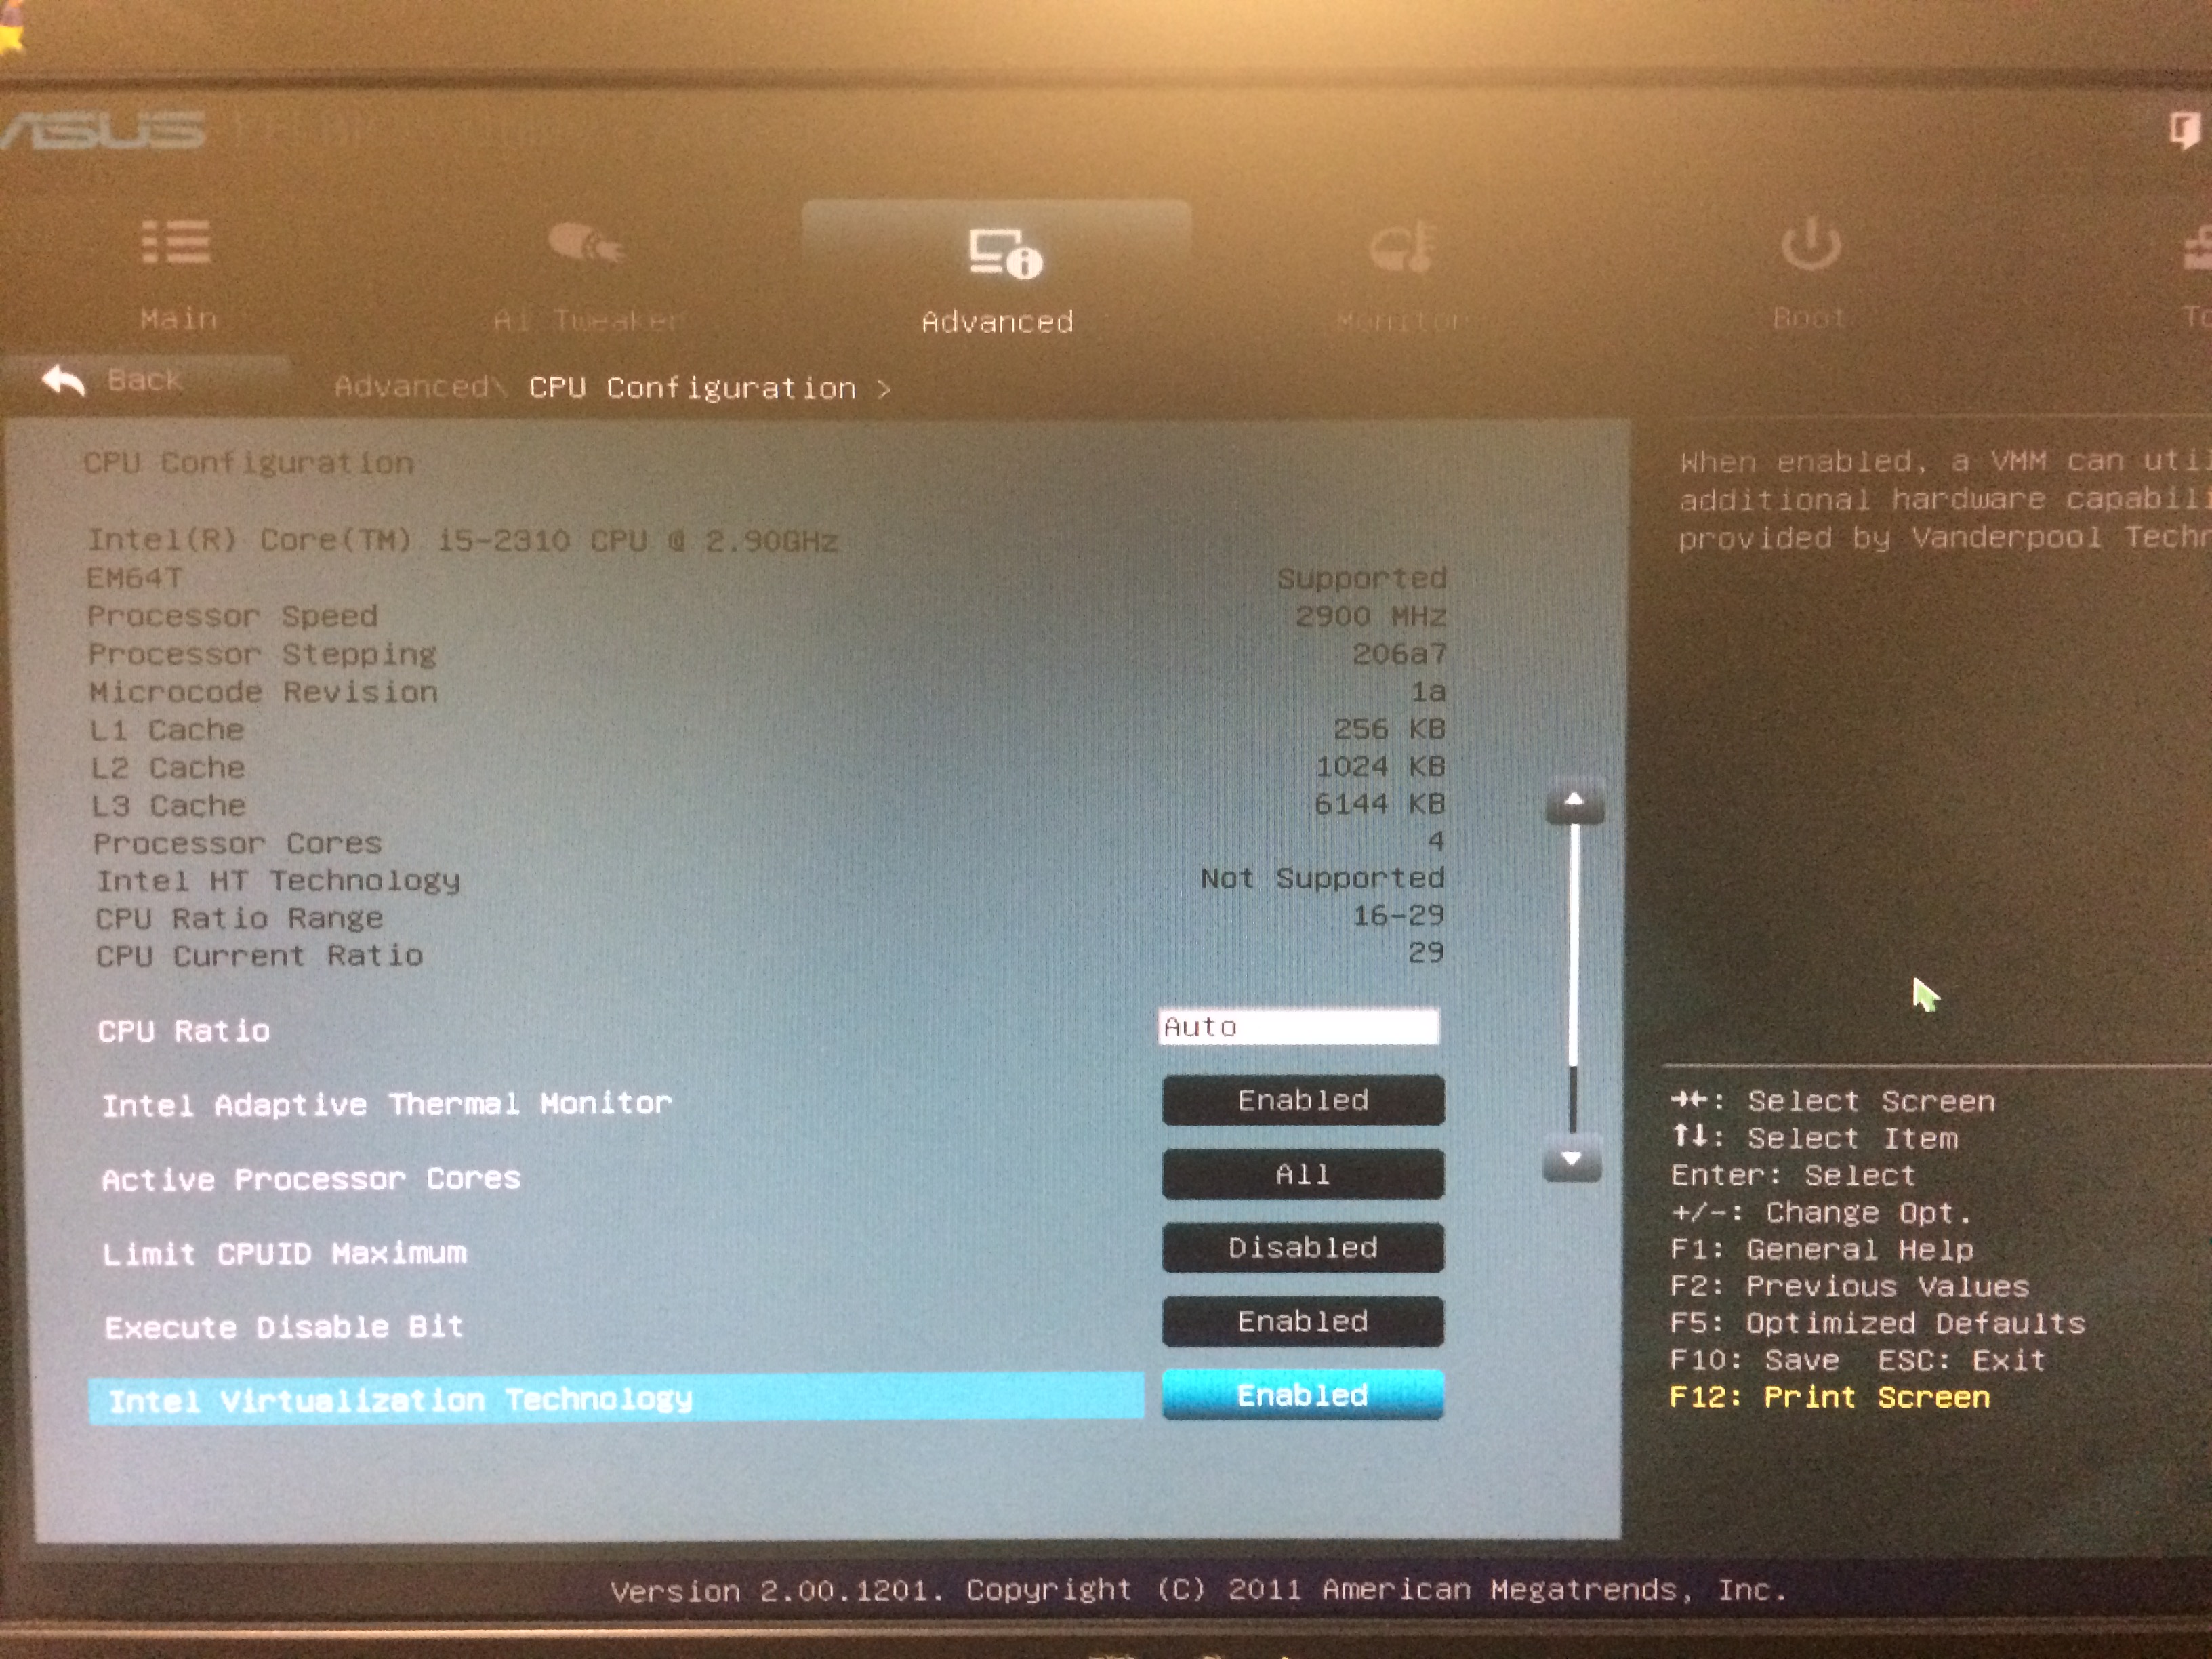
- Компьютер должен поддерживать аппаратную виртуализацию. Это возможно в процессорах, поддерживающих параметр виртуализации, а именно Intel Virtualization Technology (Intel VT) и AMD Virtualization (AMD-V). Эта функция должна быть включена в BIOS.
Если компьютер удовлетворяет этим требованиям, то можно включать . Для этого необходимо:
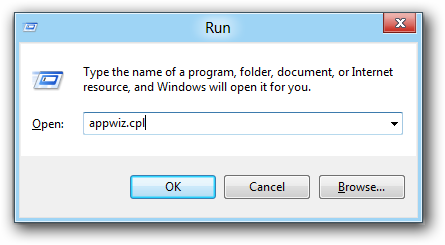
1. Нажать на сочетание клавиш «WIN+R«;
2. В строке «Выполнить» вписать команду appwiz.cpl
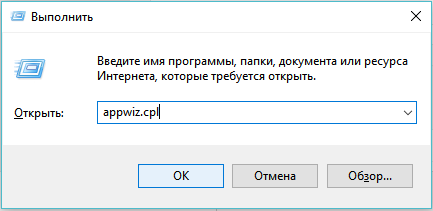
Нажать на кнопку «ОК»
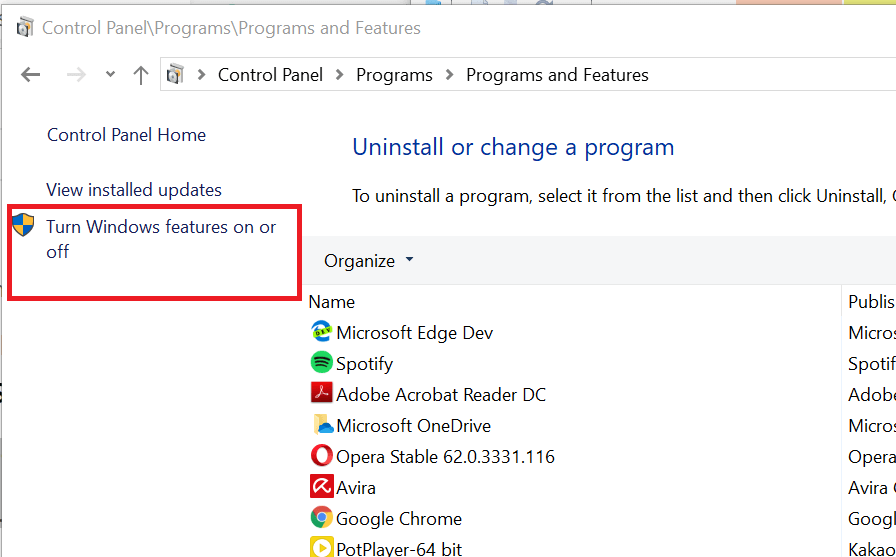
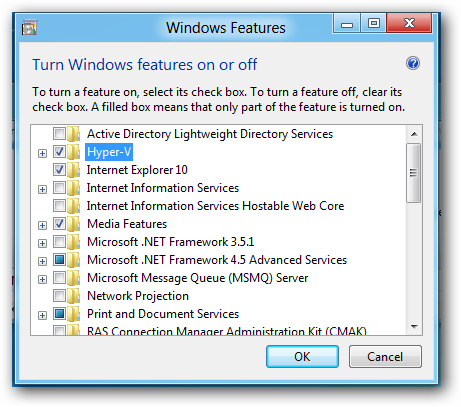
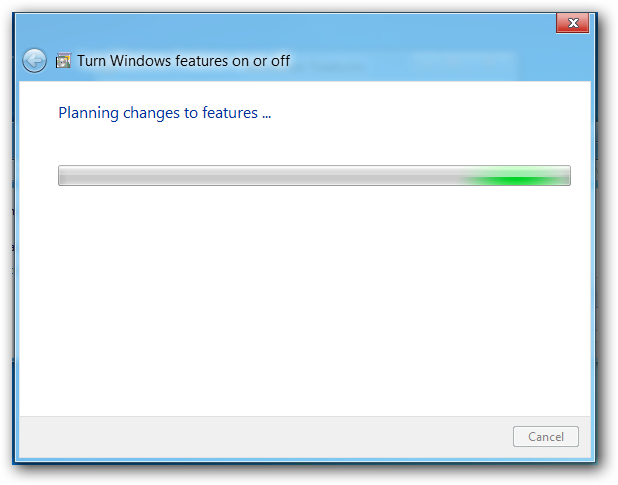
3. В окне «Программы и компоненты» выбрать «Включение и отключение компонентов Windows«:

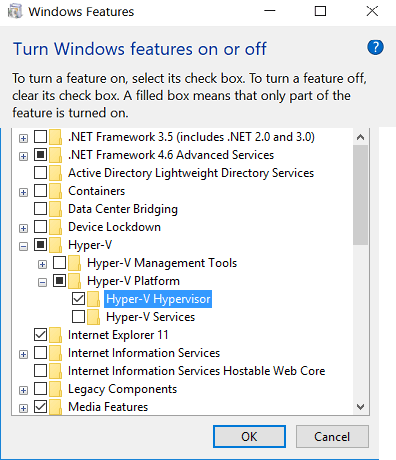
4. В окне «Компоненты Windows» отметьте пункты Hyper-V:
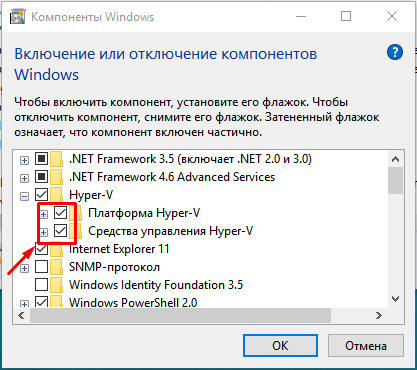
Нажмите кнопку «ОК»
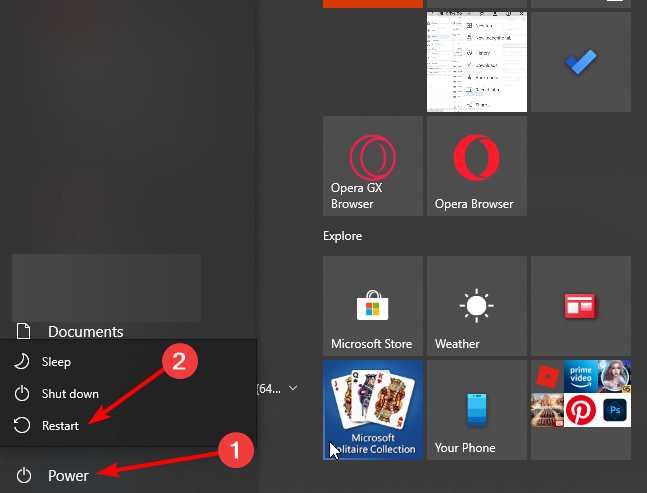
5. Перезагрузите компьютер.
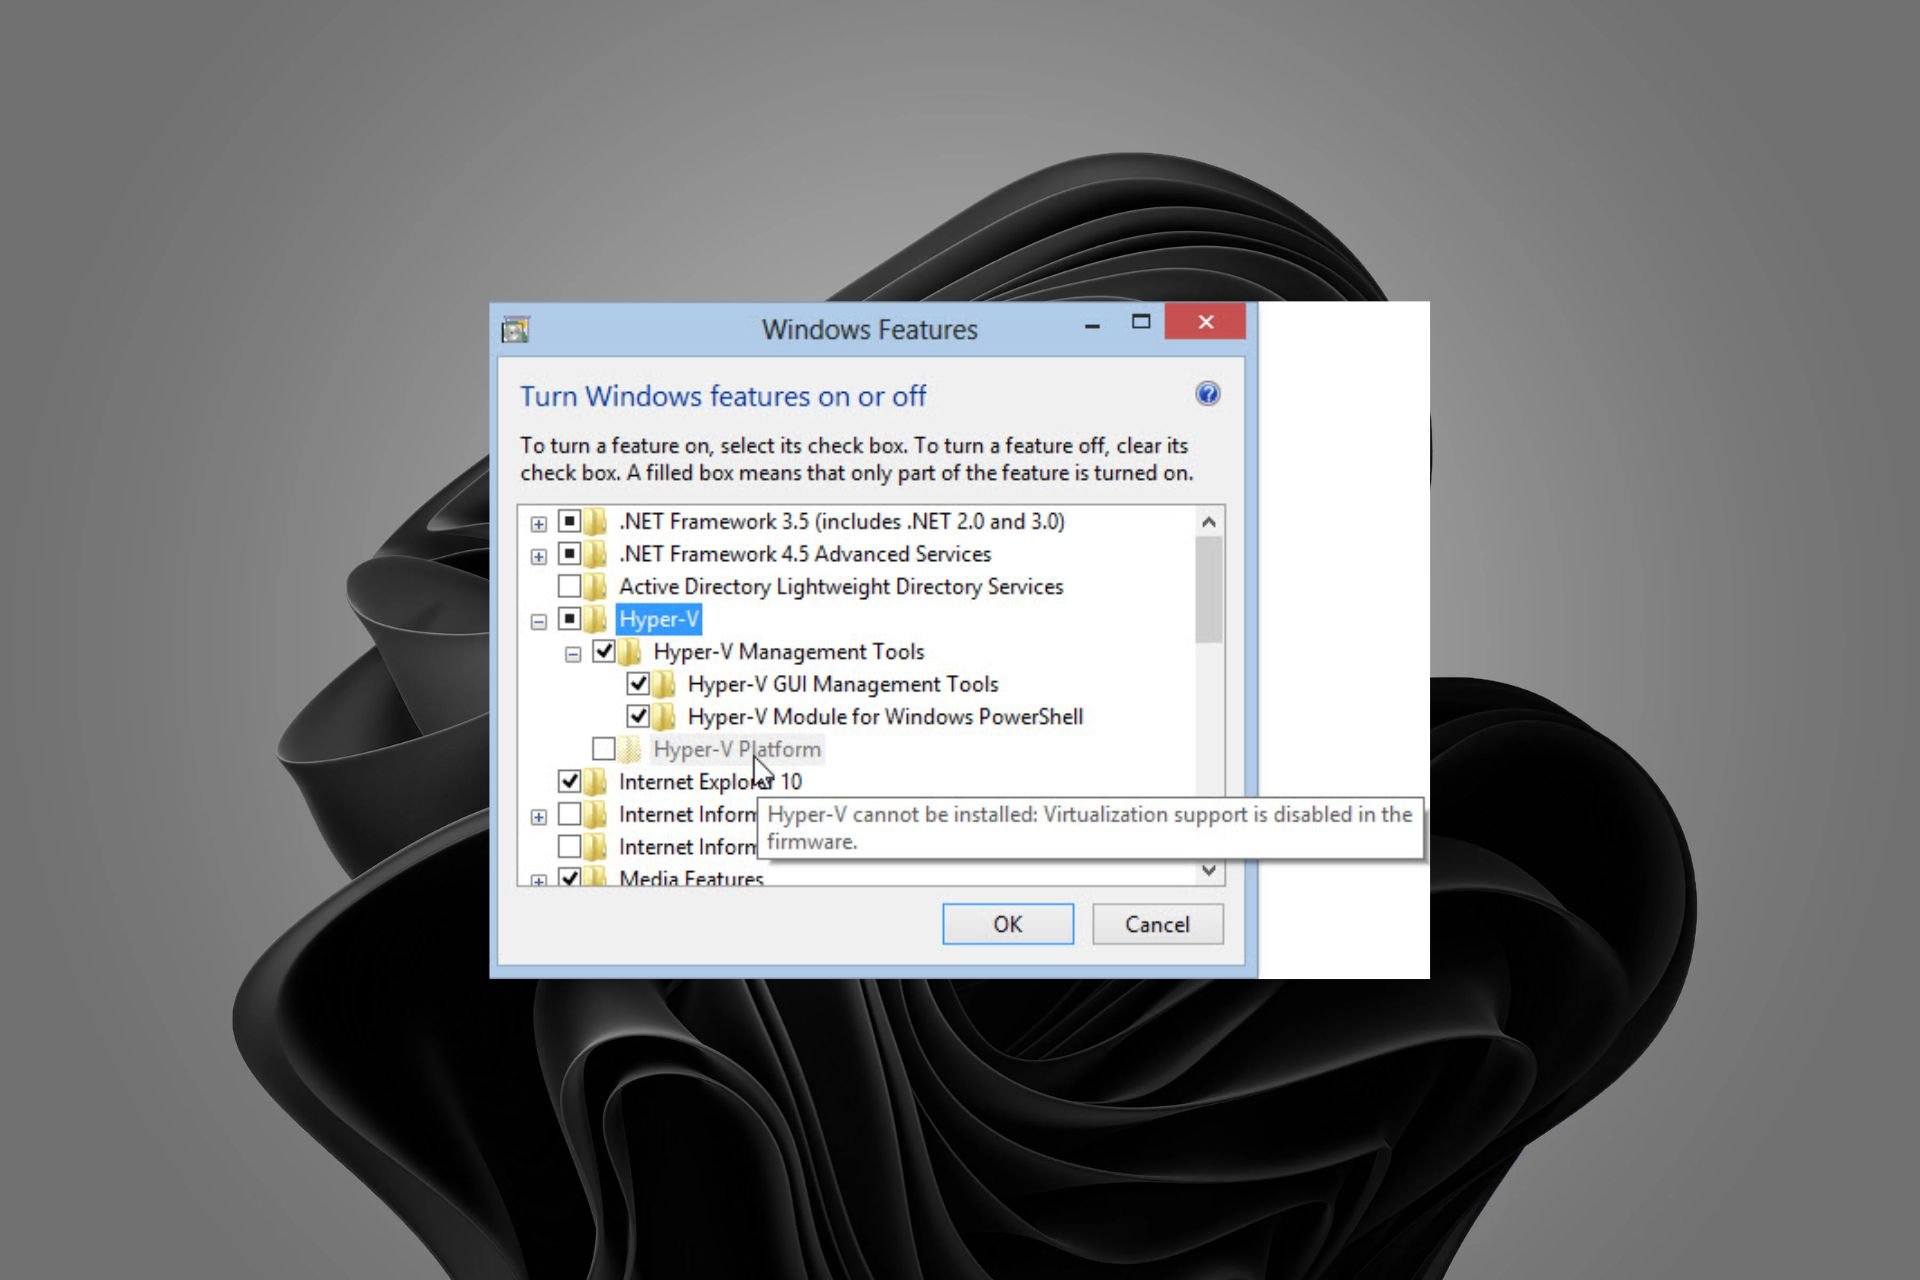
- Если пункт «Платформа Hyper-V» не выбирается и выдает при наведении на пункт сообщение:
Невозможно установить Hyper-V: во встроенном ПО отключена поддержка виртуализации

Необходимо в настройках BIOS включить параметр виртуализации (если конечно процессор поддерживает виртуализацию по п.2. требований к установке Hyper-V)
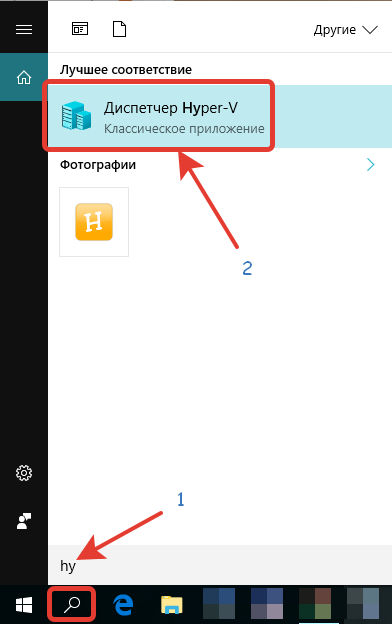
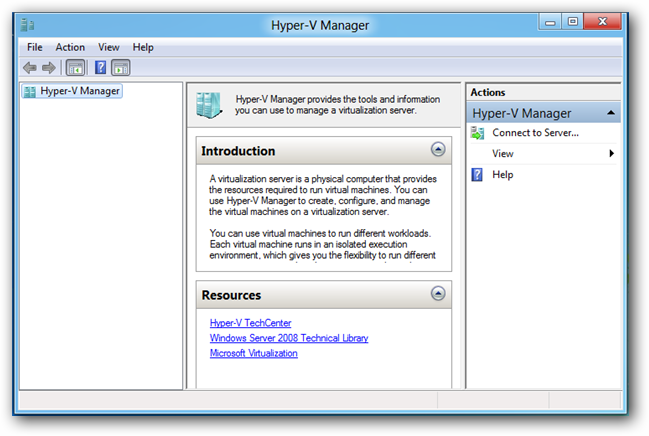
Для запуска Диспетчера Hyper-V нажмите на значке поиска «лупа» (рядом с кнопкой «Windows»). Введите слово Hyper-V и выберите «Диспетчер Hyper-V«:
Подробнее смотрите в видео:
Update your BIOS to enable virtualization support
by Claire Moraa
Claire likes to think she’s got a knack for solving problems and improving the quality of life for those around her. Driven by the forces of rationality, curiosity,… read more
Updated on
- Microsoft has made it possible to run a virtual machine without any additional software with the Hyper-V feature.
- However, if your device doesn’t meet the system requirements, you may run into some hurdles.
Hyper-V is a feature of Windows that allows you to create virtual machines on your computer. However, you may find that Hyper-V cannot be installed because virtualization support is disabled in the firmware.
When installing Hyper-V, it will automatically detect whether your system has the required hardware and software prerequisites. If your device doesn’t meet the said requirements, you will be prompted to install them before continuing with the installation process.
Why is virtualization support disabled in the firmware?
If you are wondering why you’re getting the hyper-v cannot be installed virtualization support is disabled in the firmware error, it could be due to one of the following reasons:
- Outdated OS – You probably use an old version of Windows with Hyper-V disabled. You’ll have to upgrade to Windows 11 or an OS that supports the feature.
- Hardware conflict – Hyper-V uses hardware-assisted virtualization. Therefore, if you try to install Hyper-V on a computer that might cause incompatibility issues with the software and hardware, you may get such an error message.
- Disabled in BIOS – Hyper-V Virtualization Support may be disabled because of an issue with the computer’s BIOS.
What can I do if Hyper-V cannot be installed and virtualization support is disabled?
It’s always essential to perform basic checks before any advanced troubleshooting, such as:
How we test, review and rate?
We have worked for the past 6 months on building a new review system on how we produce content. Using it, we have subsequently redone most of our articles to provide actual hands-on expertise on the guides we made.
For more details you can read how we test, review, and rate at WindowsReport.
- Check that your system meets the Hyper-V minimum requirements.
- Ensure you have enabled the Hyper-V feature.
1. Turn on Hardware Virtualization in BIOS
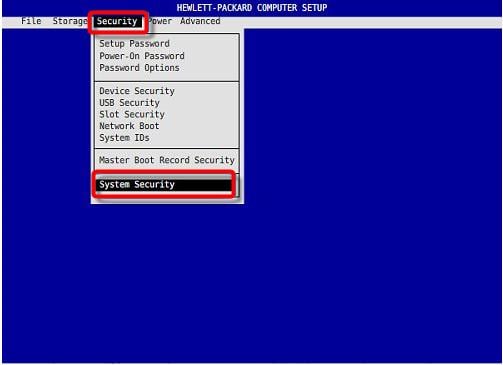
- Turn on your PC and hold down the F10 key to boot into BIOS (The specific key will depend on your device’s manufacturer, which is HP).
- Use the arrow keys, navigate to the Security tab, select System Security, and press Enter.

- Select Virtualization Technology (VTx/VTd), then Enable it.

- Press F10 to save your changes and exit the BIOS.

The steps above are specific to HP devices. You may find that Virtualization support is disabled in the firmware for Asus or Lenovo. The steps may differ a bit, but you can also borrow some similarities from this step.
2. Update your BIOS
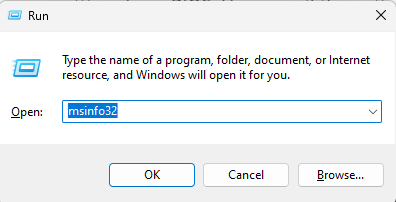
- Hit the Windows + R keys to open the Run command.
- Type msinfo32 and hit Enter.

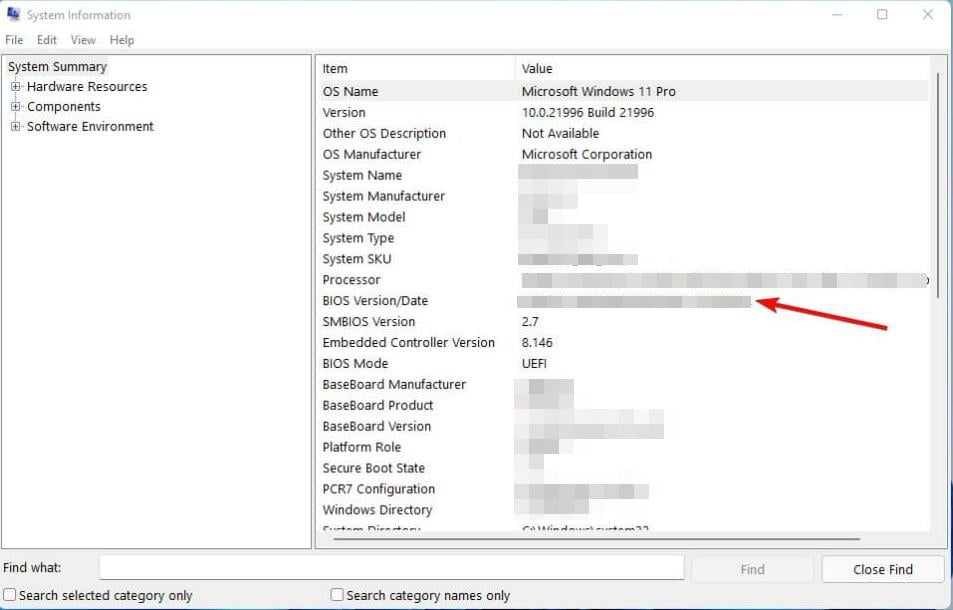
- Locate the entry marked BIOS version/date and note it down.

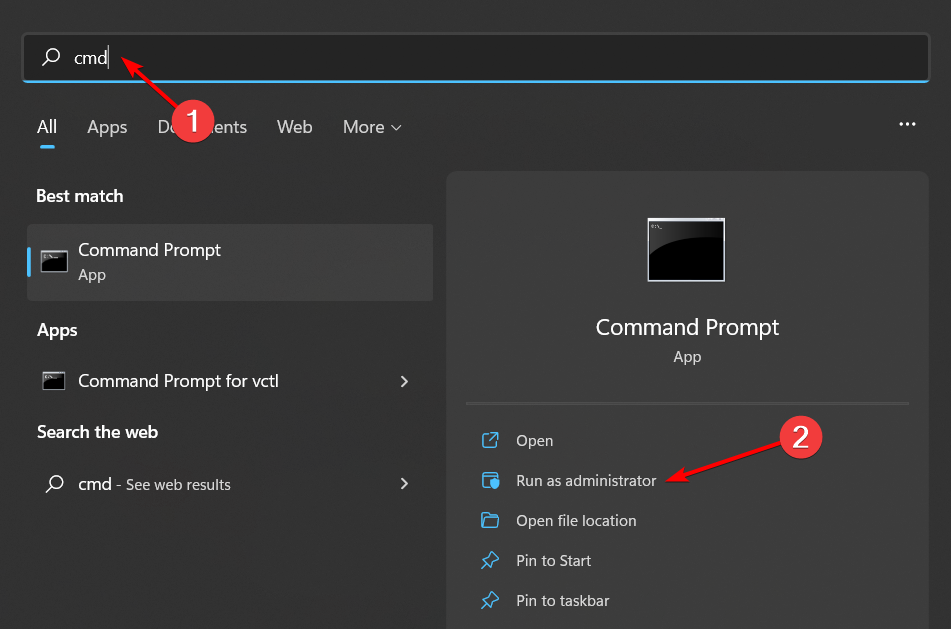
- Hit the Windows key, type cmd, and select Run as administrator.

- Type wmic baseboard, get product, manufacturer, version, and serial number, and press Enter on the keyboard.

- Note this information too.
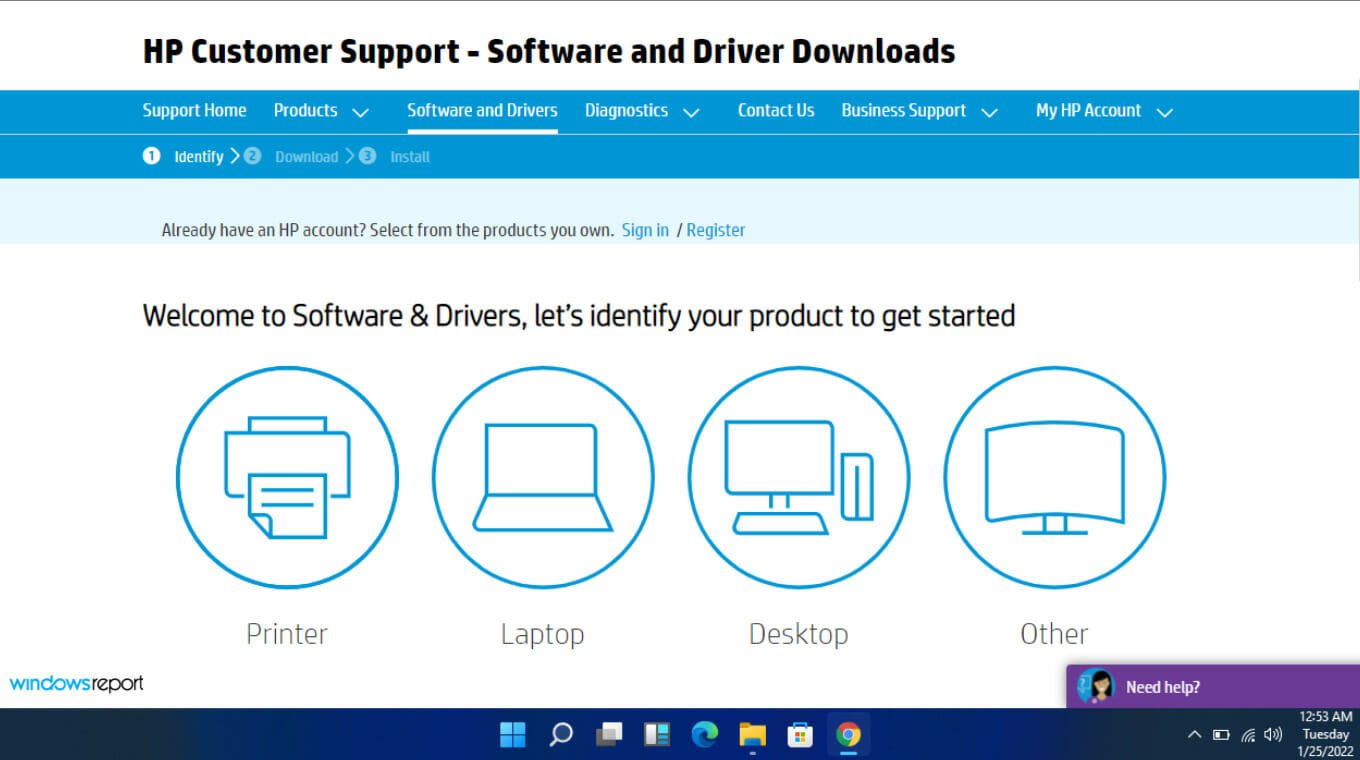
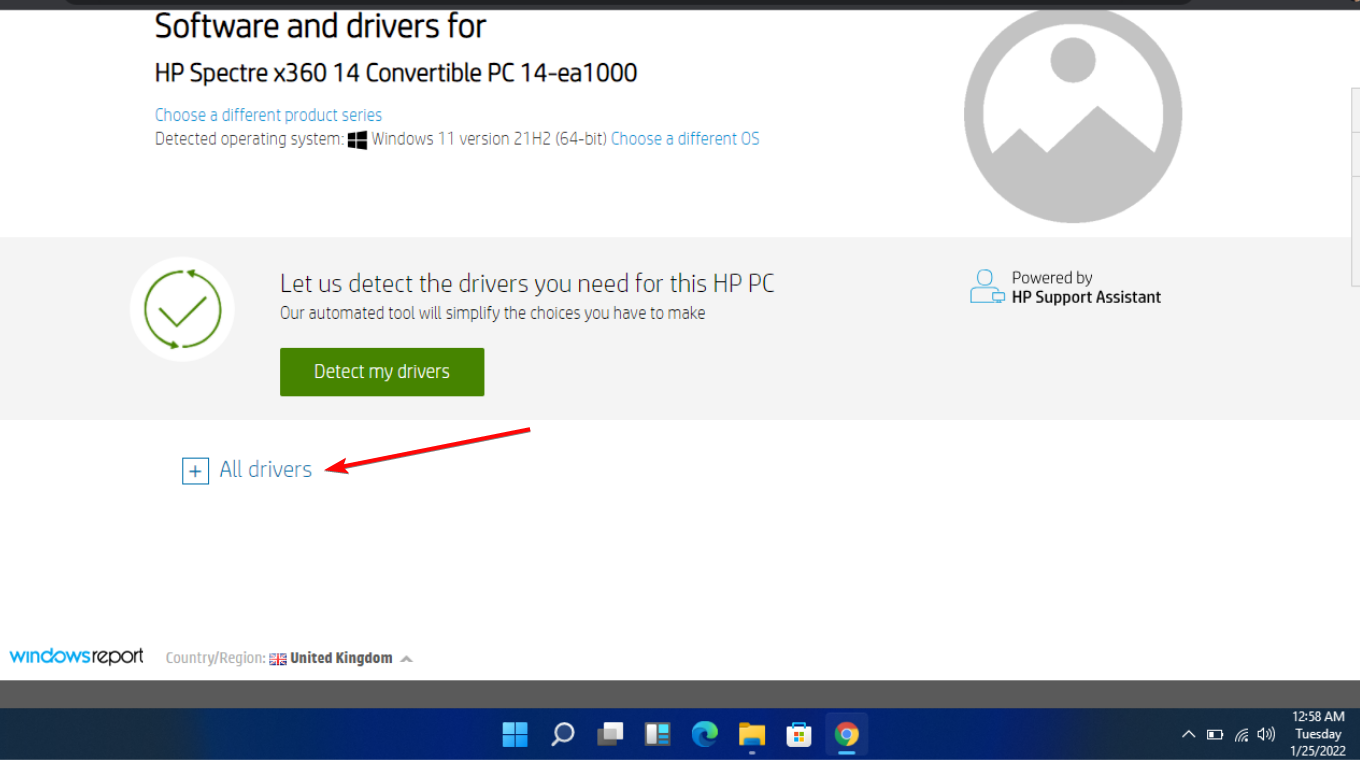
- Now, navigate to the download website (In this case, HP).
- Choose a laptop or desktop, depending on the type of computer you’re using.

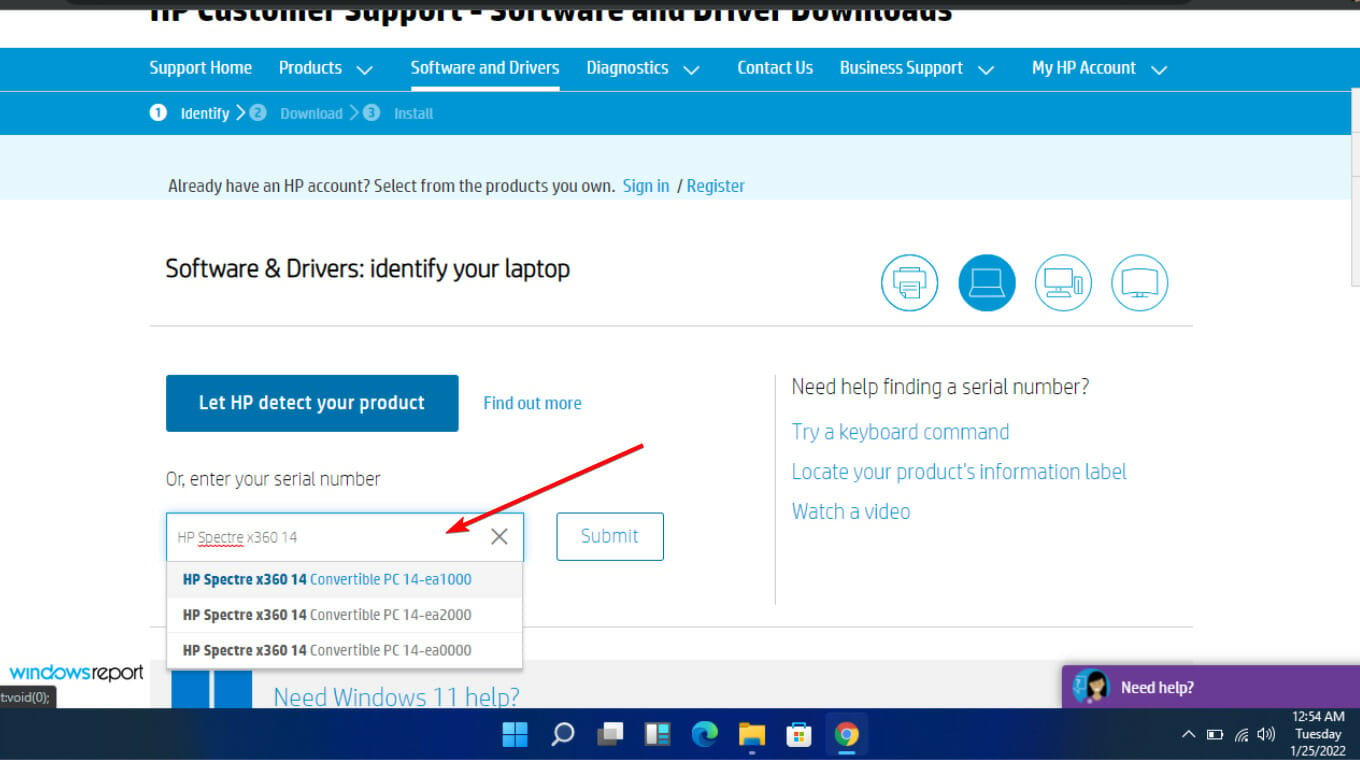
- Enter your exact serial number or your exact computer model.
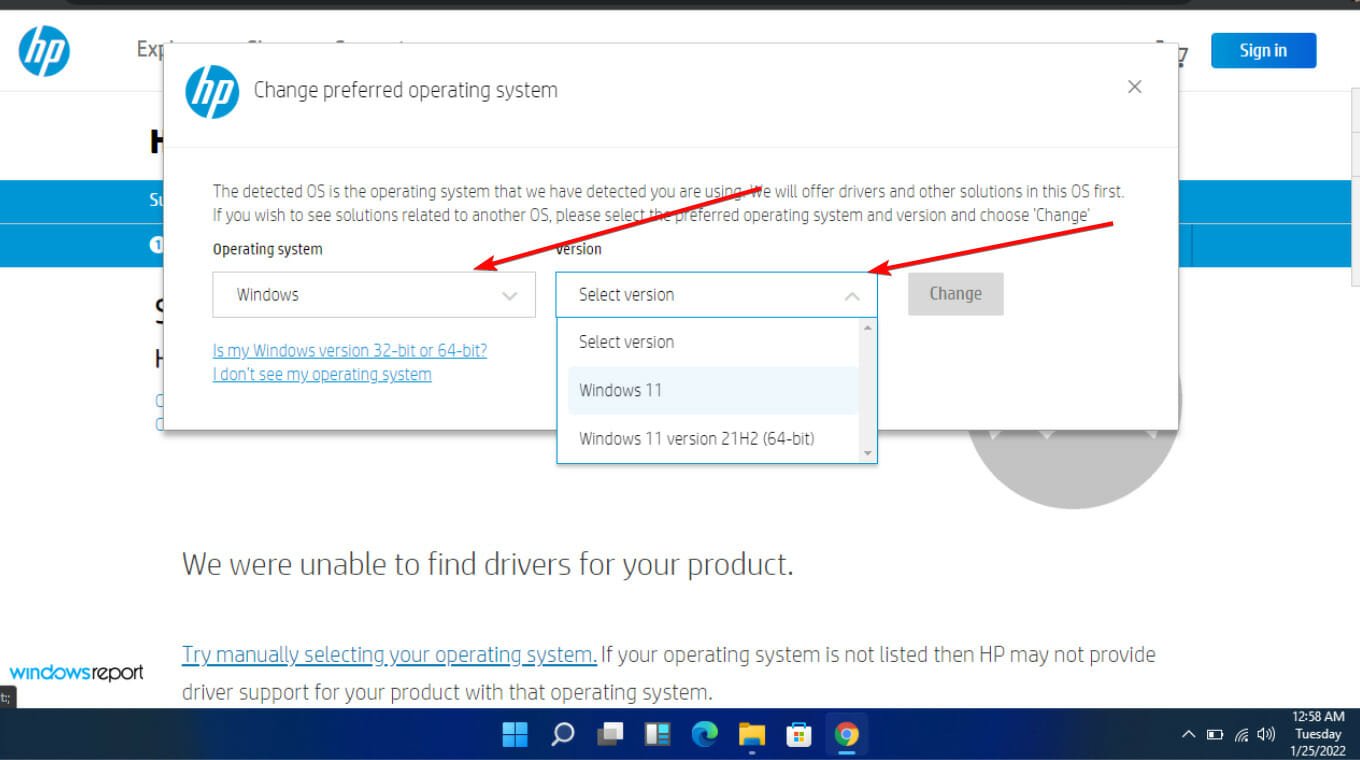
- Select your OS and OS version, then click Submit.
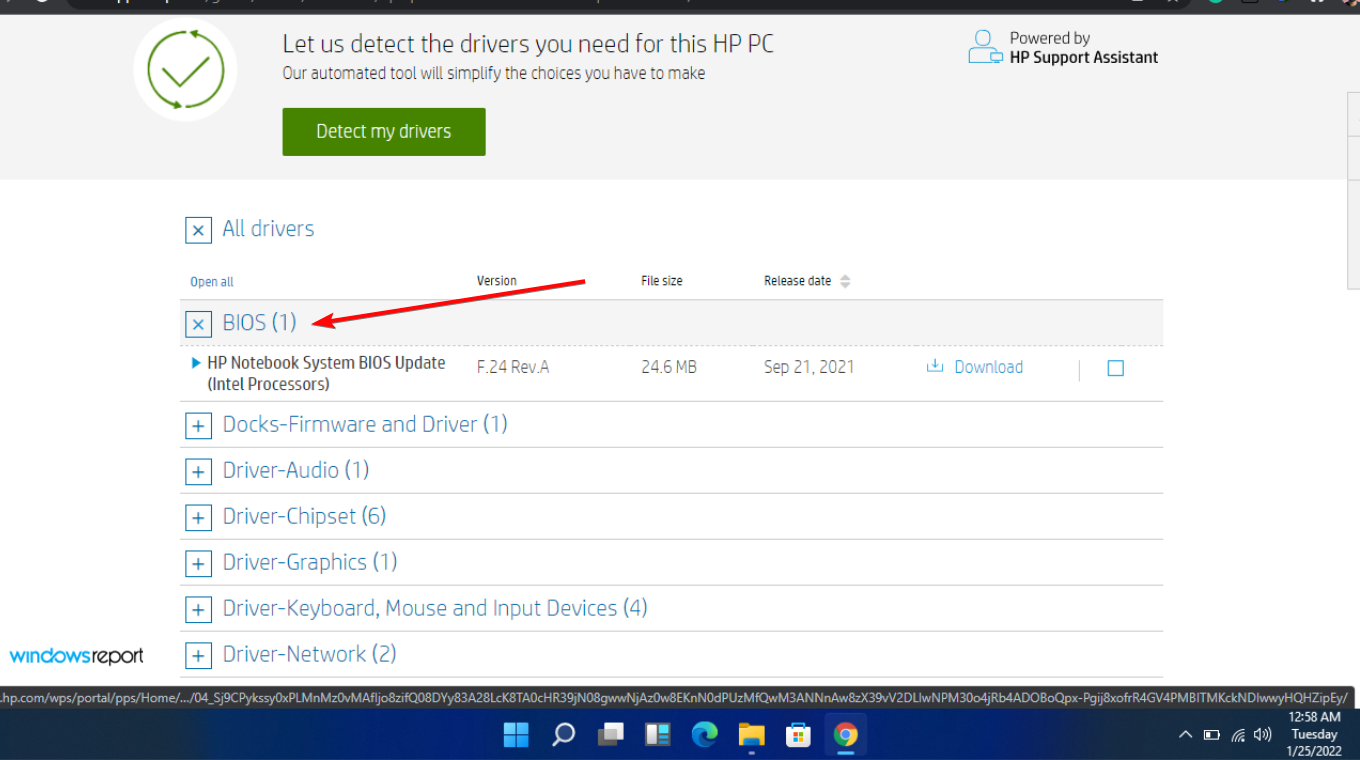
- Click on All drivers and then expand BIOS to see available updates.
- Hit the Download icon.
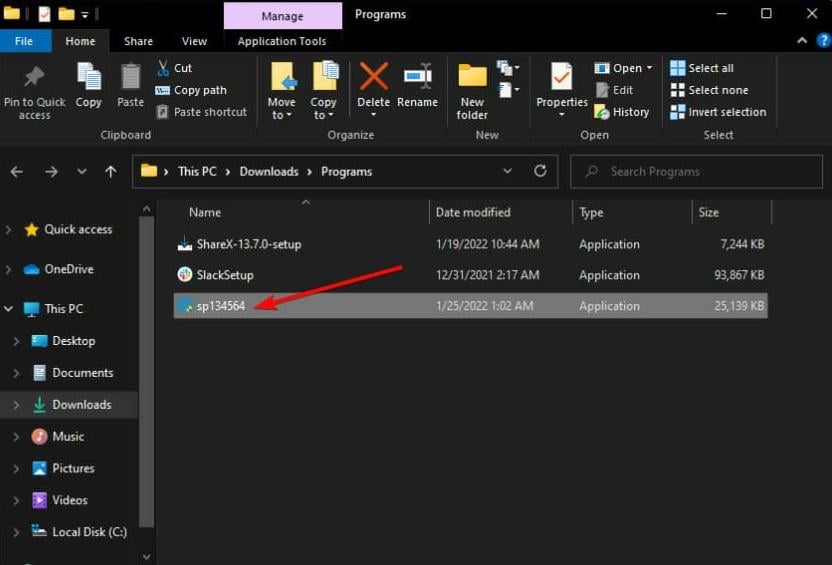
- Install the .exe file and follow the on-screen instructions.

- Restart your PC.
- During the startup, you can select Apply Update Now.

The BIOS (Basic Input/Output System) is a chip on your computer that loads when it boots up. It controls the booting process and is responsible for making sure all the hardware works together correctly.
Whereas many users reported that updating their BIOS fixed the hyper-v cannot be installed virtualization support is disabled in the firmware error, you need to exercise extra caution.
Don’t update if you’re not sure what you’re doing. BIOS updates can cause permanent damage to your computer if done incorrectly. Always read instructions carefully before updating your BIOS or asking for technical support.
- How to Make a Program Available to All Users on Windows 11
- How to Download & Install Microsoft LifeCam Drivers on Windows 11
- How to Quickly Turn Off Accents on Keyboard in Windows 11
How do I enable Hyper-V virtualization in Windows 10?
To enable Hyper-V virtualization in Windows 10, follow the steps below:
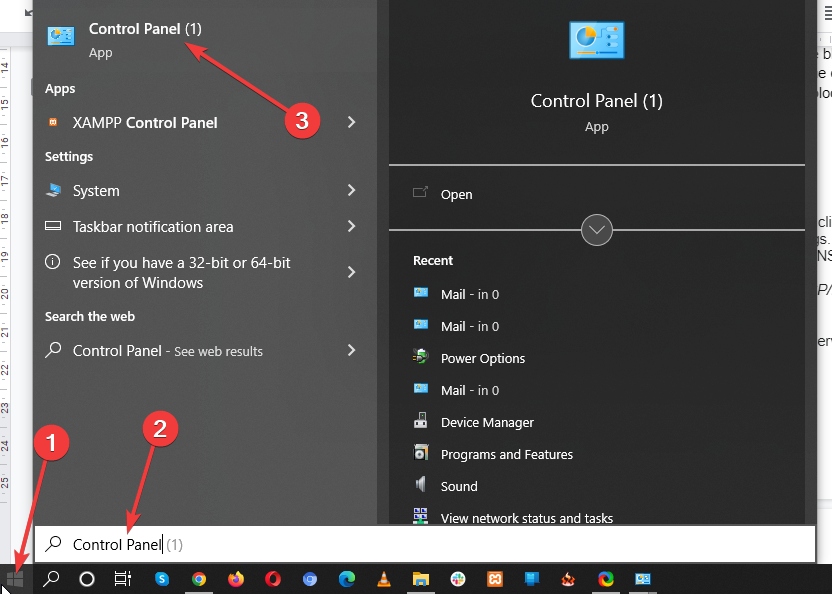
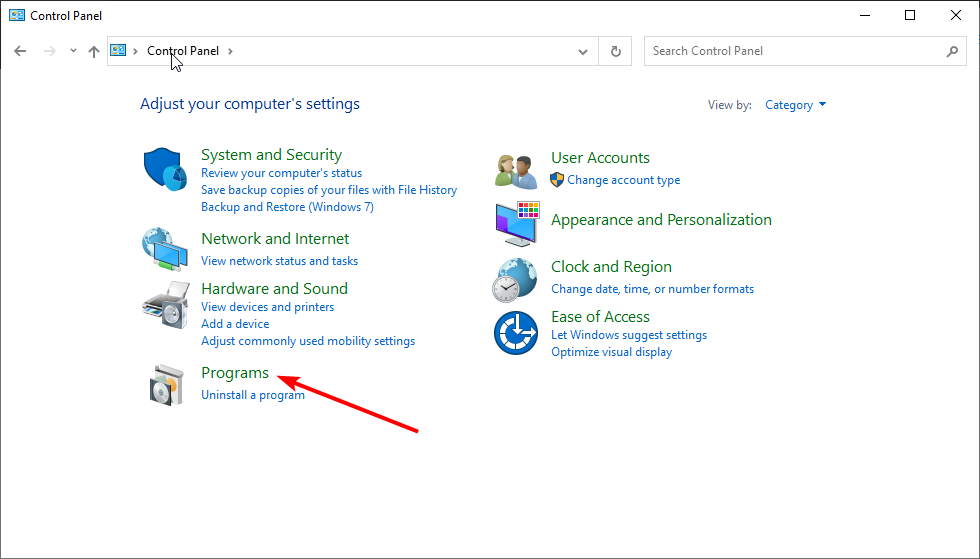
- Hit the Windows key, type Control Panel and click Open.

- Click on Programs.

- Select Turn Windows features on or off.

- Expand the Hyper-V Platform, then make sure both options are checkmarked and click OK. (If the second one is greyed-out, you’ll need to enable hardware virtualization in your BIOS).

- Next, you’ll have to reboot your PC, so click on the Restart button.

If you have problems installing Hyper-V, we have an expert guide to help bypass this issue. Some users have also complained that they ran into an error where the Hyper-V is not compatible with VMware, be sure to also check out our comprehensive guide on the same.
We love your feedback, so continue the conversation in the comment below.
![]()
ваш хост-компьютер должен поддерживать аппаратную виртуализацию, однако, в настоящее время эта функция отключена.
включение в BIOS
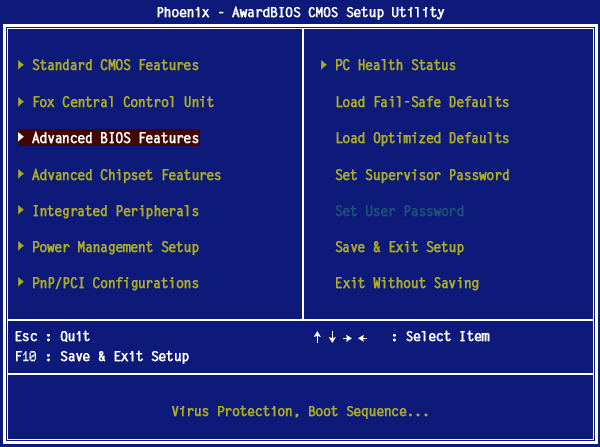
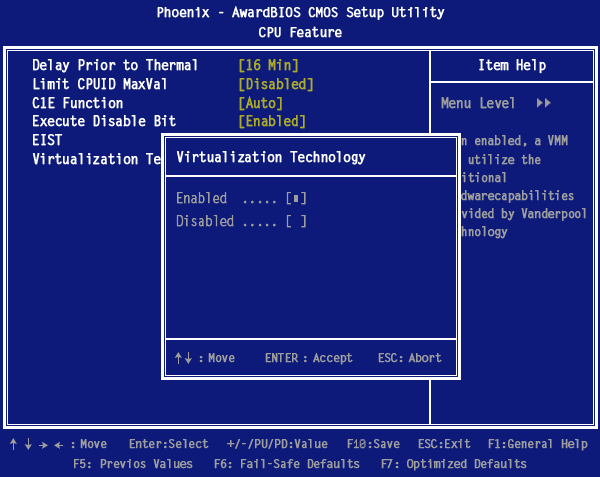
для успешного запуска виртуальных машин Parallels необходимо включить аппаратную виртуализацию в BIOS хост-компьютера.В BIOS функция виртуализации оборудования обычно называется VMX, VT, технологией виртуализации, расширениями виртуальных машин или технологией Vanderpool. Его часто можно найти в разделе «Безопасность» или Экран «CPU Features», однако, расположение этой функции зависит от материнской платы хост-компьютера. Можно использовать эти общие рекомендации для включения виртуализации оборудования:
Restart the physical computer and press Del to enter BIOS setup before the primary operating system boots up.
 Введите описание ссылки http://i3.parallels.com/r/img/vt/step4.png
Select Advanced BIOS Features and press Enter:
после его включения в Bios..
Выполните следующие действия
включение в Окна
Hyper-V устанавливается в разделе добавление компонентов диалогового окна Установка и удаление программ. Чтобы попасть туда, нам нужно открыть окно запуска, нажав Win+R, теперь введите appwiz.cpl и нажмите enter. Вы также можете добраться до окна программы и функции через Панель управления или начать поиск, но это легко и вызывающе.

теперь можно запустить Hyper-V диспетчер из приборной панели метро.

 Компоненты Hyper-V в Windows 10 позволяют создавать виртуальные машины встроенными средствами системы (подробнее: Виртуальные машины Hyper-V в Windows 10), а также служит для работы таких компонентов как Песочница Windows 10. Однако в некоторых случаях включенные компоненты Hyper-V могут мешать: например, для запуска виртуальных машин VirtualBox или эмуляторов Android.
В этой инструкции подробно о том, как отключить Hyper-V в Windows 10 двумя способами: первый предполагает отключение соответствующих компонентов системы, второй — отключение гипервизора без удаления самих компонентов Hyper-V.
- Отключение Hyper-V путем удаления в компонентах
- Как отключить Hyper-V без удаления
- Видео инструкция
- Дополнительные способы удалить Hyper-V
Отключение Hyper-V в компонентах Windows 10
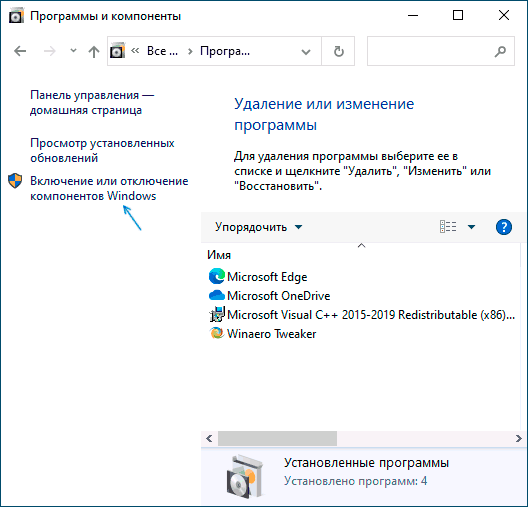
Первый способ отключить Hyper-V предполагает использование соответствующего раздела «Программы и компоненты» в панели управления, шаги будут следующими:
- Откройте Панель управления, для этого можно использовать поиск в панели задач, либо нажать Win+R на клавиатуре, ввести control и нажать Enter.
- В панели управления перейдите в раздел «Программы и компоненты» или «Удаление программы».
- Слева нажмите по пункту «Включение или отключение компонентов Windows».

- Снимите отметку с пункта «Hyper-V» и примените настройки.

- При появлении запроса на перезагрузку, перезагрузите Windows 10 для вступления изменений в силу.

Обычно указанных действий достаточно, чтобы устранить проблемы, которые иногда могут быть вызваны наличием Hyper-V в системе.
Если указанные шаги не помогли, попробуйте там же в компонентах отключить пункт «Песочница Windows» и также перезагрузить компьютер при необходимости.
Как отключить Hyper-V без удаления компонентов
Предыдущий метод отключения Hyper-V предполагает удаление соответствующих компонентов из системы, однако можно обойтись и без этого:
- Запустите командную строку от имени Администратора, для этого можно использовать поиск в панели задач, а потом выбрать пункт «Запуск от имени администратора». Другие способы запуска командной строки от имени администратора.
- Введите команду
bcdedit /set hypervisorlaunchtype off
и нажмите Enter.
- Перезагрузите компьютер.
После перезагрузки Hyper-V (гипервизор) будет выключен и не будет влиять на запуск каких-либо других виртуальных машин, при этом сам компонент останется включенным.
Чтобы снова включить Hyper-V, используйте ту же команду, но измените off на auto и перезагрузите компьютер. Также есть возможность создания меню загрузки для выбора режима, в котором будет запускаться система — с включенным или отключенным Hyper-V, об этом в инструкции Как запускать виртуальные машины Hyper-V и VirtualBox на одном компьютере.

Видео
Дополнительные способы удалить Hyper-V
Помимо описанных способов, вы можете удалить компоненты Hyper-V в PowerShell с помощью команды
Disable-WindowsOptionalFeature -Online -FeatureName Microsoft-Hyper-V-Hypervisor
Или, при использовании командной строки, с помощью команды:
DISM /Online /Disable-Feature:Microsoft-Hyper-V
Надеюсь, материал помог разобраться. Если же остаются вопросы — задавайте в комментариях. Также помните, что для работы виртуальных машин и эмуляторов следует включить аппаратную виртуализацию.