Do you need to set up a lab that needs multiple hosts? Or test an application in an isolated environment? Hyper-V nested virtualization could be the right setup you need. Hyper-V is a built-in feature or role to Windows you only need to enable to start using. And it’s free!
Not a reader? Watch this related video tutorial!
Not seeing the video? Make sure your ad blocker is disabled.
Keep reading, and you will learn how to set up Hyper-V to enable nested virtualization. By the end of this article, you will have created, installed, and configured nested virtual machines (VM) with one physical host. Let’s begin!
Prerequisites
This article is a hands-on, how-to approach. And to follow along with the instructions, you’ll need the following requirements.
- A host (physical) machine with a CPU that supports hardware virtualization (VT-x, AMD-V).
- The host machine must have enough memory to run the Hyper-V virtual machines. The VM in this tutorial will use 4GB of memory.
- For hosts with an Intel CPU, the host operating system (OS) must be Windows Server 2016, Windows 10 version 1607 (Anniversary Update), or later. For AMD-powered hosts, the minimum operating system is Windows 10 Build 19636. This article will use Windows 10 Pro version 20H2.
- An operating system installation ISO file. In this article, the OS installer ISO filename is c:\ISO\windows_server_2016.iso. You’ll use this ISO file to install the nested VM guest OS.
- Hyper-V for Windows 10 or Hyper-V for Windows Server, depending on your host’s operating system. This article uses Hyper-V on a Windows 10 host.
Creating A NAT-Enabled Virtual Switch
To set up Hyper-V nested virtualization, you must first create a network for VM hosted on a host to communicate. To do that, you’ll need to create a NAT-enabled virtual switch that all VMs will use and reach the Internet.
On a Windows 10 Hyper-V host, a NAT-enabled virtual switch already exists called Default Switch. But, to experience an end-to-end Hyper-V nested virtualization setup, let’s assume that the Default Switch does not exist on your Hyper-V host even if your host OS is Windows 10.
To create a NAT-enabled virtual switch, follow these steps.
1. First, on your Hyper-V host computer, open PowerShell as admin.
2. Next, run the command below in PowerShell to create a new internal virtual switch called vNAT.
Creating a virtual switch installs a new virtual network adapter in Windows called vEthernet (vmSwitchName), where vmSwitchName is the virtual switch name.
In this example, since the virtual switch name is vNAT, the new virtual network adapter name will be vEthernet (vNAT).
# Create a new virtual switch with the new vNAT and the type is Internal.
# This command also automatically creates a virtual network adapter with the name "vEthernet (vNAT)"
 New-VMSwitch -SwitchName vNAT -SwitchType Internal
3. Now, assign an IP address and subnet mask to the vEthernet (vNAT) network adapter by running the command below in PowerShell. This command will assign the IP address of 192.168.200.1 and the subnet mask of 255.255.255.128 (/25) to the network adapter.
The IP address and subnet mask in this command are only examples and may not apply to your environment. To avoid connectivity issues, choose a subnet mask that is not already in use in your home or office network.
# Assign an IP address and subnet to the "vEthernet (vNAT)" network adapter.
 New-NetIPAddress -IPAddress 192.168.200.1 -PrefixLength 25 -InterfaceAlias "vEthernet (vNAT)"
4. Next, create a NAT object on your Hyper-V host that will translate your VM’s internal network address. Do so by running the command below in PowerShell.
# Create a new NAT object called vNATNetwork in Windows for the virtual switch's internal IP address
 New-NetNat -Name vNATNetwork -InternalIPInterfaceAddressPrefix 192.168.200.0/25 -Verbose
Creating the First-Level Guest Virtual Machine
To set up Hyper-V nested virtualization, you must first create and configure the first-level virtual machine which is the VM that you intend to eventually be a Hyper-V host. This tutorial will refer to this first-level virtual machine as L1-VM.
There are two methods to create a virtual machine: Hyper-V Manager (GUI) and PowerShell. Either method will produce the same virtual machine.
Method 1: Creating a Virtual Machine using the Hyper-V Manager
To create the L1-VM using the Hyper-V Manager, follow these steps.
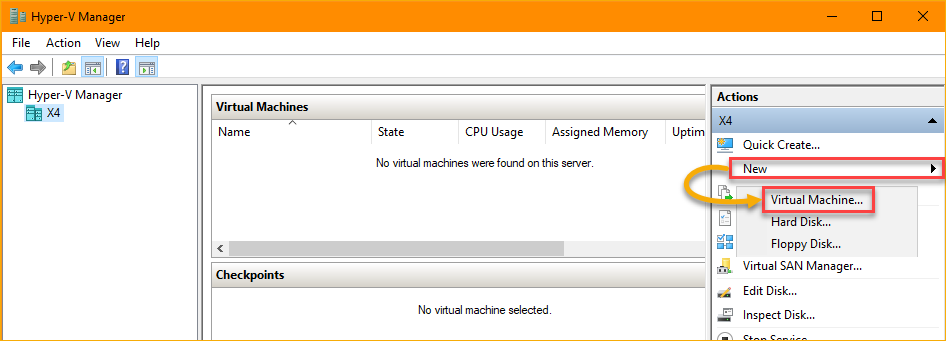
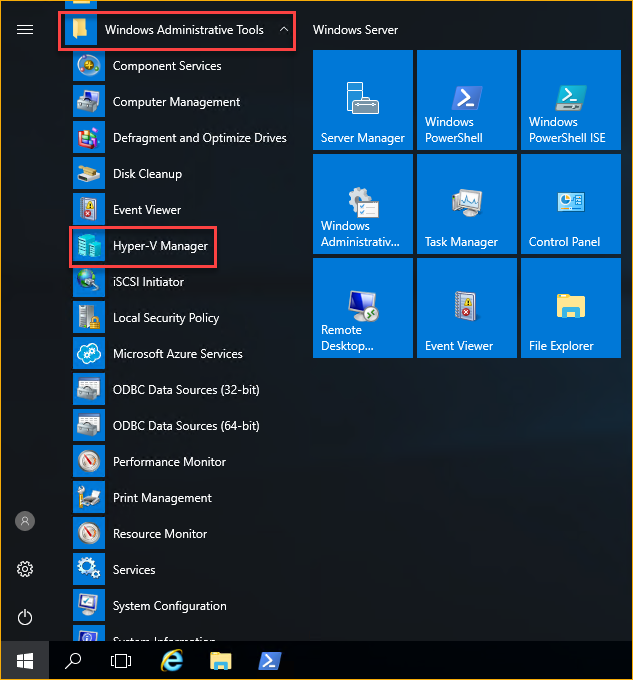
1. On your host machine, open the Hyper-V Manager. To do so, click on Start —> Windows Administrative Tools —> Hyper-V Manager.

2. Once the Hyper-V Manager window is open, on the Action pane, click New —> Virtual Machine.
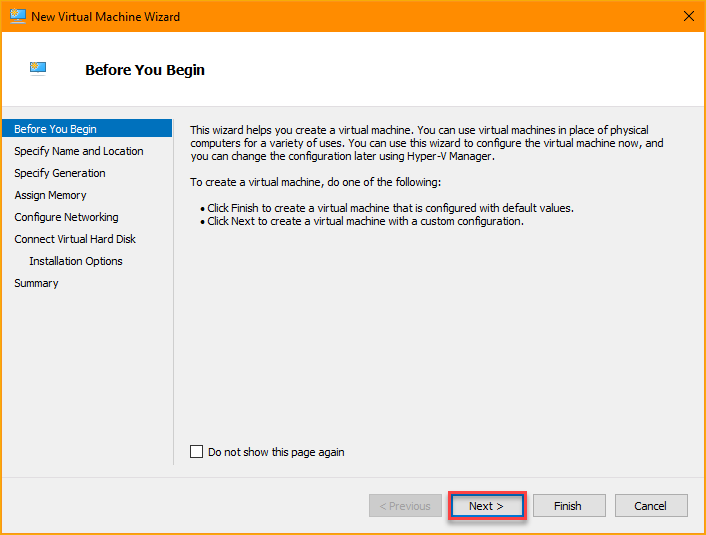
3. Once in the New Virtual Machine Wizard window, on the Before You Begin page, click Next.
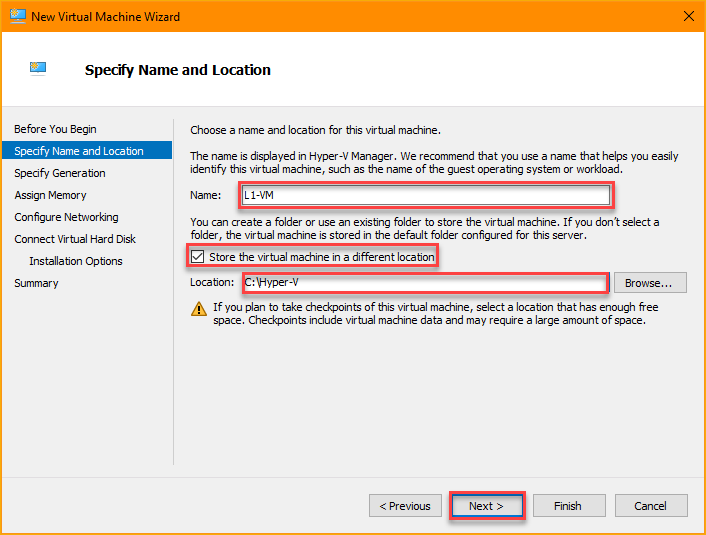
4. On the Specify Name and Location page, type the new virtual machine’s name in the Name box. In this example, the VM name is L1-VM.
If you need to change the location for the new VM, put a check on the Store the virtual machine in a different location box, then browse or enter the path in the Location box. If the folder path you specify does not exist, the wizard will create it.
Changing the VM location is useful when you need to choose a location with enough storage space. Or to organize the VMs location in your preferred folder.
Otherwise, to accept the default location, leave the box unchecked. In this example, the new VM’s location is C:\Hyper-V. Click Next after configuring the VM name and location.
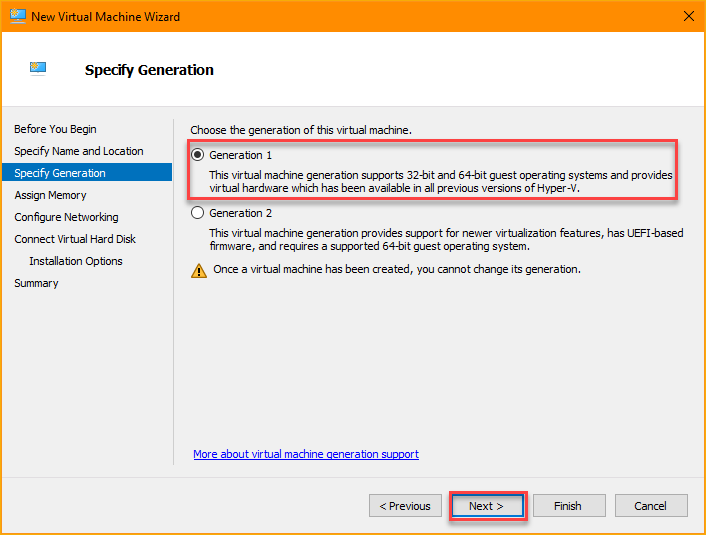
5. Next, on the Specify Generation page, choose the VM generation version. The options are:
Generation 1 – Supports 32-bit and 64-bit guest operating systems from Windows 7 and Windows Server 2008 onwards. This example will use a Generation 1 VM.
Generation 2 – Supports only 64-bit guest operating systems from Windows 8 and Window Server 2012 onwards. This generation also has UEFI-based firmware. After selecting a VM generation, click Next.
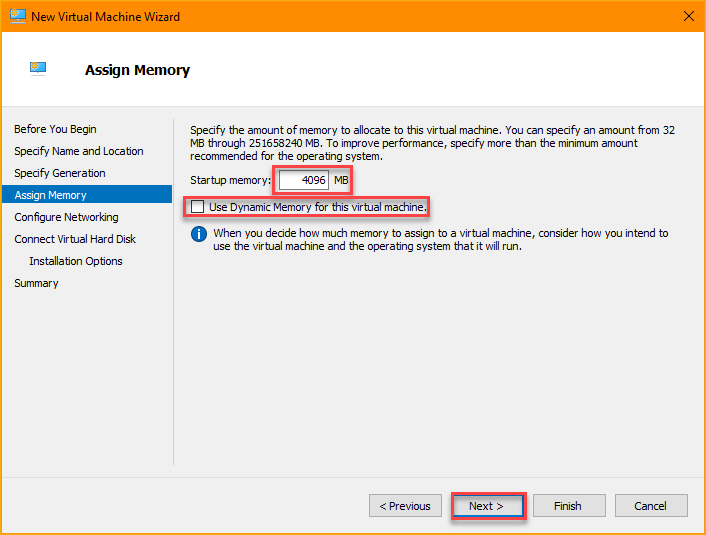
6. On the Assign Memory page, specify how much memory to assign the VM. This example assigns 4GB (4096 MB) of memory to the VM.
7. Uncheck the Use Dynamic Memory for this virtual machine box. Hyper-V nested VMs does not support dynamic memory. After finalizing the memory settings, click Next.
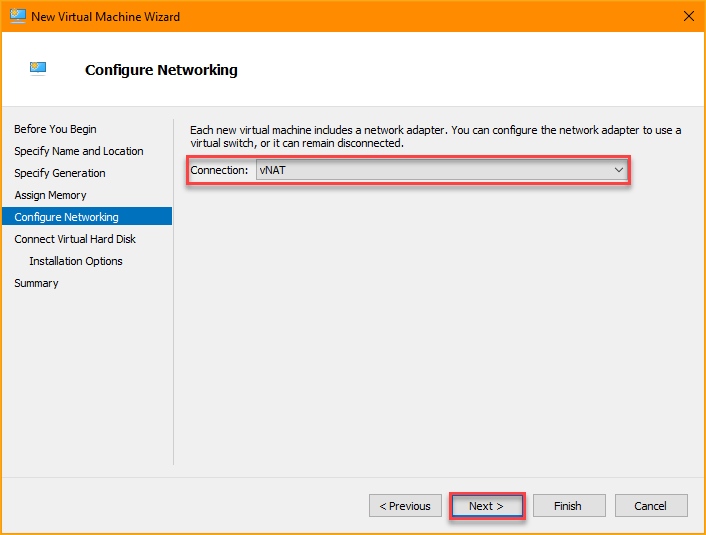
8. On the Configure Networking page, select the virtual switch call vNat that you created earlier in this article.
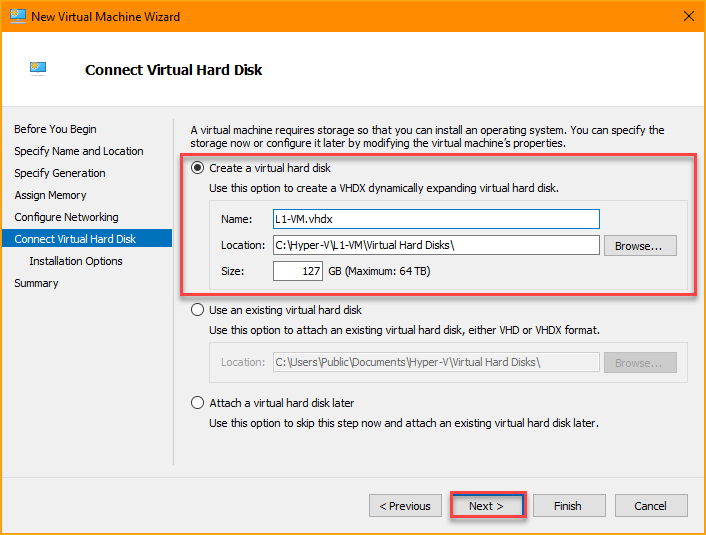
9. Next, on the Connect Virtual Hard Disk page, you have the option to:
- Create a virtual hard disk – This option creates a new virtual hard disk (VHD) and lets you customize the name, location, and size. The new VHD will be empty, and you will have to install an operating system afterward.
- Use an existing virtual hard disk – This option lets you choose an existing VHD (if you have one) that you want to be attached to the VM instead of creating a new one.
- Attach a virtual hard disk later – Choose this option if you want to skip this step and continue creating the VM without a VHD. You can still create a new or attach an existing VHD after you’ve created the VM.
This example selects the Create a virtual hard disk option and leaves the default name, location, and size values. Customize these values if you prefer. After making your selection, click Next.
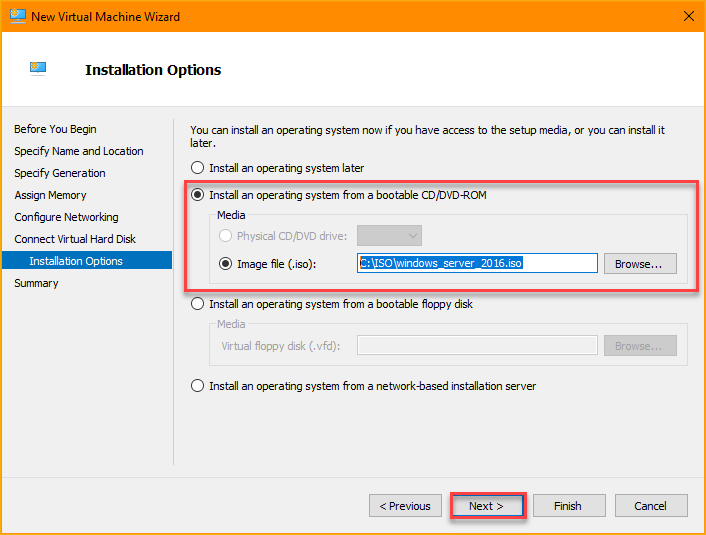
10. On the Installation Options page, choose how you want to install the operating system (OS):
In this example, the VM will install the OS using the bootable CD/DVD-ROM option. The OS installation media is an ISO file in C:\ISO\windows_server_2016.iso. When you’ve made your selection, click Next.
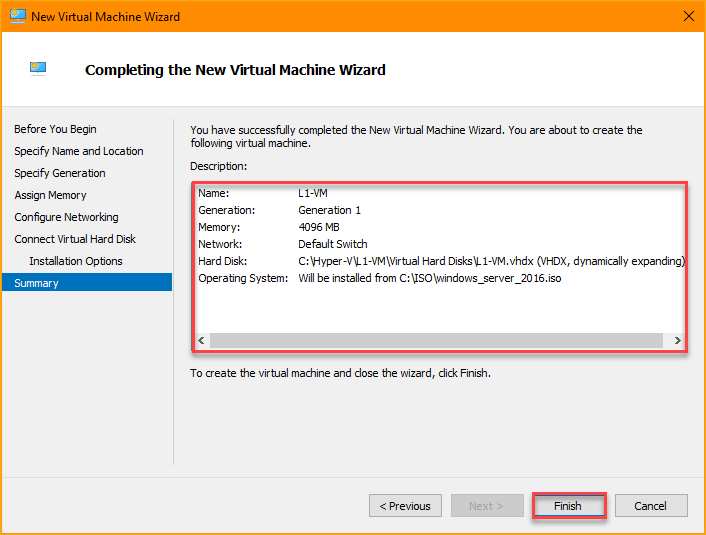
11. Finally, on the Completing the New Virtual Machine Wizard page, review the new VM’s Description. When you’re sure that you didn’t miss a step, click Finish.
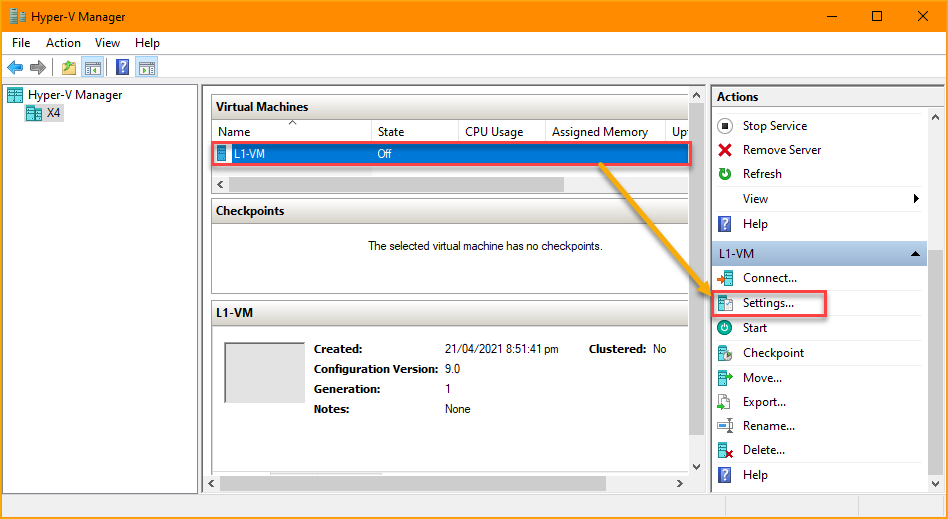
12. Now that you’ve created the VM, increasing the VM’s processor count is optional but recommended to improve the VM’s performance. To do so, click to select the VM and click on the Settings menu on the Action pane.
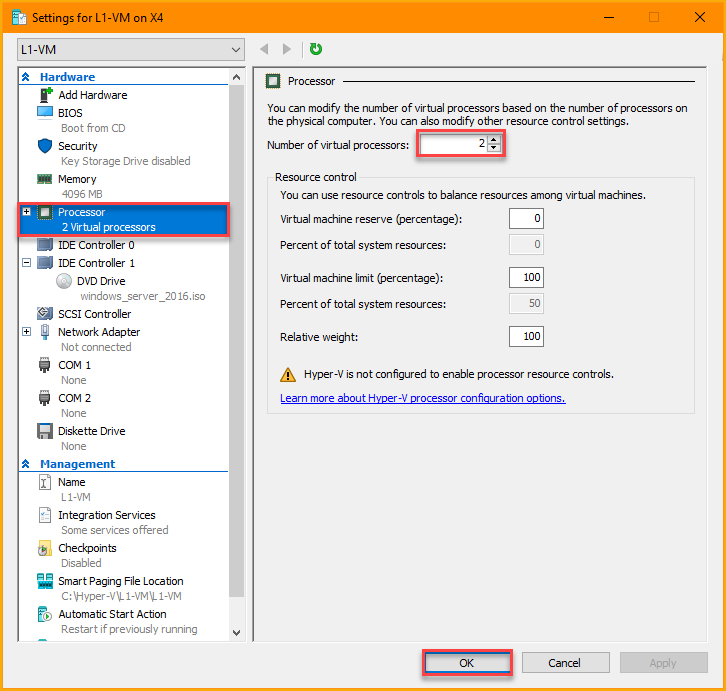
13. Once you’re on the Settings window, click Processor on the left pane. Next, increase the Number of virtual processors. In this example, the new processor count is 2. You can assign more if your host the capacity.
Method 2: Creating a Virtual Machine using PowerShell
Instead of clicking through multiple steps when creating a VM in Hyper-V Manager, another method to create a Hyper-V VM is by PowerShell.
To create and configure a new VM, follow the steps below.
1. On the Hyper-V host computer, open PowerShell as admin.
2. Next, run the code below in PowerShell to create a new VM called L1-VM. The code snippet below uses splatting to prepare the new VM’s parameter values. Refer to the inline comments to know what each parameter does.
# Prepare the new VM's properties.
 $newVM_splat = @{
     # Set the name of the new VM.
     Name = 'L1-VM'
     # Set the VM's generation version to generation 1.
     Generation = 1
     # Set the VM's memory size to 4GB
     MemoryStartupBytes = 4GB
     # Set the boot option to CD.
     BootDevice = 'CD'
     # Set the virtual switch called vNAT the VM will use to connect.
     SwitchName = 'vNAT'
     # Set the location where to create the new VM.
     Path = 'C:\Hyper-V\L1-VM'
     # Set the location where to create the new VM's virtual hard disk.
     NewVHDPath = 'C:\Hyper-V\L1-VM\VHD\L1-VM.vhdx'
     # Set the new virtual hard disk size to 100GB
     NewVHDSizeBytes = 100GB
 }
 # Create the new VM.
 New-VM @newVM_splat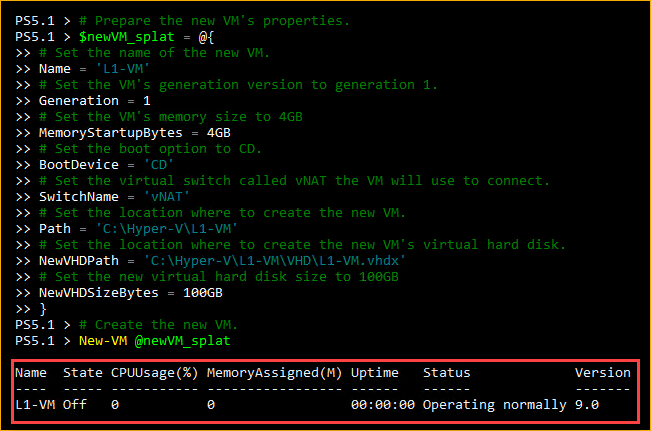
3. After creating the VM, run the command below to increase the VM’s processor count. The default processor count of a new VM is 1, which may cause the VM to run slow. The command below increases the CPU count to 2. You may add more if your host has the capacity.
# Set the VM's processor count to 2. You may increase the CPU if your host has the capacity.
 Set-VM -VMName L1-VM -ProcessorCount 2
4. Next, disable the dynamic memory on the VM by running the command below. Hyper-V nested virtualization does not support dynamic memory.
# Disable VM's Dynamic Memory.
 Set-VMMemory -VMName L1-VM -DynamicMemoryEnabled $false
5. Run the command below to mount the ISO file to the VM’s DVD drive. You’ll use this ISO file to install the operating system later on L1-VM.
# Set the ISO file's path to mount on the VM's DVD drive.
 Set-VMDvdDrive -VMName L1-VM -Path C:\ISO\windows_server_2016.iso
Enabling Nested Virtualization
To enable nested virtualization in Hyper-V, you have to expose the host’s virtualization extensions, such as VT-x for Intel and AMD-V for AMD, to the virtual machine. These virtualization extensions add functionality to the logical processors on a VM to support virtualizing an already virtualized CPU.
To enable the virtualization extension, invoke the Set-VMProcessor cmdlet as shown below.
1. Open PowerShell as admin on your Hyper-V host machine.
2. Next, copy the code below and run it in PowerShell. This command will enable the virtualization extensions on the VM’s virtual processor.
# Enable the VM's virtualization extensions
 Set-VMProcessor -VMName L1-VM -ExposeVirtualizationExtensions $true
3. Lastly, to confirm that the command was successful, run the command below in PowerShell. This command gets the value of the VM processor’s ExposeVirtualizationExtensions value. The value should be True, as you can see in the screenshot below.

Installing The Guest Operating System
Now that you’ve created the first-level (soon-to-be virtualized Hyper-V host) guest VM and configured its settings, it’s time to install the operating system on the soon-to-be Hyper-V host. To do so, proceed as follows.
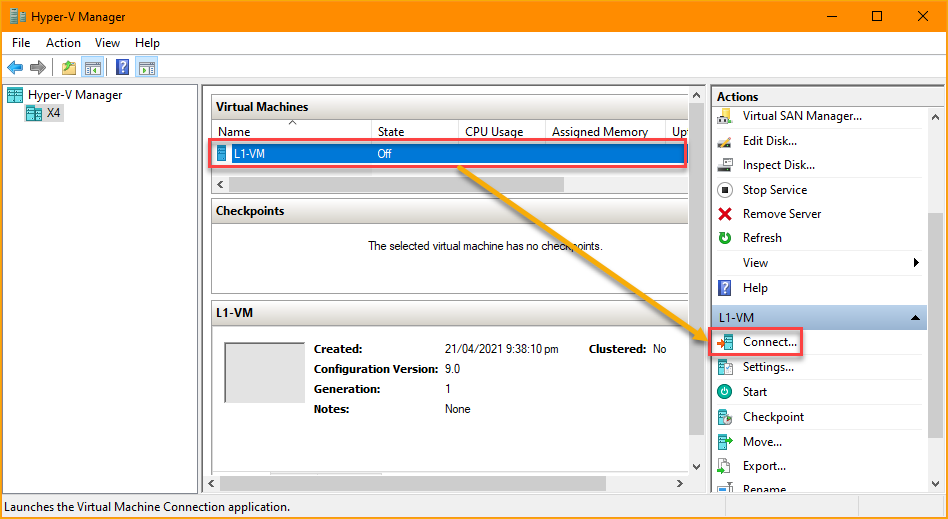
1. Open Hyper-V Manager on your Hyper-V host.
2. Click to select the VM name, in this example, L1-VM, and click Connect. Doing so will launch the Virtual Machine Connection window.
3. On the Virtual Machine Connection windows, click Start to boot up the virtual machine.
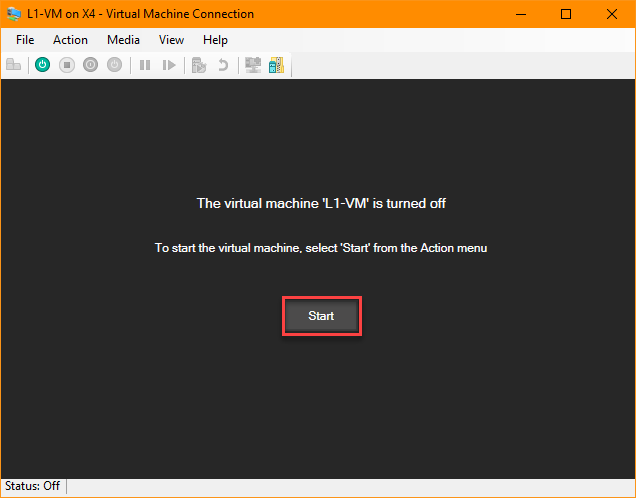
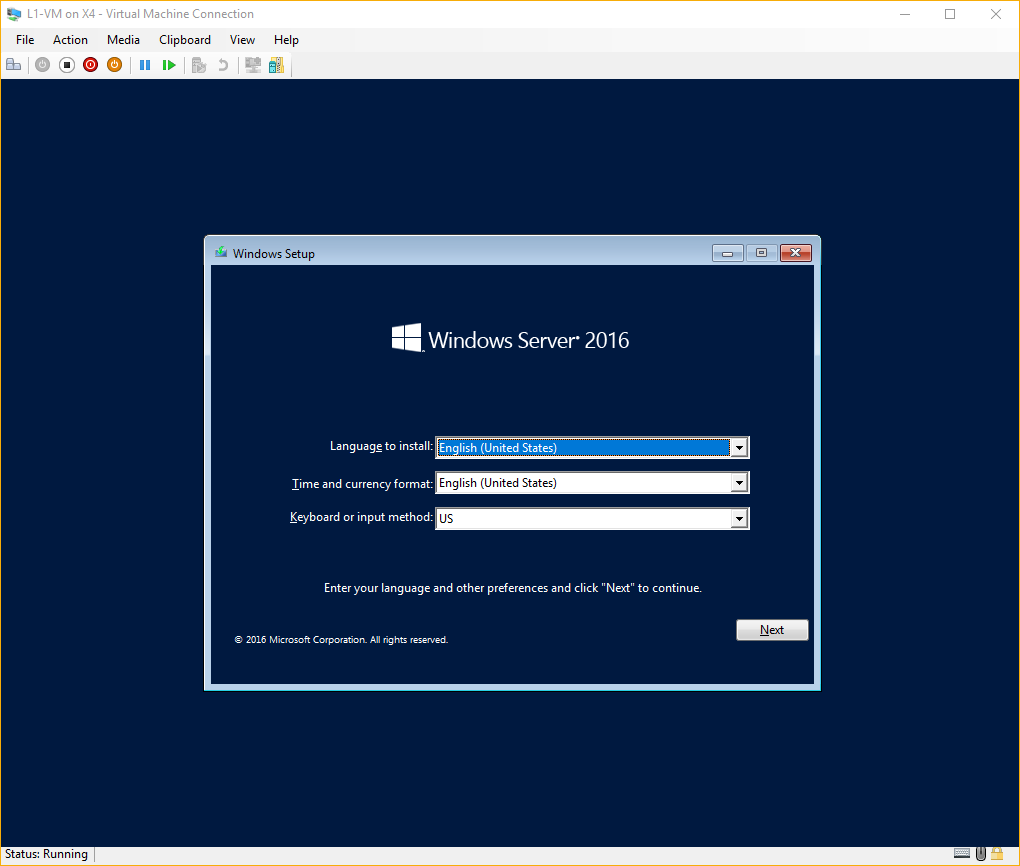
4. Now, proceed with the operating system installation to completion.
Connecting To The Network
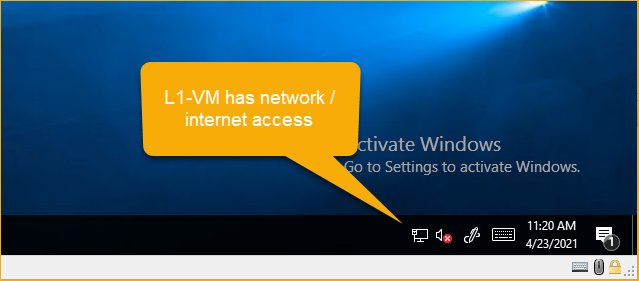
After you’ve installed the operating system on the VM, you’ll notice that the network status on the system tray shows a warning symbol. This warning symbol means that the VM is not connected to the network and has no access to the internet.
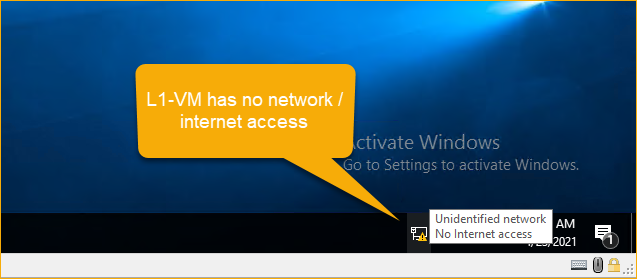
To resolve this error, you need to configure the network adapter settings on L1-VM by assigning an IP address, subnet mask, default gateway, and DNS address. To do so, follow these steps.
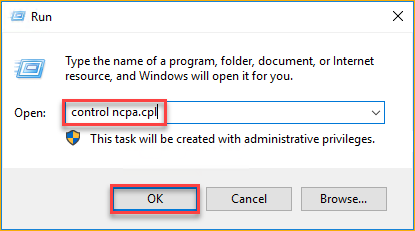
1. On L1-VM, right-click on the Start button and click Run.
2. Type control ncpa.cpl in the Open box and click OK. This command will launch the Network Connections applet.
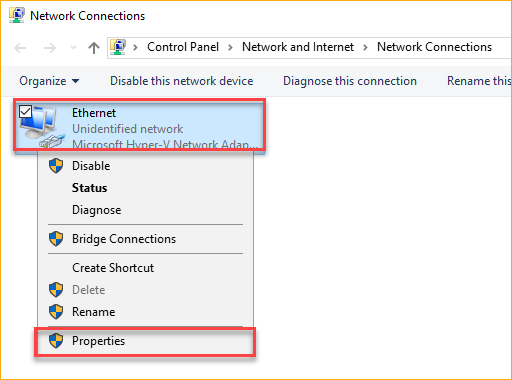
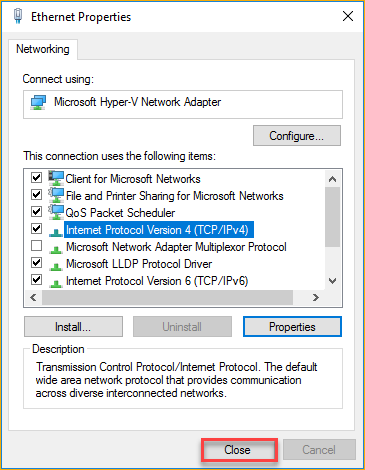
3. On the Network Connections applet window, there should only be one network adapter by default called Ethernet. Right-click on Ethernet and click on Properties.
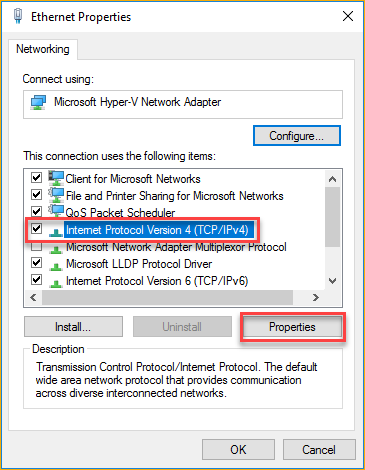
4. Next, click to highlight (DO NOT UNCHECK!!!) Internet Protocol Version 4 on the Ethernet Properties page and click the Properties button.
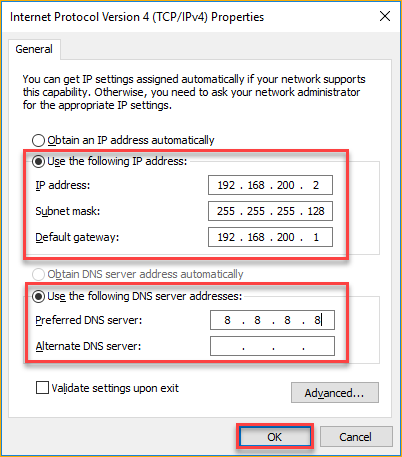
5. Inside the Internet Protocol Version 4 (TCP/IPv4) Properties windows, click on Use the following IP address and enter the values for:
- IP address – Enter the IP address you want to assign to L1-VM. The IP address you enter has to be within the range of the virtual switch you created on the Hyper-V host. For example, the vNAT virtual switch IP range is 192.168.200.0/25, making the available IP address range from 192.168.200.2 to 192.168.200.126. In this example, the IP address for L1-VM is 192.168.200.2.
- Subnet mask – Specify the netmask address of the virtual switch’s IP address range. For 192.168.200.0/25, the subnet mask is 255.255.255.128.
- Default gateway – Enter the IP address of the virtual switch. In this example, the virtual switch IP address is 192.168.200.1.
6. Next, enter the Preferred DNS server IP address. If you have a DNS server, perhaps in your home or office network, use that address. Otherwise, you can use a public DNS server address. In this example, the DNS server address is 8.8.8.8, which is Google’s public DNS server.
You can also add an Alternate DNS server if needed. But for this example, the preferred DNS server is enough. When you’ve completed the network address configuration, click OK.
Back on the Ethernet Properties window, click Close to apply the changes.
You’ll see that the network status has changed to connected.
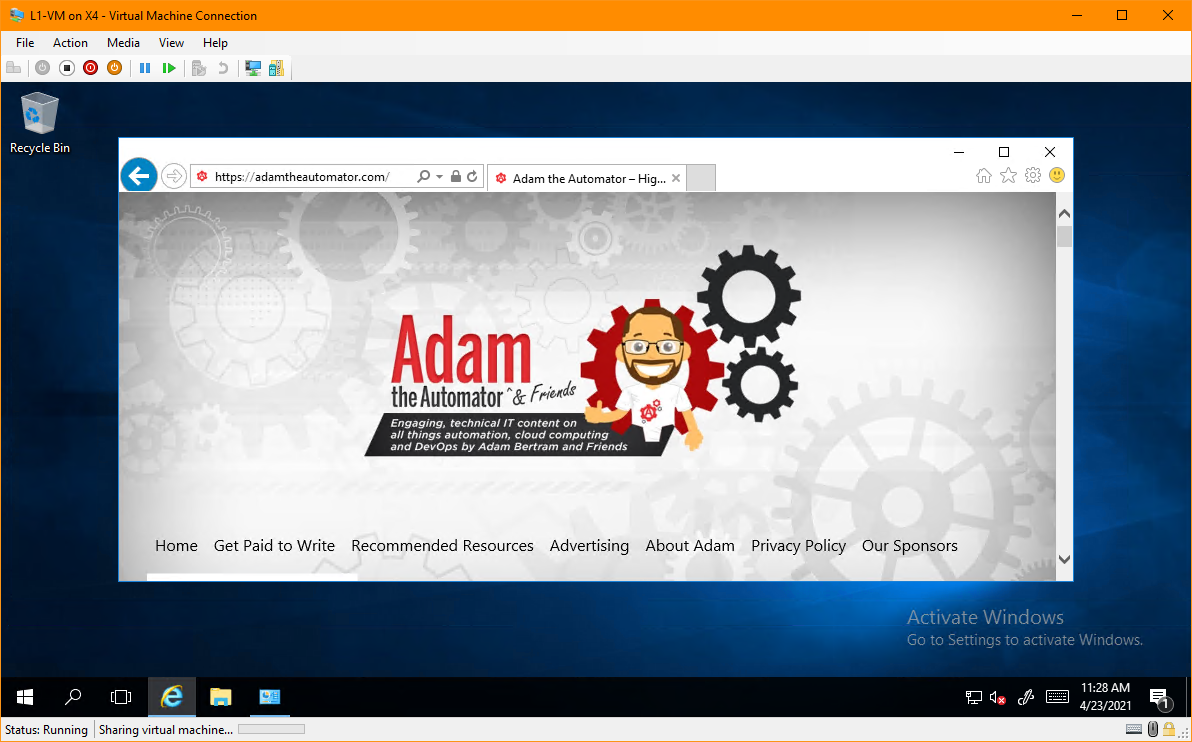
8. Finally, to test the network, open a web browser on L1-VM and navigate to a website.
Installing Hyper-V On The First-Level Virtual Machine
So far, you’ve created the soon-to-be Hyper-V host VM of your nested virtualization setup. But, the ultimate test is to install Hyper-V inside L1-VM and create the second-level (guest) VM.
Hyper-V installation will vary depending on L1-VM’s operating system. Refer to Hyper-V for Windows 10 or Hyper-V for Windows Server. This example installs Hyper-V on Windows Server 2016.
To install Hyper-V on L1-VM, ensure you’re at the L1-VM console and:
1. Open PowerShell as admin.
2. Run the command below in PowerShell to install Hyper-V. The -IncludeManagementTools switch installs Hyper-V management tools, such as the Hyper-V Manager and the Hyper-V PowerShell module. The -Restart parameter reboots L1-VM after the installation.
Install-WindowsFeature Hyper-V -IncludeManagementTools -RestartYou’ll see an install progress indicator, as shown below. Wait for the installation to finish, and L1-VM should reboot automatically.

When L1-VM has restarted, launch the Hyper-V Manager on L1-VM. To do so, click Start —> Windows Administrative Tools —> Hyper-V Manager.
Congratulations! You have now installed Hyper-V inside a Hyper-V guest VM!
At this point, you’ve successfully enabled nested virtualization in Hyper-V, and you can now create and set up your second-level VM (call it L2-VM) using the same steps as when you created L1-VM.
Conclusion
This article took you through the step-by-step process of setting up nested virtualization with Hyper-V. With nested virtualization, you can run a guest VM inside another guest VM, ideal for testing, lab environment, or simulating a production environment.
What do you think of Hyper-V nested virtualization? Is it something you’d use in your job? Or do you think there are better alternatives?
Вложенная виртуализация в Hyper V или Nested Virtualization доступна с редакций Windows Server 2016 и Windows 10. Грубо говоря это возможность виртуализировать Hyper V внутри Hyper V. Для настройки этой возможности нужно будет выполнить несколько команд Powershell. Кроме этого процессор должен быть Intel.
Установка ESXI на Hyper V, что тоже относится к вложенной виртуализации, у меня получалось, но ошибками и в конце концов я стал запускать Hyper V и ESXI поверх VMWare Workstation. Работать вместе Hyper V и VMWare Workstation тоже не могут. Опыт включения вложенной виртуализации для других платформ у меня отсутствует.
Первое с чем мы столкнемся при попытке включения или установки роли Hyper V во вложенном варианте это отсутствие возможности поставить галочку в GUI. Можно будет установить только консоль для управления. Эту ситуацию можно обойти установив Hyper V через Powershell, но и там мы встретим ошибку:
- Не удалось запустить виртуальную машину так как не работает один из компонентов Hyper-V
- Hyper-V cannot be installed: the processor does not have required virtualization capabilities

Первое что нужно сделать это выключить виртуальную машину. Я предпочитаю делать это через Powershell:
Stop-VM -Name 'Win10'
# или
Stop-Computer -ComputerName 'Win10'
Далее нам нужно включить расширение Hyper-V:
Set-VMProcessor -VMName 'Win10' -ExposeVirtualizationExtensions $trueЕсли у вас появится какая-то ошибка это может значить, что виртуальная машина была импортирована и имеет старую версию. В этом случае можно обновить виртуальную машину Hyper-V:
Update-VMVersion -Name 'Win10'Для нормальной работы сети нам нужно включить MAC spoofing:
Get-VMNetworkAdapter -VMName 'Win10' | Set-VMNetworkAdapter -MacAddressSpoofing OnЛибо через интерфейс:

Остальные ограничения связанные с Nested Virtualization, которые не получиться использовать:
- Динамическая память
- Изменение памяти работающей VM
Были проблемы с сетевыми адаптерами. При попытках настроить Docker на VM никак не работала сеть и в таких случаях помогала переустановка драйвера на сетевом адаптере основной ОС. Это происходило на Windows 10.
…
Теги:
#hyper-v
Search code, repositories, users, issues, pull requests…
Provide feedback
Saved searches
Use saved searches to filter your results more quickly
Sign up
A Windows computer needs to support virtualization technology in order to run guest operating systems (virtual machines), Windows Subsystem for Linux (WSL), and Windows Subsystem for Android (WSA).
If your computer supports virtualization, then it can be enabled from the UEFI/BIOS settings. However, in the case of a Virtual Machine (VM), you cannot access its BIOS settings. However, one can need to run a VM, an Android application, or a Linux distro inside a VM. So what do you do then?
In such an instance, you must enable nested virtualization on a guest operating system. This is our topic for today, and this post gives you a step-by-step guide on how to enable nested virtualization on VMs configured on Microsoft Hyper-V, Oracle VirtualBox, and VMware Workstation on a Windows computer.
Note: Enabling nested virtualization for VMWare Workstation and Oracle VirtualBox on operating systems other than Windows is different. In this post, we have only discussed how to enable it if your host computer is running a Windows operating system.
Table of contents
- What is Nested Virtualization
- Prerequisites for Nested Virtualization
- How To Enable Nested Virtualization (VT-x) On Hyper-V
- How To Enable Nested Virtualization (VT-x) On VMWare WorkStation
- How To Enable Nested Virtualization (VT-x) On Oracle VirtualBox
- Final Analysis
What is Nested Virtualization
Nested virtualization, often referred to as “nested VT-x,” is running a virtualized environment inside a device that is already virtualized. In other words, running a VM inside of another VM.
When enabling a nested virtualization environment, you are nesting a hypervisor. A hypervisor is software that runs and manages virtual machines on top of the host computer.
The hypervisor running the main virtual machine is considered a “Level 0 (L0)” hypervisor. The hypervisor running inside the VM is referred to as a “Level 1 (L1)” hypervisor. Further nested virtualization would result in a Level 2 (L2) hypervisor, and so on.
At this point, most users come to think “How many nested virtualization environments can you run simultaneously?” There is no definitive answer to this at the moment. However, it all depends on your system’s resources. If you have the CPU and the RAM, as well as the storage for it, you can run as many nested hypervisors as you want.
Prerequisites for Nested Virtualization
To enable nested virtualization, the hypervisor needs to support it. Hyper-V first supported nested virtualization in Windows 10/Windows Server 2016. Before that, this technology was not available in the Hyper-V hypervisor.
If you are using Oracle VirtualBox, versions 6.1 and above support nested virtualization.
Moreover, to be able to run nested virtualization, your processor must be an Intel processor with VT-x and EPT technology, or an AMD EPYC or Ryzen processor. You can verify this information by checking on the OEM website or checking hardware virtualization compatibility from Command Prompt.
Once it is confirmed that both your hardware and software are compatible, let us move on to enabling nested virtualization.
How To Enable Nested Virtualization (VT-x) On Hyper-V
Learn how to make a Windows 11 VM on Hyper-V, VirtualBox, and Workstation.
If you try installing and running a Hyper-V VM inside a VM, you will encounter an error such as the one in this image:
 On Hyper-V, VMWare, VirtualBox VMs In Windows 1")
To enable nested VT-x on a Hyper-V VM (or any other supported hypervisor), the VM must already be created and must be turned off before performing the steps below.
The Hyper-V hypervisor does not give you the option to enable nested virtualization on a VM through the settings menu. Therefore, this needs to be done using the Command Line Interface (CLI).
-
Make sure that the VM is shut down/powered off and note down the VM’s exact name.
-
On the host computer, open Windows PowerShell with elevated privileges.
-
Now run the following cmdlet to enable nested virtualization on the VM while replacing [NameOfVM] with the complete name of the virtual machine.
Set-VMProcessor -VMName "[NameOfVM]" -ExposeVirtualizationExtensions $true On Hyper-V, VMWare, VirtualBox VMs In Windows 2")
Enable nested virtualization on Hyper V VM using PowerShell
 On Hyper-V, VMWare, VirtualBox VMs In Windows 2")
Nested virtualization on that particular VM will now be enabled. You can now confirm this by running a guest OS on top of that VM.
 On Hyper-V, VMWare, VirtualBox VMs In Windows 3")
In the case you wish to disable nested virtualization, use this cmdlet in PowerShell while the VM is disabled:
Set-VMProcessor -VMName "[NameOfVM]" -ExposeVirtualizationExtensions $falseHow To Enable Nested Virtualization (VT-x) On VMWare WorkStation
Similar to Hyper-V, the WorkStation VM must be already created and powered off to enable nested virtualization. Then, follow these steps to enable nested VT-x:
-
From VMWare WorkStation, open the VM’s settings.
 On Hyper-V, VMWare, VirtualBox VMs In Windows 4")
Open VM settings -
Under the Hardware tab, select Processors, and then check the box next to “Virtualize Intel VT-x/EPT or AMD-V/RVI,” and then click Ok.
 On Hyper-V, VMWare, VirtualBox VMs In Windows 5")
Enable nested virtualization on VMWare Workstation VM
 On Hyper-V, VMWare, VirtualBox VMs In Windows 4")
 On Hyper-V, VMWare, VirtualBox VMs In Windows 5")
Nested virtualization will now be enabled on the VM. You may now run another guest OS on top of that VM.
To disable nested VT-x on the VM, simply shut down the VM, return to the Processor settings page, and uncheck the box.
How To Enable Nested Virtualization (VT-x) On Oracle VirtualBox
According to Oracle, VirtualBox now supports nested virtualization for the supported Intel and AMD processors. We also found the option to enable it from the VirtualBox VMs’ setting page. However, the option was greyed out.
 On Hyper-V, VMWare, VirtualBox VMs In Windows 6")
Upon researching, we came to know that many people ran into this option because apparently, VirtualBox has not yet enabled it for Intel processors (we do not know why).
However, there is a workaround for this and you can enable nested virtualization on VMs created in VirtualBox as well. Here is how:
-
Using File Explorer, navigate to the path where VirtualBox is installed. By default, it has the following path:
C:\Program Files\Oracle\VirtualBox
-
Copy this path and then open an elevated Command Prompt. Use the “cd” cmdlet to change your directory to the VirtualBox folder. Use the copied path from File Explorer.
cd /d [PathToVirtualBoxFolder] On Hyper-V, VMWare, VirtualBox VMs In Windows 7")
Change directory 2 -
Now, run the following cmdlet while replacing [NameOfVM] with the name of the virtual machine on which you want to enable nested virtualization.
VBoxManage modifyvm <YourVirtualMachineName> --nested-hw-virt onEnable nested virtualization on VirtualBox VM
 On Hyper-V, VMWare, VirtualBox VMs In Windows 7")
 On Hyper-V, VMWare, VirtualBox VMs In Windows 8")
Nested VT-x will now be enabled on the selected VM. You can confirm this by opening the VM’s settings again, clicking System, and then clicking the Processor tab, where you shall now be able to check and uncheck the box next to “Enable nested VT-x/AMD-V” to enable or disable nested virtualization.
 On Hyper-V, VMWare, VirtualBox VMs In Windows 9")
Note that, like Hyper-V, this cmdlet will need to be run for each individual VM that you want to enable nested VT-x on.
After running the cmdlet in the steps above, nested virtualization is enabled by default. If you wish to disable it, simply uncheck the box next to “Enable Nest VT-x/AMD-V” on the Processor settings page.
Final Analysis
Virtual machines can be used for different purposes, like performing isolated tests, running special services and tasks, etc. However, if you want to perform virtualization-related tests, then we suggest you perform it on a VM inside another VM. This way, you won’t be putting the parent host computer in harm’s way.
Nested virtualization is another great way to use limited resources while achieving more. You can use the same VM, on a physical computer or on the cloud, create multiple VMs on it, and then distribute those VMs to your students/subordinates; all while only using one level 1 VM.
Posey’s Tips & Tricks
Nested Virtualization in Windows 10 Hyper-V
To test the Windows 10X emulator, Brien needed to figure out how to configure Hyper-V to run on a Windows 10 virtual machine. Here’s how he made it work.

Windows Server has long included support for nested virtualization through Hyper-V. Although I have used nested Hyper-V several times, I’ve never considered whether it is possible to do nested virtualization in Windows 10 Hyper-V. I guess I never really had a good use case for it.
That changed earlier this month, however, when Microsoft released its emulator for the Windows 10X operating system. If you aren’t familiar with Windows 10X, it’s a new version of Windows 10 that will eventually be released for use on multiscreen Surface devices — specifically, the Surface Neo and Surface Duo. I talk more about my first impressions of the Windows 10X emulator in this column. For now, though, I’ll discuss how I prepared my system for Windows 10X using nested virtualization.
Although the Windows 10X emulator depends on Hyper-V, it requires Windows Insider Preview build 10.0.19555 or later. Even though I wanted to experiment with Windows 10X, I did not want to run the risk of installing a preview build onto one of my production machines, and I didn’t have any spare hardware. Normally, I would just install Windows to a virtual machine (VM), but the requirement for Hyper-V complicated things a bit.
My only option in this case was to see if I could make nested Hyper-V work with Windows 10. Actually, that’s not quite true — there is an additional twist.
Whenever I have run nested Hyper-V on Windows Server, I have ended up with Windows Server running inside of Windows Server, inside of Windows Server. In other words, the parent Windows Server operating system is running Hyper-V. A Hyper-V VM is also running Windows Server and has nested virtualization enabled, allowing me to run Hyper-V inside of that VM. The VMs that I have run on my virtualized Hyper-V server have also historically run Windows Server.
Because I don’t have any spare hardware at the moment, I needed to make nested virtualization work across differing OSes. My parent OS in this case is Windows Server, but I needed to configure Hyper-V to run on a Windows 10 VM. Going in, I wasn’t even sure that this configuration would work.
Nested virtualization was first introduced in Windows Server 2016 and in the Windows 10 Anniversary Update. As such, you need to be running Windows Server 2016 or higher and the Windows 10 Anniversary Update or higher. The parent OS that I am using for the examples in this column is Windows Server 2019. It’s also worth noting that nested virtualization is only supported on Intel processors. The server that I am using is equipped with two Intel Xeon processors.
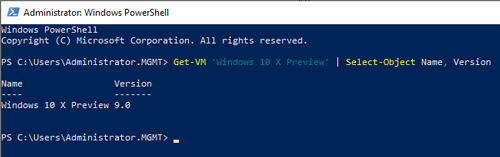
The first step in the process is to create the Hyper-V VM that will act as a Windows 10 host. Upon doing so, shut the VM down, then check the VM version. The VM must be Hyper-V Configuration Version 8.0 or higher. You can find the configuration version number in the Hyper-V Manager. As an alternative, you can use PowerShell, as shown in Figure 1. If the configuration version is too low, then you can fix the problem by using the Update-VMVersion cmdlet followed by the VM name.
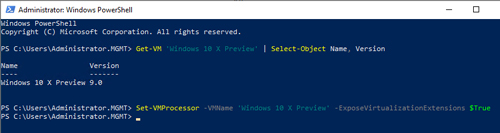
Now, with the VM still powered off, you will need to use the Set-VMProcessor cmdlet to enable nested virtualization for the VM. The required parameters include VMName and ExposeVirtualizationExtensions (which must be set to $True). Figure 2 shows how this cmdlet works.
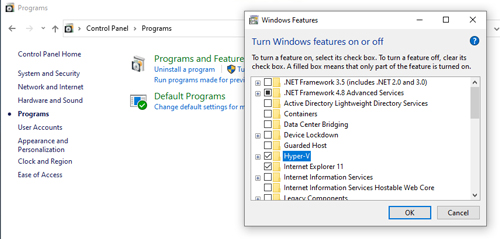
At this point, you should boot the Windows 10 VM and log into it. Next, open the Windows 10 Control Panel and click on Programs, followed by Turn Windows Features On or Off. Now, select Hyper-V from the list of Windows 10 features, as shown in Figure 3, and click OK. Windows 10 will now install Hyper-V and prompt you to reboot the VM.
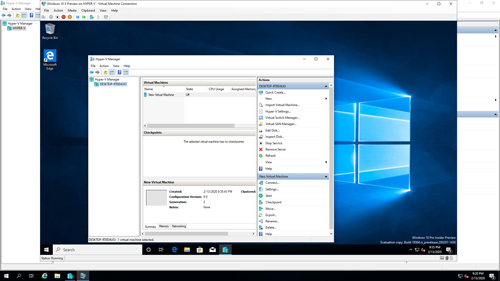
Once Windows 10 reboots, you should be able to access the Hyper-V Manager and create VMs inside of the Windows 10 VM, as shown in Figure 4.
About the Author
Brien Posey is a 22-time Microsoft MVP with decades of IT experience. As a freelance writer, Posey has written thousands of articles and contributed to several dozen books on a wide variety of IT topics. Prior to going freelance, Posey was a CIO for a national chain of hospitals and health care facilities. He has also served as a network administrator for some of the country’s largest insurance companies and for the Department of Defense at Fort Knox. In addition to his continued work in IT, Posey has spent the last several years actively training as a commercial scientist-astronaut candidate in preparation to fly on a mission to study polar mesospheric clouds from space. You can follow his spaceflight training on his Web site.