The green screen of death Windows 10 is a new type of error that often occurs when using a Windows Insider build or Windows Creators. If you are also struggling to fix the vexing issue, you come to the right place. This post of MiniTool will walk you through step-by-step guides to fix the error.
Have you come across the green screen of death error? Similar to the Blue screen of death, the Green screen of death (GSOD) error often appears after the welcome screen. After investigating extensive user reports and posts, we come to the conclusion that the Windows 10 green screen mainly appears during the process of installing a Windows Insider program or using Windows creators.
Here’s a true example from the Microsoft forum:
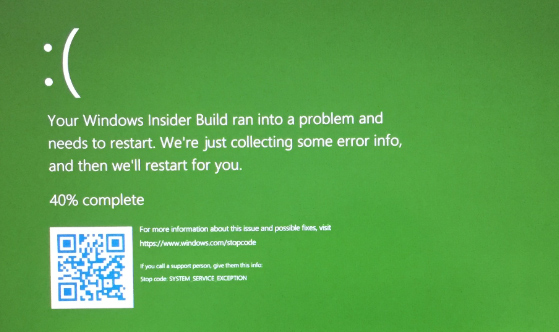
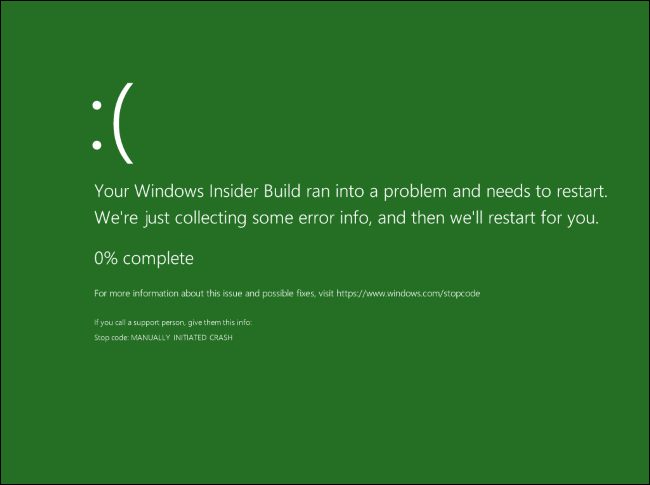
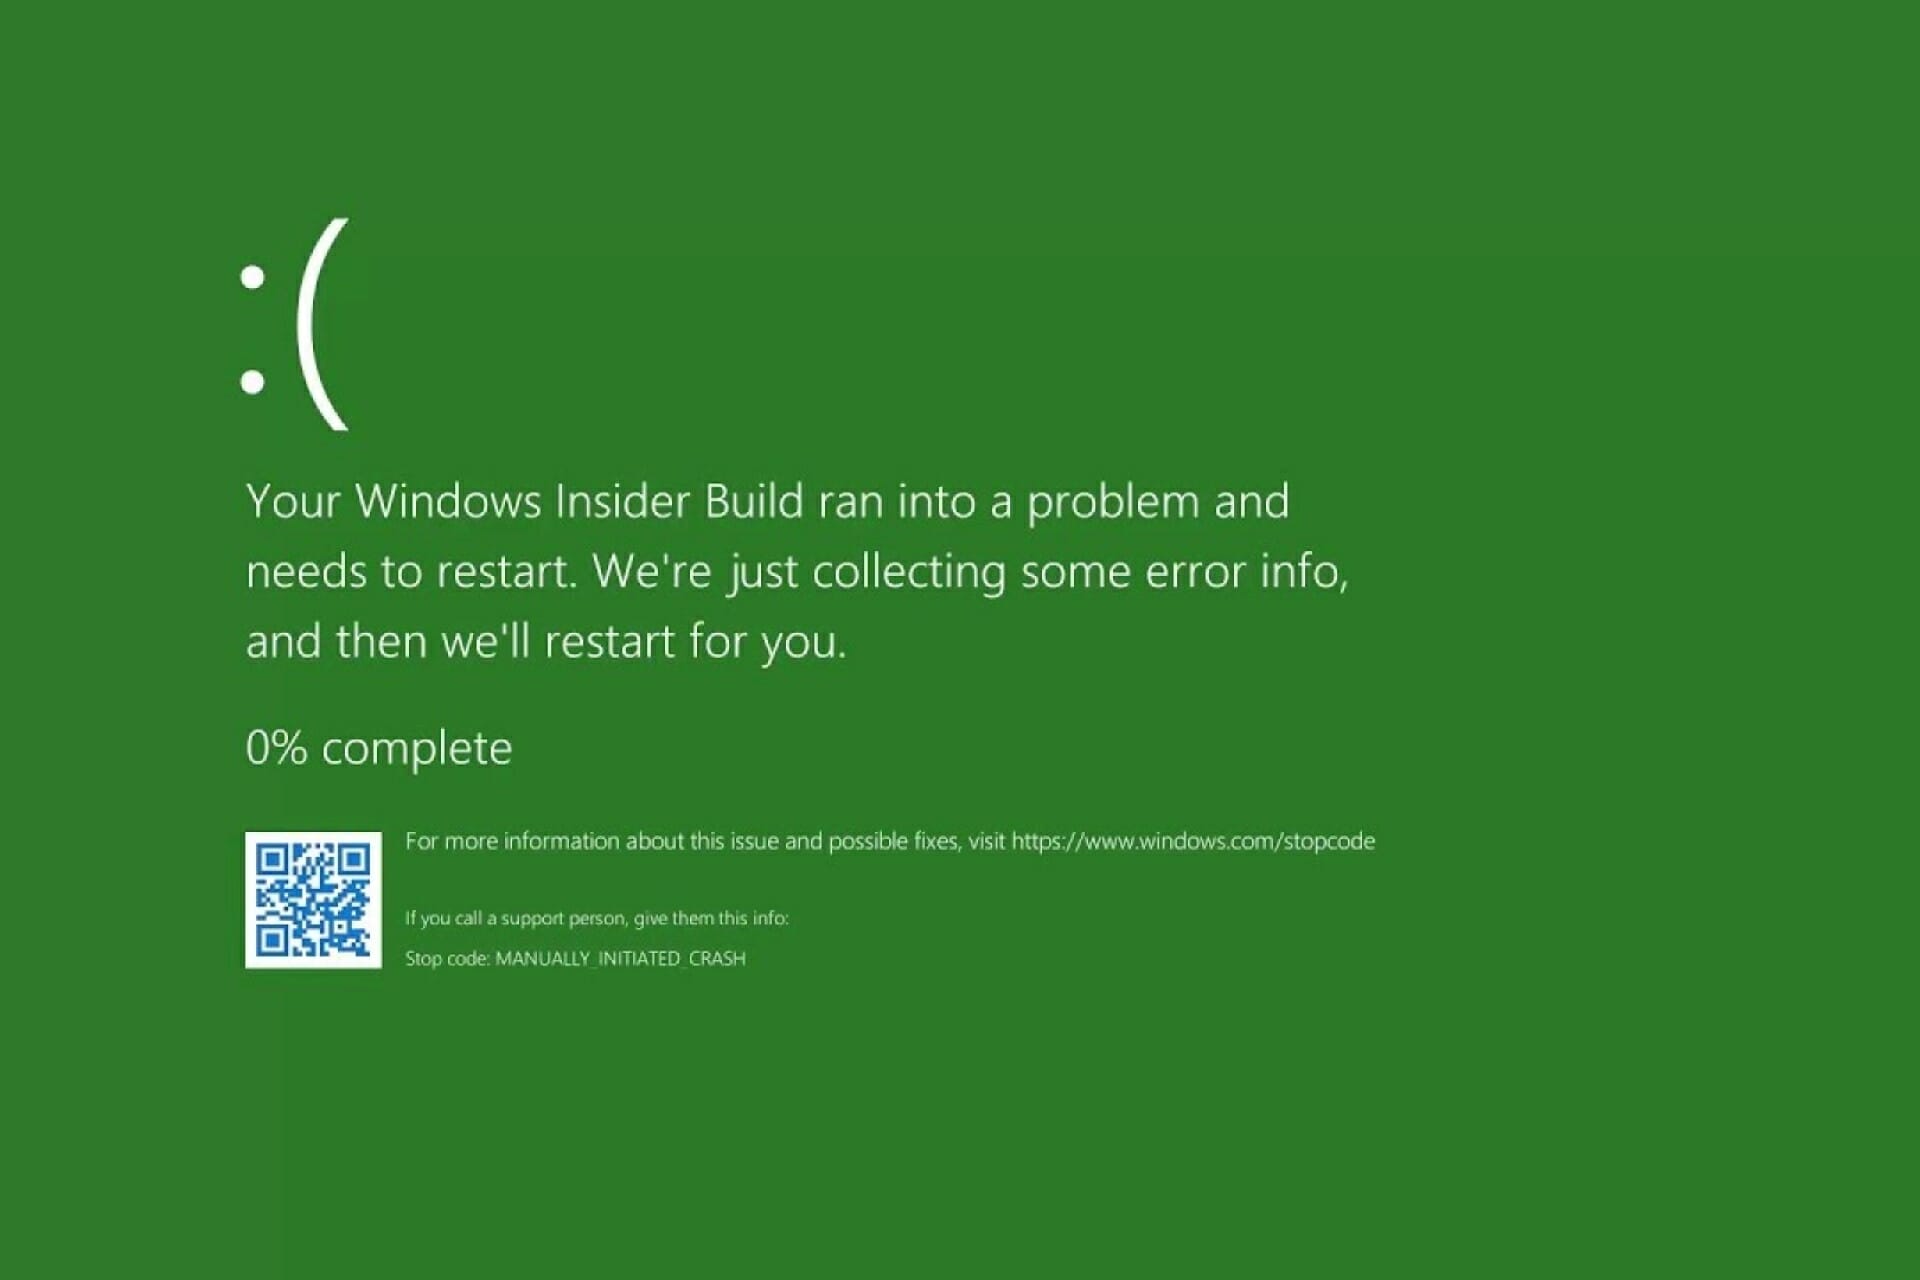
Hi There. I’ve joined the Windows Insider program and I using windows 10 Pro 64 bit with Version 1803, OS Build 17134.112 and I just install NOX application. When I start the NOX application, suddenly my computer gets stuck at the green screen of death and show the message Your Windows Insider Build ran into a problem and needs to restart. We’re just collecting some error info, and then we’ll restart for you. So, can you help me to solve this problem? https://answers.microsoft.com/en-us/windows/forum/windows_10-performance/green-screen-of-death-solved/4a82d33c-ecd4-43ca-8c42-b733615b3f88
About Green Screen of Death
Compared with the blue screen of death and the red screen of death, the Windows 10 green screen of death is unknown for most people. GSOD is a result of the critical failure of Windows 10 that only appears when running a Windows Insider Build program or creator.
What causes the green computer screen error? The major reason behind the error is the malfunction of your hardware drivers. In addition, the connected peripherals and conflicting third-party software are also responsible for the green screen error.
If it is the first time that you encounter the PC green death, you can try performing several restarts of your computer to fix the error. If the issue still persists after several simple restarts, move on to the following content.
Before Fixing Windows 10 Green Screen of Death
Prior to troubleshooting the computer green screen, it is highly recommended that you save your important data to another location. As you know, the green screen of death is a crashing error that might cause serious data loss and even a boot failure.
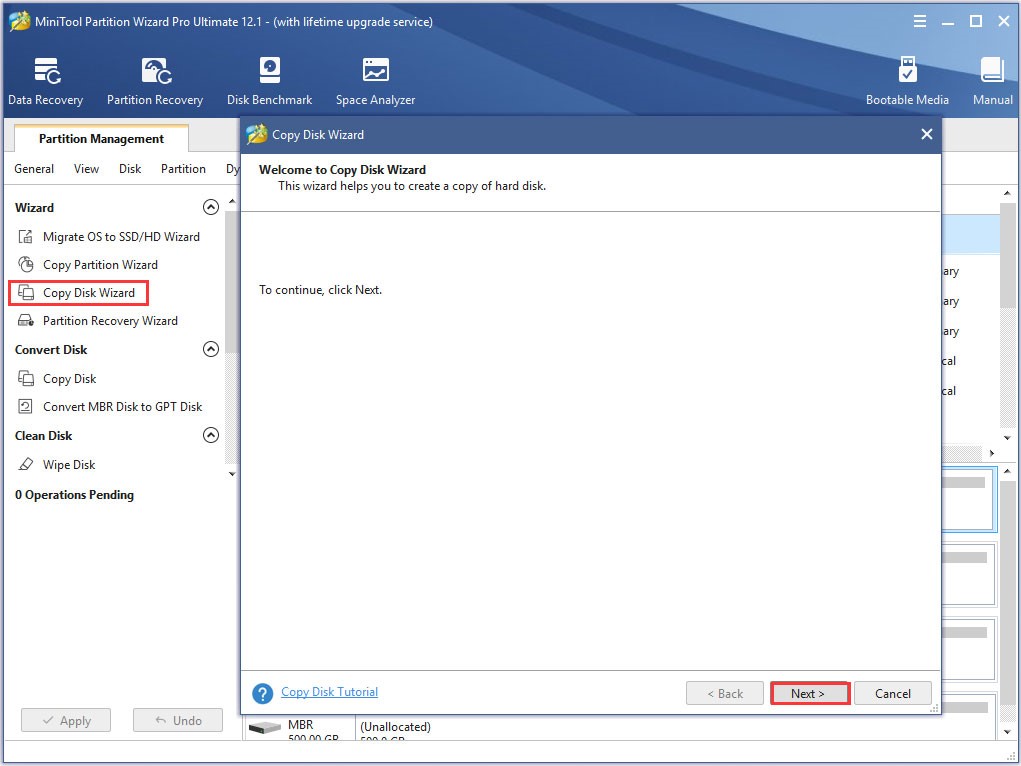
Here MiniTool Partition Wizard is an ideal utility to transfer your data to another place. With this powerful partition manager, you can back up your system and even the whole disk easily. Besides, it boasts lots of features like rebuild MBR, analyze hard drive, convert NTFS to FAT, perform disk benchmark, and so forth.
Click on the button below to download this software and install it on your computer. Then refer to this post to back up your system to an external hard drive.
Tip: Since MiniTool Partition Wizard Free Edition doesn’t support copying the system disk, we recommend you install its Pro or more advanced edition. Also, you can refer to its edition comparison to choose a suitable one.
Once you have backed up your system disk, you can continue the following troubleshooting methods without any concern.
How to Fix Green of Death on Windows 10
This part will walk you through several step-by-step guides to fix the green computer screen death error. Now, let’s start exploring them one by one.
Fix 1. Disconnect All Peripherals from Your PC
As pointed out above, the Windows 10 green screen of death can be triggered by any connected peripherals such as an external hard drive, USB flash drive, external power cable, external keyboard, power cables, etc.
So, the easiest way method is to completely turn off your computer and then disconnect all peripherals one by one. If the computer green screen issue still persists, then it indicates that the issue can be caused by other factors.
Fix 2. Update Your Device Driver in Safe Mode
If your graphics card driver gets corrupted or outdated, you may encounter the green screen of death error. To get rid of the error, you can try updating the device driver on Windows 10. Here we recommend you enter Safe Mode first, which can help fix many Windows 10 crashing issues like blue screen, black screen, and PC green screen.
Now, follow the steps below.
Step 1. Restart your computer several times until you arrive at the Automatic Repair screen.
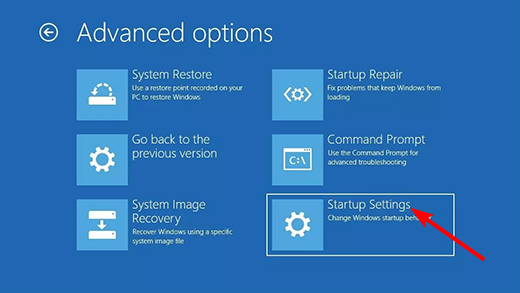
Step 2. In the pop-up window, click on Troubleshoot and navigate to the Advanced options menu.
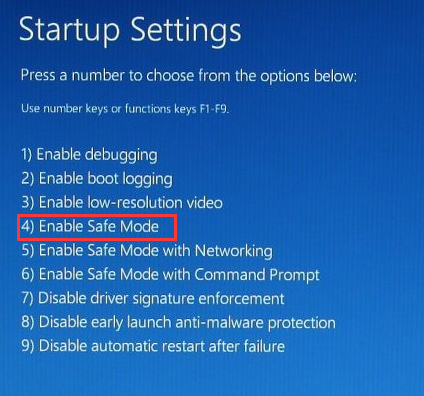
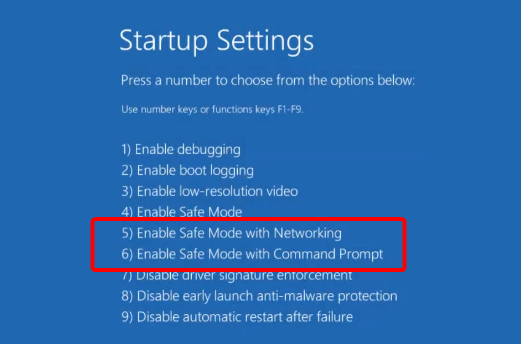
Step 3. Click on Startup Settings in the Advanced options menu. After that, you can select the Enable Safe Mode option by pressing the 4 or F4 key.
Tip: Also, you can press the F5 key to select the Enable Safe Mode with Networking option.
Step 4. Press the Win + R key to open the Run dialog box, and then type devmgmt.msc in the box and hit Enter.
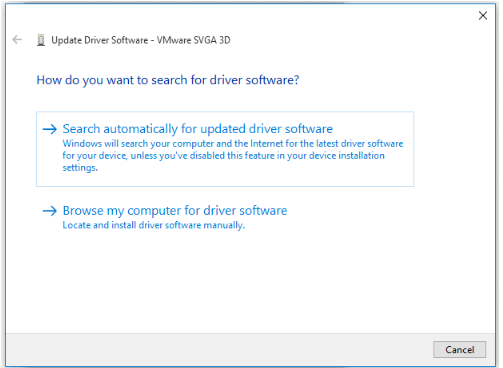
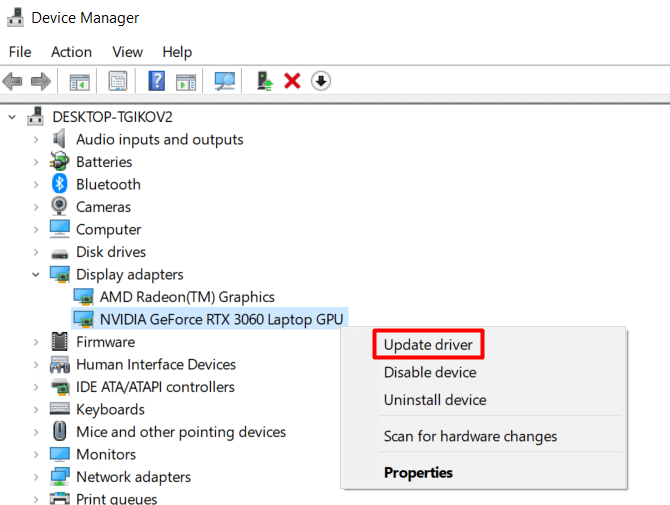
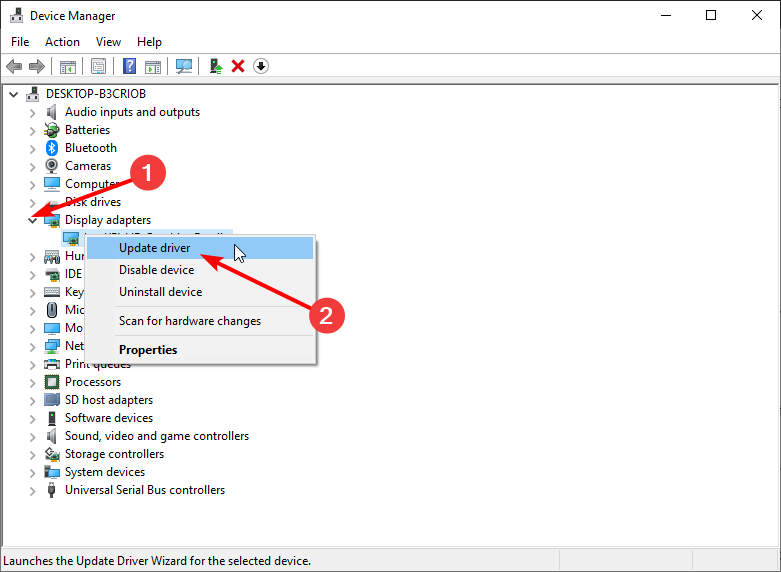
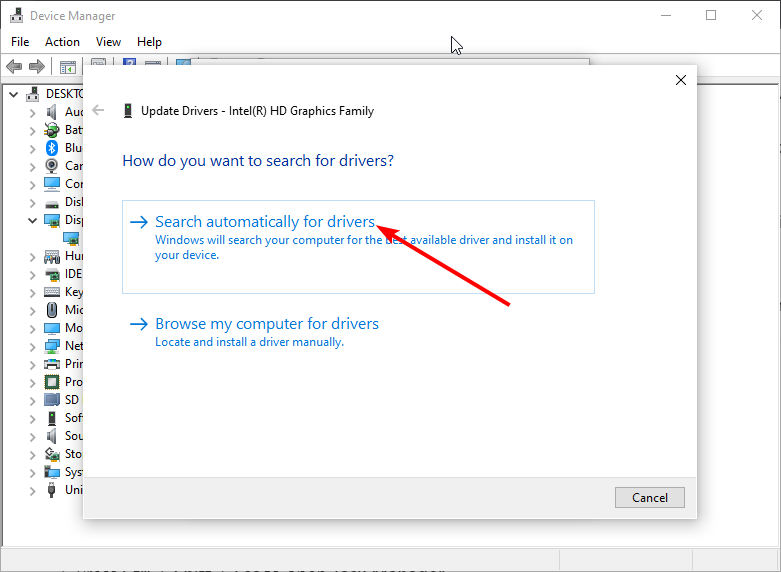
Step 5. Expand the Display adapters category, and then right-click the graphics card driver and select Update Driver.
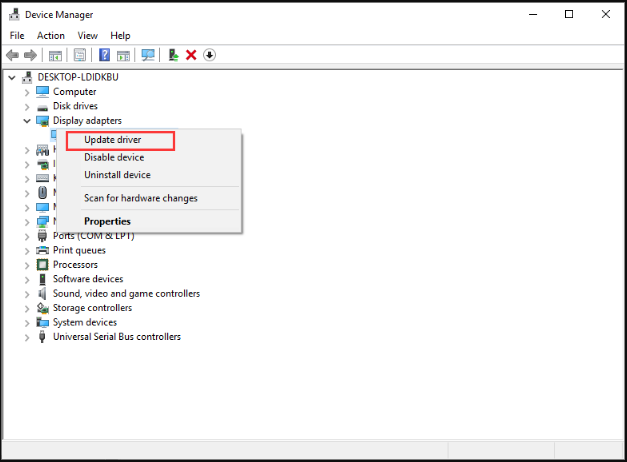
Step 6. Then you can select Search automatically for updated driver software option to update the driver automatically. After that, Windows will automatically detect any available updated device drivers and install them.
Once the update process completes, restart your computer and check if the green screen Windows 10 error is resolved or not.
Fix 3. Disable the Third-Party Antivirus Programs
If you have installed third-party antivirus software or antivirus removal tool like MRT.exe, we recommend you remove it from your computer and use Windows built-in antivirus program instead. This is because some users reported that the third-party software can throw the green screen of death error.
Here’s how to remove a third-party antivirus program from your Windows 10 PC.
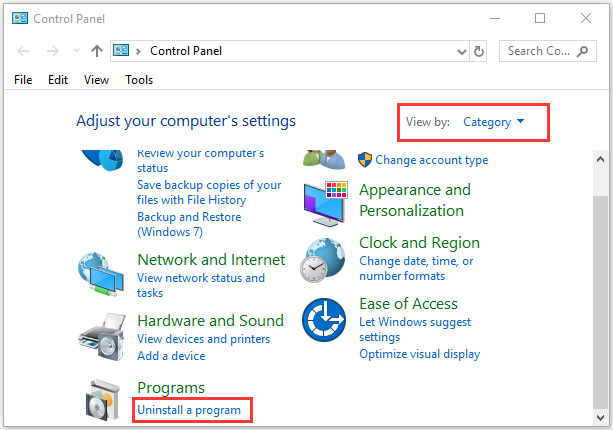
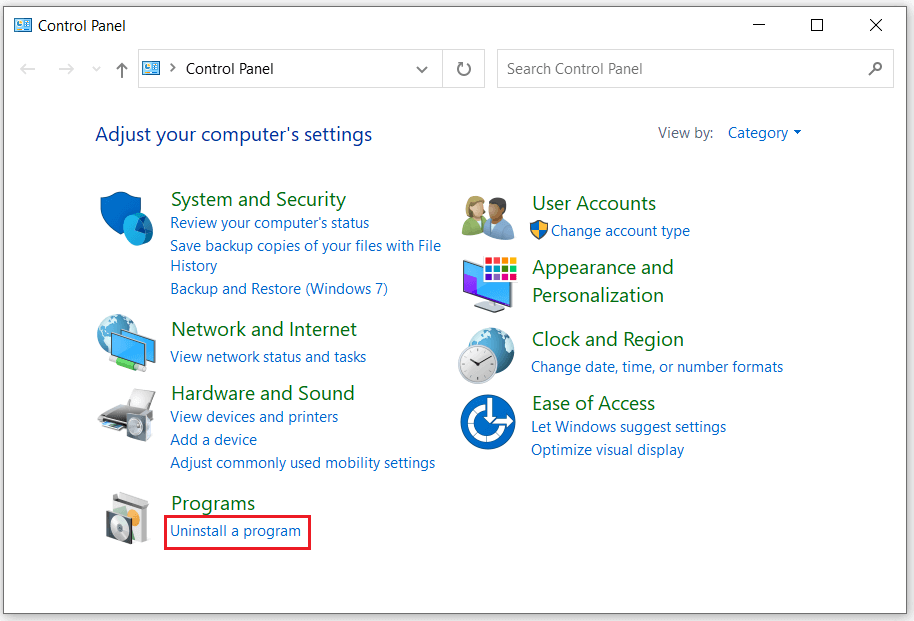
Step 1. Type control in the search box and select the Control Panel app from the context menu.
Step 2. Change the View by type to Category, and then click on Uninstall a program under the Programs section.
Step 3. Navigate to the antivirus software like Avast from the list of install programs, and then right-click it and select Uninstall. Click on Yes to confirm this uninstallation and follow the on-screen prompts to complete this operation.
Step 4. Press the Win + E keys to open the File Explorer, and then navigate to the C:ProgramData folder in C drive. Then select all Avast related folders and press Delete key to uninstall the third-party software permanently.
Now, you can reboot your computer and see if the Windows 10 green screen still persists.
Fix 4. Perform a Clean Installation of Your Windows 10
If none of the above methods troubleshoot the problem, you may have to consider performing a clean installation of your Windows 10 PC. A clean installation will wipe out all the corrupt or decaying factor on your system that might cause a green screen Windows 10.
There are several ways to perform a clean installation, but the most direct and simplest way is to Reset This PC. Here’s how to do that:
Note: Since this process will erase all the data on your system disk, please make a full backup of all the important data including personal data, your account, and settings.
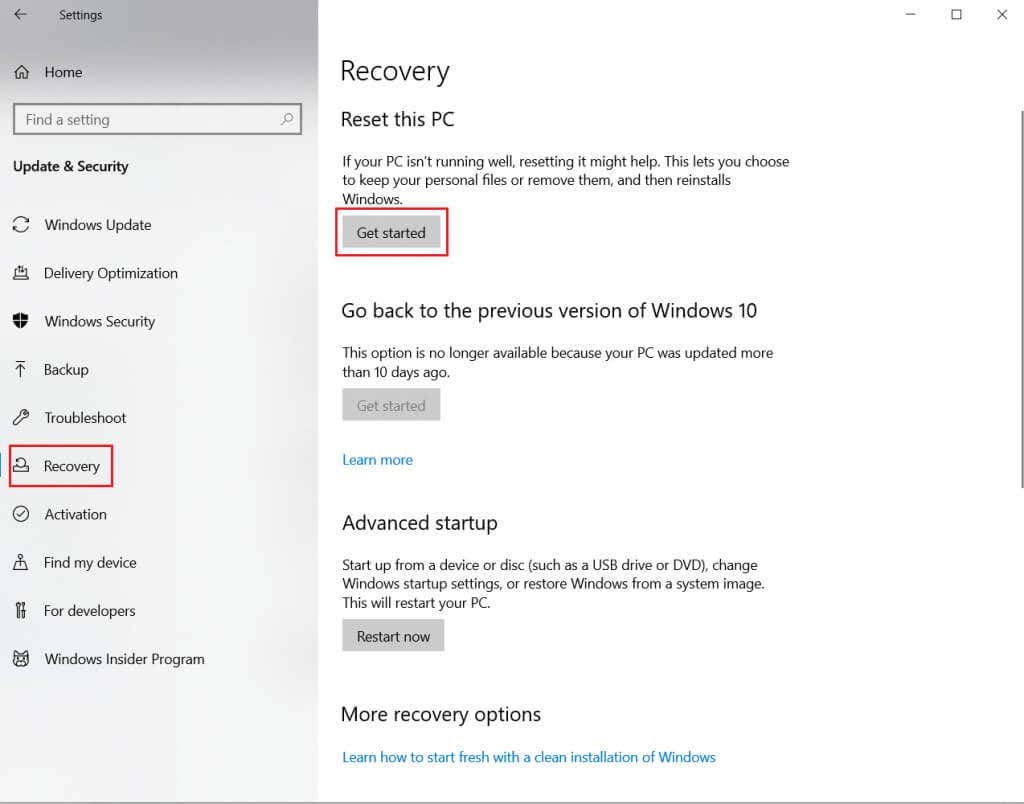
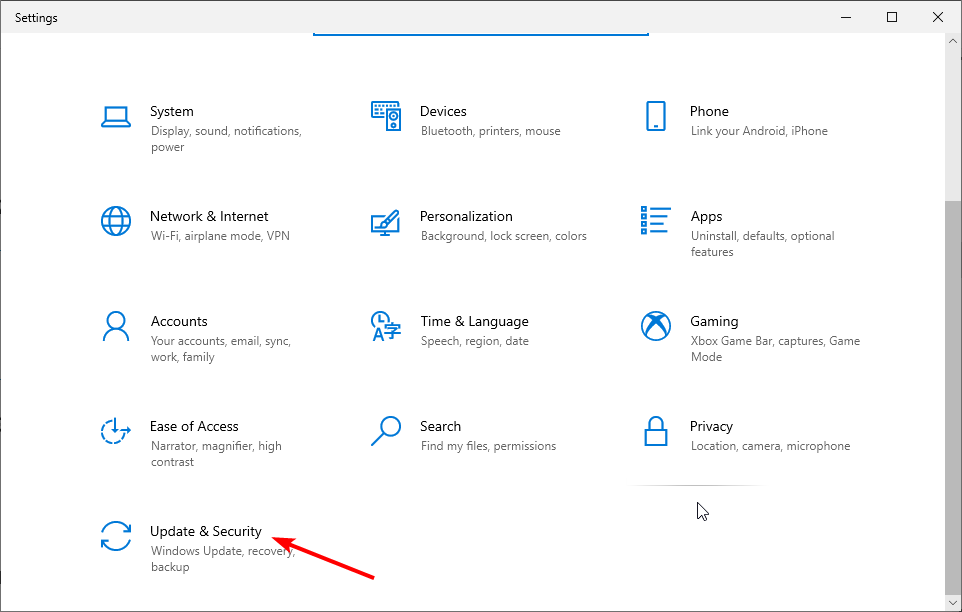
Step 1. Press Win + I keys to open the Settings app and navigate to the Update & Security tab.
Step 2. Go to the Recovery tab on the left pane, and then click on Get started under the Reset this PC section at the right side of the window.

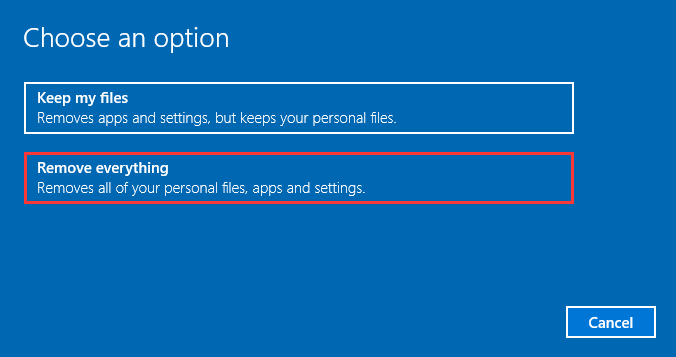
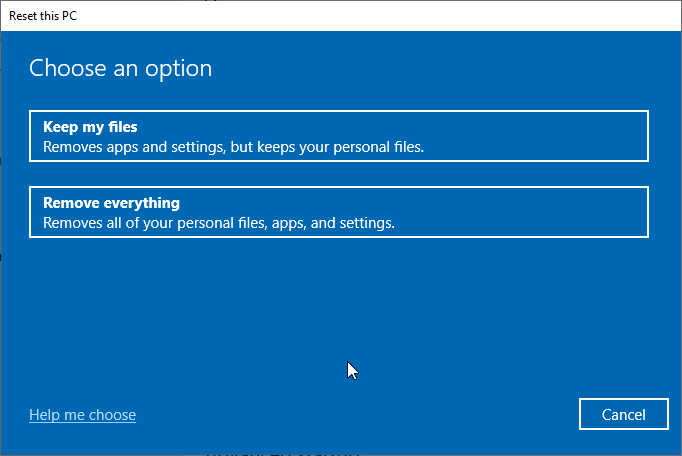
Step 3. Then you will see 2 options. Select the second option Remove everything, which will wipe out all of your personal files, apps, and settings.
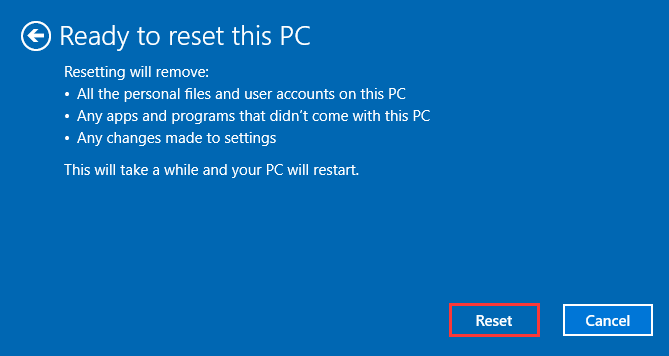
Step 4. After a while, you will be prompted with the Ready to reset this PC message and click on the Reset button.
Tip: This resetting process could take you a few hours to complete depending on your system disk space. So, please wait patiently.
Once the process completes, your Windows 10 laptop will be reset to the factory settings and the green screen of death should disappear.
Recover Lost Data from Windows 10
The green screen of death may result in the loss of your important data. Don’t worry. How to restore lost data? Now, you can recover lost data and partitions easily with the help of MiniTool Partition Wizard. Here’s a step-by-step guide for you.
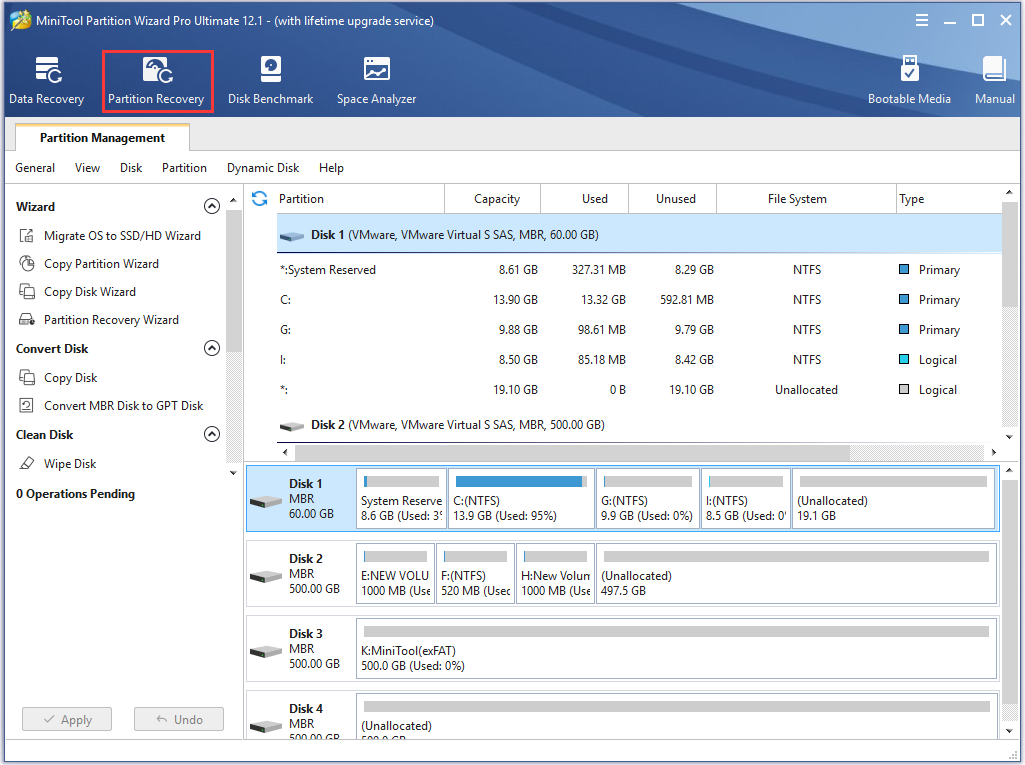
Step 1. Launch this program to enter its main interface, and then select the system disk that you lost partitions and click on Partition Recovery from the top toolbar.
Tip: Since the clean installation will wipe out all the data on the partitions, we recommend that you select the Partition Recovery. It is more suitable than the Data Recovery option to restore the partitions on the whole disk.
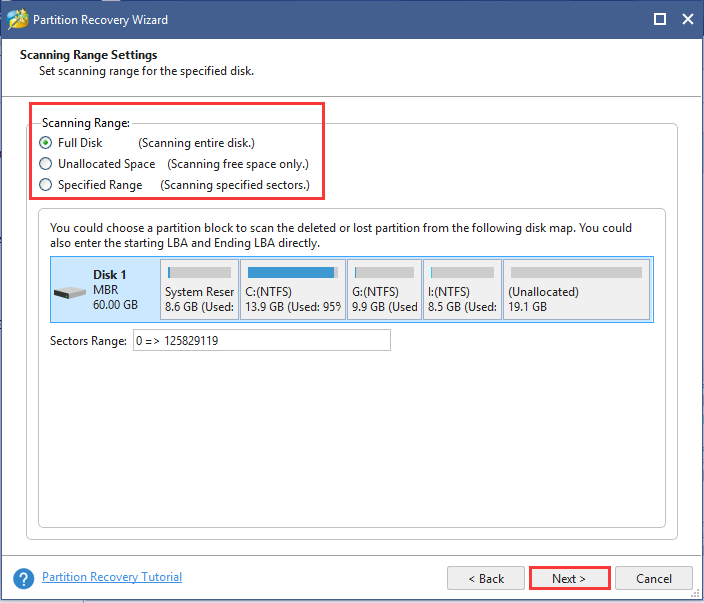
Step 2. Now, select the Full Disk option as the scanning range and click on Next to go on. You also can select the Unallocated Space, or Specified Range based on your needs.
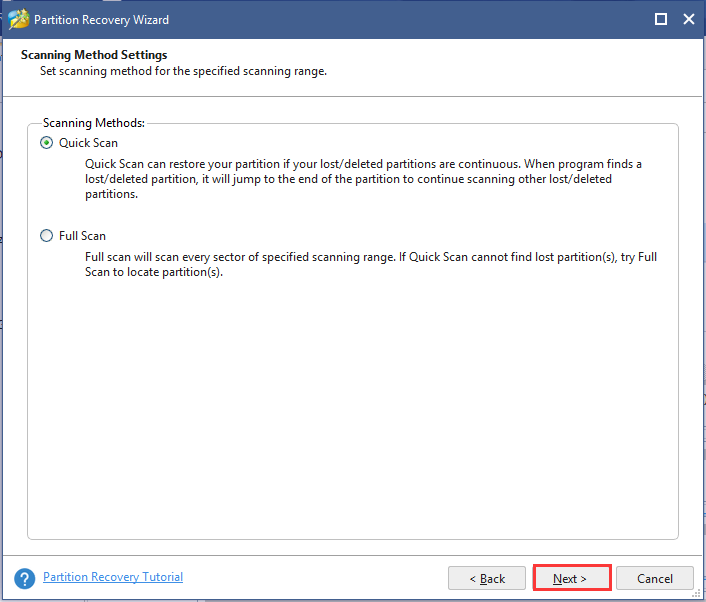
Step 3. Select a scanning method to scan the disk and click Next. Here I take the Quick Scan for example.
Step 4. Make sure that you tick checkboxes for all partitions including existing partitions and the deleted/lost partitions, and click on the Finish button.
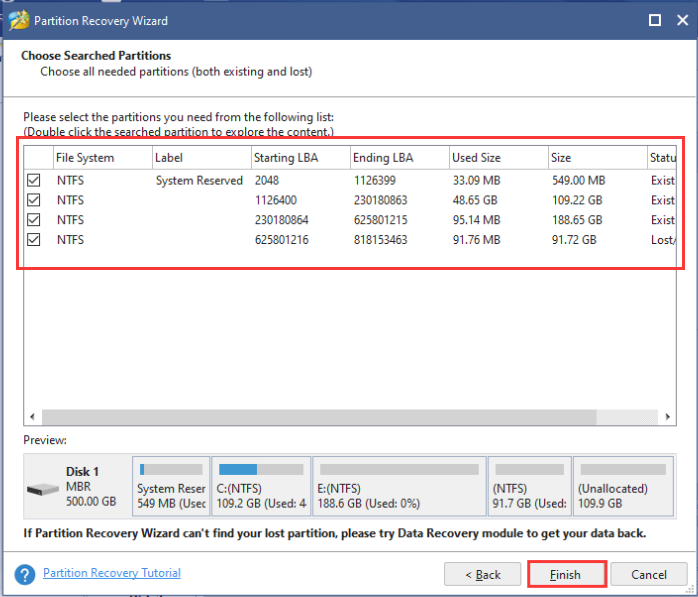
After that, the lost partitions should be recovered and the partition table will be rebuilt.
Are you bothered by the Windows 10 green screen of death? This post explores several accessible troubleshooting methods. Moreover, the post provides a step-by-step guide to recover lost data due to the error. Perhaps you are looking for such an article. Click to Tweet
Have a Try Now
How to get rid of the Windows 10 green screen of death? This post shares you with the top 5 solutions. You can try them one by one until the issue is fixed. If you have any ideas on the PC green screen issue, please share them in the comment area below. Also, you can send your doubts and questions about MiniTool software in an email via [email protected].
Green Screen of Death FAQ
What does green screen mean on computer?
It could indicate that the connector of your monitor and PC are loose. Sometimes, this issue could happen on projectors where the color display messes up. Also, it could mean that there is a bad video card. You can try connecting all your connectors with different monitor and see if your computer is still green.
How do I fix green screen of death on Windows 10?
The GSOD error can be caused by malfunctioned device driver and third-party antivirus software. Here we summarize several effective methods:
- Update device driver in Safe Mode.
- Remove the third-party antivirus software from your computer.
- Disconnect all peripherals.
- Perform a clean installation of your Windows 10.
What causes Xbox One green screen of death?
According to a survey, we found several factors that can trigger Xbox One green screen of death.
- System update failure
- System update interruption
- Corrupted hard disk on Xbox One
- Communication errors
How to fix a blue screen of death on PC?
Blue Screen of Death is a serious stop error that can shut down or restart your computer. Here are several common fixes:
- Check if there are enough free space on your C drive.
- Change some settings in BIOS.
- Disable or uninstall all antivirus software.
- Uninstall Windows update, driver, or programs in Safe Mode.
- Remove newly added hardware devices like webcam, printer, and monitor.
- Scan your computer for virus or malware.
We have all heard of the Blue Screen of Death (BSOD), but have you heard of its twin brother from the Windows Insider Program: the Green Screen of Death?
There is such a thing as a Green Screen of Death (GSOD for short), and in a way, it is the same error as BSOD. In this article, you will learn what causes the GSOD and how to fix it, or at least mitigate it, so your work is not interrupted.
What Is the Green Screen of Death
The Green Screen of Death is an error that occurs due to a critical failure of the Windows operating system. But it only happens inside the Windows Insider build or Creator editions.
Microsoft designed the Windows Insider Program for programmers and tech-savvy people who want to test future builds of Windows. The Green Screen of Death separates the errors in the Insider Program from standard Windows errors, which the Blue Screen of Death signals.
The main issue that causes GSOD errors is hardware malfunctions. But it could also be caused by connected peripherals or third-party programs, corrupted system files, outdated drivers, and excessive memory usage.
The good news is that all these problems can easily be solved. Many workarounds will allow you to deal with the GSOD and keep your workflow intact. Before we jump into all the troubleshooting and possible fixes, you should try resetting your computer to see if that helps. If it doesn’t, continue reading.
What You Should Do Before Fixing the GSOD
The Green Screen of Death is an error that can easily result in losing important data. Although there are ways to recover lost data with a significant percentage of accuracy, there is no need to allow this to happen.
Before troubleshooting the GSOD, the smartest thing you could do is save all your essential data on another device. You can also use a partition manager to divide your disk space and keep the critical data in a safe part of your hard disk. This will allow you to back up your system and even the whole disk if necessary.
How to Fix Green Screen of Death on Windows 10 and 11
You must do a hard reset when you find yourself stuck with the Green Screen of Death. Press and hold the computer’s power button for a few seconds to force it to shut down. The computer should boot now, but if it doesn’t, try booting Windows in Safe Mode. Here’s a detailed guide on how to start Windows in Safe Mode.
After you successfully boot Windows, update the operating system to make sure you get rid of all the possible bugs that might have caused GSOD.
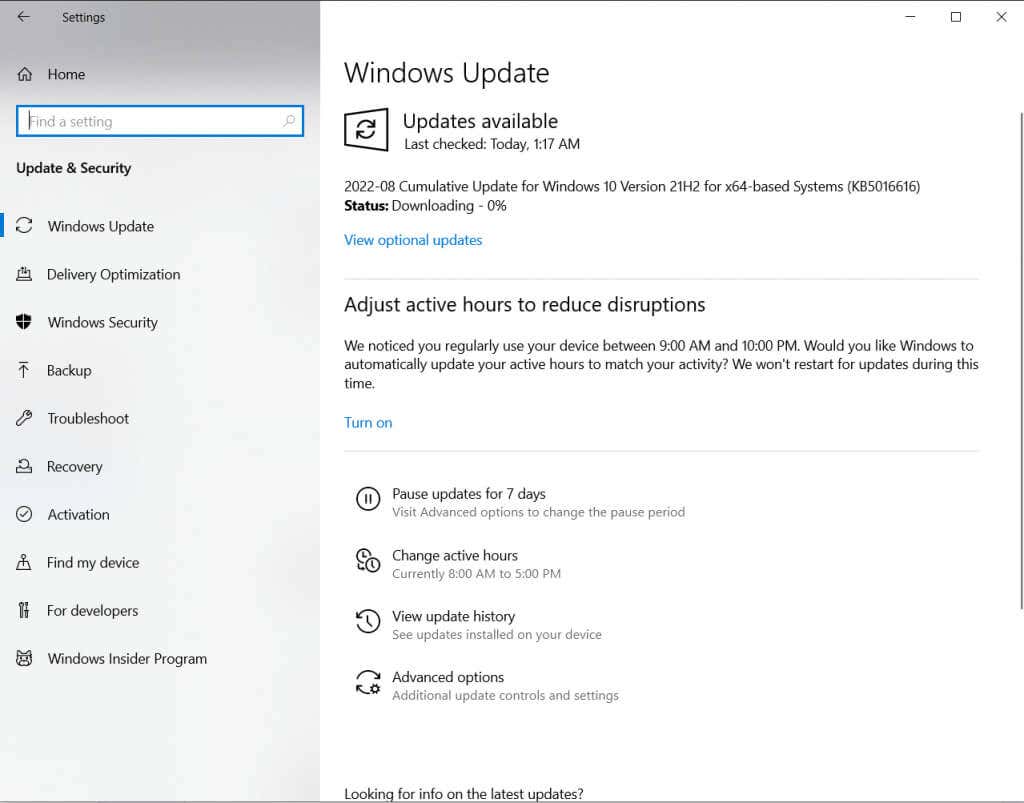
To update the Operating System, go to Settings and then Update & Security. On the left panel, you should find Windows Updates, and then click Check for Updates. If there are available updates, download and install them.
If the problem persists, try some of the following fixes.
1. Update Graphic Drivers
Outdated graphic drivers are one of the common reasons that can cause GSOD. This error often happens in Insider Preview during gaming sessions. Because of this, it is logical to suspect an issue with the graphic card drivers.
- Boot your PC in Safe Mode.
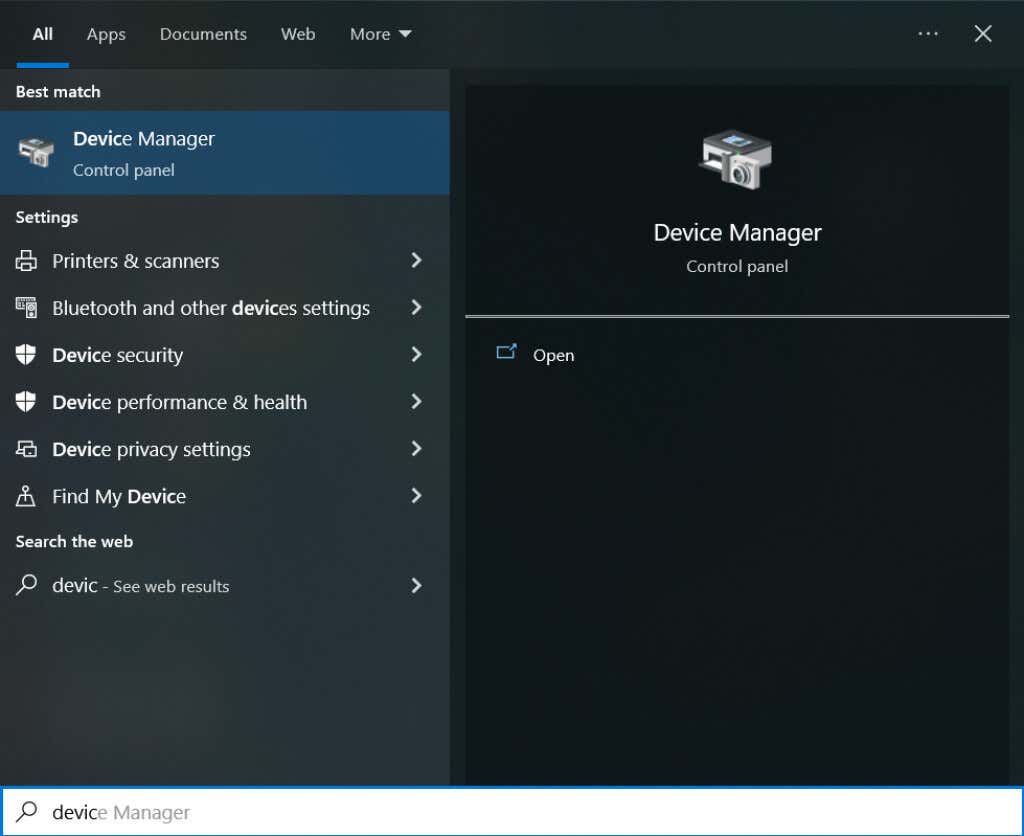
- Find the Device Manager by using the search bar and launch it.
- Choose the devices listed, right-click them, and then select Update Driver.
Once you update the drivers, reboot your PC in normal mode, and see if the GSOD reappears.
2. Remove All Peripheral Devices
Sometimes, the Green Screen of Death happens because of a hardware malfunction. But before you check your PC’s hardware, see if the issue lies with one of the peripheral devices you might have connected to it.
- Plug out all peripheral devices such as the keyboard, mouse, speakers, and other devices.
- Restart your PC and see if the GSOD appears.
If everything seems ok, one or more of your peripheral devices is malfunctioning. You will need to identify which one it is. Connect them all, one by one, and see which one will cause a GSOD error. The defective device should be repaired or replaced with a new one.
3. Remove All Third-party Programs and Apps Installed from Unreliable Sources
Third-party software can sometimes cause a Green Screen of Death because of incompatibilities with the Insider build. It is advisable to remove them and see if the error persists. To remove any programs:
- Go to Control Panel. You can use the search box to find it.
- Under the Programs section, click on Uninstall a program.
- Find the third-party program you wish to remove. Right-click on it and choose Uninstall. Confirm by clicking Yes.
Uninstalling the third-party program might not be enough. You will also have to remove all the files related to it. To do this, press Win + E on your keyboard to open File Explorer. Go to the C:\ProgramData folder, select all folders and files related to the uninstalled program, and hit the Delete key on the keyboard. Restart your PC and see if this fixed the GSOD.
4. Disable the Hardware Acceleration Feature in Your Browser
Hardware Acceleration optimizes the sound and video output of your PC. It is primarily used by people who often use video and audio streaming platforms. The sound cards and the GPU installed on your computer use this feature to give you the best possible experience while gaming, watching movies, or listening to music.
But Hardware Acceleration demands a strong GPU to provide a smooth experience. If there is insufficient power, your browser will slow down even to the point of causing the Green Screen of Death. If you suspect this is your main issue, you must disable the Hardware Acceleration feature.
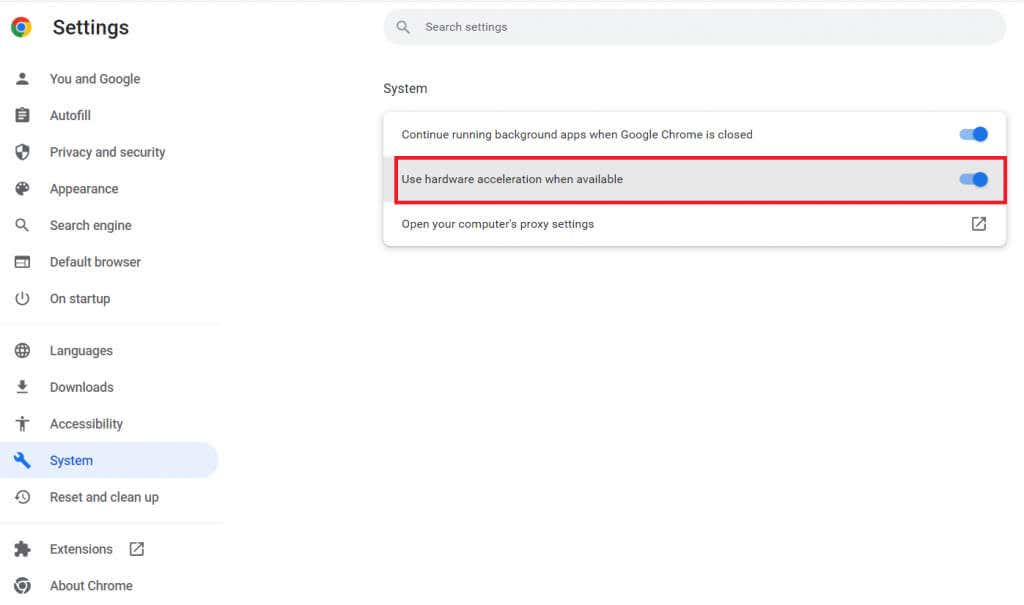
If you are using the Chrome Browser:
- Go to Settings, and navigate down to System.
- Here you will find Use Hardware Acceleration when Available. Deselect it.
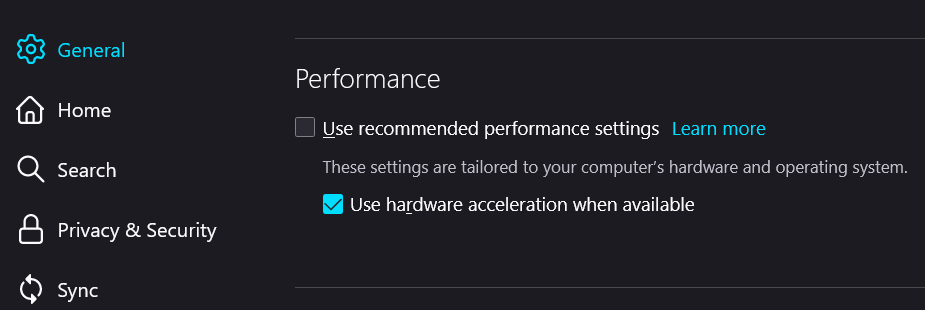
For Firefox users:
- Go to the menu in the top right corner of your browser and select Settings.
- Under the General tab, scroll down until you find Performance.
- Uncheck the box next to the Use Recommended Settings.
- Uncheck the box next to the Use Hardware Acceleration when Available.
Restart your PC and see if this fixed GSOD.
5. Reinstall Windows 10 or Windows 11
If nothing else helps and your GSOD error keeps reappearing, you won’t have another choice but to perform a clean install of your Windows OS. This may result in loss of data. In fact, GSOD may have already caused a data loss; to recover it, you might need to use one of the data recovery tools available online.
Before reinstalling your OS, ensure you backed up any important files you might need, including account information, settings, and personal files.
There are several different ways to reinstall Windows. Here is the simplest and most direct way to do it:
- Go to Settings. Find it with the Search Bar or press Win + I on your keyboard. Go to the Update & Security tab.
- Find the Recovery tab on the left panel, go to Reset this PC, and click Get Started.
- You will be given two options. It is crucial to select the second one, Remove Everything. As the name suggests, all files will be lost, ensuring all errors, bugs, and corruptions are gone.
- After some time, your PC will display a message Ready to reset this PC. Select the Reset button.
Note you have to be patient. Please make sure not to interrupt the process.
Whatever you do, do not ignore the Green Screen of Death! It can cause serious damage to your system and lead to the loss of data. If you aren’t sure what’s causing it, follow each troubleshooting step and apply the fixes one by one.
5 expert-tested solutions to get rid of every green screen issue
by Madalina Dinita
Madalina has been a Windows fan ever since she got her hands on her first Windows XP computer. She is interested in all things technology, especially emerging technologies… read more
Updated on
- The computer Green Screen error message is related to hardware or software issues.
- A system restoration tool will quickly eliminate the Windows 10 green screen issue.
- Disabling your antivirus software is yet another way of fixing the PC Green Screen crash.
Windows’ infamous Blue Screen of Death has resulted from many crippled computers over the years, but the Redmond giant decided to change things a bit with the Green Screen of Death.
This error is similar to the Blue Screen of Death because it crashes your device. However, if you’re experiencing Green Screen of Death issues, do not worry because this post contains many solutions that will help you fix this problem.
What can cause green screen?
Unlike Critical Process Died BSOD, this type of screen error isn’t that common, and it’s usually caused by system damage or corrupted files. In that regard, it’s similar to Orange Screen of Death.
In addition, if you overclock your device, you might even encounter a Brown Screen of Death on your PC or similar errors. Therefore it’s advised to remove any overclock settings that you have.
Some of the causes of this error include:
- Corrupt or broken system files – Corrupt files often affect PC settings and cause green screen crashes. Don’t hesitate to learn how to repair and restore corrupted system files.
- Outdated drivers – Drivers may become corrupt in time, leading to such issues. Take a closer look at our guide on how to update Windows drivers.
- Issues with connected peripherals – In this case, don’t hesitate to pay attention to the preliminary steps below.
How do I stop the Green Screen of Death?
- What can cause green screen?
- How do I stop the Green Screen of Death?
- 1. Update your drivers
- 2. Run SFC and DISM scans
- 3. Remove third-party antivirus tools
- 4. Reset your PC
- 5. Perform a clean install
Before making changes to your PC to fix this issue, there are a few checks you should perform:
- Disconnect any peripherals connected to your PC and check if the green screen is still showing.
- Restart your PC and see if the problem persists. If your computer fails to restart, then take a closer look at our quick solutions.
If you are still experiencing the problem, proceed to advanced troubleshooting.
1. Update your drivers
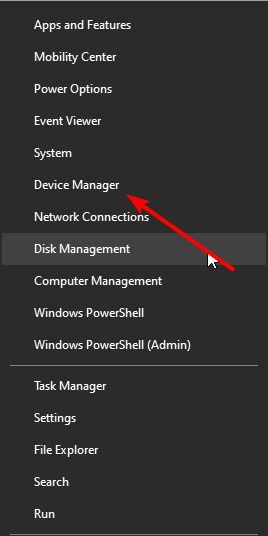
- Press the Windows key + X and select Device Manager.

- Double-click on the option to update drivers to expand it.
- Check for drivers with either a yellow exclamation mark/ question mark/ down-arrow mark/ error notification and right-click it.
- Choose Update driver.

- Now, select the Search automatically for drivers option and wait for the scan to complete.
Alternatively, you can search your driver manufacturer’s website to download the latest version of the needed driver.
How we test, review and rate?
We have worked for the past 6 months on building a new review system on how we produce content. Using it, we have subsequently redone most of our articles to provide actual hands-on expertise on the guides we made.
For more details you can read how we test, review, and rate at WindowsReport.
If the Green Screen of Death is preventing you from updating your driver, follow the steps below to boot into Safe Mode:
- Restart your computer a few times during the boot to start Automatic Repair.
- Choose Troubleshoot > Advanced options > Startup Settings.

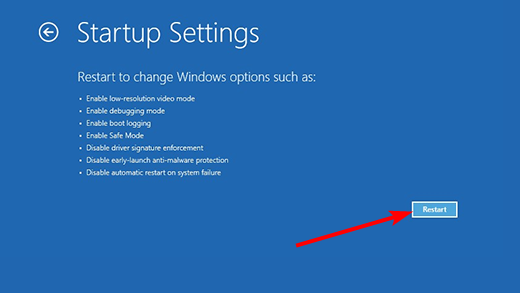
- Now, click the Restart button.
- After your PC restarts, press the numbers corresponding to Enable Safe Mode with Networking and Enable Safe Mode with Command Prompt.

After this, you can now try to update your drivers again. Also, you should perform the other fixes in this guide while in Safe Mode.
Lastly, if updating drivers manually seems a bit tedious, you might be able to fix this problem by using a third-party tool that automatically does it.
You won’t have to worry about downloading the wrong driver versions or not finding the drivers at all anymore. This tool will automatically scan your system and do it for you.

Outbyte Driver Updater
Update your drivers automatically and let Outbyte Driver Updater choose the latest version for them.
2. Run SFC and DISM scans
The Green Screen of Death is likely to be caused by system files corruption. Therefore, running SFC and DISM scans through Command Prompt can fix the issue.
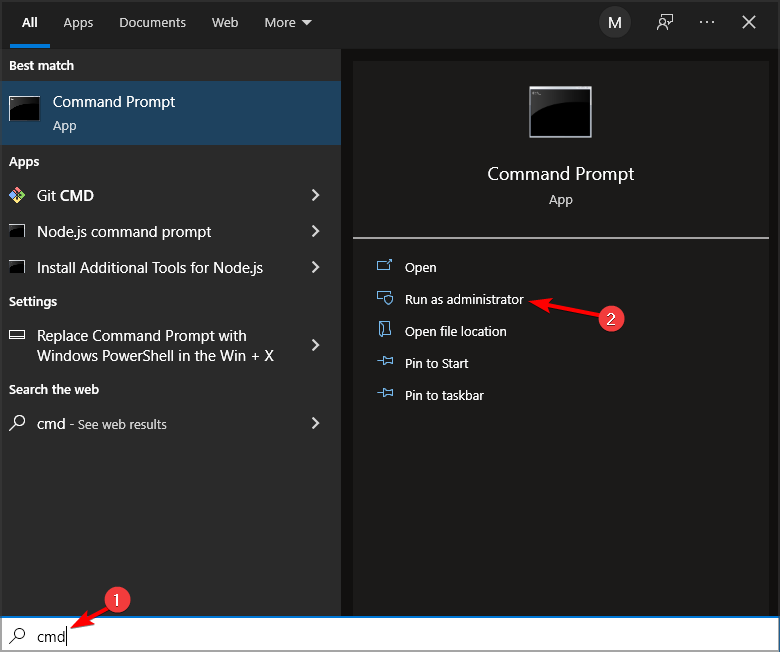
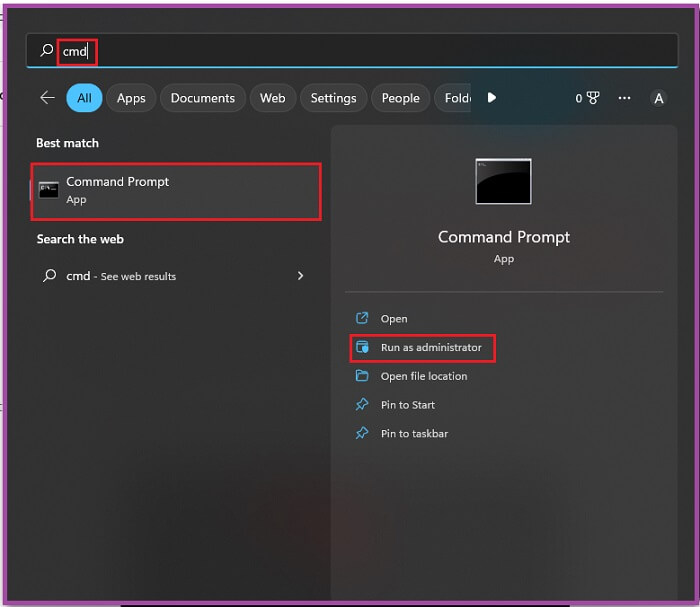
1. Press the Windows Key and type cmd in the search bar.
2. Command Prompt will appear in the results. Run it as an administrator.
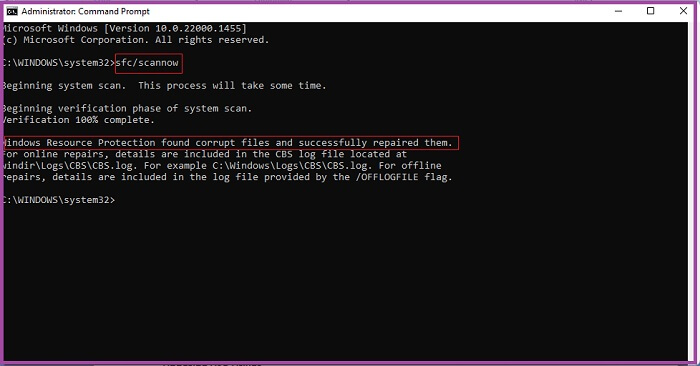
3. Input the following command and press Enter after: sfc /scannow
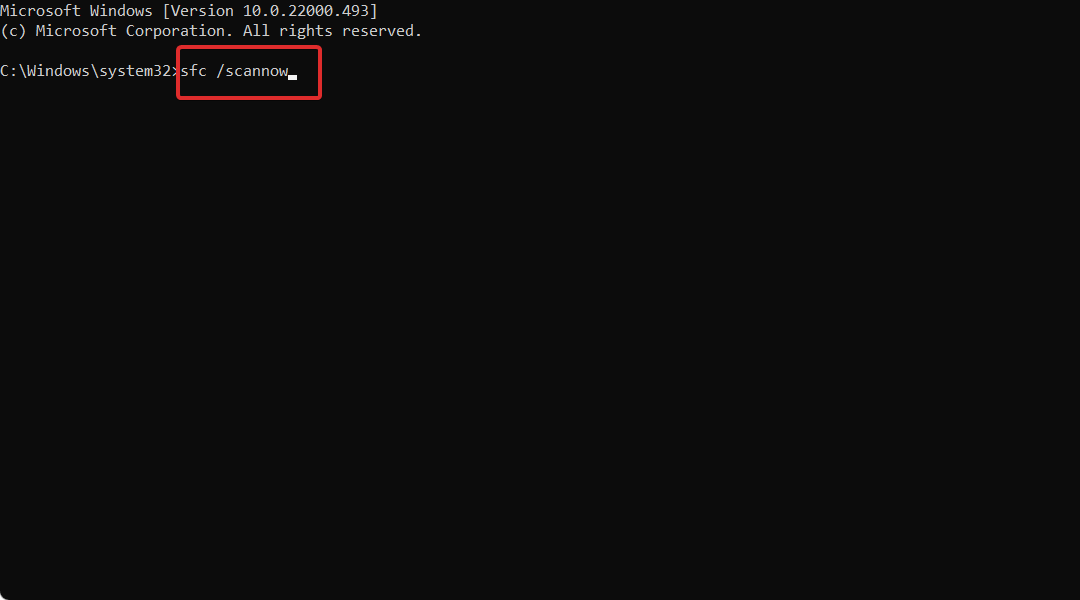
4. Wait for the command to run. This can take a while.
5. Restart your PC and check if the Green Screen issue persists. If it does, go to step 6.
6. Open cmd as an admin once more.
7. Input the following commands one by one, and press Enter after each one:
- Dism /Online /Cleanup-Image /ScanHealth
- Dism /Online /Cleanup-Image /CheckHealth
- Dism /Online /Cleanup-Image /RestoreHealth
Alternatively, you can install a dedicated third-party tool to fix your computer’s Green Screen of Death issue.
Not only will the software scan your computer for problematic or missing files, but it will also restore or replace them by itself, keeping it healthy.
3. Remove third-party antivirus tools
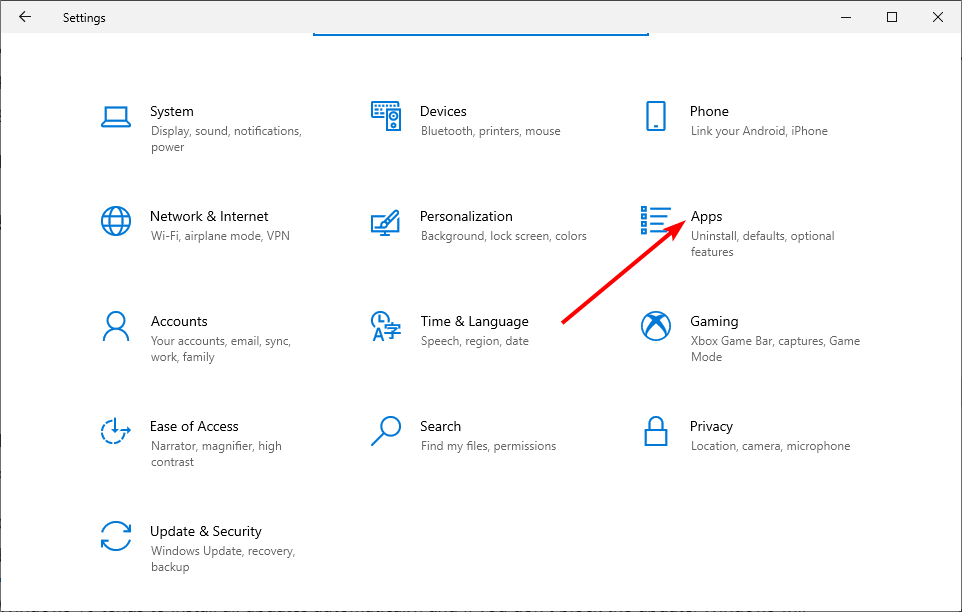
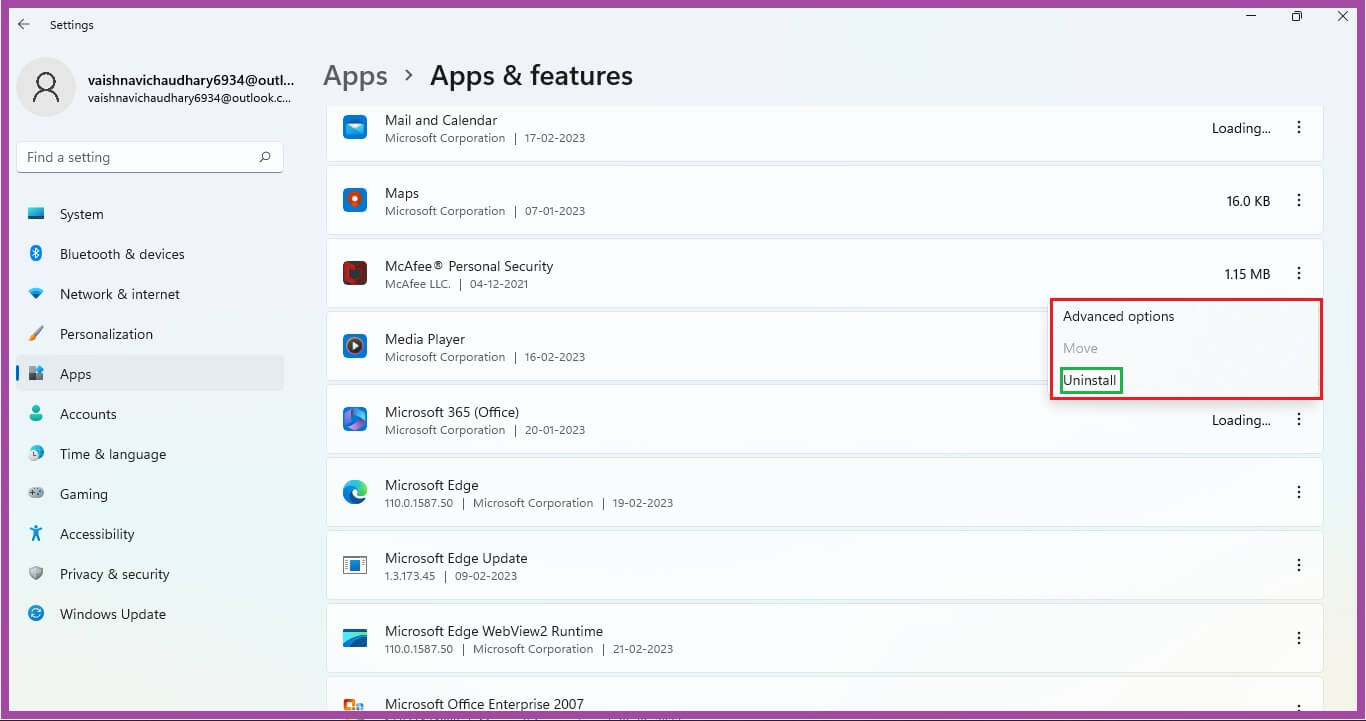
- Press the Windows key + I to open Settings and select the Apps option.

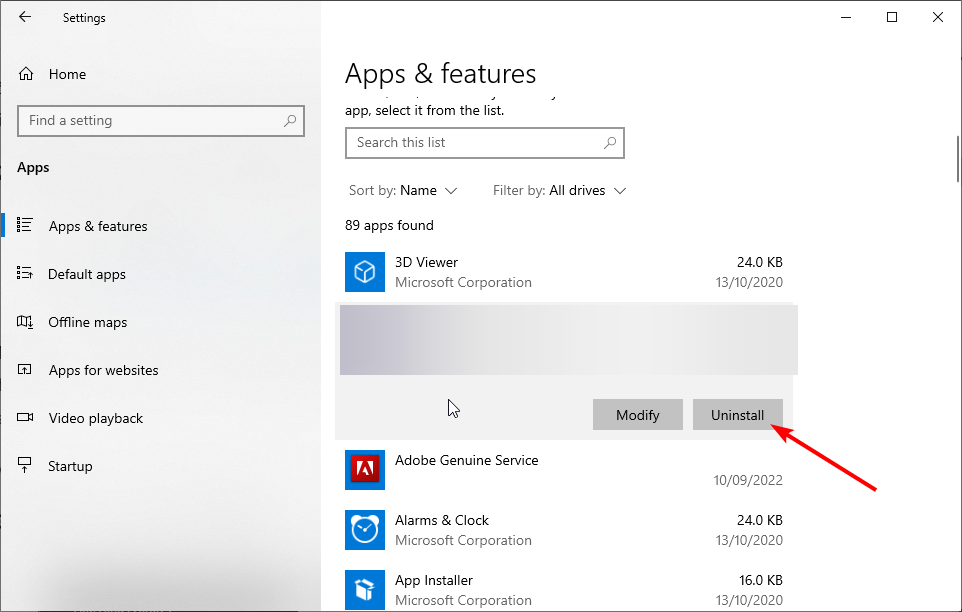
- Click the antivirus to uninstall and select the Uninstall option.
- Finally, follow the onscreen instructions to complete the process.
If you’re using a third-party antivirus tool, remove it and use Windows’ built-in antivirus instead.
In addition to uninstalling the antivirus software, use a dedicated removal tool in CCleaner to ensure all the files and folders associated with the program have been removed.
- FIX: Pink Screen of Death on Windows 10
- FIX: Red Screen errors on Windows 10/11 [RSoD error]
- Security Settings Blocked Self-signed Application [Fix]
4. Reset your PC
- Press the Windows key + I to open the Settings app and choose Update & Security.
- Choose Recovery in the left pane and click on the Get Started button under Reset this PC.
- Choose whether to keep your files or delete everything and click the Next button.

- From here, follow the onscreen instructions to complete the reset.

5. Perform a clean install
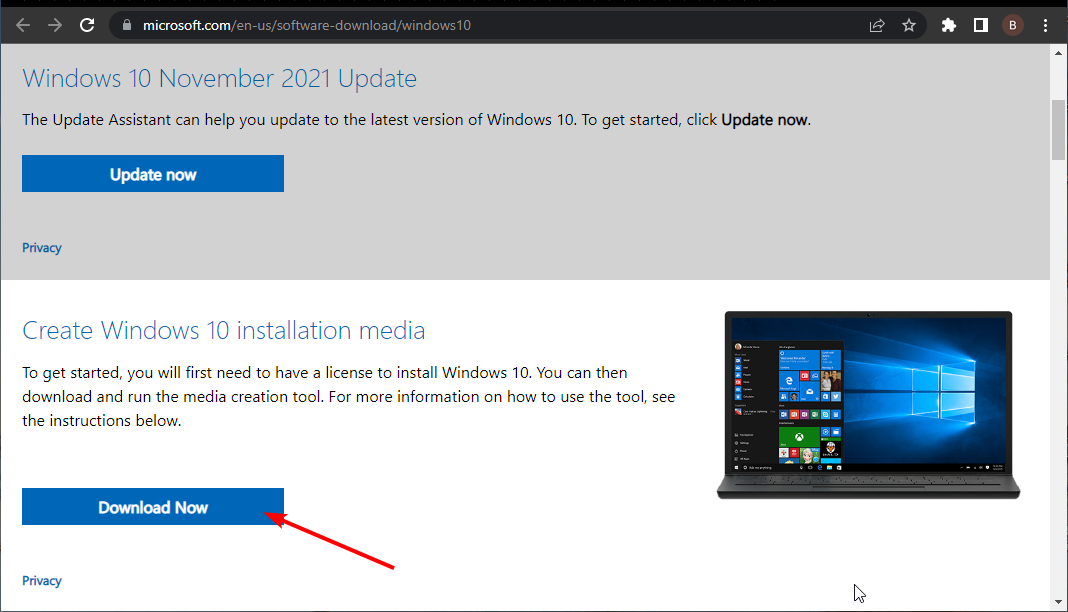
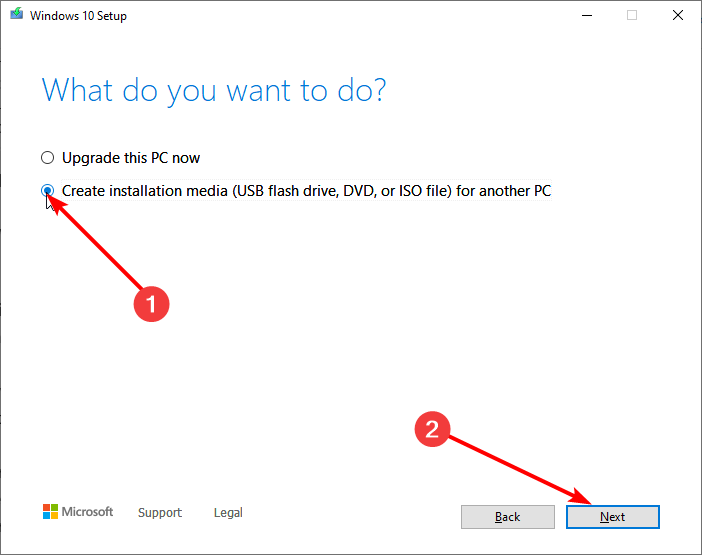
- Go to Windows 10 official download website, click the Download Now button, and click the downloaded file to run the program.

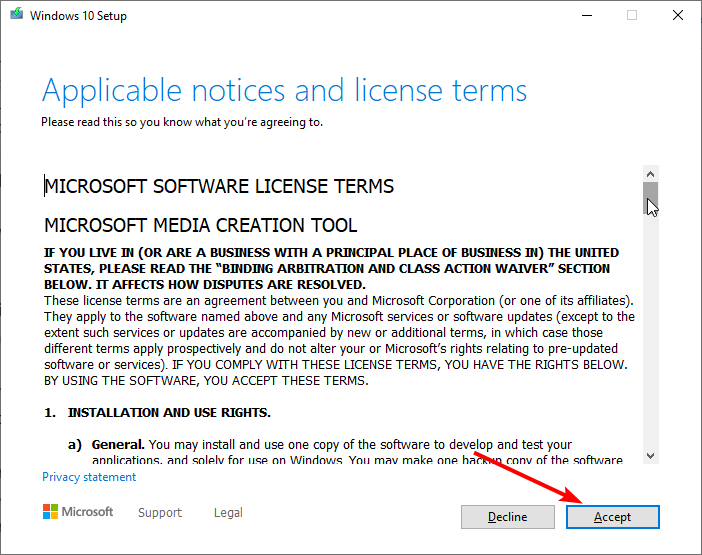
- Click the Accept button on the license page.

- Select the Create installation media for another PC option on the What do you want to do page and click Next.
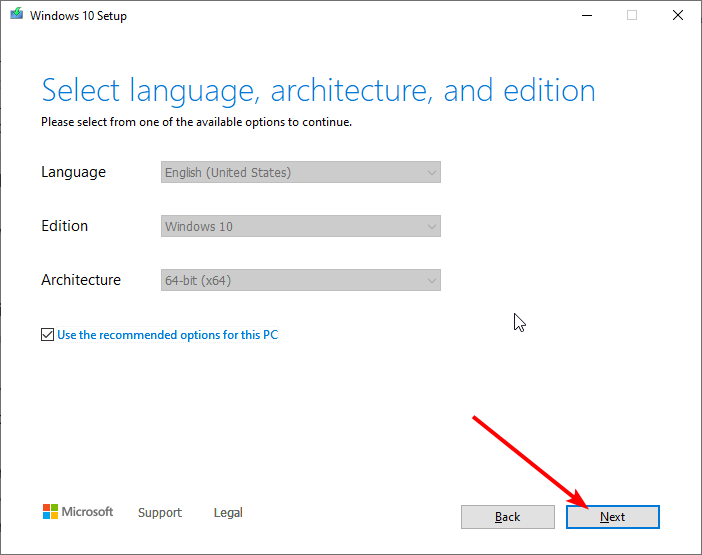
- Select your language, system version, and architecture, and click Next.
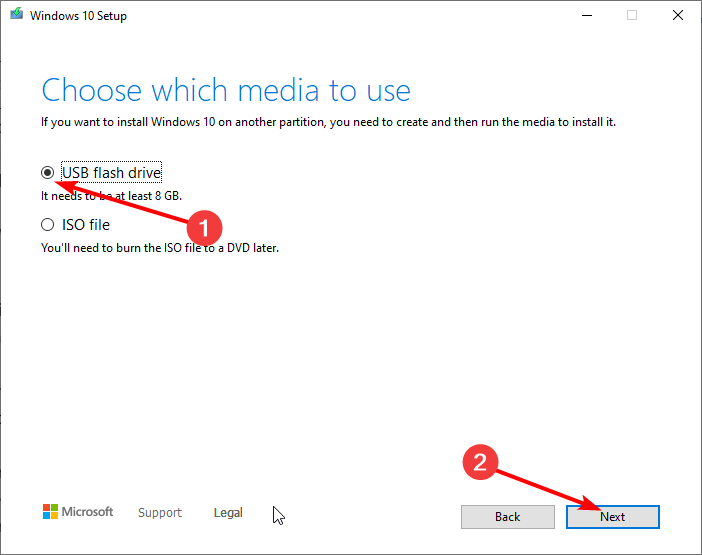
- From here, connect your drive and select the USB flash drive option. The flash drive must be at least 8GB and is recommended to be clean.
- Restart your PC with the drive still connected. This should boot your PC automatically to the drive.
- If it does not, you need to press Esc, F12, F2, or Delete, depending on your PC, immediately after it opens the boot menu.
- Select your language and other preferred settings on the Install Windows page and click Next.
- Lastly, click Install Windows.
We hope the above solutions helped you fix the GSOD error you encountered on your PC because such errors will interfere with your daily activities and tasks.
Check out five best Blue Screen of Death fixers or alternatively take a look at our comprehensive guide on how to fix a Black Screen of Death for more solutions.
If you have subject-related questions or suggestions, we’ll be glad to hear from you. You can post them in the comments section below.
![]()
If you haven’t heard of this issue and facing it on your Windows 10/11 PC, no need to panic. The Green Screen of Death or GSoD is one of those rarely heard of issues. It is so because it appears on the insider preview of Windows 10 OS. However, there are possibilities that you may face the GSoD on your Windows 10/11 OS. The issue occurs when a hardware component fails or if a critical software malfunctions. We will discuss the best and most practical methods to deal with this problem and get your system back to work.
How to fix Green Screen of Death on Windows 10/11?
When the GSoD error appears, your system’s screen will turn green, and you will see the Stop Code: CRITICAL PROCESS DIED or a similar message. As this is a critical system error, you won’t be able to use your system normally, and it will restart repeatedly. You may also lose unsaved data due to GSoD without any warning. To resolve the issue, follow the methods one by one, and you will also find a way to recover your permanently deleted data that is lost due to the Green Screen of Death on your Windows 10/11 PC.

Fix 1: Remove the peripheral devices
The GSoD occurs mostly due to hardware failure. Before checking the system hardware, let’s see if the issue lies with the peripheral devices attached to your PC.
- Remove all the peripheral attachments like the mouse, keyboard, etc.
- Restart your PC and check if the GSoD appears. If not, then one or more devices were defective.
- To identify the malfunctioning peripheral device, reconnect the devices one by one and check which one is causing BSOD.
- Remove the faulty device, get it repaired or replace it with a new one.
Fix 2: Update the OS and drivers
If you haven’t updated your Windows 10/11 OS in a while, it’s better to do it now. On the other hand, if you have updated your OS, you should update the drivers as they might be the cause behind the malfunctioning of logical and physical components.
To Update Windows OS
- Open Settings > Update & Security.
- Select Windows Updates from the left pane and click Check for updates.

- If you see available updates, download and install them.
To Update Drivers
Step 1: Boot your Windows 10/11 PC into safe mode.
Step 2: Search for Device Manager in the search bar and launch it.

Step 3: Choose each device listed in the Device Manager window one by one, right-click and choose Update Driver.

Follow the instructions on the screen to complete the procedure. Once you update all the drivers, boot your PC in normal mode and check if the GSoD appears.
Fix 3: Repair file system, bad sectors, and errors on the system drive
It is quite difficult to identify the root cause for GSoD, and there is a possibility that it occurred due to a file system error or other error on your system drive. However, you can use the Command line on your Windows 10/11 PC to fix all the bad sectors, file system errors, and other errors related to your system disk in one go. To repair the system drive issues, follow the steps below.
Step 1: Type cmd in the search box and click Run as Administrator under Command Prompt.
Note: In Windows 11, you will find the Windows Terminal instead of Command Prompt. Launch Windows Terminal and click Open Settings on the top ribbon. Change the Default Profile to Command Prompt.
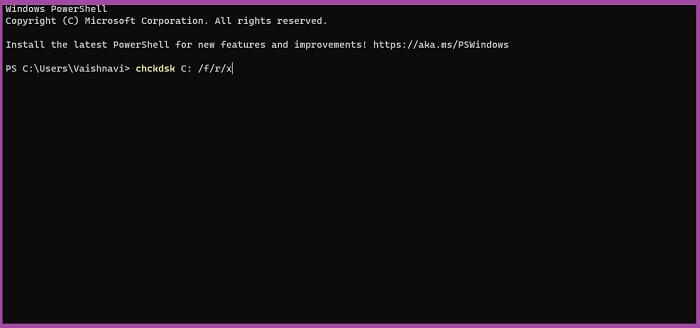
Step 2: Insert Chkdsk C: /f /r /x command line in the Command Prompt window and press Enter.

Step 3: The Windows OS will search for issues and repair them. Although, it might take some time, depending on the extent of the error, to be identified and fixed.
Be patient and let the process complete. When the repair is complete, restart your PC and check if GSoD troubles you anymore.
Fix 4: Uninstall third-party antivirus tools
Third-party antivirus tools take their toll on your system’s performance. Due to the burden they put on the processor of your PC, sometimes they cause a Green Screen of Death. Therefore, you need to uninstall any third-party antivirus software on your PC. Don’t worry, as you still have Windows Security or Windows Defender to protect your system. Here is how to uninstall antivirus tools.
Step 1: Click Start and go to Settings.

Step 2: Click Apps. You can see the third-party apps listed under the Apps & features section in the new window.

Step 3: Locate the third-party antivirus tool and click on it to see the Uninstall option.

Step 4: Click Uninstall to uninstall the program. Repeat the process for related apps and components.
Note: Every antivirus tool installs some supporting apps. You need to uninstall each one of them. You can recognize them based on the name of the antivirus tool.
When the uninstall process for the antivirus tool and related apps are complete, restart your Windows 10/11 PC normally to see if the GSoD appears again.
Fix 5: Repair your Windows OS
If you haven’t gotten rid of the GSoD problem yet, you need to repair your Windows OS. The Windows 10/11 OS is equipped with the option to rectify any errors, glitches, or malfunctions. Although, if the problem is grievous, you might need to reinstall your Windows. Reinstalling Windows might cause data loss, and you need to recover data after reinstalling Windows. Therefore, we will first try to repair the OS to save both time and energy.
Step 1: Click Start > Settings > Update & Security.
Step 2: Select the Recovery option from the left pane.
Step 3: Click Get Started under the Reset this PC section.

Follow the on-screen instructions to repair your Windows 10/11 OS. Restart your computer once the repair is complete and ensure the GSoD does not appear anymore.
Recover the data lost due to GSoD
If you have faced the GSoD on your Windows 10/11 PC, there is a high probability that you have either already lost some data or will lose it if the problem persists. In such a case, you can use Stellar Data Recovery Professional to retrieve lost data in any situation on a Windows 11/10/8/7 PC. This DIY tool reclaims lost data with the help of effective algorithms in three easy steps. The software recovers photos, videos, audio files, documents, emails, and any data type you could possibly store on your PC. Moreover, it comes with 24×7 personalized technical support to help you in any situation whatsoever.

Conclusion
The Green Screen of Death poses a potent threat to your system’s physical and logical functions. Ignoring the problem will only aggravate the damage. However, if you apply the above fixes, we can ensure you that you can get rid of the menace with ease. The solutions are formulated thoroughly to handhold you out of the trouble caused due to GSoD, and we hope you have resolved the problem. Share your thoughts with us in the comment section below.
FAQ
1. How do I force restart my laptop Windows 11?
The quickest and simple method to force restart your windows 11 is to press the Power button for 3-4 seconds. Once the screen turns off let the system shutdown and then again press the Power button. Remember any unsaved data will be lost when you force restart your Windows 11 PC. However, you can recover your data using the Stellar Data Recovery Professional for Windows 11/10/8/7.
2. Why does my Windows 11 laptop keep crashing?
The Windows OS crashes primarily due to incompatible or outdated drivers. You can try updating your system drivers by searching Device Manager and right-clicking the concerned driver to choose Update Driver from the right-click menu.
3. What’s the latest Windows 11 update?
The most recent update for Windows 11 is 21H2 (10.0.22000.593). It’s the last update released on 28 March, 2023.
Read time: 7 minutes
On Windows 10/11, you come across a green window with a sad emoticon accompanied with a message “Your Windows Insider Build ran into a problem and need to restart. We are just collecting some error info, and then we’ll restart for you. xyz% is complete.” 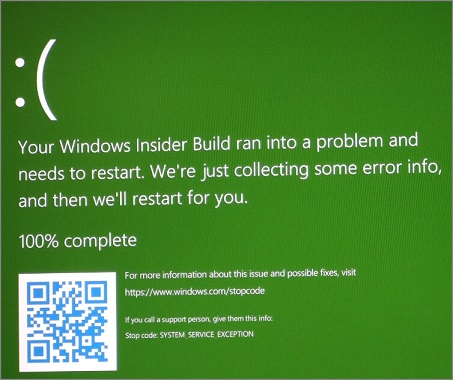
This is called Green screen of death and latter is yet another error similar to blue screen of death where-in occurs critical failure of Insider build or Creator editions of Windows Operating system. This makes your computer inaccessible. In this blog we are going to learn how to fix this issue.
Windows Insider Program: An overview
As stated above, GSOD occurs due to failure of Insider build of MS OS. To understand Insider build you should have an idea of Windows Insider Program. Microsoft launched a program named Windows Insider Program on 30-09-2014. It was purposed to connect intellects outside the Microsoft with it with an aim to study and make better its Operating system viz. Windows 10.
Under this program Microsoft allowed millions of its fans to join and preview builds of its Operating system Windows 10 and give their feedback and engage with their software engineers. It was to be done through a valid license. Later on this was extended to Windows 11 and Windows Server as well and the strength of its members rose to 10 million.
This program was envisaged to explore, identify and improve builds of its software release. As stated above Windows Insider Versions came in Windows 10 when it was launched and then in Windows 11 in its initial years of release. In these versions members can run Windows Insider Preview Builds on their computers. They can preview Windows through Channels built by Windows and Insider Preview Builds are released to the members through these channels viz. Dev Channel, Beta Channel and Release Preview Channel.
Probable reasons for GSOD
- Peripheral devices connected to your PC.
- Malfunctioning of hardware.
- Corruption of system files.
- Incompatible/outdated drivers.
- Excessive usage of memory space.
- Third party programs.
Effects of GSOD
- Turns screen of your computer green with display of an error message.
- You cannot access your system.
- System repeatedly restarts.
- Loss of unsaved data may occur without prior warning or information.
METHODS TO FIX GSOD
Method 1 – Removal of peripheral devices of your computer
In order to fix this issue first check whether there is any peripheral device attached to your computer as this issue can be due to any problematic peripheral device may it be mouse, keyboard, USB flash drive, Hard disk drive, a projector, USB, bar code reader, microphone etc. So if your computer has any of the peripheral devices then remove it or and if there are multiple devices then you may remove one by one as this may tell you which device is creating this problem to check if it is due to peripheral device. Once you have removed all peripheral devices, restart your computer and check if the problem is fixed.
Method 2 – Updating operating system and drivers of your computer
It is always recommended that you should regularly update operating system and drivers on your computer as need of update may lead to many errors due to no support or incompatibility.
Updating Windows Operating System
Follow the steps given below to update Windows OS
- Go to start
- Type settings in search box and click Open
- Select Update and Security
- Select Windows Update
- Click Check for updates

- Download and install updates if available

Updating Driver
First start your PC in safe mode in Windows.
[Note: Running of Windows in safe mode means use of limited set of files and drivers. And when you run Windows in safe mode and no error occurs, it indicates that the error is not happening due to default setting and basic device drivers.]
-
- Go to Start and type Device manager and open.
- Right-click the driver you wish to update.
- Select Update Driver

- Follow instructions to complete the process.

Once all the drivers are updated, boot your computer in normal mode and check if the issue still exists.
Method 3 – Running CHKDSK command
This is built-in utility of Windows which helps you to scan file systems drives for bad sector(s) and errors and then repairs them automatically. To run this command, follow the steps given below:
- Go to start and type cmd in search box.
- Select Run as administrator under Command Prompt

- Type chkdsk C:/f/r/x

- Press Enter
- Wait till the process is over.
- Restart your computer and check if the issue is resolved.
Method 4 – Running SFC & DISM command
This built-in utility of Windows scans system files for corruption or damage and once it finds, it repairs the same of its own. Follow the steps given under to run this command:
-
- Follow steps 1-2 of method 3.
- Type sfc /scannow and press enter.
- Once the process is over restart your computer.
- If the issue is still not resolved then run the following DISM commands:
Dism /Online /Cleanup-Image /ScanHealth
Dism /Online /Cleanup-Image /CheckHealth
Dism /Online /Cleanup-Image /RestoreHealth
Once the process is over, see if issue is resolved.
Method 5 – Uninstalling third party anti-virus tools
Antivirus tools may also cause GSOD as they may cause burden on processor of computer. Follow the steps given below to uninstall third party anti-virus tool:
-
- Go to Start
- Type settings and open
- Select Apps and then Apps and features
- Click the third party antivirus tool from the list of apps

- Select uninstall
- Similarly uninstall apps and components related to the uninstalled anti-virus tool.
Note: Since all anti-virus software tools install their supporting apps, you need to uninstall them too. They can be identified by the name of the concerned anti-virus tool.
Method 6 – Repairing Windows Operating System
Repairing of Windows OS may help you as it is purposed to fix errors, malfunctioning etc. in the OS. In case Windows is having severe problem or is corrupt then you need to reinstall Windows. Latter may cause loss of data wherein you will need to recover data using any Windows Data Recovery tool. To repair Windows follow the steps given under:
- Go to Start and type settings and open
- Select Update and Security
- Select Recovery
- Select Get started
- Press Reset this PC
- Restart your computer
Conclusion
In this blog we discussed GSOD, reasons of its occurring, various methods to fix it besides understanding Windows Insider Program. We have always endeavored to help you not only with fixing various errors thrown by your PC and system but also to recover your lost data in almost every kind of scenario. We hope you find this writing helpful.