On Windows 10/8.1/8/7, there are typically four ways to format to FAT32, which has the greatest compatibility compared to other file systems. For small capacity flash drives, pen drives, or SD cards that range from 2GB-32GB, any of the four methods are workable. However, for USB flash drives, HDDs, or external hard drives that exceed 32GB, the applicable tools will be restricted to the third-party best USB format tools and the Windows Command Prompt.
For both average and advanced users, the four ways can help you. The first one can save your time as much as possible.
1. (lifewire-recommend) Third-party USB Format tool
2. Windows 10 Explorer Quick Format
3. Windows 10 Disk Management Format
4. Windows Command Prompt
Video Guide: How to Format to FAT32 in Windows 10 in 4 Ways
Can’t format to FAT32 in Windows 10 with all given disk formatting tools? Directly jump to the final part to get additional fixes for «Cannot Format to FAT32» in Windows 10.
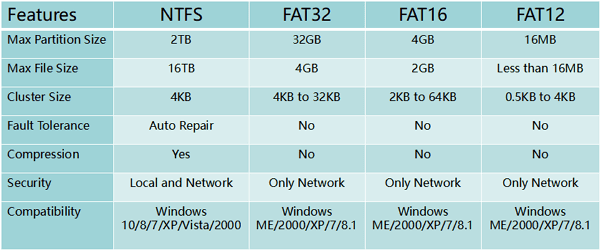
About File Systems (FAT32 Format, FAT16, FAT12, NTFS)
In computing, a file system controls how data is stored and retrieved. The common Windows file systems include FAT16, FAT32, and NTFS, etc. Users can convert their USB flash drives or external hard drives between different file systems. In the chart below, we have listed features of four common file systems, giving detailed information from max partition size to the compatibility of these file systems.
- Notice:
- Formatting a USB drive or external hard drive will remove all existing files on the device. Please make sure you have backed up files before formatting to avoid further data loss.
Solution 1. Format to FAT32 Using FAT32 Formatter Windows 10
USB requirements: none
A professional third-party Windows 10 FAT32 formatting tool can make the formatting process simple and secure. We recommend you try EaseUS Partition Master with its Format feature. Besides FAT32, it also supports format USB to NTFS, EXT2, EXT3, and ReFS.
Download this partition magic now, and follow the simple steps to freely format USB to FAT32 in Window 10.
lifewire.com: EaseUS Partition Master Free Edition is incredibly simple to use.
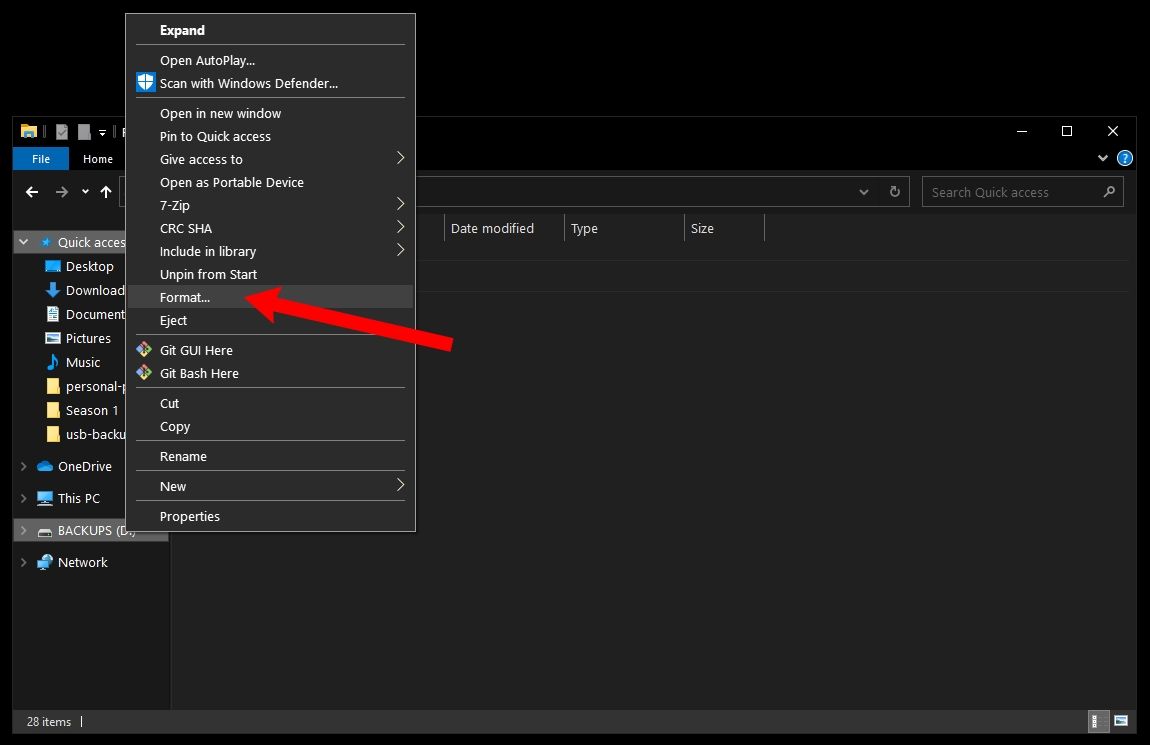
- Right-click the external drive or USB you intend to format and choose «Format».
- Set the Partition label, File system (NTFS/FAT32/EXT2/EXT3/EXT4/exFAT), and Cluster size, then click «OK».
- Click «Yes» to continue.
- Click the «Execute 1 Task(s)» button and click «Apply» to format the hard drive partition.
You May Also Like:
![]()
How to Partition Hard Drive in Windows 10
With this FAT32 formatted, you can also repartition the volumes on your HDD/SSD, external storage devices. Follow to learn how to partition a hard drive on your own.
Solution 2. Format FAT32 Windows 10 via File Explorer
USB requirements: no more than 32GB. Otherwise, you can only choose to format USB to NTFS.
To format USB under 32GB to FAT32 in Windows 10 Explorer, follow the three steps:
Step 1. Connect USB or external hard drive to Windows 10 PC.
Step 2. Open File Explorer, locate and right-click on the USB drive, select «Format».
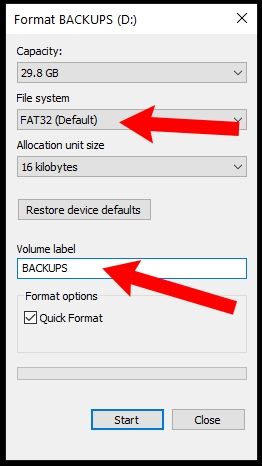
Step 3. Set the FAT32 as the target file system, tick «Quick Format» and click «Start» to start the formatting.

When the process completes, click «OK» to confirm. And now your USB is FAT32.
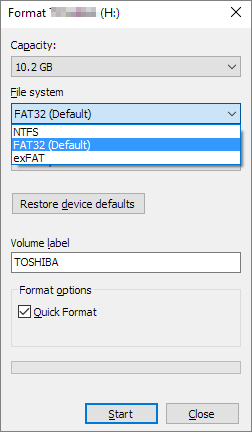
Solution 3. Format USB/External Drive to FAT32 with Disk Management
USB requirements: Similar to the Explorer, your USB drive has to be under 32GB in order to format to FAT32 within the program
Follow the 3-step guide here to format to FAT32:
Step 1. In Windows 10, go to This PC > Manage > Disk Management.
Step 2. Locate and right-click on your USB flash drive or external hard drive, select «Format».
Step 3. Set the USB file system to FAT32, tick «Perform a quick format» and click «OK» to confirm.

Solution 4. Format to FAT32 Format Windows 10 Using Command Prompt
USB requirements: none
Some experienced users or administrators prefer to use command lines to execute some operations on Windows PC. It’s also an applicable way to format your flash drive or external hard drive to FAT32 in Windows 10.
Note: Be careful while using command lines on your PC to format USB drive. Any improper operations would cause serious issues.
There are two options for you to use Command Prompt, and if they do work on your issue, share this article to help more users.
Here are the details of how to use CMD, DiskPart, or PowerShell command lines formatting device:
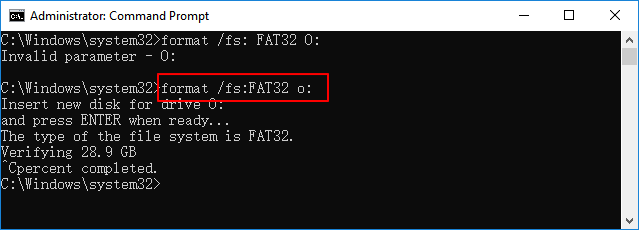
Option 1. Use CMD — Command Prompt/Diskpart Format FAT32
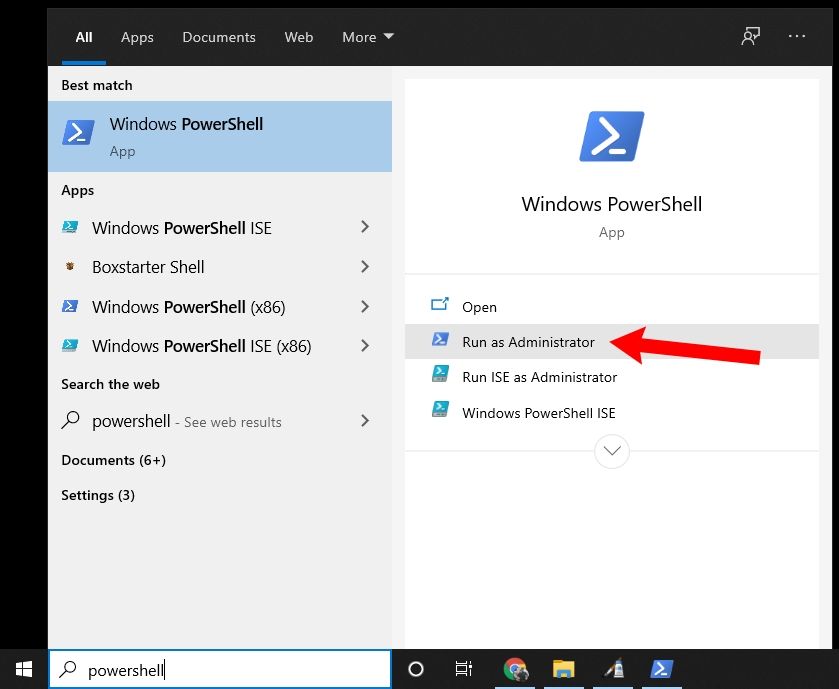
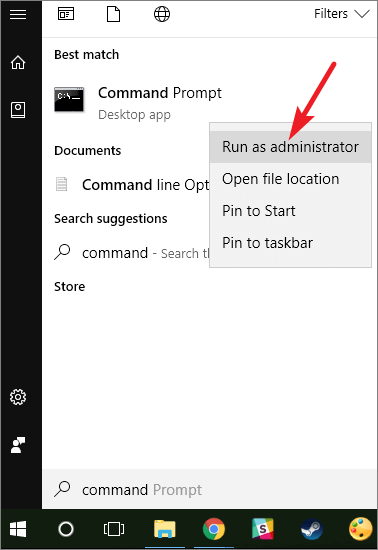
Step 1. Type command prompt in Windows 10 search bar or right-click on «Windows icon» > select «Search», and type cmd.
Step 2. Right-click on «Command Prompt» and select «Run as Administrator».

Step 3. Check the USB label and type format /fs:FAT32 o: at the prompt and hit «Enter». (Replace O: with the drive letter of your USB drive.)
Windows 10 will begin formatting the USB flash drive or external hard drive into FAT32.

Step 4. Type exit when the process has completed.
Option 2. Use DiskPart
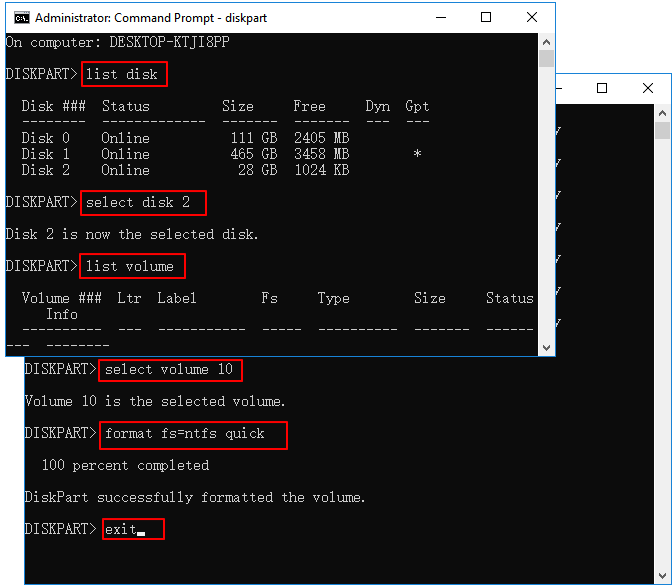
Step 1. Type diskpart in Windows search bar and hit Enter.
Step 2. Hit Enter each time when you type the below command lines to quick format hard drive:
- list disk
- select disk 2 (Replace 2 with your USB disk number)
- list volume
- select volume 10 (Replace 10 with the volume number of the USB drive that you want to format)
- format fs=fat32 quick
Step 3. Type exit and hit Enter to close the program when DiskPart reports it has successfully formatted the USB.
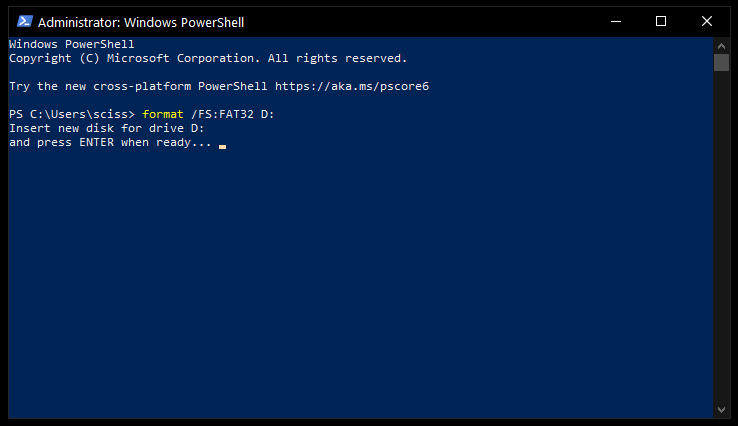
Option 3. Use PowerShell
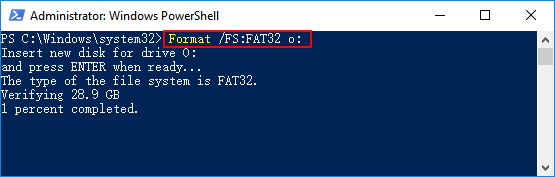
Step 1. Right-click on the Windows icon and select «Windows PowerShell Admin», click «Yes» to open it.
Step 2. Check the USB drive label, type Format /FS:FAT32 o: in PowerShell, and hit Enter.
Step 3.Type exit when the formatting process completes.
Video Guide: 4 Ways to Format to FAT32 in Windows 10
01:30 Method 1. Format the drive in File Explorer
02:13 Method 2. Format the drive in Disk Management
02:46 Method 3. Format the drive using DiskPart
03:49 Method 4. Apply EaseUS Partition Master to Format Drive
Additional Fixes for «Cannot Format to FAT32» in Windows 10
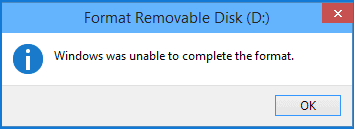
If you met a problem while formatting USB or Windows warns that Windows was unable to complete the format, don’t worry. In this part, you’ll learn why you can’t format to FAT32 in Windows 10 and how to resolve this issue effectively.
Reasons for Why You Can’t Format to FAT32
To find the right solution for your case, it’s important to find out the causes that stop you from formatting devices to FAT32. Here are the main reasons:
- 1. File system error, bad sectors exist on USB/external hard drive
- 2. The USB drive contains 2 partitions or the partition need for formatting to FAT32 is not the first primary partition
- 3. The partition in USB or external hard drive is larger than 32GB
- 4. The USB drive or external hard drive is write-protected
So how to resolve these issues, switching your USB drive to FAT32? Follow the quick fixes to troubleshoot the problem of FAT32 format in Windows 10.
Fix 1. Check disk error, fix file system errors or bad sectors
To do so, both the third-party partition manager software — EaseUS Partition Master and Windows Disk Check will work.
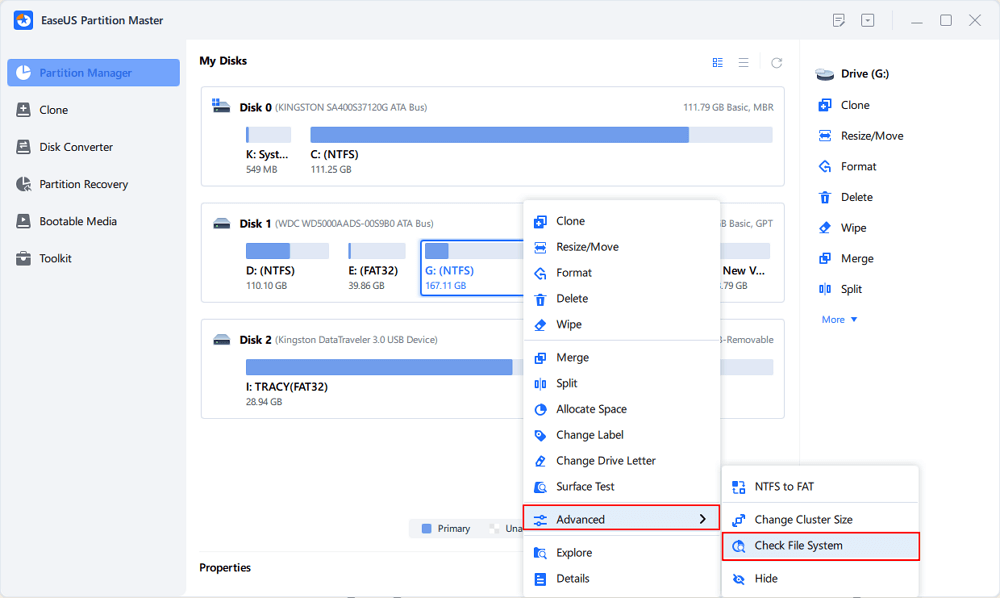
Method 1. Use EaseUS Partition Master to check and fix disk error
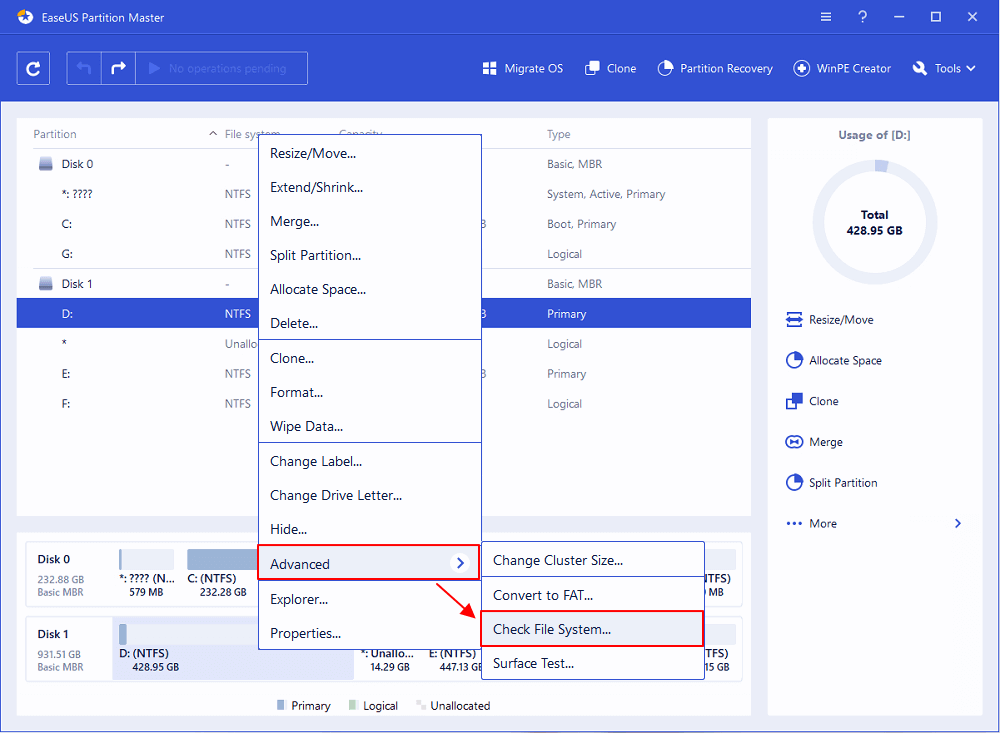
Step 1. Open EaseUS Partition Master on your computer. Then, locate the disk, right-click the partition you want to check, and choose «Advanced» > «Check File System».
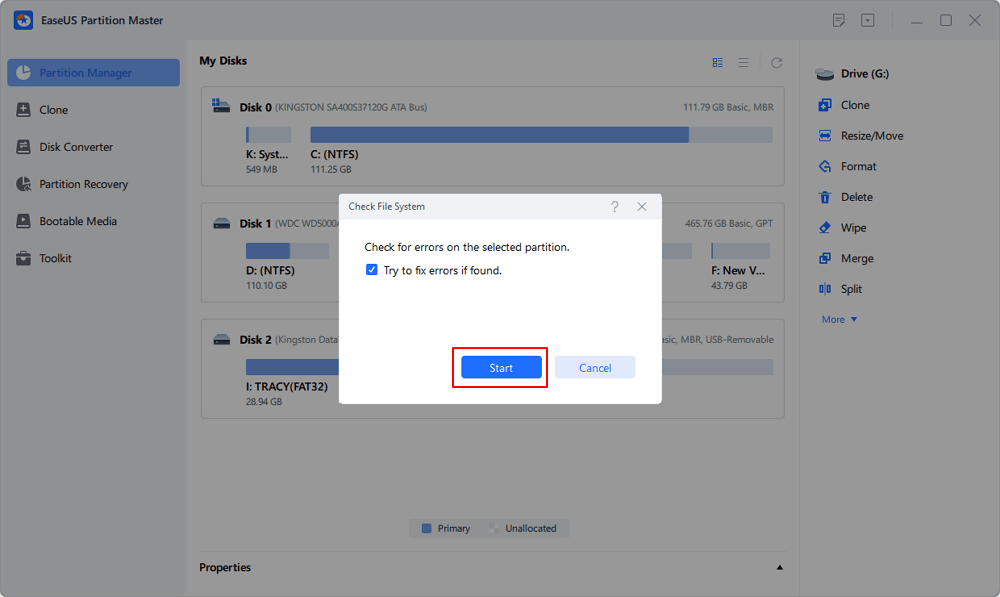
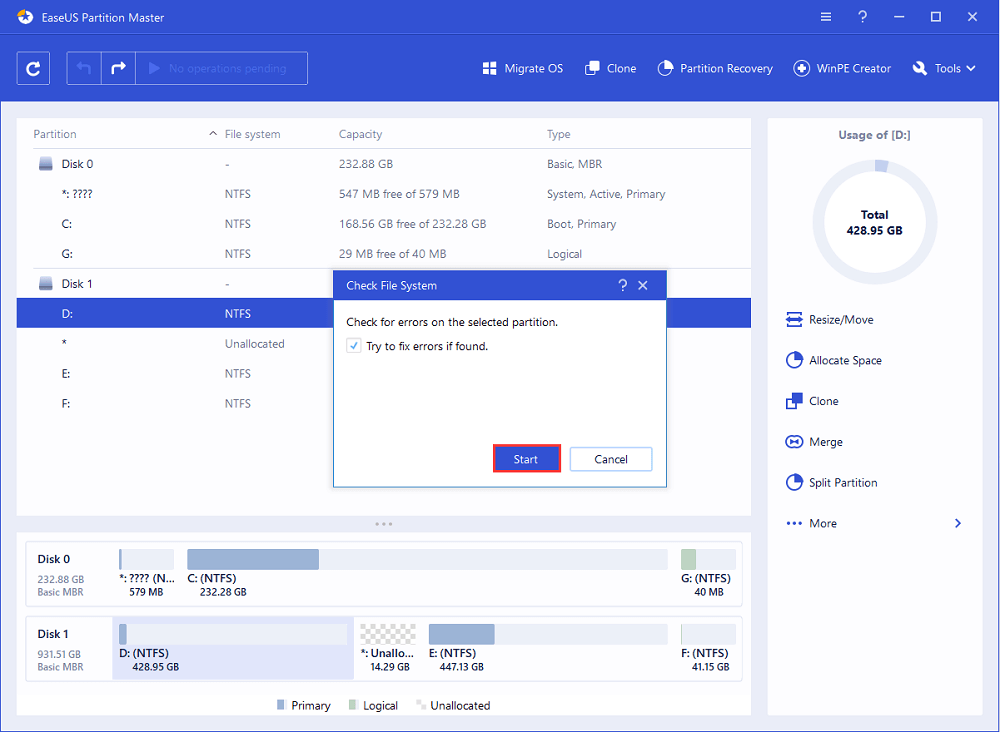
Step 2. In the Check File System window, keep the «Try to fix errors if found» option selected and click «Start».
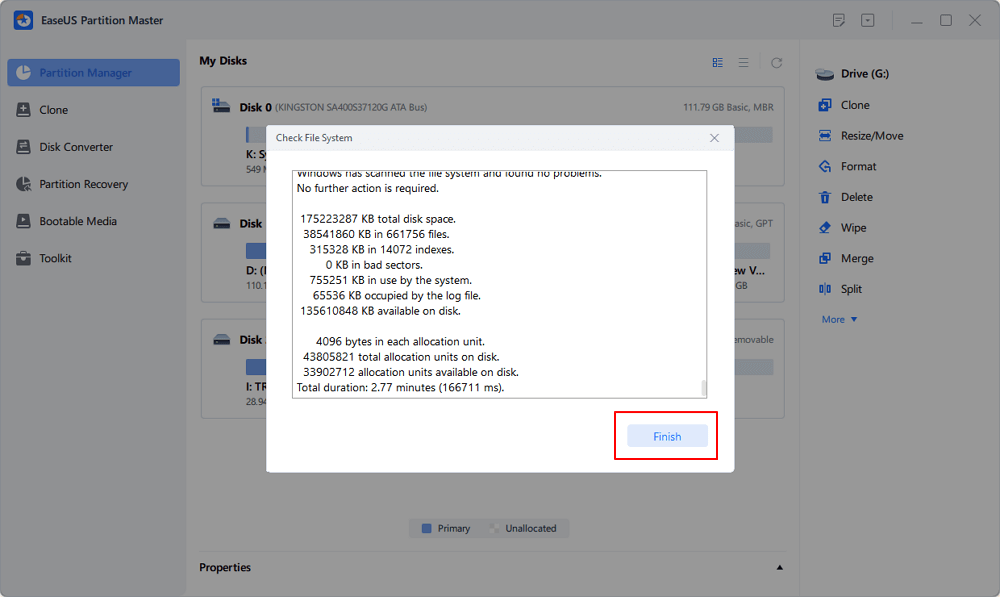
Step 3. The software will begin checking your partition file system on your disk. When it completes, click «Finish».
Method 2. Run Disk Check in Windows File Explorer
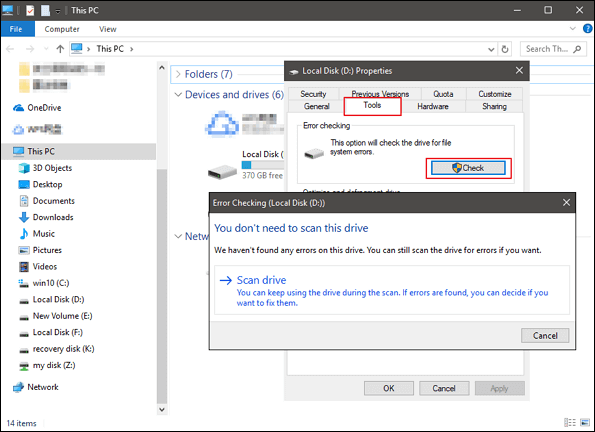
Step 1. Open File Explorer, locate and right-click the USB or external hard drive, and click «Properties».
Step 2. Go to «Tools» and click «Check» under Error-checking.
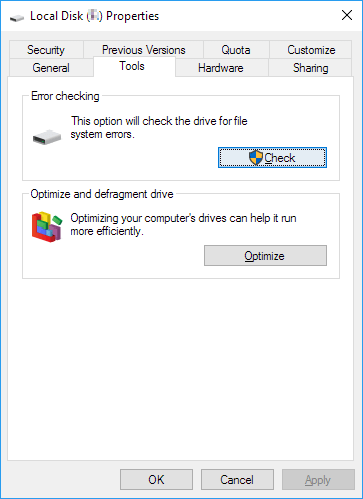
Step 3. Select «Scan and repair drive».
Or select and check both «Automatically fix file system errors» and «Scan for and attempt recovery of back sectors», then click «Start».
Fix 2. Delete all partitions and create a new FAT32 partition on USB drive
If your Windows system (version before Windows 8.1) or your USB drive doesn’t support creating two primary partitions, the computer won’t be able to recognize nor format the non-primary partition on the USB drive to FAT32.
The solution to this problem is to delete all existing partitions on USB and create a new FAT32 partition:
Step 1. Connect USB to PC and open Disk Management.
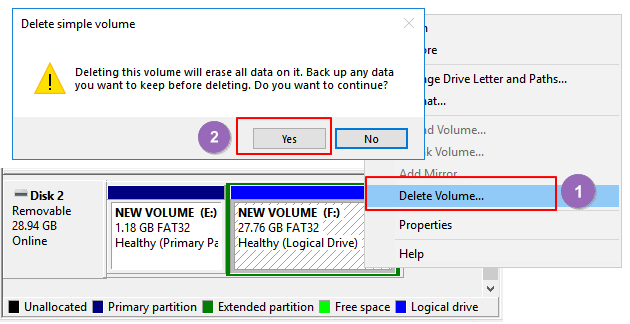
Step 2. Locate and right-click the primary partition on USB and select «Delete Volume», click «Yes» to confirm.
Step 3. Right-click on the logical partition on the USB drive, select «Delete Volume».
Step 4. Click «Yes» to confirm.

Step 5. The logical partition will become free space, right-click on it and select «Delete Partition», click «Yes» to confirm.
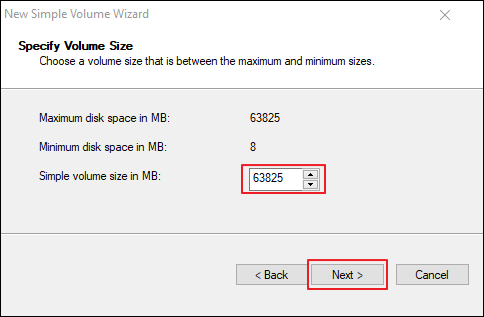
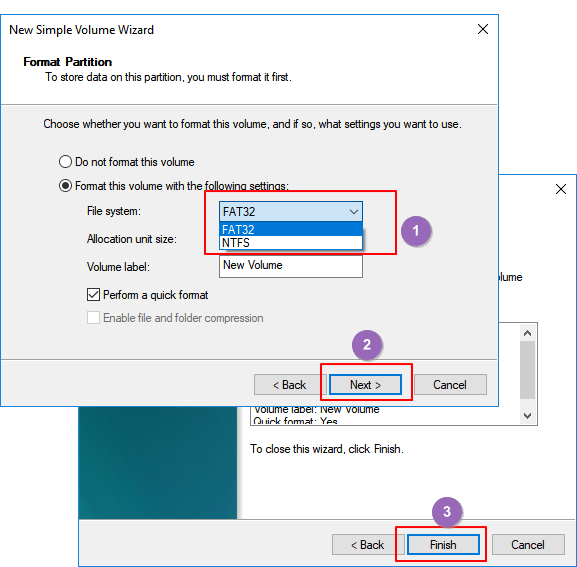
Step 6. When the USB becomes unallocated, right-click on the unallocated space and select «New Simple Volume» > «Next».
Step 7. Follow the on-screen instructions to specify volume size, drive letter, and set file system to FAT32, click «Next» > «Finish» to complete.

After this, you’ve successfully converted your USB or external hard drive to FAT32 and you don’t need to format this drive again.
Fix 3. Select NTFS as the file system or split USB larget partition to smaller FAT32 partitions
As shown in the chart at the beginning, the max size of the FAT32 partition is 32GB, which means you can only format devices smaller than 32GB into this file system.
In other words, when your USB drive partition is larger than 32GB, you can’t format it into FAT32. There are three solutions to this issue:
- Method 1. Apply EaseUS Partition Master to format USB to FAT32
Unlike Windows built-in tools, EaseUS Partition Master can simply format your USB drive even bigger than 32GB to FAT32 with ease. All you need is to go back to the partition manager to directly format your USB to FAT32 without any limitation.
- Method 2. Set NTFS as the file system of your USB drive
NTFS supports saving a single file that is larger than 4GB and supports creating a partition larger than 32GB.
If you only want to keep one partition on the USB drive, make full use of the drive space, the best choice is to set the NTFS as your USB drive.
Method 3. Divide USB partition into small ones (less than 32GB) with FAT32
The other way is to split the USB partition into small ones and format them into FAT32:
Pre-conditions: Windows system (versions after 8.1) and USB drive both support two or more partitions.
Step 1. Use Disk Management to delete the USB partition.
Step 2. Create two or more partitions smaller than 32GB with the FAT32 file system.
Fix 4. Remove USB write protection and format USB to FAT32
When the USB drive is write-protected or locked with a password, you can’t directly format it into FAT32. Here are the detailed steps to resolve this problem:
Step 1. Remove USB write protection and unlock USB
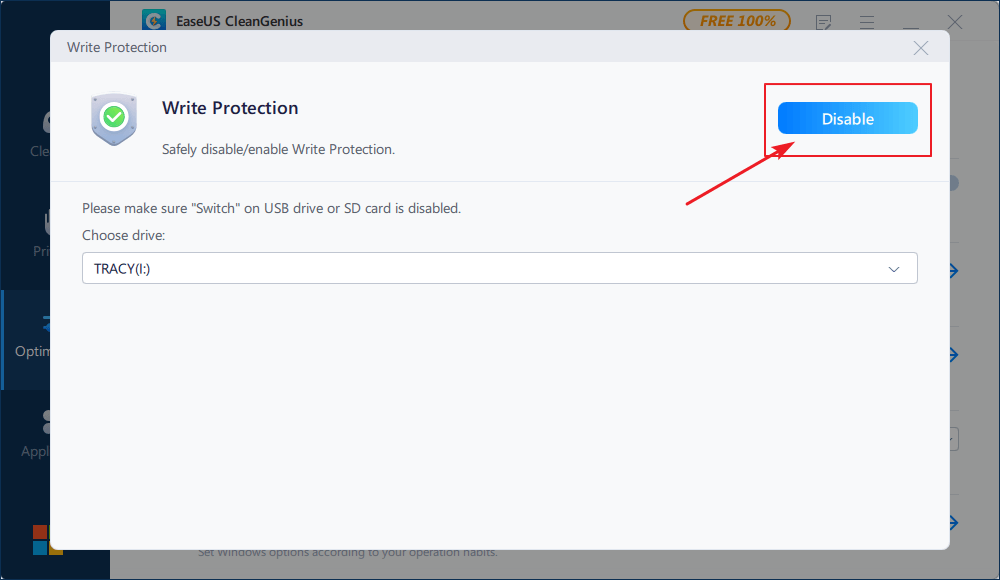
You can refer to this link to remove USB write protection on Windows 10/8/7. Or you can try to use EaseUS M Tool to simply remove the USB lock in 3 steps:
If you don’t consider yourself a pro-computer user and you’re not familiar with command-lines, don’t worry. There are graphical-based solutions to help you remove write-protection from your hard drives, USB drives, and even SD cards.
EaseUS CleanGenius is one of these tools that helps you fix aforementioned issues on your drives without knowing a thing about command-line.
Here’s an easy-to-follow guide on how to use this tool to get your issues sorted:
Step 1: DOWNLOAD and install EaseUS CleanGenius (free) on your computer.
Step 2: Run EaseUS CleanGenius on your PC, select Optimization and choose the Write Protection mode.
Step 3: Select the device that is write-protected and click Disable to remove the protection.

Step 2. Format USB to FAT32
After removing the USB write protection, you can apply any one of the above-provided solutions in Part 1 to format your USB drive to FAT32.
Final Word — Windows 10 Format FAT32
This page tells how to format a USB or external hard drive into FAT32 and resolve the issue of being unable to format USB to FAT32. It also includes helpful solutions in formatting devices bigger than 32GB into FAT32 without data loss.
If you want to convert devices into NTFS without formatting, refer to How to Convert FAT to NTFS for help.
1. How do I format a microSD card to FAT32? — Quora.com
The built-in tools, Windows Disk Management and File Explorer, are easy to use to format microSD card.
Use Disk Management: Right-click SD card and choose Format from the list. Change volume, file system, and unit size. Check Quick Format and click OK.
File Explorer: Right-click device and select Format…Choose file system label, and unit size. Confirm WARNING message and click OK.
2. How do I format a hard disk? — Quora.com
To save time and edit fast, we recommend a professional hard disk formatter — EaseUS Partition Master. If you are planning to format hard drive, run this software. Right-click the drive that needs to be formatted. Select format. It’s done!
3. Why can’t I format my USB drive to fat32?
Error happens due to USB error, USB size(larger than 32GB), and write-protected state.
FAT32 is a versatile file system that has been around for decades. It’s been largely replaced by exFAT which has capacity for larger file and partition sizes and NTFS — the most widely-used and versatile file system for Windows — but it still has uses for older devices and for those looking for a simple file format for their flash drives.
Fortunately, you can still format flash drives to the FAT32 format in Windows — whether using the integrated tool or third-party tools (which offer more options). Here’s how to format a drive to FAT32 in Windows 10 and Windows 11.
Also read: 6 Ways to Change the Drive Letter in Windows
What Is FAT32?
FAT stands for File Allocation Table, and it is a file system commonly used in USB flash drives. FAT was introduced way back in 1977 and is compatible with virtually all operating systems. This means that Macs, PCs, Linux machines, and even phones can read FAT files.

Because of FAT’s near universal compatibility, it is the ideal format for file sharing between devices. It is for this reason that most USB drives and SD cards are formatted in FAT32 straight from the manufacturer, as it’s going to work right out of the box with no additional formatting required.
The Limitations of FAT32
Since the FAT32 file system is so old, there are two significant limitations. The first is that the FAT32 file architecture cannot be used on drives larger than 16TB. Admittedly, this isn’t a huge issue for most people. However, the second drawback of FAT32 can be a bigger headache: FAT32 cannot handle individual files over 4GB in size.

FAT32 has been replaced by the more modern exFAT (extended file allocation) file system. exFAT has a greater file-size limit than FAT32. The only downside to exFAT is that it was developed by Microsoft and therefore owns all the patents.
This means the ability to manipulate the exFAT file structure, such as read, write, and repair capabilities, must be licensed. Unfortunately, this means there can be some compatibility issues when using exFAT. This makes FAT32 a bit easier to work with, despite the file-size limitations.
Format Using Integrated Tool
Windows 10 and 11 have a handy internal tool for formatting your flash drives. With the drive you want to format inserted into your PC, go to «This PC» and find the drive under «Devices and drives».
Right-click the flash drive then click «Format.»

In the Format window, click the dropdown under ‘File system’ and select «FAT32.»

You can also change your allocation unit size. Generally you should leave this as default but if the drive will only contain larger files like videos and movies, then you can crank this up all the way to 64 kilobytes, as that will (some say) make the reading of the files faster. If you deal in small files then leave the allocation unit size at default to preserve space.

You can name the volume under «Volume label», and also deselect «Quick Format» if you want Windows to scan the drive for faults before formatting.
Finally, click «Start» to format the drive.
Powershell (Command Line)
Another way to format to FAT32 in Windows is Powershell.
Before you get started, connect the storage device you want to format in FAT32 to your PC. When you connect the drive, make note of the letter assigned to it.
Note: before proceeding any further, ensure that your data is backed up. Formatting will erase all of the data currently stored on the drive.

To launch the Powershell command line, right-click the Start button and select «Run» from the menu. This will open the Run command window. Alternatively, you can press Win + R to launch the Run command box. Type powershell and either click OK or press Enter.
Once the Powershell window opens, type the following command, replacing the «F» with the letter of the drive you want to format in FAT32:

Finally, hit the Enter key. You will see a prompt warning you that all of the data on the drive will be wiped. Press the Y key to confirm the formatting. Let your computer do its thing, and before you know it, your drive will be formatted in FAT32.
Third-Party Software
If you’re not comfortable with the command line and prefer something with a graphical user interface, you can opt for third-party software. There are a number of options available, including (but not limited to) the ones listed below:
1. Mini Aide FAT32 Formatter

Mini Aide FAT32 Formatter is a nice and easy solution if you are looking to format a drive in FAT32 format. The interface is clean and provides you with all the information about your hard disks and partitions. Mini Aide also lets you create a new partition, and delete or relabel an existing partition. This tool provides all the necessary features but is also very low on RAM usage.
2. EaseUS Partition Master Free

EaseUS Partition Master Free is arguably one of the most used and popular tools for all your partition-related solutions. You can extend your HDD partition, manage disk space, delete a partition, relabel it, etc. The best thing about it is unlike other partition managers, it does not feature ads, even in the free version of the tool. Moreover, you can convert disks and partitions in multiple formats, including FAT32. This tool has a user-friendly interface, and you can interact with current partitions and disks at the bottom of the UI.
3. Rufus

Rufus is a very small, lightweight, easy-to-use, and effective format conversion tool. It is a standalone tool that lets you convert and create a bootable USB drive in multiple formats. Since the app is just over 1MB in size, it is quite fast in operation and lets you create an ISO on a USB.
Also read: How to Check Whether a USB Drive Is Bootable in Windows
Want to keep managing things in Windows? See our guide on reinstalling DirectX in Windows, as well as how to schedule shutdown and startup.
Image credit: Drive

Tech writer at Make Tech Easier. Enjoys Android, Windows, and tinkering with retro console emulation to breaking point.
Subscribe to our newsletter!
Our latest tutorials delivered straight to your inbox
If you need to format a USB flash drive, HDD, SDD, or some other form of storage to FAT32, you’ve come to the right place.
In this article we’ll go over what a file system is, the FAT32 standard, and several ways to format a storage device to FAT32 on Windows 10.
What’s a file system?
A file system is a standardized way of organizing data on a computer storage device like a flash drive or HDD.
A file system divides a storage device into virtual compartments, almost like a wall of post office boxes, and keeps track of all the information that gets stored in each box.
Some of the most common file system formats for portable storage devices are FAT32, NTFS, and ExFAT.
FAT32 compared to other formats
Of those three common formats, FAT32 is the oldest and most widely supported. Every major operating system will allow you to read and write from a USB flash drive that’s formatted to FAT32.
Meanwhile, macOS can only read NTFS drives, and you would need to install third-party software to write back to the drive.
However, though FAT32 is well supported, its maximum drive and file size is severely limited when compared to newer formats like NTFS and ExFAT:
| Max drive size | Max file size | Windows | macOS | Linux | |
|---|---|---|---|---|---|
| FAT32 | 32 GB (Windows), up to 16TB (Other OSs) | 4 GB | Read/Write | Read/Write | Read/Write |
| NTFS | 8 PB* | 16 EB** | Read/Write | Read | Read/Write |
| ExFAT | 128 PB* | 16 EB** | Read/Write | Read/Write | Read/Write |
* 1 petabyte is about 1 thousand terabytes
** 1 exabyte is about 1 million terabytes
Note that the maximum drive and file size of NTFS and ExFAT is so large that there’s basically no limit. (But it would be nice to have a 128 PB USB drive, wouldn’t it?)
On the other hand, FAT32’s max file size of 4 GB is almost nothing now that phones can record 4K videos. Also, it’s a little more difficult to format a drive larger than 32 GB to FAT32 on Windows 10.
These days, the only reason why you’d choose to format a drive to FAT32 is for compatibility. For example, if you need to boot up an old computer, maybe with a different operating system, and backup some of its files. But you’d need to be sure that none of those files are greater than 4 GB.
If you’re sure you want to go with FAT32, here’s how to format a storage drive on Windows 10.
Important note: Before you format a drive, make sure that you backup all of your important files. In fact, make two backups, and keep one on a remote service like Google Drive or Dropbox.
Formatting a drive will delete all of the data that’s currently on it.
How to use Windows File Explorer to format a USB drive to FAT32
A quick note about this method: it only works on USB flash drives that are less that 32 GB. If your USB drive is larger than 32 GB, check out one of the later methods.
With that out of the way, plug your USB drive into your computer and open Windows File Explorer.
Next, right-click on the drive on the left hand side of the File Explorer window and click «Format»:
In the window that pops up, ensure that «FAT32» is selected. Also, feel free to rename the USB drive whatever you’d like:
You can leave the rest of the options alone. Just click start to format your drive.
Once it’s done, your USB drive should be formatted to use the FAT32 file system.
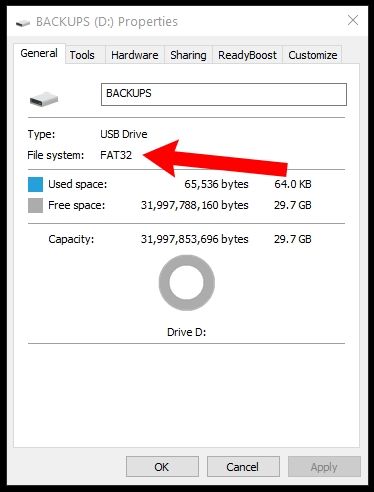
To double check this, open File Explorer, right click on your USB drive, and click «Properties».
A window will pop up and you should see that the file system is now FAT32:
If your USB drive is larger than 32 GB, you’ll need to use a third-party program like Rufus to format it.
There are lots of other programs that can format USB drives, but Rufus is really small and portable. This means you can stick Rufus right on a USB drive, plug it into any Windows computer, and format other drives on the go.
After you download Rufus, double click on the .exe file to start the application.
Make sure your USB drive is selected. Then, click the «Boot selection» dropdown and select «Non bootable»:

Next, click the «File system» dropdown and select «FAT32».
Also, feel free to change the name of your USB drive under «Volume label»:

Then, click the «Start» button to format your drive. After a few seconds it’ll be formatted to FAT32.
How to use PowerShell to format a USB drive to FAT32
While this method works with drives larger than 32 GB, it’s really slow – even formatting a 32 GB drive can take up to an hour depending on your computer.
But, if you aren’t able to use the previous two methods for some reason, this will work in a pinch.
First, click on the Windows Search Bar and type in «powershell». Then, click «Run as administrator» to launch PowerShell with elevated privileges:
In the PowerShell terminal, enter the following command:
format /FS:FAT32 DRIVE_LETTER:
Use the File Explorer to double check your drive letter. My drive letter was D, so I entered format /FS:FAT32 D:.
Press Enter, make sure your USB drive is plugged in, and press the Enter key again to start the process:
Then go run some errands or something – it will take awhile.
Once the format command is finished, your drive should be formatted to FAT32.
In closing
Now you should be able to format a USB drive of any size to FAT32 on Windows 10. And with just a little modification, any of these methods can be used to format your drive to another file system like NTFS or ExFAT.
Now get out there and format all your USB drives. (But only after you backup everything important!)
Was this helpful? Is there a better method that you know of? Tweet at me and let me know how you format things on Windows 10.
Learn to code for free. freeCodeCamp’s open source curriculum has helped more than 40,000 people get jobs as developers. Get started
В Windows 10/8.1/8/7 как для обычных, так и для опытных пользователей, обычно, доступно четыре способа форматирования в файловую систему FAT32, которая имеет наибольшую совместимость, по сравнению с другими файловыми системами. Для флэшек, флэш-накопителей или SD-карт небольшой емкости, от 2ГБ до 32ГБ, подойдет любой из четырех методов. Однако, для USB-накопителей, HDD или внешних жестких дисков емкостью более 32ГБ требуется применение стороннего средства для форматирования USB и Командная Строка Windows.
- 1. Сторонний инструмент форматирования USB
- 2. Быстрое форматирование в Проводнике Windows 10
- 3. Форматирование в Управлении Дисками в Windows 10
- 4. Командная Строка Windows
Не удается отформатировать в FAT32 в Windows 10 никаким из предложенных инструментов форматирования диска? Тогда сразу переходите к финальной части, чтобы получить дополнительные сведения по теме «Не удается отформатировать в FAT32» в Windows 10.
Что Вам Нужно Знать О Файловых Системах
В компьютерах файловая система отвечает за то, как хранятся и считываются данные. Распространенными файловыми системами для Windows являются FAT16, FAT32, NTFS и т.д. Пользователи могут менять файловую систему на своих USB-накопителях или внешних жестких дисках. В приведенной таблице ниже, мы перечислили функции четырех распространенных файловых систем, и привели подробную информацию, от максимального размера раздела до совместимости этих файловых систем.

- Примечание:
- Форматирование USB-накопителя или внешнего жесткого диска приведет к удалению всех существующих файлов на устройстве. Пожалуйста, убедитесь, что у вас есть резервная копия файлов перед форматированием чтобы избежать потери данных в будущем.
Решение 1. Форматирование в FAT32 с Помощью FAT32 Форматирования Windows 10
Требования к USB: нет
Профессиональный сторонний инструмент для форматирования в FAT32 под Windows 10 может сделать процесс форматирования простым и безопасным. Мы рекомендуем вам попробовать EaseUS Partition Master и его функцию Формат. Помимо FAT32, он также поддерживает формат USB в NTFS, EXT2, EXT3 и ReFS.
Скачайте эту волшебную программу для разделов и выполните некоторые действия, чтобы легко отформатировать USB в FAT32 в Windows 10.
- Щелкните правой кнопкой мыши внешний диск или USB, который вы собираетесь отформатировать, и выберите ‘Формат’.
- Установите Метку Раздела, Файловую систему (NTFS/FAT32/EXT2/EXT3/EXT4/exFAT) и размер Кластера, затем нажмите «ОК».
- Нажмите «ОК», чтобы продолжить.
- Нажмите кнопки ‘Выполнить операцию’ и ‘Применить’, чтобы отформатировать раздел жесткого диска.
Вам Также Может Понравиться:
Решение 2. Форматирование в FAT32 с Помощью Проводника Файлов Windows 10
Требования к USB: не более 32 ГБ. В противном случае, вам подойдёт только форматирование USB в NTFS.
Чтобы отформатировать USB, размером не более 32ГБ, в FAT32 в Проводнике Windows 10, выполните три действия:
Шаг 1. Подключите USB или внешний жесткий диск к ПК с Windows 10.
Шаг 2. Откройте Проводник, найдите USB-накопитель и щелкните по нему правой кнопкой мыши, затем выберите «Форматировать».
Шаг 3. Установите файловую систему FAT32, поставьте галочку ‘Быстрое Форматирование’ и нажмите ‘Начать’.
Когда процесс завершится, нажмите ‘ОК’ для подтверждения. Теперь ваш USB-накопитель стал FAT32.
Решение 3. Форматирование USB/Внешнего Диска в FAT32 с помощью Управления Дисками
Требования к USB: Как и в случае с Проводником, ваш USB-накопитель должен быть меньше 32ГБ, чтобы отформатировать его в FAT32 в этой программе
Следуйте приведенному ниже 3-шаговому руководству, чтобы отформатировать в FAT32:
Шаг 1. В Windows 10 перейдите в Этот компьютер > Управление Дисками
Шаг 2. Найдите USB-накопитель или внешний жесткий диск, щелкните на нём правой кнопкой мыши и выберите «Форматировать».
Шаг 3. Установите файловую систему USB на FAT32, отметьте галочкой ‘Выполнить быстрое форматирование’ и нажмите ‘ОК’ для подтверждения.

Решение 4. Форматирование в FAT32 с Помощью Командной Строки Windows 10
Требования к USB: нет
Некоторые опытные пользователи и администраторы предпочитают использовать командную строку для выполнения некоторых операций на ПК с Windows. Этот способ также можно использовать для форматирования флэш-накопителя или внешнего жесткого диска в FAT32 в Windows 10.
Примечание: Будьте осторожны при форматировании USB-накопителя с помощью командной строки на компьютере. Любые неправильные операции вызовут серьезные проблемы.
Ниже приведены подробные инструкции по использованию команд в CMD, DiskPart и PowerShell для форматирования устройств:
Вариант 1. Использование Командной Строки CMD
Шаг 1. Введите командная строка в строке поиска Windows 10 или щелкните правой кнопкой мыши «значок Windows» > выберите «Найти» и введите cmd.
Шаг 2. Щелкните правой кнопкой мыши на ‘Командная Строка’ и выберите ‘Запустить от имени Администратора’.
Шаг 3. Посмотрите какая буква диска у вашей флешки и введите Format /FS:FAT32 O: в командной строке и нажмите ‘Enter’. (Замените O: на букву диска вашего USB-накопителя.)
Windows 10 начнет форматирование USB-накопителя или внешнего жесткого диска в файловую систему FAT32.
Шаг 4. Введите exit когда процесс завершится.
Вариант 2. Использование DiskPart
Шаг 1. Введите diskpart в строке поиска Windowsи нажмите Enter.
Шаг 2. Нажимайте Enter после ввода каждой, приведенной ниже, команды для быстрого форматирования жесткого диска:
- list disk
- select disk 2 (Замените 2 на номер вашего USB-диска)
- list volume
- select volume 10 (Замените 10 на номер тома USB-накопителя, который вы хотите отформатировать)
- format fs=fat32 quick
Шаг 3. Введите exit и нажмите Enter, чтобы закрыть программу, когда DiskPart сообщит об успешном форматировании USB-накопителя.

Вариант 3. Использование PowerShell
Шаг 1. Щелкните правой кнопкой мыши по значку Windows и выберите ‘Windows PowerShell (администратор)’, нажмите ‘Да’, чтобы открыть его.
Шаг 2. Проверьте имя USB-накопителя, введите Format /FS:FAT32 o: в PowerShell и нажмите Enter.
Шаг 3. Введите exit когда процесс форматирования завершится.

Способы Исправления Ошибки ‘Не Удается Отформатировать в FAT32’ в Windows 10
Если вы столкнулись с проблемой при форматировании USB или Windows предупреждает, что Windows не удалось завершить форматирование, не волнуйтесь. В этой части статьи вы узнаете, почему не получается отформатировать в FAT32 в Windows 10 и как эффективно решить эту проблему.

Причины по Которым Форматирование в FAT32 Невозможно
Чтобы найти правильное решение в вашем случае, важно выяснить причину, из-за которой вам не можете отформатировать устройство в FAT32. Вот основные причины:
- 1. Ошибка файловой системы, на USB/внешнем жестком диске есть поврежденные сектора
- 2. USB-накопитель содержит 2 раздела или раздел, который нужно отформатировать в FAT32, не является первым основным разделом.
- 3. Размер раздела на USB или внешнем жестком диске превышает 32ГБ
- 4. USB-накопитель или внешний жесткий диск защищен от записи.
Итак, как решить эти проблемы и перевести USB-накопитель на FAT32? Следуйте инструкциям по быстрому устранению неполадок, связанных с форматом FAT32 в Windows 10.
Исправление 1. Проверка диска на ошибки, исправление ошибок файловой системы или программных поврежденных секторов
Для этого подойдет как стороннее программное обеспечение для управления разделами — EaseUS Partition Master, так и Windows Disk Check.
Способ 1. Использование EaseUS Partition Master для проверки диска на ошибки и их исправления
Шаг 1: откройте EaseUS Partition Master на вашем компьютере. Затем найдите диск, щелкните правой кнопкой мыши на том разделе, который вы хотите проверить, и выберите опцию «Проверить файловую систему».
Шаг 2: в окне «Проверить файловую систему» оставьте активной опцию «Попытаться исправить ошибки, если они обнаружены» и нажмите «Пуск».
Шаг 3: программа начнет проверку файловой системы вашего раздела на диске. Когда она будет завершена, нажмите «Готово».
Способ 2. Запуск Проверки Диска в Проводнике Windows
Шаг 1. Откройте Проводник, найдите и щелкните правой кнопкой мыши USB-накопитель или внешний жесткий диск и выберите «Свойства».
Шаг 2. Перейдите в «Инструменты» и нажмите «Проверить» в разделе «Проверка на ошибки».

Шаг 3. Выберите «Сканировать и исправить диск».
Или поставьте галочки «Автоматически исправлять ошибки файловой системы» и «Сканировать и пытаться восстановить плохие сектора», затем нажмите «Начать».

Исправление 2. Удаление всех разделов и создание нового раздела FAT32 на USB-диске
Если ваша операционная система Windows (версии до Windows 8.1) или ваш USB-диск не поддерживает создание двух основных разделов, компьютер не сможет ни распознать, ни отформатировать неосновной раздел на USB-накопителе в FAT32.
Решение этой проблемы — удаление всех существующих разделов на USB и создание нового раздела FAT32:
Шаг 1. Подключите USB к ПК и откройте Управление Дисками.
Шаг 2. Найдите основной раздел на USB-накопителе и щелкните по нему правой кнопкой мыши, затем выберите «Удалить том», нажмите «Да» для подтверждения.
Шаг 3. Щелкните правой кнопкой мыши на логическом разделе USB-диска, выберите ‘Удалить том’.
Шаг 4. Нажмите ‘Да’ для подтверждения.
Шаг 5. Логический раздел отобразится как свободное пространство, щелкните по нему правой кнопкой мыши и выберите ‘Удалить раздел’, нажмите ‘Да’ для подтверждения.
Шаг 6. Когда USB станет отображаться как нераспределенный, щелкните правой кнопкой мыши на нераспределенном пространстве и выберите ‘Новый простой том’ > ‘Далее’.
Шаг 7. Следуйте инструкциям на экране, указав размер тома, букву диска и файловую систему FAT32, нажмите ‘Далее’ > ‘Готово’ для завершения.
Вы успешно преобразовали свой USB или внешний жесткий диск в FAT32, и вам не нужно снова форматировать этот диск.
Исправление 3. Выберите NTFS в качестве файловой системы или разделите большой раздел USB на меньшие разделы FAT32.
Как показано в таблице в начале статьи, максимальный размер раздела FAT32 составляет 32ГБ, а это означает, что вы можете форматировать в эту файловую систему только устройства размером менее 32ГБ.
Другими словами, если размер раздела вашего USB-диска превышает 32ГБ, то вы не сможете отформатировать его в FAT32. Существует три решения этой проблемы:
- Способ 1. Использование EaseUS Partition Master для форматирования USB в FAT32.
В отличие от встроенных инструментов Windows, EaseUS Partition Master может легко отформатировать ваш USB-накопитель объемом более 32ГБ в FAT32. Все, что вам нужно, это запустить диспетчер разделов и отформатировать USB в FAT32 без каких-либо ограничений.
- Способ 2. NTFS в качестве файловой системы USB-диска.
NTFS поддерживает сохранение одного файла размером более 4ГБ и поддерживает создание раздела размером более 32ГБ.
Если вы хотите оставить только один раздел на USB-диске, и при этом использовать пространство полностью, то лучше всего установить NTFS в качестве файловой системы USB-накопителя.
Способ 3. Разделение одного большого USB-раздела на несколько небольших (менее 32ГБ) с файловой системой FAT32
Другой способ — разделить большой раздел USB на несколько маленьких и отформатировать их в FAT32:
Предварительные условия: ОС Windows (версии после 8.1) и USB-накопитель поддерживают два и более разделов.
Шаг 1. Используйте Управление Дисками, чтобы удалить раздел USB.
Шаг 2. Создайте два или более разделов размером менее 32ГБ с файловой системой FAT32.

Исправление 4. Снимите защиту от записи и отформатируйте USB в FAT32
Когда USB-накопитель защищен от записи или заблокирован паролем, вы не можете просто так отформатировать его в FAT32. Ниже приведены подробные инструкции по устранению этой проблемы:
Шаг 1. Снятие защиты от записи и разблокировка USB
Перейдите по этой ссылке, чтобы снять защиту от записи USB в Windows 10/8/7. Или вы можете попробовать использовать инструмент EaseUS M, чтобы просто снять блокировку USB за 3 шага:
Если вы не считаете себя профессиональным пользователем компьютера и не знакомы с командной строкой, не волнуйтесь. Существуют графические решения, которые помогут снять защиту от записи с жестких дисков, USB-накопителей и даже SD-карт.
EaseUS CleanGenius — это один из таких инструментов, который поможет вам устранить вышеупомянутые проблемы на ваших дисках, ничего не зная о командной строке.
Ниже приведено простое руководство о том, как использовать этот инструмент для решения ваших проблем:
EaseUS CleanGenius — один из этих инструментов, который поможет вам исправить вышеупомянутые проблемы на ваших дисках, ничего не зная о командной строке.
Вот простое руководство о том, как использовать этот инструмент для решения ваших проблем.:
Шаг 1: ЗАГРУЗИТЕ и установите EaseUS CleanGenius (бесплатно) на свой компьютер.
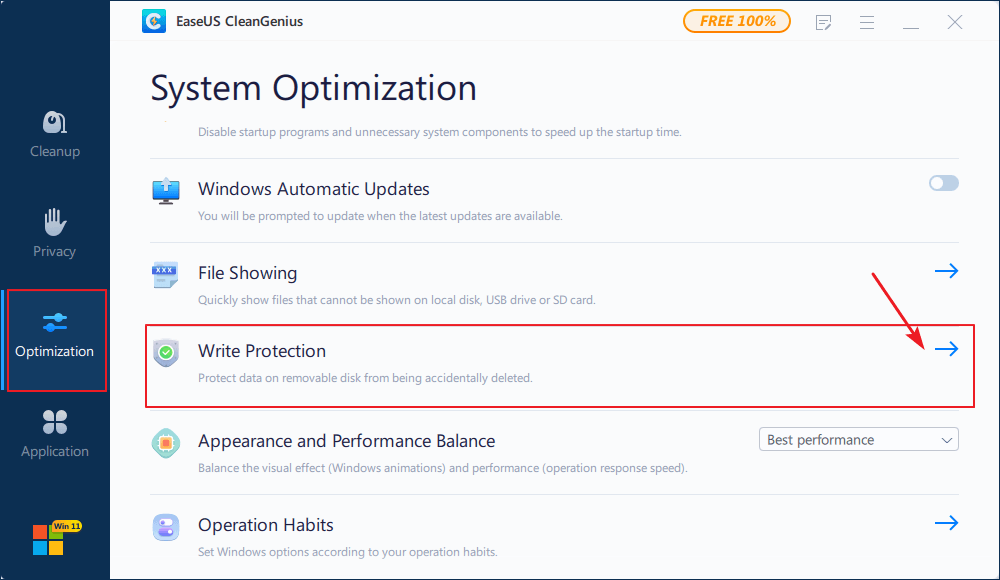
Шаг 2: Запустите EaseUS CleanGenius на своем ПК, выберите «Оптимизация» и выберите режим «Защита от записи».

Шаг 3: Выберите устройство, защищенное от записи, и нажмите «Отключить», чтобы снять защиту.
Шаг 2. Форматирование USB в FAT32
После снятия защиты USB от записи, вы можете воспользоваться любым из предложенных выше решением в Части 1 чтобы отформатировать ваш USB-диск в FAT32.
Заключительное Слово
В этой статье мы рассмотрели как отформатировать USB-накопитель или внешний жесткий диск в FAT32 и решить проблему невозможности форматирования USB-накопителя в FAT32. Также, представлены полезные решения для форматирования устройств размером более 32ГБ в FAT32 без потери данных.
Если вы хотите конвертировать устройства в NTFS без форматирования, см. Как конвертировать FAT в NTFS для получения дополнительной информации.
FAT32 is one of the most popular and versatile file formats for a drive. Follow these steps to format a drive in FAT32 in Windows 10.
In recent versions of Windows, you will no longer see FAT32 as a format option for drives larger than 32GB. For example, if you plug in a 64GB thumb drive, Windows will not show the FAT32 option while trying to format.
This is because the file format is old and has severe limitations. For instance, FAT32 formatted drives cannot hold individual files larger than 4GB. As you can guess, that is a severe limitation because most video files can be larger than 4GB, depending on their length and video quality.
File size limit is one of the reasons why you need to format a USB drive in NTFS file system format while creating a Windows bootable drive.
That said, if you understand all the limitations and yet like to format a drive in FAT32, you can do it. You must take a different route than the “right-click -> format” option we all know. Let me show you how.
Important: Before formatting, backup data in the drive. Formatting will erase all data permanently.
Table of contents:
- Command Prompt
- PowerShell
- Third-party software
Command to format a drive in FAT32
You can format large drives in FAT32 format with a single-line command in the Command Prompt.
Since we are using the Command Prompt, you need to know the drive letter of the USB drive before formatting it. This is because we need the drive letter to target the drive. Once you have the drive letter, we can use it to format the drive in FAT32.
1. First, plug in the USB drive—next, open File Explorer. In File Explorer, identify your USB drive and note down the drive letter. We are going to need it in the next step.

2. Once you have the drive letter, open Command Prompt from the Start menu. Alternatively, you can also use the run command cmd.

3. In the Command Prompt window, execute the below command. Don’t forget to replace “Drive_Letter” with the actual drive letter. In my case, the drive letter is D.
Format /FS:FAT32 Drive_Letter:4. Depending on the drive’s size, the formatting process can take some time.

5. Once the FAT32 formatting is complete, you will be asked to enter a drive name. So, type a name and press Enter.
6. After successfully formatting, you will receive a “Format complete” message.

You have successfully formatted the drive in FAT32 file system format.

Use PowerShell to format a drive in FAT32
Like the Command Prompt, you can also use PowerShell to format a drive in FAT32 format.
1. Open PowerShell by searching for it in the start menu.

2. In the PowerShell window, execute the below command while replacing Drive_Letter with the actual drive letter of the USB drive.
Format /FS:FAT32 Drive_Letter:
3. Depending on the drive size, it can take some time to format the drive. This is because the above command doesn’t do a quick format.
4. Once the formatting is complete, you will be asked to enter a new drive name. Type a new drive name and press Enter.
5. As soon as you press the Enter button, you will receive a “Format Complete” message.

That is it.
Use a Free Third-Party Application
If you are uncomfortable using the command prompt or PowerShell, you can use a free and portable software called FAT32 format.
1. First, download FAT32 Format software from the official website and execute the downloaded exe file. Being portable software, there is no need to install it.
2. Select the drive you want to format in FAT32 on the main screen. In my case, I want to format a USB drive in FAT32 format. So, I selected that drive.
3. If you want, you can change the drive name by entering a new name in the Volume Lable field. Once that is done, click on the “Start” button.

4. You will receive a warning message telling you that you will lose all data in the drive that you are about to format. Click on the “Yes” button to continue.

That is it. The software will instantly format your drive in FAT32 format.
–
As you can see, it is pretty simple to format drives in FAT32.
I hope this simple and easy Windows how-to guide helped you.
If you are stuck or need some help, send an email, and I will try to help as much as possible.