Windows 10 Version 1909 [3 in 1][10.2019] [BootCamp драйверы for MAC] v1

Сборка популярных редакций Windows 10 построена на оригинальном образе MSDN за Октябрь и предназначена для установки на MAC.
Компьютер для системы:
Apple MAC 2012-2015г
Windows 10 Version 1909 [3 in 1][10.2019] [BootCamp драйверы for MAC] v1 торрент, изменения:
В iso сборки добавлены драйверы BootComp а системы перепакованы без изменений.
Активаторы присутствуют на рабочем столе если не сработает авто-активация.
Контрольная сумма:
MD5: 48b1180c5cf821d4d02a999567796d76
Скачать с сервера напрямую
If you want to enjoy Windows 10 /11 on your Mac computer, you can download Windows 10/11 ISO for Mac, then install Windows on Mac via Boot Camp Assistant. In this article, MiniTool Software will show you how to download Windows ISO for Mac free for installation.
Can you run macOS on a Windows computer? Of course, the answer is yes. You can run macOS on a Windows PC using VMware. On the other hand, can you run Windows on a Mac computer? The answer is also yes. You can easily install Windows on your Mac computer with the help of Boot Camp Assistant. After that, you can switch between macOS and Windows as per your needs.
Before installing Windows 10/11 on your Mac computer, you need to download Windows 10/11 ISO for Mac. Now, let’s first talk about downloading Windows 10/11 ISO images for Mac.
Download Windows ISO for Mac Free
In this part, we will introduce how to download Windows 10 ISO for Mac and download Windows 11 ISO for Mac separately.
Download Windows 10 ISO for Mac Free
To protect your computer from viruses, malware, and spyware, you should download a Windows 10 ISO image for Mac using a reliable download source. Fortunately, Microsoft now enables you to directly download Windows 10 ISO image files for free from its official site. The Windows 10 ISO image direct download is only available when your computer agent is not Windows. So, it is very lucky. You can directly download a Windows 10 ISO image from Microsoft’s official site on your Mac computer and use it to install Windows 11 on Mac.
Tips:
If you are using a Windows PC, you can also directly download a Windows 10 ISO file from Microsoft by changing the user agent under the developer mode of your Chromium browser like Google Chrome or Microsoft Edge. See this post: Windows 10 ISO Images Direct Download via Microsoft’s Website.
Step 1: Go to the Download Windows 10 Disc Image (ISO File) page from Microsoft’s official site on your Mac.
Step 2: Click the Select edition menu and select Windows 10 (multi-edition ISO) option from the drop-down list.

Step 3: Click the Confirm button and wait for your request to be verified
Step 4: Choose your language and click the Confirm button to continue.
Step 5: On the next page, you will see two available download buttons: 64-bit Download and 32-bit Download. Your Mac computer only allows you to install Windows 10 Home 64-bit edition or Windows 10 Pro 64-bit edition. So, you need to click the 64-bit Download button to start downloading Windows 10 ISO file for Mac.
Step 6: The size of the Windows 10 64-bit ISO file is about 5.8 GB. So, it will take a while to complete the whole downloading process. You should wait patiently.
After downloading the Windows 10 ISO file on Mac, you should let it stay in the download folder, move to the install section, and follow the steps to install Windows 10 on your Mac computer.
Download Windows 11 ISO for Mac Free
Microsoft has released a direct download link for all users since the official initial release of Windows 11. It is also free to download a Windows 11 ISO file for Mac from Microsoft.
Step 1: Go to the Download Windows 11 Disc Image (ISO File) page from Microsoft’s official site using your Mac.
Step 2: Scroll down to the Download Windows 11 Disk Image (ISO) section. Then, click the Select Download menu and select Windows 11 option from the drop-down list.
Step 3: Click the Download button and wait for your request to be verified.

Step 4: Choose your language and click the Confirm button to continue.
Step 5: Windows 11 only has 64-bit editions. So, there is only one available download button: 64-bit Download. Click that button to download the Windows 11 ISO file on your Mac.
Step 6: The Windows 11 64-bit ISO file is 5.1 GB in size. You should wait patiently until the whole download progress ends.
Likewise, you should let the downloaded Windows 11 ISO image stay in the download folder, move to the install section, and follow the steps to install Windows 10 on your Mac computer.
Want to download Windows 10/11 ISO for Mac? This post introduces how to directly download one from Microsoft’s official site.Click to Tweet
Install Windows 10/11 on a Mac Computer
How to Install Windows 10 on Mac?
Preparations:
1. Windows 10 installation on Mac needs a Boot Camp Assistant and Boot Camp requires a Mac with an Intel processor. So, you need to have one of the following Mac computers:
- MacBook released in 2015 or later
- MacBook Air released in 2012 or later
- MacBook Pro released in 2012 or later
- Mac mini released in 2012 or later
- Mac Pro released in 2013 or later
- iMac released in 2012 or later1
- iMac Pro (all models)
2. You also need to install the latest macOS updates because they include the updates to Boot Camp Assistant.
3. To store the Windows 10 installation files, your Mac startup disk should have at least 64 GB of free storage space. Of course, more is better. For example, 128 GB of available storage space can provide the best experience because Windows updates will take up more space.
4. An external USB flash drive, which has at least 16 GB of space. However, if you are using one of the following Mac computers, it will not need a USB flash drive to install Windows 10:
- MacBook released in 2015 or later
- MacBook Air released in 2017 or later3
- MacBook Pro released in 2015 or later3
- Mac Pro released in late 2013 or later
- iMac released in 2015 or later
- iMac Pro (all models)
5. A Windows 10 Home 64-bit ISO file or Windows 10 Pro 64-bit ISO file. We have mentioned the download method above. If it is the first time to install Windows 10 on your Mac, you need to have a full version of Windows 10 rather than an upgrade.
Steps to install Windows 10 on Mac
To install Windows, use Boot Camp Assistant, which is included with your Mac.
Step 1: Change the Secure Boot settings if necessary. You need to use Full Security to install Windows 10 on Mac. After the Windows 10 installation, the Secure Boot setting will not affect the Windows startup.
Step 2: Open the Utilities folder of the Application folder. Then, open Boot Camp Assistant.
Step 3: Connect your external USB flash drive to your computer if you are required.
Step 4: Boot Camp Assistant will begin to create a Windows 10 bootable USB flash drive for installation.
Step 5: Boot Camp Assistant needs to create a BOOTCAMP partition for the Windows installation, which size should be at least 64 GB. You should not forget this. However, you should set the partition size as large as possible because you can’t change the size later.
Step 6: When Boot Camp Assistant ends the process, you need to restart your Mac to the Windows installer. In general, the installer will automatically select and format the BOOTCAMP partition. If not, the installer will ask where to install Windows. Then, you should select the BOOTCAMP partition manually and click Format to format it.
Step 7: Remove all unnecessary external drives from your Mac. Then, click the Next button and follow the onscreen instruction to install Windows 10.
Step 8: When the installation ends, your Mac machine will start up in Windows with a Welcome to the Boot Camp installer window. You need to follow the instructions to install Boot Camp and the necessary Windows support software drivers on Mac. You will be asked to restart your Mac when everything is done. Just do it.
Here is how to install Windows 10 on Mac.Click to Tweet
How to Install Windows 11 on Mac?
Windows 11 has new hardware and system requirements. Is it possible to install Windows 11 on your Mac computer? Of course, yes. But you need to use some extra steps to make the installation think your Mac device is compatible with Windows 11.
Step 1: You can also use the steps introduced in the How to Install Windows 10 on Mac section to install Windows 11 on Mac, but only when you see the Windows Setup interface pops up, you need to press Shift+F10 to call out the Command Prompt to make some changes to the related Registry key.
Step 2: Type regedit in Command Prompt and press enter to open Registry Editor.
Step 3: Go to HKEY_LOCAL_MACHINE\SYSTEM\Setup.
Step 4: Right-click the Setup folder and then select New > Key.
Step 5: Name the new key LabConfig.
Step 6: Right-click the newly created key and go to New > DWORD (32-bit). Then, name it BypassTPMCheck. After that, you should open this key and set the value to 1.
Step 7: Repeat the above steps to create two other new keys to bypass the RAM check and Secure Boot check. These two new keys should be named ByPassRAMCheck and ByPass SecureBootCheck. And their values should also be 1.
Step 8: Close the Registry Editor and Command Prompt to go back to the Windows setup interface. Then, click the Install Now button and follow the onscreen instructions to install Windows 11 on your Mac.
Here is how to install Windows 11 on Mac.Click to Tweet
Recover Lost and Deleted Files on Windows 10/11
MiniTool Power Data Recovery is a piece of professional data recovery software that works on all Windows versions, including Windows 11, Windows 10, Windows 8/8.1, and Windows 7. You can use it to recover all types of files like images, videos, music files, documents, and more.
This MiniTool data recovery software can recover data from different kinds of data storage devices like computer internal hard drives, external hard drives, memory cards, USB flash drives, pen drives, and more.
This software has a trial edition. If you are not sure if it can find the files you want to recover, you can use this trial edition to scan the drive you want to recover data from and then check the scan results for your needed files.
MiniTool Power Data Recovery TrialClick to Download100%Clean & Safe
Here is how to use this free file recovery tool to scan your drive for lost files:
Step 1: Download and install MiniTool Power Data Recovery Trial on your device.
Step 2: Open it to enter its main interface.
Step 3: Find the drive you want to recover data from under the Drives section. Hover over it and click the Scan button to start scanning that drive. If you don’t know which the target drive is, you can switch to the Devices section and select the entire disk to scan.

Step 4: Wait until the scanning ends. Then, check the scan results to find your needed files.

If you want to use this tool to recover your files, you need to use a full edition. You can just upgrade the software to a full edition in the scan results interface. So, you don’t need to take time to scan the drive again. After that, you can select all your needed files at once, click the Save button, and select a suitable folder to save files.
The End
Want to download Windows 10 ISO for Mac or download Windows 11 ISO for Mac? You can just get a Windows 10/11 ISO file from Microsoft’s official site on your Mac computer. This article shows you two related guides.
Additionally, you can also know how to install Windows 10 on Mac and how to install Windows 11 on Mac separately.
If you have other related issues to be fixed or have other good suggestions, you can let us know in the comment. You can also contact us via [email protected].
Introduction
I’ve recently tried UTM on my Apple Silicon MBP to test Windows 11. To install Windows 11, I needed a recent iso image. This blog post explains how to download the iso files for Windows 10 or 11.
Get Windows 11 Insider Preview
Go to UUP dump. This page lists all available UUP files from Windows Update servers.
Search for “feature update Windows 10” or “Windows 11 Insider Preview” and select a recent version for the required architecture (e.g. x64). Click on next.
Select a language and click next.
Select an edition, like “Windows Pro” and click next.
Select Download method “Download and convert to ISO”. Check “Include updates” and click on “Create download package”.
Extract the resulting file. You’ll see three scripts:
- Windows:
uup_download_windows.cmd - Linux:
uup_download_linux.sh - macOS:
uup_download_macos.sh
Make the uup_download_macos.sh executable by using “chmod +x uup_download_macos.sh” and try to execute it.
It will probably complain about missing files. But at the same time, it offers help on what you’ll need to install using homebrew, e.g.:
brew tap sidneys/homebrew
brew install aria2 cabextract wimlib cdrtools sidneys/homebrew/chntpw
Fix for Apple Silicon Macs
On my M1/Apple Silicon Mac, chntpw complained about a non working SSL. I’ve found this issue on Github, which has some easy installation recommendations:
curl -LO https://gist.github.com/minacle/e9dedb8c17025a23a453f8f30eced3da/raw/908b944b3fe2e9f348fbe8b8800daebd87b5966c/openssl@1.0.rb
curl -LO https://gist.github.com/minacle/e9dedb8c17025a23a453f8f30eced3da/raw/908b944b3fe2e9f348fbe8b8800daebd87b5966c/chntpw.rb
brew install --formula --build-from-source ./openssl@1.0.rb
brew install --formula --build-from-source ./chntpw.rb
rm ./openssl@1.0.rb ./chntpw.rb
Now try to execute the uup_download_macos.sh script again. It will now download the requested update files and will create automatically a nice ISO file, which can be used to install Windows.
Legal disclaimers
As we’re using the official Windows Server Update files, this method should be legal. There is a more detailed report available at win10.guru which explains, that most of the tool was developed by analyzing the network traffic of a Windows installation running updates. It’s also a good way to get the versions including the latest updates including the Insider builds. Of course there’s still the official download page from Microsoft.
Если вы хотите запустить Windows 10 на Mac из-за того, что часть ваших любимых игр и программ доступны только на этой ОС, то спешу вас обрадовать: это просто и под силу даже новичкам. В этой статье мы разберём два способа установки операционной системы Windows 10: через встроенное приложение Boot Camp и виртуальную машину, а также затронем вопросы, связанные с её настройкой.
Подготовительный этап
Прежде всего убедитесь, что ваше Mac-устройство входит в этот список:
- MacBook Pro (2012 г. и более поздние модели);
- MacBook Air (2012 г. и более поздние модели);
- MacBook (2015 г. и более поздние модели);
- iMac Pro (2017);
- iMac (2012 г. и более поздние модели);
- Mac mini (2012 г. и более поздние модели);
- Mac mini Server (конец 2012);
- Mac Pro (конец 2013).
Затем подготовьте пустую флешку объёмом не менее 16 гигабайт.
После этого потребуется скачать ISO-образ Windows 10 и подготовить для её установки соответствующий раздел на диске.
Загрузка ISO-образа Windows 10
ISO-образ — файл, имитирующий диск. В нашем случае он содержит установочные файлы операционной системы Windows 10. ISO-образ Windows 10 доступен на сайте Microsoft — https://www.microsoft.com/ru-ru/software-download/windows10ISO/. Перед скачиванием выберите нужную версию системы, язык и разрядность процессора.
Сколько пространства на диске займёт ОС?
Для запуска Windows 10 достаточно 20 гигабайт, но в этом случае останется очень мало места для дополнительных программ. Рекомендуется выделить как минимум 50 гигабайт — этого хватит даже для нескольких игр.
Установка Windows 10 с помощью Boot Camp
Boot Camp — встроенная утилита, созданная специально для установки Windows на устройства с OS X. Операционная система Windows в этом случае запускается как основная, используя все ресурсы устройства, поэтому производительность не снижается. Такой способ будет предпочтительнее, если вы собираетесь запускать игры или требовательные к ресурсам приложения. Найти программу легче всего с помощью сервиса Spotlight.
Последовательность действий при установке Windows 10 через Boot Camp
Сделайте следующее:
- Запустите Boot Camp.
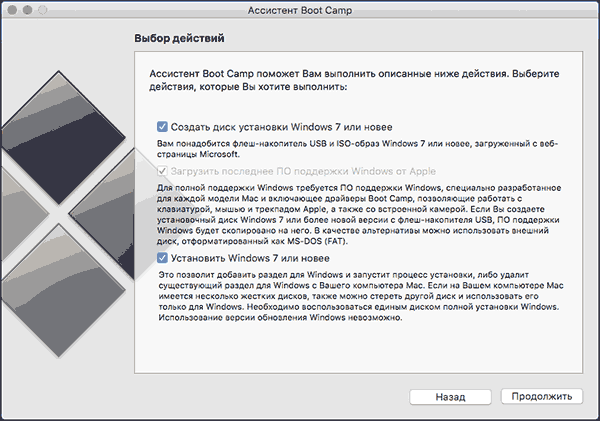
- В открывшемся окне отметьте все пункты и нажмите «Продолжить».

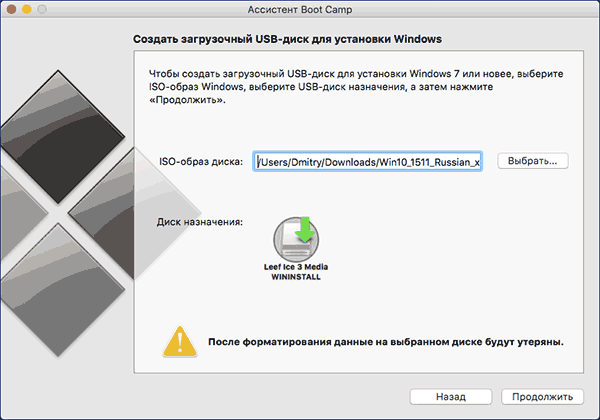
Отметьте галочками все пункты, пункт загрузки ПО от Apple будет отмечен автоматически - Укажите путь к ISO-образу и флешку, на которую установятся нужные файлы. После этого начнётся загрузка необходимых файлов (в частности, драйверов) на флешку. Примечание: если на вашем устройстве операционная система El Capitan и выше, то флеш-накопитель не понадобится.

Выберите место расположения ISO-образа и флеш-накопитель для записи установочных файлов - По окончании загрузки флеш-накопителя укажите размер пространства на диске, отводимого под раздел с Windows 10. Задавайте не менее 40 гигабайт, потом изменить размер будет нельзя.

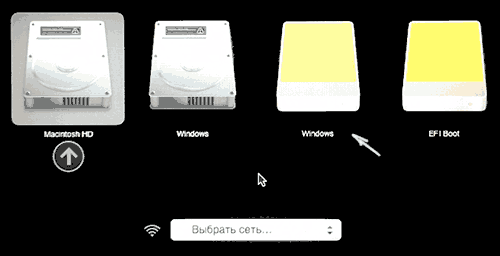
50 гигабайт хватает для нескольких объёмных приложений - После того как вы укажете величину раздела, отводимого под Windows 10, Mac перезагрузится, предложив сначала выбрать загрузочный диск из появившегося на экране списка. Выберите накопитель с именем Windows. Если список носителей не появился, перезагрузитесь вручную, зажав клавишу Option (Alt).

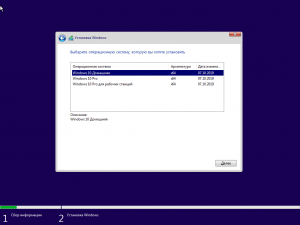
Выберите загрузочный диск с именем Windows - После перезагрузки появится окно «Установка Windows». Выберите язык, раскладку клавиатуры, формат времени и денежных единиц.

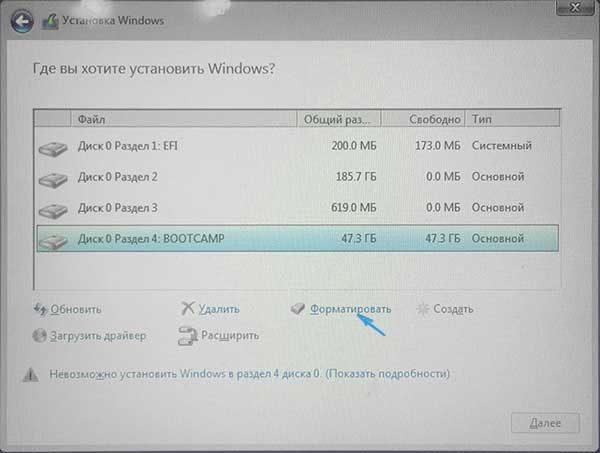
По умолчанию стоят значения «русский», поэтому их можно не менять - В новом открывшемся окне «Установка Windows» выберите раздел BOOTCAMP и отформатируйте его, иначе в дальнейшем появится сообщение, что установить Windows на этот раздел невозможно. После форматирования назначьте раздел BOOTCAMP для установки Windows 10.

Перед выбором для установки раздела BOOTCAMP отформатируйте его, иначе могут появиться ошибки - Все необходимые компоненты Windows 10 будут загружены с ISO-образа в выбранный раздел диска, и Mac снова перезагрузится.
- Далее потребуется произвести настройку Windows и создать учётную запись.


В окне настройки Windows рекомендую отключить все опции — производительность системы от этого увеличится, а сведений о вас Microsoft соберёт меньше.
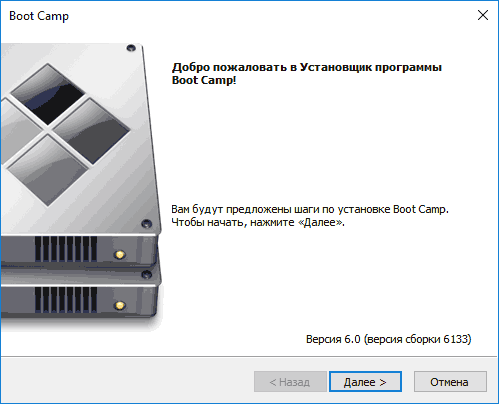
Вставьте флешку, на которой находятся драйверы. Снова запустится установщик Boot Camp, следуйте его указаниям. Если программа не запустилась автоматически, то запустите её вручную: найдите на флешке папку Boot Camp и откройте файл Setup.exe.
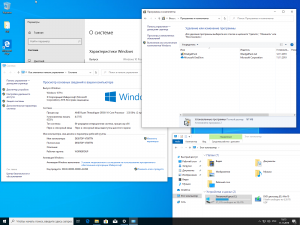
После этого в меню «Пуск» найдите приложение Apple Software Updater, запустите его и загрузите предложенные обновления. На этом процесс установки Windows 10 будет завершён.
При загрузке устройства нужно будет выбрать систему, с которой хотите работать: Windows 10 или OS X, и именно она будет загружена.
Удаление Windows 10 с Mac
Если по каким-то причинам вы оказались недовольны Windows 10 или она стала не нужна, то удалить её с Mac ещё проще, чем установить. Для этого запускаем Boot Camp из OS X и ставим галочку напротив пункта «Удалить Windows 8 или новее». Программа сама избавится от раздела диска с Windows — нужно лишь чуть-чуть подождать, и вторая ОС удалится с устройства.
Видеоинструкция по установке Windows 10 через Boot Camp
У этого способа есть и преимущества, и недостатки. При использовании виртуальной машины не нужно перезагружаться для входа в Windows — она запускается в окне системы OS X. Однако это сказывается на производительности, ведь Windows в виртуальной машине использует системные ресурсы вместе с основной системой OS X. Чтобы воспользоваться этим способом, вам понадобится установить программу, реализующую работу в режиме виртуальной машины. Самые популярные и многофункциональные платные решения для этого — Parallels Desktop и VMware. Из бесплатных программ явный фаворит у пользователей — VirtualBox: виртуальная машина, запускаемая ею, обладает гибкой настройкой и простым интерфейсом, а также доступна не только на OS X, но и на Linux.
Процесс установки Windows 10 через VirtualBox
Итак, рассмотрим VirtualBox. Это бесплатное приложение немного проигрывает своим платным конкурентам в производительности, но вполне способно удовлетворить потребности большинства пользователей. Скачать программу с официального сайта можно по ссылке https://www.virtualbox.org/wiki/Downloads. Выберите версию OS X из списка OS X hosts. После загрузки программы для установки Windows выполните следующее:
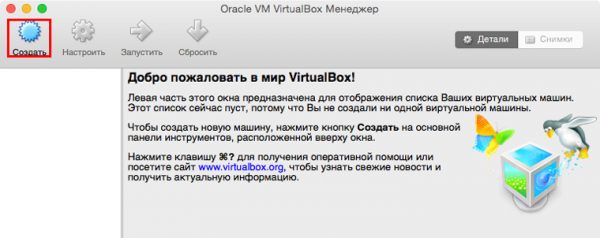
- Запустите VirtualBox. В открывшемся окне нажмите кнопку «Создать».

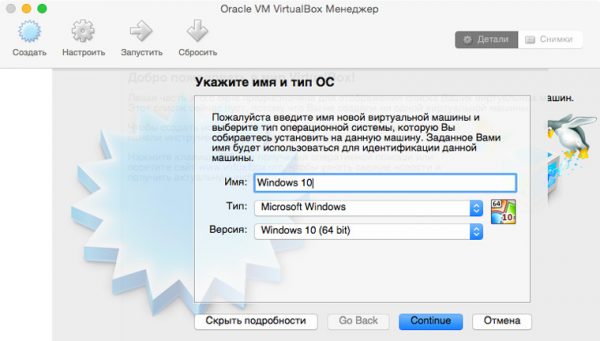
Нажмите кнопку «Создать» для создания новой виртуальной машины - В новом окне введите произвольное имя и выберите нужную ОС, в данном случае — Microsoft Windows.

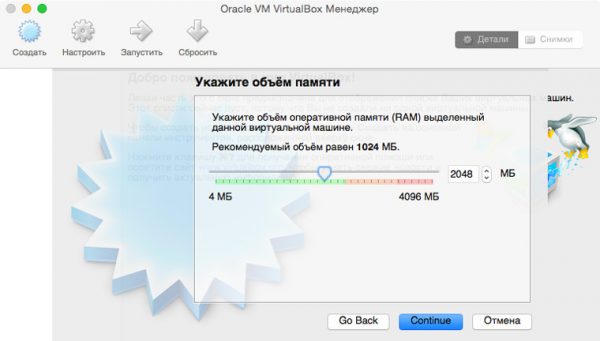
Если введёте имя Windows 10, то автоматически установится аналогичная версия ОС - Далее укажите объём оперативной памяти, отводимый виртуальной машине. Выделите не менее 2048 мегабайт.
Рекомендуемое значение — 1024 МБ, но для 64-битной Windows 10 минимальным значением является 2 гигабайта - В следующем меню выберите пункт «Создать новый виртуальный жёсткий диск». В окне «Укажите тип» всё оставьте без изменений — тип VDI.
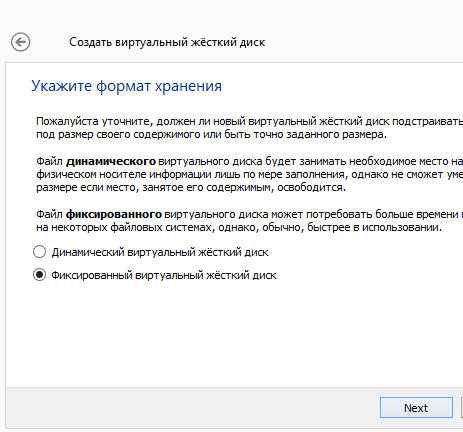
- Формат хранения виртуального жёсткого диска предпочтительно выбрать «фиксированный». Динамический диск будет увеличиваться по мере заполнения, что уменьшает скорость работы устройства. Но если динамический файл диска не будет регулярно пополняться, то разница в производительности по сравнению с фиксированным файлом не будет большой.

Фиксированный объём виртуального жёсткого диска обеспечит большую производительность, чем динамический - Выделите место под Windows — для нескольких приложений хватит 40 гигабайт, меньше выставлять не рекомендуется.
- Для запуска виртуальной машины щёлкните по кнопке «Запустить».

Для запуска виртуальной машины перед установкой Windows 10 нажмите «Запустить» - Укажите путь к ISO-образу Windows 10. Для этого нажмите на значок в виде папки и выберите папку, где находится файл образа.
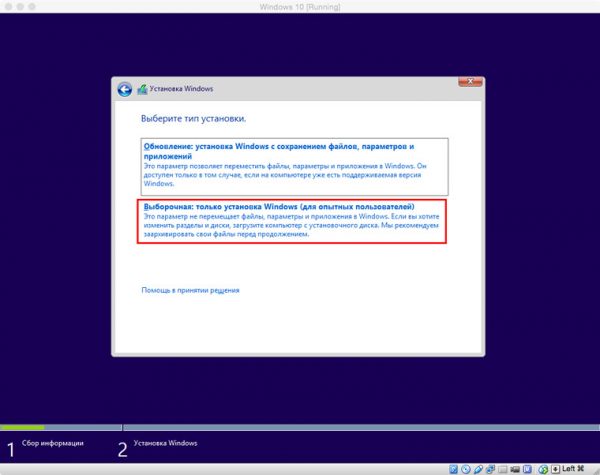
- В параметрах языка выберите «русский». Задайте выборочный тип установки.

В окне «Тип установки» выберите пункт «Выборочная установка» - Windows предложит провести настройку — можете оставить стандартные параметры или отключить ненужные вам опции.

Готово! Теперь вы можете быстро запускать Windows 10 в виртуальной машине.
Видеоинструкция по установке Windows 10 через VirtualBox
Настройка систем
После установки новой операционной системы часто возникают вопросы, связанные с её настройкой и отладкой. Самые распространённые трудности, с которыми сталкиваются пользователи, приведены ниже.
Аналоги функциональных клавиш Windows на клавиатуре Mac
Клавиатура устройств Apple не имеет некоторых клавиш, использующихся в Windows, но те же функции можно выполнить с помощью других клавиш или их комбинаций:
- клавиша Windows (Win) — Command (⌘);
- левый Alt — Option;
- правый Alt — Option+Control;
- клавиша Backspace — Delete.
Как переключаться между ОС
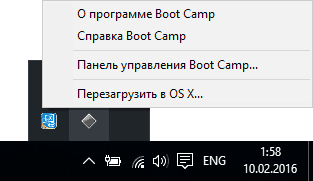
После установки Windows 10 в правом нижнем углу экрана, в списке дополнительных значков, появится иконка Boot Camp (ромбик). Нажав на неё, вы увидите надпись «Перезагрузить в OS X». Если щёлкнуть по ней, то вместо Windows загрузится OS X. Вернуться к Windows можно, перезагрузившись с зажатой клавишей Option (Alt). В появившемся окне выберите нужную ОС щелчком мыши.
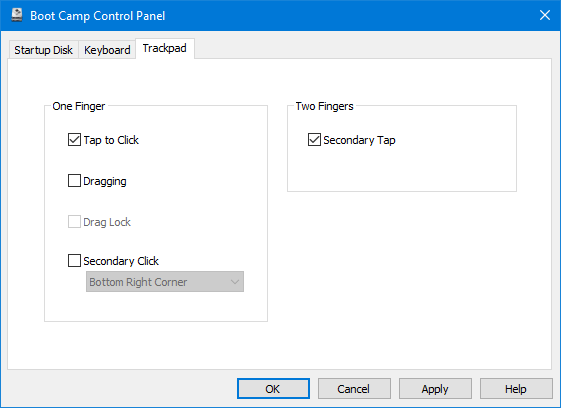
Настройка тачпада
По умолчанию тачпад от Mac в Windows 10 ведёт себя довольно странно и непривычно, не так, как в OS X. Чувствительность его заметно ниже, и некоторые жесты не распознаются . Исправить это можно с помощью утилиты Boot Camp. Запустите её, войдите в «Панель управления Boot Camp», затем перейдите в раздел «Трекпад» и выберите подходящие настройки.
Следует иметь в виду, что Windows 10 — не «родная» ОС для Mac, поэтому вряд ли будет работать на нём безукоризненно. Но если нужно использовать программы, доступные только на Windows, то установить её легко, что и было показано в этой статье. При необходимости Windows 10 всегда можно удалить и вернуться к стандартной OS X.
- Распечатать

Здравствуйте! Меня зовут Демид, живу в Севастополе.
Оцените статью:
- 5
- 4
- 3
- 2
- 1
(2 голоса, среднее: 5 из 5)
Поделитесь с друзьями!
Here’s a complete step by step guide on how you can download Windows 10 ISO file using your Mac computer.

Microsoft released the final build of Windows 10 over three months back, and along with the operating system itself, the company also took the liberty to make the ISO files available for download officially. While we have already covered how you can download the Windows 10 ISO files officially and legally, but our previous guide was Windows-centric. Today, we’ll show you how you can download the Windows 10 ISO files if you’re in the ownership of a Mac computer.
Download Windows 10 ISO File Using A Mac
1. Head over to this link using Safari.
2. Scroll down to the ‘Select edition’ section and select the edition of Windows 10 you wish to download. Click ‘Confirm’ once you’re done.

3. You’ll now be asked to select the language of the Windows 10 ISO file you wish to download. Make your choice and then click on the ‘Confirm’ button.

4. The last step involves selecting whether you want to download a 32-bit or 64-bit version of the Windows 10 ISO file. Once you make your choice, the ISO file will instantly start downloading.


If you’re a Windows user, then Microsoft offers a brilliant tool for downloading Windows 10 ISO files, and we have a complete walkthrough on how you can use it. You can check it out right here:
- Download Windows 10 ISO (32-bit / 64-bit) Officially And Legally
If you’ve been looking for a way to download the Windows 10 ISO onto your Mac, then you now know how to go about the entire process, and quite frankly, it’s pretty easy to go through, even if you’re a brand new user when it comes to such things.
If you’re planning to install Windows 10 onto your PC or Mac, then we highly recommend that you keep a copy of the Windows 10 ISO in a safe location, ensuring that you don’t lose it. Furthermore, we recommend that you perform a clean install of Windows 10 rather than upgrading over your existing Windows installation, since a fresh installation from scratch ensures maximum performance and the least amount of issues at every level.
Microsoft has revealed that it would treat Windows 10 as a service as it moves into the future, which means that it will expand its OS over time with new features using over the air updates. A smart move by Microsoft if you’re asking us, and we really wished it had pulled this off a few years back instead.