Windows power user tips
If Windows Update can’t install a particular update (or isn’t working all), Microsoft’s DISM command provides a simple way to get Windows updates installed.
Getty Images / kchungtw 
Windows’ built-in Deployment Image Servicing and Management (DISM) command, a.k.a. dism.exe, is something of a Swiss Army knife when it comes to working on Windows OS images. Among its many capabilities — such as adding optional Windows features and packages, taking image inventories, performing image cleanups, and more — DISM includes an /Add-Package option. This option allows users to install Microsoft Catalog updates in .cab or .msu files to a targeted Windows image.
.cab is short for “Windows Cabinet,” a type of compressed file that stores data and instructions for Windows that can update device drivers, system files, and so forth. The .msu file extension is associated with the Microsoft Update Standalone Installer. Normally, this installer uses the Windows Update Agent API to install update packages. Both .cab and .msu files also work with the DISM command against Windows image files, which may be of types .wim, .esd, .ffu, or virtual hard disk files of type .vhd or .vhdx.
Note that .msu updates only work on offline images, while the more common .cab files may be applied to an online image to update a running Windows install.
Why use DISM instead of Windows Update?
Good question! Sometimes, DISM provides a way to install an update when Windows Update (WU) may be having issues. At times, Windows Update may simply refuse to work, or it may hang or crash on a particular update. DISM provides a handy way to install updates when WU itself may be unable to oblige.
Other reasons to use DISM instead of Windows images include:
- Managing Windows images for large-scale and/or remote deployments using Microsoft Intune, Windows Autopilot, or Systems Center Configuration Manager (SCCM).
- Slipstreaming drivers or updates into standard Windows images for customization and special deployments.
- As an alternative to user-driven updates from an in-house update server, perhaps during scheduled maintenance periods. Holiday weekends are popular for this kind of thing in large organizations, because they provide an extra day to fix unexpected problems or to roll back to the previous status quo if such problems can’t be fixed.
Where to get Windows Update files
The Microsoft Update Catalog is the most common source for update files of all types, including .cab and .msu. Generally, items are accessed by name (e.g., Realtek Audio Driver) or by Knowledge Base (KB) article number. Thus, for example, KB4023057 is an update that applies to editions of Windows 10 versions 1507 through 1803, intended to clean up and fix any issues with Windows Update that might prevent updates from being installed.
Figure 1 shows the Update Catalog with a portion of one page’s results for KB4023057. Click the Download button in the right-hand column for the version of the file that matches the target OS to get the update.
Figure 1: The Microsoft Update Catalog with KB5023057 items on display. (Click image to enlarge it.) Ed Tittel/IDG
It you click the Download button for the topmost 1803 item shown in Figure 1, a download window appears. This provides a link to a corresponding .cab file with an extremely long name: windows10.0-kb4023057-x64_58b2f8fd3da37d22fb99bd6aa6c3f69951e67429.cab
Notice that the name includes the Windows version (10.0), the KB number, bittedness (x64 means 64-bit), and a globally unique identifier (GUID), and it ends with the cabinet file (.cab) extension. That makes this item an excellent target for an update through the DISM command.
Figure 2 shows the download page for this chosen item:
Figure 2: The download page for the 64-bit .cab for KB4023057, 64-bit, version 1803.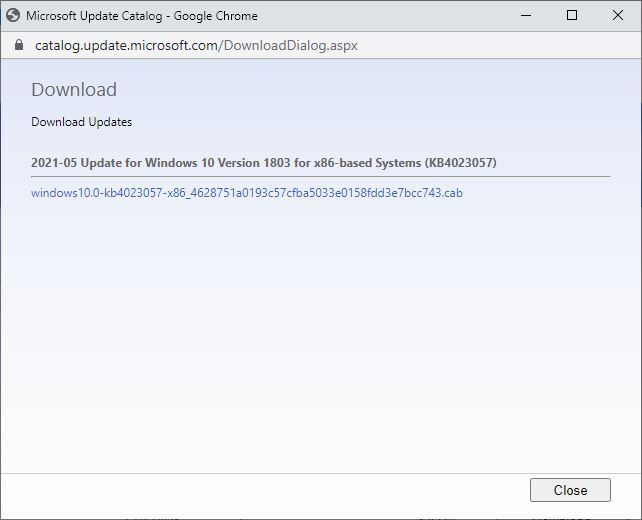 Ed Tittel/IDG
The DISM /Add-Package syntax
The DISM command is fully documented online in Microsoft Docs in the DISM Operating System Package… Servicing Command-Line Options pages. This is just a small part of the DISM Tools Reference, another online document worth bookmarking and exploring for those who work with (and on) Windows images.
The manual lays out the abstract syntax for the /Add-Package option as follows:
Dism /Add-Package /PackagePath:<path_to_cabfile> [/IgnoreCheck] [/PreventPending]
A /PackagePath can point to a single .cab or .msu file, a folder that contains a single expanded .cab file or a single .msu file, or a folder that contains multiple .cab or .msu files (you can’t mix the two types, however). If /PackagePath points to a folder that contains one or more .cab or .msu files at its root, any subfolders will be likewise recursively checked for such files as well.
The /PreventPending switch instructs DISM to skip installing the package if it, or the targeted Windows image, has any uncompleted actions still pending. This is intended to prevent operating on images that may not be complete or intact.
As already stated, you can add multiple packages within a single DISM command by including multiple .cab or .msu files in the directory that serves as input to the /PackagePath option. Ordinarily, DISM will check each package to make sure it’s applicable to the targeted image. If a package will not apply to that image, DISM will issue an error message. The /IgnoreCheck switch may be used to get DISM to run silently and skip the applicability check for each package.
DISM /Add-Package example
Let’s say I’m running a 32-bit instance of Windows 10 version 1803. If I wanted to apply KB4023057 to that running image, and the .cab file had been downloaded to the path D:\Images, Figure 3 shows what that command would look like in Command Prompt or PowerShell. But first, some important notes for clarity, understanding and brevity:
- DISM only works with administrative privileges, so you must be logged into an administrative account and opt for “run as administrator” for your command line environment.
- The
/Onlineswitch tells DISM to apply packages to the currently running Windows image. - I renamed the .cab file to KB4023057 so I could fit everything into a single line of text.
Figure 3 shows the example command in an administrative command prompt window.
Figure 3: The proper syntax for DISM /Add-Package for a running Windows system. (Click image to enlarge it.)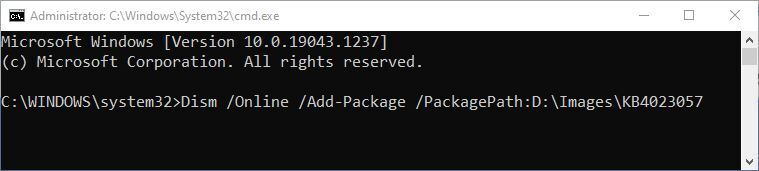 Ed Tittel/IDG
To run the command in this format, you must be sure there are no WU transactions pending. The safest way to make sure this is true is to restart the system before running any DISM /Add-Package commands.
Working on offline images is something of a specialty exercise. Here, I’ll simply say that offline images represent images that may be “under construction” or that are maintained in an image library for deployment and/or customization for distribution to users at some kind of scale — maintaining images usually isn’t worth the extra work involved, unless you have at least dozens of users, if not hundreds or more, to whom those images will be served. For more information on using DISM /Add-Package with offline images, see this Microsoft Docs item “Add or Remove Packages Offline Using DISM.”
Common cases when DISM /Add-Package is worthwhile
In my own experience, I’ve used DISM /Add-Package dozens if not hundreds of times. In nearly every such case, that use has been motivated by one of two sets of circumstances:
- Windows Update isn’t working properly, and I can’t download or install any updates.
- Some particular update hangs or crashes when I try to install it using WU.
In both of those cases, downloading the .cab file and using DISM /Add-Package will get the update installed successfully on a running Windows image.
If it doesn’t work, this usually indicates deeper problems with Windows. In those rare instances, I next turn to an in-place upgrade install (see my CW story “How to fix Windows 10 with an in-place upgrade install”). If that provides no relief, my companion story “How to repair Windows 10 (and 11) in 4 steps” should set things right.
Copyright © 2021 IDG Communications, Inc.
Обновления для операционной системы Windows выпускаются в виде файлов с расширением MSU или CAB. Если на компьютере не работает (отключена) служба Windows Update (Центр обновления Windows), вы можете скачать и установить накопительные обновления или обновления безопасности Windows вручную. В этой статье мы покажем, как скачать и установить в Windows обновления в формате MSU и CAB файлов.
Содержание:
- Как вручную скачать MSU файлы обновлений для Windows?
- Установка обновлений из MSU файлов в Windows
- Как извлечь CAB файл из MSU обновления?
- Установка CAB файла обновлений в Windows 10/11
- Установка CAB и MSU обновления с помощью скриптов
Как вручную скачать MSU файлы обновлений для Windows?
Microsoft выпускает обновления и патчи в формате CAB файла. Именно в таком виде ваш компьютер получает обновления с серверов обновлений Microsoft или локального сервера WSUS. Для более удобного ручного распространения отдельных обновлений клиентами через каталог обновлений Microsoft, такие CAB файлы упаковываются в специальный формат MSU (Microsoft Update Standalone Package).
Вы можете скачать MSU файлы обновлений Windows (а в некоторых случаях и CAB) и других продуктов MSFT можно в каталоге обновлений Microsoft (https://www.catalog.update.microsoft.com/). Перейдите в Microsoft Update Catalog, найдите и скачайте нужное обновление. К примеру, я хочу установить обновление стека 2022-05 Servicing Stack Update for Windows 10 Version 21H2 for x64-based Systems (KB5014032). Нажмите на кнопку Download.

Переместите скачанный файл ssu-19041.1704-x64_70e350118b85fdae082ab7fde8165a947341ba1a.msu в каталог C:\temp. Переименуйте файл на более короткое имя — windows10-21h2-kb5014032.msu.
Установка обновлений из MSU файлов в Windows
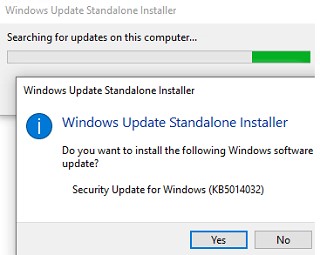
Для запуска установки пакета обновления в Windows достаточно дважды щёлкнуть по скачанному MSU файлу. Если обновление применимо к данному компьютеру, откроется диалоговое окно Автономного установщика обновлений Windows (Windows Update Standalone Installer), в котором нужно подтвердить установку апдейта.
При установке MSU обновления может появится ошибка “Обновление неприменимо к этому компьютеру”. Причины этой ошибки подробно разобраны в статье по ссылке.
Также вы можете установить msu пакет обновления из командной строки с помощью утилиты wusa.exe.
Для установки обновления в «тихом» режиме (пользователю не будут показываться никакие всплывающие окна) с отложенной перезагрузкой, откройте командную строку с правами администратора и выполните команду:
wusa.exe c:\Temp\windows10-21h2-kb5014032.msu /quiet /norestart
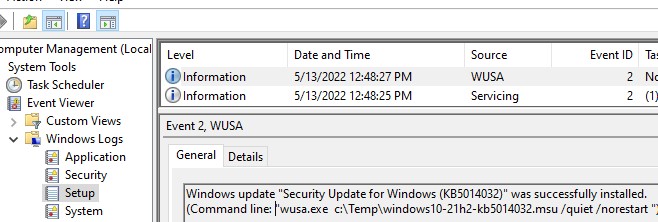
Через некоторое время проверьте, что обновление успешно установлено:
wmic qfe list | findstr 5014032
![]()
Или найдя в журнале событий Установка (Event Viewer -> Windows Logs -> Setup) запись с Event ID 2 от источника WUSA с текстом:
Windows update "Security Update for Windows (KB5014032)" was successfully installed. (Command line: "wusa.exe c:\Temp\windows10-21h2-kb5014032.msu /quiet /norestart ")
Обновление Windows "Security Update for Windows (KB5014032)" было успешно установлено. (Командная строка: C:\Windows\system32\wusa.exe c:\Temp\windows10-21h2-kb5014032.msu /quiet /norestart)
Обратите внимание, что установка обновлений в msu формате в Windows через wusa.exe выполняется медленнее, чем при установке того же обновления в виде cab файла. Причина в выполнении дополнительного сканирования на серверах Windows Update/WSUS. См статью о медленной установке msu обновлений.
Как извлечь CAB файл из MSU обновления?
Если служба Windows Update (wuausrv) работает некорректно, вы не сможете установить обновление из MSU файла. В этом случае можно вручную распаковать пакет MSU, извлечь из него CAB файл обновления и вручную установить его в Windows.
Чтобы распаковать MSU пакет в каталог C:\Temp\kb4056887 (каталог нужно предварительно создать), выполните следующую команду:
expand -f:* “C:\Temp\windows10.0-kb4056887-x64.msu” C:\Temp\kb4056887
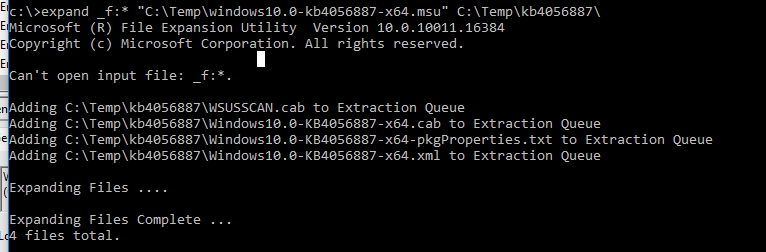
Microsoft (R) File Expansion Utility Version 10.0.10011.16384
Copyright (c) Microsoft Corporation. All rights reserved.
Adding C:\Temp\kb4056887\WSUSSCAN.cab to Extraction Queue
Adding C:\Temp\kb4056887\Windows10.0-KB4056887-x64.cab to Extraction Queue
Adding C:\Temp\kb4056887\Windows10.0-KB4056887-x64-pkgProperties.txt to Extraction Queue
 Adding C:\Temp\kb4056887\Windows10.0-KB4056887-x64.xml to Extraction Queue
Expanding Files ....
Expanding Files Complete ...
4 files total.
Как вы видите в каталоге появилось 4 типа файлов:
- .xml файл (Windows10.0-KB4056887-x64.xml) — содержит метаданные пакета msu и используется программой Wusa.exe
- .cab файл (Windows10.0-KB4056887-x64.cab — один или несколько) – непосредственно архив с обновлением Windows
- *pkgProperties.txt файл (Windows10.0-KB4056887-x64-pkgProperties.txt)– содержит свойства пакета (дата выпуска, архитектура, тип пакета, ссылка на KB и т.д.)
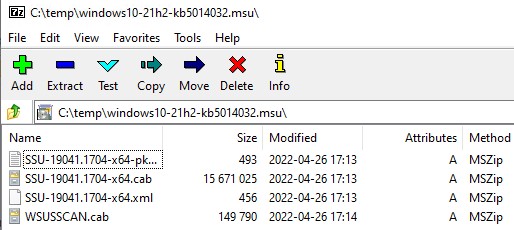
Также вы можете открыть любой MSU файла с помощью утилиты 7-ZIP и извлечь из него CAB файл.
Установка CAB файла обновлений в Windows 10/11
Вы можете установить CAB файл обновления в Windows двумя способами.
Наиболее универсальный способ установки обновления из CAB файл – утилита DISM.exe. Команда установки может быть такой:
DISM.exe /Online /Add-Package /PackagePath:c:\Temp\kb4056887\Windows10.0-KB4056887-x64.cab
Deployment Image Servicing and Management tool
Version: 10.0.10240.16384
Image Version: 10.0.10240.16384
Processing 1 of 1 - Adding package Package_for_KB4056887~31bf3856ad364e35~amd64~~10.0.1.0
[==========================100.0%==========================]
The operation completed successfully.
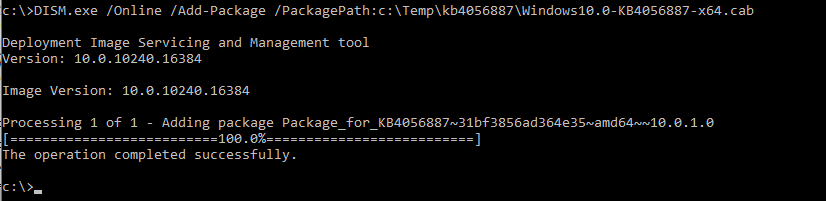
Примечание. Обратите внимание, как быстро происходит установка пакета через DISM по сравнению со скоростью установки обновления из MSU файла.
Если нужно установить CAB пакет в тихом режиме и подавить запрос на перезагрузку компьютера после установки обновления, команда DISM будет такой:
start /wait DISM.exe /Online /Add-Package /PackagePath: c:\Temp\kb4056887\Windows10.0-KB4056887-x64.cab /Quiet /NoRestart
Команда DISM.exe /Add-Package позволяет установить и MSU обновление (поддерживается только установка в офлайн образ Windows). Также вы можете в параметре
/PackagePath
указать путь к каталогу, в котором хранятся MSU и CAB файлы обновлений. DISM рекурсивно просканирует указанные каталог и вложенные папки и установит в образ Windows все найденные CAB и MSU пакеты.
Здесь нужно отметить, что команда DISM.exe /Add-Package не проверяет зависимости и требования к окружению при добавлении CAB файла в образ Windows (в отличии от wusa.exe которая предварительно проверяет, применимо ли MSU обновление к компьютеру.
Для установки CAB файлов в образ Windows вместо команды DISM /Add-Package можно использовать PowerShell командлет
Add-WindowsPackage -Online -PackagePath "C:\win10_kb123456.cab"
В Windows 8 и Windows 7 можно установить обновление с помощью менеджера пакетов Pkgmgr. Команда:
start /w Pkgmgr /ip /m:c:"c:\Temp\kb4056887\Windows-KB123456.cab"
Примечание. В Windows 10 / Windows Server 2016 менеджер пакетов PkgMgr.exe более не поддерживается. При его запуске появляется предупреждении о необходимости использовать для управления пакетами DISM.exe.
Note: The PkgMgr.exe has been deprecated. Please update your scripts to use dism.exe to extract, install, uninstall, configure and update features and packages for Windows.

Примечание. Обратите внимание, что языковые пакеты Windows (MUI) также распространяются в формате CAB. Однако не получиться использовать для их установки команду DISM. Вместо этого, для установки новых языков в систему нужно использовать отдельную утилиту lpksetup.exe.
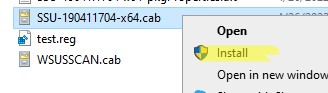
Вы можете добавить в контекстное меню File Explorer контекстное меню для установки CAB файлов. Для этого добавьте следующие *.reg файл в реестр:
Windows Registry Editor Version 5.00
[-HKEY_CLASSES_ROOT\CABFolder\Shell\RunAs]
[HKEY_CLASSES_ROOT\CABFolder\Shell\RunAs]
@="Install"
"HasLUAShield"=""
[HKEY_CLASSES_ROOT\CABFolder\Shell\RunAs\Command]
@="cmd /k dism /online /add-package /packagepath:\"%1\""
Теперь для установки CAB файла нужно выбрать пункт Install в контекстном меню.
Установка CAB и MSU обновления с помощью скриптов
Если вам нужно установить сразу несколько CAB или MSU обновлений на компьютере, вы можете использовать BAT и PowerShell скрипты. Благодаря таким скриптам вам не придется по ставить обновления вручную по одному.
Создайте на диске каталог с обновлениями и скопируйте в него все MSU файлы, которые нужно обновить. Теперь для установки всех обновлений из указанного каталога, достаточно запустить скрипт install_msu.bat:
Set Folder="C:\updates"
for %%f in (%Folder%\*.msu) do (
 wusa.exe %%f /quiet /norestart
)
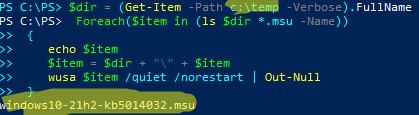
По аналогии можно использовать PowerShell скрипт для установки MSU обновлений из указанной папки:
$dir = (Get-Item -Path c:\temp -Verbose).FullName
Foreach($item in (ls $dir *.msu -Name))
{
 echo $item
 $item = $dir + "\" + $item
 wusa $item /quiet /norestart | Out-Null
}
Данная инструкция по ручной установке накопительных (если вы не помните что это такое, прочитайте статью про новую модель обновлений Windows систем) и любых других обновлений Windows применима ко всем поддерживаемым версиям ОС: Windows 11/10/8.1 и Windows Server 2022/2019/2016/2012R2.
Привет, друзья. В этой статье будем говорить о теме обновлений Windows – теме токсичной применимо к Windows 10. Напомню расклад ситуации. В Windows 7 и 8.1 в любых редакциях мы можем с помощью штатного функционала по своему желанию отключать обновления или настраивать альтернативный автоматическому их тип поставки. В Windows 10 штатной возможности полностью отказаться от обновлений нет, а альтернатива их отключению — это всего лишь возможность краткосрочного временного отложения. И только в редакциях, начиная с Pro, есть возможность на длительное время отложить установку обновлений, и то не всех, а только функциональных. На нашем сайте мы не единожды рассматривали реализуемые сторонним софтом способы отключения обновлений Windows 10, в этой же статье пойдём немного дальше и поговорим об альтернативных способах их внедрения в систему — без участия системного центра обновлений, с использованием сторонних программ.
Итак, друзья, у каждого из нас могут быть разные причины, чтобы отключить обновления Windows, будь это «Десятка» или более ранняя версия – экономия лимитного трафика, оптимизация производительности, необходимость сведения к минимуму служебных системных процессов, отказ от накопительных апдейтов в целях сохранения стабильности и т.п. Но рано или поздно вопрос с установкой обновлений придётся решать, как минимум из соображений безопасности. Вы можете отключить системные обновления, а потом, когда у вас появится время и желание, включить их и комплексно внедрить. Для этого вам нужно просто запустить автоматическую работу центра обновления Windows. Но вы можете не связываться с последним и прибегнуть к помощи сторонних программ для внедрения обновлений Windows. Такие обычно более эффективны, работают быстрее центра обновления Windows, не нагружают ресурсы компьютера. А главное — предлагают нам полностью подконтрольный процесс установки обновлений, в частности с возможностью выполнения этого процесса в ручном режиме. Такие программы предлагают не только установку, но и возможность удаления обновлений, если те повлекли за собой проблемы в работе Windows. Рассмотрим тройку таких программ.
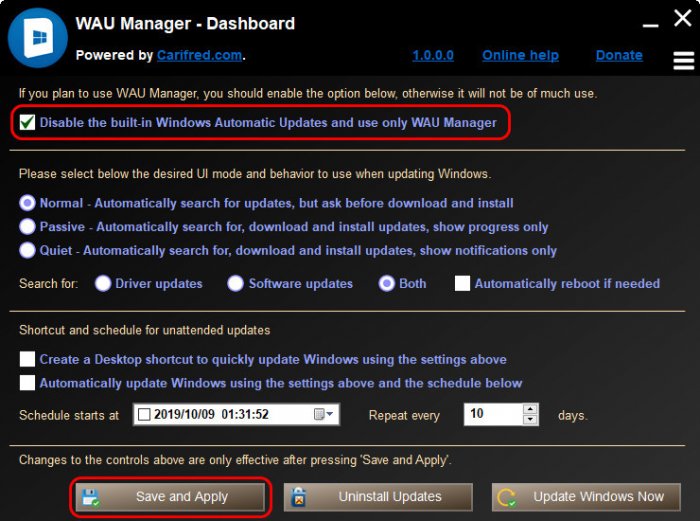
Бесплатная портативная утилита WAU Manager – это настраиваемый менеджер обновлений Windows, который может полностью заменить реализуемый штатно механизм установки обновлений. WAU Manager являет собой полноценную альтернативу центру обновления Windows: утилита может в автоматическом и ручном режиме устанавливать обновления, а также удалять уже установленные.
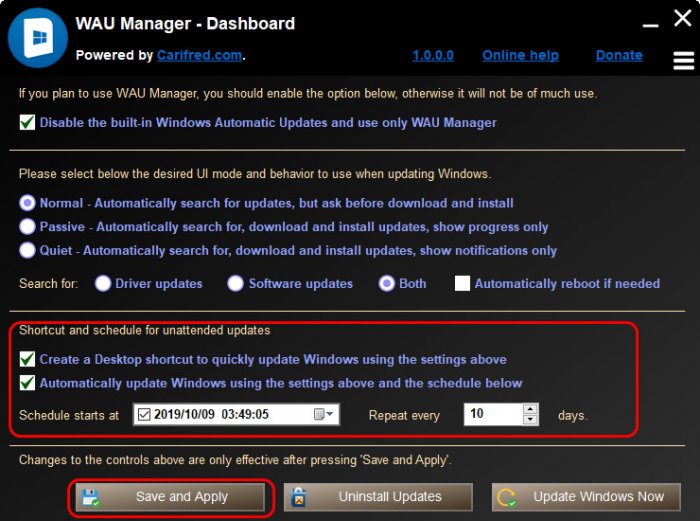
Первое, что нам нужно сделать – это отключить системный механизм обновлений. Активируем первую галочку в окне утилиты, применяем изменения кнопкой «Save and Apply» и перезагружаем компьютер.
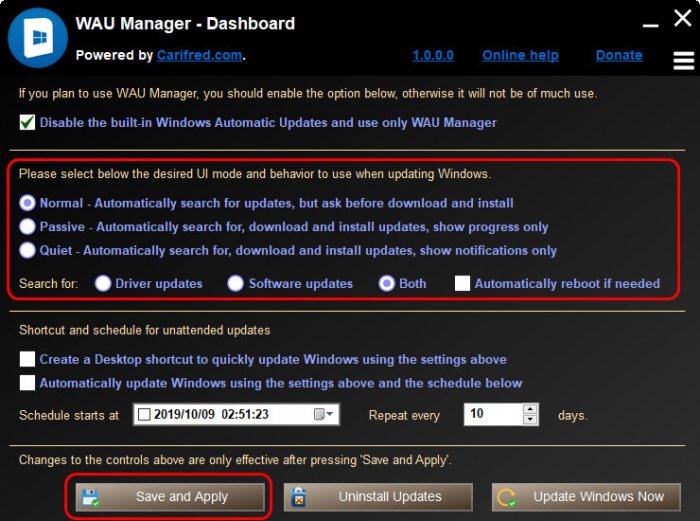
 Далее нам нужно выбрать режим поставки обновлений утилитой WAU Manager:
-
Normal – нормальный режим, при котором происходит автоматический поиск обновлений, но они не загружаются и не устанавливаются. Загрузку и установку мы производим вручную;
-
Passive — пассивный режим, при котором происходит автоматический поиск, загрузка и установка обновлений, и мы видим прогресс этих процессов;
-
Quiet – тихий режим, при котором происходит автоматический поиск, загрузка и установка обновлений, и мы видим только уведомления об этих процессах.
Ниже можем выбрать типы обновлений:
-
Driver updates — только драйверы;
-
Software updates – только ПО;
-
Both – и драйверы, и ПО.
Ну и кому нравится, когда компьютер без предупреждения вырубается для перезагрузки после обновления в самый не походящий для этого момент, может активировать галочку «Automatically reboot if needed». При любом внесении изменений применяем их кнопкой «Save and Apply».
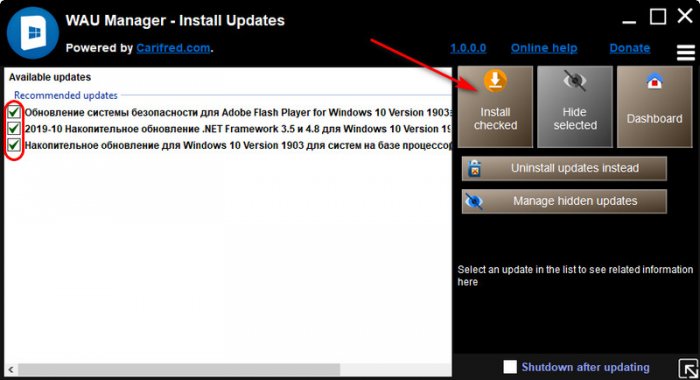
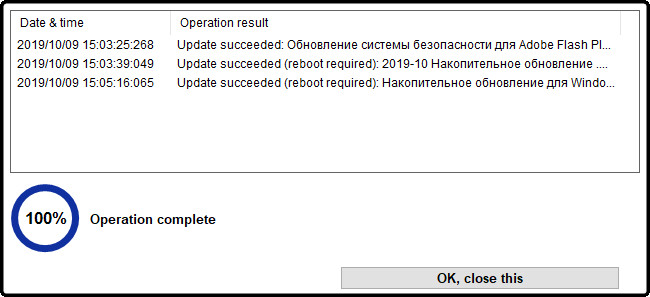
 Я оставляю все установки по умолчанию – нормальный режим и поиск типов обновлений как драйверов, так и ПО. И буду работать с установкой обновлений вручную. Жму кнопку «Update Windows Now».
 Все найденные обновления отмечены галочками для установки. Если что-то из найденного мы не хотим устанавливать, просто снимаем галочку этого обновления. Далее жмём «Install checked».
 Ожидаем завершения установки.
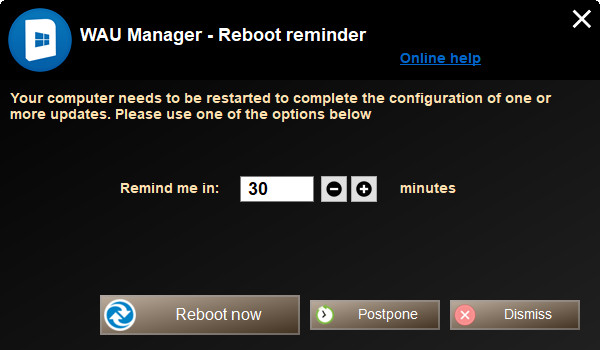
 При необходимости перезагрузки в таком вот окошке утилиты можем выбрать:
-
Remind me in – не перезагружаться сейчас, но напомнить об этом через указанное время, при этом далее следует нажать кнопку «Postpone»;
-
Reboot now – перезагрузиться прямо сейчас;
-
Dismiss – просто отменяем перезагрузку и перезагружаемся, когда нам заблагорассудится.

В нижнем блоке нам предлагаются ещё две функции:
-
Создание на рабочем столе ярлыка запуска поиска обновлений (в режиме Normal) или их автоматической установки (в режимах Passive и Quiet);
-
Планировщик установки обновлений.
При активации планировщика поиск, скачивание и установка обновлений будут происходит в автоматическом режиме. Но дату старта этой задачи и её периодику определяем мы в графах, соответственно, «Schedule starts at» и «Repeat every». Если какая-то из этих функций интересует, активируем её, настраиваем (в случае с планировщиком) и жмём кнопку «Save and Apply».
Чтобы удалить установленные обновления, в главном окне утилиты кликаем кнопку «Uninstall Updates».
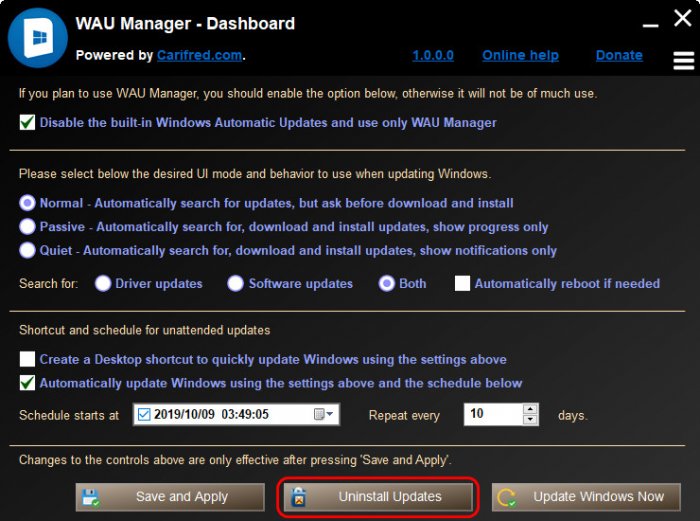 Отмечаем галочками апдейты для удаления и жмём кнопку «Uninstall checked».
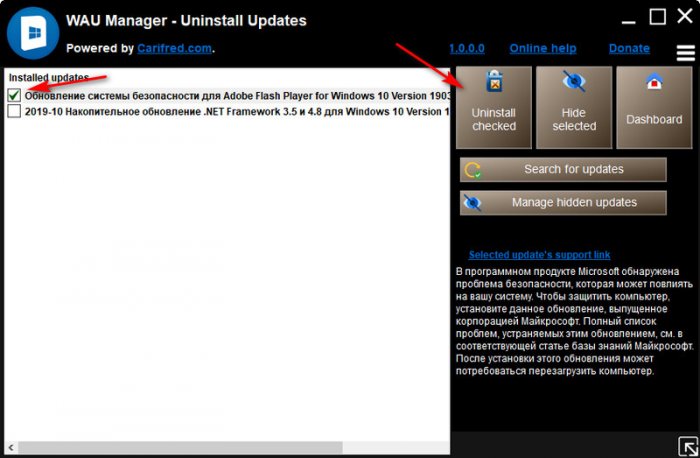 Утилита также позволяет скрывать обновления, которые нам не нужны, чтобы они впоследствии не путались в перечне с новыми. И может предложить очистку файлов установки уже установленных обновлений.
Update Manager for Windows – это сторонний менеджер управления обновлениями, с помощью которого можно их отключать, искать, скачивать, устанавливать в ручном режиме. Приложение являет собой незначительно изменённую реализацию другой утилиты Windows Update MiniTool, мы рассматривали её на страницах сайта. Она, увы, давно уже не обновлялась и в работе с обновлениями Windows 10 не эффективна в части их отключения. Собственно, в этой части и кроется основное отличие новой инкарнации утилиты. В Update Manager for Windows реализована дополнительная вкладка «Автообновление» с настройками блокировки автоматичного обновления.
Утилита существует в формате UWP-приложения для Windows 10, его можно бесплатно скачать в магазине Windows Store. Но в этом формате из-за отсутствия возможности запуска приложения с правами администратора мы не сможем воспользоваться функционалом отключения обновлений. Плюс, UWP-приложение не русифицировано. Я рекомендую использовать классическую реализацию утилиты (Win32) с GitHub.
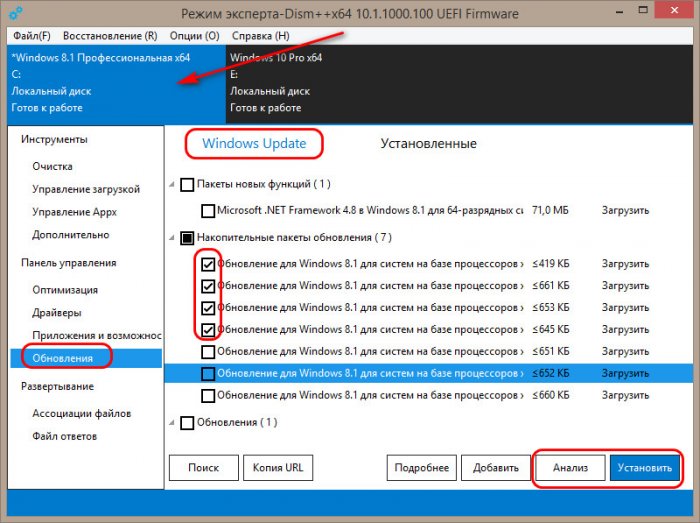
Программа Dism++ не требует представления для постоянных читателей сайта, у нас о ней, о работе с ней написано множество статей. Dism++ — это графический интерфейс штатного консольного средства для работы с образами Windows Dism. И, как и последнее, программа Dism++ умеет работать с интеграцией обновлений Windows – как в текущий её образ, т.е. установленную на компьютере операционную систему, так и в образ Windows, установленной на другом диске компьютера. Более того, Dism++ — это редактор дистрибутива Windows, и с помощью программы обновления можно внедрять в установочные образы системы. В ручном режиме с помощью Dism++ можно проводить поиск обновлений, их внедрение в Windows, а также при необходимости удаление.
В окне программы на панели вверху кликаем нужную Windows, если их несколько стоит на компьютере. Идём в раздел «Обновления». Во вкладке «Windows Update» жмём кнопку «Анализ». Жмём, пока отобразится список доступных обновлений. Далее галочками отмечаем все их или только отдельные. И жмём «Установить».
 Для удаления установленных обновлений переключаемся на вкладку «Установленные», отмечаем галочками ненужные обновления. И жмём «Удалить».
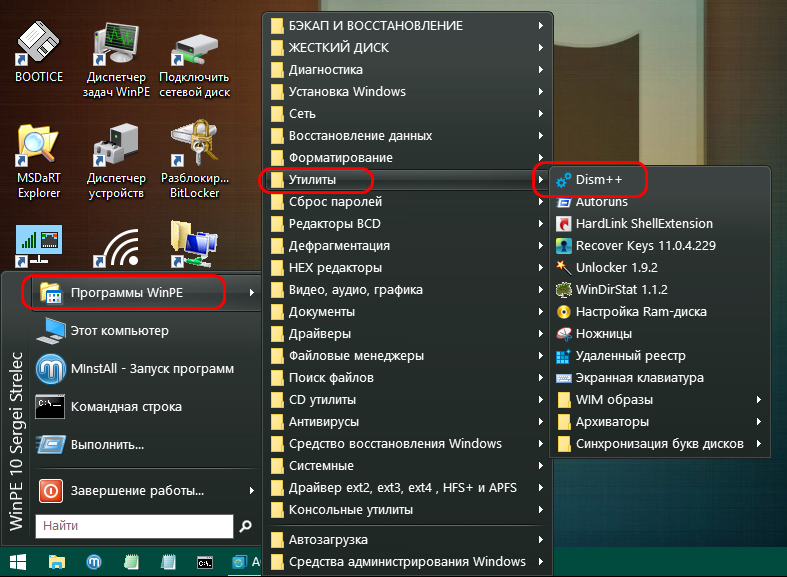
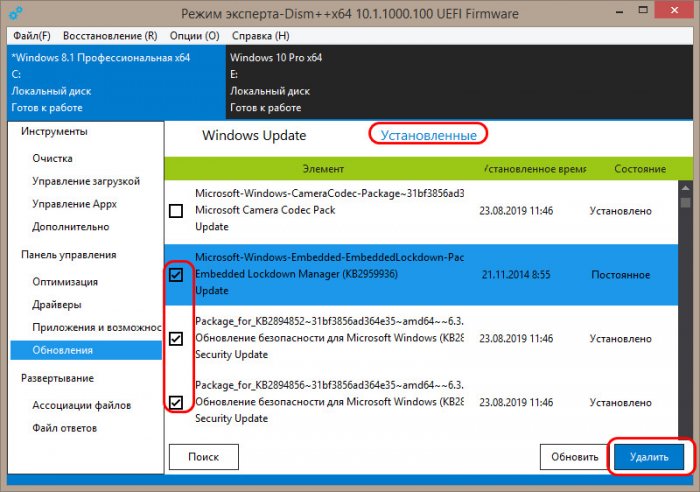 Примечательность программы Dism++ заключается, друзья, в том, что она присутствует в числе арсенала реанимационного LiveDisk’а by Sergei Strelec. Если после установки обновлений Windows и перезагрузки вместо её запуска будем лицезреть синий экран смерти, что, увы, иногда случается, можно будет загрузить компьютер с LiveDisk’а, открыть Dism++ и из перечня установленных обновлений удалить свежие. В числе которых будет и то, что повлекло за собой крах системы. И таким образом, возможно, можно будет восстановить работоспособность Windows.
Единственный нюанс: Dism++ не умеет отключать обновления Windows. Но для этих целей можно использовать бесплатные утилиты типа Win Updates Disabler или Wu10Man.
Portable Update – утилита для оффлайн-обновления Windows. Сама скачивает пакет обновлений с серверов Microsoft, сама определяет какие обновления нужны, и сама же их устанавливает. Детально о Portable Update.
Patchfluent – утилита для установки обновлений в Windows 10 и 11, являет собой альтернативу системному центру обновления в этих операционных системах. Детально о Patchfluent.
Skip to content
Hi everyone
Today I wanted to discuss small tips for making Windows Update via DISM.
The goal is that often on IoT terminal the Windows Update services is off and often not configured correctly, as the goal of IoT is often to create never changing terminal for a specific’s task. This kind of setup bring some headache sometime as to update it mean sometime when we put back on the Windows Update’s service, misconfiguration can happen.
The other goal is that often the image file is used to deploy such terminal, as such applying a patch offline to them help for future deployment.
Today I will talk the second’s goal.
DISM is a powerfull tool, but it’s to know it’s force that is a challenge.
To update a offline image the first step is to get the DISM that is shipped in the Windows Assessment and Deployment Kit (Windows ADK) (https://docs.microsoft.com/en-us/windows-hardware/get-started/adk-install)
After installing it we need to mount our WIM’s file with the /mount-wim command’s line.
dism /mount-wim /wimfile:”c:\en_windows_10_enterprise_2016_ltsb_x64_dvd_9059483\sources\install.wim” /mountdir:”c:\win10″ /index:1
After we add the package with /add-package
dism /image:”c:\win10″ /add-package /packagepath:”c:\patch\windows10.0-kb4576750-x64_c4e0b5e0f0835db971a40058aa17ae9a0d2f1e2a.msu”
After we need to commit the file back with /commit
dism.exe /Unmount-wim /mountdir:”c:\win10″ /commit
For reference if you see a DISM error #0x800f0823 it can mean you are using the wrong DISM, not the one provided with the ADK’s toolkit.
The error look like that;

That conclude today talk,
Thanks everyone !
Download Windows Speedup Tool to fix errors and make PC run faster
As a PC user, your pre-downloaded Windows 11/10 ISO image tends to get outdated due to Microsoft releasing cumulative updates monthly for the OS. Consequently, the computer then needs to download the latest updates manually each time you reinstall the OS. In this post, we show you how to add Windows Update Packages to Windows 11/10 ISO Image.
This can be done using a process called Slipstreaming. The slipstream process injects new updates to your downloaded Windows ISO image file – this way, you won’t need to download a complete image each time a new update is released.
We can add Windows Update Packages to Windows ISO Image in 3 ways. We’ll explore this topic under the methods outlined below in this section as follows.
1] Using DISM GUI tool

To add Windows Update Packages to Windows ISO Image using DISM GUI tool, do the following:
- Mount your Windows ISO to a drive letter. For the purposes of this tutorial, we assume the Windows 10 version is 21H1.
- Create a folder, example
D:\Win10ISOand copy the contents of the ISO to the folder. - Next, visit the Microsoft Update Catalog and get the Windows Update .msu or .cab packages.
- Depending on your OS architecture, search Microsoft Update Catalog using the phrase windows 10 version 21H1 x64 to find updates available for Windows 10 v21H1 64-bit. If you’re running 32-bit Windows, then use the
x86keyword instead ofx64. - Create a for example;
D:\v21H1 Updatesand download all the available updates to the folder.
Alternatively, you may use a third-party tool called WSUS Offline Updater to download the MSU packages pertaining to your computer.
- Next, download the DISM GUI tool and run the program as administrator.
- Next, create a folder, for example
D:\Mounted-WIMwhere you’re going to mount the install.wim file - In the DISM GUI tool, point the path to install.wim. In this example, the path would be
D:\Win10ISO\sources\install.wim.
Note: In the sources folder, if the file install.esd exists instead of install.wim, you’ll need to convert the ESD file to WIM format in order to service the image.
- Next, click the Display WIM Info button to view the indexes in the WIM file. For the purposes of this tutorial, we’ll choose Index: 6 for Windows 10 Pro.
- Next, select 6 in the Index drop-down box
- Next, in the Mount location, type in D:\Mounted-WIM.
- Click the Mount WIM button.
- Click on the Package Management tab in DISM GUI.
- Type in or browse to locate the packages folder. In this example, the Windows Update packages are stored under D:\v21H1 Updates.
- Click on the Add Packages button.
- Go back to the Mount Control tab, and click Dismount WIM.
- Click Yes when you’re asked to commit changes made to the WIM. Now, every available Windows Update package (*.msu and *.cab) in that folder will be integrated into the install.wim image.
- You can now delete the D:\Mounted-WIM and D:\v21H1 Updates folders manually.
You’ve now successfully updated your Windows Setup source or USB installation media. You can run Setup.exe now if you plan to do a Windows 10 repair installation or in-place upgrade of Windows 10. Or, you can point to the path of the updated install.wim if you want to run DISM mentioning the setup source path to fix any corruption in the system.
2] Using DISM console tool
To add Windows Update Packages to Windows ISO Image using DISM console tool, do the following:
- Press Windows key + R to invoke the Run dialog.
- In the Run dialog box, type cmd and then press CTRL + SHIFT + ENTER to open Command Prompt in admin/elevated mode.
- In the command prompt window, type the command below and hit Enter to get the WIM file info and its indexes.
dism.exe /Get-WimInfo /wimFile:"D:\Win10ISO\sources\install.wim"
- Next, to mount the install.wim image (index: 6) to the specified folder, run the command below:
dism.exe /Mount-WIM /WimFile:"D:\Win10ISO\sources\install.wim" /index:6 /MountDir:"D:\Mounted-WIM"
- Next, to add Windows Update Packages to the mounted WIM file, run the command below:
dism.exe /image:"D:\Mounted-WIM" /Add-Package /PackagePath:"D:\v21H1 updates"
- To verify that the packages appear correctly, run the command below:
Dism /Get-Packages /image:<path_to_image>
After reviewing done updating your image, you can now proceed to unmount the WIM file.
- To unmount the WIM file and to apply the changes (package addition or removal), run the command below:
dism.exe /Unmount-wim /mountdir:"D:\Mounted-WIM" /commit
- Exit CMD prompt.
3] Using NTLite
To add Windows Update Packages to Windows 11/10 ISO Image using NTLite, do the following:
- Mount the Windows ISO.
Alternatively, if you have the Windows installation USB media (instead of ISO) and want to update it, insert the USB drive instead.
- Create a folder, e.g.,
D:\W10-20H1-Setupand copy the contents of the mounted drive to the folder. - Next, download NTLite and install it.
- Launch the program.
- In the NTLite window, click Add > Image directory.
- Next, select the folder that contains the
install.wimimage you want to customize – e.g.,D:\W10-20H1-Setup\Sources.
Note: If the ISO/USB setup disk/mounted folder contains install.esd instead of install.wim, you’ll need to first convert the ESD file into WIM in order to service it.
- Next, select the edition of Windows 10 you want to slipstream. The Windows 11/10 ISO, downloaded from Microsoft, contains several Windows 10 editions in it.
- Right-click on the chosen edition and click Load.
- Click the Updates tab on the left.
- Click on the Add button and select Latest online updates.
- Next, select all the available updates from the list and click Enqueue. The Windows Update .msu files are now added to the update queue.
Unlike the other methods, you don’t need to manually download the .msu packages from the Microsoft Update Catalog.
- Once you add the updates to the update queue, click on the Apply button.
- Finally, click on the Process button to complete the integration process. NTLite will prompt you to disable the real-time antivirus protection to speed up the file copy process.
- When done, exit NTLite program.
That’s it on the 3 methods to add Windows Update Packages to Windows 11/10 ISO Image!
Obinna has completed B.Tech in Information & Communication Technology. He has worked as a System Support Engineer, primarily on User Endpoint Administration, as well as a Technical Analyst, primarily on Server/System Administration. He also has experience as a Network and Communications Officer. He has been a Windows Insider MVP (2020) and currently owns and runs a Computer Clinic.