Технология быстрой загрузки опирается на гибернацию: при включенной функции быстрого запуска, система при выключении сохраняет ядро Windows 10 и загруженные драйверы в файл гибернации hiberfil.sys, а при включении снова загружает его в память, т.е. процесс похож на выход из состояния гибернации.
Как отключить быстрый запуск Windows 10
Чаще пользователи ищут, как выключить быстрый запуск (быструю загрузку). Связано это с тем, что в некоторых случаях (часто причиной являются драйвера, особенно на ноутбуках) при включенной функции, выключение или включение компьютера происходит неправильно.
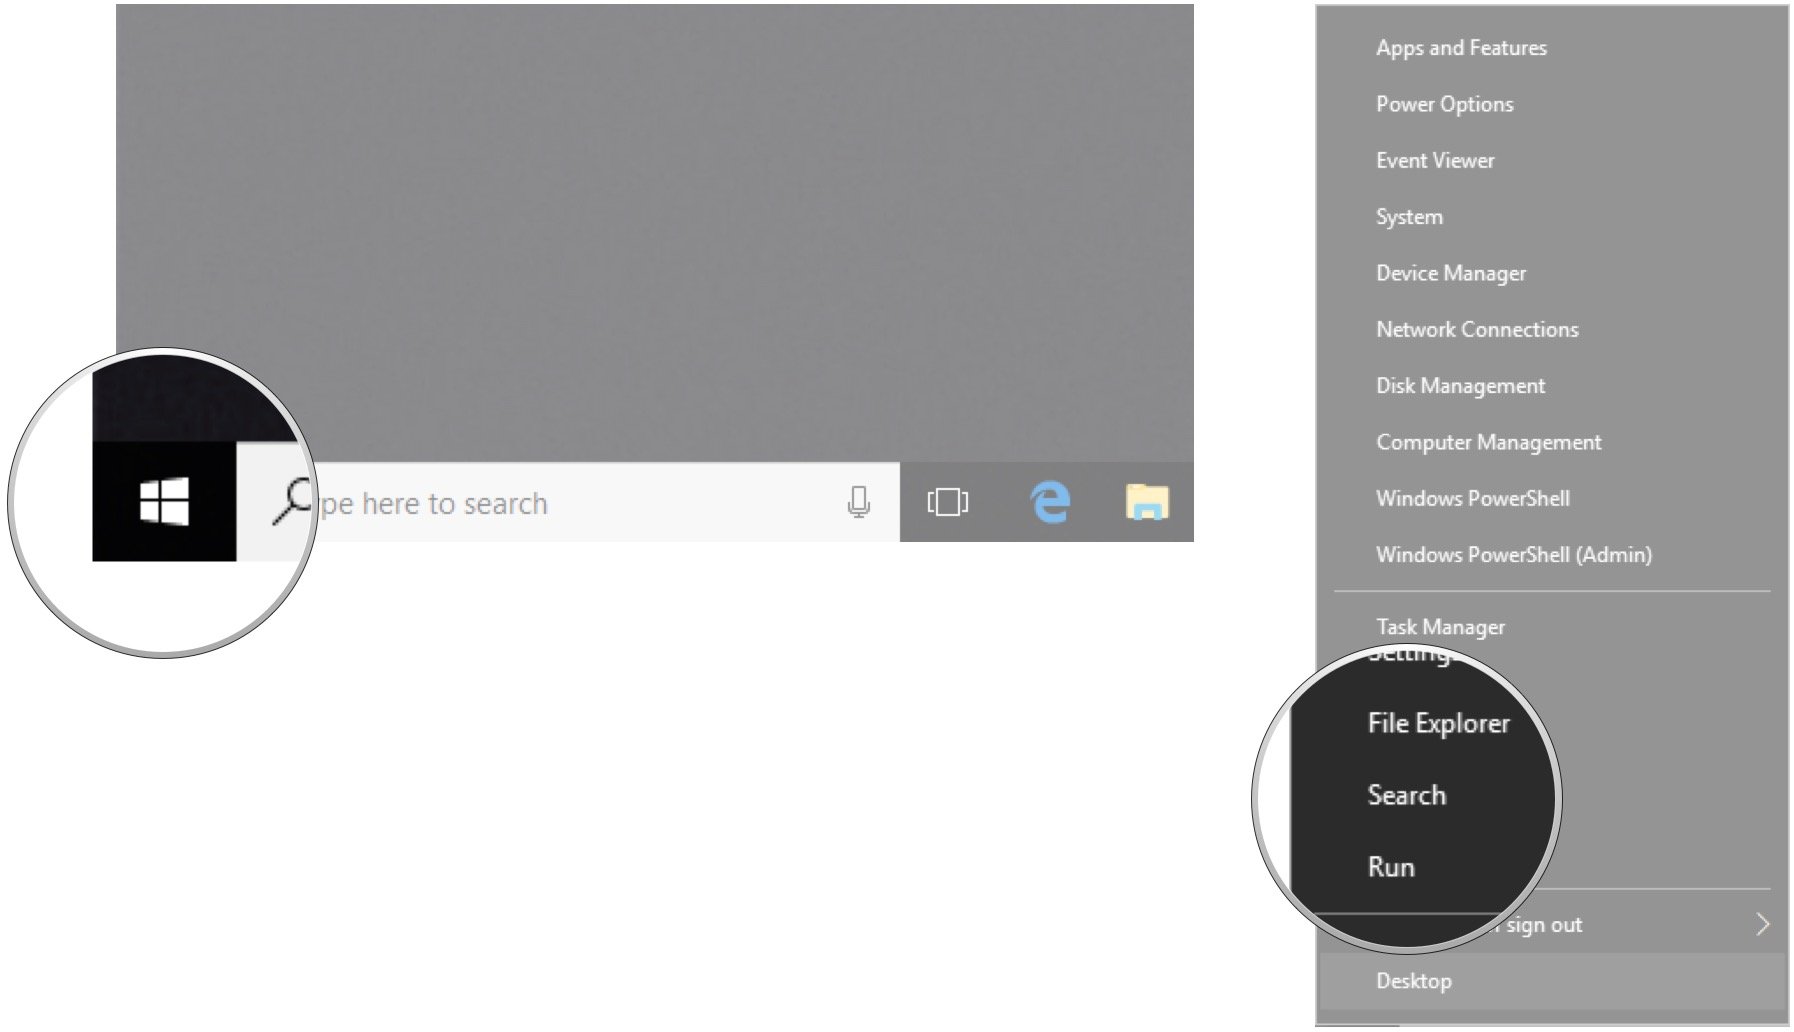
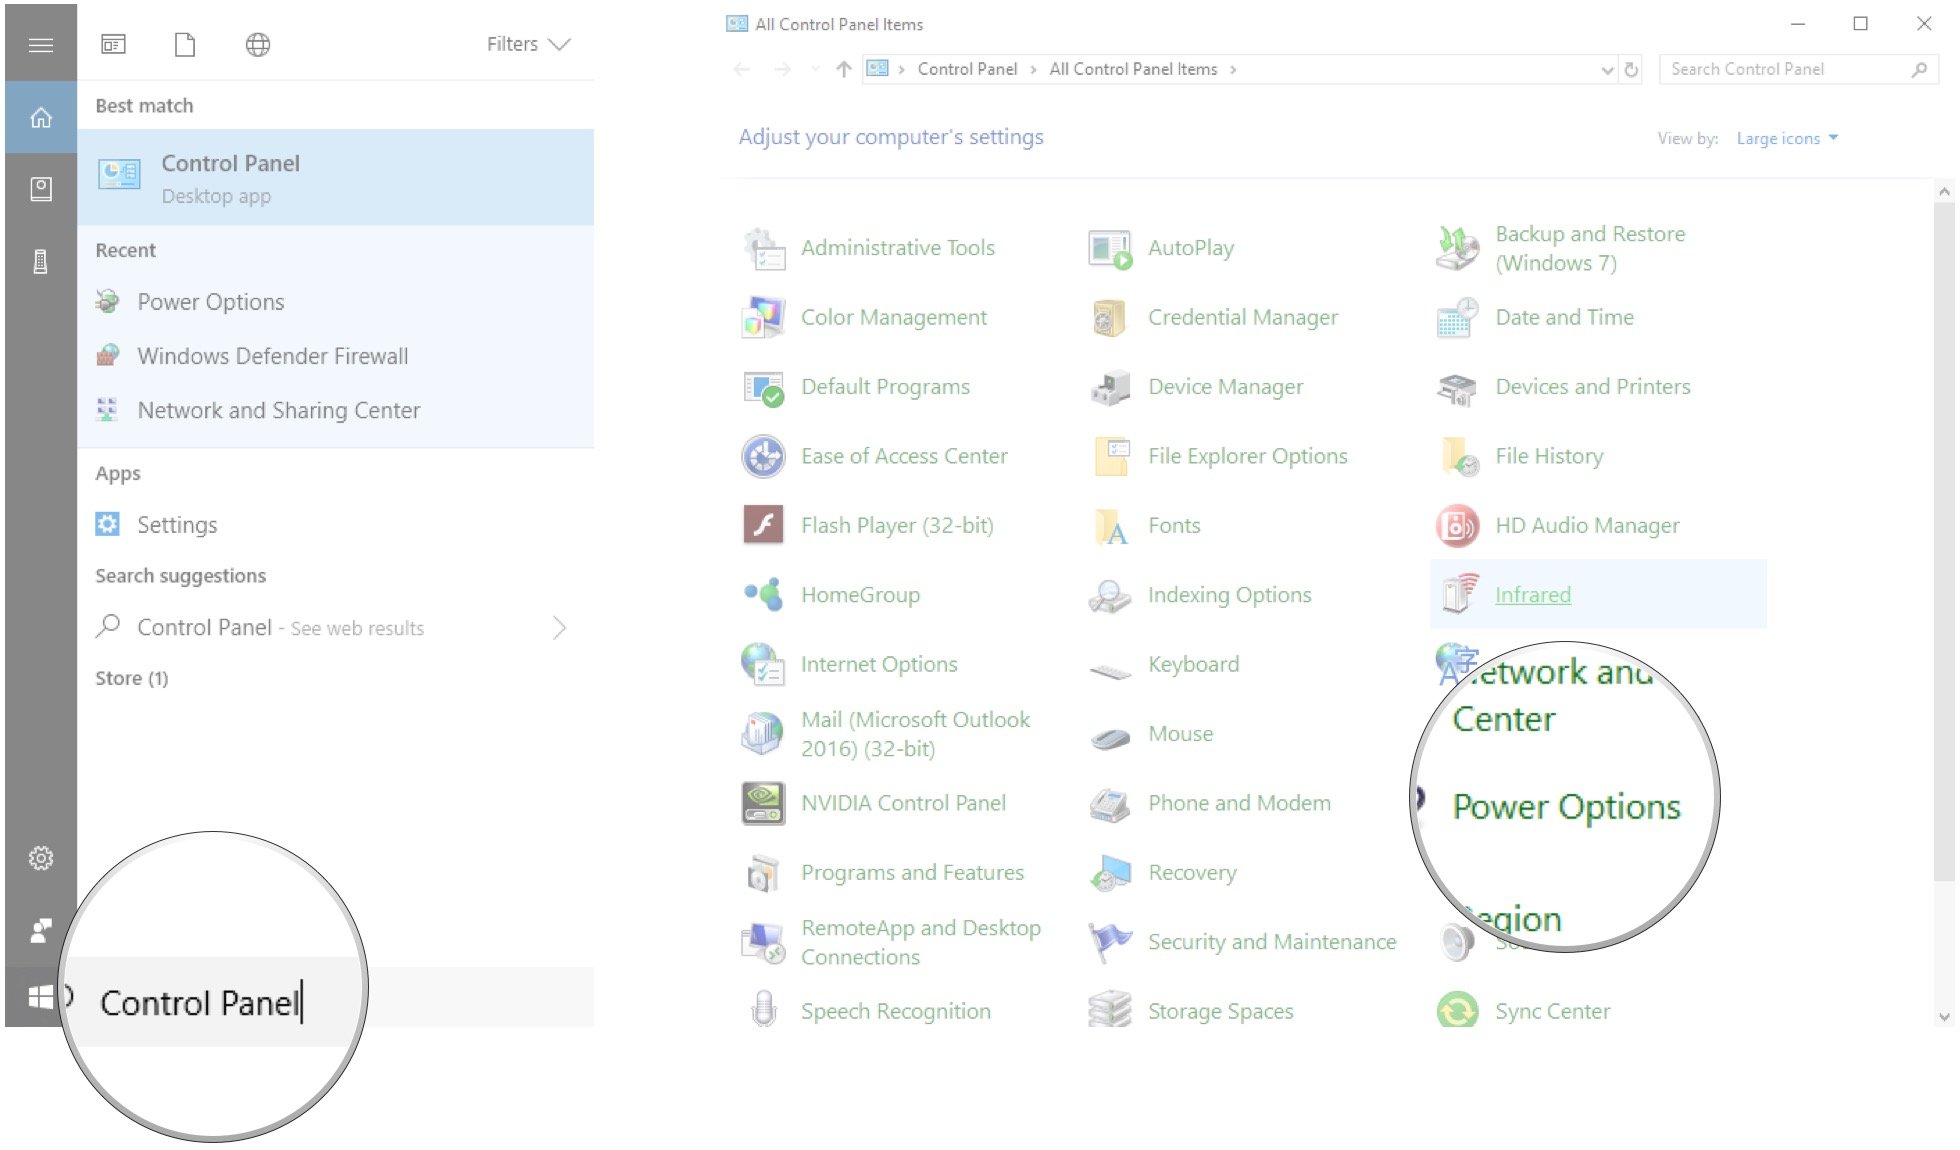
- Для отключения быстрой загрузки, зайдите в панель управления Windows 10 (через правый клик по пуску), после чего откройте пункт «Электропитание» (если его нет, в поле просмотр справа вверху поставьте «Значки» вместо «Категории».
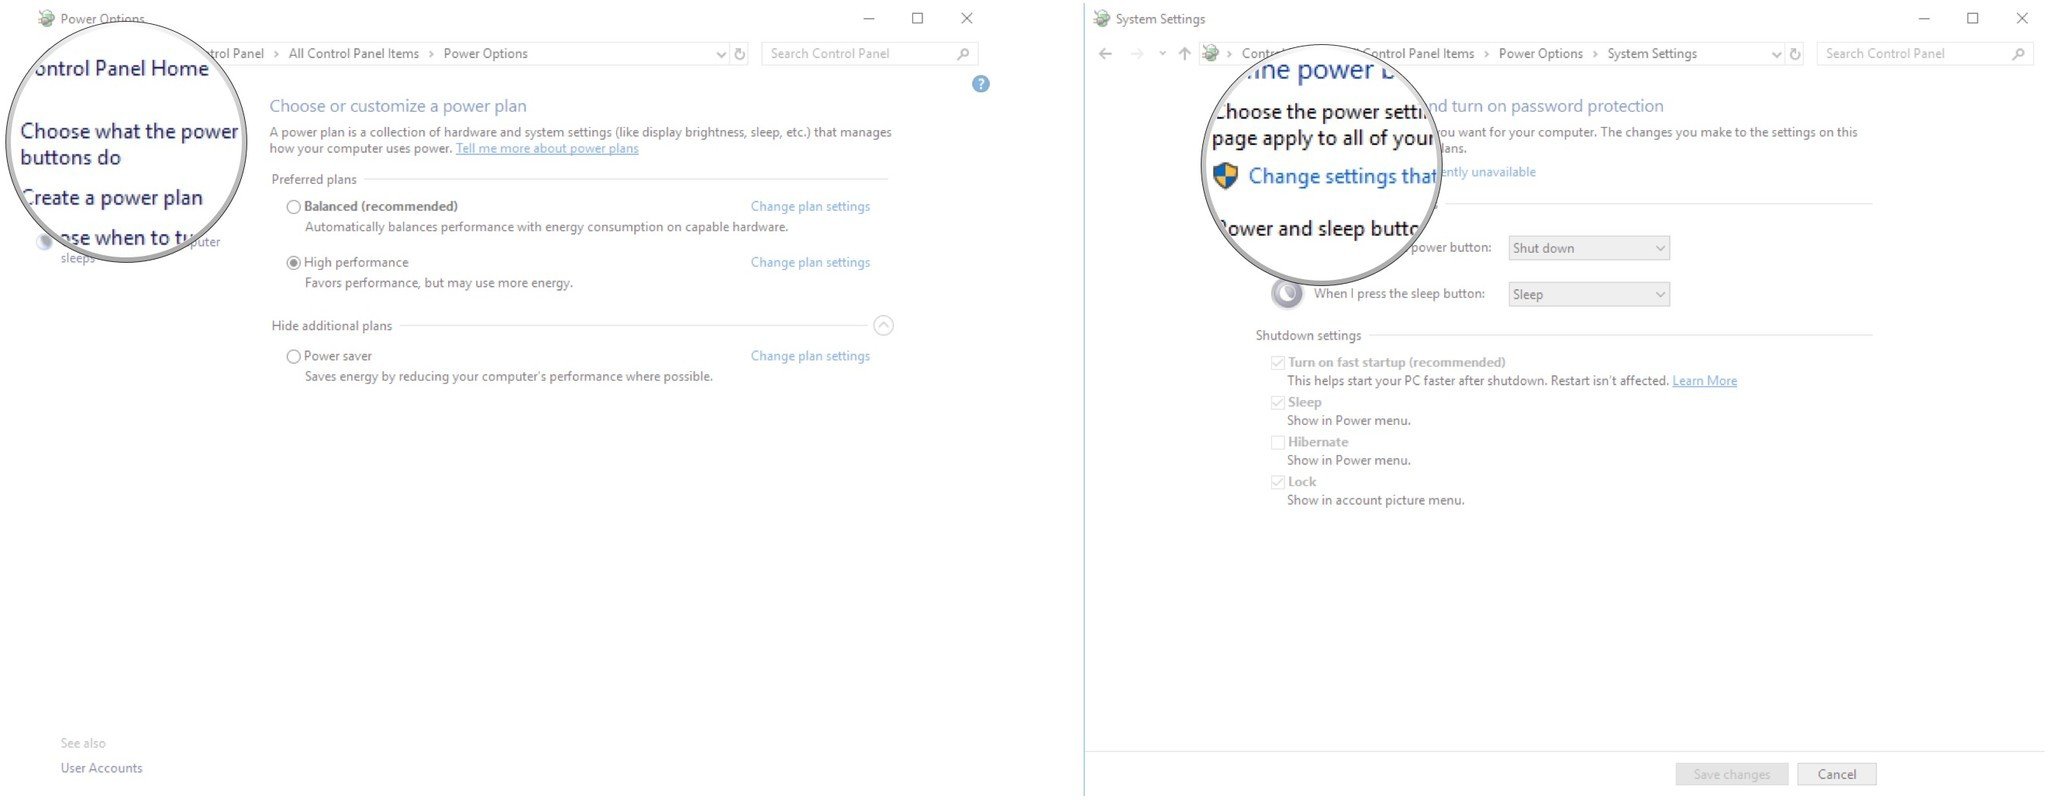
- В окне параметров электропитания слева выберите пункт «Действия кнопок питания».
- В открывшемся окне нажмите по «Изменение параметров, которые сейчас недоступны» (вы должны быть администратором для того, чтобы их изменить).
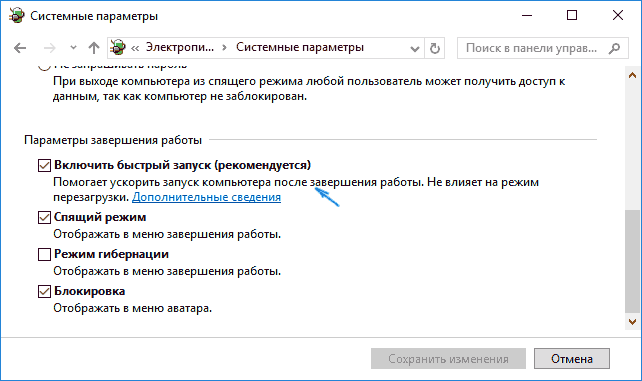
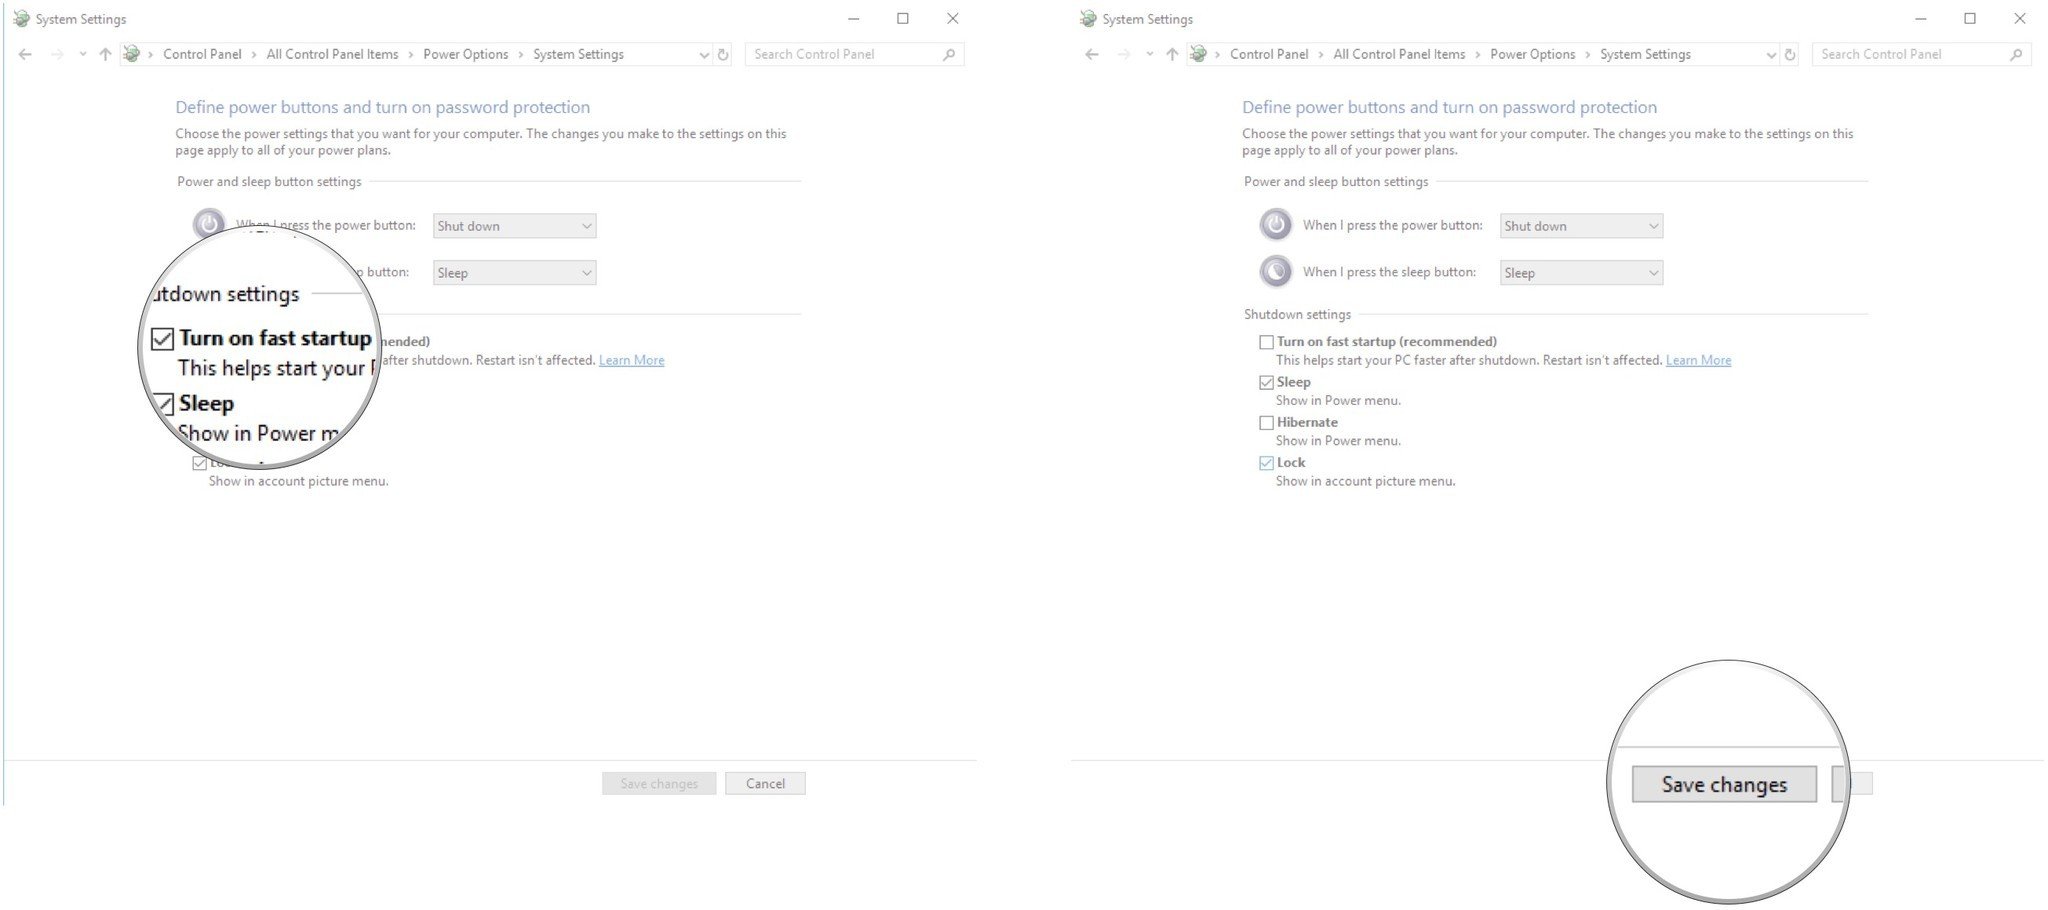
- Затем, внизу этого же окна, снимите отметку с «Включить быстрый запуск».
- Сохраните изменения.
Готово, быстрый запуск отключен.
Если вы не пользуетесь ни быстрой загрузкой Windows 10 ни функциями гибернации, то вы также можете отключить гибернацию (это действие само по себе отключает и быстрый запуск). Тем самым, можно высвободить дополнительное место на жестком диске, подробнее об этом в инструкции Гибернация Windows 10.
Кроме описанного способа отключения быстрого запуска через панель управления, этот же параметр можно изменить через редактор реестра Windows 10. За него отвечает значение HiberbootEnabled в разделе реестра
HKEY_LOCAL_MACHINE\SYSTEM\CurrentControlSet\Control\Session Manager\Power
(если значение равно 0, быстрая загрузка отключена, если 1 — включена).
Как отключить быстрый запуск Windows 10 — видео инструкция
Как включить быстрый запуск
Если вам, наоборот, требуется включить быстрый запуск Windows 10, вы можете сделать это тем же образом, что и выключение (как описано выше, через панель управления или редактор реестра). Однако, в некоторых случаях может оказаться так, что опция отсутствует или недоступна для изменения.
Обычно это означает, что ранее была выключена гибернация Windows 10, а для работы быстрой загрузки, ее требуется включить. Сделать это можно в командной строке, запущенной от имени администратора с помощью команды: powercfg /hibernate on (или powercfg -h on) с последующим нажатием Enter.
После этого вновь зайдите в параметры электропитания, как это было описано ранее, чтобы включить быстрый запуск. Если вы не пользуетесь гибернацией как таковой, но вам требуется быстрая загрузка, в упоминавшейся выше статье про гибернацию Windows 10 описан способ уменьшить файл гибернации hiberfil.sys при таком сценарии использования.
Если что-то, имеющее отношение к быстрому запуску Windows 10 осталось непонятным, задавайте вопросы в комментариях, я постараюсь ответить.
Fast startup is a feature first implemented in Windows 8 as Fast Boot and carried over to Windows 10 that allows your PC to start up more quickly, hence its name. While this handy feature can shave valuable seconds from your PC’s boot time by saving the operating system’s state to a hibernation file, Fast startup may not always work perfectly, prompting many to disable it when they get their hands on a new PC.
Let’s take a look at exactly how fast startup works, why you might want to enable or disable it, and how to do so.
What is fast startup?
Windows PCs typically operate in a number of Advanced Configuration and Power Interface (ACPI) power states. An S0 power state, for example, is when your PC is running and ready to respond to your input. There are a number of sleep states, including S1, S2, and S3, and there’s also a hybrid sleep state where hibernation is used in tandem with a sleep state.
Hibernation is considered an S4 power state. While hibernating, your PC will seem like it’s completely off, but there will be a saved hibernation file ready to be used to boot back to where you were during your last user session. Some power is usually still routed to peripherals so that you can, say, tap your keyboard and have the PC boot.
An S5 power state (soft off) is when your PC is shut down and rebooted completely. There’s no hibernation file and no saved user session. There is also a G3 power state, which is when your PC consumes absolutely no power and is completely turned off.
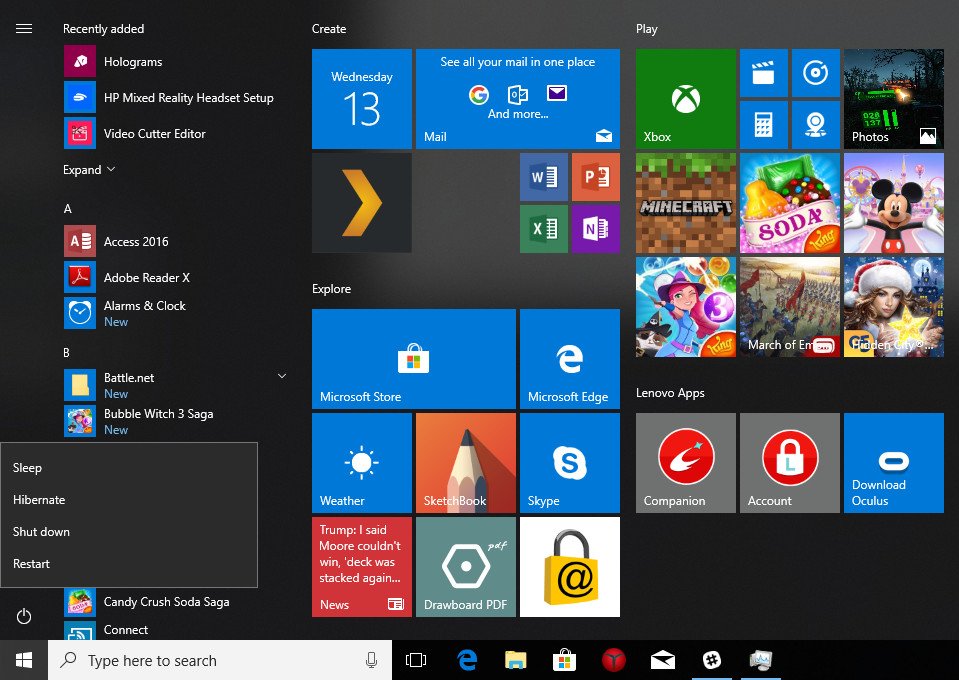
With fast startup enabled, choosing to shut down your PC might look like you’re completely shutting things down, but in reality, your PC is entering a mix between a shutdown and hibernation. A hibernation file is indeed used, although it is smaller than usual. Why? You’re logged off before the file is created, meaning your session is not recorded. The speed boost comes from the Windows kernel being saved on your hard drive and loaded when booting.
Is your PC truly shutting down?
While fast startup is a pretty harmless tool that can deliver a considerable startup speed boost, especially to PCs using hard-disk drives (HDD), some people prefer to have their PC truly shut down when they click the «Shut down» button on their PC.
In a post on the PC Master Race subreddit, a user pointed out that fast startup was re-enabled in a Windows 10 update following the release of the Fall Creators Update. Following the April 2018 Windows 10 update, Fast Startup was again re-enabled on my own PC, and it seems to have kicked in again following the May 2019 Update.
If you’re among the group of people who disable fast startup on their Windows 10 PC, you might want to recheck the settings to see if it’s still off.
Why disable fast startup?
Leaving fast startup enabled shouldn’t harm anything on your PC — it’s a feature built into Windows — but there are a few reasons why you might want to nevertheless disable it.
One of the major reasons is if you’re using Wake-on-LAN, which will likely have problems when your PC is shut down with fast startup enabled. Others would like to save the hard drive space that is usually taken up with the hibernation file, and Linux users will likely see complications with dual boot and virtualization. Furthermore, some users have even reported that power buttons on their keyboard will not work and fans in their PCs will continue spinning. These problems are by no means across the board, but they can prove to be frustrating. Finally, Windows 10 updates might not install properly if you have fast startup enabled.
And by not fully shutting down the system, fast startup can also interfere with some system updates that require a full shutdown. If you have fast startup enabled, a potential workaround would be to apply the updates by restarting, rather than shutting down, the system.
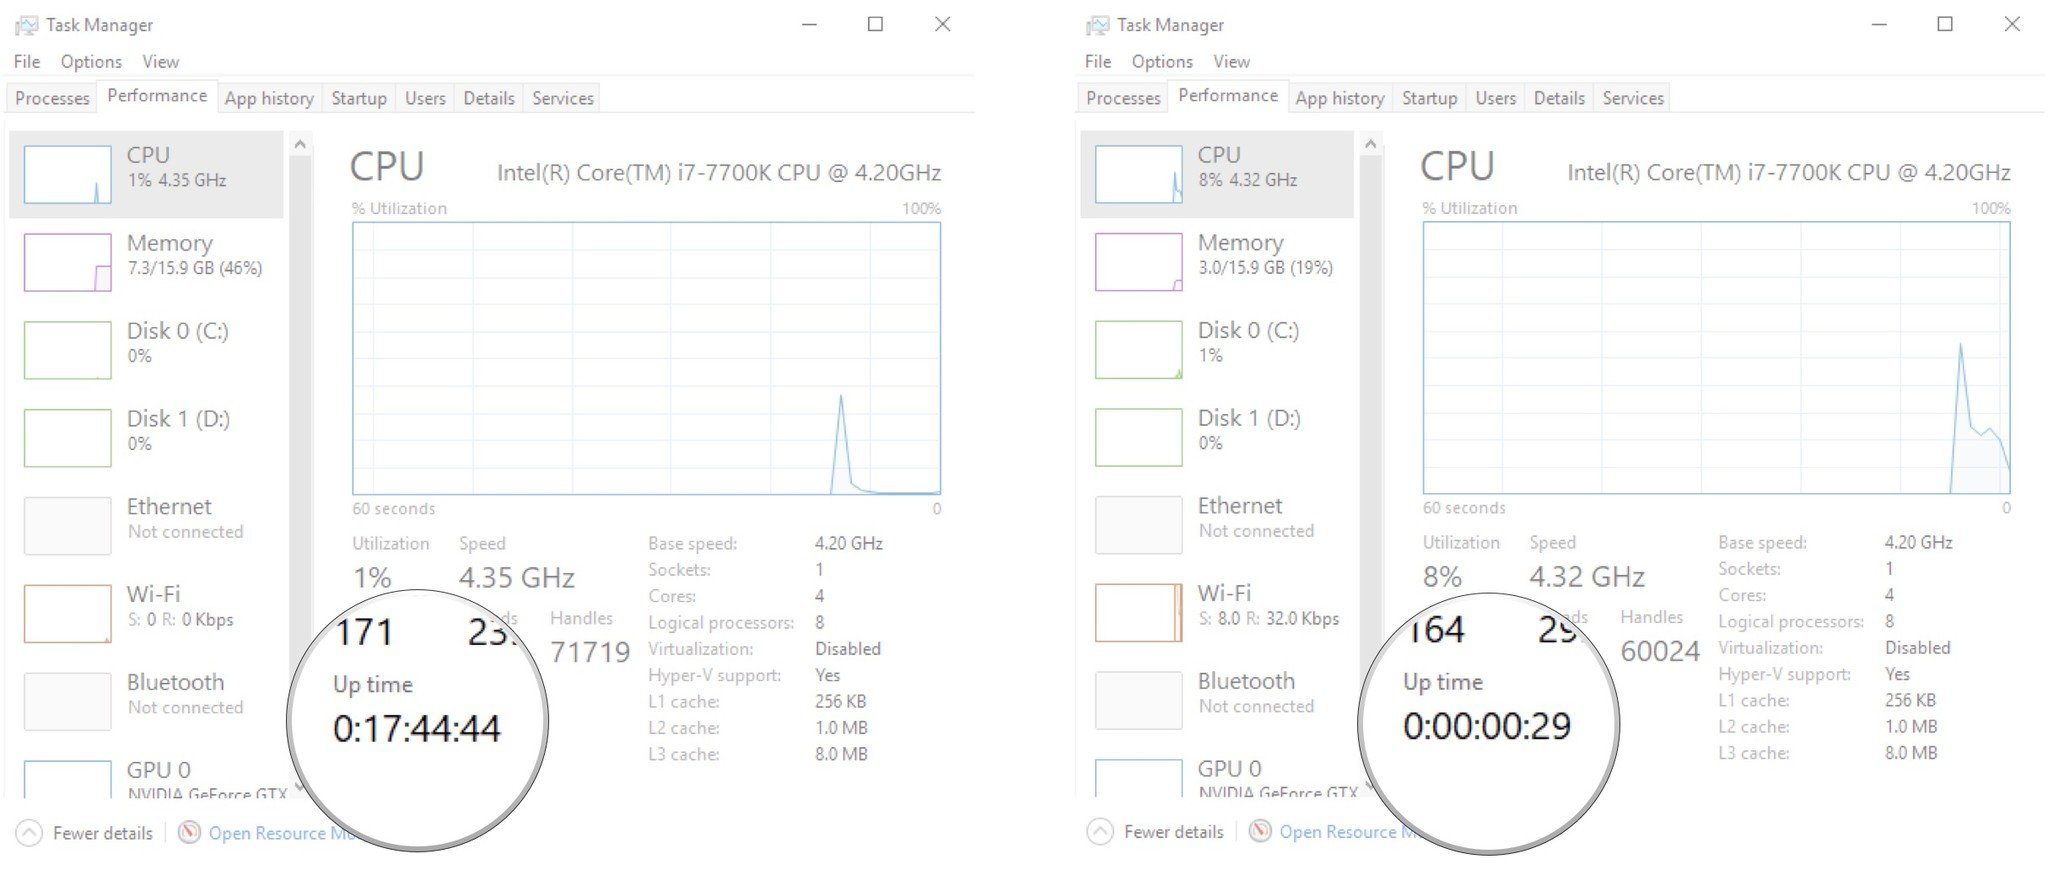
Your reason for disabling fast startup might simply have to do with wanting to see your PC truly shut down when you choose to shut down, especially when working with a speedy solid-state drive (SSD), or to have the processor (CPU) uptime reset after booting.
How to enable and disable fast startup on Windows 10
If you’d like to see how your PC performs without fast startup enabled, you can disable it in just a few steps:
- Right-click the Start button.
- Click Search.
- Type Control Panel and hit Enter on your keyboard.
- Click Power Options.
- Click Choose what the power buttons do.
- Click Change settings that are currently unavailable.
- Click Turn on fast startup (recommended) so that the checkmark disappears.
- Click Save changes.
If you want to re-enable fast startup at any point, simply repeat the steps so a checkmark appears next to Turn on fast startup.
Changing the size of your hiberation file
Alternatively, if you’re more concerned with device storage and not how fast startup may impact your laptop’s performance, you can also change the size of the stored hibernation file. Typically, these files can expand to several gigabytes, and you can reclaim this storage by typing in a simple command prompt by limiting how much space is allocated to the file.
By default, the hibernation file size will vary from system to system, but it is configured to take up to 75% of the installed RAM of your system.
To change the hibernation file’s storage size to about half of that, you’ll want to enter the Command Prompt menu as an Admin by hitting the Windows+X keys.
Once the Command Prompt dialogue appears, type: powercfg /h /type reduced
That will give you a reduced hibernation file size. If you want to reverse your action, you can type powercfg /h /type full
All the latest news, reviews, and guides for Windows and Xbox diehards.
Cale Hunt is formerly a Senior Editor at Windows Central. He focuses mainly on laptop reviews, news, and accessory coverage. He’s been reviewing laptops and accessories full-time since 2016, with hundreds of reviews published for Windows Central. He is an avid PC gamer and multi-platform user, and spends most of his time either tinkering with or writing about tech.
As IT professionals and Managed Service Providers (MSPs), understanding and controlling system features is a part of the job. Fast Startup (also known as Hiberboot or Fast Boot) in Windows 10 and Windows Server 2016, while generally beneficial, may sometimes require to be turned off. In this post, we delve into what Fast Startup is, its implications, how to disable it manually or via PowerShell, and the differences between Fast Startup and Hibernation.
Understanding Fast Startup
Fast Startup, or Hiberboot, works by saving an image of the loaded Windows kernel and drivers into the hiberfile (hiberfil.sys) before a computer shuts down. Upon restarting, Windows uses this image to speed up the boot time, creating a better user experience.
Potential Complications with Fast Startup
However, Fast Startup can present challenges in certain situations:
- Dual Boot Systems: Fast Startup can cause disk errors or data loss if another operating system accesses the Windows partition.
- System Maintenance: IT professionals might encounter difficulties when performing system updates or maintenance tasks.
- Hardware Changes: Fast Startup might not recognize new hardware changes made during shutdown.
To disable Fast Startup manually, follow these steps:
- Navigate to the Control Panel and select ‘Power Options.’
- Choose ‘Choose what the power buttons do.’
- Click on ‘Change settings that are currently unavailable.’
- Under ‘Shutdown settings,’ uncheck the ‘Turn on fast startup’ box.
Fast Startup vs. Hibernation
Fast Startup and hibernation are similar but serve different purposes. Hibernation saves an image of your work and shuts down your computer, while Fast Startup only saves an image of the system kernel and loaded drivers to reduce boot time.
The Impact of Disabling Fast Startup
Disabling Fast Startup may result in slightly longer boot times. However, the impact is usually negligible on modern systems with fast solid-state drives (SSDs).
Troubleshooting After Disabling Fast Startup
Should you encounter problems after disabling Fast Startup, you can:
- Check for Windows Updates: Ensure that your system is up to date.
- Check for Driver Updates: An outdated driver might be causing issues.
- Re-enable Fast Startup: If problems persist, you might want to re-enable Fast Startup and seek professional assistance.
How to Disable Fast Startup Using PowerShell
For professionals preferring automation, here’s a PowerShell script that checks for administrative privileges and modifies the registry to disable Fast Startup:
<#
.SYNOPSIS
    Disable Windows Fast Boot, also known as Hiberboot or Fast Startup.
.DESCRIPTION
    Disable Windows Fast Boot, also known as Hiberboot or Fast Startup.
.EXAMPLE
    No parameter needed.
    Disables Windows Fast Boot
.OUTPUTS
    None
.NOTES
    Minimum OS Architecture Supported: Windows 10, Windows Server 2016
    Release Notes:
    Initial Release
    (c) 2023 NinjaOne
    By using this script, you indicate your acceptance of the following legal terms as well as our Terms of Use at https://www.ninjaone.com/terms-of-use.
    Ownership Rights: NinjaOne owns and will continue to own all right, title, and interest in and to the script (including the copyright). NinjaOne is giving you a limited license to use the script in accordance with these legal terms.
    Use Limitation: You may only use the script for your legitimate personal or internal business purposes, and you may not share the script with another party.
    Republication Prohibition: Under no circumstances are you permitted to re-publish the script in any script library or website belonging to or under the control of any other software provider.
    Warranty Disclaimer: The script is provided “as is” and “as available”, without warranty of any kind. NinjaOne makes no promise or guarantee that the script will be free from defects or that it will meet your specific needs or expectations.
    Assumption of Risk: Your use of the script is at your own risk. You acknowledge that there are certain inherent risks in using the script, and you understand and assume each of those risks.
    Waiver and Release: You will not hold NinjaOne responsible for any adverse or unintended consequences resulting from your use of the script, and you waive any legal or equitable rights or remedies you may have against NinjaOne relating to your use of the script.
    EULA: If you are a NinjaOne customer, your use of the script is subject to the End User License Agreement applicable to you (EULA).
#>
[CmdletBinding()]
param ()

begin {
    function Test-IsElevated {
        $id = [System.Security.Principal.WindowsIdentity]::GetCurrent()
        $p = New-Object System.Security.Principal.WindowsPrincipal($id)
        $p.IsInRole([System.Security.Principal.WindowsBuiltInRole]::Administrator)
    }
}
process {
    if (-not (Test-IsElevated)) {
        Write-Error -Message "Access Denied. Please run with Administrator privileges."
        exit 1
    }

    $Path = "HKLM:\SYSTEM\CurrentControlSet\Control\Session Manager\Power"
    $Name = "HiberbootEnabled"
    $Value = "0"

    try {
        if (-not $(Test-Path $Path)) {
            New-Item -Path $Path -Force | Out-Null
            New-ItemProperty -Path $Path -Name $Name -Value $Value -PropertyType DWord -Force | Out-Null
        }
        else {
            New-ItemProperty -Path $Path -Name $Name -Value $Value -PropertyType DWord -Force | Out-Null
        }
    }
    catch {
        Write-Error $_
        Write-Host "Failed to disable Fast Boot."
        exit 1
    }
    exit 0
}
end {}
Access over 300+ scripts in the NinjaOne Dojo
Get Access
In conclusion, Fast Startup, while a beneficial feature, might not be ideal in specific IT scenarios. Understanding this feature and knowing when and how to disable it manually or via PowerShell can prove essential in maintaining a stable and robust IT infrastructure. By comprehensively understanding and managing Fast Startup, IT professionals, and MSPs can mitigate potential risks while ensuring efficient system performance.
NinjaOne can streamline your operations by automating repetitive and time-consuming tasks. Its user-friendly interface allows technicians of all levels to easily apply automation across endpoints, including custom scripts from an extensive library, making remediation simple and intuitive. As Crossroads Church’s Chris Hesler noted, «NinjaOne has helped us…cut back on the man hours…we are able to bring more automation with the script library to solve our recurring issues.» Discover the transformative power of automation in your IT operations with NinjaOne, a tool designed with flexibility and intuitiveness at its core.
Способ 1: Настройки системы
В некоторых случаях может возникать необходимость отключения функции «Быстрого запуска» в Windows 10, например, с целью обхода многих ошибок. Наиболее простой способ выполнения данной задачи сводится к изменению отдельного системного параметра в глобальных настройках электропитания.
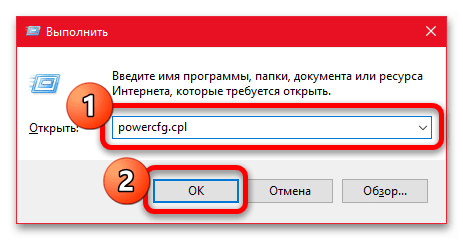
- Открыть раздел с параметрами электропитания можно многими способами, используя иконку батареи в трее на ноутбуках или соответствующие категории в «Параметрах» Windows 10. При этом мы рекомендуем воспользоваться более простым решением — нажать сочетание клавиш «WIN+R», ввести указанную ниже команду и подтвердить переход с помощью «Enter» или «ОК».
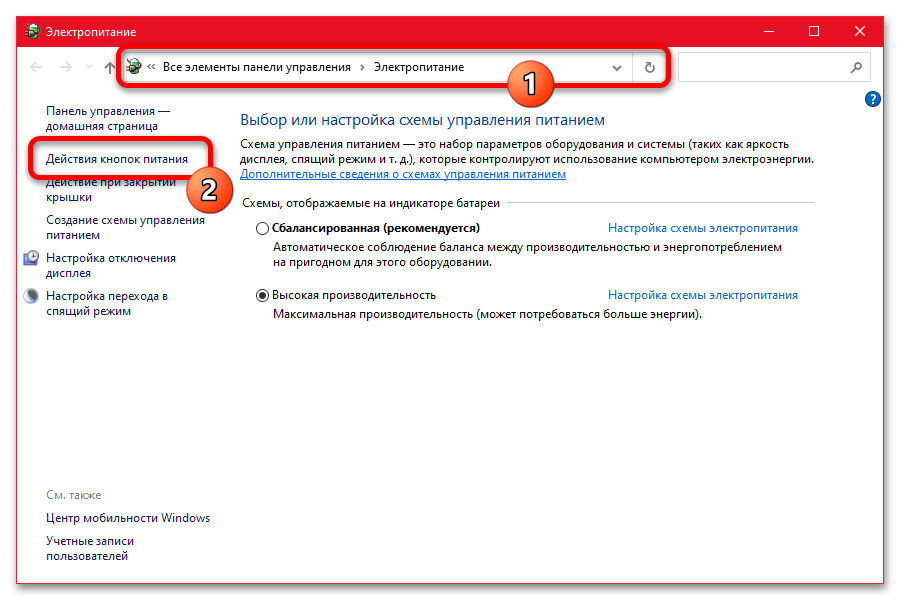
powercfg.cpl - При появлении окна «Электропитание» в левой колонке воспользуйтесь ссылкой «Действия кнопок питания». Здесь, в свою очередь, можно сразу найти нужный пункт настроек в категории «Параметры завершения работы».
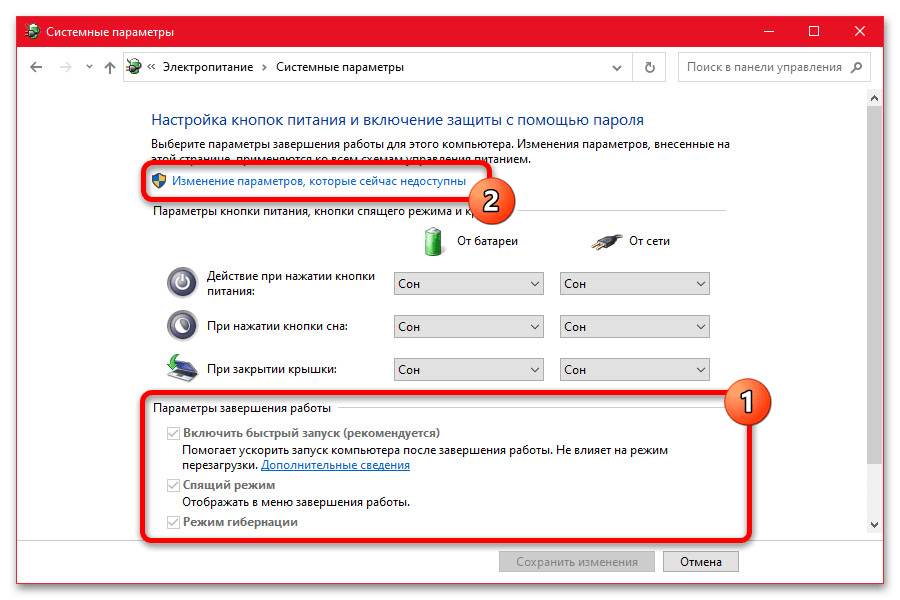
- Как правило, ни одна опция в отмеченном разделе по умолчанию недоступна для изменения из-за особенностей системы. Чтобы это исправить, достаточно будет воспользоваться ссылкой «Изменение параметров, которые сейчас недоступны» в блоке «Настройки кнопок питания и включение защиты с помощью пароля».
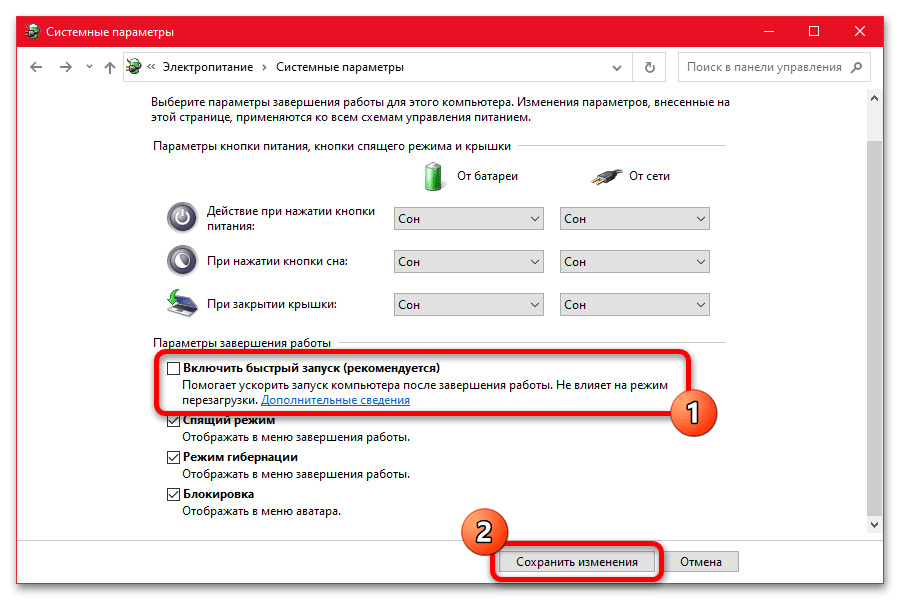
- Разобравшись с разблокировкой дополнительных возможностей, снимите галочку «Включить быстрый запуск», чтобы деактивировать функцию. После этого обязательно воспользуйтесь кнопкой «Сохранить изменения», чтобы новые параметры моментально вступили в силу.
Если все было сделано четко по инструкции, быстрый запуск будет деактивирован. Для проверки можете перезапустить компьютер, открыть вкладку «Производительность» в «Диспетчере задач» и ознакомиться с данными «Времени работы», которые теперь обновляются при каждом выключении системы.
Способ 2: Изменение реестра
Единственным альтернативным решением, если у вас по каким-то причинам не получается отредактировать настройки через графический интерфейс Windows 10, является параметр в реестре. При этом изменения, как и ранее, применяются моментально сразу после сохранения нового значения.
Читайте также: Как открыть «Редактор реестра» в Windows 10
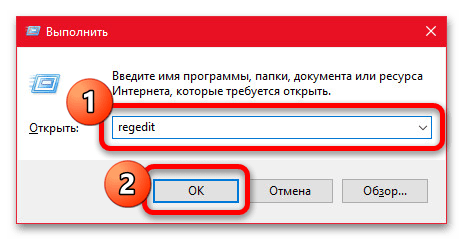
- Для открытия редактора реестра можно воспользоваться соответствующим значком в меню «Пуск» или нажать «WIN+R» и ввести указанную ниже команду. Какой бы из способов вы не выбрали, должно открыться новое окно с говорящим заголовком.
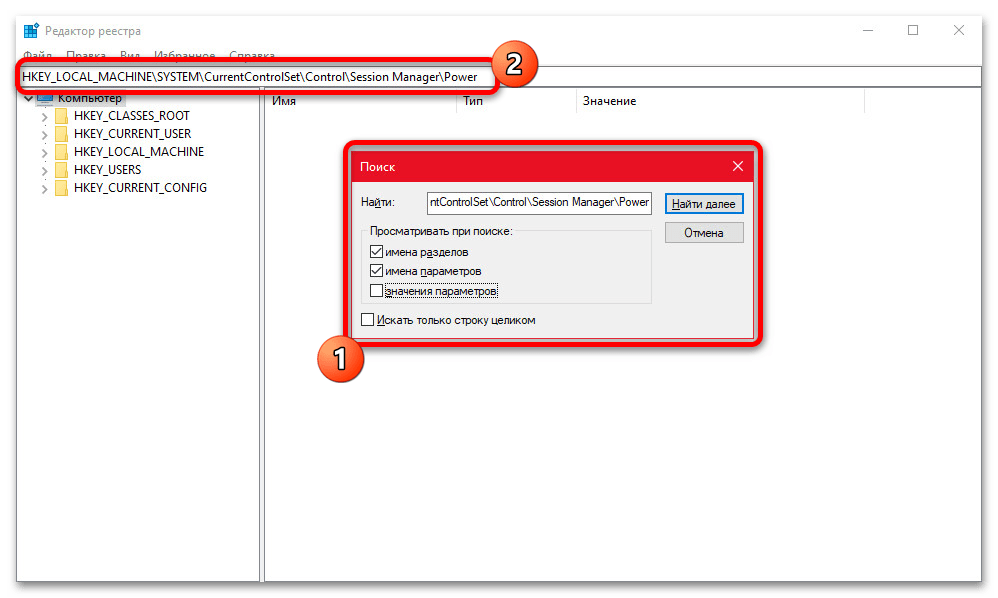
regedit - Из всех записей реестра необходимо изменить один единственный параметр, расположенный в категории «Power» по указанному ниже пути. Для удобства можете использовать встроенный поиск, доступный при нажатии «CTRL+F», или ввести полный адрес в отмеченное нами поле и нажать «ENTER».
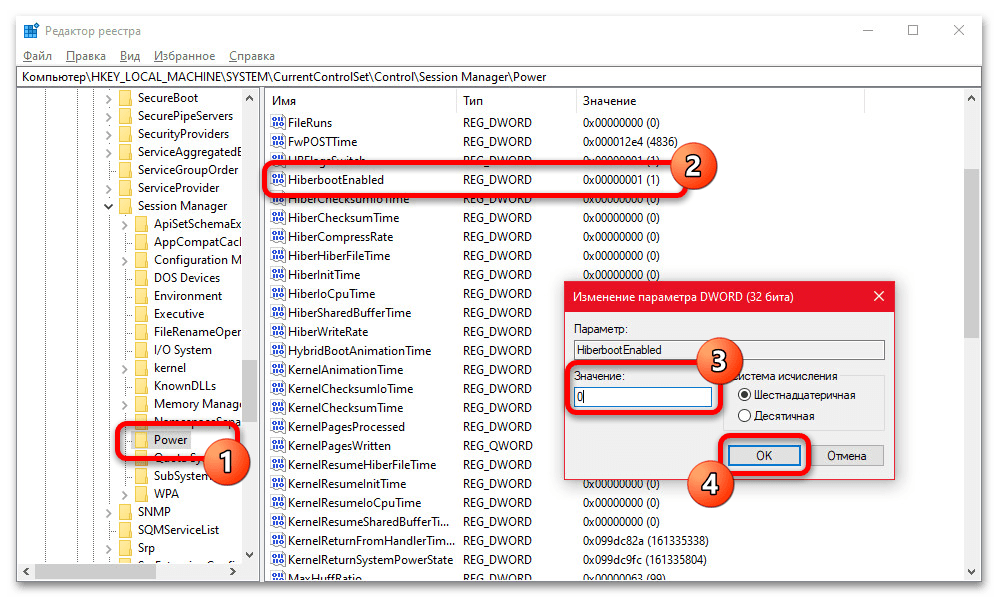
HKEY_LOCAL_MACHINE\SYSTEM\CurrentControlSet\Control\Session Manager\Power - В правой части рабочего окна редактора реестра найдите параметр «HiberbootEnabled», дважды кликните левой кнопкой мыши для изменения и в качестве значения установите «0». После нажатия кнопки «ОК» новые настройки вступят в силу и отразятся на следующем запуске.
С целью проверки, как и ранее, можете произвести полный перезапуск системы с использованием пункта «Завершение работы». При этом на компьютерах с жестким диском частичным показателем может также стать время включения, которое без быстрого запуска значительно увеличивается.
Еще статьи по данной теме:
Помогла ли Вам статья?
- To disable Fast Startup on Windows 11, open Control Panel System > Hardware and Sound > Power Options > Choose what the power button does, click on “Change settings that are currently unavailable,” turn off “Fast Startup,” and click “Save.”
- Alternatively, open Command Prompt (admin) and run the “powercfg /h off” command to disable Windows 11 Fast Startup.
- It’s also possible to disable Fast Startup with the Registry or Group Policy Editor.
On Windows 11 (and 10), you can disable “Fast Startup” in at least two ways through the Control Panel Power Options settings or Command Prompt, and in this guide, you will learn how.
Fast Startup is a power-related feature that allows your computer to boot faster, combining hibernation and regular shutdown to accomplish quicker system startup. In other words, when the feature is enabled, the system saves the kernel, drivers, and system state to the hibernation (hiberfil.sys) file, and then the computer turns off, but without saving your desktop session and running apps. When the computer turns on, the system will load the contents from the hibernation file to resume more quickly.
Although it’s a useful feature to get to the desktop faster, Fast Startup may also cause problems. For instance, it can cause conflicts when installing updates, managing storage devices with encryption, or in dual-boot systems since it won’t allow you to access the drive from the other setup. In some systems, you may not even be able to access the motherboard’s firmware (UEFI or BIOS) if Fast Startup is enabled.
Whatever the problem might be, on Windows 11 or even on Windows 10, you can turn Fast Startup on or off through Control Panel or Command Prompt.
This guide will teach you how to enable or disable the Fast Startup feature on Windows 11 (or 10).
- Disable Fast Startup on Windows 11
- Disable Fast Startup on Windows 11 from Command Prompt
- Disable Fast Startup on Windows 11 from Group Policy
- Disable Fast Startup on Windows 11 from Registry
To disable Windows 11 “Fast Startup,” use these steps:
-
Open Start on Windows 11.
-
Search for Control Panel and click the top result to open the app.
-
Click on Hardware and Sound (in the “Category” view).
-
Click on Power Options.
-
Click the “Choose what the power button does” option from the left pane.
-
Click the “Change settings that are currently unavailable” option.
-
Uncheck the “Turn on fast startup” option to disable the feature on Windows 11.
-
(Optional) Check the “Turn on fast startup” option to enable the feature.
Once you complete the steps, the feature that allows the operating system to boot faster will be disabled.
Disable Fast Startup on Windows 11 from Command Prompt
To disable Fast Startup from Command Prompt on Windows 11, use these steps:
-
Open Start.
-
Search for Command Prompt (or PowerShell), right-click the top result and select the Run as administrator option.
-
Type the following command to disable Fast Startup on Windows 11 and press Enter:
powercfg /h off
-
(Optional) Type the following command to enable Fast Startup on Windows 11 and press Enter:
powercfg /h on
After you complete the steps, the command will instruct the system to disable Fast Startup on Windows 11 (or 10).
Disable Fast Startup on Windows 11 from Group Policy
To disable Fast Startup from Group Policy, use these steps:
-
Open Start.
-
Search for gpedit.msc, and click the top result to open the Local Group Policy Editor.
-
Browse the following path:
Computer Configuration > Administrative Templates > System > Shutdown
-
Double-click the “Require use of fast startup” policy.
-
Select the Disabled option.
-
Click the Apply button.
-
Click the OK button.
Once you complete the steps, the operating system will no longer use Faster Startup.
Disable Fast Startup on Windows 11 from Registry
To turn off Fast Startup from Registry on Windows 11, use these steps:
-
Open Start.
-
Search for regedit and click the top result to open the Registry.
-
Navigate to the following path:
HKEY_LOCAL_MACHINE\SYSTEM\CurrentControlSet\Control\Session Manager\Power
-
Right-click the HiberbootEnabled key and select the Modify option.
-
Change the value from 1 to 0 to disable Fast Startup.
-
Click the OK button.
-
Restart the computer.
After you complete the steps, the Fast Start feature will be disabled on the computer.
FAQ
Should I disable Fast Startup on Windows 11?
You should only disable Fast Start when it is causing problems with updates, conflicting with apps, or you plan to set up a dual-boot system. Otherwise, you should keep the feature enabled.
Is it OK to disable Fast Startup on Windows 11?
Yes, it’s OK to disable Fast Startup on Windows 11. However, you need to consider the performance impact without using the feature.
How do I permanently disable Fast Startup?
When disabling Fast Startup using any of the available methods, you will have to enable it again manually. The easiest way to turn off the feature is from the “Power Options” settings in Control Panel.


