How to Access Device Manager From the Command Prompt
Use Command Prompt to open Device Manager with this trick
Updated on September 22, 2022
What to Know
- The Device Manager run command is handy to know for starting the Device Manager, updating drivers, and more.
- Enter devmgmt.msc into Command Prompt.
- You can also open Device Manager in Windows 11, 10, 8, 7, and Vista using a Control Panel applet.
One really easy way to start Device Manager in any version of Windows is from the Command Prompt.
Just type the devmgmt.msc command, or one of the other three we describe below, and voilà…Device Manager starts right up!
Instructions in this article apply to Windows 11, Windows 10, Windows 8, Windows 7, Windows Vista, and Windows XP.
Besides being one of the fastest ways to open it, knowing the run command for Device Manager should come in handy for other things, too. Advanced tasks like writing command-line scripts would call for the Device Manager command, as well as other programming tasks in Windows.
How to Access Device Manager From the Command Prompt
Time Required: Accessing Device Manager from Command Prompt, or another command-line tool in Windows, should take less than a minute, even if this your first time executing commands.
Follow these easy steps to access Device Manager from the Command Prompt:
-
Open Command Prompt. Search for cmd in the Start menu or search bar in most versions of Windows.
You could also do so with administrative privileges by opening an elevated Command Prompt, but you don’t need to open Command Prompt with admin rights in order to get to Device Manager from the command line.
Command Prompt is the most all-inclusive way to run commands in Windows, but the following steps could be performed via the Run tool, or even from Cortana or the search bar in newer versions of Windows.
The primary way to open the Run dialog box is with the keyboard: Press and hold the Windows key, and then press R once. Another way is through Task Manager, which you might do if the Windows desktop has crashed and you can only open Task Manager; to do that, go to Run new task at the top (Windows 11) or File > Run new task, and then enter one of the commands below.
-
Once either Command Prompt or the Run box is open, type either of the following, and then press Enter:
devmgmt.mscor
mmc devmgmt.mscDevice Manager should open immediately.
MSC files, which are XML files, are used in these commands because Device Manager is a portion of the Microsoft Management Console, which is the built-in tool included with Windows that opens these kinds of files.
-
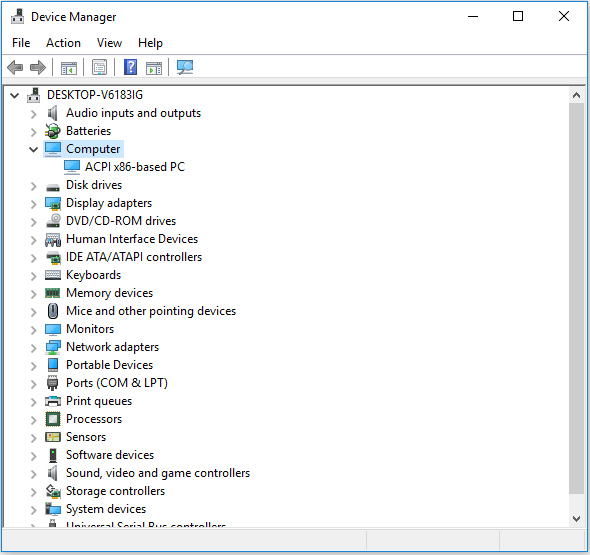
You can now use Device Manager to update drivers, view a device’s status, manage the system resources that Windows has assigned to your hardware, and more.
Two Alternative Device Manager CMD Methods
In Windows 11, 10, 8, 7, and Vista, Device Manager is included as an applet in Control Panel. This means that there’s an associated Control Panel applet command available.
Two of them, actually:
control /name Microsoft.DeviceManager
or
control hdwwiz.cpl
Both work equally well but must be executed from Command Prompt or the Run dialog box, not from Cortana or other universal search boxes.
No matter how you get it to open—via Control Panel, Run, a desktop shortcut, Command Prompt, a BAT file, PowerShell, etc.—Device Manager works the same, looks the same, and has the exact same features. You’re just picking one of several shortcuts to open the file.
Device Manager Resources
Here are some articles with more information and tutorials regarding Device Manager:
- How Do I Enable a Device in Device Manager in Windows?
- How Do I Disable a Device in Device Manager in Windows?
- How Do I View a Device’s Status in Windows?
- Why Is There a Red X in Device Manager?
- Why Is There a Black Arrow in Device Manager?
- Fixing a Yellow Exclamation Point in Device Manager
- Device Manager Error Codes
FAQ
-
How do I run Device Manager through CMD as an Administrator?
Open the cmd prompt by pressing the Windows key + R and typing in cmd, then press Ctrl + Shift + Enter. Input your administrator account credentials when prompted, then type devmgmt.msc and press Enter.
-
How do I turn off my laptop keyboard with Device Manager from CMD?
First you’ll need to uninstall the keyboard from Device Manager. From the cmd, right-click Command Prompt and select Run as Administrator. Next, type in sc config i8042prt start= disabled and press Enter. Finally, close the cmd and restart your laptop.
Thanks for letting us know!
Get the Latest Tech News Delivered Every Day
Subscribe

Диспетчер устройств – это важный инструмент в операционной системе Windows, позволяющий уточнять информацию об установленных устройствах и драйверах в режиме реального времени и в интуитивно понятном формате. Кроме того, Диспетчер устройств позволяет контролировать все основные компоненты ПК с помощью опций их включения и отключения, а также возможности обновления драйверов. То есть Диспетчер устройств – это действительно полезная утилита, но не все знают, как зайти в Диспетчер устройств. Поэтому в этой статье мы расскажем, как открыть Диспетчер устройств в Windows 10 разными способами. Заодно рассмотрим основные функции данного инструмента.
Содержание
- Как открыть меню Диспетчер устройств в Windows 10?
- Каковы основные функции Диспетчера устройств?
- Заключение
Как открыть меню Диспетчер устройств в Windows 10?
Существует несколько способов открыть Диспетчер устройств в Windows 10. В этом разделе мы рассмотрим наиболее распространенные из них.
1. Открытие Диспетчера устройств через меню «Пуск»
- Нажмите на кнопку «Пуск» в левом нижнем углу экрана или нажмите клавишу Windows на клавиатуре.
- Введите «Диспетчер устройств» в строке поиска и выберите соответствующий результат в выпадающем списке.
Если в меню «Пуск» нет поиска, воспользуйтесь меню поиска (значок лупы) на панели справа от меню «Пуск».
2. Открытие Диспетчера устройств через панель управления
- Откройте панель управления, нажав правой кнопкой мыши на кнопке «Пуск» и выбрав «Панель управления» в контекстном меню.
- В панели управления выберите «Система и безопасность».
- Затем выберите «Система» и перейдите в раздел «Диспетчер устройств».
В некоторых версиях Windows 10 зайти в Диспетчер устройств можно чуть иначе – нажав правой кнопкой мыши на «Пуск», а затем последовательно выбрав пункты «Система» и «Диспетчер устройств» (иногда пункт «Диспетчер устройств» даже доступен сразу).
3. Открытие Диспетчера устройств через командную строку или «Выполнить»
- Откройте командную строку, нажав сочетание клавиш Windows + R, затем введите «cmd» и нажмите Enter.
- В командной строке введите «devmgmt.msc» и нажмите Enter. Диспетчер устройств откроется в новом окне.

Каковы основные функции Диспетчера устройств?
Диспетчер устройств позволяет выполнять различные задачи, связанные с управлением аппаратными компонентами компьютера. В этом разделе мы рассмотрим основные функции Диспетчера устройств и то, как ими пользоваться.
1. Просмотр информации об устройствах и их драйверах
Диспетчер устройств отображает список всех установленных на компьютере устройств, разделенных по категориям. Чтобы просмотреть информацию об устройстве и его драйверах, выполните следующие действия:
- Раскройте категорию устройства, нажав на стрелку слева от названия.
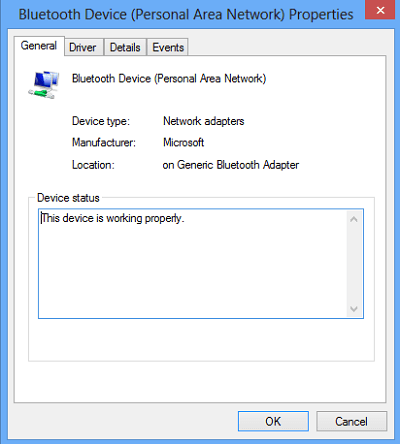
- Щелкните правой кнопкой мыши на устройстве, о котором хотите получить информацию, и выберите «Свойства».
- Во вкладке «Драйвер» вы можете увидеть информацию о драйвере устройства, такую как дата выпуска, версия и производитель.
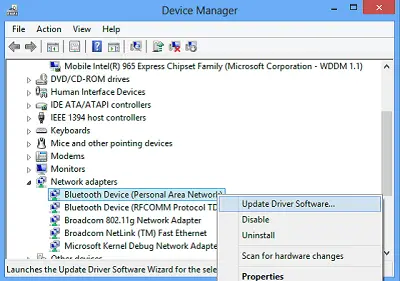
2. Обновление драйверов устройств
Если устройство работает некорректно или имеет устаревший драйвер, вы можете обновить его драйвер с помощью Диспетчера устройств. Следуйте этим шагам:
- Щелкните правой кнопкой мыши на устройстве с устаревшим драйвером и выберите «Обновить драйвер».
- В появившемся окне выберите функцию автоматического поиска. Windows будет искать и устанавливать последние драйверы для вашего устройства.
3. Удаление и переустановка драйверов устройств
В некоторых случаях, проблемы с устройством могут быть связаны с поврежденными или некорректно установленными драйверами. Вы можете удалить и переустановить драйверы устройства, следуя этим шагам:
- Щелкните правой кнопкой мыши на устройстве с проблемным драйвером и выберите «Удалить «. Подтвердите действие.
- Перезагрузите компьютер. После перезагрузки Windows автоматически установит драйвер устройства заново. Если автоматическая установка не произойдет – установите драйвер из официального источника.
4. Отключение и включение устройств
Иногда возникает необходимость отключить определенное устройство, чтобы произвести диагностику или выполнить другие задачи. Диспетчер устройств позволяет временно отключать устройства без их полного удаления.
Для отключения устройства щелкните правой кнопкой мыши на устройстве, которое вы хотите отключить, выберите «Отключить » и подтвердите действие.
Чтобы включить отключенное устройство, щелкните правой кнопкой мыши на отключенном устройстве и выберите «Включить «. Устройство будет включено и готово к использованию.

Заключение
Диспетчер устройств является мощным инструментом для управления аппаратным обеспечением компьютера в операционной системе Windows 10. В этой статье мы рассмотрели различные способы открытия Диспетчера устройств и основные функции данного инструмента. Овладев этими знаниями, вы сможете эффективно контролировать работу своего компьютера и устранять возникающие проблемы с устройствами и драйверами. Это позволит вам обеспечить стабильную и надежную работу системы, а также оптимизировать ее производительность.
Используйте полученные знания для уверенного и безопасного управления аппаратными компонентами вашего компьютера. В случае возникновения проблем с оборудованием или драйверами обращайтесь к Диспетчеру устройств для диагностики и устранения неполадок.
Теперь вы знаете, как открыть Диспетчер устройств в Windows 10 и как использовать его основные функции для решения проблем и оптимизации работы вашего компьютера. Удачи вам в дальнейшем использовании Windows 10 и освоении всех ее возможностей!
-
Home
-
News
- 10 Ways to Open Device Manager Windows 10
By Alisa |
Last Updated
Windows Device Manager allows users to view and control the hardware connected to the computer. Check the 10 ways in this post for how to open Device Manager in Windows 10 computer. To help you manage hard drive partition, recover lost/deleted files, MiniTool software is the top choice.
What Is Device Manager?
Windows Device Manager is an applet in Control Panel in OS. It allows you to check the devices that are currently connected to your Windows system, repair Windows 10 hardware problems if a piece of hardware is not working, enable or disable devices, reinstall/update device drivers, and more. The connected devices in Windows Device Manager are listed into different categories.
If you need to open Device Manager in Windows 10 to view, control or adjust the hardware status, or fix the hardware not working properly, hardware not recognized issues, etc. you can check the 10 ways below to easily open Windows 10 Device Manager.
Video Guide:
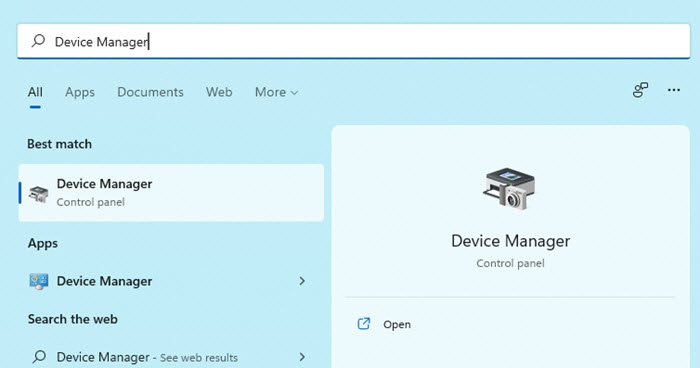
#1. How to Open Device Manager in Windows 10 with Search Box
The easiest way to open Device Manager in Windows 10 is to use Search Box.
- Click the Search Box at the taskbar next to Start menu.
- Type device manager in the Search Box, and click the best-matched result to open Device Manager in Windows 10.
- You can click Start menu at the lower-left corner on Windows 10 computer desktop.
- Then type device manager, Windows Device Manager app will display, click Device Manager to open it.
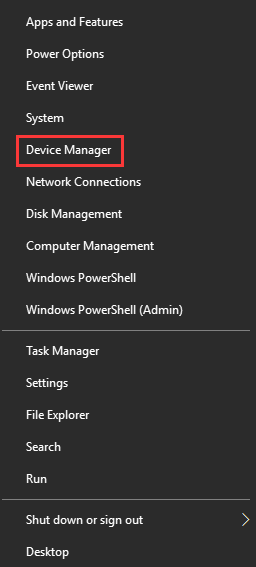
#3. Open Device Manager Windows 10 with Windows + X
- Press Windows + X keyboard shortcut keys simultaneously to open Quick Access menu.
- Click Device Manager from the list to open Device Manager app.
#4. Open Device Manager Windows 10 via Run
- You can press Windows + R keys together to open Run window.
- Type devmgmt.msc in the Run box, and hit Enter to open this app.

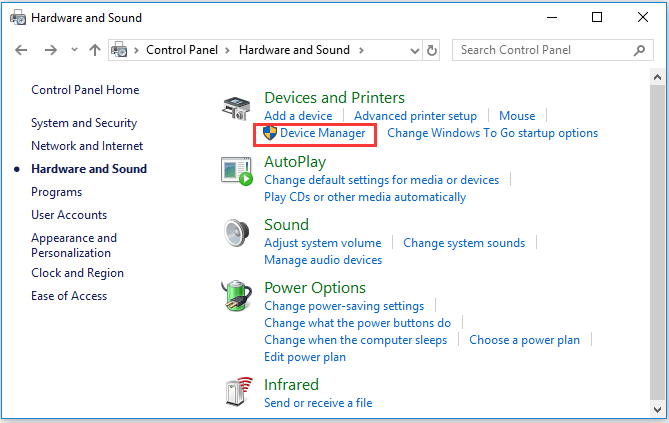
#5. How to Open Device Manager in Windows 10 from Control Panel
- Press Windows + R to open Run, and type control panel in Run dialog, hit Enter to open Control Panel. Check the 10 ways to open Control Panel in Windows 10.
- Click Hardware and Sound and click Device Manager under Device and Printers to open Device Manager.
#6. Use Cortana to Open Device Manager in Windows 10
You can click Cortana at the toolbar, and say “Launch Device Manager” to ask Cortana to open Windows 10 Device Manager for you.
#7. Use Device Manager CMD/Command
- You can press Windows + R to open Windows Run, type cmd and hit Enter to open Windows Command Prompt.
- Then you can type this command line devmgmt.msc in Command Prompt window, and hit Enter to open Windows 10 Device Manager.

#8. Enter into Device Manager with Windows PowerShell
- You can right-click Start and choose Windows PowerShell to open it.
- Then type devmgmt.msc, and hit Enter to open Device Manager.
#9. Access Windows 10 Device Manager from Computer Management
- You can open Computer Management in Windows 10.
- Then click Computer Management -> System Tools -> Device Manager to open Device Manager in Computer Management.
#10. Use Device Manager Shortcut
If you have created a desktop shortcut for Device Manager, you can double-click the Device Manager shortcut icon on computer desktop to open it.
As well, you can also create a keyboard short for Device Manager to quickly access it when you need. Check: how to create a keyboard shortcut in Windows 10 for Device Manager.
The End
This article provides you 10 ways to allow you to open Windows 10 Device Manager application quickly and easily. You can use either way to get to Windows Device Manager to enable, disable, update or reinstall devices drivers, or troubleshoot computer hardware issues, etc.
About The Author
Position: Columnist
Alisa is a professional English editor with 4-year experience. She loves writing and focuses on sharing detailed solutions and thoughts for computer problems, data recovery & backup, digital gadgets, tech news, etc. Through her articles, users can always easily get related problems solved and find what they want. In spare time, she likes basketball, badminton, tennis, cycling, running, and singing. She is very funny and energetic in life, and always brings friends lots of laughs.
The Device Manager in Windows 11/10 provides a central and organized view of all the Microsoft Windows recognized hardware installed on a computer. The Device Manager helps change hardware configuration options, manage drivers, enable or disable hardware, identify conflicts between hardware devices, etc. Device Manager also helps troubleshoot devices when they don’t work properly. Let us see how to open and use the Device Manager in Windows 11/10. You may need to be logged in using an administrator account. We will also show you how to run Device Manager as administrator.
The Device Manager in Windows 11/10 can be opened in the following ways:
- Using the WinX Menu
- Using Windows 10 Search
- Using Run box
- Using Command-line
- Using Control Panel
- Using Computer Management
- Using File Explorer
- Windows 11/10 Settings app
- Task Manager
- Using a Desktop Shortcut.
We will now learn about all these methods in detail.
1] Using the WinX Menu

You can open the WinX Menu by using the keyboard shortcut Windows Key + X. You can also right-click on the Start Menu and then select the option ‘Device Manager’.
2] Using Windows 10 Search
To open the Device Manager using the Search option, click on the ‘Search icon’ or ‘Search box’ next to the Start button. Type in Device Manager in the search box and then simply select the option.
3] Using Run box
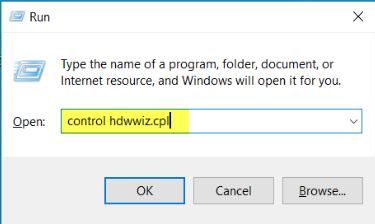
You can open the Device Manager using the Run box method with the help of any one of the three Run commands- devmgmt.msc or control hdwwiz.cpl in the open field. Simply press the Windows Key + R. Type in any one of the mentioned commands in the Open field and then select OK.
4] Using Command-line
Execute one of the following commands in CMD or PowerShell:
devmgmt.msc
OR
control hdwwiz.cpl
5] Using Control Panel

Open Control Panel > Hardware and Sound > Devices and Printers > Device Manager.
You can also access it using Control Panel’s Icon View
![]()
Open Control Panel > All Control Panel Items. To do that, click on the View by drop-down menu, and choose Large icons or Small icons, depending on your preference. All the Control Panel items will appear. Select the ‘Device Manager’ option.
Read: How to use Driver Verifier Manager in Windows
6] Using Computer Management
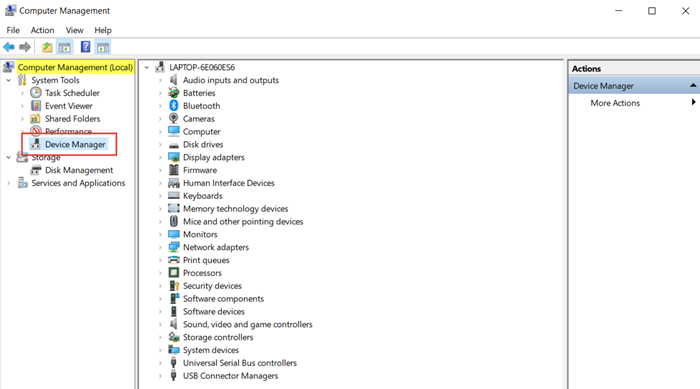
Open the Computer Management Tool on your Windows 10 PC.
Under System Tools, click on Device Manager to launch it.
7] Using File Explorer
Windows 11

- Open Explorer
- In the Navigation pane, right-click on This PC
- Select Show more options
- Next select Manage from the context menu
- Computer Management window will open
- Click on System Tools > Device Manager.
Windows 10
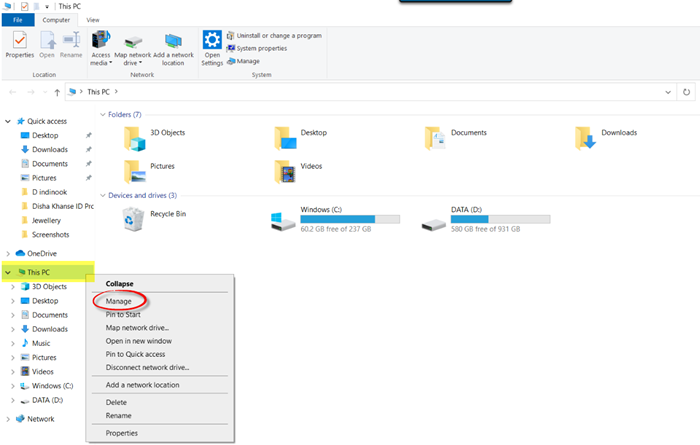
In Windows 10, go to File Explorer You will see ‘This PC’ in the left navigation pane. Right-click on This PC and select ‘Manage’ from the Context Menu. The Computer Management Tool window will open.
Now once Computer Management opens, click on System Tools > Device Manager.
So, these are the various ways to open Device Manager in Windows 11/10. Hope this was helpful for beginners!
8] Open Device Manager using the Settings app of Windows 11/10

The steps to open Device Manager using the Settings app of Windows 11/10 are as follows:
- Press the Win+I hotkey to open the Settings app
- In the System category, access the About page available on the right section
- Scroll down the page to access the Related settings section
- Click on the Device Manager option.
Alternatively, you can also use the Search box or Find a setting box of the Settings app to access the Device Manager window.
9] Open Device Manager using the Task Manager

These are the steps to open Device Manager using the Task Manager in Windows 11/10:
- Open Windows 11/10 Task Manager
- Click on the File menu
- Click on the Run new task option and a Create new task box will open
- Type
devmgmt.mscin the text box of Create new task box - Press the Enter key or click on the OK button.
10] Open Device Manager using a Desktop Shortcut
Follow these steps to open Device Manager using a desktop shortcut on Windows 11/10:
- Right-click on an empty area of your Windows 11/10 desktop
- Access the New menu
- Click on the Shortcut option. This will launch a Create Shortcut wizard
- In the Create Shortcut wizard, type
devmgmt.mscin the text field available for Type the location of the item section - Press the Next button
- Enter a name for the shortcut (say, Device Manager)
- Press the Finish button.
How to run Device Manager as administrator?
You do not normally require to run Device Manager as administrator. However, you might need to do it if you want to change the components inside. Here are multiple ways to run Device Manager as an administrator in Windows:

- Open Task Manager, click Run new task, type devmgmt.msc in the box, select Create this task with administrative privileges.
- Open Powershell with admin rights, type the following, and hit Enter:
start "C:\Windows\System32\devmgmt.msc" - Run Command Prompt as administrator, type devmgmt.msc and press Enter.
- Right-click an empty space on the desktop > New > Shortcut. In the Create Shortcut Wizard, type devmgmt.msc > click Next. Name it Device Manager > click Finish. A shortcut will appear on your desktop. Right-click the shortcut and select Run as Administrator.
- Open Win+R, type devmgmt.msc, Press Ctrl+Shift+Enter to start it as administrator.
- Type devmgmt.msc into the search box, and then from the right side, select Run as administrator to execute.
How to use Device Manager to troubleshoot Driver issues in Windows 11/10
You can use the Device Manager to identify a problematic driver. To do so, type Device Manager in Windows search and hit Enter.
If you see a triangular yellow exclamation mark, then this driver could be a suspect. Here is an example:
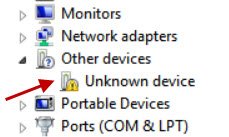
Right-click on it to open its Properties.
This will give the current status of this Driver. You can also check for Solutions online under the General tab.

If you feel that this Driver could be the cause, then under the Driver tab of the Properties box, you have the option to either Rollback, Update, Disable or Uninstall the Driver.
How do I open Device Manager from CMD?
To open Device Manager from CMD (Command Prompt window), type devmgmt.msc command and press Enter key to execute that command. You can also open Device Manager from File Explorer, using a desktop shortcut, Windows 11/10 Settings app, Task Manager, Run Command box, and more. All the possible ways to open Device Manager in Windows 11/10 are covered in this post.
Read: Device Manager shows multiple processors in Windows
Where is Device Manager in Windows 11/10 file location?
Device Manager is located in the System32 folder of Windows 11/10 OS. That folder contains devmgmt.msc (Microsoft Common Console Document) file of Device Manager. Its location is:
C:\Windows\System32
Or else, if you want to open the Device Manager window on your Windows 11/10 computer, then you can do that using File Explorer, Windows Search box, Computer Management, and other ways. You can check all such options covered by us above.
If you know of any more ways to open the Device Manager on your Windows 11/10 PC, do let us know in the comments down below.
Read next: Device Manager is blank and not showing anything in Windows.
С помощью диспетчера устройств можно управлять всеми подключенными гаджетами, обновить драйверы периферии и встроенного оборудования и т.д. Открыть приложение диспетчера просто — есть много способов.
1 Запустить диспетчер через поиск
Этот метод работает на любой версии ОС: он поможет открыть диспетчер устройств Windows 11/10/7 и других модификациях. Кроме того, именно такой способ рекомендует официальная поддержка Microsoft как самый простой.
Достаточно ввести слова «диспетчер устройств» в поле поиска на панели задач (в меню «Пуск»).
Выберите первый результат в списке выдачи — откроется нужное приложение.
Важно: если в качестве основного языка используется английский, то вводите в поиск словосочетание Device Manager.
2 Использовать интерфейс Windows
Еще один несложный метод открыть диспетчер устройств — это кликнуть правой кнопкой мыши (ПКМ) по иконке «Компьютер» и выбрать пункт «Управление» в контекстном меню. Также можно открыть папку «Мой компьютер» и выбрать раздел «Управление» на панели сверху.
В списке слева вы найдете нужный пункт — «Диспетчер устройств».
3 Открыть диспетчер устройств через Win R
Вызвать диспетчер устройств можно с помощью диалогового окна «Выполнить».
Используйте комбинацию клавиш [Win]+[R]. Win — это кнопка «Пуск», отмеченная символом Windows. Также получится запустить приложение через поиск: введите слово «выполнить» и откройте первую предложенную утилиту.
В поле «Открыть» вставьте команду devmgmt.msc и нажмите [Enter] или кнопку OK, чтобы подтвердить ввод.

Готово: откроется диспетчер устройств.
4 Открыть диспетчер устройств через командную строку
Командная строка является системным приложением Windows и находится в папке служебных программ. Также ее можно открыть, введя в поле «Выполнить» команду cmd.
Для открытия диспетчера нужно использовать ту же команду, что и в предыдущем способе: devmgmt.msc.
5 Запустить диспетчер через панель управления
Если вы не хотите использовать командную строку, то попробуйте этот метод.
- Откройте панель управления Windows. Можно найти ее через поиск или в списке служебных приложений.
- Перейдите к разделу «Оборудование и звук».
- В подразделе «Устройства и принтеры» будет кнопка для доступа к диспетчеру устройств.
6 Вызвать диспетчер из папки system32
Если ни один метод не работает или по каким-то причинам не нравится вам, то можете открыть диспетчер устройств на Виндовс прямо из системной папки system32. Она находится по адресу «C:\Windows\System32», где С — диск, на котором находятся файлы операционной системы.
Файл для запуска диспетчера называется devmgmt.msc. Откройте его с помощью двойного нажатия ЛКМ или через клик ПКМ — «Открыть».
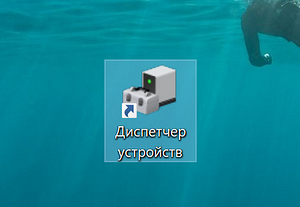
7 Создать ярлык Диспетчера устройств
Если вы часто используете диспетчер, создайте ярлык для его быстро запуска и держите его на рабочем столе.
- Кликните по любому пустому месту на рабочем экране правой кнопкой мыши и выберите «Создать» — «Ярлык».
- Введите адрес расположения объекта: C:\Windows\System32\devmgmt.msc. Мы выяснили его в предыдущем пункте.
- Укажите название ярлыка.
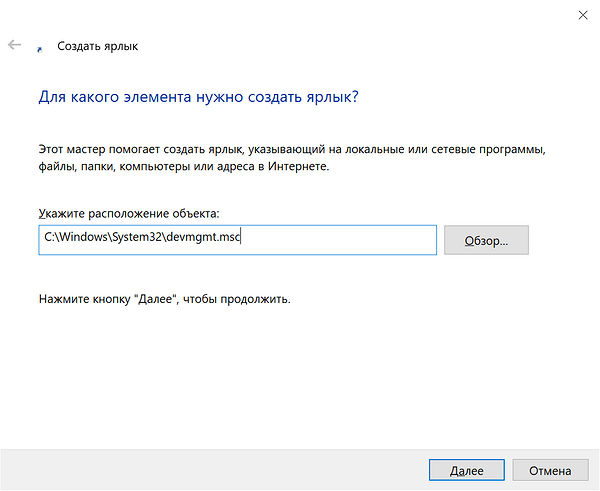
Готово: новая иконка появится на рабочем столе.
8 Использовать меню Win X
Начиная с версии Windows 8, в системе появилось меню Win X. Его можно открыть соответствующим сочетанием клавиш. В списке также есть пункт для открытия диспетчера устройств.

Читайте также:
- Как задать формат А4 в фоторедакторах типа Adobe Photoshop
- Как установить сертификат Минцифры: подробная инструкция
- Мощный ноутбук для работы и развлечений: топ-10 лучших в 2023 году