-
Swipe in from the right edge of the screen, tap Settings, and then tap Change PC settings. (If you’re using a mouse, point to the lower-right corner of the screen, move the mouse pointer up, click Settings, and then click Change PC settings.)
-
Tap or click Time and language, and then tap or click Region and language, and then tap or click Add a language.
-
Browse for the language you want, and then tap or click it to add it to your language list.
-
Swipe in from the right edge of the screen, tap Settings, and then tap Change PC settings. (If you’re using a mouse, point to the lower-right corner of the screen, move the mouse pointer up, click Settings, and then click Change PC settings.)
-
Tap or click Time and language, and then tap or click Region and language.
-
If the language says Language pack available, tap or click Options.
Note: If you don’t see Language pack available, you might be able to download the language pack at the Download Center.
-
Tap or click Download. The download process might take a while, depending on your PC and the size of the language pack.
-
Swipe in from the right edge of the screen, tap Settings, and then tap Change PC settings. (If you’re using a mouse, point to the lower-right corner of the screen, move the mouse pointer up, click Settings, and then click Change PC settings.)
-
Tap or click Time and language, and then tap or click Region and language.
-
Tap or click the language that you want to see Windows in, and then tap or click Set as primary. The Will be display language after next sign-in message will appear under the language.
-
Tap or click Set as primary to move the language to the top of the list. If the language can become your Windows display language, you’ll see Will be display language after next sign-in appear under the language.
-
Sign out of Windows, and then sign back in.
Warning: When you change your primary language, your keyboard layout might also change. When signing back in to Windows, make sure you’re using the right keyboard layout for entering your password. Otherwise, you might not be able to sign in. You can change your keyboard layout on the sign-in screen by tapping or clicking the language abbreviation button in the lower-right corner.
Change the keyboard layout or other method you use to type
Whenever you add a language, a keyboard layout or input method is added so you can enter text in the language. If you want to use a different keyboard layout or input method, you can add a new one or switch between the ones you have.
-
Swipe in from the right edge of the screen, tap Settings, and then tap Change PC settings. (If you’re using a mouse, point to the lower-right corner of the screen, move the mouse pointer up, click Settings, and then click Change PC settings.)
-
Tap or click Time and language, and then tap or click Region and language.
-
Tap or click the language you want to add a keyboard to, and then tap or click Options.
-
Tap or click Add a keyboard, browse the input method list for the one you want to use, and then tap or click it.
You can enter text with different keyboard layouts or input methods by switching between them. There are a few different ways to switch between keyboard layouts or input methods:
-
On a hardware keyboard, press and hold the Windows logo key , and then press the Spacebar to cycle through your input methods.
-
If you have a touchscreen, you can switch your touch keyboard layout by tapping or clicking the keyboard icon, and then tapping or clicking the keyboard layout you want to switch to.
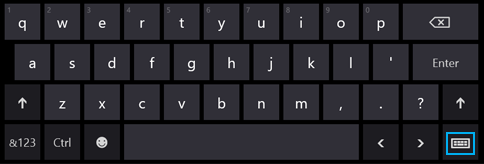
Language abbreviation button in the touch keyboard
-
On the desktop taskbar, tap or click the language abbreviation in the notification area at the far right of the taskbar, and then tap or click the keyboard layout or input method you want to switch to.
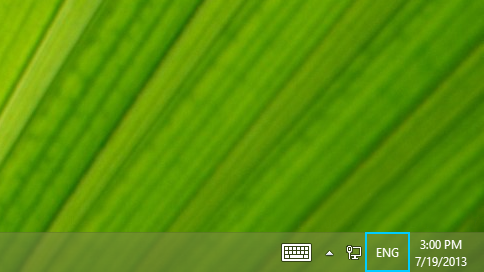
Language abbreviation button in the desktop taskbar
Your default keyboard layout or input method is the one that’s automatically used with the language you see Windows in (for example, the QWERTY keyboard for American English). If you want to keep your Windows language the same but use a different keyboard automatically, follow these steps:
-
Open Control Panel by swiping in from the right edge of the screen, tapping Search (or if you’re using a mouse, pointing to the upper-right corner of the screen, moving the mouse pointer down, and then clicking Search), entering Control Panel in the search box, and then tapping or clicking Control Panel.
-
Enter Add a language in the search box, and then tap or click Add a language.
-
Tap or click Advanced settings.
-
Under Override for default input method, choose the keyboard layout or input method you’d like to be your new default, and then tap or click Save.
Note: If you don’t see the keyboard layout or input method you want, then you haven’t added it to your input method list. For instructions, see the Add a keyboard layout or input method for a language section.
Install or change a display language
You can change the language Windows uses to display text in wizards, dialog boxes, menus, and other items in the user interface. Some display languages are installed by default, while others require you to install additional language files.
To install a Language Interface Pack (LIP), double-click the file to open the setup program. To install a language pack, follow these steps:
-
Open Region and Language by clicking the Start button , clicking Control Panel, clicking Clock, Language, and Region, and then clicking Region and Language.
-
Click the Keyboards and Languages tab.
-
Under Display language, click Install/uninstall languages, and then follow the steps.
If you’re prompted for an administrator password or confirmation, type the password or provide confirmation.
Note: The Display language section will be visible only if you have already installed a Language Interface Pack or if your edition of Windows supports a language pack. Language packs are available only in Windows 7 Ultimate and Windows 7 Enterprise.
When you change the display language, the text in menus and dialog boxes for some programs might not be in the language that you want. This happens because the program might not support Unicode.
-
Open Region and Language by clicking the Start button , clicking Control Panel, clicking Clock, Language, and Region, and then clicking Region and Language.
-
Click the Keyboards and Languages tab.
-
Under Display language, choose a language from the list, and then click OK.
Note: If you don’t see the list of display languages, you need to install additional language files.
Change your keyboard layout
-
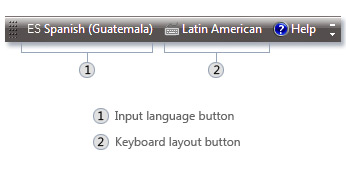
On the Language bar, click the Input language button, and then select an input language.
-
Click the Keyboard layout button, and then select a keyboard layout.
Note: If you don’t see the Language bar, right-click the taskbar, point to Toolbars, and then click Language bar.
On the Welcome screen, click the Keyboard layout button 
Note: If you don’t see the Keyboard layout button, you might not have more than one input language, or your regional and language settings might not be applied to reserved accounts.
Need more help?
Want more options?
Explore subscription benefits, browse training courses, learn how to secure your device, and more.
Communities help you ask and answer questions, give feedback, and hear from experts with rich knowledge.
Find solutions to common problems or get help from a support agent.
Use a dedicated third-party tool to fully customize your keyboard layout
by Ivan Jenic
Passionate about all elements related to Windows and combined with his innate curiosity, Ivan has delved deep into understanding this operating system, with a specialization in drivers and… read more
Updated on
- Windows 10’s keyboard layout can be easily changed at any time via built-in Settings.
- If you don’t like the default options, you can opt to create a custom keyboard layout for your Windows 10 device.
- In doing so, you will need to use the Microsoft Keyboard Layout Creator app, available for free.
Are you interested in customizing your own keyboard layouts or starting the layouts from scratch for any kind of reason, like setting the keyboard to a language Microsoft systems don’t have support for or including a symbol of your liking just by pressing a keyboard button?
In the tutorial below, we will see exactly how we can set an input method, remove an input method from our keyboard layouts and use the Microsoft Keyboard Layout Creator to customize the keyboard on Windows Windows 10 to our preferences.
How can I create a custom keyboard layout in Windows 10?
- Add a new keyboard layout
- Change keyboard input methods
- Use Microsoft Keyboard Layout Creator
1. Add a new keyboard layout
This tutorial shows how to add or remove keyboard input from Control Panel.
- Move the mouse cursor to the right side of the screen.
- In the search box type Control Panel.
- Click (left click) on the Control Panel icon that shows after the search is completed.
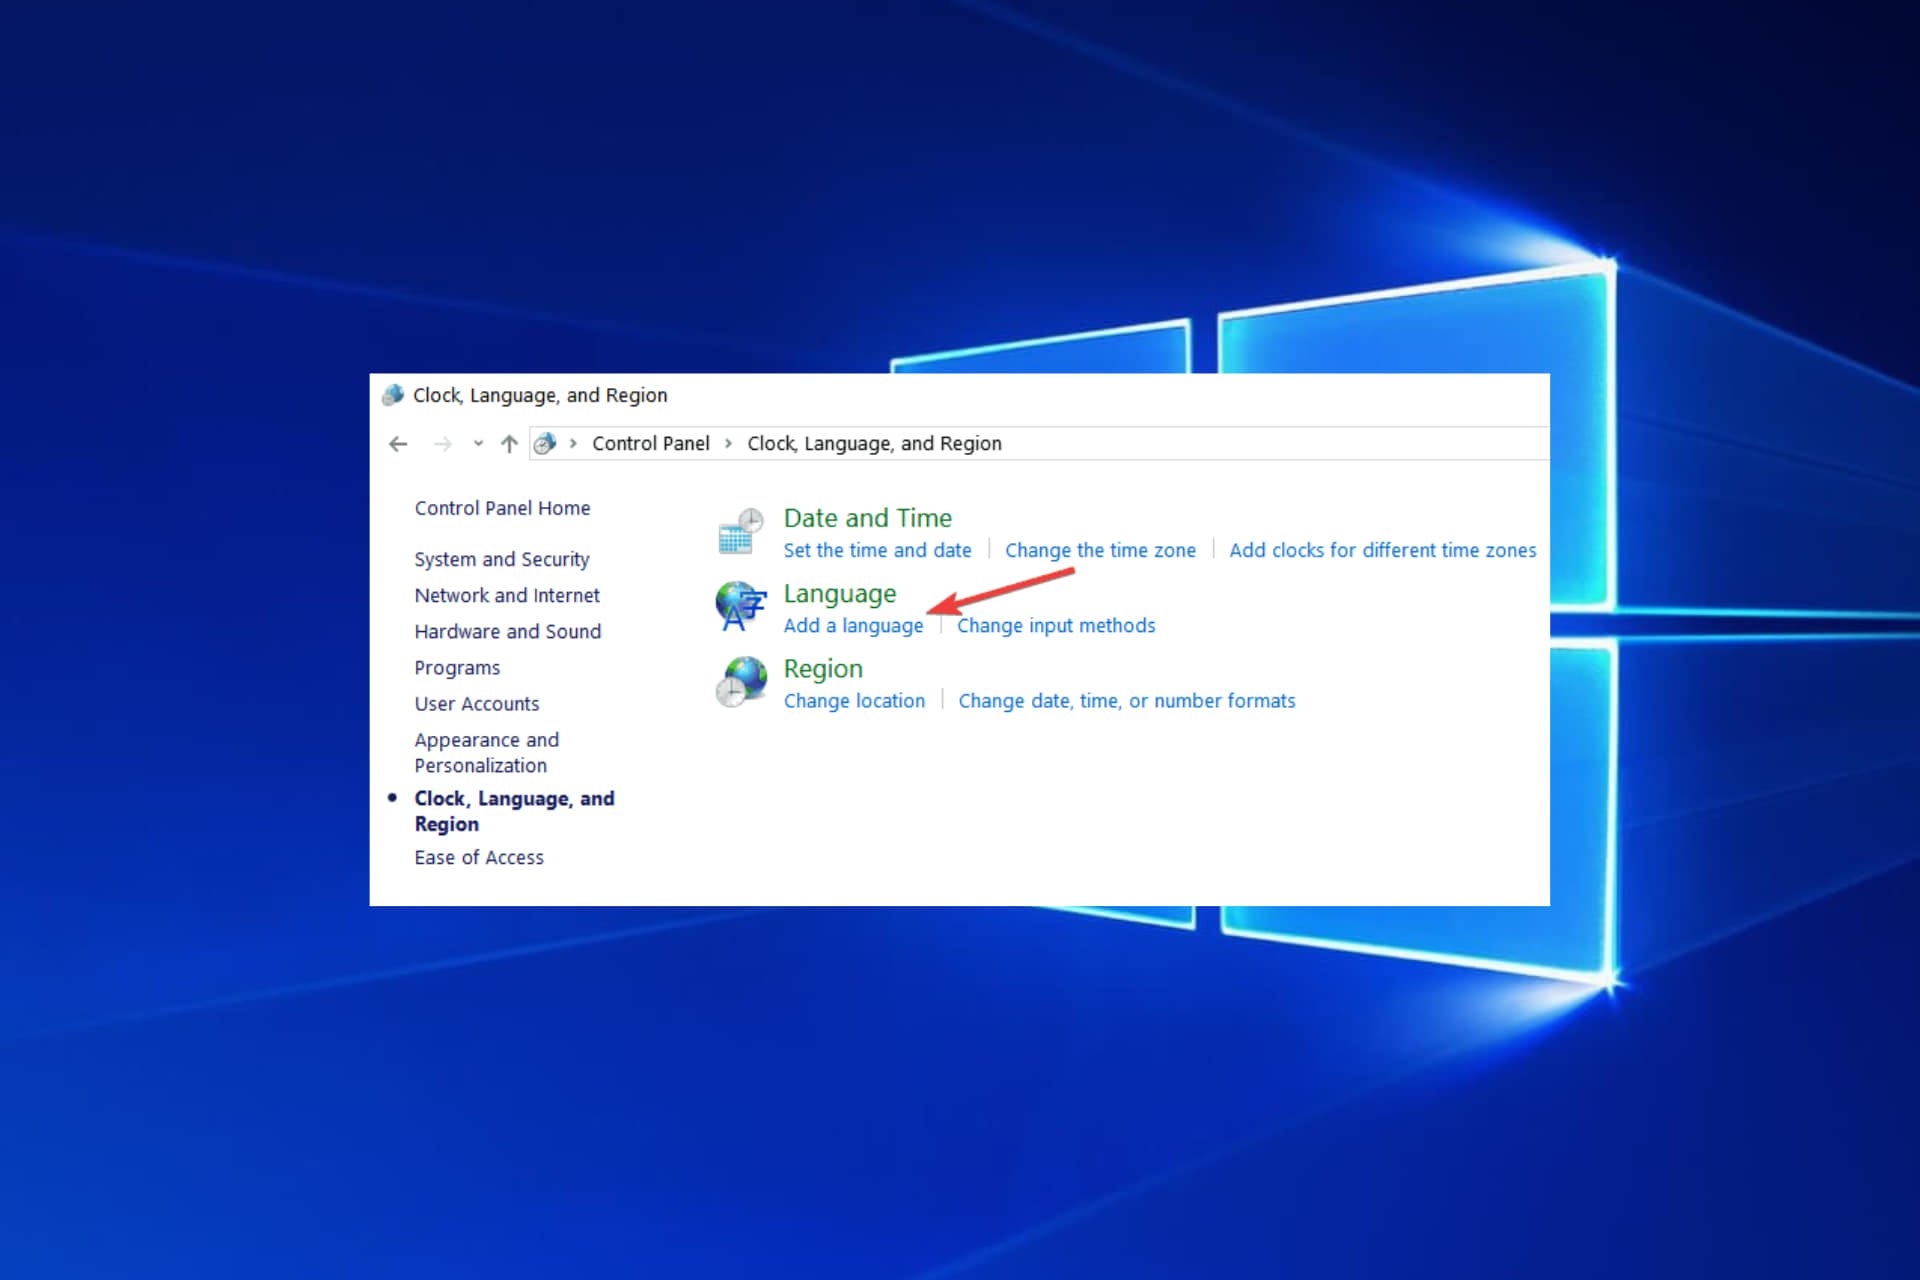
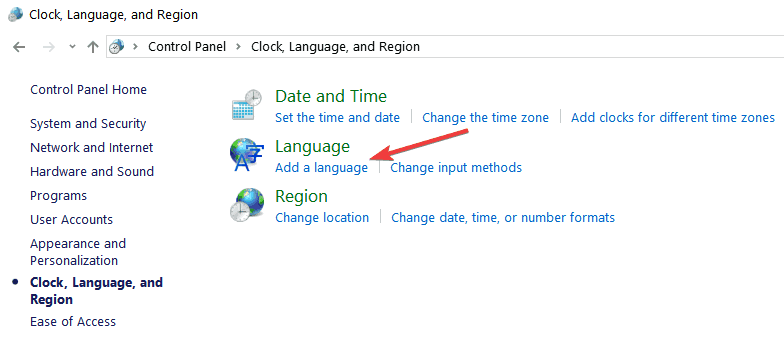
- After the Control Panel window opens click (left click) on the Language icon.
- Double click (left click) on Add a language situated in the middle side of the window you opened.
- Under the Input Method field click (left click) on Add an input method.
- Double click (left click) on an input method you prefer to add or just choose an input method and click on Add.
- You can repeat the two steps above to add another input language if you want.
- When you are finished you just need to click (left click) on Save on the lower side of the window.
- After you add an input method you will just need to switch the methods from the lower right side of the screen where it says what language is your keyboard set to operate.
2. Change keyboard input methods
You can also add or remove input methods using the PC settings feature in Windows 10, 8.1 as shown below:
- Open PC Settings by going with the mouse on the charms bar.
- Click (left click) on Settings.
- Or another way to open PC settings is by pressing and holding Windows and I buttons.
- Click (left click) on General situated on the left of the screen.
- Click (left click) on the Language Preferences link situated under the Language section on the right side of the screen.
- From here you can follow the steps presented in the first tutorial.

- How to Change the Keyboard Layout on Windows 10
- How to change keyboard layouts in Windows 11
- Top Keyboards to Buy for Your Windows 10/11 PC
- Best mechanical keyboards for Windows 10/11 PCs [2022 Guide]
- 6 best PC keyboards to buy [2022 Guide]
3. Use Microsoft Keyboard Layout Creator
1. Download Microsoft Keyboard Layout Creator from the official website.
How we test, review and rate?
We have worked for the past 6 months on building a new review system on how we produce content. Using it, we have subsequently redone most of our articles to provide actual hands-on expertise on the guides we made.
For more details you can read how we test, review, and rate at WindowsReport.
2. Install the app on your Windows 10 device.
3. Open the app.
4. Go to File > Load Existing Keyboard.
5. Choose the layout that you want to customize from the list.
6. Customize your keyboard layout by navigating to Project > Properties. From there, you can choose whichever options you want: a keyboard name, description, and language, as well as custom hotkeys.
If you’re looking to create a custom keyboard layout on Windows 10, look no further than the Microsoft Keyboard Layout Creator app.
All you need to do is download Microsoft Keyboard Layout Creator and then you can create your own keyboard layouts from scratch using it.
- Protected: How to Download Video from Facebook on PC
- Microsoft Authenticator App: Download & Install
In the past, this application used to say that it did not support Windows 10, but nevertheless it worked just fine if you installed it. Now, it is fully optimized for Windows 10 and is perfectly safe to use.
Speaking of keyboards, there are various technical issues that you may encounter after connecting your keyboard to your computer or after enabling certain settings. We have various guides on our website that you can check out.
The three ways above showed you how you can customize the keyboard input in Windows 10. All you have to do now is go and try it for yourself.
Please write us below for any new ideas on how to customize your keyboard.
Windows 10 asks you to configure additional keyboard layouts during the initial setup. However, you can always add or remove layouts if you didn’t choose the correct one or must type in another language.
Usually, it’s uncommon to change the input settings, but there many situations when you might need to. For example, sometimes you may need to switch to the Spanish layout to write words that include special characters like «Ñ,» or prefer a different layout, such as the United States-Dvorak.
Regardless of the reason, Windows 10 ships with easy settings to add, remove, and change layouts for hardware and touch keyboards.
This guide will walk you through the steps to manage keyboard layouts on Windows 10.
How to add keyboard layout on Windows 10
To add a new keyboard layout on Windows 10, use these steps:
- Open Settings.
- Click on Time & Language.
- Click on Language.
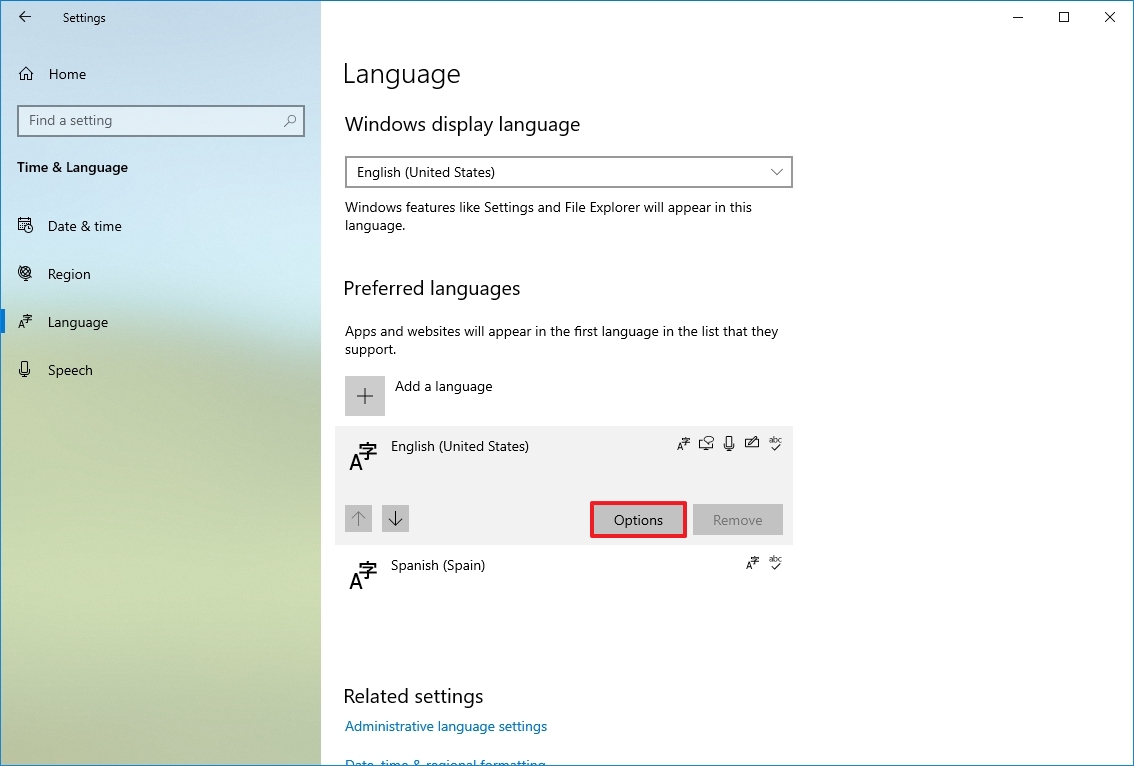
- Under the «Preferred languages» section, select the current default language (top in the list).
- Click the Options button.
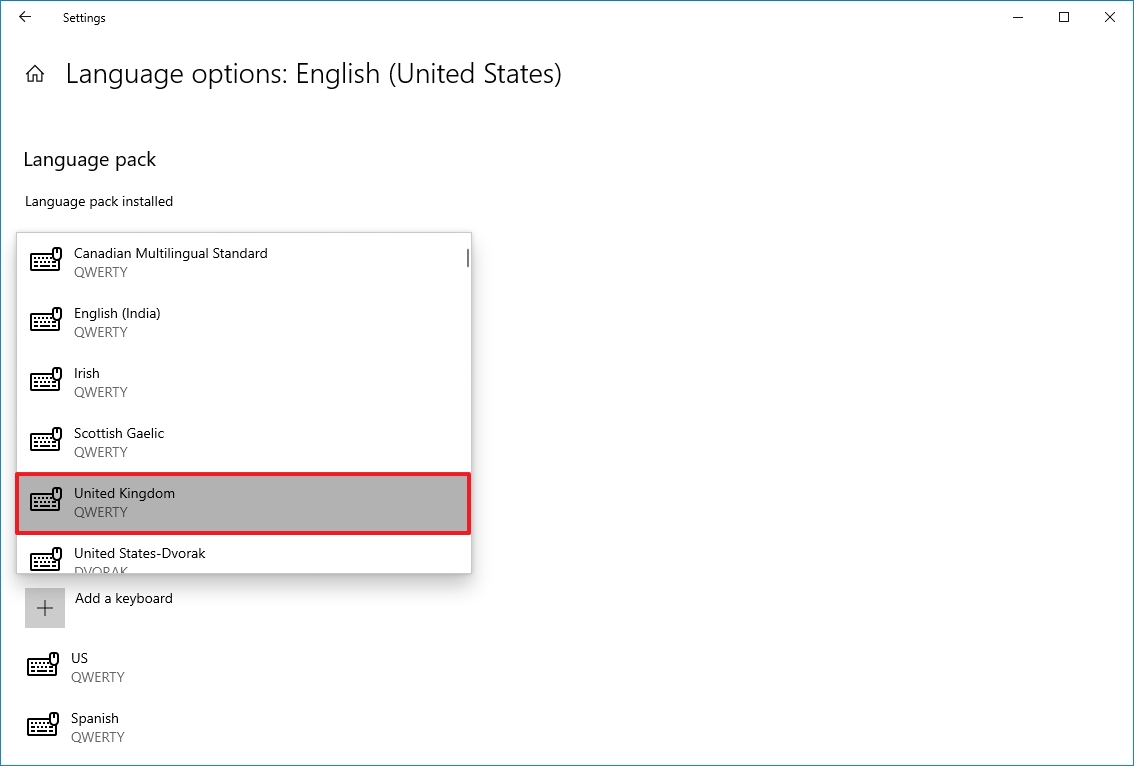
- Under the «Keyboards» section, click the «Add a keyboard» button.
- Select the new keyboard layout to add to Windows 10.
- Repeat steps 6 and 7 to add more layouts.
Once you complete the steps, the new keyboard layout will be added to the device, and you can switch between them using the instructions below.
How to change keyboard layout on Windows 10
While changing layouts is straightforward, it’ll reconfigure some of the keyboard keys, which means some of the keys may print a different character depending on the layout.
To switch between keyboard layouts on Windows 10, use these steps:
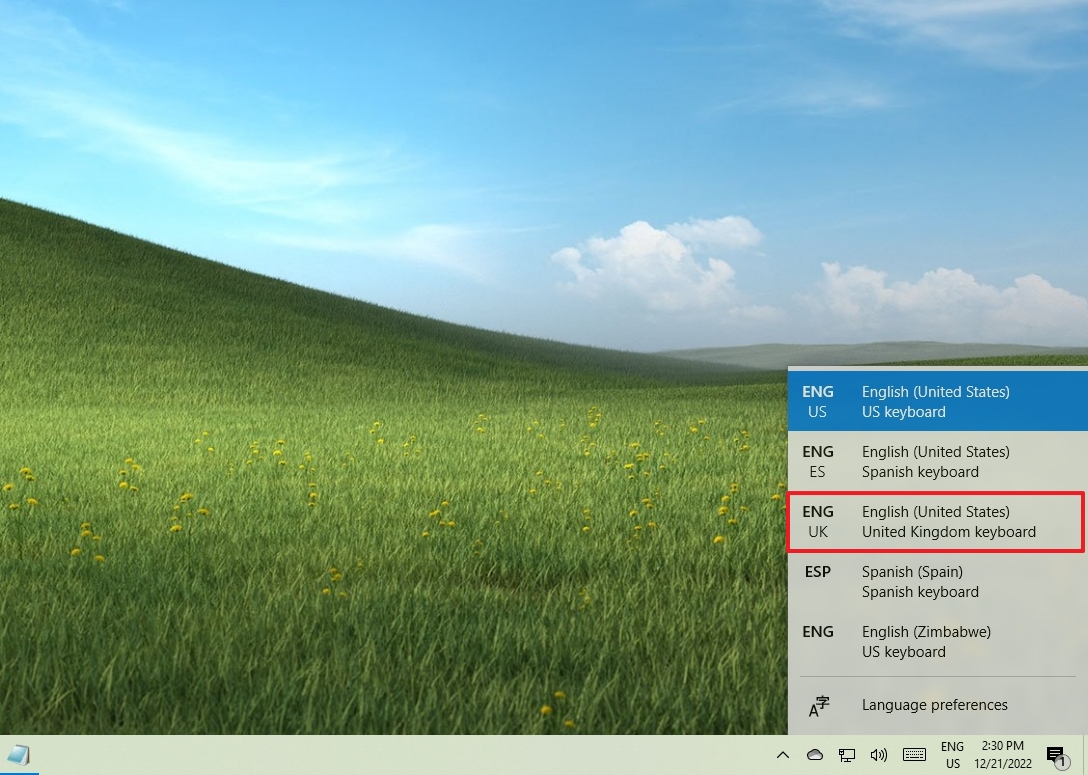
- Click the Input Indicator icon in Taskbar (bottom right).
- Select the new keyboard layout.
- Repeat steps 1 and 2 to switch back to the default layout.
After you complete the steps, you can start typing with the new keyboard layout.
Enable Input Indicator
If the Input Indicator is not present in the Taskbar, you can enable it through the Settings app.
To enable the Input Indicator on Windows 10, use these steps:
- Open Settings.
- Click on Personalization.
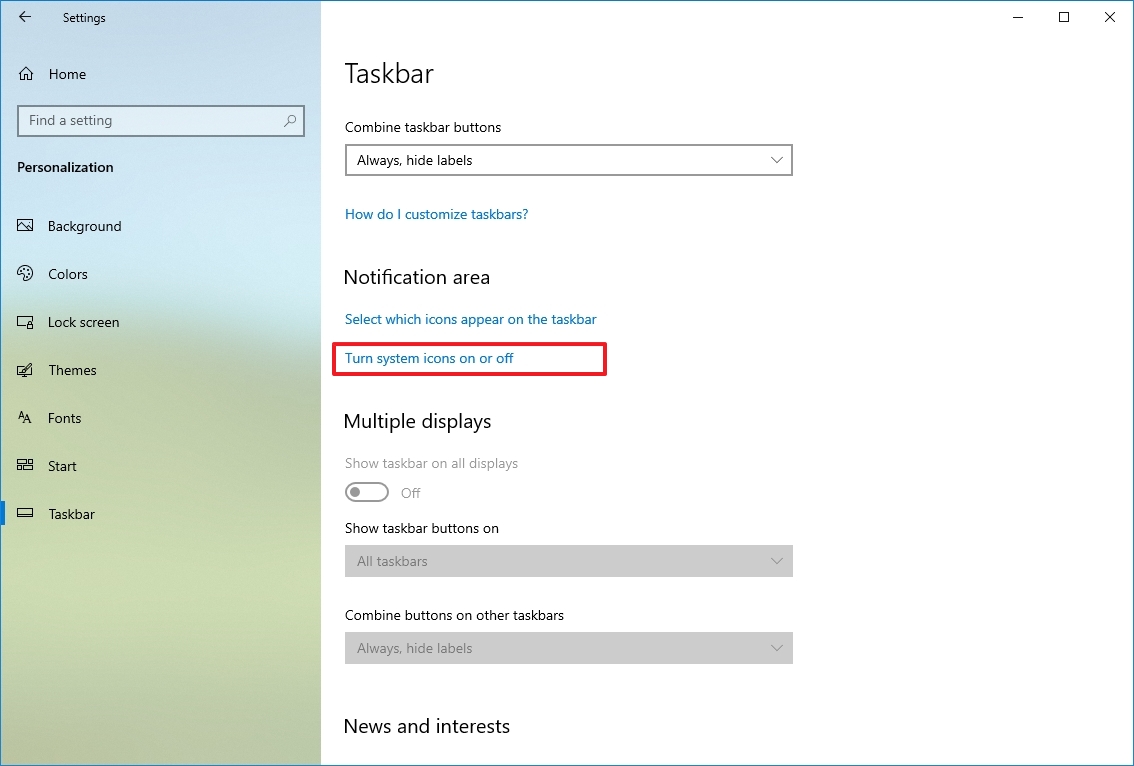
- Click on Taskbar.
- Under the «Notification area» section, click the «Turn system icons on or off» option.
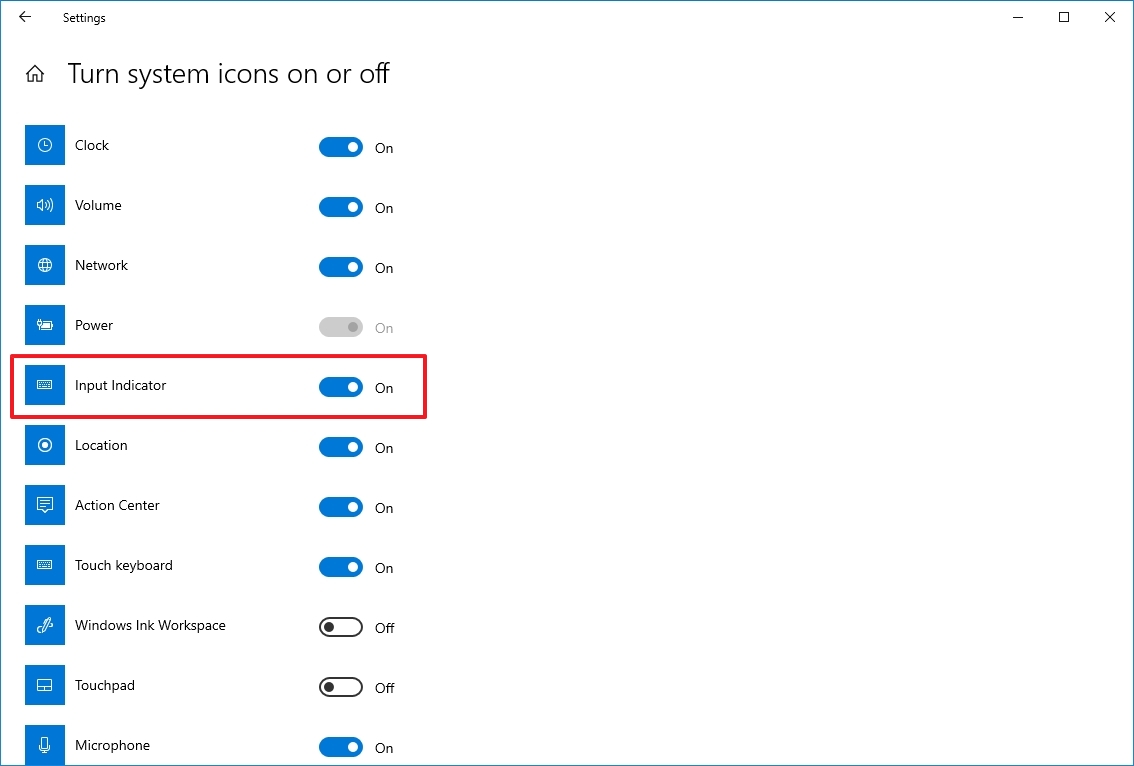
- Turn on the Input Indicator toggle switch.
Once you complete the steps, the icon will appear in the Taskbar’s notification area to access the layouts and switch between them. Alternatively, you can use the «Windows key + Spacebar» keyboard shortcut to cycle between the available keyboard layouts more quickly.
How to remove keyboard layout on Windows 10
To remove a keyboard layout on Windows 10, use these steps:
- Open Settings.
- Click on Time & Language.
- Click on Language.
- Under the «Preferred languages» section, select the current default language (top in the list).
- Click the Options button.
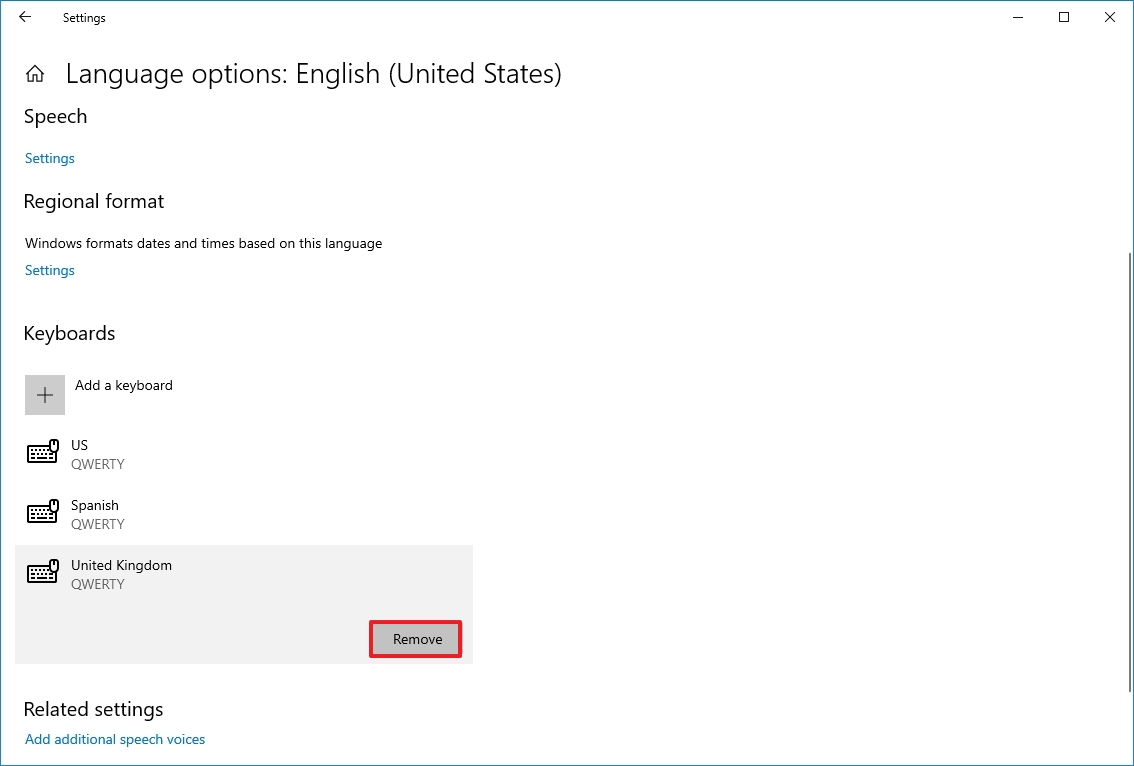
- Under the «Keyboards» section, select the keyboard to remove from the list.
- Click the Remove button.
- Repeat steps 6 and 7 to remove additional layouts.
Once you complete the steps, the keyboard layout will be removed from the device.
More resources
For more helpful articles, coverage, and answers to common questions about Windows 10 and Windows 11, visit the following resources:
- Windows 11 on Windows Central — All you need to know
- Windows 10 on Windows Central — All you need to know
Cutting-edge operating system
A refreshed design in Windows 11 enables you to do what you want effortlessly and safely, with biometric logins for encrypted authentication and advanced antivirus defenses.
All the latest news, reviews, and guides for Windows and Xbox diehards.
Mauro Huculak is technical writer for WindowsCentral.com. His primary focus is to write comprehensive how-tos to help users get the most out of Windows 10 and its many related technologies. He has an IT background with professional certifications from Microsoft, Cisco, and CompTIA, and he’s a recognized member of the Microsoft MVP community.
Skip to content
На чтение 3 мин. Просмотров 3.3k. Опубликовано
Вы заинтересованы в настройке собственных раскладок клавиатуры или запуске раскладок с нуля по любой причине – например, при настройке клавиатуры на языке, который системы Microsoft не поддерживают или не включают в себя символ вашей симпатии, просто нажимая кнопку клавиатуры? Теперь вы можете точно узнать, как это сделать, следуя инструкциям, приведенным ниже.

В учебнике ниже мы увидим, как именно мы можем установить метод ввода, удалить метод ввода из наших раскладок клавиатуры и использовать Microsoft Keyboard Layout Creator для настроить клавиатуру в Windows 10, Windows 8 в соответствии с нашими предпочтениями.
Содержание
- Установить раскладку клавиатуры на Windows 10, 8
- 1. Добавьте новую раскладку клавиатуры
- 2. Изменить методы ввода с клавиатуры
- 3. Используйте Microsoft Keyboard Layout Creator
Установить раскладку клавиатуры на Windows 10, 8
- Добавить новую раскладку клавиатуры
- Изменить методы ввода с клавиатуры
- Использовать Microsoft Keyboard Layout Creator
1. Добавьте новую раскладку клавиатуры
Из этого туториала Вы узнаете, как добавить или удалить ввод с клавиатуры на панели управления.
- Переместите курсор мыши на правую сторону экрана.
- В поле поиска введите Панель управления
- Нажмите (щелкните левой кнопкой мыши) на значке «Панель управления», который отображается после завершения поиска.
- После того, как откроется окно панели управления, щелкните левой кнопкой мыши значок «Язык».
-
Дважды щелкните левой кнопкой мыши на «Добавить язык», расположенном в средней части окна, которое вы открыли.
- Под полем «Метод ввода» нажмите (щелкните левой кнопкой мыши) «Добавить метод ввода».
-
Дважды щелкните (левой кнопкой мыши) на метод ввода, который вы предпочитаете добавить, или просто выберите метод ввода и нажмите «Добавить».
- Вы можете повторить два шага выше, чтобы добавить другой язык ввода, если хотите.
- Когда вы закончите, вам просто нужно нажать (левой кнопкой мыши) на «Сохранить» в нижней части окна.
- После того, как вы добавите метод ввода, вам просто нужно будет переключить методы в нижней правой части экрана, где будет указано, на каком языке настроена ваша клавиатура.
- СВЯЗАННЫЕ: лучшие клавиатуры для ПК на 2018 год
2. Изменить методы ввода с клавиатуры
Вы также можете добавить или удалить методы ввода, используя функцию настройки ПК в Windows 10, 8.1, как показано ниже:
- Откройте «Настройки ПК», щелкнув мышью на панели чудо-кнопок.
- Нажмите (щелкните левой кнопкой мыши) на «Настройки»
- Или другой способ открыть настройки ПК – нажать и удерживать кнопки «Windows» и «I».
- Нажмите (щелкните левой кнопкой мыши) на «Общие», расположенные в левой части экрана.
- Нажмите (щелкните левой кнопкой мыши) ссылку «Языковые настройки», расположенную в разделе «Язык» в правой части экрана.
- Отсюда вы можете выполнить шаги, представленные в первом уроке.

3. Используйте Microsoft Keyboard Layout Creator
Давайте посмотрим, как мы можем загрузить Microsoft Keyboard Layout Creator и создать наши собственные раскладки клавиатуры с нуля с помощью этого приложения.
- Перейдите по ссылке ниже, чтобы загрузить Microsoft Keyboard Layout Creator
- Используя ссылку ниже, вы увидите, что это приложение не поддерживает Windows 10, 8, но, тем не менее, оно будет работать нормально, если вы установите его. Кроме того, в качестве требования для того, чтобы это приложение работало в вашей системе Windows 10, 8, вам также необходимо установить Microsoft .NET Framework v2.0, ссылку на это приложение можно найти ниже.
Windows 10 has a lot of keyboard layouts for different languages and you can add any keyboard layout you need to use. If you can’t find the keyboard layout that suits your needs, no matter how they are, you can always create a custom keyboard layout.
- How to change the keyboard layout in Linux
- Windows 10 is about to change the keyboard layout easily with Keyboard Shortcut Manager
Keyboard layouts often point to the keyboard with keys arranged in a certain way or towards the language that users use. For example, the keyboard layout for entering Korean, French, Spanish, or Chinese will be different from the usual QWERTY keyboard layout for English typing. Their letters and locations may be more or less the same, but in some keyboards, you will be able to enter accented characters. Windows 10 has a lot of keyboard layouts for different languages and you can add any keyboard layout you need to use. If you can’t find the keyboard layout that suits your needs, no matter how they are, you can always create a custom keyboard layout. And this is very easy.
- Summary of common Microsoft Word shortcuts
- Photoshop shortcuts help you work faster (part 1)
- If you want to master Windows, master these shortcuts
- Summary of expensive shortcuts in Microsoft Excel
To create a custom keyboard layout, you need an application called Microsoft Keyboard Layout Creator . This is a free application developed by Microsoft that anyone can use to create a custom keyboard layout. It is very easy to use and the layout you create can be shared with anyone who wants to install it on their own system. Download Microsoft Keyboard Layout Creator, install and run the application.
Download the Microsoft Keyboard Layout Creator.
Custom keyboard layout for Windows 10
You will get a basic keyboard layout without a dedicated number pad. These keys are color coded. You can customize all white keys and dark gray keys do not. Dark gray keys represent keys like Tab, Shift, Caps , etc.
Click inside the customizable keys and in the dialog box that opens, enter the key / character you want to appear when you press that key. This step will help you enter the default character for that key. If you want to change the character status for the key, click the All button in the same dialog box.

You can also pair keys with Ctrl and Alt keys.
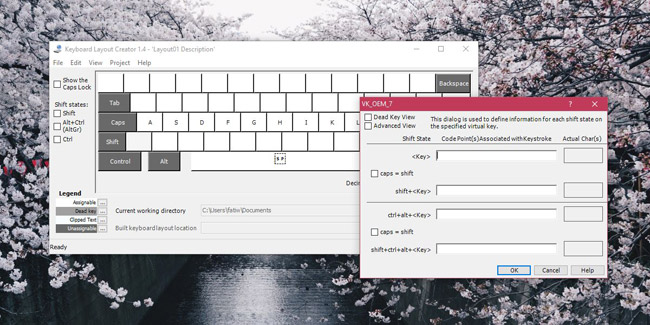
When you’re done, go to Project> Build DLL and Setup Package . You will see a prompt asking if you want to check the properties of the keyboard layout you are creating and you should perform this test. In this step you can set the appropriate name and description for the keyboard layout you create.
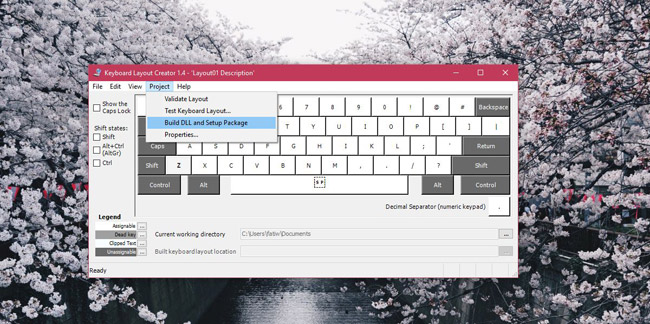
The software will create an MSI file and an EXE file, and one of the two files will be used to install your custom keyboard layout. We created a keyboard layout to type uppercase letters and named Angry. After installation, it allows users to type in all uppercase letters without holding down the Shift key. For more complex keyboard layouts, it will take longer to create but in general this tool is still easy to use and you only need time to get used to it.
See more:
- How to add number keys to the Windows 10 keyboard
- How to install Korean keyboard for Windows
- 6 ways to open virtual keyboard on Windows 10
Read more
- How to create custom shortcut keys for Raspberry Pi
- How to run a custom task in Windows 10 with Cortana
- Best ergonomic (Ergonomic) keyboard 2018
- How to create checkboxes with CSS Grid
- Learn about custom variables in Google Analytics
- Homemade keyboard is not difficult
 If you’re prompted for an administrator password or confirmation, type the password or provide confirmation.