Sign in with Microsoft
Sign in or create an account.
Hello,
Select a different account.
You have multiple accounts
Choose the account you want to sign in with.
-
In the search box on the taskbar, type Create a restore point, and select it from the list of results.
-
On the System Protection tab in System Properties, select Create.

-
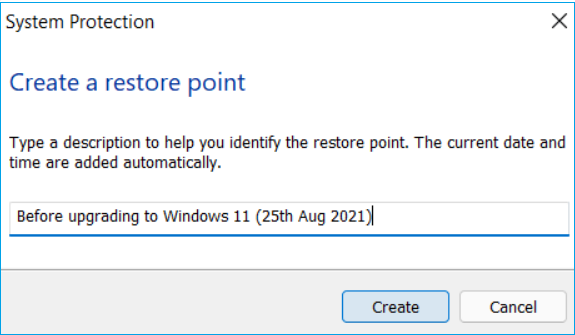
Type a description for the restore point, and then select Create > OK.
Need more help?
Want more options?
Explore subscription benefits, browse training courses, learn how to secure your device, and more.
Communities help you ask and answer questions, give feedback, and hear from experts with rich knowledge.
Thank you for your feedback!
×
 Одна из возможностей восстановления Windows 10 — это использование точек восстановления системы, позволяющих отменить последние изменения в ОС, в том числе в системных файлах и реестре ОС. Создать точку восстановления можно вручную, кроме этого, при соответствующих настройках параметров защиты системы.
В этой инструкции подробно описывается процесс создания точек восстановления, настройки, необходимые для того, чтобы Windows 10 делала это автоматически, а также способы использовать ранее сделанные точки восстановления для отката изменений в драйверах, реестре и параметрах системы. Заодно расскажу, как удалить созданные точки восстановления. Также может пригодиться: Как восстановить отдельные файлы из точек восстановления, Что делать, если восстановление системы отключено администратором в Windows 10, 8 и Windows 7, Как исправить ошибку 0х80070091 при использовании точек восстановления в Windows 10.
Примечание: точки восстановления содержат лишь информацию об изменившихся системных файлах, критичных для работы Windows 10 и записях в реестре, но не представляют собой полный образ системы. Если вас интересует именно создание такого образа, на эту тему есть отдельная инструкция — Как сделать резервную копию Windows 10 и восстановиться из нее.
- Настройка восстановления системы (для возможности создания точек восстановления)
- Как создать точку восстановления Windows 10
- Как откатить Windows 10 из точки восстановления
- Как удалить точки восстановления
- Видео инструкция
Дополнительную информацию по возможностям возврата работоспособности ОС вы можете найти в статье Восстановление Windows 10.
Настройки восстановления системы
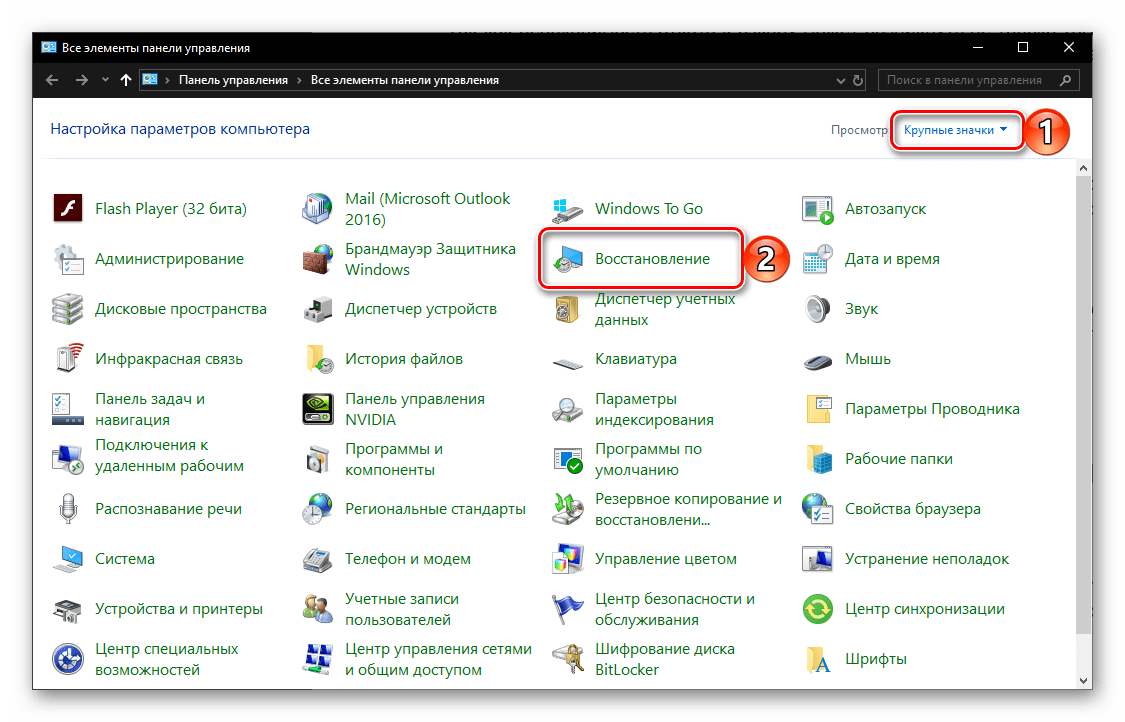
Прежде чем начать, следует заглянуть в настройки восстановления Windows 10. Для этого, кликните правой кнопкой мыши по «Пуск», выберите пункт контекстного меню «Панель управления» (Вид: значки), затем «Восстановление».
Нажмите по пункту «Настройка восстановления системы». Еще один способ попасть в нужное окно — нажать клавиши Win+R на клавиатуре и ввести systempropertiesprotection после чего нажать Enter.
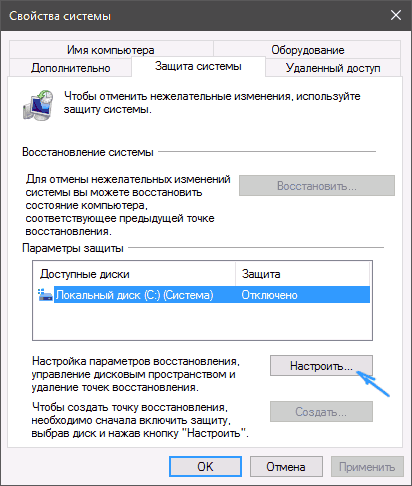
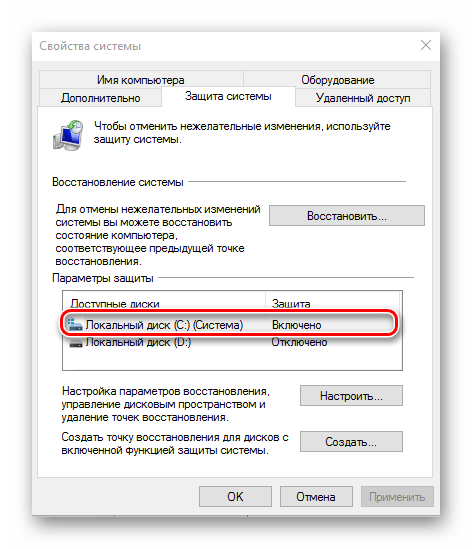
Откроется окно настроек (вкладка «Защита системы»). Точки восстановления создаются для всех дисков, для которых защита системы включена. Например, если для системного диска C защита отключена, вы можете включить ее, выбрав этот диск и нажав кнопку «Настроить».
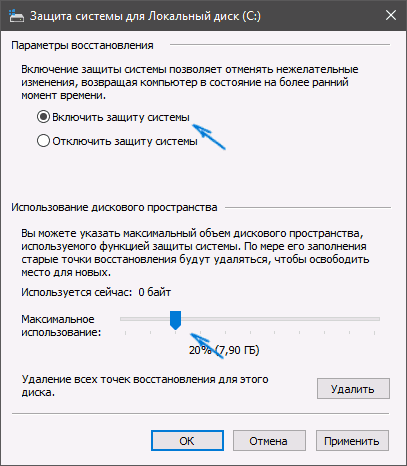
После этого выберите «Включить защиту системы» и укажите количество места, которое вы хотели бы выделить для создания точек восстановления: чем больше места, тем большее количество точек сможет храниться, а по мере заполнения пространства старые точки восстановления будут удаляться автоматически.
Как создать точку восстановления Windows 10
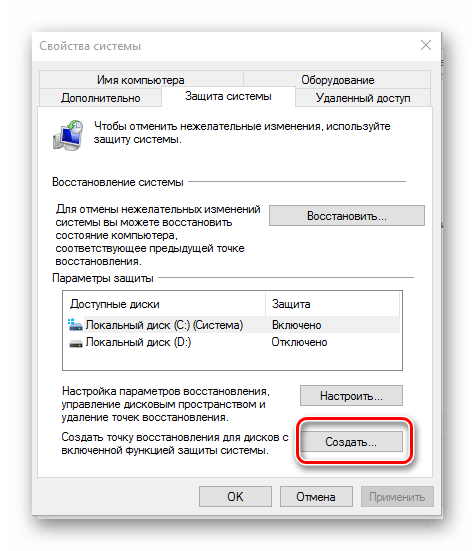
Для того, чтобы создать точку восстановления системы, на той же вкладке «Защита системы», (попасть в которую также можно через правый клик по «Пуск» — «Система» — «Защита системы») нажмите кнопку «Создать» и задайте имя новой точки, после чего еще раз нажмите «Создать». Через некоторое время операция будет выполнена.

Теперь на компьютере содержится информация, которая позволит вам отменить последние сделанные изменения в критически важных системных файлах Windows 10, если после установки программ, драйверов или других действий ОС стала работать неправильно.
Созданные точки восстановления хранятся в скрытой системной папке System Volume Information в корне соответствующих дисков или разделов, однако доступа к этой папке у вас по умолчанию нет.
Как откатить Windows 10 до точки восстановления
А теперь об использовании точек восстановления. Сделать это можно несколькими способами — в интерфейсе Windows 10, с помощью инструментов диагностики в особых вариантах загрузки, в среде восстановления, запущенной с флешки (если компьютер не загружается) и в командной строке.
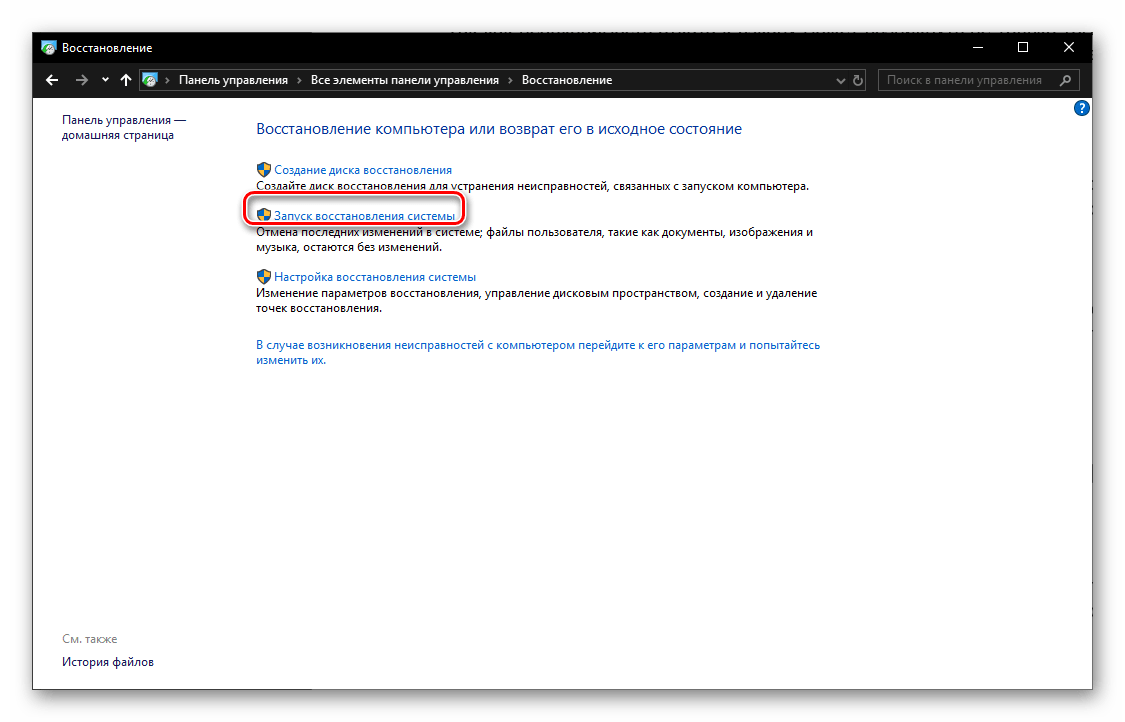
Самый простой способ, при условии, что система запускается — зайти в панель управления, выбрать пункт «Восстановление», после чего нажать «Запуск восстановления системы».
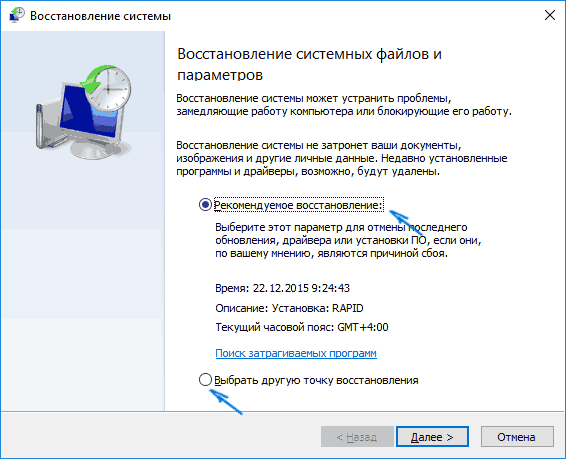
Запустится мастер восстановления, в первом окне которого вам могут предложить выбрать рекомендуемую точку восстановления (созданную автоматически), а во втором (если вы отметите «Выбрать другую точку восстановления» вы сможете сами выбрать одну из созданных вручную или автоматически точек восстановления. Нажмите «Готово» и дождитесь окончания процесса восстановления системы. После автоматической перезагрузки компьютера вам сообщат, что восстановление прошло успешно.

Второй метод использовать точку восстановления — с помощью особых вариантов загрузки, попасть в которые можно через Параметры — Обновление и восстановление — Восстановление или же, еще быстрее, прямо с экрана блокировки: нажать по кнопке «питания» справа внизу, а затем, удерживая Shift, нажать «Перезагрузка».
На экране особых вариантов загрузки выберите пункт «Поиск и устранение неисправностей» — «Восстановление системы» (или «Диагностика» — «Дополнительные параметры» — «Восстановление системы» в более ранних версиях Windows 10), далее вы сможете воспользоваться имеющимися точками восстановления (в процессе потребуется ввод пароля учетной записи).

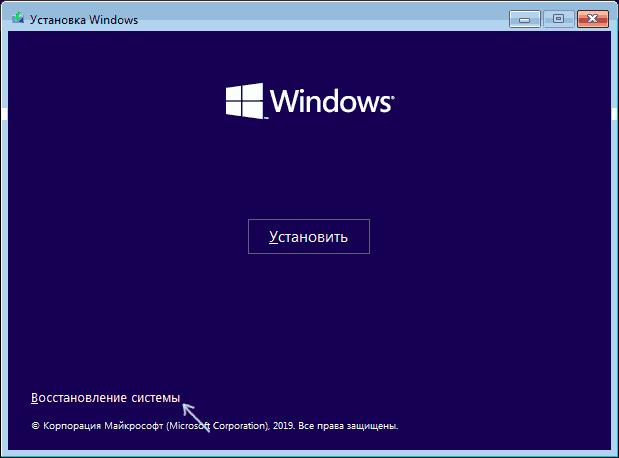
В случае, если Windows 10 не загружается, вы все равно можете использовать точки восстановления: для этого вам понадобится загрузочная флешка с Windows 10 (которую придется сделать на другом компьютере), либо диск восстановления. При использовании загрузочной флешки, достаточно будет выбрать пункт «Восстановление системы» на втором экране программы установки.
В результате вы попадете в среду восстановления, как в предыдущем способе и сможете воспользоваться точками восстановления даже на не запускающемся компьютере.
И еще один способ — запуск отката до точки восстановления из командной строки. он вам может пригодиться в том случае, если единственный работающий вариант загрузки Windows 10 — безопасный режим с поддержкой командной строки.

Просто введите в командную строку rstrui.exe и нажмите Enter для запуска мастера восстановления (он запустится в графическом интерфейсе).
Как удалить точки восстановления
Если вам потребовалось удалить имеющиеся точки восстановления, снова зайдите в окно настройки «Защиты системы», выберите диск, нажмите «Настроить», а затем используйте кнопку «Удалить» для этого. При этом удалятся все точки восстановления для этого диска.
То же самое можно сделать с помощью утилиты очистки диска Windows 10, для ее запуска нажмите Win+R и введите cleanmgr, а после того как утилита откроется, нажмите «Очистить системные файлы», выберите диск для очистки, а затем перейдите на вкладку «Дополнительно». Там вы сможете удалить все точки восстановления, кроме самой последней.

И, наконец, существует способ для удаления конкретных точек восстановления на компьютере, сделать это можно с помощью бесплатной программы CCleaner. В программе зайдите в «Инструменты» — «Восстановление системы» и выберите те точки восстановления, которые хотите удалить.
Видео — создание, использование и удаление точек восстановления Windows 10
И, в завершение, видео инструкция, если же после просмотра у вас останутся вопросы, буду рад ответить на них в комментариях.
Если вас интересует более продвинутое резервное копирование, возможно стоит приглядеться к сторонним средствам для этого, например, Veeam Agent for Microsoft Windows Free.
Содержание
- Создание точки восстановления в Виндовс 10
- Настройка восстановления системы
- Создание точки восстановления
- Откат операционной системы
- Заключение
- Вопросы и ответы

Каждый пользователь ПК рано или поздно сталкивается с тем, что операционная система начинает выдавать ошибки, разбираться с которыми просто нет времени. Это может происходить как следствие установки вредоносного ПО, сторонних драйверов, которые не подходят системе и тому подобное. В таких случаях устранить все проблемы можно, использовав точку восстановления.
Давайте разберемся что такое точка восстановления (ТВ) и как можно ее создать. Итак, ТВ — это своеобразный слепок ОС, который хранит в себе состояние системных файлов в момент его создания. То есть, при ее использовании юзер возвращает ОС в то состояние, когда была сделана ТВ. В отличие от резервной копии ОС Виндовс 10, точка восстановления не затронет пользовательских данных, так как является не полной копией, а только содержит информацию о том, как изменились системные файлы.
Процесс создания ТВ и отката ОС выглядит следующим образом:
Настройка восстановления системы
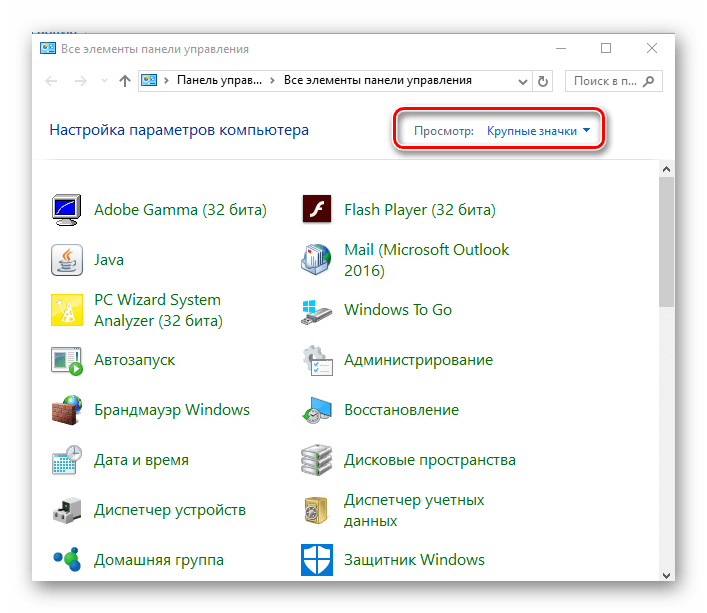
- Кликните правой кнопкой мыши по меню «Пуск» и зайдите в «Панель управления».
- Выберите режим просмотра «Крупные значки».
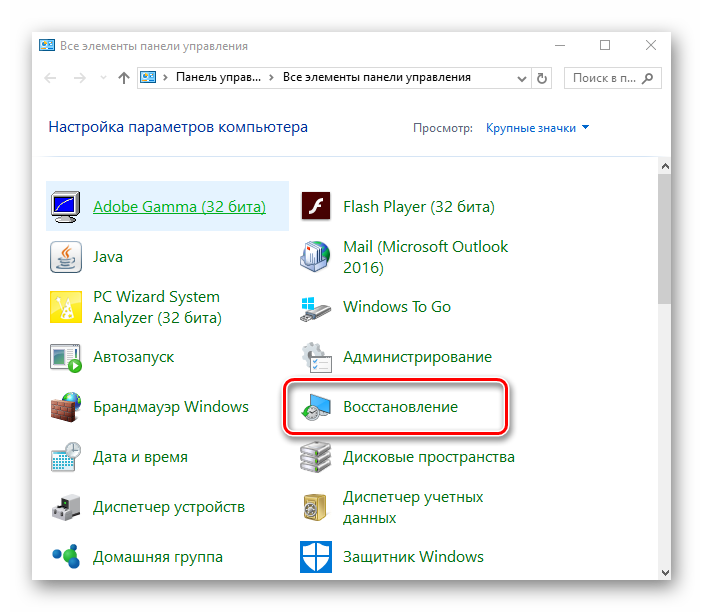
- Щелкните по элементу «Восстановление».
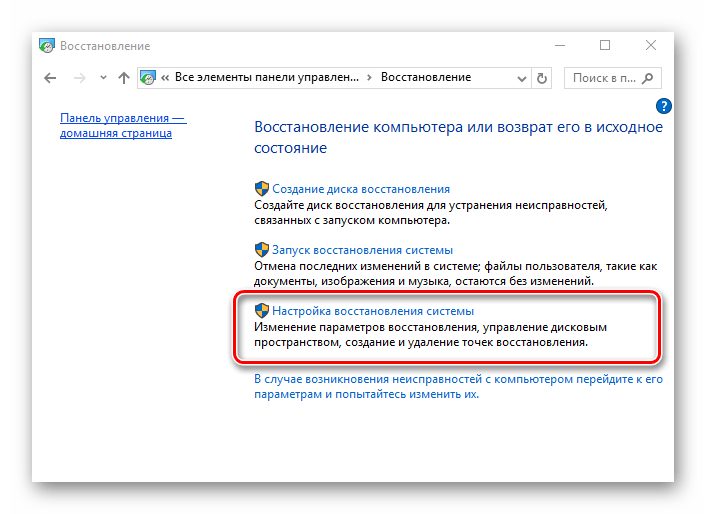
- Далее выберите «Настройка восстановления системы» (потребуется иметь права администратора).
- Проверьте, настроена ли защита для системного диска. Если она выключена, нажмите кнопку «Настроить» и установите переключатель в режим «Включить защиту системы».
Создание точки восстановления
- Повторно перейдите на вкладку «Защита системы» (для этого выполните пункты 1-5 предыдущего раздела).
- Нажмите кнопку «Создать».
- Введите краткое описание для будущей ТВ.
- Дождитесь окончания процесса.


Откат операционной системы
Точка восстановления для того и создается, чтобы в случае необходимости к ней можно было быстро вернуться. Причем выполнение данной процедуры возможно даже в тех случаях, когда Windows 10 отказывается запускаться. Узнать о том, какие существуют способы отката ОС к точке восстановления и как реализовывается каждый из них, вы можете в отдельной статье на нашем сайте, здесь же приведем лишь наиболее простой вариант.
- Зайдите в «Панель управления», переключите просмотр на «Мелкие значки» или «Крупные значки». Перейдите в раздел «Восстановление».
- Нажмите «Запуск восстановления системы» (для этого потребуется иметь права администратора).
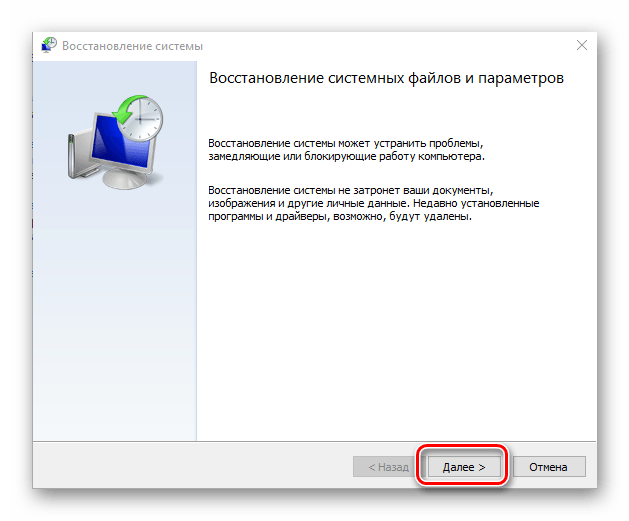
- Щелкните по кнопке «Далее».
- Ориентируясь на дату, когда ОС еще работала стабильно, выберите подходящую точку и еще раз нажмите «Далее».
- Подтвердите свой выбор нажатием кнопки «Готово» и дождитесь, пока завершится процесс отката.


Подробнее: Как откатить Виндовс 10 до точки восстановления
Заключение
Таким образом, своевременно создавая точки восстановления, в случае необходимости вы всегда сможете вернуть работоспособность Windows 10. Рассмотренное нами в рамках данной статьи средство является достаточно эффективным, так как позволяет за короткое время избавится от всевозможных ошибок и сбоев без использования такой радикальной меры, как переустановка операционной системы.
Еще статьи по данной теме:
Помогла ли Вам статья?
Almost each and every time, before making any changes to original system files or installing a new application that edits original system files, we ask our readers to create a restore point so that they can easily revert all changes with a few mouse clicks if something goes wrong.
Creating a manual restore point in Windows has always been easy. Windows 10 is no exception. Simply follow the directions mentioned in one of the given below methods to create a restore point in Windows 10.
Method 1 – create a restore point in Windows 10
Method 2 – create a restore point in Windows 10 using third-party software
Method 1 of 2
Creating a restore point via Control Panel
Step 1: In the Start menu search box, type Create a restore point and press Enter key to open System Properties dialog. Alternatively, you can type Sysdm.cpl in Start menu search box or Run command box and press Enter key to open the System Properties dialog.
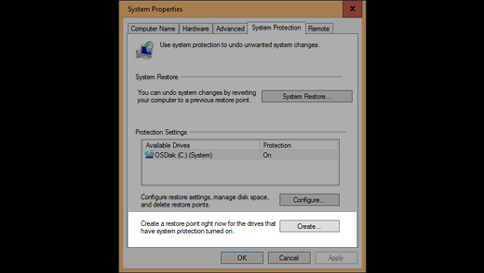
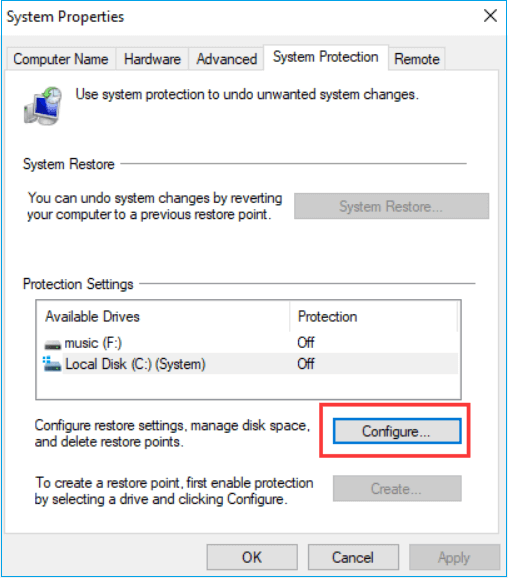
Step 2: Once System Properties is launched, under the System Protection tab, you should see the Create button.
If the Create button is greyed out, under Protection Settings (see picture), select your Windows 10 installed drive, which is usually “C”, click Configure, select Turn on system protection option in the resulting dialog, allocate at least 2% of drive’s space by moving the slider before clicking Apply button.
Step 3: Under the System Protection tab, click Create button, enter a name or description for your new restore point, and then click the Create button again to create a restore point in Windows 10.
Once the restore point is created, you will see The Restore point was created successfully message. You can close System Properties dialog now.
Method 2 of 2
Create a restore point using third-party software
There are many solid third-party tools out there to easily create restore points in Windows 10. Our favorite application is Restore Point Creator (free). Restore Point Creator not only allows you to quickly create restore points but also allows you easily delete individual restore points to free up disk space.
While Windows 10 also enables you to delete restore points, it clears all restore points at once. This means, you can’t delete individual restore points in Windows 10 without using third-party tools.
Restore Point Creator includes options to view the amount of space being used by all restore points. The ability to create restore points at scheduled times is another attraction of this free program.
You can configure the software to automatically create restore points at a specified time of the day or week. There is even an option to automatically delete restore points after “n” number of days.
There are more reasons to love this free Restore Point Creator. You can add this program to My Computer context menu or configure it to automatically create a restore point in Windows 10 at user logon. A portable version of the software is available as well.
To restore Windows 10 to a previously created restore point, complete the given below directions.
Step 1: Type Created a restore point in Start menu search box and then hit Enter key to open System Properties dialog.
Step 2: Here, under the System Protection tab, click System Restore button to launch System Restore wizard.
Step 3: Click the Next button to view all previously created restore points, select a restore point, and then click the Next button.
Tip: If you want to know what all programs will be removed, select a restore point and then click Scan for affected programs. As you likely know, restore point only deletes applications that have been installed after creating the selected restore point.
Your documents, pictures, and other files will be preserved.
Step 4: Finally, click Finish button. When you get the confirmation dialog, click Yes button to restart your PC and restore Windows 10 to the selected and restore point.
Good luck!
What Does Creating a System Restore Point Do
When you’re trying to fix a major problem in Windows, you can usually start with the system restore point tool.
Usually, Windows OS automatically creates restore points before a significant event occurs, such as installing or updating a driver or application. Windows also has options to activate these points manually. However, using an outdated restore point may result in many unnecessary changes being undone.

In addition, the functionality of the Windows System Restore tool that enables you to revert to previous versions of software, registry settings, and driver configuration is called a restore point. It is an inbuilt feature of Windows that helps to undo the significant changes in your computer by taking it back to the earlier version when the restore point was created.
It is an excellent and superficial tool to use the earlier operating system version by undoing troubleshooting. This guide will comprehend two different methods for how to create a system restore point for Windows 10/11. It may take about 30 minutes to reverse the changes using the first method for Windows System Restore. You can go with the other if you want quick and easy results.
Can System Restore Points be Created Manually
Windows computers have two options to create system restore points based on the user’s activities. As we mentioned above, Windows automatically creates initial restore points, and users can also create restore points manually to rollbacks the operating system to an earlier functional state.
Regularly creating restore points is a good idea when the operating system is in a functional state.
To manually create a restore point, follow this article’s third and fourth parts.
How to Create a System Restore Point on Windows 10/11
Windows operating system automatically creates a restore point at significant events such as after installing a Windows update, any unexpected crash, etc. It also provides options to manually create restore points to recover OS when you enter the point. Here we will explain two different methods for how to create a system restore point for Windows 10/11. Follow the detailed guide:
Step 1. Go to the Search bar, type System restore point, and click to «open the app».
Step 2. Click on «Configure».
Step 3. Select «Turn on system protection».
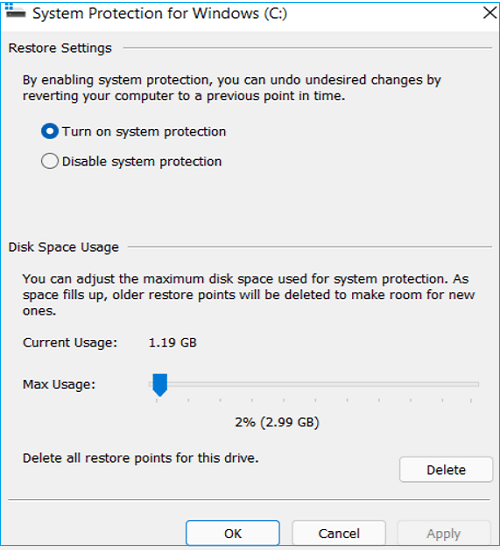
Step 4. Choose your desired disk space use and click on «Apply», then «OK».
- Notice:
- Select less than a 10% portion of the total of your hard disk/SSD drive. We recommend keeping it around 2 to 3 percent.
Step 5. After selecting your «Windows drive», click on «Create».
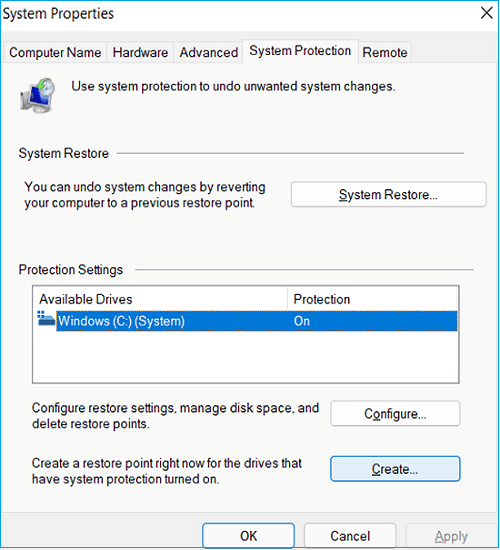
Step 6. Insert a convenient name to the system restore point to understand what it is, and then select «Create».
Now your system restore point is created successfully. It will take some time according to the size of applications, programs, and files in the C drive.
How to Create System Point with Windows Backup Software
In the earlier section, we have explained an in-built Windows functionality to create a system restore point. It does not help you to restore your files, such as images, documents, etc. In addition, creating system restore points have some troubling errors and can lead to data failure. Thus, we are introducing you to an advanced solution to protect your computer OS from losing a single file.
EaseUS Todo Backup Home is an efficient and easy-to-use backup tool with multiple additional functionalities. In case of a computer crash, this software can restore your programs, files, and settings better than a restore point creator. Unlike the limitation of the Windows built-in restore point creating tool, people can also use this backup software to save any restore point in any external backup drive or a cloud drive so that they can access and use it anywhere. It offers numerous following features:
- Complete and effortless restoration of OS images.
- Back up Windows 10/11 OS and create an image point.
- Local and Cloud backup and recovery.
- Disk/Partition Backup and Recovery on Windows.
- Clone and transfer Windows operating system.
EaseUS Todo Backup would be the most suitable and cutting-edge backup software to back up any data with a few clicks. To get started, you can download the EaseUS Todo Backup tool to avoid the hassle of unexpected system failures, data errors, and manually creating restore points in your Windows operating system.
There are complete steps you can follow to back up the Windows system using EaseUS Todo Backup software:
Step 1. On the main page, click «Select backup contents«.

Step 2. Among the four available categories, click OS.

Step 3. EaseUS Todo Backup will automatically select your system partition, you only need to select the backup destination.

Step 4. Both Local Drive and NAS are available for you to save the backup file.

Step 5. After finishing the backup process, you can check the backup status, recover, open, or delete the backup by right-clicking the backup task on the left.

How to Restore a System Restore Point in Windows 10/11
System restore enables Windows users to undo system changes without affecting personal files, such as e-mails, documents, or photos. EaseUS system restore software helps users restore their Windows operating system to an earlier stage in all versions of Windows operating systems.
Follow the given steps to do so:
* To perform system recovery on a none-bootable machine, try to boot the computer through the EaseUS Todo Backup emergency disk.
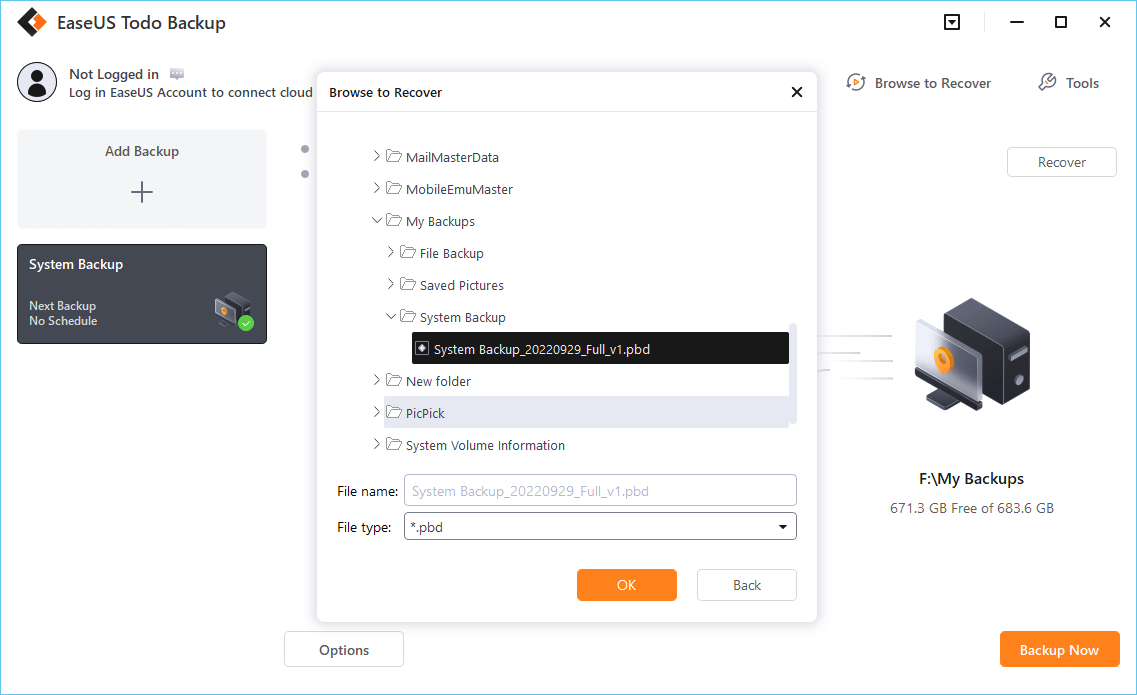
Step 1. Launch EaseUS Todo Backup, click «Browse to Recover«.

Step 2. Guide to your backup destination, choose the system backup file you need. (The backup file created by EaseUS Todo Backup is a pbd file.)
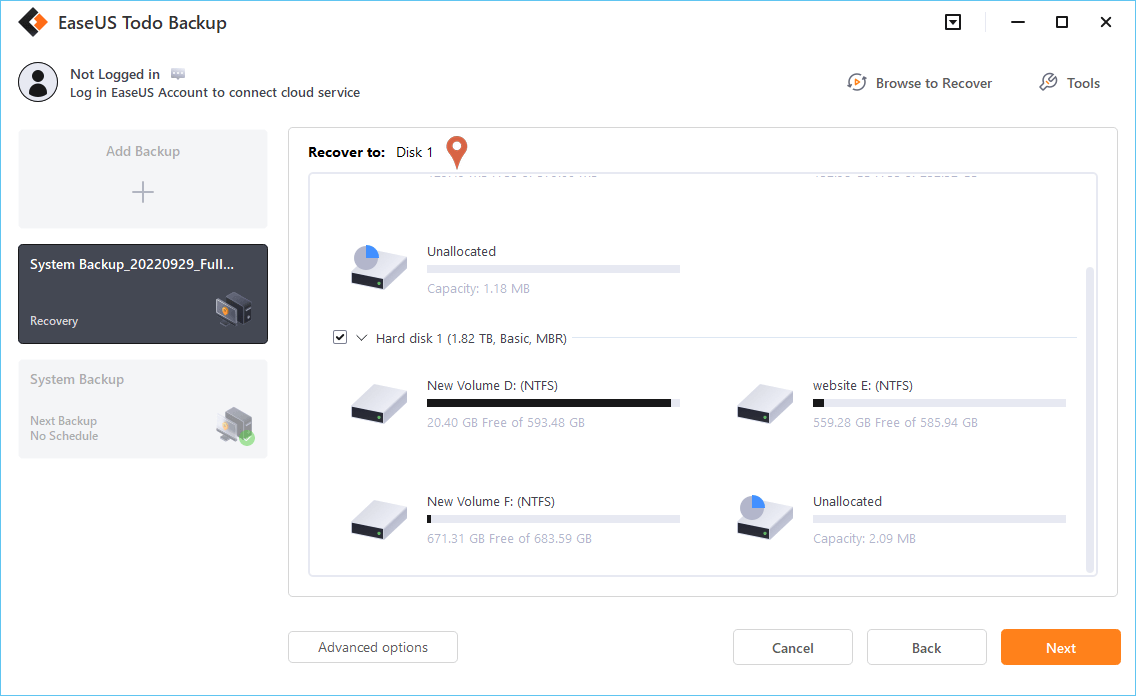
Step 3. Choose the recovery disk. Make sure that the partition style of the source disk and the recovery disk are the same.
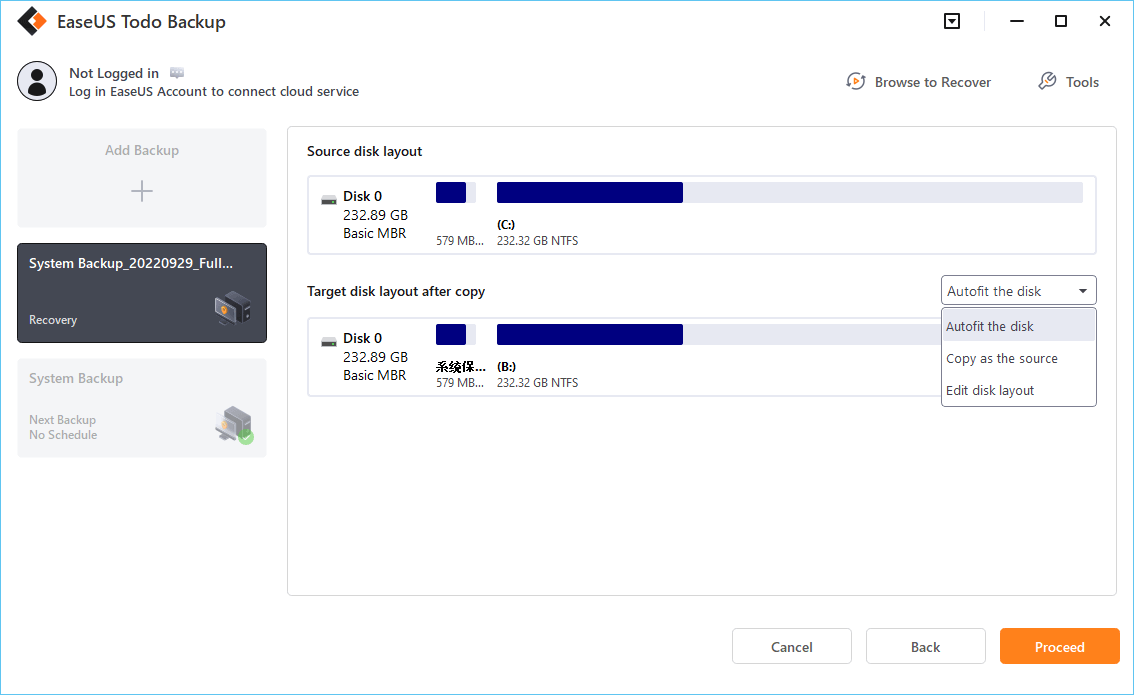
Step 4. You can customize the disk layout according to your needs. Then click «Proceed» to start system backup recovery.
Create System Restore Point FAQs
If you have additional queries about creating System Restore Point, please check these Frequently Asked Questions.
1. When should I create a system restore point?
It is advisable to regularly create a restore point by using the manual settings to avoid any data failure when you encounter any unexpected Windows error.
2. Does Windows 10 automatically create Restore points?
Windows Operating System automatically creates Restore points before critical events, such as updating Windows or installing a new driver or software.
3. How do I create a system restore point automatically?
System Restore is a built-in feature of Windows that automatically create Restore Points to avoid any system failure. In the search bar, type system restore. When «Create a restore point» is found, click on it. In the system protection tab, click «Configure» and then choose «Turn on system protection». Then selecting your «Windows drive», click on «Create». Insert a convenient name, continue to click «Create».
4. How do I restore Windows from a restore point?
Open System Restore application and click the Choose a different restore point option. Select any Restore point from the list and click next. It may take 10-30 minutes, so be patient.
Conclusion
Usually, Restore points are automatically created by the Windows Operating System and don’t need to be created manually. It is helpful to restore the OS that does not affect other files in the computer system.
Thus, the best way to prevent data failure is using EaseUS Todo Backup. It helps Windows users to control any type of data loss, including operating systems and personal files.