 Если вам требуется контролировать работу ребенка за компьютером, запретить посещение тех или иных сайтов, запуск приложений и определить время, когда допустимо использование ПК или ноутбука, реализовать это можно с помощью функций родительского контроля Windows 10, создав учетную запись ребенка и задав необходимые правила для нее. О том, как это сделать пойдет речь в этой инструкции.
На мой взгляд, родительский контроль (семейная безопасность) Windows 10 реализован несколько менее удобным способом, чем в предыдущей версии ОС. Главное появившееся ограничение — необходимость использовать учетные записи Microsoft и подключение к Интернету, в то время как в 8-ке функции контроля и отслеживания были доступны и в оффлайн-режиме. Но это мое субъективное мнение. См. также: Родительский контроль Windows 11, Установка ограничений для локальной учетной записи Windows 10. Еще две возможности: Режим киоска Windows 10 (ограничение пользователя использованием только одного приложения), Учетная запись Гость в Windows 10, Как заблокировать Windows 10 при попытках угадать пароль.
Создание учетной записи ребенка с настройками родительского контроля по умолчанию

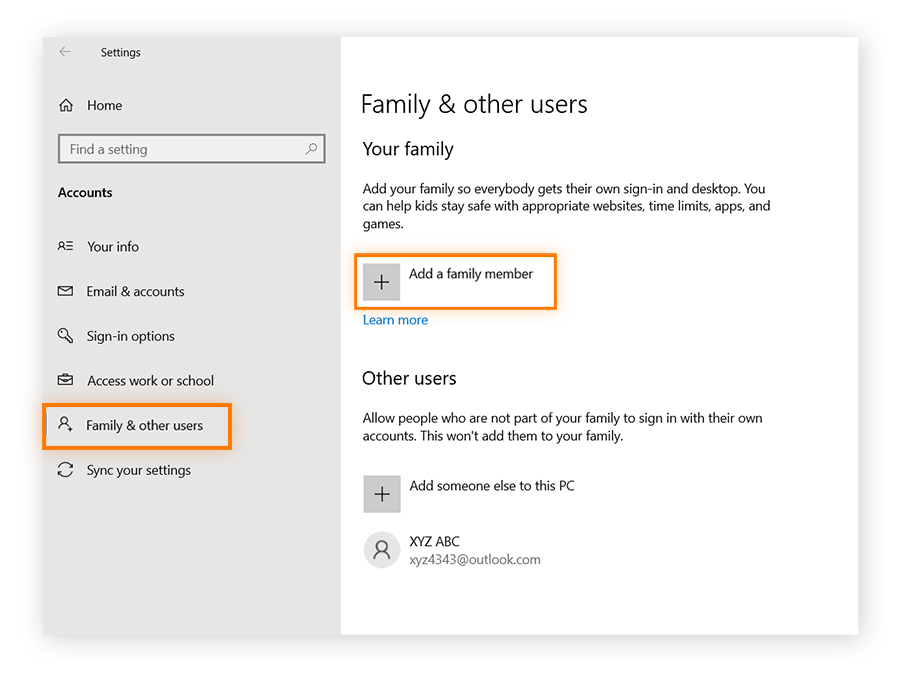
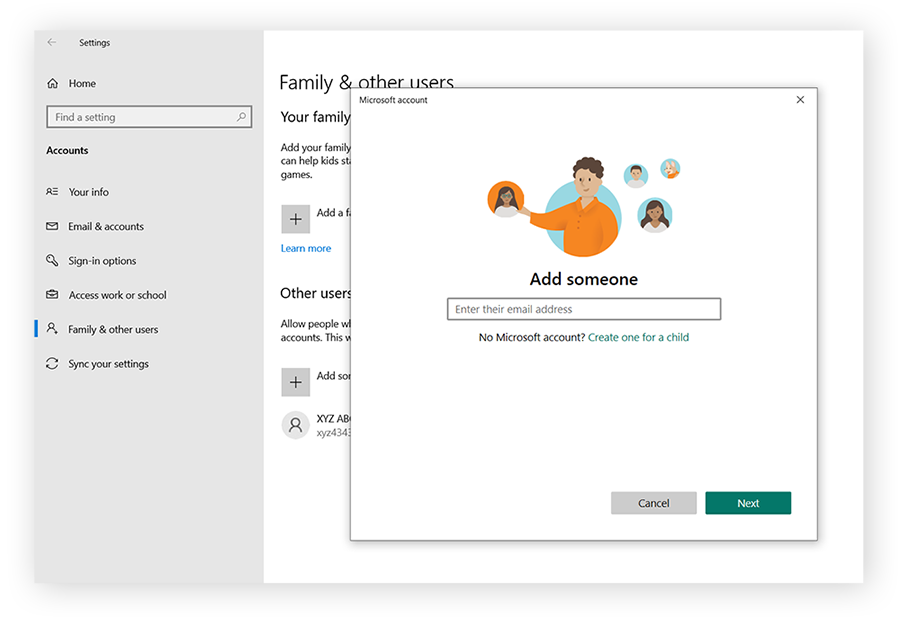
Первое действие при настройке родительского контроля в Windows 10 — создание учетной записи вашего ребенка. Сделать это можно в разделе «Параметры» (можно вызывать клавишами Win+I) — «Учетные записи» — «Семья и другие пользователи» — «Добавить члена семьи».
В следующем окне выберите пункт «Добавить учетную запись ребенка» и укажите его адрес электронной почты. Если таковой отсутствует, нажмите пункт «Нет адреса электронной почты» (вас принудят его создать на следующем шаге).

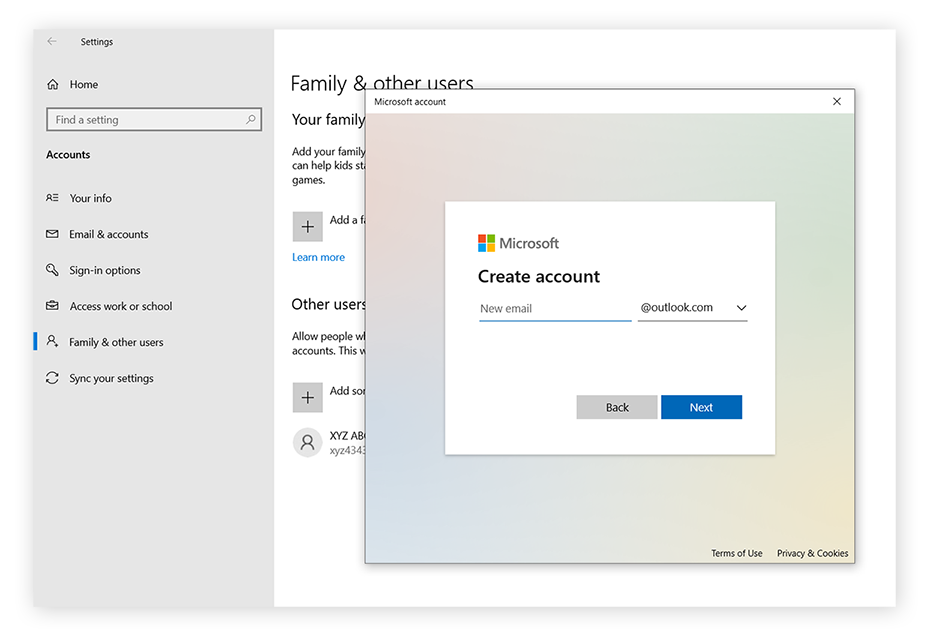
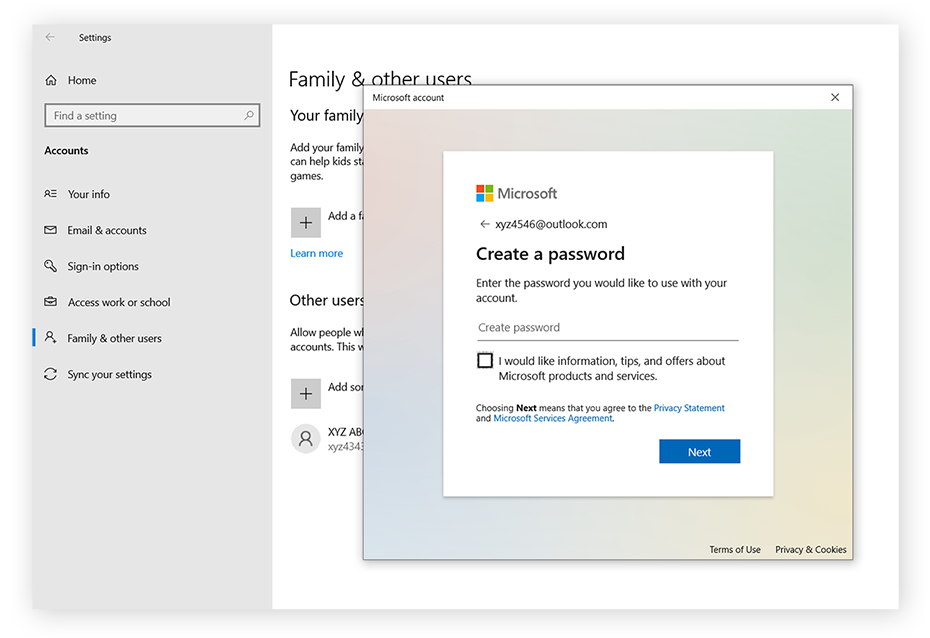
Следующий этап — указать фамилию и имя, придумать адрес почты (если не был задан), указать пароль, страну и дату рождения ребенка. Обратите внимание: если вашему ребенку менее 8 лет, автоматически будут включены повышенные меры безопасности для его учетной записи. Если он старше — стоит настроить желаемые параметры вручную (но сделать это можно в обоих случаях, о чем будет написано далее).

На следующем шаге вас попросят ввести номер телефона или адрес электронной почты на случай необходимости восстановить учетную запись — это могут быть ваши данные, а могут быть данные ваших детей, на ваше усмотрение. На завершающем этапе вам предложат включить разрешения для служб Microsoft Advertising. Я подобные вещи всегда отключаю, не вижу особенной пользы от себя или ребенка в том, что сведения о нем используются для показа рекламы.
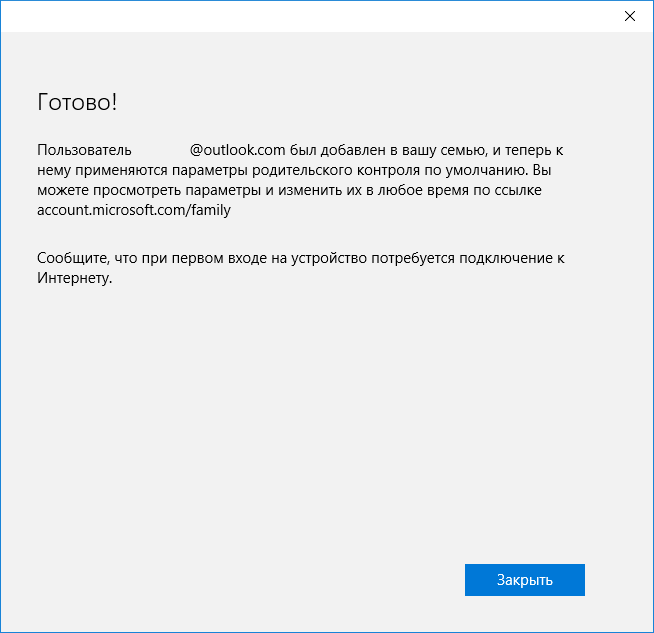
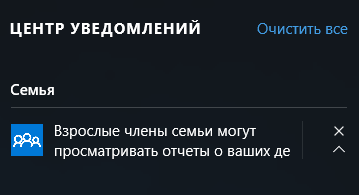
Готово. Теперь на вашем компьютере появилась новая учетная запись, под которой может войти ребенок, однако, если вы — родитель и настраиваете родительский контроль Windows 10, рекомендую первый вход выполнить самостоятельно (Пуск — клик по имени пользователя), так как могут потребоваться дополнительные настройки нового пользователя (на уровне самой Windows 10, не имеющие отношения к родительскому контролю) плюс при первом входе появляется уведомление о том, что «Взрослые члены семьи могут просматривать отчеты о ваших действиях».
В свою очередь, управление ограничениями для учетной записи ребенка осуществляется онлайн при входе из учетной записи родителя на account.microsoft.com/family (быстро попасть на эту страницу можно также из Windows через Параметры — Учетные записи — Семья и другие пользователи — Управление семейными настройками через Интернет).
Управление учетной записью ребенка
После входа в управление семейными настройками Windows 10 на сайте Microsoft, вы увидите список учетных записей вашей семьи. Выберите созданную учетную запись ребенка.
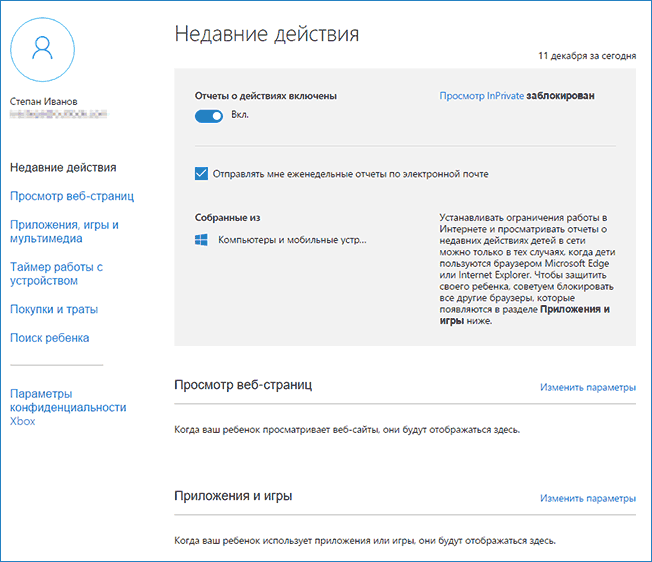
На главной странице вы увидите следующие настройки:
- Отчеты о действиях — по умолчанию включены, также включена функция отправки на электронную почту.
- Просмотр InPrivate — просмотр страниц в режиме «Инкогнито» без сбора сведений о посещаемых сайтах. Для детей младше 8 лет по умолчанию заблокирован.
Ниже (и слева) — список отдельных настроек и сведений (сведения появляются после того, как учетная запись начала использоваться), касающихся следующих действий:
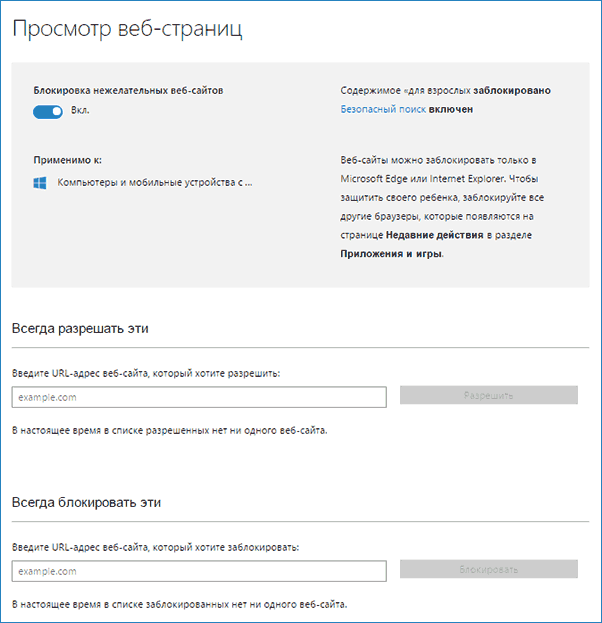
- Просмотр веб-страниц в Интернете. По умолчанию нежелательные сайты блокируются автоматически, кроме этого включен безопасный поиск. Также вы можете вручную заблокировать указанные вами сайты. Важно: собираются сведения только для браузеров Microsoft Edge и Internet Explorer, сайты блокируются также только для этих браузеров. То есть, если вы хотите установить ограничения на посещение сайтов, вам потребуется также заблокировать другие браузеры для ребенка.

- Приложения и игры. Здесь отображаются сведения об используемых программах, включая приложения Windows 10 и обычные программы и игры для рабочего стола, включая информацию о времени их использования. Также вы имеете возможность заблокировать запуск тех или иных программ, но только после того, как они появятся в списке (т.е. уже были запущены в учетной записи ребенка), либо по возрасту (только для контента из магазина приложений Windows 10).

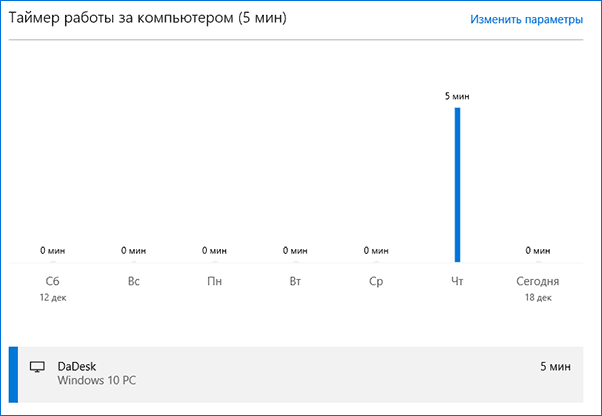
- Таймер работы с компьютером. Показывает информацию о том, когда и сколько ребенок сидел за компьютером и позволяет настроить время, в какие периоды времени ему это можно делать, а когда вход в учетную запись невозможен.

- Покупки и траты. Здесь вы можете отследить покупки ребенка в магазине Windows 10 или внутри приложений, а также «положить» ему денег на счет, не давая доступа к своей банковской карте.
- Поиск ребенка — используется для поиска месторасположения ребенка при использовании переносных устройств на Windows 10 с функциями определения местоположения (смартфон, планшет, некоторые модели ноутбуков).


В целом, все параметры и настройки родительского контроля вполне понятны, единственная проблема которая может возникнуть — невозможность заблокировать приложения до того, как их уже использовали в учетной записи ребенка (т.е. до их появления в списке действий).
Также, во время моей собственной проверки функций родительского контроля столкнулся с тем, что сведения на странице управления семейными настройками обновляются с задержкой (коснусь этого далее).
Работа родительского контроля в Windows 10
После настройки учетной записи ребенка я некоторое время решил попользоваться ею для проверки работы различных функций родительского контроля. Вот некоторые наблюдения, которые были сделаны:
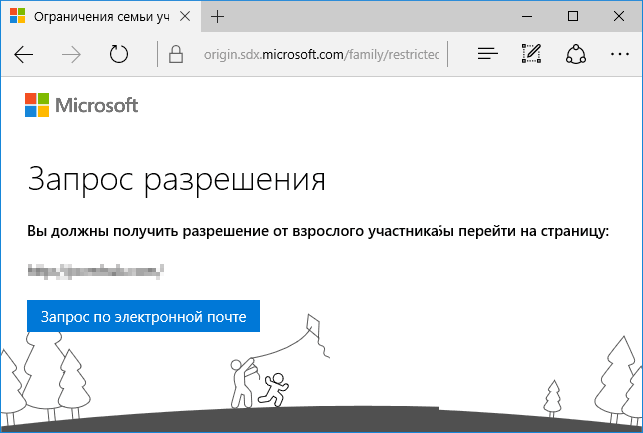
- Сайты со взрослым контентом успешно блокируются в Edge и Internet Explorer. В Google Chrome открываются. При блокировке есть возможность отправить взрослому запрос на разрешение доступа.

- Сведения о запущенных программах и времени использования компьютера в управлении родительским контролем появляются с задержкой. В моей проверке они не появились даже через два часа после окончания работы под видом ребенка и выхода из учетной записи. На следующий день информация отобразилась (и, соответственно, появилась возможность заблокировать запуск программ).

- Информация о посещенных сайтах так и не отобразилась. Причин не знаю — какие-либо функции слежения Windows 10 отключены не были, сайты посещал через браузер Edge. В качестве предположения — отображаются лишь те сайты, на которых проведено больше определенного количества времени (а я больше 2-х минут нигде не задерживался).
- Информация об установленном из Магазина бесплатном приложении не появилась в покупках (хотя это считается покупкой), только в сведениях о запущенных приложениях.
Ну и самый, наверное, главный момент — ребенок, не имея доступа к учетной записи родителя, легко может выключить все эти ограничения родительского контроля, не прибегая к каким-либо особенным ухищрениям. Правда, это не получится сделать незаметно. Не знаю, стоит ли писать здесь о том, как именно это сделать. Обновление: написал кратко в статье про ограничения локальных учетных записей, упомянутую в начале этой инструкции.
![]()
Функция родительский контроль в Windows 10 предназначена для того, чтобы родители могли следить за действиями, которые их чадо совершает за компьютером, ограничивать ребенка от посещения нежелательных ресурсов и устанавливать длительность времяпровождения за компьютером.
Также эта возможность сведет на нет вероятность сломать что-либо в системе путем удаления системных файлов или изменения критических для нее настроек. Более подробно обо всем этом узнаете из предложенной статьи, в ней же приведена детальная инструкция по созданию учетной записи и правил пользования компьютером для маленького пользователя.
В Windows 10 родительский контроль стал менее свободным — появились ограничения на использование этой функции. Они заключаются в том, что для эксплуатации семейной безопасности необходимо обязательно работать из-под учетной записи Microsoft (обо всем софт-гигант хочет знать, даже об ограничениях, которые родители накладывают на времяпрепровождение детей в виртуальном мире) и быть подключенным к глобальной сети. Без интернета функция не работает. Для пользователей такие решения не принесут никакой пользы.
Содержание
- Создаем аккаунт для ребенка с настройками, предложенными Майкрософт
- Настраиваем ограниченную учетную запись
- Принципы функционирования родительского контроля
Создаем аккаунт для ребенка с настройками, предложенными Майкрософт
[shortcod1]
Первым шагом в конфигурировании родительского контроля является формирование учетной записи для маленького пользователя. Проще всего задача решается через новое меню «Параметры».
- Вызываем его, зажав Win+I.
- Переходим в раздел «Учетные записи».
- Активируем вкладку «Семья/другие пользователи».
- Жмем по пиктограмме с плюсиком «Добавить члена семьи».

Останавливаемся на первом варианте «Добавить аккаунт ребенка», после чего задаем адрес личной электронной почты, при ее отсутствии или нежелании вводить эти данные, выбираем пункт «Нет адреса почтового ящика». Хотя при выполнении следующей итерации его придется ввести или принять предложение завести электронную почту.

Следующая итерация — указание личных данных (имя и фамилия), а также почты, если на предыдущем шаге этого сделано не было. Далее придется ввести дату рождения ребенка (Майкрософт хочет знать все, потому здесь можно слукавить, как и в случае с именем), город проживания и задать пароль для создаваемой учетной записи. Если укажете, что чадо младше 8 лет, Windows 10 автоматически активирует повышенные меры предосторожности для нового аккаунта, а если ребенок старше 8 лет — все настройки можно изменять вручную.

Затем разработчик идет еще дальше и попросит указать личный номер телефона и еще один почтовый адрес, вдруг придется проводить восстановление учетной записи. Телефонный номер придется подтвердить, потому схитрить здесь не получиться.
[shortcod2]
На финальном этапе будет предложено задействовать сервис Microsoft Advertising, чего делать не стоит. Эта служба собирает данные о пользователей и использует их для демонстрации рекламных сообщений на основе его интересов.

Закрываем окно и можем авторизоваться в новой учетной записи. Для этого, как упоминалось, необходимо соединение с интернетом. После входа в новый аккаунт нужно выполнить его дополнительную настройку, да и сообщение с данными, что родители могут следить за действиями ребенка, выскакивает только при первой авторизации в учетной записи.

Настройка ограничений для аккаунта осуществляется по ссылке account.microsoft.com/family после авторизации на ресурсе Майкрософт из-под аккаунта создававшего ограниченную учетную запись родителя. На эту страницу можно попасть и через «Параметры». Во вкладке «Семья/другие пользователи» нажимаем по кнопке «Управление параметрами через Интернет».
Настраиваем ограниченную учетную запись
После авторизации на microsoft.com появится список учетных записей всех членов семьи. В нем выбираем аккаунт ребенка.

В главном окне станут доступными следующие опции:
- Отчеты о совершенных действиях — активирована по умолчанию с функцией оповещения по электронной почте;
- Просмотр InPrivate — функция анонимного посещения web-ресурсов без хранения истории навигации (для детей до восьми лет по умолчанию отключена).
[shortcod3]
Ниже размещен перечень других параметров и настроек.
1. Просмотр web-страниц. По умолчанию вредоносные и нежелательные для посещения детьми ресурсы блокируются, а в поисковой системе включён безопасный поиск. При необходимости можно подкорректировать перечень запрещенных сайтов.
Настройки (фильтр сайтов, безопасный поиск и сбор сведений о навигации по сети) применимы только для интегрированных интернет-обозревателей (IE и Edge). Если необходим полный отчет о поведении пользователя за компьютером, иные браузеры следует заблокировать.

2. Приложения и игры. В окне отображается перечень инсталлированных на компьютере программ, в том числе интегрированных в операционную систему, установленных пользователем. В их число входят как портативные приложения, так и все обнаруженные игры. Здесь содержатся данные о времени запуска и выключения софта.
Меню позволяет провести блокировку приложений, которые появятся в списке (такое случится только после первого запуска программы/игры из-под ограниченной учетной записи), независимо от того, инсталлирована игра/программа, или является портативной. Получение контента из Магазина Windows можно ограничить по возрасту.

3. Таймеры работы за ПК. В окне выводится информация о длительности, времени начала и завершения сеанса. Здесь можно указывать длительность рабочих сеансов и указывать время, когда чадо может заходить в учетную запись.

4. Покупки/траты. При наличии денег на счету маленького пользователя можно отслеживать расход его личных средств, потраченных на приобретение цифрового контента в Магазине Виндовс или совершение покупок через встроенные в игры функции. Здесь можно пополнить опустевший счет, не предоставляя доступа к прикрепленной банковской карточке.
5. Поиск ребенка — функция необходима родителям, чье дитя берет с собой портативное устройство, например, на учебу. Она поможет отследить место нахождения пользователя во время эксплуатации девайса (ноутбука, планшета).
В принципе, ничего сложного или непонятного с работой родительского контроля в «десятке» нет, помимо пары огорчений:
- обязательное наличие интернета;
- ввод конфиденциальной информации о себе и других членах семьи;
- невозможность блокировки приложений до их первого запуска из-под ограниченного аккаунта;
- обновление конфигурации детского аккаунта со значительной задержкой (на этом стоит немного остановиться).
Принципы функционирования родительского контроля
После осуществления конфигурации детской учетной записи приходится некоторое время ждать, пока настройки не вступят в силу. Из особенностей работы этой функции следует отметить следующее.
1. Сайты, содержащие контент для взрослых практически всегда безошибочно блокируются интегрированными в Windows 10 интернет-обозревателями, но в Chrome и иных браузера открываются, запросив разрешение на их посещение у родителей.

2. Информация о работающих приложениях и времени эксплуатации ПК появляются со значительной задержкой (до нескольких часов). В таком случае автоматически становится невозможным запретить ребенку работать дольше указанного времени (видя, что на часах скоро полночь, нельзя завершить сеанс работы).
3. Информация о посещенных web-ресурсах отображается далеко не всегда даже для Edge и IE.
4. Сведения о покупках также отображаются с задержкой или вообще не выводятся, зато данные о запущенных играх и софте представляются в лучшем виде.
Еще одним неприятным для родителей моментом является то, что ребенок, овладев некоторыми знаниями и навыками работы за компьютером, сможет легко снять все установленные ограничения. Для этого не нужно иметь доступ к родительской почте или аккаунтам Microsoft. Но сделать это бесследно не получится — соответствующие оповещения сразу же придут на указанный почтовый ящик. Останавливаться на этом механизме не будем.
Setting up parental controls on Windows 10 is a straightforward process. Log in to your Microsoft Safety account and open the settings menu. There, you can set screen time limits, a web filter, and get detailed activity reports on what your kids are doing on Windows 10.
That said, the Microsoft Family Safety app has its limitations. It only monitors content on the Edge browser, SafeSearch is limited to Bing, its filter lacks categories and isn’t customizable, and tech-savvy kids can relatively easily circumvent it. To overcome these limitations and obtain enhanced, comprehensive capabilities, you might want to check some premium parental control apps.
Microsoft Safety provides basic parental control features for Windows 10, including the ability to set screen time limits, manage content restrictions and control app and game usage. I created an account for two of my children and adjusted the rules based on their age. Then, I monitored their activity through weekly reports. To set up and use Family Safety, follow these steps:
1. Set up a Child Account
- Go to Settings by clicking on the Start menu and selecting the gear icon.
- In the Settings window, choose Accounts.
- Select “Family & other users” from the left sidebar.
- Under “Your family,” click on “Add a family member” or “Add a child.”
- Follow the on-screen instructions to create a child account for your child.
2. Customize Content Restrictions
- In the “Family & other users” settings, click on the child account you created.
- Under the child account, click on “Content restrictions.”
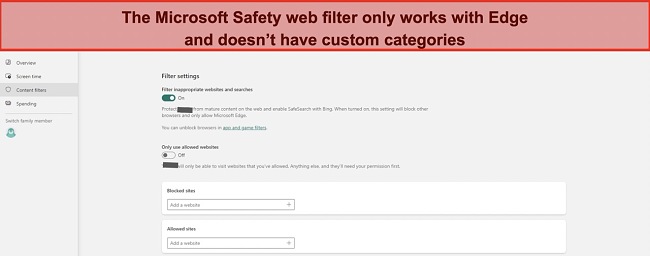
- You can enable options such as blocking inappropriate websites on Edge, turning on SafeSearch for Bing, setting age limits for apps and games, and preventing the purchase and use of mature content.

Enable the Microsoft Safety web filter and SafeSearch for Bing
3. Set Screen Time Limits
- In the “Family & other users” settings, click on the child account you created.
- Under the child account, click on “Screen time.”
- Toggle on the “Set limits for when my child can use devices” option.
- Set specific time limits for weekdays and weekends, and define bedtime hours.

Customize screen time limits with Microsoft Safety

4. Review Activity Reports
- In the “Family & other users” settings, click on the child account you created.
- Under the child account, click on “Activity reporting.”
- Enable activity reporting to receive weekly reports on your child’s computer usage, including websites visited and apps used.
After I set up Microsoft Safety on my kids’ computer, I saw that it wasn’t very good. While these features offer some level of control, I found that they didn’t have advanced web filtering options or decent protection against bypassing or disabling the app.
The web filter, which only works on the Microsoft Edge browser and Bing searches, doesn’t give me the option of blocking or allowing different categories. It just states that it “Filters inappropriate websites and searches” for mature content. This is very vague, and I have no idea, other than porn, what types of websites it will block.
The screen time tools do have general screen time limits and a usage schedule, which is good. However, my son was able to bypass these rules by simply changing the time through the Windows 10 Settings. Another hack my son showed me is that if he does a hard reset of his computer a few minutes before the screen time limits are up, they will reset when he reboots his computer.
During my research I also found several step-by-step guides on Reddit and YouTube on how to disable the Windows 10 parental control protection completely. These resources aren’t always easy, but a tech-savvy child can follow the instructions and block or disable Family Safety completely, giving them unrestricted access to the device.
To overcome these vulnerabilities, you might consider having a premium parental control app. Unlike Microsoft Safety, these cross-platform apps work on all major browsers, have custom web filters so you can choose what categories to block or allow, have app and URL blockers, and are very difficult to bypass.
Try Qustodio Free for 30 Days!
- Get a parental control app: After comprehensive testing, I found that Qustodio is easy to install and set up, has a comprehensive set of features, and can be managed remotely. You can even try it free for 30 days, no credit card required.
- Install the app on the computer: Install the app on their Windows 10 computer, and connect it to their profile. This is the only time that you need physical access to the Windows 10 computer.
- Set up parental controls on Windows 10: Log in to the parental dashboard and set custom rules, including which web categories, URLs and apps to block, screen time limits, and a usage restriction calendar.
Try Qustodio Free for 30 Days!
1. Qustodio: Comprehensive Screen Time Tools and Powerful Web Filter with 30+ Categories

- Connect to individual Windows 10 profiles and set different rules for each child
- Customizable web filter with 29 categories
- Comprehensive screen time limit tools
- Detailed reports keep you updated on your child’s online activity
- Free 30 day trial – no credit card needed
I was looking for a parental control app that would allow me to set up different rules for each of my children’s Windows 10 accounts. After extensive testing, Qustodio proved to be the best choice. In addition to comprehensive parental control features, such as setting screen time limits, web filters, and activity reports, it was very easy to set up and manage.
There are two screen time options:
- Daily Limit: I could easily set the amount of time my child could use the computer each day.
- Restricted Times: I had the ability to block access to the computer during specific time periods, irrespective of the overall screen time used. It’s worth noting that this feature worked in one-hour blocks, so I couldn’t set a more specific time range like 2:30 – 3:00, only 2:00 – 3:00.
I liked that I was able to choose what happens when the screen time limits are maxed out. I could lock the device, which logs my child out of their Windows 10 account, or block the internet connection.
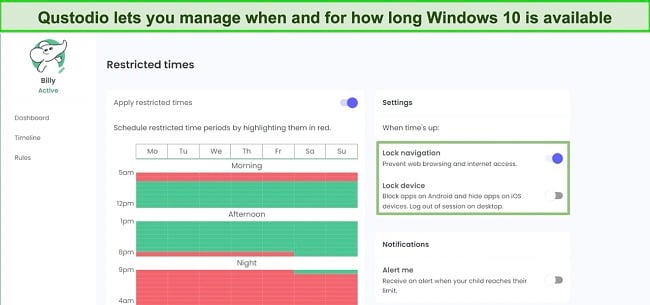
Qustodio has fully customizable screen time rules
The web filter, which has 29 categories, worked seamlessly across various browsers, including Chrome, Firefox, and Edge, even during private browsing sessions. I had the flexibility to choose which categories to allow, block, or receive alerts for when my child triggered the filter.
Monitoring my child’s activity on Windows 10 was a breeze through the Qustodio dashboard. It provided a detailed breakdown of the time spent on the computer, including a chronological breakdown of every web search and the websites they visited.
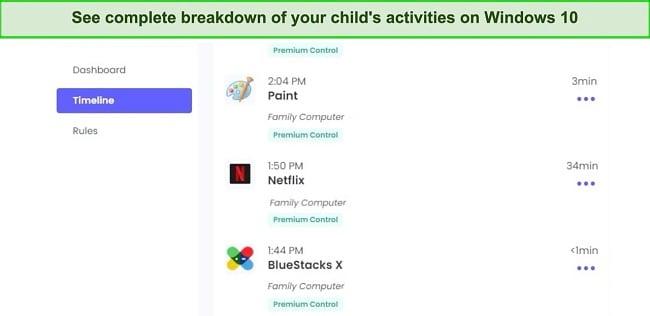
Use Qustodio to see exactly what your child is doing on the computer
Overall, my experience with Qustodio for Windows 10 was exceptional. But you don’t have to take my word for it when you can try it yourself. Qustodio offers a 30-day free trial with no credit card required, allowing you to monitor your child’s Windows 10 computer usage and create powerful parental control rules.
Try Qustodio Free for 30 Days!
2. Norton Family: Manage Screen Time Use and Set Custom Web Filter for Windows 10

- Customizable parental controls for each Windows 10 user
- Web filter with over 40 categories
- Detailed reporting updates in real time
- 30-day free trial!
Norton Family performed well during my testing process. It offers a range of features designed to promote digital safety and monitoring for children using Windows 10. With its ease of use and comprehensive functionalities, Norton Family gave me peace of mind and the ability to create a safer online environment for my children.
Norton Family is compatible with multiple Windows 10 profiles. I set up and manage the app across various profiles and adjust the restrictions I set for each of my children.
The app includes daily screen time limits and a usage calendar, allowing me to control when my child is on the computer and how long they can use it. The usage schedule has to be created using 30-minute blocks, so you can build it around your child’s daily schedule.
Norton Family goes beyond general screen time limits by offering a School Time feature. When this feature is activated, Norton Family only allows access to specific educational websites and programs, and I can also add websites to the exception list if they are not part of the default list of approved sites.
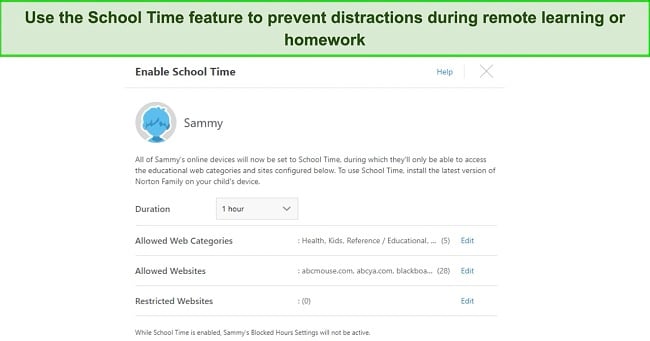
Norton Family lets you manage how your child can use their computer during remote learning
The web filter has over 40 categories, each of which can be enabled or disabled, and it worked pretty well. I challenged my kids to try and access websites that I knew should be blocked. The only time they were able to bypass the filter was by using a no-name browser. However, Norton Family has a feature that allows me to block these browsers, so my kids have to use one of the supported browsers.
The reports generated by Norton Family offer valuable insights into my child’s online activities. I can view their web activity, browser history, app usage, and time spent on the computer from anywhere by logging into the web-based dashboard.
To experience the benefits of Norton Family firsthand, the app offers a 30-day free trial, allowing parents to explore its features and functionality on Windows 10 without any financial commitment.
Try Norton Family Free for 30 Days!
3. Mobicip – Web Filter with 17 Categories Prevents Inappropriate Websites From Opening

- Create Comprehensive Screen Time Schedule
- Monitor popular social media networks for risky behavior
- 7-day free trial!
One of the key features of Mobicip is the ability to schedule and limit screen time. I found it easy to set healthy time limits, allowing me to define specific time periods when my kids could use their Windows 10 devices. This feature helped establish a balanced approach to screen time management, promoting healthy habits and ensuring that device usage doesn’t interfere with other activities.
Mobicip also impressed me with its capability to monitor social media interactions. I received alerts regarding any risky interactions that occurred on popular social media platforms like Facebook and Instagram. This feature provided an additional layer of protection, allowing me to stay informed about my children’s online social interactions and address any potential concerns promptly.
The web content filtering feature of Mobicip was effective in blocking inappropriate websites and filtering out adult content. I appreciated the peace of mind knowing that my children were safe from accessing harmful or age-inappropriate content while browsing the internet on their Windows devices.
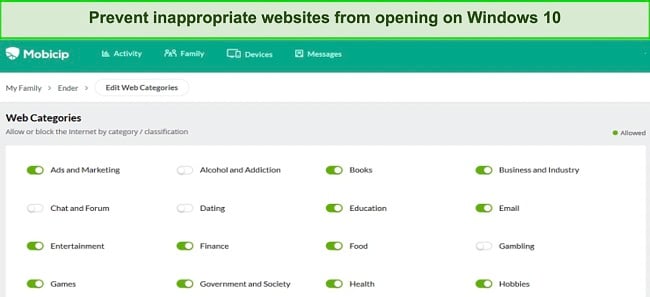
Mobicip’s web filter has 18 categories
The activity summary feature provided a daily snapshot of my children’s device usage. It gave me a quick overview of the apps they used, the websites they visited, and the time they spent on their Windows devices. This helped me stay informed and involved in their online activities, enabling me to initiate discussions about responsible internet usage and address any potential issues that arose.
Mobicip offers a free 7-day trial. This trial period is a great opportunity to explore Mobicip’s capabilities and determine if it aligns with your parental control needs on Windows 10.
Try Mobicip free for 7 Days!
To find the best parental control app for Windows 10, I conducted a thorough and unbiased evaluation of various apps. I purchased each app myself to eliminate any bias and objectively assessed their features, performance, and value. My goal was to find a user-friendly solution that prioritizes online safety and benefits parents seeking to protect their children’s digital experiences. Key factors considered included:
- Screen time management, which promotes a healthy balance between online and offline activities. Robust features empower parents to set limits on device usage, encouraging responsible digital habits.
- Comprehensive web filtering options were crucial for creating a safe browsing environment. Parents could block access to inappropriate content, ensuring their children only encountered age-appropriate websites and had a positive online experience.
- Activity monitoring and reporting provided valuable insights into children’s online behavior. By reviewing web history, search logs, and app usage reports, parents could better understand their children’s digital activities and offer informed guidance.
- App and game restrictions allowed parents to curate age-appropriate content. By limiting access to apps and games based on suitability, parents ensured their children engaged with content aligned with their values and appropriate for their age.
- Considering the value for price and free trials was important. Some apps offered premium features at reasonable costs, while others provided trial periods. This allowed parents to test functionality before purchasing, ensuring the chosen app met their requirements without exceeding their budget.
Based on these evaluations, I identified the most effective parental control apps for Windows 10. These solutions prioritize user-friendly features, performance, and value for money, while also offering free trials to ensure customer satisfaction.
How do I set up parental controls on Windows 10?
Setting up parental controls on Windows 10 is simple. You can access the built-in parental control tool by going to Settings > Accounts > Family & other users. From there, you can create a child account and customize the restrictions based on your preferences. However, the Microsoft Family Safety app is easy for kids to bypass and only monitors content on Edge. Instead, install a premium parental control app, which provides more comprehensive and powerful parental control features, and can be managed remotely.
Can I set up parental controls on multiple Windows 10 profiles?
Yes, as long as you have a premium parental control app that can monitor more than one child at a time. You can assign each child to a specific profile, allowing you to customize the screen time limits and web filters for each one of them. Whether you have multiple children or want to monitor different profiles for the same child across different devices, a reliable parental control app like Qustodio can provide the necessary features to effectively monitor and manage multiple Windows 10 profiles from a single dashboard.
Can kids bypass the parental controls rules I set up on Windows 10?
Microsoft Family Safety is relatively easy to bypass. If you’re seeking an app that is more difficult for children to disable or bypass, consider checking out Qustodio. Qustodio is known for being one of the most robust parental control apps, and it frequently releases updates to counter new techniques that kids may discover. You can also monitor your child’s activities through detailed activity reports, which include timestamps. So if your child is using the Windows 10 computer when the screen time should lock the device or visiting websites that should be blocked, you’ll be able to take steps to ensure that it doesn’t happen again.
After setting up the Microsoft Family Safety parental control rules on Windows 10, I quickly realized their limitations and began exploring other options. I conducted thorough testing of premium parental control apps, and among the numerous contenders, Qustodio emerged as the clear winner, offering a comprehensive set of features and robust monitoring capabilities.
With its seamless installation process and user-friendly interface, Qustodio provided a hassle-free experience from the start. Its screen time management tools, web filtering options, and detailed reporting features surpassed my expectations, enabling me to set appropriate limits, block unwanted content, and gain valuable insights into my child’s online activities. You can try Qustodio for free for 30 days with no credit card required, so you can install it on Windows 10 and test it for yourself.
Try Qustodio Free for 30 Days!
We rank vendors based on rigorous testing and research, but also take into account your feedback and our commercial agreements with providers. This page contains affiliate links.
Did you like this article? Rate it!
Your email
Please enter a valid email address.
Thanks for your feedback

Shauli is an online privacy expert with a love of all things technology. He spent the past few years testing, comparing, and reviewing different software programs.
How do Windows 10 parental controls work?
Windows 10 parental controls work by blocking inappropriate online content, limiting screen time, and setting age restrictions for games and apps. Parents can adjust the Microsoft parental controls based on age and interests to improve the safety of their child’s browsing habits.
This Article Contains:

This Article Contains:
Setting parental controls for an Android or Mac is a slightly different process. For more, check out our complete guides:
-
How to Set Parental Controls on Android Devices
-
How to Set Parental Controls on a Mac
How to set parental controls on Windows 10
You can set parental controls on Windows 10 by opening Start > Settings > Accounts. From there, open Family & other users, where you’ll start customizing parental controls. Setting up parental controls on Windows 10 is one of the many ways to create a safe online environment for your children.
Here’s a step-by-step guide for setting parental controls on Windows 10:
Add your child to your family group
-
Open the Windows Start menu, go to Settings, and click Accounts.

-
Select Family & other users, then click Add a family member.

-
If your child already has a Microsoft account, enter their email address here (you can skip the next section if this is the case).


Creating a Microsoft account for your child
-
If your child doesn’t have a Microsoft account, follow the steps in the section above: click the Start menu > Settings > Accounts > Family & other users > Add a family member > Create one for a child. Then, enter the new email address and click Next.

-
Create a password for your child’s account. Follow the next few steps and add your child’s first and last name, fill in your country and region, and add your child’s birthdate.

-
Now sign in to your own Microsoft account.

-
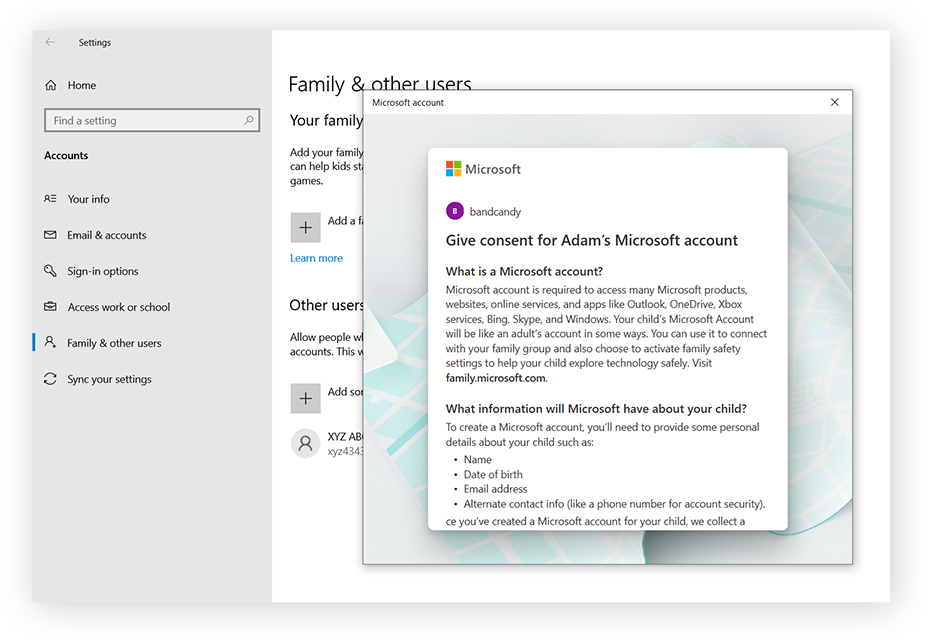
You will be asked to give consent for your child’s Microsoft account. Once you have read and understood the terms, scroll down and click Yes, I agree.

-
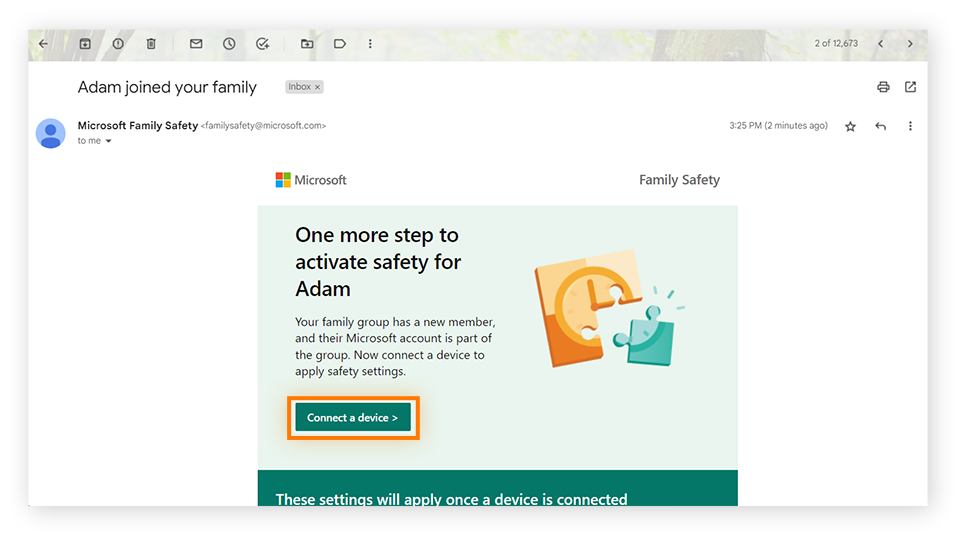
You will receive a confirmation email prompting you to connect your child’s device in order to apply family settings. In this email, click Connect a device.

-
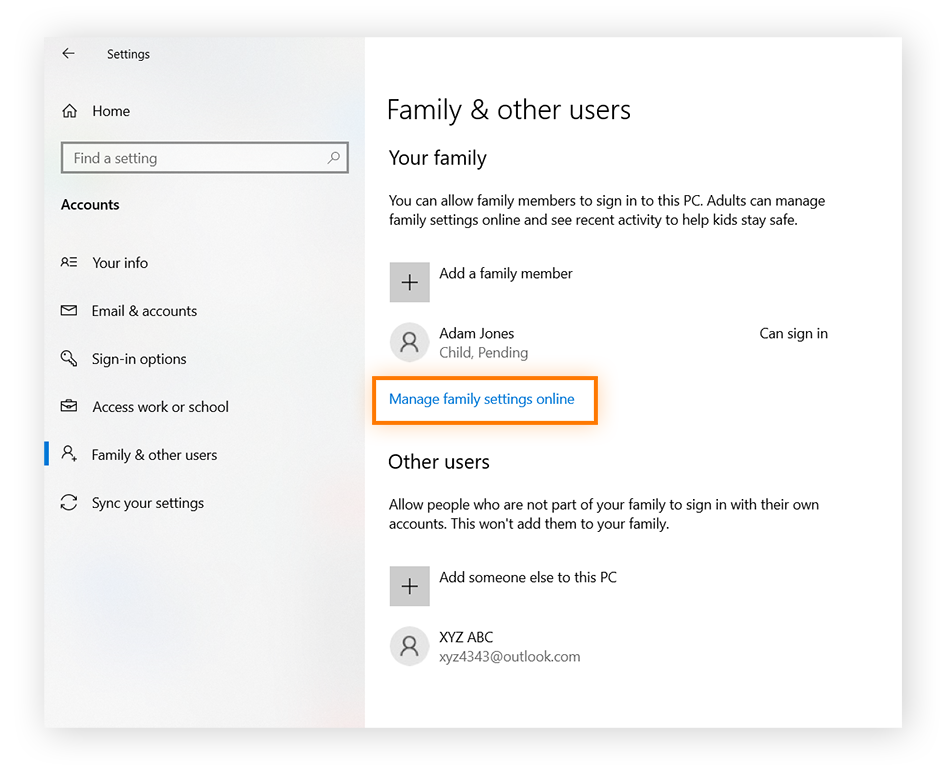
Next, you can work on setting up parental controls for your child’s account. You have the option to set up controls directly when you add your child’s account to your family group, or you can set controls by clicking Manage family settings online.

Locating your parental control settings
Once you have successfully linked your child’s account to your family group, it’s time to start setting parental controls. Here’s how to do it:
-
Open the Windows Start menu. Select Settings > Accounts > Family & other users > Manage family settings online. This will take you to your family’s homepage.
-
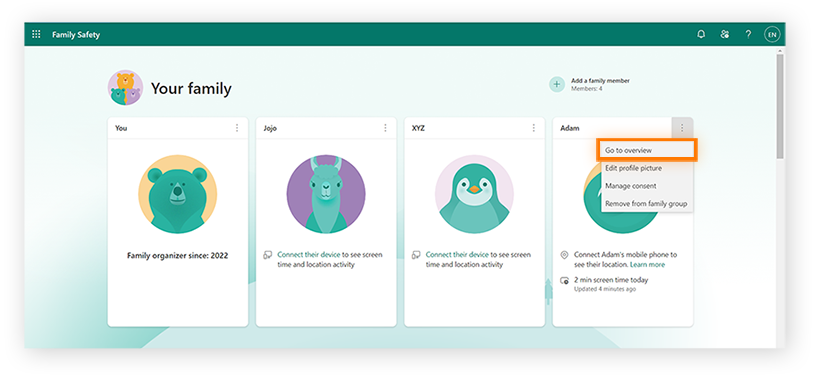
Click the Options icon (three dots) on the tile of the child you want to set controls for. Select Go to overview. From there, you can see all the Microsoft parental settings.

To make sure that your Microsoft family safety settings are set up for all your child’s devices, add your child’s phone, laptop, and any other devices. You might also want to consider setting up iPhone and iPad parental controls and setting up parental controls on your router in addition to Windows 10 parental controls.
Setting screen time limits on Windows 10
Screen time limits allow you to set how long your child will be allowed to use their device. You have several options you can set. Microsoft 10 parental controls enable you to view your child’s daily screen time and averages, which may give you some idea of where to set the limit.
Here’s how you can set screen time limits on Windows 10:
-
On the left of your child’s profile overview, click Screen time.

-
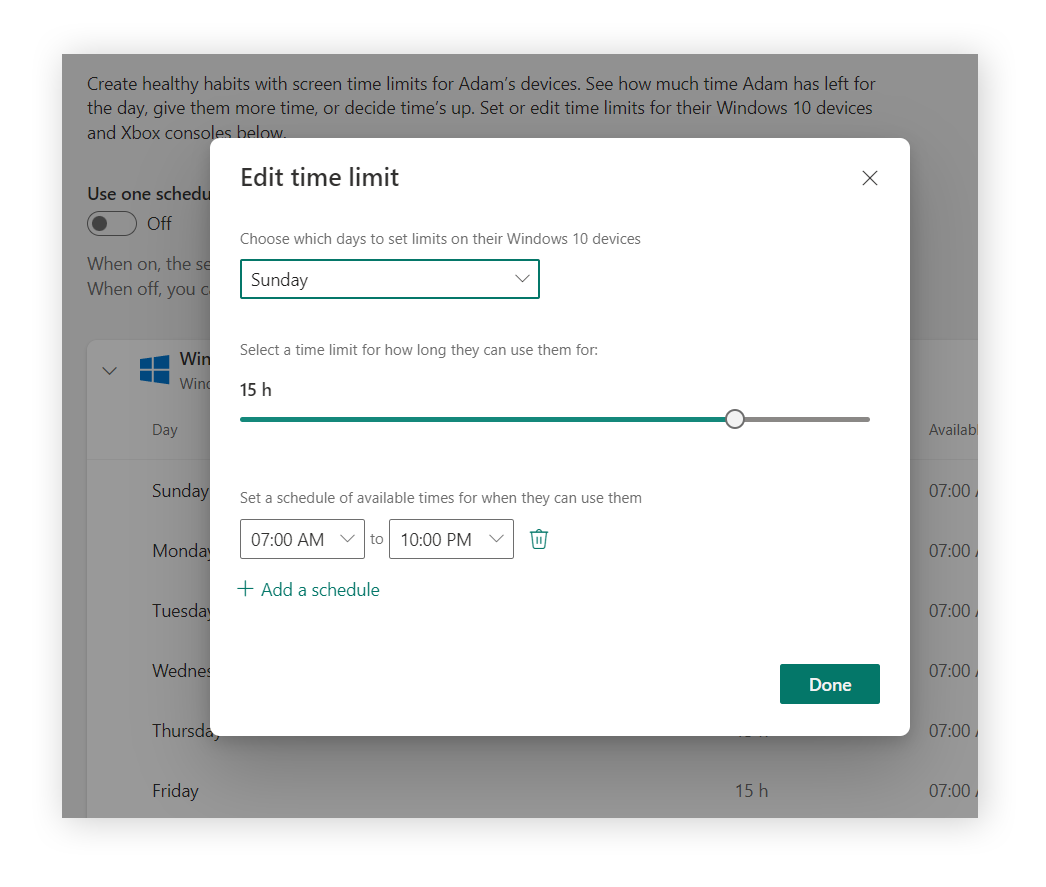
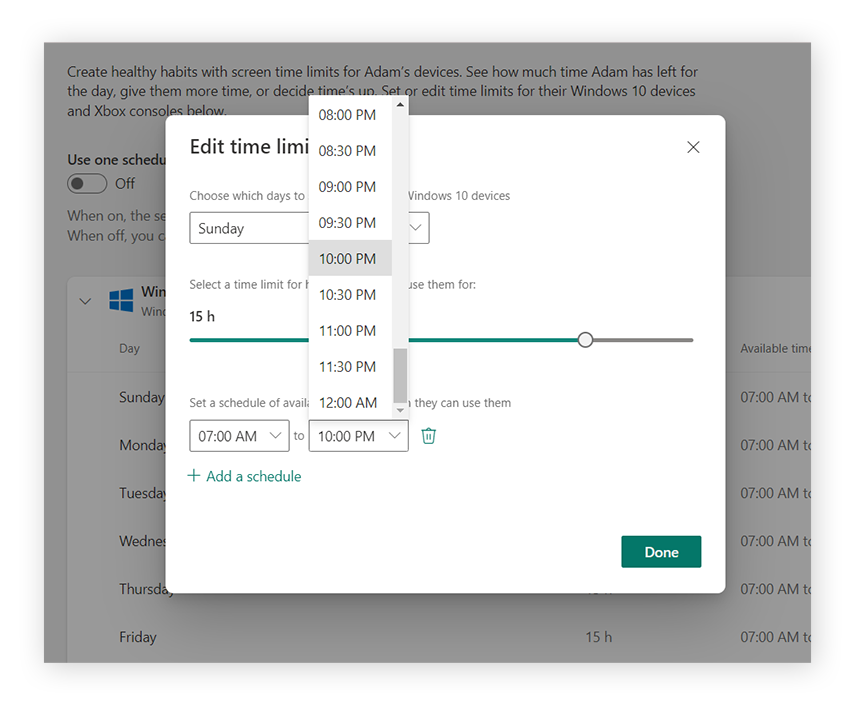
You can choose to set a time limit for each day of the week, or set the time of day the device will be available. For example, you might limit your child to two hours of screen time on weekdays but allow three hours on weekends. To edit the time limit, click the day, select the appropriate time limit, and click Done.

-
You can also set a schedule of available times. For example, you could limit screen time to daytime hours to prevent late-night screen time. Or, you can set smaller windows, such as two hours in the morning and two hours in the evening. Then, click Done.

-
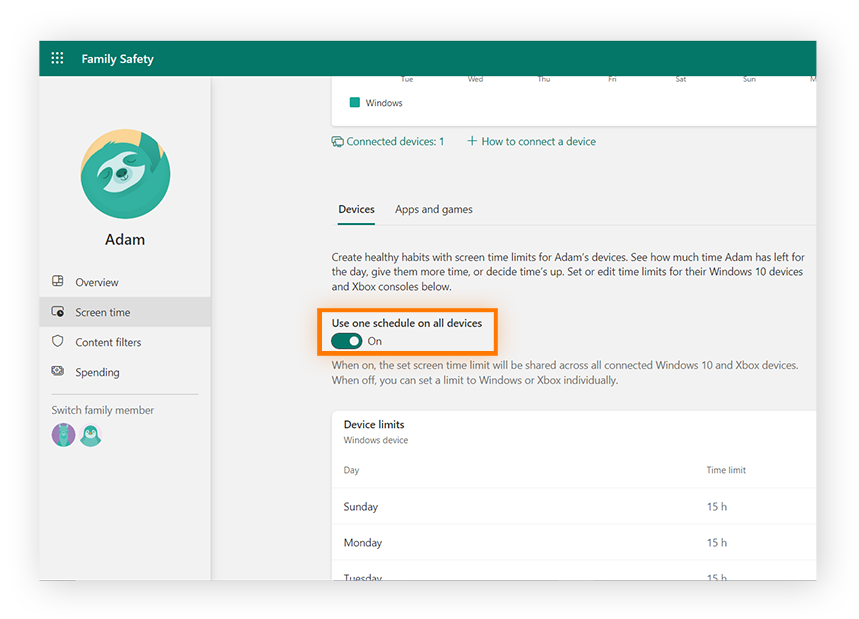
You can enable Use one schedule on all devices, or you can create separate schedules for different devices.


Setting time limits on apps and games
If your child spends a lot of time on certain apps or games, you might want to limit the amount of time they can spend on each one. Microsoft 10 shows you the average amount of time your child spends on apps and games. This might give you a sense of where to cap any time limits.
Here’s how you can set time limits for apps and games:
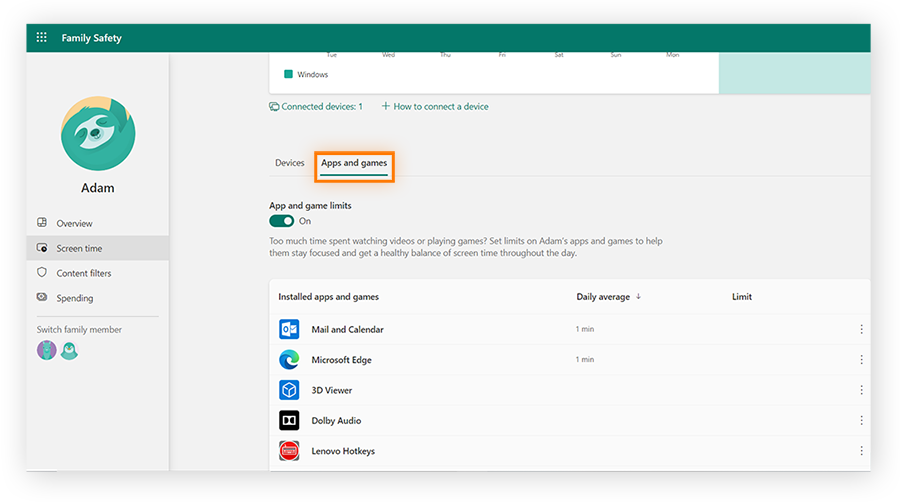
-
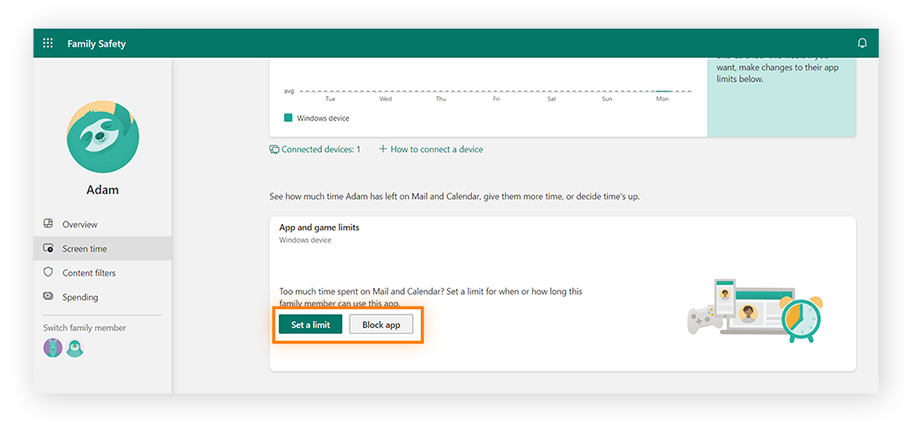
On your child’s profile, go to Screen time in the left panel and click the Apps and games tab.

-
Set a time limit on a particular app by clicking the app and selecting Set a limit. Alternatively, you can block an app completely by clicking Block app.

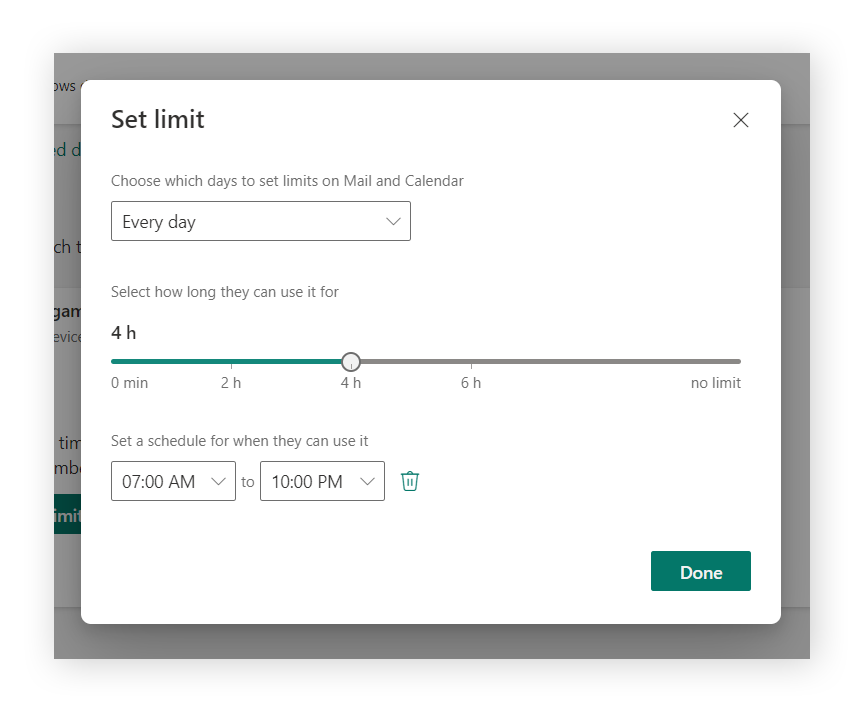
-
Select which days you want to limit the use of this app, then choose the maximum amount of time or during which hours your child is allowed to spend on the app. Then click Done.

How to set content filters on Windows 10
Setting content filters will ensure that your child will not see mature content when performing web searches. Windows 10 parental controls allow you to see your child’s search activity and the websites that they have visited. While monitoring your child’s online activity might seem intrusive, it might be needed to make sure they’re not exposed to inappropriate content.
Here’s how to set content filters on Windows 10:
-
On your child’s profile, select Content filters in the left panel.

-
Scroll down and toggle on Filter inappropriate websites and searches.

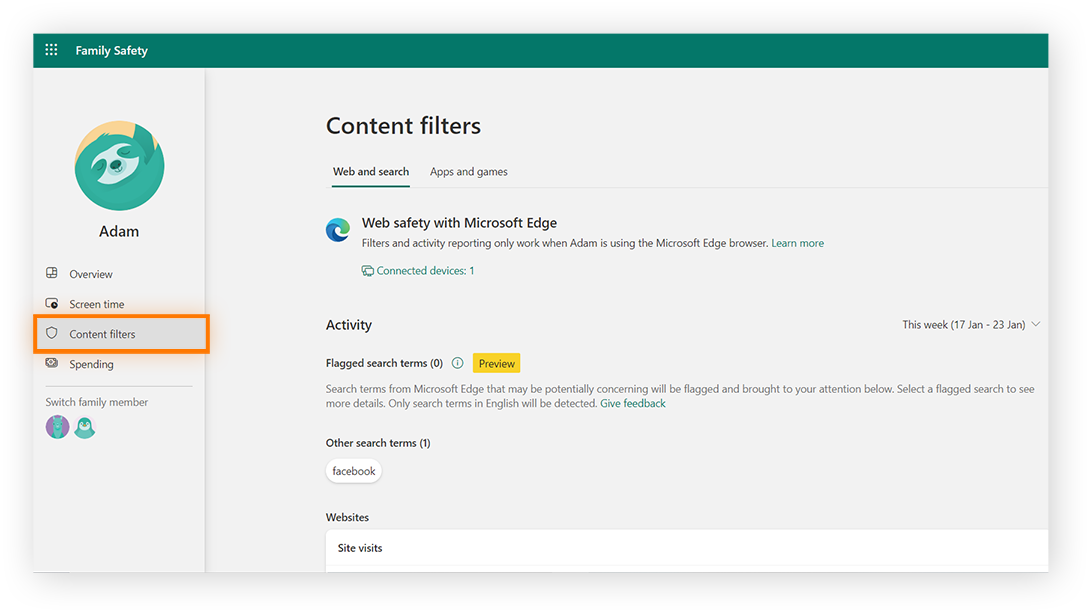
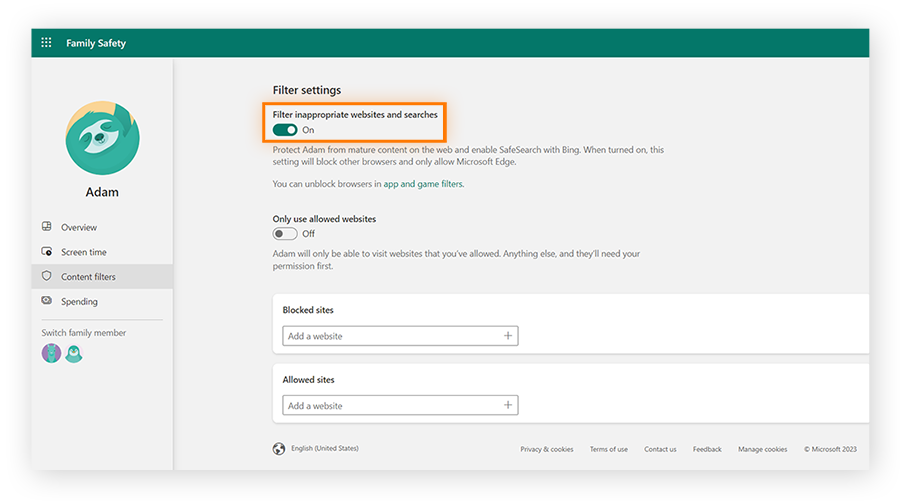
You can also create an additional online safety net by turning on Google SafeSearch.
How to block websites on Windows 10
There may be specific sites you don’t want your child to use. If so, you can add them to the list of blocked sites. This will help to keep your child safe online. You can do some research about the safety of Snapchat and other social media apps and decide which ones you are comfortable with your child using.
Here’s how to block websites on Windows 10:
-
On your child’s profile, go to Content filters and find Blocked sites.
-
Enter the URL for the website you want to block.
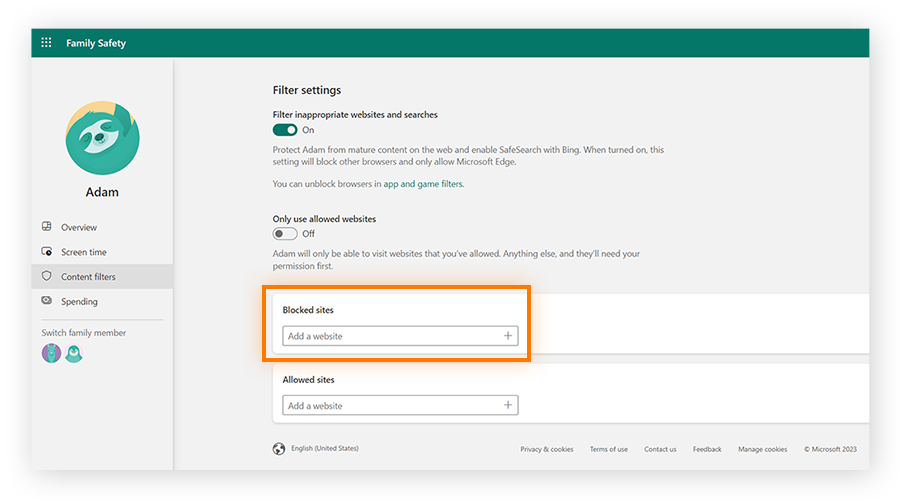
Or, you can block all sites apart from an approved list, by going to Allowed sites and entering the URLs for all the websites you’re okay with your child visiting.
How to control online spending on Windows 10
There are several ways Windows 10 enables you to limit your child’s spending online:
-
You can choose not to link a credit card to your child’s account.
-
You can link a credit card but require approval for every purchase.
-
You can add spending money to your child’s account balance.
If you give your child an account balance, they will be able to spend money as they wish without parental approval for specific purchases. But they will not be able to exceed the account balance.
To choose one of the options above, select Spending. Then, you can set the appropriate payment controls.

How to set up Xbox Live parental controls for Windows 10
Connecting your child’s Xbox Live to your Windows 10 family safety settings will let you limit your child’s gaming time.
Here is a step-by-step list of how to set up Xbox Live parental controls for Windows 10:
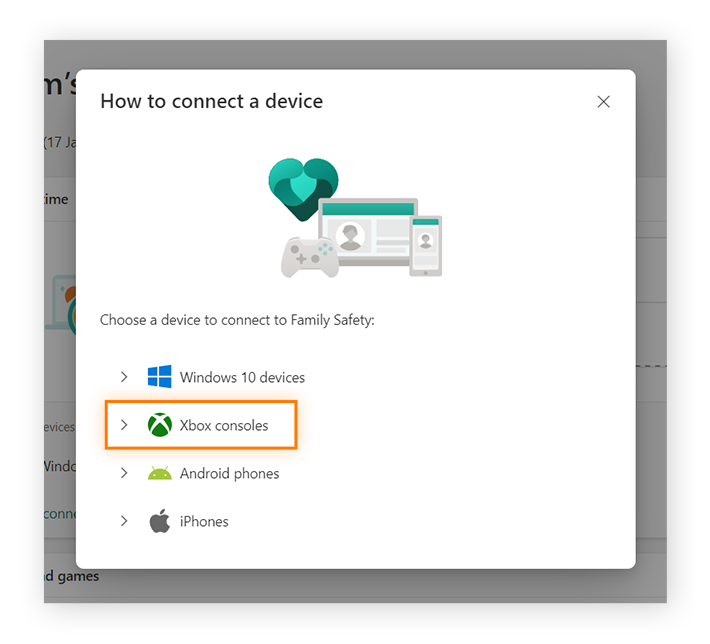
-
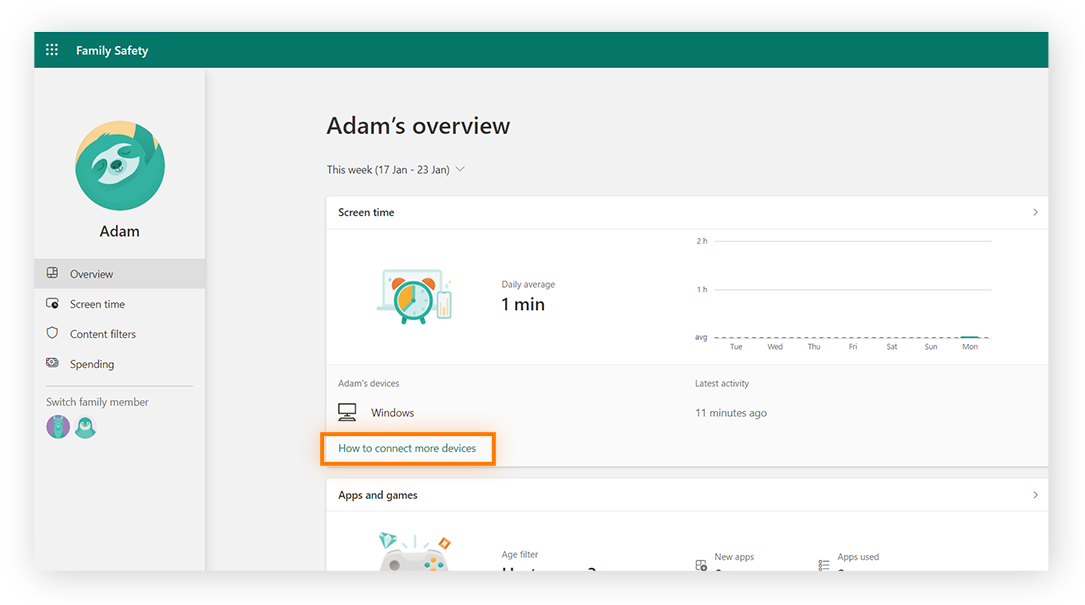
In your child’s profile overview, click How to connect more devices.

-
Next, click Xbox consoles.

-
Follow the on-screen instructions to finish setting up parental controls.

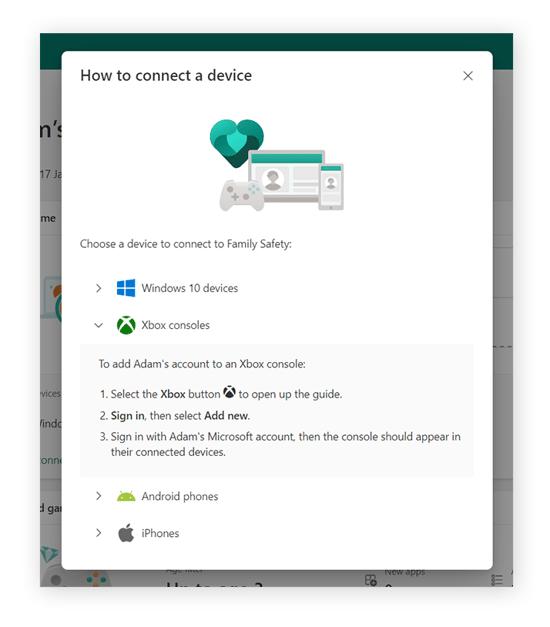
The Windows 10 parental controls you have already set up will apply to your child’s Xbox Live parameters as well.
What are the benefits of using parental control settings?
Parental control settings are ideal for keeping your child safe online. You can set time limits to ensure your child isn’t spending too many hours on apps or games, monitor and restrict which websites your child is visiting, and keep track of their online spending.
Windows 10 parental control settings allow you to:
-
Filter online searches to block mature content.
-
Block inappropriate apps, games, and websites, or create a list of approved websites.
-
Limit total screen time.
-
Limit the amount of time your child is allowed to spend on a specific app or game.
-
Monitor the websites they visit.
-
Require parental approval before your child can make an online purchase.
-
Receive notifications when your child makes a purchase.
-
Set up a Microsoft account balance to limit your child’s online spending.
Keep your children safe online with Avast
Windows 10 parental controls help to keep your child safe online, but there are limitations. Avast One protects your child by fighting scams, blocking viruses and malware, and protecting against suspicious websites. Download Avast One today to get comprehensive protection for you and your family.
Control and monitor your child’s computer usage with parental controls
What to Know
- For Windows 10, Start > Settings > Accounts > Family & Other Users > Add a Family
Member > Add a Child > enter email > Close. - For Windows 8, Windows key + C > Change PC Settings > Accounts > Other Accounts > Add An Account.
- For Windows 7, Start > enter Parental Controls in search > select child account > Enforce Current Settings > configure settings > Close.
This article explains how to enable, change, or disable parental controls in Windows. Instructions in this article apply to Windows 10, Windows 8, and Windows 7.
How to Set up Parental Controls in Windows 11
Enable Windows 10 Parental Controls
To use the most recent Windows Parental Controls and Microsoft Family Safety features, both you and your child need a Microsoft Account (not a local one). Although you can get a Microsoft account for your child before you configure available parental controls in Windows 10, it’s simpler and more straightforward get the account during the configuration process. Whatever you decide, follow these steps to get started.
Parental Controls, as outlined here, are only applied when the child logs in to a Windows device using their own Microsoft Account. These settings will not prevent what they do on their friends’ computers, school computers, or their Apple or Android devices, or when they access a computer under someone else’s account (even your account).
-
Select Start and choose Settings to launch the Windows Settings app.
-
Select Accounts.
-
In the left pane, select Family & Other Users.
-
Select Add a Family Member if your child does not have a separate account on your device. This step launches a Microsoft Account wizard.
-
Select Add a Child the either enter your child’s email address or select The Person I Want To Add Doesn’t Have An Email Address.
Complete each page of the wizard. The wizard offers different questions if the child does or doesn’t already have an email address.
-
Read the information offered (what you see here depends on what you selected in Step 5), and choose Close.
If you obtained a Microsoft Account for your child during the process above, you’ll notice that the child has been added to your list of family members in Windows Settings and that the status is Child. Parental controls are already enabled using the most common settings, and the account is ready to use. Have the child log on to their account while connected to the internet to complete the process.
If you input an existing Microsoft Account during the process, you’ll be prompted to log on to that account and follow the directions in the invitation email. In this case, the status for the account will say Child, Pending. The child will need to log on while connected to the internet to complete the setup process. You might also need to apply family safety settings manually, but this depends on several factors.
Find, Change, Enable, or Disable Parental Controls (Windows 10)
There’s a fair chance that the default Windows Family Safety controls are already turned on for your child’s account, but it’s good practice to verify if they meet your needs. To review the setting, configure, change, enable, or disable them, or to enable reporting for a Microsoft Account:
-
Select Start > Settings > Accounts > Family & Other People, and then choose Manage Family Settings Online.
Alternatively, type family into the search box next to Start. Select Family Options and then choose View Family Settings.
-
Log in if prompted, and then locate the child account from the list of accounts included with your family. Select Screen Time below your child’s name to open the Screen Time tab.
-
Make changes to the default Screen Time Settings using the drop-down lists and daily timelines.
-
Select More Options under your child’s name and choose Content Restrictions.
-
Activate Block Inappropriate Apps And Games and Block Inappropriate Websites. Add any apps or websites you wish to block or allow and select an appropriate age rating.
-
Select the Activity tab and expand Manage. Select Turn On Activity Reporting and Email weekly reports to me to get weekly reports of your child’s activities while online.
To block inappropriate websites and receive web browsing activity reports, your child must use Edge. You can block other browsers.
-
Continue to explore other settings as desired.
Windows 8 and 8.1 Parental Controls
To enable Parental Controls in Windows 8 and 8.1, you first need to create an account for your child. You do this in PC Settings. Then, from Control Panel, you configure the desired settings for that child account.
-
From the keyboard, hold down the Windows key and press C.
-
Select Change PC Settings.
-
Select Accounts, choose Other Accounts and then select Add An Account.
-
Select Add A Child’s Account.
-
Follow the prompts to complete the process, opting to create a Microsoft Account over a local account if possible.
To configure Parental Controls:
-
Open Control Panel. You can search for it from the Start screen or from the Desktop.
-
Select User Accounts And Family Safety, then choose Set Up Parental Controls For Any User.
-
Select the child’s account.
-
Under Parental Controls, choose Enforce Current Settings.
-
Under Activity Reporting, choose Collect Information About PC Usage.
-
Select the links provided for the following options and configure as desired:
- Web Filtering to block certain websites and prevent downloads
- Time Limits to choose when and on what days your child can access the PC
- Windows Store and Game Restrictions to set age, title, and rating limits on the apps your child can use
- App Restrictions to set the apps that your child can use
-
You’ll receive an email that includes information about the Microsoft Family Safety login page and what’s available there. If you use a Microsoft Account for your child you’ll be able to view activity reports and make changes online, from any computer.
Windows 7 Parental Controls
Configure Parental Controls in Windows 7 from Control Panel, in a similar manner to what’s outlined above for Windows 8 and 8.1. You’ll need to create a child account for the child in Control Panel > User Accounts > Give Other Users Access To This Computer. Work through the process as prompted.
With that done:
-
Select the Start button and type Parental Controls in the search window.
-
Select Parental Controls in the results.
-
Select the child account.
-
If prompted, create passwords for any Administrator accounts.
-
Under Parental Controls, select Enforce Current Settings.
-
Select the following links and configure settings as applicable and then choose Close: Time Limits, Games, and Allow And Block Specific Programs.
FAQ
-
Does FamiSafe work on Windows?
Yes. FamiSafe parental control software is available for Windows, macOS, iOS, Android, and Amazon Fire tablets.
-
How do I set up internet parental controls?
Thanks for letting us know!
Get the Latest Tech News Delivered Every Day
Subscribe